web administration interface - user guide
TRANSCRIPT

Web Administration Interface – User Guide (version 2.3)

Web Administration Interface User Guide 2
Disclaimer THE SPECIFICATIONS AND INFORMATION REGARDING THE PRODUCTS IN THIS MANUAL ARE SUBJECT TO CHANGE WITHOUT NOTICE. ALL STATEMENTS, INFORMATION, AND RECOMMENDATIONS IN THIS MANUAL ARE BELIEVED TO BE ACCURATE BUT ARE PRESENTED WITHOUT WARRANTY OF ANY KIND, EXPRESS OR IMPLIED. USERS MUST TAKE FULL RESPONSIBILITY FOR THEIR APPLICATION OF ANY PRODUCTS. THE SOFTWARE LICENSE AND LIMITED WARRANTY FOR THE ACCOMPANYING PRODUCT ARE SET FORTH IN THE INFORMATION PACKET THAT SHIPPED WITH THE PRODUCT AND ARE INCORPORATED HEREIN BY THIS REFERENCE. IF YOU ARE UNABLE TO LOCATE THE SOFTWARE LICENSE OR LIMITED WARRANTY, CONTACT YOUR WYDE VOICE REPRESENTATIVE FOR A COPY. IN NO EVENT SHALL WYDE VOICE OR ITS SUPPLIERS BE LIABLE FOR ANY INDIRECT, SPECIAL, CONSEQUENTIAL, OR INCIDENTAL DAMAGES, INCLUDING, WITHOUT LIMITATION LOST PROFITS OR LOSS OR DAMAGE TO DATA ARISING OUT OF THE USE OR INABILITY TO USE THIS MANUAL, EVEN IF WYDE OR ITS SUPPLIERS HAVE BEEN ADVISED OF THE POSSIBILITY OF SUCH DAMAGES. Copyright Except where expressly stated otherwise, the Product is protected by copyright and other laws respecting proprietary rights. Unauthorized reproduction, transfer, and or use can be a criminal, as well as civil, offense under the applicable law. WYDE Voice and the WYDE Voice logo are registered trademarks of WYDE Voice LLC in the United States of America and other jurisdictions. Unless otherwise provided in this Documentation, marks identified with “R” / ®, “TM” / ™ and “SM” are registered marks; trademarks are the property of their respective owners. For the most current versions of documentation, go to the WYDE support Web site: http://docs.wydevoice.com/ May 6, 2011

Web Administration Interface User Guide 3
Symbols and Notations in this Manual The following notations and symbols can be found in this manual.
Denotes any item that requires special attention or care. Damage to the equipment or the operator may result from failure to take note of the noted instructions
Figure Denotes any illustration
Table Denotes any table
Text Denotes any text output
Button Denotes any button caption

Web Administration Interface User Guide 4
Table of Contents Symbols and Notations in this Manual................................................................................... 3 Table of Contents ................................................................................................................... 4
Tables List .......................................................................................................................... 6 Figures List ......................................................................................................................... 7
Chapter 1: Introduction........................................................................................................... 9 Assumed Skills ................................................................................................................... 9 Architecture Overview ....................................................................................................... 9
Hardware ...................................................................................................................... 10 Voice Clients ................................................................................................................ 10 Integration Adapters ..................................................................................................... 10
Definitions ........................................................................................................................ 10 Chapter 2: Web Administration Interface ............................................................................ 13
Prerequisites ..................................................................................................................... 13 Accessing the Web Administration Interface................................................................... 13 Logging In ........................................................................................................................ 14 Components of the Web Administration Interface........................................................... 14 Subscriber User Management........................................................................................... 16
Create a Subscriber....................................................................................................... 16 View/Modify a Subscriber ........................................................................................... 18 Delete/Deactivate a Subscriber..................................................................................... 20 Create a Conference Account ....................................................................................... 20 Configuration of the Conferences................................................................................. 22 Modify a Conference Account ..................................................................................... 23 Delete a Conference Account ....................................................................................... 25
Conferences and Calls Management ................................................................................ 26 Calls .............................................................................................................................. 26
View Calls in progress.............................................................................................. 26 Dropping Call Participants ....................................................................................... 28 Mute Call Participants .............................................................................................. 29 Placing Call Participants on Hold............................................................................. 29
Conferences .................................................................................................................. 30 View Conferences in progress.................................................................................. 30 Conference Mute and Q&A Modes.......................................................................... 32 Q&A Sessions .......................................................................................................... 33 Dropping a Conference............................................................................................. 34 Making a Conference Secure.................................................................................... 34 Placing a Conference on Hold .................................................................................. 36 Active Speaker Notification (ASN) mode................................................................ 38 Automatic Gain Control ........................................................................................... 39 Recording a Call ....................................................................................................... 40 Dialing Another User ............................................................................................... 41 Polling....................................................................................................................... 42 Scheduling ................................................................................................................ 44 Maintaining Conferences Maximal Duration........................................................... 47

Web Administration Interface User Guide 5
Operator Conferences ....................................................................................................... 49 Control Operator Conferences Using Touch Tone Commands.................................... 50 Control Operator Conferences Using Web Administration Interface .......................... 51 Samples and Use-Cases of Operator Conference Procedures ...................................... 54
Web Report Management................................................................................................. 56 Running a report ........................................................................................................... 59 Report Screenshots ....................................................................................................... 59
DNIS Management ........................................................................................................... 65 View Existing DNIS Associations ............................................................................... 65 Create a DNIS Association........................................................................................... 66 Modify an Existing DNIS Association’s Attributes ..................................................... 67 Remove a DNIS Association........................................................................................ 69
System Management ........................................................................................................ 70 Change System Preferences ......................................................................................... 70
Chapter 3: Call Flows........................................................................................................... 72 Call Flow Attributes ......................................................................................................... 74 CONF ............................................................................................................................... 83
Sample of Conference Call Procedures Using the CONF Call Flow........................... 85 Entering conference call as a Host ........................................................................... 85 Entering a conference call as a Participants ............................................................. 85
Question and Answer Sessions within Conference Calls............................................. 86 OPERATOR ..................................................................................................................... 86 PLAYBACK..................................................................................................................... 88
Recording and Playing Back a Conference .................................................................. 89 Recording Instructions.............................................................................................. 89 Play Back Instructions .............................................................................................. 89
SPECTEL ......................................................................................................................... 90 Sample of Conference Call Procedures Using the SPECTEL Call Flow..................... 92
Entering conference call as a Host ........................................................................... 92 Entering a conference call as a Participants ............................................................. 93
Appendix A: Support Resources .......................................................................................... 94 Support Documentation.................................................................................................... 94 Web Support ..................................................................................................................... 94 Telephone Support............................................................................................................ 94 Email Support ................................................................................................................... 94

Web Administration Interface User Guide 6
Tables List Table 1: Web Administration Menus and their Administration Areas................................. 15 Table 2: Calls Columns ........................................................................................................ 26 Table 3: Conference Call Columns ...................................................................................... 27 Table 4: Conference View Columns .................................................................................... 31 Table 5: Operator Commands for OPERATOR Call Flow Conferences............................. 50 Table 6: Calls Report Columns ............................................................................................ 57 Table 7: Conferences Report Columns................................................................................. 57 Table 8: DNIS Report Columns ........................................................................................... 59 Table 9: Call Flow Attributes ............................................................................................... 75 Table 10: CONF Call Flow Attributes ................................................................................. 83 Table 11: Host Commands for CONF Call Flow Conferences ............................................ 85 Table 12: Participant Commands for CONF Call Flow Conferences .................................. 85 Table 13: OPERATOR Call Flow Attributes ....................................................................... 86 Table 14: PLAYBACK Call Flow Attributes ...................................................................... 89 Table 15: Recorded Conference Call Playback Touch Tone Commands ............................ 89 Table 16: SPECTEL Call Flow Attributes ........................................................................... 90 Table 17: Host Commands for SPECTEL Call Flow Conferences...................................... 93 Table 18: Participant Commands for SPECTEL Call Flow Conferences............................ 93

Web Administration Interface User Guide 7
Figures List Figure 1: The WYDE Bridge Architecture ............................................................................ 9 Figure 2: Initial Web Administration Login Screen............................................................. 14 Figure 3: Components of the WYDE Web Administration Interface .................................. 15 Figure 4: Subscribers Menu.................................................................................................. 16 Figure 5: Creating a New Subscriber ................................................................................... 17 Figure 6: View System Subscribers ..................................................................................... 18 Figure 7: Viewing Subscriber Information........................................................................... 20 Figure 8: Creating a New Conference Account ................................................................... 21 Figure 9: The Conference Account Created......................................................................... 22 Figure 10: Sample of User Roles Configuration for the Conference ................................... 23 Figure 11: Modifying a Conference Accounts ..................................................................... 24 Figure 12: View Calls Information....................................................................................... 27 Figure 13: Viewing the Callers within a Conference ........................................................... 28 Figure 14: The Location of the Mute Call Participants Checkbox....................................... 29 Figure 15: The Location of the Hold Call Participants Checkbox ....................................... 30 Figure 16: View Conference Information ............................................................................ 31 Figure 17: The Location of the Conference Mode Dropdown ............................................. 32 Figure 18: The Location of the Q&A Conference Icons ...................................................... 34 Figure 19: The Location of the Secure Conference Link ..................................................... 35 Figure 20: The Location of the Secure Conference Checkbox ............................................ 36 Figure 21: The Location of the Hold Conference Link........................................................ 37 Figure 22: The Location of the Hold Conference Checkbox ............................................... 38 Figure 23: The Location of the Active Speaker Notification (ASN) Conference Link ....... 39 Figure 24: The Location of the Automatic Gain Controls (AGC) and the Gain Control Window ................................................................................................................................ 40 Figure 25: The Sample of the Different Gain Controls ........................................................ 40 Figure 26: The Location of the Recording Conference Link ............................................... 41 Figure 27: Dialing Out to Another User............................................................................... 42 Figure 28: The Location of the Polling Conference Link .................................................... 43 Figure 29: The Conference Polling Session Voting Charts.................................................. 44 Figure 30: Scheduling Call Flow Attributes Sample............................................................ 45 Figure 31: Sample Conference Screen when OPERATOR conference is in progress......... 49 Figure 32: View Conference Information when OPERATOR conference is in progress.... 52 Figure 33: Viewing the Callers within an OPERATOR Conference, the user is in an operator queue ...................................................................................................................... 52 Figure 34: Viewing the Callers within an OPERATOR Conference, the user is speaking with an operator .................................................................................................................... 53 Figure 35: Attach User to a Different Conference ............................................................... 54 Figure 36: Main Reports Window........................................................................................ 56 Figure 37: Calendar to Select either the “From” Date or the “To” Date.............................. 56 Figure 38: Sample Calls report............................................................................................. 60 Figure 39: Sample Conferences Report................................................................................ 60 Figure 40: Sample Gantt Chart for the Conference.............................................................. 61 Figure 41: Sample File Manager for the Conference ........................................................... 61 Figure 42: Sample DNIS Report .......................................................................................... 62

Web Administration Interface User Guide 8
Figure 43: Sample Load Chart ............................................................................................. 62 Figure 44: Sample Show SW report ..................................................................................... 63 Figure 45: Sample Show Stat Report ................................................................................... 63 Figure 46: Sample Show Boards Report .............................................................................. 64 Figure 47: Viewing Existing DNIS Associations and Call Flows........................................ 66 Figure 48: Creating a New DNIS Association ..................................................................... 67 Figure 49: Modify an Existing DNIS Association ............................................................... 68 Figure 50: DNIS Aliases Management................................................................................. 68 Figure 51: DNIS Association Deletion Confirmation Dialog .............................................. 69 Figure 52: Changing System Preferences............................................................................. 70 Figure 53: Modifying CONF Call Flow Attributes.............................................................. 74 Figure 54: Modifying PLAYBACK Call Flow Attributes ................................................... 88

Web Administration Interface User Guide 9
Chapter 1: Introduction This is the Administration guide for the WYDE conferencing bridges (like SB-HD100, SB-HD1000, and SB-HD10000). Within this guide you will learn how to perform the basic day to day administration tasks for these units.
Assumed Skills This administration guide assumes you have a working knowledge of the following technologies and skills: • PC usage • System administration • VOIP basics • TCP/IP networking
Architecture Overview The WYDE architecture is made up of both hardware as well as software services (as shown in Figure 1) that work together to provide the best carrier-class, wideband conferencing available.
Figure 1: The WYDE Bridge Architecture

Web Administration Interface User Guide 10
WYDE services is not only turnkey software solution, it is the component that can be easily integrated into other products. The WYDE Bridge can be controlled either using web services or using real-time interface. Web services send requests to the bridge and receive information about status of the bridge. The real time interface makes call to the bridge using special client, perform SIP call to send and receive commands and exchange information about the conferences.
Hardware There are three primary WYDE platforms – the SB 1000, the VM 1000 and the VM 3000. They are designed to be attached to your network in appliance-fashion. They are, for all intents and purposes, servers that can be installed and managed as such. For more information on the WYDE hardware and its specifications – please visit www.wydevoice.com.
Voice Clients There are three possible clients for WYDE bridge: soft phones, IP phones, and regular (PSTN) telephones. The most famous soft phones are Counterpath X-Lite, Flaphone, SJ Labs SJphone; also you can use Skype as your soft phone. The most famous manufacturers of IP phones are Audio Codes (with Audio Codes 320HD), Polycom HD Voice (with Polycom 550HD), and Snom (with Snom 320). In case of the regular telephone – there is a need to have a separate unit – a voice over IP gateway in order to use the phones, for example Cisco AS 5400 or similar.
Integration Adapters WYDE can be integrated into an enterprise infrastructure through the set of adapters. There are three points of integration: • CDR storage – A storage location for the individual call records. This can be SQL
database or something else. • Authentication service – This allows the WYDE software to integrate into the
enterprise authentication systems. This could be a SQL database, RADIUS, LDAP, or other.
• Call/Conference management – This is the ability to manage conference calls, exposed through the Web API for integration with enterprise web sites.
Definitions In order to discuss the WYDE bridge effectively, we need to have a common set of terminology. For this purpose, we should definite the dictionary for the terms you will see throughout this administration guide: • Subscriber – A real person, he has a name, phone number, e-mail address, etc. The
subscriber can have conference accounts, he does not have access codes, but access codes are properties of conference accounts that have subscribers. Note that non-admin (non-operator) subscribers can see only “own” information, i.e. his information and information that belongs to subscribers created by him, he can see only their calls, conferences, the reports will show only their data, etc.

Web Administration Interface User Guide 11
• PIN – The login ID for the subscriber (must be unique). It can be used either as login in Web Administration Interface (in this case it can be either number or alpha-numeric) or as login for some call flows (in this case must be numeric) for participants authorization.
• Conference Account – The element of subscriber conferences configuration. Conference accounts always belong to subscriber. It is being used to define a person in a conference with a particular role (e.g. host, participant, listener, etc.), the DNIS number that should be used to call to the conference, and the access code that should be entered by the user that called to the conference DNIS to determine his role. A subscriber could be a host user in one conference and a listener in another. Conference accounts with the same conference number represent single conference setup.
• DNIS – A unique set of numbers that is outpulsed by a phone carrier that indicates the intended destination for a particular call. It can be any length digits (although usually 10 digits). DNIS is the property of the conference account, but different DNIS numbers can be used to connect to the same conference.
• Access Code – A numeric code unique for DNIS that allows a host or participant or listener access to a conference call. When users call to DNIS number they being asked to enter their access code. The access code determines the conference and the user role in the conference. Different access codes can determine the same conference, for instance one access code can determine the connected user has host role, another access code can determine that connected user has participant role, and another access code can determine that connected user has listener role.
• Host – A user in the conference call that can make changes to the system while the conference call is in progress. Like change the security setting, change who can talk or answer, etc. Sometimes the host user is called moderator. This user role is defined in conference account.
• Participant – A person in the conference who can actively participate in a call by both talking and listening. This user role is defined in conference account.
• Listener – A person in the conference who can hear the conference call, but cannot speak. Their audio path is one way only (receive). This user role is defined in conference account.
• Conference Number – A unique external conference number. Conference number is the property of conference account. If the conference accounts have the same conference number all these accounts determine one single conference. For instance the user can create one conference account record that determine host role, another conference account record that determine participant role, and another conference account record that determine listener role – all these records should have the same conference number to determine one unique conference.
• Conference ID – A unique conference ID that represents the instance of a conference. When any conference is being started it receives unique conference ID, and all calls to this conference have the same conference ID; if this conference has been completed and another conference is being started that conference will receive another conference ID. Conference ID is normally not exposed to users, unless on the reports.
• Call Flow – A unique conference service setup, the logic that is used to process the conference calls. This is the process a call goes through from call setup to, to processing, to call tear down. It includes the logic, DTMF key-presses used, functions,

Web Administration Interface User Guide 12
and the recorded prompts. There are two basic call flow categories: call flows without authentication (like CONF call flow) and call flows with authentication (like SPECTEL call flow).
• Audio Key – A key sequence that is used to group different calls from the same conference in a bundle to manage these calls using real-time or another external interface. Audio key is being generated by real-time application, for instance Moderator-Console, the user can enter the same audio key on his DTMF keypad, usually as #audio key# or #9audio key#, these calls (the call from real-time application and the user call to the conference) are being grouped together and the real-time application can manage this user call (the call with the same audio key), for instance mute the call, etc.

Web Administration Interface User Guide 13
Chapter 2: Web Administration Interface The WYDE Web Administration Interface allows an administrator to make changes and administrate the operation of the system of the WYDE conference bridges. The WYDE Web Administration Interface is included with the WYDE conference bridges to make everyday administration easier. You can use it to manage users/subscribers, manage conferences and individual calls, as well as run reports and change DNIS information for various types of calls. It is a simple tool that makes administration easier. As subscriber management you can create/modify/delete them – manage their PIN, passwords, modify subscriber attributes, such as first and last names, email, telephone. In addition you can create/modify/delete subscribers’ conference accounts – define their conferences, used DNISes and access codes. As conference management you can manage the conferences and calls that currently are in progress, you can view started conferences and calls, as well as set and change some of their modes – mute the conferences and participants, placing the call on hold, making the call secure, record the call, etc. The reports are used to get different information and statistics from the bridges – you can see inbound and outbound calls processed by the system, the conferences that have taken place, the usage of each DNIS and how many calls processed on each DNIS (including outbound calls), call traffic statistics by time of day, load utilization, etc. The reports can be used to troubleshoot the problems and planning your actions. As DNIS management you can create/modify/delete DNIS associations of the actual inbound DNIS numbers and call flows that are used to service these numbers. In addition the web interface allows you to change system preferences.
Prerequisites You may use to access the internal Web administration interface to administer various components of the WYDE system. Before you do, however, you must have the following prerequisites met: • A computer with a network connection to the TCP/IP subnet where the WYDE
appliance is connected • A supported web browser (Mozilla FireFox 1.0 and above or Internet Explorer 7.0 and
above) installed
Accessing the Web Administration Interface To access the web administration interface, use the following procedure: Open your web browser. 1. In the address bar, type in the assigned IP address of your WYDE system (the address
where the DNCA services are running) 2. You should see a screen similar to the one in Figure 2. If you do not, check that are
using the proper IP address and that the DNCA services are running.

Web Administration Interface User Guide 14
Figure 2: Initial Web Administration Login Screen
Logging In Once you receive the login screen, use your default PIN (admin) and default password (admin) to log in to the web administration interface. Type in your PIN/Password in the labeled fields and click “Login”. If successful, you will be presented to the administration interface, as shown in the next section. Remember the usernames and passwords are case sensitive.
Components of the Web Administration Interface The administration interface consists of three main components, as shown in Figure 3. These components are: • Menu Bar: This area contains the general administration areas of the Web
Administration tool. Table 1 outlines these areas and the types of information that can be administered under each menu
• Admin Area: This is the area where the actual administration occurs. It changes based on the item selected in the menu bar and the subsequent action being performed
• Action Buttons: These buttons are green by default and usually initiate some kind of action, such as search, create, delete, update, or cancel.

Web Administration Interface User Guide 15
Figure 3: Components of the WYDE Web Administration Interface Table 1: Web Administration Menus and their Administration Areas Menu Description Subscribers Allows you to add, delete, and modify subscribers as well as their
own conferences Conferences Allows you to delete and manage active conferences Calls Allows you to view current calls in progress, both inbound and
outbound Reports Allows you to view reports on all calls and conferences that have
taken place DNIS Allows you to modify how inbound calls are routed to different call
flows Preferences Allows you to change the hostname, number of simultaneous calls,
and number of rows shown in the admin area Logout When selected, will log you out of the web administration interface Now that you have successfully logged in to the administration interface, you can begin administering the system using whichever interface you choose.

Web Administration Interface User Guide 16
Subscriber User Management One of the administration tasks that you will be called upon frequently to do is to add unique subscribers to the system and allow them to use the system. For terminology’s sake we should clarify one main terminology item. A subscriber is a real person – he has a name, phone number, e-mail address, etc. A user is a person in a conference with a particular role (e.g. host, participant, listener, etc). So a subscriber could be a host user in one conference and a listener in another and a subscriber can have different roles in the same the conferences. Note. Operator is unable to playback the recorded conferences via Reporting of Web Administration Interface.
Create a Subscriber Whenever a new person needs access to the system, you must create a new subscriber for them so that they can log in to the system. To create a subscriber using the web interface, use the following steps: 1. Log in to the web interface 2. Open the Subscriber Management section of the portal by clicking the “Subscribers”
menu. The screen should look similar to Figure 4.
Figure 4: Subscribers Menu

Web Administration Interface User Guide 17
3. Click the “Create Subscriber” button to start the subscriber creation process. 4. In the screen that appears (similar to Figure 5), fill out the information for the new
subscriber. The fields that are required are noted with an asterisk (*). The fields you need to fill out include: • PIN: Essentially the login ID for the subscriber – It is usually a number so this PIN
can be used as a login id by telephone for additional conference features to identify the subscriber, if this is determined by call flow. This login also can be used as login into this Web Administration Interface. If the login is planning to be used as web login only, the PIN can be alpha-numeric. If you don’t want to come up with your own numbering scheme for logins, you can click the “Generate” button to generate a random, unique ID for the new subscriber.
• Password: This is a password for the user, that is used to login into Web Administration Interface. Note: you must type the password twice – once in the “Password” field and again in the “Confirm Password” field to ensure you typed it correctly.
• First Name: The subscriber’s first name. • Last Name: The subscriber’s last name. • Email: The email address of the subscriber. • Telephone No: The primary telephone number of the subscriber. This phone
number can be used during conference call setup for callout to the subscriber. • Grant operator permission: When checked – the subscriber will be able to see all
other subscribers and their conferences and calls; when unchecked – the subscriber will be able to see only own (subordinate) subscribers and their conferences and calls.
Figure 5: Creating a New Subscriber 5. Click the “Create” button to create the new subscriber. 6. Once the subscriber is created, a window will pop up indicating that it is “Now creating
conference accounts ...”. This means it is going to create conference account for the

Web Administration Interface User Guide 18
new subscriber. If you click “OK” you will be taken to the page so you can create a conference account (covered in later in this chapter). If you don’t want to create a conference account for this new subscriber, you can click “Cancel” and you will be returned to the main subscriber menu.
7. In the subscribers menu, you should now see your new subscriber (as shown in Figure 6). You should also be able to use this subscriber to log in to the web interface. Notice the “Authorized By” column. This column indicates the user who created that subscriber (also known as the “Parent” of that subscriber). If the subscriber has operator permissions (the “Grant operator permission” checkbox is checked for him) he is able to see all subscribers that exist in the system. If the subscriber does not have operator permissions he is able to see only own sub-subscribers, in other words he is able to see himself and the subscribers authorized by him.
Figure 6: View System Subscribers (subscriber menu after adding a new subscriber)
View/Modify a Subscriber Sometimes administrators need to make changes to existing subscribers. The WYDE services have several ways of viewing and/or modifying existing subscribers. You can use the web interface to view and modify any existing system subscribers and their information. To view existing subscribers and their information, log in to the web interface and click on the “Subscribers” menu. You will see a screen similar to Figure 6. This shows

Web Administration Interface User Guide 19
all the current subscribers on the system. If you wish to sort this list, click on the column heading of the column you wish to sort by (the default is sorted ascending by subscriber name). To reverse any sort order, click the column heading again. Also, since there may be more than one page of subscribers, you’ll notice a navigation bar under the “Create Subscriber” button that looks like the following: Lis t records: 1 /168 << Previous | 1 2 3 . . . | Next >> This bar allows you to navigate amongst the different pages of subscribers. You can click on the “Next >>” to move to the next page of subscribers, or the “<< Previous” to move to the previous page. Or, you can click on any number to go to that numbered page. In addition you can search the subscribers based on First Name, Last Name, PIN, Email, Phone Number, Access Code, Conference Number, DNIS:
Note. You can use the same sorting, navigation, and search mechanism on any other screens, such as “Conferences”, “Calls”, “Reports”, “DNIS”. To view and change the details of any subscriber using the web interface, log in to the web interface and use the following procedure: 1. Click on the “Subscribers” menu to view the list of subscribers on the system 2. Locate the subscriber whose details you wish to view or modify. 3. Click on that subscribers’ Subscriber Name (each subscriber name is highlighted as a
link) to bring up the subscriber property page (Figure 7) for that subscriber.

Web Administration Interface User Guide 20
Figure 7: Viewing Subscriber Information 4. You can modify any of these fields simply by clicking in the appropriate field, typing
the new text, then clicking the “Update” button.
Delete/Deactivate a Subscriber From time to time, you will need to delete a subscriber. To delete a subscriber using the web interface, log in to the web interface and use the following procedure: 1. Click the “Subscribers” menu to view the list of subscribers on the system. 2. Locate the subscriber you wish to delete. 3. Click the button next to the subscriber you wish to delete. The interface will prompt
you with “Are you sure you want to Delete?”. If you click “OK” the subscriber will be deleted.
Create a Conference Account A conference account is essentially a set of configuration settings for a particular subscriber for a particular DNIS/Call flow. Within a conference account configuration, each given a unique ID#, you specify how a particular subscriber will interact – whether they will be host, participant, or listener, which DNIS/Call flow will be used, and what the access code will be for that conference account will be.

Web Administration Interface User Guide 21
To create a conference with the web interface, start by logging in to the web interface and locating the subscriber you wish to create the conference for. Then, use the following procedure to create it: 1. Click on the Subscriber Name of the subscriber you wish to create a conference for to
view their details (Figure 7). 2. Click the “Create” button to start the creation process. A new window will appear
(Figure 8).
Figure 8: Creating a New Conference Account 3. Enter the conference number that should be used to access this conference. You can
either enter your own number, or use the automatically generated number that comes up by default, or generate a new conference number by clicking the “Generate” button.
4. Choose the DNIS for this conference. A DNIS is used to uniquely identify which number and which call flow should handle the incoming call.
5. Enter the access code that should be used to access this conference. The access code should be unique within DNIS. All participants will use this access code to gain access to this conference. You can either enter your own number, or use the automatically generated number that comes up by default, or generate a new access code by clicking the “Generate” button.
6. Choose the role that the subscriber will play in this conference. A subscriber can be any one of three options (which can be selected by choosing the appropriate option from the drop down list)
a. Host – A host is the user in the conference call that can make changes to the system while the conference call is in progress. Like change the security setting, change who can talk or answer, etc.
b. Participant – A participant can actively participate in a call by both talking and listening.
c. Listener – A listener can hear the conference call, but cannot speak. Their audio path is one way only (receive).
7. Click the “Create” button to create the new conference. The conference will now appear in the property page of that user (Figure 9).

Web Administration Interface User Guide 22
Figure 9: The Conference Account Created
Configuration of the Conferences Note that there could be different approaches with conferences configuration and setting access codes and roles for the conferences. If you would like to configure the single conference, the conference number must be the same in all conference accounts records that describe this single conference. However the DNIS number and/or subscriber for them could be different; the way that the system determines that it is the single conference is that it has same conference number. The first approach to configure the conference is the following: the subscriber creates for himself the conference account records with the same conference number (this determines that it is the single conference configuration) and multiple records with different access codes that are used for different roles (Figure 10). Depending on what access code is used when the user has entered in the conference, the role of this user is different, and the user can be either the host, or the participant or the listener.

Web Administration Interface User Guide 23
Figure 10: Sample of User Roles Configuration for the Conference The second approach to configure the conference is creating conference accounts for each subscriber that should participate in the conference. The conference number for all these conference accounts must be the same, and these records will show what access code should use the subscriber and subscriber role in the conference call.
Modify a Conference Account Once you have a conference account created, you may need to change it. To modify a conference account, you may think that you could go to the “Conferences” menu and just select the conference and change it. However, conference account settings are particular to a particular subscriber, and the “Conferences” menu is only conferences that are currently in use. To modify a conference account using the web interface, log in to the web interface and navigate to the user whose conference account you wish to modify. The conference accounts are listed on their property page. To view and modify the details of any of these conference accounts, follow this procedure: 1. Click on the Conference Number of the conference you wish to modify. A screen
similar to the one shown in Figure 11.

Web Administration Interface User Guide 24
Figure 11: Modifying a Conference Accounts 2. You may change any of the properties of the conference from this screen, just as you
did when you created it. Simply modify the entry in any text box (including access code or creating a new conference name) or select a new option from one of the drop down lists.
3. In addition you can override any of default call flow parameters for the conference in the lower section of the screen as shown on Figure 11 (lower section of the screen). If you would like to change any of the parameters, the Overridden checkbox should be checked – otherwise the value you entered will not be saved. The list of available parameters depends on selected DNIS. Note: you can override call flow parameters only if you select conference account record with the host role; for the participant and the listener roles you are unable to override call flow parameters.

Web Administration Interface User Guide 25
4. Click the “Update” button to save the changes.
Delete a Conference Account If you wish to delete any conference account, simply locate the user whose conference you wish to delete, view the details of the user to show their conference accounts, and then click the button next to the conference you wish to delete. The interface will confirm by asking “Are you sure?”. Click “OK” to delete the conference or “Cancel” to cancel deletion.

Web Administration Interface User Guide 26
Conferences and Calls Management Once a conference has begun, you can manage it using the built-in web tools. You can manage conferences on-the-fly using the web interface (although some of the information can be viewed through asterisk built-in tools, as discussed later).
Calls
View Calls in progress Any time when there are any calls in progress on the bridge, you can view them in the web interface by clicking on “Calls” menu. However, when no calls are in progress, the “Calls” tabs of the web interface will show no data. 1. Click “Calls” menu to view all calls that currently are in process on the bridge (Figure
12). All conferences will be listed, sorted ascending by conference number. There are several columns of information about each call. Table 2 details what each column indicates. Note, you will see all calls that currently are in process on the bridge only if you login as administrator or the subscriber with operator permissions (see section: Subscriber User Management). If you login as non-operator subscriber you will see only the calls that belong to the conference of your and subordinate subscribers.
Table 2: Calls Columns Column Description
Drop the user call Calling Number The incoming phone number, i.e. the phone number from which
the call was made Called Number The DNIS number called User Name The name assigned to this particular caller. You can edit it by
clicking in this box and typing a new name Access Code The access code used to enter the conference Conference Number The unique number assigned to each conference Call Begin Time when the particular call was placed Duration How long the call has been part of the conference Status Status of the call Role The subscriber’s role for this conference Mute Whether or not the user is muted Hold Whether or not the user is on hold

Web Administration Interface User Guide 27
Figure 12: View Calls Information 2. Also you can view the calls that belong to one single conference only. To do that click
“Conferences” menu to view the conferences that are in progress (this will be described later in the section View Conferences in progress, Figure 17), and then click the conference number of the conference you wish to view. This will bring up the calls window that shows the individual calls that make up this conference (Figure 13). Table 3 lists a description for each of the columns in this view. Note that when you are viewing the calls that belong to one single conference in the upper section of the screen you will see additional controls that allow you to manage the conference and all calls that belong to this conference. These controls will be described later in the section Conferences.
Table 3: Conference Call Columns Column Description
Delete a user from this conference Calling Number The incoming phone number, i.e. the phone number from which
the call was made Called Number The DNIS number called User Name The name assigned to this particular caller. You can edit it by
clicking in this box and typing a new name Access Code The access code used to enter the conference

Web Administration Interface User Guide 28
Call Begin Time when the particular call was placed Duration How long the call has been part of the conference Status Status of the call Role The subscriber’s role for this conference Mute Whether or not the user is muted Hold Whether or not the user is on hold Q&A Whether or not the user is asking a question (note, this column is
available when you view conference calls only and not available when you view all calls on the bridge)
Figure 13: Viewing the Callers within a Conference Both these calls views can refresh automatically given the interval shown in the “Set Refresh” drop down list. The default is not to refresh however you can choose intervals such as 10 seconds, 20 seconds, 1 minute, 2 minutes, and 5 minutes. You can also refresh the screen yourself using your browser’s “Refresh” function (usually pressing <F5> on your keyboard).
Dropping Call Participants If during a call, you wish to cancel a conference call for specific participants, you may use the “drop” feature to kick someone off the call. To drop someone from a conference call, first log in to the web interface, then use the following procedure:
Web Administration Interface User Guide 29
1. Click on “Calls” or click on “Conferences”, locate the conference you wish to drop someone from and click on the conference number to bring up the list of callers
2. Click the button next to the caller you want to drop from the call 3. The system will ask “Are you sure you want to Delete?” 4. Click “OK” to drop the caller.
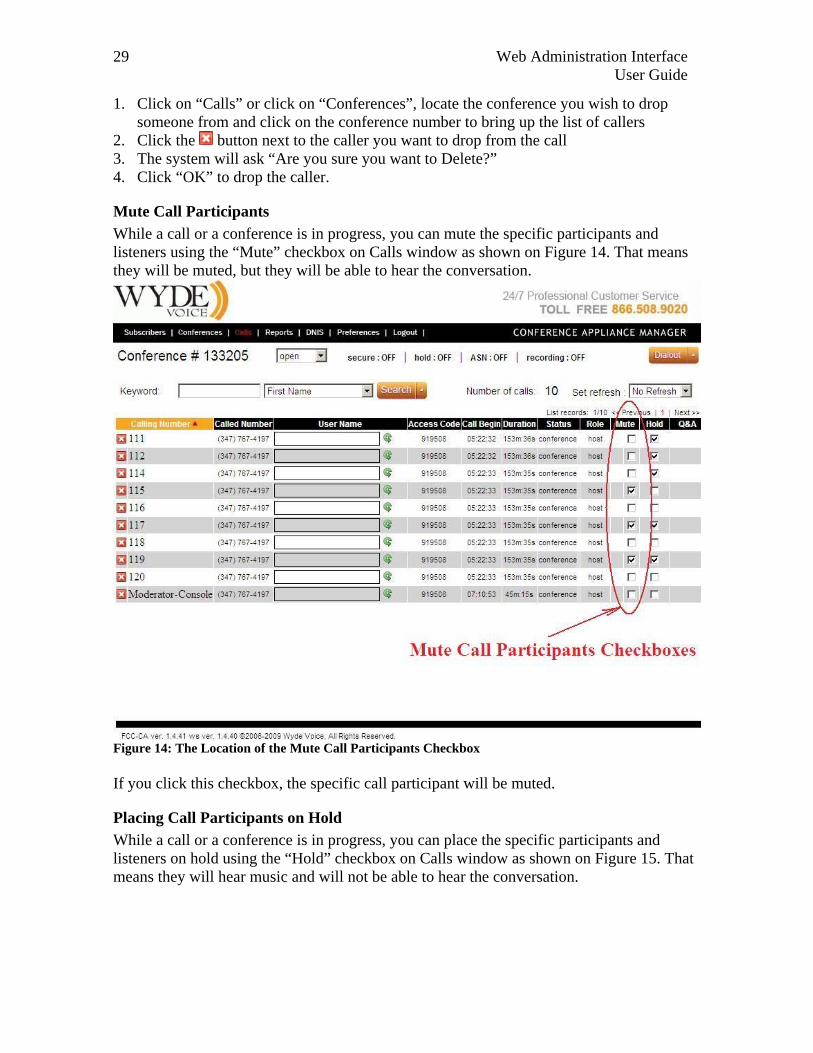
Mute Call Participants While a call or a conference is in progress, you can mute the specific participants and listeners using the “Mute” checkbox on Calls window as shown on Figure 14. That means they will be muted, but they will be able to hear the conversation.
Figure 14: The Location of the Mute Call Participants Checkbox If you click this checkbox, the specific call participant will be muted.
Placing Call Participants on Hold While a call or a conference is in progress, you can place the specific participants and listeners on hold using the “Hold” checkbox on Calls window as shown on Figure 15. That means they will hear music and will not be able to hear the conversation.

Web Administration Interface User Guide 30
Figure 15: The Location of the Hold Call Participants Checkbox If you click this checkbox, the specific call participant will be placed on hold. For CONF and SPECTEL call flows while the caller is on hold he can switch between different music-on-hold prompts using extended menu (default #) option 0 and pressing the sequential number of the prompt file from 1 till 9, or pressing 0 for default music on hold. For example #02 will set the second music-on-hold audio prompt, #00 will set the default music on hold prompt. See Chapter 3: Call Flows for details.
Conferences
View Conferences in progress Any time when there are conference calls in progress, you can view them in the web interface. However, when no conferences are in progress, the “Conferences” and “Calls” tabs of the web interface will show no data. 1. Click “Conferences” menu to view all conferences that currently are in process on the
bridge (Figure 16). All active conferences will be listed, sorted ascending by conference number. There are several columns of information about each conference. Table 4 details what each column indicates.

Web Administration Interface User Guide 31
Note, you will see all conferences that currently are in process on the bridge only if you login as administrator or a subscriber with operator permissions (see section: Subscriber User Management). If you login as non-operator subscriber you will see only your conferences, i.e. the conferences that belong to you or belong to your subordinate subscribers.
Table 4: Conference View Columns Column Description Conference Number The unique number assigned to each conference
When clicked, brings up a list of all subscribers in the specified conference
Created Time conference was started Duration How long the conference has been active since the joining
of the first caller Secure When checked, indicates the conference is secured Hold Indicates the entire conference is on hold Participant Count Indicates how many participants are currently on this call
Figure 16: View Conference Information

Web Administration Interface User Guide 32
3. Click the conference number of the conference you wish to view. This will bring up the calls window that shows the individual calls that make up this conference (Figure 13, Table 3) as it was previously described in section View Calls in progress.
The conference view can refresh automatically given the interval shown in the “Set Refresh” drop down list. The default is not to refresh however you can choose intervals such as 10 seconds, 20 seconds, 1 minute, 2 minutes, and 5 minutes. You can also refresh the screen yourself using your browser’s “Refresh” function (usually pressing <F5> on your keyboard).
Conference Mute and Q&A Modes When changes the mode of a conference call, there are different options, or “mute modes” you can choose from to determine how the conference is muted and in what mode is the conference. Figure 17 shows where to select the mode for the conference.
Figure 17: The Location of the Conference Mode Dropdown The conference modes are: • open – Anyone can talk and un-mute themselves. • relaxed – All participants will be muted by default, but can un-mute themselves. Hosts
are not muted. • strict – None of the participants can un-mute themselves. The only way to un-mute a
caller is through the web interface. In this mode, when participant tries to un-mute using

Web Administration Interface User Guide 33
*6 – the system tells “conference host has muted the conference, this line can not be unmuted”.
• question – The conference is in Q&A mode, Q&A Sessions will be described in the next section of this guide. In this mode, if participant presses *6 the system tells “If you’d like to ask a question – press 1”.
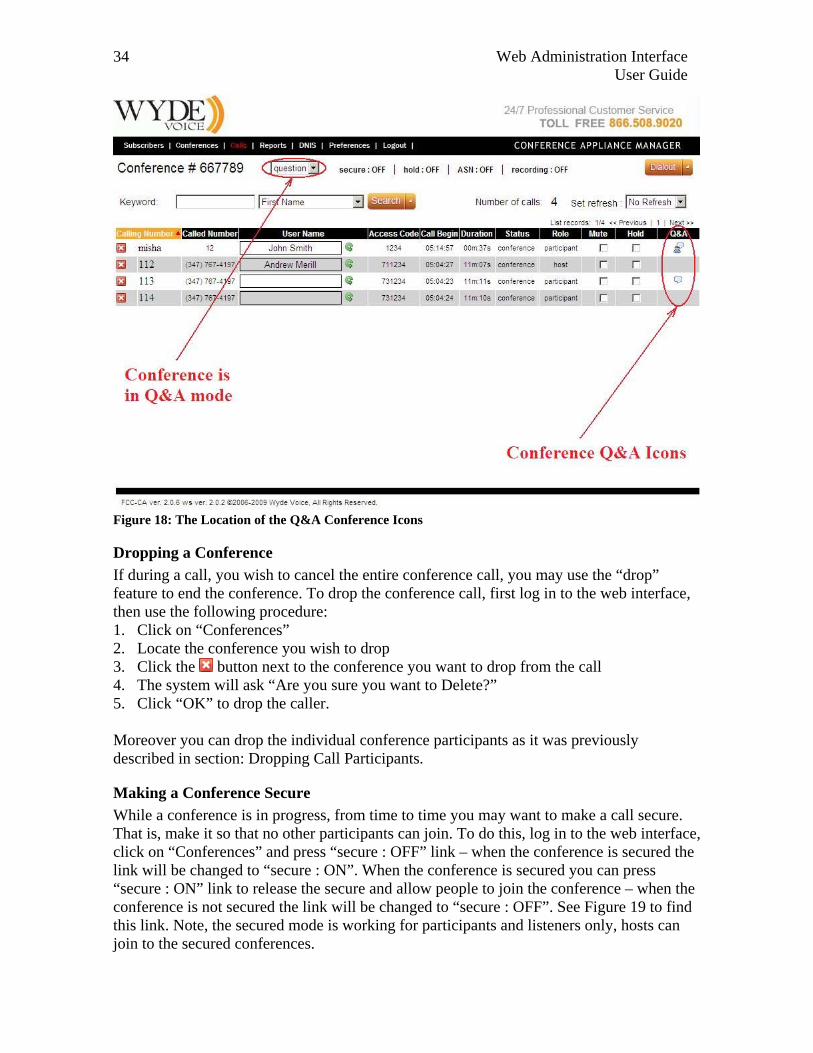
Q&A Sessions The WYDE conference software has a feature built in known as Q&A. You can set up a Q&A session from the web administration interface that allows conference participants, in turn, to ask questions and receive answers. The Q&A session can be started either from the Web Administration Interface by selection “question” mode or it can be started by the conference host from DTMF keypad. When Q&A session is started all participants will be muted and they will be unable to unmute their self, but they will be able to request to speak (to request question). The web interface will show anyone who has requested to speak with an icon in the Q&A column. You as the host in the web interface can click the icon to allow them to speak, after that this icon will be changed to an icon . Clicking them after they have finished speaking will drop them out of the Q&A queue. You can click the icon in the Q&A column twice to drop the user from the Q&A queue. See Figure 18 to find Q&A session icons. Furthermore Q&A session can be managed by the conference host using DTMF keypad. To manage Q&A session the host should press *3 (default, but can be overridden) and the following commands are available for him in Q&A session mode: 1 – to start Q&A session 2 – to move to the next questioner 3 – to end Q&A session 4 – to mute or unmute the questioner 5 – to clear Q&A queue * – to return to the conference Q&A sessions also are described in section Question and Answer Sessions within Conference Calls of this guide.
Web Administration Interface User Guide 34
Figure 18: The Location of the Q&A Conference Icons
Dropping a Conference If during a call, you wish to cancel the entire conference call, you may use the “drop” feature to end the conference. To drop the conference call, first log in to the web interface, then use the following procedure: 1. Click on “Conferences” 2. Locate the conference you wish to drop 3. Click the button next to the conference you want to drop from the call 4. The system will ask “Are you sure you want to Delete?” 5. Click “OK” to drop the caller. Moreover you can drop the individual conference participants as it was previously described in section: Dropping Call Participants.
Making a Conference Secure While a conference is in progress, from time to time you may want to make a call secure. That is, make it so that no other participants can join. To do this, log in to the web interface, click on “Conferences” and press “secure : OFF” link – when the conference is secured the link will be changed to “secure : ON”. When the conference is secured you can press “secure : ON” link to release the secure and allow people to join the conference – when the conference is not secured the link will be changed to “secure : OFF”. See Figure 19 to find this link. Note, the secured mode is working for participants and listeners only, hosts can join to the secured conferences.

Web Administration Interface User Guide 35
Figure 19: The Location of the Secure Conference Link This secure conference link works like a toggle switch. There could be two possible captions: secure : OFF – Conference is not secured, i.e. anybody can join to the conference secure : ON – Conference is secured, i.e. nobody can join to the conference You can change the conference secure mode simply by clicking on this link. You may also use the “Secure” checkbox on the “Conferences” main window (shown in Figure 20).

Web Administration Interface User Guide 36
Figure 20: The Location of the Secure Conference Checkbox If you click this checkbox, it will perform the same function as making the conference secure using the “secure : OFF” link in the “Calls” window (Figure 19). The host also can make the conference secure using DTMF keypad (default: *7) as described in Chapter 3: Call Flows.
Placing a Conference on Hold While a conference is in progress, you can place all participants and listeners on hold using the hold link. That means they will hear music while hosts have a private discussion. You should press “hold : OFF” link to place the conference on hold – when the conference is on hold the link will be changed to “hold : ON”. When the conference is on hold you can press “hold : ON” link to place the conference on line – when the conference is not on hold the link will be changed to “hold : OFF”. See Figure 21 to find this link.

Web Administration Interface User Guide 37
Figure 21: The Location of the Hold Conference Link This hold conference link works like a toggle switch. There could be two possible captions: hold : OFF – Conference is on line, i.e. all attendees can hear the conference hold : ON – Conference is on hold, i.e. only hosts can talk You can change the conference hold mode simply by clicking on this link. You may also use the “Hold” checkbox on the “Conferences” main window (shown in Figure 22).
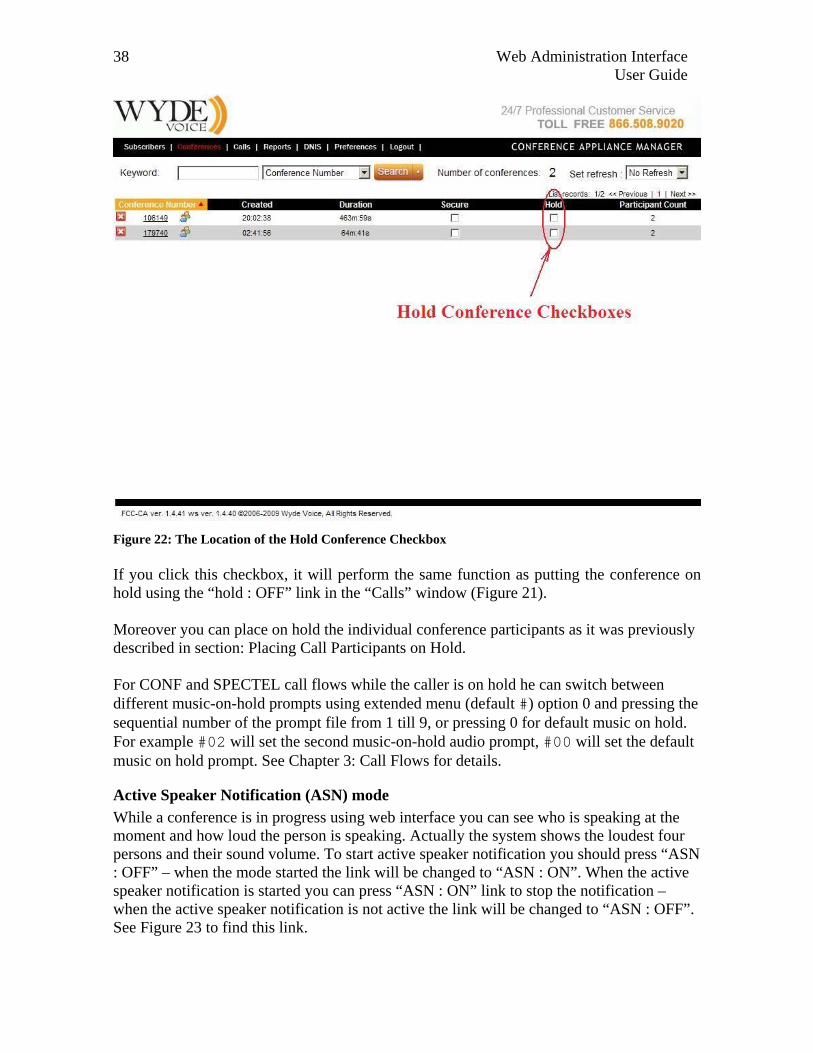
Web Administration Interface User Guide 38
Figure 22: The Location of the Hold Conference Checkbox If you click this checkbox, it will perform the same function as putting the conference on hold using the “hold : OFF” link in the “Calls” window (Figure 21). Moreover you can place on hold the individual conference participants as it was previously described in section: Placing Call Participants on Hold. For CONF and SPECTEL call flows while the caller is on hold he can switch between different music-on-hold prompts using extended menu (default #) option 0 and pressing the sequential number of the prompt file from 1 till 9, or pressing 0 for default music on hold. For example #02 will set the second music-on-hold audio prompt, #00 will set the default music on hold prompt. See Chapter 3: Call Flows for details.
Active Speaker Notification (ASN) mode While a conference is in progress using web interface you can see who is speaking at the moment and how loud the person is speaking. Actually the system shows the loudest four persons and their sound volume. To start active speaker notification you should press “ASN : OFF” – when the mode started the link will be changed to “ASN : ON”. When the active speaker notification is started you can press “ASN : ON” link to stop the notification – when the active speaker notification is not active the link will be changed to “ASN : OFF”. See Figure 23 to find this link.

Web Administration Interface User Guide 39
Figure 23: The Location of the Active Speaker Notification (ASN) Conference Link This active speaker notification conference link works like a toggle switch. There could be two possible captions: ASN : OFF – Active speaker notification is not working ASN : ON – Active speaker notification is working You can change the conference active speaker notification mode simply by clicking on this link.
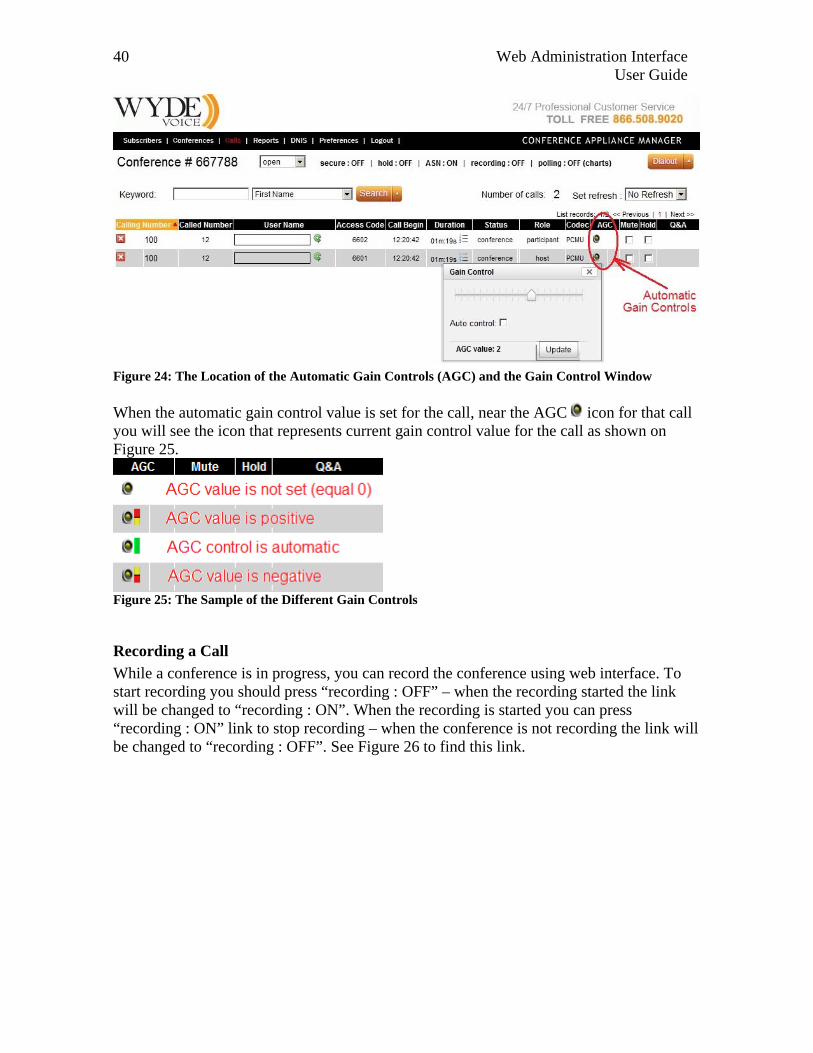
Automatic Gain Control While a conference is in progress and Active Speaker Notification mode is switch on, web admin interface shows you Automatic Gain Controls (AGC) icons for each conference call as shown on Figure 24. If you click on this AGC icon, the Gain Control window appears; this window gives you the opportunity to manage the microphone volume level of the selected call, i.e. gain control option. This value could be from -10 (the quietest/lowest sound level) till 10 (the loudest/highest sound level) or the microphone level (the gain control level) could be automatically adjusted by the WYDE bridge. You can use the slider to set the AGC value of the call or you can check “Auto control” checkbox; after you have moved the slider or checked the checkbox, you should press the “Update” button to apply your changes.
Web Administration Interface User Guide 40
Figure 24: The Location of the Automatic Gain Controls (AGC) and the Gain Control Window When the automatic gain control value is set for the call, near the AGC icon for that call you will see the icon that represents current gain control value for the call as shown on Figure 25.
Figure 25: The Sample of the Different Gain Controls
Recording a Call While a conference is in progress, you can record the conference using web interface. To start recording you should press “recording : OFF” – when the recording started the link will be changed to “recording : ON”. When the recording is started you can press “recording : ON” link to stop recording – when the conference is not recording the link will be changed to “recording : OFF”. See Figure 26 to find this link.

Web Administration Interface User Guide 41
Figure 26: The Location of the Recording Conference Link This recording conference link works like a toggle switch. There could be two possible captions: recording : OFF – Conference is not being recorded recording : ON – Conference is being recorded You can change the conference recording mode simply by clicking on this link. The host also can start/stop the conference recording using DTMF keypad (default: *9) as described in Chapter 3: Call Flows. The recorded conferences can be played back either using the Web Administration Interface reporting (as it is described in the section Web Report Management) or by calling to PLAYBACK call flow DNIS numbers and playing the conference on your phone (as it is described in the Chapter 3: Call Flows).
Dialing Another User Often, there will be a conference call in progress and you will need to call another participant. That is where the dialout feature comes in. If your system supports dialing outside users, log in to the web interface and follow this procedure: 1. Click “Conferences” 2. Click on the Conference you wish to dial out from

Web Administration Interface User Guide 42
3. The “Calls” page will open. Click the “Dialout” button in the upper right hand corner. You will see a screen similar to Figure 27.
Figure 27: Dialing Out to Another User 4. Select the subscriber you wish to dial from the drop down list. 5. Enter the phone number you wish to dial and click the “Dialout” button. 6. The user will be added to the conference. Note. There are two possibilities for dialing out to another user: • If we are able to find the requested conference account (conference user), the screen
presented on Figure 27 will be shown to user. • If we are unable to find the requested conference account (for instance if radius-
authorization is used or for some specific call flows) the dialing out screen will have additional field to enter the access code; this field will be pre-populated with the first valid access code of the selected conference.
Polling While a conference is in progress, you can start polling (voting) for the conference using web interface. To start polling you should press “polling : OFF”, submenu with available polling options (i.e. digits 1, 2, ..., 9, 0) will be opened, and in this submenu you should select available polling options and press “OK” button – after that the link will be changed to “polling : ON” and the polling will be started. When the polling is started you can press “polling : ON” link to stop polling – when the polling session is not started for the conference the link will be changed to “polling : OFF”. See Figure 28 to find this polling link and submenu with available polling options.

Web Administration Interface User Guide 43
Figure 28: The Location of the Polling Conference Link This polling conference link works like a toggle switch. There could be two possible captions: polling : OFF – Conference polling session is not in progress polling : ON – Conference polling session is in progress You can change the conference polling mode simply by clicking on this link. The hosts also can start/stop the conference polling using DTMF keypad (default: #5) as described in Chapter 3: Call Flows. When #5 is pressed the following message will be played: “to start the polling session press 1, to return to the conference press *”; when 1 is pressed the following message will be played: “please enter available polling options followed by the #” – after that you should select all possible options (i.e. digits 1, 2, ..., 9, 0) and press # to start polling (the message will inform you what available options are selected and tell you that polling sessions is started). When the polling session is started the conference participants can press #6 to start polling (this command availability is defined by conference extended menu DTMF policy parameter – conference_extended_dtmf, by default parameter value is “hpl”, i.e. polling is available for hosts, participants, listeners); the message “please vote now” will be played next; after that it is possible to select one of the available options or press * to return to the conference (the selected option will be pronounced after your voting). When the polling session is started the hosts can press #5 again to stop the polling session; the following message will be played: “to stop the polling session press 1, to return to the conference press *”; after 1 is pressed the message “the polling session is now over” will be played and the polling session will be ended. While the conference is in progress (regardless either the polling session is started or it is over) you can see the polling results in the Web Administration Interface using “(charts)” link. For instance if there were two polling sessions (the first with options “1”, “2”, “3” and the second with options “4”, “5”, “6”) the polling charts should look similar to shown on Figure 29.

Web Administration Interface User Guide 44
Figure 29: The Conference Polling Session Voting Charts When the conference is over the results of the conferences polling can be seeing using the Web Administration Interface reporting (as it is described in the section Web Report Management).
Scheduling Any conference could be scheduled to take place at specific date (date range), time, week day (DOW), with specified number of the conference participants. The following call flow attributes (see section: Call Flow Attributes) are responsible for the conference scheduling: • conference_scheduled (Conference scheduled) – denotes if the conference is
scheduled or not, this attribute value should be equal “on” for the scheduled conferences, if this attribute value is “off” all scheduling attributes are being ignored;
• conference_schedule (Conference schedule) – denotes date (date range), time, day of the week when the conference is scheduled and how many participants can be joined to this scheduled conference, this attribute has the following format: <scheduling 1>[;<scheduling 2>[;<scheduling 3>[;...]]] i.e. this is the list of the conference scheduling records separated with semicolon (;); each scheduling record has the following format: <part_count>,<days>,<tm_begin>,<duration>,<date_begin>,<date_end> where o part_count – number of participants allowed to the scheduled conference; o days – days of the week when the scheduled conference is allowed: 1 (Sunday), 2
(Monday), ..., 7 (Saturday); o tm_begin – time when the scheduled conference begins in hhmm format; o duration – the scheduled conference duration in minutes; o date_begin – the beginning date in YYMMDD format when the conference
scheduling is active (i.e. the first date when the scheduling is on); o date_end – the ending date in YYMMDD format when the conference scheduling
is active (i.e. the last date when the scheduling is on)

Web Administration Interface User Guide 45
For example if you need to schedule the conference for 20 participants on Monday, Wednesday, Thursday, from 10:00 a.m. for 90 minutes (i.e. till 11:30 a.m.), for the date range from November 1st, 2009 till March 1st, 2010 the attribute value should be: 20,245,1000,90,091101,100301 If in addition to previous scheduling you need to schedule the conference for 30 participants on November 11th, 2009 (Wednesday) the attribute value should be: 20,245,1000,90,091101,091110;30,4,1000,90,091111,091111;20,245,1000,90,091112,100301
• conference_schedule_extend_dtmf (Schedule conference extend DTMF policy) – denotes who (h/p/l, default: h – host) can extend duration of the scheduled conference;
• conference_schedule_extend_dtmf_binding (Schedule conference extend DTMF binding) – denotes what keys should be used to extend duration of the scheduled conference, when these keys are pressed the following message will be played: “please press 1 to extend conference duration for 5 minutes, press 2 – for 10 minutes, press * – to return to the conference”, the total maximal extension time is defined in the attribute conference_schedule_extend;
• conference_schedule_extend (Schedule conference extend maximal time in seconds) – denotes to what maximal time in seconds the duration of the scheduled conference can be extended;
• conference_schedule_remind (Schedule conference end remind time in seconds) – denotes remind time in seconds before the scheduled conference ends when the reminder (warning) message should be played to the conference host, for instance if this attribute value is 600 before 10 minutes (600 seconds) till the scheduled conference ending time the remind message will be played to the host;
• conference_schedule_hold (Wait before scheduled conference begin) – denotes wait time in seconds before the scheduled conference begins when the participants can join; if the participant connected prior to this time his call will be dropped, if he connected after this time but prior the conference begin time music-on-hold will be played to him until the conference starts, for instance if the conference is scheduled to be started at 11:00 and this parameter values is 600 (i.e. 10 minutes) all participants’ calls earlier than 10:50 will be dropped with the message that the conference is scheduled to be started at 11:00, the participants’ calls from 10:50 till 11:00 will be placed on hold (music on hold will be played) until the conference begins.
The sample of call flow attributes that could be used for the conference scheduling is shown on Figure 30.
Figure 30: Scheduling Call Flow Attributes Sample

Web Administration Interface User Guide 46
The following conference scheduling logic is being implemented: • if conference_scheduled attribute is “off”, the conference is not scheduled (the
processing logic is usual, as for non-scheduled conferences); • if conference_schedule attribute is empty, the conference is not scheduled; • otherwise, if conference_scheduled attribute is “on” and
conference_schedule attribute describes conference scheduling, the conferences are being considered as scheduled and the following logic will be applied: o if there are no any scheduled conferences for the nearest 30 days, the call will be
dropped with the message “This conference has no schedule. Please check with the organizer. Good bye.”;
o if for the current day of week all scheduled conferences are already completed, i.e. the current time is more than ending time for the last scheduled conference, the call will be dropped with the message “Your conference is not running or scheduled. Please check its schedule with the organizer. Good bye.”;
o if the time remaining until the scheduled conference beginning time (<tm_begin>) is more than an hour the message “There is no upcoming conference scheduled within an hour. Please check the schedule with the organizer. Good bye.” will be played and the call will be dropped;
o if the time remaining until the scheduled conference beginning time (<tm_begin>) is less than an hour, but more than period defined in conference_schedule_hold attribute value the message “Your conference will begin in <NNN> minutes. Please call again later. Good bye.” (where <NNN> – minutes till the conference beginning time) will be played and the call will be dropped;
o if the time remaining until the scheduled conference beginning time (<tm_begin>) is less than conference_schedule_hold attribute value the message “Please wait. Your conference will begin shortly. This line is now on hold.” will be played and the call will be placed on hold (music on hold will be played); at conference beginning time (<tm_begin>) the message “Your conference is started. Please wait while we place you into the conference.” will be played to inform that the conference is ongoing;
o if the new call exceeds <part_count> amount the call will be dropped with the message “This conference is already full. Please call again later. Good bye.”, the host also receives the warning about that;
o at conference_schedule_remind seconds before the conference ending time of the scheduled conference, the host receives announcement “This conference has <MMM> more minutes to complete. Press <KEY> to request an extension.” (where <MMM> – minutes till the conference ending time, <KEY> – keys defined in conference_schedule_extend_dtmf_binding call flow attribute value that should be used on DTMF keypad by the host if he wishes to extend the conference duration); the host can extend the conference duration, the maximal extension time is defined in conference_schedule_extend attribute value;

Web Administration Interface User Guide 47
o when the scheduled conference time is over the message “This conference has run out of time. All calls will now end.” will be played and all this conference calls will be dropped.
Maintaining Conferences Maximal Duration The WYDE bridge software allows you to define the maximal duration time for your conferences. The following call flow attributes (see section: Call Flow Attributes) are responsible for the conference maximal duration definition: • conference_maxduration (Maximal conference duration) – denotes the maximal
duration of the conference; if this attribute value equal -1 (default) that means that there is no duration limit for the conference, this attribute positive value denotes maximal conference duration in seconds;
• conference_schedule_extend_dtmf (Schedule conference extend DTMF policy) – denotes who (h/p/l, default: h – host) can extend maximal duration of the conference;
• conference_schedule_extend_dtmf_binding (Schedule conference extend DTMF binding) – denotes what keys should be used to extend maximal duration of the conference, when these keys are pressed the following message will be played: “please press 1 to extend conference duration for 5 minutes, press 2 – for 10 minutes, press * – to return to the conference”, the total maximal extension time is defined in the attribute conference_schedule_extend;
• conference_schedule_extend (Schedule conference extend maximal time in seconds) – denotes to what maximal time in seconds the duration of the conference can be extended, i.e. the maximal conference duration could be conference_maxduration + conference_schedule_extend, default this attribute value is 1800 seconds (30 minutes), the conference can be extended multiple times by 5 or 10 minutes by the callers in the roles defined in conference_schedule_extend_dtmf attribute using DTMF keys defined in conference_schedule_extend_dtmf_binding attribute till maximum time defined it this attribute;
• conference_schedule_remind (Schedule conference end remind time in seconds) – denotes remind time in seconds before the conference ends when the reminder (warning) message should be played to the conference host, for instance if this attribute value is 600, then 10 minutes (600 seconds) before the conference ending time the remind message will be played to the host, default this attribute value is 120 seconds (2 minutes).
Note if the conference is scheduled and it has maximal conference duration defined, the actual maximum conference duration is being defined using the scheduler’s parameters. The following conference maximal duration logic is being implemented: • if conference_maxduration attribute value is less than 0, that means that there is
no duration limit for the conference, i.e. its duration is unlimited;

Web Administration Interface User Guide 48
• if conference_maxduration attribute value is equal to 0, that means that the conference will be stopped immediately after its start, the message “This conference has exceeded it's time limit. All calls will now end.” will be played;
• otherwise, if conference_maxduration attribute value is positive, this value defines the conference maximal duration in seconds and the following logic will be applied: o at conference_schedule_remind seconds before the conference ending
time of the conference with maximal duration defined and conference_schedule_extend_dtmf_binding attribute value not defined, the host receives announcement “This conference has <MMM> more minutes to complete.” (where <MMM> – minutes till the conference ending time);
o at conference_schedule_remind seconds before the conference ending time of the conference with maximal duration defined and conference_schedule_extend_dtmf_binding attribute value also defined, the host receives announcement “This conference has <MMM> more minutes to complete. Press <KEY> to request an extension.” (where <MMM> – minutes till the conference ending time, <KEY> – keys defined in conference_schedule_extend_dtmf_binding call flow attribute value that should be used on DTMF keypad by the host if he wishes to extend the conference duration); the host can extend the conference duration, the maximal extension time is defined in conference_schedule_extend attribute value;
o if hosts or callers in the roles defined in conference_schedule_extend_dtmf attribute press the keys defined by conference_schedule_extend_dtmf_binding attribute they hear the message “Please press 1 to extend conference duration for 5 minutes, press 2 for 10 minutes, press * to return to the conference.” and are able to extent the conference duration using these keys;
o after the conference duration has been extended the message “Your conference has been extended for <X> minutes.” will be played (where <X> – either 5 or 10 minutes);
o if the conference maximal extend time defined by conference_schedule_extend attribute is over the message “We are sorry. Your conference cannot be extended.” will be played;
o when the conference maximal duration time is over the message “This conference has exceeded it's time limit. All calls will now end.” will be played and all this conference calls will be dropped.

Web Administration Interface User Guide 49
Operator Conferences Operator conferences and call flows are designed to administrate the conferences and assist the users in case of any problems. In other words operator conferences can be used as quick technical support for users. The operator can monitor the conferences, connect to the different conferences, receive requests from the users, attach the users to the different conferences, dialout, etc. When operator connects to his OPERATOR conference he is being notified when new requests are assigned to his queue or he can initiate the conference surveillance and management. During the conference any call participants can request a call to an operator. To do that they should press *0 (default, can be overridden); after that the users will be asked to press: 1 – to speak to an operator; 2 – to post your request and return to your conference. If the user presses 1 button he will be prompted: “Please wait and you will connect to an operator”, after that he will be placed to the operator queue and will hear music-on-hold while he is waiting operator assistance – when the operator is available he starts private conversation with this user. If the user presses 2 button he will be returned to his conference and he will be able to continue the conversation in his conference while he is waiting operator assistance – when the operator is available he connects to this conference and starts talking to all this conference users. The web interface will show anyone who has requested to call to an operator with an icon in the Status column as shown on Figure 31.
Figure 31: Sample Conference Screen when OPERATOR conference is in progress Any time while the user is waiting the operator response he can press *0 again and he will be asked to press: 1 – to cancel the request; 2 – to return to the conference. In addition some call flows can provide that if the user is entering access code three times incorrectly this user is being placed to an operator queue automatically. The operator can assist to such user connect to the requested conference.
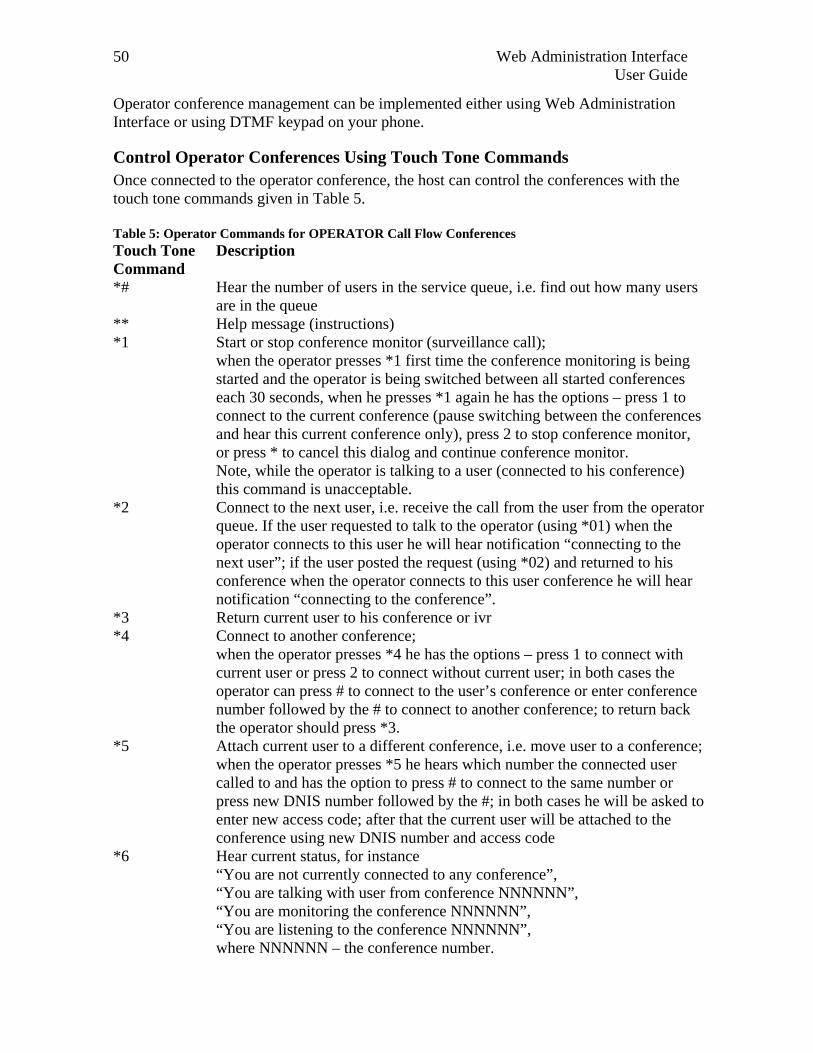
Web Administration Interface User Guide 50
Operator conference management can be implemented either using Web Administration Interface or using DTMF keypad on your phone.
Control Operator Conferences Using Touch Tone Commands Once connected to the operator conference, the host can control the conferences with the touch tone commands given in Table 5. Table 5: Operator Commands for OPERATOR Call Flow Conferences Touch Tone Command
Description
*# Hear the number of users in the service queue, i.e. find out how many users are in the queue
** Help message (instructions) *1 Start or stop conference monitor (surveillance call);
when the operator presses *1 first time the conference monitoring is being started and the operator is being switched between all started conferences each 30 seconds, when he presses *1 again he has the options – press 1 to connect to the current conference (pause switching between the conferences and hear this current conference only), press 2 to stop conference monitor, or press * to cancel this dialog and continue conference monitor. Note, while the operator is talking to a user (connected to his conference) this command is unacceptable.
*2 Connect to the next user, i.e. receive the call from the user from the operator queue. If the user requested to talk to the operator (using *01) when the operator connects to this user he will hear notification “connecting to the next user”; if the user posted the request (using *02) and returned to his conference when the operator connects to this user conference he will hear notification “connecting to the conference”.
*3 Return current user to his conference or ivr *4 Connect to another conference;
when the operator presses *4 he has the options – press 1 to connect with current user or press 2 to connect without current user; in both cases the operator can press # to connect to the user’s conference or enter conference number followed by the # to connect to another conference; to return back the operator should press *3.
*5 Attach current user to a different conference, i.e. move user to a conference; when the operator presses *5 he hears which number the connected user called to and has the option to press # to connect to the same number or press new DNIS number followed by the #; in both cases he will be asked to enter new access code; after that the current user will be attached to the conference using new DNIS number and access code
*6 Hear current status, for instance “You are not currently connected to any conference”, “You are talking with user from conference NNNNNN”, “You are monitoring the conference NNNNNN”, “You are listening to the conference NNNNNN”, where NNNNNN – the conference number.

Web Administration Interface User Guide 51
Touch Tone Command
Description
*7 Dialing out to another user *8 Record and play message to the operator queue or to the all calls on the
bridge; when the operator presses *8 and there is no previously recorded operator message he is being asked to leave his message after the tone and press # when it is done; after the message has been recorded (and # was pressed) this message will be played back to the operator and he will have the options either press 1 to send the recorded message to the users from his operator’s queue, or press 2 to send the recorded message to the all users on the bridge, or press * to cancel; the recorded message will be played to the users until the operator clears this message, i.e. stops playing this message; when the operator presses *8 and there is previously recorded operator message he is being asked to press 1 to clear the message or press 2 to listen to the message or press * to cancel; if the operator presses 1 the message will be cleared so no recorded message will be played to users
*9 Record and play message to the conference; when the operator presses *9 the following message is being played to the operator: “press # to connect to the user's conference, otherwise enter conference number followed by the #”; if the operator already connected to the conference or talking to the user from the conference, he can press # to leave his message to this conference, if he do not connected to the conference or if he wants to leave the message to another conference, he should enter the conference number and press # (otherwise he receives the message “you are not currently connected to any conference”); after the conference where to send operator message was established the operator is being asked to leave his message after the tone and press # when it is done; after the message has been recorded (and # was pressed) this message will be played back to the operator and he will have the options either press 1 to send the recorded message to the conference, or press * to cancel; the recorded message will be played to all participants and listeners from the selected conference
All these commands also can be implemented using Web Administration Interface as it is described in the next section of this guide.
Control Operator Conferences Using Web Administration Interface If the OPERATOR conference is in progress on the “Conferences” view there will be shown operator conference icon in the “Conference Number” column for the OPERATOR conference (see Figure 32).

Web Administration Interface User Guide 52
Figure 32: View Conference Information when OPERATOR conference is in progress Once you visited the OPERATOR conference, on other conferences screens (CONF or SPECTEL) the icon will be shown (see Figure 31); when this icon is pressed the operator will listen the selected conference. Moreover once you visited the OPERATOR conference the main menu will contain “Back to the Queue” link button; when you click on this button you will go to the last visited OPERATOR conference. If the user clicks on OPERATOR conference number this conference screen is different from other conferences screens (see Figure 33 and Figure 34). The operator conference screen will have additional controls that are specific for OPERATOR conferences only and allow managing OPERATOR conferences.
Figure 33: Viewing the Callers within an OPERATOR Conference, the user is in an operator queue

Web Administration Interface User Guide 53
Figure 34: Viewing the Callers within an OPERATOR Conference, the user is speaking with an operator OPERATOR conference screen instead of “Conference #” caption will have “Operator #” in the left upper corner of the screen. Operator can enter conference number he wishes to listen into “Start listen #:” textbox and press enter. If the operator is already listening any conference the caption of this textbox is “Listening #” and this textbox contains the number of the conference operator is listening at the moment; if operator presses icon right after the textbox with conference number, he will disconnect from this conference. This also is managed by “Connect to a conference” call flow attribute and default key for this action is *4. When the checkbox “Conference Scan:” is checked the operator will start surveillance of the active conferences, i.e. the operator will switch between the conferences and hear each conference 30 seconds. This mode is managed by “Start or stop surveillance call” call flow attribute and default key for this action is *1. The icon in the “Status” column means that the user is in the operator queue and waiting the operator response. When the operator is ready to process the users and there are any people in operator queue, they are shown in rose color (Figure 33). To take the next user from the queue the operator should press icon . This action also is managed by “Receive call” call flow attribute and default key for this action is *2. Note that the operator should complete the conversation with the current user before he takes the next user from the queue. If there are users in the operator queue who are waiting the operator response when this page is refreshed there will be ding signal played in the browser to inform you about non-empty operator queue (QuickTime plug-in may be required). The icon in the “Status” column indicates that the user is speaking to the operator. This line is shown in light green color (Figure 34). If the operator presses icon in “User Name” column the user will be disconnected and returned to his conference. The same can be managed by “Return current user to his conference or ivr” call flow attribute and default key for this action is *3.
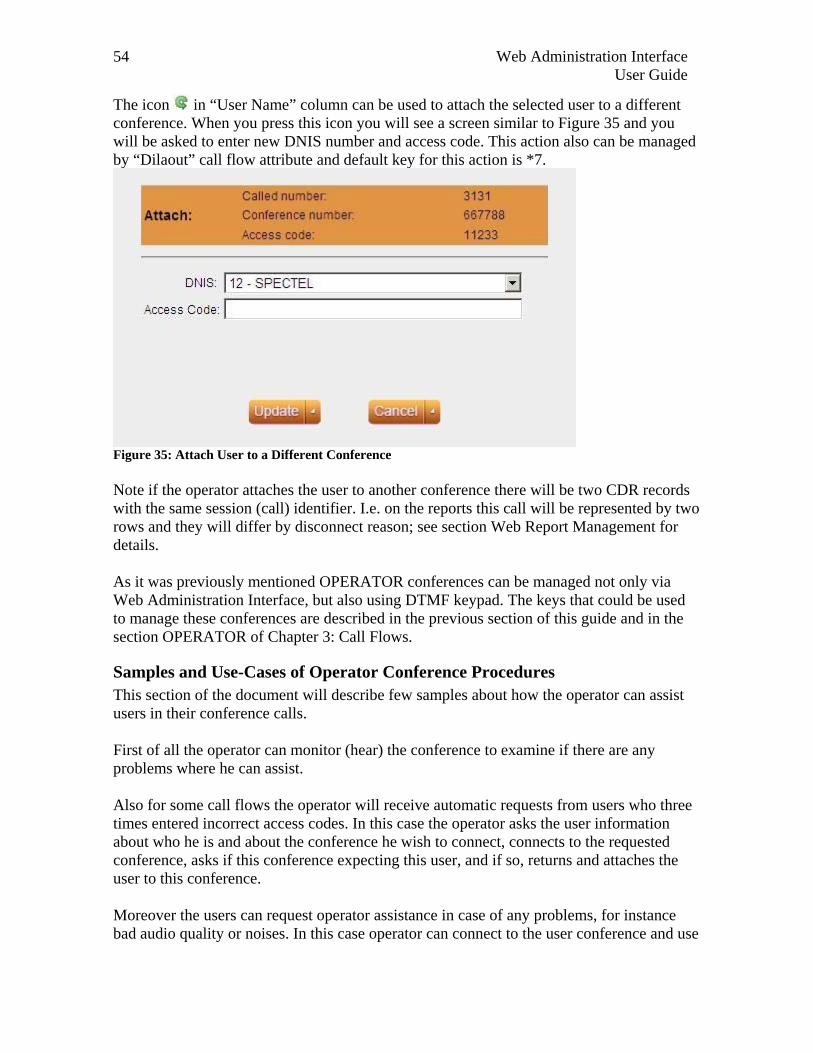
Web Administration Interface User Guide 54
The icon in “User Name” column can be used to attach the selected user to a different conference. When you press this icon you will see a screen similar to Figure 35 and you will be asked to enter new DNIS number and access code. This action also can be managed by “Dilaout” call flow attribute and default key for this action is *7.
Figure 35: Attach User to a Different Conference Note if the operator attaches the user to another conference there will be two CDR records with the same session (call) identifier. I.e. on the reports this call will be represented by two rows and they will differ by disconnect reason; see section Web Report Management for details. As it was previously mentioned OPERATOR conferences can be managed not only via Web Administration Interface, but also using DTMF keypad. The keys that could be used to manage these conferences are described in the previous section of this guide and in the section OPERATOR of Chapter 3: Call Flows.
Samples and Use-Cases of Operator Conference Procedures This section of the document will describe few samples about how the operator can assist users in their conference calls. First of all the operator can monitor (hear) the conference to examine if there are any problems where he can assist. Also for some call flows the operator will receive automatic requests from users who three times entered incorrect access codes. In this case the operator asks the user information about who he is and about the conference he wish to connect, connects to the requested conference, asks if this conference expecting this user, and if so, returns and attaches the user to this conference. Moreover the users can request operator assistance in case of any problems, for instance bad audio quality or noises. In this case operator can connect to the user conference and use

Web Administration Interface User Guide 55
Web Administration Interface – Active Speaker notification mode (see section Active Speaker Notification (ASN) mode) to examine where is the problem and after that inform the user about the reason of the problems. In addition the operator can dialout to another user and attach the user to the conference. If call flows do not allow making dialout within the conference the operator assistance is needed.

Web Administration Interface User Guide 56
Web Report Management One of the most powerful features of the WYDE series of conference bridges is the ability to get information and statistics from the bridges. This information comes mainly in the form of management reports. These reports are run from the web interface primarily. All of this information can be obtained by first logging in to the web interface, and clicking on the “Reports” menu. You should see a window similar to the one in Figure 36.
Figure 36: Main Reports Window In this screen, you can see the default report, the Calls Report (which we will discuss later in this chapter). Whenever you view the main reports window, you will see the date range for the report you are looking at. In Figure 36 it shows data for specific date range, all the calls listed fall within that date range. If you wish to change the date range, simply click on either the “From” date or the “To” date and it will bring up a small calendar which you can use to select a new date (Figure 37).
Figure 37: Calendar to Select either the “From” Date or the “To” Date On the right hand side of the screen, you will see the statistics for this report, including number of calls, and total minutes for all calls. You will also see the navigation bar that will

Web Administration Interface User Guide 57
allow you to navigate between the pages of the report if there is more than one page of call data. You will also notice a box above each column in the report. These are filter boxes. They are used to filter the report by some data (especially useful if there is too much data to be useful and you need to filter it by some criteria, like time or called user). To filter, type the selection criteria in the box above the column you want to filter by and press enter. The report will be refreshed and only the records matching the criteria will be displayed. There are seven reports that come standard with each WYDE conferencing appliances. They are: • The Calls Report – Shows all inbound and outbound calls processed by the system
during the specified date range. The columns shown on the Calls Report see in Table 6. The Calls Report sample is shown on Figure 38.
Table 6: Calls Report Columns
Column Description Call Created Date and time when the conference was created Conference Number The unique number assigned to each conference Conference Id The internal unique conference ID Access code The conference account access code that was entered Subscriber Name The fist and last name of the subscriber Custom Name The caller custom name if this name was entered in the Web
Interface Called number The called number, i.e. the number to which called the callerCalling number The incoming calling number, i.e. the number from which
called the caller Call duration Indicates duration of the call In conference Indicates how long the call has been active in the conferenceDisconnect info - Time The date and time when the call was disconnected Disconnect info - Reason The reason of disconnection, for instance Normal, Dropped
by host, Incorrect access code, Moved to other conference. NOANSWER, CONGESTION, etc.
Disconnect info - Initiator Who initiated the disconnection; possible values: BRIDGE and USER
• The Conferences Report – Shows all conferences that have taken place during the
specified date range. The columns shown on the Conferences Report see in Table 7. The Conferences Report sample is shown on Figure 39.
Table 7: Conferences Report Columns
Column Description Conference Number The unique number assigned to each conference Conference Number – “Show subscribers” button – when clicked, brings up a list
of all subscribers in the specified conference

Web Administration Interface User Guide 58
Column Description Conference Number – “See the Gantt chart” button – when clicked, brings up the
Gantt chart for the specified conference (the sample screen is shown on Figure 40). If the participants count exceeds 300 the Gantt chart will not be built.
Conference Number – “See polling results” button – when clicked, brings up the polling results chart for the specified conference (the sample screen is shown on Figure 29). If there were not the polling sessions for the conference the message “No charts available for this conference.” will be shown.
Recording - “File manager” button – when clicked, brings up a File Manager for the specified conference (the sample screen is shown on Figure 41). File Manager always shows all recording files that belong to the selected conference number, the files shown in red color belong to recording of the selected conference ID (i.e. the specific conference that occurred in the system), the files shown in black color belong to the same conference number, but to another conference ID; the names of the files are conference ID; the extension “asn” means active speaker file, the extension “ul” means audio file
Recording - “Play recording” button – when clicked, starts the conference playback
Recording - “Stop recording” button – when clicked, starts the conference playback
Recording - Indicates the conference playback is not available in spite of the conference was recorded (for instance the recording file was deleted or the recording file was not saved because of any internal error)
Recording - “Save recoding” button – when clicked, allows saving the conference playback file (for instance *.wav file)
Recording - Duration of the conference call Conference Id The internal unique conference ID, the conference ID on
this report is unique Created Date and time when the conference was started Ended Date and time when the conference was ended Duration Indicates how long the call has been active since the joining
of the conference Number of Calls Indicates how many calls were made to this conference via
the specified conference account • The DNIS Report – Shows the usage of each DNIS and how many calls processed on
each DNIS (including outbound calls). The columns shown on the DNIS Report see in Table 8. The DNIS Report sample is shown on Figure 42.

Web Administration Interface User Guide 59
Table 8: DNIS Report Columns Column Description DNIS The DNIS Association – the combination of the call flow
and the actual inbound DNIS number Number of Calls Number of calls to DNIS in the selected period Total Duration Total duration of all calls to DNIS in the selected period Average Duration Average call duration, i.e. Total Duration divided by
Number of Calls • The Load Chart – Shows call traffic statistics by time of day during the specified date
range. The Load Chart sample is shown on Figure 43. • The Show SW Report – Shows DSP-specific information for the specified date range.
The Show SW Report sample is shown on Figure 44. • The Show Stat Report – Shows DNCA statistic information. The Show Stat Report
sample is shown on Figure 45. • The Show Boards Report – Shows installed boards and their specific information. The
Show Boards Report sample is shown on Figure 46.
Running a report To run a report, log into the web interface and click on the “Reports” menu. Then, use the following procedure: 1. Enter dates for the date range you wish to view information for by clicking on the dates
next to “From:” and “To:” for the start date and end date, respectively. 2. Select the report you wish to view from the drop down list 3. Click the “Create” button to run the report 4. The report information will be displayed on the screen. You can change it on the fly by
changing any of the parameters you wish to change and clicking the “Create” button again.
Report Screenshots For reference, this section will show figures with samples of the stock reports contained in the standard WYDE installation.
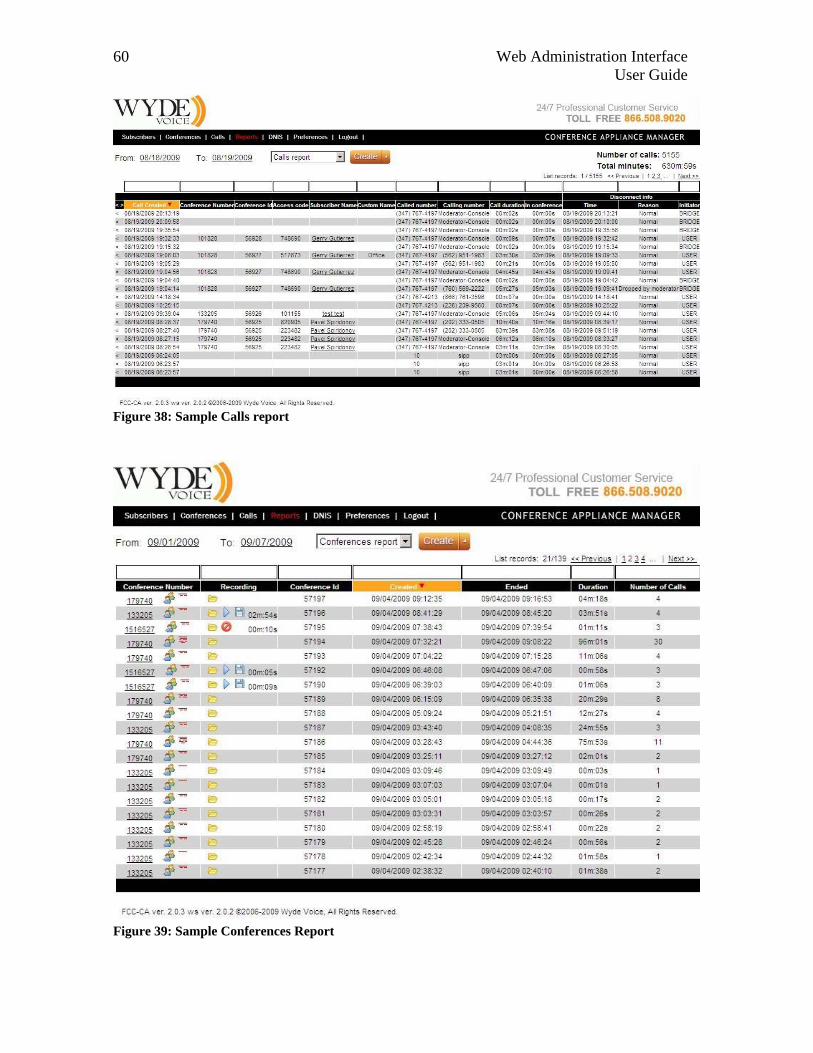
Web Administration Interface User Guide 60
Figure 38: Sample Calls report
Figure 39: Sample Conferences Report

Web Administration Interface User Guide 61
Figure 40: Sample Gantt Chart for the Conference
Figure 41: Sample File Manager for the Conference
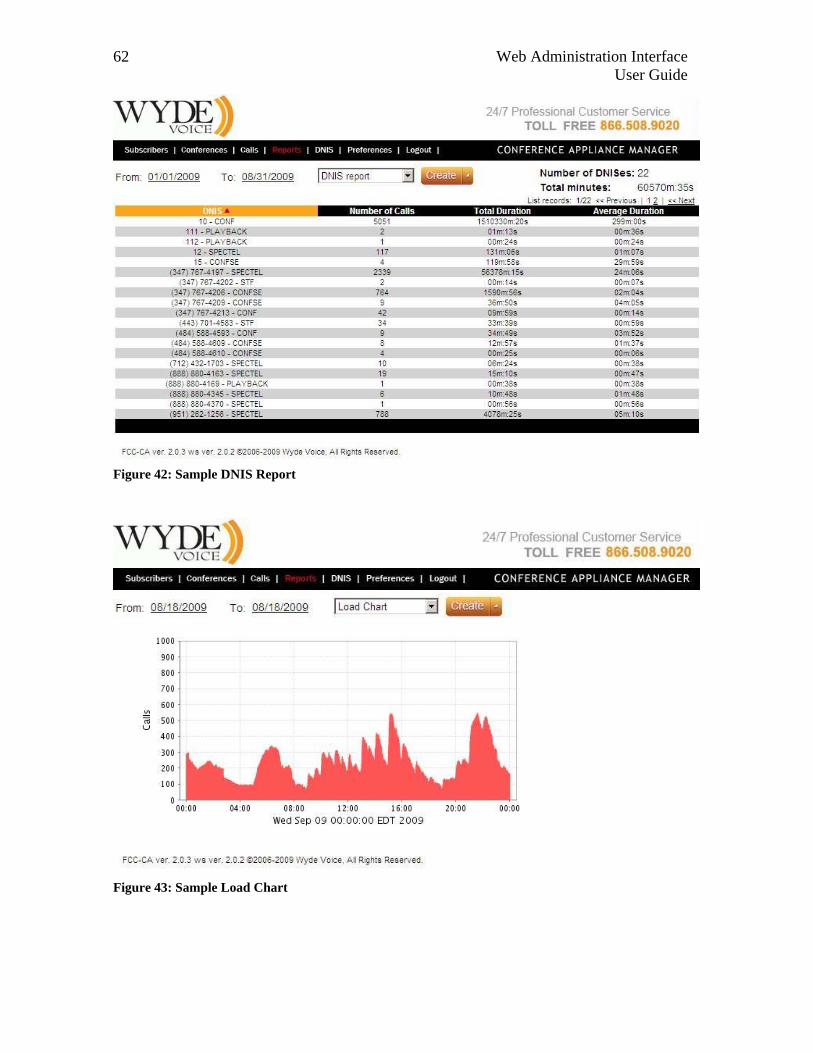
Web Administration Interface User Guide 62
Figure 42: Sample DNIS Report
Figure 43: Sample Load Chart
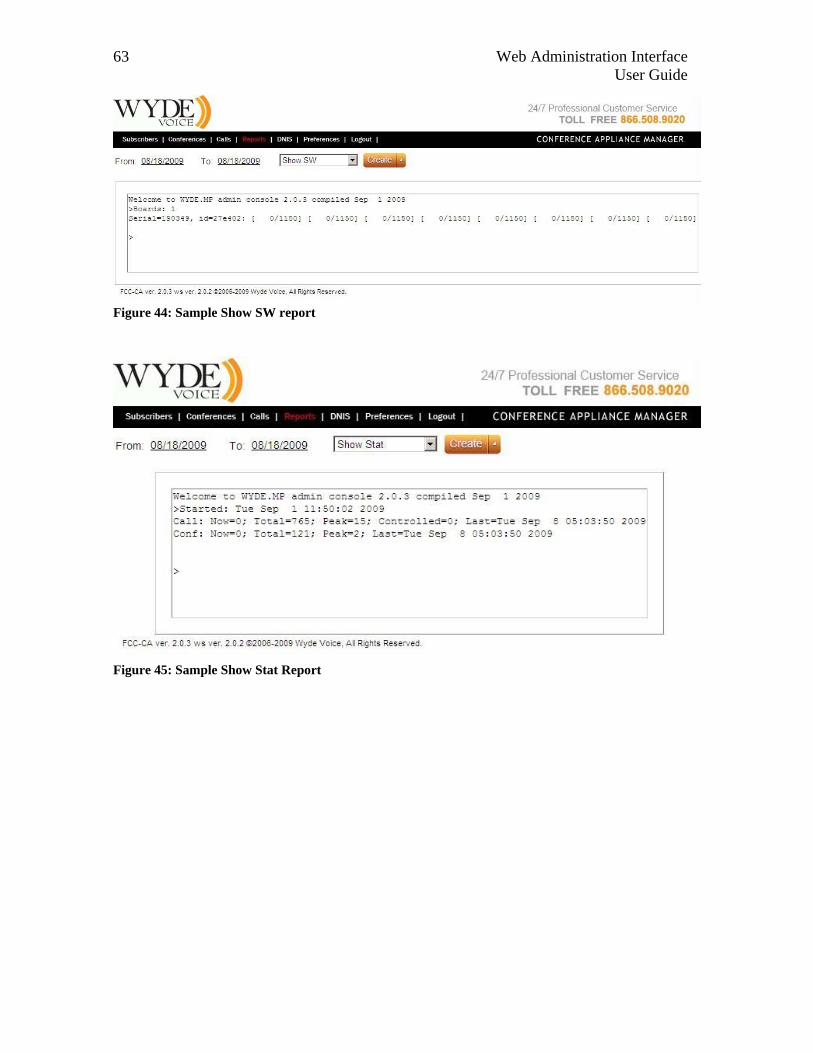
Web Administration Interface User Guide 63
Figure 44: Sample Show SW report
Figure 45: Sample Show Stat Report

Web Administration Interface User Guide 64
Figure 46: Sample Show Boards Report

Web Administration Interface User Guide 65
DNIS Management A DNIS is the unique set of numbers that is outpulsed by a phone carrier that indicates the intended destination for a particular call. It can be any length digits (although usually less than 10 digits). DNIS should be registered in the system, it is the property of the conference account, but different called numbers can be used to connect to the same conference. As DNIS number you can also use the mask of the number, in such mask '*’ – denotes any sequence of digits and ‘?’ – denotes one single digit; in this case for such DNISes the bridge will process all numbers that comply with the DNIS number mask. Moreover you can define aliases of the DNIS number, i.e. alternative conference called numbers that will be processed by the bridge the same way as the base DNIS number is being processed. For the purposes of our discussion, a DNIS Association is a combination of a call flow and an actual inbound DNIS number. Chapter 3: Call Flows will be described in the next chapter of this guide.
View Existing DNIS Associations As with other administration tasks, you can view existing DNIS associations using the web interface. To view the existing DNIS associations, log in to the web interface, and from the main window of the web administration interface, click on “DNIS”. You will see a screen similar to Figure 47. Notice from this screen you can also see the call flows that are configured on this system. There are three columns of information for DNISes section of the screen: • DNIS – The actual inbound DNIS number or mask of number • Call Flow Name – The name of the call flow used • Description – A description of this DNIS Association There are two columns of information for Call Flows section of the screen: • Call Flow Name – The name of the call flow used • Directory Path – The path to call flow scripts and prompts

Web Administration Interface User Guide 66
Figure 47: Viewing Existing DNIS Associations and Call Flows
Create a DNIS Association You can create DNIS association using the web interface. To create a new DNIS association, simply log in to the web interface and use the following procedure: 1. From the web interface main screen, click “DNIS”. This will bring up the screen
previously shown in Figure 47. 2. Click the “Create” button. You will then see a screen similar to the one shown in Figure
48.

Web Administration Interface User Guide 67
Figure 48: Creating a New DNIS Association 3. In the field labeled “DNIS” type in the inbound DNIS number you want to be
associated with this DNIS Association. 4. From the drop down list labeled “Call Flow Name”, select the call flow to be used with
this DNIS Association (CONF in this sample). 5. In the field labeled “Description”, type a description for this DNIS Association. 6. Click the “Create” button to finalize creation. The new DNIS will be created and take
on the default call flow attributes of the call flow you assigned. It should be noted that you should accept the default attributes of the call flows that area assigned.
Changing any of the default attributes, unless instructed to do so by WYDE technical support, can render your system inoperable.
Modify an Existing DNIS Association’s Attributes You can change the DNIS number, Call Flow, and Description of any of the DNIS associations using the web interface. To modify an existing DNIS Association’s attributes using the web interface, log in to the web interface and use the following procedure: 1. Click on any underlined DNIS number. A screen like the one shown in Figure 49 will
appear.

Web Administration Interface User Guide 68
Figure 49: Modify an Existing DNIS Association 2. From this screen, you can click in either the “DNIS” or “Description” fields and change
the text or select a new Call Flow Name from the “Call Flow Name” drop down list. 3. In addition you can override any of default call flow parameters. If you would like to
change any of the parameter, the Overridden checkbox should be checked – otherwise the value you entered will not be saved. The list of available parameters depends on selected call flow name. The detail description and possible values of each call workflow parameter will be given later in this document in the Chapter 3: Call Flows.
4. Moreover you can add/update/delete aliases for the DNIS. To do so you should click on the aliases link or on [_] link if no aliases defined yet. See Figure 50 for details.
Figure 50: DNIS Aliases Management

Web Administration Interface User Guide 69
5. Once you have made all your changes, click the “Update” button to accept the changes.
Remove a DNIS Association There will come a time when a DNIS number is no longer in use and should be removed from the system to avoid confusion with active DNIS Associations. To remove a DNIS association using the web interface, log in to the web interface, click on the DNIS menu, and use the following procedure: 1. Click the button next to the DNIS association you want to delete. 2. The interface will ask you “Are you sure you want to delete this DNIS? All registered
conferences on this number will be deleted?” as shown on Figure 51.
Figure 51: DNIS Association Deletion Confirmation Dialog 3. Click “OK” to delete the DNIS Association.

Web Administration Interface User Guide 70
System Management In addition to the daily call administration, you will have to administer the system itself. These system management tasks could be the following: • Change Initial IP Address • Change System Name • Install WYDE Software • Starting and Stopping the WYDE services • Managing DSP Cards using Prosody IP Manager
Change System Preferences To change system preferences you should logon into system and click on “Preferences”. You will see the screen similar to shown on Figure 52.
Figure 52: Changing System Preferences As you can see you can change the following parameters from this screen: • Maximum number of simultaneous calls – This parameter controls how many calls
should be allowed on the system at the same time. This number should be less than the number of supported callers and allows the administrator to limit further the number of callers on the system for performance tuning.
• Name of Bridge – This parameter defines the system’s name of the bridge. • Rows count on the list forms – This parameter controls how many rows there are on
each page that lists something in the web interface. The default is 20. You can change it to 5, 10, 20, 50, or 100 by selecting the proper number from the drop down list.

Web Administration Interface User Guide 71
• Allow Subscribers to modify access codes and create subordinate subscribers – This parameter controls permissions of non-operator (non-admin) subscribers. When this checkbox is unchecked, non-operators cannot create new subscribers and cannot create/modify subscriber conference accounts.
Click the “Update” button to make the changes permanent.

Web Administration Interface User Guide 72
Chapter 3: Call Flows One piece of terminology unique to conference call setup is the idea of a call flow. In other words, the call flow is unique conference call setup, the logic that is used to process the calls; this is the process a call goes through from call setup to, to processing, to call tear down. It includes the logic, DTMF key-presses used, functions, and the recorded prompts. The various system settings and usage parameters are different depending on the call flow used. The following basic call flows are available in the system: • CONF • OPERATOR • PLAYBACK • SPECTEL One of the benefits of the WYDE architecture is the ability to build a complete custom call flow for your organization. So additional custom call flows could be created as customization of the existing call flows. For more information on a custom call flow, please contact your WYDE representative. Using Web Administration Interface you will be able to change parameters of the call flows, as it will be described later in this chapter. To do so you should login into the system, go to “DNIS” menu, and then click on desired call flow name. For all call flow the attributes call flow name and directory path will be read-only and you will be unable to change them. But you will be able to change specific call, conference, dnis, and recording attributes. The name of the attributes is started from “call_”, “conference_”, “dnis_”, “operator_”, and “recording_” representing what is the scope of this attribute. The Call Flow attributes shown on call flow screen are default call attributes. They can be overridden on DNIS configuration level and also can be overridden in the conferences setup for subscribers. In other words the hierarchy of the attributes is the following Call Flows DNIS Associations Subscriber Conferences. The role of an attribute can be either “Conference” or “DNIS”. When the attribute role is “DNIS”, the attribute can be overridden in DNIS Associations only. When the attribute role is “Conference”, the attribute can be overridden either in DNIS Associations or in Subscriber Conferences. Available attributes are specific for each call flows, but some of them are general and exist in different call flows. The set of available attributes will be described for each call flows. Any possible user command usually is represented by pair of call flow attributes – the policy attribute and the DTMF binding attribute. When the attribute defines policy of any option that means the person to whom this option should be available. There could one of the 3 possible policies: “hpl” (the option is available for hosts (h), participants (p), and listeners (l) of the conference), “hp” (the option

Web Administration Interface User Guide 73
is available for hosts (h) and participants (p) of the conference), and “h” (the option is available for conference hosts (h) only). The name of such attribute usually is defined as <scope>_<command>_dtmf, for example call_mute_dtmf attribute describes the policy of who can mute himself (his call) in the conference and “hp” value means that hosts and participants can mute their calls or conference_mute_dtmf attribute describes the policy of who can mute the entire conference and “h” value means that only the hosts can mute the conference. When the attribute defines binding that means the special functions – the keys (assigned access codes) that should be pressed on telephone keypad to facilitate the call, change any modes of the call, etc. The name of such attribute usually defined as <scope>_<command>_dtmf_binding, for example call_mute_dtmf_binding attribute describes the keys (default: *6) that should be pressed on your telephone to mute yourself or conference_mute_dtmf_binding attribute describes the keys (default: *5) that should be pressed on your telephone to mute the entire conference. Note that policy attributes usually have “Conference” role, i.e. they can be overridden either in DNIS Associations or in Subscriber Conferences; binding attributes usually have “DNIS” role, i.e. they can be overridden in DNIS Associations only. Call flow attributes also can define parameters of the calls and conferences, for instance maximum values, switching on or off any calls or conference modes, etc. If the attribute defines maximum value, for instance, Maximal calls duration (call_maxduration), Max number of calls per conference (conference_maxcalls), Maximal conference duration (conference_maxduration), Maximal number of calls per DNIS (dnis_maxcalls), etc. the value “-1” means that there is no limit used for this parameter.
Changing any of the call flow attributes, unless instructed to do so by WYDE technical support, can render your system inoperable.
If you would like to edit call flow attributes you should open DNIS section of the portal by clicking the “DNIS” menu and then click on desired call flow name in lower section (Call Flows) of the screen to edit the call flow attributes. The screen should look similar to Figure 53 (the screen sample is given for CONF call flow attributes).

Web Administration Interface User Guide 74
Figure 53: Modifying CONF Call Flow Attributes
Call Flow Attributes As it was previously told available attributes are specific for each call flows, but some of them are general and exist in different call flows. Possible call flow attributes are listed in Table 9.

Web Administration Interface User Guide 75
Table 9: Call Flow Attributes Call Flows Roles1Attribute Description
(Attribute Name)
CO
NF
OPE
RA
TO
R
PLA
YB
AC
K
SPE
CT
EL
Notes
call
Announce participant count on enter (call_announceparticipantcount)
C – – C Denotes to which users (h/p/l2) will played the current number of participants when he connected to the conference
Connect to a conference DTMF policy (call_connect2conf_dtmf)
– C – – Denotes who (usually – host) can connect to another conference using OPERATOR call flow
Connect to a conference DTMF binding (call_connect2conf_dtmf_binding)
– C – – Denotes what keys should be used to connect to another conference (default: *4); when these keys are pressed the system starts the dialog to select to which conference it is necessary to connect and who (host operator and/or currently connected user) should be connected to this conference
Delay before answer (call_delay)
D D D D The delay in seconds between invitation from the user and the playing of the welcome prompt message (default: 2 seconds)
Return current user to his conference or ivr DTMF policy (call_dropuser_dtmf)
– C – – Denotes who (usually – host) can drop the user from OPERATOR conference and return him to his original conference
Return current user to his conference or ivr DTMF binding (call_dropuser_dtmf_binding)
– C – – Denotes what keys should be used to drop the user from OPERATOR conference and return him to his original conference (default: *3)
Exit DTMF policy (call_exit_dtmf)
C – – C Denotes who (h/p/l) can exit from the conference
Exit DTMF binding (call_exit_dtmf_binding)
D – – D Denotes what keys should be used to exit from the conference (default: *3)
Gain control decreasing policy (call_gaindec_dtmf)
C – – C Denotes who (h/p/l) can decrease the microphone volume level of the call (gain control option)
Gain control decreasing binding (call_gaindec_dtmf_binding)
D – – D Denotes what keys should be used to decrease the microphone volume level of the call
Gain control increasing policy (call_gaininc_dtmf)
C – – C Denotes who (h/p/l) can increase the microphone volume level of the call (gain control option)
Gain control increasing binding (call_gaininc_dtmf_binding)
D – – D Denotes what keys should be used to increase the microphone volume level of the call
Find out how many users are in the queue DTMF policy (call_find_dtmf)
– C – – Denotes who (usually – host) can request telling how many users are in the OPERATOR queue line
Find out how many users are in the queue DTMF binding (call_find_dtmf_binding)
– C – – Denotes what keys should be used to play how many users in the OPERATOR queue line (default: *#)
Instructions DTMF policy call_instructions_dtmf
C C – C Denotes who (h/p/l) can play the instructions (i.e. help message) about available commands
Instructions DTMF binding (call_instructions_dtmf_binding)
D C – D Denotes what keys should be used to play instructions about the keys and their purposes (default: **)
Enter job code when joins the conference (call_jobcodeonenter)
C – – C Denotes to whom (usually – host) the system should ask to enter numeric job code; the job code is being asked after entering access code; this job code is being saved in the database and it could be used for different purposes, such as reporting, etc.
Maximal calls duration (call_maxduration)
D – D D Denotes maximum call duration, default value: -1 – that means unlimited call duration
Move user to a conference DTMF policy (call_move2conf_dtmf)
– C – – Denotes who (usually – host) can move the user from the OPERATOR conference to another conference
1 “C” – conference, “D” – DNIS, “–” – not used in the call flow 2 “h” – hosts, “p” – participants, “l” – listeners
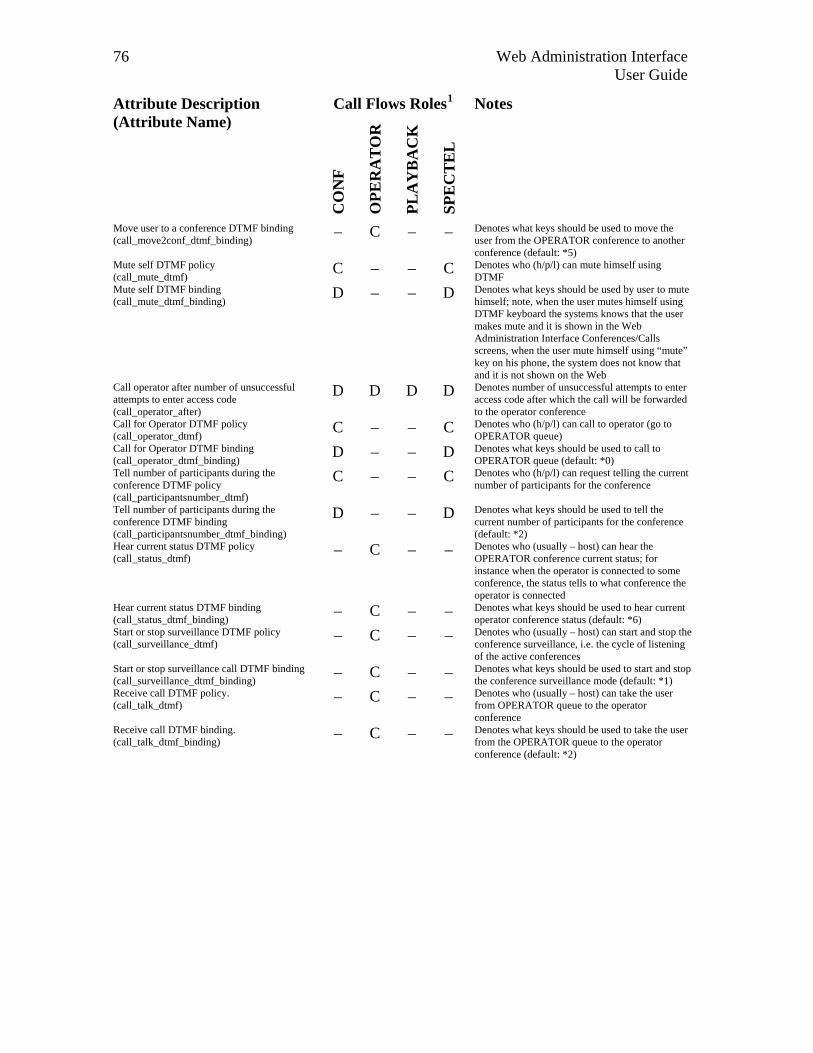
Web Administration Interface User Guide 76
Call Flows Roles1Attribute Description (Attribute Name)
Notes
CO
NF
OPE
RA
TO
R
PLA
YB
AC
K
SPE
CT
EL
Move user to a conference DTMF binding (call_move2conf_dtmf_binding)
– C – – Denotes what keys should be used to move the user from the OPERATOR conference to another conference (default: *5)
Mute self DTMF policy (call_mute_dtmf)
C – – C Denotes who (h/p/l) can mute himself using DTMF
Mute self DTMF binding (call_mute_dtmf_binding)
D – – D Denotes what keys should be used by user to mute himself; note, when the user mutes himself using DTMF keyboard the systems knows that the user makes mute and it is shown in the Web Administration Interface Conferences/Calls screens, when the user mute himself using “mute” key on his phone, the system does not know that and it is not shown on the Web
Call operator after number of unsuccessful attempts to enter access code (call_operator_after)
D D D D Denotes number of unsuccessful attempts to enter access code after which the call will be forwarded to the operator conference
Call for Operator DTMF policy (call_operator_dtmf)
C – – C Denotes who (h/p/l) can call to operator (go to OPERATOR queue)
Call for Operator DTMF binding (call_operator_dtmf_binding)
D – – D Denotes what keys should be used to call to OPERATOR queue (default: *0)
Tell number of participants during the conference DTMF policy (call_participantsnumber_dtmf)
C – – C Denotes who (h/p/l) can request telling the current number of participants for the conference
Tell number of participants during the conference DTMF binding (call_participantsnumber_dtmf_binding)
D – – D Denotes what keys should be used to tell the current number of participants for the conference (default: *2)
Hear current status DTMF policy (call_status_dtmf)
– C – – Denotes who (usually – host) can hear the OPERATOR conference current status; for instance when the operator is connected to some conference, the status tells to what conference the operator is connected
Hear current status DTMF binding (call_status_dtmf_binding)
– C – – Denotes what keys should be used to hear current operator conference status (default: *6)
Start or stop surveillance DTMF policy (call_surveillance_dtmf)
– C – – Denotes who (usually – host) can start and stop the conference surveillance, i.e. the cycle of listening of the active conferences
Start or stop surveillance call DTMF binding (call_surveillance_dtmf_binding)
– C – – Denotes what keys should be used to start and stop the conference surveillance mode (default: *1)
Receive call DTMF policy. (call_talk_dtmf)
– C – – Denotes who (usually – host) can take the user from OPERATOR queue to the operator conference
Receive call DTMF binding. (call_talk_dtmf_binding)
– C – – Denotes what keys should be used to take the user from the OPERATOR queue to the operator conference (default: *2)

Web Administration Interface User Guide 77
Call Flows Roles1Attribute Description (Attribute Name)
Notes
CO
NF
OPE
RA
TO
R
PLA
YB
AC
K
SPE
CT
EL
conference
Application specific data (conference_appspecific)
C – – C Denotes data that could be used by external custom application
Callers database (conference_callerdb)
– C – C Denotes should be or should not be saved in the database the custom name from the web; it is dropdown with two possible values on and off (default: off); if the parameter switched on the custom name will be saved and the next time when the same user (the user with the same calling number and access code) will be connected, this custom name will be shown
Dilaout DTMF policy (conference_dialout_dtmf)
– C – C Denotes who (h/p/l) can make a call to another user to connect him to the conference
Dilaout DTMF binding (conference_dialout_dtmf_binding)
– D – D Denotes what keys should be used to dialout to another user to connect him to the conference
Mask dids for operator (conference_dids_mask)
– C – – Denotes the mask of DNIS numbers that may be serviced (default: * – all DNIS numbers); note: DNIS and DIDS are synonyms here
Distributed conferencing (conference_distributed)
C – – C Denotes should or should not the conferences between different bridges (i.e. distributed conferences) be allowed; it is dropdown with two possible values on and off (default: off)
Entry and exit tones DTMF policy (conference_entryexittones_dtmf)
C – – C Denotes who (usually – host) can manage entry and exit tones of the conference
Entry and exit tones DTMF binding (conference_entryexittones_dtmf_binding)
D – – D Denotes what keys should be used to manage the entry and exit tones of the conference (default: *8)
Entry tones (conference_entrytones)
C – – C Denotes should or should not be played entry tones (beep sound) when the user enters to the conference; it is dropdown with two possible values on and off (default: on)
Exit tones (conference_exittones)
C – – C Denotes should or should not be played exit tones (beep sound) when the user exits from the conference; it is dropdown with two possible values on and off (default: on)
Conference extended menu DTMF policy (conference_extended_dtmf)
C – – C Denotes who (host, participant, listener) can use extended menu for the conference.

Web Administration Interface User Guide 78
Call Flows Roles1Attribute Description (Attribute Name)
Notes
CO
NF
OPE
RA
TO
R
PLA
YB
AC
K
SPE
CT
EL
Conference extended menu DTMF binding (conference_extended_dtmf_binding)
D – – D Denotes what keys should be used to enter into extended menu (default: #); extended menu entries: • #0<n> CS – switch music-on-hold prompts,
where <n> is sequential number of the prompt file from 1 till 99 or 0 is default music on hold prompt (see Placing Call Participants on Hold and Placing a Conference on Hold)#0;
• #1, #2, #3, #4 S – enter to the sub-conference; • #5 S – start/stop polling (available for hosts
only regardless of the policy attribute value); • #6 S – vote (when the polling is in progress); • #7 and #8 S – calls respectively first and
second external VoIP application defined in conference_extra attribute;
• #8<n> C – switch dialog language, where <n> is sequential number of the languages defined in dnis_language_all attribute from 1 till 99 or 0 for EN (English)#8;
• #9 CS – enter audio key (the audio key is used to group the calls (for instance it is used to group different types of calls); the user is pressing #9audio key#, this info is stored in the database; the calls with the same audio key are being grouped together into the bundle, and grouped commands can be performed for such groups using Real Time interface.
Extra services URIs (conference_extra)
– – – C Denotes URI to external VoIP application that could be used as the conference plug-in; there could be multiple comma-separated URIs defined in this argument
CS extended menu entry is available in CONF and SPECTEL call flows. #0 the music-on-hold files are being searched in folders $varlib_dir/recordings/<conf_number>/moh (files uploaded by subscriber via web interface) and $varlib_dir/sounds/moh (pre-recorded files or files defined by administrator) sorted by the folder and the file name; if <n> grater than number of available music-on-hold files the error message “your input is invalid” will be played. After #0 keys pressed the system expects two-digit sequential number during two seconds; if the desired music-on-hold prompt is single-digit (for example 2nd file), you can either select it as #002, or enter it followed by #: #02#, or enter #02 and wait 2 seconds. #0# switches to the next music-on-hold prompt. S extended menu entry is available in SPECTEL call flow only. C extended menu entry is available in CONF call flow only. #8 if <n> grater than number of available languages the error message “your input is invalid” will be played; if <n> language defined in the list of available languages, but does not installed on the bridge – EN (English) will be used; if <n> language is valid and successfully switched the message “thank you” will be played in the selected language. After #8 keys pressed the system expects two-digit language number during two seconds; if the desired language is single-digit (for example 5th language), you can either select it as #805, or enter it followed by #: #85#, or enter #85 and wait 2 seconds.

Web Administration Interface User Guide 79
Call Flows Roles1Attribute Description (Attribute Name)
Notes
CO
NF
OPE
RA
TO
R
PLA
YB
AC
K
SPE
CT
EL
Hold policy for participant (conference_hold_participant)
– – – C Denotes should participants or should not hear each other (be on hold) when there are no hosts in the conference (only participants connected to the conference); when the attribute is set to true all participants will be on hold (will not hear each other) when there are no hosts in the conference, when the attribute is set to false all participants will hear each other even if there are no hosts in the conference; it is dropdown with two possible values true and false (default: false)
Enter job code DTMF policy (conference_jobcode_dtmf)
C C – C Denotes who (usually – host) can change the job code that was entered when the call was started; see call_jobcodeonenter
Enter job code DTMF binding (conference_jobcode_dtmf_binding)
D D – D Denotes what keys should be used to change job code
Language (conference_language)
C C C C Denotes the dialog language (default)
Lock conference DTMF policy (conference_lock_dtmf)
C – – C Denotes who (h/p/l) can place the entire conference in the secure mode (see section: Making a Conference Secure)
Lock conference DTMF binding conference_lock_dtmf_binding
D – – D Denotes what keys should be used to place the conference in the secure mode (default: *7)
Max number of calls per conference (conference_maxcalls)
C – – C Denotes maximum number of calls per conference, default value: -1 – that means unlimited number of calls
Maximal conference duration conference_maxduration
D – – D Denotes maximum conference duration, default value: -1 – that means unlimited conference duration
Music on hold (conference_moh)
C C – C Denotes music on hold file name, i.e. the name of the file that is being played when the conference is on hold (default – means default on hold message). See “Command Line Administration Interface – User Guide”, section “Audio Prompts Management” for information how to use own audio files in music on hold prompts
Music on hold options (conference_moh_options)
C C – C Denotes music on hold options; the following attribute formats are valid: • if empty – play the file defined in
conference_moh attribute as music on hold;
• AC:<period> – play the file as music on hold and in the given period pronounce the access code that was entered;
• ADV:<period>:<keys> – denotes that advertising messages should be played in the given period, dnis_aduri call flow attribute also should be set, <keys> – is the list of advertising keys separated with ampersand (&) that should be used to play the messages (i.e. key1[&key2[&key3]])
Mute mode DTMF policy (conference_mute_dtmf)
C – – C Denotes who (h/p/l) can mute the conference (see section: Conference Mute and Q&A Modes); note that depending on the conference mode the participants can or can not un-mute their self
Mute mode DTMF binding conference_mute_dtmf_binding
D – – D Denotes what keys should be used to mute the conference (default: *5)

Web Administration Interface User Guide 80
Call Flows Roles1Attribute Description (Attribute Name)
Notes
CO
NF
OPE
RA
TO
R
PLA
YB
AC
K
SPE
CT
EL
Mute policy for listener (conference_mute_listener)
– – – C Denotes can or can not the listeners un-mute their self; it is dropdown with three possible values: open (un-muted), relaxed, (muted, but can un-mute their self, strict (can not be un-muted) (default: strict)
Get participants count and detailed participants info DTMF policy (conference_participantsinfo_dtmf)
C – – C Denotes who (h/p/l) can play participants count and detailed participants info into the conference
Get participants count and detailed participants info DTMF binding (conference_participantsinfo_dtmf_binding)
D – – D Denotes what keys should be used to get participants count and detailed participants info
Q&A session DTMF policy (conference_qa_dtmf)
C – – C Denotes who (h/p/l) can place the entire conference in the Q&A (question) session mode (see section: Conference Mute and Q&A Modes)
Q&A session DTMF binding conference_qa_dtmf_binding
D – – D Denotes what keys should be used to place the conference in Q&A mode (default: *3)
Realtime protocol (conference_realtime)
C C – C Denotes should or should not the realtime protocol be switched for the conference; it is dropdown with two possible values on and off (default: on)
Conference roll call default (conference_rollcall)
C – – C Denotes should or should not the system ask the user to introduce himself when he joined to the conference; it is dropdown with two possible values on and off (default: off)
Entry name (conference_rollcall_onenter)
C – – C Denotes should or should not the system pronounce the name of the user who has entered to the conference; it is dropdown with two possible values on and off (default: off)
Exit name (conference_rollcall_onexit)
C – – C Denotes should or should not the system pronounce the name of the user who has exited from the conference; it is dropdown with two possible values on and off (default: off)
Conference schedule (conference_schedule)
– – – C Contains the information describing when the conference is scheduled (date, time, DOW) and how many participants allowed for this conference (see section: Scheduling for details)
Schedule conference extend maximal time in seconds (conference_schedule_extend)
– – – D Denotes to what maximal time in seconds the duration of the scheduled conference can be extended
Schedule conference extend DTMF policy (conference_schedule_extend_dtmf)
– – – C Denotes who (h/p/l) can extend duration of the scheduled conference
Schedule conference extend DTMF binding (conference_schedule_extend_dtmf_binding)
– – – D Denotes what keys should be used to extend duration of the scheduled conference
Wait before scheduled conference begin (conference_schedule_hold)
– – – D Denotes wait time in seconds before the scheduled conference begins the participants can join; if the participant connects prior to this time his call will be dropped, if he connects after this time but prior the conference begin time music-on-hold will be played to him until the conference starts
Schedule conference end remind time in seconds (conference_schedule_remind)
– – – D Denotes remind time in seconds before the scheduled conference ends when the reminder (warning) message should be played to the host
Conference scheduled (conference_scheduled)
– – – D Denotes if the conference is scheduled or not; it is dropdown with two possible values: on and off (default: off)
How conference begins (conference_start_how)
– – – C Denotes when the conference begins; it is dropdown with two possible values: first (the conference begins when the first participant connected) and moderator (the conference begins when the first host/moderator connected); default: first

Web Administration Interface User Guide 81
Call Flows Roles1Attribute Description (Attribute Name)
Notes
CO
NF
OPE
RA
TO
R
PLA
YB
AC
K
SPE
CT
EL
Wait to start without moderator (conference_start_wait)
– – – C Denotes the time in seconds (for instance 300 seconds) how long the conference should wait until moderator connects to the conference – after this number of seconds the entire conference will be ended and all participants will be dropped
How conference ends (conference_stop_how)
C – – C Denotes when the conference ends; it is dropdown with two possible values: last (the conference ends when the last participant disconnected) and moderator (the conference ends when the host/moderator disconnected); default: last
Wait before disconnect when moderator left the conference (conference_stop_wait)
C – – C Denotes the time in seconds (for instance 300 seconds) how long the conference should be active after the moderator left the conference – after this number of seconds the entire conference will be ended and all participants will be dropped
dnis
Ad key (dnis_adkey)
D – – – Denotes key (password) to advertising message that will be played when the user connects to the conference; the message is being played only if the key is not empty
Ad URI (dnis_aduri)
D – – – Denotes URI (URL) to advertising message that will be played when the user connects to the conference
Authorize method (dnis_authorizemethod)
D D D D Denotes conference authorization method; it is dropdown with five possible values: free (no access code verification performed, i.e. any access code is allowed), local (perform access code verification, i.e. the access code must be valid), vsrradius, wyderadius (RADIUS verification performed), ldap (LDAP verification performed)
Billing rule (dnis_billingrule)
D D D D Denotes conference billing rule that is used to store and/or transmit CDR data that could be used for billing (default billing rule: default)
Conference numbers domain (dnis_domain)
– D – – It is used in call flows with free authorization, this allows to the calls from different DNIS numbers go to different conferences based on access codes entered by users and this DNIS domain value
All accessible languages (dnis_language_all)
D – – – Denotes semicolon-separated list of all languages that are being used for the conference dialog audio prompts (for example the languages BR:CS:DE:ES:FR:GB:IT:JA:JP:NG:NL:PT:RO:UK could be used)
Languages list for accesscode prompt (dnis_language_list)
D – – – Denotes semicolon-separated list of languages that are being used for access code prompt; if it is empty – only conference language will be used (for instance the sequence EN:DE:IT defines three languages that will be sequentially used in the prompt to enter access code)
Maximal number of calls per DNIS (dnis_maxcalls)
D D D D Denotes maximum number of calls per DNIS, default value: -1 – that means unlimited number of calls
Reffered DNIS number (dnis_number)
– – D – Denotes the DNIS number to playback the conference, for instance 10 means that the conference with DNIS number 10 can be played back using this PLAYBACK call flow
Playback number (dnis_playbacknumber)
– – – D Denotes the playback number that can be used to playback the recorded conferences

Web Administration Interface User Guide 82
Call Flows Roles1Attribute Description (Attribute Name)
Notes
CO
NF
OPE
RA
TO
R
PLA
YB
AC
K
SPE
CT
EL
Validate subscriber pin (dnis_validatesubscriberpin)
– – – D Denotes should or should not the system ask and validate subscriber PIN; it is dropdown with two possible values: on and off (default: off)
Welcome prompt (dnis_welcomeprompt)
D D D D Denotes the message that is played before entering access code (or default); the welcome prompt files should be placed into the folder /usr/local/DNCA/var/welcome-prompts/; for CONF call flow if the custom welcome prompt and dnis_language_list attributes values are defined the system will use welcome prompt files for each of the defined languages, the files names are being formed as <welcome prompt file name>_<language> (if the file for specific language not found the file with the name <welcome prompt file name> will be used instead of that)
operator
Record and play message to the conference DTMF policy (operator_conference_message_dtmf)
– C – – Denotes who (usually – host) can record and play message to the users (participants and listeners) from the conference
Record and play message to the conference DTMF binding (operator_conference_message_dtmf_binding)
– C – – Denotes what keys should be used to record and play message to the users (participants and listeners) from the conference (default: *9)
Record and play message to the operator queue to the all calls on the bridge DTMF policy (operator_message_dtmf)
– C – – Denotes who (usually – host) can record and play message to the users from the operator’s queue or to the all users on the bridge
Record and play message to the operator queue or to the all calls on the bridge DTMF binding (operator_message_dtmf_binding)
– C – – Denotes what keys should be used to record, play or clear the message to the users from the operator’s queue or to the all users on the bridge (default: *8)
recording
Recording server address (recording_addr)
D D – D Denotes recording server address if remote or remote_trusted recording method is used
Recording DTMF policy (recording_dtmf)
C – – C Denotes who (h/p/l) can start the recording (see Recording a Call)
Recording DTMF binding (recording_dtmf_binding)
D – – D Denotes what keys should be used to start and stop the recording
Recording method (recording_method)
D D – D Denotes recording method; it is dropdown with four possible values: local (local server, subscriber PIN should be entered), local_trusted (local server, subscriber PIN should not be entered), remote (remote server, subscriber PIN should be entered), remote trusted (remote server, subscriber PIN should not be entered); (see recording_addr attribute)
How recording ends (recording_stop_how)
– – – C Denotes when the recording should be ended; it is dropdown with two possible values: last (the recording ends when the last participant disconnected) and moderator (the recording ends when the host/moderator disconnected); default: last
Wait before stop recording when moderator left the conference (recording_stop_wait)
– – – C Denotes the time in seconds (for instance 0 seconds) how long the recording should continue before stopping after the moderator left the conference – after this number of seconds the recording will be stopped

Web Administration Interface User Guide 83
CONF The CONF call is a normal conference call setup with no security. All participants use the conference number as the access code and the only differentiator between host and participant is the termination of the login – hosts use *, participants use #. Open DNIS section of the portal by clicking the “DNIS” menu. Then click “CONF” in lower section (Call Flows) of the screen to edit CONF call flow attributes. The screen should look similar to Figure 53. Available CONF call flow attributes are listed in Table 10. Table 10: CONF Call Flow Attributes Attribute Description
Attribute Name Role Default Value
Notes
call Announce participant count on enter call_announceparticipantcount Conference hp Available for hosts (h)
and participants (p) Delay before answer call_delay DNIS 2
Exit DTMF policy call_exit_dtmf Conference hpl Available for hosts (h), participants (p), and listeners (l)
Exit DTMF binding call_exit_dtmf_binding DNIS *3 Gain control decreasing policy call_gaindec_dtmf Conference
Gain control decreasing binding call_gaindec_dtmf_binding DNIS
Gain control increasing policy call_gaininc_dtmf Conference
Gain control increasing binding call_gaininc_dtmf_binding DNIS
Instructions DTMF policy call_instructions_dtmf Conference hp Available for hosts (h) and participants (p)
Instructions DTMF binding call_instructions_dtmf_binding DNIS ** Enter job code when joins the conference call_jobcodeonenter Conference
Maximal calls duration call_maxduration DNIS -1
Mute self DTMF policy call_mute_dtmf Conference hp Available for hosts (h) and participants (p)
Mute self DTMF binding call_mute_dtmf_binding DNIS *6 Call operator after number of unsuccessful attempts to enter access code
call_operator_after DNIS 3
Call for Operator DTMF policy call_operator_dtmf Conference hp
Call for Operator DTMF binding call_operator_dtmf_binding DNIS *0
Tell number of participants during the conference DTMF policy
call_participantsnumber_dtmf Conference hp Available for hosts (h) and participants (p)
Tell number of participants during the conference DTMF binding
call_participantsnumber_dtmf_binding DNIS *2
conference Application specific data conference_appspecific Conference
Distributed conferencing conference_distributed Conference off Selected in dropdown list, other value: on
Entry and exit tones DTMF policy conference_entryexittones_dtmf Conference h Available for hosts (h)
only Entry and exit tones DTMF binding conference_entryexittones_dtmf_binding DNIS *8
Entry tones conference_entrytones Conference on Selected in dropdown list, other value: off
Exit tones conference_exittones Conference on Selected in dropdown list, other value: off

Web Administration Interface User Guide 84
Attribute Description
Attribute Name Role Default Value
Notes
Conference extended menu DTMF policy conference_extended_dtmf Conference hpl
Conference extended menu DTMF binding conference_extended_dtmf_binding Conference #
Enter job code DTMF policy conference_jobcode_dtmf Conference h Available for hosts (h) only
Enter job code DTMF binding conference_jobcode_dtmf_binding DNIS *4
Language conference_language Conference default Lock conference DTMF policy conference_lock_dtmf Conference h Available for hosts (h)
only Lock conference DTMF binding conference_lock_dtmf_binding DNIS *7
Max number of calls per conference conference_maxcalls Conference -1
Maximal conference duration conference_maxduration DNIS -1
Music on hold conference_moh Conference default Music on hold options conference_moh_options Conference
Mute mode DTMF policy conference_mute_dtmf Conference h Available for hosts (h) only
Mute mode DTMF binding conference_mute_dtmf_binding DNIS *5 Get participants count and detailed participants info DTMF policy
conference_participantsinfo_dtmf Conference
Get participants count and detailed participants info DTMF binding
conference_participantsinfo_dtmf_binding DNIS
Q&A session DTMF policy conference_qa_dtmf Conference h Available for hosts (h) only
Q&A session DTMF binding conference_qa_dtmf_binding DNIS *1
Realtime protocol conference_realtime Conference off Selected in dropdown list, other value: on
Conference roll call default conference_rollcall Conference off Selected in dropdown list, other value: on
Entry name conference_rollcall_onenter Conference off Selected in dropdown list, other value: on
Exit name conference_rollcall_onexit Conference off Selected in dropdown list, other value: on
How conference ends conference_stop_how Conference last Selected in dropdown list, other value: moderator
Wait before disconnect when moderator left the conference
conference_stop_wait Conference 300
dnis Ad key dnis_adkey DNIS Ad URI dnis_aduri DNIS
Authorize method dnis_authorizemethod DNIS free
Selected in dropdown list, other values: local, vsrradius, wyderadius, ldap
Billing rule dnis_billingrule DNIS default
All accessible languages dnis_language_all DNIS BR:CS:DE:ES:FR:GB:IT:JA:JP:NG:NL:PT:RO:UK
Languages list for accesscode prompt dnis_language_list DNIS
Maximal number of calls per DNIS dnis_maxcalls DNIS -1
Welcome prompt dnis_welcomeprompt DNIS default recording Recording server address recording_addr DNIS 0
Recording DTMF policy recording_dtmf Conference h Available for hosts (h) only
Recording DTMF binding recording_dtmf_binding DNIS *9

Web Administration Interface User Guide 85
Attribute Description
Attribute Name Role Default Value
Notes
Recording method recording_method DNIS local
Selected in dropdown list, other values: local_trusted, remote, remote_trusted
Sample of Conference Call Procedures Using the CONF Call Flow This section describes the basic procedures used within a conference call that uses the CONF call flow. These procedures should be somewhat familiar to you if you have ever moderated or participated in a conference call.
Entering conference call as a Host The person responsible for managing the conference call while in progress is known as the Host. This person has special functions they can use to facilitate the call. The following is the procedure for entering a conference call: 1. Dial the host number, wait for the welcome prompt. 2. When prompted, enter the assigned access code, followed by the *key. 3. Once connected to the live conference, the host can control the call with the commands
given in Table 11. Table 11: Host Commands for CONF Call Flow Conferences Touch Tone Command Description *2 Count – plays the number of parties in the call *3 Exit – exit the conference call *4 Instructions – conference instructions *5 Listen only modes – host controlled muting *6 Mute/Unmute – caller controlled muting *7 Secured/Unsecured – stops callers from entering *8 Entry and Exit Tones Control
Entering a conference call as a Participants If you are entering a conference call as a participant on a WYDE bridge that is set up with the CONF call flow, use the following procedure: 1. Dial the host number, wait for the welcome prompt. 2. When prompted, enter the assigned access code, followed by the # key. 3. Once connected to the live conference, every caller will be able to talk. Every caller
will also have access to the touch tone commands listed in Table 12. Table 12: Participant Commands for CONF Call Flow Conferences Touch Tone Command Description *3 Conference Exit *4 Conference Instructions *5 Mute line on/off

Web Administration Interface User Guide 86
Question and Answer Sessions within Conference Calls It is possible to use the conference call flows CONF or SPECTEL for modified Q&A sessions. Once inside a conference call, to use the Q&A feature, the host can begin a Q&A session by using the following procedure (this procedure assumes the CONF call flow – other flows may have different key bindings, but the basic procedure is the same): 1. From within an active conference, the host puts conference on mute in strict mode using
*5. 2. Host then announces to the conference that they can ask questions by pressing *6. 3. Each participant can press *6 and confirm that he wants to ask a question. The
participants will be placed in a queue in the order that they pressed *6. 4. Once the conference has been muted, the host can press *0 1 to start Q&A session.
Each participant, in turn, will then be unmuted to ask their question. 5. To move to the next question – host should press *0 1 again. 6. There is an option to mute current questioner without out kicking them from the queue
– *0 2. 7. To stop the Q&A session, then host should press *0 3. You can also control the Q&A session from the web. To do this, use the procedure described in the chapter Conferences and Calls Management of this guide.
OPERATOR The OPERATOR call is used for administrative purposes; it is not used for actual conferences. The operator can receive requests from the users who wish to talk with him; if the operator accepts the request the new conference with two participants is being started. The operator also can manage this user, for instance move him to another conference or listen to the conference of this user (the conference where the user came from). In addition, for instance, the operator can connect to any conference without being noticed. The operator functions can be implemented either from the web interface or using touch tone commands. Open DNIS section of the portal by clicking the “DNIS” menu. Then click “OPERATOR” in lower section (Call Flows) of the screen to edit OPERATOR call flow attributes. The screen should look similar to Figure 53. Available OPERATOR call flow attributes are listed in Table 13. Table 13: OPERATOR Call Flow Attributes Attribute Description
Attribute Name Role Default Value
Notes
call Connect to a conference DTMF policy call_connect2conf_dtmf Conference h Available for hosts (h)
only Connect to a conference DTMF binding call_connect2conf_dtmf_binding Conference *4
Delay before answer call_delay DNIS 3 Return current user to his conference or ivr DTMF policy
call_dropuser_dtmf Conference h Available for hosts (h) only

Web Administration Interface User Guide 87
Attribute Description
Attribute Name Role Default Value
Notes
Return current user to his conference or ivr DTMF binding
call_dropuser_dtmf_binding Conference *3
Find out how many users are in the queue DTMF policy call_find_dtmf Conference h Available for hosts (h)
only Find out how many users are in the queue DTMF binding call_find_dtmf_binding Conference *#
Instructions DTMF policy call_instructions_dtmf Conference h Available for hosts (h) only
Instructions DTMF binding call_instructions_dtmf_binding Conference ** Move user to a conference DTMF policy call_move2conf_dtmf Conference h Available for hosts (h)
only Move user to a conference DTMF binding call_move2conf_dtmf_binding Conference *5
Call operator after number of unsuccessful attempts to enter access code
call_operator_after DNIS 3
Hear current status DTMF policy call_status_dtmf Conference h Available for hosts (h)
only Hear current status DTMF binding call_status_dtmf_binding Conference *6
Start or stop surveillance DTMF policy call_surveillance_dtmf Conference h Available for hosts (h)
only Start or stop surveillance call DTMF binding call_surveillance_dtmf_binding Conference *1
Receive call DTMF policy. call_talk_dtmf Conference h Available for hosts (h) only
Receive call DTMF binding. call_talk_dtmf_binding Conference *2 conference Callers database conference_callerdb Conference off Selected in dropdown
list, other value: on
Dilaout DTMF policy conference_dialout_dtmf Conference h Available for hosts (h) only
Dilaout DTMF binding conference_dialout_dtmf_binding DNIS *7 Mask dids for operator conference_dids_mask Conference * Enter job code DTMF policy conference_jobcode_dtmf Conference Enter job code DTMF binding conference_jobcode_dtmf_binding DNIS
Language conference_language Conference default Music on hold conference_moh Conference default Music on hold options conference_moh_options Conference
Realtime protocol conference_realtime Conference off Selected in dropdown list, other value: on
dnis
Authorize method dnis_authorizemethod DNIS local
Selected in dropdown list, other values: free, vsrradius, wyderadius, ldap
Billing rule dnis_billingrule DNIS default Conference numbers domain dnis_domain DNIS 0 Maximal number of calls per DNIS dnis_maxcalls DNIS -1
Welcome prompt dnis_welcomeprompt DNIS default operator Record and play message to the conference DTMF policy operator_conference_message_dtmf Conference h Available for hosts (h)
only Record and play message to the conference DTMF binding
operator_conference_message_dtmf_binding Conference *9
Record and play message to the operator queue to the all calls on the bridge DTMF policy
operator_message_dtmf Conference h Available for hosts (h) only

Web Administration Interface User Guide 88
Attribute Description
Attribute Name Role Default Value
Notes
Record and play message to the operator queue or to the all calls on the bridge DTMF binding
operator_message_dtmf_binding Conference *8
recording Recording server address recording_addr DNIS
Recording method recording_method DNIS local_trusted Selected in dropdown list, other values: local, remote, remote_trusted
PLAYBACK The PLAYBACK call is used to playback previously recorder conferences. The user calls to the PLAYBACK call number, then the user enters the conference access code, and after that he is able to playback the conference. Open DNIS section of the portal by clicking the “DNIS” menu. Then click “PLAYBACK” in lower section (Call Flows) of the screen to edit PLAYBACK call flow attributes. The screen should look similar to Figure 53. Available PLAYBACK call flow attributes are listed in Table 14.
Figure 54: Modifying PLAYBACK Call Flow Attributes
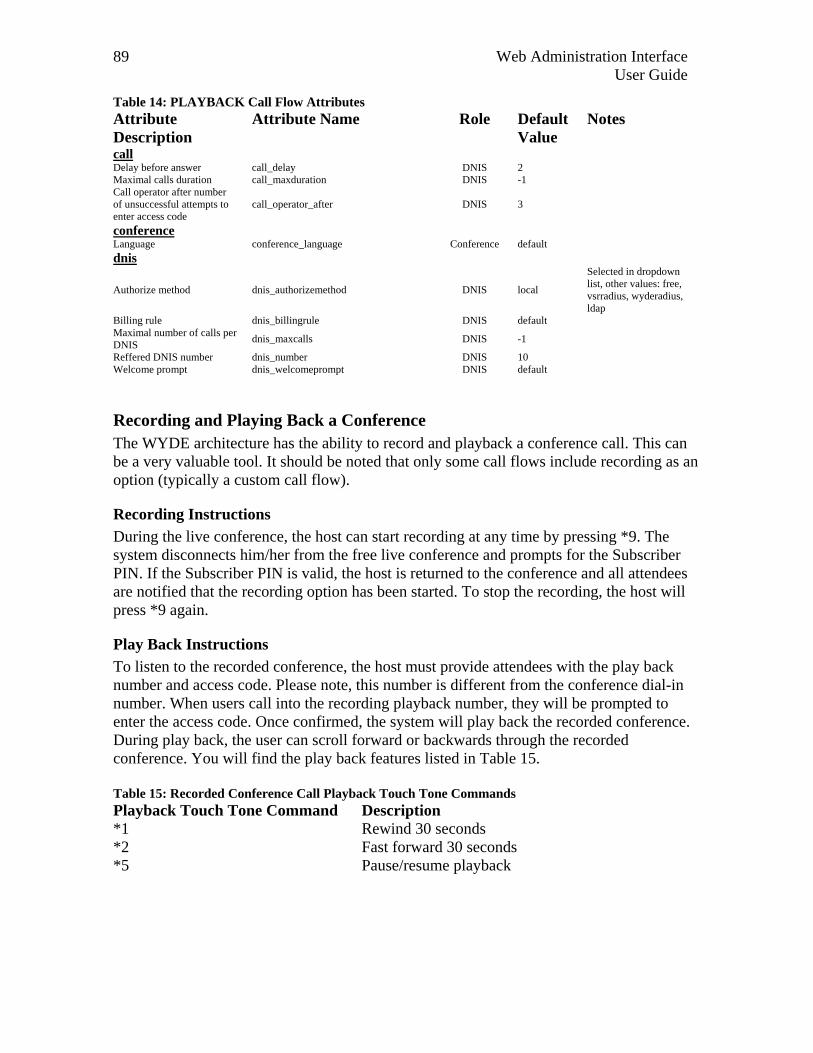
Web Administration Interface User Guide 89
Table 14: PLAYBACK Call Flow Attributes Attribute Description
Attribute Name Role Default Value
Notes
call Delay before answer call_delay DNIS 2 Maximal calls duration call_maxduration DNIS -1 Call operator after number of unsuccessful attempts to enter access code
call_operator_after DNIS 3
conference Language conference_language Conference default dnis
Authorize method dnis_authorizemethod DNIS local
Selected in dropdown list, other values: free, vsrradius, wyderadius, ldap
Billing rule dnis_billingrule DNIS default Maximal number of calls per DNIS dnis_maxcalls DNIS -1
Reffered DNIS number dnis_number DNIS 10 Welcome prompt dnis_welcomeprompt DNIS default
Recording and Playing Back a Conference The WYDE architecture has the ability to record and playback a conference call. This can be a very valuable tool. It should be noted that only some call flows include recording as an option (typically a custom call flow).
Recording Instructions During the live conference, the host can start recording at any time by pressing *9. The system disconnects him/her from the free live conference and prompts for the Subscriber PIN. If the Subscriber PIN is valid, the host is returned to the conference and all attendees are notified that the recording option has been started. To stop the recording, the host will press *9 again.
Play Back Instructions To listen to the recorded conference, the host must provide attendees with the play back number and access code. Please note, this number is different from the conference dial-in number. When users call into the recording playback number, they will be prompted to enter the access code. Once confirmed, the system will play back the recorded conference. During play back, the user can scroll forward or backwards through the recorded conference. You will find the play back features listed in Table 15. Table 15: Recorded Conference Call Playback Touch Tone Commands Playback Touch Tone Command Description *1 Rewind 30 seconds *2 Fast forward 30 seconds *5 Pause/resume playback

Web Administration Interface User Guide 90
SPECTEL The SPECTEL call is similar to CONF call flow. The difference from CONF call flow is that this one more suitable for more organized conferences where authentication is important; where participants should wait for the host to start a conference or be disconnected after host hangs up. Also, each participant can have their own access code, or the participants can share an access code, or you can give groups of participants their own access codes. Open DNIS section of the portal by clicking the “DNIS” menu. Then click “SPECTEL” in lower section (Call Flows) of the screen to edit SPECTEL call flow attributes. The screen should look similar to Figure 53. Available SPECTEL call flow attributes are listed in Table 16. Table 16: SPECTEL Call Flow Attributes Attribute Description
Attribute Name Role Default Value
Notes
call Announce participant count on enter call_announceparticipantcount Conference hpl
Available for hosts (h), participants (p), and listeners (l)
Delay before answer call_delay DNIS 2 Exit DTMF policy call_exit_dtmf Conference Exit DTMF binding call_exit_dtmf_binding DNIS Gain control decreasing policy call_gaindec_dtmf Conference
Gain control decreasing binding call_gaindec_dtmf_binding DNIS
Gain control increasing policy call_gaininc_dtmf Conference
Gain control increasing binding call_gaininc_dtmf_binding DNIS
Instructions DTMF policy call_instructions_dtmf Conference hp Available for hosts (h) and participants (p)
Instructions DTMF binding call_instructions_dtmf_binding DNIS ** Enter job code when joins the conference call_jobcodeonenter Conference h Available for hosts (h)
only Maximal calls duration call_maxduration DNIS -1
Mute self DTMF policy call_mute_dtmf Conference hp Available for hosts (h) and participants (p)
Mute self DTMF binding call_mute_dtmf_binding DNIS *6 Call operator after number of unsuccessful attempts to enter access code
call_operator_after DNIS 3
Call for Operator DTMF policy call_operator_dtmf Conference
Call for Operator DTMF binding call_operator_dtmf_binding DNIS *0
Tell number of participants during the conference DTMF policy
call_participantsnumber_dtmf Conference hp Available for hosts (h) and participants (p)
Tell number of participants during the conference DTMF binding
call_participantsnumber_dtmf_binding DNIS *8
conference Application specific data conference_appspecific Conference
Callers database conference_callerdb Conference off Selected in dropdown list, other value: on
Dilaout DTMF policy conference_dialout_dtmf Conference h Available for hosts (h) only
Dilaout DTMF binding conference_dialout_dtmf_binding DNIS *1

Web Administration Interface User Guide 91
Attribute Description
Attribute Name Role Default Value
Notes
Distributed conferencing conference_distributed Conference off Selected in dropdown list, other value: on
Entry and exit tones DTMF policy conference_entryexittones_dtmf Conference
Entry and exit tones DTMF binding conference_entryexittones_dtmf_binding DNIS
Entry tones conference_entrytones Conference on Selected in dropdown list, other value: off
Exit tones conference_exittones Conference on Selected in dropdown list, other value: off
Conference extended menu DTMF policy conference_extended_dtmf Conference hpl
Conference extended menu DTMF binding conference_extended_dtmf_binding Conference #
Extra services URIs conference_extra Conference
Hold policy for participant conference_hold_participant Conference false Selected in dropdown list, other value: true
Enter job code DTMF policy conference_jobcode_dtmf Conference h Available for hosts (h) only
Enter job code DTMF binding conference_jobcode_dtmf_binding DNIS
Language conference_language Conference default Lock conference DTMF policy conference_lock_dtmf Conference h Available for hosts (h)
only Lock conference DTMF binding conference_lock_dtmf_binding DNIS *7
Max number of calls per conference conference_maxcalls Conference -1
Maximal conference duration conference_maxduration DNIS -1
Music on hold conference_moh Conference default Music on hold options conference_moh_options Conference
Mute mode DTMF policy conference_mute_dtmf Conference h Available for hosts (h) only
Mute mode DTMF binding conference_mute_dtmf_binding DNIS *5
Mute policy for listener conference_mute_listener Conference strict Selected in dropdown list, other value: open, relaxed
Get participants count and detailed participants info DTMF policy
conference_participantsinfo_dtmf Conference
Get participants count and detailed participants info DTMF binding
conference_participantsinfo_dtmf_binding DNIS
Q&A session DTMF policy conference_qa_dtmf Conference h Available for hosts (h) only
Q&A session DTMF binding conference_qa_dtmf_binding DNIS *3
Realtime protocol conference_realtime Conference on Selected in dropdown list, other value: off
Conference roll call default conference_rollcall Conference off Selected in dropdown list, other value: on
Entry name conference_rollcall_onenter Conference off Selected in dropdown list, other value: on
Exit name conference_rollcall_onexit Conference off Selected in dropdown list, other value: on
Conference schedule Conference Schedule conference extend maximal time in seconds conference_schedule_extend DNIS 1800
Schedule conference extend DTMF policy conference_schedule_extend_dtmf Conference h Available for hosts (h)
only Schedule conference extend DTMF binding conference_schedule_extend_dtmf_binding DNIS
Wait before scheduled conference begin conference_schedule_hold DNIS 300
Schedule conference end remind time in seconds conference_schedule_remind DNIS 120

Web Administration Interface User Guide 92
Attribute Description
Attribute Name Role Default Value
Notes
Conference scheduled conference_scheduled Conference off Selected in dropdown list, other value: on
How conference begins conference_start_how Conference first Selected in dropdown list, other value: moderator
Wait to start without moderator conference_start_wait Conference 3000
How conference ends conference_stop_how Conference last Selected in dropdown list, other value: moderator
Wait before disconnect when moderator left the conference
conference_stop_wait Conference 0
dnis
Authorize method dnis_authorizemethod DNIS local
Selected in dropdown list, other values: free, vsrradius, wyderadius, ldap
Billing rule dnis_billingrule DNIS default Maximal number of calls per DNIS dnis_maxcalls DNIS -1
Playback number dnis_playbacknumber DNIS
Validate subscriber pin dnis_validatesubscriberpin DNIS off Selected in dropdown list, other value: on
Welcome prompt dnis_welcomeprompt DNIS default recording Recording server address recording_addr DNIS
Recording DTMF policy recording_dtmf Conference h Available for hosts (h) only
Recording DTMF binding recording_dtmf_binding DNIS *9
Recording method recording_method DNIS local_trusted Selected in dropdown list, other values: local, remote, remote_trusted
How recording ends recording_stop_how Conference last Selected in dropdown list, other value: moderator
Wait before stop recording when moderator left the conference
recording_stop_wait Conference 0
Sample of Conference Call Procedures Using the SPECTEL Call Flow This section describes the basic procedures used within a conference call that uses the SPECTEL call flow. These procedures should be familiar to you if you have ever moderated or participated in a conference call. The difference from CONF call flow is that this one more suitable for more organized conferences where authentication is important; where participants should wait for the host to start a conference or be disconnected after host hangs up.
Entering conference call as a Host The person responsible for managing the conference call while in progress is known as the Host. This person has special functions they can use to facilitate the call. The following is the procedure for entering a conference call: 1. Dial the host number, wait for the welcome prompt. 2. When prompted, enter the assigned access code, followed by the # key. 3. Once connected to the live conference, the host can control the call with the commands
given in Table 17.

Web Administration Interface User Guide 93
Table 17: Host Commands for SPECTEL Call Flow Conferences Touch Tone Command Description *1 Dial Out to a 3rd party *2 Record a conference *3 Start Q&A Session *4 Increase/Decrease volume *5 Conference lecture mode on/off (Mute all Participants) *6 Mute Host Line *7 Lock Conference on/off *8 Participant count or roll call ** Listen to Instructions
Entering a conference call as a Participants To enter a SPECTEL conference call as a participant, the procedure is similar to CONF, bearing in mind that a SPECTEL conference call uses a different set of procedures than CONF call flow calls. Use the following procedure when dialing in to SPECTEL conference calls: 1. Dial the host number, wait for the welcome prompt. 2. When prompted, enter the assigned access code, followed by the # key. 3. Once connected to the live conference, every caller will be able to talk (unless they
have been configured as a listener in the call setup). Every caller will also have access to the touch tone commands listed in Table 18.
Table 18: Participant Commands for SPECTEL Call Flow Conferences Touch Tone Command Description *6 Mute Host Line *8 Participant count or roll call ** Listen to Instructions

Web Administration Interface User Guide 94
Appendix A: Support Resources If you have difficulty with this guide and any of the procedures listed herein, please contact us using the following support resources.
Support Documentation In addition to this Guide, you may obtain other WYDE Voice documentation from WYDE Voice or from the WYDE Voice documentation Web site: http://docs.wydevoice.com/.
Web Support Our support website is available 24 hours a day, 7 days a week, and 365 days a year at http://www.wydevoice.com. You may download patches, support documentation and other technical support information.
Telephone Support For difficulties with any procedures described in this Guide, please contact us at 866-508-9020 during our normal phone support hours of 7:00 am to 6:00 pm Pacific Standard Time (PST). An engineer will respond to your inquiry within 24 hours.
Email Support You may also email us your questions at [email protected]. We will respond to your question within 24 hours.