wda interactive alv
TRANSCRIPT

SAP COMMUNITY NETWORK SDN - sdn.sap.com | BPX - bpx.sap.com | BOC - boc.sap.com | UAC - uac.sap.com
© 2010 SAP AG 1
WDA: Interactive ALV
Applies to:
This document applies to SAP ECC 6.0, SAP Netweaver 2004s. For more information, visit the Web Dynpro ABAP homepage.
Summary
This article helps a developer to use Interactive ALV Report in WDA.
Author: Rahul Muraleedharan
Company: Applexus Software Solutions (P) Ltd
Created on: 24 November 2010
Author Bio
Rahul Muraleedharan is working as SAP Technology Consultant with Applexus Software Solutions (P) Ltd. He has an experience of over 1 year in SAP ABAP.

WDA: Interactive ALV
SAP COMMUNITY NETWORK SDN - sdn.sap.com | BPX - bpx.sap.com | BOC - boc.sap.com | UAC - uac.sap.com
© 2010 SAP AG 2
Table of Contents
Introduction ......................................................................................................................................................... 3
Steps for implementing an Interactive ALV Report: ........................................................................................ 3
Step by Step Process ......................................................................................................................................... 4
Step 1: Create a Web Dynpro Component. .................................................................................................... 4
Step 2: Data Binding. ...................................................................................................................................... 5
Step 3: Context Mapping................................................................................................................................. 5
Step 4: Declare Component Usage. ............................................................................................................... 6
Step 5: Declare the component Usage in the view controller. ........................................................................ 6
Step 6: Design the layout. ............................................................................................................................... 8
Step 7: Embed the VIEWCONTAINERUIELEMENT. ..................................................................................... 8
Step 8: Context Mapping Between the two components. ............................................................................... 9
Step 9: Create a view for Item Details .......................................................................................................... 10
Step 10: Bind the node to be displayed as ALV. .......................................................................................... 10
Step 11: Set the HOTSPOT .......................................................................................................................... 11
Step 12: Create an event handler method for hotspot click. ......................................................................... 12
Step 13: Create Plugs for navigation between the views. ............................................................................ 12
Step 14: Navigation from Header details to Item details. .............................................................................. 13
Step 15: Navigate back from Item details to the header details. .................................................................. 14
Step 16: Activate and create a Web Dynpro Application. ............................................................................. 15
Application ........................................................................................................................................................ 16
Related Content ................................................................................................................................................ 17
Disclaimer and Liability Notice .......................................................................................................................... 18

WDA: Interactive ALV
SAP COMMUNITY NETWORK SDN - sdn.sap.com | BPX - bpx.sap.com | BOC - boc.sap.com | UAC - uac.sap.com
© 2010 SAP AG 3
Introduction
WDA provides a Web Dynpro Component SALV_WD_TABLE for including SAP List Viewer. In most cases the end user requirements will be drill through the reports ie., from a header level report, on clicking a particular field the corresponding item level report should be displayed. This article is a step by step guide to make the ALV Report interactive.
Steps for implementing an Interactive ALV Report:
1. Create a Web Dynpro Component.
2. Data Binding.
3. Context Mapping.
4. Declare Component Usage.
5. Declare the component Usage in the view controller.
6. Design the layout.
7. Embed the VIEWCONTAINERUIELEMENT.
8. Context Mapping Between the two components.
9. Create a view for Item Details
10. Bind the node to be displayed as ALV.
11. Set the HOTSPOT
12. Create an event handler method for hotspot click.
13. Create Plugs for navigation between the views.
14. Navigation from Header details to Item details.
15. Navigate back from Item details to the header details.
16. Activate and create a Web Dynpro Application.

WDA: Interactive ALV
SAP COMMUNITY NETWORK SDN - sdn.sap.com | BPX - bpx.sap.com | BOC - boc.sap.com | UAC - uac.sap.com
© 2010 SAP AG 4
Step by Step Process
Step 1: Create a Web Dynpro Component.
Got to the SE80 transaction and create a Web Dynpro Component.
Save the Component and Activate it.

WDA: Interactive ALV
SAP COMMUNITY NETWORK SDN - sdn.sap.com | BPX - bpx.sap.com | BOC - boc.sap.com | UAC - uac.sap.com
© 2010 SAP AG 5
Step 2: Data Binding.
Go to the Component Controller and add the required nodes and attributes to the Root node of the context.
In this example I have added two nodes viz., HEADER and ITEM each containing attributes from tables VBAK and VBAP respectively.
Step 3: Context Mapping.
Go to the context tab of the header details view. Map the context nodes from the Component Controller to the Context Root Node of the view.

WDA: Interactive ALV
SAP COMMUNITY NETWORK SDN - sdn.sap.com | BPX - bpx.sap.com | BOC - boc.sap.com | UAC - uac.sap.com
© 2010 SAP AG 6
Step 4: Declare Component Usage.
Note: a new folder of Component Usages is created in the objects tree in the left hand side of the screen.
Step 5: Declare the component Usage in the view controller.
Go to the properties tab of the view. Here also the SALV_WD_TABLE component should be specified among the Used Controllers/Components as the View of the SAL_WD_TABLE component is to be displayed in the layout of the custom view created.

WDA: Interactive ALV
SAP COMMUNITY NETWORK SDN - sdn.sap.com | BPX - bpx.sap.com | BOC - boc.sap.com | UAC - uac.sap.com
© 2010 SAP AG 7
Click on the button to Create Controller Usage.
Select the Interface Controller of the component SALV_WD_TABLE.

WDA: Interactive ALV
SAP COMMUNITY NETWORK SDN - sdn.sap.com | BPX - bpx.sap.com | BOC - boc.sap.com | UAC - uac.sap.com
© 2010 SAP AG 8
Step 6: Design the layout.
Insert a VIEWCONTAINERUIELEMENT on the view. This is done to embed the TABLE view from the SALV_WD_TABLE component, which contains the ALV report, into our view.
Step 7: Embed the VIEWCONTAINERUIELEMENT.
Go to the window and select the VIEWCONTAINERUIELEMENT we have created in the view. Embed the required view from SALV_WD_TABLE. Right Click the VIEWCONTAINERUIELEMENT and select Embed View Option.

WDA: Interactive ALV
SAP COMMUNITY NETWORK SDN - sdn.sap.com | BPX - bpx.sap.com | BOC - boc.sap.com | UAC - uac.sap.com
© 2010 SAP AG 9
Press ENTER. Now the navigation tree shows that the view TABLE of SALV_WD_TABLE is embedded into our VIEWCONTAINERUIELEMENT.
Step 8: Context Mapping Between the two components.
Go to COMPONENT USAGES -> ALV -> INTERFACECONTROLLER_USAGE.
In the properties tab click CREATE COMPONENT USAGE.
Select your Web Dynpro Component.
WDA: Interactive ALV
SAP COMMUNITY NETWORK SDN - sdn.sap.com | BPX - bpx.sap.com | BOC - boc.sap.com | UAC - uac.sap.com
© 2010 SAP AG 10
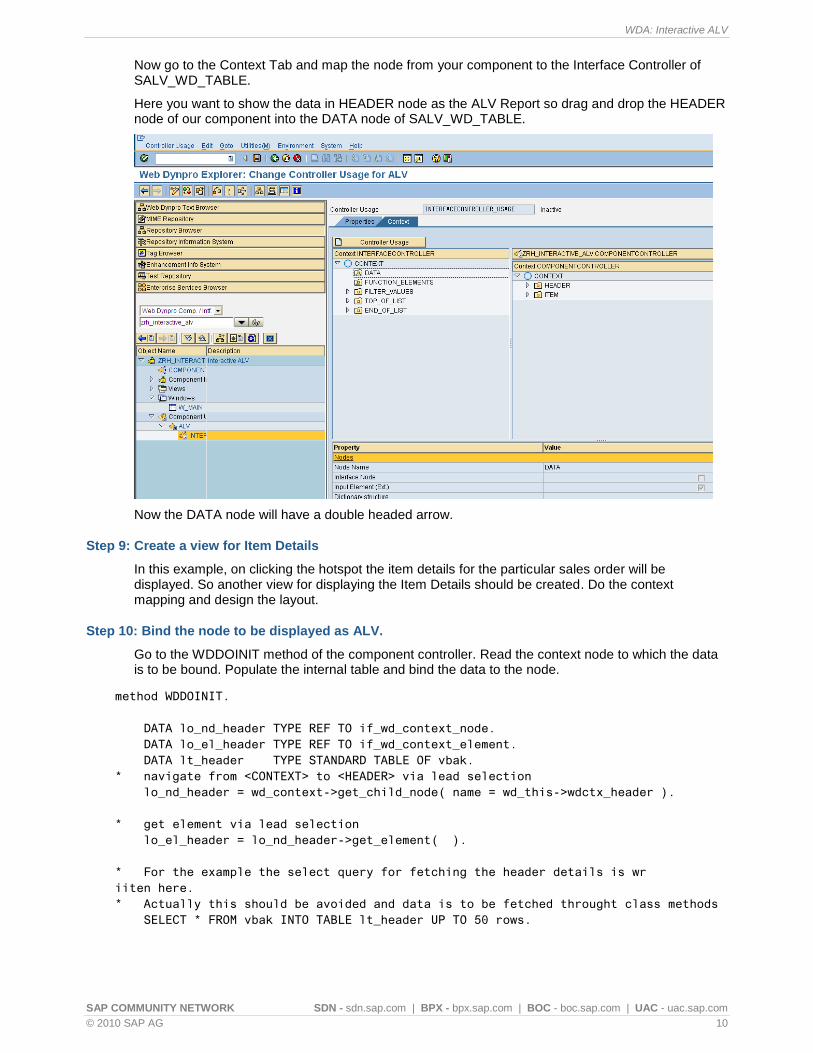
Now go to the Context Tab and map the node from your component to the Interface Controller of SALV_WD_TABLE.
Here you want to show the data in HEADER node as the ALV Report so drag and drop the HEADER node of our component into the DATA node of SALV_WD_TABLE.
Now the DATA node will have a double headed arrow.
Step 9: Create a view for Item Details
In this example, on clicking the hotspot the item details for the particular sales order will be displayed. So another view for displaying the Item Details should be created. Do the context mapping and design the layout.
Step 10: Bind the node to be displayed as ALV.
Go to the WDDOINIT method of the component controller. Read the context node to which the data is to be bound. Populate the internal table and bind the data to the node.
method WDDOINIT.
DATA lo_nd_header TYPE REF TO if_wd_context_node.
DATA lo_el_header TYPE REF TO if_wd_context_element.
DATA lt_header TYPE STANDARD TABLE OF vbak.
* navigate from <CONTEXT> to <HEADER> via lead selection
lo_nd_header = wd_context->get_child_node( name = wd_this->wdctx_header ).
* get element via lead selection
lo_el_header = lo_nd_header->get_element( ).
* For the example the select query for fetching the header details is wr
iiten here.
* Actually this should be avoided and data is to be fetched throught class methods
SELECT * FROM vbak INTO TABLE lt_header UP TO 50 rows.

WDA: Interactive ALV
SAP COMMUNITY NETWORK SDN - sdn.sap.com | BPX - bpx.sap.com | BOC - boc.sap.com | UAC - uac.sap.com
© 2010 SAP AG 11
lo_nd_header->bind_table( lt_header ).
endmethod.
Step 11: Set the HOTSPOT
Write the code for setting the hotspot in the ALV in the WDDOINIT method of the header view.
a) For this you have to get the reference to the component used.
b) Then a reference to the interface controller of the used component should be obtained.
c) After that reference to the column on which the hotspot has to be set should be obtained.
d) Now the hot spot action should be set for the particular column.
method WDDOINIT .
DATA: lo_ref_cmp_usage TYPE REF TO if_wd_component_usage,
lo_salv TYPE REF TO iwci_salv_wd_table,
lo_value TYPE REF TO cl_salv_wd_config_table,
lo_column_settings TYPE REF TO cl_salv_wd_column,
lo_link_to_action TYPE REF TO cl_salv_wd_uie_link_to_action.
* create the used component
lo_ref_cmp_usage = wd_this->wd_cpuse_alv( ).
IF lo_ref_cmp_usage->has_active_component( ) IS INITIAL.
lo_ref_cmp_usage->create_component( ).
ENDIF.
* Get a pointer to the SALV interface controller
lo_salv = wd_this->wd_cpifc_alv( ).
* Get the reference to properties of all the columns and rows
lo_value = lo_salv->get_model( ).
* Get the reference to the column VBELN
call method lo_value->if_salv_wd_column_settings~get_column
EXPORTING
id = 'VBELN'
receiving
value = lo_column_settings.
* Create the object of cl_salv_wd_uie_link_to_action
* If the column has to be in the editable mode create the object
* of cl_salv_wd_uie_input_field instead.
CREATE OBJECT lo_link_to_action.
* Set the Field VBELN with the Hyperlink Texts in the Cells
lo_link_to_action->set_text_fieldname( 'VBELN' ).
endmethod.

WDA: Interactive ALV
SAP COMMUNITY NETWORK SDN - sdn.sap.com | BPX - bpx.sap.com | BOC - boc.sap.com | UAC - uac.sap.com
© 2010 SAP AG 12
Step 12: Create an event handler method for hotspot click.
Go to methods tab of the view in which ALV is embedded, and create an event handler method for handling the event ON_CLICK of SALV_WD_TABLE.
Step 13: Create Plugs for navigation between the views.
Create an inbound and outbound plug each for the two views and navigation links. Outbound plug from Header Screen is triggered when hotspot is clicked and outbound plug from item details is triggered when BACK button is pressed.

WDA: Interactive ALV
SAP COMMUNITY NETWORK SDN - sdn.sap.com | BPX - bpx.sap.com | BOC - boc.sap.com | UAC - uac.sap.com
© 2010 SAP AG 13
Step 14: Navigation from Header details to Item details.
In the event handler method ACTIONON_CLICK of the header details view fire the outbound plug after the binding the internal table to the node.
method ACTIONON_CLICK .
TYPES: BEGIN OF ty_item,
vbeln TYPE vbeln_va,
posnr TYPE posnr_va,
matnr TYPE matnr,
charg TYPE charg_d,
arktx TYPE arktx,
pstyv TYPE pstyv,
zmeng TYPE dzmeng,
meins TYPE meins,
kdmat TYPE matnr_ku,
spart TYPE spart,
netwr TYPE netwr_ap,
waerk TYPE waerk,
END OF ty_item.
DATA: lt_item TYPE STANDARD TABLE OF ty_item.
FIELD-SYMBOLS: <fs_lv_vbeln> TYPE vbeln_va.
DATA lo_nd_item TYPE REF TO if_wd_context_node.
DATA lo_el_item TYPE REF TO if_wd_context_element.
DATA ls_item TYPE wd_this->element_item.
* navigate from <CONTEXT> to <ITEM> via lead selection
lo_nd_item = wd_context->get_child_node( name = wd_this->wdctx_item ).
ASSIGN r_param->VALUE->* TO <fs_lv_vbeln>.
SELECT vbeln
posnr
matnr
charg
arktx
pstyv
zmeng
meins
kdmat
spart
netwr
waerk FROM VBAP
INTO TABLE lt_item
WHERE vbeln = <fs_lv_vbeln>.
UNASSIGN <fs_lv_vbeln>. lo_nd_item->bind_table( lt_item ).
wd_this->fire_to_item_plg( ).

WDA: Interactive ALV
SAP COMMUNITY NETWORK SDN - sdn.sap.com | BPX - bpx.sap.com | BOC - boc.sap.com | UAC - uac.sap.com
© 2010 SAP AG 14
endmethod.
Step 15: Navigate back from Item details to the header details.
Assign an ACTION to the Button BACK in the layout of the Item details view.

WDA: Interactive ALV
SAP COMMUNITY NETWORK SDN - sdn.sap.com | BPX - bpx.sap.com | BOC - boc.sap.com | UAC - uac.sap.com
© 2010 SAP AG 15
Step 16: Activate and create a Web Dynpro Application.
Activate the whole Web Dynpro component and create a Web Dynpro application.
Save the application and test it.

WDA: Interactive ALV
SAP COMMUNITY NETWORK SDN - sdn.sap.com | BPX - bpx.sap.com | BOC - boc.sap.com | UAC - uac.sap.com
© 2010 SAP AG 16
Application
On Hotspot click:

WDA: Interactive ALV
SAP COMMUNITY NETWORK SDN - sdn.sap.com | BPX - bpx.sap.com | BOC - boc.sap.com | UAC - uac.sap.com
© 2010 SAP AG 17
Related Content
ALV Interactive in webdynpro
Dynamic report output in a webdynpro alv
SAP List Viewer in Web Dynpro for ABAP
For more information, visit the Web Dynpro ABAP homepage.

WDA: Interactive ALV
SAP COMMUNITY NETWORK SDN - sdn.sap.com | BPX - bpx.sap.com | BOC - boc.sap.com | UAC - uac.sap.com
© 2010 SAP AG 18
Disclaimer and Liability Notice
This document may discuss sample coding or other information that does not include SAP official interfaces and therefore is not supported by SAP. Changes made based on this information are not supported and can be overwritten during an upgrade.
SAP will not be held liable for any damages caused by using or misusing the information, code or methods suggested in this document, and anyone using these methods does so at his/her own risk.
SAP offers no guarantees and assumes no responsibility or liability of any type with respect to the content of this technical article or code sample, including any liability resulting from incompatibility between the content within this document and the materials and services offered by SAP. You agree that you will not hold, or seek to hold, SAP responsible or liable with respect to the content of this document.