wargame shop publicationwargameshop.uk/pdf/middleearth-uk.pdf3 middle earth uk initiativeinitiative...
TRANSCRIPT

1
Middle Earth UK
IntroductionIntroductionIntroductionIntroduction The following rules are inspired and based completely upon the great works of J.R.R. Tolkien’s Middle Earth, they are designed to recreate and capture the essence of these lands and the legends that have been written about them. In doing so it is hoped that you will once again pick up these wonderful volumes and enjoy reading them anew. Bring the journey through Middle Earth alive:
The road goes ever on and on, down from the door where it began. Now far ahead the road has gone, and I must follow, if I can. Pursuing it with weary feet, until it joins some larger way, Where many paths and errands meet and whither then? I cannot say. Frodo Baggins – T.A.3018 JRR Tolkien – Fellowship of the Ring
The rules that follow are the core rules which will allow basic battles to be fought in any of the three ages of Middle Earth. Accompanying these rules are specific period rules that give extra information and rules for a particular era in Middle Earths history.
Designed around individual skirmish rules, they are fast, furious and very addictive. The ability to use close order formations on the battlefield by grouping the individual figures together, gives a realistic feel to the rules. With a figure’s individual ability value marked upon its base, there is no need for charts and factors to be memorised, just add up these values with other figures in combat and roll the dice!
The heroes of Middle Earth are present as ever, they have a number of hero points to expend in doing heroic deeds that normal creatures dare not or cannot do. With archaic magic the wizards and wise influence the actions and feelings of mortals. But beware evil is always lurking around every corner and nobody knows when it might strike next.
The mechanics of the rules are simple all figures will have an ability value. The ability value must be marked on the figures base because it indicates the figures skills with a weapon, its defence value and the chance required for other various checks. To carryout a check against a figures ability value a pair of percentage dice are required; the ability score or lower is required for a successful check.
With the aid of additional hero points heroic deeds can be performed by figures that have one or more hero points to expend, these deeds can take the form of extraordinary feats of manoeuvre, combat or missile fire. The points should be spent wisely and will aid a figure in becoming a powerful and revered opponent.
The knowledge of archaic magic is only possessed by a few individuals; these are very powerful adversaries, so use them wisely. Spells alter nature and affect the minds of lesser mortals, inspiring them to great deeds or turning their thoughts to despair and flight, but take care, spell points are not infinite.
Although these rules use references to J.R.R. Tolkien’s Middle Earth it is not our intention to breach the copyright or intellectual property of these works. We offer these rules free and with good intensions that they will inspire people to purchase the works for themselves if they already have not. The rules are based around the books and not the film trilogies by New Line Cinema or the rule sets by Games Workshop.
If you have a question or enquiry, then contact us on-line at [email protected] .
Ashnazgdurbatuluk ashnazggimbatul
ashnazgthrakatuluk aghburzumishikrimpatul

2
Middle Earth UK
Bound SequenceBound SequenceBound SequenceBound Sequence
1. Initiative
a. Motivation Check
b. Initiative Roll
2. Spell Casting
a. Cast Spell
b. Negate Magic
c. Heroic Dispel Magic
3. Actions
a. Declare Shielding
b. Extraordinary Checks
c. Scouting
4. Movement
a. Compulsory Movement
b. Heroic Movement
c. Normal Movement
d. Heroic Movement
e. Special Movement
5. Missile Fire
a. Heroic Missile Fire
b. Normal Missile Fire
c. Heroic Missile Fire
d. Contact Missile Fire
e. Reclamation Move
6. Combat
Phase 1 Phase 2 Phase 3
a. Heroic Combat d. Normal Combat f. Heroic Combat
b. Impact Combat e. Reclamation Move g. Impact Combat
c. Reclamation Move h. Reclamation Move 7. Morale
a. Recovery Check
b. Company Morale Test
c. Heroic Commander Retest

3
Middle Earth UK
InitiativeInitiativeInitiativeInitiative The initiative determines which side good or evil will initiate each phase of a round within the bound sequence. Gaining initiative can be very important especially at the pivotal point of the battle. A figure that strikes first and kills its opponent will not receive a retaliation attack against it from the killed figure. Occasionally it is desirable to go second especially for reactive movement, but since initiative is determined from rolling a dice it’s purely luck if you get what you want, or is it?
Initiative can be swayed through motivational checks, see below: Motivation Check
A motivation check is undertaken when the reactive nature of a side is subjected to external influences. In short a side might feel inspired to attack an enemy this bound because of an external influence, these influences are:
War Drums These motivational musical instruments just keep on rolling throughout the game; they encourage and reassure that all is well, even when this may not be the case. War drums have an initial motivational factor of 40 for the first set of drums. Additional war drums will add an additional 20 to the motivational factor to a maximum factor of 80 for three sets of war drums.
The motivational factor or below must be rolled for a successful motivation check. A success indicates that an extra initiative dice is rolled in the following initiative roll phase.
Drum Roll Once within an encounter the war drums may roll, rising to a crescendo, before stopping. When this happens the motivational check for the war drums is automatically passed and an extra initiative dice is gained. Once the war drums have stopped they cannot be initiated again within the same encounter. If multiple war drums are used then only one set of drums will stop, reducing the overall motivational factor of the side.
Horns and Trumpets An army command group that has horns and/or trumpets present with it can use these to influence and inspire the actions of the army. Each bound the horns and trumpets may sound to declare a specific course of action around the battlefield. The flourish of horns and trumpets has a motivational factor of 60 and only one group of horns and/or trumpets are allowed per encounter.
The motivational factor or below must be rolled for a successful motivation check. A success indicates that an extra initiative dice is rolled in the following initiative roll phase.
Fanfare The horns and/or trumpets can be brought to an arousing fanfare that influences and empowers the army once within an encounter. When this happens the motivational check is automatically passed and an extra initiative dice is gained in the following initiative roll phase.
Royal Fanfare The horns and/or trumpets can sound the Royal Fanfare once within an encounter if a figure with the Lordship special ability is within 10cm of the musical group. When this happens the motivational check is automatically passed and two extra initiative dice are gained in the following initiative roll phase.
Captains Charge A captain or heroic commander can lead a charge out against the enemy, then in the following motivation check phase of the next bound the figure must roll against its ability value to successfully pass a motivation check. If successful an extra initiative is gained in the following initiative roll phase.
Spells The spell Gain Initiative can be cast after the initiative roll, in the spell casting round to automatically steal back the lost initiative from the enemy. This spell uses a single spell point for the caster.
Initiative Roll
At the start of the bound each side rolls a 1d10 dice, the highest number gains initiative for that bound and goes first in each of the seven rounds that are listed above. If both sides roll the same number then the side that held initiative last bound regains it again this bound. On the initial bound if both sides roll the same number, then the dice should be rolled again.
Any additional dice that have been gained from a motivational check are rolled together with the initiative dice, and the highest scoring dice counts for the sides initiative dice.

4
Middle Earth UK
Spell CastingSpell CastingSpell CastingSpell Casting Some special figures are able to call upon archaic magic; this enables the spell casting figure to influence the abilities and behaviour of other figures or to affect and alter nature in a specific way.
Spell casting figures have a fixed number of spell points that are between 1 and 10 to use in an encounter, each of the spells listed below uses a single spell point when cast.
A figure that casts a spell must forego its normal movement phase (4c) and cannot be in close combat. Mind Spells
These spells have an effective range of 30cm from the casting figure. Figures that are within the range of the spell are affected at the time of casting, figures that move within 30cm of the caster after the spell has been cast are not affected.
Saving throws for the following mind spells are NOT REQUIRED:
Courage All friendly figures within the spells area of effect will double their attack value for this bound.
Despair All enemy figures within the spells area of effect will halve their attack value for this bound.
Gallantry All friendly figures within the spells area of effect will be Gallant for this bound.
Valour A single friendly figure is given an extra heroic action this bound.
Saving throws for the following mind spells are REQUIRED:
Confusion All enemy figures within the spells area of effect will be confused for the remainder of the bound, the affected figures cannot move or attack, but they can make a wound saving throw.
Control The spell caster can take control of a single enemy figure for the remainder of this bound, the caster can attempt to cause the figure to make a heroic action in each of the heroic action phases, but the figure can attempt to save against each attempt. A successful save will break the control spell.
Shock The spell caster overwhelms the mind of an enemy figure with waves of relentless pulsing energy. The target figure is stunned unable to move or act and is also knocked prone if it doesn’t make a successful save against this spell. The figure is flung to the ground 1D10cm away from it current position, the caster places the figure.
Terror All enemy figures that don’t successfully save within the spells area of effect will runaway in terror at the figures normal movement rate. This is executed in the compulsory movement phase (4a) and there is no reduction for any difficult terrain. The spell caster will decide on the figures final placement, see: Fleeing in Terror.
Power Spells
These spells have no effective range and cover the entire battlefield.
Saving throws for the following power spells are NOT REQUIRED:
Gain Initiative The initiative for this bound is transferred to the side that cast this spell. The side that had initiative will lose it, but will gain it again if the initiative roll is drawn at the start of the next bound.
Standard All friendly companies that are under the influence of an adverse morale result must immediately attempt a recovery check, if successful the company will immediately rally and then it can move normally in the movement round.
Stay & Rally A single friendly company that is under the influence of an adverse morale result will immediately attempt to rally with an additional 40% chance for the effects of this spell. If successful the company will immediately rally.

5
Middle Earth UK
Spell CastingSpell CastingSpell CastingSpell Casting Natural Spells
These spells have no effective range and cover the entire battlefield unless otherwise stated.
There are no savings throws required for natural spells.
Darkness This spell causes natural dark clouds to appear which will block out the sun, moon or stars; a dark menacing evil shadow is cast upon the land. All evil creatures will now receive a +5 bonus to their ability values and no morale checks are required for any causes inflicted this bound upon evil companies. This spell also negates Starlight.
Fire The caster has the ability to ignite wood within 30cm if there is a fire source next to caster to initiate the spell. A figure within 5cm of ignited wood must save against its full ability value or it will receive a wound from the fire. The fire will only last for the present bound, after which the fire source is exhausted and the ignited wood is consumed leaving just a smoking husk of wood. It a tree is ignited, then any surrounding trees within 5cm will also catch fire causing a chain reaction, this continues until there are no other trees within range. Lightning The spell caster sends forth a bolt of sizzling bright white energy to smite its opponent; the bolt will strike its target automatically. Make the required saving throw as a wound recover roll at half the figures ability value (rounded down). A figure with Iron Will can save at its full ability value.
Obscure This spell affects the natural clothes of the caster, the colours and hues will alter to blend in with the natural surroundings. A figure must remain stationary for the spell to take effect, and then it can move at its normal movement rate in the following movement round. The figure can continue being invisible each bound by expending another spell point; this does not require the caster to remain stationary.
Shutting/Opening This touch spell affects the natural properties of wood and stone doors; it causes such materials to swell or contract slightly. Once swollen the portal will be shut firm and only a counter spell can open it.
Starlight A dazzling bright radiance extends from the caster; it will cause all evil figures to divert and shield their gaze and so it reduces their ability value by -10 for the remainder of this bound. This spell also negates Darkness.
Saving Against Spells
Some spells have an automatic effect and do not allow a chance to negate their magic, whilst other more potent spells allow a chance of negation. A figure uses half of its ability value (rounded down) to attempt to negate the effects of any magic that is cast against it; a successful roll indicates that the spell has no effect upon the figure.
A figure that has the special ability of Iron Will can use its full ability value when saving against a spell.
Naur an edraith ammen! Naur dan i ngaurhoth!
There was a roar and a crackle, and the
tree above him burst into a leaf and bloom
of blinding flame. The fire leapt from tree-
top to tree-top.
JRR Tolkien – Fellowship of the Ring

6
Middle Earth UK
Heroic ActionsHeroic ActionsHeroic ActionsHeroic Actions A figure of outstanding ability will have a number of hero points to use in making heroic actions. A figure listed with a red ability value will have a single hero point to expend, whilst a figure with a red number of between 2 and 10 next to its ability value will have this number of hero points to expend in a game.
A company leader is denoted with a red ring around its base and has a single hero point to expend, whilst a lieutenant with a blue ring around its base has two hero points to expend and a captain with a purple ring around its base has three hero points.
Only a single hero point can be expended by a figure in each of the heroic action phases that occur within the bound sequence. The movement, missile and combat rounds each have two heroic action phases; a single hero point must be used in each if both heroic action phases are used.
Hero points can be used to do the following:
Accuracy A good figure may use the first heroic missile fire phase (5a) to aim into a friendly combat, then in the normal missile fire phase (5b) the figure can fire without hitting any friendly figures. The figure may expend an extra hero point to continue aiming and firing in the next heroic missile fire phase (5c).
Combat Press A figure may execute a pressing combat move of 5cm in one of the reclamation movement phases (6c, 6e or 6h) the figure may only do this if it is not held in close combat with an enemy figure.
Evade Zone Of Control A figure can evade an enemy’s zone of control by expending a hero point in the first heroic movement phase (4b). The figure will then move in its normal movement phase (4c) and pass through all zones of control. When passing through a zone of control the figure is exempt from being attacked, unless it makes contact with a figure.
Extra Combat Attack A figure can make a full set of attacks in any of the heroic combat phases (6a) or (6f).
Extra Manoeuvre A figure can make a special manoeuvre, leap, jump, climb or balance in any of the heroic movement phases (4b) or (4d) with a doubled chance of a successful manoeuvre check.
Extra Missile Attack A figure can make a full set of attacks in any of the heroic missile fire phase (5a) or (5c).
Extra Movement A figure can make an extra move at the figures normal movement rate in any of the heroic movement phases (4b) or (4d).
Manoeuvre Save A figure that fails a manoeuvre check may use a hero point to reroll the manoeuvre check at the time of failure.
Morale Retest A figure with the Command, Leadership or Lordship special ability can expend a hero point to cause one or more company’s to retest a failed morale check, see Heroic Commander Retest.
Negate A figure can automatically shrug off the effects of a spell or special ability that directly affects it this bound.
Retreat A figure can retreat from combat, in the special movement phase (4e). The figure leaves combat and makes a normal move, it can initiate combat with a new enemy this bound. When leaving combat the figure is exempt from being attacked and a figure can leave even if it is surrounded or trapped.
Wound Recovery A figure can reroll for a failed wound recovery check, roll again against the figures ability value. The figure can continue to expend its hero points to attempt to recover the wound, until it succeeds or it has exhausted its hero points. Success indicates that the figure survives to continue the fight, whilst failure indicates instant death.
Commanders
A figure with the special ability of Command, Leadership or Lordship can expend a hero point on a heroic action and all friendly figures within a specific range can also undertake the heroic action. The range is dependant on the exact special ability the commander is using, see Special Abilities.

7
Middle Earth UK
Special AbilitiesSpecial AbilitiesSpecial AbilitiesSpecial Abilities A few extraordinary figures will have one or more special abilities which they can use within the bound sequence. Special weapons or items can also bestow special abilities upon a figure when the weapon or item is used.
Agility When executing any special manoeuvres the figure will make its attempt to succeed with the manoeuvre at half the required chance of failure. The figure may also move over or through all difficult terrain at full speed. An agile figure can never be knocked prone by another figure. The agility skill also allows a figure to move at full normal speed and still fire a missile weapon without suffering any penalties.
Ambush Figures that have the ambush ability don’t have to be placed on the battlefield at the start of the battle. They can be placed on the battlefield in any of the special movement phases (4e) after which they can move and attack normally.
Command A figure that has the special ability of command can with the aid of a heroic action inspire all friendly figures within a 10cm radius to perform the same heroic action. This action can be any of the listed heroic actions, but all figures must perform the same action and must remain within the area of command.
Evade A figure with the evade ability can attempt to evade initial contact with an enemy figure, the figure rolls against its ability value in the special movement phase (4e). If successful the figure evades contact and is able to execute a full normal move away from the contacting enemy figure. When leaving combat the figure is exempt from being attacked and a figure can leave even if it is surrounded or trapped. The figure must head for the safety of its own forces and can’t initiate a new close combat with another enemy figure.
Fiery Breath Some creatures of colossal power have the ability to spew forth from their jaws a stream of white hot fire. Such an attack covers a 10cm radius from its points of aim. All figures good or evil that are caught within this area will suffer an attack equal to the creatures attack value.
Flight This ability allows a creature that normally has wings to fly at a normal movement rate of 60cm in the movement round. All difficult and impassable terrain features are ignored unless the creature attempts to land within it.
Frenzy A figure that is within 20cm of an enemy will become frenzied and will move in the compulsory movement phase (4a); the frenzied figure will close the remaining ground to its nearest opponent. Each bound the figure will gain two extra attacks in the impact combat phases (6b and 6g). The figure will increase its stamina, which will give it the same effect as a figure with Toughness. The figure may make a reclamation move of 5cm after each phase of combat if it kills all its opponents. Spells will only have a 10% chance of affecting a frenzied figure.
Gallant A figure that is gallant need not make a saving throw for any terror or despair attack that is directed against it.
Insight Insight allows a figure to see beings that exist and move around in the realm of shadows.
Iron Will A figure may use its full ability value to attempt to negate any magic that is cast against it.
Impact A figure that charges with the impact ability will initiate its attack in the first impact combat phase (6b); if the figure is successful it may continue with its attack in the normal combat phase (6d); again if successful it may have a final attack in the second impact combat phase (6g), see: Impact Speed Movement.
Leadership Like Command a figure that as the special ability of Leadership can with the aid of a heroic action inspire all friendly figures within a 20cm radius to perform the same heroic action. This action can be any of the listed heroic actions, but all figures must perform the same action and must remain within the area of command.
Lordship Like Command a figure that has the special ability of Lordship can with the aid of a heroic action inspire all friendly figures within a 30cm radius to perform the same heroic action. This action can be any of the listed heroic actions, but all figures must perform the same action and must remain within the area of command.

8
Middle Earth UK
Special AbilitiesSpecial AbilitiesSpecial AbilitiesSpecial Abilities
Immense A creature that is exceptionally large may be classed as immense. A figure that attacks an immense creature will halve its ability value (rounded down) and all Smite attacks have no effect on a creature with the immense special ability.
Poison Some creatures have a poison bite/sting attack that will automatically disable a figure for the remainder of the battle. To successfully inject the poison the creature must roll twice against its ability value, the first is to hit and the second is to inject the poison. A hero may use a hero point to automatically negate the effect of the poison.
Projection This ability allows a figure to see beings that exist and move around in the realm of shadows, it also gives the figure the ability to project itself in to that realm and attack such creatures that exist there.
Shadow Walk Evil beings of great power have the ability to walk in the realm of shadows; the figure ignores all zones of control and does not radiate a zone of control itself. A shadow creature can only be killed by others figures that are also in the shadow realm or by special weapons that have the ability to strike at such shadow creatures. A shadow creature that suffers a non-lethal mortal wound will be banished and removed from the present battle.
Smite An exceptionally strong figure may have the ability to smite an opponent; if the figure causes a wound then its opponent will make a half value wound recovery check (rounded down) against the wound.
Spell Casting This ability allows a figure to use one of its hero points to cast a Mind Spell.
Steed A mount with this special ability has a normal movement rate of 45cm; its rider can execute a full move and still undertake bow fire or spell casting without suffering any penalties. The mount will come to the call of its rider and so can move independently when it is without rider.
Stealth The figure ignores all zones of control and does not radiate a zone of control itself.
Stomp A large and powerful creature that has this special ability can execute a stomp attack with its legs against an opponent. The attack causes an extreme crushing blow and any attack rolls of between 01 and 10 on the D100 attack dice will inflict an Exceptional Hit. If the figure causes a normal wound then its opponent will make a half value wound recovery check (rounded down) against it. If the recovery check is successful the figure will immediately be knocked prone, unless it has the Agility special ability.
Sweep This ability allows an attack against every figure that is in base contact with the figure. The sweep can start at any point and must then move continuously clockwise or counter clockwise. It will be blocked and halted if any of the opponents succeed with a wound recovery check against a successful attack. A figure is considered to have ducked the attack if it misses, but the sweeping attack will continue onto the next figure in the sweep.
Swiftness This ability allows a figure to make an extra attack at its normal ability value when any weapon is used. The figure may also undertake a 5cm reclamation move after killing the last figure that is in contact with it.
Thrust An exceptionally strong figure that is armed with a long reach weapon can make an extra attack against a supporting opponent if the initial attacked opponent as been killed.
Terror A figure will continually emanate a feeling of overpowering terror. Any enemy figures that are within a 10cm radius will be required to make an ability check in the next extraordinary check phase (3b). Failure indicates that the figure runs away in full flight for this move, this is carried out immediately in the compulsory movement phase (4a), see: Fleeing in Terror; a hero point may be expended to negate this effect.
Toughness An extremely large creature or one with exceptionally thick skin will continually count has being shielded, this allows the figure to re-roll any failed wound recovery rolls. The figure will attack normally whilst shielded.

9
Middle Earth UK
Special TrSpecial TrSpecial TrSpecial Trainainainaininginginging Some individuals or select companies might have special key training skills that will benefit their abilities on the battlefield, these skills are as follows:
Individual Skills
Veteran An individual figure that has experienced years of combat action can be classified has a Veteran Figure . The figure will receive the benefit of two attacks per missile and/or combat phase and will have a single hero point to expend (denote this by writing its ability value on its base in RED permanent ink.).
A company leader or higher level commander can be a veteran, again write its factor in RED, and the figure will benefit from an additional attack and will also receive an additional hero point.
Company Skills
Archery A company or ancillary squad that has the archery skill can move at up to half its normal movement rate and fire a missile weapon without any penalty being applied to a figures ability value.
Examples of figures that benefit for this skill are: Wood-elves and Rangers
Assault An ancillary squad that has the assault skill can assail a defended position, moving at the full normal movement rate with ladders and other siege equipment. Figures continually count as being shielded due to their specially prepared armour.
Examples of figures that benefit for this skill are: Uruk-hai and Orcs
Bodyguard A company or ancillary squad that has the bodyguard skill will continually count as being shielded the figures may attack normally whilst counting as being shielded.
Examples of figures that benefit for this skill are: Minas Tirith Tower Guard and Rohan Royal Guard
Camouflage A company or ancillary squad that has the camouflage skill can conceal themselves in a terrain feature, wood, rocks etc and remain undetected until they attack an enemy, move or an enemy figure moves within 10cm of their position and makes a successful ability check in the extraordinary checks phase (3b).
Examples of figures that benefit for this skill are: Grey-elves and Rangers
Horsemanship A company or ancillary squad that has the horsemanship skill can ride a mount at its full normal movement rate and still fire a missile weapon from the mounts back without any penalty being applied to a figures ability value.
Examples of figures that benefit for this skill are: Riders of Rohan and Easterling Bow Cavalry
Mountaineer A company or ancillary squad that has the mountaineer skill can move at its full normal movement rate through or across any broken ground. Figures can also negotiate climbs or drops at half their ability value, see Climbing Obstacles.
Examples of figures that benefit for this skill are: Dwarves and Goblins
Scout An ancillary squad that has the scout skill can help determine how units are deployed at the start of the battle see, Initial Setup and Scouting. A figure with the scouting skill can evade in the special movement phase (4e) if it rolls its ability value when it is initially contacted by an enemy figure, see the Evade special ability. Scouts are lightly armed so suffer a -5 penalty on their base ability values.
Examples of figures that benefit for this skill are: Riders of Rohan and Rangers
Woodcraft A company or ancillary squad that has the woodcraft skill can move at its full normal movement rate through a wooded terrain feature, but a company formation will still become unformed whilst it is within the restriction. The figures also gain the benefit of being shielded whilst in the wooded terrain, the figures can attack normally.
Examples of figures that benefit for this skill are: Grey-elves and Huorns

10
Middle Earth UK
ActionsActionsActionsActions Declare Shielding
A figure who is armoured with a shield may declare that it is shielding this bound. The figure is given a shield marker to indicate that it is shielding. A figure that is shielding will forgo its attack this bound, but in return the figure receives an additional recovery check if a wound is inflicted, see Shielding. A shielded figure will have reduced visibility whilst moving so reduce the forward movement rate of a shielded figure by 5cm.
A figure must also declare that it is un-shielding itself before it can attack normally, this is declared in a subsequence shielding phase and the shield marker is then removed from the figure.
The illustration left shows a figure with a shield marker to indicate that it is shielded and can’t attack this bound. A larger shield marker can be used to indicate that a formation of figures are all shielded instead of placing a shield marker with each figure, this is useful when advancing figures against missile fire. A figure that carries a large body shield will increase its wound recover chance by +20 instead of the normal +10 bonus for this type of shield.
Extraordinary Checks
A figure that is required to undertake a check that is caused by a special ability or an extraordinary circumstance will roll its extraordinary check dice in this phase. Scouting
A scout is the eyes and ears of an army; it carefully positions itself between the enemy and its own advancing force. Its role is to observe the actions and movements of the enemy and report back to its commanders. A scout is lightly armoured and this is reflected with a -5 penalty to the figures base ability value. A scout has the Evade special ability, which gives the figure a chance of extracting itself from a perilous encounter.
In the scouting phase (3c) of the action round, scouts can undertake a scouting check if they are not in close combat by rolling against their ability value, ability values may be grouped with other scouts of the same squad.
Scouts are able to give its army three supporting roles these are:
Wary Movement The scouts cause any enemy company or ancillary squad to move warily at half its normal speed in the normal movement phase (4c). Heroic movement phases in the same round are not affected.
Spotter The scouts can act has a spotter for one group of friendly archers from any company or squad that wish to fire their missiles indirectly at an enemy.
Tactician The scouts have the ability to pin-point a weakness in an enemy’s formation. This allows a friendly formation to make an initial close combat assault against the designated enemy with a +5% bonus to each figures ability value. Note the bonus is lost in subsequent rounds.
To use these three supporting roles the scouts must be within 50cm of all parties and must have a direct line of sight to the enemy formation. The Spotter and Tactician scouting abilities must also have a direct line of sight back to its own formation that it is directing.
Scouts may move after a successful check has been made, but they must retain any required line of sights.
A scout is allowed to fire a missile weapon at half its ability value (rounded down) and still continue to successfully scout, if the scout moves its ability value will be reduced to a quarter (rounded down).

11
Middle Earth UK
Rules Of EngagementRules Of EngagementRules Of EngagementRules Of Engagement The fantasy land of Middle Earth is awash with possibilities for battlefields from the cold tundra ice cap in the north above Forodwaith, through the heartlands of Eriador and Rhovanion, to the hot deserts of the south in Far Harad. But no matter where the battlefield is, certain rules of engagement must be upheld by the opposing sides, these are:
Engagement Type
Is the engagement:
@ A random encounter where both sides arrive at the battlefield at the same or similar times
@ A predetermined encounter with specific objectives
@ A defensive encounter where one side holds the battlefield, whilst the other side attacks
@ A scenario encounter from the book
These four engagement types will be known as Random, Objective, Defensive and Scenario engagements. Initial Setup
The initial setup requires an agreed level of tact and diplomacy between both sides, remember that it’s only a game not a war. Random Engagement
Determine the layout of the battlefield jointly and then roll a D10 dice, the side with highest dice selects which battlefield edge to bring their army on by. The opposing army will come on the opposite battlefield edge.
Alternatively allow one side to select the complete battlefield layout, but the opposing side can then select its starting edge.
All armies will then start with their figures up to 30cm in from their relevant battlefield edge.
Repeatedly roll to determine who will position a company or ancillary squad in their deployment area, after all the units have been deployed the individual figures will be positioned in the same area, see Deployment.
If a force is out scouted then its order of setup will be affected after deployment, see Out Scouting.
Objective Engagement Determine the layout of the battlefield as for the Random Engagement above and then place 5 objective flags or markers on the battlefield.
One objective flag/marker on each of the opposing sides up to one third of the way in from the edge of the battlefield, but not within the initial deployment area. Place the remaining three anywhere within the central area of the battlefield.
Once this is complete select each side’s initial deployment area, deploying figures as above.
It is sensible to place the objective flags/markers on strategic positions, i.e. the top of a hill, a wood, a building.
Defensive Engagement A defensive engagement allows the defender to layout the battlefield and select which side it is going to defend.
The opposing side is then allowed to place or remove up to D5 (1D10 halved) terrain features in its half of the battlefield.
The attacker must deploy all of its army within its initial deployment area of 30cm from its battlefield edge and then the defender deploys its army anywhere within its half of the battlefield.
If a defender is out scouted its order of setup will be affected, see Out Scouting.
Scenario Engagement Companies and figures are placed on the battlefield to best represent the scenario from the book. Once placement is agreed by both sides the encounter begins.

12
Middle Earth UK
Rules Of EngagementRules Of EngagementRules Of EngagementRules Of Engagement Battlefield Deployment
The following battlefield images show the initial deployment areas for three types of engagements.
Random Engagement Objective Engagement Defensive En gagement Scouting Points
Determine the scouting points of an army by adding together the ability value of each figure that is designated has a scout within the army.
Receive a single scouting point for every 100 ability points; any remaining ability points must be rolled for randomly on a D100 dice. Rolling the remaining ability points or below will give another single scouting point. Therefore a total scouting ability value of 143 would give one scouting point and 43% chance of a second scouting point. Out Scouting
Now compare the scouting points of each side by deducting the lowest form the highest.
The side with the greater difference in scouting points will out scout its opposing side. If both sides have the same points then neither side will be out scouted.
An army that has scouting points remaining will be able to use these to aid their initial deployment.
Deployment
Each side rolls a D10 dice; the side with the lowest roll must deploy one of its companies or ancillary squads as the encounter demands. Continue to roll opposing dice after each deployment until all units have been deployed by a side, any remaining companies or ancillary squads of the opposing side will then be freely deployed as the encounter demands.
Finally make a single opposing roll on a D10, the lowest roll deploys any hero’s or individual figures first.
Affecting Deployment
After all initial dispositions have been made by both sides within the Initial Setup sequence.
One company and/or its ancillary squad can be relocated on the battlefield for each scouting point. A company and/or squad may be repositioned up to 60cm in from its side’s edge of the battlefield, but no further forward than its half way point. These can include companies and/or squads with special training like the Camouflage ability.
Finally the armies scouts are allowed to be redeployed anywhere within their sides half of the battlefield.

13
Middle Earth UK
MovementMovementMovementMovement All normal movement rates for figures are listed below in centimetres: Good Movement
Evil Movement
Hobbits 10 Goblin 10
Dwarf 12 Orc 12
Men 15 Men 15
Númenórean 17 Uruk-hai 17
Grey-elf 20 Half-orc 20
High-elf 22 Trolls 22
Huorn/Ent 25 Olog-hai 25
Horse (Mounts) 30 Horse (Mounts) 30
Restricted Movement
Any movement over or through difficult terrain will be executed at half the normal movement rate.
Difficult terrain includes:
@ All Woods
@ Broken Ground
@ Boggy Ground
@ Steep Hills
@ Water Obstacles
@ Inside Buildings Interpenetration
Under normal circumstances an individual figure may not interpenetrate another individual figure friend or foe, all figures must move around each other. The only exception to this rule is for figures that flee or suffer from an adverse morale result, these may interpenetrate friendly figures and then it is more of a dodge move than interpenetration.
An individual figure may interpenetrate a formed friendly formation, the formation will open up to let the figure through. Figures that are part of the same formation may also freely interpenetrate. A figure that interpenetrates will be placed at the back of the formation, if it finishes its move within the formation.
A figure that interpenetrates a close order unit and is suffering from an adverse morale result will cause the formation to become unformed for the remainder of the present bound. The unit will automatically reform in the following bound, unless other circumstances dictate otherwise. The close order formation does have the option to lock ranks which will cause flees and figures suffering from adverse morale results to flow around the formation but only from its front. About Facing
If a figure turns to face another figure then it does not count as moving as long as it remains on the same spot.
Moving Siege Weapons and Equipment
A movement rate of 10cm is possible for any siege weapon or equipment that is drawn by pack animals. A siege weapon can be manhandled at a movement rate of 5cm if the ability value of the figures that are manhandling it exceeds the ability value of the siege weapon.
A full bound is required for siege weapons or equipment to be limbered or unlimbered.

14
Middle Earth UK
MovementMovementMovementMovement Mounting/Dismounting
When mounting a figure must reduce its movement rate by a half to successfully mount, the remainder of its move can be expended before and/or after the mount takes place. A figure with the Agility special ability will only reduce its movement rate by a quarter.
Dismounting does not require any reduction in movement rate, although if half the movement phase is not spent tying up the mount then it will wander away from the battlefield and is removed, unless it is an Intelligent Mount.
Offensive mounts like Worgs will continue to fight on the battlefield; these can only be remounted when they are not in combat.
Riders have to move to their mounts before they can remount, except intelligent mounts who will come to their master’s call; this is declared in the special movement phase (4e) the mount will then be placed next to its master in the following compulsory movement phase (4a). Locked in Close Combat
A figure is considered to be “Locked in Combat” once a figure is in base contact with an enemy figure. The figures cannot reposition themselves to allow other friendly figures to engage in the close combat. If the space for contact is not there then the figure cannot initiate close combat.
A figure is allowed to unlock itself and carry out a reclamation move if it kills an enemy figure, see Reclamation Movement.
Cavalry may also pull-off from a close combat situation; see Cavalry Pull-Off and Rally.
A figure may also use a hero point to retreat from combat this automatically unlocks the figure from close combat, see the Retreat heroic action. Cavalry Pull-Off and Rally
A mounted company may in the special movement round (4e) pull-off from close combat against infantry and rally to the company standard. The following restrictions apply to this pull-off and rally manoeuvre:
@ The company must still have its company standard and company leader present
@ All the company must not have yet moved within the present movement bound (4a) to (4d)
@ A figure cannot pull-off if it is surrounded or trapped by enemy figures
@ All figures that pull-off must move their full normal movement rate
@ Figures that pull-off cannot initiate a new close combat this bound
@ Figures that pull-off cannot fire missile weapons in the missile round
A company that successfully pulls off from close combat will immediate rally at the fullest extent of their movement this bound facing the enemy. Fleeing in Terror
A figure will be moved by the opposing side if it is affected by an aura of terror or the fright of a terror spell, this is done in the compulsory movement phase (4a).
The following rules must be adhered to when moving the figure:
@ The figure must move away from the effect
@ The figure must move away from any other opposing figures
@ The figure must move its full movement rate, no deductions for restrictive terrain
@ If the figure is trapped or surrounded it will automatically surrender
A fleeing figure does not radiate a zone of control and can interpenetrate friendly figures without effect. A figure that is contacted after a flee move will not fight, but it can make a wound recovery check.

15
Middle Earth UK
MovementMovementMovementMovement Impact Movement
Most figures advance to contact with an enemy, this is done in a controlled and calculated manner. A few figures however have the ability of impact which allows them to basically charge an enemy. There are two types of impact movement, these are impact speed and impact mass.
A few individual figures and all mounted figures will have the ability of impact speed. This ability allows an individual figure to use its bulk to smash through enemy figures that are not killed and knock them to the ground.
All formed close order formations that are at least four figures abreast and three deep will have the ability of impact mass. This ability is imparted to the formation because of the sheer number of figures.
Move all figures and formations as normal, but when contact is made with the enemy declare “Impacting”. Then in the combat round follow the procedure for either impact speed or impact mass see Close Combat.
A figure or formation that has the impact ability does not have to use it every time contact is made.
The advantage on impacting is that the figure or formation may initiate three phases of combat in a single combat round. If enemies are killed, then reclamation movement may be undertaken in order to contact fresh enemy or extract the figure from combat in the case of impact speed, see Reclamation Movement. Close Order Formations
Figures from the same company that are within a 10cm radius can form into a close order formation if they spend the required amount of time doing so. The formations that can be achieved are:
Single Line: A single line takes half a movement round to form/reform.
Double Line: A double line takes three quarters of a movement round to form/reform.
Column: A column takes a full movement round to form/reform.
Large formations like pike phalanxes may require two or more movement rounds to form. Once the initial core of the unit is formed and ready, any loose figures within 10cm of it can then join the formation in the next movement round.
There will be no reduction in movement for breaking up a formation, either into smaller components or disbanding it completely.
A close order formation will move at 10cm, it can wheel or echelon at half speed or it can about face which will reduce its movement by a quarter, it may also turn 90º to the side and reform this will reduce its movement by half.
A company commander who is part of the formation may use his hero point to make a heroic move in a heroic movement phase, the whole formation will be affected not just the figures within 10cm. Higher level commanders with the Command ability can affect the whole formation just by being with 10cm of any part of it.
Figures that are killed in a formation may be replaced by moving the remaining figures from behind the lost figure forward so reclaiming the space; this is implemented in reclamation movement after each phase of combat. The victorious figure can reclaim the space if it is not reclaimed by the supporting figures.
A formation may execute its final impact mass move to contact at its full movement rate.
A unit that is unformed will not receive any of the benefits of a close order formation until it is reformed.
Close order formations cannot move through difficult terrain without becoming unformed.

16
Middle Earth UK
MovementMovementMovementMovement Reclamation Movement
The only normal movement that is allowed in combat is reclamation and cavalry pull-off movement.
After a figure is killed the space that is vacated by the dead figure may be claimed by the opponent that inflicted the wound. All figures are moved in the reclamation phase, this comes after the combat phase; except for a figure that has any additional attacks outstanding, this figure may be moved in the combat phase so that its outstanding attacks can be completed.
A figure may leave contact with other enemy figures through reclamation movement as long as it remains in contact with at least one of them, see illustration below left and centre. Reclamation movement cannot be performed if the figure is completely surrounded or trapped and performing such movement would displace an enemy figure, see illustration above right. If a figure was attacked front and back and it killed either with its attack, no reclamation movement would be possible, due to the figure having to leave contact with the other enemy figure, see illustrations above.
There are a few exceptions to the above reclamation moves, these are:
A figure that contacts an enemy and kills it with contact missile fire can make a reclamation move of 5cm and it can veer up to 45º of its frontal facing to contact a new enemy or move to safe ground.
Safe ground is any open space that is free from the zones of control of any enemy figures.
A frenzied figure that kills all its opponents can make a reclamation move of 5cm; it can veer up to 90º from its frontal facing to contact a new enemy. If an enemy cannot be reached, then only a normal reclamation move is allowed, but remember that the figure will still be in frenzy if there is other enemy figures within 20cm and the nearest of these must be contacted in the compulsory movement phase (4a) in the next bound sequence.
If an exceptional hit occurs the figure may move a distance of 5cm in any direction from its frontal facing to contact a new enemy, see Exceptional Hits.
The special ability of Swiftness allows a 5cm reclamation move after a successful kill.
A figure that is performing an impact move can traverse a greater distance; impact speed allows a reclamation move of 10cm through 22½° whist impact mass is 5cm, b ut the company must move straight forward.
A figure that moves these greater distances cannot ignore the zones of control of figures about it, and so must contact a figure if it passes into its zone of control. For more information on reclamation movement for formations, see Close Combat and the appropriate sub section impact speed, impact mass or close order formations.

17
Middle Earth UK
MovementMovementMovementMovement Forced March
A company leader has the ability to inspire good figures or terrorise evil figures into attempting a forced march in the movement round. The leader affects all the figures within its company if a successful forced march check is made. The figure declares in the special movement phase (4e) that it is attempting a forced march.
The company leader must roll less than or equal to its ability value to successfully inspire or terrorise the company into moving again. A successful forced march roll indicates that the entire company will move again at its full normal movement rate in the special movement phase (4e).
The figures are considered to be running and lumbering forward, because of this they cannot fire a missile weapon or undertake a normal phase of close combat (6d). A hero point can be expended to inspire the figures to fight in the heroic combat phases (6a) or (6f).
Impact movement is not allowed after a forced march, but heroic movement in phases (4b) and/or (4d) is allowed before a forced march is attempted.
A figure that has forced marched this bound and receives a wound will make a reduced wound recovery check at half its ability value (rounded down).
Fatigued
For a forced march that comes after a normal moveme nt phase (4c): If the forced march roll indicates 96 or above then the company becomes fatigued and will immediately stop and rest. It must rest for the following full bound and cannot fire any missile weapons or retaliate to any close combats that are initiated against it.
For a forced march that comes after any heroic move ment phases (4b) and/or (4d): If the forced march roll indicates 91 or above then the company becomes extremely fatigued and will immediately stop, sit down and rest. It must rest for the following two full bounds and cannot fire any missile weapons or retaliate to any close combats that are initiated against it. The figures count as being prone if they are contacted whilst fatigued.
Being caught in close combat whilst fatigued doesn’t count towards the required bound of rest for the company. They must extract themselves and spend the full bound in complete rest, once rested the company can continue as normal.
Drovers
An evil company can employ the use of a drover to whip and torture its figures into moving faster. The drover adds its ability value to that of the company leader when the forced march check is made. Success indicates that the entire company executes a forced march. A drover also reduces the chance of a company becoming fatigued, this is reduced to a roll of 100 (00) on the forced march dice. Only one drover is allowed per company.
It tends to be very encouraging when somebody bigger than you is whipping your ass!
Driving Terror
An evil figure can use its Terror special ability to frighten companies into moving faster. The figure uses its own ability value for the forced march check and does not add it to the ability value of the company leader. The figure makes one single forced marched check and if successful all the companies that are within its radius of terror will be affected (measure from the figure to the company standard for each affected company). Night and Darkness
At night or in the effects of the Darkness spell, creatures with good night vision will function normally, whilst other creatures will have their normal movement rates reduced by 5cm.
The following creatures have good night vision:
Goblin Orcs Uruk-hai Wargs Great Spiders Trolls Olog-hai Dwarves

18
Middle Earth UK
MovementMovementMovementMovement Special Manoeuvres
The success of a special manoeuvre is based on the distance in millimetres that a figure wishes to traverse. Each millimetre is equivalent to a 1% chance of failure, so a figure that tries to traverse over 100mm will automatically fail unless there are other factors to consider, these are covered below.
Special manoeuvres cover a number of different categories these are:
Leaping Gaps The distance across a gap in millimetres indicates the chance of failure, for success a figure must roll this measurement or above on a percentage dice. Treat a failure as a jumping down check from the height that the leap started.
Jumping Down The height of a vertical drop in millimetres indicates the chance of failure, for success a figure must roll this measurement or above on a percentage dice. Treat a failure as a fall check.
Climbing Obstacles The vertical height or vertical decent of a climb in millimetres indicates the chance of failure, for success a figure must roll this measurement or above on a percentage dice. A single climbing check may be split into a number of checks that are carried out over a stated number of bounds.
Example : A figure wishes to climb the outside of a tower which has a vertical height of 100mm. The figure would automatically fail if it attempted to climb it in a single bound, but if it split the climb in two, the figure could make two 50% checks, one each bound. Checks may be reassessed each bound, the figure might have split the climb into five 20% rolls, but after the second successful check it may have decided to make the third check its final one at a 60% chance of failure.
A failure indicates a slip and fall, treat this as a jumping down from the height that was climbed too or from the height that still remains to be descended.
Example : Whilst attempting to climb the above tower the figure rolls 35% for its first climbing check; this indicates that the figure fell at the 35mm point. If the figure had successfully climbed the first half of the tower it would have fallen 85mm (50mm + 35mm). This failure result is the value used on the required jumping down check; a successful roll indicates no damage, whilst an unsuccessful roll indicates a fall check.
Crossing Obstacles A foot figure may cross an obstacle that does not exceed half the figures height, whilst a mounted figure can cross an obstacle that does not exceed the full height of the mount. These obstacles can be simply crossed by vaulting or jumping over them. The vertical height of an obstacle in millimetres indicates the chance of failure, for success a figure must roll this measurement or above on a percentage dice. Failure indicates that the figure falls whilst crossing but no fall check is required; success indicates that the figure can continue with its full move.
Crossing Rivers A figure can cross a shallow river or ford at half its normal movement rate, a deeper or swifter flowing river will require a check. The distance between the two banks of the river in millimetres indicates the chance of failure, for success a figure must roll this measurement or above on a percentage dice. The figure may split this into a number of checks that are carried out over a stated number of bounds. Failure indicates that the figure is swept away 20cm down river, and another ability check is then requires each bound in the extraordinary checks phase (3b). Continuing failure indicates that the figure is once again swept away 20cm, but a successful check indicates that the figure has once again regained a steady foothold in the river.
Agility Manoeuvre A figure that traverses along a narrow obstacle or piece of terrain must take a manoeuvre check. The distance of manoeuvre in millimetres indicates the chance of failure, for success a figure must roll this measurement or above on a percentage dice. Treat a failure as a jumping down check from the point that the manoeuvre had reached.
Falling Check
If a figure falls, a check must be made to see if a wound is received from the fall. The chance of a wound is dependent upon the height of the fall in millimetres. A wound is caused if the number rolled is less than the height of the fall, but by rolling the same or above a wound will be avoided. A figure that is successful and survives the fall will be knocked prone, unless it as the Agility ability which causes the figure to land on its feet.

19
Middle Earth UK
Zones of ControlZones of ControlZones of ControlZones of Control Every figure has an invisible area of control around itself called a zone of control; this area extends out the same distance as the base size of the figure, see the illustration below. The zone of control cannot normally be moved through by an enemy figure without initiating close combat, see exceptions below. In the illustration above the red figure can’t pass in between the two blue enemy figures because there is not a sufficient gap between them. If the figure wishes to continue forward, it must initiate close combat with one of the two enemy figures.
Overlapping zones of control don’t affect figures, it’s only when a zone of control overlaps a figures base that it will stop the figure from passing.
There are a few exceptions to the rule for zones of control these are:
@ A figure that expends a hero point can negate all zones of control for a single movement round
@ A figure with the Stealth special ability ignores all zones of control
@ A figure with the Shadow Walk special ability ignores all zones of control
@ A figure that fled or escaped this bound will not radiate a zone of control
@ A figure that suffered an adverse morale result will not radiate a zone of control
@ A prone figure will not radiate a zone of control
If a figure does not radiate a zone of control, then opposing figures can pass it by without hindrance.
In a close order formation the second ranks of figures will automatically be protected by the zone of control of the figure that is in front of it, so contact to flanks must be made to the third or fourth ranks.
Simultaneous contact to a first and second rank figure on the flank of a formation will not unform it; only contact to the third or fourth rank figures can unform a formation.

20
Middle Earth UK
Missile FireMissile FireMissile FireMissile Fire Observation
This is automatic when there is an unobstructed line of sight between two opposing figures and the acquiring foot figure is observing through a frontal 180° arc. If the figure is mounted then the figure can acquire a target through an extended 270° arc, see illustrations below. Direct missile fire is not permitted if there is an obstruction that is blocking the line of sight from the firer to its target, see Indirect Fire below instead.
A figure counts as an obstruction for any direct missile fire; if the line of sight goes through a figures base then this will obstruct the firer’s line of sight, see Overhead Firing for an exception to this rule.
An undetected figure that is on the edge of a building or wood cannot be observed unless the observer is within 30cm of the figure and makes a successful ability check in the extraordinary checks phase (3b) or until the figure reveals itself to the enemy by moving out of the cover or firing its missile weapon.
The observation distance into or through a building or close wood is 5cm, an open wood is 10cm.
To observe over an obstacle without incurring a cover penalty, like a hedge or wall a figure must be touching it and must have the height to see over it. The figure can then be observed by other figures that have a direct line of sight to the obstacle, but the figure against the obstacle will be in cover.
A figure on higher ground can automatically see over terrain that is lower than it, there is no dead ground.
At night or in Darkness figures without good night vision will have their observation distance limited to 30cm.
All other figures are considered to be out of sight and can’t be observed until one of the above rules applies.
Missile Ranges
The following table shows the wounding range in centimetres for normal and volley fire:
Missile Type Ranges
Normal Volley
Throwing Axe 5 N/A
Throwing Spear 10 N/A
Sling 20 40
Short Bow 30 60
Cross Bow 40 80
Long Bow 50 100
Composite Bow 60 120
Great Bow 70 140
Contact missiles are Throwing Axes and Spears these can be used when initial contact with an enemy figure is made, see Contact Missile Fire.

21
Middle Earth UK
Missile FireMissile FireMissile FireMissile Fire Moving and Firing
All bow armed figures may move any distance and fire at half their ability value (rounded down). Some figures may have the Archery or Horsemanship special training, these figures are allowed to move and fire without incurring this penalty, see Special Training.
A crossbow armed figure may move any distance and fire at half its ability value if the weapon is already loaded. It takes half a bound to reload, so after reloading a figure could move the remaining half move, but it would still fire at half its ability value. Loading counts as moving so if the figure loads and remains stationary in the same bound it will still receive a penalty.
Turning a figure around on the same spot to reface doesn’t count as moving.
Contact Missile Fire
Contact weapons consist of all thrown weapons; these are launched at an opponent just before contact is initially made in the contact missile fire phase (5d). If the missile attack kills an opponent, the attacking figure can make an immediate 5cm reclamation move. No contact missile fire is allowed on a new opponent that is contacted within the reclamation move (5e). A defending stationary figure can throw its contact weapon if it is contacted by an enemy, but it will be allowed a reclamation move after inflicting a kill.
Grouping Missile Fire
Any number of figures that can observe the same target may group their missile fire in each fire phase. Total up the ability values of those figures that are firing at the same target and make a single check to see if the target receives a wound. If the resultant number is over one hundred, then an automatic hit is inflicted for every hundred and a roll is made against the remaining percentage chance. Volley Fire
A volley fire team can be formed by positioning 3 to 6 figures in base to base contact with each other. The figures must be armed with the same missile weapon and from the same ancillary squad or company. Their individual ability values are added together to give a single ability value for the volley fire team.
The advantage of volley fire is that the effective range of the missile is doubled. If the target is within the normal fire range then it counts as direct fire, if the target is within the extended fire range then it will count as indirect fire. Indirect Fire
Indirect fire takes place when the firer cannot directly observe its intended target, see Unobserved Missile Fire below or at the extended range for volley fire see Volley Fire above.
For any indirect fire the opponent chooses the figure that is removed if the target is within a cluster of figures. A cluster will occur when two or more figures are within each others zone of control. A single stray figure could be chosen by the firer as the target if it is outside the zones of control of any other friendly figures. Unobserved Missile Fire
This can only used by a volley fire team, the 3rd and/or 4th ranks of a close order formation and siege weapons. If the target is unobservable by the missile armed figures, a spotter of the same company must be used to call in the fire. The spotter must have a direct line of sight to the target and must also be within 20cm of the firer for a volley fire team or siege weapon. The figure from the front rank of a close order formation can spot for its rear ranks.
The chance of a successful hit with any unobserved missile fire is half the ability value (rounded down) of the firing figures. Shielding Against Missiles
A figure may shield itself against all normal missile fire, this excludes siege missiles, see Shielding. A close order formation will receive the ability of defensive ranks against normal missile fire, see Close Order Formations.

22
Middle Earth UK
Missile FireMissile FireMissile FireMissile Fire Body Shields
A figure that is carrying a large body shield will increase its wound recovery chance by +10 for each check that the figure undertakes.
Overhead Firing
A missile armed figure can fire over the head of another figure that is in front of it as long as it is in base contact with the front figure. This allows two ranks of missile armed figures to figure directly without any penalties.
A volley fire team can acquire a target by using the unobserved missile fire over the heads of numerous friendly figures, as long as the spotter is within 20cm of the volley fire team.
Higher Ground
When shooting over any figures from higher ground there must be at least 5cm between the intervening figures and the target figure. The same applies if a figure is firing from lower ground to higher ground, there must be a clear 5cm between the firer and any figures that are directly in front of it. Figures in Cover
A missile armed figure must half its ability value when attacking a figure that is in or behind cover, a figure that is behind a battlement will also count as shielded.
Quarter Chances
A quarter is the maximum that a figure will reduce its chance of hitting by, so a figure that moved and fired at a figure in cover will reduce its ability value by a quarter. But figures that moved and fired indirectly at a figure in cover will still only reduce their ability value by a quarter. Crossbows
The impact of such weapons causes all opponents to make their wound recovery checks with a -5 penalty.
Targeting Figures in Close Combat
A good figure cannot fire into combat unless it uses the heroic action of Accuracy, but an evil figure may freely fire into combat. To determine whose figure is hit roll a 1d10, and add 1 for each good figure in combat and then subtract 1 for each evil figure in combat.
The resulting number shows who is hit 1-5 for evil, 6-10 for good. At this point let the opposing player select which figure the missile attack is against and then roll an attack as normal.

23
Middle Earth UK
Siege MSiege MSiege MSiege Missile Fireissile Fireissile Fireissile Fire Siege Missile Ranges
The following table shows the maximum and minimum wounding range in centimetres for siege missiles:
Siege Missile Class Ranges
Rate of Fire Crew Number
Base Ability Value
Traverse of Projectile Minimum Maximum
Direct Fire
Troll Hurled Rock 0 30 2/1 1 ½ Value 0-9
Repeating Bolt Thrower 0 80 3/2 2 19 0
Light Bolt Thrower 0 100 1/1 2 24 0-9
Medium Bolt Thrower 0 125 2/3 3 34 0-9
Heavy Bolt Thrower 0 150 1/2 4 44 0-18
Indirect Fire
Light Rock Thrower 10 100 1/1 2 39 0-9
Light Catapult 15 150 1/2 3 49 0-18
Medium Catapult 20 200 1/3 4 59 0-18
Trebuchet 30 300 1/4 6 69 0-27
All siege weapons have a firing arc of 45°
The rate of fire indicates how many times in a bound a piece of siege equipment can fire, 3/2 indicates that it can fire 3 times in a bound, but it can only fire every 2 bounds due to reloading.
If a troll helps to reload a siege weapon, then the reload time will be halved to a minimum of 1/1.
The base ability value is the equipments basic value before a 1d6 dice is added; see Calculating Ability Values. Models should be based with separate crew who have their own ability factors. For each crew figure that is killed decrease the reload time by another bound. A troll who hurls a rock will do so at half its normal ability value and if it then moves or attacks a target in cover it will deduce it to a quarter. Direct Sequence of Fire
The firing sequence for direct weapons is as follows:
@ Select Target, weapon must have direct line of sight to target
@ Determine Traverse of Projectile
@ Resolve Attacks on all figures within the projectiles traverse Indirect Sequence of Fire
The firing sequence for indirect weapons is as follows:
@ Select Point of Aim, indicate this with a marker
@ Determine any Deviation of Aim
@ Determine Traverse of Projectile
@ Resolve Attacks on all figures within the projectiles traverse
Point of Aim
For indirect fire weapons place a point of aim marker at any point between the minimum and maximum ranges of the projectile and within a 45º arc of the weapons frontal facing, then roll for deviation.

24
Middle Earth UK
Siege MSiege MSiege MSiege Missile Fireissile Fireissile Fireissile Fire Deviation of Aim
There are four possible results from a deviation check rolled on a 1d100, these are:
@ Land at Point of Aim Less than or equal to half the weapons ability value
@ Minor Deviation Above half, but less than or equal to the weapons ability value
@ Major Deviation Above the weapons ability value, but less than 100
@ Damage Weapon A roll of 100
An indirect siege weapon that does not have a line of sight to its Point of Aim will treat a land at point of aim result as a minor deviation. All halved weapon ability values must be rounded down.
If a 100 is rolled, then the siege weapon suffers a cataclysmic disruption; something breaks. It can no longer be used for the rest of this game and should be removed from play. Deviations
Two rolls are required to determine any deviation that occurs. The first roll indicates the direction of deviation and the second roll indicates the distance of deviation. To determine the direction of deviation roll a 1d10 and refer to the indicator below left:
Minor Deviation Distances For all minor deviations roll a 1d10 and move the point of aim marker this number of centimetres in the determined direction.
If the direction roll was a 9 or 10, then a minor deviation will become a major deviation, see below. Major Deviation Distances For all major deviations roll 3d10 and move the point of aim marker this number of centimetres in the determined direction.
If the direction roll was a 9 or 10, then a major deviation will become an extreme deviation, see below. Extreme Deviation Distances For all extreme deviations roll 1d100 and move the point of aim marker this number of centimetres in the determined direction.
Traverse of Projectile
The traverse of a projectile is the flight or bounce of a projectile from its point of first impact. For both direct and indirect fire roll a 1d10, a zero (0) indicates that the projectile stops at its first point of impact. A roll of 1 to 9 indicates the number of centimetres that the projectile traverses in a direct line from the firer and through its point of aim. For direct fire this is measured from the front of the targets base, whilst indirect fire indicates the distance that the marker is moved. If the traverse of the projectile is greater than 9cm and a 9 was rolled then roll a 1d10 again, add zero for 0 or add the second number to 9 to extend the traverse up to 18cm. For a trebuchet repeat the roll again if a second 9 is rolled, this gives a final maximum distance of up to 27cm of traverse. Frontage of Projectile Path
A medium catapult projectile will have the frontage of an infantry base, whilst a trebuchet projectile will have the frontage of a cavalry base, it is suggested that these bases with an appropriate rock are used for their point of aim marker. All other siege weapon projectiles have a 7mm frontage, the size of a standard pencil.
5
2
3
4 6
7
8
9
10
1

25
Middle Earth UK
Siege MSiege MSiege MSiege Missile Fireissile Fireissile Fireissile Fire Resolve Attacks
Make an attack against every figure or object that the projectile frontage passes over on it final path. If a wound is inflicted on a figure then it must make its wound recovery check with the standard reduction for a Smite Attack, half ability value rounded down. Objects that are hit must also save or be damaged.
Objects
These are doors and walls etc. each will have an ability value which relates to its wound recovery check. Objects of stone or rock will not undergo a Smite Attack and so make a full wound recovery check.
Examples of object ability values are as follows:
Object Normal Smite
Door 40 20
Door, Reinforced 60 30
Building Wall 75 75
Curtain Wall 90 90
Object values must be predetermined before the commencement of a battle
Repositioning Weapons
A siege weapon can be man-handled around to present a new fire arc. Small weapons will take half a move to reposition, these can still fire but at half their ability value. Medium and larger siege weapons will take a full move to reposition; this must be added to their reload time. Attacking Siege Weapons
A siege weapon is either destroyed by killing all its crew with missile fire or contacting it and making a successful attack against it. Crew figures don’t have an ability value, so make any missile attacks against the ability value of the siege weapon. An unsuccessful wound recovery check indicates that a crew figure as been killed, this reduces the effectiveness of the weapons fire. When all the crew figures have been killed the siege weapon is considered to have been destroyed. Crew figures don’t attack in a close combat situation they run, so consider all siege weapons that are contacted by enemy forces to be overrun and destroyed after a single successful attack as been made against it.
26
Middle Earth UK
Close CombatClose CombatClose CombatClose Combat Combat is initiated when two or more opposing figures make base to base contact.
A figure is not permitted to move normally once it is in contact with an enemy figure; the only movement allowed is reclamation movement. A figure cannot leave combat unless it either kills all of its opponents, it initiates a heroic action to Retreat from combat, it uses its special ability of Evade or it is cavalry attacking infantry.
Mechanics of Combat
The side that holds the initiative receives the first attacks in all of the close combat phases, heroic, impact and normal for the present bound.
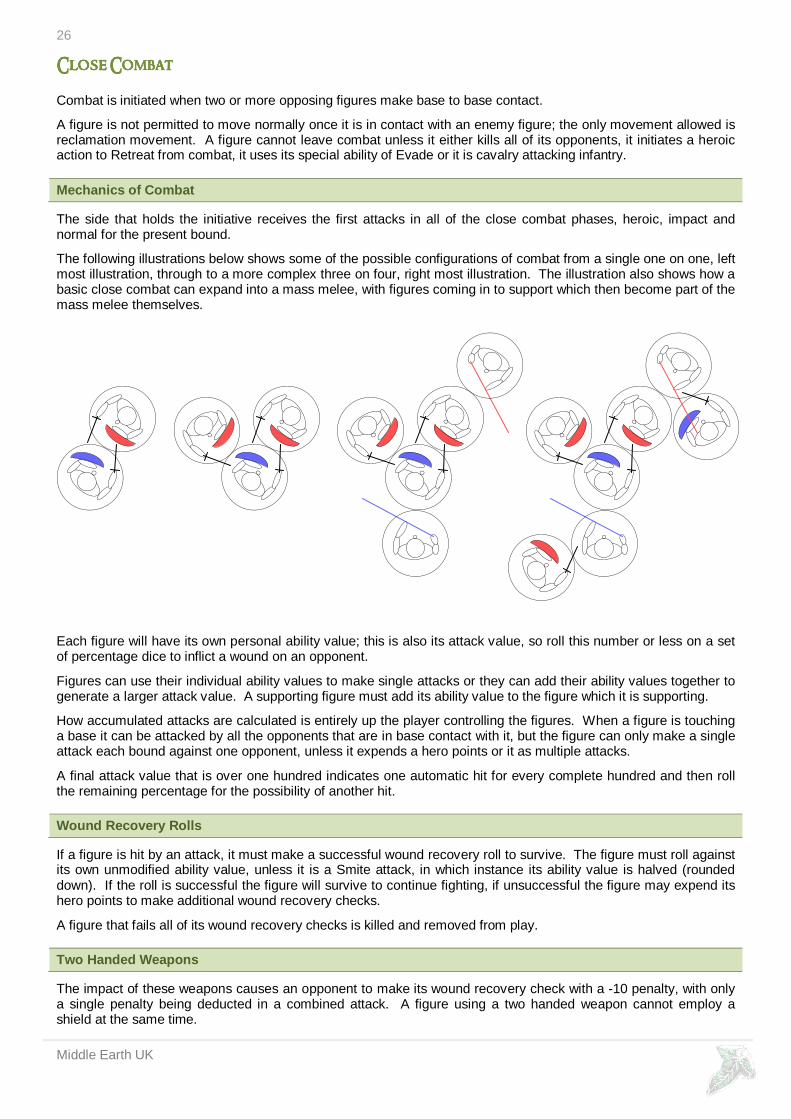
The following illustrations below shows some of the possible configurations of combat from a single one on one, left most illustration, through to a more complex three on four, right most illustration. The illustration also shows how a basic close combat can expand into a mass melee, with figures coming in to support which then become part of the mass melee themselves. Each figure will have its own personal ability value; this is also its attack value, so roll this number or less on a set of percentage dice to inflict a wound on an opponent.
Figures can use their individual ability values to make single attacks or they can add their ability values together to generate a larger attack value. A supporting figure must add its ability value to the figure which it is supporting.
How accumulated attacks are calculated is entirely up the player controlling the figures. When a figure is touching a base it can be attacked by all the opponents that are in base contact with it, but the figure can only make a single attack each bound against one opponent, unless it expends a hero points or it as multiple attacks.
A final attack value that is over one hundred indicates one automatic hit for every complete hundred and then roll the remaining percentage for the possibility of another hit. Wound Recovery Rolls
If a figure is hit by an attack, it must make a successful wound recovery roll to survive. The figure must roll against its own unmodified ability value, unless it is a Smite attack, in which instance its ability value is halved (rounded down). If the roll is successful the figure will survive to continue fighting, if unsuccessful the figure may expend its hero points to make additional wound recovery checks.
A figure that fails all of its wound recovery checks is killed and removed from play. Two Handed Weapons
The impact of these weapons causes an opponent to make its wound recovery check with a -10 penalty, with only a single penalty being deducted in a combined attack. A figure using a two handed weapon cannot employ a shield at the same time.

27
Middle Earth UK
Close CombatClose CombatClose CombatClose Combat Body Shields
A figure that is using a large body shield will increase its wound recovery chance by +10 for each check.
Shielding in Combat
A figure that is carrying a shield may forego its attack in a bound and choose to shield against any figures within its forward arc. A figure that attacks a shielding opponent will do so with its normal ability value, if a wound is inflicted then the figure will make a normal wound recovery check. If the roll is successful then no further action need be taken and the figure survives the wound, if unsuccessful the figure receives a second wound recovery check due to the shielding. Again if the figure is successful, it survives the wound but it will be pushed back the figures full base distance, otherwise the figure receives a critical wound and dies.
The illustration on the left shows that if a figure is pushed back it must move directly away from any enemy figures. A figure is only pushed back if at least one of its opponents follows-up the pushback.
A figure that is surrounded or trapped will not be pushed back if it fails its first wound recovery check. A figure will not be pushed back from a defensive obstacle.
Figures that are armed with a long reach weapon and are supporting a shielded figure can make a combat attack against the shielded figures attacker.
Prone Opponents
An opponent that has been knocked prone will not radiate a zone of control, it cannot attack effectively and it cannot shield A prone figure that is not in combat can stand; this will reduce the figures movement rate by half for this bound. A prone figure that is in combat must make a successful attack against its opponent to stand; the attack doesn’t inflict a wound, so a wound recovery check is not required.
A figure that was knocked prone from an impact move will be dazed and will only be able to stand in the following bound if it makes a successfully ability check. In the next following bound, the second after the impact the figure may move as normal and is no longer dazed. Other figures that are still prone may now stand and move at half their movement rate, these too are no longer dazed.
A +10 attack bonus is received for each figure that attacks a prone opponent, if a wound is inflicted then the prone opponent makes a reduced wound recovery check at half the figures ability value (rounded down).
Long Reach Weapons
A long reach weapon is either a spear or pike; these weapons can be set against an impact charge or used to support a friendly figure that they are in base contact with.
A spear or pike can support the figure that is directly in front of it, whilst a pike can also support from the third rank of a close order formation. Long reach weapons can be used to attack down from higher ground or up to higher ground, a spear has a reach of 2cm, whilst a pike has a reach of 4cm. The illustration shows a spearman and pikeman.
Setting Weapons
A figure must remain stationary to set its long reach weapon against an impact charge. This also indicates that the figure must have the initiative to set its weapon in place before the charge contacts it. A figure is considered to be shielded when its long reach weapon is set against the initial contact of an impact charge, after the initial contact the shielded status of the defender is lost.

28
Middle Earth UK
Close CombatClose CombatClose CombatClose Combat Lance Weapons
A mounted figure that is armed with a lance and impacts into close combat will gain an additional Smite attack if the weapon inflicts a wound on its initial contact (6b), subsequence impact wounds in phases 6d and 6g don’t count.
Supporting Ranks
In a normal close combat situation only one supporting figure is allowed for each friendly combatant, the supporting figure may use either a spear or pike.
Add the ability value of the supporting figure to the ability value of the attacking figure; this gives a final ability value for the combined attack.
Pikes in a close order formation will add the attacking figures ability value to both of the supporting figures ability values if a pike is also used in the third rank of the formation.
Supporting figures are not classed as being in close combat for missile fire, these figures may also move freely in their own movement round. In the above left illustration only one supporting figure is allowed to support the combat, so the other figure would have to move around to contact the enemy figure directly, see the second illustration.
Exceptional Hits
If zero one is rolled “01” on the attack dice then an exceptional hit has occurred. The attacker immediately kills its opponent, no wound recovery roll is allowed unless a hero point is used. A free second attack is immediately obtained, if there are no enemy figures in base contact with the figure a 5cm reclamation move may be made to contact a new enemy. The free attack is then executed; but if no enemy can be contacted the free attack is lost.
Exceptional Misses
If double zero is rolled “100” on the attack dice then an exceptional miss has occurred. The attacking figure will stumble and fall to the ground prone; all figures that are in base contact with the figure will immediately receive a free attack against a prone figure, see Prone Opponents. Burning Brands
These may be snatched from any fire source to be used against figures that are affected by fire. It takes a quarter of a move to snatch a burning brand and two full bounds to make a fire source.
Concussion Hits
A figure can attempt to concuss an enemy instead of inflicting a wound; this would be done if a figure had to be captured. Declare a concussion hit before the attack dice are rolled, if the result is 5% or below a wound is inflicted instead of a concussion hit and this could kill the figure if the wound recovery check is unsuccessful. A successful concussion hit will knock a figure out cold for this and the next bound; the figure will roll in the Extraordinary Checks phase (3b) in each of the successive bounds against its ability value to see if it awakens.

29
Middle Earth UK
Close CombatClose CombatClose CombatClose Combat Capturing Figures
An unconscious figure will be captured if two or more enemy figures can achieve base contact with it, before it regains consciousness. The captured figure will be disarmed and it can’t escape as long as at least one figure remains in base contact with it. A figure can be bound if one full movement round is spent doing this; the figure can then be carried by a single figure of similar size or larger at half its movement rate or two figures at the normal movement rate. The captured figure will be moved by the capturing side in their own normal movement phase (4c). Escaping Capture
If the captured figure is not in base contact with an enemy figure, then it may attempt to escape its bonds if tied. To escape its bonds a figure must make a successful ability check in the Extraordinary Checks phase (3b) at half its ability value (rounded down). If successful the figure can stand and move at half its normal movement rate. A friendly figure can release a prisoner in one full bound after base contact is made.
Surrounding and Trapped Figures
If a figure cannot leave combat without displacing an enemy figure then it is surrounded. When a figure is against an obstacle and cannot leave combat without displacing an enemy figure then it is trapped. All surrounded or trapped figures will receive a half wound recovery check, if a wound is inflicted on them. 1 2 3 In illustration 1 the figure is not surrounded because it can freely move away without displacing its opponents. In illustration 2 the figure is surrounded and cannot move away without displacing its opponents, three is the minimum number of figures required to surround a figure. Finally illustration 3 depicts a trapped figure against a wall. Retiring, Retreating and Routing Figures
If a figure is contacted at the end of its adverse morale move, it will not fight and any wound recovery checks that it makes will be made at half the figures ability value. If the figure survives the attack it will move again in the next compulsory movement phase (4a) leaving combat without any attacks being made against it.
Mounted Combat
Mounted combat is executed as normal with figures that are mounted on horseback, with the exception that all mounts have the special ability of Impact.
A figure that is mounted on a creature can simultaneously fight two different opponents, the mount will attack one whilst the rider attacks another, and each attack will be half the ability value of the mounted figure (rounded down).
Killing Mounts
A mounted figure will fight and make a wound recovery check as a single figure, if killed both rider and mount are removed. The only time a rider and mount are treated as two separate entities is when the rider dismounts.

30
Middle Earth UK
Close CombatClose CombatClose CombatClose Combat Company Standard
A company standard can only affect figures from the company that the standard belongs to. A figure that is within 10cm sight of the standard bearer will feel inspired and will add a +5 bonus to all combat and magic checks. If the standard bearer is killed, then all the remaining figures from the company will suffer the affects of Despair and will fight at half their ability value for the next full bound.
Army Standard
An army standard can only affect figures from the same army. A figure that is within 20cm sight of the standard bearer will feel inspired and will add a +10 bonus to all combat and magic checks. If the standard bearer is killed, then all the remaining figures within the army will suffer the affects of Despair and will fight at half their ability value for the next two full bounds.
Reclaiming a Standard
The standard will be lost if there are no friendly figures in base contact when the standard bearer is killed, the enemy is assumed to have taken or destroyed it. If a friendly figure of the same company or army (dependent on standard type) was in base contact with the standard bearer, then an attempt can be made to reclaim it in the next extraordinary checks phase (3b). For all figures that were in base contact with the deceased standard bearer roll a 1d10 the highest roll snatches the standard. If the same side reclaims it, then the reclaiming figure will become the new standard bearer. If an opponent claims it then the standard is lost, even if the claiming figure is killed in the same bound.
If the standard is immediately reclaimed then a morale test is not required for “loss of standard”.
If a friendly figure reclaims a fallen standard, then remove the reclaiming figure and replace it with the original standard bearer. The figure will retain its original ability value, unless the reclaiming figure is a personality, in which case the ability value and hero points of this figure will be kept. Cover in Combat
A figure that is defending a hedge or wall will be able to withstand the attacks of four enemy figures of a similar size; these include a supporting rank.
When attacking a defended obstacle support may be given from the rear as normal, but also a figure on either side may give support to the attack.
Due to the defensive nature of the position the final attack value of the attackers will be halved (rounded down).
The defender will automatically count as shielded, due to the obstacle and the figure may attack as normal whilst shielded at the figures full ability value.
The effect of a push-back does not apply to the defender if the figure successfully saves against a second wound recovery check.
If the defender is killed, then one attacking figure may move across the obstacle in the reclamation move.
No bonus will be received for figures that impacts to contact against a figure that is defending an obstacle. Siege Weapons in Combat
A siege weapon that is caught in close combat cannot fire; it is allowed a wound recovery check against any successful attacks against the weapon at its full ability value. If it fails the weapon is destroyed, the siege weapons crew can fight as normal in close combat at their ability values. The siege weapons reload time will be increased if any of the crew are killed and the weapon is able to fire again after combat.

31
Middle Earth UK
Close CombatClose CombatClose CombatClose Combat Close Order Formations
A close order formation obtains the following benefits for being formed:
Impact Mass If the formation initiates contact with an enemy and is at least four figures abreast and three deep, it will have the ability of impact mass.
The formation may execute three possible attacks within the combat round of a bound sequence, see Impact Mass.
Shield Wall If the formation is contacted and the front rank of figures is armed with shields, then the formation will gain the ability of Shield Wall.
This will allow all the front rank of figures with shields to simultaneously attack and shield at the same time, see Shielding.
Stead Fast An individual figure within a formed formation cannot be pushed back; the only time a push back can occur to a formation is after a successful phase of combat by another formation that is impacting, see Impact Mass.
Supporting Ranks Figures behind a first rank figure that have appropriate long reach weapons can support it in combat. If the front rank figure is killed in combat the supporting figures have the first opportunity of any reclamation movement, all supporting figures are moved forward. Missile armed figures in the third and fourth ranks can give supporting indirect fire into the supporting ranks of the contacting enemy figures.
Defensive Ranks When a figure is required to make a wound recovery check, add the ability values of any supporting figures that have appropriate long reach weapons. If the front figure is shielded, then reroll the total again if the first check was unsuccessful.
Unit Command A company commander can issue a company command using his hero point and all the formation will perform the heroic action, even if the commander is not in direct contact with the threat; see illustration above, red circle.
Company Standard If the company standard is included within the formation then all figures within the formation will receive a +5 combat bonus to their ability values.
Spells If spells are cast against the formation, then the company commander need only save against the effects for the whole formation to successfully pass. If the commander fails then the whole formation is affected.
The disadvantages of close order formations are:
Company It can only be formed by figures from the same company, so this may limit its size and effectiveness.
Unformed Once the formation becomes unformed, it loses its battle cohesion and none of the above benefits will apply.
The formation will become unformed if:
@ It is contacted on its side or rear at any time
@ It is pushed back into friendly figures
@ It cannot maintain a solid continuous front rank of 4 figures
@ More than 50% of the initial starting figures are killed

32
Middle Earth UK
Close CombatClose CombatClose CombatClose Combat Impact Mass
To count as impacting, a formation must be at least four figures abreast and three deep, it must be formed and it must initiate the attack, this will give the formation the special ability of impact mass. The formation can use contact weapons in the contact missile fire phase (5d), but only on initial contact.
The impacting formation will lose its ability to shield, due to the vigour of the impacting attack.
Impact Phase I. Each attacking figure initially gains a combat attack in the first impact combat phase (6b); the defending or attacking figures may use a hero point to call a heroic combat before this impact attack (6a).
Impact Phase II. Each attacking figure now uses its normal attack in phase (6d); if the defending figure has initiative then it will make the first attack.
Impact Phase III. Each attacking figure now gains a second impact attack in the second impact combat phase (6g); the defending or attacking figures may use a hero point to call a heroic combat before this impact attack (6f).
The mechanics of each of the above combat phases is as follows:
After each impact phase the formation can proceed with a reclamation movement as normal to fill in gaps and close ranks, and then one of the following will occur.
If the impacting formation inflicts more casualties than it receives, then it will push back any figures that are in contact with it by 3cm, this includes other formations. New enemy figures that the push back contacts will also be displaced and will become part of the combat.
If the impacting formation draws by inflicting none or the same casualties on its enemy as it receives, then it will be checked and no push back will occur. If it is immediately checked again in the next combat phase, the formation will loss the ability of impact mass until it can extricate itself from the combat and initiate a new impact in another bound.
If the impacting formation receives more casualties than it inflicts, then the impact will be immediately halted and the formation will loss the ability of impact mass until it can extricate itself from the combat and initiate a new impact in another bound.
If all the opposing enemy figures are killed, then the formation may make a reclamation move of up to 5cm to contact fresh enemy figures. This must be done in a straight line with no deviation; if no figures are within this distance then no reclamation move is possible.
Example Of Impact Mass Push Back and Reclamation Movement

33
Middle Earth UK
(6b) (6c)
(6d) (6e)
(6g) (6h)
Close CombatClose CombatClose CombatClose Combat Impact Speed
To count as impacting, a figure with the special ability of impact speed must initiate combat with a standing enemy figure; this is achieved in the movement round. No contact weapon is allowed to be thrown by the attacker, due to the speed of contact. The figure will cease its impact move if it stops to contact a figure that is prone or is in an existing combat situation, the figure may still make a normal attack if this is done prior to the normal combat phase.
Impact Phase I. The attacking figure initially gains a combat attack in the first impact combat phase (6b); the defending or attacking figures may use a hero point to call a heroic combat before this impact attack (6a). If the defending figure is killed or knocked prone, the attacker can make a reclamation move (6c) of up to 10cm.
Impact Phase II. The attacking figure now uses its normal attack in phase (6d); if the defending figure has initiative then it will make the first attack. If the defending figure is killed or knocked prone, the attacker can make another reclamation move (6e) of up to 10cm.
Impact Phase III. The attacking figure now gains a second combat attack in the second impact combat phase (6g); the defending or attacking figures may use a hero point to call a heroic combat before this impact attack (6f). If the defending figure is killed or knocked prone, the attacker can make another reclamation move (6h) of up to 10cm. At this point the impact move ends.
The mechanics of each of the above combat phases is as follows:
The attacking figure makes an attack and checks against its ability value:
If the attack is successful the enemy figure must make a wound recovery check or die. If the attack is unsuccessful the enemy figure must make a wound recovery check or be knocked prone.
If a defending figure is successful with its wound recovery check, then the impact move is stopped immediately at this point, no further wound recovery checks are required by other figures that are still in contact. The attacker may still make a normal attack, not impact, if it was stopped in the initial impact combat phase (6b).
A figure that is knocked prone will be thrown to the edge of the attacker’s base, the figure will be dazed and must make a successful wound recovery check in the next Extraordinary Check phase (3b) to stand. Otherwise the figure will remain prone for the next full bound and then it can automatically stand in the following bound.
If more than one enemy figure is contacted then make the number of attacks that is appropriate to the attacking figure. Any figures that are not attacked count as having an unsuccessful attack made against them and must make a successful wound recovery check or they will be knocked prone by the impact of the mount.
The illustration above shows the possible stages of an impact speed charge, but if the defender makes a successful wound recovery check at any point (6b), (6d) or (6g) the impact move will be immediately halted.
The attacker may veer up to 22½º of its frontal facing to contact a new enemy figure or move to safe ground in its reclamation move (6c, 6e or 6h), if no contact is made the impact move immediately ends.

34
Middle Earth UK
MoraleMoraleMoraleMorale A morale test will greatly enhance the game for larger battles of three or more opposing companies, but for smaller skirmish games it is suggested that the morale round is ignored.
Morale tests are only executed at company level, so squads and individuals are exempt from these tests.
When to Check
A morale test is required by a company when any of the following situations occur to it in a bound:
@ Shock Casualties – 3 or more figures lost in a single missile or combat round
@ Company Leader is Suffering from Despair including Company and Army Standard Lost
@ Company Leader Fled in Terror
@ Company’s Lieutenant is Killed
@ Company’s Captain is Killed
@ Company’s King or Heroic Commander is Killed
@ Company is Burst Through by a Routing Company
A company must test for each and every morale cause from the above list at the end of the present bound. For instance a company that has lost its company standard and suffered three plus casualties in a single combat round will be required to successfully pass two successive morale checks at the end of the present bound. Company Morale Test
When a morale test is required, the company leader attempts to rally the company by using the company standard as the rallying point, if the standard is lost or the company leader is killed then the morale test will be much harder to successfully pass.
Roll a percentage dice (D100) for the company that requires a morale test and subtract the following modifiers:
? Company Leader – use its ability value
1 Each Figure – still present from the testing company
10 Defending Cover
10 Company Musician – trumpeter/drummer
15 Lieutenant
20 Army Standard
25 Captain
30 King or Heroic Commander
All the above modifiers MUST be within 20cm of the Company Standard Bearer or else they will not count. If the company standard bearer is lost then only the ability value of the company leader can be counted, unless a lieutenant, captain, king or heroic commander is in base contact with him, count each, or the army standard bearer is within 20cm, this will substitute for the lost company standard.
If the company leader is killed then the company will automatically RETIRE from the battlefield. In subsequent bounds a lieutenant, captain or heroic commander can take over the leadership of the company; this requires a successful Recovery Check. The higher level commander will then become the company’s leader, but its ability to influence another company in the Company Morale Test is nullified.
One designated figure in a company can be used as a trumpeter/drummer to sound commands for the company to respond to. This figure adds a modifier to the morale check only when they are not engaged in close combat.
If a routing company contacts another friendly company when it is routing, then the routing company will burst through the company ignoring all zones of control. The only exception to this is if the routing company contacts another friendly company that is formed into a formation. The contacted company will automatically lock shields and the rout will flow around the company instead.

35
Middle Earth UK
Morale ChecksMorale ChecksMorale ChecksMorale Checks Adverse Morale Effects
To successfully pass the morale test the final dice roll with the modifiers applied must be a NEGATIVE SCORE
The following indicates the results for the morale test:
Negative OK Proceed as normal
00 - 15 Fallback Move one full move towards own baseline in phase 4a, then stop and rally
16 - 30 Retire Move one full move towards own baseline in phase 4a
31 - 45 Retreat Move two full moves towards own baseline in phases 4a and 4c
46+ Rout Move three full moves towards own baseline in phases 4a, 4c and 4e A company that falls back or retires will always face the enemy, figures may fire their missile weapons, but they do count as having moved a full move. Figures can’t initiate combat, but they can attempt to wound an opponent if they themselves are attacked.
A company that retreats or routs will always have their backs to the enemy. They can’t fire any missile weapons or initiate combat; but they can attempt a wound recovery check if they are themselves attacked and hit.
Figures that leave combat due to an adverse morale effect can’t be attacked when they disengage.
When executing an adverse morale effect all figures must move towards the company standard bearer unless this means moving forward towards the enemy. In this case the figure will remain stationary, but it still suffers the same effects as the rest of the company, i.e. an archer will count as moving even if the figure remained stationary this bound. Only when the standard bearer passes it will it proceed with the adverse morale effect.
A figure will be permanently removed from the battle when it reaches the edge of the battlefield whilst undertaking an adverse morale move, unless it is a fallback result in which case the figure will stop and rally at the edge.
If a company leader is still present on the battlefield after all movement, then it must undertake a Recovery Check in phase 7a of the same bound to attempt to recover its normal morale status. A recovery check is not taken if there is another cause for a morale test this bound, in this case the recovery check is ignored and a company morale test is taken instead.
A company leader that takes a morale test whilst suffering from an adverse morale result can never improve its morale status; the result can only get worse. Recovery is only achieved in the Recovery Check phase. Recovery Check
Each round a company leader may attempt to recover its morale, unless it suffers another cause for a morale test. If the recovery is successful then the company may move as normal in the next movement phase. A close order formation must reform, taking the appropriate time to do so before it continues with its formation movement.
If the recovery check is unsuccessful then the company remains at its present state of morale, its morale can only deteriorate through another morale test and not a morale recovery check. Heroic Commander Retest
A figure with the Command special ability can cause a company that fails its morale test to immediately recheck its morale in the Heroic Command Retest phase (7c).
Remember that company leaders have a single hero point, lieutenants have two hero points and captains have three hero points. Heroic commanders can also be used to cause a retest of the company’s morale if they are within 20cm of the company’s standard bearer.
A figure with the special ability of Leadership or Lordship can cause multiple companies to recheck their morale in this phase. The standard bearer of each company must be within the radius of effect of the special ability that is being used by the figure.
Only one morale retest is allowed per company per bound. The result of the retest must be used by the company even if it indicates a worse adverse morale effect than the initial morale result did.

36
Middle Earth UK
Formation OFormation OFormation OFormation Organisationrganisationrganisationrganisation The forces of good and evil are organised into formations which consist of a number of companies, leading these formations are company leaders, lieutenants, captains and heroes.
The components of these organised formations are as follows:
Company A company is formed by a group of 12 or more figures, the group must include a leader and standard bearer.
There are two different types of companies these are Drilled and Horde. Drilled are capable of forming a cohesive close order formation whilst a Horde will fight individually with its figures, a drilled company may fight individually like their horde counterparts if they so wish.
It is suggested that each company has its own identity, either a different style of uniform or some colour difference around its base. This will make a morale tests easier to execute.
Company Leader The company leader is denoted by a Red Banded Base , the figure will have a single hero point to expend and it will also have the special ability of Command. The company leader is the single most important figure within the company, without the leader the company will simply retire from the battlefield.
Company Standard Bearer A company standard bearer can influence the ability values of figures from its company just by being close to them. The standard can affect the combat, magic and morale tests of figures; see Company Standard. It is the second most important figure within the company; the standard is used as the rallying point in times of crisis.
Company Musician A company musician will influence the morale of company and is able to use its instrument to aid the command calls of the company leader; a trumpeter is a good example of a company musician.
Company Drover A figure that bullies and terrorises the figures within the company to move them along faster, see Forced March.
Lieutenant A lieutenant figure is denoted by a Blue Banded Base ; it will command between three and six companies and it will have two hero points to expend, it will also have the special ability of Command.
Captain A captain figure is denoted by a Purple Banded Base , it will command an army which consists of any number of companies and ancillary figures. The figure will have three hero points to expend and it will have the special abilities of Command and Gallant.
Army Standard Bearer Captains are normally accompanied by an army standard bearer who will influence the ability values of figures that are within the army. The standard affects combat and magic checks of figures; see Army Standard.
Army Musical Band A band may take many forms, two figures playing war drums or the trumpeters of a royal bodyguard can form such groups, and these figures influence the armies Motivational Check at the start of each new bound.
Ancillary Squad This is a separate small specialist unit of 3 to 6 figures; the squad doesn’t have a leader and therefore doesn’t require a more test. Each company may have one ancillary squad for specialist duties, like scouting or skirmishing. If the parent company of the ancillary squad suffers from an adverse morale result and is removed from the battlefield then the ancillary squad must also be removed in the same bound.
Heroic Commander A heroic commander is an individual of special notability who posses a number of hero points that exceeds those of an ordinary figure and also has the special ability of Command. The hero will normally posses a number of other special abilities and in some cases the ability to cast archaic magic.
Heroic Figure A hero is an individual of special notability who posses a number of hero points that exceeds those of an ordinary figure. The hero will normally posses a number of other special abilities and in some cases the ability to cast archaic magic. Normal heroes do not possess the special ability of Command, so they will attempt to aid the army in individual acts of bravery. These figures normally fall outside the command structure of an army, so they can act independently as needed, but because of this they are not inspired by company or army standards.

37
Middle Earth UK
CharacteristicsCharacteristicsCharacteristicsCharacteristics Ability Values Of Figure
Ability values for your own armies can be determined randomly as follows:
Select the race and type of the figure for your company formation or ancillary squad. The base ability value for a figure is shown on the left of the chart.
Base Mordor Isengard Gondar Rohan Other
4 Goblin Goblin Militia Militia Halflings
9 Orc Orc Hill Men Dales Men Breelander
14 Haradrim Dunlending Man-at-Arms Man-at-Arms Northman
19 Uruk-hai Uruk-hai Rangers Riders Eastfold Wood-elf
24 Easterling Wargs Tower Guard Riders Westfold Dwarf
29 Khandesh Half-orcs Knights Royal Guard Grey-elf
34 Corsairs Wild Men Dol Amroth High-elf
39 Great Spider Warg Rider Númenórean Dúnedain
44 Stone-troll Beorning
49 Cave-troll Huorn
54 Mountain-troll Great Eagle
59 Olog-hai Ent
Random Factor Once the base ability value has been determined, roll a D6 dice and add this score to the initial base ability value.
If a 6 is rolled then add 5 to the base ability value and roll the D6 dice again. If another 6 is rolled for a second time then make this figure a Veteran figure, add 5 and continue to roll the D6 dice. Continue rolling until a 6 is not rolled or the revised base ability value reaches 20 above its starting value.
The final ability value is written on the back of the figures base in black permanent ink, red for a Veteran figure.
Randomly determine the ability values for all figures within a company or ancillary squad.
Additionally for a company leader roll one extra D6 dice, for a Lieutenant roll two extra D6 dice and for a Captain roll three extra D6 dice, any sixes are rerolled as above and the ability value can reach 30 above its base value.
If a company or ancillary squad has Special Training then this should be determined now, all Scouts receive a -5 penalty to their ability value and this should be denoted in the final ability value that is printed on the figures base. Notes on Elves: Wood-elves are from Mirkwood, Grey-elves are from Lothlorian, High-elves are from Rivendell.

38
Middle Earth UK
CharacteristicsCharacteristicsCharacteristicsCharacteristics Larger Creatures
Some larger creatures may also have special abilities these are as follows:
Creatures
Beorning Gallant Frenzy
Great Eagle Gallant Flight Swiftness Steed
Huorn Gallant Toughness Impact
Ent Gallant Toughness Impact Stomp
Great Spider Agility Ambush Poison
Stone-troll Toughness Impact
Cave-troll Toughness Impact Sweep/Thrust
Mountain-troll Toughness Impact Sweep/Thrust Smite
Olog-hai Toughness Impact Sweep/Thrust Smite Command
Great Eagles have a normal 45cm move when flying and 5cm when walking on the ground.
Huorns and Ents have the special training of Woodcraft which allows them to move freely through wooded terrain.
Great Spiders can spin webs and move in these at their normal movement rate of 20cm.
Stone/Cave-trolls have the special training of Mountaineer which allows them to move freely across broken terrain.
Cave-trolls, Mountain-trolls and Olog-hai can either use Sweep or Thrust this is dependent on the weapon they are using to make their attack.
An Olog-hai is a more intelligent troll that has been breed by Sauron and can have the Command special ability. Mûmakil
Mûmakil are a large breed of elephant from the southern and eastern lands of Far Harad and Rhûn. An elephant of war designed to transport great platforms upon their backs, with impenetrable skin that no arrow could pierce or so it was said?
Mûmakil have the following special abilities and statistics:
Ability Value: 80 Abilities: @ Immense
Hero Points: 0 @ Toughness
Spell Points: 0 @ Impact
Attacks: 4 @ Stomp
Movement Rate: 20 @ Thrust/Sweep
Mûmakil have four attacks in the normal combat phase (6d) two stomp attacks with its great legs and two thrust or sweep attacks with its immense horns. The beast will automatically impact against its enemies, even if it starts in close combat with them. Enemy horses will not go within 10cm of a mûmakil unless a successful ability check is made in the movement round, friendly horses act normally around them.
Panic A mûmakil will automatically panic if it saves a wound recovery check with a score of 1 to 5 on its percentage dice. Roll a D10 dice and refer to the deviations diagram in siege missile fire section of the rules. This indications the random direction that the mûmakil panics in, the beast becomes Frenzy and will attack the nearest figures friend or foe that are in its way.
A panicked mûmakil must be moved in each compulsory movement phase (4a) and every reclamation move (6c), (6e) and (6h). Reroll the direction of movement for the beast prior to its initial movement each bound.
The only way of stopping a panicked mûmakil is to kill it.
39
Middle Earth UK
CharacteristicsCharacteristicsCharacteristicsCharacteristics War Wagons
A war wagon is a mobile platform for moving a number of figures around the battlefield; the figures can fight from the back of the wagon or dismount and fight on foot.
There are number of variations and rules for these wagons, these are as follows:
Light Wagon These light wagons are normally known as chariots, they have the capacity to carry a single figure in a light framed wagon that is pulled by two mounts. The wagon will have the special ability of Impact and the single figure will have the special training of Horsemanship. Impact weapons can be thrown on initial contact with the enemy; these normally take the form of a short throwing spear.
A light war wagons normal movement rate is 30cm.
Medium Wagon These slightly larger wagons have the capacity to carry two figures on a platform that is pulled by four mounts. The platform is normally boarded to add a shielding effect to its passengers, so the special ability of Toughness is gained by the figures that fight from it. The wagon also as the special ability of Impact and both figures will have the special training of Horsemanship. Impact weapons can be thrown on initial contact with the enemy; these normally take the form of a short throwing spear.
A medium war wagons normal movement rate is 27cm.
Heavy Wagon These wagons have the ability to carry an ancillary squad of six figures; the wagon is of a large construction with high boarded sides that allow the figures full protection against missile fire. This protection gives the figures the effects of being shielded by a body shield with the special ability of Toughness, +20 to all wound recovery checks and a reroll. The protection allows normal missile fire and close combat to take place from the wagon. The wagon is pulled by four to six mounts and these are normally protected by barding.
This heavy wagon also as the special ability of Impact and all the figures will have the special training of Horsemanship. Impact weapons can be thrown on initial contact with the enemy; these normally take the form of a short throwing spear.
A heavy war wagons normal movement rate is 25cm.
Wagon Impact Attacks Each wagon will have an equivalent ability value that is equal to the distance that the wagon as moved in its present movement round. The faster the wagon is travelling the more chance of inflicting damage on an enemy.
Scythed Attacks Some wagons have attached to their wheels sharp blades that twirl when the wagon is in motion. Count a wagon that has such weapons attached to it as a Lance attack with an ability value that is equal to the distance that the wagon as moved in its present movement round.
Wrecking A war wagon will automatically wreck if all the figures on it are killed, the wagon is simultaneously removed with the last figure that is killed.
There is also a chance of wrecking a war wagon if it makes any additional moves in its movement round other than in the normal movement phase (4c). Roll a D10 for each additional movement phase that the wagon moves in and if a 1 is rolled the war wagon will throw a wheel and immediately wreck. The passengers will be thrown from the wreckage and must immediately roll for wound recovery check or be killed.
Difficult Terrain War wagons cannot traverse any difficult terrain.

40
Middle Earth UK
CharacteristicsCharacteristicsCharacteristicsCharacteristics Hero’s
A hero is an individual who stands out from the other figures around it, by its actions and deeds. The following will show you how to scratch build a hero for your games.
Firstly there are a number of factors for the figure that you need to determine these are its:
@ Ability Value between 40 and 90
@ Hero Points between 2 and 10
@ Spell Points between 0 and 10
@ Attacks dependent on the figures weapon or natural attacks
@ Movement Rate between 10cm and 30cm
Is the figure is a heroic commander? If it is you will need to determine if it can only lead company or can it lead a number of companies or even a whole army. This determines if the figure requires the Command, Leadership or the Lordship special ability.
Then you need to determine if the figure has any other special abilities that apply to it. An example of a “War of the Ring” character is as follows: Aragorn: Strider - Ranger of the North
Ability Value: 80 Abilities: @ Command
Hero Points: 8 @ Gallant
Spell Points: 0 @ Iron Will
Attacks: 1 @ Ambush
Movement Rate: 17 @ Sweep
Bloodline: Númenórean
Aragorn son of Arathorn and descendant of Elendil and heir of Isildur the last King of Gondar. He is lean, dark and tall, with shaggy dark hair "flecked with grey", grey eyes, and a stern pale face. He is Aragorn Chieftain of the Dúnedain of Arnor “All that is gold does not glitter, Not all those who wander are lost, The old that is strong does not wither, Deep roots are not reached by the frost, From the ashes a fire shall be woken, A light from the shadows shall spring, Renewed shall be blade that was broken, The crownless again shall be King”.
Aragorn has the special training of Woodcraft and Horsemanship.
Once the “One Ring” reaches Rivendell, Aragorn can reforge the shards of his sword Narsil and can obtain Andúril “Flame of the West”. This sword gives Aragorn the additional special abilities of Swiftness and Smite. Rule Support [email protected]
If you have any questions about the rules please contact us at the above email address.
Copyright of the Middle Earth Rules resides with its designer Martin Brierley and Wargame Shop.
Copyright and Intellectual Properties of any references to names or locations within Middle-earth resides with the Tolkien Estate and or Games Workshop.