w p i point 200 installation guide wpa 802.1 … · white paper: ironpoint 200 installation guide...
TRANSCRIPT

FOU
ND
RY
NET
WO
RK
S W
HIT
E P
AP
ER
WHITE PAPER: IRONPOINT 200 INSTALLATION GUIDE WPA – 802.1X PEAP WITH FUNK ODYSSEY
Written By: Michael Hong
February 2005
©2005 Foundry Networks, Inc. 1 All Rights Reserved.

WHITE PAPER: IRONPOINT 200 INSTALLATION GUIDE ®WPA – 802.1X PEAP WITH FUNK ODYSSEY
FOU
ND
RY
NET
WO
RK
S W
HIT
E P
AP
ER –
DR
AFT
: DO
NO
T D
ISTR
BIU
TE
Summary This installation guide provides step-by-step instructions for configuring WPA-802.1x PEAP wireless LAN security on Foundry Networks IronPoint 200 with Funk Software Odyssey. This installation guide maybe useful for proof-of-concept tests, customer demonstrations or hands-on training. Content Before You Begin............................................................................................................3 Physical Network Configuration.....................................................................................3 Configuring IP 200 Access Point ....................................................................................4 Obtaining Funk Software Odyssey Server, Certificate Authority & Requester and Client ............................................................................................................................12 Installing Funk Software Odyssey Server ....................................................................13 Installing and Configuring Funk Software Certificate Authority .................................14 Installing and Configuring Funk Software Certificate Requester ................................19 Approving Certificate Request .....................................................................................22 Configuring Funk Software Odyssey Server.................................................................26 Exporting the Server Certificate...................................................................................32 Installing Funk Software Odyssey Client .....................................................................40 Importing the Server Certificate ..................................................................................42 Configuring Funk Software Odyssey Client..................................................................46 Appendix A: Configuring IP 200 – Non-Virtual AP Versions ........................................56 Appendix B: Disabling IAS on Microsoft Windows Server ...........................................62 Appendix C: Starting the Odyssey Service ...................................................................64 Appendix D: Uninstalling Microsoft Active Directory ...................................................66
February 2005 ©2005 Foundry Networks, Inc. 2 All Rights Reserved.

WHITE PAPER: IRONPOINT 200 INSTALLATION GUIDE ®WPA – 802.1X PEAP WITH FUNK ODYSSEY
FOU
ND
RY
NET
WO
RK
S W
HIT
E P
AP
ER –
DR
AFT
: DO
NO
T D
ISTR
BIU
TE
Before You Begin This installation guide requires the following: A Foundry Networks IronPoint 200 (IP 200) Access Point with firmware version 01.2.10 or newer. An Ethernet Wwitch. A computer that supports Funk Software’s Odyssey Server1. This installation guide uses Microsoft Windows 2000 Professional with SP4. Another computer that supports Funk Software’s Odyssey Client with a wireless NIC that is Wi-Fi certified for WPA – Enterprise2. This installation guide uses Microsoft Windows XP computer with SP2 with an 802.11g wireless NIC. Basic knowledge of wired and wireless LANs, Microsoft Windows operating systems and Foundry Networks IP 200 Access Points.
Physical Network Configuration This installation guide uses the network configuration:
1 For more information on supported computers, please refer to Funk Software’s documentation. Information on obtaining Funk Software’s documentation can be found in the section Obtaining Funk Software Odyssey Server, Certificate Authority & Requester and Client. 2 To see if your wireless NIC is Wi-Fi certified for WPA – Enterprise, look for the Wi-Fi certification logo or check the list of Wi-Fi certified products at www.wi-fi.org/certified_products.
February 2005 ©2005 Foundry Networks, Inc. 3 All Rights Reserved.
WHITE PAPER: IRONPOINT 200 INSTALLATION GUIDE ®WPA – 802.1X PEAP WITH FUNK ODYSSEY
FOU
ND
RY
NET
WO
RK
S W
HIT
E P
AP
ER –
DR
AFT
: DO
NO
T D
ISTR
BIU
TE
Configuring IP 200 Access Point The IP 200 Access Point must be using firmware version 01.2.10 or newer.
Configuration of the IP 200 in this installation guide starts with the IP 200 in factory default configuration and with the country code and Ethernet interface IP address already configured. To configure the country code and Ethernet interface IP address, please refer to the Foundry IronPoint 200 Installation Guide.
This section of the installation guide configures an IP 200 using firmware version that supports Virtual AP (1.3.01 or newer). For firmware versions that do not support Virtual AP (01.3.00, 01.2.x and older), the IP 200 configuration can be found in the Appendix A: Configuring IP 200 – Non-Virtual AP Versions.
This installation guide includes configuration of the IP 200 from the CLI and the Web Interface. If you prefer configuring the IP 200 from the Web Interface, you can skip the next section Configuring from the CLI and go to the following section Configuring from the Web Interface.
Configuring from the CLI If you prefer configuring the IP 200 from the web interface, you can skip this section and go to the next section Configuring from the Web Interface.
From the CLI, go to the configure context. Enter the following commands:
Foundry AP(config)#radius-server address x.x.x.x
Foundry AP(config)#radius-server key ********
Where:
x.x.x.x is the IP address of the computer that will have Odyssey Server installed on it. In this installation guide, this is the Windows 2000 computer.
******** is a Secret key. This Secret key can be any length and use any character.
Note: You will need to remember this Secret key when you configure the Odyssey Server.
Next, go to the context for VAP 0 on any one of the wireless interfaces. This installation guide will use the 802.11g wireless interface. Enter the following commands:
Foundry AP(if-wireless g: VAP[0])#802.1x required
Foundry AP(if-wireless g: VAP[0])#encryption
Foundry AP(if-wireless g: VAP[0])#wpa-clients Required
Foundry AP(if-wireless g: VAP[0])#wpa-mode Dynamic
Foundry AP(if-wireless g: VAP[0])#multicast-cipher TKIP
Foundry AP(if-wireless g: VAP[0])#ssid My SSID
Foundry AP(if-wireless g: VAP[0])#no shutdown
This completes the configuration of the IP 200 from the CLI. You can skip the next section Configuring from the Web Interface and proceed to the following section Obtaining Funk Software Odyssey Server, Certificate Authority & Requester and Client.
February 2005 ©2005 Foundry Networks, Inc. 4 All Rights Reserved.

WHITE PAPER: IRONPOINT 200 INSTALLATION GUIDE ®WPA – 802.1X PEAP WITH FUNK ODYSSEY
FOU
ND
RY
NET
WO
RK
S W
HIT
E P
AP
ER –
DR
AFT
: DO
NO
T D
ISTR
BIU
TE
Configuring from the Web Interface If you have configured the IP 200 using the previous section Configuring from the CLI, you do not need to configure the IP 200 using the Web Interface.
From the Web Interface, go to the RADIUS webpage. For the IP Address of the Primary Radius Server Setup, enter the IP address of the computer that will have Odyssey Server installed on it. In this installation guide, this is the Windows 2000 computer. Enter a Secret Key. This Secret Key can be any length and use any character. Note: You will need to remember this Secret Key when you configure the Odyssey Server. Click Apply.
February 2005 ©2005 Foundry Networks, Inc. 5 All Rights Reserved.

WHITE PAPER: IRONPOINT 200 INSTALLATION GUIDE ®WPA – 802.1X PEAP WITH FUNK ODYSSEY
FOU
ND
RY
NET
WO
RK
S W
HIT
E P
AP
ER –
DR
AFT
: DO
NO
T D
ISTR
BIU
TE
When Configuration has been saved! appears, click Security for any one of the Radio Interfaces. This guide configures Security for Radio Interface 802.11g.
February 2005 ©2005 Foundry Networks, Inc. 6 All Rights Reserved.

WHITE PAPER: IRONPOINT 200 INSTALLATION GUIDE ®WPA – 802.1X PEAP WITH FUNK ODYSSEY
FOU
ND
RY
NET
WO
RK
S W
HIT
E P
AP
ER –
DR
AFT
: DO
NO
T D
ISTR
BIU
TE
For VAP 0, check Enable and enter My SSID for the SSID. Click Apply.
February 2005 ©2005 Foundry Networks, Inc. 7 All Rights Reserved.
WHITE PAPER: IRONPOINT 200 INSTALLATION GUIDE ®WPA – 802.1X PEAP WITH FUNK ODYSSEY
FOU
ND
RY
NET
WO
RK
S W
HIT
E P
AP
ER –
DR
AFT
: DO
NO
T D
ISTR
BIU
TE
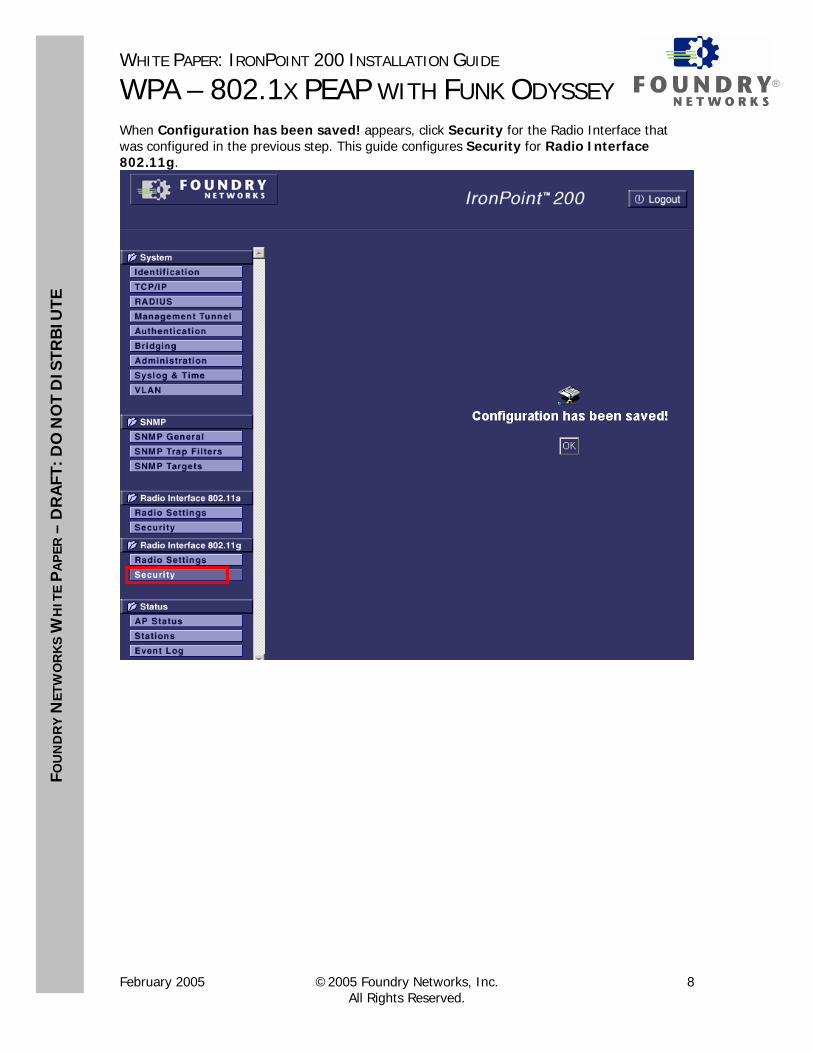
When Configuration has been saved! appears, click Security for the Radio Interface that was configured in the previous step. This guide configures Security for Radio Interface 802.11g.
February 2005 ©2005 Foundry Networks, Inc. 8 All Rights Reserved.

WHITE PAPER: IRONPOINT 200 INSTALLATION GUIDE ®WPA – 802.1X PEAP WITH FUNK ODYSSEY
FOU
ND
RY
NET
WO
RK
S W
HIT
E P
AP
ER –
DR
AFT
: DO
NO
T D
ISTR
BIU
TE
For VAP 0 click More.
February 2005 ©2005 Foundry Networks, Inc. 9 All Rights Reserved.

WHITE PAPER: IRONPOINT 200 INSTALLATION GUIDE ®WPA – 802.1X PEAP WITH FUNK ODYSSEY
FOU
ND
RY
NET
WO
RK
S W
HIT
E P
AP
ER –
DR
AFT
: DO
NO
T D
ISTR
BIU
TE
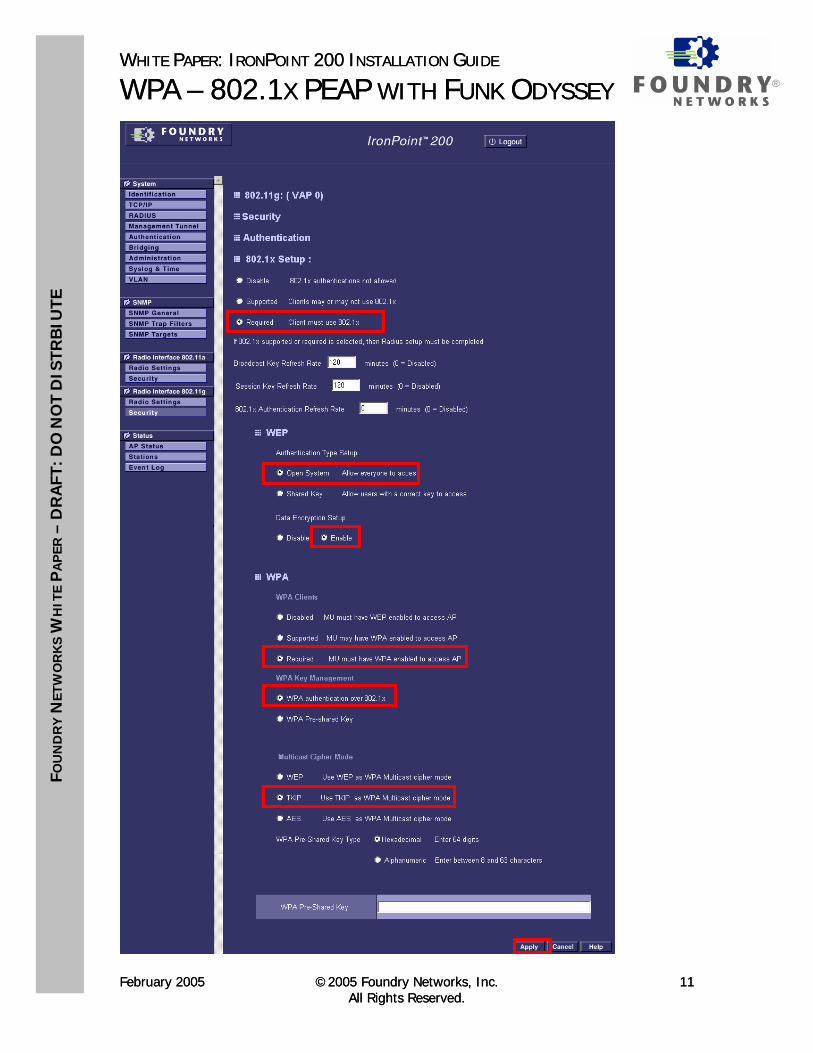
This will take you to the 802.11g (VAP 0) Security page. (See the screen image on the next page) For 802.1x Setup: select Required. For WEP Authentication Type Setup, select Open System. For Data Encryption Setup, select Enable. For WPA Clients, select Required. For WPA Key Management, select WPA Authentication over 802.1x. For Multicast Cipher Mode, select TKIP. Click Apply. This completes the configuration of the IP 200 from the Web Interface. Proceed to the next section Obtaining Funk Software Odyssey Server, Certificate Authority & Requester and Client.
February 2005 ©2005 Foundry Networks, Inc. 10 All Rights Reserved.
WHITE PAPER: IRONPOINT 200 INSTALLATION GUIDE ®WPA – 802.1X PEAP WITH FUNK ODYSSEY
FOU
ND
RY
NET
WO
RK
S W
HIT
E P
AP
ER –
DR
AFT
: DO
NO
T D
ISTR
BIU
TE
WHITE PAPER: IRONPOINT 200 INSTALLATION GUIDE
WPA – 802.1X PEAP WITH FUNK ODYSSEY
February 2005 ©2005 Foundry Networks, Inc. 11 All Rights Reserved.
FOU
ND
RY
NET
WO
RK
S W
HIT
E P
AP
ER –
DR
AFT
: DO
NO
T D
ISTR
BIU
TE
®
February 2005 ©2005 Foundry Networks, Inc. 11 All Rights Reserved.
WHITE PAPER: IRONPOINT 200 INSTALLATION GUIDE ®WPA – 802.1X PEAP WITH FUNK ODYSSEY
FOU
ND
RY
NET
WO
RK
S W
HIT
E P
AP
ER –
DR
AFT
: DO
NO
T D
ISTR
BIU
TE
Obtaining Funk Software Odyssey Server, Certificate Authority & Requester and Client
1. On the Internet, go to: http://www.funk.com/ 2. From the Choose a Product/Download Demo drop down menu, select Odyssey. 3. From the Odyssey webpage, select the link “Download demo”. 4. This may redirect you to a registration webpage. Enter the required information and
submit. 5. This will redirect you to the Odyssey – Download Demo webpage. Download the
following files: • odys201.msi: Odyssey Server • Odyssey_CA.msi: Odyssey Certificate Authority • Odyssey_CR.msi: Odyssey Certificate Requester • odyc303.msi: Odyssey Client. There may be other versions. Select the version that
supports the computer that you will be installing the Odyssey Client on. This installation guide will be installing odyc303.msi.
Note: You may also download the Readme, Manuals and other files for additional information on Odyssey such as supported computers and configurations. Downloading this additional information is not required for this installation guide.
February 2005 ©2005 Foundry Networks, Inc. 12 All Rights Reserved.

WHITE PAPER: IRONPOINT 200 INSTALLATION GUIDE ®WPA – 802.1X PEAP WITH FUNK ODYSSEY
FOU
ND
RY
NET
WO
RK
S W
HIT
E P
AP
ER –
DR
AFT
: DO
NO
T D
ISTR
BIU
TE
Installing Funk Software Odyssey Server 1. While it is possible to run multiple RADIUS servers on the same computer, configuring
this falls outside of the scope of this installation guide. Therefore, ensure that no other RADIUS servers are installed or enabled on the computer that you will be installing Odyssey Server on. If using Microsoft Windows Server, ensure that IAS is uninstalled or disabled. For instructions on how to disable IAS, see Appendix B: Disabling IAS on Microsoft Windows Server.
2. While it is also possible to run Odyssey Server with Microsoft Active Directory, configuring this also falls outside of the scope of this installation guide. Therefore, ensure that Microsoft Active Directory is not installed on the computer that you will be installing Odyssey Server on. For instructions on how to uninstall Active Directory, see Appendix D: Uninstalling Active Directory.
3. Copy the file odys201.msi to the computer you want to install Odyssey Server on. In this installation guide, this will be the Windows 2000 computer.
4. Open odys201.msi to run the installation program. This installation guide selects the default installation settings when provided.
5. When the installation completes, you may launch Odyssey Server. This is step not required. If Odyssey Server is launched, you will see the Odyssey Server Administrator.
6. If you see the message below when launching Odyssey Server, see Appendix C:
Starting the Odyssey Service.
Proceed to the next section, Installing and Configuring Funk Software Certificate Authority.
February 2005 ©2005 Foundry Networks, Inc. 13 All Rights Reserved.
WHITE PAPER: IRONPOINT 200 INSTALLATION GUIDE ®WPA – 802.1X PEAP WITH FUNK ODYSSEY
FOU
ND
RY
NET
WO
RK
S W
HIT
E P
AP
ER –
DR
AFT
: DO
NO
T D
ISTR
BIU
TE
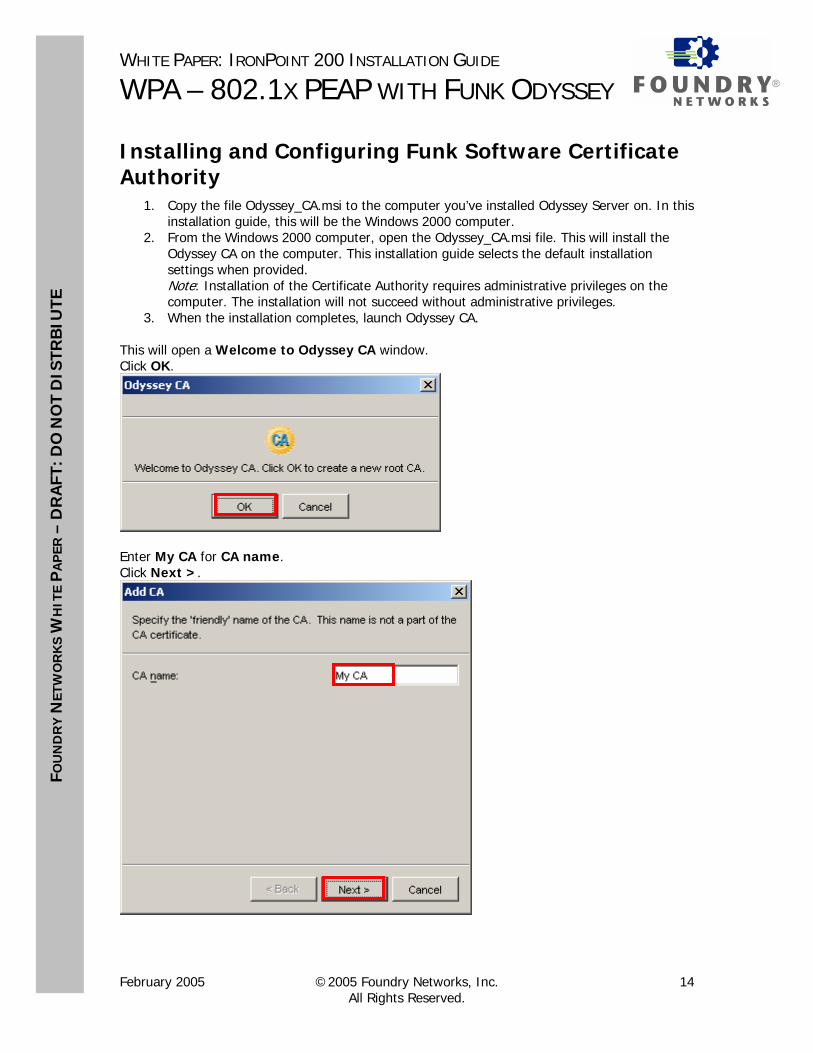
Installing and Configuring Funk Software Certificate Authority
1. Copy the file Odyssey_CA.msi to the computer you’ve installed Odyssey Server on. In this installation guide, this will be the Windows 2000 computer.
2. From the Windows 2000 computer, open the Odyssey_CA.msi file. This will install the Odyssey CA on the computer. This installation guide selects the default installation settings when provided. Note: Installation of the Certificate Authority requires administrative privileges on the computer. The installation will not succeed without administrative privileges.
3. When the installation completes, launch Odyssey CA.
This will open a Welcome to Odyssey CA window. Click OK.
Enter My CA for CA name. Click Next >.
February 2005 ©2005 Foundry Networks, Inc. 14 All Rights Reserved.

WHITE PAPER: IRONPOINT 200 INSTALLATION GUIDE ®WPA – 802.1X PEAP WITH FUNK ODYSSEY
FOU
ND
RY
NET
WO
RK
S W
HIT
E P
AP
ER –
DR
AFT
: DO
NO
T D
ISTR
BIU
TE
Click Next >.
Enter My CA for Common name:. Click Next >.
February 2005 ©2005 Foundry Networks, Inc. 15 All Rights Reserved.

WHITE PAPER: IRONPOINT 200 INSTALLATION GUIDE ®WPA – 802.1X PEAP WITH FUNK ODYSSEY
FOU
ND
RY
NET
WO
RK
S W
HIT
E P
AP
ER –
DR
AFT
: DO
NO
T D
ISTR
BIU
TE
Click Next >.
Click Next >.
February 2005 ©2005 Foundry Networks, Inc. 16 All Rights Reserved.

WHITE PAPER: IRONPOINT 200 INSTALLATION GUIDE ®WPA – 802.1X PEAP WITH FUNK ODYSSEY
FOU
ND
RY
NET
WO
RK
S W
HIT
E P
AP
ER –
DR
AFT
: DO
NO
T D
ISTR
BIU
TE
Click Next >.
Click Finish.
February 2005 ©2005 Foundry Networks, Inc. 17 All Rights Reserved.

WHITE PAPER: IRONPOINT 200 INSTALLATION GUIDE ®WPA – 802.1X PEAP WITH FUNK ODYSSEY
FOU
ND
RY
NET
WO
RK
S W
HIT
E P
AP
ER –
DR
AFT
: DO
NO
T D
ISTR
BIU
TE
You will see this window while the keys are being created.
When the keys have been created, you will see the Odyssey CA Administrator. Select Odyssey CA on the left hand column. Confirm that My CA appears on the right hand column.
Proceed to the next section Installing and Configuring Funk Software Certificate Requester.
February 2005 ©2005 Foundry Networks, Inc. 18 All Rights Reserved.

WHITE PAPER: IRONPOINT 200 INSTALLATION GUIDE ®WPA – 802.1X PEAP WITH FUNK ODYSSEY
FOU
ND
RY
NET
WO
RK
S W
HIT
E P
AP
ER –
DR
AFT
: DO
NO
T D
ISTR
BIU
TE
Installing and Configuring Funk Software Certificate Requester
1. Copy the file Odyssey_CR.msi to the computer you installed Odyssey Server on. In this installation guide, this will be the Windows 2000 computer.
2. From the Windows 2000 computer, open the Odyssey_CR.msi file. This will install the Odyssey Certificate Requester on the computer.
3. Follow all of the instructions in the installation program. Select the default settings when provided.
4. When the installation completes, you may be asked to reboot your computer. If so, reboot your computer.
5. When the computer reboots, launch Odyssey Certificate Requester.
This will open the “Welcome to the Odyssey Certificate Requester” window. Click Next >.
February 2005 ©2005 Foundry Networks, Inc. 19 All Rights Reserved.

WHITE PAPER: IRONPOINT 200 INSTALLATION GUIDE ®WPA – 802.1X PEAP WITH FUNK ODYSSEY
FOU
ND
RY
NET
WO
RK
S W
HIT
E P
AP
ER –
DR
AFT
: DO
NO
T D
ISTR
BIU
TE
Click Next >.
Set Key size: to 1024. Click Next >.
February 2005 ©2005 Foundry Networks, Inc. 20 All Rights Reserved.

WHITE PAPER: IRONPOINT 200 INSTALLATION GUIDE ®WPA – 802.1X PEAP WITH FUNK ODYSSEY
FOU
ND
RY
NET
WO
RK
S W
HIT
E P
AP
ER –
DR
AFT
: DO
NO
T D
ISTR
BIU
TE
For Odyssey CA address or host name, enter the IP address of this computer. Click Next >.
You will see the Certificate request pending window.
Leave this window open and proceed to the next section Approve Certificate Request.
February 2005 ©2005 Foundry Networks, Inc. 21 All Rights Reserved.

WHITE PAPER: IRONPOINT 200 INSTALLATION GUIDE ®WPA – 802.1X PEAP WITH FUNK ODYSSEY
FOU
ND
RY
NET
WO
RK
S W
HIT
E P
AP
ER –
DR
AFT
: DO
NO
T D
ISTR
BIU
TE
Approving Certificate Request Launch Odyssey CA Administrator. Select Odyssey CA in the left hand column. This will open the folder to show My CA. Select My CA. This will open the folder to show information for My CA. Select Pending Certificate Requests. This will show all pending certificate requests on the right hand column. Select the pending certificate request. Click Process.
Click Next >.
Click Finish
Return to the Odyssey Certificate Requester Certificate request pending window.
February 2005 ©2005 Foundry Networks, Inc. 22 All Rights Reserved.

WHITE PAPER: IRONPOINT 200 INSTALLATION GUIDE ®WPA – 802.1X PEAP WITH FUNK ODYSSEY
FOU
ND
RY
NET
WO
RK
S W
HIT
E P
AP
ER –
DR
AFT
: DO
NO
T D
ISTR
BIU
TE
Click Next >.
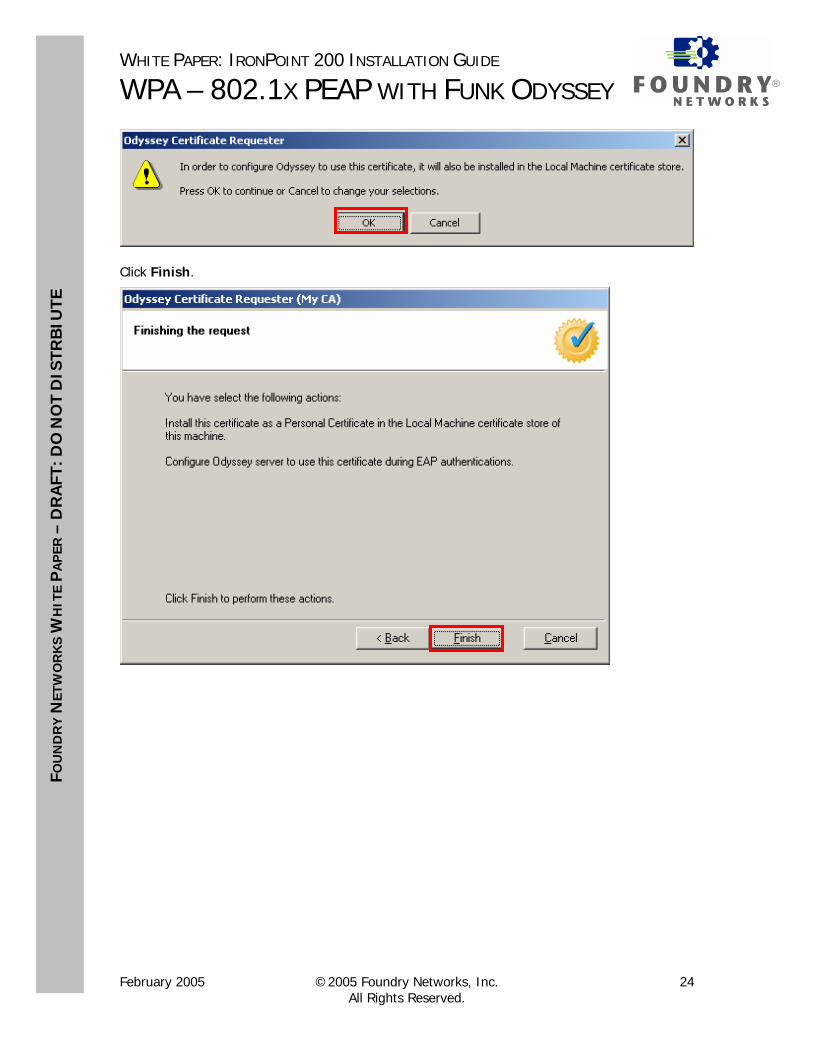
Select Configure the local copy of Odyssey Server with this certificate. Click Next >.
Click OK.
February 2005 ©2005 Foundry Networks, Inc. 23 All Rights Reserved.
WHITE PAPER: IRONPOINT 200 INSTALLATION GUIDE ®WPA – 802.1X PEAP WITH FUNK ODYSSEY
FOU
ND
RY
NET
WO
RK
S W
HIT
E P
AP
ER –
DR
AFT
: DO
NO
T D
ISTR
BIU
TE
Click Finish.
February 2005 ©2005 Foundry Networks, Inc. 24 All Rights Reserved.
WHITE PAPER: IRONPOINT 200 INSTALLATION GUIDE ®WPA – 802.1X PEAP WITH FUNK ODYSSEY
FOU
ND
RY
NET
WO
RK
S W
HIT
E P
AP
ER –
DR
AFT
: DO
NO
T D
ISTR
BIU
TE
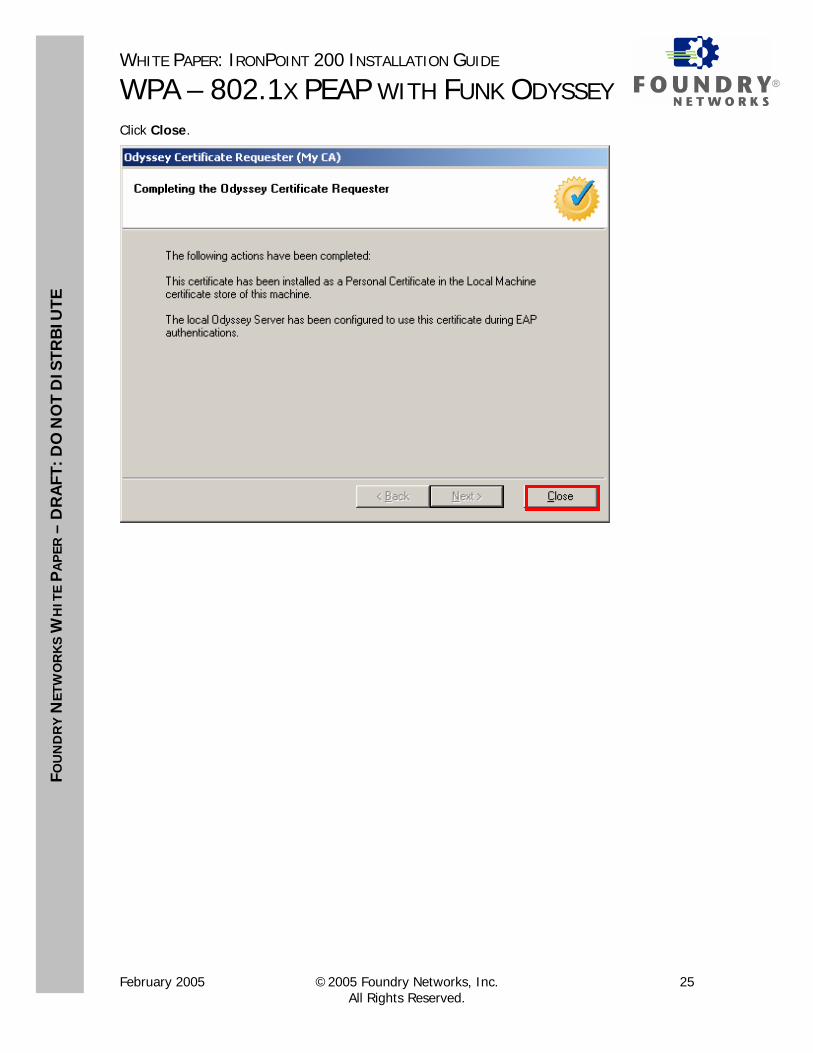
Click Close.
February 2005 ©2005 Foundry Networks, Inc. 25 All Rights Reserved.
WHITE PAPER: IRONPOINT 200 INSTALLATION GUIDE ®WPA – 802.1X PEAP WITH FUNK ODYSSEY
FOU
ND
RY
NET
WO
RK
S W
HIT
E P
AP
ER –
DR
AFT
: DO
NO
T D
ISTR
BIU
TE
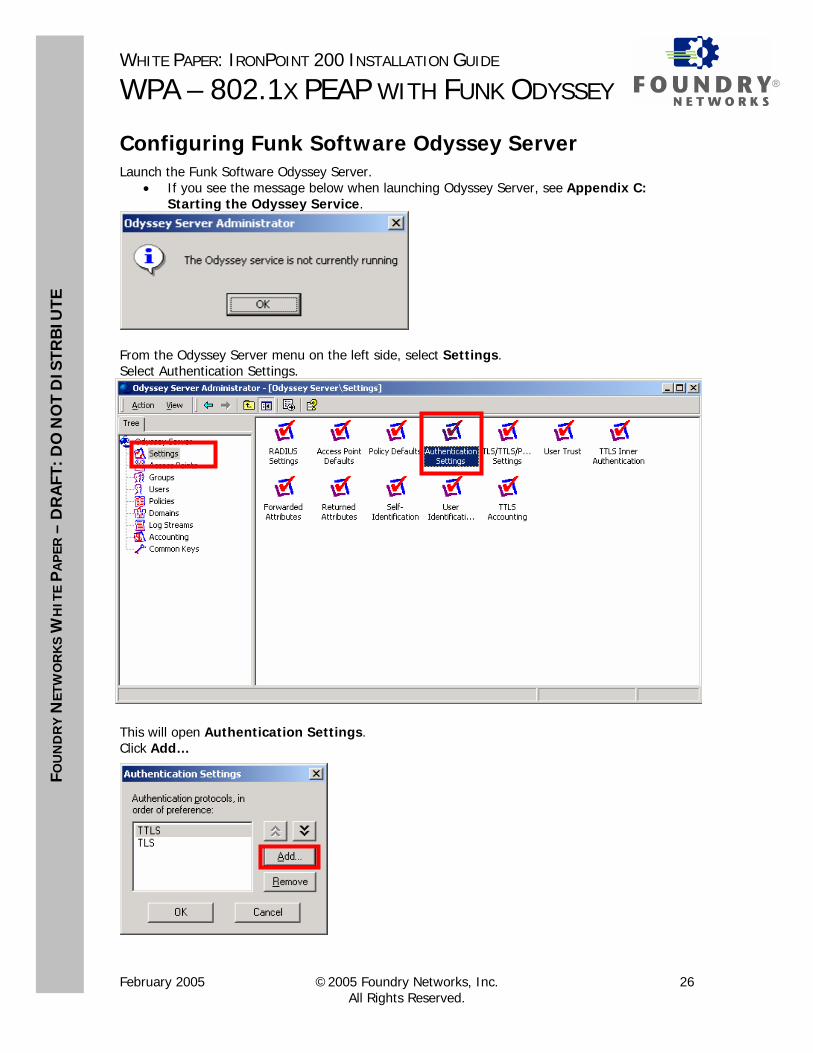
Configuring Funk Software Odyssey Server Launch the Funk Software Odyssey Server.
• If you see the message below when launching Odyssey Server, see Appendix C: Starting the Odyssey Service.
From the Odyssey Server menu on the left side, select Settings. Select Authentication Settings.
This will open Authentication Settings. Click Add…
February 2005 ©2005 Foundry Networks, Inc. 26 All Rights Reserved.

WHITE PAPER: IRONPOINT 200 INSTALLATION GUIDE ®WPA – 802.1X PEAP WITH FUNK ODYSSEY
FOU
ND
RY
NET
WO
RK
S W
HIT
E P
AP
ER –
DR
AFT
: DO
NO
T D
ISTR
BIU
TE
This will open Add EAP Protocol. Select PEAP. Click OK.
This will take you back to Authentication Settings. Select PEAP Click the UP arrow twice.
This will move PEAP to the top of the list. Click OK.
February 2005 ©2005 Foundry Networks, Inc. 27 All Rights Reserved.
WHITE PAPER: IRONPOINT 200 INSTALLATION GUIDE ®WPA – 802.1X PEAP WITH FUNK ODYSSEY
FOU
ND
RY
NET
WO
RK
S W
HIT
E P
AP
ER –
DR
AFT
: DO
NO
T D
ISTR
BIU
TE
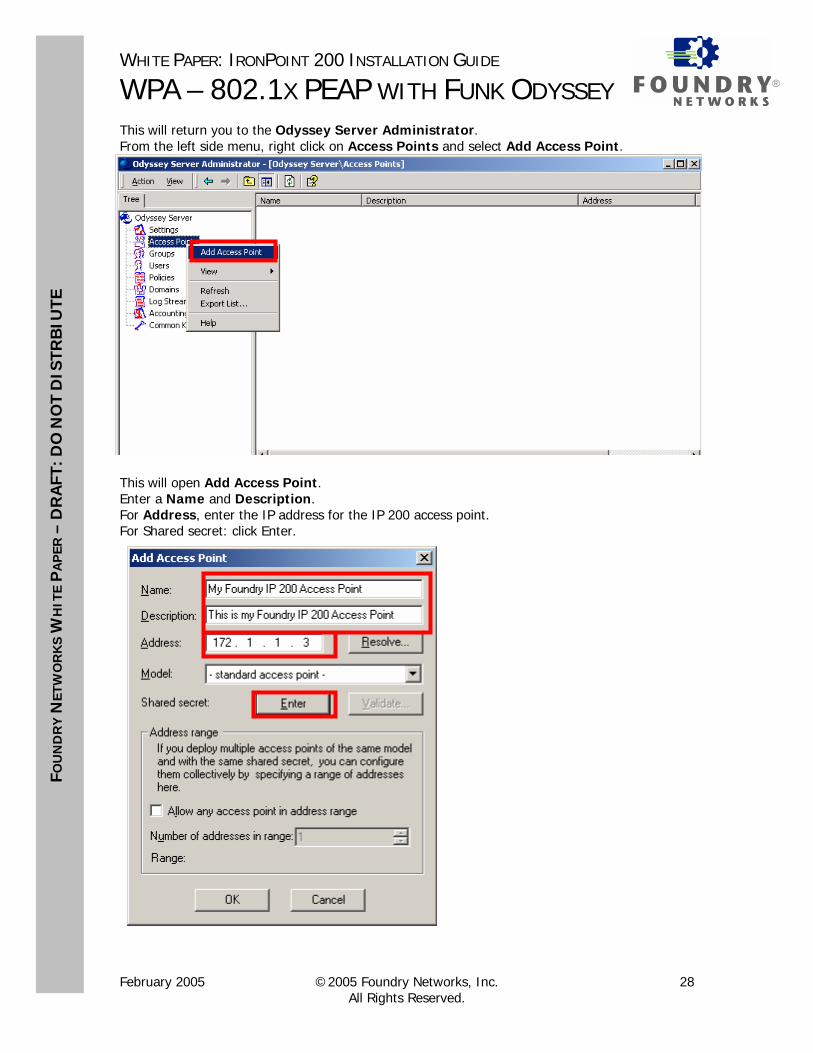
This will return you to the Odyssey Server Administrator. From the left side menu, right click on Access Points and select Add Access Point.
This will open Add Access Point. Enter a Name and Description. For Address, enter the IP address for the IP 200 access point. For Shared secret: click Enter.
February 2005 ©2005 Foundry Networks, Inc. 28 All Rights Reserved.

WHITE PAPER: IRONPOINT 200 INSTALLATION GUIDE ®WPA – 802.1X PEAP WITH FUNK ODYSSEY
FOU
ND
RY
NET
WO
RK
S W
HIT
E P
AP
ER –
DR
AFT
: DO
NO
T D
ISTR
BIU
TE
This will open Enter Shared Secret. Enter the same shared secret that was configured in your IP 200. Click OK.
This will return you to Add Access Point. Click OK.
February 2005 ©2005 Foundry Networks, Inc. 29 All Rights Reserved.

WHITE PAPER: IRONPOINT 200 INSTALLATION GUIDE ®WPA – 802.1X PEAP WITH FUNK ODYSSEY
FOU
ND
RY
NET
WO
RK
S W
HIT
E P
AP
ER –
DR
AFT
: DO
NO
T D
ISTR
BIU
TE
This will return you to the Odyssey Server Administrator. From the left side menu, right click on User and select Add User(s).
This will open Add User(s). Select a user. Click Add. Note: Select a user with a known password. Remember the user and password. You will need them when you configure the Odyssey Client.
February 2005 ©2005 Foundry Networks, Inc. 30 All Rights Reserved.

WHITE PAPER: IRONPOINT 200 INSTALLATION GUIDE ®WPA – 802.1X PEAP WITH FUNK ODYSSEY
FOU
ND
RY
NET
WO
RK
S W
HIT
E P
AP
ER –
DR
AFT
: DO
NO
T D
ISTR
BIU
TE
The selected user will appear in the list below. Click OK.
February 2005 ©2005 Foundry Networks, Inc. 31 All Rights Reserved.

WHITE PAPER: IRONPOINT 200 INSTALLATION GUIDE ®WPA – 802.1X PEAP WITH FUNK ODYSSEY
FOU
ND
RY
NET
WO
RK
S W
HIT
E P
AP
ER –
DR
AFT
: DO
NO
T D
ISTR
BIU
TE
Exporting the Server Certificate From the Odyssey Server Administrator, Select Settings from the left side menu. Open TLS/TTLS/PEAP Settings
This will open TLS Settings (for EAP-TLS, EAP-TTLS, and PEAP).
• Click View…
February 2005 ©2005 Foundry Networks, Inc. 32 All Rights Reserved.
WHITE PAPER: IRONPOINT 200 INSTALLATION GUIDE ®WPA – 802.1X PEAP WITH FUNK ODYSSEY
FOU
ND
RY
NET
WO
RK
S W
HIT
E P
AP
ER –
DR
AFT
: DO
NO
T D
ISTR
BIU
TE
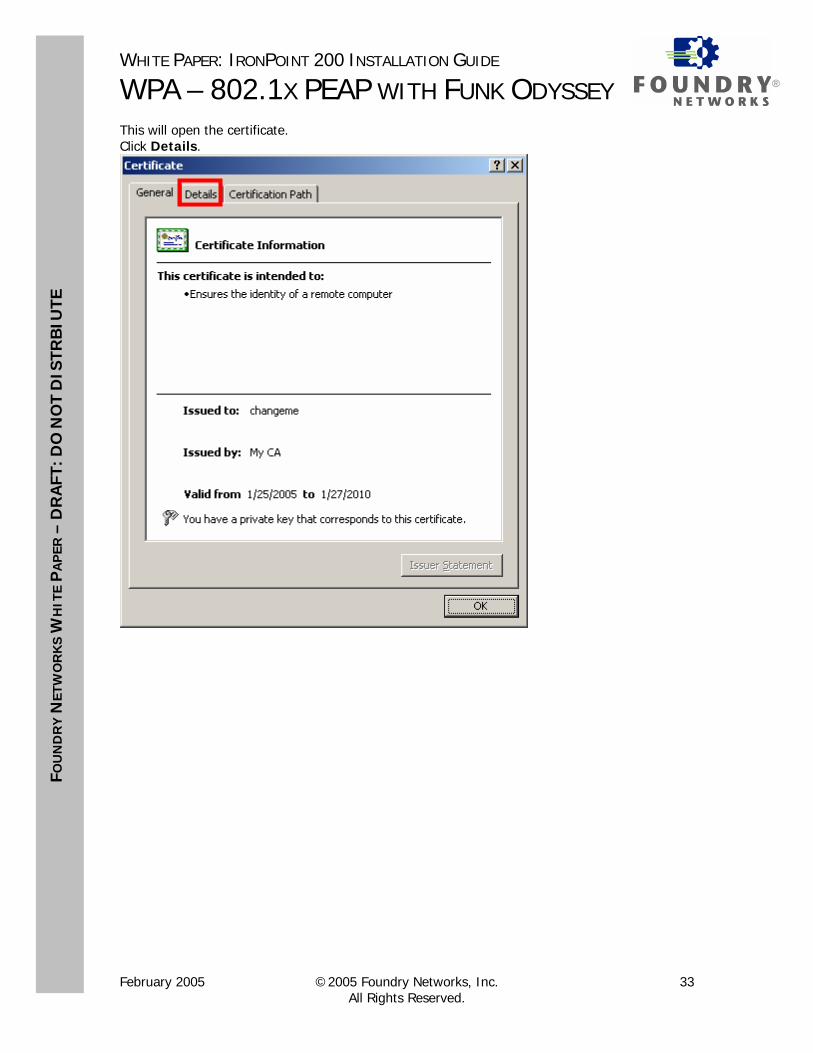
This will open the certificate. Click Details.
February 2005 ©2005 Foundry Networks, Inc. 33 All Rights Reserved.
WHITE PAPER: IRONPOINT 200 INSTALLATION GUIDE ®WPA – 802.1X PEAP WITH FUNK ODYSSEY
FOU
ND
RY
NET
WO
RK
S W
HIT
E P
AP
ER –
DR
AFT
: DO
NO
T D
ISTR
BIU
TE
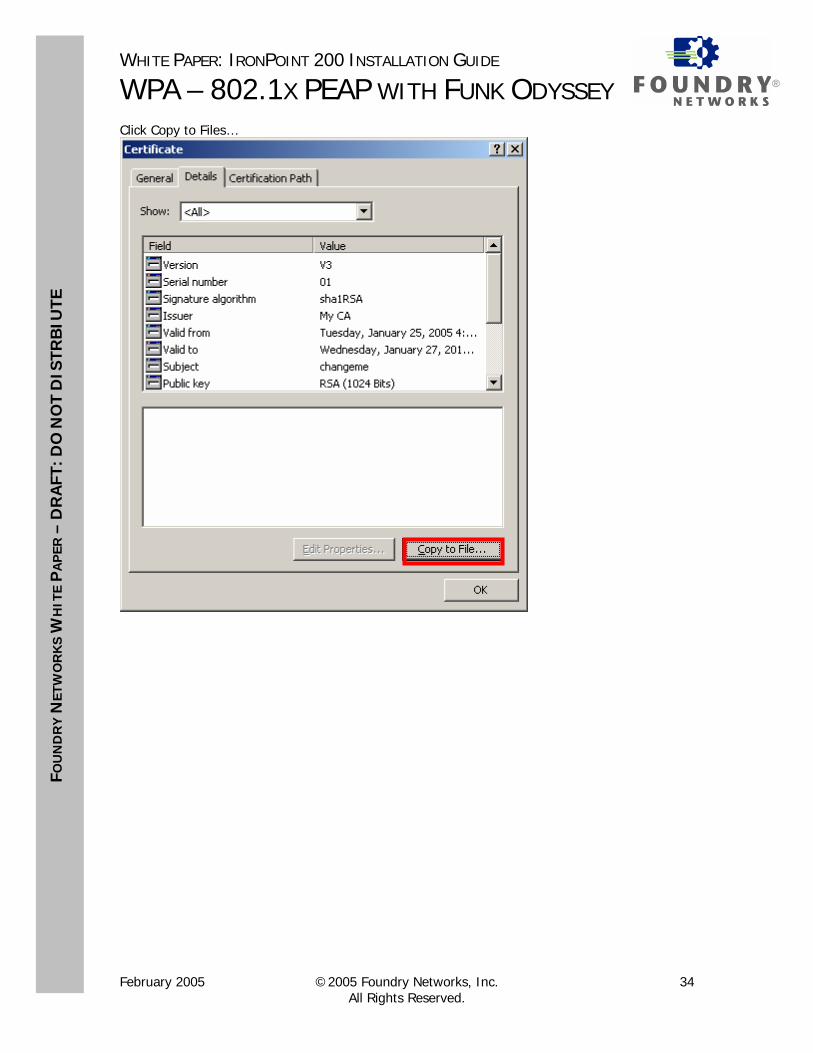
Click Copy to Files…
February 2005 ©2005 Foundry Networks, Inc. 34 All Rights Reserved.

WHITE PAPER: IRONPOINT 200 INSTALLATION GUIDE ®WPA – 802.1X PEAP WITH FUNK ODYSSEY
FOU
ND
RY
NET
WO
RK
S W
HIT
E P
AP
ER –
DR
AFT
: DO
NO
T D
ISTR
BIU
TE
This will open Welcome to the Certificate Export Wizard. Click Next >.
Select Yes, export the private key. Click Next >.
February 2005 ©2005 Foundry Networks, Inc. 35 All Rights Reserved.
WHITE PAPER: IRONPOINT 200 INSTALLATION GUIDE ®WPA – 802.1X PEAP WITH FUNK ODYSSEY
FOU
ND
RY
NET
WO
RK
S W
HIT
E P
AP
ER –
DR
AFT
: DO
NO
T D
ISTR
BIU
TE
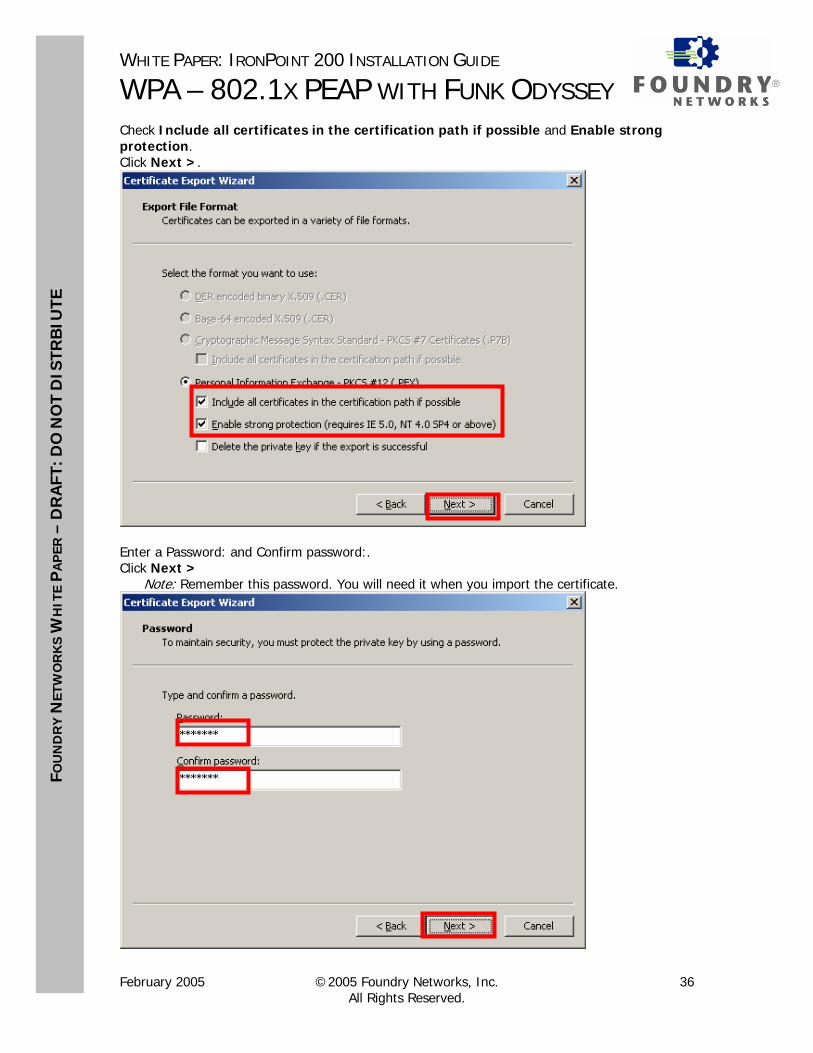
Check Include all certificates in the certification path if possible and Enable strong protection. Click Next >.
Enter a Password: and Confirm password:. Click Next >
Note: Remember this password. You will need it when you import the certificate.
February 2005 ©2005 Foundry Networks, Inc. 36 All Rights Reserved.

WHITE PAPER: IRONPOINT 200 INSTALLATION GUIDE ®WPA – 802.1X PEAP WITH FUNK ODYSSEY
FOU
ND
RY
NET
WO
RK
S W
HIT
E P
AP
ER –
DR
AFT
: DO
NO
T D
ISTR
BIU
TE
• Click Browse …
Browse to a folder to export the certificate to. Enter a File name:. Click Save.
Note: Remember the location and name of the file you are exporting the certificate to. You will need to remember this when importing the certificate.
February 2005 ©2005 Foundry Networks, Inc. 37 All Rights Reserved.

WHITE PAPER: IRONPOINT 200 INSTALLATION GUIDE ®WPA – 802.1X PEAP WITH FUNK ODYSSEY
FOU
ND
RY
NET
WO
RK
S W
HIT
E P
AP
ER –
DR
AFT
: DO
NO
T D
ISTR
BIU
TE
Click Next >.
Click Finish.
February 2005 ©2005 Foundry Networks, Inc. 38 All Rights Reserved.

WHITE PAPER: IRONPOINT 200 INSTALLATION GUIDE ®WPA – 802.1X PEAP WITH FUNK ODYSSEY
FOU
ND
RY
NET
WO
RK
S W
HIT
E P
AP
ER –
DR
AFT
: DO
NO
T D
ISTR
BIU
TE
Click OK.
Click OK.
February 2005 ©2005 Foundry Networks, Inc. 39 All Rights Reserved.

WHITE PAPER: IRONPOINT 200 INSTALLATION GUIDE ®WPA – 802.1X PEAP WITH FUNK ODYSSEY
FOU
ND
RY
NET
WO
RK
S W
HIT
E P
AP
ER –
DR
AFT
: DO
NO
T D
ISTR
BIU
TE
Installing Funk Software Odyssey Client 1. Copy the file Odyssey Client installation program to the computer that will run the
Odyssey Client. In this installation guide, this will be the Windows XP computer with the wireless NIC. The installation program will be odyc303.msi.
2. Uninstall or disable any other 802.1x supplicants or 3rd party NIC vendor utilities from the computer that will run the Odyssey Client. This includes Microsoft Windows Wireless Zero Configuration. To disable Wireless Zero Configuration on Windows XP, see the Appendix at the end of this guide.
3. Open the odyc303.msi file. This will install the Odyssey Client on the computer. 4. Follow all of the instructions in the installation program. Select the default settings when
provided. 5. When the installation is complete, launch the Odyssey Client. When launching the
Odyssey Client, you may see the following screens:
Click Next >.
February 2005 ©2005 Foundry Networks, Inc. 40 All Rights Reserved.

WHITE PAPER: IRONPOINT 200 INSTALLATION GUIDE ®WPA – 802.1X PEAP WITH FUNK ODYSSEY
FOU
ND
RY
NET
WO
RK
S W
HIT
E P
AP
ER –
DR
AFT
: DO
NO
T D
ISTR
BIU
TE
Click Finish.
February 2005 ©2005 Foundry Networks, Inc. 41 All Rights Reserved.

WHITE PAPER: IRONPOINT 200 INSTALLATION GUIDE ®WPA – 802.1X PEAP WITH FUNK ODYSSEY
FOU
ND
RY
NET
WO
RK
S W
HIT
E P
AP
ER –
DR
AFT
: DO
NO
T D
ISTR
BIU
TE
Importing the Server Certificate This section guides you through importing the server certificate on to the computer with Odyssey Client. In this installation guide, this is the Windows XP computer. Copy the file that was exported in the previous section Exporting the Server Certificate to the computer with Odyssey Client. In this installation guide, this file is called cert4me.pfx and the computer is the Windows XP computer.
• Open this file.
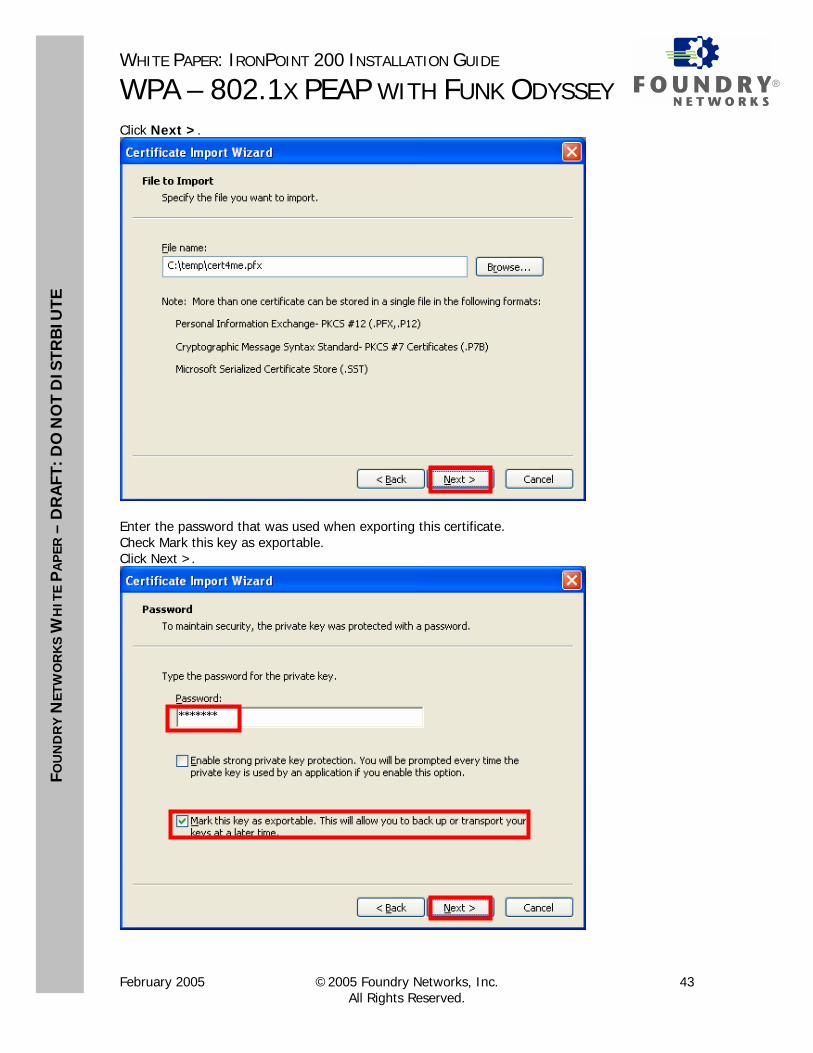
This will open the Welcome to the Certificate Import Wizard. Click Next >.
February 2005 ©2005 Foundry Networks, Inc. 42 All Rights Reserved.
WHITE PAPER: IRONPOINT 200 INSTALLATION GUIDE ®WPA – 802.1X PEAP WITH FUNK ODYSSEY
FOU
ND
RY
NET
WO
RK
S W
HIT
E P
AP
ER –
DR
AFT
: DO
NO
T D
ISTR
BIU
TE
Click Next >.
Enter the password that was used when exporting this certificate. Check Mark this key as exportable. Click Next >.
February 2005 ©2005 Foundry Networks, Inc. 43 All Rights Reserved.
WHITE PAPER: IRONPOINT 200 INSTALLATION GUIDE ®WPA – 802.1X PEAP WITH FUNK ODYSSEY
FOU
ND
RY
NET
WO
RK
S W
HIT
E P
AP
ER –
DR
AFT
: DO
NO
T D
ISTR
BIU
TE
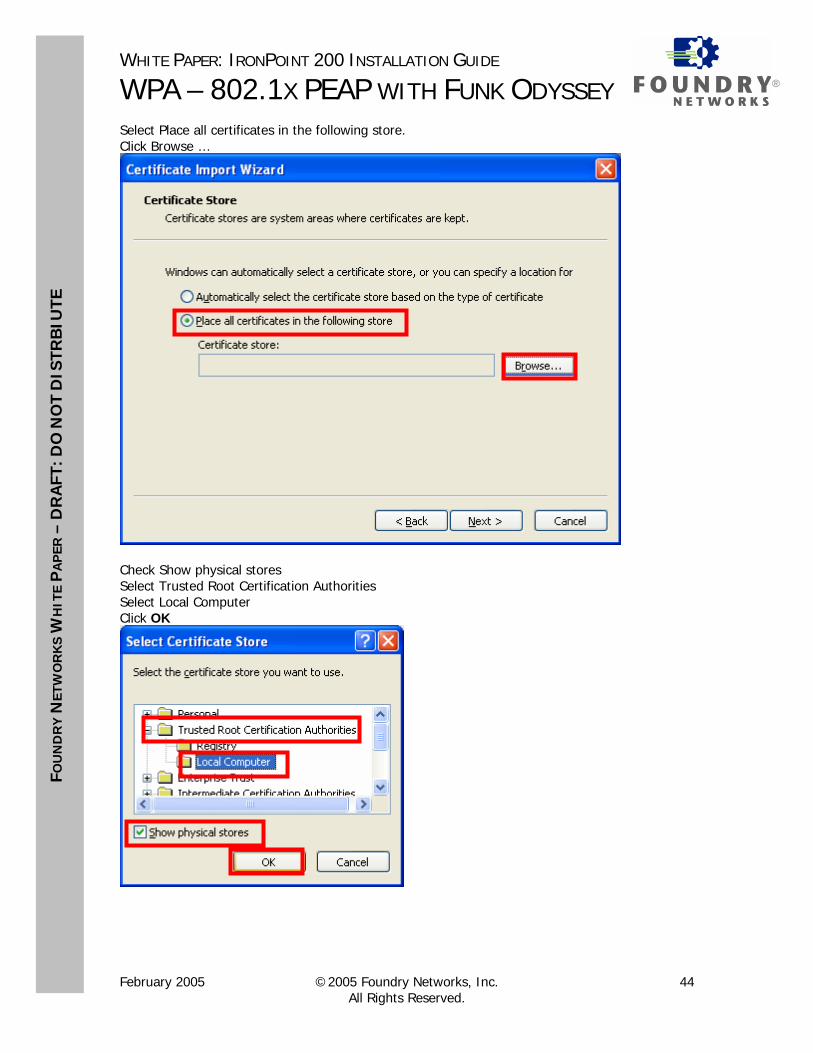
Select Place all certificates in the following store. Click Browse …
Check Show physical stores Select Trusted Root Certification Authorities Select Local Computer Click OK
February 2005 ©2005 Foundry Networks, Inc. 44 All Rights Reserved.

WHITE PAPER: IRONPOINT 200 INSTALLATION GUIDE ®WPA – 802.1X PEAP WITH FUNK ODYSSEY
FOU
ND
RY
NET
WO
RK
S W
HIT
E P
AP
ER –
DR
AFT
: DO
NO
T D
ISTR
BIU
TE
Click Next >.
Click Finish.
Click OK.
February 2005 ©2005 Foundry Networks, Inc. 45 All Rights Reserved.

WHITE PAPER: IRONPOINT 200 INSTALLATION GUIDE ®WPA – 802.1X PEAP WITH FUNK ODYSSEY
FOU
ND
RY
NET
WO
RK
S W
HIT
E P
AP
ER –
DR
AFT
: DO
NO
T D
ISTR
BIU
TE
Configuring Funk Software Odyssey Client Open the Odyssey Client Manager. Select Profiles. Click Add … .
February 2005 ©2005 Foundry Networks, Inc. 46 All Rights Reserved.
WHITE PAPER: IRONPOINT 200 INSTALLATION GUIDE ®WPA – 802.1X PEAP WITH FUNK ODYSSEY
FOU
ND
RY
NET
WO
RK
S W
HIT
E P
AP
ER –
DR
AFT
: DO
NO
T D
ISTR
BIU
TE
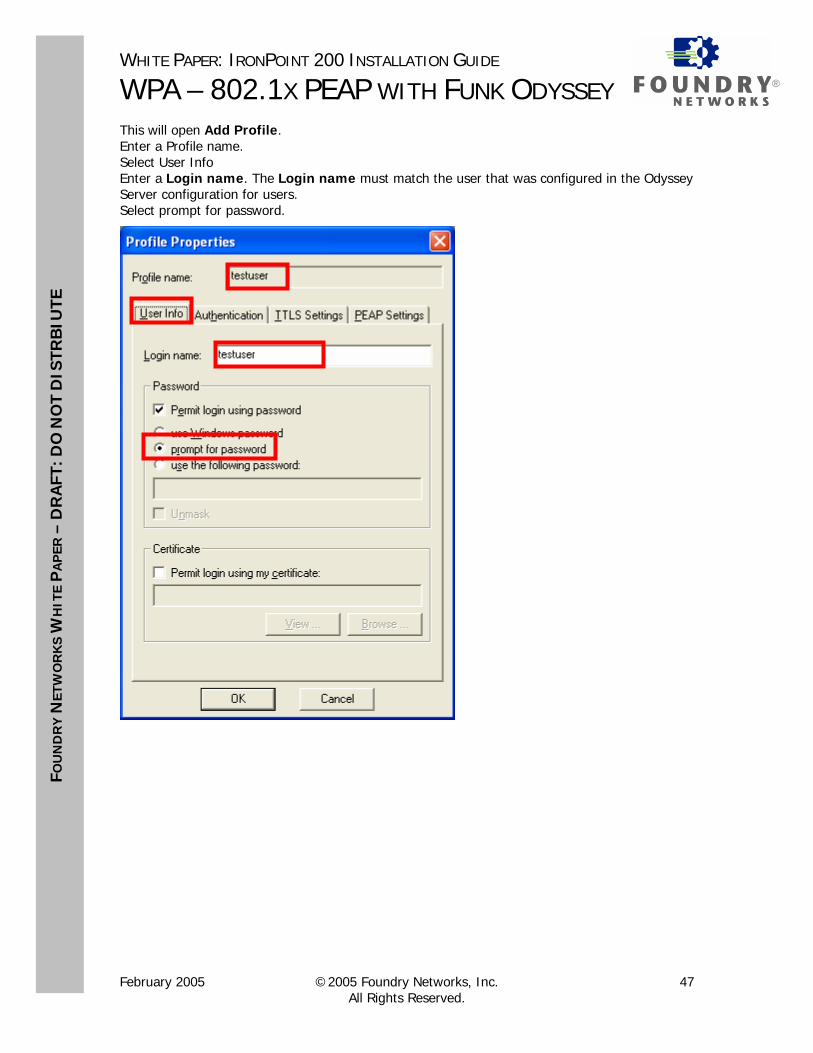
This will open Add Profile. Enter a Profile name. Select User Info Enter a Login name. The Login name must match the user that was configured in the Odyssey Server configuration for users. Select prompt for password.
February 2005 ©2005 Foundry Networks, Inc. 47 All Rights Reserved.
WHITE PAPER: IRONPOINT 200 INSTALLATION GUIDE ®WPA – 802.1X PEAP WITH FUNK ODYSSEY
FOU
ND
RY
NET
WO
RK
S W
HIT
E P
AP
ER –
DR
AFT
: DO
NO
T D
ISTR
BIU
TE
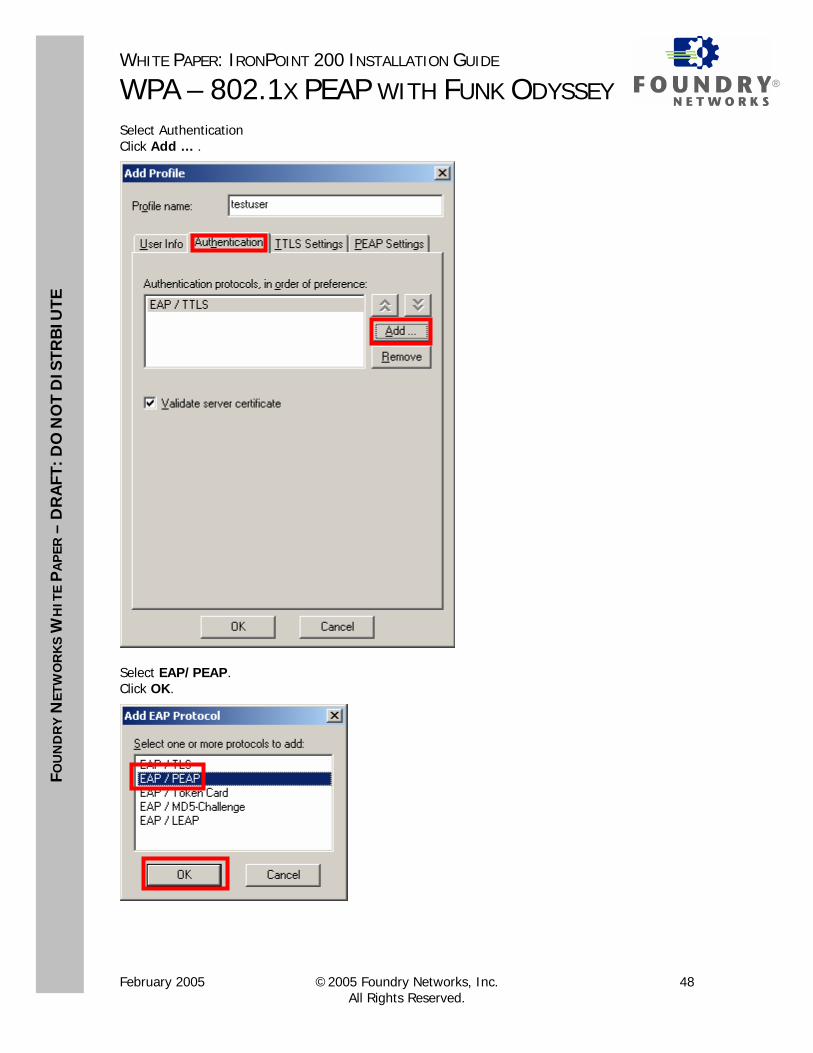
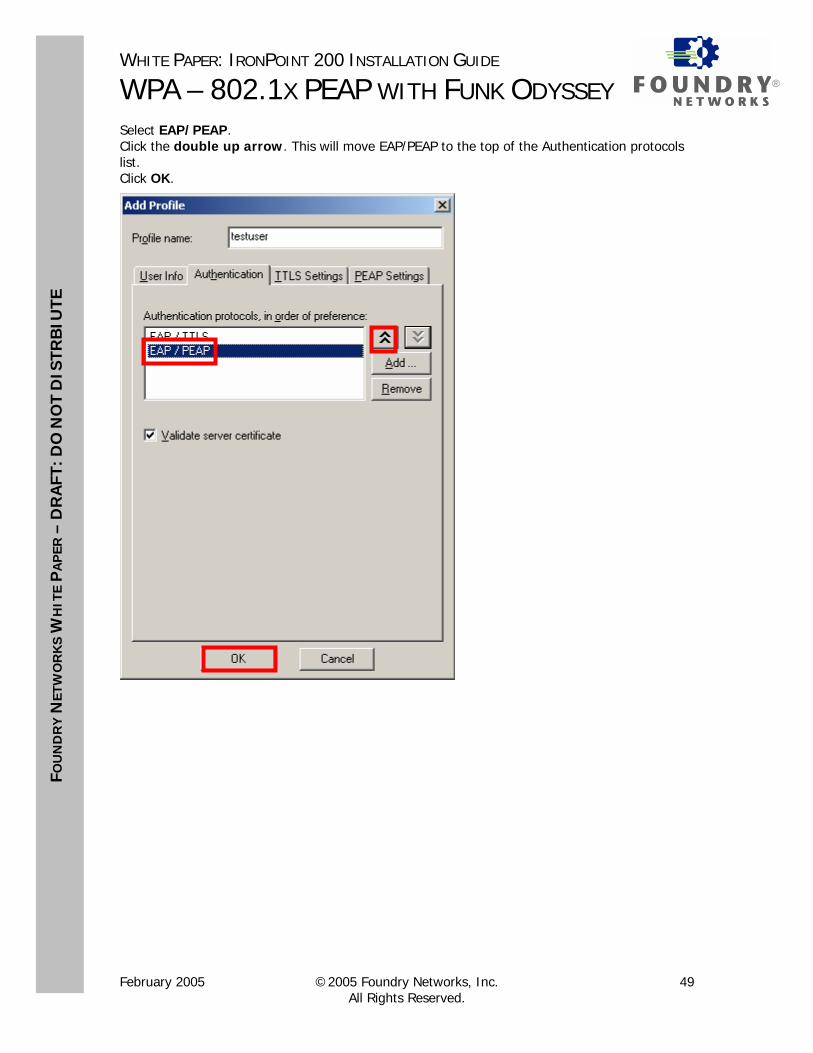
Select Authentication Click Add … .
Select EAP/PEAP. Click OK.
February 2005 ©2005 Foundry Networks, Inc. 48 All Rights Reserved.
WHITE PAPER: IRONPOINT 200 INSTALLATION GUIDE ®WPA – 802.1X PEAP WITH FUNK ODYSSEY
FOU
ND
RY
NET
WO
RK
S W
HIT
E P
AP
ER –
DR
AFT
: DO
NO
T D
ISTR
BIU
TE
Select EAP/PEAP. Click the double up arrow. This will move EAP/PEAP to the top of the Authentication protocols list. Click OK.
February 2005 ©2005 Foundry Networks, Inc. 49 All Rights Reserved.
WHITE PAPER: IRONPOINT 200 INSTALLATION GUIDE ®WPA – 802.1X PEAP WITH FUNK ODYSSEY
FOU
ND
RY
NET
WO
RK
S W
HIT
E P
AP
ER –
DR
AFT
: DO
NO
T D
ISTR
BIU
TE
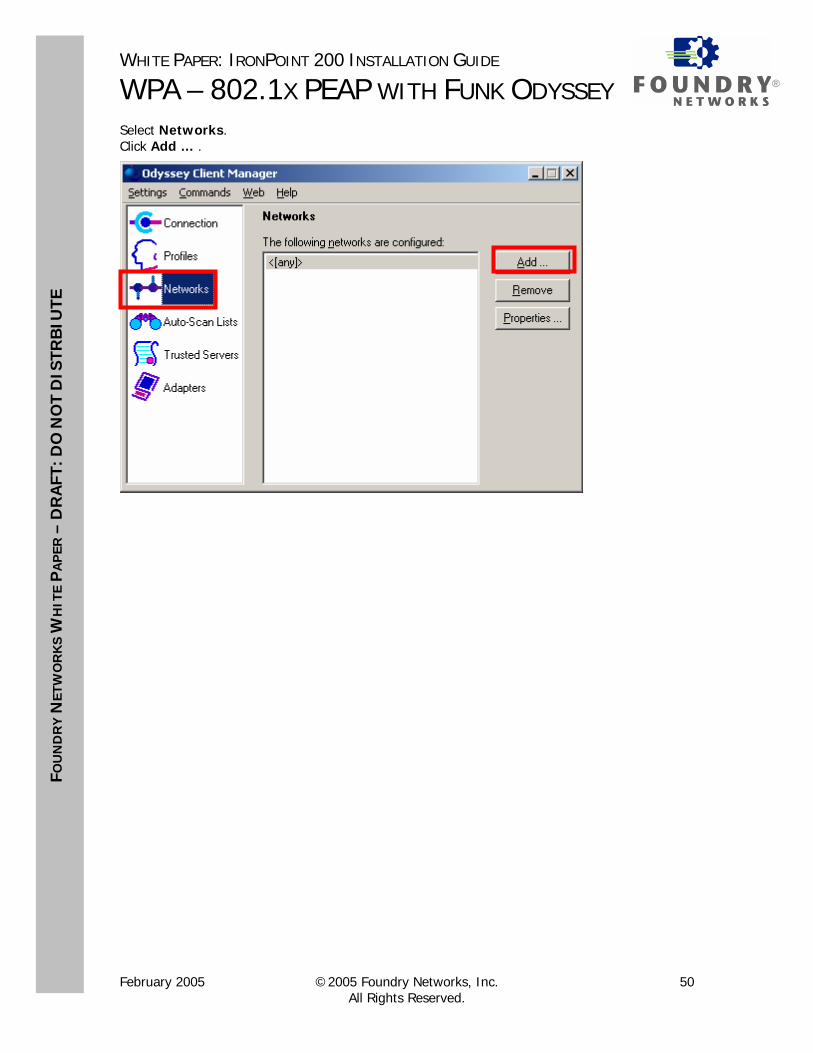
Select Networks. Click Add … .
February 2005 ©2005 Foundry Networks, Inc. 50 All Rights Reserved.

WHITE PAPER: IRONPOINT 200 INSTALLATION GUIDE ®WPA – 802.1X PEAP WITH FUNK ODYSSEY
FOU
ND
RY
NET
WO
RK
S W
HIT
E P
AP
ER –
DR
AFT
: DO
NO
T D
ISTR
BIU
TE
This will open Add Network. Enter My SSID for Network name (SSID). For Association mode: select WPA For Encryption method: select TKIP Check Authenticate user profile: and select the profile you just created in the previous step Check Keys will be generated automatically for data privacy Click OK
February 2005 ©2005 Foundry Networks, Inc. 51 All Rights Reserved.

WHITE PAPER: IRONPOINT 200 INSTALLATION GUIDE ®WPA – 802.1X PEAP WITH FUNK ODYSSEY
FOU
ND
RY
NET
WO
RK
S W
HIT
E P
AP
ER –
DR
AFT
: DO
NO
T D
ISTR
BIU
TE
Select Trusted Servers Click Add …
Check Trust any server with a valid certificate regardless of its name. Click Browse …
February 2005 ©2005 Foundry Networks, Inc. 52 All Rights Reserved.

WHITE PAPER: IRONPOINT 200 INSTALLATION GUIDE ®WPA – 802.1X PEAP WITH FUNK ODYSSEY
FOU
ND
RY
NET
WO
RK
S W
HIT
E P
AP
ER –
DR
AFT
: DO
NO
T D
ISTR
BIU
TE
Select Trusted Root Certification Authorities Select the certificate issued by My CA Click OK
Click OK
February 2005 ©2005 Foundry Networks, Inc. 53 All Rights Reserved.

WHITE PAPER: IRONPOINT 200 INSTALLATION GUIDE ®WPA – 802.1X PEAP WITH FUNK ODYSSEY
FOU
ND
RY
NET
WO
RK
S W
HIT
E P
AP
ER –
DR
AFT
: DO
NO
T D
ISTR
BIU
TE
Select Connection. Check Connect to network: From the pull down menu, select <My SSID> Click Reconnect
Status will display the connection status.
February 2005 ©2005 Foundry Networks, Inc. 54 All Rights Reserved.

WHITE PAPER: IRONPOINT 200 INSTALLATION GUIDE ®WPA – 802.1X PEAP WITH FUNK ODYSSEY
FOU
ND
RY
NET
WO
RK
S W
HIT
E P
AP
ER –
DR
AFT
: DO
NO
T D
ISTR
BIU
TE
The Odyssey Client is successfully connected when the Status is open and authenticated. The Odyssey ship and key icon will be colored blue when successfully connected.
February 2005 ©2005 Foundry Networks, Inc. 55 All Rights Reserved.

WHITE PAPER: IRONPOINT 200 INSTALLATION GUIDE ®WPA – 802.1X PEAP WITH FUNK ODYSSEY
FOU
ND
RY
NET
WO
RK
S W
HIT
E P
AP
ER –
DR
AFT
: DO
NO
T D
ISTR
BIU
TE
Appendix A: Configuring IP 200 – Non-Virtual AP Versions This Appendix is for IP 200 firmware versions that do not support Virtual AP (01.3.00, 01.2.x and older).
This installation guide includes configuration of the IP 200 from the CLI and the Web Interface. If you prefer configuring the IP 200 from the Web Interface, you can skip the next section Configuring from the CLI and go to the following section Configuring from the Web Interface.
Configuring from the CLI From the CLI, go to the configure context. Enter the following commands:
Foundry AP(config)#radius-server address x.x.x.x
Foundry AP(config)#radius-server key ********
Foundry AP(config)#802.1x required
Where:
x.x.x.x is the IP address of the computer that will have Odyssey Server installed on it. In this installation guide, this is the Windows 2000 computer.
******** is a Secret key. This Secret key can be any length and use any character.
Note: You will need to remember this Secret key when you configure the Odyssey Server.
Next, go to the context for VAP 0 on any one of the wireless interfaces. This installation guide will use the 802.11g wireless interface. Enter the following commands:
Foundry AP(if-wireless g)#ssid My SSID
Foundry AP(if-wireless g)#encryption 128
Foundry AP(if-wireless g)#wpa-clients Required
Foundry AP(if-wireless g)#wpa-mode Dynamic
Foundry AP(if-wireless g)#multicast-cipher TKIP
Foundry AP(if-wireless g)#no shutdown
February 2005 ©2005 Foundry Networks, Inc. 56 All Rights Reserved.

WHITE PAPER: IRONPOINT 200 INSTALLATION GUIDE ®WPA – 802.1X PEAP WITH FUNK ODYSSEY
FOU
ND
RY
NET
WO
RK
S W
HIT
E P
AP
ER –
DR
AFT
: DO
NO
T D
ISTR
BIU
TE
Configuring from the Web Interface If you have configured the IP 200 using the previous section Configuring from the CLI, you do not need to configure the IP 200 using the Web Interface.
From the Web Interface, go to the RADIUS webpage. For the IP Address of the Primary Radius Server Setup, enter the IP address of the computer that will have Odyssey Server installed on it. In this installation guide, this is the Windows 2000 computer. Enter a Secret Key. This Secret Key can be any length and use any character. Note: You will need to remember this Secret Key when you configure the Odyssey Server. Click Apply.
February 2005 ©2005 Foundry Networks, Inc. 57 All Rights Reserved.
WHITE PAPER: IRONPOINT 200 INSTALLATION GUIDE ®WPA – 802.1X PEAP WITH FUNK ODYSSEY
FOU
ND
RY
NET
WO
RK
S W
HIT
E P
AP
ER –
DR
AFT
: DO
NO
T D
ISTR
BIU
TE
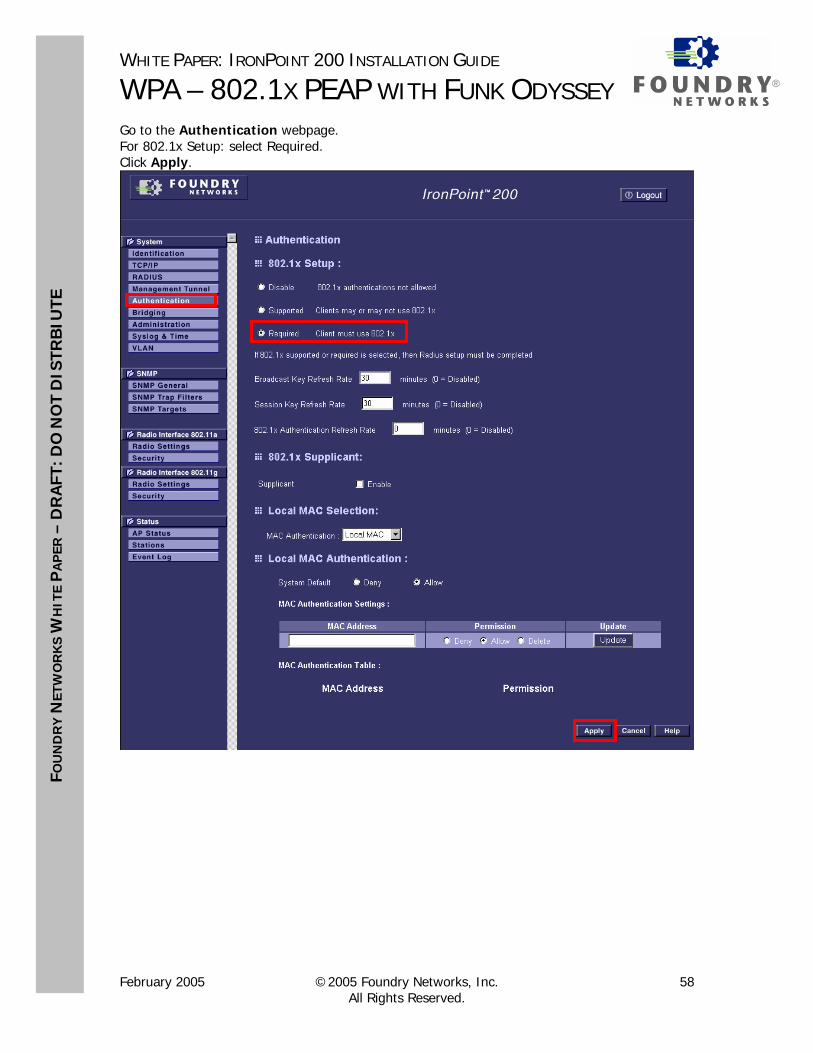
Go to the Authentication webpage. For 802.1x Setup: select Required. Click Apply.
February 2005 ©2005 Foundry Networks, Inc. 58 All Rights Reserved.
WHITE PAPER: IRONPOINT 200 INSTALLATION GUIDE ®WPA – 802.1X PEAP WITH FUNK ODYSSEY
FOU
ND
RY
NET
WO
RK
S W
HIT
E P
AP
ER –
DR
AFT
: DO
NO
T D
ISTR
BIU
TE
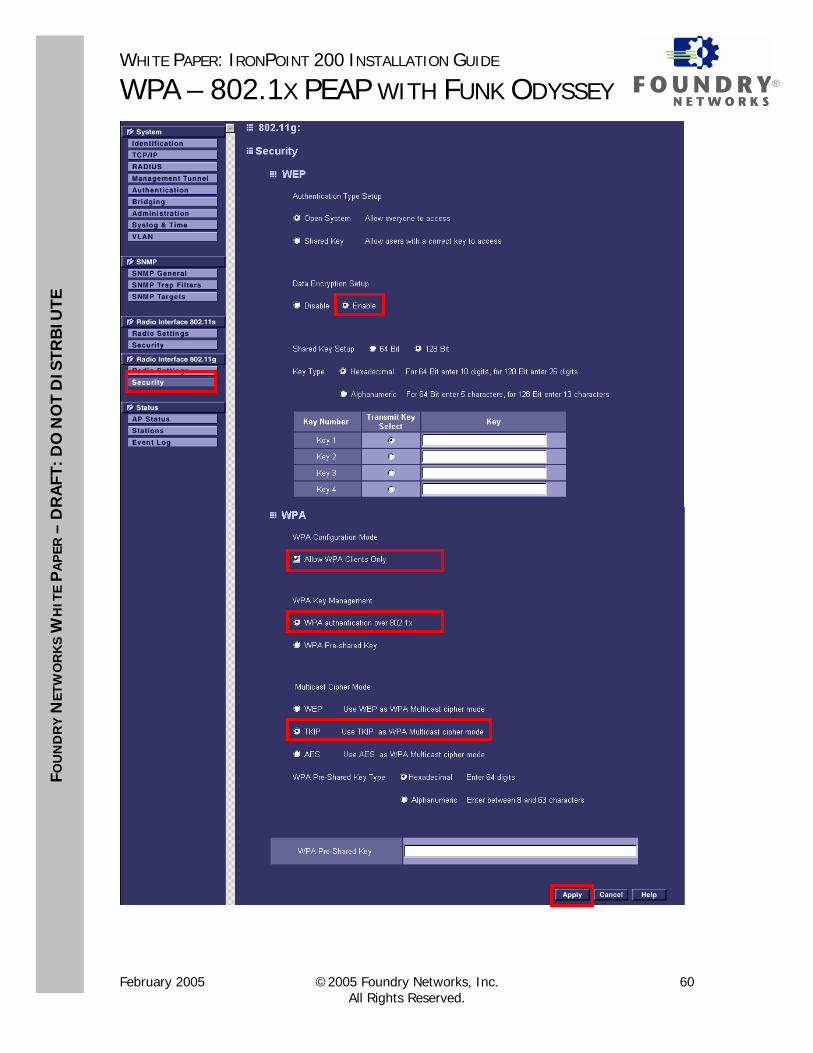
Go to the Security webpage for any one of the Radio Interfaces. This guide configures Security for Radio Interface 802.11g. (See the screen image on the next page) For Data Encryption Setup, select Enable. Enable Allow WPA Clients Only. For WPA Key Management, select WPA authentication over 802.1x. For Mulitcast Cipher Mode select TKIP. Click Apply.
February 2005 ©2005 Foundry Networks, Inc. 59 All Rights Reserved.
WHITE PAPER: IRONPOINT 200 INSTALLATION GUIDE ®WPA – 802.1X PEAP WITH FUNK ODYSSEY
FOU
ND
RY
NET
WO
RK
S W
HIT
E P
AP
ER –
DR
AFT
: DO
NO
T D
ISTR
BIU
TE
February 2005 ©2005 Foundry Networks, Inc. 60 All Rights Reserved.
WHITE PAPER: IRONPOINT 200 INSTALLATION GUIDE ®WPA – 802.1X PEAP WITH FUNK ODYSSEY
FOU
ND
RY
NET
WO
RK
S W
HIT
E P
AP
ER –
DR
AFT
: DO
NO
T D
ISTR
BIU
TE
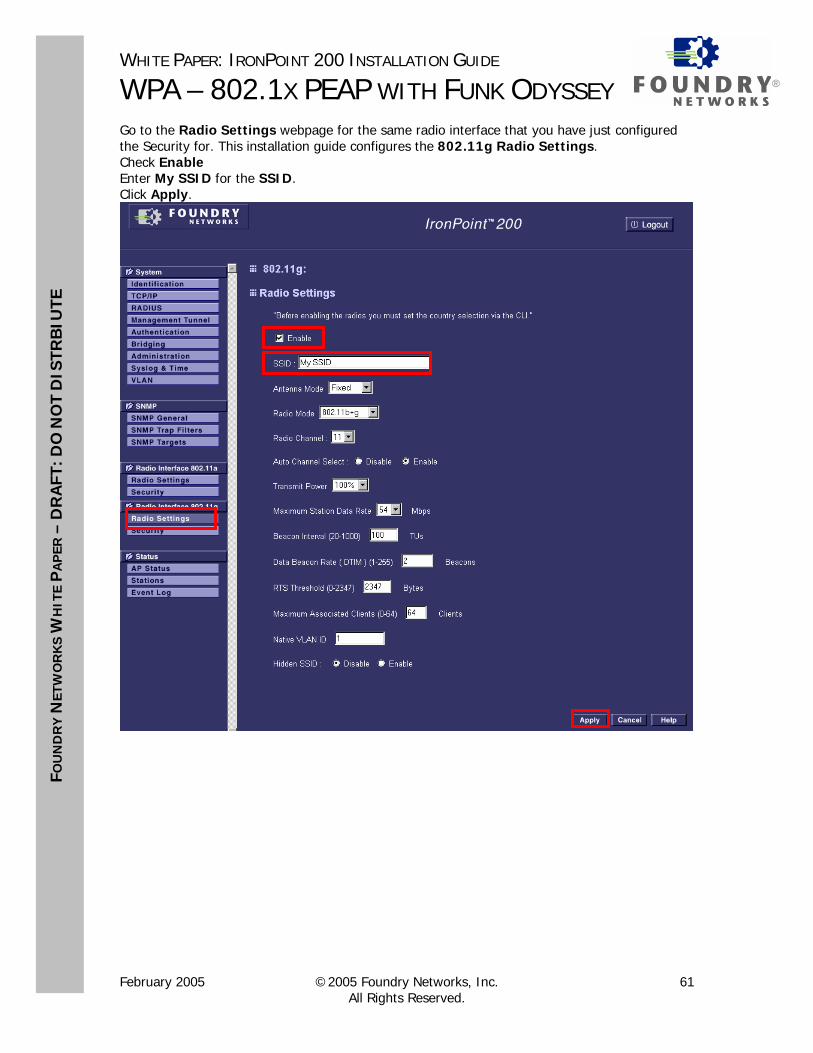
Go to the Radio Settings webpage for the same radio interface that you have just configured the Security for. This installation guide configures the 802.11g Radio Settings. Check Enable Enter My SSID for the SSID. Click Apply.
February 2005 ©2005 Foundry Networks, Inc. 61 All Rights Reserved.

WHITE PAPER: IRONPOINT 200 INSTALLATION GUIDE ®WPA – 802.1X PEAP WITH FUNK ODYSSEY
FOU
ND
RY
NET
WO
RK
S W
HIT
E P
AP
ER –
DR
AFT
: DO
NO
T D
ISTR
BIU
TE
Appendix B: Disabling IAS on Microsoft Windows Server Open the services on your computer and look for Internet Authentication Service.
February 2005 ©2005 Foundry Networks, Inc. 62 All Rights Reserved.

WHITE PAPER: IRONPOINT 200 INSTALLATION GUIDE ®WPA – 802.1X PEAP WITH FUNK ODYSSEY
FOU
ND
RY
NET
WO
RK
S W
HIT
E P
AP
ER –
DR
AFT
: DO
NO
T D
ISTR
BIU
TE
Open Internet Authentication Service and Stop the service.
You may have to reboot the computer for the Internet Authentication Service to stop.
February 2005 ©2005 Foundry Networks, Inc. 63 All Rights Reserved.
WHITE PAPER: IRONPOINT 200 INSTALLATION GUIDE ®WPA – 802.1X PEAP WITH FUNK ODYSSEY
FOU
ND
RY
NET
WO
RK
S W
HIT
E P
AP
ER –
DR
AFT
: DO
NO
T D
ISTR
BIU
TE
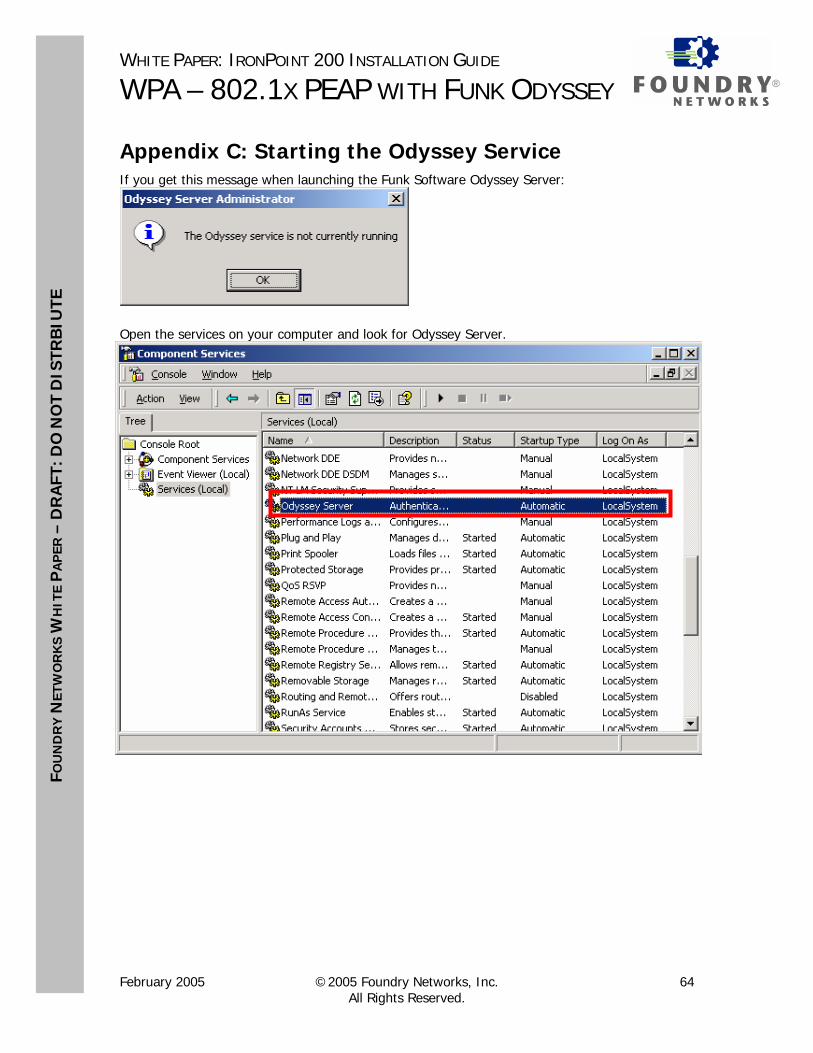
Appendix C: Starting the Odyssey Service If you get this message when launching the Funk Software Odyssey Server:
Open the services on your computer and look for Odyssey Server.
February 2005 ©2005 Foundry Networks, Inc. 64 All Rights Reserved.
WHITE PAPER: IRONPOINT 200 INSTALLATION GUIDE ®WPA – 802.1X PEAP WITH FUNK ODYSSEY
FOU
ND
RY
NET
WO
RK
S W
HIT
E P
AP
ER –
DR
AFT
: DO
NO
T D
ISTR
BIU
TE
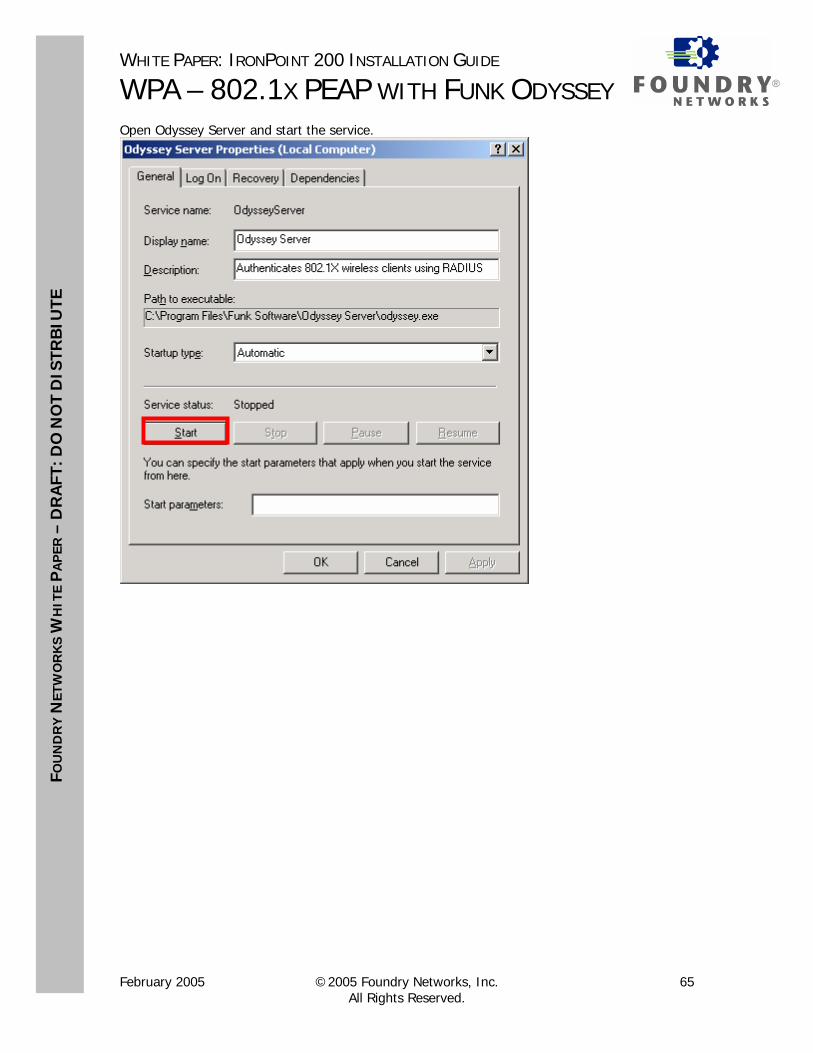
Open Odyssey Server and start the service.
February 2005 ©2005 Foundry Networks, Inc. 65 All Rights Reserved.

WHITE PAPER: IRONPOINT 200 INSTALLATION GUIDE ®WPA – 802.1X PEAP WITH FUNK ODYSSEY
FOU
ND
RY
NET
WO
RK
S W
HIT
E P
AP
ER –
DR
AFT
: DO
NO
T D
ISTR
BIU
TE
Appendix D: Uninstalling Microsoft Active Directory To uninstall Microsoft Active Directory:
1. Click Start and then Run. 2. In Open, type dcpromo
February 2005 ©2005 Foundry Networks, Inc. 66 All Rights Reserved.
WHITE PAPER: IRONPOINT 200 INSTALLATION GUIDE ®WPA – 802.1X PEAP WITH FUNK ODYSSEY
FOU
ND
RY
NET
WO
RK
S W
HIT
E P
AP
ER –
DR
AFT
: DO
NO
T D
ISTR
BIU
TE
Foundry Networks, Inc. Headquarters 2100 Gold Street P.O. Box 649100 San Jose, CA 95164-9100 U.S. and Canada Toll-free: (888) TURBOLAN Direct telephone: +1 408.586.1700 Fax: +1 408.586.1900 Email: [email protected] Web: http://www.foundrynet.com Foundry Networks, BigIron, EdgeIron, FastIron, NetIron, ServerIron, and the “Iron” family of marks are trademarks or registered trademarks of Foundry Networks, Inc. in the United States and other countries. All other trademarks are the properties of their respective owners. ©2005 Foundry Networks, Inc. All Rights Reserved.
February 2005 ©2005 Foundry Networks, Inc. 67 All Rights Reserved.