vtx v25-ii preset guide
TRANSCRIPT

c
VTX V25-II Preset Guide
2
c
Introduction
The VTX V25-II Release 1.4 preset library includes ST, LT, and XLT operating modes for V25-II along with X, 60 and 80
sub/low processing for VTX V25-II and G28/S28 subwoofer combinations. Cardioid presets are included for all VTX sub-
woofer models. VTX presets are exclusively developed for Crown iTech HD amplifiers and come bundled with JBL
HiQnet Performance ManagerTM control software. Audio Architect presets are also available on an on-demand basis.
Please see below for a detailed description of V25-II operating modes and subwoofer processing options and refer to
Preset Summary setup sheets for preset descriptions, memory locations, and output channel assignments.
V25-II Preset Modes
Three preset options are available for VTX V25-II: ST, LT and XLT:
VTX V25-II ST (Single Box and Short Throw) presets have nominally-flat low and high frequency response and are to
be used in situations were one to three V25-II cabinets are appropriate, such as distributed front fills, stacked side fills
for stage monitoring or stacked theater/club systems. ST preset tonal balance is intended to be used for small arrays
(1 - 3 x V25-II.)
VTX V25-II LT (Long Array and Long Throw) presets have a 6 dB low-frequency shelving characteristic and high-
frequency shelving response (HF pre-emphasis) to offset LF/MF array buildup and air absorption over typical medium-
to-long throw distances for nominally-focused arrays (equal enclosure site angle impact spacing over the desired audi-
ence coverage area). LT preset tonal balance is intended to be used for small to medium size arrays (4 - 8 x V25-II.)
VTX V25-II XLT (Extra Long Arrays and Extra Long Throw) presets have a 6 dB low-frequency shelving characteristic
and high-frequency shelving response (HF pre-emphasis) to offset LF/MF array buildup and air absorption over typical
long– to extra-long throw distances for nominally-focused arrays . XLT preset tonal balance intended to be used for
medium to large size arrays (8 - 24 x V25-II.)
Notes:
Mixing ST, LT, and XLT presets within the same array (for example, ST presets on lower circuits, LT presets on mid-
dle circuits and XLT on upper circuits of the array) is not recommended.
The LT and XLT presets provide a good tonal balance starting point for a given array size. The Array Size Compensa-
tion filter found in the JBL Line Control Panel (LACP) can be used to further fine tune the tonal balance of an array
for a given array length. Please refer to the LACP section below for more information.
For more details on working with the JBL Line Array Control Panel, please refer to the Performance Manager or JBL
Line Array Calculator help files. Additional online support is available here.
3
c
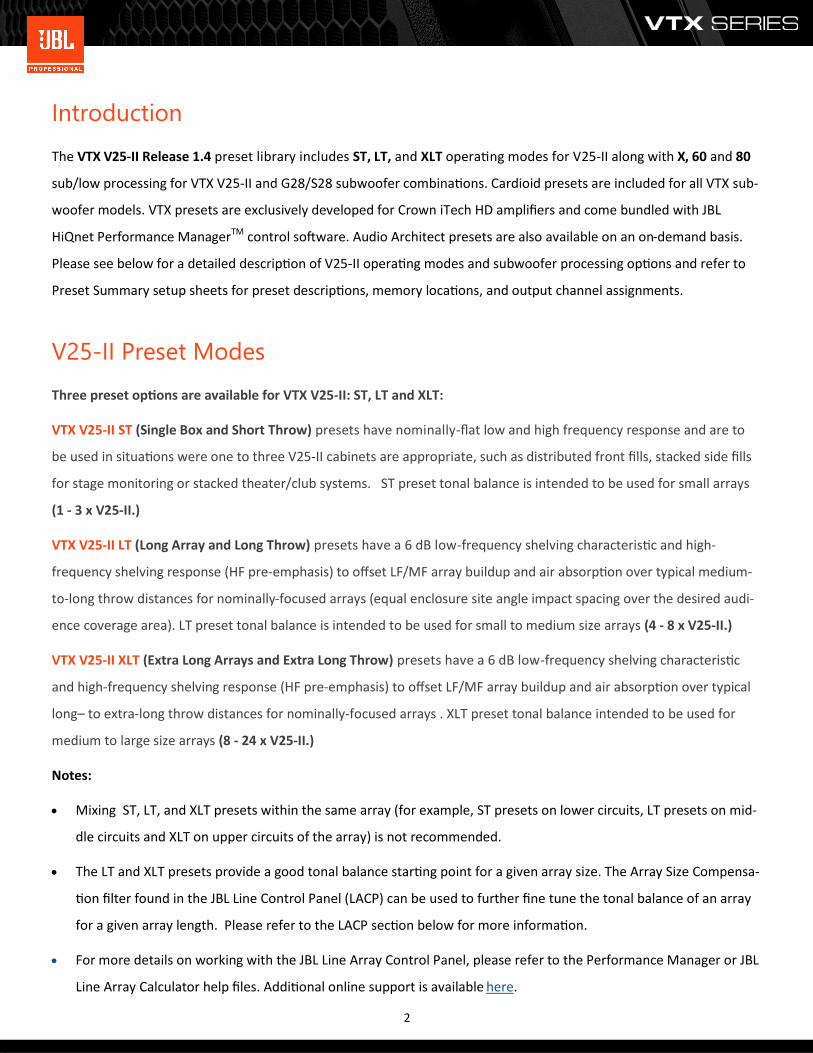
Example: Medium to Large V25-II system consisting of Left/Right arrays, V25-II outfills and V25-II as front fills
XLT XLT
LT LT
ST ST ST ST
Example: Large V25-II system consisting of Left/Right arrays, flown subs and V25-II outfills
XLT XLT
XLT XLT
4
c
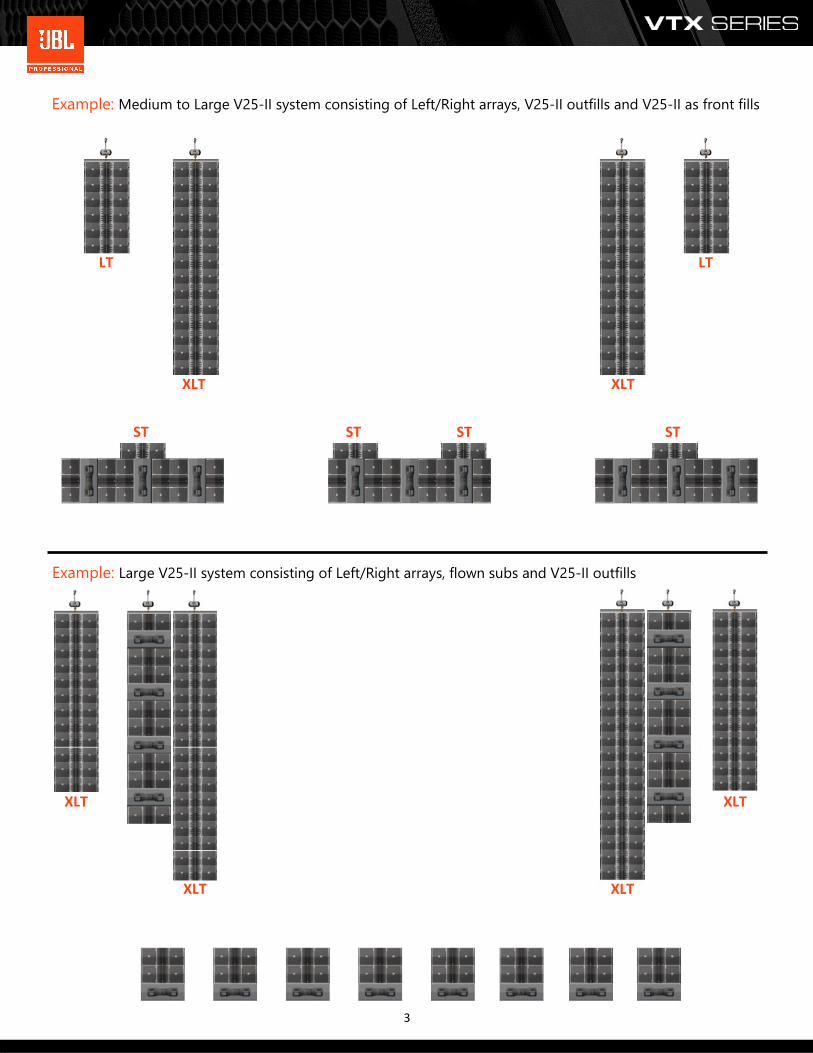
JBL Line Array Control Panel (LACP)
The frequency response of a line array is determined by many factors including the array size (number of boxes), array
curvature, and the listening distance. JBL factory presets (ST, LT, and XLT) were designed to create an appropriate tonal
balance starting point for the array conditions described above. Since the number of presets that can be created by a
manufacturer is not infinite, user adjustment of certain DSP parameters is necessary to create the desired tonal bal-
ance for a given array and application. The JBL Line Array Control Panel (LACP) was designed to help system engineers
quickly and easily manipulate the tonal balance of an array. LACP parameters can be modeled in JBL Line Array Calcula-
tor 2 (LAC-II) and applied in real time using JBL Performance Manager control software.
The LACP consists of 6 adjustable DSP filters, each with a specific intended purpose. Some of these filters are grouped
across the entire array (global adjustments), some filters are circuit group specific, and some filters have frequency
centers and Q values that are linked but have adjustable circuit gain. Below is a description of how these 6 filters work:
1 Array Size Compensation: Filter 1 is intended for correcting LF/MF build up created by an array that is longer
than the intended preset. LF adjustments should be applied to all cabinets within the array, therefore filter 1
is a global filter. See next section for an example of how to use filter 1.
LF Directivity Tapering: Filter 2 is intended for stabilizing or adjusting the vertical coverage angle of the array
at low frequencies. Frequency centers and Q values are linked across circuits.
2
5
c
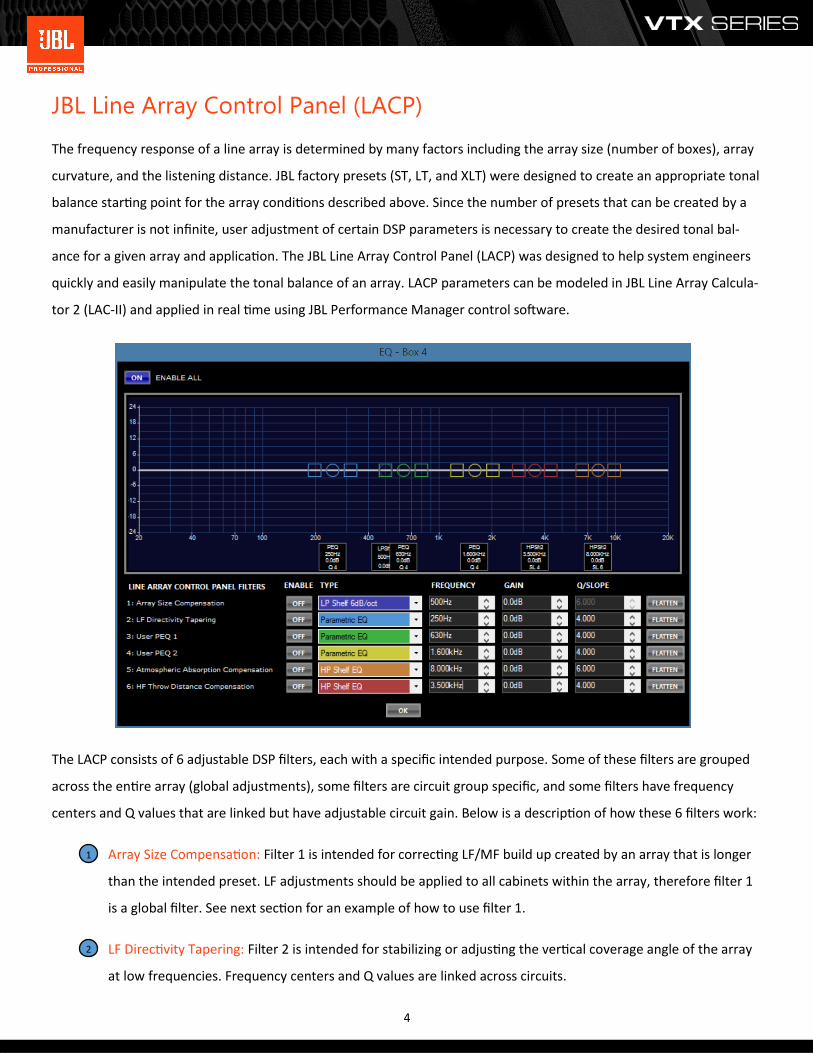
3 User PEQ 1 & 2: Filters 3 and 4 are User PEQs that can be applied to individual circuit groups. Frequency cen-
ters and Q are not linked across circuits and, for this reason, it is recommended that User PEQ 1 &2 are used
for frequencies above 1kHz with moderate gain changes only.
5 Atmospheric Absorption Compensation: Filter 5 is intended to compensate for atmospheric conditions due to
large variations in temperature and humidity that can have an impact on the overall HF energy. Filter 5 is ap-
plied globally and can be used to quickly brighten or darken an array. This filter can also be used for artistic
preference reasons to adjust overall system tonal balance.
4
6 HF Throw Distance Compensation: Filter 6 along with Gain shading is intended to correct for distance offsets
between different sections of an array. The Type, Frequency and Q are linked across the entire array but the
gain is adjustable per circuit group. This filter can be used to reduce HF energy close to an array and increase
HF energy to areas further away where air absorption has a bigger impact.
LAC-II Example:
To access LACP within LAC-II click on the EQ button next to the speaker selection drop-down menu. If user circuit
groups were created, LACP adjustments are applied to all elements within the selected circuit group. Global filters like
Filter 1 and 5 are automatically applied to all circuit groups in the array.
6
c
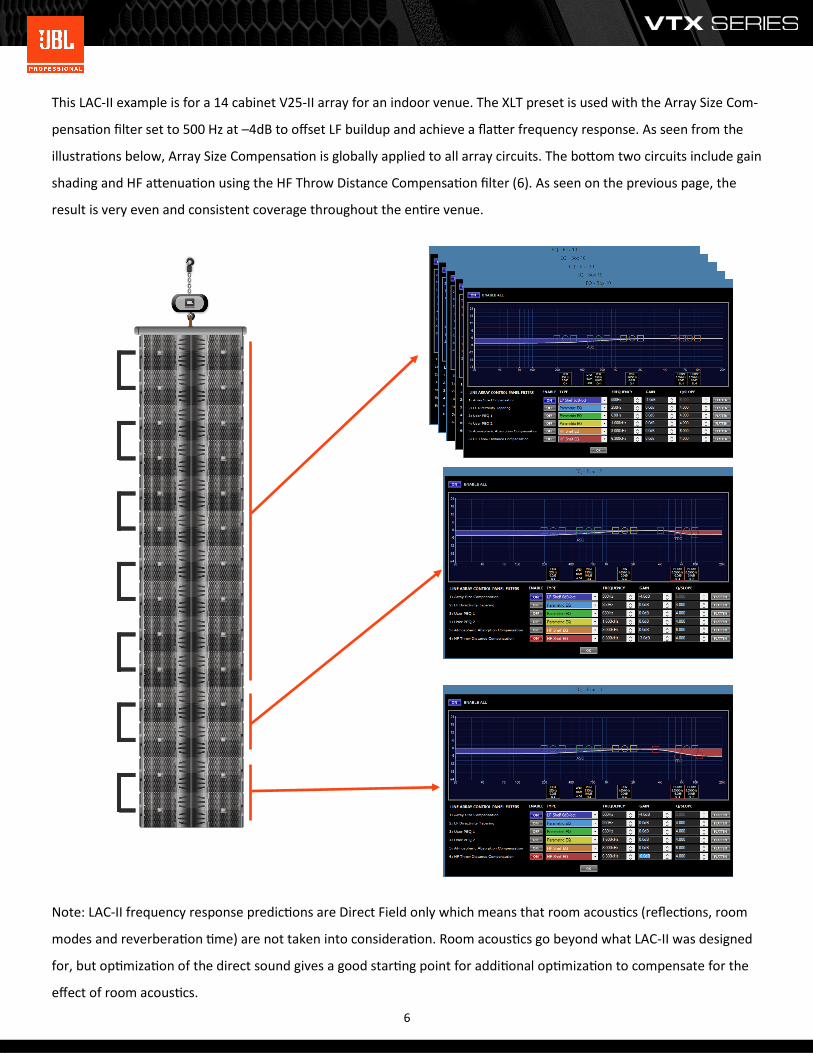
This LAC-II example is for a 14 cabinet V25-II array for an indoor venue. The XLT preset is used with the Array Size Com-
pensation filter set to 500 Hz at –4dB to offset LF buildup and achieve a flatter frequency response. As seen from the
illustrations below, Array Size Compensation is globally applied to all array circuits. The bottom two circuits include gain
shading and HF attenuation using the HF Throw Distance Compensation filter (6). As seen on the previous page, the
result is very even and consistent coverage throughout the entire venue.
Note: LAC-II frequency response predictions are Direct Field only which means that room acoustics (reflections, room
modes and reverberation time) are not taken into consideration. Room acoustics go beyond what LAC-II was designed
for, but optimization of the direct sound gives a good starting point for additional optimization to compensate for the
effect of room acoustics.
7
c
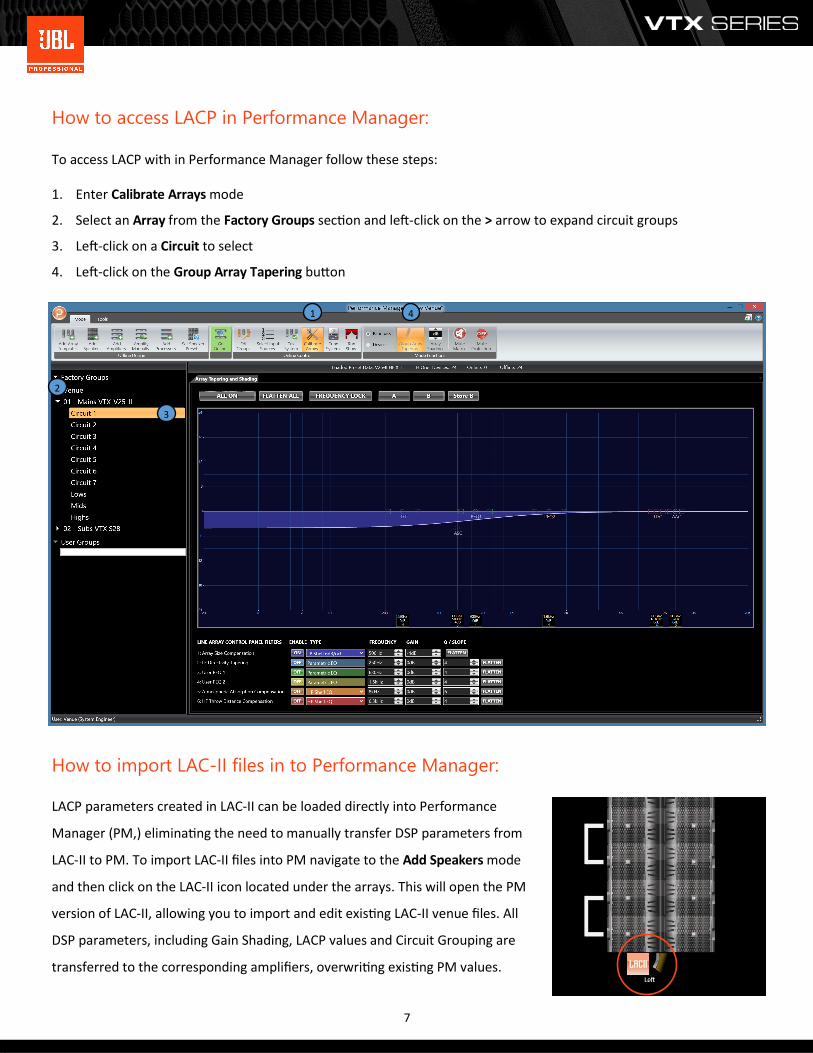
How to access LACP in Performance Manager:
To access LACP with in Performance Manager follow these steps:
1. Enter Calibrate Arrays mode
2. Select an Array from the Factory Groups section and left-click on the ˃ arrow to expand circuit groups
3. Left-click on a Circuit to select
4. Left-click on the Group Array Tapering button
LACP parameters created in LAC-II can be loaded directly into Performance
Manager (PM,) eliminating the need to manually transfer DSP parameters from
LAC-II to PM. To import LAC-II files into PM navigate to the Add Speakers mode
and then click on the LAC-II icon located under the arrays. This will open the PM
version of LAC-II, allowing you to import and edit existing LAC-II venue files. All
DSP parameters, including Gain Shading, LACP values and Circuit Grouping are
transferred to the corresponding amplifiers, overwriting existing PM values.
How to import LAC-II files in to Performance Manager:
1
2
4
3
8
c
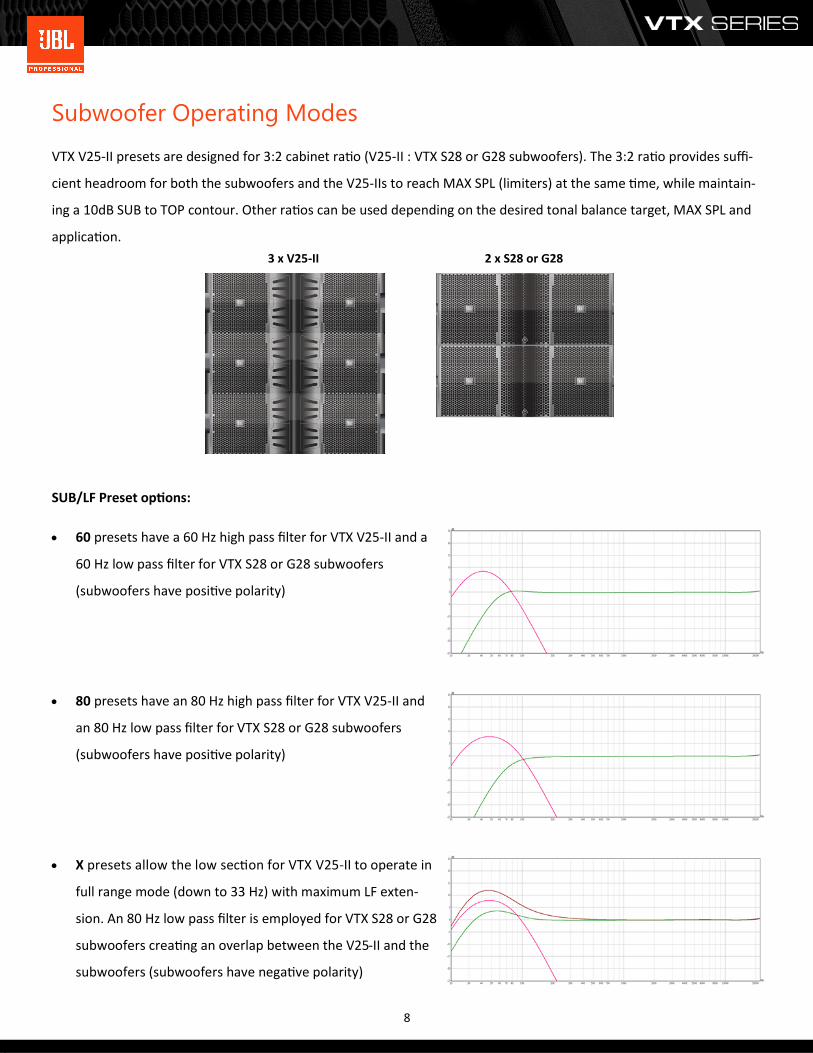
Subwoofer Operating Modes
VTX V25-II presets are designed for 3:2 cabinet ratio (V25-II : VTX S28 or G28 subwoofers). The 3:2 ratio provides suffi-
cient headroom for both the subwoofers and the V25-IIs to reach MAX SPL (limiters) at the same time, while maintain-
ing a 10dB SUB to TOP contour. Other ratios can be used depending on the desired tonal balance target, MAX SPL and
application.
SUB/LF Preset options:
60 presets have a 60 Hz high pass filter for VTX V25-II and a
60 Hz low pass filter for VTX S28 or G28 subwoofers
(subwoofers have positive polarity)
80 presets have an 80 Hz high pass filter for VTX V25-II and
an 80 Hz low pass filter for VTX S28 or G28 subwoofers
(subwoofers have positive polarity)
X presets allow the low section for VTX V25-II to operate in
full range mode (down to 33 Hz) with maximum LF exten-
sion. An 80 Hz low pass filter is employed for VTX S28 or G28
subwoofers creating an overlap between the V25-II and the
subwoofers (subwoofers have negative polarity)
3 x V25-II 2 x S28 or G28
9
c
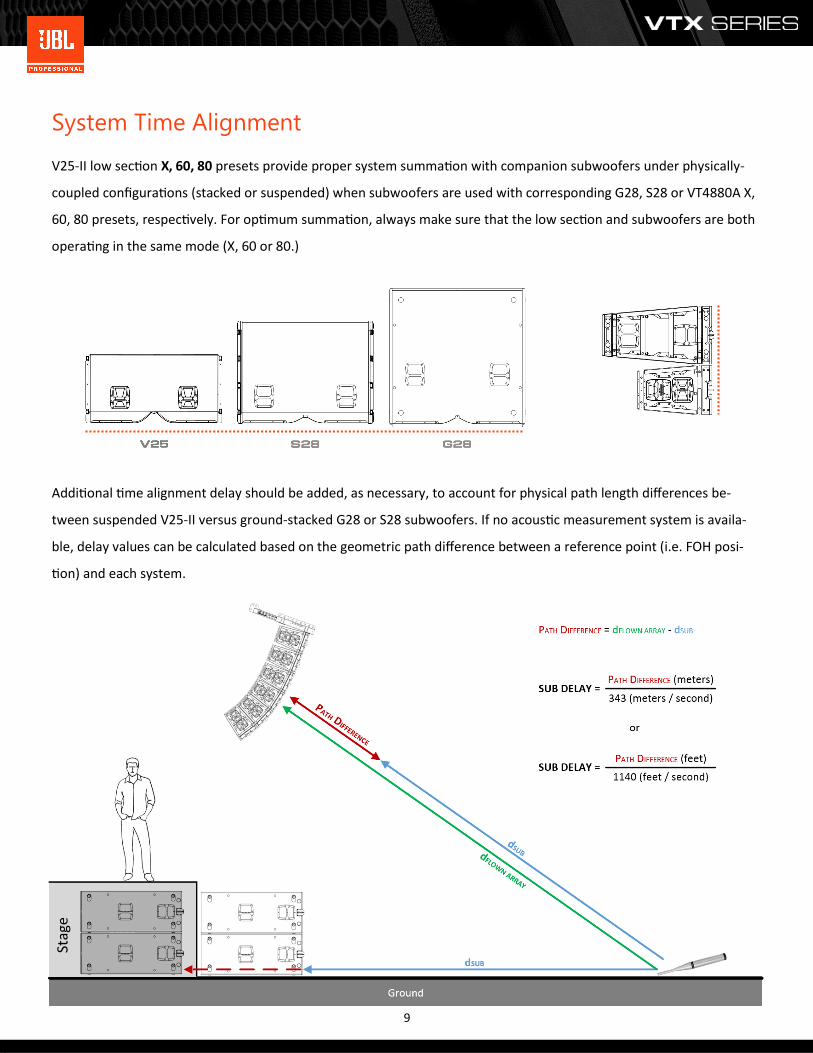
Additional time alignment delay should be added, as necessary, to account for physical path length differences be-
tween suspended V25-II versus ground-stacked G28 or S28 subwoofers. If no acoustic measurement system is availa-
ble, delay values can be calculated based on the geometric path difference between a reference point (i.e. FOH posi-
tion) and each system.
System Time Alignment
V25-II low section X, 60, 80 presets provide proper system summation with companion subwoofers under physically-
coupled configurations (stacked or suspended) when subwoofers are used with corresponding G28, S28 or VT4880A X,
60, 80 presets, respectively. For optimum summation, always make sure that the low section and subwoofers are both
operating in the same mode (X, 60 or 80.)
Stag
e
10
c
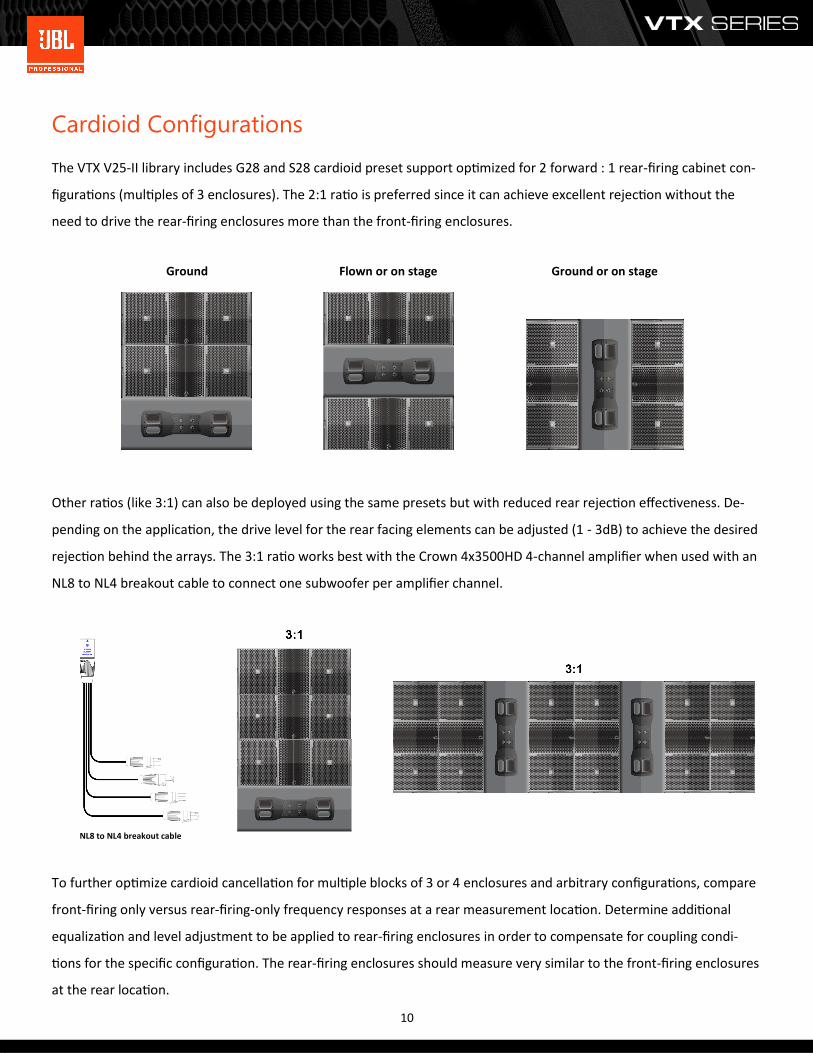
Other ratios (like 3:1) can also be deployed using the same presets but with reduced rear rejection effectiveness. De-
pending on the application, the drive level for the rear facing elements can be adjusted (1 - 3dB) to achieve the desired
rejection behind the arrays. The 3:1 ratio works best with the Crown 4x3500HD 4-channel amplifier when used with an
NL8 to NL4 breakout cable to connect one subwoofer per amplifier channel.
To further optimize cardioid cancellation for multiple blocks of 3 or 4 enclosures and arbitrary configurations, compare
front-firing only versus rear-firing-only frequency responses at a rear measurement location. Determine additional
equalization and level adjustment to be applied to rear-firing enclosures in order to compensate for coupling condi-
tions for the specific configuration. The rear-firing enclosures should measure very similar to the front-firing enclosures
at the rear location.
Cardioid Configurations
The VTX V25-II library includes G28 and S28 cardioid preset support optimized for 2 forward : 1 rear-firing cabinet con-
figurations (multiples of 3 enclosures). The 2:1 ratio is preferred since it can achieve excellent rejection without the
need to drive the rear-firing enclosures more than the front-firing enclosures.
NL8 to NL4 breakout cable
Ground Flown or on stage Ground or on stage

11
c
To implement cardioid presets in Performance Manager, switch the Mode Function from Bandpass to Device and then
click the R button on rear-firing subwoofers. PM will then send the appropriate presets to the associated amplifiers.
To implement VTX S28 or G28 cardioid configurations using Audio Architect, select the appropriate X, 60 or 80 preset
for front- and rear-firing enclosures, respectively, as illustrated below:
Rear-Firing Enclosure
26: VTX G28 Cardioid X (60,80)
Front-Firing Enclosure
22: VTX G28 X (60,80)
12
c
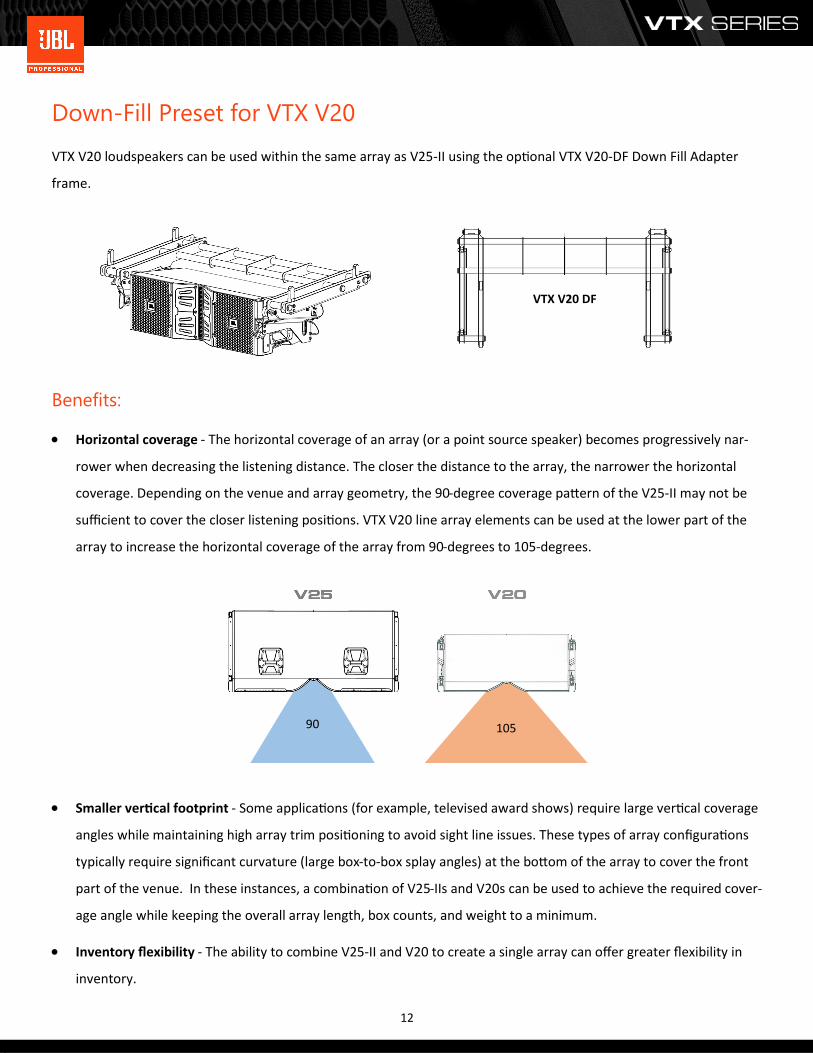
Down-Fill Preset for VTX V20
VTX V20 loudspeakers can be used within the same array as V25-II using the optional VTX V20-DF Down Fill Adapter
frame.
90 105
Smaller vertical footprint - Some applications (for example, televised award shows) require large vertical coverage
angles while maintaining high array trim positioning to avoid sight line issues. These types of array configurations
typically require significant curvature (large box-to-box splay angles) at the bottom of the array to cover the front
part of the venue. In these instances, a combination of V25-IIs and V20s can be used to achieve the required cover-
age angle while keeping the overall array length, box counts, and weight to a minimum.
Inventory flexibility - The ability to combine V25-II and V20 to create a single array can offer greater flexibility in
inventory.
Benefits:
Horizontal coverage - The horizontal coverage of an array (or a point source speaker) becomes progressively nar-
rower when decreasing the listening distance. The closer the distance to the array, the narrower the horizontal
coverage. Depending on the venue and array geometry, the 90-degree coverage pattern of the V25-II may not be
sufficient to cover the closer listening positions. VTX V20 line array elements can be used at the lower part of the
array to increase the horizontal coverage of the array from 90-degrees to 105-degrees.
VTX V20 DF

13
c
Appropriate ratio:
The VTX V20 DF (down fill) adapter frame and preset were developed for V20 cabinets to be used at the lower part of a
V25-II array to accommodate shorter throw distances and tightly wrapped enclosures that are intended to cover the
front section of the venue. The correct ratio between V25-II and V20 cabinets should be maintained for proper array
performance and coupling. In general, a 3:1 ratio (3 x V25-II for every 1 x V20) is recommended for most applications.
Depending on the array size and venue geometry, other ratios similar to 3:1 can be used, but a ratio of 1:1 should be
avoided. Use the latest version of JBL’s Line Array Calculator II software to determine the ideal array parameters.
VTX V20 DF Preset:
The VTX V20 Down Fill preset optimizes the performance characteristics of VTX V20 when suspended underneath VTX
V25-II and is required for this configuration. When V25-II and V20 are combined in the same array, standard array cali-
bration and tuning techniques as described above apply and the combined array should be treated as if it consisted of
V25-II enclosures only.
Notes:
The standard VTX V20 V5 presets are not compatible with this mode. Always use the VTX V20-DF preset for this
application.
VTX V20 DF presets are available for the full active mode only (quad amplified). The 2-Way Passive mode is current-
ly not supported in this configuration.
Incorrect Correct Correct
14
c
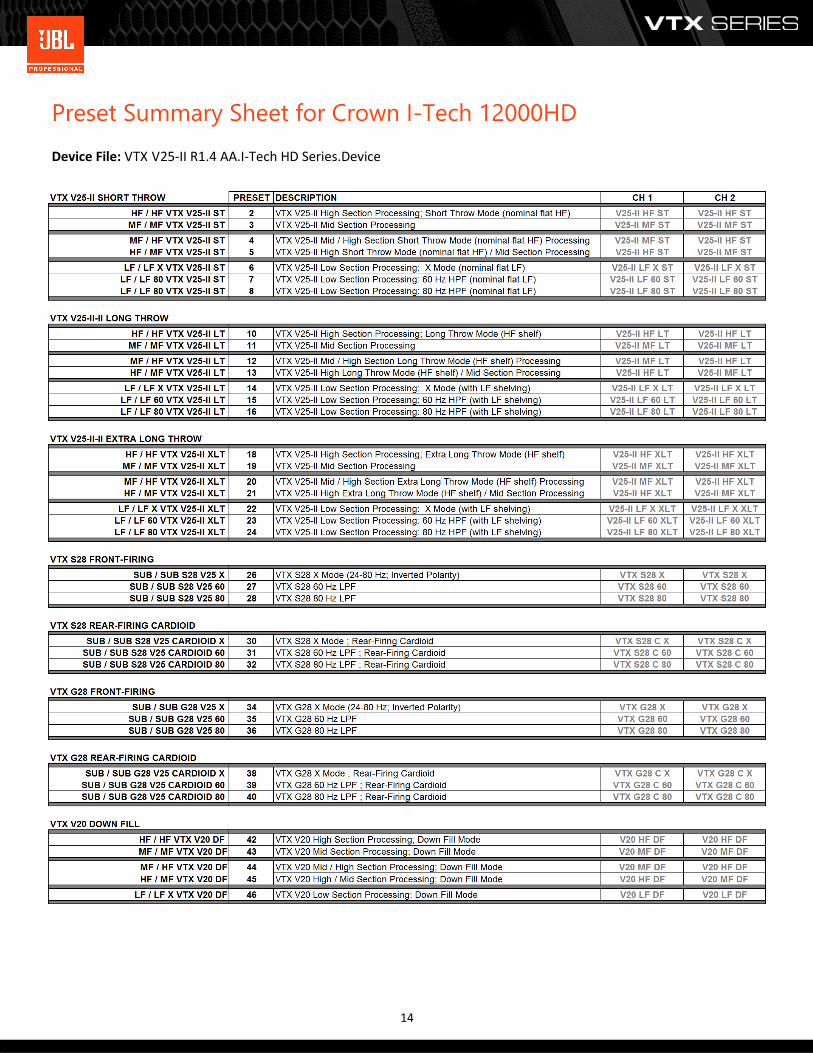
Preset Summary Sheet for Crown I-Tech 12000HD
Device File: VTX V25-II R1.4 AA.I-Tech HD Series.Device
15
c
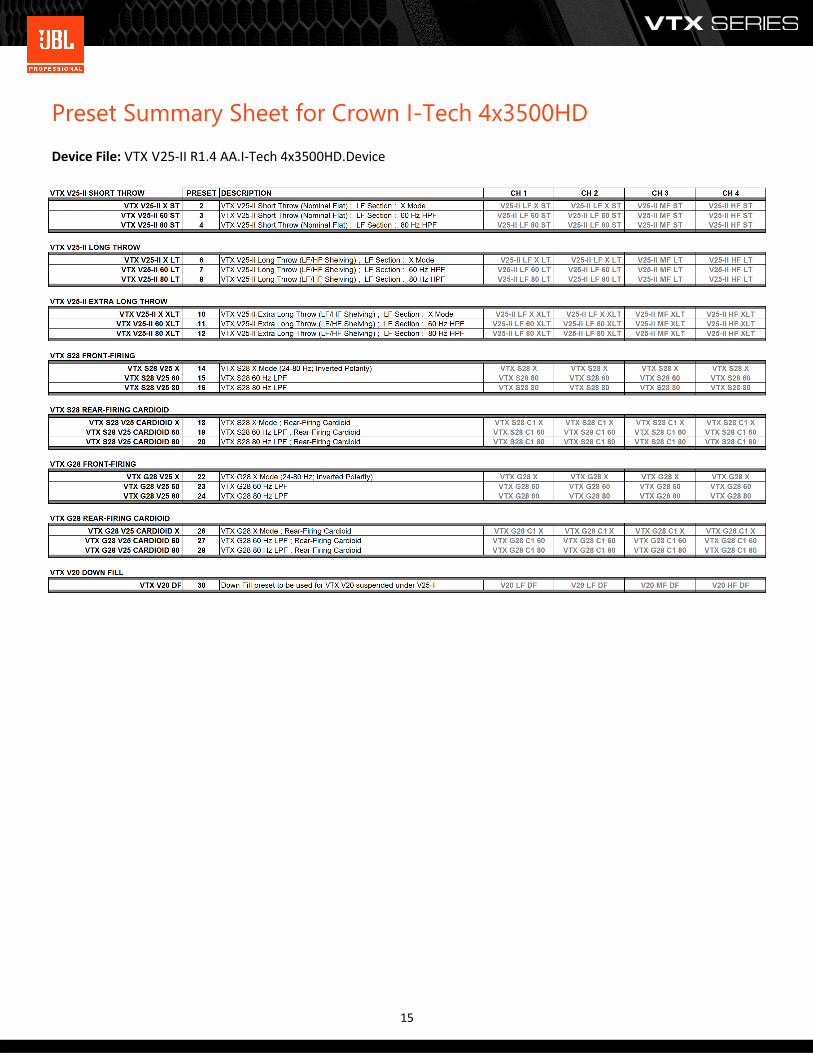
Preset Summary Sheet for Crown I-Tech 4x3500HD
Device File: VTX V25-II R1.4 AA.I-Tech 4x3500HD.Device