vpn access to the nten network - pearson · · 2009-02-10condition may also grant permission to...
TRANSCRIPT

VPN Access to the NTEN Network
© 2004 Networking and Telecommunications Engineering
By: Leif Thordarson Copyright © 2009 Pearson Education Canada
Copyright © 2009 Pearson Education Canada

Copyright © 2009 Pearson Education Canada
Virtual Private Network Documentation Page ii
TABLE OF CONTENTS
List of Illustrations and Tables .......................................................... iii 1. Introduction and General Description ............................................. 1
1.1 Overview of Networks.............................................................. 1 1.2 What is VPN?......................................................................... 1
2. Architectural Description............................................................ 3 3. User Instructions ...................................................................... 4
3.1 Account Information ............................................................... 4 3.1.1 Account Login Information ................................................... 4 3.1.2 Changing Your Password...................................................... 4
3.2 Configuring VPN to a Remote Network.......................................... 5 3.3 Verifying Connectivity ............................................................12 3.4 Connecting to a Network Drive ..................................................14
4. Connection Troubleshooting .......................................................16 4.1 Physical Connectivity .............................................................16 4.2 Loop-back Test .....................................................................17 4.3 ISP Connectivity – Default Gateway ............................................17 4.4 ISP Connectivity – Internet.......................................................18 4.5 Incorrect DNS.......................................................................18 4.6 Router and Firewall Privileges...................................................19 4.7 Error Connecting to Technologies.ouc.bc.ca..................................20
5. Security Features ....................................................................21 5.1 Windows 2000 Domains ...........................................................21 5.2 VPN Features .......................................................................21 5.3 VPN Security ........................................................................21
6. Equipment ............................................................................22 6.1 Client Side ..........................................................................22 6.2 Server Side..........................................................................22
7. Definitions ............................................................................23 8. Bibliography ..........................................................................25

Virtual Private Network Documentation Page iii
Copyright © 2009 Pearson Education Canada
LIST OF ILLUSTRATIONS AND TABLES
Figure 1 – Secure VPN Tunnel ............................................................ 2 Figure 2 – Remote VPN Connection to Engtech........................................ 3 Figure 3 – Network Connections Window............................................... 5 Figure 4 – New Connection Wizard: Welcome Screen .............................. 6 Figure 5 – New Connection Wizard: Network Connection Type6Figure 6 – New Connection Wizard: Network Connection .............................................. 7 Figure 7 – New Connection Wizard: Connection Name............................... 7 Figure 8 – New Connection Wizard: VPN Server Selection........................... 8 Figure 9 – New Connection Wizard: Completed Screen .............................. 8 Figure 10 – Connection Dialogue......................................................... 9 Figure 11 – Connection Properties....................................................... 9 Figure 12 – TCP/IP Properties ...........................................................10 Figure 13 – Advanced TCP/IP Settings .................................................10 Figure 14 – Connection Dialogue: Information Entry ................................11 Figure 15 – Network Connections: Active Connection...............................11 Figure 16 – Connection Established Bubble ...........................................12 Figure 17 – Ping: Remote Network: Valid .............................................13 Figure 18 – Ping: Remote Network: Invalid ...........................................13 Figure 19 – Map Network Drive..........................................................14 Figure 20 – Map Network Drive: Settings ..............................................14 Figure 21 – Mapped Drive Connected ..................................................15 Figure 22 – Ethernet Cable and Port ...................................................16 Figure 23 – Ping: Remote Default Gateway: Valid ...................................19 Figure 24 – Ping: Remote Default Gateway: Invalid .................................19 Table 1 - Methods of VPN Encryption ..................................................21 Table 2 - Definitions ................................................................. 23–24

Virtual Private Network Documentation Page 1
1. INTRODUCTION AND GENERAL DESCRIPTION In your studies at Okanagan University College (OUC) you will need to take advantage of the resources OUC provides. Assignments or projects will require you to utilize the tools given to you, such as software installed on workstations at school or configuration of network devices. At times, the need to use these tools remotely will be more appropriate. Through the use of a VPN (Virtual Private Network), every resource that is available to you from a physical workstation on the Engtech network is available to you at home. Within this manual you will find the information required to understand and configure a VPN connection to the Okanagan University College Engtech network. Establishing the VPN connection, troubleshooting, and security features involved are detailed throughout the manual.
1.1 Overview of Networks Many different networks will be involved to establish a VPN connection. The first network that you receive from your ISP (Internet Service Provider) is your home network. Your ISP is probably Shaw Cable or Telus. This Internet connection will provide a virtual physical connection to the Engtech network through the use of a VPN tunnel. The VPN tunnel includes your home network, the ISP (in the case of Shaw, Big Pipe is used for the high speed connection to Vancouver), Public Learning Network (PLNet), and the OUC network. The VPN tunnel ends at the entrance of the Engtech network. A VPN tunnel protects data within headers to protect the data from being interpreted by networks that act as a route of transmission. VPN includes encryption techniques to keep the information secure along the other networks as well.
1.2 What is VPN? VPN (Virtual Private Network) is used to establish connectivity to a remote location for the purpose of being registered on that network. VPN is used when you need to make a connection to a remote network and you must go through another network that is considered insecure or “un-trusted” (www.cisco.com). The virtual connection allows your computer to generate traffic on a remote network as if you were sitting physically on that network. This enables the user to use remote resources—such as a mapped network drive—networked devices—such as printers—and connect to local devices—such as routers and switches.
Copyright © 2009 Pearson Education Canada

Virtual Private Network Documentation Page 2
This traffic is generated on the network as if it were local traffic, so this condition may also grant permission to access certain resources that aren’t available over the internet for security reasons.
Secure VPN Tunnel (www.sonicguard.com) - Figure 1
Copyright © 2009 Pearson Education Canada

Virtual Private Network Documentation Page 3
2. ARCHITECTURAL DESCRIPTION A VPN tunnel is created between your home computer and the Engtech network. For data to be sent securely and act as if this data is of local traffic, it must be encapsulated with frame headers to protect other networks from interpreting this data incorrectly. VPN data can be sent through any type of network on any medium, as illustrated in Figure 2. Data is sent from your home computer to your ISP. Your ISP then sends that data to Big Pipe, which handles the long distance connection from Kelowna to Vancouver. In Vancouver the data reaches PLNet. From PLNet the data travels back to the OUC network. Once inside the OUC network the data is then sent to the proper department—in this case, the Engineering department. Data reaches the Gigabit server where the signalling medium is changed. Data is then sent to the ISA server. The ISA server handles firewall functions and the VPN authorization “servicesgo.” From the ISA server, data is then sent to the switches in the lab classrooms, which connect to the client workstations.
Note:
The data must be sent to PLNet first before it can reach the OUC network since PLNet is the ISP for OUC. PLNet provides OUC with internet access that is restricted so inappropriate content is not
delivered. ( Image: www.bblocks.co.uk )
Remote VPN Connection to Engtech Figure 2
Copyright © 2009 Pearson Education Canada

Virtual Private Network Documentation Page 4
3. USER INSTRUCTIONS
3.1 Account Information
3.1.1 Account Login Information Accounts are created by the system administrator of Engtech. All created accounts are automatically enabled for VPN access. Your username will be your first initial and your complete last name. For example, a person named “Leif Thordarson” would have a username of “lthordarson.” The password assigned to you will be your OUC ID (the nine-digit number found below your name on your OUC ID).
Note:
This is the same password you use to log into the Engtech network from school.
3.1.2 Changing Your Password During your initial connection to Engtech your password should be changed immediately for security reasons. This new password should be 6–8 characters and include both letters and numbers.
Step 1. Press CTRL+ALT+DELETE
Step 2. Click “Change password”
Step 3. In the username field type your username as defined in section 4.1.1 “Account Login Information.” In the log on to field make sure “Engtech” is selected. In the “Old Password” field, type your old password (i.e., your student ID). In the “New Password” field type your newly selected password. Retype your new password again in the “Confirm Password” field to ensure your password was correctly entered.
Step 4. Click “OK”
Step 5. Click “Cancel” to close the windows security window.
Copyright © 2009 Pearson Education Canada
Virtual Private Network Documentation Page 5
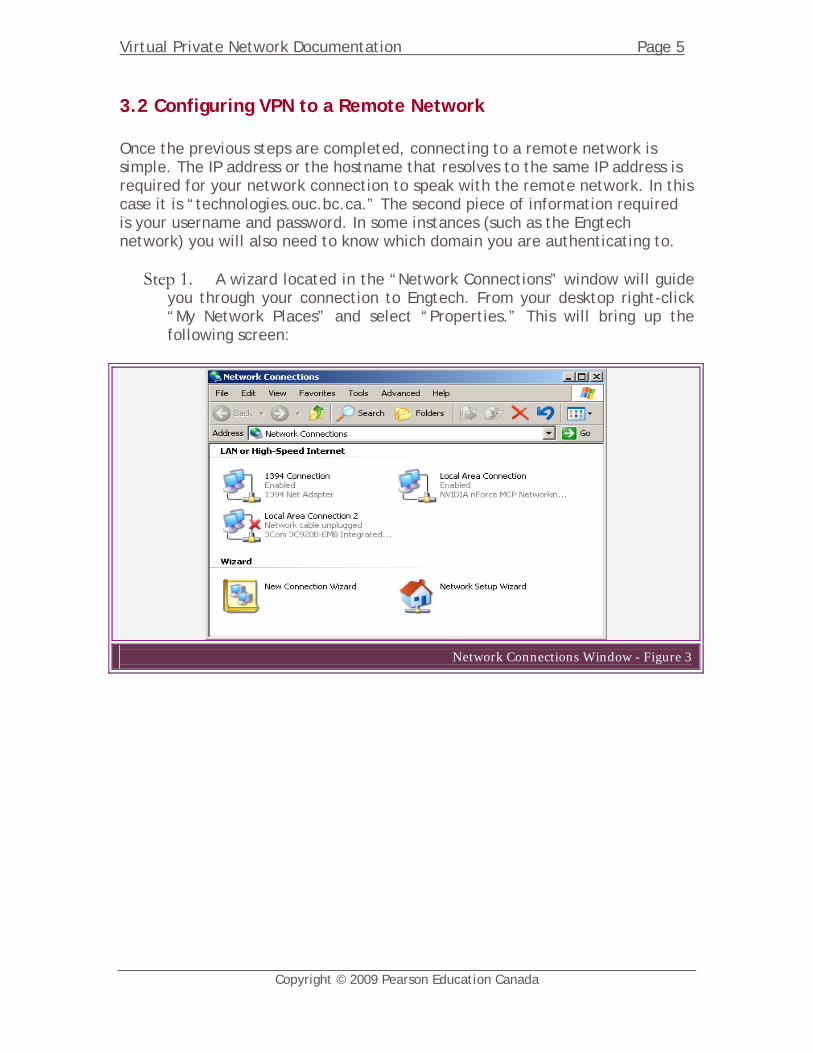
3.2 Configuring VPN to a Remote Network Once the previous steps are completed, connecting to a remote network is simple. The IP address or the hostname that resolves to the same IP address is required for your network connection to speak with the remote network. In this case it is “technologies.ouc.bc.ca.” The second piece of information required is your username and password. In some instances (such as the Engtech network) you will also need to know which domain you are authenticating to.
Step 1. A wizard located in the “Network Connections” window will guide you through your connection to Engtech. From your desktop right-click “My Network Places” and select “Properties.” This will bring up the following screen:
Network Connections Window - Figure 3
Copyright © 2009 Pearson Education Canada

Virtual Private Network Documentation Page 6
Step 2. From the “Network Connections” window double-click the “New Connection Wizard” icon. This will start the wizard to guide you through the connection process. The first screen will show you a few of the processes available through this wizard. Then click “Next.”
New Connection Wizard: Welcome Screen - Figure 4
Step 3. This next screen will show options for various client connections.
Select the second option “Connect to the network at my workplace.” Then click “Next.”
New Connection Wizard: Network Connection Type - Figure 5
Copyright © 2009 Pearson Education Canada

Virtual Private Network Documentation Page 7
Step 4. To enable VPN using your high-speed connection, select the second option of “Virtual Private Network connection.” Then click “Next.”
New Connection Wizard: Network Connection - Figure 6
Step 5. This is where you will label your newly created connection. For
consistency we will name it the same as the hostname of “technologies.ouc.bc.ca.” Then click “Next.”
New Connection Wizard: Connection Name - Figure 7
Copyright © 2009 Pearson Education Canada

Virtual Private Network Documentation Page 8
Step 6. In the available textbox, type “technologies.ouc.bc.ca.” Then click “Next.”
New Connection Wizard: VPN Server Selection – Figure 8
Step 7. The final screen in this wizard shows that your new connection
has been created. The available checkbox allows this newly created connection to have its own shortcut from the desktop. This selection is optional. Then click “Finish.”
New Connection Wizard: Completed Screen - Figure 9
Step 8. Click the “Properties” button within the connections dialogue window.
Copyright © 2009 Pearson Education Canada

Virtual Private Network Documentation Page 9
Connection Dialogue - Figure 10
Step 9. Select the “Networking” tab. Within the connection properties,
ensure that “Internet Protocol (TCP/IP)” is selected, then hit “Properties.”
Connection Properties - Figure 11
Copyright © 2009 Pearson Education Canada
Virtual Private Network Documentation Page 10
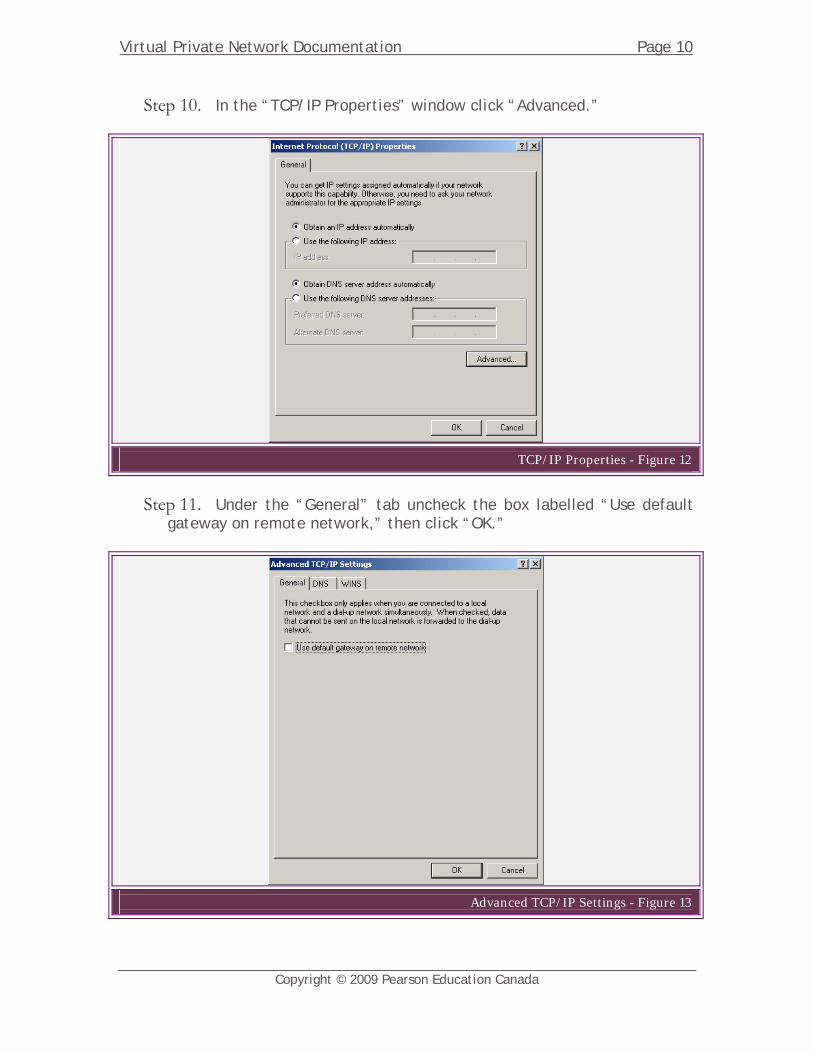
Step 10. In the “TCP/IP Properties” window click “Advanced.”
TCP/IP Properties - Figure 12
Step 11. Under the “General” tab uncheck the box labelled “Use default
gateway on remote network,” then click “OK.”
Advanced TCP/IP Settings - Figure 13
Copyright © 2009 Pearson Education Canada

Virtual Private Network Documentation Page 11
Step 12. Click “OK” three times to make the changes to each window. The connections window will come into view again. In the User name field, type “Engtech\” immediately followed by your username. In the password field, type your Engtech password.
Connection Dialogue: Information Entry - Figure 14
Step 13. Now that the connection has been established, the VPN icon will
change from greyed-out to full color. This indicates the connection has been established.
Before
After
Network Connections: Active Connection - Figure 15
Copyright © 2009 Pearson Education Canada

Virtual Private Network Documentation Page 12
Step 14. At the same time the connection is established a pop-up bubble
will appear over your task tray (usually located on the bottom right corner of your screen), showing this new connection.
Connection Established Bubble - Figure 16
Step 15. Congratulations! You are now successfully connected to Engtech through a VPN connection.
3.3 Verifying Connectivity To test connectivity to the remote network, the ping command will be used to test the response from the default-gateway on the remote network. If at any step a negative result is returned, recreate your connection by completing Section 4.2, “Configuring VPN to a Remote Network.”
Step 1. Click the “Start” button
Step 2. Click on “Run…”
Step 3. Type in “cmd” and click “OK”
Step 4. This will bring up the command prompt window. Type “ipconfig” at the command line. Information about your internet adapters will be displayed. Look for a line saying “PPP adapter technologies.ouc.bc.ca”; if this line is not there, there is a problem with your connection.
Copyright © 2009 Pearson Education Canada

Virtual Private Network Documentation Page 13
Step 5. Test your ability to ping other devices on the network by pinging Tachyon (at 10.1.1.5) by entering “ping 10.1.1.5” at the command line. Four lines of ping replies should be received back from Tachyon.
Ping: Remote Network: Valid - Figure 17
Step 6. If four “Request time out” replies are received there is a problem
with your connection.
Ping: Remote Network: Invalid - Figure 18
Copyright © 2009 Pearson Education Canada

Virtual Private Network Documentation Page 14
3.4 Connecting to a Network Drive
Step 1. From your desktop double-click “My Computer.”
Step 2. On the toolbar click “Tools,” then click “Map Network Drive…”
Map Network Drive - Figure 19
Step 3. Change the drive letter to a desirable drive letter.
Step 4. The folder location for your hard drive is option a) if you are a first-year student, and option b) if you are a second-year student. Then click “Finish.”
a) \\10.1.1.5\users\nten\year_1\yourusername b) \\10.1.1.5\users\nten\year_2\yourusername
Map Network Drive: Settings - Figure 20
Copyright © 2009 Pearson Education Canada

Virtual Private Network Documentation Page 15
Step 5. A new window will appear with the contents of your network
drive. This network drive will now be available from “My Computer” when your VPN connection is established.
Mapped Drive Connected - Figure 21
Copyright © 2009 Pearson Education Canada

Virtual Private Network Documentation Page 16
4. CONNECTION TROUBLESHOOTING Troubleshooting is a linear process, which could be required by any one of a multitude of problems. This section is designed to troubleshoot common problems you may experience. If you experience a problem, start with the first step and keep working until you discover where the error occurred. If a solution is not outlined, seek further assistance through your hardware manufacturer or your ISP.
4.1 Physical Connectivity
Step 1. Locate the Ethernet port on the rear of your computer.
Note:
This is not to be confused with an existing modem jack that looks similar but is smaller. The Rj-45 end of the cable should have eight
metal pins on it. A phone jack will only have four. ( www.udayton.edu )
Ethernet Cable and Port (www.udayton.edu) - Figure 22
Step 2. Insert your Ethernet cable with an Rj-45 end (see Figure 22). The connection light should then turn on if the computer is powered on and the NIC is properly installed and configured. If not, continue to step three.
Copyright © 2009 Pearson Education Canada

Virtual Private Network Documentation Page 17
Step 3. Ensure the other end of your cable is plugged into the modem provided to you by Shaw.
Step 4. The coax cable should run between your modem and the wall outlet. Ensure that both ends are connected appropriately. The status lights on the front of your modem should indicate that the modem is “Online.”
Diagnosis:
If these steps could not be completed with success there is a problem with your NIC, cable, wall outlet, ISP connection, or
modem. (Image: www.kingsdaughtershospital.org)
4.2 Loop-back Test
Step 1. Click the “Start” button.
Step 2. Click on “Run.”
Step 3. Type in “cmd” and hit enter or click “OK.”
Step 4. Type “ping 127.0.0.1.” This will test your loop-back adapter from the physical level up to the network level.
Diagnosis:
If these steps could not be completed there is a problem with your NIC installation.
4.3 ISP Connectivity – Default Gateway
Step 1. Click the “Start” button.
Step 2. Click on “Run.”
Step 3. Type in “cmd” and hit enter or click “OK.”
Step 4. Type “ipconfig” and look for the line that says “Ethernet Adapter Local Area Connection.” Below that look for the line that says “Default Gateway” followed by your IP address (in the format of x.x.x.x ). At the command prompt type “ping,” then a space, followed by the number recorded as your default gateway.
Step 5. You should receive four ping replies from this address. If not continue to step 6.
Copyright © 2009 Pearson Education Canada

Virtual Private Network Documentation Page 18
Step 6. At the command line type “ipconfig /release.” Repeat steps 4–5.
Diagnosis:
If these steps could not be completed there is a problem with your default gateway. This is a problem associated with your ISP.
Contact your ISP for further information.
4.4 ISP Connectivity – Internet
Step 1. Click the “Start” button.
Step 2. Click on “Run.”
Step 3. Type in “cmd” and hit enter or click “OK.”
Step 4. Type “ping www.google.com.”
Step 5. You should receive four ping replies from this address.
Diagnosis:
If these steps could not be completed there is a problem with your ISP. Contact your ISP for further information.
4.5 Incorrect DNS
Note:
If you have disabled the use of the remote default gateway (Section 4.2 “Configuring VPN to a Remote Network” steps 9–13) then skip
this troubleshooting subsection.
Step 1. Click the “Start” button.
Step 2. Click on “Run.”
Step 3. Type in “cmd” and hit enter or click “OK.”
Step 4. Type “nslookup www.google.com.”
Step 5. You should receive a reply from the destination.
Copyright © 2009 Pearson Education Canada

Virtual Private Network Documentation Page 19
Ping: Remote Default Gateway: Valid - Figure 23
Step 6. If you receive a reply similar to Figure 24, then your DNS is currently offline or your DNS information is incorrect.
Ping: Remote Default Gateway: Invalid - Figure 24
Diagnosis:
If these steps could not be completed there is a problem with your default gateway. This is a problem associated with your ISP.
Contact your ISP for further information.
4.6 Router and Firewall Privileges If internet traffic goes through a router, smart switch, or a firewall on your network you may need to change or enable settings on these devices. Consult the manual that came with these network devices for more information on allowing VPN traffic.
Copyright © 2009 Pearson Education Canada

Virtual Private Network Documentation Page 20
4.7 Error Connecting to Technologies.ouc.bc.ca This error indicates one of several problems. Assuming the previous steps have been tested successfully, the problem probably lies in your login information. To contact Clinton Myers, the System Administrator for the Engtech network, send an email to [email protected].
Copyright © 2009 Pearson Education Canada

Virtual Private Network Documentation Page 21
5. SECURITY FEATURES
5.1 Windows 2000 Domains Windows 2000 domains allow for integrated authentication from VPN into the remote network. This common access allows a strict set of policies to be applied to a particular account. Policies allow for administration to automatically occur on a user account. The implementation of a single domain allows for a single point of administration on user accounts.
5.2 VPN Features VPN supports two methods of Encryption between the host computer and the ISA server.
Methods of VPN Encryption (www.howstuffworks.com) Table 1
Encryption type Description
Symmetric key
A key to code to the information is known by both the sender and the receiver. The same key is used to encrypt the data when it is sent and to decode the message at the recipient.
Public key
This method uses a combination of public key and private key. A key is sent to other computers so they may communicate with your machine without knowing your decryption codes and vice versa.
5.3 VPN Security The ISA server provides a layer of security for VPN at the entrance of the Engtech network. The ISA server can identify VPN traffic and apply the security settings assigned to your Engtech account to the firewall. Firewall security policies differentiate depending on the user logged in.
Note:
Although the ISA serves many purposes beyond additional security for VPN, for the purpose of this manual only VPN related information was
included.
Copyright © 2009 Pearson Education Canada

Virtual Private Network Documentation Page 22
6. EQUIPMENT
6.1 Client Side To utilize VPN components on your home network you require:
Personal computer with installed NIC Cabling to gain access to internet. This may include additional
equipment such as routers, switches, hubs, or cable. Internet access from Shaw or Telus Home network running TCP/IP
6.2 Server Side To VPN into a remote network the following devices must be on the network:
Active directory Structured user accounts Firewall (or ISA server) Network storage Connection to ISP VPN server DNS or IP
Copyright © 2009 Pearson Education Canada

Virtual Private Network Documentation Page 23
7. DEFINITIONS
Definitions Table 2
Acronym Definition
Active Directory Enterprise Server application integrated with DNS and TCP/IP
Big Pipe A Shaw company that sells high speed connections across long distances
CMD Command Prompt The executable name to start the program “Command Prompt”
Coax A type of electrical cable, sually used
for high speed internet and cable television
Default gateway The route data takes in a network to reach the internet.
DNS Domain Name Server A service that resolves a domain name into an IP address
Domain A logical group of users and devices where authentication takes place
Domain name A name given to a single domain
Encryption Changing data so it is unreadable except by the recipient
Engtech Engineering Technologies The name given to the Engineering Technologies network
Ethernet cable The cable used to wire an Ethernet network
Ethernet port The type of port used in conjunction with an Rj-45 connector for Ethernet
networks
Firewall A piece of hardware or software that protects a network or computer from
unauthorized access
Gigabit server A server that changes the networking medium from coax to fibre optic
Header A piece of information used to encapsulate data
Host computer A machine that the user originates on
Copyright © 2009 Pearson Education Canada

Virtual Private Network Documentation Page 24
Table 2, Continued…
Hostname A named used to identify a specific
computer. On the internet an example is www.google.com
Interface “The point of interconnection between a user terminal and a private or public
network”
Internet Any network that resides between your ISP and the destination network
IP address Internet Protocol Address A unique number to identify a computer on the internet
Ipconfig Internet Protocol Configuration
A program that details information about your network interfaces
ISA Server Internet Security and Acceleration Server
A server- based firewall; on Engtech it also runs
VPN services
ISP Internet Service Provider Provides an end user with access to the internet
Local traffic Traffic that originates and stays within a single network
Loop-back adapter
An imaginary interface used to test the physical loop of a NIC
NIC Network Interface Card A card installed into a computer to connect the terminal to a network
Nslookup Name Server Lookup A program that displays the resolved IP address of a domain name
OUC Okanagan University College A University College located in Kelowna, British Columbia
Ping A program that sends data to a terminal and back to test connectivity
PLNet Public Learning Network A network that acts as an ISP for OUC
Remote network Any network that is not local to the current workstation
Rj-45 Registered Jack Number 45 A connector type used on Ethernet cable in Ethernet switched networks
Tachyon The name given to the server of 10.1.1.5 on Engtech
User account A combination of a username and
password given to a user to connect to a network domain
VPN Virtual Private Network See section 2.2
VPN tunnel Virtual Private Network Tunnel See section 2.1
Wizard A program that guides users through a set of options to configure a piece of
software
Copyright © 2009 Pearson Education Canada

Virtual Private Network Documentation Page 25
Copyright © 2009 Pearson Education Canada
8. BIBLIOGRAPHY Burnout in the Capital, Retrieved December 6, 2004, from
www.bblocks.co.uk/BITC/flame.gif How Virtual Private Networks Work, Retrieved November 25, 2004, from
http://computer.howstuffworks.com/vpn6.htm Your Tangent Computer, Retrieved November 25, 2004, from
www.udayton.edu/~question/1999/tower/ tower_rear_slots.html King’s Daughters Hospital and Health Services, Retrieved December 6, 2004,
from www.kingsdaughtershospital.org/images/Clip%20Art/Stethoscope%203.gif SonicWALL Firewalls and Internet Security Solutions, Retrieved November 28,
2004, from www.sonicguard.com/Media/VPN_tunnel.gif Virtual Private Networks (VPNs), Retrieved November 25, 2004, from
www.cisco.com/univercd/cc/td/doc/cisintwk/ito_doc/vpn.htm