voicepoint hosted user guide - access point, inc. · pdf filevoicepoint hosted user guide...
TRANSCRIPT

VoicePoint Hosted User Guide Contents
Getting Started Home Activity
o Activity Graphs o Path Usage
Voicemail
o Voicemail Configuration
Services
o Phone Numbers o E911 o SIP Trunks o Fax Lines o Extensions o Endpoints o Mailboxes o Auto Attendant o Time Frames o Groups o Conference Bridge o Listen Live o Call Center o Holidays o Call Recording o Hold Music o Call Blocking
Cases
Accounting
o Orders o Invoices o Payments
Reports
o Report Types
Settings
o Users o Message Center

VoicePoint Hosted User Guide
Getting Started
Overview
In this section, you will find an explanation of the common screen items and how to use them.
Understanding the Screen Layout
WELCOME
The Welcome line in the far upper right corner displays your full name with user name in parentheses, the My Profile link, a Logout link and a Help & Training link.
To check that you are logged in as the correct user, look at the text in the Welcome. It will show your Username.
To view your profile or to make any changes in your profile, click the My Profile link. To Logout of your session, click the Logout link. To access the Help system, click the Help & Training link.
TABS
The screen layout contains tabs across the top of the screen and these tabs remain visible at all times. Clicking on a tab redirects you to a "landing" page that is specific to that tab. Each tab accesses a functional area of the software. For example, the Accounting tab contains accounting information about Orders, Invoices, Payments, etc. The Voicemail tab allows you to set the Voicemail Configuration for your mailbox.
BREADCRUMBS
The line immediately below that tabs is a "breadcrumb" trail of your navigation through the tabs on the top and menus and submenus on the left. You can navigate to a previous location in the sequence by clicking on the menu choice or tab in your "breadcrumb" trail.
PAGINATION
At the top and bottom of most lists, you will find the page navigation and control. The default usually shows 20 records.

VoicePoint Hosted User Guide
•Use the drop down to specify 10, 50, 100, or All records on the screen at once.
•Use the Previous link to return to the previous part of the list.
•Use the Next link to move to the next page of records.
Some lists do not allow control of the exact number of records on the screen; however, you can still use the Previous and Next links.
•Use the View All link to view all the records.
CREATE NEW MENU
The Create New menu at the top of the left panel is available from all tabs. Using this dropdown menu, you can quickly create a new extension, mailbox, auto attendant, time frame, lead, customer, proposal, order, payment, credit/memo, refund, item, inventory unit, reseller or user. Depending on your user level and the permission rights granted to your user account, the dropdown commands listed will vary and display only the allowed command options for the user logged into the menu.
MENUS AND SUBMENUS
Each tab presents its own menu and submenus in the left panel. Click on the menu item or submenu item.
RECENT ITEMS
Under the Recent Items heading in the left panel, you will find quick links to your most recent activity searches for your convenience. By selecting one of these links, you will be redirected to a new screen

VoicePoint Hosted User Guide based on your selection. For example, if you recently viewed an invoice, there will be a quick link to that invoice under the Recent Items heading.
RECORD HISTORY
To look at a when and by whom changes were made, scroll to the bottom to review the Record History section. This shows in most record types, such as Voicemail Configuration, PBX Info and other Services functions, Cases, Orders and many others. The Record History shows the Date, User, IP address and the Operation when the record was Created and for each time a record has been Modified.
Home
Overview
Home is the default screen that opens when you launch the application. The Home tab gives you one-click access to common commands, as well as a quick glance of your most Recent Transactions and Message Center. Based on your user rights, information will be provided to help you perform Common Tasks.
Under Common Tasks, on the left side of the screen, you can view your own cases, see a list of PBX extensions, check voicemail, view all configured telephone numbers, and make a one-time payment. The Message Center in the upper right allows you to access messages, notifications, and alerts that are delivered here instead of through email. Recent Transactions in the lower right shows a compiled list of the 10 most recent transactions of All Types - Invoices, Orders, and Payments transactions. You may use the drop down list to limit the data to just one type of transaction.

VoicePoint Hosted User Guide Working on the Home Tab
The landing screen for every user of the software is the Home screen. Based on your user rights, information will be provided to help you perform your own most common tasks, view messages and access recent transactions.
USING COMMON TASKS
The links provided for Common Tasks automatically navigate through the menus for you and take you to the appropriate screen to accomplish the selected task.
Common Task Action
View LNP or RESPORG cases assigned to you in the Cases tab. From here, you can search for and view the status of cases, as well as enter New Number Posting Cases.
View a list of all the Standard Extensions in your PBX in the Standard Extension List screen, where you can search for and edit specific extensions.
View and/or make changes to your Standard Extension Details configuration, where you can manages settings for Routing & Configuration and the Voice Mailbox.
View, listen to and delete voicemail message in the Voicemail tab. You can select the Mailbox and Folder to change the mailbox settings.
View a list of all telephone numbers currently configured in your account. On this screen, you can search for and view the phone numbers. You can edit the Caller ID Settings, Call Routing, or Features for each number. You can also edit the Billing Address Company information for multiple numbers.
Make a one-time credit card payment on your account. From here, you can use a previously entered credit card or enter new information for Visa, MasterCard, American Express, or Discover
MANAGING YOUR MESSAGES
The convenient Message Center in the upper right shows 3 types of information – Messages, Notifications and Alerts. The messages shown are delivered here rather than emails. You can view the contents, delete, mark the message as unread, or archive it for later use. Click the View All link to go directly to the Message Center to manage all your messages.

VoicePoint Hosted User Guide The entries are in reverse chronological order, showing the most recent at the top of the list. These defaults are restored each time you access the Home tab.
Here are common examples of the message types:
Message – A generic messaging that allows you to communicate with all users in the portal
Notification – A notice about an upcoming configuration change or maintenance window.
Alert - System updates, changes, or notices.
•To access a specific type of message, make a choice from the drop-down list – Choose Messages, or Notification, or Alerts.
•To access the message, click on the message name in the Message column. From the message details, you can Delete the message, Archive it, or Mark as Unread.
•To change the sort order of the list, click on the column heading.
•To archive the message, click on the Archive icon.
•To view all messages and go to the Message Center, click the View All link.
VIEWING RECENT TRANSACTIONS
By default, the Recent Transactions section shows transactions of All types - Invoices, Orders and Payments. The entries are in reverse chronological order, showing the most recent at the top of the list. These defaults are restored each time you access the Home tab.
•To access a specific type of transaction, make a choice from the drop-down list – Choose Invoices, or Orders, or Payments.
•To change the sort order of the list, click on the column heading.
•To access the details, click on the link in the Date column.
Activity
Overview
Activity provides access to your inbound, outbound and internal calls. When you select this Activity tab, you will be redirected to the Call Activity screen, showing you the last seven days of call traffic. You can change the criteria to search and filter call activities through the search fields provided at the top of the screen. From the screen, you can also access graphs of call activity and path usage from the links below the search criteria or from the menu choices in the left panel.
Call Activity
The Call Activity list includes date/time, duration, call type (incoming, outgoing, or internal), from, to information and account code. The data can be filtered by date and call type; and you may search on keywords within the from, to and account code fields in the report.
1.Enter search criteria as necessary.

VoicePoint Hosted User Guide ▪Enter a Start and End Date.
▪Choose a Call Type (incoming, outgoing, incoming and outgoing, or eternal).
TIP: Inbound calls routed to Groups and Queues will only identify the Group Name or Que Name that answered the call and not designate an extension or agent # on this activity data.
▪Type a Keyword. (This will search the From, To and Account Code fields.) Click Search.
▪Use the Next and Previous buttons (top right and bottom right of the page) to move between pages.
▪By default, 20 items per page will display. Use the dropdown list near the top right or bottom right of the page to display 10, 50, 100 or 500 items on a page.
Exporting the Call Activity List
1.Filter and run the list you wish to export.
2.Click Export Results.
3.Do one of the following:
•To have the report open in Excel, click in the Open radio button and then click on OK. Excel will launch with the report displayed.
•To save the report as a .csv (Comma Separated Values) file, click the Save button and then Save again. The file will be saved with a default name in your default file download location.

VoicePoint Hosted User Guide
Activity Graphs
To access the Call Activity Graphs, use the View Activity Graphs link on the Call Activity list page or choose Activity Graph from the submenu in the left panel. This will display a column graph depicting any of the following:
•Total Call Volume by Date (default graph type)
•Outgoing Call Volume by Phone Number
•Total Call Volume by Extension
•Average Call Volume by Hour
Call Activity Graph
TIP: Use the Graph Type dropdown menu to choose Total call volume by date, Outgoing call volume by phone number, Total call volume by extension, or Average call volume by hour and then click View Graph to update the graph.
TIP:
Use the Call Type dropdown menu to choose Incoming & Outgoing Calls (the default), Incoming Calls, or Outgoing Calls and then click View Graph to update the graph.

VoicePoint Hosted User Guide
Path Usage
To access the Path Usage graph, use the View Virtual Path Usage link on the Call Activity list page or choose Path Usage from the submenu in the left panel. This will show a column graph depicting path utilization.
Virtual Paths Used
TIP:
Type of choose a start date for the graph using the Start Date field or calendar picker.
TIP:
Use the Zoom Level dropdown menu to choose between zooming to Month (default), Week, Day or Hour and then click Submit to refresh the graph.
VoicePoint Hosted User Guide
Voicemail Overview
Voicemail lets you configure your mailbox settings, as well as view, listen to (download) and delete voicemail messages for a selected mailbox. When you click on the Voicemail tab, the screen shows your current Mailbox and the Inbox folder, as well as the voicemail storage settings. Use the dropdowns to view and, if necessary, delete the information for a specific Mailbox and Folder.
From this tab, you can also use the Voicemail Configuration menu in the left panel to view and modify your name, password, announcement settings and email settings.
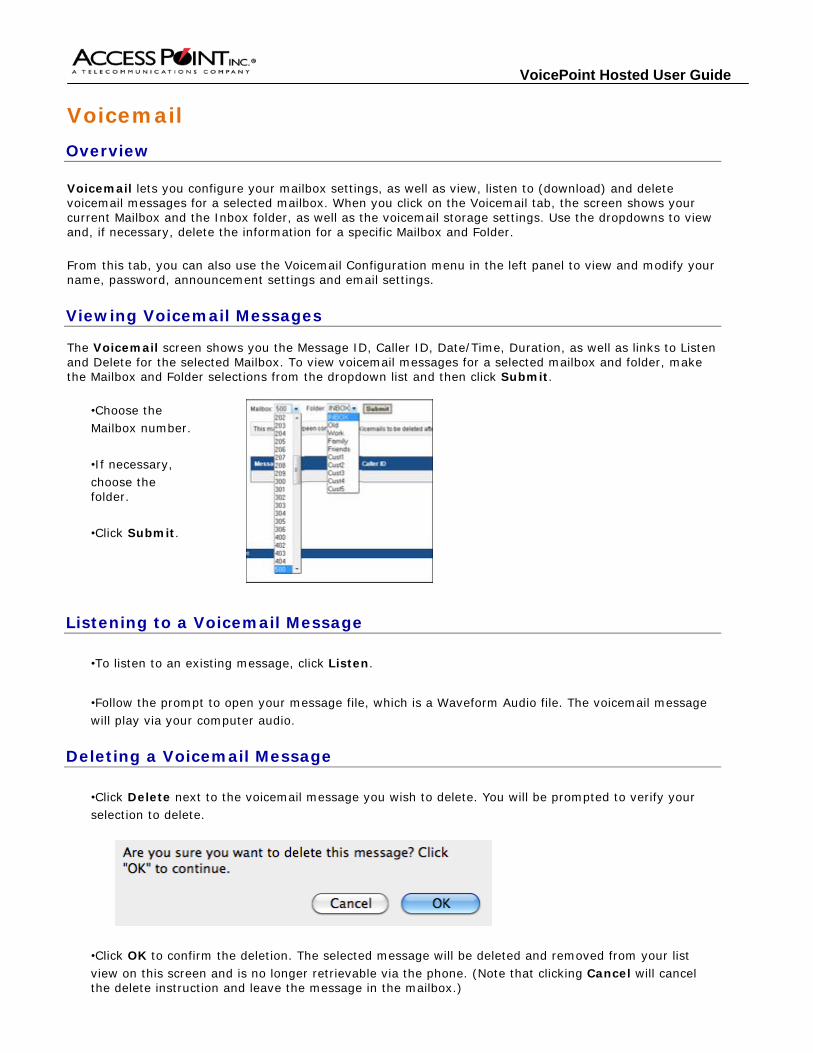
Viewing Voicemail Messages
The Voicemail screen shows you the Message ID, Caller ID, Date/Time, Duration, as well as links to Listen and Delete for the selected Mailbox. To view voicemail messages for a selected mailbox and folder, make the Mailbox and Folder selections from the dropdown list and then click Submit.
•Choose the Mailbox number.
•If necessary, choose the folder.
•Click Submit.
Listening to a Voicemail Message
•To listen to an existing message, click Listen.
•Follow the prompt to open your message file, which is a Waveform Audio file. The voicemail message will play via your computer audio.
Deleting a Voicemail Message
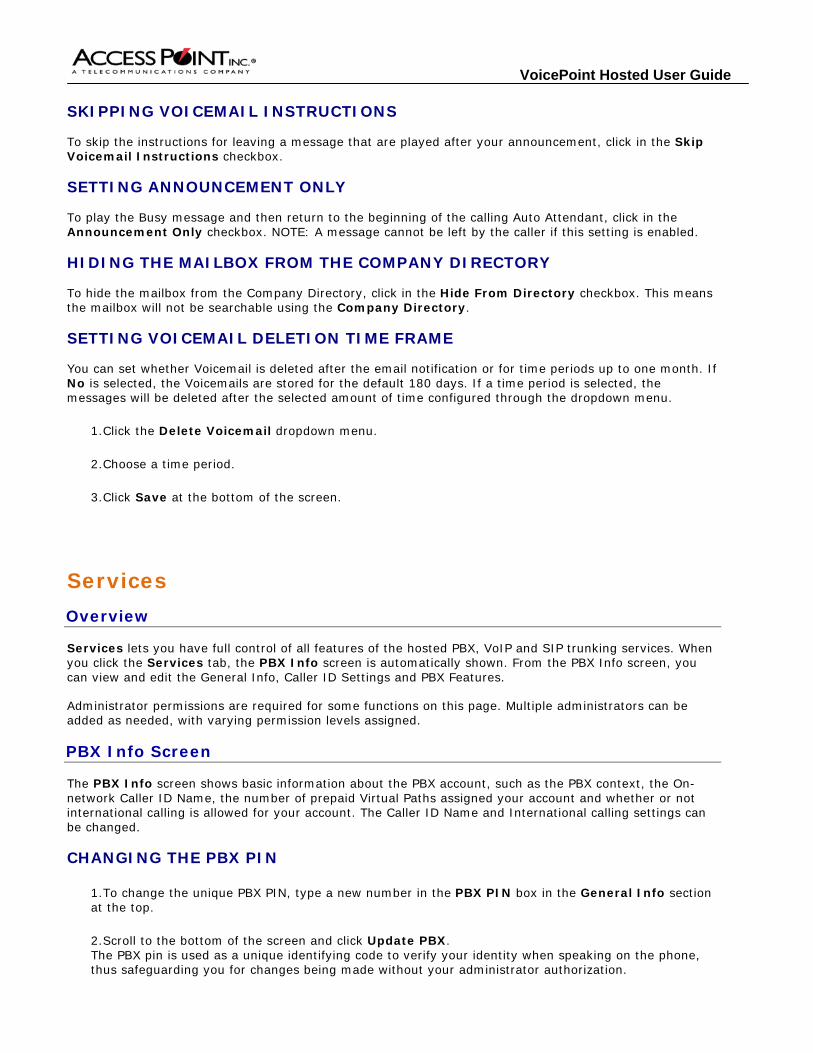
•Click Delete next to the voicemail message you wish to delete. You will be prompted to verify your selection to delete.
•Click OK to confirm the deletion. The selected message will be deleted and removed from your list view on this screen and is no longer retrievable via the phone. (Note that clicking Cancel will cancel the delete instruction and leave the message in the mailbox.)

VoicePoint Hosted User Guide Voicemail Configuration
The Voicemail Configuration screen shows the settings of the voice mailbox associated with your extension. You can modify your name, password, announcement settings and email settings as presented in the overview below. For detailed steps, please access the Voicemail Configuration instructions.
Setting Overview
General Settings Name (for Directory) - This field is used in the company directory for callers to identify and find your mailbox.
Password - by default, the same as the mailbox number. Please note that if the password is the same as the mailbox number, you will hear the voicemail setup wizard each time you check your voicemail. Anytime the password is changed to be the same as the mailbox number, you will hear the voicemail setup wizard again.
Recordings & Greetings
In this section you are able to set or play the recordings for your Unavailable Message, Busy Message and Your Name recordings for a selected mailbox.
You may record these greetings by phone, or by uploading audio files. The audio files must a .wav or.mp3 file format.
Notifications Email to notify - If an email address is entered into this box, a message will be sent to the address each time a voicemail is received. The audio file will be attached to the email in .wav format.
SMS email to notify - If an email address is entered into this box, a message will be sent to the address each time a voicemail is received. The audio of the message will not be attached.
Advance Settings Dial During Announcement -If checked, the caller will be able to dial an extension during the playing of this mailbox message and redirect their call.
Skip Voicemail Instructions - If checked, the PBX systems will not play generic instructions the caller. Instead, only the user's recorded message will play, followed by the beep.
Announcement Only - If this box is checked, then the caller will hear a recorded greeting, but the caller will not be asked to leave a message.
Hide from Directory - If checked this mailbox will not be accessible from the "Company Directory" option.
Delete Voicemail - This dropdown menu option allows the user to configure the period of time to retain voicemail messages before deleting.
Voicemail Configuration
Changing Your Voicemail Password
Use the Password and Confirm Password boxes to change the password.

VoicePoint Hosted User Guide
1. Type a new password in the Password box. NOTE: Your password must be four digits or less.
2. Type the new password into the Confirm Password box.
3. Click Save.
Managing Recordings and Greeting
You may record by phone or upload voicemail announcements for an Unavailable Message, a Busy Message, or Your Name. If you wish to record by phone, please dial * + your mailbox number or click the Record button below. Your phone will ring and you will be guided through the recording process.
RECORDING A VOICEMAIL MESSAGE
1.To record a message from your phone, select the extension in the box provided, as shown below.
2.Click the Record button. The system will ring the extension identified in the above.
3.Follow the instructions and prompts from the voicemail system on your phone.
4.Click Save at the bottom of this screen when finished.
UPLOADING A VOICEMAIL MESSAGE
1.To upload a message file, use the Browse button to locate the file.
Accepted message file types include:
▪ .wav files
▪ .mp3 files
2.Click Save at the bottom of the screen.
PLAYING A VOICEMAIL MESSAGE
1.To play an existing message, click Play.

VoicePoint Hosted User Guide SETTING EMAIL/SMS NOTIFICATIONS
An email and/or an SMS notification can be sent for each message left in your voicemail box. When a message is received, the system will send both the email and SMS notification if configured. Only the email notification will contain an actual audio file of the voicemail message
1.To change the Email to notify or SMS to notify, type an email address or phone number in the appropriate box.
TIP: The Email to Notify supports multiple email addresses, separated by commas.
TIP:
The SMS to notify address should conform to the format of the user's carrier. The major US cellular carriers use the [email protected]_domain.com format for SMS to text capable cell phones.
Alltel [email protected]
AT&T [email protected]
Nextel [email protected]
Sprint [email protected]
T-mobile [email protected]
VoiceStream [email protected]
Verizon [email protected]
2.Click Save at the bottom of the screen.
Managing Advanced Settings
You can control settings for whether the caller can dial an extension during the announcement, skip voicemail instructions, hide the mailbox from the company directory and set the time frame for deleting the voicemail message.
ALLOWING EXTENSION DIALING DURING AN ANNOUNCEMENT
To allow dialing of an extension during the announcement, click in the Dial During Announcement checkbox.
If Dial During Announcement is selected, the caller will be able to dial an extension during the playing of this mailbox message and redirect their call.
VoicePoint Hosted User Guide SKIPPING VOICEMAIL INSTRUCTIONS
To skip the instructions for leaving a message that are played after your announcement, click in the Skip Voicemail Instructions checkbox.
SETTING ANNOUNCEMENT ONLY
To play the Busy message and then return to the beginning of the calling Auto Attendant, click in the Announcement Only checkbox. NOTE: A message cannot be left by the caller if this setting is enabled.
HIDING THE MAILBOX FROM THE COMPANY DIRECTORY
To hide the mailbox from the Company Directory, click in the Hide From Directory checkbox. This means the mailbox will not be searchable using the Company Directory.
SETTING VOICEMAIL DELETION TIME FRAME
You can set whether Voicemail is deleted after the email notification or for time periods up to one month. If No is selected, the Voicemails are stored for the default 180 days. If a time period is selected, the messages will be deleted after the selected amount of time configured through the dropdown menu.
1.Click the Delete Voicemail dropdown menu.
2.Choose a time period.
3.Click Save at the bottom of the screen.
Services
Overview
Services lets you have full control of all features of the hosted PBX, VoIP and SIP trunking services. When you click the Services tab, the PBX Info screen is automatically shown. From the PBX Info screen, you can view and edit the General Info, Caller ID Settings and PBX Features.
Administrator permissions are required for some functions on this page. Multiple administrators can be added as needed, with varying permission levels assigned.
PBX Info Screen
The PBX Info screen shows basic information about the PBX account, such as the PBX context, the On-network Caller ID Name, the number of prepaid Virtual Paths assigned your account and whether or not international calling is allowed for your account. The Caller ID Name and International calling settings can be changed.
CHANGING THE PBX PIN
1.To change the unique PBX PIN, type a new number in the PBX PIN box in the General Info section at the top.
2.Scroll to the bottom of the screen and click Update PBX. The PBX pin is used as a unique identifying code to verify your identity when speaking on the phone, thus safeguarding you for changes being made without your administrator authorization.

VoicePoint Hosted User Guide SELECTING ON-DEMAND CALL PATHS
Select the number of On-Demand Paths you would like available for your use. On-Demand Paths are charged to your account when and if used, per the terms of your agreement with your Service Provider.
1.In the General Info section, choose the desired number from the On-Demand Call Paths drop-down box.
2.Scroll to the bottom of the screen and click Update PBX.
SETTING THE CALLER ID FOR OUTBOUND CALLS
Enter the information you would like to use for caller ID on on-network outbound calls. This will be the default value used as you setup new phone numbers. This value may be overridden for each phone number in the phone number edit screen.
1.In the Caller ID Settings section, type the name in the Caller ID (CNAM) box. This will be the default value used for outbound Caller ID as you setup new phone numbers. This field will only accept letters, numbers, spaces, commas or periods.
2.Scroll to the bottom of the screen and click Update PBX.
CONTROLLING PBX FEATURES
Field Details
Allow International Calling?
•To allow international calling, click the Yes radio button. If this is set to No, this allows domestic calling only, which includes the U.S., Canada, Puerto Rico and the U.S. Virgin Islands.
Enable Directed Call Pickup
•To enable directed call pickup, click the Yes radio button. If enabled, all users of the PBX will be able to dial *8 plus an extension number to answer a call ringing another user's phone. Enabled directed call does not work with a Group or Que Call.
Enable Intercom? •To enable intercom use, click the Yes radio button. If enabled, all users of the PBX will be able to dial *1 + another user's extension to activate the intercom feature of the phone. This currently works only with Polycom brand devices.
Enable 7 digit dialing? •To enable 7-digit dialing, click the Yes radio button. If enabled, instead of requiring the user to dial 10 digits for local calls, the caller can now dial the number without the area code in the local calling area. Callers will have to hit "send" or "dial" following the 7 digits to send the call.
Prefix •To specify an automatic area code for 7-digit dialing, enter the area code in the Prefix box. If 7 digit dialing is enabled, the local calling area's area-code must be entered here.
Enable Directory By First Name?
•To enable directory listing by first name, click the Yes radio button. The default is No, which will use Last Name.
Read Extension Numbers in Directory?
•If set to Yes, the AutoAttendant will read the extension number the call will be transferred to. If set to No, the call will be transferred without the reading of any extension information.
Call Parking Timeout •To set the time out before calls are parked, type the number of seconds in

VoicePoint Hosted User Guide
the Call Parking Timeout box.
If this timeout is reached, the call will ring back to the extension that placed the call in the parking lot.
Phone Numbers
Overview
Phone Numbers, including Standard, Toll Free and Fax number that are assigned to your account are shown in by default. The headings list Phone #, Caller ID (CNAM), Rings To, Toll Free?, Fax Capable?, Active? and an Edit link. Here you can to modify the call routing and behavior of incoming calls. You can search and edit all numbers. You can also use the submenu on the left to view just Standard (toll) Phone Numbers, a list of Toll Free Numbers or a list of Fax numbers.
STANDARD PHONE NUMBERS
Standard Phone Numbers are numbers that support inbound and outbound dialing as allowed within your account.
•To show only the Standard phone numbers in a list, click the Standard Phone Numbers submenu in the left panel.
TOLL FREE PHONE NUMBERS
Toll Free Phone Numbers are toll free numbers associated with your account.
•To show only the Toll Free phone numbers in a list, click the Toll Free Phone Numbers submenu in the left panel.
FAX PHONE NUMBERS
Fax Phone Numbers are numbers that support T38 Fax capabilities as configured on your account.
•To show only the Fax phone numbers in a list, click the Fax Phone Numbers submenu in the left panel.
Searching and Selecting Phone Numbers
1.Enter any part of a phone number in the Search box.
2.Click Search. The results will be displayed.
TIP: To display all records, click the Clear Search link.
Editing Phone Numbers
1.Use Search or the menus on the left panel to locate the phone number(s).
2.To edit one phone number, click on the phone number link or click the Edit link to the right of the record.

VoicePoint Hosted User Guide
3.To edit multiple phone numbers, click in the checkbox to the left of each number.
4.Click the Edit button.
5.Make changes as necessary.
6.Click Save.
Here are details about each of the fields: Field Details
State •To select a state, make a selection from the State dropdown list.
•The state is usually assigned to the customer service state but is configurable as needed.
Caller ID Name (CNAM)
This value will be displayed on the called party's Caller ID display when you make outgoing calls from this phone number. This field is limited to 15 characters including spaces, commas and periods but no other punctuation.
•To use the default value setup for your account on the PBX Info screen, click the Use Default hyperlink. Note that this name will override the global CNAM setting in the PBX info page.
•Updated On and Pending Updated On display the update information of the CNAM to the global CNAM service provider.
Internal Presentation
If the caller ID name for incoming calls needs to be presented differently from what the incoming caller has supplied, change this setting. Any text entered in this box will be pre-pended to the beginning of the caller ID name received followed by a colon and will displayed to the called party.
•Uncheck the Show Caller ID checkbox to display only the text entered into the Internal Presentation field and not pre-pend the caller ID name that the caller has presented to the customer.
If Holiday If a call comes in on a day that is configured as a holiday, the call will be routed as directed in the If Holiday selection.
•To configure specific dates as holidays, click the Holidays submenu in the left panel. Click New Holiday to define a new holiday or click an existing holiday to edit.
Route To All incoming calls to this number are routed based on the rule defined by this field.
•Click the Route To dropdown and make a selection from the list. A secondary dropdown menu will let you further define the Route To destination. For example, if the call will be routed to an extension, use the Select Extension dropdown list to choose a specific extension.

VoicePoint Hosted User Guide
Call Routing
Hold Music Group •To specify the hold music group to be played, click in the Hold Music Group dropdown and make a selection.
•To add new hold music, click the Hold Music submenu in the left panel. Click New Group to define a new hold music group and follow the onscreen instructions to add new custom hold music tracks.
Screen for Privacy
One feature of the PBX System is to have incoming calls screened for telemarketers or other automatic dialer programs.
•If Yes is selected, all callers who do not present a caller ID will hear a greeting asking them to enter a caller ID number using the dial pad on their phone before the call will be connected.
E911
Overview
To meet Federal regulations, each phone must be able to dial 9-1-1 and be connected to a Public Safety Answering Point (PSAP). Each E911 location must be associated with one and only one phone number, for callback purposes When 9-1-1 is dialed, the PSAP must be presented with a callback phone number and a physical street address. Therefore, each extension entered into the Customer Portal must have an associated E911 address. To associate an E911 address with extensions, you first enter E911 locations in the E911 tab. Each E911 location must be associated with one and only one phone number, for callback purposes.

VoicePoint Hosted User Guide The E911 detail displays the street address and extensions associated with each phone number. For each record you can view and edit the street address and the extensions associated with the E911 address. You can search the list, view and edit an existing location or add a new location.
Searching E911
Use the Search feature to locate a phone number based on the address.
1. Enter any part of an address in the Search box. 2. Click Search. The results will be displayed.
TIP: To display all records, click the Clear Search link.
Adding a New E911 Location
1.Click the New Location button.
2.Provide the exact street address of your location where the phone(s) will be present. This is the geographical street address per the United State Postal Service (USPS).
TIP:
If you enter your address, and receive an error about not being able to verify the address, go to the United States Postal Service's Find a Zip Code utility, enter your address and click Submit. The USPS website will present you with a properly formatted version of the address you entered. Copy and paste that address into the form in the Customer Portal.
3.Select the Phone Number from the existing list. For callback purposes, each E911 location must be associated with one and only one phone number.
4.Click in the checkbox next to all applicable extensions that will be present at the address.
5.Click in the I agree to the Terms and Conditions checkbox. You must agree to the E911 Terms of Service listed in the textbox to add a new E911 location.
6.Click Save.
Viewing and Editing an E911 Location
1.If necessary, search for the location.
2.Click the View/Edit link.
3.Edit the information as necessary.
4.Click I agree to the Terms and Conditions checkbox. You must agree to the E911 Terms of Service listed in the textbox to add a new E911 location.
5.Click Save to update or Delete to remove the address.

VoicePoint Hosted User Guide
SIP Trunks
Overview
Use the SIP (Session Initiation Protocol) Trunks detail information to connect your remote PBX system or SIP device to the hosted PBX system. By default, the list displays the Trunk ID, Description, Type, Caller ID and Emergency Location for each SIP. From here, you can search for, view and edit SIP trunks.
Searching for SIP Trunks
Use the search feature to locate records by Trunk ID or Description. The search is not applicable to other columns.
1.Enter all or part of the Trunk ID or Description information in the Search box. Do not enter the “#” sign for a Trunk ID search.
2.Click Search. The results will be displayed.
TIP: To display all records, click the Clear Search link.
Viewing and Editing SIP Trunks
1.If necessary, search for the desired SIP Trunk ID.
2.Click on either the Trunk ID # or the Edit link on the far right side.
3.In the General Information section, modify the Description field if necessary. (This is the PBX to which the SIP trunk connects.)
4.As necessary, complete the SIP Configuration fields:
Field Details
Type of Authentication •The type of authentication to connect your remote PBX system or SIP endpoint to the hosted PBX system.
•Specify Username & Password or IP Address Based.
SIP Username •Username to authenticate to the PBX.
SIP Password/IP Address •The SIP Password is an automatically generated password used to authenticate to the PBX. To generate a new password, click on the Generate New Password link to the right of the field.
•When IP Address Based is selected, you must supply an IP Address for authentication.
Generate New Password Link
•Generates a new random password. Use when the Type of Authentication is IP Address.
SIP Registration Hostname •The registration server's hostname is generated by the system for you.

VoicePoint Hosted User Guide Codec •Choose the codec suitable for your use. The default is ulaw;alaw.
•Other options provided are:
og729;ulaw;alaw
oalaw;ulaw
ogsm;ulaw;alaw
og729 only
ogsm only
DTMF Mode •Choose the DTMF mode used by the SIP trunk to the PBX. The default is RFC 2833.
•Other options provided are:
oIn-band
oInfo
NAT •Choose the NAT mode. The default is Yes.
•Other options provided are:
oRFC3581
oNo
Can Reinvite •Choose the Can Reinvite mode. The default is No.
•Other options provided are
oNo (When NAT)
oNo
Qualify •Choose the Qualify mode. The default is Yes.
•Other options provided are
oNo
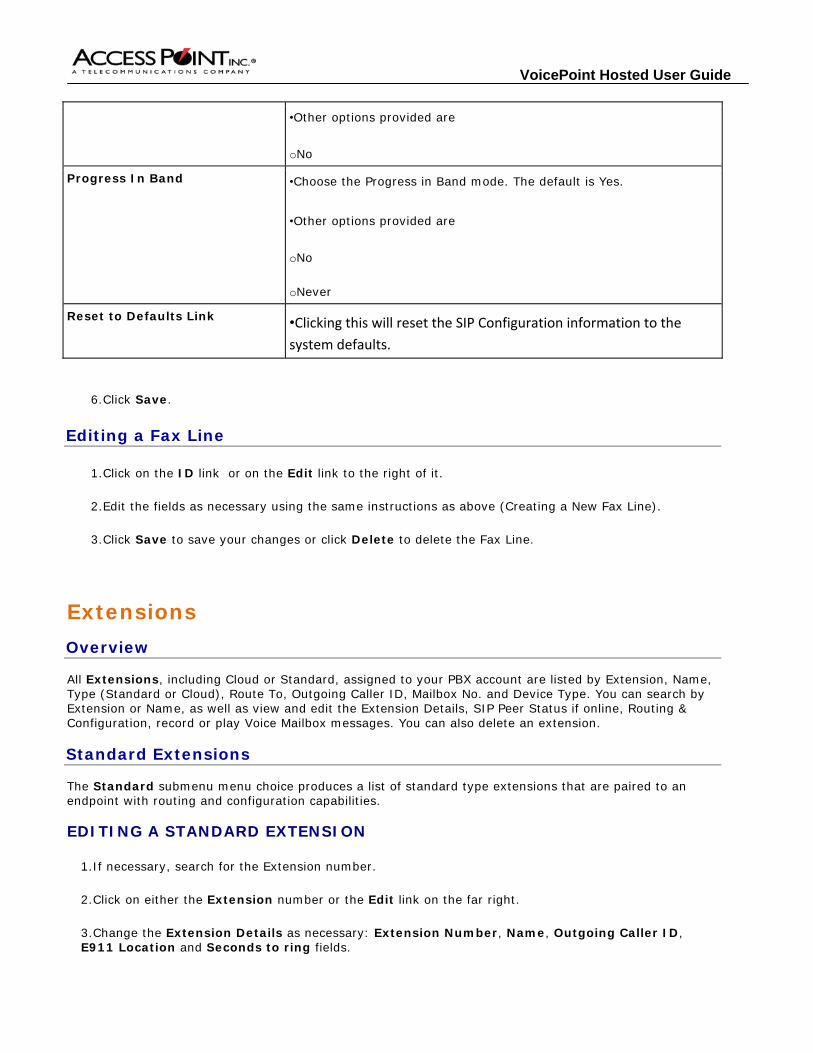
Progress In Band •Choose the Progress in Band mode. The default is Yes.
•Other options provided are
oNo

VoicePoint Hosted User Guide
oNever
Reset to Defaults Link •Clicking this will reset the SIP Configuration information to the system defaults.
5.Choose Caller ID Settings (outbound calls) to control how the hosted PBX will determine the Caller ID Number for outbound calls. If you would like the remote PBX system or SIP device to assign the Caller ID Number, then select Passthrough the Caller ID sent from the remote PBX system or SIP device. If you want the hosted PBX system to present the caller ID settings, select the Use This Phone Number option and then select the phone number from the dropdown menu.
6.Choose the appropriate Emergency dialing Options setting (Use this address or Passthrough the Caller ID). If you would like the remote PBX system or SIP device to assign the Caller ID Number, then select Passthrough the Caller ID sent from the remote PBX system or SIP device to determine the emergency address. If you want the hosted PBX system to indentify the E911 address dialing options, click in Use this Address and select an address from the dropdown menu.
7.Click Save.
Fax Lines
Overview
All Fax Lines, configured as T38 Fax numbers assigned to your PBX account are listed by ID, Description, Caller ID and Emergency Location. From here, you can view, edit, add, search for or delete a Fax Line. If you do not have a Fax phone number, this link will not appear in the left panel.
Searching Fax Lines
Use the Search feature to locate a Fax number.
1. Enter all or part of the fax line description name in the Search box. 2. Click Search. The results will be displayed.
TIP: To display all records, click the Clear Search link.
Adding a New Fax Line
1.Click the New Fax Line button.
2.Enter a description in the Description field, which is used for reference name within the Customer Portal.
3.Choose a caller ID number from the Caller ID dropdown list.
4.Choose an E911 address from the E911 Address dropdown list.
5.As necessary, complete the SIP Configuration fields. It is recommended that you use the default values.
Field Details
SIP Username •Username to authenticate to the PBX and is systemically generated

VoicePoint Hosted User Guide
and not configurable by the end-user.
SIP Password/IP Address •The SIP Password is an automatically generated password used to authenticate to the PBX. To generate a new password, click on the Generate New Password link to the right of the field.
Generate New Password Link •Generates a new random password.
SIP Registration Hostname •The registration server's hostname is generated by the system for you.
Codec •Choose the codec suitable for your use. The default is ulaw;alaw.
•Other options provided are:
og729;ulaw;alaw
oalaw;ulaw
ogsm;ulaw;alaw
og729 only
ogsm only
DTMF Mode •Choose the DTMF mode used by the Fax Line to the PBX. The default is RFC 2833.
•Other options provided are:
oIn-band
oInfo
NAT •Choose the NAT mode. The default is Yes.
•Other options provided are:
oRFC3581
oNo
Can Reinvite •Choose the Can Reinvite mode. The default is No.
•Other options provided are
oNo (When NAT)
oNo
Qualify •Choose the Qualify mode. The default is Yes.
VoicePoint Hosted User Guide
•Other options provided are
oNo
Progress In Band •Choose the Progress in Band mode. The default is Yes.
•Other options provided are
oNo
oNever
Reset to Defaults Link •Clicking this will reset the SIP Configuration information to the
system defaults.
6.Click Save.
Editing a Fax Line
1.Click on the ID link or on the Edit link to the right of it.
2.Edit the fields as necessary using the same instructions as above (Creating a New Fax Line).
3.Click Save to save your changes or click Delete to delete the Fax Line.
Extensions
Overview
All Extensions, including Cloud or Standard, assigned to your PBX account are listed by Extension, Name, Type (Standard or Cloud), Route To, Outgoing Caller ID, Mailbox No. and Device Type. You can search by Extension or Name, as well as view and edit the Extension Details, SIP Peer Status if online, Routing & Configuration, record or play Voice Mailbox messages. You can also delete an extension.
Standard Extensions
The Standard submenu menu choice produces a list of standard type extensions that are paired to an endpoint with routing and configuration capabilities.
EDITING A STANDARD EXTENSION
1.If necessary, search for the Extension number.
2.Click on either the Extension number or the Edit link on the far right.
3.Change the Extension Details as necessary: Extension Number, Name, Outgoing Caller ID, E911 Location and Seconds to ring fields.
VoicePoint Hosted User Guide
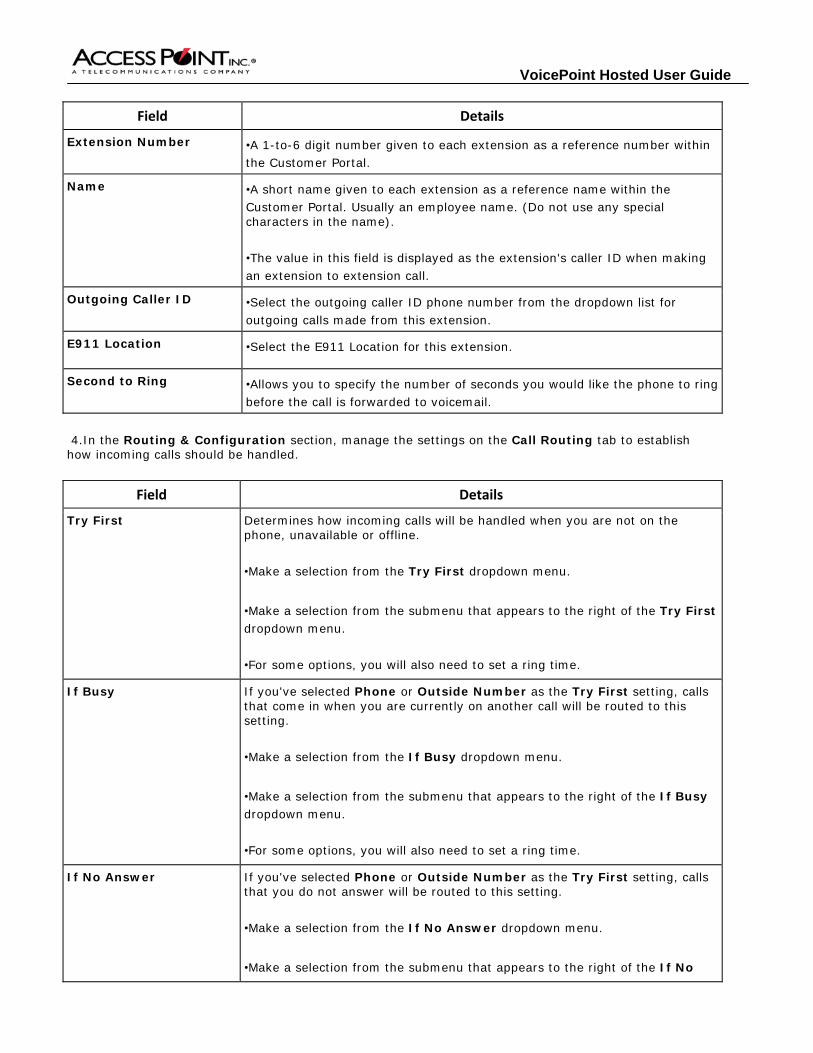
Field Details
Extension Number •A 1-to-6 digit number given to each extension as a reference number within the Customer Portal.
Name •A short name given to each extension as a reference name within the Customer Portal. Usually an employee name. (Do not use any special characters in the name).
•The value in this field is displayed as the extension's caller ID when making an extension to extension call.
Outgoing Caller ID •Select the outgoing caller ID phone number from the dropdown list for outgoing calls made from this extension.
E911 Location •Select the E911 Location for this extension.
Second to Ring •Allows you to specify the number of seconds you would like the phone to ring before the call is forwarded to voicemail.
4.In the Routing & Configuration section, manage the settings on the Call Routing tab to establish how incoming calls should be handled.
Field Details
Try First Determines how incoming calls will be handled when you are not on the phone, unavailable or offline.
•Make a selection from the Try First dropdown menu.
•Make a selection from the submenu that appears to the right of the Try First dropdown menu.
•For some options, you will also need to set a ring time.
If Busy If you've selected Phone or Outside Number as the Try First setting, calls that come in when you are currently on another call will be routed to this setting.
•Make a selection from the If Busy dropdown menu.
•Make a selection from the submenu that appears to the right of the If Busy dropdown menu.
•For some options, you will also need to set a ring time.
If No Answer If you've selected Phone or Outside Number as the Try First setting, calls that you do not answer will be routed to this setting.
•Make a selection from the If No Answer dropdown menu.
•Make a selection from the submenu that appears to the right of the If No

VoicePoint Hosted User Guide
Answer dropdown menu.
•For some options, you will also need to set a ring time.
If Offline If you've selected Phone or Outside Number as the Try First setting, calls that come in when your phone is offline or your internet connection is down will be routed to this setting.
•Make a selection from the If Offline dropdown menu.
•Make a selection from the submenu that appears to the right of the If Offline dropdown menu.
•For some options, you will also need to set a ring time.
5.In the Routing & Configuration section, manage the settings on the Find Me tab to locate the call recipient.
Field Details
Find Me The Find Me feature attempts to locate you by dialing each of the following locations until you accept or reject the call. The caller is placed on hold until you are found. Once you answer the call, you have the option to accept the call, or reject the call. You also have the option to reject the call and leave a short message for the caller.
•Make a selection from the #1 dropdown menu (My Extension, Outside Line, Other Extension).
•Make selections as necessary from the additional dropdown menus below (#2 through #5) to set other Find Me locations.
•The Active checkbox enables that Find Me location. If left unchecked, it will not search that location to find you.
Ring Each Location •Lets you set the number of seconds that each location will be rung for the Find Me settings #1 through #5 above.
Record caller's name and announce them to you before connecting
•Use to record the caller's name and announce it to you before connecting.
Give the caller the option of transferring to voicemail between each location defined above
•Use to give the caller the option of transferring to voicemail between each location defined above.
Active during the hours below / Always active
•Used to specify whether the Find Me feature is always active or only during the hours specified.
•If specifying hours, use the From and To fields to set times. Next to Include, click in the Saturday and Sunday checkboxes to include those days in the Find Me.

VoicePoint Hosted User Guide Then send calls to •Lets you instruct the system where calls should be sent outside of the active
hours defined.
6.In the Routing & Configuration section, manage the settings on the Advanced tab.
Field Details
Message Waiting Extension
•Enter the mailbox number for which you would like to receive notification of new messages.
•Multiple mailbox numbers can be entered separate by commas.
Disallow Dial-By-Extension
•If checked, this extension cannot be dialed from any Auto Attendant - it can only be routed by PBX settings.
Disable Call Waiting Indicator
•If set to yes, the user will not hear a beep or a tone when they are on a call and another call comes in.
Disable Missed Call List •If set to yes, the missed call list will be disabled on your phone. (Currently supported for Polycom phone models only.)
Enable Buddy List •If set to yes, the Polycom features for this phone will be active for this extension.
Dial '#' to transfer •If set to yes, then the caller can dial # (pound) to initiate a blind transfer.
7.In the Voice Mailbox section, set the Voice Mailbox, record or play or upload a file for the following:
Field Details
Unavailable Message •The message that will be heard when you are not logged in to your extension.
Busy Message •The message that will be heard when you are on a call.
Your Name •The announcement of your name.
8.Click Save. See the Voicemail tab for details on each.
SIP PEER STATUS
SIP Peer Status reports whether the endpoint configured to the standard extension is registered (green check) or not peered (red x) to the PBX. If the endpoint is not registered to the PBX, you will not be able to make or receive phone calls.
Cloud Extensions
The Cloud menu choice produces a list of only the Cloud type extensions, which have no physical device information. A Cloud extension is used for configuring the routing of call traffic to and from the PBX and to provide voicemail capabilities.
EDITING A CLOUD EXTENSION
1.If necessary, search for the extension number.

VoicePoint Hosted User Guide
2.Click on either the extension number or the Edit link on the far right.
3.Change the Extension Details as necessary.
Field Details
Extension Number •A 1-to-6 digit number given to each extension as a reference number within the Customer Portal.
Name •A short name given to each extension as a reference name within the Customer Portal. Usually an employee name.
•The value in this field is displayed as the extension's caller ID when making an extension to extension call.
Second to Ring •Allows you to specify the number of seconds you would like the phone to ring before the call is forwarded to voicemail.
4.In the Routing & Configuration section, manage the settings on the Call Routing tab to establish how incoming calls should be handled. (See instructions above for Editing a Standard Extension.)
5.In the Routing & Configuration section, manage the settings on the Find Me tab to locate the call recipient. (See instructions above for Editing a Standard Extension.)
6.In the Routing & Configuration section, manage the settings on the Advanced tab. This controls the Dial-By-Extension feature.
Field Details
Disallow Dial-By-Extension
•If checked, this extension cannot be dialed from any Auto Attendant - it can only be routed by PBX settings.
7.In the Voice Mailbox section, set the Voice Mailbox, record or play or upload a file for the following:
Field Details
Unavailable Message •The message that will be heard when you are not logged in to your extension.
Busy Message •The message that will be heard when you are on a call.
Your Name •The announcement of your name.
8.Click Save. See the Voicemail tab for details on each.
VoicePoint Hosted User Guide
Endpoints
Overview
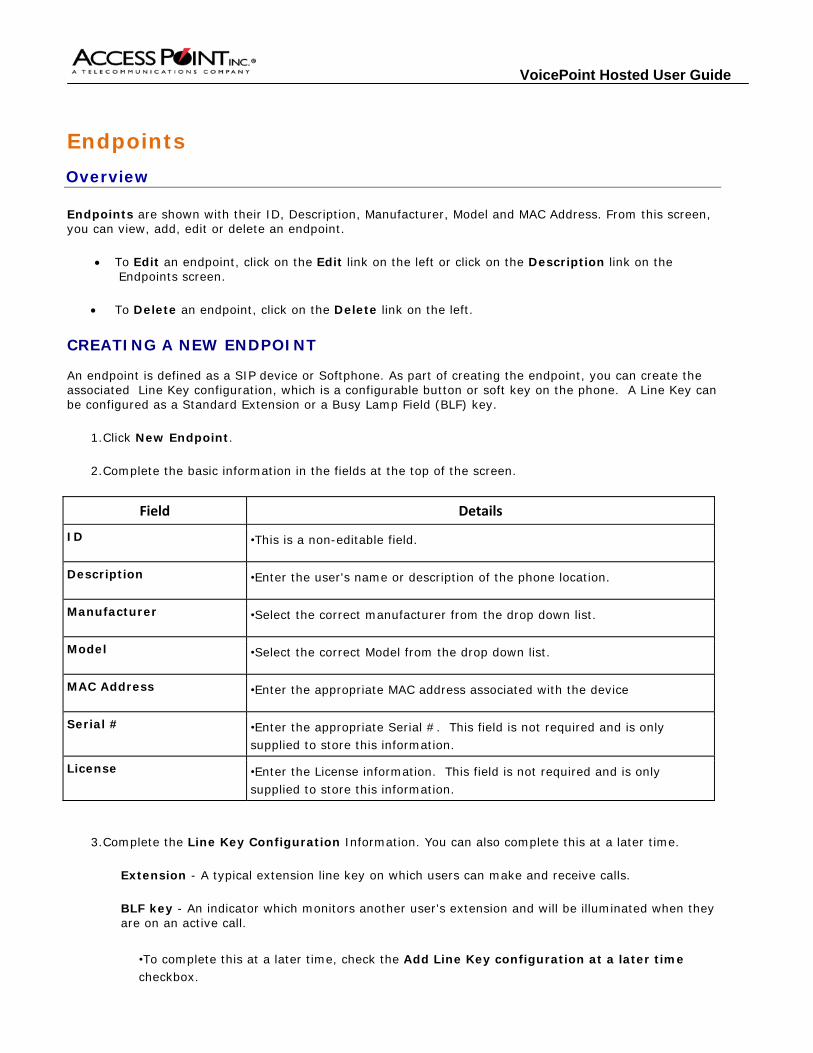
Endpoints are shown with their ID, Description, Manufacturer, Model and MAC Address. From this screen, you can view, add, edit or delete an endpoint.
To Edit an endpoint, click on the Edit link on the left or click on the Description link on the Endpoints screen.
To Delete an endpoint, click on the Delete link on the left.
CREATING A NEW ENDPOINT
An endpoint is defined as a SIP device or Softphone. As part of creating the endpoint, you can create the associated Line Key configuration, which is a configurable button or soft key on the phone. A Line Key can be configured as a Standard Extension or a Busy Lamp Field (BLF) key.
1.Click New Endpoint.
2.Complete the basic information in the fields at the top of the screen.
Field Details
ID •This is a non-editable field.
Description •Enter the user's name or description of the phone location.
Manufacturer •Select the correct manufacturer from the drop down list.
Model •Select the correct Model from the drop down list.
MAC Address •Enter the appropriate MAC address associated with the device
Serial # •Enter the appropriate Serial #. This field is not required and is only supplied to store this information.
License •Enter the License information. This field is not required and is only supplied to store this information.
3.Complete the Line Key Configuration Information. You can also complete this at a later time.
Extension - A typical extension line key on which users can make and receive calls.
BLF key - An indicator which monitors another user's extension and will be illuminated when they are on an active call.
•To complete this at a later time, check the Add Line Key configuration at a later time checkbox.

VoicePoint Hosted User Guide
•From Key 1, Key Configuration, Extension is the default choice.
•From Key 1, Key Configuration, use the "select" drop down list to specify the Extension name. It is required that Key 1 be the Extension that this device is peered.
•For Key 1, type a Label. This label will display to the phone LCD, if supported, as the Line Key Label.
•For Key 2, Key Configuration, choose Extension or BLF from the dropdown menu.
•From Key 2, Key Configuration, use the "select" dropdown list to specify the Extension name. An extension can only be associated to one endpoint. Only available extensions will able to be selected from the drop down list. Unavailable extensions will be grayed out.
•To add another key, click the green plus button on the right.
•To delete a key, click the trash can icon on the right.
4.In the Endpoint Configuration File and the bottom of the screen, specify the Configuration Template from the dropdown list provided. The dropdown list is established from the selections made at the top of the screen for Manufacturer and Model.
5.Click Save.
Editing an Endpoint
1.Click on the Edit link at the left for the endpoint you want to edit. Or you may click the Delete link at this location to delete a selected endpoint.
2.Edit the fields as necessary using the same instructions as above. (Creating a New Endpoint).
3.Click Save to save your changes or click Delete to delete the Endpoint.
Mailboxes
Overview
All Mailboxes, including Standard or Broadcast, assigned to your PBX account are listed by Mailbox #, Name and Type (Standard or Broadcast). From here, you can view, edit, add, search for or delete a mailbox.
▪Use the Standard or Broadcast submenu on the left panel to display a list of mailboxes by type.
▪A Standard mailbox is configured for a single voicemail box.
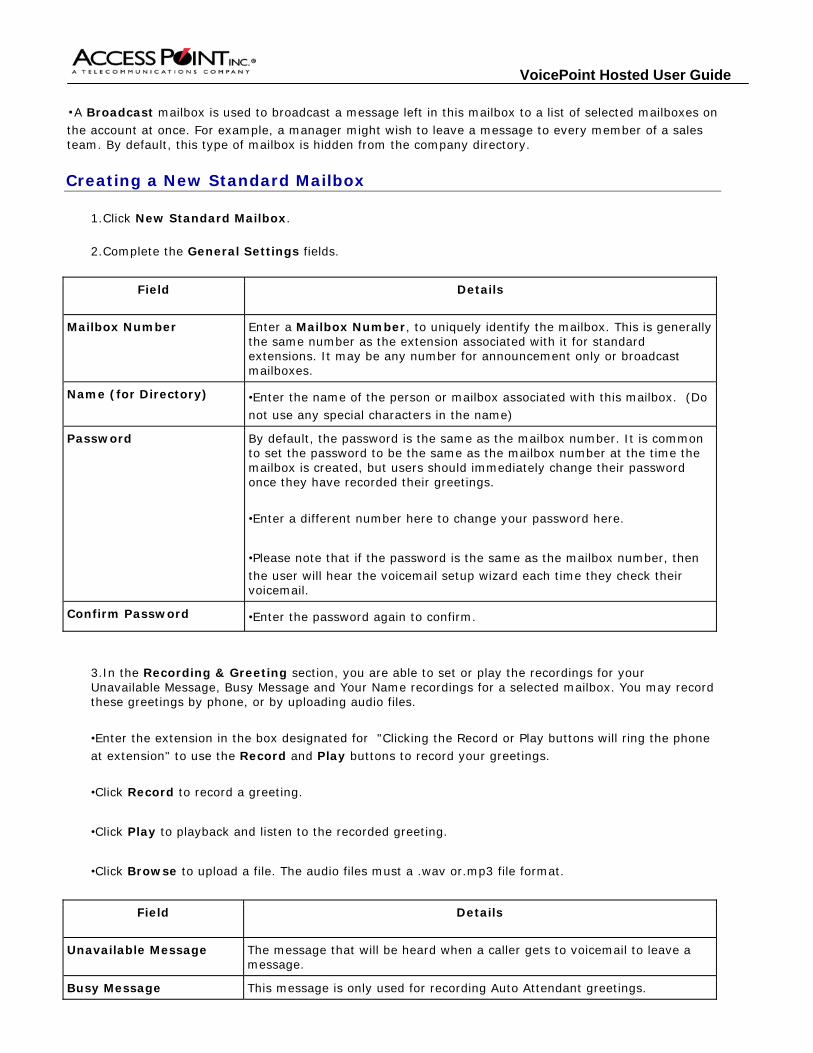
VoicePoint Hosted User Guide ▪A Broadcast mailbox is used to broadcast a message left in this mailbox to a list of selected mailboxes on the account at once. For example, a manager might wish to leave a message to every member of a sales team. By default, this type of mailbox is hidden from the company directory.
Creating a New Standard Mailbox
1.Click New Standard Mailbox.
2.Complete the General Settings fields.
Field Details
Mailbox Number Enter a Mailbox Number, to uniquely identify the mailbox. This is generally the same number as the extension associated with it for standard extensions. It may be any number for announcement only or broadcast mailboxes.
Name (for Directory) •Enter the name of the person or mailbox associated with this mailbox. (Do not use any special characters in the name)
Password By default, the password is the same as the mailbox number. It is common to set the password to be the same as the mailbox number at the time the mailbox is created, but users should immediately change their password once they have recorded their greetings.
•Enter a different number here to change your password here.
•Please note that if the password is the same as the mailbox number, then the user will hear the voicemail setup wizard each time they check their voicemail.
Confirm Password •Enter the password again to confirm.
3.In the Recording & Greeting section, you are able to set or play the recordings for your Unavailable Message, Busy Message and Your Name recordings for a selected mailbox. You may record these greetings by phone, or by uploading audio files.
•Enter the extension in the box designated for "Clicking the Record or Play buttons will ring the phone at extension" to use the Record and Play buttons to record your greetings.
•Click Record to record a greeting.
•Click Play to playback and listen to the recorded greeting.
•Click Browse to upload a file. The audio files must a .wav or.mp3 file format.
Field Details
Unavailable Message The message that will be heard when a caller gets to voicemail to leave a message.
Busy Message This message is only used for recording Auto Attendant greetings.

VoicePoint Hosted User Guide Your Name The announcement of your name for the Company Directory feature,
Personal assistant for Find Me or as the Unavailable Message if one is not recorded.
4.In the Notifications section, enter an email address in the Email to notify field. An email will be sent to this address, containing a .wav file, once an message in left in this mailbox. You can enter multiple emails separated by commas.
5.Use SMS email to notify to specify the SMS (text) email to notify. Note that the .wav file is not sent to your cell phone. It is only a notification that a voicemail has been received. The SMS to notify address should conform to the format of the user's carrier. The major US cellular carriers use the [email protected]_domain.com format for SMS to text capable cell phones.
6.Complete the Advanced Settings fields as necessary.
Field Details
Dial During Announcement
If Dial During Announcement is checked, the caller will be able to dial an extension during the playing of this mailbox message and redirect their call.
Skip Voicemail Instructions
To skip the instructions for leaving a message that are played after your announcement, click in the Skip Voicemail Instructions checkbox. If checked only the user's voicemail greeting will play, followed by a beep.
Announcement Only To play the Busy message and then return to the beginning of the calling Auto Attendant, click in the Announcement Only checkbox.
NOTE: A message cannot be left by the caller if this setting is enabled.
Hide from Directory To hide the mailbox from the Company Directory, click in the Hide From Directory checkbox. This means the mailbox will not be searchable through utilization of the Company Directory.
Delete Voicemail You can set whether Voicemail is deleted after the email notification or for time periods up to one month. If No is selected, the Voicemails are stored for the default 180 days. If a time period is selected, the messages will be deleted after the selected amount of time configured through the dropdown menu.
1.Click the Delete Voicemail dropdown menu.
2.Choose a time period from selections provided.
7.Click Save.
Editing a Standard Mailbox
1.Click on the Edit link at the right for the mailbox you look to edit.
2.Edit the fields as necessary using the same instructions as above (Creating a New Standard Mailbox).
3.Click Save to save your changes or click Delete to delete the mailbox.

VoicePoint Hosted User Guide Creating a New Broadcast Mailbox
1.Click New Broadcast Mailbox.
2.Complete the General Settings fields.
Field Details
Mailbox Number Enter a Mailbox Number, to uniquely identify the broadcast mailbox. It may be only numeric in value and no longer than 10 numbers in length.
Name (for Directory) Enter a Mailbox Name, to uniquely identify the broadcast mailbox within your PBX configuration.
Password Enter a Password, to the mailbox. This will be required access this mailbox to make changes when not accessing through the portal.
Confirm Password Enter the password again in Confirm Password, to validate the accuracy
3.In the Mailboxes in the Group section you will define what individual mailboxes are to be included in this Broadcast Mailbox. select the Available Mailboxes and then the Add, Add All, Remove, and Remove All buttons to create the list of Mailboxes to Include in the group.
▪Select an individual Mailbox from the Available Mailboxes List and then click Add to include that mailbox to your defined Broadcast Mailbox.
▪By clicking Add All, you will move all available mailboxes to the Mailboxes to Include list.
▪Select an individual Mailbox from the Mailboxes to Include and then click Remove to take that mailbox out of your defined Broadcast Mailbox.
▪By clicking Remove All, you will remove all mailboxes currently defined in the Mailboxes to Include list.
4.In Advanced Settings, specify whether or not to Skip Voicemail Instructions. If checked, the system will skip the instructions for leaving a message that are played after your announcement, only the user's voicemail greeting will play, followed by a beep.
5.In Advanced Settings, the default to Hide From Directory (which hides the mailbox from the Company Directory) is selected.
6.Click Save.
Editing a Broadcast Mailbox
1.Click on the Edit link at the right for the broadcast mailbox you want to edit.
2.Edit the fields as necessary using the same instructions as above. (Creating a New Broadcast Mailbox).
3.Click Save to save your changes or click Delete to delete the Broadcast Mailbox.
VoicePoint Hosted User Guide
Auto Attendant
Overview
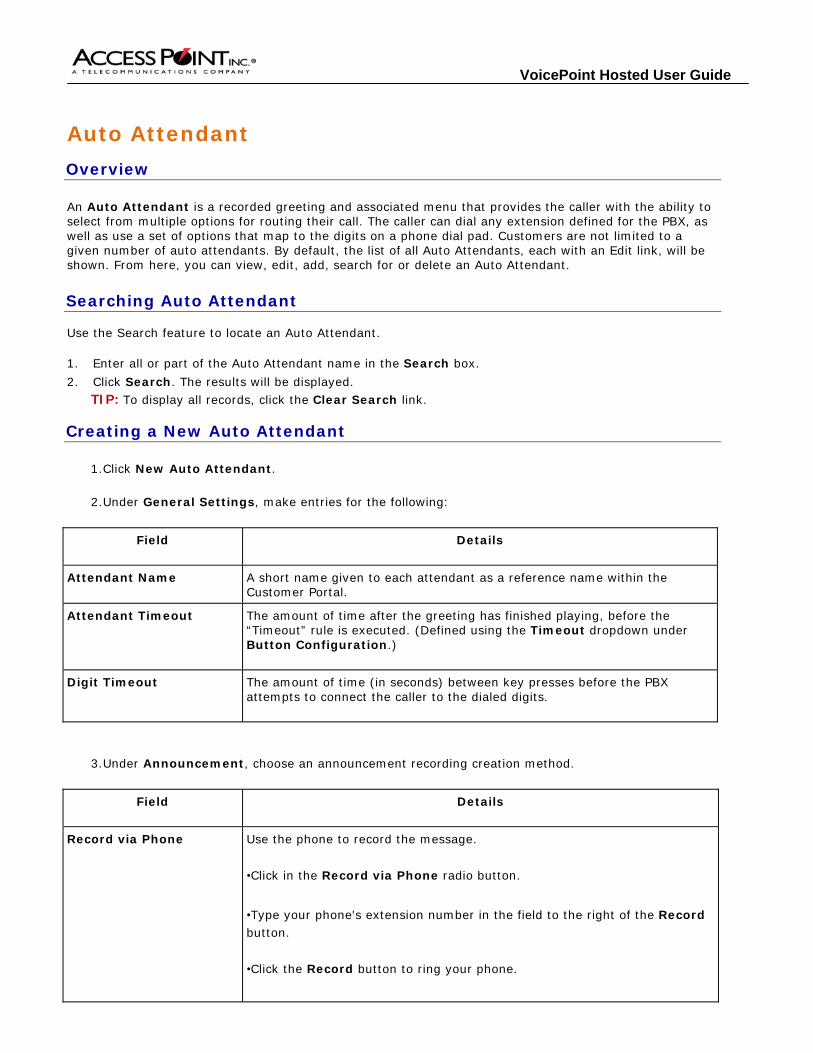
An Auto Attendant is a recorded greeting and associated menu that provides the caller with the ability to select from multiple options for routing their call. The caller can dial any extension defined for the PBX, as well as use a set of options that map to the digits on a phone dial pad. Customers are not limited to a given number of auto attendants. By default, the list of all Auto Attendants, each with an Edit link, will be shown. From here, you can view, edit, add, search for or delete an Auto Attendant.
Searching Auto Attendant
Use the Search feature to locate an Auto Attendant.
1. Enter all or part of the Auto Attendant name in the Search box. 2. Click Search. The results will be displayed.
TIP: To display all records, click the Clear Search link.
Creating a New Auto Attendant
1.Click New Auto Attendant.
2.Under General Settings, make entries for the following:
Field Details
Attendant Name A short name given to each attendant as a reference name within the Customer Portal.
Attendant Timeout The amount of time after the greeting has finished playing, before the “Timeout” rule is executed. (Defined using the Timeout dropdown under Button Configuration.)
Digit Timeout The amount of time (in seconds) between key presses before the PBX attempts to connect the caller to the dialed digits.
3.Under Announcement, choose an announcement recording creation method.
Field Details
Record via Phone Use the phone to record the message.
•Click in the Record via Phone radio button.
•Type your phone's extension number in the field to the right of the Record button.
•Click the Record button to ring your phone.

VoicePoint Hosted User Guide
•Answer your phone and you will be guided through the recording process.
•Use the Play button to listen to the current recording.
Upload a File Use this option to upload an existing audio file.
•Click in the Upload a File radio button.
•Click Browse to upload a file (.mp3 or .wav format). Use the Play button to listen to the current recording
•Use the Play button to listen to the current recording.
Default Recording Use this option to use a default pre-recorded greeting:
"Hello and thank you for calling. If you know your party's extension, you may dial it at any time. For a company directory, please press * now. To leave a message in our general company voice mailbox, continue to hold or press 1. To hear these options again, press 9 now. Thank you for calling."
•Click in the Default Recording radio button.
Mailbox Use this option to record the Auto Attendant greeting via a voice mailbox.
•Click in the Mailbox radio button.
•Choose a mailbox from the Mailbox dropdown list.
•Choose a recording from the message type dropdown list (Busy, Greeting or Unavailable).
4.Under Button Configuration, select a Route To setting for each button. The menu is displayed below.

VoicePoint Hosted User Guide
5.After the Route To selection is made, make a selection from the secondary menu dropdown list that appears. An example is displayed below.
6.Click Save.
TIP:
When setting up Auto Attendants, set up all the boxes and then test your system by dialing your main number and allowing the auto attendant to pick up. Always remember to select a Route To for your Timeout.
Editing an Auto Attendant
1.Click on the Auto Attendant name or on the Edit link to the right of it.
2.Edit the fields as necessary using the same instructions as above (Creating a New Auto Attendant).
3.Click Save to save your changes or click Delete to delete the Auto Attendant.
Time Frames
Overview
Time Frames provide you with the ability to specify call routing options, which can be configured to behave differently at different times of the day or different days of the week. Time Frames are not active until they are assigned to a phone number or an Auto Attendant. The screen shows a list of all Time Frames, each with an Edit link. From here, you can view, edit, add, search for or delete a Time Frame.
Searching Time Frames
Use the Search feature to locate a Time Frame.
1. Enter all or part of the Time Frame name in the Search box. 2. Click Search. The results will be displayed.
TIP: To display all records, click the Clear Search link.
Creating a New Time Frame
Note that the same information may be edited through the Edit link on the far right.
1.To create a new time frame, click New Time Frame.
2.Enter a Time Frame Name, which is used for reference within the Customer Portal.

VoicePoint Hosted User Guide
3.Specify routing during normal business hours using the During hours forward call to dropdown list. All times are represented in Eastern Time. Please adjust the hour accordingly if your PBX is located in another timezone.
4.Specify routing after normal business hours using the After hours forward call to dropdown list.
5.Click in one or more of the Day checkboxes.
6.For each day, select All Day or choose a specific Before (from) and After (to) time.
7.Click Save.
Editing an Time Frame
1.Click on the Time Frame name or on the Edit link to the right of it.
2.Edit the fields as necessary using the same instructions as above (Creating a New Time Frame).
3.Click Save to save your changes or click Delete to delete the Time Frame.
Groups
Overview
Groups, also known as "Ring Groups," are collections of extensions which are to be rung at the same time or sequentially for the same inbound call. The list includes the Group name, Ring Extensions (Same time or Sequentially), # of Extensions and an edit link for each group. From here, you can view, edit, add, search for or delete a Group.
Searching Groups
Use the Search feature to locate a Group.
1. Enter all or part of the Group name in the Search box. 2. Click Search. The results will be displayed.
TIP: To display all records, click the Clear Search link.
Creating a New Ring Group
1.Click New Ring Group.
2.Specify Group Name, which is used for reference within the Customer Portal.
3.Select a ring option from the Ring all extensions dropdown list.
4.Specify the number of seconds to ring in the Seconds to Ring field.
5.Select caller ID options under the Caller ID Settings dropdown list.

VoicePoint Hosted User Guide
Field Details
Group Name This is a short name given to each group to be used for reference within the Customer Portal. It is often the name of a department or functional area.
Ring All Extensions •Use At the same time for all extensions to ring simultaneously.
•Use Sequentially for each extension to ring for the set number of Seconds to Ring before the call will be sent to the next extension. The extensions will ring in the order defined in the Extensions to Ring box below.
Seconds to Ring •For At the same time, enter the number of seconds to ring before the timeout option is executed. The timeout option is selected in the After Ringing group forward call dropdown list at the bottom of the screen.
•For Sequentially, enter the number of seconds to ring before rolling to the next extension in sequence. Once all extensions have rung a no answer will go to the timeout option as well.
Caller ID Settings
Field Details
Original Caller ID Displays the inbound caller’s original Caller ID name on the phone's LCD.
Custom Text Only Displays on the LCD display only the text that is entered in the box on the phone's LCD.
Custom Text: Original Caller ID
Passes through the Custom Text, followed by the caller’s original Caller ID name on the phone's LCD.
None Displays nothing on the LCD display on the phone's LCD.
6.Specify the Extensions to ring.
Field Details
Available Extensions These are all extensions defined in the PBX.
Extensions to Ring These are the extension that will ring either at the same time or sequentially.
•To move an extension into this box, highlight the corresponding extension in the Available Extensions list and then click Add.
•To remove the extension, highlight the Extensions to Ring entry and then click Remove.
7.Make a choice for the After ringing Group forward call field. If no extension answers the call in the time defined, the call is routed as specified by the choices in this field.

VoicePoint Hosted User Guide
8.Click Add Group.
TIP: Use the Up and Down buttons to reorder a selected extension.
Editing a Group
1.Click on the Group name or on the Edit link to the right of it.
2.Edit the fields as necessary using the same instructions as above (Creating a New Group).
3.Click Update to save your changes or click Delete to delete the Group.
Conference Bridge
Overview
A Conference Bridge connects a number of people participating in a conference call. There is no limit to the number of Conference Bridges (conference rooms) you can host or configure for your account. The number of participants in a conference room is only limited by the number of call paths defined for your account. Calls are usually routed to a conference room through an auto attendant or phone number, which would require the caller to enter a conference number and password. By default, the screen presents a list of all conference rooms with the Conference ID, Name and an Edit link for each conference room. From here, you can view, edit, add, search for or delete a Conference Bridge.
Searching Conference Bridges
Use the Search feature to locate a Conference Bridge.
1. Enter all or part of the Conference Bridge name in the Search box. 2. Click Search. The results will be displayed.
TIP: To display all records, click the Clear Search link.
Creating a New Conference Bridge
Note that the same information may be edited through the Edit link on the far right.
1.Click New Conference Room.
2.Enter a Conference Number, which must be a unique number that will identify the conference Room in the PBX Configuration.
3.Enter a Password for the conference room.
4.Verify the Enable Music On Hold field. By default, this is checked; and hold music will play when there is only one participant in the conference room.
5.Verify the Play Enter/Exit Sounds field. By default, this is checked; and the PBX will play audible indicators when a participant enters or exits the conference room.
6.Verify the Announce Attendee Count field. By default, this is checked; and the caller entering the conference room will hear a greeting indicating how many participants are currently in the room.
7.Click Add Conference Bridge.

VoicePoint Hosted User Guide Editing a Conference Bridge
1.Click on the Conference Bridge name or on the Edit link to the right of it.
2.Edit the fields as necessary using the same instructions as above (Creating a New Conference Bridge).
3.Click Update to save your changes or click Delete to delete the Conference Bridge.
Listen Live
Overview
Listen Live shows information about Listen Live and Barge functionality on the account. "Listen Live" is the ability to listen to another user's calls from your own phone. "Barge" is the ability to listen to another user's calls and be able to "whisper" to the extension you selected.
On this page you designate who may listen and who may be listened to. It is important to remember to follow local legal requirements regarding notifying callers and employees that their calls may be monitored.
To listen to a call or barge in on a call (listen and talk on the call):
▪Dial *57 + an extension number to listen in on a conversation. You will not be able to talk to either party.
▪Dial *58 + an extension number to barge in on a call. You will be able to speak to the extension that you dialed.
Adding or Editing Listen Live
1.Click Listen Live.
2.Make a choice from the Listen Live Settings dropdown menu.
Field Details
Off The Listen Live feature is disabled. You will not be able to listen or speak.
Listen Live Only You will be able to listen but not speak.
Barge Only You will not be able to listen, but you will be able to barge (whisper to) the extension.
Listen Live and Barge You will be able to both listen to and barge (whisper to) the complete conversation on the extension on the PBX. The inbound caller will not hear you.
3.Complete the Password field. Enter a password that is 3 or more digits, without alpha characters.
4.From the Users who may not listen box, select the users who will be allowed to listen and/or barge and then click Add.

VoicePoint Hosted User Guide
5.From the Users who may Listen box, select the users who may no longer listen and/or barge and then click Remove.
6.In the Users that may be listen to list, click in the check box next to the extension of those who may be listened to and/or barged by authorized users.
7.Click Add Listen Live.
Call Center
Overview
Call Center features may be included in your PBX, depending on your Service plan. There are three main components of the Call Center are call Queues, Automatic Call Distribution (ACD) and Agents. From this screen, you can search for a queue, add a new queue, as well as edit or delete an existing queue.
Creating a New Queue
Note that the same information may be edited through the Edit link on the far right.
1.Click New Queue.
2.Complete the general information fields.
Field Details
Name •Enter a name to identify this queue.
Caller ID Prefix This determines the settings of the Caller ID display when ringing an agent's phone. There are four options:
Original Caller ID - Display the caller's original Caller ID name
Custom Text Only - Displays on the LCD display only the text that is entered in the box
Custom Text - Original Caller ID - Passes through the Custom Text, followed by the caller’s original Caller ID name
None - Display nothing on the agent's LCD display.
Queue Timeout •Enter the number of minutes that a caller should remain in the queue before their call is forwarded to another location within the PBX.
•If you would like callers to remain in the queue forever, enter 0.
After Timeout If you have a timeout set in the above field, this determines where the caller is forwarded after the timeout expires.
•Make a choice from first the dropdown list.
•Make a subsequent choice from the second dropdown list.

VoicePoint Hosted User Guide Can Callers Join an Empty Queue
If "Yes" is selected, then a caller will be able to join the queue,even if no agents are logged into the queue. Otherwise, the queue will immediately time out and the caller will be sent to the "After Timeout" setting.
3.In the Ringing Strategy section, set the fields to determine the method ringing agents.
Field Details
Ring Strategy
Ring All Rings all logged-in agents at the same time until one of the agents answers
Least Recent Rings the agent who least recently answered a queued call
Fewest Calls Rings the agent who has taken the least amount of calls than all other logged-in agents
Random Rings agents in a random manner
Round Robin Rings agents in a round-robin manner to evenly distribute calls.
Ring Each Agent For Determine how long the agent's phone will ring before sending the call to the next available agent
If Agent Doesn’t Answer This is the action taken if the agent doesn’t answer.
Wrap-up Time After an agent finishes a queued call, this is the number of seconds the queue should wait before attempting to send the agent another call. “0” seconds would be acceptable.)
4.Complete the While Caller is Waiting in Queue section.
Field Details
Play Periodic Announcements?
While the caller is waiting in the queue, the caller will hear the hold music from your PBX. You may configure an announcement to periodically interrupt the hold music and play to the waiting caller.
•If set to Yes, specify the Announcement Audio mailbox and How often (seconds) fields.
Can Caller Press 0 to Exit Queue?
•If Yes, while the caller is waiting in the queue, your periodic announcement should instruct the caller that they are able to do so.
If Caller Presses 0 This will specify where the waiting call will be forwarded to within the PBX.
•Make a choice from first the dropdown list.

VoicePoint Hosted User Guide
•Make a subsequent choice from the second dropdown list.
5.Complete the Agents Assigned to this Queue section.
•From the Available Agents box, select the Agents who should be members of this queue and then click Add.
•From the Agents to Ring box, select any agents who should not be a member of the queue and then click Remove.
6.Click Save.
Creating a New Agent
Agents are employees of your company who have an identification number to login to their assigned queues to accept queued calls. For any person to receive queued calls, that person must be first configured as an agent and second assigned to one or more queues.
This list shows the Agent ID, the agent Name and an Edit link.You can search by any part of the Agent ID or the Name.
1.Click the Agents choice from the submenu in the left panel. (Note that the same information may be edited through the Edit link on the far right.)
2.Enter the Agent ID, which can be any number from 1 to 5 digits long. The Agent will use this number to log in and out of the queues.
3.Enter the agent’s Name as it should appear in the Call Center reports.
4.Click Save.
Configuring Reason Codes
When an Agent needs to stop receiving calls from the queue(s), but does not want to log out of the queue(s), the agent can pause. The agent will stop receiving queue calls until un-pause, but will still be reported as logged into the queue(s). In addition, the agent can provide a "Reason Code" to indicate the reason for the current pause. This reason code is logged with their pause event and reported on the Realtime Console. From the ACD REason Codes Configuration screen, you can enter text for 9 reason codes.
1.Click the Reason Codes choice from the submenu in the left panel.
2.Type the ACD Reason Codes Configuration entries for Reason Code 1 through Reason Code 9. Enter as many or as few reasons as needed.
3.Click Save.
Configuring ACD Tally Codes
When an Agent receives a call from the queue(s) and needs to assign that call a specific category for billing or other purposes, the agent can provide a "Tally Code" to indicate the nature of the call. This Tally Code is logged in the Queue Call Activity Report. From the aCD Tally Codes Configuration screen, you can enter text for 10 tally codes.

VoicePoint Hosted User Guide
1.Click the Tally Codes choice from the menu on the left.
2.Type the ACD Tally Codes Configuration entries for Tally Code 0 through Tally Code 9. Enter as many or as few values as needed.
3.Click Save.
Holidays
Overview
In managing Phone Numbers, you have the option to configure specific dates to be holidays, using the Holidays feature. If a call comes in on a day that is configured as a holiday, the call will be routed based on the defined holiday name and date.
The list displays the holiday Name and Date, as well as Edit and Delete links. From this screen, you can search, view, create, edit and delete holidays.
Searching Holidays
Use the Search feature to locate holidays.
1. Enter all or part of the holiday name in the Search box.2. Click Search. The results will be displayed.
TIP: To display all records, click the Clear Search link.
Creating a New Holiday
Note that the same information may be edited through the Edit link on the far right.
1.Click the Holidays choice from the submenu in the left panel.
2.Click New Holiday.
3.Enter the Name field.
4.Use the dropdown to specify the Date field for month and day.
5.Click Add Holiday. (If editing an existing holiday, click Update Holiday.)
Deleting a Holiday
1.Click the Holidays choice from the menu on the left.
2.If necessary, search for the Name of the holiday.
3.Click Delete.

VoicePoint Hosted User Guide
Call Recording
Overview
Call Recording allows a user of the Service (“Subscriber”) to record individual telephone conversations. The laws regarding the notice and notification requirements of such recorded conversations vary by state to state. The subscriber is solely responsible for applying the local laws in the relevant jurisdiction when using this feature. This premium feature must be enabled on your account in order for you to see the Call Recording menu.
Configuring Call Recording
1.Click Call Recording.
2.Click in the “By clicking this checkbox …” to enable call recording and agree to the terms for recording conversations.
3.Use the Add Extension, Add Phone Number and Add Queue buttons to specify the Calls to Record.
Field Details
Add Extension Opens a separate dialog box that allows you to enable call recording for a specific extension.
•Click in the checkbox next to the Extension Number(s) to be added from the list.
•Click on the Add Extension(s) button.
NOTE: Calls routed to an extension through a group will NOT be recorded. Use the Remove link to remove the extension from the list.
Add Phone Number Opens a separate dialog box that allows you to enable call recording for a specific Phone Number.
•Click in the checkbox next to the Phone Number(s) to be added from the list.
•Click on the Add Phone Number(s) button.
Use the Remove link to remove the extension from the list.
Add Queue Opens a separate dialog box that allows you to enables call recording for a specific Queue.
•Click in the checkbox next to the Queue(s) to be added from the list.
•Click on the Add Queue(s) button.
Use the Remove link to remove the extension from the list.
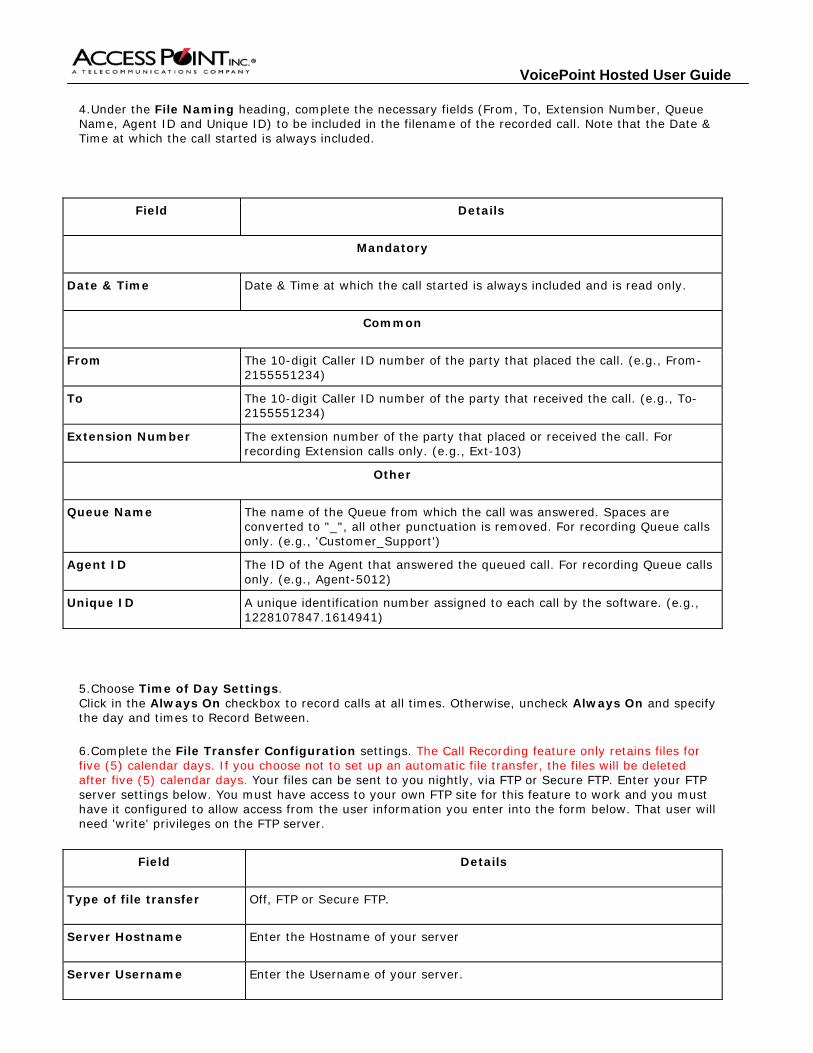
VoicePoint Hosted User Guide
4.Under the File Naming heading, complete the necessary fields (From, To, Extension Number, Queue Name, Agent ID and Unique ID) to be included in the filename of the recorded call. Note that the Date & Time at which the call started is always included.
Field Details
Mandatory
Date & Time Date & Time at which the call started is always included and is read only.
Common
From The 10-digit Caller ID number of the party that placed the call. (e.g., From-2155551234)
To The 10-digit Caller ID number of the party that received the call. (e.g., To-2155551234)
Extension Number The extension number of the party that placed or received the call. For recording Extension calls only. (e.g., Ext-103)
Other
Queue Name The name of the Queue from which the call was answered. Spaces are converted to "_", all other punctuation is removed. For recording Queue calls only. (e.g., 'Customer_Support')
Agent ID The ID of the Agent that answered the queued call. For recording Queue calls only. (e.g., Agent-5012)
Unique ID A unique identification number assigned to each call by the software. (e.g., 1228107847.1614941)
5.Choose Time of Day Settings. Click in the Always On checkbox to record calls at all times. Otherwise, uncheck Always On and specify the day and times to Record Between.
6.Complete the File Transfer Configuration settings. The Call Recording feature only retains files for five (5) calendar days. If you choose not to set up an automatic file transfer, the files will be deleted after five (5) calendar days. Your files can be sent to you nightly, via FTP or Secure FTP. Enter your FTP server settings below. You must have access to your own FTP site for this feature to work and you must have it configured to allow access from the user information you enter into the form below. That user will need 'write' privileges on the FTP server.
Field Details
Type of file transfer Off, FTP or Secure FTP.
Server Hostname Enter the Hostname of your server
Server Username Enter the Username of your server.

VoicePoint Hosted User Guide Server Password Enter the Password for your server.
Server Port Enter the Post for your server.
Test Connection Test the Connection. If the connection is not established, an error message will appear.
Files are retained for 5 Calendar days (not editable).
Email Each night, the system will send an email to this address with a status of files transferred.
7.Click Save.
Accessing Call Recordings (File Access)
You may delete or download one or more files. At the top of the screen you will see your file storage capacity.
1.Click File Access (under Call Recording) from the menu on the left.
2.To delete one or more files, click in the checkbox for the desired file(s) and then click DELETE. Warning: Clicking on All in the heading will select all of the files.
3.To listen to a file, click the Download link on the right.
SEARCHING CALL RECORDINGS
Use the Search feature to locate a call recording.
1. Enter all or part of the call recording filename in the Search box. 2. Click Search. The results will be displayed.
TIP: To display all records, click the Clear Search link.
Hold Music
Overview
Hold Music shows information about custom music on hold for an account. Multiple tracks may be gathered into a Group. Music files should be in .wav format with a maximum track size of 10MB and a maximum total for all groups of 60MB. Hold music plays sequential and any call placed on hold will hear the designated music on hold track, starting at the beginning of the track. Be default, you will see a list of the Group Names with the Track Listing for each, as well as links for Edit Group, Add Track and Delete Track. You can search by all or part of the Group Name, create a new group or edit an existing group. You can also add or delete tracks for each group.
Searching Hold Music
Use the Search feature to locate hold music.
1. Enter all or part of the Group Name or Track Listing in the Search box.

VoicePoint Hosted User Guide 2. Click Search. The results will be displayed.
TIP: To display all records, click the Clear Search link.
Creating a New Hold Music Group
Note that the same information may be edited through the Edit link on the far right.
1.Click New Group.
2.Enter a Name for the group. Avoid special characters in the name to prevent problems playing the group.
3.Select a Yes in Use for outbound calling? to use this group for all outbound calls. Your PBX may use only one group for outbound calling.
4.Click Save. (To add new tracks for this group now, use Save & Add Tracks.)
Adding a Track
1.Click the Add Track link.
2.Enter the Name for the track.
3.Select an existing group name in the Hold Music Group field.
4.Use File and Browse… to locate the existing file to be used.
5.Click Save. (To create another new track, use Save & New Track.)
Call Blocking
Overview
Call Blocking allows customers to block given phone numbers from being dialed, or from calling into the PBX. The system will automatically block all 900 numbers from the PBX. Specific numbers (either incoming or outgoing) can also be manually blocked. The list displays the Phone Number, the Direction, Play and a View/Edit link. The Call Blocking screen lets you view, edit, delete and create a new call block.
Searching Call Blocking
Use the Search feature to locate a blocked number.
1. Enter the full phone number in the Search box. 2. Click Search. The results will be displayed.
TIP: To display all records, click the Clear Search link.
Creating a New Call Block
1.Click New Call Block.
2.Enter the Phone Number to be blocked for either incoming or outgoing calls. Enter the full phone number, including area code.

VoicePoint Hosted User Guide
3.Choose a Direction - Inbound or Outbound.
▪If Inbound, the caller will hear a busy signal.
▪If Outbound, you can choose whether the caller hears a busy signal or a generic pre-recorded message stating that the number has been blocked from the Play dropdown list.
4.Add a comment in the Comment field (optional). This could include why the number is blocked, to whom the number belongs, or other general information about the call block reason.
5.Click Save.
Accounting
Overview
Accounting provides you with details about orders, paid and unpaid invoices and payments related to the account.
When you select the Accounting tab, the Orders screen appears by default, showing you the order history for your account. You can change the criteria to search and filter orders through the search fields provided at the top of the screen. From the menus in the left side panel, you can also access Invoices and Payments screens. Through Payments, you can also make one-time credit card payments.
Working with Orders
By default, all Order Types display in the Orders list with columns showing the Order Date, Status, MRC, Total, Order Type, Note and Order/Active Order Totals. The list is in reverse chronological order by Order Date.
If necessary, you can search for a specific Order ID or Orders by date. You can view the details of any order, including MRC Order Items, NRC Order Items, Total Due at Signing, Total Summary, Record History and links to view the order details.
SEARCHING FOR ORDERS
Accounting - Search Orders 1. Enter search criteria as necessary.
•To search for one specific order, enter the Order ID or any part of the Company name in the first search box.
•To filter the search results by Date, type a date or click on the calendar icon and choose a date.
2. Click on the Search button.
3. To display all records, click on the Clear Search link.
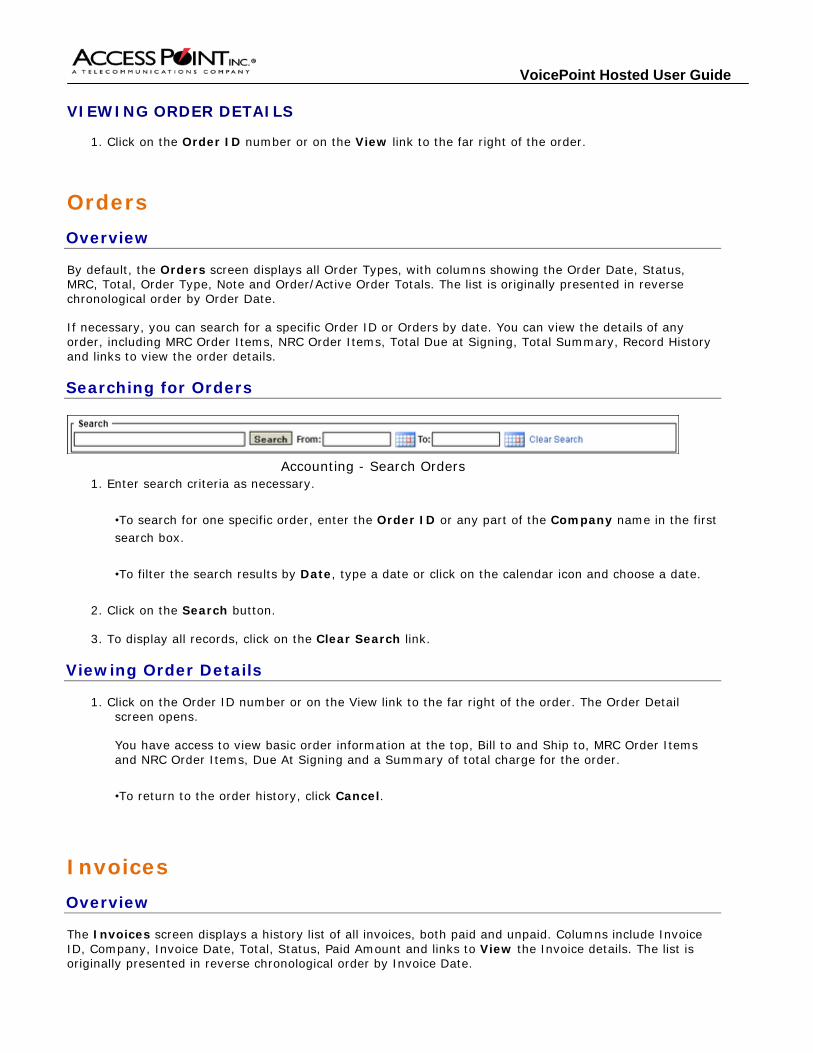
VoicePoint Hosted User Guide VIEWING ORDER DETAILS
1. Click on the Order ID number or on the View link to the far right of the order.
Orders
Overview
By default, the Orders screen displays all Order Types, with columns showing the Order Date, Status, MRC, Total, Order Type, Note and Order/Active Order Totals. The list is originally presented in reverse chronological order by Order Date.
If necessary, you can search for a specific Order ID or Orders by date. You can view the details of any order, including MRC Order Items, NRC Order Items, Total Due at Signing, Total Summary, Record History and links to view the order details.
Searching for Orders
Accounting - Search Orders 1. Enter search criteria as necessary.
•To search for one specific order, enter the Order ID or any part of the Company name in the first search box.
•To filter the search results by Date, type a date or click on the calendar icon and choose a date.
2. Click on the Search button.
3. To display all records, click on the Clear Search link.
Viewing Order Details
1. Click on the Order ID number or on the View link to the far right of the order. The Order Detail screen opens.
You have access to view basic order information at the top, Bill to and Ship to, MRC Order Items and NRC Order Items, Due At Signing and a Summary of total charge for the order.
•To return to the order history, click Cancel.
Invoices
Overview
The Invoices screen displays a history list of all invoices, both paid and unpaid. Columns include Invoice ID, Company, Invoice Date, Total, Status, Paid Amount and links to View the Invoice details. The list is originally presented in reverse chronological order by Invoice Date.

VoicePoint Hosted User Guide You can search for a specific Invoice ID or a date range of invoices. You can also view the details of any invoice, including an Account Summary, Monthly Recurring Charges (MRC), the Non-Recurring Charges (NRC), the Taxes and Fees and a Transaction History for this specific invoice.
Searching Invoice Orders
1. Enter search criteria as necessary.
•To search for one specific Invoice, enter the Invoice ID box or any part of the Company name in the first search box.
•To limit the search results by date, type a Date or click on the calendar icon and choose a date.
2. Click on the Search button.
3. To display all records, click on the Clear Search link.
Showing/Hiding Overpaid Invoices
By default, all invoice types are listed – Paid, Unpaid and Overpaid. Use the Show Overpaid Invoices to display only the overpaid invoices for the account.
1. Click in the Show Overpaid Invoices checkbox. It will work in combination with other search arguments.
2. Click on the Search button.
Viewing Invoice Details
1. Click on the Invoice ID number or on the View link to the far right of the order. This presents the Invoice Detail screen.
You have access to view Customer Information, Account Summary, Monthly Recurring Charges, Non Recurring Charges, Taxes and Fees and Transaction History for the Invoice.
•To print a .PDF version of the invoice, use the Download link in the Customer Information section.
•To access details of a transaction history item, such as a payment or credit memo or refund, click the Transaction Number link.
•To return to the order history, click Cancel.
Payments
Overview
The Payments screen shows the history of payments made on the account and lists the Payment ID, Payment Date, Company, Paid Amount, Amount Applied and Method of payment. The list is originally presented in reverse chronological order by Payment Date.

VoicePoint Hosted User Guide Searching Payments
1.Enter search criteria as necessary.
•To search for one specific Invoice, type the Payment ID or any part of the Company name in the first search box.
•To limit the search results by Date, type a date or click on the calendar icon and choose a date.
2.Click on the Search button.
3.To display all records, click on the Clear Search link.
Creating a New Payment
You may make a one-time payment for the current Amount Due using previously entered credit card information or by entering details for a new card.
CREATING A NEW PAYMENT WITH A PREVIOUSLY ENTERED CARD
1.From the Accounting screen, activate the Payments menu choice.
2.Click on the New Payment button.
3.Click in the Previously used credit card ending in radio button.
4.Verify information shown in the fields below.
5.Click in the I agree to the Terms & Conditions above checkbox.
6.Click on the Submit Payment button.
CREATING A NEW PAYMENT WITH A NEW CREDIT CARD
1.From the Accounting screen, activate the Payments menu choice.
2.Click New Payment.
3.Click the Enter new credit card information radio button.
4.Click in the Save credit card info for future use checkbox, if applicable. This will save the information to your customer account for any autopayment provisioning and future use.
5.Choose the credit Card Type (Visa, MasterCard, American Express, or Discover).
6.Type the Card Number.
7.Specify the Expiration Date.
8.In Name on Card field, type the name of the card holder, exactly as shown on the card.
9.Type the Billing Address details including Street, Street2, City, State and Zip Code.

VoicePoint Hosted User Guide
10.Click in the I agree to the Terms & Conditions above box.
11.Click Submit Payment.
Reports
Overview
Reports lets you view, print, or export a variety of Activity Reports for Administrator users on your call activity.
When an End User Administrator selects the Reports tab, the Call Activity screen shows the last seven days of call traffic. You can change the criteria to search and filter call activities through the search fields provided at the top of the screen. From this screen, you can also access graphs of call activity and path usage from the links below the search criteria or the menu choices in the left panel.
Click here for a list of report types.
Call Activity
The Call Activity list includes date/time, duration, call type (incoming, outgoing, or internal), from, to information and account code. The data can be filtered by date and call type; and you may search on keywords within the from, to and account code fields in the report.
1.Enter search criteria as necessary.
▪Enter a Start Date and End Date.
▪Choose a Call Type (incoming, outgoing, incoming and outgoing, or internal).
TIP: Inbound calls routed to Groups and Ques will only identify the Group Name or Que Name that answered the call and not designate an extension or agent # on this activity data.
▪Type a Keyword. (This will search the From, To and Account Code fields.)
2.Click Search.
▪Use the Next and Previous buttons (top right and bottom right of the page) to move between pages.
▪By default, 20 items per page will display. Use the dropdown list near the top right or bottom right of the page to display 10, 50, 100 or 500 items on a page.
You can also click the View Activity Graphs or View Virtual Path Usage link to view graphs using that data subset.
Exporting the Call Activity List
1.Filter and run the list you wish to export.
2.Click Export Results.
3.Do one of the following:

VoicePoint Hosted User Guide
•To have the report open in Excel, click in the Open radio button and then click on OK. Excel will launch with the report displayed.
•To save the report as a .csv (Comma Separated Values) file, click the Save button and then Save again. The file will be saved with a default name in your default file download location.
Searching Reports
Some reports offer keyword search fields. After running a report, type a keyword in the Keyword field and then click Search to locate that keyword within the report or table. To clear the search results, click Clear Search.
Report Types
Reports are listed under two headings: Activity Reports, which show activity, activity graph and path usage for End User Administrators. If you have Call Center activated as a Premium feature on your PBX, the ACD Reports show the Automatic Call Distribution real time console, as well as related reports.
Each report type provide filters options. For example, you may be able to filter a report by specific dates or by a single phone number, agent or queue. Each report is described below.
Report Menu
ACD Reports
Click ACD Reports or Real-time Console to view the Automatic Call Distribution Realtime Console, which displays your queue, calls waiting, longest hold, number of agents logged in and average hold time. Each agent’s status and call count are also displayed.

VoicePoint Hosted User Guide
TIP: The ACD Real-time Console is set to refresh every 30 seconds. To change this setting (to never or 60 seconds), make a selection from the Refresh Every dropdown menu.
QUEUE PERFORMANCE
The Queue Performance table displays real-time queue performance including queue, calls offered, calls answered, abandoned call information, calls transferred, calls answered percentage, average hold time, average abandon time, total call time, average call time and total timeouts.
TIP: Use the Start Date and End Date fields or calendar pickers to narrow a report down to specific dates and then click Submit to refresh the table.
AGENT PERFORMANCE
The Agent Performance table displays agent performance by a variety of statistics including ACD and non-ACD calls answered, outbound calls and call time, shift time, ACD and non-ACD call times, number of non-ACD calls inbound, plus totals for hold time, pause time, pause count and idle time.
TIP: Use the Start Date and End Date fields or calendar pickers to narrow a report down to specific dates and then click Submit to refresh the table.
AGENT EVENTS
The Agent Events table lets you view a variety of statistics by agent including login, logout, shift time, idle time, number of calls answered, total call time, total hold time, non-ACD inbound time and calls, outbound time and calls, pause time and pause count.
TIPS: Choose an agent from the Agent dropdown list and then click Search to refresh the table.By default, the table shows a summary. To view a detailed report, click in the Show Detail radio button and then click Submit to refresh the table
Use the Start Date and End Date fields or calendar pickers to narrow a report down to specific dates and then click Search to refresh the table.
QUEUE CALL ACTIVITY
The Queue Call Activity table lets you view a variety of statistics by queue and/or agent including date, time, phone numbers, duration, hold time, on call time, queue and agent and tally code (if a code has been set).
TIPS: Choose an agent from the Agent dropdown list and then click Search to refresh the table.Use the Start Date and End Date fields or calendar pickers to narrow a report down to specific dates and then click Search to refresh the table.
ANSWER/ABANDON REPORT
The Answer/Abandon Report table lets you view a variety of statistics regarding abandoned calls including time, total calls, calls answered, maximum hold time and abandoned call details.
TIPS: Use the Start Date and End Date fields or calendar pickers to narrow a report down to specific dates and then click Submit to refresh the table.
Click in the All Day button or select a specific range of hours by clicking in the Hour Range button and specifying a range of time. Then click Submit to refresh the table.
Choose a timing interval from the Interval dropdown menu (15, 30 or 60 minutes)and then click Submit to refresh the table.
Choose an agent from the Agent dropdown list and then click Submit to refresh the table.

VoicePoint Hosted User Guide
Choose a queue from the Queue dropdown list and then click Submit to refresh the table.
QUEUE SUMMARY BY NUMBER
The Queue table lets you view a variety of queue related statistics including number dialed, queue, calls offered, calls answered, calls abandoned, average hold time and average call time.
TIPS: Use the Start Date and End Date fields or calendar pickers to narrow a report down to specific dates and then click Submit to refresh the table.
Choose a phone number from the Phone Number dropdown list and then click Submit to refresh the table.
Choose a queue from the Queue dropdown list and then click Submit to refresh the table.
Settings
Overview
Settings gives you control over your user profile information. If your user type is administrator, you will also be able to manage other users who will have access to the software. When you click on the Settings tab, you are redirected to the My Profile screen, which lists your user characteristics, such as Extension name and passwords. From Settings, you can also add,change and delete Users, as well as manage the Message Center for current, archived and deleted messages.
Working with My Profile
The My Profile page is where you can customize your user information. What you see and are able to control on your user profile page will depend on your user role and permissions. Once you make changes to the profile and click Update User, you will receive an automatically generated email, sent to the email identified in your profile, itemizing what information was changed.
The fields for the My Profile page for an end user are described in the table below.
Field Description/Instructions
User Type The User Type dropdown identifies your current user role. Your role and those with fewer user rights will show. For example, an Administrator will see Administrator, Call Center Agent and Employee in the dropdown list.
Extension The Extension dropdown identifies your extension.
The dropdown will show all configured extensions on the account that can be used for your user type association.
Note: This field applies to the Administrator and Employee roles. If the User Type is Call Center Agent, the Agent ID field will appear instead of the Extension.
Changing Your Password
1.Click My Profile.
2.To change your password, type a new password in the New Password field. Your password must contain a minimum of 8 characters containing at least 1 uppercase letter, 1 lowercase letter and 1 number.
3.Type your new password in the Confirm New Password box.

VoicePoint Hosted User Guide
4.Click Update User.
Updating Your Personal Information
1.Click My Profile.
2.Type the updated information in the First Name, Last Name and Email fields.
3.Click Update User.
Enabling your Profile Select Yes or No in the Enabled field. If Yes is selected, the user will be an active user, which means that you can log in.
f No is selected, the user will not be an active user in the portal, which means that you cannot successfully log into the software.
Note: Your enabled status can systemically be turned to No by security measure of the system, after excessive unsuccessful log in attempts.
Users
Overview
The Users screen lets you view and search within your list of users. You can create new users and edit existing users from this screen. By default, a list of active users appears and shows the User ID, Username, Full Name, PBX, Email address and the User Type.
Searching Users
You may search for a specific User using the Search field at the top of the User List page.
1.Type a name in the Search field.
2.To include disabled users in the list, check the Show Disabled Users checkbox.
3.Click Search.
4.Click Clear Search to clear the current search results.
Creating a New User
1.Click Users.
2.Click New User.
3.Choose a user type from the User Type dropdown menu. User types include Administrator, Call Center Agent, or Employee.
4.Choose an extension from the Extension dropdown list. Note: This field applies to the Administrator and Employee roles. If the User Type is Call Center Agent, the Agent ID field will appear instead of the Extension.
5.Type a username for the new user in the Username field. Once a usename is set up and the user is added, you cannot change that Username.

VoicePoint Hosted User Guide
6.Type a password for the new user in the Password field. The password must contain a minimum of 8 characters containing at least 1 uppercase letter, 1 lowercase letter and 1 number.
7.Type the password again in the Confirm New Password field.
8.Type the new user’s first name in the First Name field.
9.Type the new user’s last name in the Last Name field.
10.Type the new user’s email address in the Email field. This is the email address that is established for sending any system generated emails.
11.Select the appropriate permissions for the new user:
•Choose Default to use the default permissions for that user type.
•Choose Custom to customize permissions for this new user. After clicking on Add User, you will be presented with another screen confirming that the new users was saved. You are returned to the new user information, but near the bottom, Permissions Edit button is now exposed and you will be able to customize permissions. Check the box for each permission you would like to grant to this specific user.
12.Click Add User.
Editing an Existing User
1.Click the link in the Username column.
2.Make changes as necessary. Note that you cannot change the read only Username field. Refer to the description and guidelines above for each field.
3.Click Update User.
Customizing User Permissions
•Customize a user's permissions while adding a new user by selecting the Permissions: Custom radio button at the bottom of the screen. Check the box for each permission you would like to grant to this specific user. Click Save when finished.
•Change permissions of an existing user by selecting the Permissions: Edit button at the bottom of the screen. Check the box for each permission you would like to grant to this specific user. Click Save when finished.
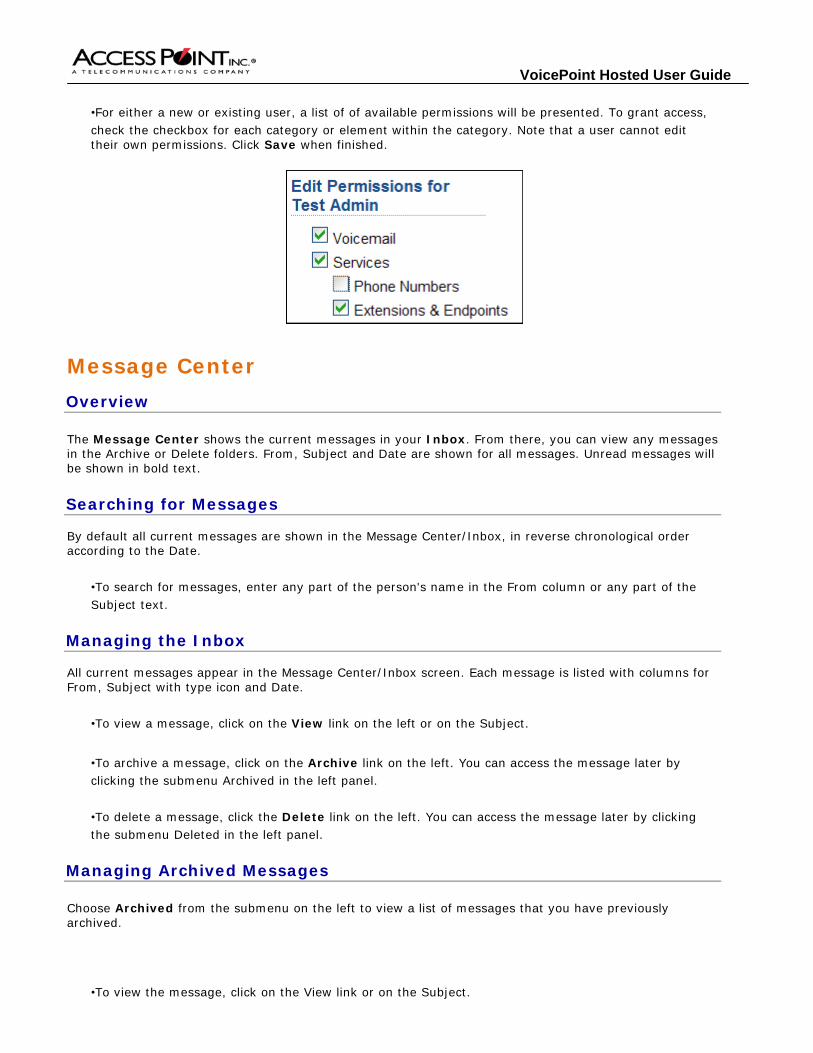
VoicePoint Hosted User Guide
•For either a new or existing user, a list of of available permissions will be presented. To grant access, check the checkbox for each category or element within the category. Note that a user cannot edit their own permissions. Click Save when finished.
Message Center
Overview
The Message Center shows the current messages in your Inbox. From there, you can view any messages in the Archive or Delete folders. From, Subject and Date are shown for all messages. Unread messages will be shown in bold text.
Searching for Messages
By default all current messages are shown in the Message Center/Inbox, in reverse chronological order according to the Date.
•To search for messages, enter any part of the person's name in the From column or any part of the Subject text.
Managing the Inbox
All current messages appear in the Message Center/Inbox screen. Each message is listed with columns for From, Subject with type icon and Date.
•To view a message, click on the View link on the left or on the Subject.
•To archive a message, click on the Archive link on the left. You can access the message later by clicking the submenu Archived in the left panel.
•To delete a message, click the Delete link on the left. You can access the message later by clicking the submenu Deleted in the left panel.
Managing Archived Messages
Choose Archived from the submenu on the left to view a list of messages that you have previously archived.
•To view the message, click on the View link or on the Subject.

VoicePoint Hosted User Guide
•To Delete a message, click the Delete link on the left. You can access the message later by clicking the submenu Deleted in the left panel.
Managing Deleted Messages
Choose Deleted from the submenu on the left to view a list of messages that you have previous deleted.
•To view the message, click on the View link or on the Subject.
•To Archive a message, click on the Archive link on the left.
•To permanently delete a message, click on the Delete link on the left.