voice processing system kx-tvm200 model no. kx-tvm50
TRANSCRIPT

Document Version 2.1 2008/04
Manager’s ManualVoice Processing System
Model No. KX-TVM50KX-TVM200
Thank you for purchasing a Panasonic Voice Processing System.Please read this manual carefully before using this product and save this manual for future use.
KX-TVM50/KX-TVM200: Version 2.1 (Main Software Version 2.50 or later)

IntroductionAbout this Manual
This Manager’s Manual is designed to help the System Manager and Message Manager program the VPSusing the features that are available to them, including setting up mailboxes, recording prompts, etc. Note thatthe features available to the System Manager and Message Manager are not the same; for more information,refer to the information in this manual or consult your dealer.This manual is divided into the following sections:
1 Training the SubscriberThis section offers basic suggestions on how to train subscribers to use the VPS and its features on a dailybasis. For detailed information, subscribers should refer to the Subscriber’s Manual.
2 System Manager’s GuideThis section describes the programming features that are available to the System Manager, includingsetting up mailboxes, setting Class of Service (COS) parameters, etc.
3 Message Manager’s GuideThis section describes the programming features that are available to the Message Manager, includingmanaging the General Delivery Mailbox, recording prompts and messages, etc.
IndexAn alphabetical listing of features and terms, as well as the page numbers of related sections.
Note• The term "beeper" is used in this manual to refer to a pager.
2 Manager’s Manual Document Version 2.1 2008/04
Introduction

Table of Contents1 Training the Subscriber ...........................................................................42 System Manager’s Guide ........................................................................52.1 Logging in to the System Manager’s Mailbox ................................................................52.2 Setting Up Mailboxes ........................................................................................................52.3 Setting Class of Service (COS) Parameters ...................................................................72.4 Setting the System Clock ...............................................................................................112.5 Changing the Service Mode Setting ..............................................................................122.6 Changing the Company Greeting and Incoming Call Service Setting .......................122.7 Broadcasting Messages .................................................................................................132.8 Changing the System Manager’s Password .................................................................14
3 Message Manager’s Guide ....................................................................153.1 Logging in to the Message Manager’s Mailbox ............................................................153.2 Managing the General Delivery Mailbox .......................................................................153.3 Setting Up Message Waiting Notification .....................................................................163.4 Customising the Message Manager’s Mailbox .............................................................173.5 Setting the System Clock ...............................................................................................183.6 Recording Messages ......................................................................................................193.7 Remote Call Forwarding Set ..........................................................................................203.8 Setting the Timed Reminder ..........................................................................................213.9 List of Prompts for VM and AA Service ........................................................................22
Document Version 2.1 2008/04 Manager’s Manual 3

1 Training the SubscriberThe System Manager or Message Manager should explain the basic functions of the VPS to all subscribers.The System Manager or Message Manager should explain which service (Voice Mail Service, AutomatedAttendant Service, Interview Service, or a Custom Service) will play during the day, and what services will playduring night, lunch, and breaks.
The System Manager or Message Manager should also explain the special privileges of VPS subscribers.Subscribers can call from any touchtone telephone in the world and get their messages. To check messages(or change mailbox parameters) from an outside telephone, do the following:
As soon as the VPS plays a guidance message, press code [# 6] and then the mailbox number. For example,a subscriber who has extension 1015 and mailbox 1015 would press code [# 6 1015]. If the subscriber has apassword enabled, the password must be entered.
With Toll Saver enabled, the subscriber can call the VPS from anywhere in the world and find out if there areany new messages in his or her mailbox without incurring telephone charges. Note however that Toll Saverfeatures are available only with certain integration types. For more information, refer to 5.17 Assigning YourTelephone Numbers for Remote Automatic Log-in and Toll Saver in the Subscriber’s Manual.
If the subscriber forgets his or her password, the System Manager can clear the password so that the subscribercan establish a new password.
Explain the purpose of the General Delivery Mailbox. The Message Manager will periodically check it, andforward the contents to the appropriate subscriber.
Explain the purpose of Mailbox Groups. They can be created by the System Administrator to facilitate thedistribution of messages to several subscribers. In particular, senior staff members ought to know how to takeadvantage of Mailbox Groups. 20 lists can be created, with up to 62 mailboxes (KX-TVM50) or up to 100mailboxes (KX-TVM200) in each list.
Finally, if Custom Service menus are used, subscribers should be encouraged to listen to these menus oftenand make suggestions for improvement. Custom Service is a very powerful feature of the Panasonic VPS.Make the most out of this feature.
4 Manager’s Manual Document Version 2.1 2008/04

2 System Manager’sGuide2.1 Logging in to the Sys-tem Manager’s MailboxThe procedures described in this manual require theSystem Manager to use a telephone, however, many ofthese procedures can also be performed using a PCand the KX-TVM Maintenance Console software. Formore information, consult your dealer.In order to perform these procedures with a telephone,the System Manager must log in before performing anySystem Manager task. To log in as the SystemManager, 3 items of information must be known: theextension number of a port connected to the VPS, theSystem Manager’s mailbox number, and the SystemManager’s mailbox password.– The System Manager’s mailbox number is 99, 999,
9999 or 99999 depending on the mailbox numberlength specified in System Programming.
– The System Manager’s password can be assignedby the System Administrator using KX-TVMMaintenance Console or by the System Managerusing his or her extension telephone (see2.8 Changing the System Manager’s Password).
Note• Before the System Manager can perform any
System Manager tasks, "System ManagerAccess from Telephone" must be enabled and"Password for System Manager" must be set bythe System Administrator using KX-TVMMaintenance Console.
• The VPS will announce the number of totalmessages, the number of new messages, or thelength of new messages depending on the COSsettings of the System Manager.
• If there are new messages in the mailbox, themessages will be played automatically. TheSystem Manager can listen to themcontinuously without listening to the systemprompts. This feature is only available when"Autoplay New Message" is activated for theSystem Manager’s COS.
• If the VPS is being programmed via KX-TVMMaintenance Console, the System Managercannot create or edit mailboxes. The VPS willannounce, "Sorry, this function is notavailable".
Manual Log-in
1. Go off-hook.2. Enter the extension number of the VPS.3. # 6
4. and your mailbox number.• The System Manager’s mailbox number is 99,
999, 9999 or 99999.5. Enter your password, then # .
Note• For more information on logging in, see
2.1 Logging in to Your Mailbox in theSubscriber’s Manual.
2.2 Setting Up MailboxesThe System Manager’s primary function is to createmailboxes for new subscribers and to maintain systemorganisation by deleting unneeded passwords andmailboxes.
Note• If the VPS is being programmed via KX-TVM
Maintenance Console, the System Managercannot create or edit mailboxes. The VPS willannounce, "Sorry, this function is notavailable".
Creating and Editing a Mailbox
The System Manager can create and edit subscribermailboxes by following the steps below.While editing a mailbox’s parameters, press [1] to savethe current setting or press [2] to leave the settingunchanged.When creating a new mailbox, the following parameterscan be set:• Mailbox Number• Subscriber’s Name: The VPS allows a maximum
of 10 s for each name. The name should be spokenslowly and clearly. (We recommend using thesubscriber’s last name.)
• Extension Number• First 3 or 4 Letters of the Subscriber’s Last
Name: Enter only the first 3 or 4 letters of theowner’s last name.
• First 3 or 4 Letters of the Subscriber’s FirstName: Enter only the first 3 or 4 letters of thesubscriber’s first name.
Document Version 2.1 2008/04 Manager’s Manual 5
2.2 Setting Up Mailboxes

• Class of Service Number: Enter any COS number(1-62).
• Interview Mailbox Number: Interview MailboxNumbers must not be the same number as anexisting mailbox.
• All Calls Transfer To Mailbox: If this parameter isenabled, the extension is considered to be a LogicalExtension and therefore calls directed to theextension via Automated Attendant service areautomatically forwarded to the extension mailbox.The extension does not ring when a call is received.
• Message Notification: If this parameter is enabled,the Message Waiting Lamp of the subscriber’stelephone turns on when a new message isrecorded.
• External Message Delivery: Allows a subscriber tosend a message to several subscribers andnon-subscribers (including outside parties). Ifenabled, the prompt mode setting determines thelanguage heard when the VPS calls the recipient.
• Auto Forwarding: Moves or copies unplayedmessages from one mailbox to another, after aspecified period of time.
Follow the steps listed below to create, edit or deleteany mailbox parameter.1. Log in to the System Manager’s mailbox.
• See 2.1 Logging in to the System Manager’sMailbox.
2. 4 1
3. 1 to assign or edit.4. Enter the mailbox number.5. 2 to accept.
a. Subscriber’s Name1. 1 to change the current setting.2. Record the subscriber’s name.3. 2 to accept.
b. Extension Number1. 1 to change the current setting.2. Enter the subscriber’s extension number.3. 2 to accept.
c. First 3 or 4 Letters of the Subscriber’s LastName1. 1 to change the current setting.2. Enter the first 3 or 4 letters of subscriber’s
last name.3. 2 to accept.
d. First 3 or 4 Letters of the Subscriber’s FirstName1. 1 to change the current setting.2. Enter the first 3 or 4 letters of subscriber’s
first name.
3. 2 to accept.e. Class of Service Number
1. 1 to change the current setting.2. Enter the Class of Service Number (1-62).3. 2 to accept.
f. Interview Mailbox Number1. 1 to change the current setting.2. Enter the Interview Mailbox Number.3. 2 to accept.
g. All Calls Transfer To Mailbox1. 1 to change the current setting (enable
or disable).2. 2 to accept.
h. Beeper Callback Entry No.1. 1 for Caller Select.
2 for Without Message.3 for Before Message Recording.4 for After Message Recording.5 to disable.
2. 6 to accept.i. Message Waiting Lamp Notification for
Unreceived Messages1. 1 to change the current setting (enable
or disable).2. 2 to accept.
j. Device Notification for UnreceivedMessages1. 1 to change the current setting (enable
or disable).2. 2 to accept.
k. External Message Delivery1. 1 to change the current setting (enable
or disable).2. 2 to accept.
• If set to "Disable", go to l.l. Prompt Mode
1. 1 for Primary.2 for System.
• Enter system prompt number (1-10).3 for Caller Select.
2. 4 to accept the current setting, then goto j.• To change the current setting, go to k
step 1.m. Auto Forwarding
1. 1 to change the current setting (enableor disable).
6 Manager’s Manual Document Version 2.1 2008/04
2.2 Setting Up Mailboxes

• If set to "Disable", go to step 6.2. 2 to accept.
n. Forwarding Mailbox Number1. 1 to change the current setting.
• If no mailbox number is assigned, go tostep 2.
2. Enter the forwarding mailbox number.3. 2 to accept.
o. Forwarding Delay Time1. 1 to change the current setting.2. Enter the delay time, and #.3. 2 to accept.
p. Forwarding Mode1. 1 to change the current setting (Copy or
Move).2. 2 to accept, then go to l.
6. The Auto Forwarding parameter is the lastparameter to be entered. When this parameter isset, the prompt at step 3 will be announced.Continue assigning or editing other mailboxes byrepeating from step 4, or go to step 7 to finish.
7. to return to the Main Menu.
Deleting a Mailbox
The System Manager should delete mailboxes that areno longer needed. When another person accesses theVPS, the action is automatically cancelled.1. Log in to the System Manager’s mailbox.
• See 2.1 Logging in to the System Manager’sMailbox.
2. 4 1 2
3. Enter the mailbox number.4. 1 to delete the mailbox.
Resetting a Mailbox Password
When a password is forgotten, the System Managermust reset the password before it can be reassigned bythe subscriber.1. Log in to the System Manager’s mailbox.
• See 2.1 Logging in to the System Manager’sMailbox.
2. 4 1 3
3. Enter the mailbox number.4. 1 to delete the password.
Note• The System Manager password cannot be
reset here. The System Administrator can resetthe System Manager password using KX-TVMMaintenance Console.
• After the password is reset, if the SystemAdministrator has set "Default Password forNew Mailboxes" to "Enable", the password willbe set to the default password. If set to"Disable", the mailbox will have no password.
2.3 Setting Class of Serv-ice (COS) ParametersA Class of Service (COS) defines the set of VPSservices available to the mailboxes assigned to it. Thereare 64 Classes of Service; they can be assigned tomailboxes by the System Administrator using KX-TVMMaintenance Console or by the System Manager usinga telephone. COS No. 63 and No. 64 are assigned bydefault to the Message Manager and the SystemManager respectively.
Class of Service
Follow the steps detailed below to set the followingClass of Service parameters:• Personal Greeting Length: 1-360 s*1
• New Message Retention Time: 1-30 days/0:Unlimited
• Saved Message Retention Time: 1-30 days/0:Unlimited
• Message Length: 1-60 min./0: Unlimited• Mailbox Capacity Maximum Message Time:
(KX-TVM200) 1-600 min/0: Unlimited, (KX-TVM50)1-120 min/0: Unlimited
• Message Retrieval Order: LIFO (Last In First Out)or FIFO (First In First Out)
• Prompt Mode: Setting is one of installedlanguages.
• Delete Message Confirmation: Enable/Disable• Message Envelope Setting: Before, After, or
Require• Caller ID Callback: Enable/Disable• Remote Call Forward to Outside*2: Enable/
Disable• Play System Prompt after Personal Greeting*1:
Enable/Disable• Use Call Waiting on Busy*1: Enable/Disable
Document Version 2.1 2008/04 Manager’s Manual 7
2.3 Setting Class of Service (COS) Parameters
• Message Cancel for Live Call Screening*1:Enable/Disable
• Intercom Paging Group: 1-32/All*1• Number of Caller IDs for Caller Name
Announcement: 1-30/0: None*1
• Number of New Messages Announcement:Subscriber Service, Receiving Message, or None
• Total Number of Message Announcement:Subscriber Service, Receiving Message, or None
• Mailbox Capacity Warning: 1-60 min/0: None• VM Menu*1: Enable/Disable• Personal Greeting for Caller ID*1: Enable/Disable• Caller ID Screen*1: Enable/Disable• Call Transfer to Outside*1: Enable/Disable• Subscriber Tutorial*1: Enable/Disable• Notify of Transfer: Enable/Disable• Directory Listing*1: Enable/Disable• Auto Receipt: Enable/Disable• Autoplay New Message: Enable/Disable• First Playback Urgent Messages: Enable/Disable• Announce Message Transferred Information:
Enable/Disable• Caller ID Number Announcement: Enable/
Disable• Announce Option Menu After Erasing
Messages: Enable/Disable• New Message Length Announcement: Enable/
Disable
*1 Not available for COS No. 63 (Message Manager) and COS No.64 (System Manager)
*2 Not available for COS No. 64 (System Manager)
Note• If the VPS is being programmed via KX-TVM
Maintenance Console, the System Managercannot set COS parameters. The VPS willannounce, "Sorry, this function is notavailable".
1. Log in to the System Manager’s mailbox.• See 2.1 Logging in to the System Manager’s
Mailbox.2. 4 2
3. Enter the Class of Service Number (1-64).4. Follow the steps below and set each parameter.
Personal Greeting Length
1. 1 to change the greeting length.2 to accept the current setting, then go to the
next parameter.
2. Enter the greeting length (1-360 s).3. 2 to accept.
New Message Retention Time
1. 1 to change the retention time.2 to accept the current setting, then go to the
next parameter.2. Enter the retention time (a maximum of 30 days or
0: Unlimited).3. 2 to accept.
Saved Message Retention Time
1. 1 to change the retention time.2 to accept the current setting, then go to the
next parameter.2. Enter the retention time (a maximum of 30 days or
0: Unlimited).3. 2 to accept.
Message Length
1. 1 to change the message length.2 to accept the current setting, then go to the
next parameter.2. Enter the message length (1-60 min or 0:
Unlimited).3. 2 to accept.
Total Message Time Available perMailbox
1. 1 to change the total message time.2 to accept the current setting, then go to the
next parameter.2. Enter the total message time ([KX-TVM200] 1-600
min or 0: Unlimited, [KX-TVM50] 1-120 min or 0:Unlimited).
3. 2 to accept.
Message Retrieval Order
1. 1 to change the current setting (LIFO or FIFO).
8 Manager’s Manual Document Version 2.1 2008/04
2.3 Setting Class of Service (COS) Parameters
2 to accept the current setting, then go to thenext parameter.
2. 2 to accept.
Prompt Mode
1. 1 for Primary.2 for System.
• If set to Primary, go to step 2.2. Press [1] to [10] (KX-TVM200) or press [1] to [3]
(KX-TVM50) to change the desired mode.KX-TVM2001 for System 1 Prompt.2 for System 2 Prompt.3 for System 3 Prompt.4 for System 4 Prompt.5 for System 5 Prompt.6 for System 6 Prompt.7 for System 7 Prompt.8 for System 8 Prompt.9 for System 9 Prompt.10 for System 10 Prompt.
KX-TVM501 for System 1 Prompt.2 for System 2 Prompt.3 for System 3 Prompt.
3. 3 to accept.
Delete Message Confirmation
1. 1 to change the current setting (enable ordisable).
2. 2 to accept.
Message Envelope Playback Mode
1. 1 for Before.2 for After.3 for Require.4 to accept the current setting, then go to the
next parameter.2. 4 to accept.
Caller ID Callback
1. 1 to change the current setting (enable ordisable).
2. 2 to accept.
Remote Call Forward to Outside
1. 1 to change the current setting (enable ordisable).
2. 2 to accept.
Play System Prompt after PersonalGreeting
1. 1 to change the current setting (enable ordisable).
2. 2 to accept.
Use Call Waiting on Busy
1. 1 to change the current setting (enable ordisable).
2. 2 to accept.
Message Cancel for Live CallScreening
1. 1 to change the current setting (enable ordisable).
2. 2 to accept.
Intercom Paging Group
1. 1 to change the paging group.2 to accept the current setting, then go to the
next parameter.2. Enter the group number (1-33).3. 3 to accept.
• If set to "33 (Group 33)", the Intercom Pagingfeature is activated for all groups.
Document Version 2.1 2008/04 Manager’s Manual 9
2.3 Setting Class of Service (COS) Parameters

Maximum Number of Caller IDs forCaller Name Announcement
1. 1 to change the current setting.2 to accept the current setting, then go to the
next parameter.2. Enter the number of announcements that can be
programmed by subscribers (1-30/0: None).3. 2 to accept.
Number of New Message Announce-ment
1. 1 for Subscriber Service.2 for Receiving Message.3 for None.4 to accept the current setting, then go to the
next parameter.2. 4 to accept.
Total Number of Message An-nouncement
1. 1 for Subscriber Service.2 for Receiving Message.3 for None.4 to accept the current setting, then go to the
next parameter.2. 4 to accept.
Mailbox Capacity Warning
1. 1 to change the current setting.2 to accept the current setting, then go to the
next parameter.2. Enter the warning threshold (1-60 min or 0: None).3. 2 to accept.
VM Menu
1. 1 to change the current setting (enable ordisable).
2. 2 to accept.
Personal Greeting for Caller ID
1. 1 to change the current setting (enable ordisable).
2. 2 to accept.
Caller ID Screen
1. 1 to change the current setting (enable ordisable).
2. 2 to accept.
Call Transfer to Outside
1. 1 to change the current setting (enable ordisable).
2. 2 to accept.
Subscriber Tutorial
1. 1 to change the current setting (enable ordisable).
2. 2 to accept.
Notify of Transfer
1. 1 to change the current setting (enable ordisable).
2. 2 to accept.
Directory Listing
1. 1 to change the current setting (enable ordisable).
2. 2 to accept.
Auto Receipt
1. 1 to change the current setting (enable ordisable).
2. 2 to accept.
10 Manager’s Manual Document Version 2.1 2008/04
2.3 Setting Class of Service (COS) Parameters

Autoplay New Message
1. 1 to change the current setting (enable ordisable).
2. 2 to accept.
First Playback Urgent Messages
1. 1 to change the current setting (enable ordisable).
2. 2 to accept.
Announce Message Transferred In-formation
1. 1 to change the current setting (enable ordisable).
2. 2 to accept.
Caller ID Announcement
1. 1 to change the current setting (enable ordisable).
2. 2 to accept.
Announce Option Menu After Eras-ing Messages
1. 1 to change the current setting (enable ordisable).
2. 2 to accept.
New Message Length Announce-ment
1. 1 to change the current setting (enable ordisable).
2. 2 to accept.
2.4 Setting the SystemClockThe system clock can be set directly from the telephone.It is important to set the clock accurately becauseMessage Waiting Notification, External MessageDelivery, redialling and rescheduling of ExternalMessage Delivery, and Automatic Message Deletionare all scheduled using this setting. The SystemAdministrator and Message Manager are also able toset the clock.If the start and end dates for daylight saving time areprogrammed, the VPS automatically adjusts the time fordaylight saving time.
Note• The System Manager cannot set the system
clock while:– the VPS is being programmed via KX-TVM
Maintenance Console.– the Message Manager is setting the system
clock, recording system messages, orcustomising the Message Manager’sMailbox.
The VPS will announce, "Sorry, this function isnot available".
1. Log in to the System Manager’s mailbox.• See 2.1 Logging in to the System Manager’s
Mailbox.2. 4 3
3. 1 to change the current setting.4. Enter the current time, then # .
For example:• To enter 5:00, press [5] [#].• To enter 5:15, press [5] [1] [5] [#].
5. 1 for AM.2 for PM.
• This option may not be available if the VPS isprogrammed to use 24-hour time.
6. 2 to accept.7. 1 to change.8. Enter the current month, then # .
For example:• To enter January, press [1] [#].
9. Enter the day, then # .10. Enter the last 2 digits of the year, then # .11. 2 to accept.
Document Version 2.1 2008/04 Manager’s Manual 11
2.4 Setting the System Clock

2.5 Changing the ServiceMode SettingWhen an incoming call is received by a Service Group,the way the call is handled is determined by the ServiceMode assigned to the Service Group which received thecall.– If the Service Mode is set to "Automatic", the call will
be handled by the Call Service assigned to thecurrent time mode.
– If the Service Mode is set to one of the manualmodes (day, night, lunch, or break), the Call Serviceassigned to that time mode will always handle thecall.
– If the Service Mode is set to "PBX Control Mode",the VPS will switch time modes when the PBX does,and the call will be handled by the Call Serviceassigned to the current time mode (available withAPT/DPT Integration only).
Only the System Manager or System Administrator canchange the Service Mode. Once it is changed, thesetting is retained even after if the VPS is shutdown.
Note• If the VPS is being programmed via KX-TVM
Maintenance Console, the System Managercannot change the Service Mode. The VPS willannounce, "Sorry, this function is notavailable".
Assigning the Service Mode
The following Service Modes are available.• Automatic Mode: Incoming calls will be handled by
the Call Service assigned to the current time mode.• Manual Day Mode: Incoming calls will be handled
by the Call Service assigned to the day mode,regardless of the time of day.
• Manual Night Mode: Incoming calls will be handledby the Call Service assigned to the night mode,regardless of the time of day.
• Manual Lunch Mode: Incoming calls will behandled by the Call Service assigned to the lunchmode, regardless of the time of day.
• Manual Break Mode: Incoming calls will behandled by the Call Service assigned to the breakmode, regardless of the time of day.
• PBX Control Mode: The VPS will switch timemodes according to when the PBX changes timemodes, and incoming calls handled by the CallService assigned to the current time mode. This
mode is available only with APT/DPT Integration. Ifthis mode is selected when using other integrationtypes, the VPS will operate in Automatic Mode.
Note• Depending on the model and/or the software
version of the connected PBX, PBX ControlMode may not function properly. For moreinformation, consult your dealer.
In the Automatic Mode, services have the followingorder of priority:Automatic Log-in (Toll Saver) > Holiday Service >Caller ID Call Routing > DID Call Routing > TrunkService > Port Service(Automatic Log-in [Toll Saver] has the highest priority.)In the Manual Modes (Day, Night, Lunch, or Break),services have the following order of priority:Automatic Log-in (Toll Saver) > Caller ID CallRouting >DID Call Routing > Trunk Service > PortService(Holiday Service are disregarded.)Follow the steps below to assign a Service Mode toeach Service Group 1-48.1. Log in to the System Manager’s mailbox.
• See 2.1 Logging in to the System Manager’sMailbox.
2. 4 4
3. Enter the Service Group number (1-48).4. 1 to change.5. Select the desired Service Mode.
1 for Automatic Mode.2 for Manual Day Mode.3 for Manual Night Mode.4 for Manual Lunch Mode.5 for Manual Break Mode.6 for PBX Control Mode.
6. 2 to accept.
2.6 Changing the Compa-ny Greeting and Incom-ing Call Service SettingWhen the VPS answers calls, it greets the callers witha Company Greeting and then activates an IncomingCall Service. The System Manager or SystemAdministrator can choose:– The appropriate company greeting for each time
mode (Day, Night, Lunch, and Break) of each call
12 Manager’s Manual Document Version 2.1 2008/04
2.6 Changing the Company Greeting and Incoming Call Service Setting

service. The default company greeting is theSystem Greeting.
– The desired Incoming Call Service for each timemode of each call service. The default service isAutomated Attendant service.
– The assignment of the Service Group for each Port/Trunk.
Note• If the VPS is being programmed via KX-TVM
Maintenance Console, the System Managercannot change the Company Greeting andIncoming Call Service Setting. The VPS willannounce, "Sorry, this function is notavailable".
Changing Service Group Setting
1. Log in to the System Manager’s mailbox.• See 2.1 Logging in to the System Manager’s
Mailbox.2. 4 5
3. 2 to change Service Group setting.4. Enter the Service Group Number (1-48).5. Select the desired Time Service period entry.
1 for Day Time service.2 for Night Time service.3 for Lunch Time service.4 for Break Time service.
6. 1 to change the Company Greeting.2 to change the Incoming Call Service, then go
to step 10.7. 1 to change the setting.
2 to accept.8. Select the desired setting entry.
1 to change a Company Greeting number.2 to set the System Greeting, then go to step 13.3 to disable, then go to step 13.
9. Enter a Company Greeting number (1-32), then goto step 13.
10. 1 to change the setting.2 to accept.
11. Select the desired setting entry.1 to set Voice Mail Service, then go to step 13.2 to set Automated Attendant Service, then go
to step 13.3 to set Custom Service.4 to set Interview Service.
12. Enter the Custom Service number (1-100), or theInterview Mailbox number.
13. 2 to accept.
Changing Service Group Assign-ment
1. Log in to the System Manager’s mailbox.• See 2.1 Logging in to the System Manager’s
Mailbox.2. 4 5
3. 1 to change Service Group Assignment.4. 1 for Port setting.
2 for Trunk setting.5. Enter the Port/Trunk number (Port 1-24
[KX-TVM200]/Port 1-6 [KX-TVM50], Trunk 1-64/0:None).
6. 1 to change the service group, then go to step 7.2 to accept.
7. Enter the Service Group Number (1-48).(1-48, or 49: to disable [for Trunk setting only])
8. 2 to accept.
2.7 Broadcasting Mes-sagesThe System Manager can deliver a message to multiplesubscribers with one operation. Messages can be sentto all subscribers (Broadcasting Message feature) or tospecified subscribers only. When delivering a messageto specified subscribers, the System Manager canreceive verification when the recipients listen to themessage.
Note• The System Manager can set the date and time
when a message is delivered. The date can beset up to one month in advance.
Delivering Messages to All Mailbox-es (Broadcasting Messages)
The Broadcasting Messages feature allows the SystemManager to deliver a message to multiple subscriberswith one operation. Broadcast messages have priorityover other regular or urgent messages, but otherwiseare treated like regular messages. This feature is useful
Document Version 2.1 2008/04 Manager’s Manual 13
2.7 Broadcasting Messages

when informing subscribers about the current VPSstatus such as remaining hard disk capacity, requestingthat unnecessary messages be erased, etc.1. Log in to the System Manager’s mailbox.
• See 2.1 Logging in to the System Manager’sMailbox.
2. 2
3. 1 to record a broadcast message.4. 1 to end recording.5. 2 to accept.
Delivering Messages to SpecifiedMailboxes
Use this feature to deliver the same message to one ormore subscribers by specifying their mailbox numbers.1. Log in to the System Manager’s mailbox.
• See 2.1 Logging in to the System Manager’sMailbox.
2. 2 2
3. Enter the mailbox number of the intended recipient.• Enter by name by pressing [#] [1] first.
Use a Mailbox Group by specifying its number.4. 2 to accept.5. 1 to record a message.
• Press [2] to add mailbox numbers. Press [3] toreview the mailing list. Press [ ] to cancelmessage transfer.
6. 1 to end recording.7. 2 to accept.8. 1 1 to specify the delivery time.
• Press [1] [2] to send the message immediately,then go to step 14.
9. Enter the desired delivery time, then # .10. 1 for AM.
2 for PM.• This option may not be available if the VPS is
programmed to use 24-hour time.11. Enter the day of the month for delivery, then # .
For example:• If today is February 16 and you enter [1] [7] [#],
the message will be delivered tomorrow.• If today is February 16 and you enter [5] [#], the
message will be delivered on March 5.12. 2 to accept.13. 1 to make the message urgent.
2 to continue.14. 1 to make the message private.
2 to continue.15. 1 to request a receipt.
2 to continue.
2.8 Changing the SystemManager’s PasswordThe System Manager must enter the System Managerpassword in order to log in before performing anySystem Manager task. In order to ensure systemsecurity, we recommend selecting a long (maximum 16digits) password that can not be easily guessed.
Note• If the VPS is being programmed via KX-TVM
Maintenance Console, the System Managercannot change the System Manager password.The VPS will announce, "Sorry, this function isnot available".
1. Log in to the System Manager’s mailbox.• See 2.1 Logging in to the System Manager’s
Mailbox.2. 3
3. 1 to change the mailbox password.2 to accept the current setting.
4. Enter the desired password, then # .5. 2 to accept.
14 Manager’s Manual Document Version 2.1 2008/04
2.8 Changing the System Manager’s Password

3 Message Manager’sGuide3.1 Logging in to the Mes-sage Manager’s MailboxThe procedures described in this manual require theMessage Manager to use a telephone, however, manyof these procedures can also be performed using a PCand the KX-TVM Maintenance Console software. Formore information, consult your dealer.In order to perform these procedures with a telephone,the Message Manager must log in before performingany Message Manager task. To log in as the MessageManager, 3 items of information must be known: theextension number of a port connected to the VPS, theMessage Manager’s mailbox number, and the MessageManager’s mailbox password.– The Message Manager’s mailbox number is 98,
998, 9998 or 99998 depending on the mailboxnumber length specified in System Programming.
– The Message Manager’s password can beassigned by the System Administrator usingKX-TVM Maintenance Console or by the MessageManager using his or her extension telephone (see3.4 Customising the Message Manager’sMailbox).
Note• Before the Message Manager can perform
Message Management (recording CustomService Menus, messages, etc.), "MessageManager Access from Telephone" must beenabled and "Password for MessageManager" must be set by the SystemAdministrator using KX-TVM MaintenanceConsole.
• The VPS will announce the number of totalmessages, the number of new messages, or thelength of new messages depending on the COSsettings of the Message Manager.
• If there are new messages in the mailbox, themessages will be played automatically. TheMessage Manager can listen to themcontinuously without listening to the systemprompts. This feature is only available when"Autoplay New Message" is activated for theMessage Manager’s COS.
Automatic Log-in
Note• This feature is not available with certain PBXs
and may be disabled by the SystemAdministrator for your mailbox.
1. Go off-hook.2. Enter the extension number of the VPS.3. Enter your password, then # .
Manual Log-in
1. Go off-hook.2. Enter the extension number of the VPS.3. # 6
4. and your mailbox number.• The Message Manager’s mailbox number is 98,
998, 9998 or 99998.5. Enter your password, then # .
Note• For more information on logging in, see
2.1 Logging in to Your Mailbox in theSubscriber’s Manual.
3.2 Managing the GeneralDelivery MailboxOne of the Message Manager’s functions is to checkthe General Delivery Mailbox for messages and transferthem to the appropriate mailbox or mailboxes (MailboxGroups may be used). This can be done at any timeusing the telephone.
Listening to Messages
The Message Manager can monitor the status of theGeneral Delivery Mailbox through his or her mailbox.He or she can listen to the messages stored in theGeneral Delivery Mailbox and, if necessary, transferthem to their intended recipients.1. Log in to the Message Manager’s mailbox.
• See 3.1 Logging in to the Message Manager’sMailbox.
2. 1 to receive the message.3. 1 to listen to new messages.
Document Version 2.1 2008/04 Manager’s Manual 15
3.2 Managing the General Delivery Mailbox
2 to listen to old messages.3 to listen to deleted messages.
4. The VPS plays each message, identifying thesender and indicating when the message wasrecorded.1 to repeat this message.1 1 to replay the previous message.1 2 to play the next message.2 3 to listen to the message envelope.
• VPS programming determines if the messageenvelope is played before each message, aftereach message, or only when you press [2] [3].
2 5 to resume Bookmark (when Bookmark isset).2 6 to save as new (when the new message
is listened).3 to erase this message.4 to reply.5 to rewind.6 to fast forward.7 to transfer.0 to listen to the entire menu.
Transferring Messages
Messages left in the General Delivery Mailbox shouldbe transferred to their intended recipients on a regularbasis. The Message Manager can add his or her ownvoice comments when necessary. When a message istransferred, the original message is not deleted from theGeneral Delivery Mailbox; it must be deleted manually.1. Start with step 1-4 in "Listening to Messages"
above.7 while listening to the message to transfer.
2. Enter the destination mailbox number.3. 2 to accept.4. 2 to record a comment.
• Press [1] to transfer messages withoutcomment. Press [3] to add a mailbox number.Press [4] to review the Mailing List.
5. 1 to end recording.6. 2 to accept.
3.3 Setting Up MessageWaiting NotificationThe VPS can notify the Message Manager whenunplayed messages are waiting in his or her mailbox byturning on the message waiting lamp and/or calling anexternal device (i.e., telephone or beeper).The VPS can also send notification via e-mail if theSystem Administrator has enabled this feature.
Setting Notification by MessageWaiting Lamp
The VPS lights the message waiting lamp on theMessage Manager’s extension when a new message isrecorded in the Message Manager’s mailbox.
Note• Extensions assigned as operators can be called
by dialling [0], however, when setting thisfeature the extension number (not "0") must bespecified. For more information, consult yourSystem Administrator.
• When a proprietary telephone with 6-linedisplay is used, the number of new (unplayed)messages will be displayed while the messagewaiting lamp is lit. This feature is only availablewith Panasonic KX-T series PBXs using DPTIntegration. For more information, consult yourSystem Administrator.
1. Log in to the Message Manager’s mailbox.• See 3.1 Logging in to the Message Manager’s
Mailbox.2. 2
3. 1 to change the Message Waiting LampNotification Status.
4. 1 to change.2 to accept.
Setting Notification by External De-vice
The VPS calls the preprogrammed telephone numberor beeper when a new message is recorded in theMessage Manager’s mailbox. Set the followingparameters as needed.
16 Manager’s Manual Document Version 2.1 2008/04
3.3 Setting Up Message Waiting Notification
Assigning Notification Numbers
A maximum of 3 telephone or beeper numbers can beset for message notification. Use the number keys 0 to9, and the Beeper Callback Number Display Entry Code[X] to make these assignments.When the Beeper Callback No. Entry Code is added atthe end of a beeper number, the VPS will ask the callerto enter the callback number that will be displayed onthe beeper. System Programming determines if theCallback Number Entry is to be entered before, after, orwithout the message.It is also possible to have the caller select whether ornot he or she wishes to enter a callback number. TheSystem Manager must authorise the use of the BeeperCallback No. Entry Code.1. Log in to the Message Manager’s mailbox.
• See 3.1 Logging in to the Message Manager’sMailbox.
2. 2
3. 3 to assign a telephone/beeper number.4. 1 to change the first telephone number.
2 to change the second telephone number.3 to change the third telephone number.
5. 1 to accept.6. Enter the telephone number.7. 2 to accept.8. 1 to change the telephone number.
2 to accept.3 to review.4 to add more digits.5 to insert a pause.6 to insert a wait for dial tone.7 to insert a beeper display command.
9. 1 to be notified by telephone.2 to be notified by beeper.
Setting Device Status
For each device, the notification is enabled or disabledaccording to a preset schedule. The Message Managercan enable a device according to a schedule. However,the System Administrator must first assign a destinationnumber to the desired device.1. Log in to the Message Manager’s mailbox.
• See 3.1 Logging in to the Message Manager’sMailbox.
2. 2 2
3. Enter the device number (1-3).• If a telephone number has not been assigned to
the selected device number, you cannot set thedevice status. See "Assigning NotificationNumbers" in this section to assign a telephonenumber.
4. Select the desired message type.1 to notify all messages.2 to notify urgent messages.
5. Select when the device will be used for messagenotification.1 for schedule (notification is sent each time a
message is received, but only during the timesprogrammed by the System Administrator).2 for continuously.3 for not use (notification is never sent).
3.4 Customising the Mes-sage Manager’s MailboxThe Message Manager can customise the MessageManager’s mailbox by changing the followingparameters.– The Message Manager’s mailbox password– The extension numbers of Operator 1, 2, and 3– Telephone numbers 1 and 2 used for call forwarding
destinations when Remote Call Forwarding is set toan outside line
Note• If the VPS is being programmed via KX-TVM
Maintenance Console, the Message Managercannot customise his or her mailbox. The VPSwill announce, "Sorry, this function is notavailable".
Message Manager’s Password
The Message Manager must enter the MessageManager password in order to log in before performingany Message Manager task. In order to ensure systemsecurity, we recommend selecting a long (maximum 16digits) password that can not be easily guessed.
Operator’s Extensions
When callers require help, they can dial [0] to betransferred to an operator. A maximum of 3 operators
Document Version 2.1 2008/04 Manager’s Manual 17
3.4 Customising the Message Manager’s Mailbox

can be programmed for each time mode; theseoperators are not necessarily the same as the operatorextensions programmed for the PBX. The extensionassigned as Operator 1 for the day mode is designatedas the Message Manager.
Telephone Numbers 1 and 2 for Re-mote Call Forward to Outside
After programming/changing the telephone numbersused for Remote Call Forward to Outside, the MessageManager must reset the remote call forwarding setting(see 3.7 Remote Call Forwarding Set), even if it wasalready enabled. Telephone numbers set here will notbe effective until remote call forwarding is reset. If youdo not reset remote call forwarding, calls will beforwarded to the old telephone numbers.1. Log in to the Message Manager’s mailbox.
• See 3.1 Logging in to the Message Manager’sMailbox.
2. 3
3. 1 to change the password.2 to accept.
4. Enter the password, then # .5. 1 to accept.6. 1 to change or assign the operator’s extension.
2 to accept.3 to delete, then go to step 9.
• Operator 1’s extension number cannot bedeleted.
7. Enter the extension number.8. 2 to accept.9. Repeat steps 6-8 to assign or to delete the
extension number for the Day, Night, Lunch andBreak Modes for each operator.
10. 1 to change or assign the telephone number 1setting.2 to accept the current setting, then go to step
13.11. Enter the telephone number using (0-9, ).
• Make sure you begin the telephone number withan outside line access number (to seize anoutside line).
• When connected to the KX-TD500 or a KX-TDEor KX-TDA series PBX, the maximum numberof characters allowed to be entered is 24; whenconnected to any other KX-T series PBX, 16.
12. 2 to accept.
13. 1 to change or assign the telephone number 2setting.2 to accept the current setting.
14. Enter the telephone number using (0-9, ).15. 2 to accept.
3.5 Setting the SystemClockThe system clock can be set directly from the telephone.It is important to set the clock accurately becauseMessage Waiting Notification, External MessageDelivery, redialling and rescheduling of ExternalMessage Delivery, and Automatic Message Deletionare all scheduled using this setting. The SystemAdministrator and System Manager are also able to setthe clock.If the start and end dates for daylight saving time areprogrammed, the VPS automatically adjusts the time fordaylight saving time.
Note• The Message Manager cannot set the system
clock while:– the VPS is being programmed via KX-TVM
Maintenance Console.– the System Manager is configuring
mailboxes, setting COS, System Clock,Service Mode, Company Greeting andIncoming Call service, or customising theSystem Manager’s Mailbox.
The VPS will announce, "Sorry, this function isnot available".
1. Log in to the Message Manager’s mailbox.• See 3.1 Logging in to the Message Manager’s
Mailbox.2. 4 1
3. Enter the current time, then # .4. 1 for AM.
2 for PM.• This option may not be available if the VPS is
programmed to use 24-hour time.5. 2 to accept.6. 1 to change the current date setting.7. Enter the current month, then # .
For example:• To enter January, press [1] [#].
8. Enter the day, then # .
18 Manager’s Manual Document Version 2.1 2008/04
3.5 Setting the System Clock

9. Enter the last 2 digits of the year, then # .10. 2 to accept.
3.6 Recording MessagesThe Message Manager is responsible for recordingvarious system messages (menus, voice labels, systemprompts, and system caller names) and is alsoresponsible for maintaining the following:• Company Greetings: A maximum of 32 company
greetings for business/non-business and lunch/break hours as well as holidays can be selected,recorded, or deleted as necessary.
• Company Name• Custom Service Menus: A maximum of 100
custom service menus can be recorded. Thesemenus guide callers to the services they requirewithout the need for a human operator.
• Voice Labels: A maximum of 20 Mailbox Groupscan be created by the System Administrator. Eachlist can have a voice label.
• System Prompts: The Message Manager canchange system prompts by recording new promptsand restoring them.
• Multilingual Selection Menu: With this menu,callers can select the language they prefer for voiceguidance. For example, the Message Manager canrecord a menu that announces:"For English, press (7).""For French, press (8).""For Chinese, press (9)."
• The System Caller Names: A maximum of 200Caller ID numbers can be registered by the SystemAdministrator. The Message Manager isresponsible for recording a name for each Caller IDnumber.
• On Hold Announcement Menu: With this menu,callers in a queue can listen to the announcementor music while they are on hold.
Note• If the VPS is being programmed via KX-TVM
Maintenance Console, the Message Managercannot record any messages. The VPS willannounce, "Sorry, this function is notavailable".
Recording Menus and Voice Labels
1. Log in to the Message Manager’s mailbox.
• See 3.1 Logging in to the Message Manager’sMailbox.
2. 5 to record messages.3. Select the desired number to record.
1 for Company Greetings.2 for Company Name.3 for Custom Service Menus.4 for Voice Labels for Mailbox Groups.5 for System Prompts.6 for Multilingual Selection Menu.7 for System Caller Names.8 for On Hold Announcement Menu.
4. For the item selected in step 3, follow these steps:a. For Company Greetings: Enter the Company
Greeting Number (1-32).b. For the Company Name: Go to step 5.c. For Custom Service Menus: Enter a Custom
Service Number (1-100).• Enter [0] to record the Custom Service exit
prompt.d. For Voice Labels: Enter a Mailbox Groups
number to labelled. (The System Administratorassigns list numbers.)
e. For the Multilingual Selection Menu: Go tostep 5.
f. For the On Hold Announcement Menu: Go tostep 5.
5. 1 to change the message.• If a message has not yet been recorded, go to
step 7.6. 1 to record a message.
2 to erase the current message, then go to step3 or 4.
7. 1 to end recording.8. 2 to accept.9. Repeat steps 4-8 to record other Company
Greetings, Custom Service Menus, and/or VoiceLabels.
Recording System Prompts
1. Log in to the Message Manager’s mailbox.• See 3.1 Logging in to the Message Manager’s
Mailbox.2. 5 5
3. Enter the system prompt number you want tochange.
4. To change specific prompts, go to step 5.
Document Version 2.1 2008/04 Manager’s Manual 19
3.6 Recording Messages

To change all prompts one after another withoutreviewing the current recording, go to step 6.
5. To change specific prompts:a. 1
b. Enter the prompt number you want to change(see 3.9 List of Prompts for VM and AAService).
c. The VPS plays the prompt number and itsprompt. If a prompt has not yet been recorded,the VPS plays the system prompt. If a prompt isturned off, "The prompt is now turned off" willplay before the prompt.
d. 1 to record.e. 1 to end recording.f. 2 to accept.g. Repeat steps 5b to 5f to record other prompts.
Note• It is possible to restore the original system
prompts included in the VPS using theincluded CD-ROM. Consult your SystemAdministrator about this feature.
6. To change all prompts one after another.a. 2
b. Enter the prompt number you want to change.c. 1 to change.d. 1 to end recording.e. 2 to accept.f. The VPS plays the next prompt number.g. Repeat steps 6c to 6f to record other prompts.
Recording System Caller Names
Before recording System Caller Names, the associatedtelephone numbers must first be programmed usingKX-TVM Maintenance Console. For more information,consult your System Administrator.1. Log in to the Message Manager’s mailbox.
• See 3.1 Logging in to the Message Manager’sMailbox.
2. 5
3. 7 to modify system caller names.4. Enter the Caller ID List Number*1 (1-200).
• Enter [ ] to go to step 3.5. 1 to change the name.
• If a name has not yet been recorded for thisCaller ID number, go to step 6.
• Press [2] to accept or [3] to erase the currentname, then go to step 4.
6. 1 to end recording.7. 2 to accept.8. Repeat steps 4-7 to record names for other Caller
ID List numbers.
*1 Guidance is "Caller Name Announcement number".
3.7 Remote Call Forward-ing SetThe Message Manager can program his or herextension from a remote location to forward varioustypes of calls to the desired extension or an outsidetelephone. There are 6 forwarding settings available:• FWD All: Forwards all incoming calls to a specified
extension number.• FWD Busy: Forwards all incoming calls to a
specified extension number when the line is busy.• FWD No Answer: Forwards all incoming calls to a
specified extension number when there is noanswer.
• FWD Busy or No Answer: Forwards all incomingcalls to a specified extension number when the lineis busy or there is no answer.
• FWD to Outside: Forwards all incoming calls totelephone number 1 or 2 (preprogrammed in theMailbox Setting), or to any other telephone number.
• FWD Cancel: Cancels the forwarding setting.
Note• This feature is only available with Panasonic
KX-T series PBXs using DPT Integration. Formore information, consult your SystemAdministrator.
• This feature is not available when the MessageManager’s extension (assigned for Operator 1in the Day Mode) is "0" (default). For moreinformation, consult your System Administrator.
• In order to use the FWD to Outside option,Remote Call Forward to CO must be enabledfor the Message Manager’s COS in the VPS,and must also be enabled for the COS assignedto the Message Manager’s extension number inthe PBX.
20 Manager’s Manual Document Version 2.1 2008/04
3.7 Remote Call Forwarding Set

Assigning Remote Call ForwardingSet
Before setting Remote Call Forwarding Outside, youshould first store 2 telephone numbers (see3.4 Customising the Message Manager’s Mailbox).1. Log in to the Message Manager’s mailbox.
• See 3.1 Logging in to the Message Manager’sMailbox.
2. 6
3. Select the desired forwarding setting.1 for FWD All.2 for FWD Busy.3 for FWD No Answer.4 for FWD Busy or No Answer.5 for FWD to Outside, then go to step 6.6 for FWD Cancel, then go to step 9.
4. Enter the extension number.5. 2 to accept the extension number, then go to
step 10.• Press [1] to change the extension number, then
go to step 4.6. 1 for telephone number 1, then go to step 8.
2 for telephone number 2, then go to step 8.3 for another telephone number.
• Before you can forward your calls to telephonenumber 1 or 2, you should first store thetelephone numbers you plan on using with thisfeature.
7. Enter the telephone number (0-9, ).• Make sure you begin the telephone number with
an outside line access number (to seize anoutside line).
• When connected to the KX-TD500 or a KX-TDEor KX-TDA series PBX, the maximum numberof characters allowed to be entered is 24; whenconnected to any other KX-T series PBX, 16.
8. 2 to accept, then go to step 10.• Press [1] to change the telephone number, then
go to step 6.9. 2 to accept.10. The new settings are transmitted to the PBX. If the
setting has been completed properly, you will hear:"Call forwarding accepted" or "Call forwarding iscancelled" as appropriate.
Note• If the VPS announces, "Call forwarding not
accepted. Please check the destinationnumber.", the forwarding setting has not
been completed properly at the PBX,possibly because a nonexistent extensionnumber has been entered as thedestination, or because the PBX does notsupport the Remote Call Forwardingfeature. For more information, consult yourSystem Administrator.
3.8 Setting the Timed Re-minderThe Message Manager can set or cancel the TimedReminder. The telephone will ring at the set timeaccording to the set mode (Once/Daily).
Note• This setting is only available when the VPS is
connected using DPT integration to a KX-TDEseries PBX or a KX-TDA series PBX (MPRVersion 2.1 or higher).
1. Log in to the Message Manager’s mailbox.• See 3.1 Logging in to the Message Manager’s
Mailbox.2. 7
3. 1 to change the setting.2 to accept, then go on-hook to finish.3 to cancel (turn off), then go on-hook to finish.
4. Enter the desired time, then # .5. 1 for AM.
2 for PM.• This option may not be available if the VPS is
programmed to use 24-hour time.When setting via VM Menu feature: the timeformat (12 or 24 hour) is determined by the systemclock. For more information, consult your SystemAdministrator.When setting via System Guidance: the timeformat (12 or 24 hour) is determined by the "Positionof "AM/PM" in Time Stamp" setting. For moreinformation, consult your System Administrator.
6. 1 to set once.2 to set daily.
7. 2 to accept.
Document Version 2.1 2008/04 Manager’s Manual 21
3.8 Setting the Timed Reminder

3.9 List of Prompts for VM and AA ServiceThere are over 1000 system prompts in the VPS. These prompts can be customised by re-recording them tochange their content, or can be recorded in various languages (KX-TVM50: 3 languages; KX-TVM200: 10languages). The maximum length of a prompt is fixed at 6 min.When recording prompts in other languages, most often it is not necessary to record all prompts contained inthe VPS; recording over 1000 system prompts is a big undertaking. When a caller is connected to AA serviceor VM service, most likely he or she will only hear a small selection of the following prompts. Therefore, it isnecessary only to record (or modify) the prompts that callers will hear.Please change prompts to suit the application. For example, prompt no. [1068] could be re-recorded toannounce, "Thank you for calling ABCD Travel", instead of "Welcome to the Voice Processing System".It is possible to record the prompts you wish to modify on your computer in .wav format and upload them tothe VPS. For more information, consult your System Administrator.
Prompts Common to VM and AA Services
Prompt No. Modifiable Prompts
324 Good afternoon
325 Good evening
326 Good morning
1068 Welcome to the Voice Processing System
876 To enter by name, press the pound sign and [1]
196 Enter the first 3 or 4 letters of the person’s last name
272 For ‘Q’, press [7]
273 For ‘Z’, press [9]
639 Sorry, there are no more matching names
647 Sorry, this name cannot be found
350 Incorrect entry
346 If you are using a rotary telephone, stay on the line
785 To call the operator, press [0]
82 Calling the operator
548 Please wait a moment
1066 Welcome to the general delivery mailbox
545 Please leave a message at the tone
869 To end recording, hang up or press [1] for more features
918 To pause and restart recording, press [2]
943 To review, press [1]
761 To accept, press [2]
22 Manager’s Manual Document Version 2.1 2008/04
3.9 List of Prompts for VM and AA Service
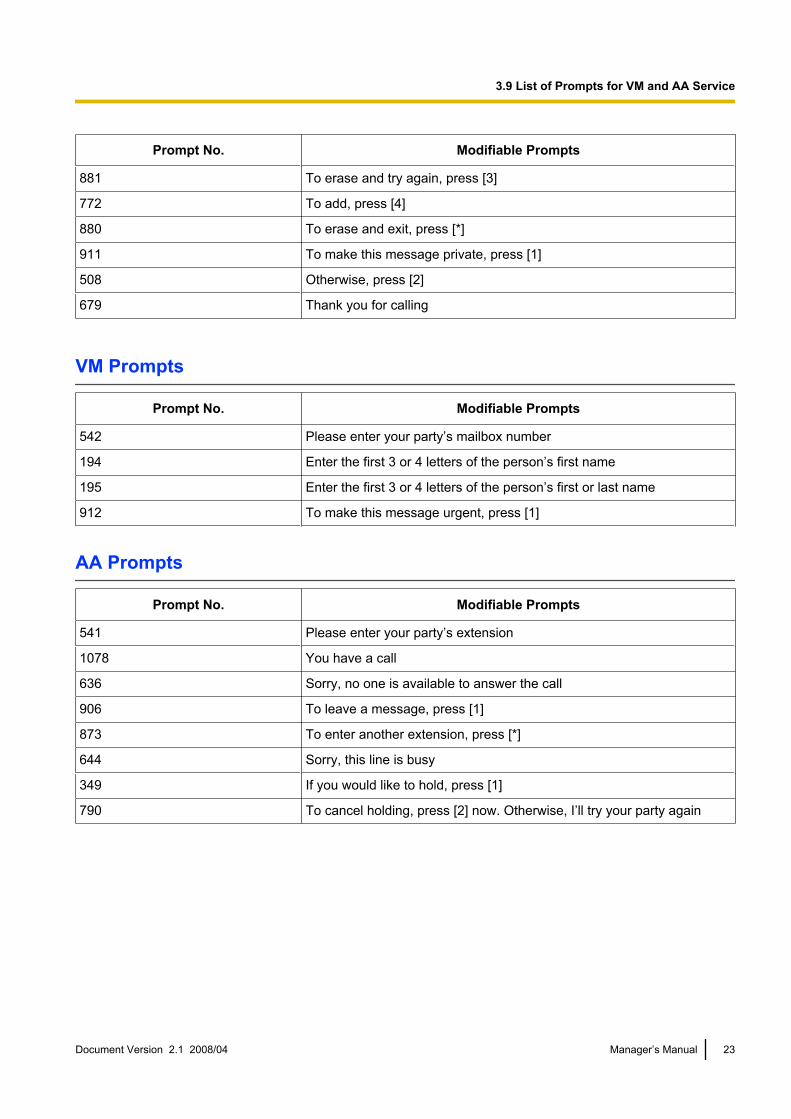
Prompt No. Modifiable Prompts
881 To erase and try again, press [3]
772 To add, press [4]
880 To erase and exit, press [*]
911 To make this message private, press [1]
508 Otherwise, press [2]
679 Thank you for calling
VM Prompts
Prompt No. Modifiable Prompts
542 Please enter your party’s mailbox number
194 Enter the first 3 or 4 letters of the person’s first name
195 Enter the first 3 or 4 letters of the person’s first or last name
912 To make this message urgent, press [1]
AA Prompts
Prompt No. Modifiable Prompts
541 Please enter your party’s extension
1078 You have a call
636 Sorry, no one is available to answer the call
906 To leave a message, press [1]
873 To enter another extension, press [*]
644 Sorry, this line is busy
349 If you would like to hold, press [1]
790 To cancel holding, press [2] now. Otherwise, I’ll try your party again
Document Version 2.1 2008/04 Manager’s Manual 23
3.9 List of Prompts for VM and AA Service

Panasonic Communications Co., Ltd.1-62, 4-chome, Minoshima, Hakata-ku, Fukuoka 812-8531, Japan
http://www.panasonic.com/csd
Copyright:This material is copyrighted by Panasonic Communications Co., Ltd., and may be reproduced for internal use only.All other reproduction, in whole or in part, is prohibited without the written consent of Panasonic CommunicationsCo., Ltd.
© 2005, 2007 Panasonic Communications Co., Ltd. All Rights Reserved.
PSQX4349YA KK1007HF1048