vmware esx 3 - cis center for internet security · timeliness or completeness of any product or ......
TRANSCRIPT
Security Configuration Benchmark For
Version 1.0.0 November 9, 2009
VMware ESX 3.5
Copyright 2001-2009, The Center for Internet Security http://cisecurity.org

TERMS OF USE Background. CIS provides benchmarks, scoring tools, software, data, information, suggestions, ideas, and other services and materials from the CIS website or elsewhere (“Products”) as a public service to Internet users worldwide. Recommendations contained in the Products (“Recommendations”) result from a consensus-building process that involves many security experts and are generally generic in nature. The Recommendations are intended to provide helpful information to organizations attempting to evaluate or improve the security of their networks, systems and devices. Proper use of the Recommendations requires careful analysis and adaptation to specific user requirements. The Recommendations are not in any way intended to be a “quick fix” for anyone’s information security needs. No representations, warranties and covenants. CIS makes no representations, warranties or covenants whatsoever as to (i) the positive or negative effect of the Products or the Recommendations on the operation or the security of any particular network, computer system, network device, software, hardware, or any component of any of the foregoing or (ii) the accuracy, reliability, timeliness or completeness of any Product or Recommendation. CIS is providing the Products and the Recommendations “as is” and “as available” without representations, warranties or covenants of any kind. User agreements. By using the Products and/or the Recommendations, I and/or my organization (“we”) agree and acknowledge that: No network, system, device, hardware, software or component can be made fully secure; We are using the Products and the Recommendations solely at our own risk; We are not compensating CIS to assume any liabilities associated with our use of the Products or the Recommendations, even risks that result from CIS’s negligence or failure to perform; We have the sole responsibility to evaluate the risks and benefits of the Products and Recommendations to us and to adapt the Products and the Recommendations to our particular circumstances and requirements; Neither CIS, nor any CIS Party (defined below) has any responsibility to make any corrections, updates, upgrades or bug fixes or to notify us if it chooses at it sole option to do so; and Neither CIS nor any CIS Party has or will have any liability to us whatsoever (whether based in contract, tort, strict liability or otherwise) for any direct, indirect, incidental, consequential, or special damages (including without limitation loss of profits, loss of sales, loss of or damage to reputation, loss of customers, loss of software, data, information or emails, loss of privacy, loss of use of any computer or other equipment, business interruption, wasted management or other staff resources or claims of any kind against us from third parties) arising out of or in any way connected with our use of or our inability to use any of the Products or Recommendations (even if CIS has been advised of the possibility of such damages), including without limitation any liability associated with infringement of intellectual property, defects, bugs, errors, omissions, viruses, worms, backdoors, Trojan horses or other harmful items. Grant of limited rights. CIS hereby grants each user the following rights, but only so long as the user complies with all of the terms of these Agreed Terms of Use: Except to the extent that we may have received additional authorization pursuant to a written agreement with CIS, each user may download, install and use each of the Products on a single computer; Each user may print one or more copies of any Product or any component of a Product that is in a .txt, .pdf, .doc, .mcw, or .rtf format, provided that all such copies are printed in full and are kept intact, including without limitation

3 | P a g e
the text of this Agreed Terms of Use in its entirety. Retention of intellectual property rights; limitations on distribution. The Products are protected by copyright and other intellectual property laws and by international treaties. We acknowledge and agree that we are not acquiring title to any intellectual property rights in the Products and that full title and all ownership rights to the Products will remain the exclusive property of CIS or CIS Parties. CIS reserves all rights not expressly granted to users in the preceding section entitled “Grant of limited rights.” Subject to the paragraph entitled “Special Rules” (which includes a waiver, granted to some classes of CIS Members, of certain limitations in this paragraph), and except as we may have otherwise agreed in a written agreement with CIS, we agree that we will not (i) decompile, disassemble, reverse engineer, or otherwise attempt to derive the source code for any software Product that is not already in the form of source code; (ii) distribute, redistribute, encumber, sell, rent, lease, lend, sublicense, or otherwise transfer or exploit rights to any Product or any component of a Product; (iii) post any Product or any component of a Product on any website, bulletin board, ftp server, newsgroup, or other similar mechanism or device, without regard to whether such mechanism or device is internal or external, (iv) remove or alter trademark, logo, copyright or other proprietary notices, legends, symbols or labels in any Product or any component of a Product; (v) remove these Agreed Terms of Use from, or alter these Agreed Terms of Use as they appear in, any Product or any component of a Product; (vi) use any Product or any component of a Product with any derivative works based directly on a Product or any component of a Product; (vii) use any Product or any component of a Product with other products or applications that are directly and specifically dependent on such Product or any component for any part of their functionality, or (viii) represent or claim a particular level of compliance with a CIS Benchmark, scoring tool or other Product. We will not facilitate or otherwise aid other individuals or entities in any of the activities listed in this paragraph. We hereby agree to indemnify, defend and hold CIS and all of its officers, directors, members, contributors, employees, authors, developers, agents, affiliates, licensors, information and service providers, software suppliers, hardware suppliers, and all other persons who aided CIS in the creation, development or maintenance of the Products or Recommendations (“CIS Parties”) harmless from and against any and all liability, losses, costs and expenses (including attorneys' fees and court costs) incurred by CIS or any CIS Party in connection with any claim arising out of any violation by us of the preceding paragraph, including without limitation CIS’s right, at our expense, to assume the exclusive defense and control of any matter subject to this indemnification, and in such case, we agree to cooperate with CIS in its defense of such claim. We further agree that all CIS Parties are third-party beneficiaries of our undertakings in these Agreed Terms of Use. Special rules. CIS has created and will from time to time create special rules for its members and for other persons and organizations with which CIS has a written contractual relationship. Those special rules will override and supersede these Agreed Terms of Use with respect to the users who are covered by the special rules. CIS hereby grants each CIS Security Consulting or Software Vendor Member and each CIS Organizational User Member, but only so long as such Member remains in good standing with CIS and complies with all of the terms of these Agreed Terms of Use, the right to distribute the Products and Recommendations within such Member’s own organization, whether by manual or electronic means. Each such Member acknowledges and agrees that the foregoing grant is subject to the terms of such Member’s membership arrangement with CIS and may, therefore, be modified or terminated by CIS at any time. Choice of law; jurisdiction; venue. We acknowledge and agree that these Agreed Terms of Use will be governed by and construed in accordance with the laws of the State of Maryland, that any action at law or in equity arising out of or relating to these Agreed Terms of Use shall be filed only in the courts located in the State of Maryland, that we hereby consent and submit to the personal jurisdiction of such courts for the purposes of litigating any such action. If any of these Agreed Terms of Use shall be determined to be unlawful, void, or for any reason unenforceable, then such terms shall be deemed severable and shall not affect the validity and enforceability of any remaining provisions. We acknowledge and agree that we have read these Agreed Terms of Use in their entirety, understand them and agree to be bound by them in all respects.

4 | P a g e
Table of Contents
Table of Contents .................................................................................................................................................. 4
Overview .................................................................................................................................................................. 6
Consensus Guidance ........................................................................................................................................ 6
Intended Audience ........................................................................................................................................... 6
Acknowledgements ......................................................................................................................................... 7
Typographic Conventions ............................................................................................................................. 8
Configuration Levels ....................................................................................................................................... 8
Level-I Benchmark settings/actions .................................................................................................... 8
Level-II Benchmark settings/actions ................................................................................................... 8
Scoring Status .................................................................................................................................................... 8
Scorable ........................................................................................................................................................... 8
Not Scorable ................................................................................................................................................... 8
Recommendations ................................................................................................................................................ 9
1.1 Installation Considerations.............................................................................................................. 9
1.1.1 Do Not Use the Management Network for the Virtual Machine Network (Level 1, Not Scorable) ............................................................................................................................................ 9
1.1.2 Protect against the Root File System Filling Up (Level 1, Scorable) .................... 11
1.2 Preparation, Packages, Patching ................................................................................................. 12
1.2.1 Keep System Patched (Level 1, Not Scorable) .............................................................. 12
1.2.2 BIOS Configuration (Level 1, Not Scorable)................................................................... 14
1.2.3 Minimize Boot services (Level 1, Scorable) ................................................................... 14
1.2.4 Configuring NTP (Level 1, Scorable) ................................................................................ 16
1.3 System Access, Authentication, Authorization, and User Accounts .............................. 18
1.3.1 SSH Access (Level 1, Scorable) ........................................................................................... 18
1.3.2 Implement SUDO (Level 1, Not Scorable) ...................................................................... 20
1.3.3 Require Password History (Level 1, Scorable) ............................................................. 21
1.3.4 Require Password Complexity (Level 1, Scorable) ..................................................... 21
1.3.5 Failed Login Attempts (Level 1, Scorable) ..................................................................... 23
1.3.6 Maximum Days Before Password Change (Level 1, Scorable) ............................... 24
1.3.7 Minimum Days Before Password Change (Level 1, Scorable) ................................ 25
1.3.8 Minimum Password Length (Level 1, Scorable) .......................................................... 26
1.4 Logging ................................................................................................................................................. 28
1.4.1 Log Compression and Rotation (Level 1, Scorable).................................................... 28
1.4.2 Review Logs (Level 1, Not Scorable) ................................................................................ 29
1.4.3 Configure syslogd to Send Logs to a Remote LogHost (Level 1, Scorable) ........ 30
1.5 Networking ......................................................................................................................................... 31
1.5.1 Protect Against MAC Address Spoofing, Forged Transmits, and Promiscuous mode (Level 1, Scorable) ....................................................................................................................... 31
1.5.2 Configure the Firewall to Allow Only Authorized Traffic (Level 1, Scorable) .. 33
1.6 Storage .................................................................................................................................................. 36
1.6.1 Use CHAP to Connect to iSCSI Devices (Level 1, Scorable) ...................................... 36
1.7 Warning Banners .............................................................................................................................. 37
1.7.1 Create Warning Banners (Level 1, Scorable) ................................................................ 37
1.8 Guest Interaction with the Host .................................................................................................. 38
1.8.1 Remove Guest Control of Hardware Devices (Level 1, Scorable) ......................... 38
1.8.2 Remove SetInfo Message Logging (Level 1, Scorable) .............................................. 40
1.8.3 Disable Cut and Paste (Level 1, Scorable) ...................................................................... 41
1.8.4 Limit Log File Size and Number of Logs (Level 1, Scorable) ................................... 42
5 | P a g e
1.9 File / Directory Permissions and Ownership ........................................................................ 44
1.9.1 Disable Group and Other Write File Permissions for .vmx Files (Level 1, Scorable) ...................................................................................................................................................... 44
1.9.2 Disable Group and Other Read, Write and Execute File Permissions for .vmdk Files (Level 1, Scorable) ......................................................................................................................... 45
1.9.3 Restrict Owner and Group File Ownership to Root for .vmx Files (Level 1, Scorable) ...................................................................................................................................................... 45
1.9.4 Restrict Owner and Group File Ownership to Root for .vmdk Files (Level 1, Scorable) ...................................................................................................................................................... 46
Appendix A: References ................................................................................................................................... 48
Appendix B: Acronyms..................................................................................................................................... 50
Appendix C: CIS Red Hat Enterprise Linux 5 Benchmark .................................................................. 51
Appendix D: Other Considerations .............................................................................................................. 52
Appendix E: Alternate Audit Methods ....................................................................................................... 53
1.5.1 Protect Against MAC Address Spoofing, Forged Transmits, and Promiscuous mode (Alternate Audit Method) ......................................................................................................... 53
1.8.1 Remove Guest Control of Hardware Devices (Alternate Audit Method) ........... 53
1.8.2 Remove SetInfo Message Logging (Alternate Audit Method) ................................. 55
1.8.3 Disable Cut and Paste (Alternate Audit Method) ........................................................ 57
1.8.4 Limit Log File Size and Number of Logs (Alternate Audit Method) ..................... 59
Appendix F: Change History .......................................................................................................................... 61
6 | P a g e
Overview This document, Security Configuration Benchmark for VMware ESX 3.5, provides prescriptive guidance for establishing a secure configuration posture for VMware ESX 3.5 running on hardware compliant with the vendor compatibility guide http://www.vmware.com/resources/compatibility/search.php?action=base&deviceCategory=server. This guide was tested against VMware ESX 3.5 as installed by a vendor evaluation ISO containing Update 3, build number 153875 downloaded from http://www.vmware.com. To obtain the latest version of this guide, please visit http://cisecurity.org. If you have questions, comments, or have identified ways to improve this guide, please write to us at [email protected].
Consensus Guidance This guide was created using a consensus review process comprised of volunteer and contract subject matter experts. Consensus participants provide perspective from a diverse set of backgrounds including consulting, software development, audit and compliance, security research, operations, government, and legal. Each CIS benchmark undergoes two phases of consensus review. The first phase occurs during initial benchmark development. During this phase, subject matter experts convene to discuss, create, and test working drafts of the benchmark. This discussion occurs until consensus has been reached on benchmark recommendations. The second phase begins after the benchmark has been released to the public Internet. During this phase, all feedback provided by the Internet community is reviewed by the consensus team for incorporation in the CIS benchmark. If you are interested in participating in the consensus review process, please send us a note to [email protected].
Intended Audience This document is intended for system and application administrators, security specialists, auditors, help desk, and platform deployment personnel, who plan to develop, deploy, assess, or secure solutions that incorporate VMware ESX 3.5 on hardware compliant with the vendor compatibility guide.

7 | P a g e
Acknowledgements This benchmark exemplifies the great things a community of users, vendors, and subject matter experts can accomplish through consensus collaboration. The CIS community thanks the entire consensus team with special recognition to the following individuals who contributed greatly to the creation of this guide:
Authors Michael Hoesing, University of Nebraska at Omaha Iben Rodriguez
Maintainers Edward L. Haletky, AstroArch Consulting, Inc. Michael Hoesing, University of Nebraska at Omaha Iben Rodriguez Lance Seelbach, CSC Chyna Trople, TripWire
Editors Michael Hoesing, University of Nebraska at Omaha JP Schaaphok Jason Young
Testers Michael Hoesing, University of Nebraska at Omaha Iben Rodriguez
Contributors and Reviewers Michael Berman, Catbird Cody Bunch, Rackspace Banjot Chanana, VMware Charu Chaubal, VMware Blake Frantz, Center for Internet Security Edward L. Haletky, AstroArch Consulting, Inc. Moses Hernandez Wade Holmes, Siwel Consulting Joel Kirch Steven Piliero, Center for Internet Security Hemma Prafullchandra, HyTrust, Inc. Rob Randell, VMware John Reeman, VM Informer JP Schaaphok, 4Base Technology, Inc. Lance Seelbach, CSC William Stearns Chyna Trople, TripWire Rob VandenBrink Joe Wulf, ProSync Technologies Group, Inc. Jason Young, HyTrust, Inc.
8 | P a g e
Typographic Conventions The following typographical conventions are used throughout this guide:
Convention Meaning Stylized Monospace font Used for blocks of code, command, and script examples.
Text should be interpreted exactly as presented. Monospace font Used for inline code, commands, or examples. Text should
be interpreted exactly as presented. <italic font in brackets> Italic texts set in angle brackets denote a variable
requiring substitution for a real value. Italic font Used to denote the title of a book, article, or other
publication.
Note Additional information or caveats
Configuration Levels This section defines the configuration levels that are associated with each benchmark recommendation. Configuration levels represent increasing levels of security assurance.
Level-I Benchmark settings/actions Level-I Benchmark recommendations are intended to:
be practical and prudent; provide a clear security benefit; and do not negatively inhibit the utility of the technology beyond acceptable means
Level-II Benchmark settings/actions
Level-II Benchmark recommendations exhibit one or more of the following characteristics: are intended for environments or use cases where security is paramount acts as defense in depth measure may negatively inhibit the utility or performance of the technology
Scoring Status This section defines the scoring statuses used within this document. The scoring status indicates whether compliance with the given recommendation is discernable in an automated manner.
Scorable The platform’s compliance with the given recommendation can be determined via automated means.
Not Scorable
The platform’s compliance with the given recommendation cannot be determined via automated means.

9 | P a g e
Recommendations
1.1 Installation Considerations
1.1.1 Do Not Use the Management Network for the Virtual Machine Network (Level 1, Not Scorable)
Description: During the installation of ESX, unselect the default option to create a default network for virtual machines.
Rationale: The default installation option will combine the Virtual Machine network with the virtual infrastructure Service Console management network. This could potentially allow network-based access to the Service Console to a wider population of users than just system administrators, possibly allowing access to sensitive configuration traffic. The Service Console management traffic should always be isolated on a separate network.
Remediation: If subsequent to installation it is determined the management network segment is on the same segment as the guest and or data (i.e. iSCSI) traffic, additional networking will need to be enabled. Assuming the requisite amount of physical network interface cards (nics) are present in the host (4 or 6 depending if IP data network is involved and to provide for redundancy) and cabled to the correct external network routing, switching, DNS and other components or services, configure the additional nics using:
1. Select the <host> in the navigation panel. 2. Select the Configuration tab. 3. Click the Network Adapters link. 4. Verify all physical network adapters, each sequentially named <vmnic*>, for the
host are listed. Note: The <vmnic*> number assigned to the desired nic and the vSwitch assigned should be none for newly added nics.
5. Select the Networking link on the left Hardware panel. 6. Select Add Networking link in the upper right hand corner. 7. Select the Virtual Machine radio button for a connection type, then Next. 8. Verify the radio button for Create a virtual switch is selected. 9. Click the check box for the appropriate <vmnic*> connected to the desired
segment of your external network that was just added, and then select Next. 10. Enter a <network label name> (which is the new PortGroup name) then select
Next. 11. Verify the network label and nic association are correct. 12. Select Finish. 13. Configure security settings for both the new vSwitch and the PortGroup (see
section 1.5.1.)

10 | P a g e
14. Power off each guest, and in each guest: a. Select Edit Settings. b. Select the network adapter, on the right at the bottom there should be a
Network Connection: Network Label title. c. Select the name of the new Network Label (PortGroup), created above, in
the drop down the section box. 15. Restart the guest. 16. Configure network settings inside the guest (i.e. static IP addresses.)
Audit: Evaluate network segmentation by reviewing vCenter displays of networking by performing the following:
1. Select the <host> in the navigation panel. 2. Select the Configuration tab. 3. Click the Network Adapters link, this will display a listing of the physical adapters in
the host with each sequentially named <vmnic*> . 4. Review the listing of each <vmnic*> and its association with a numbered virtual
switch <vSwitch*> and the <IP address range> associated with the vSwitch/vmnic combination. Each of the 2 (or 3) traffic types should have their own unique <vmnic*> / <vSwitch*>/ <IP address range> pairing with no overlap in addressing.
5. If the preceding step indicates segregation is possible, then review the association of guests with virtual switches by selecting the Networking link.
6. In the networking screen, review each virtual switches and ensure all guests are on a virtual switch (or switches) that does not also have management traffic (Service Console) or data traffic (VMkernel as is that case for iSCSI)
On the ESX host, the following commands can be used to display networking information:
1. Review the vendor name of the nic and its PCI location on the motherboard. Verify there are at least 2 nics (4 or 6 would facilitate failover.)
esxcfg-nics –l
2. Review the IP addresses associated with virtual software interfaces in ESX that the
service console either uses for management or data traffic. Verify none of the IP network address ranges listed are available for guest use.
esxcfg-vswif –l
3. Review the sequentially numbered virtual switch (<vSwitch*>) and the <vnic*> that
it is coupled with and the portgroups that are associated with a <vmnic*> / <vSwitch*> pair. Verify there are at least 2 vSwitches, one connected to a Service Console portgroup for management and another for connection to the production network for guest traffic, and a possible third connection to IP storage with a default portgroup name of VMkernel.

11 | P a g e
4. Verify an additional VMKernel portgroup has been created for VMotion traffic and kept isolated from other networks. For example: VMkVMotion
esxcfg-vswitch –l
5. Review which portgroup a guest is associated with. Each available Ethernet
connection contains a configuration line of ethernet*.networkName = <yournetworkname>. Review the <yournetworkname> for each connection defined in the guest configuration file for association with the appropriate production network name and the absence of Service Console, VMkernel or other management related portgroups
cat /vmfs/volumes/<storeagedevicename>/<guestname*> / <guestname.vmx |
grep ".networkName ="
References: More complete descriptions and other remediation options are available in the vendor documentation http://www.vmware.com/support/pubs/vi_pages/vi_pubs_35.html
1.1.2 Protect against the Root File System Filling Up (Level 1, Scorable)
Description: During installation, the following file system structures should be configured on their own disk partitions with each having a minimum size greater than or equal to 5000 1K-blocks:
/ 5000
/boot 5000
/home 5000
swap
/tmp 5000
/var 5000
/var/core 5000
/var/log 5000
Rationale: If these partitions fill up, it can cause a denial of service.
Note: The above file systems are in addition to the default /, /boot, swap, and /var/log partitions. Core files, which could be large as they may result from dump situations, are placed within the /var/core/ directory. In a default partitioning scheme, these core files can fill up the root partition /.
Remediation: If the default partition configuration was used during the installation process, that configuration process will consume the whole drive leaving no room for the suggested additional partitions. The affected host must either be reinstalled or an exception to policy

12 | P a g e
granted. If default partitions are used, change the installation procedures or scripts to modify the partitions and sizes to the recommendations during future installations.
Audit: Verify the output of the df command and ensure the 8 partitions above, are configured on their own disk partition in the Filesystem column and their files sizes in the 1K-blocks column is greater than or equal to 5000.
df
For example: here is an example of a system that is configured correctly.
# df
Filesystem 1K-blocks Used Available Use% Mounted on
/dev/sda5 5162796 1392180 3508360 29% /
/dev/sda1 248895 30271 205774 13% /boot
/dev/sda9 4127076 32992 3884440 1% /home
/dev/sda8 4127076 311752 3605680 8% /opt
none 134284 0 134284 0% /dev/shm
/dev/sda10 4127076 272108 3645324 7% /tmp
/dev/sda7 4127076 246568 3670864 7% /var
/dev/sda3 5162828 32828 4867740 1% /var/Core
/dev/sda6 4127076 142044 3775388 4% /var/log
References: 1. VMWare, Inc. (2009). ESX Server 3 Installation Guide - Install ESX Server 3.5, VC 2.5.
Available: http://vmware.com/pdf/vi3_35/esx_3/r35/vi3_35_25_installation_guide.pdf
1.2 Preparation, Packages, Patching
1.2.1 Keep System Patched (Level 1, Not Scorable)
Description: It is critical that an organization develop a formal process for keeping up-to-date with applicable vendor patches. VMware uses three categories for patches: Security, Critical, and General. The patch # refers to KB (knowledge base) article number that goes into more detail. VMware will (usually) issue a KB article when they become aware of security vulnerabilities and other serious functionality issues before they issue a patch. However, it is up to the organization to actually download and install these patches in accordance to their policies and SLA requirements, some patches may require a reboot of the system. Patches should typically be evaluated in a test environment, before being implemented into a QA/Production environment. It is recommended that the VMware Update Manager be used for this purpose. Note: Red Hat operating system patches should not be applied to the ESX host console operating system.
Rationale:
13 | P a g e
Applying vendor supported patches minimizes vulnerabilities, utilizes the vendor’s security research and their product knowledge regarding compatibility of changes with other components of the console operating system.
Remediation: If Update Manager is installed, follow the procedures for that application to identify hosts and the patches needed, then apply as instructed by that software. Log on to the service console; acquire root privileges and performing the following:
1. Run a test install to check dependencies and verify sufficient disk space: esxupdate –d <url_of_update_repository> --test update
2. Install patches, via the command line, on the ESX host after the patches have been:
Evaluated as relevant to your organizations environment and prioritized (e.g. wait for the next update window or apply immediately.)
Downloaded and unzipped if needed. Moved to the update repository. Tested in a non-production environment. Approved and documented including backup and roll-back plans in accordance
with your organization’s change management policies and procedure.
Note: Some patches require rebooting the guests and or the host. Review each patch for reboot and other requirements or dependencies and communicate timelines to affected parties.
esxupdate –d <url_of_update_repository> update
Audit: Log on to the service console; acquire root privileges and performing the following:
1. Determine the version and build of your ESX host:
vmware -v
2. Determine the patches that have been installed:
# Execute the following for ESX Server 3.5 Update 3 or higher
esxupdate –a query
# Execute "esxupdate –l query" for older installations
3. Compare the installed patches to the list of vendor patches for the version and build
number, obtained from the previous command, as shown per the vendor at:

14 | P a g e
http://support.vmware.com/selfsupport/download/. Assess any variance for applicability to the environment and any authorized exceptions.
Note: Optional audit steps.
4. Review the patch activity log for errors:
cat /var/log/vmware/esxupdate.log
5. Determine the list of CVE’s resolved by installed patches:
rpm –qa –changelog | grep CVE
References: 1. VMWare, Inc. (2009). VMware Update Manager Administration Guide. Available:
http://www.vmware.com/pdf/vi3_vum_10_admin_guide.pdf. 2. VMWare, Inc. (2008). ESX Server 3 Patch Management Guide. Available:
http://www.vmware.com/pdf/vi3_35/esx_3/r35/vi3_35_25_esxupdate.pdf. 3. VMware Support Center -Download Patches:
https://www.vmware.com/mysupport/download/.
1.2.2 BIOS Configuration (Level 1, Not Scorable)
Description: Disable the server's ability to boot off all non-hard disk devices, including floppy, CD-ROM, and USB. Configure any required BIOS passwords in conformance with the organization’s policy.
Rationale: Providing access control to the BIOS and limiting boot sources can reduce the risk that the physical server’s BIOS can be insecurely configured or that an organization’s storage or network resources may be accessed by a non-conforming operating system.
Remediation: While the system is booting press the appropriate key to enter the BIOS configuration, enter a password if required, and navigate to the menu item that controls the boot sequence and set the boot order to not boot off of the removable media.
Audit: While the system is booting, observe the administrator accessing the BIOS menu using organization approved credentials and display the boot settings for the absence of removable media choices.
1.2.3 Minimize Boot services (Level 1, Scorable)
Description:

15 | P a g e
Services enabled at ESX host startup should be limited to the vendor’s default services and any authorized exceptions.
Rationale: Any additional services running on an ESX host beyond, added or omitted, to the vendor’s default configuration per the list below, could diminish host performance or introduce an attack vector.
Remediation: 1. Compare services discovered in the audit procedures with the recommended list of
services presented. For enabled services not on the recommended list, determine whether they are required and disable unnecessary services with the chkconfig command.
/sbin/chkconfig <servicename> off
Note: Some services may also require a firewall rule change or rule addition. These items, such as NTP (see also section 2.5), are best changed using vCenter if available.
2. Enable services missing from the boot sequence with the chkconfig command for
the list of services shown in the audit section.
/sbin/chkconfig --level 3 <servicename> on
Audit: 1. Ensure only and all of the following services are scheduled to start at run level 3:
microcode_ctl
vmkstart
vmware
vmware-aam
vmware-late
vmware-webAccess
vmware-vmkauthd
mgmt-vmware
vmware-autostart
vmware-vpxa
megaraid_sas_ioctl
mptctlnode
firewall
network
syslog
irqbalance
random
ipmi
sshd
xinetd
ntpd
crond
local
pegasus
16 | P a g e
wsman
Note: the service cciss_char_interface was added with ESX 3.5 Update 4
2. Compare the results from the following command to the list above:
chkconfig –list | grep 3:on
References: 1. VMWare, Inc. (2009). ESX Server 3 Configuration Guide. Available:
http://www.vmware.com/pdf/vi3_35/esx_3/r35/vi3_35_25_3_server_config.pdf. 2. VMWare, Inc. (2009). Security Hardening - VMware Infrastructure 3 (VMware ESX 3.5
and VMware VirtualCenter 2.5). Available: http://www.vmware.com/files/pdf/vi35_security_hardening_wp.pdf.
1.2.4 Configuring NTP (Level 1, Scorable)
Description: Add configuration settings to enable system clock synchronization with Network Time Protocol (NTP) server(s).
Rationale: Keeping your systems synchronized to a local or remote NTP server ensures log entries are date and time stamped consistently across systems allowing for accurate event correlation. This also ensures proper functioning on the system given its interaction to other systems (e.g. vCenter). The default installation of an ESX host does not configure NTP, since the location of your NTP server varies by organization.
Remediation: Adding NTP requires enabling the service, allowing the service through the firewall, and configuring the ESX NTP client for the type and location of the NTP server.
1. Using vCenter, select the host from inventory. 2. Select the Configuration tab. 3. Select the Security Profile in the Software panel. 4. Click the Properties link and in the Firewall Properties pop up window, scroll
down the ungrouped services to NTP Client, 5. Select the empty check box in front of NTP Client, and you will be returned to the
configuration page where NTP Client is now showing in the Outgoing Connections list associated with port 123. Note: These steps will both activate the service and open the related port through the firewall.
6. Select Time Configuration in the Software panel.
17 | P a g e
7. Click the Properties link and in the Time Configuration pop up window, click the Options buton.
8. Select NTP Settings in the NTP Daemon (ntpd) Options dialog. 9. Use the Add… button to add the address of an <NTP server>. 10. Repeat step 9 until three NTP servers are present. 11. Select the check box Restart NTP service to apply changes and click the OK
button. 12. Click the OK button to close the Time Configuration dialog.
Note: If vCenter is not used then enable NTP, open a firewall rule, and define the NTP server following the vendor’s steps described in the knowledge base article at http://kb.vmware.com/kb/1339.
Audit: 1. Verify the NTP service is running. If no output is present the test fails.
ps aux | grep ntp | grep –v grep
2. Verify the NTP service is allowed out through the firewall. If the status is blocked or
the NTP service is not on then the test fails.
esxcfg-firewall –q ntpClient
3. Review /etc/ntp.conf and verify only the following tokens are set:
a. The first restrict token is set to 127.0.0.1.
grep ^restrict[[:space:]]127\.0\.0\.1 /etc/ntp.conf
b. The second restrict token is set to kod nomodify notrap noquery nopeer.
grep
^restrict[[:space:]]kod[[:space:]]nomodify[[:space:]]notrap[[:space:
]]noquery[[:space:]]nopeer /etc/ntp.conf
c. The first server token is set to <authorized_NTP_server_primary>.
grep ^server[[:space:]]<authorized_NTP_server_primary> /etc/ntp.conf
d. The second server token is set to <authorized_NTP_server_secondary>.
grep ^server[[:space:]]<authorized_NTP_server_secondary> \
/etc/ntp.conf
e. The third server token is set to <authorized_NTP_server_tertiary>.
18 | P a g e
grep ^server[[:space:]]<authorized_NTP_server_tertiary> \
/etc/ntp.conf
4. Review /etc/ntp/step-tickers and verify only authorized NTP servers are
present: a. The first server is set to <authorized_NTP_server_primary>.
grep ^<authorized_NTP_server_primary> /etc/ntp/step-tickers
b. The second server is set to <authorized_NTP_server_secondary>.
grep ^<authorized_NTP_server_secondary> /etc/ntp/step-tickers
c. The third server is set to <authorized_NTP_server_tertiary>.
grep ^<authorized_NTP_server_tertiary> /etc/ntp/step-tickers
References: 1. VMware Knowledgebase article on NTP: http://kb.vmware.com/kb/1339
1.3 System Access, Authentication, Authorization, and User Accounts
1.3.1 SSH Access (Level 1, Scorable)
Description: Remote shell access to the console operating system should protect both the authentication credentials of the administrator and the content communicated between the ESX host and the administrator using secure shell (SSH). Do not enable Direct Root SSH. Do not enable direct su to root, only allow sudo (see section 1.3.2). Note: Direct console access should be mitigated with physical security controls. Also, other vendor supplied remote access tools may rely on the SSL protocol to protect browser based sessions. Review the vendor recommendations for replacing default, vendor supplied certificates http://www.vmware.com/pdf/vi_vcserver_certificates.pdf.
Rationale: Securing administrator login and communication sessions reduces the chance of unauthorized interception of credentials or sensitive configuration information.
Remediation: Note: Make a backup before editing configuration files. If SSH server is not enabled, then:
1. Using vCenter, select the <host> from inventory.
19 | P a g e
2. Select the Configuration tab. 3. Select the Security Profile in the Software panel. 4. Choose the Properties link and in the Firewall Properties pop up window, scroll
down to the ungrouped services to SSH Server. 5. Select the empty check box in front SSH server, and you will be returned to the
configuration page where SSH Server is now showing in the Outgoing Connections list associated with port 22. These steps will both activate the service and open the related port through the firewall.
6. Perform the following post-installation actions to secure the SSH service: a. Change to the /etc/ssh directory. b. Edit sshd_config. c. Set the Protocol token to 2. If it is absent, add and set it. d. Set the IgnoreRhosts token to yes. If it is absent, add and set it. e. Set the StrictModes token to no. If it is absent, add and set it. f. Set the RhostsAuthentication token to no. If it is absent, add and set it. g. Set the RSAAuthentication token to yes. If it is absent, add and set it. h. Set the RhostsRSAAuthentication token to no. If it is absent, add and set it. i. Set the PermitRootLogin token to no. If it is absent, add and set it. j. Set the PermitEmptyPasswords token to no. If it is absent, add and set it. k. Set the Banner token to /etc/issue. If it is absent, add and set it. l. Set the Ciphers token to aes256-abc,aes128-cbc. If it is absent, add and set
it. m. Save the updated sshd_config file. n. Set root as the owner of sshd_config and ssh_config. o. Set sys as the group owner of sshd_config and ssh_config. p. Restrict write access to sshd_config and ssh_config to the file owner root.
7. Perform the following post installation actions to secure system-wide SSH client configuration:
a. Change to the /etc/ssh directory. b. Edit ssh_config. c. Set the Protocol token to 2. If it is absent, add and set it. d. Set the RhostsRSAAuthentication token to no. If it is absent, add and set it. e. Set the Ciphers token to aes256-abc,aes128-cbc. If it is absent, add and set
it. f. Save the updated ssh_config file.
Audit: 1. Verify the SSHD service is running. If no output is present, SSHD is not configured as
recommended.
ps aux | grep /usr/sbin/sshd | grep –v grep
2. Verify the configuration files /etc/ssh/ssh_config and /etc/ssh/sshd_config
options and tokens are set as outlined in remediation steps 6 and 7 above.
20 | P a g e
cat /etc/ssh/ssh_config
cat /etc/ssh/sshd_config
References: 1. VMWare, Inc. (2009). ESX Server 3 Configuration Guide. Available:
http://www.vmware.com/pdf/vi3_35/esx_3/r35/vi3_35_25_3_server_config.pdf. 2. VMWare, Inc. (2009). Security Hardening - VMware Infrastructure 3 (VMware ESX 3.5
and VMware VirtualCenter 2.5). Available: http://www.vmware.com/files/pdf/vi35_security_hardening_wp.pdf.
3. VMWare, Inc. (2009). Replacing VirtualCenter Server Certificates. Available: http://www.vmware.com/pdf/vi_vcserver_certificates.pdf.
1.3.2 Implement SUDO (Level 1, Not Scorable)
Description: SUDO allows non-root or non-administrative users to gain root or administrative access and commands, while providing logging that enhances user accountability.
Rationale: SUDO enables associating users with powerful administrative commands and allowing root privileges. Further, SUDO provides logging of those users who access these advanced capabilities. SUDO is not configured on the default ESX installation, since the account and groups to be included vary by organization.
Remediation: General SUDO configuration steps include identification of administrators and users and placing them in groups, assigning the groups to wheel status or specific commands.
Note: Any changes to SUDO configurations must be made using the special editor visudo (not vi).
Audit: Review the settings for SUDO alias specifications, wheel group membership, and user command combinations for appropriate functionality commensurate with the user’s job functions. Also, SUDO messages are included in /var/log/ messages, ensure this log file is included in the log reviews (section 4.2) and collection (section 4.3) procedures.
cat /etc/sudoers
References: 1. For guidance on the configuration of SUDO see the main page for the software
provider http://www.gratisoft.us/sudo/. 2. VMWare, Inc. (2008). Security Hardening - VMware Infrastructure 3 (VMware ESX
3.5 and VMware VirtualCenter 2.5) Available: http://www.vmware.com/files/pdf/vi35_security_hardening_wp.pdf.
21 | P a g e
1.3.3 Require Password History (Level 1, Scorable)
Description: Retain a history of previous passwords used and configure the authentication controls to validate new passwords against greater than or equal to 10 recently used credentials.
Rationale: Maintaining a history file containing previously used credentials for each user, along with an access control parameter limits continual reuse of recent passwords. Combined with minimum and maximum password life this control helps maintain password effectiveness.
Remediation: Log on to the service console; acquire root privileges and performing the following:
1. If a password history repository does not exit then create it:
touch /etc/security/opasswd
2. Configure the file permissions:
chmod 600 /etc/security/opasswd
3. Change the file ownership:
chown root:root /etc/security/opwasswd
4. Change to the /etc/pam.d directory. 5. Edit system-auth. 6. If absent, add the token remember=10 to the line containing password sufficient
/lib/security/$ISA/pam_unix.so 7. Save the updated system-auth file.
Audit: Verify password history is enabled and the value after remember=<password_history> is greater than or equal to 10. If no results are returned then password history is not enabled.
grep –E \
'password.*sufficient.*pam_unix.so.*remember=' /etc/pam.d/system-auth
References: 1. VMWare, Inc. (2009). ESX Server 3 Configuration Guide. Available:
http://www.vmware.com/pdf/vi3_35/esx_3/r35/vi3_35_25_3_server_config.pdf.
1.3.4 Require Password Complexity (Level 1, Scorable)
Description:
22 | P a g e
Password strength requirements: Ignored when 1 character class is used. Ignored when 2 character classes are used. Ignore passphrases. Greater than or equal to 12 characters in length when 3 character classes are used. Greater than or equal to 8 characters in length when 4 character classes are used. Ignore reuse of any number of characters from the old password unless the new
password is exactly the same as the old password.
Rationale: The user should create a password that consists of a mix of character classes from the four choices; upper case, lower case, numeric, or special to reduce the use of common words as passwords and increase the difficulty of an unauthorized user guessing their credential.
Note: The default installation of ESX uses the pam_cracklib.so plug-in for both password complexity (default is not configured) and number of failed login attempts before account lockout (default setting is 3.) This plug-in does not check the root account for complexity. You should use the pam_passwdqc.so library to handle password complexity for all accounts (including the root account).
Remediation: Log on to the service console; acquire root privileges and performing the following:
1. Configure password complexity: esxcfg-auth --usepamqc=-1 -1 -1 12 8 -1
Note: Setting the value of any of these options to -1 ignores the requirement. Setting any of these options to disabled disqualifies passwords with the associated characteristic. The values used must be in descending order except for -1 and disabled. The options for the command esxcfg-auth --usepamqc=<N0> <N1> <N2> <N3> <N4> <match> are:
<N0> # of characters required for passwords using one character classes <N1> # of characters required for passwords using two character classes
<N2> passphrases
<N3> # of characters required for passwords using three character classes
<N4> # of characters for passwords using all four character classes
<match> # of character allowed to be reused from the old password Note: When the esxcfg-auth --usepamqc command sets pam_passwdqc.so as the complexity control, the pam_cracklib.so plug-in is disabled, as is the 3-attempts control.
2. Reconfigure the failed login control under pam using pam_tally.so to a maximum
of 3 attempts (see section 1.3.5).
23 | P a g e
Audit: 1. Verify password complexity is enabled:
grep –i ^password[[:space:]]sufficient[[:space:]] \
/lib/security/\$ISA/pam_passwdqc.so
If no text string is displayed, the complexity is not set. If the text string is displayed, verify the parameters meet the complexity requirements above.
2. Verify failed login control is enabled (see section 1.3.5)
References: 1. VMWare, Inc. (2008). VMware ESX Server 3 Configuration Guide for version 3.5, page
236 for password complexity. Available: http://www.vmware.com/pdf/vi3_35/esx_3/r35/vi3_35_25_3_server_config.pdf.
2. VMWare, Inc. (2008). Security Hardening - VMware Infrastructure 3 (VMware ESX 3.5
and VMware VirtualCenter 2.5). Available: http://www.vmware.com/files/pdf/vi35_security_hardening_wp.pdf.
1.3.5 Failed Login Attempts (Level 1, Scorable)
Description: Set the number of login attempts allowed before the account is locked / disabled to:
Less than or equal to 3 failed logins.
Rationale: For user accounts, setting the failed attempt number at a low level discourages repetitive tries, which may be automated, to guess a user’s password.
Remediation: Log on to the service console; acquire root privileges and performing the following:
1. Set pam control of maximum, failed login attempts.
esxcfg-auth –-maxfailedlogins=3
Audit: 1. Verify the failed login control is enabled and properly configured by running:
grep –E 'account.*required.*pam_tally.so.*deny=3' \
/etc/pam.d/system-auth
If the string deny= is not displayed with the value 3 in the results, this test fails.

24 | P a g e
grep -i \
^password[[:space:]]required[[:space:]]/lib/security/\$ISA/[[:space:]]retry \
/etc/pam.d/system-auth
References: 1. VMWare, Inc. (2008). VMware ESX Server 3 Configuration Guide for version 3.5, page
236 for password complexity. Available: http://www.vmware.com/pdf/vi3_35/esx_3/r35/vi3_35_25_3_server_config.pdf.
2. VMWare, Inc. (2008). Security Hardening - VMware Infrastructure 3 (VMware ESX 3.5 and VMware VirtualCenter 2.5). Available: http://www.vmware.com/files/pdf/vi35_security_hardening_wp.pdf.
1.3.6 Maximum Days Before Password Change (Level 1, Scorable)
Description: Set the maximum number of days before a password is required to be changed to
Less than or equal to 90 days.
Rationale: Minimizing the life of a credential reduces the likelihood that the password will become compromised.
Remediation: Log on to the service console; acquire root privileges and performing the following:
1. Set the maximum password life in days in /etc/login.defs to less than or equal to 90 days. esxcfg-auth –passmaxdays=90
Note: The above command will not reset the remaining days in any existing user accounts. Therefore, if an account had more days remaining than the new standard they retain those extra days of password life. The change above will be effective at the time a new password is changed. Administrators should force service console users (with the appropriate advance communication) to change their password at the next login, thus implementing the new maximum standard.
2. Set a number of days since password was last changed for each user account.
chage –d 0 <useraccount>
Audit: 1. Verify the password maximum life setting is set to less than 90 days by running the
following:
#!/bin/sh
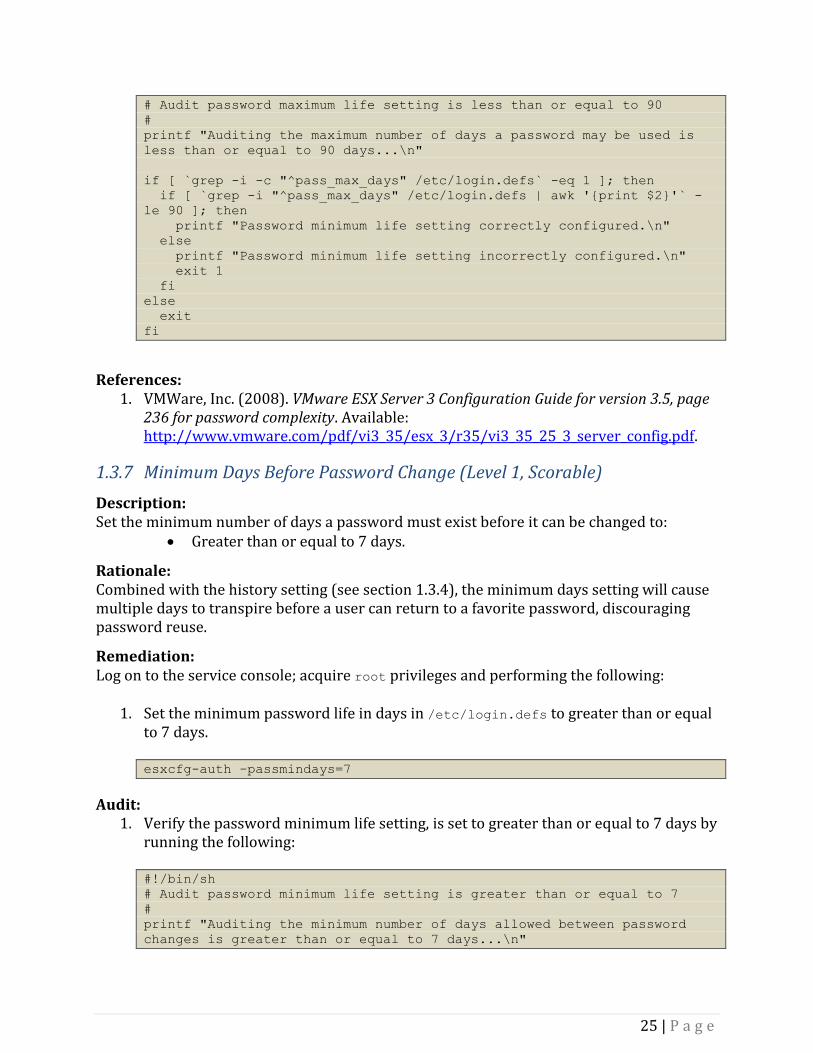
25 | P a g e
# Audit password maximum life setting is less than or equal to 90
#
printf "Auditing the maximum number of days a password may be used is
less than or equal to 90 days...\n"
if [ `grep -i -c "^pass_max_days" /etc/login.defs` -eq 1 ]; then
if [ `grep -i "^pass_max_days" /etc/login.defs | awk '{print $2}'` -
le 90 ]; then
printf "Password minimum life setting correctly configured.\n"
else
printf "Password minimum life setting incorrectly configured.\n"
exit 1
fi
else
exit
fi
References: 1. VMWare, Inc. (2008). VMware ESX Server 3 Configuration Guide for version 3.5, page
236 for password complexity. Available: http://www.vmware.com/pdf/vi3_35/esx_3/r35/vi3_35_25_3_server_config.pdf.
1.3.7 Minimum Days Before Password Change (Level 1, Scorable)
Description: Set the minimum number of days a password must exist before it can be changed to:
Greater than or equal to 7 days.
Rationale: Combined with the history setting (see section 1.3.4), the minimum days setting will cause multiple days to transpire before a user can return to a favorite password, discouraging password reuse.
Remediation: Log on to the service console; acquire root privileges and performing the following:
1. Set the minimum password life in days in /etc/login.defs to greater than or equal to 7 days.
esxcfg-auth –passmindays=7
Audit: 1. Verify the password minimum life setting, is set to greater than or equal to 7 days by
running the following:
#!/bin/sh
# Audit password minimum life setting is greater than or equal to 7
#
printf "Auditing the minimum number of days allowed between password
changes is greater than or equal to 7 days...\n"
26 | P a g e
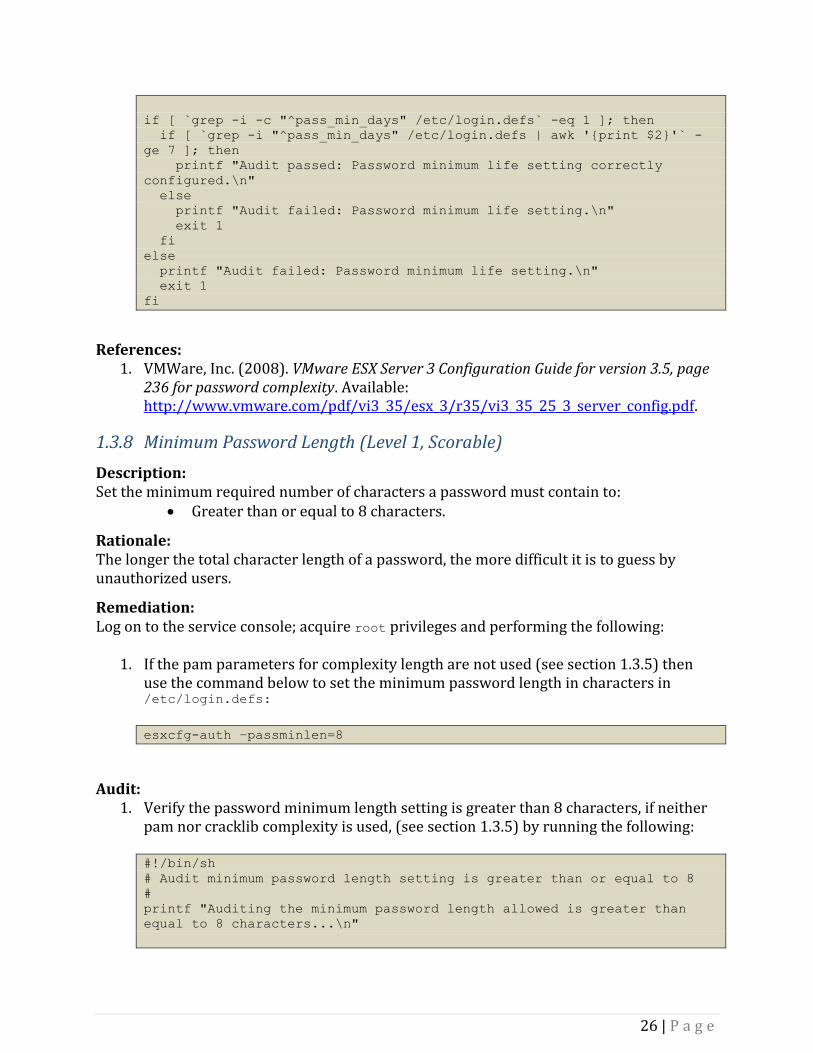
if [ `grep -i -c "^pass_min_days" /etc/login.defs` -eq 1 ]; then
if [ `grep -i "^pass_min_days" /etc/login.defs | awk '{print $2}'` -
ge 7 ]; then
printf "Audit passed: Password minimum life setting correctly
configured.\n"
else
printf "Audit failed: Password minimum life setting.\n"
exit 1
fi
else
printf "Audit failed: Password minimum life setting.\n"
exit 1
fi
References: 1. VMWare, Inc. (2008). VMware ESX Server 3 Configuration Guide for version 3.5, page
236 for password complexity. Available: http://www.vmware.com/pdf/vi3_35/esx_3/r35/vi3_35_25_3_server_config.pdf.
1.3.8 Minimum Password Length (Level 1, Scorable)
Description: Set the minimum required number of characters a password must contain to:
Greater than or equal to 8 characters.
Rationale: The longer the total character length of a password, the more difficult it is to guess by unauthorized users.
Remediation: Log on to the service console; acquire root privileges and performing the following:
1. If the pam parameters for complexity length are not used (see section 1.3.5) then use the command below to set the minimum password length in characters in /etc/login.defs:
esxcfg-auth –passminlen=8
Audit: 1. Verify the password minimum length setting is greater than 8 characters, if neither
pam nor cracklib complexity is used, (see section 1.3.5) by running the following: #!/bin/sh
# Audit minimum password length setting is greater than or equal to 8
#
printf "Auditing the minimum password length allowed is greater than
equal to 8 characters...\n"

27 | P a g e
if [ `grep -i -c "^pass_min_len" /etc/login.defs` -eq 1 ]; then
if [ `grep -i "^pass_min_len" /etc/login.defs | awk '{print $2}'` -ge
8 ]; then
printf "Password minimum life setting correctly configured.\n"
else
printf "Audit failed: minimum password length.\n"
exit 1
fi
else
printf "Audit failed: minimum password length.\n"
exit 1
fi
2. If cracklib is used instead of pam for password complexity, and therefore length,
enter the command cat /etc/pam.d/system-auth and review the line containing cracklib and review the settings for length and complexity credits.
References: 1. VMWare, Inc. (2008). VMware ESX Server 3 Configuration Guide for version 3.5, page
236 for password complexity. Available: http://www.vmware.com/pdf/vi3_35/esx_3/r35/vi3_35_25_3_server_config.pdf.

28 | P a g e
1.4 Logging
1.4.1 Log Compression and Rotation (Level 1, Scorable)
Description: Increase the file size 2096K and enable compression for the log files vmkernel and vmksummary.
Rationale: The larger the log file the more events will be captured to help research system performance or security issues. Compression will allow more events to be captured in the file space provided.
Remediation: Log on to the service console; acquire root privileges and performing the following: 1. Perform the following actions to configure log compression and rotation:
a. Change to the /etc directory b. Open /etc/logrotate.conf file with an editor c. Uncomment the compress token to enable the global log compression, remove
the # (pound sign). If it is absent, add it. d. Save the updated logrotate.conf file.
2. After host compression is enabled above, perform the following actions to set
compression and log size for the two files /etc/logrotate.d/vmkernel and /etc/logrotate.d/vmksummary :
a. Change to the /etc/logrotate.d directory b. Open vmkernel c. Change the nocompress option to compress. If it is absent, add it. d. Change the size token to 2096K. If it is absent, add and set it. e. Save the updated vmkernel file. f. Open vmksummary. g. Change the nocompress option to compress. If it is absent, add it. h. Change the size token to 2096K. If it is absent, add and set it. i. Save the updated vmksummary file.
3. Perform the following actions to set compression and log size for the file
/etc/logrotate.d/vmkwarning: a. Change to the /etc/logrotate.d directory b. Open vmkwarning c. Add the compress option. d. Add the size token 2096K. e. Save the updated vmkwarning file.
Audit:
29 | P a g e
The global settings for logging of host events is located in the /etc/logrotate.conf and individual settings for each log type (kernel, summary, warning) are located in separate files in the /etc/logrotate.d/ directory. (For configuring and assessing guest event logging in the /vmfs/volumes/ directory see section 1.8.4)
1. Verify host global settings for compression is enabled.
grep compress /etc/logrotate.conf
If the command above yields no output then compression is not configured as recommended.
2. Review each of the log file’s separate configuration files located in the
/etc/logrotate.d directory to evaluate the presence of compression and the log size with the following command: cat /etc/logrotate.d/<logfilename> | grep -E '(compress|size)'
If the above command does not yield two lines, one for compression and another for size, then logrotate is not configured as recommended.
References: 1. VMWare, Inc. (2008). VMware ESX Server 3 Configuration Guide for version 3.5, page
236 for password complexity. Available: http://www.vmware.com/pdf/vi3_35/esx_3/r35/vi3_35_25_3_server_config.pdf.
2. VMWare, Inc. (2008). Security Hardening - VMware Infrastructure 3 (VMware ESX 3.5 and VMware VirtualCenter 2.5). Available: http://www.vmware.com/files/pdf/vi35_security_hardening_wp.pdf.
1.4.2 Review Logs (Level 1, Not Scorable)
Description: Establish procedures defining the timing of and the staff responsibility for log reviews.
Note: Host logs such as those mentioned in section 4.1 and vmkwarning, messages, secure, and any log files in the /var/log/vmware/ directory, and guest logs stored in /vmfs/volumes/<yourstoragedevice> /<yourguest>, and vCenter logs (if in use) may help provide additional research sources related to ESX host analysis.
Rationale: Reviewing logs in a timely manner may detect a performance or security issue in its early stages enabling the organization to take countermeasures to reduce the event’s impact.
Remediation:

30 | P a g e
Establish documented review procedures for the logs listed above including: frequency, staff accountability, content to alert upon, escalation and communication, integration with other security information management tools and any other procedures.
Audit: Review the documented procedure and verify those procedures for the logs listed above were implemented through interviews and review of procedural records that the following are working as intended including: frequency of the review with sign-offs, correct staff are performing the review from a confidentiality standpoint and the ability and authority to take appropriate action, action escalation and communication commensurate with the content of the alert, accurate hand-off of data to other security information management tools and any other procedures.
References: 1. VMWare, Inc. (2008). VMware ESX Server 3 Configuration Guide for version 3.5, page
236 for password complexity. Available: http://www.vmware.com/pdf/vi3_35/esx_3/r35/vi3_35_25_3_server_config.pdf.
2. VMWare, Inc. (2008). Security Hardening - VMware Infrastructure 3 (VMware ESX 3.5 and VMware VirtualCenter 2.5). Available: http://www.vmware.com/files/pdf/vi35_security_hardening_wp.pdf.
1.4.3 Configure syslogd to Send Logs to a Remote LogHost (Level 1, Scorable)
Description: Configure syslogd to send a copy of ESX host logs to a remote location.
Rationale: Remote logging is essential in detecting intrusion and monitoring multiple servers simultaneously. If an intruder is able to obtain root on a host, they may be able to edit the system logs to remove all traces of the attack. If a copy of the logs is stored off the machine that cannot be accessed with the compromised host’s credentials, those logs can be analyzed for anomalies and used for prosecuting the attacker.
Remediation: Log on to the service console; acquire root privileges and performing the following:
1. Perform the following actions to configure logging: a. Change to the /etc directory. b. Open syslog.conf c. Add the name of your log server(s) preceded by an ampersand
(@<yourlogserver1>) to the end of each line that identifies a log file in the /etc/syslog.conf file.
d. Save the updated syslog.conf file. 2. Perform the following actions to allow syslog traffic through the firewall, open the
standard port with the commands below: esxcfg-firewall -o 514,udp,out,syslog

31 | P a g e
esxcfg-firewall -i
Note: Syslog is one service ESX firewall does not have built-in when all known services are listed with the esxcfg-firewall –s command.
Audit: 1. Execute the following command to identify logging facilities that are not configured
to send log entries to an authorized log server. If this command yields any output then syslog is not configured as recommended.
grep –Ev '(^#|<yourlogserver1>|<yourlogserver2>)' /etc/syslog.conf
2. Execute the following command to determine if your authorized syslog servers are
configured. If this command does not yield any output then syslog is not configured as recommended.
grep –E '(<yourlogserver1>|<yourlogserver2>)' /etc/syslog.conf
3. Issue the following command, at the end of the output, is a list of ports and related
services that are not controlled by the firewall as a known service, the syslog service manually added above should appear in this section.
esxcfg-firewall -q
References: 1. VMWare, Inc. (2008). VMware ESX Server 3 Configuration Guide for version 3.5, page
236 for password complexity. Available: http://www.vmware.com/pdf/vi3_35/esx_3/r35/vi3_35_25_3_server_config.pdf.
2. VMWare, Inc. (2008). Security Hardening - VMware Infrastructure 3 (VMware ESX 3.5 and VMware VirtualCenter 2.5). Available: http://www.vmware.com/files/pdf/vi35_security_hardening_wp.pdf.
1.5 Networking
1.5.1 Protect Against MAC Address Spoofing, Forged Transmits, and Promiscuous mode (Level 1, Scorable)
Description: Change the flags to reject for the settings MAC Address Changes and Forged Transmits for a <vSwitch> or a <PortGroup>. Note: The default setting is accept in virtual switches and in portgroups.
Rationale:
32 | P a g e
These settings provide the ability to drop incoming and outgoing guest network packets if a guest MAC address in a packet is different from the MAC address specified in the guest configuration file (vmx).
Remediation: 1. Perform the following actions in vCenter to set the MAC address spoofing and forged
transmits setting from the default configuration of Accept (saved as true in the configuration files) to Reject (saved as false in the configuration files) using vCenter as follows:
a. Select the <host> in the navigation panel, b. Select the Configuration Tab and click on the Networking link, this will
display a listing of the vswitches, port groups, physical nics and the guest association.
c. For each virtual switch, click on the properties link: d. In the vSwitch panel select each <vSwitch> or a <PortGroup> that needs
modification. e. Click on the Edit button. f. Click on the Security tab.
Note: The properties of the VSwitch are inherited in the PortGroup unless overridden in the PortGroup settings.
g. Drop down the selector and choose Reject instead of Accept.
2. Change vSwitch security policy settings at the command line using the vimsh command below, replacing the [OPTIONS] with:
--securepolicy-promisc=false
--securepolicy-macchange=false
--securepolicy-forgedxmit=false
vmware-vim-cmd hostscv/net/vswitch_setpolicy [OPTIONS] <yourvswitch>
3. Change PortGroup security policy settings at the command line using the vimsh
command below, replacing the [OPTIONS] with:
--securepolicy-promisc=false
--securepolicy-macchange=false
--securepolicy-forgedxmit=false
vmware-vim-cmd /hostsvc/net/portgroup_set [OPTIONS] <yourvswitch> \
<yourportgroup>
Audit: 1. In vCenter:
a. Select the <host> in the navigation panel,

33 | P a g e
b. Select the Configuration Tab and click on the Networking link, this will display a listing of the vswitches, port groups, physical nics and the guest association.
c. For each virtual switch, click on the properties link: d. In the vSwitch properties panel, select each vSwitch and PortGroup and
review the settings for the value Reject noting any settings of Accept for correction.
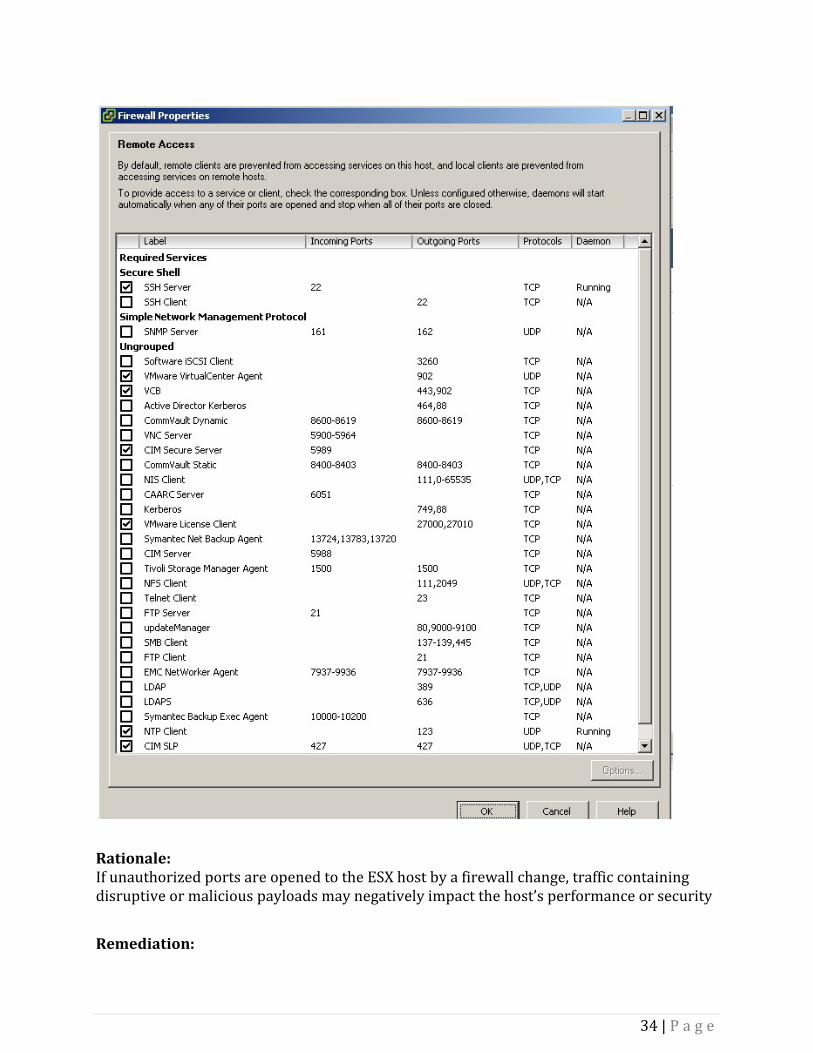
1.5.2 Configure the Firewall to Allow Only Authorized Traffic (Level 1, Scorable)
Description: Configure the built-in firewall to ensure only authorized ports and related network traffic sources are allowed to and from the ESX host. Note: In vCenter the known services can be managed along with their port numbers per the list below. However, firewall rules can be set outside of vCenter to enable services and ports that will not be displayed in vCenter (see section 1.4.3 regarding the syslogd service).
34 | P a g e
Rationale: If unauthorized ports are opened to the ESX host by a firewall change, traffic containing disruptive or malicious payloads may negatively impact the host’s performance or security
Remediation:
35 | P a g e
1. Using vCenter: a. Navigate to the Firewall Properties screen (an example of which is in the
“Additional Information” title of this section). Check to enable or uncheck to disable the boxes in front of the services to allow or block related ports in the firewall.
b. Selecting the <host> in the navigation panel. c. Selecting the Configuration Tab and click on Security Profile. d. Select the Properties link. e. Navigate to the Remote Access panel. f. Check to enable or uncheck to disable the boxes in front of the services to
allow or block related ports in the firewall based on the recommended services in the figure above.
Alternatively: Log on to the service console; acquire root privileges and performing the following:
1. Enable known services defined in the figure above by configuring the firewall.
esxcfg-firewall –e <servicename>
2. Disable known services not defined in the figure above by configuring the firewall.
esxcfg-firewall –d <servicename>
3. If the service you wish to enable is not on the esxcfg-firewall list (esxcfg-
firewall –s), it can be enabled with the open parameter of the command as shown below for example for syslogd services (see also section 1.4.3) that are not one of the predefined services.
# Example: esxcfg-firewall -o 514,udp,out,syslog
Audit: 1. In vCenter:
a. Navigate to the Firewall Properties screen (an example of which is in the “Additional Information” title of this section).
b. Selecting the <host> in the navigation panel. c. Selecting the Configuration Tab and click on Security Profile. d. Select the Properties link. e. Navigate to the Remote Access panel. f. Review the listing of incoming and outgoing connections with their related
ports and compare that list to the list in the recommended services defined in the figure above.
There is also a host configuration file for the firewall at /etc/sysconfig/iptables-config. The settings in this file mostly relate to saving of rules and are all commented out in a

36 | P a g e
default installation. If any of these lines have been activated (“#” removed from the start of a line) they should be matched with the organization change control documentation. Any activated lines can be found with the following command.
grep –v ^# /etc/sysconfig/iptables-config
Vendor supplied commands can be used to assess the status of those services that have been pre-defined by the vendor. The first command (-s) shows all pre-defined services controlled by the vendor’s command esxcfg-firewall. The second command shows the status of the service specified.
esxcfg-firewall –s
esxcfg-firewall –q <servicename>
For a complete listing of all rules employed by the firewall the command below will indentify all traffic rules similar to the output from issuing a iptables –L command, including those services not defined in esxcfg-firewall –s. For example, the syslog service and port described above will be on the output of the command below, but would not be in the vCenter screens or in the esxcfg-firewall command options.
esxcfg-firewall –q
1.6 Storage
1.6.1 Use CHAP to Connect to iSCSI Devices (Level 1, Scorable)
Description: Configure connections to iSCSI storage devices to use the CHAP protocol for authentication.
Rationale: Use of the CHAP protocol ensures ESX hosts and storage devices are communicating with known endpoints.
Note: It is also recommended if iSCSI is in use the network segment that iSCSI clear data traffic traverses, also be isolated from the general user network (see section 1.1.1 on how to create a segregated network path).
Remediation: Perform the following to enable CHAP in vCenter:
1. Select the <host> from inventory. 2. Select the Configuration tab. 3. Then select the Storage Adapters in the Hardware panel. 4. Chose the <iSCSI adapter number> in the blue Properties link and in the iSCSI
Initiator Properties 5. Select the CHAP Authentication tab.

37 | P a g e
6. Click on the configure button. 7. Select the radio button for Use CHAP. 8. Enter the <credentials>.
Audit: 1. Verify CHAP authentication is enabled by executing the following command.
vmware-vim-cmd hostsvc/storage/info | grep chap
2. If the chapAuthEnabled value is set to false, the host does not have CHAP enabled
and fails this requirement.
1.7 Warning Banners
1.7.1 Create Warning Banners (Level 1, Scorable)
Description: Create warning banners for console and remote access. Note: There are no default warning banners since your organization’s exact wording is unknown at installation.
Rationale: Presenting some sort of statutory warning message prior to the normal user logon may assist the prosecution of trespassers on the computer system. Changing some of these login banners also has the side effect of hiding OS version information and other detailed system information from attackers attempting to target specific attacks at a system (though there are other mechanisms available for acquiring this information). Guidelines published by the US Department of Defense require that warning messages include at least the name of the organization that owns the system, the fact that the system is subject to monitoring and that such monitoring is in compliance with local statutes, and that use of the system implies consent to such monitoring. The organization's local legal counsel and/or site security administrator should review the content of all messages before any system modifications are made, as these warning messages are inherently site-specific.
Remediation: Log on to the service console; acquire root privileges and performing the following:
1. Create or edit Message of the Day warning banner. vi /etc/motd
2. Create or edit login warning banner.
vi /etc/issue
3. Create or edit network login, warning banner.

38 | P a g e
vi /etc/issue.net
4. Create or edit the GUI-Based warning banner.
vi /usr/lib/vmware/hostd/docroot/index.htm
5. Create or edit the vCenter warning banner:
a. Select the Administration menu name in vCenter. b. Select Edit Message of the Day to edit or change the text to your
organization’s warning content.
Note: Also, if additional banners are specified in the /etc/ssh/sshd_config file, that specified banner file should include the organization’s warning text.
Audit: Verify system warning banners for message of the day, login, network login, GUI and vCenter are configured with the current version of your organizations warning banner language:
1. Verify the Message of the Day banner is properly configured. cat /etc/motd
2. Verify the login banner is properly configured.
cat /etc/issue
3. Verify the network login banner is properly configured.
cat /etc/issue.net
4. Verify GUI-Based login banner is properly configured.
vi /usr/lib/vmware/hostd/docroot/index.htm
5. Verify vCenter banners:
a. Select the Administration menu name in vCenter. b. Select Edit Message of the Day to compare that text to your organization’s
content.
1.8 Guest Interaction with the Host
1.8.1 Remove Guest Control of Hardware Devices (Level 1, Scorable)
Description: Do not allow guests to control hardware devices outside of ESX or vCenter.

39 | P a g e
Rationale: Guest control of hardware devices could lead to resource conflicts and possible poor performance, or access to unauthorized devices and data stored there.
Remediation: Perform the following actions using the vCenter management console to set guest control:
1. If running, shut down the virtual machine within the guest using the appropriate procedure.
2. Right click on the <guest name> in the navigation tree. 3. Select Edit Settings. 4. Select the Options tab. 5. Select the General line item indented from the Advanced line (not the General
Options line item). 6. Click on the Configuration Parameters button.
Note: The configuration parameters panel will pop up with each setting listed with a Name and Value pair per line.
7. Add the name value pair below:
isolation.device.connection.disable = false
Audit: Validate the settings in the guest configuration file (*.vmx). Login to the vCenter management console:
1. Select a <guest virtual machine> to assess in the Inventory tree. 2. If running, shut down the virtual machine within the guest using the appropriate
procedure. 3. Right click on the <guest virtual machine> in the navigation tree. 4. Select Edit Settings. 5. Select the Options tab. 6. Select the General line item indented from the Advanced line (not the General
Options line item). 7. Click on the Configuration Parameters button.
Note: The configuration parameters panel will pop up with each setting listed with a Name and Value pair per line.
8. Review the settings list, if the name / value pair below is not present, the guest fails the test:
isolation.device.connectable.disable = false
References:

40 | P a g e
1. VMWare, Inc. (2009). Security Hardening - VMware Infrastructure 3 (VMware ESX 3.5 and VMware VirtualCenter 2.5). Available: http://www.vmware.com/files/pdf/vi35_security_hardening_wp.pdf.
1.8.2 Remove SetInfo Message Logging (Level 1, Scorable)
Description: Disable the ability of the guest to send SetInfo messages to the host.
Rationale: SetInfo messages have an unlimited length. A malformed message, or messages, of extreme length could overwhelm the host creating a denial of service situation.
Remediation: Perform the following actions using the vCenter management console to set guest control:
1. If running, shut down the virtual machine within the guest using the appropriate procedure.
2. Right click on the guest name in the navigation tree. 3. Select Edit Settings. 4. Select the Options tab. 5. Select the General line item indented from the Advanced line (not the General
Options line item). 6. Click on the Configuration Parameters button.
Note: The configuration parameters panel will pop up with each setting listed with a Name and Value pair per line.
7. While on the configuration parameters pop-up panel, click on the Add button and add Name and Value pairs, where indicated by the red arrows, using the text below.
isolation.tools.setinfo.disable true
Audit: Validate the settings in the guest configuration file (*.vmx). Login to the vCenter management console:
1. Select a <guest virtual machine> to assess in the Inventory tree. 2. If running, shut down the virtual machine within the guest using the appropriate
procedure. 3. Right click on the <guest virtual machine> name in the navigation tree. 4. Select Edit Settings. 5. Select the Options tab. 6. Select the General line item indented from the Advanced line (not the General
Options line item). 7. Click on the Configuration Parameters button.
41 | P a g e
Note: The configuration parameters panel will pop up with each setting listed with a Name and Value pair per line.
8. Review the settings list for an entry of a Name and Value pair per the text below, if the string pair below is not present the guest fails the test. isolation.tools.setinfo.disable true
Note: This is different from the section 1.8.1 test. In that section we were looking for a non-compliant string and in this section 1.8.2 we are looking for a compliant string.
References: 1. VMWare, Inc. (2009). Security Hardening - VMware Infrastructure 3 (VMware ESX 3.5
and VMware VirtualCenter 2.5). Available: http://www.vmware.com/files/pdf/vi35_security_hardening_wp.pdf.
1.8.3 Disable Cut and Paste (Level 1, Scorable)
Description: Disable the ability of data to be cut and paste from the guest to the hosts that is enabled when vmware-tools are installed in a guest.
Rationale: The cut and paste capability provides the ability to place executable files on a destination without logging to trace actions to users.
Remediation: Perform the following actions using the vCenter management console to set guest control:
1. If running, shut down the virtual machine within the guest using the appropriate procedure.
2. Right click on the <guest virtual machine> name in the navigation tree. 3. Select Edit Settings. 4. Select the Options tab. 5. Select the General line item indented from the Advanced line (not the General
Options line item). 6. Click on the Configuration Parameters button.
Note: The configuration parameters panel will pop up with each setting listed with a Name and Value pair per line.
7. While on the configuration parameters pop-up panel, double click on each of the three setting shown below to change the true in the Value field to false:
isolation.tools.copy.enable false
isolation.tools.paste.enable false
isolation.tools.setGUIOptions.enable false

42 | P a g e
Audit: Validate the settings in the guest configuration file (*.vmx). Login to the vCenter management console:
1. Select a <guest virtual machine> to assess in the Inventory tree. 2. If running, shut down the virtual machine within the guest using the appropriate
procedure. 3. Right click on the <guest virtual machine> name in the navigation tree. 4. Select Edit Settings. 5. Select the Options tab. 6. Select the General line item indented from the Advanced line (not the General
Options line item). 7. Click on the Configuration Parameters button.
Note: The configuration parameters panel will pop up with each setting listed with a Name and Value pair per line.
8. Review the settings list for an entry of a Name and Value pair per the text below. If the string pair below is present the guest fails the test. Note: This is different from the section 1.8.1 test, in that section we were looking for only one non-compliant string and in this section 1.8.3 we are looking for three non-compliant strings:
isolation.tools.copy.enable true
isolation.tools.paste.enable true
isolation.tools.setGUIOptions.enable true
References: 1. VMWare, Inc. (2009). Security Hardening - VMware Infrastructure 3 (VMware ESX 3.5
and VMware VirtualCenter 2.5). Available: http://www.vmware.com/files/pdf/vi35_security_hardening_wp.pdf.
1.8.4 Limit Log File Size and Number of Logs (Level 1, Scorable)
Description: Set the maximum size of each log file and number of log files to retain in each guest directory under /vmfs/volumes/<yourstoragedevice>/ to:
Rotate the current log file when the size is less than or equal to 10000000 Bytes. Retain less than or equal to 30 historical log files.
Rationale: Minimize denial of service attack on log file data-store.
Remediation:

43 | P a g e
Perform the following actions using the vCenter management console to set guest control: 1. If running, shut down the virtual machine within the guest using the appropriate
procedure. 2. Right click on the <guest virtual machine> name in the navigation tree 3. Select Edit Settings. 4. Select the Options tab. 5. Select the General line item indented from the Advanced line (not the General
Options line item). 6. Click on the Configuration Parameters button.
Note: The configuration parameters panel will pop up with each setting listed with a Name and Value pair per line.
7. While on the configuration parameters pop-up panel, double click on any of the two settings shown below to change the Value field to your organization’s standard. If the settings are not present, click on the Add button to create a new Name and Value pair as shown below:
log.rotateSize 10000000
log.keepOld 30
Audit: Validate the settings in the guest configuration file (*.vmx). Login to the vCenter management console:
1. Select a <guest virtual machine> to assess in the Inventory tree. 2. If running, shut down the virtual machine within the guest using the appropriate
procedure. 3. Right click on the <guest virtual machine> name in the navigation tree, select Edit
Settings. 4. Select the Options tab. 5. Select the General line item indented from the Advanced line (not the General
Options line item). 6. Click on the Configuration Parameters button.
Note: The configuration parameters panel will pop up with each setting listed with a Name and Value pair per line.
7. Review the settings list for an entry of a Name and Value pair per the text below. If both of the string pair settings below are present and the metrics match organization standards, the guest passes the test. Note: This is different from the section 1.8.2 test, in that section we were looking for only one compliant string and in this section 1.8.4 we are looking for two compliant strings:

44 | P a g e
log.rotateSize 10000000
log.keepOld 30
References: 1. VMWare, Inc. (2009). Security Hardening - VMware Infrastructure 3 (VMware ESX 3.5
and VMware VirtualCenter 2.5). Available: http://www.vmware.com/files/pdf/vi35_security_hardening_wp.pdf.
1.9 File / Directory Permissions and Ownership
1.9.1 Disable Group and Other Write File Permissions for .vmx Files (Level 1, Scorable)
Description: Set file permissions for all .vmx configuration files to:
Deny group write access Deny other write access
Rational: Disabling file permissions for configuration files helps prevent accidental or malicious changes to the system.
Remediation: Log on to the service console; acquire root privileges and performing the following:
1. Set file permissions for user and other to deny write access for all <vmx_file_location> files. chmod go-w <vmdk_file_location>
Audit: Log on to the service console; acquire root privileges and performing the following:
1. List all virtual machine file locations on your host: vmware-cmd -l
2. Verify group and other file permissions for all <vmx_file_location> files have write
access disabled: ls –lL <vmx_file_location>
References: 1. VMWare, Inc. (2009). Security Hardening - VMware Infrastructure 3 (VMware ESX 3.5
and VMware VirtualCenter 2.5). Available: http://www.vmware.com/files/pdf/vi35_security_hardening_wp.pdf.
45 | P a g e
1.9.2 Disable Group and Other Read, Write and Execute File Permissions for .vmdk Files (Level 1, Scorable)
Description: Set file permissions for all .vmdk disk files to:
Deny group read, write and execute access Deny other read, write and execute access
Rational: Disabling file permissions for virtual machine disk files helps prevent accidental or malicious changes to application data.
Remediation: Log on to the service console; acquire root privileges and performing the following:
1. Set file permissions for user and other to deny read, write and execute access for all <vmdk_file_location> files. chmod go-rwx <vmdk_file_location>
Audit: Log on to the service console; acquire root privileges and performing the following:
1. List all virtual machine file locations on your host: vmware-cmd -l
2. Verify group and other file permissions for all <vmdk_file_location> files have read,
write and execute access disabled: ls –lL <vmdk_file_location>
References: 1. VMWare, Inc. (2009). Security Hardening - VMware Infrastructure 3 (VMware ESX 3.5
and VMware VirtualCenter 2.5). Available: http://www.vmware.com/files/pdf/vi35_security_hardening_wp.pdf.
1.9.3 Restrict Owner and Group File Ownership to Root for .vmx Files (Level 1, Scorable)
Description: Set file ownership for all .vmx files to:
Restrict owner and group file ownership to root
Rational: Restricting file ownership for configuration files helps prevent accidental or malicious changes to the system.

46 | P a g e
Remediation: Log on to the service console; acquire root privileges and performing the following:
1. Set file ownership parameters for owner and group to root for all <vmx_file_location> files: chown root:root <vmx_file_location>
Audit: Log on to the service console; acquire root privileges and performing the following:
3. List all virtual machine file locations on your host: vmware-cmd -l
4. Verify file ownership:
ls –lL <vmx_file_location>
References: 1. VMWare, Inc. (2009). Security Hardening - VMware Infrastructure 3 (VMware ESX 3.5
and VMware VirtualCenter 2.5). Available: http://www.vmware.com/files/pdf/vi35_security_hardening_wp.pdf.
1.9.4 Restrict Owner and Group File Ownership to Root for .vmdk Files (Level 1, Scorable)
Description: Set file ownership for all .vmdk disk files to:
Restrict owner and group file ownership to root
Rational: Restricting file ownership for virtual machine disk files helps prevent accidental or malicious changes to application data.
Remediation: Log on to the service console; acquire root privileges and performing the following:
1. Set file ownership parameters for owner and group to root for all <vmdk_file_location> files: chown root:root <vmdk_file_location>
Audit: Log on to the service console; acquire root privileges and performing the following:
1. List all virtual machine file locations on your host: vmware-cmd -l
47 | P a g e
2. Verify file ownership:
ls –lL <vmdk_file_location>
References: 1. VMWare, Inc. (2009). Security Hardening - VMware Infrastructure 3 (VMware ESX 3.5
and VMware VirtualCenter 2.5). Available: http://www.vmware.com/files/pdf/vi35_security_hardening_wp.pdf.
48 | P a g e
Appendix A: References 1. CIS. (2008). VMWare ESX Server 3.x Benchmark. Available:
http://community.cisecurity.org/download/. Last accessed 1 October 2009.
2. DISA. (2009). ESX server – Security Technical Implementation Guide. Available: http://iase.disa.mil/stigs/stig/esx_server_stig_v1r1_final.pdf. Last accessed 1 October 2009.
3. NSA. (2008). VMWare ESX Server 3 Configuration Guide. Available: http://www.nsa.gov/ia/_files/support/I733-009R-2008.pdf. Last accessed 1 October.
4. VMWare, Inc. (2009). Basic System Administration. Available:
http://www.vmware.com/pdf/vi3_35/esx_3/r35/vi3_35_25_admin_guide.pdf. Last accessed 1 October 2009.
5. VMWare, Inc. (2009). ESX Server 3 Configuration Guide. Available: http://www.vmware.com/pdf/vi3_35/esx_3/r35/vi3_35_25_3_server_config.pdf. Last accessed 1 October 2009.
6. VMWare, Inc. (2009). ESX Server 3 Configuration Guide, Update 2 and Later. Available: http://www.vmware.com/pdf/vi3_35/esx_3/r35u2/vi3_35_25_u2_3_server_config.pdf. Last accessed 1 October 2009.
7. VMWare, Inc. (2009). ESX Server 3 Installation Guide - Install ESX Server 3.5, VC 2.5. Available: http://vmware.com/pdf/vi3_35/esx_3/r35/vi3_35_25_installation_guide.pdf. Last accessed 1 October 2009.
8. VMWare, Inc. (2008). ESX Server 3 Patch Management Guide. Available: http://www.vmware.com/pdf/vi3_35/esx_3/r35/vi3_35_25_esxupdate.pdf. Last accessed 1 October 2009.
9. VMWare, Inc. (2009). Replacing VirtualCenter Server Certificates. Available: http://www.vmware.com/pdf/vi_vcserver_certificates.pdf. Last access 1 October 2009.
10. VMWare, Inc. (2009). Security Hardening - VMware Infrastructure 3 (VMware ESX 3.5 and VMware VirtualCenter 2.5). Available: http://www.vmware.com/files/pdf/vi35_security_hardening_wp.pdf. Last accessed 1 October 2009.
11. VMWare, Inc. (2009). VMware Update Manager Administration Guide. Available: http://www.vmware.com/pdf/vi3_vum_10_admin_guide.pdf.
49 | P a g e
12. VMware Knowledgebase article on NTP: http://kb.vmware.com/kb/1339. Last accessed 1 October 2009.
13. VMware Support Center -Download Patches: https://www.vmware.com/mysupport/download/. Last accessed 1 October 2009.
14. Guidance on the configuration of SUDO see the main page for the software provider. Available: http://www.gratisoft.us/sudo/. Last accessed 1 October 2009

50 | P a g e
Appendix B: Acronyms
Component Code Description VMware VirtualCenter Management Server Renamed vCenter by the vendor
VCMS Or vCenter
VMware VirtualCenter Server centrally manages and monitors multiple Virtual Infrastructure Nodes. It runs on a windows-based server platform and requires network connectivity to all VMware ESX hosts that it manages.
VirtualCenter Database Server
VCDB VMware VirtualCenter Database Server is an approved and supported database server that contains the information needed by VMware VirtualCenter to manage its environment.
VMware Virtual Infrastructure License Server
VILS VMware Virtual Infrastructure License Server manages licensing of Virtual Infrastructure features throughout the enterprise. This software is typically installed on the same server as the VirtualCenter Server.
VMware ESX Server Host ESXH VMware ESX host is the platform on which the Virtual Infrastructure is executed. It runs a proprietary kernel with a Linux console for direct management
VMware VCB Proxy Server VPRX The VMware VCB proxy server is used to provide off network backups to the VMware Virtual Infrastructure. This host must be a windows host and should be attached to the backup SAN.
VMware Virtual Machine Guest
VMG Or Guest
This is a VMware Virtual Machine instance housed on a VMware ESX host. Guests can be saved as Templates to facilitate future deployments.
Storage VIS Storage used by Virtual Infrastructure VMware Infrastructure Client
VIC This is the Client used to manage VMware ESX hosts and VMware VirtualCenter Management Servers.
51 | P a g e
Appendix C: CIS Red Hat Enterprise Linux 5 Benchmark Apply all recommendations except the following: Section 4.6: disable IPMI, network, ntpd, these are required services for VMware ESX

52 | P a g e
Appendix D: Other Considerations Depending on your organization’s security environment, additional items that may be considered include:
1. Installation of additional software on the ESX host – The vendor generally recommends avoiding installing other software on the ESX host, and mentioned certain security software in some versions of their documentation. Any software installed should be approved by your organizations policy and communicated to VMware to determine its affect on support. A recommendation is to maintain a default installation of an ESX server. Running the rpm –qa | sort command on that machine will give a standard list of items installed by the rpm command, running the same command on a production host and using diff to compare the two lists will give a indication of noncompliant software. (Note: executable binary files not installed with the rpm command will not show up on either list).
2. /etc/vmware/hostd/config.xml – This configuration file contains settings for web access related to performance, storage, function and also governs SSL behavior. The contents of this file on a production ESX host should be compared to the same file contained in the default build and any changes matched to the organization’s documented and authorized change management process.
3. sysstat and auditd logging – Consideration may be given to adding these two logging facilities for a more focused collection of messages related to performance and security events.
4. Data Residing on the ESX host – While the intent of the ESX host is not to store production applications or data, if there is a malfunction it is possible a dump may deposit data in the /var/core/ directory. A periodic review of the /var/core/, /home (and other directories if additional software is found above) is in order to ensure, and if present remove, duplicate, sensitive customer or other organization data from the ESX host.
5. SNMP Community Strings – The SNMP read community string in ESX is “Public”. Some organizations policies or some compliance requirements state default authentication credentials be changed.
6. Boot Loader Password – ESX utilizes the GRUB bootloader, in the default configuration this boot loader does not require a password.
7. Kernel Routing – Some organizations prohibit operating systems from performing certain network functions. In most Linux distributions the parameters for accept_redirects, send_redirects, accept_source-route may be set to the value 0 or disabled. In ESX these setting are sometimes set to 1 or enabled, at the all , default, or interface subdirectories of /proc/sys/net/ipv4/. Given the internal network routing functions expected to be performed by an ESX host, it is recommended if your security policy prohibits these settings, an exception to policy may be considered for an ESX host.
8. Encryption Certificates - “Enabling Server-Certificate Verification for Virtual Infrastructure Clients”:http://kb.VMware.com/kb/4646606
9. Enable Full and Secure Use of Certificate-based Encryption: http://www.vmware.com/vmtn/resources/658
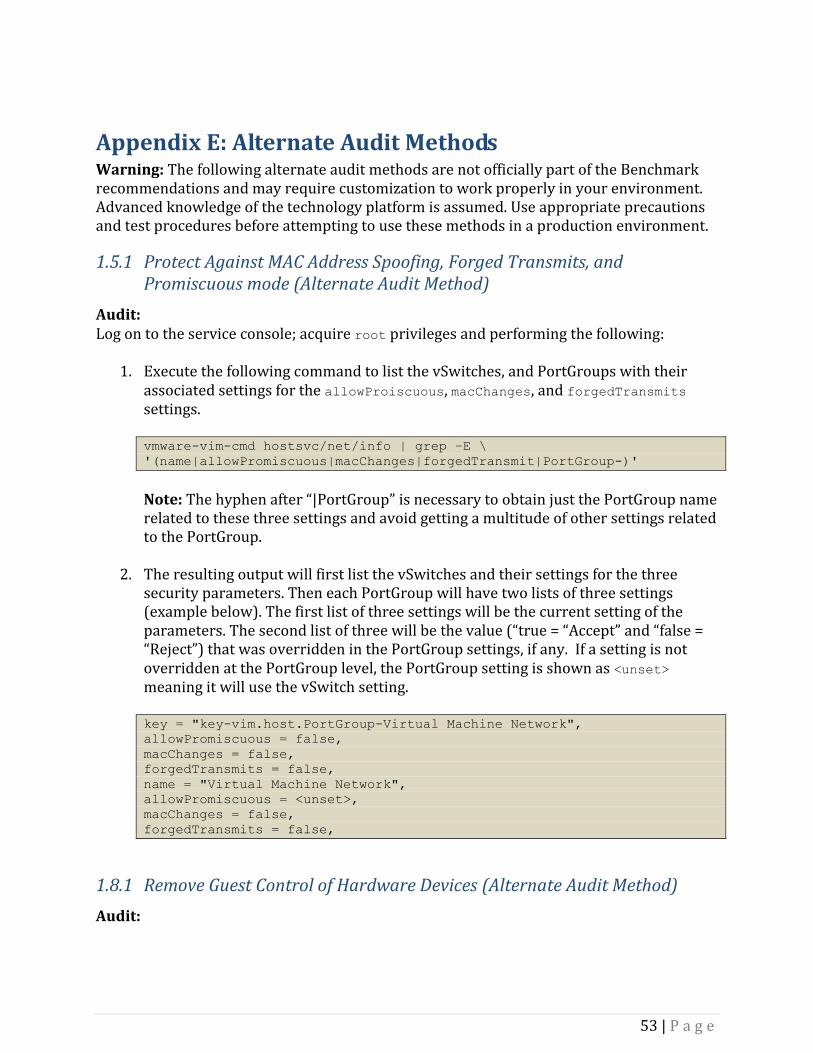
53 | P a g e
Appendix E: Alternate Audit Methods Warning: The following alternate audit methods are not officially part of the Benchmark recommendations and may require customization to work properly in your environment. Advanced knowledge of the technology platform is assumed. Use appropriate precautions and test procedures before attempting to use these methods in a production environment.
1.5.1 Protect Against MAC Address Spoofing, Forged Transmits, and Promiscuous mode (Alternate Audit Method)
Audit: Log on to the service console; acquire root privileges and performing the following:
1. Execute the following command to list the vSwitches, and PortGroups with their associated settings for the allowProiscuous, macChanges, and forgedTransmits settings.
vmware-vim-cmd hostsvc/net/info | grep –E \
'(name|allowPromiscuous|macChanges|forgedTransmit|PortGroup-)'
Note: The hyphen after “|PortGroup” is necessary to obtain just the PortGroup name related to these three settings and avoid getting a multitude of other settings related to the PortGroup.
2. The resulting output will first list the vSwitches and their settings for the three
security parameters. Then each PortGroup will have two lists of three settings (example below). The first list of three settings will be the current setting of the parameters. The second list of three will be the value (“true = “Accept” and “false = “Reject”) that was overridden in the PortGroup settings, if any. If a setting is not overridden at the PortGroup level, the PortGroup setting is shown as <unset> meaning it will use the vSwitch setting.
key = "key-vim.host.PortGroup-Virtual Machine Network",
allowPromiscuous = false,
macChanges = false,
forgedTransmits = false,
name = "Virtual Machine Network",
allowPromiscuous = <unset>,
macChanges = false,
forgedTransmits = false,
1.8.1 Remove Guest Control of Hardware Devices (Alternate Audit Method)
Audit:

54 | P a g e
The second approach involves issuing the commands below to search through the *.vmx file for each guest (or *.vmtx files for guest templates). The *.vmx files are located in the /vmfs/volumes directory, that directory will have a subdirectory for each storage device available to the ESX host. In those storage directories there will be additional subdirectories, one named for each guest, which is where each guest’s *.vmx configuration file will reside. Note, dormant or inactive guests may still have a directory and *.vmx plus *.vmdk and other files in their respective subdirectory, even if the guest is not currently active on this host. Navigate to the subdirectory of the named guest you wish to assess and issue following command:
grep -Hi 'allowGuestConnectionControl = "true"' <yourguestname.vmx>
Alternatively, if multiple quest subdirectories are to be searched, the script below will inventory the *.vmx file population and use that list to test each file contents for the presence of the test string (allowGuestConnectionControl = “true”), listing each *.vmx file that contains the test string into a results file. If the results file is not empty the list of non-compliant files is displayed. This script can be modified to perform similar tests discussed in sections 1.8.2, 1.8.3, and 1.8.4. The script should be modified to reflect your organization’s file and directory naming conventions and other requirements. The script is presented as a starting point; it is not representing to be either, the only, nor the optimal, way to perform this task. These test sections 1.8.1 through 1.8.4 represent a special case in that while it is a test executed on the host, the test is performed multiple times across many guests’ configuration files. The grep command uses the “–i” (case insensitive) parameter, this will match the instances of “true” and “TRUE” and “True”. Also, the “H” parameter provides the name of the file within which the string was found within along with providing the line of the file containing the matching string. The test for this section 1.8.1 is searching for the presence of a non-compliant text string.
#!/bin/bash
# set paths, variables, and files
DATAPATH="/home/student01/ESX_Benchmark_Testing"
SCORE="Fail"
RESULTFILE="/home/student01/ESX_Benchmark_Testing/element_8-
1/FailedGuestConnect.txt"
rm $RESULTFILE
touch $RESULTFILE
#
# Create a list of vmx files from all /vmfs/volumes available to this
# host
find /vmfs/volumes/ -name '*.vmx' > $DATAPATH/vmx_files.txt
#
# Load each vmx file based on the list above and look for;
# any devices allow guest connection control.
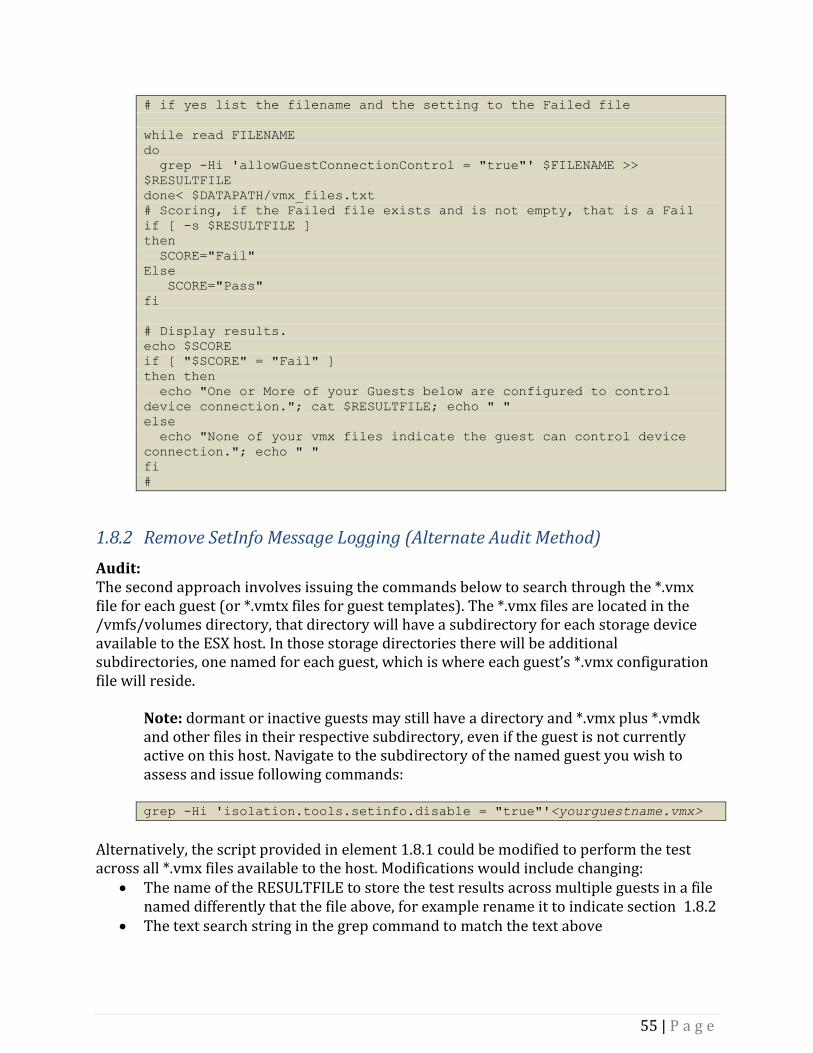
55 | P a g e
# if yes list the filename and the setting to the Failed file
while read FILENAME
do
grep -Hi 'allowGuestConnectionControl = "true"' $FILENAME >>
$RESULTFILE
done< $DATAPATH/vmx_files.txt
# Scoring, if the Failed file exists and is not empty, that is a Fail
if [ -s $RESULTFILE ]
then
SCORE="Fail"
Else
SCORE="Pass"
fi
# Display results.
echo $SCORE
if [ "$SCORE" = "Fail" ]
then then
echo "One or More of your Guests below are configured to control
device connection."; cat $RESULTFILE; echo " "
else
echo "None of your vmx files indicate the guest can control device
connection."; echo " "
fi
#
1.8.2 Remove SetInfo Message Logging (Alternate Audit Method)
Audit: The second approach involves issuing the commands below to search through the *.vmx file for each guest (or *.vmtx files for guest templates). The *.vmx files are located in the /vmfs/volumes directory, that directory will have a subdirectory for each storage device available to the ESX host. In those storage directories there will be additional subdirectories, one named for each guest, which is where each guest’s *.vmx configuration file will reside.
Note: dormant or inactive guests may still have a directory and *.vmx plus *.vmdk and other files in their respective subdirectory, even if the guest is not currently active on this host. Navigate to the subdirectory of the named guest you wish to assess and issue following commands: grep -Hi 'isolation.tools.setinfo.disable = "true"'<yourguestname.vmx>
Alternatively, the script provided in element 1.8.1 could be modified to perform the test across all *.vmx files available to the host. Modifications would include changing:
The name of the RESULTFILE to store the test results across multiple guests in a file named differently that the file above, for example rename it to indicate section 1.8.2
The text search string in the grep command to match the text above

56 | P a g e
The display messages to describe this test as a “setinfo messages” assessment rather than another “device connection“ assessment
Also the logic is reversed from the test in section 1.8.1, since the grep logic will find a compliant string in section 1.8.2, we need to capture when that does not happen by using the if [ $? –ne 0 ] logic that evaluates the last command’s (grep’s) exit status, if not 0 then the setinfo true search string combination was not found and write the file name to the exception list. Above in section 1.8.1 the grep match showed a non-compliant string and the file name could be written directly to the exception file.
#!/bin/bash
# set paths, variables, and files
DATAPATH="/home/student01/ESX_Benchmark_Testing"
SCORE="Fail"
RESULTFILE="/home/student01/ESX_Benchmark_Testing/element_8-
2/FailedSetinfoMessages.txt"
rm $RESULTFILE
touch $RESULTFILE
#
# Create a list of vmx files from all /vmfs/volumes available to this
host
find /vmfs/volumes/ -name '*.vmx' > $DATAPATH/vmx_files.txt
#
# Load each vmx file based on the list above and look for;
# any the disablement of setinfo messages.
# if yes list the filename and the setting to the Failed file
while read FILENAME
do
grep -iq 'isolation.tools.setinfo.disable = "true"' $FILENAME
if [ $? -ne 0 ]
then
echo $FILENAME >> $RESULTFILE
fi
done< $DATAPATH/vmx_files.txt
#
# Scoring, if the Failed file exists and is not empty, that is a Fail
if [ -s $RESULTFILE ]
then
SCORE="Fail"
else
SCORE="Pass"
fi
# Display results.
echo $SCORE
if [ "$SCORE" = "Fail" ]
then
echo "Guests listed below are configured to send setinfo messages to
the host."; cat $RESULTFILE; echo " "
else
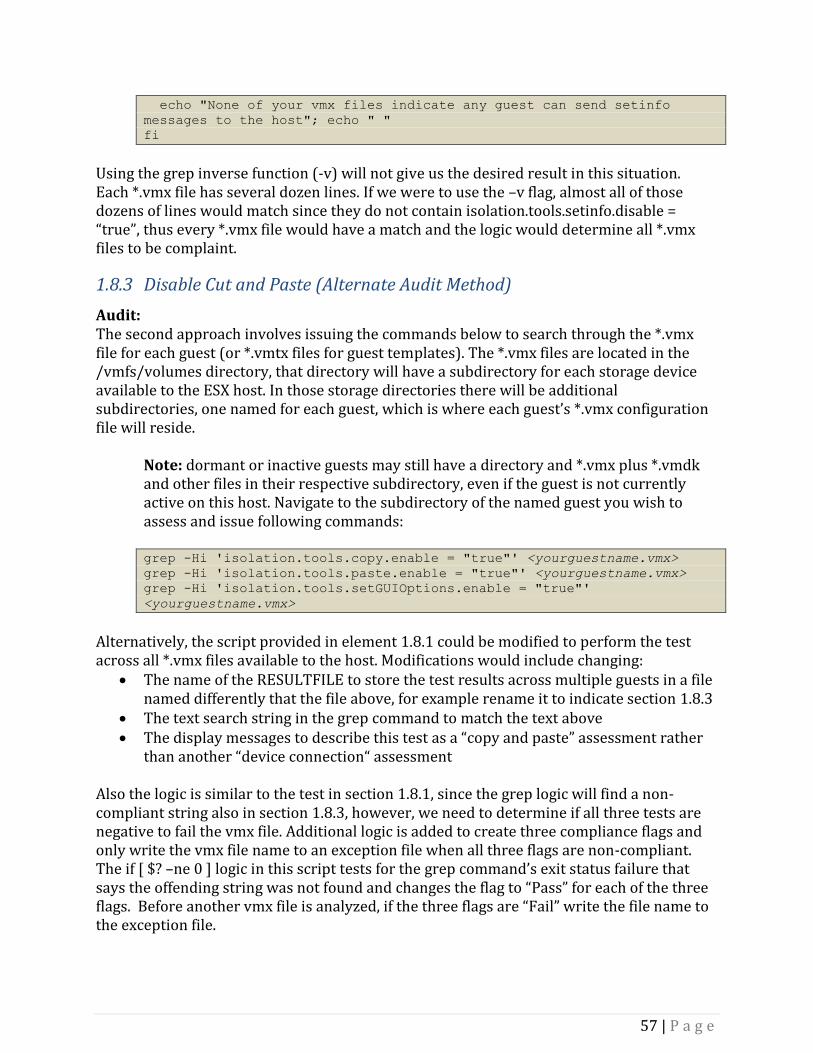
57 | P a g e
echo "None of your vmx files indicate any guest can send setinfo
messages to the host"; echo " "
fi
Using the grep inverse function (-v) will not give us the desired result in this situation. Each *.vmx file has several dozen lines. If we were to use the –v flag, almost all of those dozens of lines would match since they do not contain isolation.tools.setinfo.disable = “true”, thus every *.vmx file would have a match and the logic would determine all *.vmx files to be complaint.
1.8.3 Disable Cut and Paste (Alternate Audit Method)
Audit: The second approach involves issuing the commands below to search through the *.vmx file for each guest (or *.vmtx files for guest templates). The *.vmx files are located in the /vmfs/volumes directory, that directory will have a subdirectory for each storage device available to the ESX host. In those storage directories there will be additional subdirectories, one named for each guest, which is where each guest’s *.vmx configuration file will reside.
Note: dormant or inactive guests may still have a directory and *.vmx plus *.vmdk and other files in their respective subdirectory, even if the guest is not currently active on this host. Navigate to the subdirectory of the named guest you wish to assess and issue following commands: grep -Hi 'isolation.tools.copy.enable = "true"' <yourguestname.vmx>
grep -Hi 'isolation.tools.paste.enable = "true"' <yourguestname.vmx>
grep -Hi 'isolation.tools.setGUIOptions.enable = "true"'
<yourguestname.vmx>
Alternatively, the script provided in element 1.8.1 could be modified to perform the test across all *.vmx files available to the host. Modifications would include changing:
The name of the RESULTFILE to store the test results across multiple guests in a file named differently that the file above, for example rename it to indicate section 1.8.3
The text search string in the grep command to match the text above The display messages to describe this test as a “copy and paste” assessment rather
than another “device connection“ assessment Also the logic is similar to the test in section 1.8.1, since the grep logic will find a non-compliant string also in section 1.8.3, however, we need to determine if all three tests are negative to fail the vmx file. Additional logic is added to create three compliance flags and only write the vmx file name to an exception file when all three flags are non-compliant. The if [ $? –ne 0 ] logic in this script tests for the grep command’s exit status failure that says the offending string was not found and changes the flag to “Pass” for each of the three flags. Before another vmx file is analyzed, if the three flags are “Fail” write the file name to the exception file.
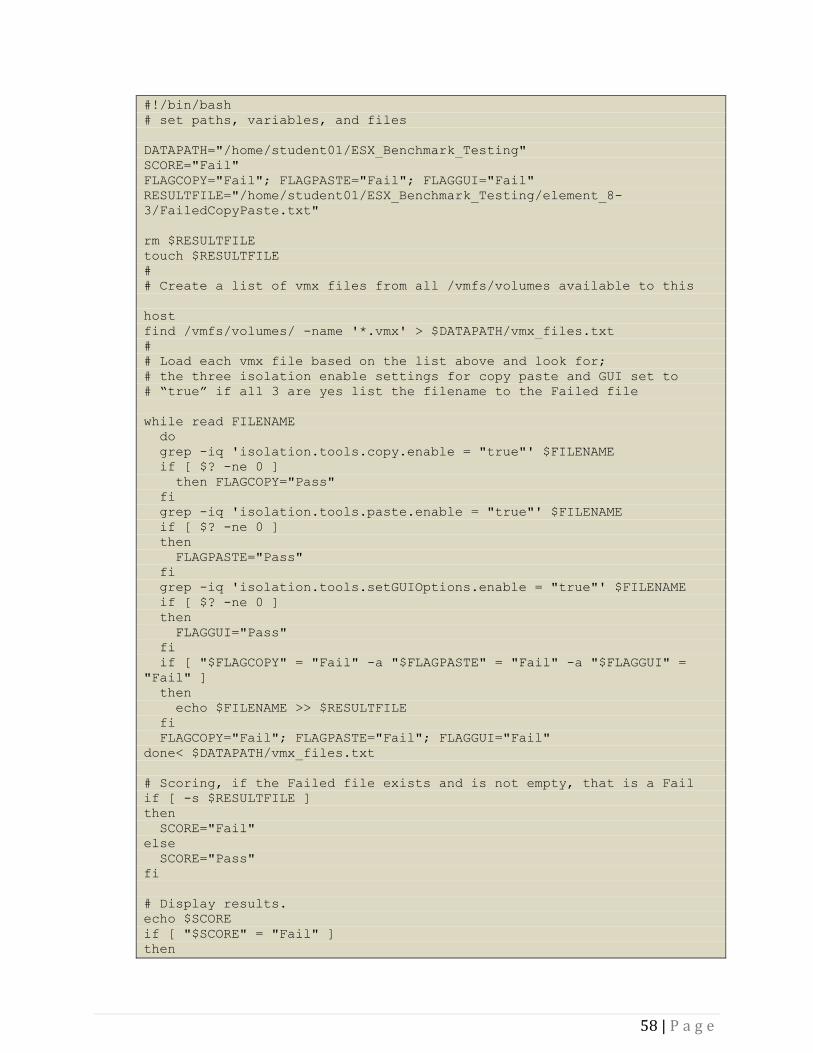
58 | P a g e
#!/bin/bash
# set paths, variables, and files
DATAPATH="/home/student01/ESX_Benchmark_Testing"
SCORE="Fail"
FLAGCOPY="Fail"; FLAGPASTE="Fail"; FLAGGUI="Fail"
RESULTFILE="/home/student01/ESX_Benchmark_Testing/element_8-
3/FailedCopyPaste.txt"
rm $RESULTFILE
touch $RESULTFILE
#
# Create a list of vmx files from all /vmfs/volumes available to this
host
find /vmfs/volumes/ -name '*.vmx' > $DATAPATH/vmx_files.txt
#
# Load each vmx file based on the list above and look for;
# the three isolation enable settings for copy paste and GUI set to
# “true” if all 3 are yes list the filename to the Failed file
while read FILENAME
do
grep -iq 'isolation.tools.copy.enable = "true"' $FILENAME
if [ $? -ne 0 ]
then FLAGCOPY="Pass"
fi
grep -iq 'isolation.tools.paste.enable = "true"' $FILENAME
if [ $? -ne 0 ]
then
FLAGPASTE="Pass"
fi
grep -iq 'isolation.tools.setGUIOptions.enable = "true"' $FILENAME
if [ $? -ne 0 ]
then
FLAGGUI="Pass"
fi
if [ "$FLAGCOPY" = "Fail" -a "$FLAGPASTE" = "Fail" -a "$FLAGGUI" =
"Fail" ]
then
echo $FILENAME >> $RESULTFILE
fi
FLAGCOPY="Fail"; FLAGPASTE="Fail"; FLAGGUI="Fail"
done< $DATAPATH/vmx_files.txt
# Scoring, if the Failed file exists and is not empty, that is a Fail
if [ -s $RESULTFILE ]
then
SCORE="Fail"
else
SCORE="Pass"
fi
# Display results.
echo $SCORE
if [ "$SCORE" = "Fail" ]
then

59 | P a g e
echo "Guests listed below are configured to allow cut and paste.";
cat $RESULTFILE; echo " "
else
echo "None of your vmx files indicate any guest can cut and paste.";
echo " "
fi
#
1.8.4 Limit Log File Size and Number of Logs (Alternate Audit Method)
Audit: The second approach involves issuing the commands below to search through the *.vmx file for each guest (or *.vmtx files for guest templates). The *.vmx files are located in the /vmfs/volumes directory, that directory will have a subdirectory for each storage device available to the ESX host. In those storage directories there will be additional subdirectories, one named for each guest, which is where each guest’s *.vmx configuration file will reside.
Note: dormant or inactive guests may still have a directory and *.vmx plus *.vmdk and other files in their respective subdirectory, even if the guest is not currently active on this host. Navigate to the subdirectory of the named guest you wish to assess and issue following commands: grep -Hi 'log.rotateSize = ' <yourguestname.vmx>
grep -Hi 'log.keepOld = ' <yourguestname.vmx>
Alternatively, the script provided in element 1.8.2 could be modified to perform the test across all *.vmx files available to the host. Modifications would include changing:
The name of the RESULTFILE to store the test results across multiple guests in a file named differently that the file above, for example rename it to indicate section 1.8.4
The text search string in the grep command to match the text above The display messages to describe this test as a “log settings” assessment rather than
another “device connection“ assessment Also the logic is similar to the test in section 1.8.2, since the grep logic will find compliant string also in section 1.8.4; however, we need to determine if both tests are positive for the vmx file to pass. Additional logic is added to check for the absence of either setting string and write the vmx file name to an exception file when either of the two flags are non-compliant. The if [ $? –ne 0 ] logic in this script tests for the grep command’s exit status success, that says the compliant string was not found and copies the vmx file name to the exception list. Note: failing either condition completely fails this section 1.8.4. Also, the first failure (rotateSize) places the vmx file in the exception list, therefore when remediating check both entries (rotateSize and keepOld) as shown above for correction.

60 | P a g e
#!/bin/bash
DATAPATH="/home/student01/ESX_Benchmark_Testing"
SCORE="Fail"
RESULTFILE="/home/student01/ESX_Benchmark_Testing/element_8-
4/FailedLogSizeHistory.txt"
rm $RESULTFILE
touch $RESULTFILE
#
# Create a list of vmx files from all /vmfs/volumes available to this
# host
find /vmfs/volumes/ -name '*.vmx' > $DATAPATH/vmx_files.txt
#
# Load each vmx file based on the list above and look for;
# the presence of both log size and log history settings
# if either is missing list the filename to the Failed file
while read FILENAME
do
grep -iq 'log.rotateSize = ' $FILENAME
if [ $? -ne 0 ]
then
echo $FILENAME >> $RESULTFILE
else
grep -iq 'log.keepOld = ' $FILENAME
if [ $? -ne 0 ]
then
echo $FILENAME >> $RESULTFILE
fi
fi
done< $DATAPATH/vmx_files.txt
# Scoring, if the Failed file exists and is not empty, that is a Fail
if [ -s $RESULTFILE ]
then
SCORE="Fail"
else
SCORE="Pass"
fi
# Display results.
echo $SCORE
if [ "$SCORE" = "Fail" ]
then
echo "Guests listed below are missing either a log.rotateSize or a
log.keepOld setting (or maybe both)."; cat $RESULTFILE; echo " "
else echo "None of your vmx files indicate any guest is missing log
size or history settings."; echo " "
fi

61 | P a g e
Appendix F: Change History Date Version Changes for this version
November 9, 2009 1.0.0 Public Release