vl02-en/cn-a01 proxima quick start guide - voxelab 3d p
TRANSCRIPT

This guide is only applicable to Voxelab Proxima 3D printer
Proxima
Quick Start GuideVL02-EN/CN-A01
Please put on gloves while using photopolymer resin to avoid direct contact with hands.
To ensure the printing quality, please don’t open the light shield unless it’s necessary.
Unused photopolymer resin needs to be stored in a dark, dry , and cool place.
Please clean the finished model with anhydrous alcohol.
Please ensure that the platform is installed correctly and no items before operating to avoid damaging the LCD screen.
1.
2.
3.
4.
5.
WARNING


Each 3D printer has passed the printing test before leaving the factory. It is normal if there is residual material in the extruder or slight scratch on the printing platform and does not affect the use.
Users will find the Quick Start Guide together with the printer accessories. The Quick Start Guide will help you start your print journey as soon as possible.
Note:
Quick Start Guide
Foreword
Dear User:
Thank you for choosing and using the products of Voxelab Technology. Thank you for your support and help to Voxelab Technology.The products of Voxelab Technology have excellent quality and performance. For your convenience, please read this Guide carefully before use and follow the instructions strictly. The Voxelab team is always ready to provide you with the perfect service. In case of any problems during the use, please contact us by phone or email listed in this Guide.
In order to better experience our products, you can also get operation knowledge of the equipment from the following way:
1

PLEASE STRICTLY FOLLOW ALL THE SAFETY WARNINGS AND NOTICE BELOW ALL THE TIME.
Work Environment Safety
Notice
Keep your work place tidy.Do not operate Proxima in the presence of flammable liquids, gases or dust.Proxima should be placed out of children and untrained people's reach.
Place Requirements
The device must be placed in a dry and ventilated environment. The distances of the left, right and back side space should be at least 20cm, and the distance of the front side space should be at least 35cm.
Cautions
Do not leave the device unattended for long.Do not make any modifications to the device.Do not operate the device in bright light.Operate the device in a well-ventilated environment.Never use the device for illegal activities.Never use the device to make any food storage vessels.Never use the device to make any electrical appliance.Never put the model into your mouth.Do not remove the models with force.
Personal Safety
please don’t direct touch the photopolymer resin with hands.Please put on gloves and masks during operation.Please don’t look at the light source directly.Do not operate the device while you are tired or under the influence of drugs, alcohol or medication.
Electricity Safety
Always use the Proxima with a properly grounded outlet. Do not refit Proxima plug.Do not use Proxima in damp or wet locations. Do not expose Proxima to burning sun.Do not abuse the cable. Avoid using the device during an thunderstorm.In case of uncertain accident, please unplug the device if you do not use it for long.
2

Environment Requirements
Temperature: RT 15-30℃Moisture: 20%-70%
Photopolymer Resin Requirements
Do not abuse the photopolymer resin. Please make sure you use the Voxelab photopolymer resin or the photopolymer resin from the brands accepted by Voxelab.
Photopolymer Resin Storage
Unused photopolymer resin needs to be stored in a dark, dry, cool place, and out of the reach of children. The resin stored at low temperature should be shaken well and used at room temperature (above 20℃).
Notes on model layout
Try to avoid inverted loopholes of model layout. Reduce exposure time when printing models with dense layout.
Legal Notice
All the information in this document is subject to any amendment or change without the official authorization from Voxelab.
First edition(April 2020)@Copyright 2020 Zhejiang Flashforge 3D Technology Co., Ltd. All rights reserved
3

Getting to Know Your Proxima
5. Box Tighten Knob
7. USB Stick Port
9. Power Switch
4. Resin Box
1. Platform Tighten Knob 2. Z-axis
8. Light Shield
6. Touched Screen
10. Power Slot
3. Build Plate
4
8
9 10
2
4
5
6
7
1
3

Parameter
Print Technology
Light Resource
XY Resolution
Suggested Layer Thickness
AC Input
Liquid Crystal Display
405nm UV integrated light array
0.050mm(2560*1620)
0.025-0.1mm
7KGNet Weight
110-220V, 50-60Hz 12V, 5A, 60W
Software CHITUBOX/VoxelPrint
Screen
Connectivity
Production Dimensions
Build Volume
3.5’’ color IPS Touch Screen
USB Stick
230*200*410mm
125*68*155mm
5

Accessory Box
After-sales cardPower cable
USB stick
Proxima Quick start guide
Power adapter Build plate Rubber gloves
Filter paper
Wrench set Screw set Metal Scraper
This guide is only applicable to Voxelab Proxima 3D printer
Proxima
Quick Start GuideVL02-EN/CN-A01
Please put on gloves while using photopolymer resin to avoid direct contact with hands.
To ensure the printing quality, please don’t open the light shield unless it’s necessary.
Unused photopolymer resin needs to be stored in a dark, dry , and cool place.
Please clean the finished model with anhydrous alcohol.
Please ensure that the platform is installed correctly and no items before operating to avoid damaging the LCD screen.
1.
2.
3.
4.
5.
WARNING
Plastic Scraper
6

Leveling
7
1. Install the build plate on the plate holder.
2. Tighten the platform tighten knob. If the build plate cannot fix well, please to do step 3 first, then do the step 2.
3. Just loose two screws in the front and right side of cradle head on the build plate.
4. Make sure it can move free but not to fall.
Open the paper box and take out the Proxima on the desk. Remove all protective foam and plug in the power cable.
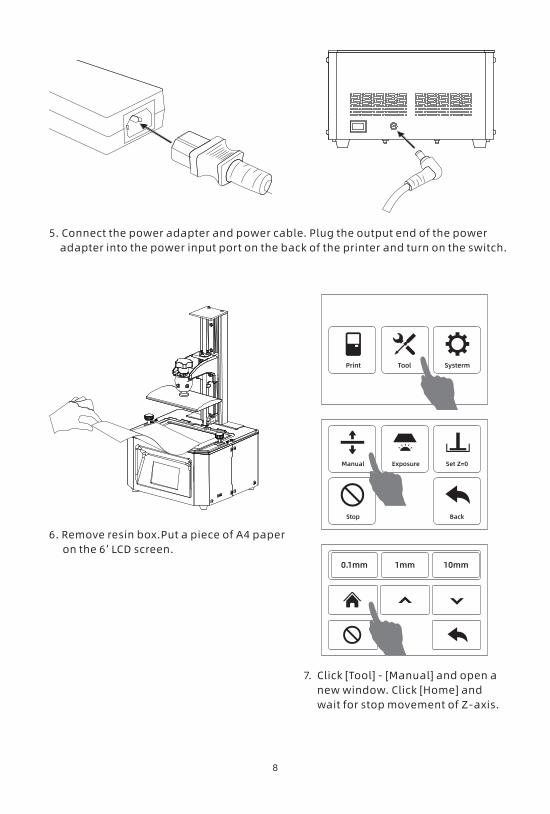
7. Click [Tool] - [Manual] and open a new window. Click [Home] and wait for stop movement of Z-axis.
6. Remove resin box.Put a piece of A4 paper on the 6’ LCD screen.
5. Connect the power adapter and power cable. Plug the output end of the power adapter into the power input port on the back of the printer and turn on the switch.
Print Tool Systerm
Manual
Stop
Exposure Set Z=0
Back
0.1mm 1mm 10mm
8

9. Click [Back] to come back and click [Set Z=0] to set the height of the current build plate to zero. Then click [Manual] to lift the build plate upper.
Note: It must to level fo first using, changing new build plate and new screen. It have to level again when print abnormal. For example, printed model cannot stick to build plate.
8. If twitch a piece of A4 paper and feel the large resistance.Press the top of the build plate with one hand to let four corners of build plate to touch the LCD screen evenly. And just tighten the screws in the front and right side of cradle head first. Then tighten again.
If twitch a piece of A4 paper and don’t feel the large resistance, click [0.1mm] in the touched screen and twitch paper and feel the resistance again. Repeat it, until feel the large resistance from paper. Then tighten all screws.
Press
Tighten the screws
Manual
Stop
Exposure Set Z=0
Back
0.1mm 1mm 10mm
Note:Because of change in tightness by tighten screws on the build plate, it have to adjust the height of Z-axis. If twitch a piece of A4 paper and feel little resistance or no resistance, click [0.1mm] and the height of Z-axis decline 0.1mm; If twitch a piece of A4 paper and feel large resistance, click [0.1mm] and height of Z-axis rise 0.1mm. Over and over. The perfect state is pulling out the paper and you still feel some resistance.
9

First Print
3. Verify the installation of resin box and build plate first. Then pour the resin into the resin box.
Note: Do not exceed the mark line in the resin box.
2. Tighten the two box tighten knobs.1.Make sure LCD screen, build plate and resin box is clear. Install the resin box on the LCD screen.
10

4. Close the light shield after all above preparatory work.
5. Click [Print] and choose the printed file in the list. Click the printed file and star to print.
Print Tool Systerm
Model-01 Model-02
Model-03 Model-04
Note: Do not open the top cover in the process of printing to avoid eyes hurt.
11

1.Touched screen will show the tips after the printing is finished. Click [OK] and then open the top cover.
4. After cleaning finished, remove the alcohol in the model by non-dust cloth or air gun. It is better to solidify the model again by using curing box.
2. Just loose the platform tighten knob to remove the build plate easily.
3. Remove the printed model by mental scraper knife and put the model into the cleaning box with anhydrous alcohol to clean excess resin.
Note: Do not damage the FEP film in the resin box or the LCD screen in the process of removing model.
Postprocessing
Model-01
00h01m 02h57m 899/899
OK
Print completed!Time: 02h57m
12

5. If you do not print within a period of time, it suggest that pour the residual resin into the resin bottle. The residual resin must be filtered by using filter paper first. At last, Close the power and clean the printer, especially build plate and resin box, by using non-dust cloth and anhydrous alcohol.
13
Filter paper
Clean and sealable bottle
Residual resin

CHITUBOX V1.0
File List
Settings
Slice
Select All
X
ZY
untitled*
Solid
X-Ray
Software Operation
1. Install and open the ChiTuBox 64.exe program.
3. Using movement and rotation to move the model to the right postion, where can not lower the platform.
2. Click the upper left menu button, and click【Open...】to choose the printed files.
CHITUBOX V1.0
Open Project
Save ProJect
Open...
Save As...
X:
Y:
Z:
0.00
0.00
0.00
Put on the plate
Centered
Reset
X:
Y:
Z:
+90°
+90°
+90°
Flatten by face
Reset
-90°
-90°
-90°
0.00
0.00
0.00
CHITUBOX
14

4.Click [Settings] and open the pop-up window. Generally, adjust ‘Layer Height, Bottom Layer Count, Exposure Time, Bottom Exposure Time’
5.Finish all parameter setting, click [Slice] and there is a tip in the down right of the window shows“Slicing...”. After slicing, there is a pre-review window.
6.Click [Save] , choose the file type as”.fdg” and stored place and click [Save] .
Settings
Default
Proxima
Machine
Layer Height:
Bottom Layer Count:
Exposure Time:
Bottom Exposure Time:
Light-off Delay:
Bottom Light-off Delay:
mm
s
s
s
s
mm
mm
mm/min
mm/min
mm/min
5
5
60
60
180
0.05
6
2.5
20
0
0
Bottom Lift Distance:
Lifting Distance:
Bottom Lift Speed:
Lifting Speed:
Retract Speed:
Resin Print Infill Gcode Advanced
Save
Network Sending
Machine:Proxima
Resin:normal
Volume:1.8 (ml)
Weight:2.0 (g)
Price:0.05$
Time:2h50m17s
Back
CHITUBOX V1.0 untitled*
15

1.Copy the “.fdg” file to the USB stick from the computer. It is better to remove USB stick to avoid file damage after exiting the computer safely.
2. Pull USB stick into the USB stick port in the Proxima. Click [Print] in the touched screen and open files list. Only showed in the list, the files are recognized.
Note: USB stick permit to remove in the process of printing.
Load printed files
Print Tool Systerm
Model-01 Model-02
Model-03 Model-04
Mainteness
Do not pour the residual resin back to the resin bottle with unused resin.
The waste resin can be poured into the hermetic bag to encapsulate and exposure to the sun until solidify all resin.
If stop print within a period of time, pour the residual resin back into the resin bottle and save it to avoid light. If there are some thin solidified pieces in the resin, it must to filter before storage.
Do not clear the solidified pieces in the resin box by using sharp mental scraper knife or other sharp instrument to avoid the damage of FEP film.
If there is some resin dropped in the touched screen, it must to clear by non-woven fabrics; or the resin have been solidified, please clear it by non-woven fabrics and anhydrous alcohol.
Please keep two places showed in the picture clear. No dust and fingerprint.
16


Sales Service: [email protected] Service: [email protected]: Zhejiang Flashforge 3D Technology Co.LtdAdd: 2/F, No, 518, Xianyuan Road, Jinhua, Zhejiang, China