visualizing construction the bartlett center from start to ... · the program microsoft office...
TRANSCRIPT

Project Number: GFS-0807
Visualizing Construction
The Bartlett Center from Start to Finish
An Inter-Qualifying Project Submitted to the faculty of
Worcester Polytechnic Institute In partial fulfillment of the requirements for the
Degree of Bachelor of Science
Submitted By: Mustansir Jivanjee
Submitted To: Project Advisor:
Guillermo Salazar
Terms: A07, B07
Date: February 28, 2008

II
Abstract
This project addresses the importance of the use of visual aids in teaching and
learning by exploring its potential on CE3020 material taught at WPI. A website is
developed incorporating dynamic and static visuals, text information, and
enhanced functionality progressing upon another recently developed website to
aid students taking CE3020 at WPI. The site illustrates different construction
phases of the recently built Bartlett Center (WPI); survey results expressing
student’s views on the importance of visual learning and teaching are analyzed.

III
Acknowledgements
I would like to thank Professor Salazar for his patience and motivation without
which this project could not accomplish its goal. I would also like to thank Ryan
Bourque and James Marois for providing access to their website, IQP project and
other relevant information which formed the foundation for this IQP project.

IV
Project Overview
This project involved the development of the “Visualizing Construction – Bartlett
Center from Start to Finish” web-site. After reviewing the aforementioned
“Visualizing the Bartlett Center Construction” and the IQP report by Bourque and
Marois, and extensive research on visual learning styles and methods, a draft
was initiated. The Bartlett Center – a recently constructed admissions building for
Worcester Polytechnic Institute was chosen as the exemplary focal point to
demonstrate the incorporation of visual aids with scheduling information and the
process of construction. The Bartlett Center also proved to be a more practical
example due to its location; today, WPI students interact with the structure
almost on a daily basis, some of whom had the opportunity to observe its
construction first hand during 2005 and 2006. The web-site was initially designed
on paper, with emphasis on making use of visual data to relay information to the
readers as outlined in the Bourque-Marois paper.
The web-site development process was a difficult one; with no prior experience
the program Microsoft Office FrontPage 2003 was studied extensively to ensure
a functional and effective tool for students. During the preliminary phases, the
structure of the web-site was developed which evolved over the period of the
development process. The construction process was simplified and broken down
into terms that could be easily comprehended by novice users and categorized
into twelve major construction phases, from Pre-Construction phases through
Close-out.
Each phase was allotted its own page with a concise description of the
respective term, along with an explanatory panel on the left that displayed
information on concepts and terminology used in construction related to the step.
Furthermore, the left panel also consisted of illustrations in the form of pie-charts
and a Gantt schedule, which illustrated the breaking down of activities involved in

V
the form of a dependency relationship to convey the dependence of each step on
the previous one in a logically ordered fashion, forming a precedence relationship.
Video clips of each phase of construction from Bartlett Center’s actual
construction footage were used to visually stimulate the viewers and effectively
relay information mentioned in the text. Furthermore, an “interactive summary”
page consisting of video clips, the complete schedule, activity breakdown
overview and CSI list were integrated into one page for the viewers’ convenience.
This would also eliminate mundane use of text allowing the viewer to jump to any
phase and instantly acquiring information related to each phase; hence, the
viewer could witness the entire construction process of the Bartlett Center phase-
by-phase in only twelve clicks.
After the prototype website was completed, an on-line survey questionnaire was
sent to CE3020 students who took the course between 2003 and 2007. The
survey collected the students’ views and assessment of the web-site on the basis
of ease of use, functionality, and effectiveness of visual aids, and educational
value.

VI
Table of Contents
Abstract ............................................................................................................................... II
Acknowledgements ........................................................................................................... III Project Overview .............................................................................................................. IV Table of Contents .............................................................................................................. VI Table of Figures ............................................................................................................... VII 1.0 Introduction ................................................................................................................... 1 2.0 Background ................................................................................................................... 3
2.1 The Bourque – Marois Paper .................................................................................... 3 2.2 Creativity in Education and Learning ....................................................................... 3 2.3 Learning and Teaching Styles in Engineering Education ......................................... 4
2.4 The Kolb Cycle ......................................................................................................... 5 2.5 Observations and Results from the Bourque – Marois paper ................................... 6
3.0 Visually aided Communication..................................................................................... 7
3.1 Why Visual Learning is Essential ............................................................................. 7 3.2 Technology Advancement ........................................................................................ 9
3.3 Cross-Cultural Communication .............................................................................. 10 4.0 Visualizing Construction: The Bartlett Center from Start to Finish ........................... 11
4.1 About the Web-site ................................................................................................. 11
4.2 The Development Process....................................................................................... 12 4.3 Index of Learning Styles Questionnaire ................................................................. 12
4.4 Pre-Construction Phase through Close-out, and More ........................................... 15 4.5 Review of website improvements ........................................................................... 23
5.0 Results ......................................................................................................................... 27
5.1 Survey Results ........................................................................................................ 27
5.2 Conclusion .............................................................................................................. 31 5.3 Recommendations ................................................................................................... 32
6.0 Bibliography ............................................................................................................... 33
7.0 Appendices .................................................................................................................. 34
Appendix A – Index of Learning Styles Survey Results .............................................. 35 Appendix B – Felder’s Original Index of Learning Styles Questionnaire .................... 40 Appendix C – Bourque – Morais Survey Results ......................................................... 45 Appendix D – Mustansir Jivanjee Survey Results ........................................................ 51
Appendix E – Gilbane Construction Co. Primavera Schedule (Bartlett Center) .......... 58 Appendix F – List of Activities Submitted by CE3020 Students ................................. 71 Appendix G – Reduced List of Owner’s Activities by CE3020 Students .................... 79
Appendix H – “Visualizing Construction” Website ..................................................... 84 Appendix I – New Simplified Gantt chart Schedule (Publisher) ................................ 101 Appendix J – Bourque – Morais Website Template ................................................... 103

VII
Table of Figures
Figure 1 - The Kolb Cycle ..................................................................................................... 5 Figure 2 - Learning Styles of Average Student in CE/ES 256, Fall 2000 - Professor Fernando Cadena ................................................................................................................ 8 Figure 3 - Preferred Learning Style in CE/ES 256, Fall 2000 - Professor Fernando Cadena 8 Figure 4 - Question 2 from the Index of Learning Styles Questionnaire .......................... 13 Figure 5 - Question 9 from the Index of Learning Styles Questionnaire .......................... 14 Figure 6 - Dedicated page comprising of a main page, and a side panel (left) ................ 16 Figure 7 - Project Completion-o-meter illustrating percentage of project complete with respective phase. .............................................................................................................. 16 Figure 8 - Gantt chart illustrating break-down of tasks in the phase Excavation. ........... 17 Figure 9 - Example of video footage provided from Higgins Labs (left half) & Harrington Auditorium (right half) ...................................................................................................... 18 Figure 10 - Side panel displaying an overview of the Excavation Phase. ......................... 19 Figure 11 - Example of pictures provided for the phase Interior Walls, Mechanical & HVAC, where no video footage was available. ................................................................. 20 Figure 12 - Summary page broken into four independent smaller pages. ....................... 21 Figure 13 - CSI List, Division 01: General Requirements. .................................................. 22 Figure 14 - Navigation Links for all phases. ...................................................................... 23 Figure 15 - The Bourque - Morais sequential time-line. ................................................... 24 Figure 16 - Precedence relationship of the task breakdown structure within the Steel Frame phase. ..................................................................................................................... 24 Figure 17 - Complete precedence relationship structure by phases and respective tasks............................................................................................................................................ 25 Figure 18 - Precedence Relationship links ........................................................................ 26 Figure 19 - Construction Knowledge/ Construction Experience survey results. .............. 28 Figure 20 - Importance of Visual Aids ............................................................................... 28 Figure 21 - Areas of the term project that may have been difficult for students. ........... 29

1
1.0 Introduction
The emphasis on using visual media to support teaching and learning has been
increasing for over more than a decade. As educators and learners we must
acknowledge the fact that today in the 21st century, we are living in a state of global
media saturation. Visual information exerts very powerful influences on us socially,
emotionally and intellectually; as we evolve, our intellect has developed “Visual
Intelligence”; Michael B. McGrath and Judith R. Brown’s “Visual Learning for Science
and Engineering” paper discusses and explores the diverse benefits of visual aids.
A vast majority of the jobs now require visual problem solving in the field of
engineering, biology, chemistry, mathematics, etc. proving we are becoming a visually
integrated culture. Yet, the teaching style which is proven to be most effective, learning
through visualization, is not being fully utilized. It is imperative that educators around the
world strive to improve their teaching methods by incorporating visual imagery and thus
stimulating visual thinking, and set a standard which helps students improve their
competence not only in critical analysis of visual imagery, but in visual communication
as well.
Today, few educators make use of an array of visual information derived from a
variety of sources such as the traditional static media such as pictures and PowerPoint
slides, as can be seen in many classes on WPI’s tech savvy campus. However, it is not
suffice in today’s competitive dog-eat-dog world. Educators must prepare students to
effectively interact with today's experiences as well as tomorrows by enhancing their
educational opportunities by moving up to “incorporation of the digital media that is
manipulative”1. This report explores the possibilities of the incorporation of visual aids in
the subject of civil engineering, specifically the process of construction.
This report attempts to integrate dynamic and static visual data with the
process of construction, which may appear simple at most times, but is really quite
1 McGrath, M. and J. Brown, “Visual Learning for Science and Engineering,” IEEE Computer Graphics and Applications, Volume 25 No. 5, pp. 56-
63.

2
complicated involving a relationship of intermingled tasks and events. Visual learning
may simplify information so it can be interpreted better, and as a result understood
better by novice students. In the following chapters facts, methodologies and results
regarding visual learning and teaching are outlined which were reviewed and cross-
analyzed with results from an educational experiment based (Appendix D) on the
development of a web-site titled “Visualizing Construction – The Bartlett Center from
Start to Finish” (Appendix H) which incorporated various forms of visual imagery to
demonstrate the process of construction in simpler terms. These results essentially
helped to prove or disprove the effectiveness of visual aids in teaching and learning.
Furthermore, the web-site was fine tuned to provide beginner civil engineering students
with a tool to understand the principles, concepts and processes of construction from a
construction management perspective as taught in CE3020.

3
2.0 Background
This report is the result of further research and development conducted by
Mustansir Jivanjee for an IQP Project exploring the potential of learning using visual
aids. The project reviewed, analyzed and progressed upon a previous IQP project
authored by two WPI students Ryan Bourque and James Marois, who initially explored
the subject.
2.1 The Bourque – Marois Paper
Ryan Bourque and James Marois seeking to prove the benefits of visual aids
targeted a similar problem in their paper titled “Visualizing the Bartlett Center
Construction” 2. Their project involved the development of a web-site explaining the
process of construction and analyzing feedback from CE3020 students, which in the
end brought back important results. It was a test to confirm the effectiveness of the
implementation of visual aids in the case of learning the process of construction, and
the result was positive. Although their website, in my opinion, failed to incorporate
sufficient use of illustrations and visual data to convey the relevant information and
hence ineffectively portray the importance of illustrative aids, their paper notes key
points regarding the subject. Following, is an analysis of their work.
2.2 Creativity in Education and Learning
Creativity in Education & Learning rendered some key facts that were used to
shape their project. A. J. Cropley defines the differences between creativity and
intelligence in “Creativity in Education & Learning: A Guide for Teachers and Educators”.
The main difference between the two is that the function of intelligence is to acquire,
recall, and memorize already known information and then apply it, while Creativity is the
skill to develop or invent new ways to utilize the already known information for
application. Keeping this in mind it is rudimentary that WPI students have the
2 “Visualizing Construction – The Bartlett Center Construction,” by Ryan Bourque & James Morais

4
necessary intelligence and knowledge but in a lot of cases lack the ability to apply the
acquired information toward specific projects in new and creative ways. Their paper
states that in the case of studying civil engineering the role of imagery is evident:
visualizations trigger different parts of the brain which auditory learning does not. With
this portion of the brain functioning, students can link the two styles of learning together
and apply them to arrive at more creative solutions to problems.3
2.3 Learning and Teaching Styles in Engineering Education
Learning and Teaching Styles in Engineering Education by Richard Felder
gave an in depth analysis of learning styles and related them to explicit engineering
topics. Richard Felder, a co-director at the American Society for Engineering Education
and National Effective Teaching Institute also shows how each learning style relates to
its corresponding teaching style. It is stated that visual learners correspond with a
presentation type teaching environment. The work recognizes that students can learn
in a variety of ways; however it categorizes learning into three main methods. One such
method is teaching using visualization, although it may not be the most widely used
tactic approach in college, it has been proven to be highly effective. This method
involves the use of pictures, diagrams, video, or other visual mediums that students can
analyze and learn from. Another method is auditory learning where people use
language in to order obtain knowledge. Both reading and listening to lectures are
included in this category. The last technique is known as kinesthetic. In this form of
learning people learn from physical feelings: taste, touch, and/or smell.4
3 “Creativity in Education & Learning: A Guide for Teachers and Educators” by A. J. Cropley
4 “Visualizing Construction – The Bartlett Center Construction,” by Ryan Bourque & James Morais

5
2.4 The Kolb Cycle
The main theory behind the David Kolby’s Kolb Learning Cycle can be
explained by the quote: “Learning is the process whereby knowledge is created through
the transformation of experience.”5
In 1984, David Kolby developed a cycle consisting of four phases that best
explain how people gain knowledge (see Fig. 1). The first phase is Concrete
Experience (CE), where the student is educated by means of an example, video, case
study, or any experience where a learner can extract a piece of knowledge. After the
student reviews the experience from multiple perspectives, they reflect upon what they
have just obtained, they might ask themselves: What happened? What did I observe?
This phase is called Reflective Observation (RO). The third phase is called Abstract
Conceptualization (AC), where the learners develop theories and look for patterns.
Conclusions drawn by Kolby were reached from the experience and correlations were
drawn between variables. For example, when A happens, B will result. The final phase
is called Active Experimentation (AE), where the learners brainstorm ways of how to
apply the information they have obtained in another example in the future. The overall
concept of the Kolby Learning Cycle is to use information obtained from past
experiences to learn new skills, facts, or ways of thinking and to apply them in the
future.6
Figure 1 - The Kolb Cycle
5 Kolb, D. 1984 Experiential Learning: Experience as the Source of Learning and Development Englewood Cliffs, NJ: Prentice Hall
6 “Visualizing Construction – The Bartlett Center Construction,” by Ryan Bourque & James Morais

6
2.5 Observations and Results from the Bourque – Marois paper
Ryan Bourque and James Marois developed a web-site in 2006 using visual
aids targeting Project Management CE students and received feedback from users via a
survey. They received 45 responses from a control group of CE students over the past
4 years with CE3020 knowledge – 15% responded. Many responses were suggested at
improving the site’s aesthetics and efficiency by streamlining the navigation controls.
But the most important feedback they received as stated in their report was that 95.6%
of the respondents agreed that the web-site prove as a useful for its intended purpose –
to better student’s understanding of the construction process overall.
They posed a question in their survey “Do you feel the use of this site would be
beneficial in any classes other than CE 3020?” to which common responses ranged
from courses such as CE3021 – Cost Estimating to CE1030 – Introduction to Civil
Engineering.
The Bourque – Morais paper and website was successful in accomplishing its
primary goal: Visual aids can be, and should be implemented to more than one course
and offer the student population diversity in styles of learning for better understanding
and information retention. The results of Bourque and Morias’ paper brought realization
to the fact that more effective visual aids along with added functionality should be
incorporated.

7
3.0 Visually aided Communication
As mentioned before, the importance of visual learning in today’s competitive and
fast paced world cannot be emphasized more. Educators in the Science, Mathematics,
and Technology and Engineering disciplines are urged to adopt visual methods to
communicate about science and engineering. Exploring the vast domain of visual
learning has the ability to engage students’ interest and the potential to make any
subject more appealing, as a result captivating more minds into the field of science and
engineering.
3.1 Why Visual Learning is Essential
Visual learning methods open up a new portal to problem solving, encourage
new ways to think about science and engineering which are out-of-the-box, and
enhance the education and practice of science and engineering.
Visual approaches let scientists and engineers communicate more complex and
subtle concepts to each other and to students, and visual approaches to learning can
engage the student more fully in the ideas. A revolutionary change to scientists' way of
thinking is evidenced by the fact that they now say they cannot do scientific research or
communication without visualization. This “visualization revolution” showed that letting
scientists engage the higher cognitive parts of the brain by thinking and communicating
visually improved how they performed their research. 7
7 (1. B. H. McCormick et al. (Eds.) “Visualization in Scientific Computing,” Computer Graphics, Vol. 21, Number, 6, Nov. 1987.)

8
Figure 2 - Learning Styles of Average Student in CE/ES 256, Fall 2000 - Professor Fernando Cadena
According to a study conducted by a Civil Engineering Professor Fernando
Cadena of NMSU, as figure 2 illustrates, he states “the students in his Environmental
Science class (33 engineering and environmental science sophomores) shows that on
the average the students in this class prefer the visual and audio styles.” 8
Figure 3 - Preferred Learning Style in CE/ES 256, Fall 2000 - Professor Fernando Cadena
Furthermore, he discovered from his survey that “by far the majority of the
students in his class preferred the visual style. These trends appear to be common in
the engineering profession. It is not surprising to see seasoned engineers take full
advantage of visual aids to communicate design concepts.” 9 This is illustrated in Fig. 3.
8
9
“Implementing Innovative Visual Aids in Engineering Education”, Fernando Cadena, Professor, Civil Engineering, NMSU

9
3.2 Technology Advancement
Visual learning has existed in the sciences for a long time, for example in
Chemistry, the stick and ball models to demonstrate bonding and molecule assembly.
However, it cannot be ignored that with time technology has evolved providing us with
more ways to teach and learn using visual imagery. Mathematics programs such as
Maple and Matlab allow students to define complex symbolic and numerical models and
visualize their output.
Other subjects such as biology make use of detailed models illustrating complex
functions of the human anatomy, such as the human heart. These models use visual
methods to convey the functionality ranging from the beating heart pumping blood
through the circulation system and the brain to the human brain transmitting neurons
form nerve stimuli.10
It is therefore evident that the form of visual aids has transformed over the years.
As we evolve further and discover more complex relationships and reactions in our
surroundings, educators must develop more ways to relay new information to future
minds for the ultimate betterment and progress of humanity. A good example of the
incorporation of visual data into engineering is the Building Information Model (BIM), a
visual tool to help educate construction engineering students
“The Building Information Model (BIM) is a set of information generated and
maintained throughout the life cycle of a building. BIM covers geometry, spatial
relationships, geographic information, quantities and properties of building components
(for example manufacturers' details). BIM can be used to demonstrate the entire
building life cycle including the processes of construction and facility operation.
Quantities and shared properties of materials can easily be extracted. Scopes of work
10
McGrath, M. and J. Brown, “Visual Learning for Science and Engineering,” IEEE Computer Graphics and Applications, Volume 25 No. 5, pp.
56-63.

10
can be isolated and defined. Systems, assemblies, and sequences are able to be
shown in a relative scale with the entire facility or group of facilities.”11
The implementation of BIM may very possibly improve visualization, enhancing
the user’s understanding, and hence productivity due to easy retrieval of information.
BIM proponents claim users may increase their coordination of construction documents,
their speed of getting their work done with reduced costs, and relative ease improving
overall efficiency. Visual Teaching as conducted using BIM is one of the many important
methods of promoting visual learning in today’s world.
3.3 Cross-Cultural Communication
The world’s population is growing at a fast rate. The WPI student body shows the
diversity of cultures present studying various disciplines such as engineering and
chemistry. This may pose as some form of a barrier for communication in any medium;
be it language or interdisciplinary, for example communication may be more difficult
between a chemist and a biologist in the same university than between two chemists in
different countries. However, these communication barriers can be overcome using
visuals as this is a more universal form of communication as shown in a study by
Jacqueline Ford Morie, Associate Director of Creative Development at the University of
Southern California’s Institute for Creative Technologies. Although many variables must
be taken into consideration such as cultural differences, but visual aids in learning may
break communication medium barriers for a more generic understanding, therefore
overcoming cross-cultural challenges be they across disciplines or across nations.
11
What is BIM? - By Professor Charles M. Eastman, Director of AEC Integration Lab at Georgia Tech.

11
4.0 Visualizing Construction: The Bartlett Center from Start to Finish
The web-site development process was a difficult one; with no prior experience
the program Microsoft Office FrontPage 2003 was studied extensively to ensure a
functional and effective tool for students. During the preliminary stages, the structure of
the web-site was developed which evolved over the period of the development process.
The construction process was simplified and broken down into terms that could be
easily comprehended by novice users and categorized into twelve major construction
steps, from Pre-Construction phases through Close-out.
4.1 About the Web-site
Teaching the construction process to civil engineering students at WPI in a
program does not have specific courses dedicated to this purpose; not all material is
covered is given proper attention, but rather a generic overview. Therefore using a
construction example seemed like an appropriate topic to conduct this educational
experiment on, as it posed some challenges in determining and developing visual data
for its intended purpose. The example of Bartlett Center using actual data also provided
a good way to illustrate different information in different visual styles. The actual
schedule and some visual data was provided by the Gilbane Building Company who
was the CM fro this project, and some contributions were made by Ryan Bourque and
James Morais, including the information from their paper and website, which were the
stepping stones for this project.

12
4.2 The Development Process
The compilation of the preliminary data was provided by Professor Salazar,
which comprised of references to IQPs previously conducted on the topic as well as
spreadsheets from CE3020 listing tasks broken down by CSI code (Appendix F – List of
Activities & Appendix G – Reduced List of Owner’s Activities, and some Primavera
documents (Appendix E) containing all the scheduling information, courtesy of Gilbane.
The first step towards making progress was to research and account for all work
that had been accomplished on the subject in the past. The Bourque – Marois paper
and web-site was determined as a good start-off point as it posed a challenge on the
web-site development criteria. The web-site development process was an important
milestone because all observations, results and conclusions were to be drawn from the
said web-site which would illustrate effective visual imagery. These visuals would be
tested upon by conducting a survey amongst a control group of CE students with prior
and on-going knowledge of CE3020 Project Management. The results were analyzed
and evaluated to get concrete results that the visual aids did indeed make the expected
impact on understanding of students, and this would be evident from the feedback
received. Therefore, a new a web-site was sought to be developed.
4.3 Index of Learning Styles Questionnaire
Before any progress could be made on the web-site, another control survey was
created for input into the web-site (see Appendix A for survey results). For this, use of
The Felder Survey (Appendix B) was sought. Felder, as aforementioned, was a co-
director at the American Society for Engineering Education and National Effective
Teaching Institute. He developed a survey comprised of forty four questions, the result
of which could be categorized into various groups, one of which was Visual Learners VS
Verbal Learners. Appropriate questions from the Felder Survey were compiled to put
the statistics to the test.

13
The survey was titled Index of Learning Styles Questionnaire derived from
Felder’s original survey, and was sent to forty CE colleagues with prior knowledge of
CE3020 in the early stages of the project. The response rate was 80%; results may be
found in Appendix A.
2. When I think about what I did yesterday, I am most likely to get
Response Percent
Response Count
a picture.
93.8% 30
words.
9.4% 3
Figure 4 - Question 2 from the Index of Learning Styles Questionnaire
A question was posed regarding information retention on a daily basis by asking
the question, “When I think about what I did yesterday, I am most likely to get…” 93.8%
responded they would think of a picture than something verbal or auditory (Fig. 4). This
provides indication that Felder’s statement “processes can be made more tangible
through visualization”12 and the fact that visual imagery plays a major role in information
retention and/or understanding information.
Another question was posed “I prefer courses that emphasize” with the choices,
“A. Concrete Material (facts, data)”, or “B. Abstract Material (concepts, theories).” 71.9%
of the control group responded with A. Facts and data are forms of information that
require retention rather than understanding in the case of concepts and theories. Hence,
if processes can be made more tangible through visualization and abstract material can
12
“Learning and Teaching Styles in Engineering Education” by L.L. Silverman/Felder

14
be taught using visual aids enabling students to grasp material with ease, concepts and
theories can be made less ‘dreadful’.
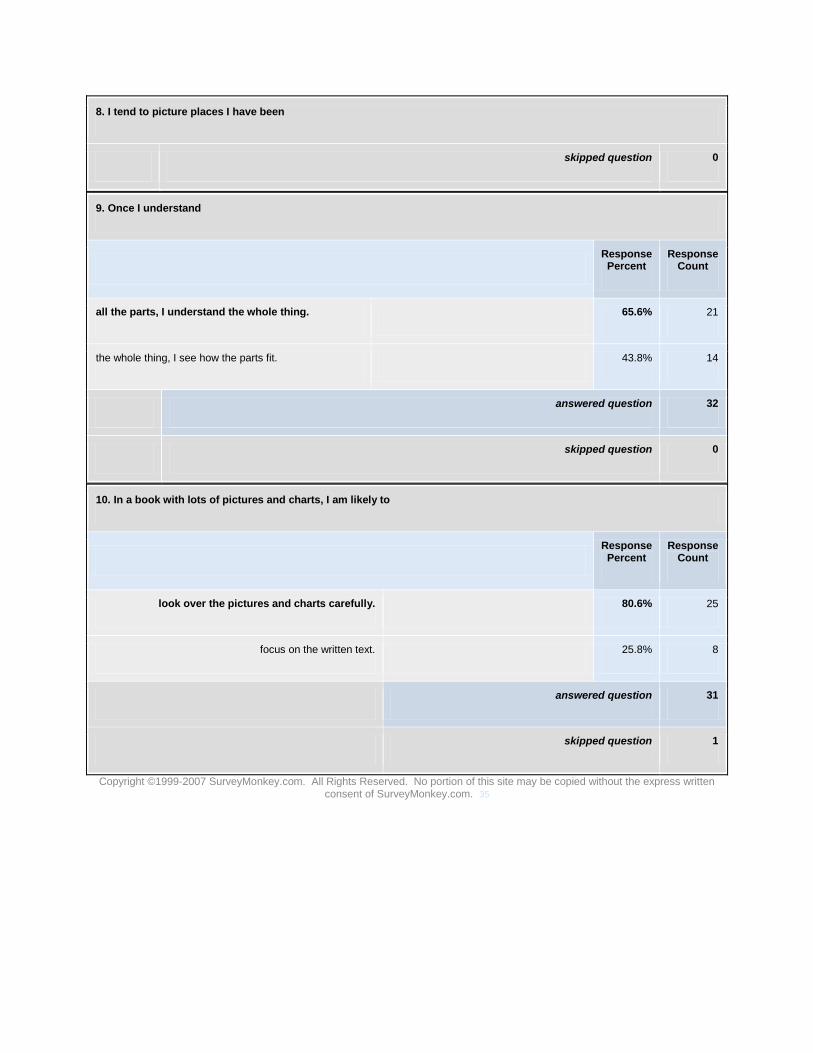
9. Once I understand
Response Percent
Response Count
all the parts, I understand the whole thing.
65.6% 21
the whole thing, I see how the parts fit.
43.8% 14
Figure 5 - Question 9 from the Index of Learning Styles Questionnaire
One more crucial question was selected from Felder’s Survey: (Fig. 5) “Once I
understand…” with two choices: “A. All the parts, I understand the whole thing”, or “B.
The whole thing, I see how the parts fit.” According to Felder, learning styles can be
grouped as Sequential VS Global learners, where sequential learners obtain information
by means of logically ordered steps. Global learners happen to learn in bits and pieces
and progress learning randomly with no connections, and then see the big picture, if
they see it at all. 65.6% of the respondents replied with option B, hence providing
another important guideline for the web-site development process. Attention must be
paid not only on visual aids, but also on how and in what sequence it is presented.
Researching and organizing various sources of information related to the subject,
and conducting weekly meetings with Professor Salazar resulted in the web-site’s
gradual evolution of the preliminary design. Microsoft Office FrontPage 2003 was
chosen as the primary web-site design program due to its user friendly interface, and
after trial and error, and extensive self-study the skeletal frames and structure of the
web-site was developed.

15
4.4 Pre-Construction Phase through Close-out, and More
The complex process of construction in its entirety was broken down into the
following twelve easy to understand phases:
Pre-Construction Phases
Construction Schedule
Bartlett Center Schedule
Mobilization
Excavation
Foundation
Steel Frame
Exterior Walls & Roofing
Interior Walls, Mechanical & HVAC
Landscaping
Finishing/Punch-list
Close-out

16
Figure 6 - Dedicated page comprising of a main page, and a side panel (left)
Each page was split into a main page and a side panel as shown in Figure 6.
The figure shows how each phase was allotted its individual page and briefly
explained, with construction concepts and terminology explained in the left panel for
easy understanding of novice users. Incorporated into each page was a “Project
Completion-o-meter” illustrating the percentage of construction completed phase-by-
phase. This not only emphasized the dependency of each phase regarding its position
in the precedence relationship of construction phases, but also helped the process of
flow of construction reminding students every step was a step forward as illustrated in
Figure 7 below.
Figure 7 - Project Completion-o-meter illustrating percentage of project complete with respective phase.

17
Along with the “Project Completion-o-meter”, a Gantt chart was also provided to
help students keep track of the phase and all its activities with respect to the project as
a whole as shown in Figure 8.
Figure 8 - Gantt chart illustrating break-down of tasks in the phase Excavation.
A scroll bar was provided for easy navigation of the phase schedule with respect
to the entire project schedule on the same page to prevent students from losing track of
what was essential, i.e. the process of construction, rather than getting lost in a sea of
different windows.
After an explanation and breakdown of information via the static forms of visual
data, the page also provided actual video footage of the phase that had been recorded
during the construction of the Bartlett Center. An example is illustrated in Figure 9.

18
Figure 9 - Example of video footage provided from Higgins Labs (left) & Harrington Auditorium (right)
This was an important step because it helped students who had just acquired the
information relating to the phase from the text and other static visual data, and present it
from a dynamic point of view. This proved to be helpful as it allowed students to look at
the tasks broken down by CSI code.
CSI is a technical society formed by an association of individual members in the
U.S. non-residential building design and construction industry, which develop voluntary
standards for the preparation of specifications, organize continuing education sessions
to train practitioners to read and write written construction documents, and hold product
shows in their effort to continually improve the process of non-residential building design
and construction.13
The video footage showed the phase from two angles, from Higgins Laboratory
as well as Harrington Auditorium using webcams positioned there by the WPI ATC for
the entire construction of the project. This form of visual data would allow students to
relate to the information provided on the page on a higher level.
13
http://www.ordesignandconstruction.com/glossary.htm, Copyright © 2002

19
The side panel not only provided the user with definitions of technical terminology,
but also with an overview in terms of percent time of the total project duration for the
phase the page displayed as shown in Figure 10.
Figure 10 - Side panel displaying an overview of the Excavation Phase.
The side panel was also provided with a scroll bar for on-page navigation
preventing students from getting lost. It comprised information such as percentage of
the project completed with the completion of each phase in the form of a pie-chart, a
different form of displaying numerical data. It also included a mini-schedule comprising
only of the task break-down of the phase in question. This allowed easy access to
information, isolating the users from the main page focusing their attention on the
information at hand by displaying the task sub-duration within duration period of the
entire phase. Right below the mini-schedule, the tasks displayed were broken down in
detail by ID, Description, Start date of task, Finish date of task and Bid Package number.

20
The summation of all the information alone conveyed a new set of information in terms
of detail as opposed to the main page.
Figure 11 - Example of pictures provided for the phase Interior Walls, Mechanical & HVAC, where no video
footage was available.
In some cases where video data could not be applied, more still pictures of
phase were posted. As can be seen in Figure 11, information for each picture was
provided with an option to make the image bigger for better viewing. For example, in the
phase Interior Walls, Mechanical and HVAC, video footage was not available because
the webcams could not document the inside of the building. However, a picture was
provided for some of the tasks involved.
In addition to each page dedicated to each phase of construction, a summary
page was also provided. This page proved to be a major break-through as it allowed the

21
compilation of all available visual data on one interactive page. The breakdown of the
summary page is illustrated in Figure 12 with window numbers 1, 2, 3 and 4 respectively.
Figure 12 - Summary page broken into four independent smaller pages.
The summary page can be looked as a four-in-one page (refer to Figure 12):
1. The first page displayed an overview of a phase similar to what could be seen on the
side-panel when on the main page of a certain phase. It summarized the phase-
related information such as percentage of project completed with the completion of
the phase, a mini-schedule with a break-down of each of the tasks involved and
listed them by ID, Description, Start date of task, Finish date of task and Bid
Package number. An independent scroll bar was provided.
2. The second page displayed all dynamic forms of visual data in its entirety. A list of all
the phases comprised in the construction process was listed and hyperlinked, which
if clicked would display a video or a list of pictures of the respective phase within the
same page. In the case of pictures, a dedicated scroll bar was provided for easy
navigation.

22
3. The third page comprised a ‘collapsed’ version of the schedule to provide the user
with precedence relationship guidelines preventing confusion which was possible
with the volume of information displayed on the page. Each phase was listed on the
Gantt chart similar to ones that could be found on the main page, and was made
interactive by making each phase “click-able”. Clicking on a certain phase, for
example, Interior Walls, Mechanical and HVAC, page 1 and 2 would display the
Interior Walls, Mechanical and HVAC overview and dynamic data respectively. Thus,
by allowing the user to interact with the Gantt chart control over information
displayed was relinquished allowing the user to freely jump to his or her phase of
choice instantaneously summarizing and transforming all relevant data by one click.
An Independent scroll bar was provided to view the schedule with ease, preventing
font shrinkage.
4. The fourth and the last page remained constant throughout the interaction process.
This page displayed the CSI list as a reference, breaking down the sixteen divisions
with each applicable task involved in each phase to be identified as shown in Figure
13. In addition to an independent scroll bar, each division was also provided with a
“Top” button (see Figure 13), clicking which resulted the user to be sent to the top of
the page where links were provided to jump to a CSI division of choice to prevent
confusion and ease in navigation.
Figure 13 - CSI List, Division 01: General Requirements.

23
With the construction process broken down into twelve distinct steps, with each
phase having a dedicated page, and with the information displayed in different forms of
visual aid in addition to text, it became evident that navigation could become confusing
for the user. The lack of ease in navigation would damp the effectiveness of information
that needed to be conveyed. Hence, a solution was proposed. Each phase was to be
displayed in the form of a button at the bottom of each page totaling twelve buttons in all;
the result of clicking each would lead to the user being re-directed to the main page of
the phase clicked on. These buttons are shown below in Figure 14.
Figure 14 - Navigation Links for all phases.
These buttons were designed to catch the users’ attention in the case of his or
her intention to browse to another phase, or to aid them in the event of getting ‘lost’.
Hence, the web-site’s functionality was ensured preventing a student from feeling
overwhelmed, improving effectiveness and efficiency of the web-site.
4.5 Review of website improvements
In comparison to the previous version of this website, a lot more visual data was
embedded into the new web-site. However, in the process of compiling pictures, videos
and other visual imagery, the volume of information increased proportionally.
The Bourque-Morais website made use of a simplistic time-line methodology
outlining the milestone phases; each phase highlighted denoting its location in the chain
of phases of construction. The time-line is illustrated in Figure 15. This proved to be a
strong tool in relaying the related information without any major complications. Each
phase following the next was shown cascading giving it a precedence relationship effect
complete with dates as well.

24
Figure 15 - The Bourque - Morais sequential time-line.
This methodology was taken into consideration in the development of schedules
related to each phase in the form of Gantt Charts, forming a more detailed and
contoured time-line relaying more information by breaking down tasks involved with
each phase, where each task followed another to show a precedence relationship within
a phase as well. For example, in the Foundation phase, the task Fabricate Steel was
followed by Steel Delivery, then Erect Basement Steel, Erect First Floor Steel, and
henceforth, until the tasks involved in the phase were completed leading into the next
phase, i.e. Exterior Walls & Roofing. This is illustrated in Figure 16 on the following
page.
Figure 16 - Precedence relationship of the task breakdown structure within the Steel Frame phase.

25
Hence, the complete timeline of phases could be broken down into a timeline of
tasks by phase, generating a schedule of tasks as well as their respective phases as
demonstrated in Figure 17. A legible version of this schedule, as provided on the
website, may be found in Appendix I.
Figure 17 - Complete precedence relationship structure by phases and respective tasks.
Microsoft Publisher was used to generate these Gantt Charts, a tool that is used
in today’s world to generate detailed construction schedules; this program also proved
to be much more user friendly than another notorious scheduling program, Primavera.
This process allowed a greater amount of construction information to be captured
by the updated version of the website, where technical construction jargon was
explained by hyper-linking every term rendered confusing to novice users.
The navigation on the Bourque-Marois website was also further developed. Each
page allotted to a phase was not only provided with links to all phases to retrieve
information of choice, but with a link specific to the sequential process of construction
(precedence relationship-wise), promoting gradual flow of information as portrayed by

26
the illustrations aforementioned. This was thought to help students to keep on track of
the timelines developed to avoid confusion, while giving them the freedom to access
any phase of choice. For example, as can be seen in Figure 18, when a viewer desires
to move onto the following phase, he or she is initially presented with the option to link
back to a previous phase as outlined by the timeline, or go to the next phase of the
precedence relationship, i.e. Exterior Walls & Roofing. Were a viewer to select an
alternate phase, links to allow them to do so were provided immediately after these
options.
Figure 18 - Precedence Relationship links
Hence, the results from the Index of Learning Styles Questionnaire (Appendix A)
were put to good use, helping to shape the website into a more efficient tool for students
promoting sequential learning, using aids to capture abstract material in concrete form
and ultimately, helping students understand the material in an expeditious manner.

27
5.0 Results
The survey (Appendix A) was derived from Felder’s Original Survey (Appendix B),
which was then sent out to a group of CE students for feedback on the various aspects
of teaching styles. The results of that survey are discussed as follows.
5.1 Survey Results
Upon substantial completion of the website, a survey was created to assess its
functionality and efficiency based on the responses of that survey, and pointers on how
to make it better were sought.
The survey had to be a controlled one in order to consistently determine the
contributions of the new version of the website when compared with the work
accomplished by previous authors. CE 3020 students and alumni from class groups
A03 through A07 were chosen as the control group, totaling the number of potential
participants to 276. The survey was designed with questions similar to those posed by
Ryan Bourque and James Morais in their survey to maintain consistency so that the
results obtained may be compared to their results to measure the progress achieved
(Appendix C).
However, a large number of student’s have graduated since they took the course
and their WPI email address is no longer operational. This reduced the list dramatically
from 276 students to 140, nearly half of the original amount.
Only 20 CE 3020 alumni responded which is equivalent to 15%. A 100% of the
respondents were Civil Engineering majors with no responses from the A03 class group.
The control group was questioned on their construction knowledge and
construction experience prior to taking the CE3020 course, to obtain generic
demographic information regarding their familiarity with Construction Information. Most

28
0
10
20
30
40
50
1
None
Some
Moderate
High
Very High
of the participants faired moderately on both aspects of the question, as illustrated in
Figure 19.
Figure 19 - Construction Knowledge/ Construction Experience survey results.
The web-site faired well on ratings (as can be seen in Appendix D) scoring with
the 80% majority rating it a 5 out of 5 on content, 4 out of 5 on aesthetics and 4 out of 5
on functionality.
When asked to what extent visual aids were important in improving student’s
understanding of a subject, the results ranged from moderate to very high, with 50%
being the majority voting its
importance to be high. Of the other
half of the survey population
respondents, 20% voted for its
importance being moderate, where
as 30% claimed its importance
was very high. (See Fig. 20)
The results clearly showed that visual aids were crucial to students not only for
understanding of material being covered in any subject, but as a preference. However,
Figure 20 - Importance of Visual Aids

29
the experiment’s results had to be compared and contrasted with results obtained from
previous work.
Figure 21 - Areas of the term project that may have been difficult for students.
Students were asked standard questions similar to those asked in the survey
conducted previously as deemed appropriate. One such question asked what areas of
the term project were difficult for students understanding in a multiple choice format
where students could choose multiple answers. Figure 21 breaks down the hurdles that
posed a challenge for students of which the three highest were ‘Creating A Sequential
Schedule’ (63.2%), ‘Cost Risk Analysis’ (42.1%) and ‘Developing A List of Activities’
(26.3%). However, the response rate for the choice ‘Visualizing the logical process
sequence’ faired as the fourth highest obstacle in the term project, an option for which
the response rate was expected to be higher considering the positive response rate to
the question discussed earlier, i.e. regarding the importance of visual aids in
understanding a subject. It is interesting that the creation of a schedule received 64%,
one of the most important objectives of this work. However, visualization of the process
only received 21%.
Another question the students were asked was whether the website would prove
to be useful in helping them over come the challenges that the term project presented
them. 85% of the students voted yes while the remaining 15% voted maybe (Appendix
D). Students were asked for feedback on how the website could be improved. Most of
the respondents felt that the website was suffice content and navigation wise, however

30
it is important to mention for future progress that some respondents suggested that a
more aesthetic and professional interface be used and that “CE3020 needed very
detailed part of the project and the website only provided a broad overview and for
those who need visualization it only gave basic information” (see Appendix D). However,
since the goal of this project was to give novice students the big picture in order to help
them visualize, understand and put together the smaller working parts themselves, the
content was suffice.
The survey proved the website would be an efficient and effective tool in helping
students taking CE3020 understand and overcome the challenges they faced by
visualizing the process of construction from a project management perspective.
Students were also requested to suggest what other courses the website could
prove helpful for. One student responded suggesting, “Yes, I think that websites similar
to this or branched off of this website could help with many civil engineering courses at
this school. However, I think the site may contain too much help and that if it were
improved upon anymore it would take away from the difficulty of the class. I think the
class is viewed as a very hard class to get an A in and as a person who got one of
those A's I wouldn't want to see other kids take the course and miss out on the time and
effort I put into it because in a way the class itself and how it is structured shows you the
importance of time management. I say this because I think I learned more from the
amount of effort I had to put into the class to get that A than anything. This site seems to
just kind of hand everyone the answers and if I were to offer advice to people in this
class it would be learn to budget the responsibilities of this class early so everything
doesn't pile on at the end. This site would allow kids to slack off more and would take
away from the feeling that you are really working on a project of your own and make it
seem more like you are just replicating what has already been accomplished.” This may
give the instructor an incentive to raise expectations on the course.
This was considered as very helpful feedback. Even though some of the students
thought it would take away the essence of the effort that should be put into the class to
get an A, he or she believed the website would give other students an unfair chance at

31
achieving a similar grade. However, thought was put into this issue during the websites
preliminary stages, and hence Microsoft publisher was used to develop precedence
relationships and files were not provided as it is not only a good tool to illustrate the
point precedence relationships make, but also succeeded in not giving away any
Primavera related answers which students were required to figure out themselves for
the CE3020 term project. The feedback hence essentially suggests that the website
could make an even leveled playing field for all students, helping weaker students
understand the crucial basics better and faster, while at the same time pushing students
that excel to put more work into advanced topics in helping them secure a higher grade,
hence giving them more educational value. Other classes this tool could be used toward,
as per suggestions in the survey results (Appendix D) were CE3020, CE3021, CE3022
and CE535.
5.2 Conclusion
“Visual thinking is crucial to the future of learning, with particular connections to
collaborative learning methodologies, distance learning, and virtual learning
environments.”14 On a global scale, efforts in seeking means to enunciate and interpret
the subtle differences of visual realm must be increased. Collaboration across different
cultures and professional disciplines needs to be established not only for a macro-scale
welfare, but for a more unitary and micro-scale benefits; students having difficulty
understanding material may not only improve their understanding but may also taken
upon dual majors for self betterment, and ultimately, betterment for humanity.
Further studies along with applications of the results of studies regarding visual
learning need to be assessed and implemented simultaneously. The field of academia
needs to embrace the fact that the use of imagery for teaching science and engineering
is a respectable approach, and could very well catalyze scientific discovery and
invention by encouraging out of the norm thinking eliminating one-dimensional textbook
thinking.
14
“Implementing Innovative Visual Aids in Engineering Education”, Fernando Cadena, Professor, Civil Engineering, NMSU

32
5.3 Recommendations
The website proved to be a successful accomplishment. However, it is far from
perfect. It is suggested that further refinement of the visualization process by improving
the navigation features by making the interface more user friendly. It is also suggested
that a more sleek and more attractive/addictive interface be used to capture the young
students’ attention in today’s fast paced technological environment so that the website
may preserve it’s appeal. It is also suggested that the content be revised and sharpened
around the edges to eliminate information that may send a novice mind to wander or
contribute to his or her confusion, and more visual emphasis be made on the
sequencing of the processes of construction. And of course, use of better and more
efficient visual data should be implemented.
The main goal of this project was to help students to better understand the
construction process through visualization. This website was aimed at giving them a
broader knowledge of all the activities involved in construction as an aid to classroom
lectures, not to replace them. Schools all over the world should start adopting the visual
medium of learning not only as suggested by science, but also as demanded and
desired by today’s students.

33
6.0 Bibliography
“Creativity in Education & Learning: A Guide for Teachers and Educators” by A. J.
Cropley
“Learning and Teaching Styles in Engineering Education” by L.L.
Silverman/Felder
“Learning Styles and Strategies.” by R. M. Felder/Barbara A. Solomon
“Implementing Innovative Visual Aids in Engineering Education”, Fernando
Cadena, Professor, Civil Engineering, NMSU
McGrath, M. and J. Brown, “Visual Learning for Science and Engineering,” IEEE
Computer Graphics and Applications, Volume 25 No. 5, pp. 56-63.
“Strategies for Improving Visual Learning: A Handbook for the Effective…”, by
Francis M. Dwyer
Alan F. Blackwell, “Thinking with diagrams” volume 15, nos. 1-2, 2001.
"Golden Retriever." World Book Encyclopedia. 1999. Volume 8, p.255.
What is BIM? - By Professor Charles M. Eastman, Director of AEC Integration
Lab at Georgia Tech.
Oberlender, “Project Management for Engineers and Construction.” 2000

34
7.0 Appendices

35
Appendix A – Index of Learning Styles Survey Results

Logged in as "mg1g" Log Off
s u r v e y t i t l e :
Index of Learning Styles Questionaire Edit Title Page: Learning Using Visual Aids
1. I prefer courses that emphasize
Response Percent
Response Count
concrete material (facts, data).
71.9% 23
abstract material (concepts, theories).
34.4% 11
answered question 32
skipped question 0
2. When I think about what I did yesterday, I am most likely to get
Response Percent
Response Count
a picture.
93.8% 30
words.
9.4% 3
answered question 32
skipped question 0
3. When I solve math problems
Response Percent
Response Count

3. When I solve math problems
I usually work my way to the solutions one step at a time.
62.5% 20
I draw an illustration of the problem to understand the problem better.
40.6% 13
answered question 32
skipped question 0
4. I like teachers
Response Percent
Response Count
who put a lot of diagrams on the board.
71.9% 23
who spend a lot of time explaining.
37.5% 12
answered question 32
skipped question 0
5. I remember best
Response Percent
Response Count
what I see.
84.4% 27
what I hear.
25.0% 8
answered question 32
6. It is more important to me that an instructor

6. It is more important to me that an instructor
Response Percent
Response Count
lay out the material in clear sequential steps.
71.9% 23
give me an overall picture and relate the material to other subjects.
34.4% 11
answered question 32
skipped question 0
7. I prefer to get new information in
Response Percent
Response Count
pictures, diagrams, graphs, or maps.
75.0% 24
written directions or verbal information.
31.3% 10
answered question 32
skipped question 0
8. I tend to picture places I have been
Response Percent
Response Count
easily and fairly accurately.
87.5% 28
with difficulty and without much detail.
15.6% 5
answered question 32
8. I tend to picture places I have been
skipped question 0
9. Once I understand
Response Percent
Response Count
all the parts, I understand the whole thing.
65.6% 21
the whole thing, I see how the parts fit.
43.8% 14
answered question 32
skipped question 0
10. In a book with lots of pictures and charts, I am likely to
Response Percent
Response Count
look over the pictures and charts carefully.
80.6% 25
focus on the written text.
25.8% 8
answered question 31
skipped question 1
Copyright ©1999-2007 SurveyMonkey.com. All Rights Reserved. No portion of this site may be copied without the express written consent of SurveyMonkey.com. 35

40
Appendix B – Felder’s Original Index of Learning Styles Questionnaire

NC STATE UNIVERSITY
Index of Learning Styles Questionnaire
Barbara A. Soloman
First-Year College
North Carolina State University
Raleigh, North Carolina 27695
Richard M. Felder
Department of Chemical Engineering
North Carolina State University
Raleigh, NC 27695-7905
Directions
Please provide us with your full name. Your name will be printed on the information that is returned to you.
Full Name
For each of the 44 questions below select either "a" or "b" to indicate your answer. Please choose only one answer for each
question. If both "a" and "b" seem to apply to you, choose the one that applies more frequently. When you are finished selecting
answers to each question please select the submit button at the end of the form.
1. I understand something better after I
(a) try it out.
(b) think it through. 2. I would rather be considered
(a) realistic.
(b) innovative. 3. When I think about what I did yesterday, I am most likely to get
(a) a picture.
(b) words. 4. I tend to
(a) understand details of a subject but may be fuzzy about its overall structure.
(b) understand the overall structure but may be fuzzy about details. 5. When I am learning something new, it helps me to
(a) talk about it.
(b) think about it. 6. If I were a teacher, I would rather teach a course
(a) that deals with facts and real life situations.
(b) that deals with ideas and theories. 7. I prefer to get new information in
(a) pictures, diagrams, graphs, or maps.
(b) written directions or verbal information. 8. Once I understand
(a) all the parts, I understand the whole thing.
(b) the whole thing, I see how the parts fit. 9. In a study group working on difficult material, I am more likely to

(a) jump in and contribute ideas.
(b) sit back and listen. 10. I find it easier
(a) to learn facts.
(b) to learn concepts.
11. In a book with lots of pictures and charts, I am likely to
(a) look over the pictures and charts carefully.
(b) focus on the written text. 12. When I solve math problems
(a) I usually work my way to the solutions one step at a time.
(b) I often just see the solutions but then have to struggle to figure out the steps to get to them.
13. In classes I have taken
(a) I have usually gotten to know many of the students.
(b) I have rarely gotten to know many of the students. 14. In reading nonfiction, I prefer
(a) something that teaches me new facts or tells me how to do something.
(b) something that gives me new ideas to think about.
15. I like teachers
(a) who put a lot of diagrams on the board.
(b) who spend a lot of time explaining. 16. When I'm analyzing a story or a novel
(a) I think of the incidents and try to put them together to figure out the themes.
(b) I just know what the themes are when I finish reading and then I have to go back and find the
incidents that demonstrate them. 17. When I start a homework problem, I am more likely to
(a) start working on the solution immediately.
(b) try to fully understand the problem first.
18. I prefer the idea of
(a) certainty.
(b) theory. 19. I remember best
(a) what I see.
(b) what I hear.
20. It is more important to me that an instructor
(a) lay out the material in clear sequential steps.
(b) give me an overall picture and relate the material to other subjects. 21. I prefer to study
(a) in a study group.
(b) alone.
22. I am more likely to be considered
(a) careful about the details of my work.
(b) creative about how to do my work. 23. When I get directions to a new place, I prefer
(a) a map.

(b) written instructions.
24. I learn
(a) at a fairly regular pace. If I study hard, I'll "get it."
(b) in fits and starts. I'll be totally confused and then suddenly it all "clicks." 25. I would rather first
(a) try things out.
(b) think about how I'm going to do it.
26. When I am reading for enjoyment, I like writers to
(a) clearly say what they mean.
(b) say things in creative, interesting ways. 27. When I see a diagram or sketch in class, I am most likely to remember
(a) the picture.
(b) what the instructor said about it.
28. When considering a body of information, I am more likely to
(a) focus on details and miss the big picture.
(b) try to understand the big picture before getting into the details. 29. I more easily remember
(a) something I have done.
(b) something I have thought a lot about.
30. When I have to perform a task, I prefer to
(a) master one way of doing it.
(b) come up with new ways of doing it. 31. When someone is showing me data, I prefer
(a) charts or graphs.
(b) text summarizing the results.
32. When writing a paper, I am more likely to
(a) work on (think about or write) the beginning of the paper and progress forward.
(b) work on (think about or write) different parts of the paper and then order them. 33. When I have to work on a group project, I first want to
(a) have "group brainstorming" where everyone contributes ideas.
(b) brainstorm individually and then come together as a group to compare ideas.
34. I consider it higher praise to call someone
(a) sensible.
(b) imaginative. 35. When I meet people at a party, I am more likely to remember
(a) what they looked like.
(b) what they said about themselves.
36. When I am learning a new subject, I prefer to
(a) stay focused on that subject, learning as much about it as I can.
(b) try to make connections between that subject and related subjects. 37. I am more likely to be considered
(a) outgoing.
(b) reserved.
38. I prefer courses that emphasize

(a) concrete material (facts, data).
(b) abstract material (concepts, theories). 39. For entertainment, I would rather
(a) watch television.
(b) read a book.
40. Some teachers start their lectures with an outline of what they will cover. Such outlines are
(a) somewhat helpful to me.
(b) very helpful to me. 41. The idea of doing homework in groups, with one grade for the entire group,
(a) appeals to me.
(b) does not appeal to me.
42. When I am doing long calculations,
(a) I tend to repeat all my steps and check my work carefully.
(b) I find checking my work tiresome and have to force myself to do it. 43. I tend to picture places I have been
(a) easily and fairly accurately.
(b) with difficulty and without much detail.
44. When solving problems in a group, I would be more likely to
(a) think of the steps in the solution process.
(b) think of possible consequences or applications of the solution in a wide range of areas.
When you have completed filling out the above form please click on the Submit button below. Your results will be returned to you. If you are not satisified with your answers above please click on Reset to clear the form.
Submit Reset
Dr. Richard Felder, [email protected]

45
Appendix C – Bourque – Morais Survey Results

Monday, March 05, 2007
Results Summary
Show All Pages and Questions
Filter Results
To analyze a subset of your data,
you can create one or more filters.
Total: 45 Visible: 45
Share Results
Your results can be shared with others,
without giving access to your account.
Status: Enabled
Reports: Summary and Detail
1. From Start to Finish
1. Name (optional)
Total Respondents
16

(skipped this question) 29
2. What is your major?
Response
Percent Response
Total
CEE 91.1% 41
CM 4.4% 2
MGE 0% 0
OIE 0% 0
Other
(please
specify)
4.4% 2
Total Respondents 45
(skipped this question) 0
3. What term did you take CE3020
Response Percent
Response Total
A04 4.4% 2
A05 40% 18
A06 51.1% 23
Other
(please
specify)
4.4% 2
Total Respondents 45
(skipped this question) 0

4. What was your construction experience prior to CE3020?
Response
Percent Response
Total
None 42.2% 19
Some 48.9% 22
Extensive 8.9% 4
Total Respondents 45
(skipped this question) 0
5. Which areas of the term project did you find to be difficult?
Response
Percent Response
Total
Developing
a list of
activities
24.4% 11
Creating a sequential
schedule
(critical
path
method)
40% 18
Types of
costs
(overhead,
variable, wages,
materials,
etc.)
26.7% 12
Cost risk
analysis
31.1% 14
Comprehension
of activities
15.6% 7
Visualizing
the logical
process

sequence
33.3% 15
Formulating
an estimate of final
costs
31.1% 14
Other
(please specify)
11.1% 5 Total Respondents 45
(skipped this question) 0
6. Do you think this site could be helpful for the intended purposes?
Response Percent
Response Total
Yes
95.6% 43
No 4.4% 2
Total Respondents 45
(skipped this question) 0
7. Please, rate (1=poor, 5=excellent) this site on each of these categories.
1 2 3 4 5 Response
Average
Content (information: text & graphics) 0% (0) 7% (3) 20% (9) 44% (20) 29% (13) 3.96
Appearance (looks) 2% (1) 11% (5) 16% (7) 47% (21) 24% (11) 3.80
Functionability (ease of navigation) 2% (1) 2% (1) 24% (11) 42% (19) 29% (13) 3.93
Total Respondents 45
(skipped this question) 0

8. How could the site be improved?
Total Respondents
19
(skipped this question) 26
9. Do you think that this website could be helpful in any other civil engineering courses? IF so which ones?
Total Respondents
20
(skipped this question) 25

51
Appendix D – Mustansir Jivanjee Survey Results

Logged in as "mg1g" Log Off
s u r v e y t i t l e :
Visualizing Construction: The Bartlett Center Edit Title Page: Visualizing Construction - Bartlett Center From Start to Finish.
1. What is your major?
Select Major
CEE CM MGE OIE Other (please
specify) Response
Count
Select a major from the menu
100.0% (20) 0.0% (0) 0.0% (0) 0.0% (0) 0.0% (0) 20
Other (see below) 1
answered question 20
skipped question 0
2. Please select your level of current construction knowledge/construction experience.
Construction Knowledge
None Some Extensive Response
Count
Please select your level of knowledge and experience
0.0% (0) 85.0% (17) 15.0% (3) 20
Construction Experience
None Some Extensive Response
Count
Please select your level of knowledge and experience
25.0% (5) 75.0% (15) 0.0% (0) 20
answered question 20
skipped question 0
3. To what extent do you consider visual input important in improving your understanding of a subject?

3. To what extent do you consider visual input important in improving your understanding of a subject?
Response Percent
Response Count
None 0.0% 0
Some 0.0% 0
Moderate
20.0% 4
High
50.0% 10
Very High
30.0% 6
answered question 20
skipped question 0
4. What term did you take CE3020
Response Percent
Response Count
A03 0.0% 0
A04
10.0% 2
A05
25.0% 5
A06
30.0% 6
A07
35.0% 7
answered question 20
5. Which areas of the term project did you find to be difficult?

5. Which areas of the term project did you find to be difficult?
Response Percent
Response Count
Developing a list of activities
26.3% 5
Creating a sequential schedule (critical path method)
63.2% 12
Types of costs (overhead, variable, wages, materials, etc.)
10.5% 2
Cost risk analysis
42.1% 8
Comprehension of activities
15.8% 3
Visualizing the logical process sequence
21.1% 4
Formulating an estimate of final costs
15.8% 3
Other (see below) 3
answered question 19
skipped question 1
6. Do you think this web-site could be helpful for its intended purpose?
Response Percent
Response Count
Yes
75.0% 15
No
10.0% 2
Maybe
20.0% 4

6. Do you think this web-site could be helpful for its intended purpose?
answered question 20
skipped question 0
7. Please, rate (1=poor, 5=excellent) this site on each of these categories.
1 2 3 4 5 Response
Count
Content (information: text & graphics)
0.0% (0) 10.0% (2) 25.0% (5) 30.0% (6) 35.0% (7) 20
Appearance (looks) 5.0% (1) 15.0% (3) 30.0% (6) 40.0% (8) 10.0% (2) 20
Functionability (ease of navigation) 5.0% (1) 15.0% (3) 25.0% (5) 35.0% (7) 20.0% (4) 20
answered question 20
skipped question 0
8. Do you think that this website could be helpful in any civil engineering courses other than CE3020? IF so, which ones?
Response
Count
(see below) 10
answered question 10
skipped question 10
9. How could this web-site be improved for its intended purpose?
Response
Count

9. How could this web-site be improved for its intended purpose?
(see below) 8
answered question 8
skipped question 12
Other Responses
Question 1 Comment Text Response Date
1. Fire Protection Mon, 12/3/07 10:07 PM
Question 5 Comment Text Response Date
1. Using the required computer program Thu, 12/20/07 4:06 PM
2. I didn't find the course difficult outside of managing my own time to complete the large amount of work.
Mon, 12/10/07 2:43 PM
3. Primavera Sun, 12/9/07 10:07 AM
Question 8 Comment Text Response Date
1. Maybe a cost estimating class or another project management class Thu, 12/20/07 4:06 PM
2. Yes, I think that websites similar to this or branched off of this website could help with many civil engineering courses at this school. However, I think the site may contain too much help and that if it were improved upon anymore it would take away from the diffculty of the class. I think the class is viewed as a very hard class to get an A in and as a person who got one of those A's I wouldn't want to see other kids take the course and miss out on the time and effort I put into it because in a way the class itself and how it is structured shows you the importance of time management. I say this because I think I learned more from the amount of effort I had to put into the class to get that A than anything. This site seems to just kinda hand everyone the answers and if I were to offer advice to people in this class it would be learn to budget the responsibilities of this class early so everything doesn't pile on at the end. This site would allow kids to slack off more and would take away from the feeling that you are really working on a project of your own and make it seem more like you are jsut replicating what has already been accomplished.
Tue, 12/11/07 11:45 PM
3. Any of the CE302- courses i.e. 3022, 3021 Tue, 12/11/07 2:54 PM
4. A website would be helpful - this website was difficult to navigate and seemed lack approachable content.
Tue, 12/11/07 10:18 AM
5. none that i can think of Mon, 12/10/07 2:51 PM
6. I think the website is most useful for the final project, in 3020 (seeing how to organize information). I didn't take any other class this would have been useful for, but 3020 was the only CM class I took.
Mon, 12/10/07 2:43 PM
7. CE 535 Mon, 12/10/07 2:15 PM
8. CE3022 Sun, 12/9/07 10:07 AM
9. Cost Estimating Tue, 12/4/07 6:33 PM
10. CE3021, CE3022 Tue, 12/4/07 3:43 PM

Question 9 Comment Text Response Date
1. Maybe a cost estimating class or another project management class Thu, 12/20/07 4:06 PM
2. Yes, I think that websites similar to this or branched off of this website could help with many civil engineering courses at this school. However, I think the site may contain too much help and that if it were improved upon anymore it would take away from the diffculty of the class. I think the class is viewed as a very hard class to get an A in and as a person who got one of those A's I wouldn't want to see other kids take the course and miss out on the time and effort I put into it because in a way the class itself and how it is structured shows you the importance of time management. I say this because I think I learned more from the amount of effort I had to put into the class to get that A than anything. This site seems to just kinda hand everyone the answers and if I were to offer advice to people in this class it would be learn to budget the responsibilities of this class early so everything doesn't pile on at the end. This site would allow kids to slack off more and would take away from the feeling that you are really working on a project of your own and make it seem more like you are jsut replicating what has already been accomplished.
Tue, 12/11/07 11:45 PM
3. Any of the CE302- courses i.e. 3022, 3021 Tue, 12/11/07 2:54 PM
4. A website would be helpful - this website was difficult to navigate and seemed lack approachable content.
Tue, 12/11/07 10:18 AM
5. none that i can think of Mon, 12/10/07 2:51 PM
6. I think the website is most useful for the final project, in 3020 (seeing how to organize information). I didn't take any other class this would have been useful for, but 3020 was the only CM class I took.
Mon, 12/10/07 2:43 PM
7. CE 535 Mon, 12/10/07 2:15 PM
8. CE3022 Sun, 12/9/07 10:07 AM
9. Cost Estimating Tue, 12/4/07 6:33 PM
10. CE3021, CE3022 Tue, 12/4/07 3:43 PM
Copyright ©1999-2007 SurveyMonkey.com. All Rights Reserved. No portion of this site may be copied without the express written consent of SurveyMonkey.com. 35

58
Appendix E – Gilbane Construction Co. Primavera Schedule (Bartlett Center)


71
Appendix F – List of Activities Submitted by CE3020 Students

Template
GROUP 1 DOM Construction Inc.
task_code wbs task_name target_drtn_hr_cnt
Activity ID CSI Code Activity Name Original Duration(d)
10 START SCHEDULE 1
1000 16050 Electric Relocation Work- Phase 1-16A 3
1020 16050 Shutdown #1- 16A 1
1030 16050 Electric Relocation Work- Phase 2-16A 5
1100 02200 Erect Fence/Prep Site/Erosion Control- 02A 4
1060 16050 Shutdown #2- 16A 1
1070 16050 Energize New HV Loop- 16A 1
1050 03100 Place Concrete for New Ductbank- 16A 2
1130 03100 Form/Place/Strip Balance of Footings- 02A 3
1110 02200 Exc. Bsmt/Prep for Found Footings- 02A 5
1080 02050 Demo Ductbank/MH- 02A 2
1090 02200 Backfill/Restore Grade- 02A 1
1210 05100 Steel Shops Submitted 1
1220 05100 Steel Shops Approved/Returned 10
1115 05520 Deliver Anchor Bolts/Embeds- 05A 1
1126 02450 Prep for Balance of Footings- 02A 3
1122 02600 Install Sewer Line- 02A 15
1120 03100 Form/Place/Strip Basement Footings- 03A 3
1150 03100 Form/Place/Strip Basement Walls- 03A 4
1153 07100 Partially Dampproof & Insulate Foundation 4
1160 03100 Forms/Place/Strip Balance of Walls- 03A 8
1225 05100 Fabricate Steel 41
1124 02600 Install Water Line/Tap- 02A 15
5012 05300 Sub Shp Dwgs 10
5402 14200 Sub SD Elevator 10
1170 15700 Install U/G Ductwork- 15B 5
1175 02200 Backfill Int. Fnd. Walls & U/G Duct- 02A 2
5042 07500 Sub Roofing EPDM Shp Dwgs 10
5052 07300 Sub Roofing Slat Shp Dwgs 10
5062 08500 Sub Windows Shp Dwsg 10
5072 08900 Sub Curtain Shp Dwgs 10
5370 08050 Arch Compl Door Schedule 10
5082 09250 Sub Drywall Shp Dwgs 25
5092 06100 Sub Struct Studs / Dens Shp Dwgs (Dens sub) 11
5112 10651 Sub Folding Part Shp Dwgs 11
5102 09550 Sub Act Ceil Shp Dwgs 41
5122 09100 Sub FEC Shp Dwgs 41
5212 06400 Prep Millwork Bid Pkg 6
5022 05520 Sub Stair Shp Dwgs 15
5412 15700 Mechanical Coordination Duct mech Ppg/Pimg 10
5000 04200 Fab & Del Brick 55
5014 05300 A/E Review Deck Shp Dwgs 5
1155 02200 Partially Backfill Basement Walls- 02A 1
1177 02200 Excavate for U/G Plumbing- 02A 2
1230 05520 Survey Anchor Bolts 2
5016 05300 Fab & Del Deck 2
5372 08100 Prep Frames / Hardware Bid Pkg 10
1180 15400 Install U/G Plumbing- 15B 10
Page 1

Template
5064 08500 A/E Review WindowsShp Dwgs 10
5074 08900 A/E Curtainwall Shp Dwgs 10
5044 07500 A/E Review EPDM Shp Dwgs - rejected 15
5054 07300 A/E Review Slate Shp Dwgs 10
1196 07100 Install Dampproofing/Insulation- 03A 2
5214 06400 Bid Period Millwork 15
5374 08100 Bid Drs / frames / Hardware 15
5001 04200 A/E Review Precast SD 10
1198 02200 Backfill/Rgh Grade Foundation & Site- 02A 3
1183 03302 Prep/Place Basement SOG- 03A 4
5024 05520 A/E Review Stair Shp Dwgs 10
1204 02200 Prep Site for Steel 6
1202 President's Inauguration/Commencement 1
5414 15300 Sprinkler Coord 14
5416 16050 Electrical Coord 14
5076 08900 Fab & Del West Curtainwall 83
5066 08500 Fab & Del Windows 93
1185 03302 Prep/Place Main SOG- 03A 5
5084 09250 A/E review Drywall Shp Dwgs 10
1240 05100 Steel Delivery 1
1351 15700 Set AHU/Mechanical Room Equipment- 15B 5
1260 05100 Erect Basement Steel 3
5342 12600 Prep Aud Seating Bid Pkg 12
5132 09600 Prep Flooring Bid Pkg 15
5182 09900 Prep Painting Bid Bkg 15
5026 05520 Fab & Del Stairs 1 & 2 MAIN STAIRS 38
5311 10400 Owner Clarify Signage Bid Pkg 53
1270 05100 Erect First Floor Steel 5
1275 05100 Erect Second Floor Steel 5
5376 08100 Eval & Recom Award Drs/Frames/Hardware 5
5216 06400 Eval & Recom Award Millwork 8
1277 05100 Erect Attic Steel 3
5045 07500 Resubmit EPDM Shp Dwgs 5
5056 07300 Fab & Del Slate Roofing 30
1280 05100 Erect Roof Steel 10
1255 WPI Reunion Weekend 1
1290 05300 Install Roof Decking 5
5378 08100 Owner App Award Drs/Frames/Hardware 2
5384 08100 Award Aud Drs/ Frames/Hardware 1
1340 02200 Backfill/Prep Landing-02A 5
1318 05100 Install Precast Supports / Adjust 9
5096 05500 Fab & Del Exterior Studs / Dens 10
5386 08100 Sub SD Drs/Frames/Hardware 24
1380 15500 Mechanical Rough-in-15B-Mech RM 77
1295 05300 Install First Floor Deck/Studs 1
1297 05300 Install Second Floor Deck/Studs 1
1300 05300 Install Attic Deck 4
1298 15700 MEP Slab Prep First Floor 2
5222 06400 Owner App Award Millwork 2
6094 06100 A/E Structural Studs / DensShp Dwgs 10
5114 10651 A/E Folding Part Shp Dwgs 10
1299 03300 Prep/pour First Floor SOD 5
Page 2

Template
5047 07500 A/E Review EPDM Shp Dwgs 5
5002 03400 Fab & Del Precast 25
5344 12600 Bid Period Aud Seating 17
2190 06100 Stock Insulation, Densdeck & Plywood- 09A - Attic 1
5224 06400 Award Millwork 1
1302 15700 MEP Second Floor SOD Prep 2
5086 09250 Fab & Del Drywall 14
5104 09510 A/E Act Ceil Shp Dwgs 10
5134 09600 Bid Period Flooring 18
5184 09900 Bid Period Painting 22
5032 06400 Sub Millwork Shp Dwgs 15
1304 03300 Prep/Pour Second Floor SOD 2
5420 15950 MEP Coordination Signoff 5
2490 06100 Inst 1st & 2nd Flr/Gable Ext. Studs/ Sheath -East 14
5046 07500 Fab & Del EPDM Roofing 40
1390 15700 Heat Rough-in- 15B - Mech / Elect room 68
1400 15400 Plumbing Rough-in- 15B - Mech / Elect room 66
5422 15500 Fab & Del Duct - 2nd flr 27
5116 05520 Fab & Del Folding Part Rail 150
5117 05520 Fab & Del Folding Part Wall 10
1577 09100 Layout 1st floor and Top Track 2
5404 14200 A/E Review Sd Elevator 10
3090 07700 Install Roof Drains & Vents - Roof 3
5027 05520 fab & Del Basement Stair 25
5392 08100 Fab & Del Drs/Frames/Hardware 15
2520 04200 Install 1st & 2nd Floor Brick & Precast East 27
5418 15950 A/E review MEP Coordination (for record) 5
2900 06100 Install 1st & 2nd Floor Studs & Sheath - South 8
2600 06100 Install 1st & 2nd Floor Studs & Sheath - North 8
5105 09550 Re-Sub Act Ceil Shp Dwgs 10
5388 08100 A/E Review Sd Drs / Frames / Hardware 10
1445 16300 Deliver/Install Switchgear- 16A Electric Rms 1
5406 14200 Fab & Del Elevator 131
5186 09900 Eval & Recom Award Painting 5
5346 12600 Eval & Recom Aud Seating 5
1835 15400 Overhead Heat Pipe - 2nd flr 10
1580 15500 Overhead Ductwork - 1st flr 15
1590 15400 Overhead Heat Pipe - 1st flr 16
5136 09050 Eval Award 5
1860 06100 Install Interior Studs and Frames - 2nd flr 10
1885 15400 Plumbing in-Wall Rough - 2nd flr 4
2546 04200 Install Gable-End Brick & Precast - East (Br dne) 9
2700 06100 Inst 1st & 2nd floor/Gable Studs & Sheath - West 9
2770 04200 Install Gable-End Brick & Precast - West 17
1375 06100 Install Stud Walls/Door Frames- 09A - Basement 3
2715 16050 Electric Shutdown Switchgear 2
1630 06100 Install Interior Stud Walls/Door Frames - 1st flr 8
1855 15300 Overhead Sprinkler - 2nd flr 10
2720 04200 Install 1st & 2nd Floor Brick & Precast West 15
3100 07600 Install Roof Sheathing - East - Roof 3
1503 05520 Install Stairs - basement 18
6000 05520 Submit Sketch Ladder & Handrail - 05A - Attic 3
Page 3

Template
6010 07300 Fab & Del Slate Infills North 124
3110 07600 Install Rood Sheathing - North 3
2610 04200 Install 1st & 2nd Floor Brick & Precast - North 17
5192 09900 Owner App award Painting 2
5348 12600 Owner App Award Aud Sealing 2
5107 09550 A/E Review Re-Sub Act Ceil Shp Dwgs 10
1840 15400 Overhead Plumbing - 2nd flr 3
1600 15400 Overhead Plumbing - 1st flr 5
1924 08500 Install Plastic in Windows - 2nd flr 5
3130 07600 Installation of Sheathing - South 3
5194 09900 Award Painting 1
5354 12600 Award Aud Seating 1
5124 09100 A/E FEC Shp Dwgs 10
1636 15400 Plumbing In-Wall Rough - 1st flr 5
1620 15300 Overhead Sprinkler - 1st flr 10
1360 05520 Install Stairs/Areaway Grates-05A basement 12
1850 16050 Overhead Electric - 2nd flr 5
1663 15700 Insulate Duct & Piping - 1st flr 5
2910 04200 Install 1st & 2nd Floor Brick & Precast - South 8
1610 16050 Overhead Electric - 1st flr 10
1661 09100 Frame Chases - 1st flr 2
1921 09100 Frame Chases - 2nd flr 2
2005 05520 Sub SD Ladder & Handrail - 05A - Attic 107
5142 09600 Owner App award Flooring 2
5144 09600 Award Flooring 1
5196 09900 Sub SD Painting 10
5146 09680 Sub SD Vct 10
5156 09680 Sub SD Carpet 10
5166 09300 Sub SD Slate 10
1890 16100 Electrical In-Wall - 2nd flr 10
1895 16800 Fire Alarm In-Wall - 2nd flr 5
1900 16300 Control In-Wall - 2nd flr 5
1920 15700 Insulate Duct & Piping - 2nd floor 5
2270 15700 Mechanical Rough-in-14A - Attic 19
3180 07700 Install EPDM - Pit & Balcony 5
5034 06400 A/E Review Millwork Shp Dwgs 10
1410 15300 Sprinkler Rough-in- 15B - Mech/Elect Rms 104
1905 09100 Build Elevator Shaft - 2nd flr 5
1465 10200 Install Areaway Louvers- North 2
3140 07300 Install Slate Shingles- North 5
5356 12600 Sub SD Aud Seating 10
1450 09100 Build Elevator Shaftwall- 09A - Basement 3
1285 05520 Install 1st Floor Stairs & Rails 5
1640 16100 Electric In-Wall Rough - 1st flr 5
1922 09250 Sheetrock Chases - 2nd flr 5
5033 06050 Select Wood Veneer Leed Certification 5
5198 09900 A/E Review Sd Painting 10
2291 16300 Del Main Transformer 23
1645 16300 Control In -Wall Rough - 1st flr 5
1647 16800 Fire Alarm In-Wall Rough - 1st flr 5
5106 09550 Fab & Del Act Ceil Grid 96
5110 09550 Fab & Del Act Ceil Tile 96
Page 4

Template
1664 09250 Sheetrock Chases - 1 st flr 5
2755 08900 Install Partial Curtainwall- West 7
3190 07200 Temp Dry In Full Roof 0
1910 15950 MEP Inspections - 2nd flr 1
1305 05520 Install 2nd Floor Stairs & Rails 5
5148 09680 A/E Review Sd Vct 10
6158 09680 A/E Review Sd Carpet 10
5168 09300 A/E Review Sd Slate 10
5202 09900 Fab & Del Painting 84
5126 09100 Fab & Del FEC (Avail) 30
1660 15950 MEP Inspections - 1st flr 1
1650 09100 Build Elevator Shaftwall - 1st fl 7
5358 12600 A/E Review Sd Aud Seating 10
1925 09250 Insulate/Hang Drywall - 2nd flr 5
3150 07300 Install Slate shingles- North 5
2280 15400 Plumbing Rough-in - Attic 10
2290 16050 Electrical Rough-in - Attic 10
2550 08500 Install Windows - East 15
3170 07300 Install Slate Shingles- South 5
5163 09680 Fab & Del Custom Carpet 1st flr 84
5152 09680 Fab & Del Vct (Avail) 30
5162 09680 Fab & Del Carpet 30
3160 07300 Install Slate Shingles-West 5
3248 03050 Site Concrete- Mock-up Approved 3
2780 08500 Install Windows - West 10
1670 09250 Insulate/Hang Drywall - 1st flr 5
2300 09100 Install & Densdeck - Attic 15
2950 08500 Install Windows - South 5
1350 03050 Form/place Stair Landing -03A - Basement 5
1460 14200 Elevator Machine Room Rough- 14A - Basement 15
1325 05520 Install Roof Stairs 2
1440 16800 Electric/Fire Alarm Rough-in- 16A Mech/ Electr 8
5036 06400 Fab & Del Millwork 60
2640 08500 Install Windows - North 5
1930 09250 Finish Drywall - 2nd flr 10
1480 09250 Insulate/Hang Drywall- 09A - Basement 3
1892 Owner Pull Telecommunications 2nd flr 10
1642 Owner Pull Telecommunications 1st flr 10
2570 08100 Install Alum DFH -East 5
2790 08100 Complete CW/Install Alum DFH - West 2
1470 15950 MEP Inspections Mech / Elect Rms 1
3200 02200 Site Prep- East & North Sides 5
1490 09250 Finish Drywall- 09A - Basement 5
3400 02200 Site Prep- West & South Sides 5
3260 03100 Site Concrete- East & North Sides 10
5324 10400 Owner Award Signage 10
2305 06100 Install Plywood - Attic 5
1680 09250 Finish Drywall - 1st flr 8
3452 02700 Final Paving 1
5326 10400 Sub Signage 10
1940 09900 Prime Paint - 2nd flr 5
1685 09250 Sheetrock & Tapes Stairs 10
Page 5

Template
3805 03400 Precast - West Entrance 5
1934 08200 Fab & Del Wood Doors & Hardware - 2nd flr 30
1972 10651 Install Folding Partition Support Pail - 2nd flr 1
3450 03100 Site Concrete- West & South Sides 2
3840 07400 Terminate Roofing - West Entrance 1
1945 09500 Install Ceiling Grid - 2nd flr 6
1993 14200 Install Elevator 15
3800 03400 Precast - East Entrance 5
3810 09100 Frame - West Entrance 3
2025 09500 Complete Ceil Grid / Tile 2nd Flr 1-05A - Attic 3
5328 10400 A/E Review Sd Signage 10
1690 09900 Prime Paint - 1st Flr 5
1955 15300 Install Sprinkler Heads - 2nd flr 5
1942 09300 Ceramic Tile Toilet 2nd flr 3
3845 07400 Terminate Roofing - east Entrance 1
1634 05520 Install Presentation Room Stair - 1st flr 5
1800 09250 Install Sheetrock & Tape Ceiling Lobby - 1st flr 10
1520 16050 Electrical Finish - Basement 3
1695 09500 Install Ceiling Grid - 1st floor 5
1980 15400 Plumbing Finish - 2nd flr 5
1950 15700 Install D's - 2nd Flr 5
1692 09300 Ceramic Alum Exterior Entrance Doors 3
2572 08100 Install Alum Exterior Entrance Doors 5
1985 16050 Electrical Finish - 2nd flr 5
1700 15700 Install RGD's - 1st flr 5
1705 15300 Install Sprinkler Heads - 1st flr 5
1970 09600 Install Flooring - 2nd flr 10
1960 09500 Flood Ceiling Tile - 2nd flr 5
5172 09300 Fab & Del Slate to Customs 0
2015 Remove Wd Ladder from Rm 2nd Flr 1-05A - Attic 1
1915 08800 Install Glass Handrail - 2nd flr 3
1995 10980 Install Specialties - 2nd flr 10
2020 05300 Install Deck @ Attic 2nd Flr 1-05A- Attic 1
2260 05520 Install Ladder & Handrail -05A- Attic 5
6002 05520 Fab & Del Ladder & Handrail-05A- Attic 10
1505 05520 Install Stair Handrails - Basement 3
1965 06200 Install Millwork - 2nd flr 5
2650 07300 Install Slate Infills North 3
1935 08200 Install Wood Doors & Hardware - 2nd flr 5
1710 09500 Flood Ceiling Tile - 1st flr 5
1973 10651 Install Folding Partition Wall - 2nd flr 1
5332 10400 Fab & Del Signage 60
1805 06200 Install Wood Paneling in Lobby- 1st flr 7
1722 09300 Install Slate Flooring - 1st flr 5
2960 07300 Install Slate Infills - South 5
1686 08200 Install Wood Doors / Hardware - 1st 5
3825 09100 Frame - East Entrance 3
1790 09700 Install Fabric Panels - 1st flr 3
1795 06200 Install Wood Paneling in Lobby- 1st flr 3
5359 12600 Gilbane Release Aud Seating (Stain Color) 5
1975 09900 Final Paint - 2nd flr 5
1716 06200 Install Millwork - 1st flr 5
Page 6

Template
1990 15900 Mechanical Finish - 2nd flr 5
5362 12600 Fab & Del Aud Seating 0
2010 05520 Install Stair Rails 29
3815 16500 R.I. Lights - West Entrance 1
3820 08400 Densglass - West Entrance 5
3830 16500 R.I. Lights - East Entrance 1
3835 08400 Densglass - East Entrance 5
1720 09600 Complete Flooring - 1st flr 4
1725 09900 Complete Paint - 1st flr 3
3700 Fire Marshall Inspect Building 1
3705 test & Balance Building - Bldg 6
1997 Punchlist - 2nd flr 3
1740 15900 Mechanical Finish - 1st flr 2
1807 12600 Install Presentation Room Seating - 1st flr 2
1730 16050 Electrical Finish - 1st flr 3
1727 10400 Install Signage in Building 4
1750 12400 Install Mecxho Shades - 1st flr 5
1815 01046 Final Clean - 1st flr 5
3710 Commissioning Building 6
3722 Flush Building 10
2000 01046 Final Cleaning - 2nd flr 5
3715 Substantial Completion C of O 5
3860 07400 Ballast Roofing - East Entrance 1
2013 09500 Complete Attic Insulation 6
2011 12500 Owner Furniture 10
3720 WPI Move - in 38
3600 03700 Place Exterior West Slab 3
1830 15500 Overhead Duct 2nd flr 10
1833 15700 Fab & Del Valves Heat Pipe - 2nd flr 4
3120 07600 Install Roof Sheathing - West 12
5173 09300 Slate Clear Customs & Deliver 5
2012 06400 Furnish & Install Plam Top 5
3821 09200 Plaster - Both Entrance 5
3650 02900 Landscaping & Brick Paving 20
2735 WPI Occupy Building 0
1811 Building Dedication 0
Page 7

79
Appendix G – Reduced List of Owner’s Activities by CE3020 Students

WBS
CodeItem Description
Estimated Time
Duration (Work days)
Project Milestones
Project Starts
Design Kick-off Meeting
Design Completed
Foundation Completed
Building Enclosed
Final Inspection & Approval
Substantial Completion C of O
Flush Building
Project Ends
010 Project Management
Develop Work Plan 6
Form Project Team 6
Building Permits 30
Move In, Erect Fence, Erosion Control 6
Procure Contractor's Bids 90
Handover 7
Punch List & Move 14
010 Design
Structural Design 40
Storm-Water Design 8
Sanitary Sewer Design 8
Architectural Design 60
On-Site Utilities Design 8
Mechanical Systems Design 10
Electrical Systems Design 21
020 SiteWork & Excavation
Backfill/Restore Grade 1
Excavate Bsmt/Prep for Found Footings 8
Install Sewer Line 15
Backfill Int. Fnd. Walls & U/G Duct 3
Install Water Line/Tap 15
Excavate for U/G Plumbing 2
Backfill/Rgh Grade Foundation & Site 3
Prep Site for Steel 6
Backfill/Prep Landing 5
Final Paving 1
Landscaping & Brick Paving 20
030 Concrete (incl formwork, reinforced steel)
Form/Place/Strip Balance of Footings 6
Form/Place/Strip Basement Walls 12
Prep/Place Basement Slab On Grade 4
Prep/Place Main Slab on Grade 5
Prep/pour First Floor Slab On Deck 5

Prep/Pour Second Floor Slab On Deck 5
Form/place Stair Landing Basement 5
Site Concrete- all Sides 12
Place Exterior West Slab 3
034 Precast Concrete
Fab & Del Precast 25
Precast - Entrance 10
040 Masonry
Fab & Del Brick 55
Install 1st & 2nd Floor Brick & Precast East 27
Install Gable-End Brick & Precast - East (Br dne) 9
Install Gable-End Brick & Precast - West 17
Install 1st & 2nd Floor Brick & Precast West 15
Install 1st & 2nd Floor Brick & Precast - North 17
Install 1st & 2nd Floor Brick & Precast - South 8
050 Metals
Fab & Del Deck 2
Fabricate & Deliver Steel 42
Survey Anchor Bolts 2
Erect Steel Frame 16
Erect Roof Steel 10
Install Deck/Studs 2
Install Roof & Attic Decking 9
Install Precast Supports / Adjust 9
Fab & Del Stairs 1 & 2 MAIN STAIRS 38
fab & Del Basement Stair 25
Install Stairs - basement 18
Install Stairs Building 30
Fab, Del & Install Ladder & Handrail-- Attic 15
Install Stair Rails 32
060 Carpentry
Fab & Del Millwork 60
Install Millwork 10
Install Wood Paneling 10
Install Plywood - Attic 5
070 Roof & Moisture Protection
Fab & Del Slate Roofing 30
Fab & Del EPDM Roofing 40
Fab & Del Slate Infills North 124
Dampproof & Insulate Foundation 6
Install Roof Sheathing 15
Install Slate Shingles 12
Install EPDM - Pit & Balcony 5
Terminate Roofing Entrance 2
Install Slate Infills 8

080 Doors & Windows
Fab & Del Drs/Frames/Hardware 15
Fab & Del West Curtainwall 83
Fab & Del Windows 93
Fab & Del Wood Doors & Hardware 30
Install Windows 25
Install Wood Doors / Hardware 10
Install Plastic in Windows - 2nd flr 5
Install Curtainwall 10
Densglass Entrance 8
Install Alum Exterior Entrance Doors 5
Install Alum DFH -East 5
Install Glass Handrail - 2nd flr 3
090 Finishes
Fab & Del Exterior Studs / Dens 10
Fab & Del Drywall 14
Fab & Del Painting 94
Fab & Del Act Ceil Grid 96
Fab & Del Vynil Tile, FEC 30
Fab & Del Custom Carpet 1st flr 84
Install Exterior Studs/ Sheath 20
Install Interior Studs and Frames 25
Sheetrock Chases 8
Build Elevator Shaft 15
Insulate/Hang Drywall 15
Install & Densdeck - Attic 15
Fnish Drywal 20
Prime Paint 13
Install Ceiling Grid 10
Install Sheetrock & Tape Ceiling 20
Install Flooring - 2nd flr 10
Frame Entrance 6
Ceramic Tile Toilet 3
Install Slate Flooring - 1st flr 5
Flood Ceiling Tile 9
Final Paint 8
Complete Attic Insulation 5
100 Specialties
Fab & Del Folding Partition Wall & Rail 150
Install Folding Partition Support Wall & Rail 3
Fab & Del Signage 60
Install Signage in Building 4
140 Elevator
Fab & Del Elevator 131
Install Elevator 15
Elevator Machine Room Rough- 14A - Basement 15
150 Mechanical

MEP Slab on Grade Prep 15
MEP Second Floor Slab On Deck Prep 4
Install Roof Drains & Vents - Roof 3
Fab & Del Duct 27
Overhead Ductwork 25
Overhead Plumbing, Sprinkler, Heat Pipe 25
Plumbing & Mechanical Rough-in Mech / Elect room 77
Plumbing in-Wall Rough 9
Heat Rough-in Mech / Elect room 68
Mechanical & Plumbing Rough-in Attic 29
Sprinkler Rough-in Mech/Elect Rms 104
Mechanical & Plumbing Finish 7
Install Sprinkler Heads 10
160 Electrical
Electric Relocation Work 8
Overhead Electric 15
Electrical In-Wall 15
Control In-Wall 10
Fire Alarm 15
Electrical Rough-in - Attic 10
Electrical Finish 12
Del Main Transformer 23
R.I Lights Entrance 3
Electrical Coordination 14

84
Appendix H – “Visualizing Construction” Website

The Bartlett Center: From Start to Finish
A Glimpse at the newest addition to WPI's Campus
The Bartlett Center, WPI's first "Green Building" was inaugurated on the 10th of June as its newest admissions building. Designed by Childs Bertman Tseckares Inc. (CBT), the construction of the Bartlett Center followed U.S. Green Building (USGB) guidelines using local building materials and increasing recycling of construction materials. Being a "Green" building, not only does it make the Bartlett Center's existence environmentally friendly, but also reduces its operation costs while providing its employees a safer work surrounding.
Some of its visible advantages being a "Green" Building is that 'the open area on the site equal to the footprint of the building, the design introduces substantial new green space to the campus, while the removal of the asphalt paving reduces the heat island effect and decreases the rate and quality of storm-water run-off. Facing the general east/west direction it takes optimum advantage of day-light while simultaneously using a 'portico' for shade, mitigates rising temperatures within.
To learn more about the two story, 16,589-square-foot, silver LEED rating Bartlett Center, visit the link on the left panel. To see the phase by phase process of the construction of the Bartlett Center, click on "Visualize" Construction

Construction Entities
Owner Architect/Designer Construction Manager Contractor
SubcontractorOwner: The owner, as can be seen in Fig 1: Construction "Food-Chain" is at the top of the "food-chain". The owner is not only the financier of the entire project, but importantly plays the role of defining the scope of work that needs to be done. Depending on the type of project (Design-Build, Design-Bid-Build, etc. See next section) the owner may opt for any of the following entities that play an essential role in the successful completion of the owner’s project.
Architect/Designer: Once the owner has defined the scope of work (for example, for a 3 bedroom, 2 bathrooms residential home), the owner hires an architect or a designer who is an entity involved in the art of planning, designing and overseeing the construction of buildings, or more generally, the designer of a scheme or plan. The architect/designer molds the owners scope of work into a physical, constructible solution complete with drawings and specifications tailored to the owner’s specifications.
Project Manager: As discussed before, the project manager plans, budgets, co-ordinates, monitors and controls the operational contributions of property professionals, and others, in a project in accordance with a client's objectives in terms of quality, cost and time. The project manager takes over the responsibility of handing over the project to the owner within the deadline giving "time, cost and quality" special importance.
Contractor: A general contractor is defined as such if it is the signatory as the builder of the prime construction contract for the project. A general contractor is responsible for the means and methods to be used in the construction of the project in accordance with the contract documents. These contract documents usually include the contract agreement including budget, the general and special conditions and the plans and specification of the project that are prepared by a design professional (Architect/Designer). A general contractor usually is responsible for the supplying of all material, labor, equipment, (engineering vehicles and tools) and services necessary for the construction of the project. To do this it is common for the general contractor to subcontract part of the work to other persons and companies that specialize in these types of work.
Subcontractor: Subcontractors may be large organizations or small business owners, but they all have one thing in common: work specialization. These entities focus on a certain type of skilled profession ranging from elevators, sprinklers, iron-works, steel fabrication to bathroom tiles, electrical switches and furniture. Once the subcontractor enters a contract, it is the subs job to deliver the end product as specified in the contract with all the necessary close-out documents and deliverables such as include but are not limited to attic stock, special warranties, and keys.
Home Picture Gallery Survey Bartlett Center IQP Report
TheConstruction Process
Construction on the Bartlett Center began on the 23rd February 2005 and continued for a period of one year and three months to be handed over to WPI on 1st June 2006.
In this project, Worcester Polytechnic Institute was the Owner, while Gilbane Construction Co. and Childs Bertman Tseckares Inc. (CBT), Boston
were the Construction Managers (CM and Architects, respectively. (Click on any of the terms to get an explanation of each in left panel.)
The Bartlett Center project was delivered using the Construction Management @ Risk System. Before construction could actually begin, there are a lot of pre-construction phases that have to be taken into account; the entire process can be summarized as shown below:
There were many phases in the construction of this facility, many of which are typical of construction of various types of structures: Pre-Construction phases through Close-out. These steps are listed below in the form of links which will discuss each step in detail, walking through the schedule, percentage of work complete, list of tasks involved in each step linked to the CSI code and with a discussion of each step with a video or picture demonstration as well. These steps can be navigated by clicking on the links below (These links will be available on every page hence forth for easy navigation):
Top
Home Picture Gallery Survey Bartlett Center IQP Report
Subcontractors
Owner
Construction
Manager
Architect/
Engineer

Scope Schedule Budget
Scope: 'The project scope is the written summation of the purpose of a project, the intended result of a project, a description of the physical items to be constructed, and the expected deliverables/responsibilities of the project participants. The project scope addresses the method and approach to be utilized to satisfy the project requirements within a specified time period for a given amount of money.'
Schedule: The required time to produce the end product as described under the scope of the project. All tasks that are involved in getting the job done have to be performed in a sequence, as the precedence chart illustrates, and the time required perform all tasks according to specifications is known as the project schedule.
Budget: This is an estimated cost to complete the project. The project costs depend on several variables including (mainly): labor rates, material rates, risk management, plant (buildings, machines, etc.), equipment, and profit. The expected total to perform all these tasks is generally referred to as the budget.
Main Page Survey Picture Gallery Bartlett Center IQP Report
Pre-Construction Phases
Preconstruction phases include but are not restricted to the following activities:
Formulation: Formulation consists of identifying the scope, schedule and budget for the proposed project. The scope is generally identified by a sketch prepared by the architect/designer. Once the scope has been identified the plans are evaluated and the projects total cost is estimated. The schedule is similarly planned and estimated. The scope, schedule and budget information is summarized for (after the active involvement and approval of) the owner.
Preliminary Design: This is the initial phase of the design process. The agreed upon scope, schedule and budget of each project is defined during the formulation process, all of which are refined as more details about the project are received. It will be the PMs responsibility to keep these three parameters in focus when making decisions regarding the project design. In order to achieve a successful project, the design team must get input from, and coordinate with, a number of different entities such as engineers, accountants and superintendents with regular meetings with the owners, QA/QC, architects and project managers as the project moves along. All changes made to design have to be approved by the owner.
Construction Documents: This is a phase where design is finalized and all necessary documents to "seal the deal" are organized. The main emphasis of this phase is to verify that all the information is on the drawings and in the specifications so that the project can be bid for construction. Clarity and completeness is key to avoid costly changes while in construction. All bonds, permits and other construction documentation such as drawings, project manuals, general conditions, specifications etc are refined and outlined and finalized for construction to begin.
Project completion-o-meter:
0% 2% 100%
Pre-Construction
Mobilization Excavation Foundation Steel-Frame
Ext.Walls/Roof Int.Walls/Mech./HVAC Landscaping Finishes/Punch-
List Close-
Out
<< Back Construction Schedule - Next >>
Main Page Survey Picture Gallery Bartlett Center IQP Report

Direct Costs
Indirect Costs
Direct Costs:
Overhead
Material takeoff
Pricing Material & Equipment
Construction Equipment
Labor
Special Conditions
Government Furnished Materials
Sampling & Analysis Costs
Transportation & Waste Disposal
Environmental Management
Conditions
The more accurate the estimates, the more prepared the owner will be for expected expenses, hence, fewer the consequences on
the schedule.
Indirect Costs:
‘The indirect costs may be included as part of the code of
accounts for a project. One method to estimate the indirect costs
is to assign a cost to each cost account. This must be based on the size and type of contract and could be a lengthy list. This
method requires a great deal of experience and a working
knowledge of the construction firm's experience.’
Main Page Survey Picture Gallery Bartlett Center IQP Report
Construction Schedule
Fig. 2
Construction planning is a fundamental and challenging activity in the management and execution of construction projects. It involves the choice of technology, the definition of work tasks, the estimation of the
required resources and durations for individual tasks, and the identification of any interactions among the
different work tasks. A good construction plan is the basis for developing the budget and the schedule for work. Developing the construction plan is a critical task in the management of construction, even if the plan is not
written or otherwise formally recorded. In addition to these technical aspects of construction planning, it may also be necessary to make organizational decisions about the relationships between project participants and even
which organizations to include in a project.
Figure 2 simplifies the breakdown of the dependent variables that play a role in the development of a
construction schedule. These variables are broken down into two main categories that deal with the two critical
elements involved in the smooth running of a project: Cost Oriented and Schedule Oriented variables.
Cost Oriented Variables: In simple words, this is just a matter of buying and selling. When a project is
constructed, excluding property costs, resources and raw material constitute for almost a hundred percent of the costs. Without sufficient capital these resources such as labor, steel, concrete, HVAC, etc (direct costs as per
specifications) cannot be acquired. To determine precise details of an estimate the direct costs and indirect costs
must be calculated.
Schedule Oriented Variables: Once work activities have been defined, the relationships among the activities can
be specified. Precedence relations between activities signify that the activities must take place in a particular sequence. Numerous natural sequences exist for construction activities due to requirements for structural
integrity, regulations, and other technical requirements. Figure 3 illustrates a simple example of a precedence
relation:
Fig. 3
Similarly, a more complex precedence relationship involving a more complex network of activities can be
established. Primavera and Gantt Charts are effective tools used to plan, organize, direct, control and budget a
project effectively.
<< Back Bartlett Center Schedule - Next >>
Main Page Survey Picture Gallery Bartlett Center IQP Report

Files (click file to open externally)
Original Primavera Systems schedule (PDF)
Activities by CSI division (approx. 350) & duration (XLS)
Summation of Activities by WBS codes (approx. 140) & item description (XLS)
Gantt Chart (List simplified from a multiple page schedule to a one page construction agenda - PDF)
Gantt Chart phase by phase (Mobilization thru Close-out - PDF)
Main Page Survey Picture Gallery Bartlett Center IQP Report
Bartlett Center Schedule
Construction on the Bartlett Center began on the 23rd February 2005 and continued for a period of one year and three months to be handed over to WPI on 1st June 2006. The schedule for this project is an elaborate precedence relationship flow chart of complex construction operations intertwined, working independently or simultaneously, produced by using Primavera (a widely used scheduling program), one activity following another with construction equipment and labor operating accordingly.
Engineers, accountants and superintendents follow this <Primavera schedule (PDF)>, where a list of activities to be completed, roughly 350 in Bartlett Center's case, can be broken down by its CSI division (www.icces.org) with its respective duration. Hence, the list of activities can be reduced to a summation of activities sorted by WBS Code (click here - new window - for example for WBS construction technique), with each and every item description as shown here (Each file can be found on the left panel - FILES - Click here).
Similarly, the complex schedule can be simplified by connecting, essentially, the same series of tasks together, to break it down phase by phase, and distributing activities into categories by mobilization through close-out, as listed on the main page (left pane). From the next slide onwards, the construction schedule timeline will be demonstrated using the same methodology. Click here (new window) for the simplified Gantt Schedule listing activities. (Click here to interact with the Gantt Schedule for overviews on subtasks/activities involved in each task as shown below) - opens in new window
<< Back Mobilization - Next >>
Main Page Survey Picture Gallery Bartlett Center IQP Report

Mobilization Schedule Overview
ID Description Start Finish BDPK
1030
Erect Fence/Prep Site/Erosion Ctrl
3/9/05 3/14/05 02A
1130
Form/Place/Strip Balance of Footings
3/14/05 3/18/05 03A
1115 Deliver Anchors Bolts/Embeds
3/22/05 3/22/05 05A
1126 Prep for Balance of Footing
3/22/05 3/24/05 02A
Main Page Survey Picture Gallery Bartlett Center IQP Report
Mobilization
Mobilization is the planned act of transporting and establishing resources for the project, required and specified as per the contract. Mobilization shall include all activities and associated costs for transportation of contractor's personnel, equipment operating and maintenance costs, and operating supplies to the site; establishment of offices, buildings, and other necessary general facilities for the contractor's operations at the site. Some examples of construction equipment are lifting cranes, hoisting engines, back hoes, dump trucks, dozers, etc.
Project completion-o-meter:
0% 5% 100%
Pre-Construction
Mobilization Excavation Foundation Steel-Frame
Ext.Walls/Roof Int.Walls/Mech./HVAC Landscaping Finishes/Punch-List
Close-Out
<< Back Excavation - Next >>
Main Page Survey Picture Gallery Bartlett Center IQP Report

Excavation Schedule Overview
ID Description Start Finish BDPK
1090 Backfill/Restore Grade
3/18/05 3/18/05 02A
1130 Excavate for Foundation
3/23/05 4/21/05 02A
1150 Form/Place/Strip Basement Wall
3/28/05 3/31/05 03A
1175
Backfill Int. Fnd. Walls & U/G Duct
4/21/05 4/22/05 02A
5372
Prep Drs/Frames/ Hardware Bid Pks
5/9/05 5/12/05 08B
Main Page Survey Picture Gallery Bartlett Center IQP Report
Excavation
This is the systematic 'digging-up' of soil at the location of the proposed structure. The entire skeleton of the structure that supports the dead-load of the components of the building, the live-load when it is inhabited, snow-loads, wind-loads and earthquake under different climatic circumstances, all depend on one thing: the foundation. Excavation equipment are chosen carefully for optimum performance within budget to cut costs and keep on top of the schedule. Soil bores are taken, and samples analyzed to determine the type of foundation required, and accordingly, the site is excavated and soil disposed off appropriately to make room for the concrete foundation that will be placed in its stead. Plans and drawings are double checked to be careful about pre-existing conduits to avoid damage to existing conditions. The Excavation in the Bartlett Center faced many obstacles due to restricted space in an active college environment. Large excavation equipment and machinery was a big problem in the confined space where hindrances in the everyday processes could be afforded.
Project completion-o-meter:
0% 11% 100%
Pre-Construction
Mobilization Excavation Foundation Steel-Frame
Ext.Walls/Roof Int.Walls/Mech./HVAC Landscaping Finishes/Punch-List
Close-Out
<< Back Foundation - Next >>
Main Page Survey Picture Gallery Bartlett Center IQP Report

Foundation Schedule Overview
ID Description Start Finish BDPK
1110
Exc. Bsmt/Prep for Foundation Footings
3/15/05 3/21/05 02A
1090
Backfill/ Restore Grade
3/18/05 3/18/05 02A
Cure concrete
3/8/05 4/5/05 03A
1126
Prep for Balance of Footing
3/22/05 3/24/05 02A
1153
Partially damp-proof and insulate foundation
4/1/05 4/4/05 03B
Main Page Survey Picture Gallery Bartlett Center IQP Report
Foundation
Excavation and Foundation Development usually go together. Once excavation is complete, forms are placed to form the walls of the foundation and braced with shoring to make ready for the concrete pour. Depending on the type of foundation and according to specifications, concrete of specific strength and quality is transported by a fleet of concrete-mixing trucks. Each batch is tested on site for air content and slump. This is essential because if the foundation fails, the consequences could prove catastrophic. The foundation is carefully cured, and climatic controls are put in place for effective curing to achieve maximum desirable concrete strength.
Project completion-o-meter:
0% 23% 100% Pre-Construction
Mobilization Excavation Foundation Steel-Frame
Ext.Walls/Roof Int.Walls/Mech./HVAC Landscaping Finishes/Punch-List
Close-Out
<< Back Steel Frame - Next >>
Main Page Survey Picture Gallery Bartlett Center IQP Report

Steel Frame Schedule Overview
ID Description Start Finish BDPK
1225 Fabricate Steel
4/4/05 5/31/05 05A
1240 Steel Delivery
6/1/05 6/1/05 05A
1260
Erect Basement Steel
6/1/05 6/3/05 05A
1270 Erect First Floor Steel
6/3/05 6/6/05 05A
1275
Erect Second Floor Steel
6/6/05 6/7/05 05A
1280 Erect Roof Steel
6/10/05 6/13/05 05A
Main Page Survey Picture Gallery Bartlett Center IQP Report
Steel Frame
Once the foundation is tested and approved for further construction, a silent celebration is in order because this is the point of construction where the project starts to take shape. As mentioned before, the steel frame structure of any project can be thought of as the structural skeleton, holding walls, floors and ceilings together to protect its inhabitants against inclement weather and providing a safe work environment for its employees. The Bartlett Center, as many buildings like its size, are framed with steel columns and beams. These columns and beams are designed before the procurement stages begin where the thickness and strength of these columns and beams are determined by the stresses they will carry. The weight they support must successfully transfer to the foundation below without buckling keeping the structure in equilibrium. Not only is the fabrication of the steel frame important to the structural stability of the building but the connections used to tie these columns and beams together play just as big of a role. Framework is costly and dangerous as construction moves from the first floor to the second, scaffolding and man-lifts are used to place heavy beams and girders above ground level increasing the risk of workers on site. After the steel frames have been erected, the floor decks are poured with concrete and rough roofing installed.
Project completion-o-meter:
0% 35% 100%
Pre-Construction
Mobilization Excavation Foundation Steel-Frame
Ext.Walls/Roof Int.Walls/Mech./HVAC Landscaping Finishes/Punch-List
Close-Out
<< Back Exterior Walls & Roofing - Next >>
Main Page Survey Picture Gallery Bartlett Center IQP Report

Exterior Wall & Roofing Schedule Overview
ID Description Start Finish BDPK
1290 Install Roof Decking 6/14/05 6/17/05 05A
1318 Install Precast/ Supports
6/14/05 6/24/05 05A
5096 Fab & Del Exterior Studs/Dens
6/14/05 6/27/05 09A
1295 Install First Floor Deck/Studs
6/15/05 6/15/05 05A
Exterior Works 6/20/05 8/15/05
1280 Install Second Floor DeckStuds
6/15/05 6/15/05 05A
2520
Install First & Second Floor Brick - East/North/West/South Respectively
8/8/05 9/9/05 04A
3140 Install Shingles 9/12/05 10/12/05 07A
Main Page Survey Picture Gallery Bartlett Center IQP Report
Exterior Walls & Roofing
Exterior wall is the barrier between the inside and outside of the building. Over centuries, architecture has progressed into a new era where new ways to create an aesthetic facade to make a structure look magnificent, or in Bartlett Center's case, to make it blend into its surroundings, giving it a more 'old-school' academic appearance. Once the framing is complete, exterior walls are developed using concrete blocks, insulation, mortar and brick. The function of an exterior wall is more than that of keeping animals and unwanted elements of nature out, vents are designed to encourage air circulation and to help dissipate moisture within the air spaces. Flashing, weeps and insulation is used to keep the interior of the structure at a constant level without any leaks of any sort, keeping moisture out. The brick is laid by hand by masons, usually using scaffolding as the wall progresses higher, leaving gaps as per drawings for windows and doors. This is a meticulously tedious job as it is important to assure its functionality as well as its appearance. Roofing plays a similar role, it can be thought of as an exterior wall on the ceiling of the entire structure, using insulation and a combination of waterproof materials to help keep moisture (critically from snow and rain) out and provide shelter to its inhabitants. Bartlett Center's ten foot ceilings allow light to penetrate the interior spaces, where a double-height reception area acts as a natural chimney to pull air through the building for better circulation.
Project completion-o-meter:
0% 60% 100%
Pre-Construction
Mobilization Excavation Foundation Steel-Frame
Ext.Walls/Roof Int.Walls/Mech./HVAC Landscaping Finishes/Punch-List
Close-Out
View From Higgins View From Harrington
<< Back Interior Walls, Mechanical & HVAC - Next >>
Main Page Survey Picture Gallery Bartlett Center IQP Report

Interior Walls, Mech. & HVAC Schedule Overview
ID Description Start Finish BDPK
1360 Install stairs & Areaway Gates
8/21/05 9/1/05 05A
1663 Insulate Duct/Piping 8/23/05 9/20/05 15C
1640
"Electrical, Plumbing, Telecommunications, Fire Alarms, etc Install (Rough & Finish)
9/15/05 1/13/06 16A
1934 Install Wood Paneling
1/10/06 1/10/06 09A
1993 Install Elevetors 11/21/05 12/28/05 14A
1280 Install & Complete Flooring
12/16/05 2/24/06 05A
2520 Paint - Prime 11/29/05 1/1/06 04A
Main Page Survey Picture Gallery Bartlett Center IQP Report
Interior Walls, Mechanical & HVAC
Once the exterior walls are assembled, windows and doors are installed and the interior of the structure can be focused on. Fire retardants are sprayed onto every inch to help prevent fire outbreaks. As per owner specifications on drawings, partitions are framed by spacing between the exterior walls to form rooms. The bare ceilings are attached with shelves and vents to support heating, air conditioning and ventilation systems, as well as sprinkler systems and continuous electrical wiring to be fed to every electrical outlet and switches in every room as specified by the electrical section in the specifications. The walls are insulated and either side plastered for a rough finish, forming walls. Mechanical and HVAC systems may be planted either in the attic or the basement, where heaters, ventilation systems, electrical systems, water boilers, etc are powered from to circulate either commodity to specified outlets in every room. bathroom fixtures are attached and all rooms are brought to a rough finish making sure every fan, light, tap, drain works.
Project completion-o-meter:
0% 85% 100%
Pre-Construction
Mobilization Excavation Foundation Steel-Frame
Ext.Walls/Roof Int.Walls/Mech./HVAC Landscaping Finishes/Punch-List
Close-Out
Click on thumbnails for larger pictures - hit 'Back' on your browser to go back to page)
<< Back Landscaping - Next >>
Main Page Survey Picture Gallery Bartlett Center IQP Report

Landscaping Schedule Overview
ID Description Start Finish BDPK
3705 Test/Balance Building 3/1//06 3/1//06 99E
3708 "Exterior Finishes, Plantation & Grading"
1/11/06 4/19/06
3650 Landscaping & Brick Paving
4/18/06 5/18/06 02B
Main Page Survey Picture Gallery Bartlett Center IQP Report
Landscaping
Landscaping is an art of transforming the project's exterior surroundings to quite literally, a sight for sore eyes. This task refers to any activity that modifies the visible features of the project milieu and may range from living elements such as trees, to landforms, elevations and bodies of water, to structural enhancements that help blend the structure in with its surroundings eliminating construction messiness. In the Bartlett Center's case, landscaping was kept in mind while the structural exterior such as entrance stairs, side-walks and walk ways were poured, and the process slowly progressed as the project was fenced in for safety reasons, continuing through until the project was at the finishing stages.
Project completion-o-meter:
0% 90% 100%
Pre-Construction
Mobilization Excavation Foundation Steel-Frame
Ext.Walls/Roof Int.Walls/Mech./HVAC Landscaping Finishes/Punch-List
Close-Out
<< Back Finish/Punch-list - Next >>
Main Page Survey Picture Gallery Bartlett Center IQP Report

Finishes/Punch-list Overview
ID Description Start Finish BDPK
1110
Exc. Bsmt/Prep for Foundation Footings
3/15/05 3/21/05 02A
1090 Backfill/ Restore Grade
3/18/05 3/18/05 02A
Cure concrete 3/8/05 4/5/05 03A
1126 Prep for Balance of Footing
3/22/05 3/24/05 02A
1153
Partially damp-proof and insulate foundation
4/1/05 4/4/05 03B
Main Page Survey Picture Gallery Bartlett Center IQP Report
Finishes/Punch-list
This is the stage where the final inspection of construction work is conducted. The start of of closing out of the project begins near the end of a project, when the contactor requests a final inspection of the work. Before completion of the project, various equipment, electrical systems, and mechanical systems must be ready for testing and approval by the construction manager. A punch list is prepared listing all items that need to be completed or corrected. To develop this punch list, the field inspection personnel must carefully review their daily inspector's log to note all work items which have been entered that require corrective actions. The punch list is generally a list of tasks, or”to-do” items organized for the completion of a project. Acceptance of the work and final payment to the contractor must be done in accordance with the specification sin the contract documents. Substantial completion of a project is the date when the construction is sufficiently complete in accordance with the contract documents so that the project can be used for the purposes intended. 1
Project completion-o-meter:
0% 97% 100%
Pre-Construction
Mobilization
Excavation Foundation Steel-Frame Ext.Walls/Roof Int.Walls/Mech./HVAC Landscaping Finishes/Punch-List
Close-Out
<< Back Close-Out - Next >>
Main Page Survey Picture Gallery Bartlett Center IQP Report

Close-Out Schedule Overview
1 Oberlender, Project Management for Engineers and
Construction. 2000
Main Page Survey Picture Gallery Bartlett Center IQP Report
Close-Out
Construction management involves a number of steps that have to be processed before the project is finished. These steps include engineering study, final design, construction contractors, construction, and close-out, etc. Completing a project does not only comprise of the construction phase, there are other phases necessary to carry out a project. Contractually, construction management firms are required to perform paperwork and other type of administrative tasks before handing the project to the owner. That process is identified as close-out.
Furthermore, the close-out process for a construction project is the final stage before handing the project to the owner. The process includes the following items:
• Final Inspection (Certificate of Substantial Completion) • Punch List • Certificate of Occupancy • Guarantee/Warranty • Clean-up • Lien Releases
As-Build Drawings • Disposition of Project File • Call Backs • Disposition of Project File • Keys • Attic Stock • Owner’s Manual
The final inspection is completed when the CM requests the owner’s representative to visit the site in order to check the final work of the project. This is done after the project manager checks all the punch list items, which is a "to-do" list of items, still left after majority of work has been completed, and ensures that all the work has been completed. Upon the acceptance of work, a Certificate of Substantial Completion is issued by the CM and approved by the owner. The Certificate of Occupancy is issued after that by the state/city hall approving the building. At this point, the project can be used for its intended purposes and only minor items remain to be finished. The guarantee period is usually one year after completion of construction. The CM also submits guarantee/warranties for all equipment, machines and work done by subcontractors. The owner can request a lien release or a payment bond indicating that all subcontractors and laborers have been paid. A Lien is a hold on property for the benefit of someone whose work improves the property. 1 Another important part of close-out is the delivery of attic stock and keys from the subcontractors to the owners. This can be a lengthy process depending on the size of the project. Attic stock includes but is not limited to: gypsum boards, tiles, carpet, etc. The CM is also required to hand over record files and as-built drawings, prepared by all the subcontractors on the work they completed, to the owner at the end of the project. Close-out involves engineers, accountants, project managers, and the primary owner. It is a lengthy and important process in the construction management industry.
Close-out is often a time consuming process where nobody wants to take responsibility, thus, the CM must insure that there is a responsible party for each of the items involved in the close-out phase of the job. Good construction managers ensure that the close-out process starts as soon as project work commences, making sure that the subcontractors and all parties involved in the project close-out when they finish their work.
Project completion-o-meter:
0% 100%
Pre-
Construction
Mobilization Excavation Foundation Steel-
Frame
Ext.Walls/Ro
of
Int.Walls/Mech./HVAC Landscapin
g
Finishes/Pun
ch-List
Close-
Out
<< Back - Finishing/Punchlist Picture Gallery - Next >>
Main Page Survey Picture Gallery Bartlett Center IQP Report

Picture Gallery Options
Preconstruction Phases
Construction Schedule
Bartlett Center Schedule
Bartlett Center Schedule Files
Mobilization
Excavation
Foundation
Steel Frame
Exterior Walls & Roofing
Interior Walls, Mechanical & HVAC
Landscaping
Finishing/Punch-list
Close-out
Main Page Survey Picture Gallery Bartlett Center IQP Report
Picture Gallery
Construction entities hierarchy.
Relationship between Scope, Cost & Time
<< Back to Close-out Main Page >>
Main Page Survey Picture Gallery Bartlett Center IQP Report
Subcontractors
Owner
Construction
Manager
Architect/
Engineer

Summary Page on Bartlett Center Schedule page
Excavation Schedule Overview
Videos: Excavation Foundation Steel Frame Ext. Wall (Har) Ext. Wall (Hig) Int. Wall
Landscaping
Click here to Go Back (Close Window)
CSI List
CSI Division Number:
1, 2, 3, 4, 5, 6, 7, 8, 9, 10, 11, 12, 13, 14, 15, 16
Division 01 — General Requirements
01410 - Testing Laboratories
01420 - Inspection Services

101
Appendix I – New Simplified Gantt chart Schedule (Publisher)

ID Task Name
1 Start Project 2/23/052 Mobilization 2/23/05 - 3/24/053 Erect Fence/Prep Site/Erosion Control - 024 Form/Place/Strip Balance of Footings - 03A5 Deliver Anchors Bolts/Embeds - 05A6 Prep for Balance of Footing - 02A7 Excavation 3/18/05 - 5/12/058 Backfill/Restore Grade - 02A9 Excavate for Foundation10 Form/Place/Strip Basement Wall - 03A11 Backfill Int. Fnd. Walls & U/G Duct - 02A12 Prep Drs/Frames/Hardware Bid Pks13 Foundation 2/23/05 - 4/5/0514 Exc. Bsmt/Prep for Foundation Footings - 15 Backfill/ Restore Grade - 02A16 Cure concrete17 Prep for Balance of Footing - 02A18 Partially damp-proof and insulate foundatio19 Steel Frame 4/4/05 - 6/13/0520 Fabricate Steel21 Steel Delivery22 Erect Basement Steel 23 Erect First Floor Steel24 Erect Second Floor Steel25 Erect Attick Steel26 Erect Roof Steel27 Exterior Walls & Roofing 6/14/05 - 10/12/0528 Install Roof Decking29 Install Precast/ Supports30 Fab & Del Exterior Studs/Dens31 Install First Floor Deck/Studs32 Exterior Works33 Install Second Floor DeckStuds34 Install First & Second Floor Brick - East/No35 Install Shingles36 Interior Walls, Mechanical & HVAC 8/21/05 -37 Install stairs & Areaway Gates38 Insulate Duct/Piping39 Electrical, Plumbing, Telecommunications,40 Install Wood Paneling41 Install Elevetors42 Install & Complete Flooring43 Paint - Prime 44 Furnishing/Finishes 1/27/06 - 3/7/0645 Mechanical Finishes46 Fab & Del Aud Seating47 Paint - Finish48 Install Stair Rails49 R.I. Lights West & East Entrance50 Install Signage in Building51 Substantial C of O52 Landscaping 1/3/06 - 5/18/0653 Test/Balance Building54 Exterior Finishes, Plantation & Grading55 Landscaping & Brick Paving56 Punch-List 2/22/06 - 4/14/0657 Punch-List First Floor58 Punch-List Second Floor59 Close-Out 3/13/06 - 6/1/0660 Final Cleaning61 Commissioning Building62 Flush Building63 Owner Furniture64 WPI Move-in65 WPI Occupy Building66 Building Dedication67 End Project 6/1/06
Start Project 2/23/05Mobilization 2/23/05 - 3/24/05
Erect Fence/Prep Site/Erosion Control - 02AForm/Place/Strip Balance of Footings - 03A
Deliver Anchors Bolts/Embeds - 05APrep for Balance of Footing - 02A
Excavation 3/18/05 - 5/12/05Backfill/Restore Grade - 02A
Excavate for FoundationForm/Place/Strip Basement Wall - 03A
Backfill Int. Fnd. Walls & U/G Duct - 02APrep Drs/Frames/Hardware Bid Pks
Foundation 2/23/05 - 4/5/05Exc. Bsmt/Prep for Foundation Footings - 02A
Backfill/ Restore Grade - 02ACure concrete
Prep for Balance of Footing - 02APartially damp-proof and insulate foundation
Steel Frame 4/4/05 - 6/13/05Fabricate SteelSteel Delivery
Erect Basement Steel Erect First Floor SteelErect Second Floor Steel
Erect Attick SteelErect Roof Steel
Exterior Walls & Roofing 6/14/05 - 10/12/05Install Roof Decking
Install Precast/ SupportsFab & Del Exterior Studs/Dens
Install First Floor Deck/StudsExterior Works
Install Second Floor DeckStudsInstall First & Second Floor Brick - East/North/West/South Respectively
Install ShinglesInterior Walls, Mechanical & HVAC 8/21/05 - 2/24/06
Install stairs & Areaway GatesInsulate Duct/Piping
Electrical, Plumbing, Telecommunications, Fire Alarms, etc Install (Rough & Finish)Install Wood Paneling
Install ElevetorsInstall & Complete Flooring
Paint - Prime Furnishing/Finishes 1/27/06 - 3/7/06
Mechanical FinishesFab & Del Aud Seating
Paint - FinishInstall Stair Rails
R.I. Lights West & East EntranceInstall Signage in Building
Substantial C of OLandscaping 1/3/06 - 5/18/06
Test/Balance BuildingExterior Finishes, Plantation & Grading
Landscaping & Brick PavingPunch-List 2/22/06 - 4/14/06
Punch-List First FloorPunch-List Second Floor
Close-Out 3/13/06 - 6/1/06Final CleaningCommissioning Building
Flush BuildingOwner Furniture
WPI Move-inWPI Occupy BuildingBuilding DedicationEnd Project 6/1/06
5 March 2005 April 2005 May 2005 June 2005 July 2005 August 2005 September 2005 October 2005 November 2005 December 2005 January 2006 February 2006 March 2006 April 2006 May 2006 June 2006 July 2006
Task
Split
Progress
Milestone
Summary
Project Summary
External Tasks
External MileTask
Split
Page 1
Project: Project_Initial_TimelineDate: Sat 10/6/07

103
Appendix J – Bourque – Morais Website Template

The Bartlett Center: From Start to Finish
Excavation Foundation Steel Frame
Exterior (Wall) Windows & Doors
Roofing (Owner) Site Work
CBT (Construction Manager) (Architect) Additional PicturesInterior Pictures Survey: http://www.surveymonkey.com/s.asp?u=838053255728
Page 1 of 2Blank
2/24/2008http://users.wpi.edu/~bourquer/Publication3.htm
PDF Creator: PDF4U Pro DEMO Version. If you want to remove this line, please purchase the full version

STEEL FRAME The Steel Frame can be an exciting stage because it the first step in construction where progress can be seen above ground. The Bartlett
Center, as many buildings like its size, are framed with steel columns and beams. These columns and beams are designed before theprocurement stages begin. The thickness of these columns and beams are determined by the stresses they will carry. Not only is thefabrication of the steel frame important to the structural stability of the building but the connections used to tie these columns and beamstogether play just as big of a role. Although exciting, framework is costly and dangerous. When framework is being placed in a multiplestory building, there is scaffolding needed to hold up the workers and the steel frame, the higher the story is, the expensive it becomes. As
the cost goes up with height so does the danger. Video Clip: Steel Frame
3/23/05-5/12/05 EXCAVATION3/30/05-5/3/05 FOUNDATION5/31/05-6/14/05 STEEL FRAME6/11/05-7/11/05 ROUGH ROOFING
7/11/05-9/12/05 EXTERIOR (WALLS)9/3/05-10/6/05 FINISH ROOFING10/28/05-11/20/05 WINDOWS & DOORS3/23/05-8/3/06 SITEWORK ————————————–—————————————— SITEWORK
Excavation Foundation
Steel Frame Exterior (Wall)
Windows & Doors Roofing
Site Work
Page 1 of 2Blank
2/24/2008http://users.wpi.edu/~bourquer/Publication6.htm
PDF Creator: PDF4U Pro DEMO Version. If you want to remove this line, please purchase the full version