visual merchandising - svdp usa standards manual _final_04.20.17.pdfvisual merchandising is the key...
TRANSCRIPT

VISUALMERCHANDISINGSTANDARDS MANUAL
Table of ContentsWHAT IS VISUAL MERCHANDISING? 4STORE OVERVIEW 6 1) STORE LAYOUT & FLOW ADJACENCIES 7VISUAL MERCHANDISING BASICS 8 1) VERTICAL MERCHANDISING 9 2) HORIZONTAL MERCHANDISING 10 3) PYRAMIDING 11 4) COLORIZATION 12 5) SIZING 13 6) REPETITION 14 7) NEGATIVE SPACE 15 8) STACKING 16CATEGORY MERCHANDISING 17 1) WOMENS 19 2) MENS 20 3) KIDS 21 4) ACCESSORIES 22 5) SHOES 23 6) HOME 24 7) ELECTRONICS 25 8) TOYS 25VISUAL ELEMENTS 26 1) MANNEQUINS / FORMS 27 2) PROPS 28

Table of Contents Table of ContentsSIGNAGE ELEMENTS 29 1) CATEGORY SIGNS 30 2) PRICE POINT SIGNS 30STYLING 31 1) STYLING MANNEQUINS 32 3) STYLING ACCESSORY FORMS 32 4) STYLING WINDOWS 33VISUAL MAINTENANCE 34 1) HANGING APPAREL 35 2) TAGGING PRODUCT 36 3) FITTING ROOMS 36 4) LIGHTING 37 5) HOUSEKEEPING 37BOUTIQUE CONCEPTS 38

What is Visual Merchandising?What does Visual Merchandising actually do?

“Visual” - Highlighting important or seasonal merchandise.
“Merchandising” - Organizing the merchandise.
5
It’s your job to ensure that all St. Vincent De Paul stores are set up and merchandised to create the best possible thrift store experience for our customers. To help you define this
goal, we have created this Visual Merchandising StandardsManual to train you on the St. Vincent De Paul standards.
Visual Merchandising is the key to ensuring that the products in our stores are set up, so that it’s easy to shop and understand the assortment of merchandise that we are selling. It’s goal is to also
highlight and feature special products, seasonal items & categories.
Keep in mind that successful merchandising makes shopping easier for the customers. It helps to raise
the quality perception of thrift store products, inspires customers on how to use and mix different products, and
most importantly, ensures that the St. Vincent De Paul shopping experience exceeds our competitors. „
„

Store Overview

Store Layout & Flow Adjacencies
7
Creating the store floorplan and layout is the first step for any retail space. The store floorplan includes merchandise placement, layout and helps to define the
overall look and feel. It is important to arrange the store departments, aisles and display fixtures with traffic flow in mind.
Within the floorplan, departments are separated accordingly. For example, the women’s department should include all female apparel and accessories. Women’s apparel
includes tops, bottoms, dresses, coats, etc. The items should complement each other within the department. Aside from the core departments, it is important to utilize open
spaces for traffic flow, giving a clear separation between departments. This space is ideal for seasonal and trend displays, as well as feature items.
TOPS
GIRLS
BOYS
PANTS / SKIRTS
CASH WRAP
ENTRANCE
WO
MEN
S A
CC.
HO
USE
WA
RES
MEN
S A
CC.
WOMENSHOME +FURNITURE
MENS
KIDS TOYS BOOKSELECTRONICS
SEASONALAPPAREL
PANTS / SKIRTS
PANTS / SKIRTS HOUSEWARES
HOUSEWARESTOPS
TOPS TOPS DISPLAY DISPLAY
DISPLAY
DISPLAYTOPS
PAN
TS GIRLS
BOYS
SHO
ES
PAN
TS 5+ YEA
RS
0-5 Y
EAR
S
ELEC.
BO
OK
S
PAN
TS
SEASONALHARDLINES
WINDOWS WINDOWS
DISPLAY
Legend
seasonal display
seasonal products DISPLAY
Visual Merchandising Basics

9
Example of Vertical Merchandising
Vertical MerchandisingVERTICAL
MERCHANDISING IS...organizing in a vertical row, while
separating merchandise by style, color, product and shape.
IMPLEMENTATION Step 1: Place focal merchandise at eye level, or 5‘4“.
Step 2: Work from top to bottom, not side to side.
Step 3: Fill the wall accordingly. Larger items can be heavy, so, keep them towards the bottom.
Step 4: Repetition is key for giving an overall feeling of fullness and organization.
RESULTS• Vertical merchandising will force the
customer’s eyes upward.
• This type of merchandising makes it easy to restock items as needed.
TIP: Place hooks, brackets and shelves to fill the wall and create balance.
Fill the wall with your product presentation.
„„

10
IMPLEMENTATION Step 1: Place focal merchandise at eye
level, or 5’4”. Step 2: Work from side to side, not top to bottom.
Step 3: Merchandise the display by color, shape, or item.
Step 4: Repetition is key for giving an overall feeling of fullness and organization.
organizing merchandise in ahorizontal direction, which is ideal
for larger amounts of items.
HORIZONTAL MERCHANDISING IS...
RESULTS• Horizontal merchandising will grab
the customers’ attention, encouraging them to shop the entire display.
• This form of merchandising makes it easy to replenish and restock as
needed.
Example of Horizontal Merchandising
Horizontal Merchandising
TIP: Place hooks and brackets at the same level for strong horizontal statements.
„„
10
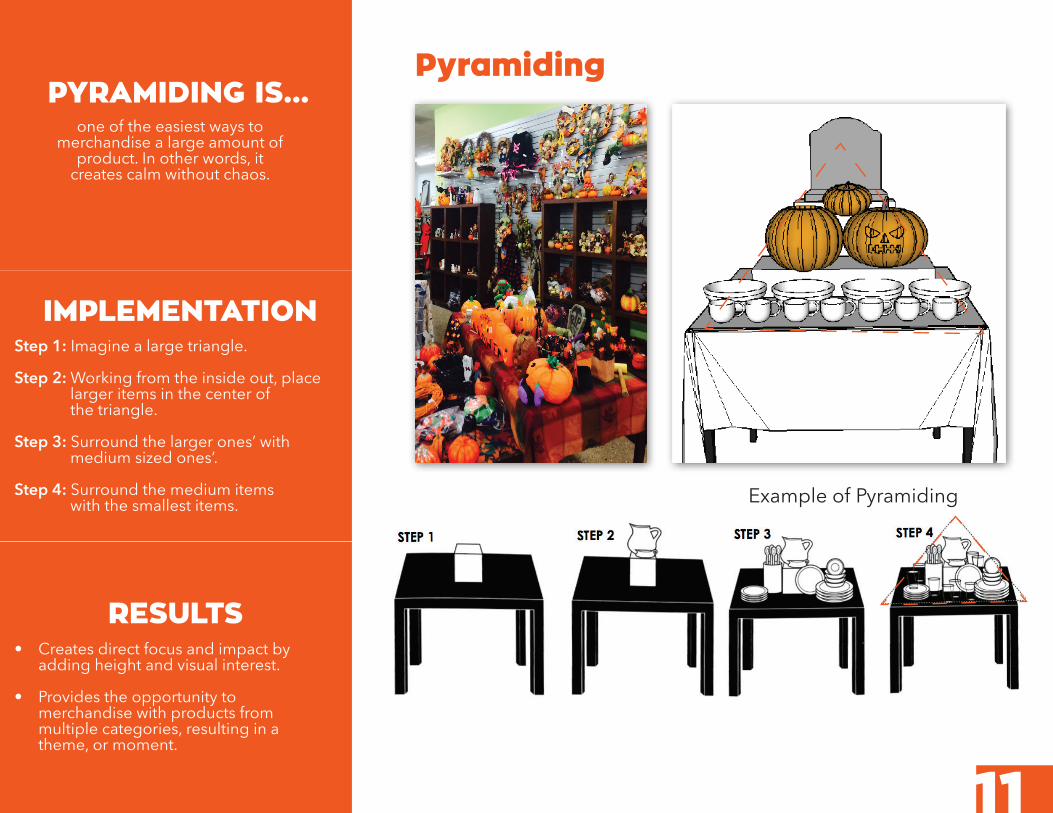
Example of Pyramiding
PYRAMIDING IS... one of the easiest ways to
merchandise a large amount ofproduct. In other words, it
creates calm without chaos.
IMPLEMENTATION Step 1: Imagine a large triangle.
Step 2: Working from the inside out, place larger items in the center of
the triangle.
Step 3: Surround the larger ones’ with medium sized ones’.
Step 4: Surround the medium items with the smallest items.
RESULTS• Creates direct focus and impact by
adding height and visual interest.
• Provides the opportunity to merchandise with products from multiple categories, resulting in a theme, or moment.
Pyramiding
11

Complementary colors are colors that are opposite of each other on the wheel, and can be
used to create a strong visual impact.
Adjacent colors are those that are next to each other on the color wheel and can be used to
create a calm, or harmonious feeling.
Apparel is often merchandising by color. The colorization of these items makes it easy
for customers to find their color of choice and it creates visual impact in our stores.
Colorization can follow a specific flow or color organization as determined by your store.
Traditionally retailers use a flow of bright colors to neutral colors to dark colors.
Colorization
12Example of Complementary ColorizationExample of Colorization flow with Apparel

12
SIZING IS... merchandising a collection of
items by size.
IMPLEMENTATION Step 1: Sort product by category (shirts, pants, dresses, etc.).
Step 2: Sort the category by size (small, medium, large, extra-large).
Step 3: Work from left to right, starting with the smallest size, and ending with the largest.
Step 4: For an added effect, utilize colorization on the fixture.
RESULTS• Correct sizing will help the customer find
the size they are looking for quickly.
• Provides an easy process of restocking for store associates.
Example of Sizing
Sizing
Small Medium Large XL
13
TIP: Some locations use size rings on the rack to help organize by size within a category. „„

REPETITION IS... showing the customer a varying selection
of merchandise which helps to create a cohesiveness throughout the store.
IMPLEMENTATION Step 1: Use this technique to blend multiple items from different
departments together.
Step 2: Arrange the items accordingly, either by colorization, vertical or horizontal methods.
Step 3: Repeat the design as needed to
fill the entire area.
RESULTS• A selection of similar items will
influence the customer to browse the entire display.
• Successful use of repetition will give the customer a sense of calmness and organization.
Repetition
14

14
NEGATIVE SPACE IS... leaving intentional space within displays, producing a sense of
organization and openness.
IMPLEMENTATION Step 1: When starting a new display, keep negative space in mind, leaving
parts of it without product.
Step 2: If merchandising on shelves, keep each shelf at least two feet
apart, vertically. This will allow for negative space.
Step 3: If the finished display is too full, remove some merchandise.
RESULTS• A display with the correct amount of
negative space will give the customer a better idea of available merchandise.
• Helps to provide a cohesive store feeling and presence.
Example of Negative Space
Negative Space
15
TIP: Thrift stores can appear too cluttered for some guests. Organizing products helps create
a better shopping experience for everyone.„„
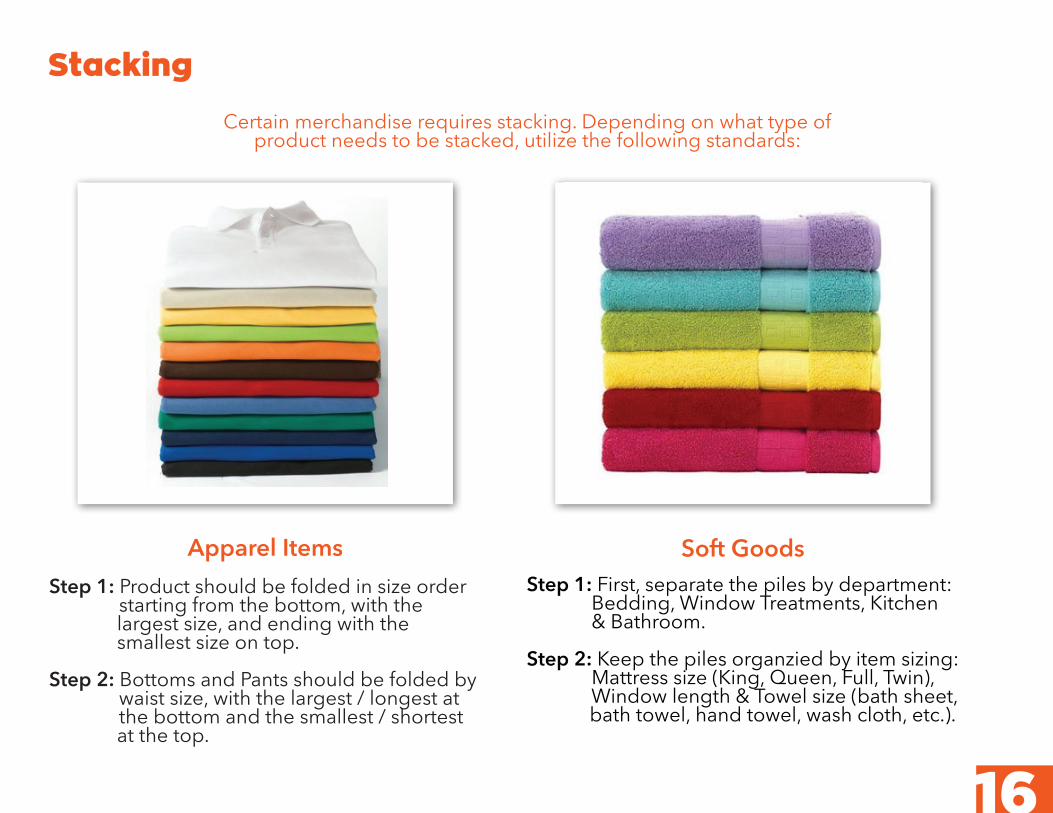
Stacking
Apparel ItemsStep 1: Product should be folded in size order starting from the bottom, with the largest size, and ending with the smallest size on top.
Step 2: Bottoms and Pants should be folded by waist size, with the largest / longest at the bottom and the smallest / shortest at the top.
16
Certain merchandise requires stacking. Depending on what type of product needs to be stacked, utilize the following standards:
Soft Goods Step 1: First, separate the piles by department: Bedding, Window Treatments, Kitchen & Bathroom.
Step 2: Keep the piles organzied by item sizing: Mattress size (King, Queen, Full, Twin), Window length & Towel size (bath sheet, bath towel, hand towel, wash cloth, etc.).
16
Category Merchandising
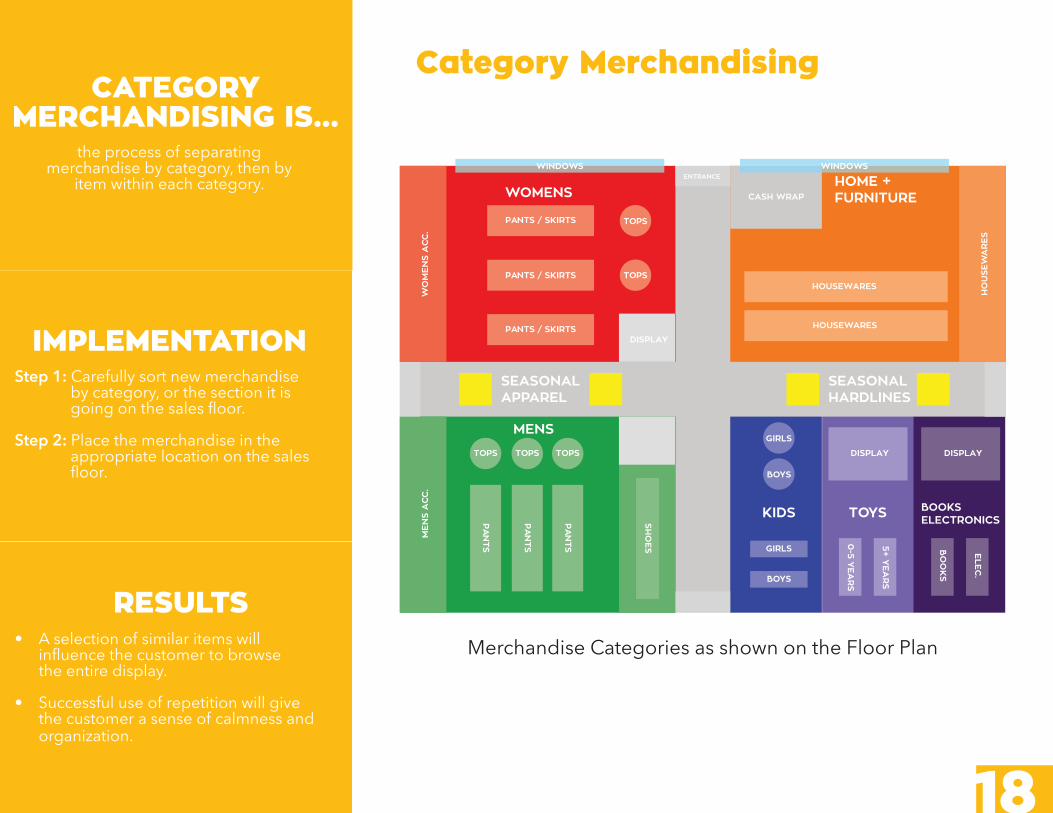
CATEGORY MERCHANDISING IS...
the process of separating merchandise by category, then by
item within each category.
IMPLEMENTATION Step 1: Carefully sort new merchandise by category, or the section it is
going on the sales floor.Step 2: Place the merchandise in the appropriate location on the sales floor.
RESULTS• A selection of similar items will
influence the customer to browse the entire display.
• Successful use of repetition will give the customer a sense of calmness and organization.
TOPS
GIRLS
BOYS
PANTS / SKIRTS
CASH WRAP
ENTRANCE
WO
MEN
S A
CC.
HO
USE
WA
RES
MEN
S A
CC.
WOMENSHOME +FURNITURE
MENS
KIDS TOYS BOOKSELECTRONICS
SEASONALAPPAREL
PANTS / SKIRTS
PANTS / SKIRTS HOUSEWARES
HOUSEWARESTOPS
TOPS TOPS DISPLAY DISPLAY
DISPLAY
DISPLAYTOPS
PAN
TS GIRLS
BOYS
SHO
ES
PAN
TS 5+ YEA
RS
0-5 Y
EAR
S
ELEC.
BO
OK
S
PAN
TS
SEASONALHARDLINES
WINDOWS WINDOWS
DISPLAY
Merchandise Categories as shown on the Floor Plan
Category Merchandising
18

Womens
Dresses TopsLong Sleeve PantsDresses Suits Coat
Jackets
Intimates
Vests Shorts
Socks
Bras
Short Sleeve Skirts
Tank
Bottoms Suits UndergarmentsCoats/Jackets
19

Mens
SuitsTopsLong Sleeve Pants Suits Coat Intimates
Vests Shorts
Socks
Short Sleeve
Tank
Bottoms UndergarmentsCoats/Jackets
Jackets
20
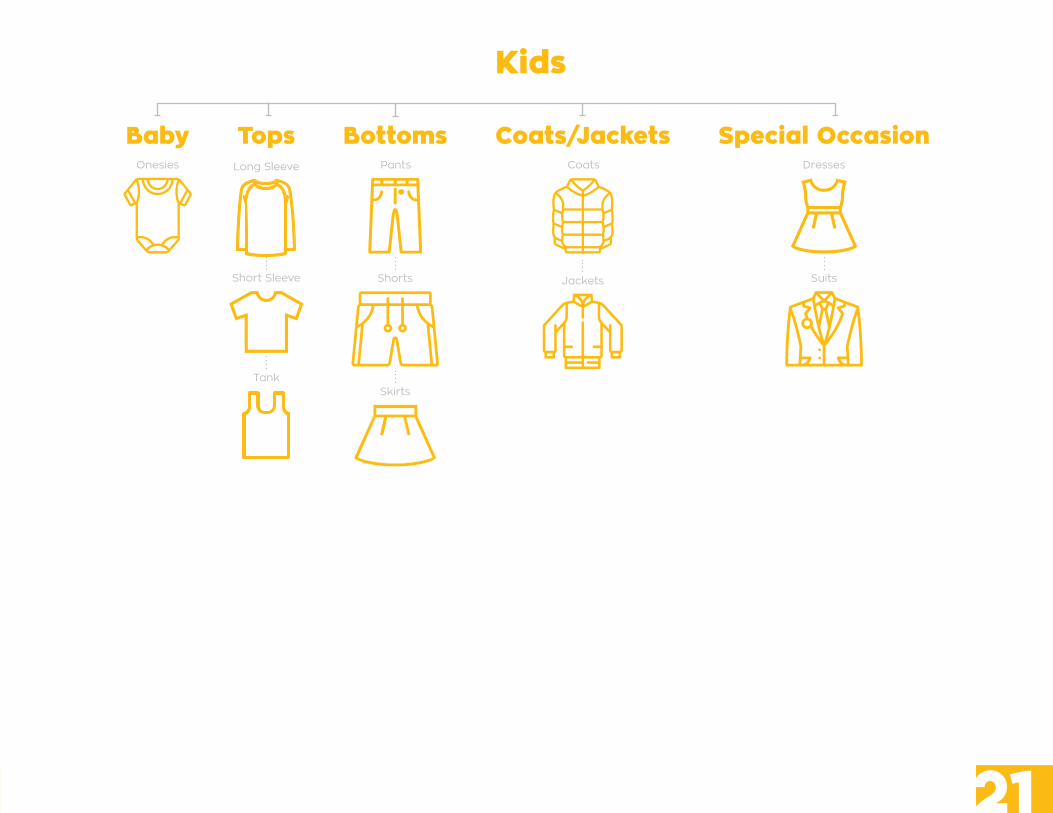
Kids
Baby TopsPantsOnesies Coats
Shorts SuitsShort Sleeve
Tank
Bottoms Special OccasionCoats/Jackets
Skirts
Dresses
Jackets
Long Sleeve
2120

Accessories
Mens WomensNecklacesBelts Belts Suitcases
Rings
Bracelets
Wallets Wallets
Scarves / Gloves Scarves / Gloves
Hats Hats
Ties Handbags
Jewelry Travel
Earrings
22
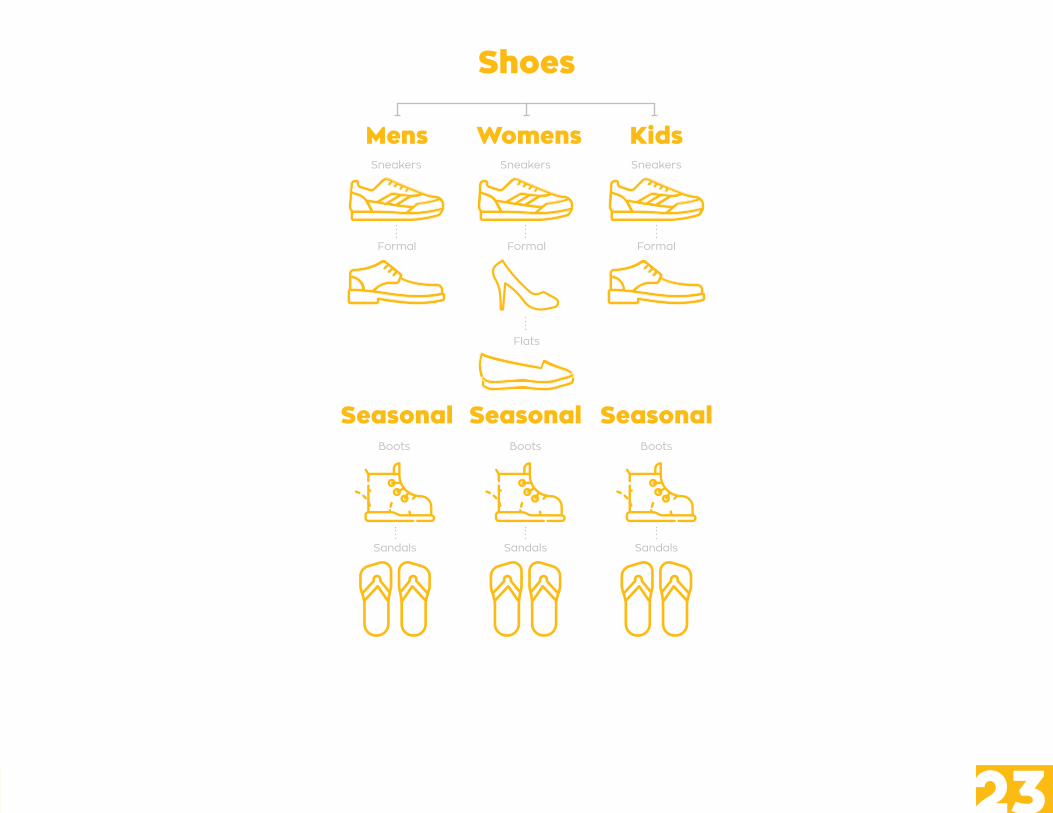
Shoes
Mens
Seasonal SeasonalSeasonal
WomensSneakers SneakersSneakers
Sandals SandalsSandals
Boots BootsBoots
FormalFormal Formal
Kids
Flats
2322
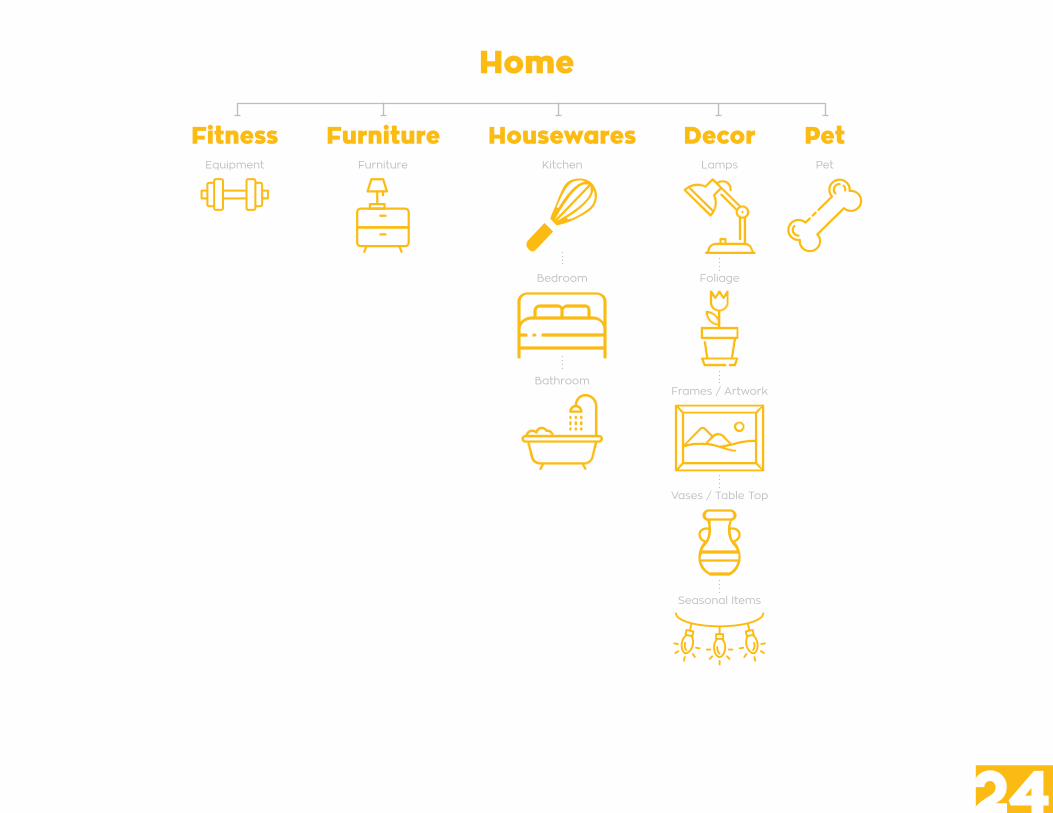
Home
Fitness FurnitureFurniture KitchenEquipment Lamps
Bedroom Foliage
Housewares PetDecor
BathroomFrames / Artwork
Vases / Table Top
Seasonal Items
Pet
24
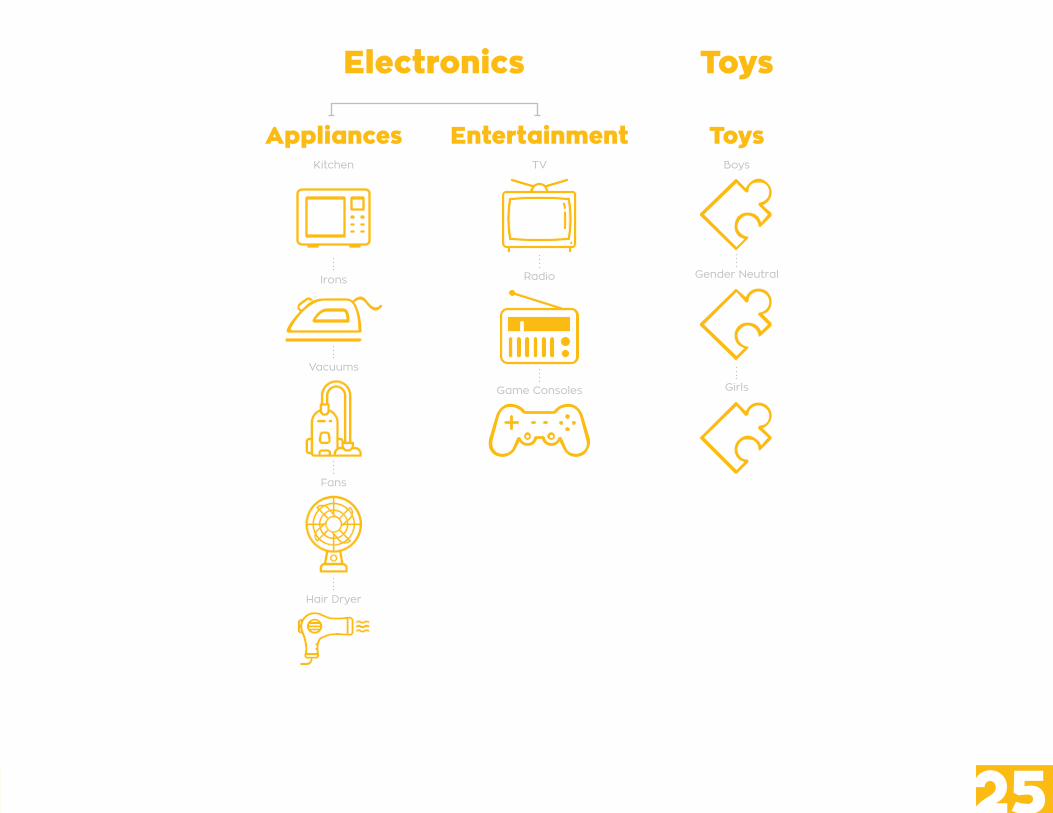
Boys
Gender Neutral
Toys
Girls
Electronics Toys
Appliances EntertainmentTV
Vacuums
Fans
Hair Dryer
Irons Radio
Game Consoles
Kitchen
2524

Visual Elements

Mannequins are a great way to showcase specific looks and trends through clothing and accessories. They also add visual interest to their display area.
27
Mannequins / Forms
How to dress a full-length mannequin: How to dress a hanger mannequin:
1. Hang mannequin in a secure location.
2. Dress the form with the appropriate size and article of clothing.
3. Mannequins that are just a torso, will be dressed only with tops. If it is a full-length mannequin, it will require a complete outfit.
1. If the mannequin has several pieces, start by separating the legs, torso and arms.
2. Dress the bottom half first. This is easiest by turning the legs upside down.
3. Next, dress the top half. If the mannequin has arms that are removable, slip them through the item of clothing and then re-attach to the torso. During this step, it helps to have the article of clothing around the neck.
4. Re-attach the torso to the legs.
5. Carefully inspect that all moving parts are securely attached.
6. Style and inspect for flaws and visible tags.
7. Gently place the mannequin at the intended location.
Step
Step
Step
Step
Step
Step
Step

28
Foam Head Neck Form Acrylic Risers Easel
Props are an excellent tool for creating visual appeal. When creating a new display, select props that add depth and perspective. Prop usage will enhance visual appeal throughout
the store. Commonly used props are shown below.
Props / Accessory Forms

28
Signage Elements
30
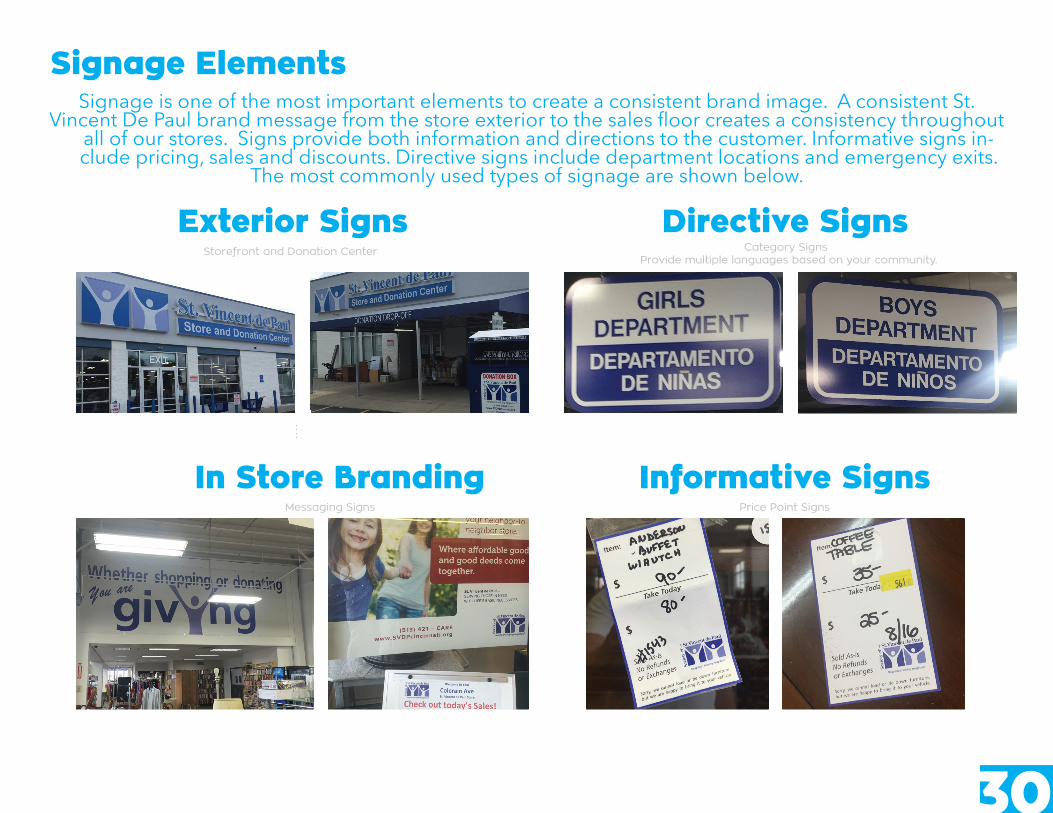
Signage ElementsSignage is one of the most important elements to create a consistent brand image. A consistent St.
Vincent De Paul brand message from the store exterior to the sales floor creates a consistency throughout all of our stores. Signs provide both information and directions to the customer. Informative signs in-clude pricing, sales and discounts. Directive signs include department locations and emergency exits.
The most commonly used types of signage are shown below.
Category SignsProvide multiple languages based on your community.
Price Point SignsMessaging Signs
Storefront and Donation Center
Exterior Signs Directive Signs
Informative Signs In Store Branding

30
Styling
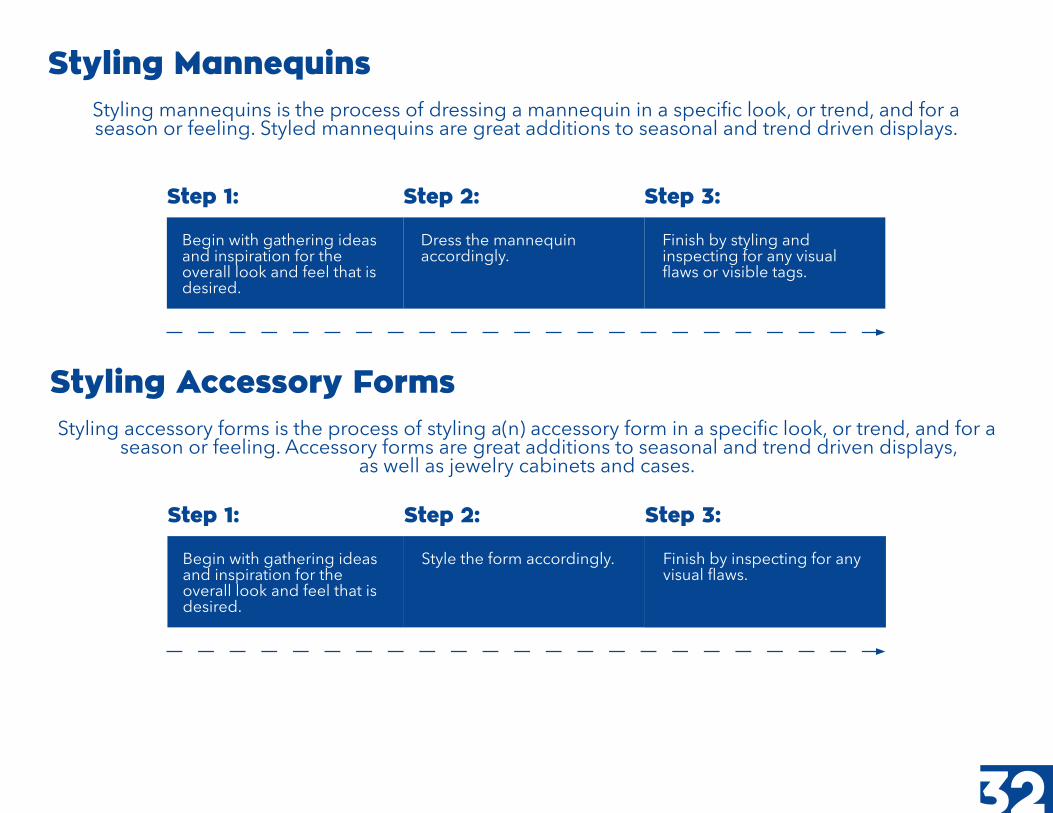
Styling MannequinsStyling mannequins is the process of dressing a mannequin in a specific look, or trend, and for a season or feeling. Styled mannequins are great additions to seasonal and trend driven displays.
Step 1: Step 2: Step 3:
Dress the mannequin accordingly.
Begin with gathering ideas and inspiration for the overall look and feel that is desired.
Finish by styling and inspecting for any visual flaws or visible tags.
Styling Accessory FormsStyling accessory forms is the process of styling a(n) accessory form in a specific look, or trend, and for a
season or feeling. Accessory forms are great additions to seasonal and trend driven displays, as well as jewelry cabinets and cases.
Step 1: Step 2: Step 3:
Begin with gathering ideas and inspiration for the overall look and feel that is desired.
Style the form accordingly. Finish by inspecting for any visual flaws.
32

32 33
Store windows are a crucial aspect of Visual Merchandising. It is important to keep them updated, clean and understandable. The windows will influence potential customers
to enter the store, while also creating a brand identity for SVDP.
Step 1: Step 2: Step 3: Step 4:
Styling Windows
Develop a theme or purpose.
The first step is one of the most important when designing your window. Customers today can be easily distracted, so a standout window display can make the difference between people rushing past the store, or coming in to shop. Consider the following: What is the inspiration for the window? Are there any upcoming holidays?
Choose products that will garner interest and complement each other.
Correctly utilize the size of the window.
Determine where eye level is on the window, as well as window depth and height. Using these measurements, create a map of your window. With your window now mapped out, it will be easier to stage and place the merchandise in the correct spots.
Consider the following:Will the window fit the necessary products chosen to convey the theme?
Focus on stand-out pieces that would intrigue customers, while also cross merchandising.
Begin to set the space.
You’re now ready to begin setting your window! Start by placing focal items first. Next, add any large props, or visual aids that require extra effort or attention. After these items and props are placed, it will be easier to work other merchandise into the space.
Consider the following: Group items together that will lead the eye throughout the display, but avoid overcrowding it. Create a dynamic look—odd-numbered groupings create more visual interest than items arranged symmetrically.
Stay true to the decided theme, which will reduce the chances of confusing the customer.
Window maintenence.
Now that the window display is set, start adding any finishing touches. This is the time to make sure all items and props are correctly placed and secure.
Consider the following: Ensure that any lighting is functioning properly and pointed in the correct direction. Make sure your window(s) is/are clean. A dirty window could deter customers from entering.
Are there any visible flaws, like tags, dents or rips in the merchandise?

Visual Maintenance
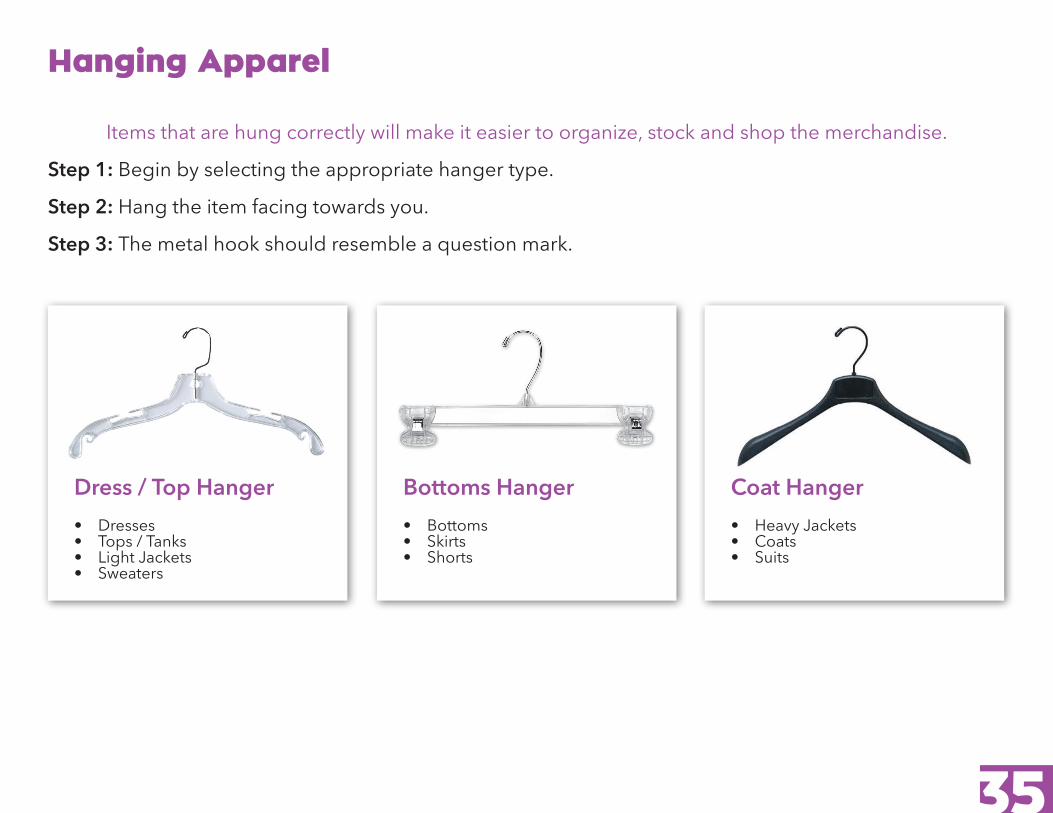
Items that are hung correctly will make it easier to organize, stock and shop the merchandise.
Step 1: Begin by selecting the appropriate hanger type.
Step 2: Hang the item facing towards you.
Step 3: The metal hook should resemble a question mark.
Hanging Apparel
Dress / Top Hanger• Dresses• Tops / Tanks• Light Jackets• Sweaters
Bottoms Hanger• Bottoms• Skirts• Shorts
Coat Hanger• Heavy Jackets• Coats• Suits
35
Tagging Product Fitting Rooms
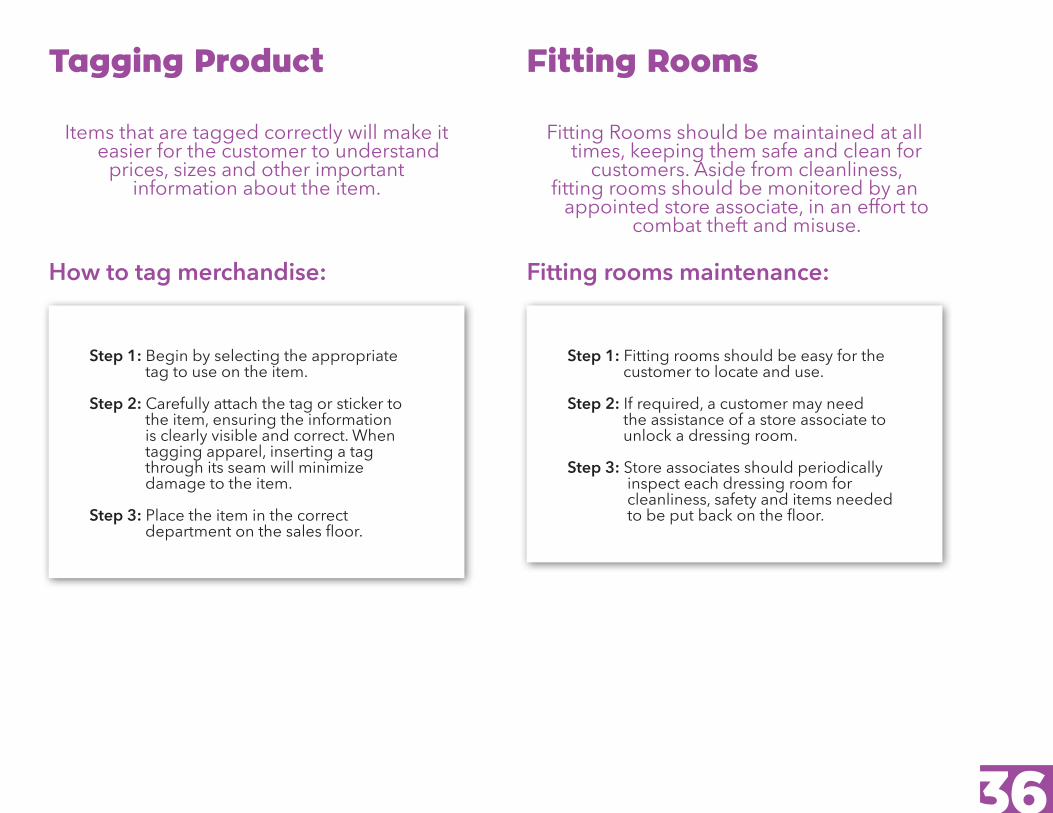
Items that are tagged correctly will make it easier for the customer to understand
prices, sizes and other important information about the item.
Fitting Rooms should be maintained at all times, keeping them safe and clean for
customers. Aside from cleanliness, fitting rooms should be monitored by an
appointed store associate, in an effort to combat theft and misuse.
How to tag merchandise: Fitting rooms maintenance:
Step 1: Begin by selecting the appropriate tag to use on the item. Step 2: Carefully attach the tag or sticker to the item, ensuring the information is clearly visible and correct. When
tagging apparel, inserting a tag through its seam will minimize
damage to the item.
Step 3: Place the item in the correct department on the sales floor.
Step 1: Fitting rooms should be easy for the customer to locate and use.
Step 2: If required, a customer may need the assistance of a store associate to unlock a dressing room.
Step 3: Store associates should periodically inspect each dressing room for cleanliness, safety and items needed
to be put back on the floor.
36

36
Lighting Housekeeping
Lighting can help create a mood for a display,especially within a window. The sales
floor, including areas like fitting rooms, cashwrap and heavy traffic spots should be
well lit, keeping it safe for both store associates and customers.
Having a dirty sales floor will deter customers from shopping. Routine cleaning
of infrequently used locations, like windows and shelving is also important.t.
Lighting maintenance: Housekeeping maintenance:
Step 1: When working on a new display, try to incorporate lighting elements.
Step 2: Aim lights toward the product in order to highlight.
Step 3: Monitor the lighting systems daily, checking for bulbs that may need to be replaced.
Step 1: The management team should create a daily or weekly store maintenence chart, or check list.
Step 2: Scheduled cleaning days will ensure that the sales floor and other areas are kept clean and tidy.
37

St. Vincent De Paul Thrift Boutique Concept
The St. Vincent De Paul Thrift Boutique Store concept is a unique type of store concept, which is slightly different from our
standard St. Vincent De Paul thrift stores.
• The merchandising techniques presented in this manual still apply Thrift Boutique concepts.
• Thrift Boutique concepts use key merchandising techniques like cross merchandising and story telling to create a unique boutique
shopping experience for their customers.
• Thrift Boutique concepts are often branded under special names and have their own identity and merchandising philosophy.
• All Thrift Boutique concepts must prominently display an official Society of ST. VINCENT de PAUL logo.
„„
39
A ST. VINCENT DE PAUL BOUTIQUE CONCEPT
A ST. VINCENT DE PAUL BOUTIQUE CONCEPT

What Makes a St. Vincent De Paul Boutique Thrift Concept?Our boutique thrift stores have an individual, and often curated point of view. Boutiques are one-of-a-kind
shops, which provide an assortment and selection that fits into the vision of the boutique owner. Boutique stores often feature their own personality through store signage, department signage,
artwork and murals to create a special experience.
Boutique merchandising is a technique which combines different product categories to tell a story, or theme. Boutique merchandising has a clear point-of-view, in which the store owner and employees
have a talent and vision for storytelling with the product, fixtures, props and signage. Boutique merchandising still uses techniques like vertical and horizontal merchandising, as well as pyramiding,
but the way the products are combined to tell a story is what makes it special.
Boutique stores often create presentations that speak to a particular lifestyle or fashion trend. A lifestyle presentation often combines a visual display with a product statement
to attract and entice a specific customer. Examples of a lifestyle product story:
A Gardeners Lifestyle Story, A Beach Lifestyle Story, Hipster Lifestyle Story, A Midcentury Modern Lifestyle Story & A Contemporary Lifestyle Story.
Cross Merchandising is a technique often used in boutique statements. Cross Merchandising begins with identifying a top selling item and merchandising it with two, or more products, that can be
used with the top selling item. This encourages add-on and impulse sales.
Boutique Merchandising
Lifestyle
Cross Merchandising
40
VintageOur Boutique concepts by St Vincent De Paul are often a unique cross between a vintage store and a
thrift store, or they have created a vintage or boutique shop in shop department within the store.
• Vintage products are often representative of a specific era from the past. • A vintage item is at least 20 years old, and can date back to the 1920’s.
• Items which pre-date 1920 are considered antiques.
• Vintage items fall between 20-100 years old and fit a specific fashion or design era. • Vintage stores often have a curated assortment of products which is verified for it’s authenticity as a vintage item, as compared to a used, or second hand item.
• Vintage items often hold a higher value and can also be considered collectibles.
41
„ „Excellent visual merchandising standards elevates the perceived value of the vintage
products you sell in your store.