visual basic program: basic math functions - world class … 3b basic... · 3-2 writing math...
TRANSCRIPT

3-1
C h a p t e r 3B Addendum
Visual Basic Program: Basic Math Functions
In this chapter, you will learn how to use the following Visual Basic Application functions to World Class standards:
Opening Visual Basic Editor Beginning a New Visual Basic Project Laying Out a User Input Form in Visual Basic Insert a Label into a Form Insert a Textbox into a Form Insert a Label into a Form to Post an Output Insert Command Buttons into a Form Adding a Copyright Statement to a Form Insert a Picture into a Form Adding Comments in Visual Basic to Communicate the Copyright Declaring Variables in a Program with the Dimension Statement Setting Variables in a Program Adding Numbers in Visual Basic Subtracting Numbers in Visual Basic Multiplying Numbers in Visual Basic Dividing Numbers in Visual Basic Finding Remainders in Visual Basic Computing Absolute Values in Visual Basic Fixing Numbers in Visual Basic Rounding Numbers in Visual Basic Computing Exponents in Visual Basic Computing Square Roots in Visual Basic Computing Sine’s in Visual Basic Computing Cosines in Visual Basic Resetting the Data Exiting the Program Running the Program

3-2
Writing Math Equations in Visual Basic _________________________________________________________ There are many arithmetic and geometric functions that we can utilize in programming in Visual Basic. Some arithmetic functions include adding, subtracting, multiplying and dividing, which are obvious for everyday work. The absolute value, exponent and square roots are for more serious technicians. Even greater code writers that are computing angles are using sine and cosine. These functions are easy to learn and there are examples in each section to practice every function in this chapter. Figure 3B.1 shows a layout of the form we want to create to see how math functions operate in Visual Basic.
Figure 3B.1 – A Sketch of Arithmetic Functions
Open the Visual Basic Editor _________________________________________________________ In this lesson, we will step through each procedure in adding labels, textboxes and command buttons and we will integrate into the tutorial the methods such as adding, subtracting, multiplying and dividing numbers. We will also include formatting the answers as they are shown in the answer labels. As in every project, we will create variables, set their values, execute mathematical equations and output data.

3-3
To open a new project, we select File on the Menu Bar and New Project.
Figure 3B.2 – The Start Page We start a new Windows Application by picking the Windows Application icon from the installed templates list on the New Project window. With the Visual Basic Editor open, select File on the Menu Bar and select Save All. For the location, we will browse to the folder “Visual Basic Projects” that we made in Chapter 2. We will name this project “Basic Math Functions”. A folder called “Basic Math Functions” will be made and all the files for the program will be located in the folder.
Figure 3B.3 – New Project

3-4
Beginning a New Visual Basic Application _________________________________________________________ Remember, that all programming projects begin with one or more sketches. The sketch will show labels, textboxes, and command buttons. In this project, we will name the input form, Basic Math Functions. We will have two textboxes to key in number1 and number2. We will have two labels to output each mathematical expression and the answers. In front of the two labels, we will have labels to identify the mathematical process. We will have three command buttons, Calculate, Reset and Exit. On the bottom of the form, we will write the copyright statement using another label. On this presentation, we can help ourselves by being as accurate as possible, by displaying sizes, fonts, colors and any other specific details which will enable us to quickly create the form. On this form, we will use a 12 point Arial font. From the beginning of inserting the form into the project, we need to refer to our sketch. We should train new programmers initially in the art of form building. When using the editor, we insert and size the form, and selecting the Controls Toolbox, we will place all the various input tools and properly label them. Whenever we place an input tool, the properties window will display a list of every attribute associated with the tool, and we will take every effort to arrange the tool by performing such actions as naming, labeling and sizing the visual input device.
Figure 3B.4 – Sketch of the Resistor Sizing Form

3-5
Figure 3B.5 – Designing the Basic Math Functions Form in Visual Basic
Laying Out a User Input Form in Visual Basic _________________________________________________________ We will change the Text in the Properties pane to Math in Visual Basic. Go ahead and change the form in two other aspects, BackColor and Size.
Alphabetic (Name) frmBasicMath BackColor White Font Arial, 12 pt Size 418,574 Text Math in Visual Basic
The first number is the width and the second number is the height. The form will change in shape to the size measurement.
Figure 3B.6 – Setting the Form Properties

3-6
The background color will change to a white. There are many more attributes in the Properties pane that we will use on future projects.
In this project, we will select the font in the form. By selecting the font, font style and size for the form, each label, textbox and command button we insert will have these settings for their font. When highlighting the row for Font, a small command button with three small dots appears to the right of the default font name of Microsoft San Serif. Click on the three dotted button to open the Visual Basic Font window.
Figure 3B.7 – The Font Window in Visual Basic
We will select the Arial font, Regular font style and 12 size for this project to agree with the initial sketch if the user input form. If we wish to underline the text or phrase in the label, add a check to the Underline checkbox in the Effects section of the Font window. When we finish making changes to the font property, select the OK command button to return to the work area.
Figure 3B.8 – Changing the Font to Arial

3-7
Inserting a Label into a Form _________________________________________________________
A good form is easy to figure out by the user, so when we are attempting to provide information on the window that will run in Windows; we add labels to textboxes to explain our intent. Press the Label (A) button on the Control Toolbar to add a label. To size the label area, click on the upper left area of the form and hold down on the left mouse button, draw the dotted label box.
When the first label is done, the background color of the label matches the background color of the form. In many cases that effect is visually pleasing to the eye, versus introducing another color. Both color and shape will direct the user in completing the form along with the explanation we place on the window to guide the designer in using the automated programs. Use colors and shape strategically to communicate well.
We will insert our first Label on the upper left corner of the form and call the entity lblNumber1.
Alphabetic (Name) lblNumber1 Size 76,18 Text Number 1
Since the backcolor and font are already set, we just type “Number1” at the text attribute. Figure 3B.9 – The Finished Label on the Form
Inserting a Textbox into a Form _________________________________________________________
A textbox is used so that a user of the computer program can input data in the form of words, numbers or a mixture of both. Press the TextBox (ab) button on the Control Toolbar to add a textbox. To size the label area, click on the upper left area of the form and hold down on the left mouse button, draw the dotted textbox.
Figure 3B.10 – Placing a TextBox on the Form

3-8
We will name the TextBox using the three letter prefix followed by the name or phrase of the tool. For our first textbox, the name is txtNumber1.
Alphabetic (Name) txtNumber1 Size 76, 26 TextAlign Right
The size of the textbox will be 72 wide and 26 tall and the characters inside the textbox will be aligned to the right.
Figure 3B.11 – Setting the Size of the Textbox
We will insert our second Label on the upper right corner of the form and call the entity lblNumber2.
Alphabetic (Name) lblNumber2 Size 76,18 Text Number 1
For our second textbox, the name is txtNumber2.
Alphabetic (Name) txtNumber2 Size 76, 26 TextAlign Right
The size of the textbox will be 72 wide and 26 tall and the characters inside the textbox will be aligned to the right.
Figure 3B.12 – Adding another Label and Textbox

3-9
Inserting a Label into a Form to Post the Output _________________________________________________________ Some labels on a form are used to show answers. The first row will label and show the adding function and answer. We begin by adding a label called lblAdding label. The key attributes for the label are:
Alphabetic (Name) lblAdding BackColor White Size 103,26 Text Adding TextAlign MiddleRight
Figure 3B.13 – The Labels for the Adding Row We will insert the label for the math expression to the right of lblAdding and name the label lblAddingPblm.
Alphabetic (Name) lblAddingPblm BackColor White BorderStyle FixedSingle Size 173,26 TextAlign MiddleRight
We will insert the label for the answer to the right of lblAddingPblm and name the label lblAddingAns.
Alphabetic (Name) lblAddingAns BackColor White BorderStyle FixedSingle Size 76,26 TextAlign MiddleRight
We will make the borderstyle FixedSingle to place a line around the math expression and answer. The text will be in the middle of the label and align to the right Figure 3B.14 – Labels for the Arithmetic Expressions

3-10
We use our mouse to draw a box over each of the three labels for the Adding label, math expression and answer. When we select the three labels, we right click on them and choose copy from the popup menu. Then we right click on an open portion of the form and choose paste. Three labels will appear on the form and we should move them into position under the Adding row. The following table shows the names of each label in the form.
lblAdding lblAddingPblm lblAddingAns lblSubtracting lblSubtractingPblm lblSubtractAns lblMultiplying lblMultiplyingPblm lblMultiplyAns lblDividing lblDividingPblm lblDivideAns lblDividing2 lblDividing2Pblm lblDivideAns2 lblRemainder lblRemainderPblm lblRemainderAns lblAbsValue lblAbsValuePblm lblAbsValueAns lblFixing lblFixingPblm lblFixingAns lblRounding lblRoundingPblm lblRoundingAns lblExponents lblExponentsPblm lblExponentsAns lblSquRoots lblSquRootsPblm lblSquRootsAns lblSine lblSinePblm lblSineAns lblCosine lblCosinePblm lblCosineAns
All of the labels have the same measurement as the labels on the Adding row.
Inserting a Command Buttons into a Form _________________________________________________________ A command button is used so that a user will execute the application. Press the Command button on the Control Toolbar to add a command button. To size the label area, click on the upper left area of the form and hold down on the left mouse button, draw the command button as shown in Figure 3B.15.
We will name the command button using the name is cmdCalculate.
Alphabetic (Name) cmdCalculate Caption Calculate Size 108,34
Figure 3B.15 – The Command cmdCalculate Button

3-11
Add a second Command button, named cmdReset is for clearing the txtName and lblGreeting objects. The third command button is to exit the program. When the user presses the Exit command button, the application closes. Notice the equal spacing between the command buttons gives a visually friendly appearance.
Figure 3B.16 – Insert Two More Command Buttons
Adding a Copyright Statement to a Form _________________________________________________________ At the beginning of a new program, we will expect to see an explanation or any special instructions in the form of comments such as copyright, permissions or other legal notices to inform programmers what are the rules dealing with running the code. Comments at the opening of the code could help an individual determine whether the program is right for their application or is legal to use. The message box is a great tool when properly utilized to inform someone if they are breaking a copyright law when running the code. Finish the form with the following copyright information.
Basic Math Functions.dv copyright (c) 2011 by charles robbins If there are special rules or instructions that the user needs to know, place that information on the bottom of the form.
Figure 3B.17 – Adding a Copyright Statement
Adding Comments in Visual Basic to Communicate the Copyright _________________________________________________________ The comments we placed in the first three lines of the program will inform the individual opening and reading the code, but those user that may run the application without checking, the label on the bottom of the form with the copyright information is a great tool to alert the client to the rules of the program and what will the application do.

3-12
To begin the actual coding of the program, double click on the Hello command button. At the top of the program and before the line of code with Private Sub cmdCalculate_Click (), place the following comments with the single quote (‘) character. Remember, the single quote character (‘) will precede a comment and when the code is compiled, comments are ignored. Type the following line of code:
'Basic Math Functions.vb copyright (c) 2011 by Charles W. Robbins 'This program will open a dialogue box, allow the user to type two numbers 'When the user clicks on the Calculate button, several calculations are made.
Figure 3B.18 – Adding a Copyright Statement
Declaring Variables in a Program with the Dimension Statement _________________________________________________________ When we are going to use a number, text string or object that may change throughout the life of the code, we create a variable to hold the value of that changing entity. In Visual Basic, the dimension statement is one of the ways to declare a variable at the procedure level. The other two ways are the Private and Public statements, which we will use in later chapters. In our program, we will retrieve the data from the textboxes and also we will create data from mathematical computations. We will place the values in variables called Number1 and Number2. These variables will hold numbers for calculations so we will declare them as Double Integers. We also made another 13 variables, which are double integers. Type the following code under the cmdCalculate subroutine of the program.
' declare variables Dim Number1 As Double Dim Number2 As Double Dim AddingAnswer As Double Dim SubtractingAnswer As Double Dim MultiplyingAnswer As Double Dim Dividing1Answer As Double Dim Dividing2Answer As Double

3-13
Dim RemainderAnswer As Double Dim AbsoluteAnswer As Double Dim FixAnswer As Double Dim RoundingAnswer As Double Dim ExponentAnswer As Double Dim SquareRootAnswer As Double Dim SineAnswer As Double Dim CosineAnswer As Double
Figure 3B.19 – Declaring Variables with Dim Statements Notice that the variable name should be a word or a phrase without spaces that represents the value that the variable contains. If we want to hold a value of one’s date of birth, we can call the variable, DateofBirth. The keywords Date and Birth are in sentence case with the first letter capitalized. There are no spaces in the name. Some programmers use the underscore character (_) to separate words in phrases. This is acceptable, but a double underscore (__) can cause errors if we do not detect the repeated character.
Adding Two Numbers in a Visual Basic _________________________________________________________ The first arithmetic function we will address is one of the most common, the adding function which is displayed by the icon +. The addition function allows us to add two or more numbers. The values of the numbers can be whole like 1,2,3… or decimals, positive or negative. Remember we can have more than two numbers like 2 + 3 + 7 + 4.

3-14
In this program, we will add the two variables that are holding the numbers, Number1 and Number2. The variable AddingAnswer will equal the sum of the value in variable number1 and with the value in variable number2. Type the following code in the Define Variables Section. `Define Variables Dim AddingAnswer As Double Then assign the variable AddingAnswer the results of adding Number1 plus Number2. `Assign Variables AddingAnswer = Number1 + Number2 By writing the addition problem to a label caption, we will display the answer to the problem when adding the numbers together. We will use the text concatenation function (&) to connect the text string together so the label can be easily inserted into the caption. `Adding the numbers lblAddingPblm.Text = txtNumber1.Text & " + " & txtNumber2.Text & " = " lblAddingAns.Text = AddingAnswer.ToString The following is an extract from the Visual Basic Quick Reference for the Addition function.
Function Name Description
+ Adding The addition function will add two or more numbers
Examples Using integers answer = 4 + 6 Answers 10 Using decimals answer = 2.3 + 5.1 Answers 7.4 Using negatives answer = 3 + -7 Answers -4
Subtracting Numbers in a Visual Basic _________________________________________________________ The subtraction function is similar to the adding function, but the number following the first argument is subtracted from the first number. Again there is not a limit to the number of arguments in the math statement. An easy error to make is mistaking the negative sign attached to the front of a number constructing a negative value with the minus sign in the subtraction function. Be aware of these two symbols are their meaning to prevent a troubleshooting dilemma In this program, we will subtract the second variable Number2 from the first variable, Number1 to equal the variable SubtractingAnswer.

3-15
Type the following code in the Define Variables Section.
`Define Variables Dim SubtractingAnswer As Double Then assign the variable SubtractingAnswer the results of subtracting Number2 from Number1.
`Assign Variables SubtractingAnswer = Number1 - Number2 By writing the subtraction problem to a label caption, we will display the answer to the problem when subtracting the numbers. We will use the text concatenation function (&) to connect the text string together so the label can be easily inserted into the caption.
`Subtracting the numbers lblSubtractPblm.Text = txtNumber1.Text & " - " & txtNumber2.Text & " = " lblSubtractAns.Text = SubtractingAnswer.ToString The following is an extract from the Visual Basic Quick Reference for the Subtraction function.
Function Name Description
- Subtracting The subtraction function will subtract a number from the preceding number
Examples Using integers answer = 4 - 6 Answers -2 Using decimals answer = 2.3 - 5.1 Answers -2.8 Using negatives answer = 3 - -7 Answers 10
Multiplying Numbers in a Visual Basic _________________________________________________________ We can use the multiplying function to multiply two or more numbers together using the asterisk icon. After practicing the simple examples in the multiplying table, we can be experimenting with compound expressions on the AutoCAD Command line like:
answer = (4 + 3) * (7 – 3) After computing 4 + 3 = 7 and 7 -3 = 4, the computer calculates 7 * 4 = 28. Very neat. Now, we will multiply the first and second numbers.
In this program, we will multiply the two variables that are holding the numbers, Number1 and Number2. The variable AddingAnswer will equal the product of the value in variable number1 and the value in variable number2. Type the following code in the Define Variables Section.

3-16
`Define Variables Dim MultiplyingAnswer As Double Then assign the variable MultiplyAnswer the results of Number1 times Number2.
`Assign Variables MultiplyingAnswer = Number1 * Number2 By writing the addition problem to a label caption, we will display the answer to the problem when multiplying the numbers together. We will use the text concatenation function (&) to connect the text string together so the label can be easily inserted into the caption.
`Adding the numbers lblMultiplyPblm.Text = txtNumber1.Text & " * " & txtNumber2.Text & " = " lblMultiplyAns.Text = MultiplyingAnswer.ToString
The following is an extract from the Visual Basic Quick Reference for the Multiplication function.
Function Name Description
* Multiplying The multiplication function will multiply two or more numbers
Examples Using integers answer = 4 * 6 Answers 24 Using decimals answer = 2.3 * 5.1 Answers 11.73 Using negatives answer = 3 * -7 Answers -21
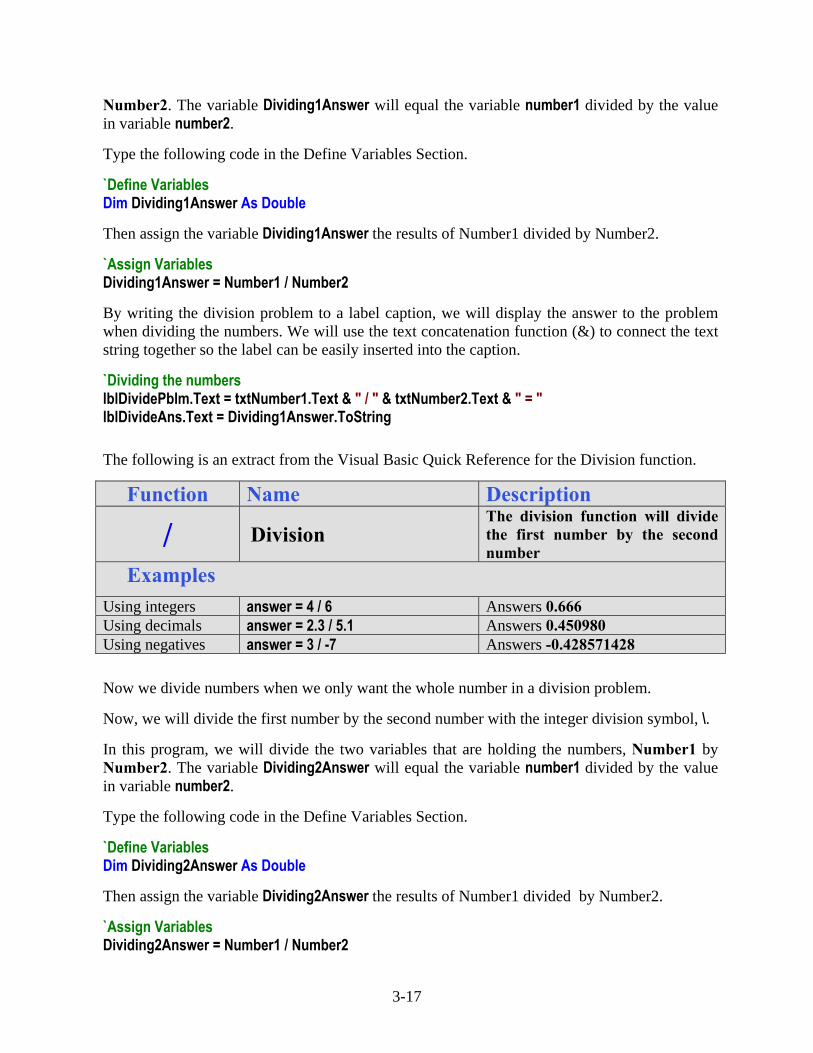
Dividing Numbers in a Visual Basic _________________________________________________________ As the first three arithmetic functions were very similar in there handling of integers, decimals and negatives, the division function will cause some problems depending on the direction of the division symbol. Also, we can divide multiple numbers where the first argument is divided by the second and if there is a third, the process will continue until there are no more arguments, but the danger in this function exists when we change the direction of the division symbol. In any Visual Basic, type the expression 3 / 2 and the return is 1.5, and there is no problem, but type in 3 \ 2 and the answer will be 1. When we only want the whole number in a division problem to determine the number of loops in the program, the integer division function \ will return an answer with the decimal remainder left off, so the 3 \ 2 is 1 instead of 1.5. Some programmers make the error thinking the Visual Basic code will round the number up if the remainder is 5 or greater, but not so, the decimal component is just removed. Now, we will divide the first number by the second number.
In this program, we will divide the two variables that are holding the numbers, Number1 by
3-17
Number2. The variable Dividing1Answer will equal the variable number1 divided by the value in variable number2. Type the following code in the Define Variables Section.
`Define Variables Dim Dividing1Answer As Double Then assign the variable Dividing1Answer the results of Number1 divided by Number2.
`Assign Variables Dividing1Answer = Number1 / Number2 By writing the division problem to a label caption, we will display the answer to the problem when dividing the numbers. We will use the text concatenation function (&) to connect the text string together so the label can be easily inserted into the caption.
`Dividing the numbers lblDividePblm.Text = txtNumber1.Text & " / " & txtNumber2.Text & " = " lblDivideAns.Text = Dividing1Answer.ToString
The following is an extract from the Visual Basic Quick Reference for the Division function.
Function Name Description
/ Division The division function will divide the first number by the second number
Examples
Using integers answer = 4 / 6 Answers 0.666 Using decimals answer = 2.3 / 5.1 Answers 0.450980 Using negatives answer = 3 / -7 Answers -0.428571428 Now we divide numbers when we only want the whole number in a division problem. Now, we will divide the first number by the second number with the integer division symbol, \. In this program, we will divide the two variables that are holding the numbers, Number1 by Number2. The variable Dividing2Answer will equal the variable number1 divided by the value in variable number2. Type the following code in the Define Variables Section.
`Define Variables Dim Dividing2Answer As Double Then assign the variable Dividing2Answer the results of Number1 divided by Number2.
`Assign Variables Dividing2Answer = Number1 / Number2

3-18
By writing the division problem to a label caption, we will display the answer to the problem when dividing the numbers. We will use the text concatenation function (&) to connect the text string together so the label can be easily inserted into the caption. `Dividing the numbers lblDividePblm2.Text = txtNumber1.Text & " \ " & txtNumber2.Text & " = " lblDivideAns2.Text = Dividing2Answer.ToString The following is an extract from the Visual Basic Quick Reference for the Integer Division function.
Function Name Description
\ Integer Division The division function will divide the first number by the second number
Examples Using integers answer = 15 \ 6 Answers 2 Using decimals answer = 3 \ 2 Answers 1 Using negatives answer = 13 \ -7 Answers -1
Finding Remainders with Visual Basic _________________________________________________________ The Modulus Division function will return a number displaying the remainder after the second number is divided into the first number. This is a useful tool when determining whether a counter number even or odd. If you write the following expression to set the counter.
counter = 4 And the even and odd checker to determine the state of the counter.
EvenOrOdd = counter mod 2 The variable EvenOrOdd will be a 0 for even or a 1 for odd. In this program, we will divide the two variables that are holding the numbers, Number1 by Number2 and place the remainder in the variable RemainderAnswer. Type the following code in the Define Variables Section.
`Define Variables Dim RemainderAnswer As Double Then assign the variable RemainderAnswer the results of Number1 divided by Number2 using the mod function.

3-19
`Assign Variables RemainderAnswer = Number1 mod Number2 By writing the remainder problem to a label caption, we will display the answer to the problem. We will use the text concatenation function (&) to connect the text string together so the label can be easily inserted into the caption.
'Finding the Remainder lblRemainderPblm.Text = "The remainder of " & txtNumber1.Text & " / " & txtNumber2.Text & " is " lblRemainderAns.Text = RemainderAnswer.ToString The following is an extract from the Visual Basic Quick Reference for the Integer Division function.
Function Name Description
mod Modulus Division
The Modulus Division function will return a number displaying the remainder after the second number is divided into the first number
Examples Using integers answer = 15 mod 6 Answer 3 Using decimals answer = 3 mod 2.1 Answer 0.9 Using negatives answer = 13 mod -7 Answer 0
Computing Absolute Values with Visual Basic _________________________________________________________ The absolute value function, a function that will only allow a single case to follow the syntax abs will return with a positive number. This function is useful in formula writing when deciphering positive distances. In our career, we will discover that graphics program uses a starting point and ending point to explain the construction of a line. When subtracting the starting point x-value and ending point x-value depending on how the line is drawn, our answer can be a negative number. Placing the absolute value function in front of any answer will result in a positive number. Now, we will find the absolute value of a number.
In this program, we will change the figure in variable Number1 to its absolute value and place the answer in the variable AbsoluteAnswer. Type the following code in the Define Variables Section.
`Define Variables Dim AbsoluteAnswer As Double Then assign the variable AbsoluteAnswer the results of Number1 using the abs function.

3-20
`Assign Variables AbsoluteAnswer = Math.Abs(Number1) By writing the absolute value to a label caption, we will display the answer to the problem. We will use the text concatenation function (&) to connect the text string together so the label can be easily inserted into the caption.
'Finding the absolute value lblAbsValuePblm.Text = "The absolute value of " & txtNumber1.Text & " is " lblAbsValueAns.Text = AbsoluteAnswer.ToString The variable AbsoluteAnswer will equal the positive value of the variable number1. The following is an extract from the Visual Basic Quick Reference for the Absolute Value function.
Function Name Description
abs Absolute Value The absolute value function will return the positive value of a number
Examples Using integers answer = abs (15) Answers 15 Using decimals answer = abs (3.1) Answers 3.1 Using negatives answer = abs (-7) Answers 7
Fixing Numbers in Visual Basic _________________________________________________________ The fix function is in our list of number modifiers for arithmetic functions, but we will visit the tool again in the conversion function list. This contrivance will take a real number and remove the decimal places leaving a whole number or integer. There is not any rounding, but the numbers to the right of the decimal place are just removed. This coding method will be useful when computing an array, where we want a whole number response. In this program, we will fix the variable Number1. Type the following code in the Define Variables Section.
`Define Variables Dim FixAnswer As Double Then assign the variable FixAnswer the results of Number1 using the fix function.
`Assign Variables FixAnswer = Fix(Number1) By writing the fixing problem to a label caption, we will display the answer to the problem. We

3-21
will use the text concatenation function (&) to connect the text string together so the label can be easily inserted into the caption. ‘Fixing the number lblFixingPblm.Text = "Fixing " & txtNumber1.Text & " to " lblFixingAns.Text = FixAnswer.ToString The following is an extract from the Visual Basic Quick Reference for the Fix function.
Function Name Description
fix Fix
The fix function will return a whole number of a value by removing the number’s decimal places
Examples Using integers answer = fix (15) Answer 15 Using decimals answer = fix (3.1) Answer 3 Using negatives answer = fix (-7.5) Answer -7
Rounding Numbers in a Visual Basic _________________________________________________________ The round function will take a single number and round the number to the integer value or if we set the placeholder value will round the decimal places to the placeholder value. Numbers to the right of the rounding placeholder will cause that value to increase by one if the number is 5 or above. If the number to the right of the rounding placeholder is 4 or less, the value at the precise decimal place being requested will remain the same. Type the following code in the program to set the variables for the rounding function. In this program, we will round the variable Number1. Type the following code in the Define Variables Section.
`Define Variables Dim RoundingAnswer As Double Then assign the variable RoundingAnswer the results of Number1 using the Round function.
`Assign Variables RoundingAnswer = Math.Round(Number1, 2) By writing the rounding problem to a label caption, we will display the answer to the problem. We will use the text concatenation function (&) to connect the text string together so the label can be easily inserted into the caption.

3-22
'Rounding Answer lblRoundingPblm.Text = "Rounding " & txtNumber1.Text & " to 2 places is " lblRoundingAns.Text = RoundingAnswer.ToString The following is an extract from the Visual Basic Quick Reference for the Round function.
Function Name Description
Round Round The round function will return a number set to the requested decimal place.
Examples Using integers answer = round (15,0) Answer 15 Using decimals answer = round (3.125,2) Answer 3.13 Using negatives answer = round (-7.523,1) Answer -7.5
Computing an Exponent in Visual Basic _________________________________________________________ The exponent function is used when applying formulas like the area of a circle, which is
A = πr 2
Setting the radius of the circle to 3 type: r = 3
The value of π in AutoLISP is already assigned with syntax, pi. Remember we can type !pi to check any variable, so try check the value of pi. Now to find the area of the radius 3 circle, enter the code shown.
a = pi * r ^ 2 Type the following code in the program to set the variables for the exponent function. In this program, we will take the variable Number1 to the power of the value in the variable Number2. Type the following code in the Define Variables Section.
`Define Variables Dim ExponentAnswer As Double Then assign the variable ExponentAnswer the results of Number1 to the Number2 power.
`Assign Variables ExponentAnswer = Number1 ^ Number2 By writing the expediential problem to a label caption, we will display the answer to the problem. We will use the text concatenation function (&) to connect the text string together so the label can be easily inserted into the caption.

3-23
'Finding the Exponent lblExponentsPblm.Text = txtNumber1.Text & " to the " & txtNumber2.Text & " power equals " lblExponentsAns.Text = Format(ExponentAnswer, "#.####") We have added a new feature to the output by using the Format() function with the variable first then a comma and the format of how many decimals we would like to see in the answer. “#.###” will give us 3 decimals in the answer. The following is an extract from the Visual Basic Quick Reference for the Exponent (^) function.
Function Name Description
^ Exponent The exponent function will raise the first number to the power of the second number
Examples Using integers answer = 4 ^ 3 Answers 64 Using decimals answer = 5.5 ^ 0.2 Answers 1.40628 Using negatives answer = -2.0 ^ 4 Answers 16.0
Computing a Square Root in Visual Basic _________________________________________________________ The square root function will return a decimal number representing the side of a square area. This function only expects a single argument after the function sqrt. Remember no negative numbers are permissible with the square root function. A complex expression that would be common place would be finding the hypotenuse of a triangle using the variables a and b that are already defined:
c = sqrt ((a ^ 2) + (b ^ 2)) In this program, we will take the square root of the variable Number1. Type the following code in the Define Variables Section.
`Define Variables Dim SquareRootAnswer As Double Then assign the variable SquareRootAnswer the results of the square root of Number1. `Assign Variables SquareRootAnswer = Math.Sqrt(Number1) By writing the square root problem to a label caption, we will display the answer to the problem. We will use the text concatenation function (&) to connect the text string together so the label can be easily inserted into the caption.

3-24
'Finding the square root lblSquRootsPblm.Text = "The square root of " & txtNumber1.Text & " is " lblSquRootsAns.Text = Format(SquareRootAnswer, "#.####") The following is an extract from the Visual Basic Quick Reference for the Square Root function.
Function Name Description
sqrt Square Root The square root function will find the root of the square represented a number
Examples Using integers answer = sqrt (4) Answers 2.0 Using decimals answer = sqrt (5.5) Answers 2.34521 Using negatives answer = sqrt (-155) Negatives Not Allowed The sine, cosine and tangent functions use a angular measurement of radians. We are moist familiar with radians when we hear the word pi. Pi radians or 3.14159 is equal to 180 degrees. To convert degrees to radians, divide the angle in degrees by 57.29578.
Computing Sine in a Visual Basic _________________________________________________________ The sin function is a key tool in find the length of the side opposite the angle and in the case of the standard CAD drawing system using the Cartesian coordinate system, the sine of the angle times the hypotenuse of the triangle or length of the line will represent the delta-y of the line being examined.
delta_y = sin (angle / 57.29578) Type the following code in the program to set the variables for the sine function. In this program, we will take the Sine of the variable Number1. Type the following code in the Define Variables Section.
`Define Variables Dim SineAnswer As Double Then assign the variable SineAnswer the results of the sine of Number1.
`Assign Variables SineAnswer = Math.Sin(Number1) By writing the Sine problem to a label caption, we will display the answer to the problem. We will use the text concatenation function (&) to connect the text string together so the label can be easily inserted into the caption.

3-25
'Finding the Sine lblSinePblm.Text = "The sine of " & txtNumber1.Text & " radians is " lblSineAns.Text = Format(SineAnswer, "#.####") The following is an extract from the Visual Basic Quick Reference for the Sine function.
Function Name Description
sin Sine
The sine function will return the length of the side opposite the angle of a right sided triangle when the hypotenuse is 1
Examples Using integers answer = sin (2) Answer 0.909297 Using decimals answer = sin (0.5) Answer 0.479426 Using negatives answer = sin (-0.2) Answer -0.198669
Computing Cosine in a Visual Basic _________________________________________________________ The cos function is likewise a tool in find the length of the side adjacent to the angle and in the case of the standard CAD drawing system using the Cartesian coordinate system, the cosine of the angle times the hypotenuse of the triangle or length of the line will represent the delta-x of the line being examined.
delta_x = cos (angle / 57.29578)
In this program, we will take the Cosine of the variable Number1. Type the following code in the Define Variables Section.
`Define Variables Dim CosineAnswer As Double Then assign the variable CosineAnswer the results of the cosine of Number1.
`Assign Variables CosineAnswer = Math.cos(Number1) By writing the Cosine problem to a label caption, we will display the answer to the problem. We will use the text concatenation function (&) to connect the text string together so the label can be easily inserted into the caption.
'Cosine lblCosinePblm.Text = "The cosine of " & txtNumber1.Text & " radians is " lblCosineAns.Text = Format(CosineAnswer, "#.####") The following is an extract from the Visual Basic Quick Reference for the Cosine function.

3-26
Function Name Description
cos Cosine
The cosine function will return the length of the side adjacent to the angle of a right sided triangle when the hypotenuse is 1
Examples Using integers answer = cos (2) Answer -0.416147 Using decimals answer = cos (0.5) Answer 0.877583 Using negatives answer = cos (-0.2) Answer 0.980067 We have now added our last label that defines the category and another that holds the answer to the math problem in the caption. The last step in the program is to add the reset and exit code. For each label, we have coded a simple math function using one or both of the numbers at the top of the form to get an answer described to the left of the form. The following is the entire subroutine to calculate the expressions.
Public Class frmBasicMath 'Basic Math Functions.vb copyright (c) 2011 by Charles W. Robbins 'This program will open a dialogue box, allow the user to type two numbers 'When the user clicks on the Calculate button, several calculations are made. Private Sub cmdCalculate_Click(ByVal sender As System.Object, ByVal e As System.EventArgs) Handles cmdCalculate.Click ' declare variables Dim Number1 As Double Dim Number2 As Double Dim AddingAnswer As Double Dim SubtractingAnswer As Double Dim MultiplyingAnswer As Double Dim Dividing1Answer As Double Dim Dividing2Answer As Double Dim RemainderAnswer As Double Dim AbsoluteAnswer As Double Dim FixAnswer As Double Dim RoundingAnswer As Double Dim ExponentAnswer As Double Dim SquareRootAnswer As Double Dim SineAnswer As Double Dim CosineAnswer As Double 'Assign variables Number1 = Val(txtNumber1.Text) Number2 = Val(txtNumber2.Text) AddingAnswer = Number1 + Number2 SubtractingAnswer = Number1 - Number2 MultiplyingAnswer = Number1 * Number2

3-27
Dividing1Answer = Number1 / Number2 Dividing2Answer = Number1 \ Number2 RemainderAnswer = Number1 Mod Number2 AbsoluteAnswer = Math.Abs(Number1) FixAnswer = Fix(Number1) RoundingAnswer = Math.Round(Number1, 2) ExponentAnswer = Number1 ^ Number2 SquareRootAnswer = Math.Sqrt(Number1) SineAnswer = Math.Sin(Number1) CosineAnswer = Math.Cos(Number1) 'Adding the numbers lblAddingPblm.Text = txtNumber1.Text & " + " & txtNumber2.Text & " = " lblAddingAns.Text = AddingAnswer.ToString 'Subtracting the numbers lblSubtractPblm.Text = txtNumber1.Text & " - " & txtNumber2.Text & " = " lblSubtractAns.Text = SubtractingAnswer.ToString 'Multiplying the numbers lblMultiplyPblm.Text = txtNumber1.Text & " * " & txtNumber2.Text & " = " lblMultiplyAns.Text = MultiplyingAnswer.ToString 'Dividing the numbers lblDividePblm.Text = txtNumber1.Text & " / " & txtNumber2.Text & " = " lblDivideAns.Text = Dividing1Answer.ToString lblDividePblm2.Text = txtNumber1.Text & " \ " & txtNumber2.Text & " = " lblDivideAns2.Text = Dividing2Answer.ToString 'Finding the remainder lblRemainderPblm.Text = "The remainder of " & txtNumber1.Text & " / " & txtNumber2.Text & " is " lblRemainderAns.Text = RemainderAnswer.ToString 'Finding the absolute value lblAbsValuePblm.Text = "The absolute value of " & txtNumber1.Text & " is " lblAbsValueAns.Text = AbsoluteAnswer.ToString 'Fixing the number lblFixingPblm.Text = "Fixing " & txtNumber1.Text & " to " lblFixingAns.Text = FixAnswer.ToString 'Rounding the number lblRoundingPblm.Text = "Rounding " & txtNumber1.Text & " to 2 places is " lblRoundingAns.Text = RoundingAnswer.ToString

3-28
'Exponents lblExponentsPblm.Text = txtNumber1.Text & " to the " & txtNumber2.Text & " power equals " lblExponentsAns.Text = Format(ExponentAnswer, "#.####") 'Square root lblSquRootsPblm.Text = "The square root of " & txtNumber1.Text & " is " lblSquRootsAns.Text = Format(SquareRootAnswer, "#.####") 'Sine lblSinePblm.Text = "The sine of " & txtNumber1.Text & " radians is " lblSineAns.Text = Format(SineAnswer, "#.####") 'Cosine lblCosinePblm.Text = "The cosine of " & txtNumber1.Text & " radians is " lblCosineAns.Text = Format(CosineAnswer, "#.####") End Sub
Resetting the Data _________________________________________________________ To reset the textboxes or labels containing the data, we will replace the date with blank strings and the date and time with the current day and time setting. Type the following code under the cmdReset subroutine of the program
'Reset the two textboxes and the labels txtNumber1.Text = "" txtNumber2.Text = "" lblAddingPblm.Text = "" lblAddingAns.Text = "" lblSubtractPblm.Text = "" lblSubtractAns.Text = "" lblMultiplyPblm.Text = "" lblMultiplyAns.Text = "" lblDividePblm.Text = "" lblDivideAns.Text = "" lblDividePblm2.Text = "" lblDivideAns2.Text = "" lblRemainderPblm.Text = "" lblRemainderAns.Text = "" lblAbsValuePblm.Text = "" lblAbsValueAns.Text = "" lblFixingPblm.Text = "" lblFixingAns.Text = "" lblRoundingPblm.Text = ""

3-29
lblRoundingAns.Text = "" lblExponentsPblm.Text = "" lblExponentsAns.Text = "" lblSquRootsPblm.Text = "" lblSquRootsAns.Text = "" lblSinePblm.Text = "" lblSineAns.Text = "" lblCosinePblm.Text = "" lblCosineAns.Text = ""
Figure 3B.20 – Computing the Reset Button by Clearing a Textbox and Label Caption

3-30
Exiting the Program _________________________________________________________
Figure 3B.21 – Exiting the Program To exit this program, we will unload the application and end the program. Type the following code:
“Unload and exit the program Me.Close()
Running the Program _________________________________________________________
After noting that the program is saved, press the F5 to run the Basic Math Functions application. The Basic Math Functions window will appear on the graphical display as shown in Figure 3B.22. Notice the professional appearance and presentation of information in a clean dialogue box.
Figure 3B.22 – Launching the Program

3-31
Type 3.3 in the Number1 textbox and 2 in the Number2 textbox as shown in Figure 3B.23. If we make a mistake, we can type over the text entry or press the Reset command button to clear the textbox. Press the Calculate command button and the answer labels will show the math expressions and answers. After experimenting with our program, press the Exit command button to exit the application.
Figure 3B.23 – Running the Program If our program does not function correctly, go back to the code and check the syntax against the program shown in previous sections. Repeat any processes to check or Beta test the program. When the program is working perfectly, save and close the project. There are many variations of this Visual Basic Application we can practice and obtain information from a personal computer. While we are practicing with forms, we can learn how to use variables, strings and comments. These are skills that we want to commit to memory.
* World Class CAD Challenge 90-2B * - Write a Visual Basic Application that displays a single input form, allows the user to type in their numbers, and when executed, the program will give the user results to mathematical expressions. Continue this drill four times using some other form designs, each time completing the Visual Basic Project in less than 1 hour to maintain your World Class ranking.