virtual communications guide for service providers and
TRANSCRIPT

VIRTUAL COMMUNICATIONS GUIDEFor Service Providers and Volunteers

Voice to Voice Smartphone Video -WhatsApp
Smartphone Video -ZOOM
Computer Video -ZOOM
Description Clients use any cellphone or landline to connect with service providers and volunteers through a phone call
Clients use WhatsApp on their smartphone to message, voice and video chat with service providers and volunteers
Clients use Zoom on their phone to video chat and share screen with service providers and volunteers who use their computer
Clients use Zoom on their computer to video chat and share screen with service providers and volunteers
Best Use For clients without broadband or cellular access, or who areuncomfortable using technology
WhatsApp lets you text, video chat and send audio recordings at any time, but it shares the phone number you use to register
Zoom lets you schedule meetings to video chat, share your screen, and doesn’t share your phone number
For clients with reliable broadband or cellular access;Zoom video and screen share are easier to use on a computer
Device Any cell or landline Smartphone with WiFi
Smartphone with WiFi
Computer with WiFi and camera
App Required
N/A WhatsApp (Free) Zoom (Free) Zoom (Free)
Digital LiteracyRequired
Any Medium Medium Medium
INTRODUCTION
The purpose of this guide is to help service providers and volunteers determine which virtualcommunication channels are best for them and their clients. Use the introduction pages to learnabout the options and select the best one. Then, navigate to the guide for that channel in order toenable it for yourself. Finally, share the how-to guide with your client and interpreters.
Virtual Communication Options
Note: if your client is going to use Zoom on their smartphone, you as the service provider or volunteer can use Zoom on either your smartphone or computer.
Note: if your client has data but no WiFi, you might find the video does not work as well and might be frustrating.
Below are a set of options for virtual communication that take into consideration varying levels oftechnology access and digital literacy. If you are already using virtual options that are not on thislist but are working for you, please keep using them!

INTRODUCTION
What is the client’s digital literacy level?
Option 1: Voice to Voice
Does the client & service
provider have a computer with WiFi & camera?
Option 4: Computer Video -
Zoom
Does the client have a
smartphone with WiFi?
Option 1: Voice to Voice
Does the service provider
have a non-personal phone they can use?
Option 2: Smartphone Video
Option 3: Smartphone Video
– Zoom
Determining the Best OptionUse the questions below to determine which option is best for you and your client. Be sure toconsider needs of other participants, like interpreters.
None/Low Medium
Yes
No
No
No
Yes; or can sign up for free/low cost
WiFi
Yes
Start Here

INTRODUCTION
Virtual Communication Etiquette and Best PracticesFor service providers, volunteers and interpreters:
• Like all of us, clients might be stuck inside with many other people and may be distractedduring a voice call. Help them find a quiet place to talk, and keep the content engaging
• Find a quiet space for yourself as well, or let roommates/family members know you are on acall with a client
• With the absence of physical co-location, use conversation to get to know each other andestablish a personal connection
• With virtual channels you’ll have less physical cues – check for understanding often
• If sharing video, avoid eating or drinking in front of client
• Be conscious of maintaining confidentiality – if you or the client are taking the call in a crowdedspace, use chat to share more private topics
• Consider using passwords for Zoom meetings to increase security
• We are all learning through this time together – ask your client what worked well, and whatyou both can improve for next time in terms of setting up and having virtual communication
For clients:
• Do your best to be on time
• Find a quiet space for yourself to take a call, or let roommates/family members know you areon a call

INTRODUCTION
Table of Contents
How To Guide: Voice to Voice Page 6
How To Guide: WhatsApp for Androids Page 7
How To Guide: WhatsApp for iPhones Page 14
How To Guide: Zoom for Androids Page 19
How To Guide: Zoom for iPhones Page 21
How To Guide: Zoom for Windows PC Page 23
How To Guide: Zoom for Mac Page 35
Using the How To GuideNow that you have determined the best option for you and your client, navigate to the proper how to guide based on the type of phone or computer you have. Provide your client with a copy of the client guide for your chosen option.
Disclaimer: The inclusion of virtual communication apps and services in this document does not represent HIAS or Accenture’s endorsement of that particular service

VOICE TO VOICE
Making a 3 Way Call on an Android
1. Dial the first person. When they have answered, tap Add Call.
2. Find the second person you want to call in your contacts list. Tap the Dial icon.
3. Tap the Mergeicon.
4. You are connected.
Making a 3 Way Call on an iPhone
1. Dial the first person. When they have answered, tap Add Call.
2. Select the second person you want to call in your contacts list.
3. Tap the Mergeicon.
4. You are connected.

WHATSAPP for Android Users
1. Open the Android App Store. 2. Tap the Search Box.
3. Type Whatsapp. 4. Tap Install. When app has downloaded, tap Open.
Step 1: Download WhatsApp

WHATSAPP for Android Users
1. Tap Agree and Continue.
2. Tap Continue.
3. Tap Allow to give WhatsApp access to photos and contacts.
4. Enter your phone number and tap Next.
5. Tap Ok. 6. You will receive a text message with a code. Enter the code here.
7. The app will verify your code.
8. Type your name and tap Next.
Your Name
Step 2: Set Up WhatsApp When you open the app for the first time, you will need to set it up. You will only need to do this upon your first use.

1. Open the Contacts app on your phone. Then tap the + icon to add a contact.
2. Enter the contact’s name and phone number, then tap Save.
WHATSAPP for Android Users
Step 3: Adding ContactsWhatsApp adds the contacts on your phone to the app. To add a contact to your phone, follow these steps. Otherwise, skip to the next section.

1. Open WhatsApp and tap the new message icon.
2. Scroll to find your contact and tap. Now you are ready to chat.
Sandy Smith
WHATSAPP for Android Users
Step 4: Communicating in WhatsAppWithin WhatsApp there are four methods of communication: text chat, voice calls, video calls, and audio recordings. You may choose any of the four you are comfortable with to communicate with your contacts.
In the chat window, type your message at the bottom of the screen, then tap the arrow to send.
Sandy Smith
To start a voice call, click on the phone icon.
Sandy Smith
To start a video call, click on the camera icon.
To make an audio recording, hold down the microphone button and speak. Let go when finished.
Text Chat Voice Call Video Call Voice Recording

Sandy Jay
Sandy Smith
Jay Brooks
Sandy Smith
Jay Brooks
Maria Feldman
Sandy Jay
WHATSAPP for Android Users
Step 5: Creating a Conversation with 3 or More ParticipantsUse this section to start a conversation with multiple parties, such as a client and interpreter. Make sure both have been added as contacts in your phone first.
1. Open WhatsApp and tap the new message icon.
2. Tap New Group.
3. Scroll to find the contacts you want to add and tap each one.
4. Name your group and tap the green check.
5. Click the phone icon to begin a call with the group.
6. Select the participants you want to call. Click the video icon for a video call, or the phone icon for a voice call.
Sandy Jay
Sandy, Jay, You
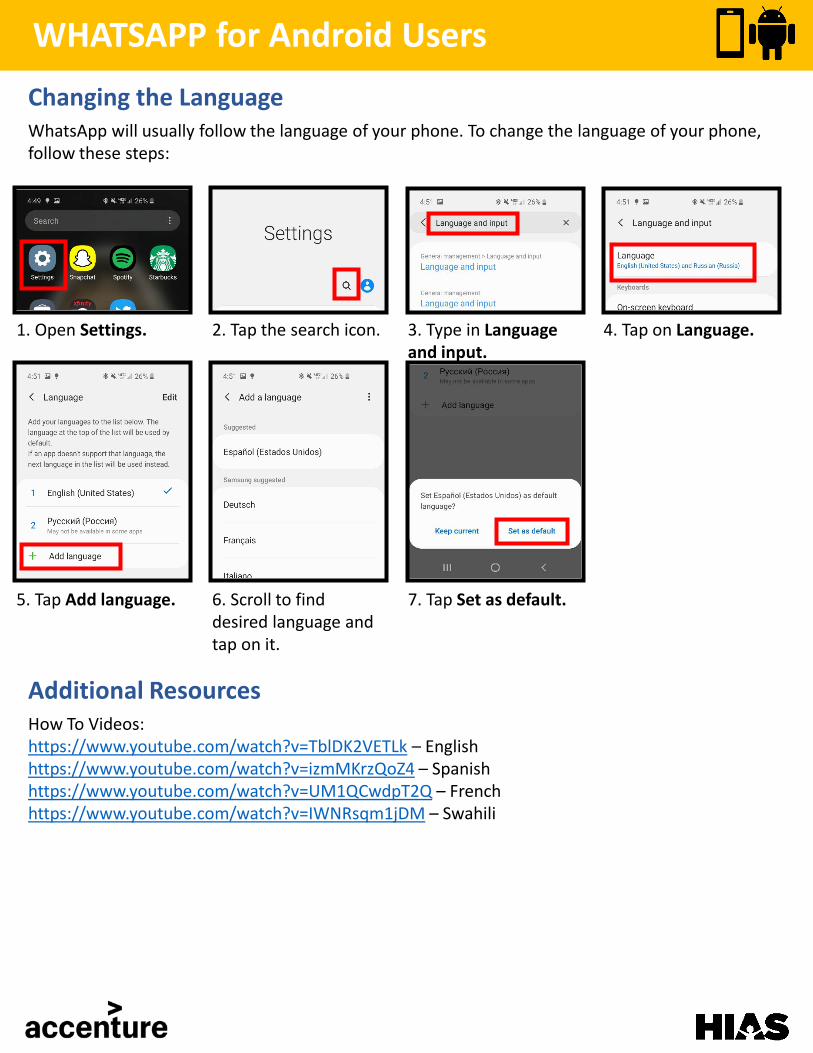
1. Open Settings. 2. Tap the search icon. 3. Type in Language and input.
4. Tap on Language.
5. Tap Add language. 6. Scroll to find desired language and tap on it.
7. Tap Set as default.
WHATSAPP for Android Users
Changing the LanguageWhatsApp will usually follow the language of your phone. To change the language of your phone, follow these steps:
Additional ResourcesHow To Videos:https://www.youtube.com/watch?v=TblDK2VETLk – English https://www.youtube.com/watch?v=izmMKrzQoZ4 – Spanish https://www.youtube.com/watch?v=UM1QCwdpT2Q – French https://www.youtube.com/watch?v=IWNRsqm1jDM – Swahili

1. Open iPhone App Store. 2. Tap Search.
3. Type Whatsapp. 4. Tap Install. When app has downloaded, tap Open.
WHATSAPP for iPhone Users
Step 1: Download WhatsApp

+1 (415) 555-5555
WHATSAPP for iPhone Users
1. Tap Agree and Continue.
2. Tap Allow. 3. Enter your phone number and tap Done.
5. You will receive a text message with a code. Enter the code here. The app will verify your code.
6. Type your name and tap Done.
Step 2: Set Up WhatsApp When you open the app for the first time, you will need to set it up. You will only need to do this upon your first use.
+1 (415) 555-5555
4. Tap Yes.
Your Name

1. Open the Phone icon on your phone. Then tap the + icon to add a contact.
2. Enter the contact’s name and phone number, then tap Save.
WHATSAPP for iPhone Users
Step 3: Adding ContactsWhatsApp adds the contacts on your phone to the app. To add a contact to your phone, follow these steps. Otherwise, skip to the next section.

1. Open WhatsApp and tap the new message icon.
2. Scroll to find your contact and tap. Now you are ready to chat.
WHATSAPP for iPhone Users
Step 4: Communicating in WhatsAppWithin WhatsApp there are four methods of communication: text chat, voice calls, video calls, and audio recordings. You may choose any of the four your are comfortable with to communicate with your contacts.
In the chat window, type your message at the bottom of the screen, then tap the arrow to send.
To start a voice call, click on the phone icon.
To start a video call, click on the camera icon.
To make an audio recording, hold down the microphone button and speak. Let go when finished.
Text Chat Voice Call Video Call Voice Recording

WHATSAPP for iPhone Users
Step 5: Creating a Conversation with 3 or More Participants
1. Open WhatsApp and tap the New Message icon to start a chat.
2. Tap New Group.
3. Select contacts to add.
4. Tap Next. 5. Type subject for the group.
6. Tap Create.
7. Type your message and tap the Send icon.

1. Open Settings. 2. Tap on General. 3. Tap Language & Region.
4. Tap Other languages.
WHATSAPP for iPhone Users
Changing the LanguageWhatsApp will usually follow the language of your phone. To change the language of your phone, follow these steps:
5. Select the desired language.
6. Tap Change to [your language].

This Zoom guide is meant to guide clients in downloading Zoom and joining a meeting. Service providers and volunteers should use the Zoom guide for their computer to create an account and set up meetings.
ZOOM for Android Users
Step 1: Download Zoom
1. Open the Play Store.
2. Select the search bar.
3. Type in Zoom and tap Zoom Cloud Meetings.
4. Tap Install. 5. Once install is complete, tap Open.
Step 2: Join a Zoom Meeting
1. Open Zoom and tap Join a Meeting.
2. Type in the Meeting ID andyour name.
3. Tap Join Meeting.
5. If the host has not joined yet, you will see this screen.
4. If the meeting has a password, enter it and tap Ok.

ZOOM for Android Users
Step 2: Join a Zoom Meeting (Continued)
5. Once the host joins, you will see this screen the first time you join a meeting. Tap Got it.
6. The first time you join a meeting, you will see this screen. Tap Allow.
7. Tap Call via Device Audio.
8. To start video, tap the Start Video icon.
9. The first time you share video, you will see this screen. Tap Allow.
10. To share your screen, tap the Share icon.
11. Tap Screen. 12. The first time you share screen, you will see this screen. Tap Start now.
13. Tap the toggle to allow Zoom to view your screen.
14. Tap the back button. You are now ready to share.

This Zoom guide is meant to guide clients in downloading Zoom and joining a meeting. Service providers and volunteers should use the Zoom guide for their computer to create an account and set up meetings.
ZOOM for Android Users
Step 1: Download Zoom
1. Open the Play Store.
2. Select the search bar.
3. Type in Zoom and tap Zoom Cloud Meetings.
4. Tap Install. 5. Once install is complete, tap Open.
Step 2: Join a Zoom Meeting
1. Open Zoom and tap Join a Meeting.
2. Type in the Meeting ID andyour name.
3. Tap Join Meeting.
5. If the host has not joined yet, you will see this screen.
4. If the meeting has a password, enter it and tap ok.

ZOOM for Android Users
Step 2: Join a Zoom Meeting (Continued)
5. Once the host joins, you will see this screen the first time you join a meeting. Tap Ok.
6. Tap Allow. 7. Tap Join Audio. 8. Tap Call using Internet Audio.
9. You can now hear and speak in the call. To enable video, tap Start Video.
10. Tap Ok. 11. To share your screen, tap Share Content.
12. Tap Screen. 13. Select the application you want to share and tap Start Recording.
14. Go to the app you want to share. Tap Stop Recording when done.

ZOOM for Windows PC Users
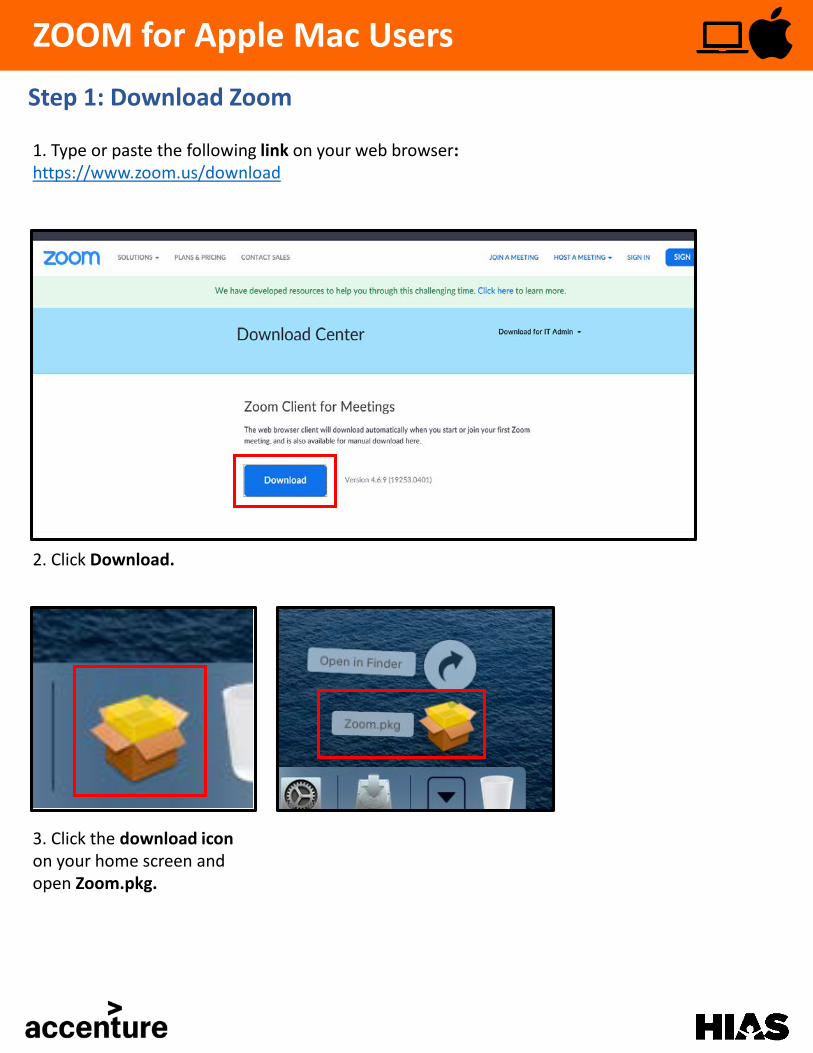
Step 1: Download Zoom1. Type or paste the following link in your web browser:https://www.zoom.us/download
2. Click Download. 3a. Click the Run button on the bottom of the page.
4. You will see the above page show up on your screen as Zoom finishes installing on your Windows PC.
3b. You might see this on your screen instead, if so click on ZoomInstaller.exe.

ZOOM for Windows PC Users
1. The following window will pop up on your computer once Zoom has been installed on your machine. Click the Sign in button.
2. Navigate to the bottom right of the page and select Sign Up Free. A browser window will open.
Step 2: Set Up Zoom When you open Zoom for the first time, you will need to set it up. You will only need to do this upon your first use.
2. Enter in the month, day and year of your birth. Click Continue.

3. Enter your email address and click Sign Up.
If you have a Google account, you can scroll down and Sign in with Google. Skip to step 7 if you want to sign in with Google.
ZOOM for Windows PC Users
4. The following window will appear. Log in to your email account and open the Zoom email.
Step 2: Set Up Zoom (Continued)
5. Select Activate Account found in the Zoom email sent to your provided email.
6. Enter in your name and a new password. Select Continue.

ZOOM for Windows PC Users
Step 2: Set Up Zoom (Continued)
8. Select Create Account.7. Enter your Gmail account information and select Next to enter password.
5. Select Activate Account found in the Zoom email sent to your provided email.
6. Enter in your name and a new password. Select Continue.
Continue here if using your Google account:

ZOOM for Windows PC Users
Step 3: Sign Into ZoomAfter initial set up, you will be asked to sign into Zoom when you open it.
5a. Enter your email and password then press the Sign In button.
5b. If you signed in with your Google account, select Sign In with Google.

ZOOM for Windows PC Users
1. Select Home from the menu at the top of the page and select Schedule.
Step 4: Create a Zoom Meeting
2. Enter the meeting title in the Topic Section.

ZOOM for Windows PC Users
Step 4: Create a Zoom Meeting (Continued)
1. To change the meeting date and time, click on drop down arrow to show the calendar.
2. Use the left and right arrows to change the month/year.
3. To select the meeting day, click on the desired date on the calendar below.
4. Use the up and down arrows to change the time.
5. Use the drop-down menus to change the Duration.NOTE: Zoom Basic Plans only allow for maximum duration of 40 minutes if a meeting has more than 2 participants
6. Use the drop-down menu to change the Time Zone.

ZOOM for Windows PC Users
7. Select Generate Automatically for Meeting ID.
8. Check Require meeting passwordbox for added security.
Step 4: Create a Zoom Meeting (Continued)
9. Select Both for Audio to allow participants to use phone or computer audio.
10. Select the drop icon for Advance Options and Check the box on any of the meeting options above as needed.
11. Click Schedule.

ZOOM for Windows PC Users
Step 5: Invite Others to a Zoom Meeting
1. Once you have saved your meeting, navigate to the Meetings page using the menu at the top.
2. To invite others to the meeting, select the meeting and select Copy Invitation, which includes Meeting ID, a link to join and the password (if applicable). Paste into an email or text to send to attendees.
3. When you are ready to start the meeting, click the Start button beneath the meeting details.

ZOOM for Windows PC Users
Step 6: Join a Zoom Meeting
1. Navigate to the Home screen from the menu at the top of the page. Click Join.
2. Enter the 6 digit Meeting ID or Personal Link Name given to you by the meeting organizer. Click Join.
3.Enter the meeting password if asked.

ZOOM for Windows PC Users
Step 6: Join a Zoom Meeting (Continued)
5. The above screen will appear once the host has joined the meeting.
4. You may see this screen if the host has not yet joined the meeting.
6. Select Join Audioto enable sound.
7. Click Join with Computer Audio to join through your computer microphone and speakers.
8. Click Start Videoto enable video

ZOOM for Windows PC Users
Step 7: Share Screen in a Zoom Meeting
1. In the meeting, select Share Screen.
2. Select Screen to share your whole desktop screen. Then click Share.
1. Type or paste the following link on your web browser:https://www.zoom.us/download
2. Click Download.
3. Click the download icon on your home screen and open Zoom.pkg.
Step 1: Download Zoom
ZOOM for Apple Mac Users

4. Click Continue to proceed. 5. Click Install.
6. When the software is finished installing, the above message should appear on your screen. Click Close.
Step 1: Download Zoom (Continued)
ZOOM for Apple Mac Users
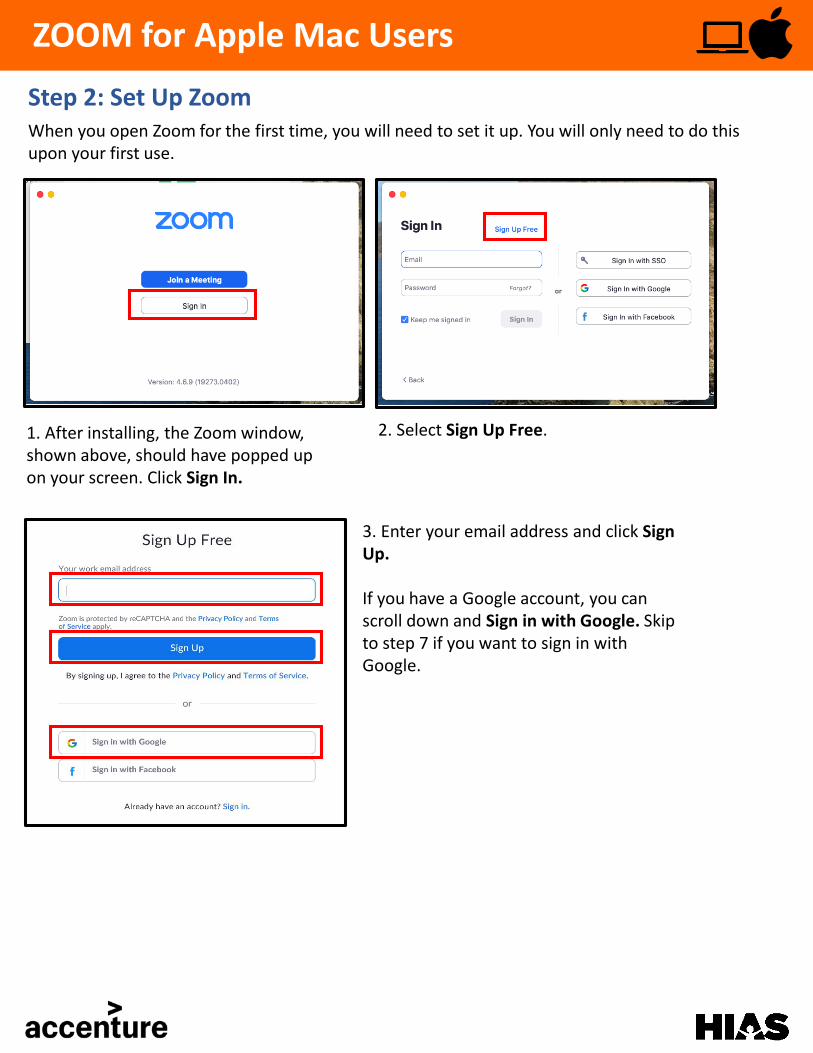
3. Enter your email address and click Sign Up.
If you have a Google account, you can scroll down and Sign in with Google. Skip to step 7 if you want to sign in with Google.
2. Select Sign Up Free.1. After installing, the Zoom window, shown above, should have popped up on your screen. Click Sign In.
Step 2: Set Up Zoom When you open Zoom for the first time, you will need to set it up. You will only need to do this upon your first use.
ZOOM for Apple Mac Users
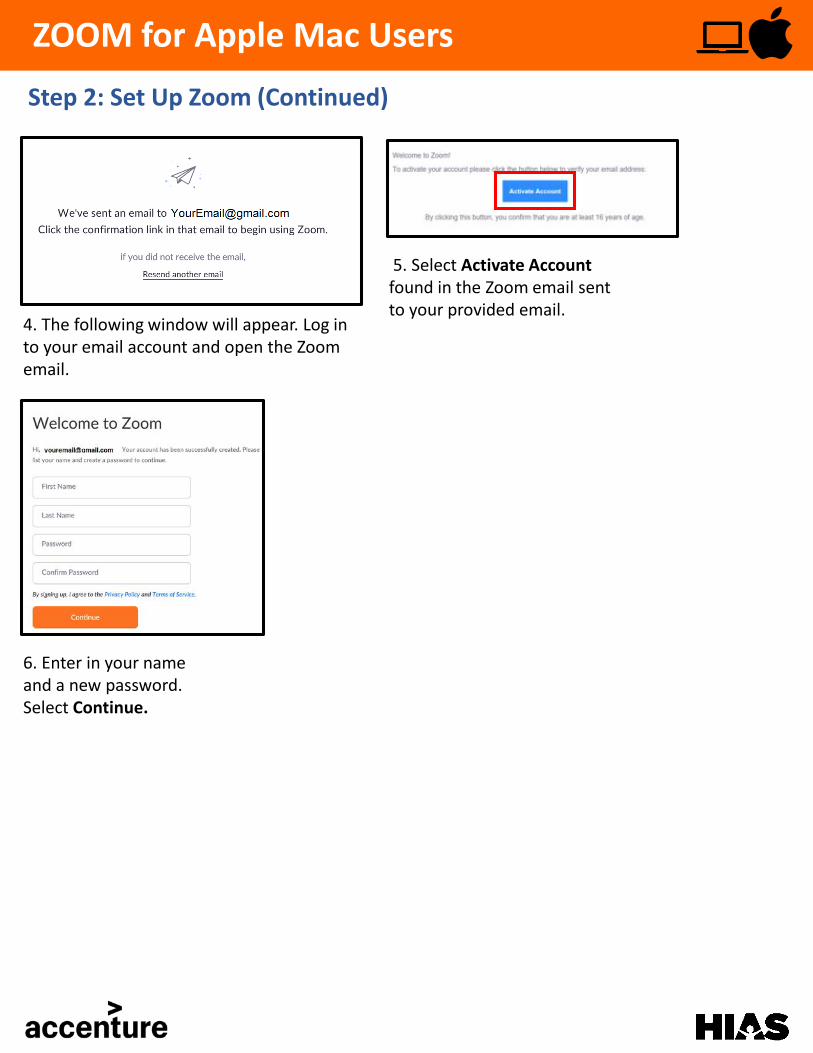
5. Select Activate Accountfound in the Zoom email sent to your provided email.
6. Enter in your name and a new password. Select Continue.
Step 2: Set Up Zoom (Continued)
4. The following window will appear. Log in to your email account and open the Zoom email.
ZOOM for Apple Mac Users

8. Select Create Account.7. Enter your Gmail account information and password. Click Next.
Step 2: Set Up Zoom (Continued)
ZOOM for Apple Mac Users
Continue here if using your Google account:

Step 3: Sign Into ZoomAfter initial set up, you will be asked to sign into Zoom when you open it.
1. Navigate to the menu on the top righthand side of the screen. Select Sign In.
2. Enter your email address and password and click Sign In. Or, to sign in with your Google account, select Sign in with Google.
3. If signing in with your Google account, select the account you wish to log in with.
ZOOM for Apple Mac Users

1. Navigate to the menu on the top right of the screen. Select Schedule a Meeting.
2. Under the Meetings tab, select Schedule a New Meeting.
3. Enter a name, date and time, and duration for your meeting. NOTE: Zoom Basic Plans only allow for maximum duration of 40 minutes if a meeting has more than 2 participants
Step 4: Create a Zoom Meeting
ZOOM for Apple Mac Users
4. Check Require meeting password box for added security. 5. Scroll down and click Save to schedule your meeting.

Step 5: Invite Others to a Zoom Meeting
1. Under the Meetings tab, select the meeting you want to invite others to.
2. Select Copy the invitation.
ZOOM for Apple Mac Users

Step 5: Invite Others to a Zoom Meeting (Continued)
3. Click Copy Meeting Invitation. 4. Open your email account and start a new message. Right Click and Paste the text into the email. Don’t forget to add recipients and a subject. Click Send to send the meeting invite.
You can also text this information to participants.
ZOOM for Apple Mac Users

1. Navigate to the menu on the top right of the screen. Click Join a Meeting.
2. Enter the 6 digit Meeting ID or Personal Link Name given to you by the meeting organizer. Click Join. Put in the password if prompted.
3. The message above will appear as the meeting is loading.
4. If the host has not joined the meeting yet, you will be asked to wait. The above screen will appear once the meeting has opened.
Step 6: Join a Zoom Meeting
ZOOM for Apple Mac Users

7. To enable video, navigate to the menu on the bottom of the meeting screen. Select the icon for Start Video.
8. To stop the video, select the same icon, which should now say Stop Video.
5. To join audio navigate to the menu on the bottom of the meeting screen. Select Join Audio. You can also join by selecting the icon for Join Audio in the middle of the screen.
6. Select Join With Computer Audio from the pop up that appears on the screen.
ZOOM for Apple Mac Users
Step 6: Join a Zoom Meeting (Continued)

1. Navigate to the menu at the bottom of the meeting screen. Select the icon for Share Screen.
2. Select the screen you wish to share. Click Share to begin sharing with other participants.
3. To stop sharing your screen, navigate to the menu at the top of the screen. Select Stop Share.
Step 7: Share Screen in a Zoom Meeting
ZOOM for Apple Mac Users