tutorials.render-test.comtutorials.render-test.com/worddocs/displacement_mod_ooze... · web...
TRANSCRIPT

Displacement ModifiersChapter 1 - Living Ooze
In this tutorial we will utilize Displacement maps to create an amorphic oozing blob of writhing goop. This will be a great way to start your knowledge of using the displace modifier with something fairly simple, and very entertaining.
To start, open 3DS Max and create a box from the Geometry under the create tab.
I have created this box, and given it a Length, Width, and Height of 50.0 with
20 Segments in each as well.
This will give us quite a view polygons to work with and make our ooze stretch and writhe as smooth as possible.
1

Next, we are going to make sure our box is selected and go to the modifier tab. From the drop down list, we are going to find the Spherify modifier and add it to our box.
This modifier does exactly what its name would suggest. It makes other objects look as much like a sphere as possible.
Once you have added it, you'll see that the settings consist of a percentage of 0 to 100.
Minor Spherification to Full Spherification. It's default is 100 and we will leave it at this.
You might ask why the heck didn't we just create a sphere?
The answer is, you absolutely could have just made a sphere. However, when you create a sphere from the geometry section, look at the top and bottom where the poles would be if it were the planet earth. Notice that they are made up of triangles. Triangles don't smooth as well as Quads, you tend to get a pinch effect out of the top and bottom of a sphere instead of smooth edges.
Using spherify lets us avoid these triangle polys, and in turn will allow for a much smoother animation.
2
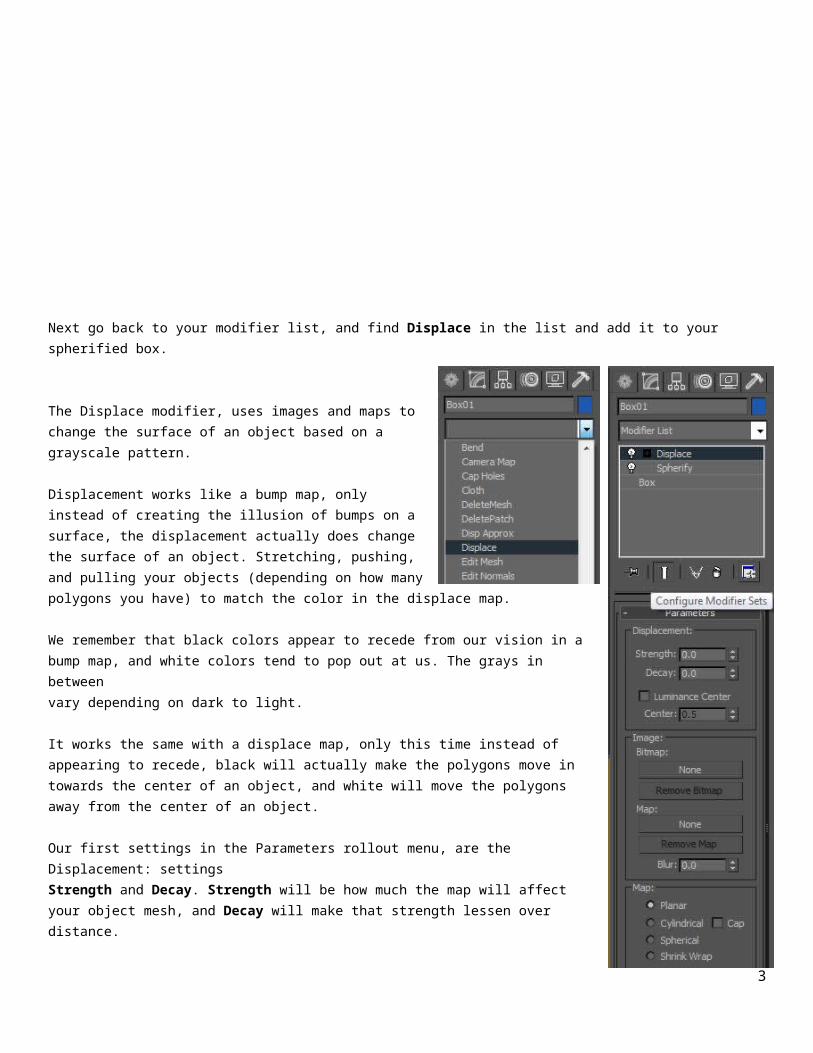
Next go back to your modifier list, and find Displace in the list and add it to your spherified box.
The Displace modifier, uses images and maps to change the surface of an object based on a grayscale pattern.
Displacement works like a bump map, only instead of creating the illusion of bumps on a surface, the displacement actually does change the surface of an object. Stretching, pushing, and pulling your objects (depending on how many polygons you have) to match the color in the displace map.
We remember that black colors appear to recede from our vision in a bump map, and white colors tend to pop out at us. The grays in between vary depending on dark to light.
It works the same with a displace map, only this time instead of appearing to recede, black will actually make the polygons move in towards the center of an object, and white will move the polygons away from the center of an object.
Our first settings in the Parameters rollout menu, are the Displacement: settingsStrength and Decay. Strength will be how much the map will affect your object mesh, and Decay will make that strength lessen over distance.
Luminance Center will allow you to change the level of gray that is used for the middle of the road.Gray at 128, or 50% gray is defaulted as the Center with a value of 0.5.
This means that any gray above 128 will move the polygons in the outward direction, away from the center. Any gray below 128 will move the polygons inward, toward the center of the object.
With the Center: setting as long as Luminance Center is marked, you can modify where this center value of gray will happen.
The next group of settings is the Image: settings, and this is the most important group. Without an image, the displace modifier has nothing to go on and no idea what you want it to modifier the shape of your object using.
You have two choices here, you can choose a Bitmap (picture) for the displacement image, or you can choose a Map (Editable Material in Max).
3

Click on the None button under Map:
The Material/Map Browser window will open, you should recognize this window from creating textures in the Material Editor.Select Noise from the list, and click on Ok.
<--- It will show up in your Image: settings. Noise is editable to our liking.
4

In order to be able to quickly and easily edit the Noise map settings to our liking, we need to open up our Material Editor (M).Click and drag your newly added Noise Map from your Displace modifier settings, over to an empty texture slot in your material editor.
When the copy map window opens, make sure you have Instance marked.
This allows any changes we make to the Noise map in our Material Editor, to be automatically transferred to the Noise Map that we put in our Displace Modifier settings.
The empty gray sphere in your Material Editor will change to a flat image of the noise map.
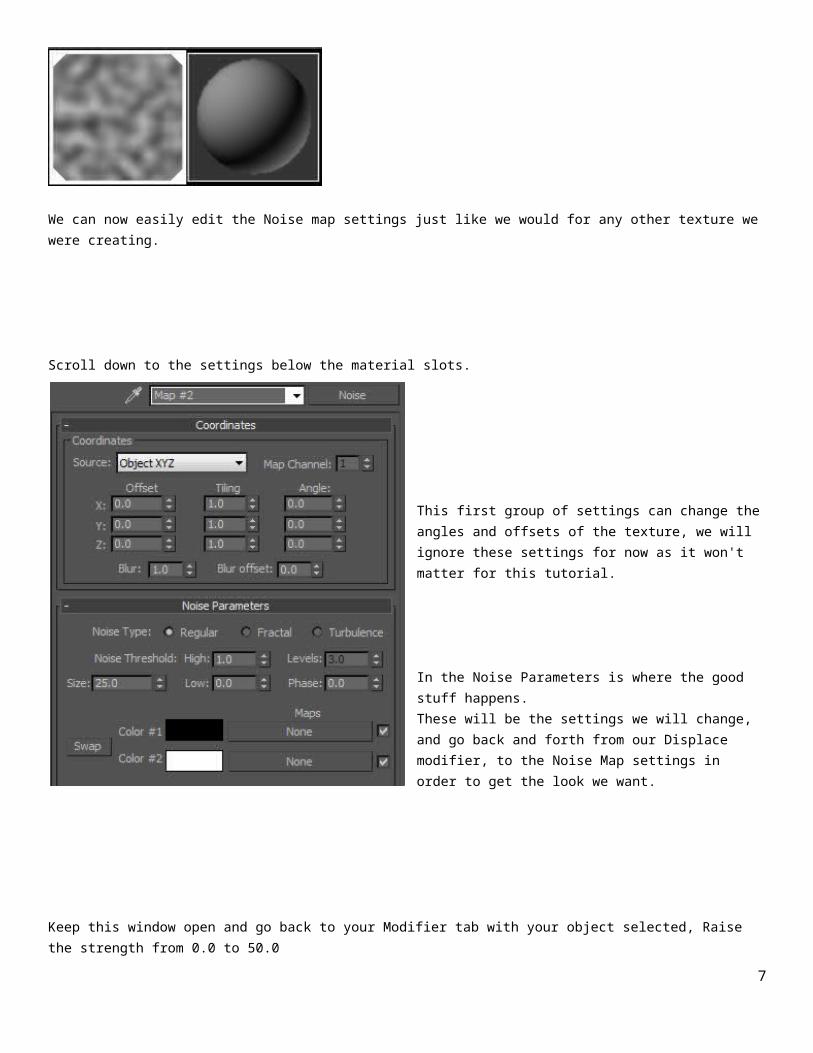
We can now easily edit the Noise map settings just like we would for any other texture we were creating.
5

Scroll down to the settings below the material slots.
This first group of settings can change the angles and offsets of the texture, we will ignore these settings for now as it won't matter for this tutorial.
In the Noise Parameters is where the good stuff happens.These will be the settings we will change, and go back and forth from our Displace modifier, to the Noise Map settings in order to get the look we want.
Keep this window open and go back to your Modifier tab with your object selected, Raise the strength from 0.0 to 50.0
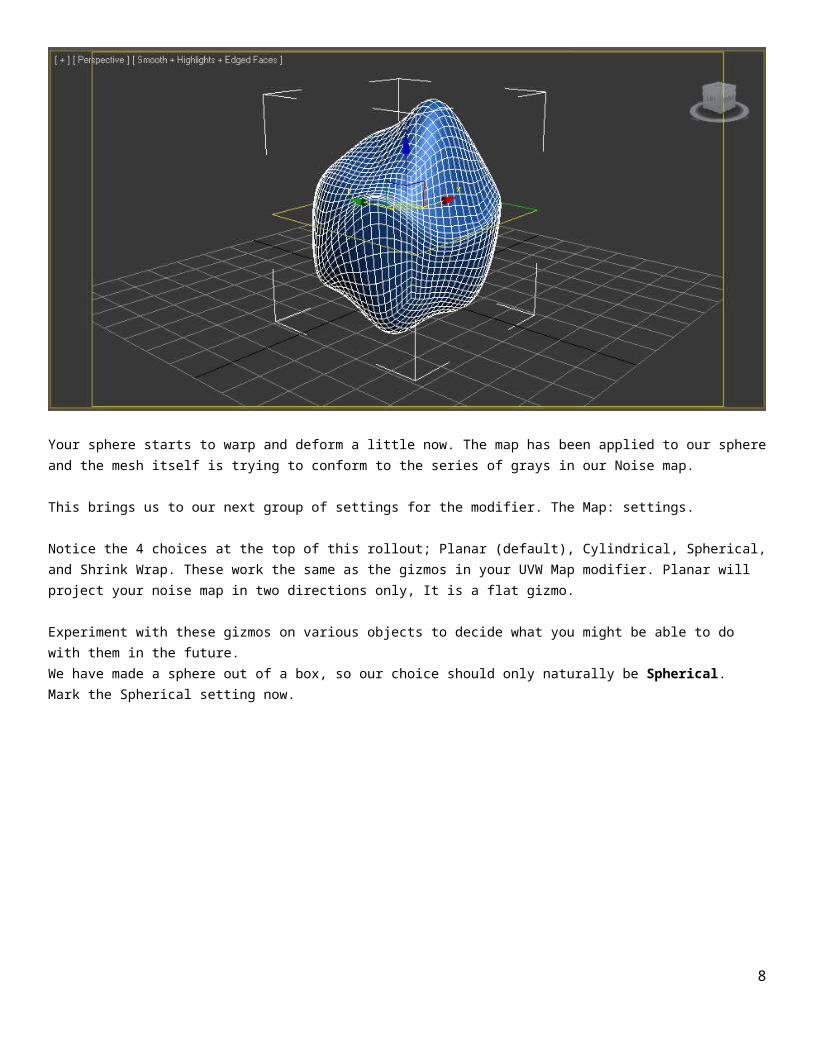
Your sphere starts to warp and deform a little now. The map has been applied to our sphere and the mesh itself is trying to conform to the series of grays in our Noise map.
6
This brings us to our next group of settings for the modifier. The Map: settings.
Notice the 4 choices at the top of this rollout; Planar (default), Cylindrical, Spherical, and Shrink Wrap. These work the same as the gizmos in your UVW Map modifier. Planar will project your noise map in two directions only, It is a flat gizmo.
Experiment with these gizmos on various objects to decide what you might be able to do with them in the future. We have made a sphere out of a box, so our choice should only naturally be Spherical. Mark the Spherical setting now.
Notice the immediate change in your object. Click back and forth to see the difference. Spherical projects your noise to all sides of your object.
7
Now return to your Material Editor (M).
Find the Size: setting and try reducing it from its default at 25.0 to 15.0. Decreasing the size of the noise, makes more light and dark areas in the map, and translates to more deformations of the object.Now, find the Phase: setting watch your object as you scroll this setting up and down. The curves in the mesh start writhing in and out and around the surface of our sphere giving it a rather menacing effect.Using your auto key you can animate the settings like Size and Phase to give yourself some new and now moving deformations of our once plain box/sphere. Animate the Strength and Decay settings in the Displace modifier and see what that will do for you as well. Adjust your various settings to your liking.
Now all that is missing is your favorite customized texture, and perhaps some nice lighting to really make this ..." thing" come to life.
8