versity storage manager (vsm) administration guide
TRANSCRIPT
VSM Administration Guide
Contents
Overview About Versity Storage Manager (VSM)
What is VSM? Who are the people behind VSM? Open Core Open Source
Setting Up VSM Hardware recommendations Supported Operating Systems Supported Libraries, Drives, & Media
File Configurations High Capacity and Volume Management Paged and Direct I/O Metadata Storage Fast File Recovery Shared File System Support
Design Design Characteristics of Versity Storage Manager Specified Disk Allocation Units (DAU) Settings File System Types Setting the stripe width
Installation Configure Files Install License Key Configure File Systems Configure Archive Devices Configuration Notes
The Master Configuration File Basic Information Required Fields Equipment Identifier Automated library description Tape drive description Equipment Number Equipment Type Family Set Field
Configuring A File System Initializing the File system How to create the Round Robin and Striped configuration
Configuring a Shared File System
Adding and Removing Client Hosts Configuring NFS Quotas
Enable Default Quota Values Enable or Change Quota limits Checking Quotas Removing or Changing Quotas
Archive Daemons Daemons and Processes Trace Files
Operator Utility - samu a The Archiver status c The Device configuration display d The Daemon trace controls display f The File systems display g The Shared clients display h The Help information display (see Default samu help display) l The Usage information display m The Mass storage status display n The Staging status display p The Removable media load requests display r The Removable media display s The Device status display Device Codes t The Tape drive status display u The Staging queue display v The Robot catalog display w The Pending stage queue display C The Memory display D The Disk volume dictionary I The Inode display J The Shared memory display
The Storage Archive Processes Configuring The Archiver
Archive Directives Controlling the Size of Archive Files Using the archmax Directive Setting the Archiver buffer Size Using the bufsize Directive
Configuring The Releaser The Releaser Process Partial Releasing and Partial Staging
Configuring The Stager About The Stager Stager.cmd Preview Request Setting Global or File system Specific Water Marks Priority Request Priority Scheme

Configuring The Recycler Controlling the Recycler Process Removable Media Cartridges recycler.cmd file Prevent recycling with the no_recycle directive Specifying Recycling on an Automated Library recycler.sh Configure Recycling for Disk Archive Volumes
Advanced Topics Samfsdumps Device logging Samexplorer Enabling the Device Log Using samset Removable Media Files Error Reporting Enabling SEF Configuring Vendor-Specific Libraries SCSI Media changer over Fibre Channel Interface
Section 13 - Additional Configuration Sharing the File System with a Network File System Modifying the defaults.conf file Timing Values Customizing Default Values
Support Contacting Versity support

Overview
Welcome to the Versity Storage Manager (VSM) administration guide. VSM has been designed to deliver a powerful data tiering and archive management tool. With VSM, organizations can more easily take advantage of the rapid evolution of low cost networking and storage technology while maintaining data preservation as a primary objective. VSM delivers advanced tiered storage features that reduce storage costs while enhancing data availability and ensuring long-term data preservation.
Installing, configuring, and maintaining VSM is not difficult. This guide will outline all of the necessary steps to set up, administer, and maintain VSM. If problems or question arise, users may consult the VSM support forum or contact the Versity support desk directly at: http://www.versity.com/support
About Versity Storage Manager (VSM)
Versity Storage Manager is based on the open source SAM-QFS distribution from Sun Microsystems. VSM is supported on the Linux platform, both for the metadata server and clients. VSM is not available on the Solaris operating system.
What is VSM?
VSM is a hierarchical storage management software package comprised of an operating system module, which supplies the Versity Shared File System (VSFS) paired with a userland data archiving and management application. The system presents a POSIX file system interface to a global namespace spanning all tiers of the storage infrastructure. All users on the file system utilize the VSM interface to read and write files to the storage devices as if they were doing so on primary disk storage. The system may be configured to back up all work in progress instantaneously in the background, or periodically based on time or other policy criteria. VSM storage tiering is accomplished by copying or moving files from an online disk cache to disk or tape archive media.
Archive media may consist of a VSM file system, another file system, robotic library tape storage, disk storage, or manually loaded tape storage devices. The administrator sets up policies which classify data for the archive. VSM releases disk space associated with archived data according to policies and then restores (stages) the files to the online disk cache as needed. The process of staging and releasing files is completely seamless to the applications.

VSM is a feature rich, sophisticated, reliable, and mature hierarchical storage
management tool enabling customers to access, manage, and control very large data repositories.
Who are the people behind VSM?
Versity Software was co-founded by Harriet Coverston and Bruce Gilpin in 2011. Harriet Coverston is a file system expert with deep experience in high performance storage and archiving. Harriet developed a well known storage and archiving product called SAM-QFS during her tenure at LSC Inc., and was the lead architect for the product at Sun Microsystems. Harriet is the CTO of Versity Software and is responsible for technology strategy, product architecture, and software development. Bruce Gilpin is a technology entrepreneur who has been working with emerging technology companies in Silicon Valley since 1995. Bruce is the CEO of Versity Software and is responsible for sales, corporate development, administration, and corporate strategy. Cray Inc. is a strategic partner working with Versity to provide a fully supported hardware and software archiving solution called Tiered Adaptive Storage (TAS).
Open Core
VSM is a proprietary software product constructed around an open source core technology (SAM-QFS). SAM-QFS was released as open source software by Sun Microsystems under the CDDL license in March of 2008. VSM incorporates portions of the open source SAM-QFS technology under the terms of the Sun Microsystems open source CDDL licence.
Open Source
Versity Software believes that long-term storage and archive data formats must be open. Locking customer data through the use of proprietary file formats is something Versity rejects as a business strategy and something that the company and much of the industry considers an unsound long-term data storage practice. Versity Software utilizes an open source file format – GNU TAR. Files written with VSM can be read directly from the media without the use of any additional software either open source or proprietary. VSM media is also self-describing; meaning that all file meta data is stored on the media with the files in an open standard format. Customers utilizing VSM are able to access their files without the use of any licensed software.

Setting Up VSM Hardware recommendations
VSM is utilized in a wide variety of environments under a range of different workloads. The hardware configurations are dependent upon the workloads and the specific requirements of the site. As part of the deployment planning process, Versity will offer advice on server hardware.
Supported Operating Systems
The supported Linux operating systems are Redhat and Centos. Please refer to the VSM release notes for the currently supported Linux releases.
Supported Libraries, Drives, & Media
The supported tape devices include LTO 4, 5, and 6, STK 10000A, B, C, and D, STK 9840, STK 9940, and the IBM 3592. The supported automated libraries include IBM 3584, Spectra Python robots, the STK L700, L180, SL500, SL3000, and SL8500, and the Quantum Scalar i2000 and i6000. Many other tape drives and libraries can be enabled. Please go to Versity Support for details.

File Configurations
High Capacity and Volume Management
The Versity Shared File System uses a true 64-bit address space, so that large files can be striped and easily spread across various disks and RAID devices. VSM imposes no limit on the number of file systems. Each file system can specify up to 1020 device partitions (LUN’s) and each device partition can range in size up to 4.5 Petabytes of data. VSM supports up to a maximum of 4.5 Exabytes of data per file system.
VSFS supports two kinds of disk allocation - striped and round robin. The volume
management features are specified in the master configuration file (mcf) and the mount parameters.
VSM does not require an external volume management application, however, such
applications may supplement the VSM system.
The inode space is dynamically allocated allowing for a virtually unlimited number of files on VSM. The only limitation is the amount of disk storage available. Each inode entry is a 1024-byte block of descriptive information about the characteristics of a directory or file.
Inodes are located in the .inodes file under the mount point. Inodes can be separated
or included on the file data devices. If inodes are separated, they are located on the dedicated metadata devices. The number of files may be increased by adding additional metadata devices. The size of the metadata devices restricts the number of files in the Versity file system. The number of files can be increased by dynamically growing the metadata devices. There is a limit on the number of files at 264 -1 files. Versity currently recommends no more than 300 million files per file system for optimal performance.

The following table displays standard inode times. The first 3 times listed are POSIX
times and the last 3 times listed are VSM times.
inode times
modification time The time when the file was last modified
access time The time when the file was last accessed
changed time The time when the inode information was last changed
attributes time The time the attributes specific to the file were last changed
residence time The time the file changed from online to offline or offline to online
creation time The time the file was created
Paged and Direct I/O
Paged refers to cached and buffered I/O. User data is stored or cached in memory
pages to be used by the kernel and written to disk. Direct I/O writes user data directly from user memory to disk. To use direct I/O instead of the default paged I/O, set O_DIRECT in the filemode on the open system call. Note, for direct I/O, the buffer must be aligned to 4k and each buffer size must be a multiple of 4k.
Metadata Storage
Metadata is data that describes and gives information on files. File systems use this
metadata as a way to reference files and reference directory information. VSM allows administrators to separate file system metadata and file data by storing them on different devices. Multiple metadata devices may be defined in order to help reduce head movement on the data devices and also to reduce rotational latency. Defining multiple devices can also improve the RAID cache utilization.
Fast File Recovery
Fast file recovery is a key function of VSM. The system allows for quick recovery
after an unexpected outage. VSM dynamically recovers after a failure using:
1. Identification records 2. Error checking on all critical I/O operations 3. Serial writes
After an outage, it is recommended to execute a samfsck –F to repair the file system;
however, with fast file recovery, it is possible to schedule the samfsck at a later time if necessary. If there are errors on the first samfsck -F, Versity recommends to run the samfsck –F process again.

Shared File System Support
The Versity Storage Manager shared file system has performance advantages over a
network file system. File data in an NFS mounted file system is accessed over the network. File data on disks in a shared VSM file system is directly accessed by the hosts. File data travels via direct access I/O (or "local path I/O"), as VSM moves data directly between the disks and the hosts.
Multiple host systems can be mounted in a distributed file system. One host is the
metadata server for the file system while other hosts are designated as the clients. Only one host can serve as the metadata server (MDS) at any given moment; however, more than one host may be configured to potentially function as a metadata server.
See: Configuring A Shared File System
Design
Design Characteristics of Versity Storage Manager
The Versity file system is a multi-threaded storage management system. The VSM
archiving capability provides continuous data protection for the file system. Data is archived across all tiers of storage. This means that all of the data is available, but not on high cost storage. It is recommended to create multiple file systems to harness the system’s full capabilities.
Specified Disk Allocation Units (DAU) Settings
VSM supports a wide range of block sizes, called disk allocation units (DAU’s). The
DAU is set when the file system is initialized (sammkfs). This is an important feature which when set correctly, can reduce overhead associated with read-modify-write operations and is especially useful when dealing with applications that access large files.
File System Types

There are two different file system types inside VSM, ms and ma. The file system type is defined in the master configuration file.
● ms file system The ms file system maintains data and file system metadata on the same devices
● ma file system The ma file system maintains data and file system metadata on different devices
An ms file system type must use the md device type. The metadata and the data are
both written to the md device(s).
An ma file system type writes the metadata to mm devices while the data is written to either md or mr devices.
The mr device type can be adjusted to have different DAU sizes but the size is in
power of 2 increments. The DAU size can be set to 8 kilobytes up to a maximum 32,768 kilobytes. The default mr DAU is 64 kilobytes.
When the md device type is used in a ma file system it is used to store only data,
never metadata. When the md device type is used in an ms file system it stores both metadata and data.
The md and mm device types use a dual allocation scheme, which means small and
large allocation is used. The small DAU is 4k and the large DAU is 16, 32, or 64 kilobytes on the md device. The small DAU is 4k and the large DAU is 16k on the mm device.
The default DAU size is 64 kilobytes but different DAU sizes may be specified at file system initialization time by using the sammkfs command:
# sammkfs -a allocation-size family_set
Setting the stripe width
Stripe = 0 means allocation is round robin. The VSM file system allocates each file
on a different device in a round robin fashion. Stripe > 0 means the VSM file system allocates n DAUs for each file on one device before switching to the next device.

The stripe width should be set based on workload. If the machine is used in a general-purpose environment, then stripe = 0 is optimal. If the workload is large file streaming I/O access, then stripe > 0 is optimal.
The stripe width mount option has a different default for the standalone file system versus the shared file system. The default stripe width on standalone ms and ma file systems is 128K. The default stripe width on shared ms and ma file systems is round robin (stripe = 0).
To set the stripe width, use the -o stripe=n mount option where n is a numeric value
representing the stripe width. If the stripe width is set to 0 then the default round robin allocation will be used. A stripe width = n (>0), means n DAUs are allocated on a device for one file before switching to the next device.
Default stripe widths for standalone file system
DAU size Stripe width (default) Amount allocated
16 kilobytes 8 DAUs 128 kilobytes
32 kilobytes 4 DAUs 128 kilobytes
64 kilobytes 2 DAUs 128 kilobytes
>=128 kilobytes 1 DAU 1 DAU

Installation
When installing VSM, be certain that the Redhat or CentOS kernel is the latest version.
Next, install and configure the kdump Crash Recovery Service.
https://access.redhat.com/documentation/en-US/Red_Hat_Enterprise_Linux/6/html/Deployment_Guide/ch-kdump.html
There are only two rpm packages for VSM. One package contains the VSM archive
manager and the VSFS file system. The other package contains the enhanced debug information. To run a client with just the file system, add the mount parameter, nosam. Clients running just the file system do not require separate license keys, only the MDS requires a license key.
The Linux distributions are Redhat and Centos 6.4 or 6.5
The VSM rpm is: vsm-1.0.2-1.el6.x86_64.rpm Installation Instructions: 1. Check to see if VSM is currently running, as VSM cannot be upgraded while running. Use the following commands to see if VSM is currently mounted or loaded into the kernel. grep VSMqfs/proc/modules If VSM is mounted or loaded, use the following commands to umount and terminate the VSM kernel module. samd umount samd unload 2. Type the following command once per system to import the Versity public key rpm –import vsm-1.02/RPM-GPG-KEY-vsm

3. If upgrading the vsm rpm, type the following command. This command also works for new installations.
rpm –Uvh vsm-1.0.2.el6.x86_64.rpm
4. If downgrading the vsm rpm, type the following command. rpm -Uvh –-oldpackage vsm-1.0.2.el6.x86_64.rpm 5. Reload the file system kernel module and restart sam-fsd. samd reload The file systems can be mounted after completing the above steps. The Redhat and CentOS el6 VSM rpm runs on the 2.6.32 Linux kernel.
Configure Files
Files are installed in the following directories:
/etc/opt/vsm /var/opt/vsm /opt/vsm
Ensure the man and man-pages RPMS are installed. Use yum to download and install those packages.
yum install man -y man man-pages
Set up the sam-log. Touch the file /var/log/vsm/sam-log. Then, add the lines from the /opt/vsm/examples/rsyslog.conf_examples file to the /etc/rsyslogd.conf file and send a HUP to the rsyslogd daemon.
Install License Key

To activate the software, first obtain a license key from Versity. After obtaining a license key, place the license key in the /etc/opt/vsm/VSM.license file.
The key is generated with the system-uuid and is tied to a specific host. Use the following command to obtain the system uuid on the appropriate host. /usr/sbin/dmidecode -s system-uuid
Configure File Systems
Configure the file systems in the master configuration file (mcf), /etc/opt/vsm/mcf
file. Set up persistent disk devices in the mcf if the system is not using multipath (/dev/mapper). In the mcf, set up the disk devices with the path /dev/disk/by_id unless the site is using multipath. For example: [root@dev-mdc1 /]# ls -l /dev/disk/by-id lrwxrwxrwx 1 root root 10 Sep 30 13:03 scsi-360080e50001f5d800000093c521606f7 -> ../../sdba lrwxrwxrwx 1 root root 10 Sep 30 13:03 scsi-360080e50001ff8e800000ab6521616dc -> ../../sdaz lrwxrwxrwx 1 root root 10 Sep 30 13:03 scsi-360080e50001ff8e800000ab852161712 -> ../../sdbb lrwxrwxrwx 1 root root 10 Sep 30 13:03 scsi-360080e50002907b400001244520c4829 -> ../../sdax lrwxrwxrwx 1 root root 10 Sep 30 13:03 wwn-0x60080e50001f5d800000093c521606f7 -> ../../sdba lrwxrwxrwx 1 root root 10 Sep 30 13:03 wwn-0x60080e50001ff8e800000ab6521616dc -> ../../sdaz lrwxrwxrwx 1 root root 10 Sep 30 13:03 wwn-0x60080e50001ff8e800000ab852161712 -> ../../sdbb lrwxrwxrwx 1 root root 10 Sep 30 13:03 wwn-0x60080e50002907b400001244520c4829 -> ../../sdax
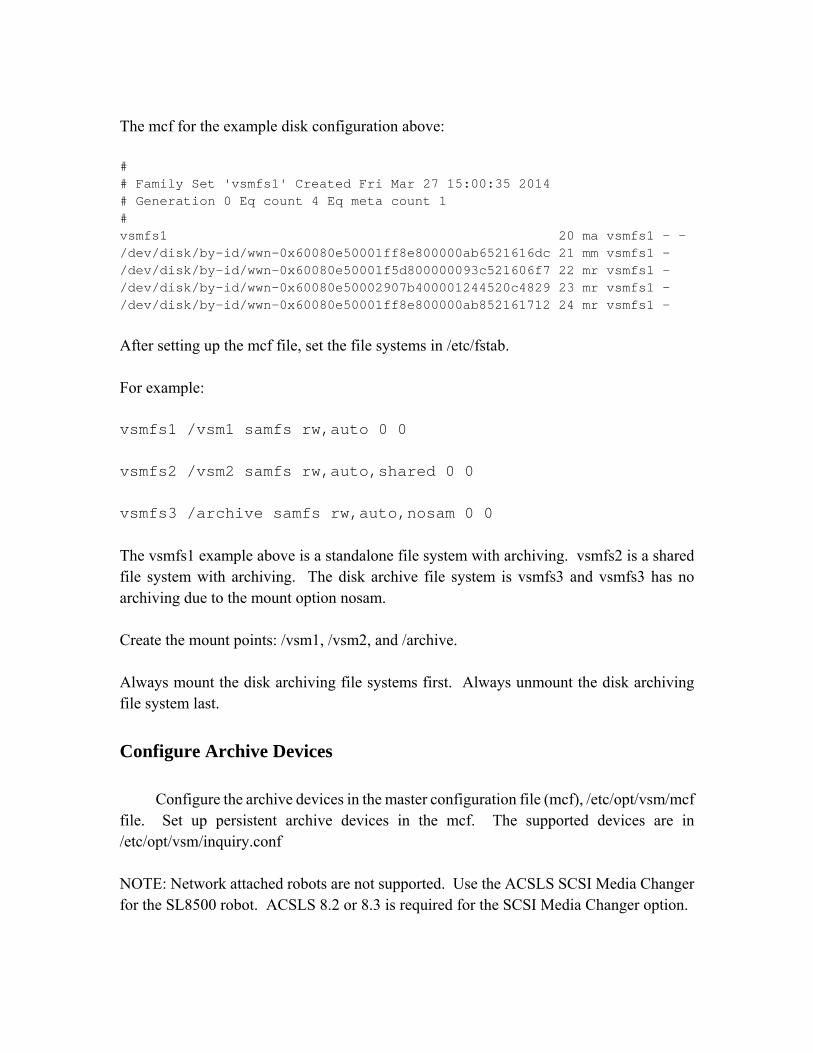
The mcf for the example disk configuration above: # # Family Set 'vsmfs1' Created Fri Mar 27 15:00:35 2014 # Generation 0 Eq count 4 Eq meta count 1 # vsmfs1 20 ma vsmfs1 - - /dev/disk/by-id/wwn-0x60080e50001ff8e800000ab6521616dc 21 mm vsmfs1 - /dev/disk/by-id/wwn-0x60080e50001f5d800000093c521606f7 22 mr vsmfs1 - /dev/disk/by-id/wwn-0x60080e50002907b400001244520c4829 23 mr vsmfs1 - /dev/disk/by-id/wwn-0x60080e50001ff8e800000ab852161712 24 mr vsmfs1 - After setting up the mcf file, set the file systems in /etc/fstab. For example: vsmfs1 /vsm1 samfs rw,auto 0 0 vsmfs2 /vsm2 samfs rw,auto,shared 0 0 vsmfs3 /archive samfs rw,auto,nosam 0 0 The vsmfs1 example above is a standalone file system with archiving. vsmfs2 is a shared file system with archiving. The disk archive file system is vsmfs3 and vsmfs3 has no archiving due to the mount option nosam. Create the mount points: /vsm1, /vsm2, and /archive. Always mount the disk archiving file systems first. Always unmount the disk archiving file system last.
Configure Archive Devices
Configure the archive devices in the master configuration file (mcf), /etc/opt/vsm/mcf
file. Set up persistent archive devices in the mcf. The supported devices are in /etc/opt/vsm/inquiry.conf NOTE: Network attached robots are not supported. Use the ACSLS SCSI Media Changer for the SL8500 robot. ACSLS 8.2 or 8.3 is required for the SCSI Media Changer option.
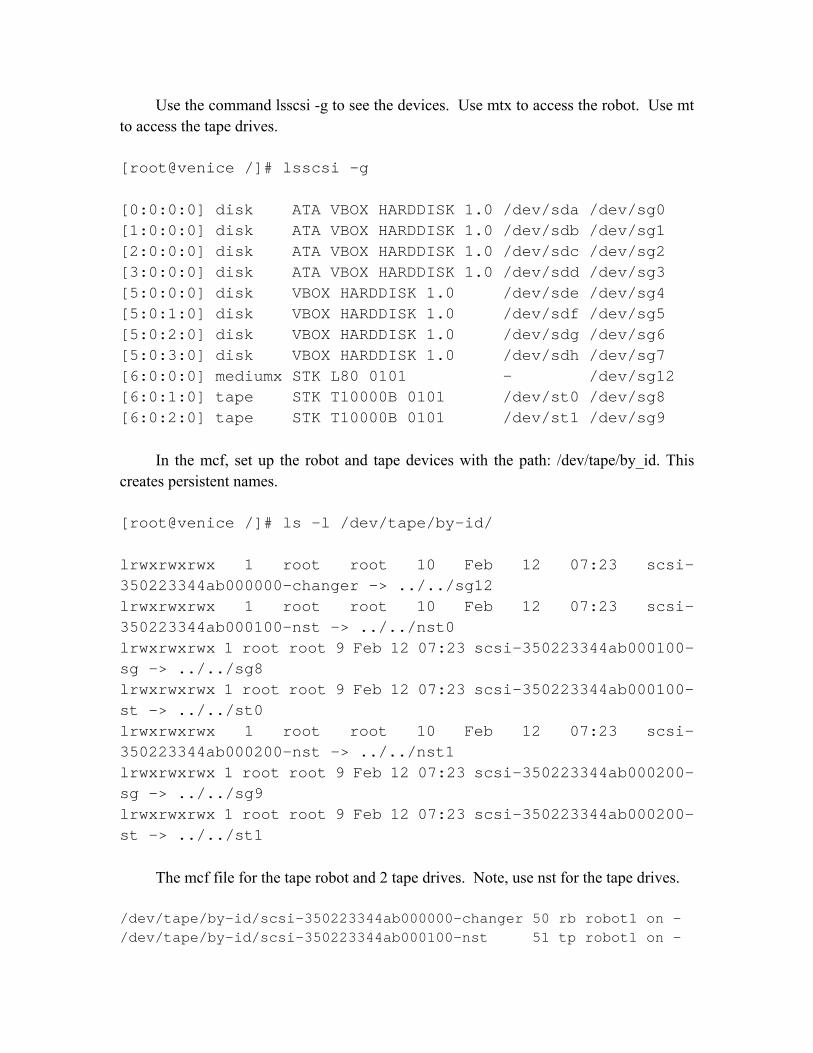
Use the command lsscsi -g to see the devices. Use mtx to access the robot. Use mt to access the tape drives. [root@venice /]# lsscsi -g [0:0:0:0] disk ATA VBOX HARDDISK 1.0 /dev/sda /dev/sg0 [1:0:0:0] disk ATA VBOX HARDDISK 1.0 /dev/sdb /dev/sg1 [2:0:0:0] disk ATA VBOX HARDDISK 1.0 /dev/sdc /dev/sg2 [3:0:0:0] disk ATA VBOX HARDDISK 1.0 /dev/sdd /dev/sg3 [5:0:0:0] disk VBOX HARDDISK 1.0 /dev/sde /dev/sg4 [5:0:1:0] disk VBOX HARDDISK 1.0 /dev/sdf /dev/sg5 [5:0:2:0] disk VBOX HARDDISK 1.0 /dev/sdg /dev/sg6 [5:0:3:0] disk VBOX HARDDISK 1.0 /dev/sdh /dev/sg7 [6:0:0:0] mediumx STK L80 0101 - /dev/sg12 [6:0:1:0] tape STK T10000B 0101 /dev/st0 /dev/sg8 [6:0:2:0] tape STK T10000B 0101 /dev/st1 /dev/sg9
In the mcf, set up the robot and tape devices with the path: /dev/tape/by_id. This creates persistent names. [root@venice /]# ls -l /dev/tape/by-id/ lrwxrwxrwx 1 root root 10 Feb 12 07:23 scsi-350223344ab000000-changer -> ../../sg12 lrwxrwxrwx 1 root root 10 Feb 12 07:23 scsi-350223344ab000100-nst -> ../../nst0 lrwxrwxrwx 1 root root 9 Feb 12 07:23 scsi-350223344ab000100-sg -> ../../sg8 lrwxrwxrwx 1 root root 9 Feb 12 07:23 scsi-350223344ab000100-st -> ../../st0 lrwxrwxrwx 1 root root 10 Feb 12 07:23 scsi-350223344ab000200-nst -> ../../nst1 lrwxrwxrwx 1 root root 9 Feb 12 07:23 scsi-350223344ab000200-sg -> ../../sg9 lrwxrwxrwx 1 root root 9 Feb 12 07:23 scsi-350223344ab000200-st -> ../../st1
The mcf file for the tape robot and 2 tape drives. Note, use nst for the tape drives. /dev/tape/by-id/scsi-350223344ab000000-changer 50 rb robot1 on - /dev/tape/by-id/scsi-350223344ab000100-nst 51 tp robot1 on -

/dev/tape/by-id/scsi-350223344ab000200-nst 52 tp robot1 on -
Rebuild the symlinks if they are missing, reboot, and verify that they exist. Use the following command to rebuild the symlinks:
/sbin/udevadm trigger

Configuration Notes
Disable SELinux. Set SELINUX=disabled in the /etc/sysconfig/selinux file.
Run with all firewalls disabled on the server.
Check debug dependencies:
1. check for crash kernel for 2.6.32-x.y.z.el6.x86_64 2. kdump 3. Firewall disabled 4. Set selinux to disabled in /etc/sysconfig/selinux
(SELINUX=disabled) 5. Enable core dumps. Set the core size to unlimited in
etc/security/limits.conf. Add the following line * soft core unlimited
The Master Configuration File
Basic Information
The Master Configuration (mcf) file is located in
/etc/opt/vsm/mcf
This section contains examples of the mcf for different kinds of file systems.
The mcf is vital for the file system to run as it holds information for how the equipment managed by VSM is interrelated and how it communicates with other parts of the system. The mcf holds specific information about the devices and file systems that are
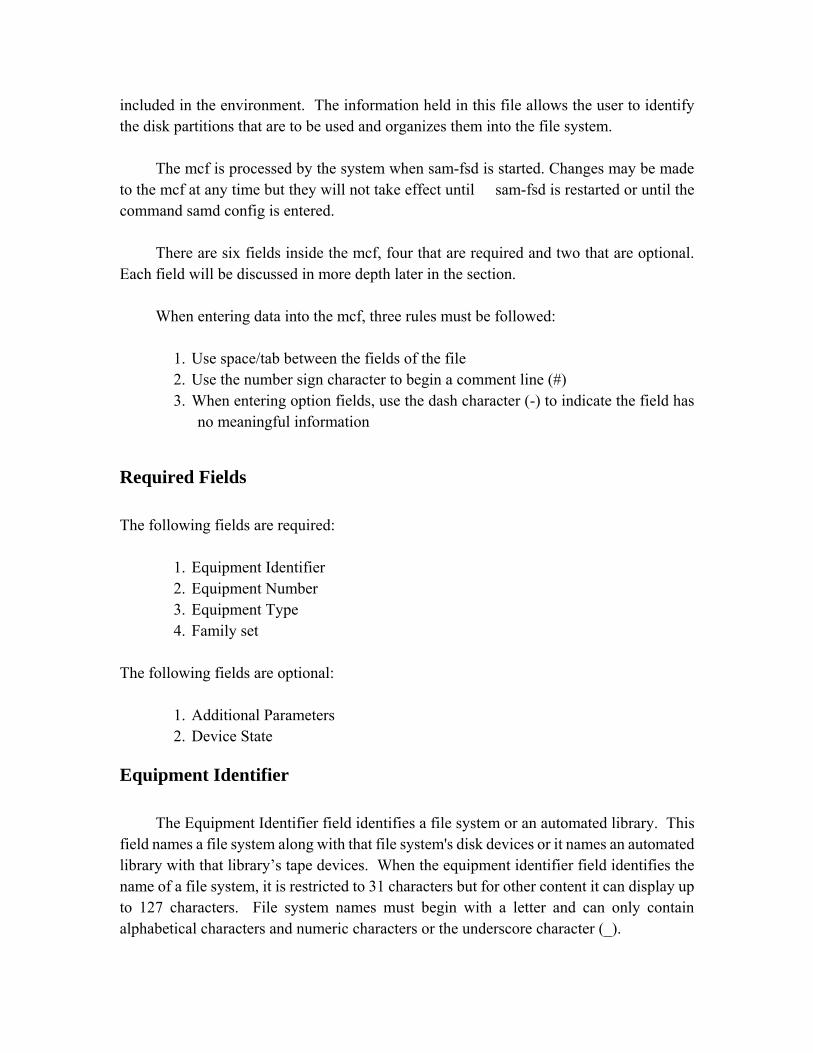
included in the environment. The information held in this file allows the user to identify the disk partitions that are to be used and organizes them into the file system.
The mcf is processed by the system when sam-fsd is started. Changes may be made to the mcf at any time but they will not take effect until sam-fsd is restarted or until the command samd config is entered.
There are six fields inside the mcf, four that are required and two that are optional. Each field will be discussed in more depth later in the section.
When entering data into the mcf, three rules must be followed:
1. Use space/tab between the fields of the file 2. Use the number sign character to begin a comment line (#) 3. When entering option fields, use the dash character (-) to indicate the field has
no meaningful information
Required Fields
The following fields are required:
1. Equipment Identifier 2. Equipment Number 3. Equipment Type 4. Family set
The following fields are optional:
1. Additional Parameters 2. Device State
Equipment Identifier
The Equipment Identifier field identifies a file system or an automated library. This
field names a file system along with that file system's disk devices or it names an automated library with that library’s tape devices. When the equipment identifier field identifies the name of a file system, it is restricted to 31 characters but for other content it can display up to 127 characters. File system names must begin with a letter and can only contain alphabetical characters and numeric characters or the underscore character (_).
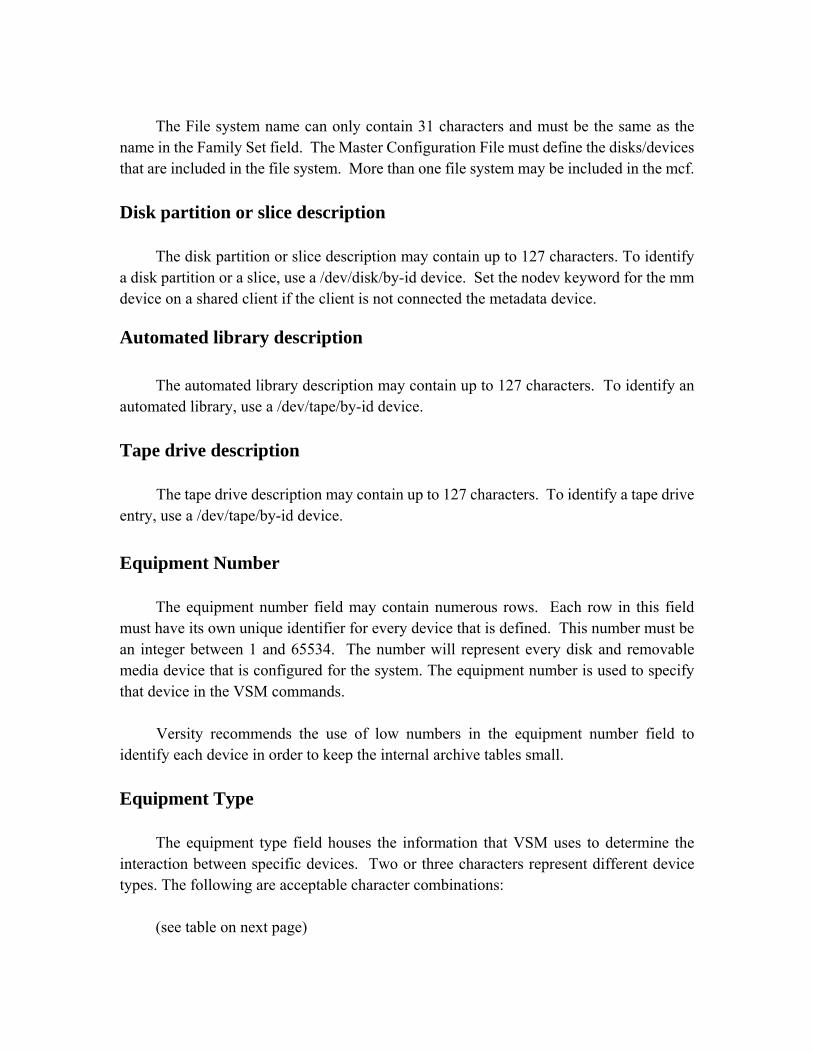
The File system name can only contain 31 characters and must be the same as the
name in the Family Set field. The Master Configuration File must define the disks/devices that are included in the file system. More than one file system may be included in the mcf.
Disk partition or slice description
The disk partition or slice description may contain up to 127 characters. To identify a disk partition or a slice, use a /dev/disk/by-id device. Set the nodev keyword for the mm device on a shared client if the client is not connected the metadata device.
Automated library description
The automated library description may contain up to 127 characters. To identify an
automated library, use a /dev/tape/by-id device.
Tape drive description
The tape drive description may contain up to 127 characters. To identify a tape drive entry, use a /dev/tape/by-id device.
Equipment Number
The equipment number field may contain numerous rows. Each row in this field must have its own unique identifier for every device that is defined. This number must be an integer between 1 and 65534. The number will represent every disk and removable media device that is configured for the system. The equipment number is used to specify that device in the VSM commands.
Versity recommends the use of low numbers in the equipment number field to identify each device in order to keep the internal archive tables small.
Equipment Type
The equipment type field houses the information that VSM uses to determine the interaction between specific devices. Two or three characters represent different device types. The following are acceptable character combinations:
(see table on next page)

Equipment Type
ms A file system that stores data and metadata together on the same device.
ma A file system that stores metadata on a separate device. The metadata is stored on mm devices and the data is stored on a md or mr device.
md
A round-robin or a striped disk device using dual allocation to store the file data. In a ms file system, data and metadata is stored on this md device. In a ma file system, only data is stored on this device.
mm
A device that stores the metadata information (inodes, directories, etc.). More than one metadata device can be defined. Round robin is the default allocation used for multiple metadata devices. All metadata on a ma file system is stored on separate devices from the data devices.
mr A round robin or striped device using single allocation to store file data.
rb A SCSI attached library which is automatically configured by VSM. It is also a STK library configured in SCSI emulation mode by ACSLS.
tp A generic tape drive which is automatically configured by VSM.
hy The historian, the on-the-shelf media catalog
Family Set Field
The family set is a user-defined name for a group of devices. The name must begin with a letter and can only contain numeric, alphabetic, and the underscore (_) characters.
The family set name is used to associate related groups of related devices. These names can be a file system name, an automated library identifier, or a dash character. The dash character must only be for a standalone removable tape device. When the name of an automated library identifier is established, then the library and all the drives associated with that library must use the same identifier. When a family system name is established, every disk device attached to the file system must share the same file system name in the family set field. VSM uses this field to group all of the devices together as a file system or all of the devices together as a automated library. Use the sammkfs
command to record the family set name for all of the devices connected to the file system. The samfsck –F –R command can be used to rename the family set name. Device State Field & Additional Parameters
When the file system is first initialized it sends the state of the device to be displayed in the device state field. It will display either on or off. All devices are set to be on, by default. The device state field is optional and can be any of the following: on (default), off, unavail, down, idle, readonly, and noalloc. This field is used by disk devices, libraries, drives, and any other devices attached to the system.
The additional parameters field contains information that is not necessarily vital to the system. It may display the path to a library catalog or it might display an interface file. This field cannot exceed 127 characters. This field can also be left blank with the dash character (-) in its place. Use this field to specify a new path to the library catalog file. The default setting is: /var/opt/vsm/catalog/family-set-name
In a shared file system, the path must include the keyword shared in the additional parameters field.
Configuring A File System The Master Configuration File
As mentioned previously, the Master Configuration File (mcf) holds the information on all the devices that are controlled by VSM.
The ASCII mcf file should be created when initially configuring the system. The mcf file contains information the file system requires to organize RAID/disk devices into file systems. The mcf also contains the entries for every automated library or standalone tape device in the file system.
The mcf file is located in /etc/opt/vsm/mcf. A sample mcf is located in /opt/vsm/examples/mcf.
The samfs.cmd File
The samfs.cmd file defines the mount parameters for VSM file systems.

Initializing the File system
The sammkfs command initializes the file system. sammkfs is used to create a new file system or to replace an outdated or damaged file system.
How to create the Round Robin and Striped configuration
This section provides a sample configuration of VSM that separates the metadata onto low-latency disk such as SSD and allocates the data on each of the data devices.
The following is an example illustrating the creation of a file system with one
metadata device and five data devices. First, create the mcf file. For example: # VSM disk cache file system # Equipment Ordinal Type Family Set Family Device Addt’l # Identifier Ord Type Set State Parameters # ---------- ------ ------ ------ ------ ------------- vsmfs1 20 ma vsmfs1 on - /dev/mapper/tst-mdt0 21 mm vsmfs1 on /dev/mapper/tst-dc2 22 mr vsmfs1 on /dev/mapper/tst-dc3 23 mr vsmfs1 on /dev/mapper/tst-dc4 24 mr vsmfs1 on /dev/mapper/tst-dc5 25 mr vsmfs1 on /dev/mapper/tst-dc6 26 mr vsmfs1 on Second, create the /vsm1 mount point for the vsmfs1 file system # mkdir /vsm1 Third, initialize the file system # sammkfs vsmfs1 Fourth, modify the /etc/fstab file vsmfs1 /vsm1 samfs rw,auto,stripe=0 Finally, mount the file system # mount /vsm1

The mount parameter stripe = 0 selects round robin allocation. This means each file is allocated on a different data device in a round-robin mode. The allocation for the file remains on that device until the device is full. It is possible to change the allocation mode to striped while the file system is mounted. Setting stripe = n > 0 means n DAUs are allocated on each data device before switching to the next data device. To set stripe, issue the samcmd command: # samcmd stripe 20 2 The stripe parameter is not consistent across mounts. In order to keep the stripe setting for the next mount, it is necessary to modify the /etc/fstab in order to keep the stripe setting for the next mount. vsmfs1 /vsm1 samfs rw,auto,stripe=2 # umount /vsm1 # mount /vsm1 The mount parameter stripe = 2 means the file system is running with striped allocation. Type the samfsinfo command to display the file system information.
------------------------------------------------------------------------------------------------------------ # samfsinfo vsmfs1 samfsinfo: filesystem vsmfs1 is mounted. name: vsmfs1 version: 3 opt mask 0x120 time: Fri Feb 14 07:33:52 2014 Extended attribute files present feature: Aligned Maps count: 6 capacity: 0000000917800000 DAU: 1024 space: 0000000916759c00 meta capacity: 000000001a2afc00 meta DAU: 16 meta space: 000000001a2ac090 ord eq capacity space device 0 21 000000001a2afc00 000000001a2ac090 /dev/mapper/tst-mdt0 on 1 22 00000001d1800000 00000001d17ffc00 /dev/mapper/tst-dc2 on 2 23 00000001d1800000 00000001d17ffc00 /dev/mapper/tst-dc3 on 3 24 00000001d1800000 00000001d17ffc00 /dev/mapper/tst-dc4 on 4 25 00000001d1800000 00000001d17ffc00 /dev/mapper/tst-dc5 on 5 26 00000001d1800000 00000001d17ffc00 /dev/mapper/tst-dc6 on
------------------------------------------------------------------------------------------------------------ samfsinfo output shows that the vsmfs1 file system is a version 3 superblock.
Configuring a Shared File System

This section shows how to build and configure a shared file system. The parameter shared must be added in the additional parameter field in the mcf file. The parameter -S must be specified on the sammkfs to build a shared file system. The mount parameter shared must be set in order to mount a shared file system.
First, create the mcf file and add the shared parameter: # VSM disk cache file system # Equipment Ordinal Type Family Set Family Device Addt’l # Identifier Ord Type Set State Parameters # ---------- ------ ------ ------ ------ --------------- vsmfs1 20 ma vsmfs1 on shared /dev/mapper/tst-mdt0 21 mm vsmfs1 on /dev/mapper/tst-dc2 22 mr vsmfs1 on /dev/mapper/tst-dc3 23 mr vsmfs1 on /dev/mapper/tst-dc4 24 mr vsmfs1 on /dev/mapper/tst-dc5 25 mr vsmfs1 on /dev/mapper/tst-dc6 26 mr vsmfs1 on Second, create the /vsm1 mount point for the vsmfs1 file system # mkdir /vsm1 Third, initialize the hosts table in /etc/opt/vsm/hosts.family_set_name. The following file, hosts.vsmfs1, shows a shared file system with two hosts. #Host file paris.versity.lan 172.30.86.218 1 0 server paris-client.versity.lan 172.30.86.219 2 0 Fourth, initialize the file system. Specify the –S option. # sammkfs –S vsmfs1 Fifth, modify the /etc/fstab file. Add the mount parameter shared vsmfs1 /vsm1 samfs rw,auto,shared Finally, mount the shared file system on the MDS. # mount /vsm1 Mounting/Unmounting shared file systems

The order in which one mounts and unmounts shared file systems is crucial to proper system function. Take particular care when mounting the metadata server and clients. The mount options should be the same on the metadata server and all potential metadata servers as this is important in recovering from a system failure. It is a good idea to create one samfs.cmd file as the default file and simply copy that file across all hosts. Both “ma” and “ms” file system equipment types can be used in a shared file system environment. The default stripe width for shared file systems is round robin (stripe=0). Mounting a Shared File System
Mount the file system on the metadata server first before mounting the file system on any of the client hosts. The file system can be mounted on the client hosts in any order once the metadata server has been mounted. Mount the file system on the metadata server and clients with the following command:
# mount -t samfs -o shared vsmfs1 /vsm1 Unmounting a Shared File System
To unmount the file system work in reverse from when mounting the file system. First, unmount from the client hosts that the file system was mounted on - the order of the client hosts does not matter. If necessary, force the file system to unmount by using the -f option.
client# umount -f /vsm1
It is safe to unmount the file system on the metadata server after every participating client has been unmounted.
metadataserver# umount /vsm1
Sometimes the system may require that this command is run twice in a row. This is not an error and is not harmful to the system.
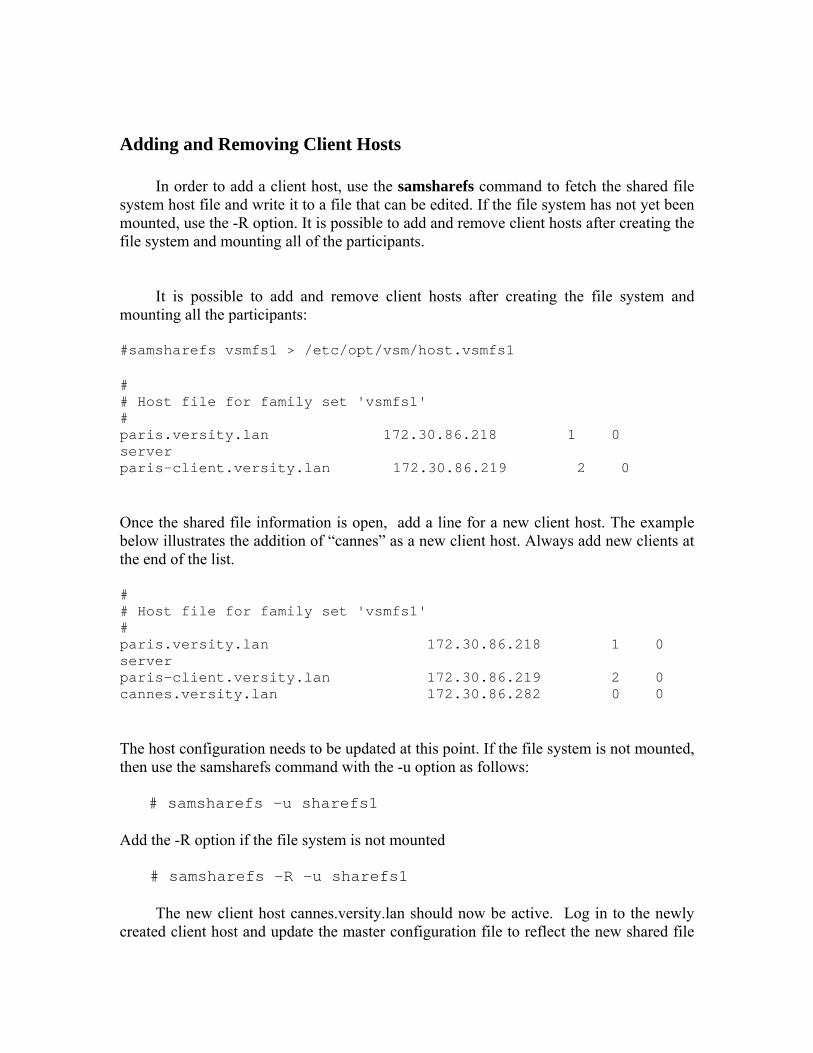
Adding and Removing Client Hosts
In order to add a client host, use the samsharefs command to fetch the shared file system host file and write it to a file that can be edited. If the file system has not yet been mounted, use the -R option. It is possible to add and remove client hosts after creating the file system and mounting all of the participants.
It is possible to add and remove client hosts after creating the file system and
mounting all the participants: #samsharefs vsmfs1 > /etc/opt/vsm/host.vsmfs1 # # Host file for family set 'vsmfs1' # paris.versity.lan 172.30.86.218 1 0 server paris-client.versity.lan 172.30.86.219 2 0 Once the shared file information is open, add a line for a new client host. The example below illustrates the addition of “cannes” as a new client host. Always add new clients at the end of the list. # # Host file for family set 'vsmfs1' # paris.versity.lan 172.30.86.218 1 0 server paris-client.versity.lan 172.30.86.219 2 0 cannes.versity.lan 172.30.86.282 0 0 The host configuration needs to be updated at this point. If the file system is not mounted, then use the samsharefs command with the -u option as follows: # samsharefs -u sharefs1 Add the -R option if the file system is not mounted # samsharefs -R -u sharefs1
The new client host cannes.versity.lan should now be active. Log in to the newly created client host and update the master configuration file to reflect the new shared file

system vsmfs1. The file system and disk declaration need to have identical data in the equipment type, equipment number, and family set name fields of the mcf on the metadata server, paris.versity.lan. Use the samfsconfig command to build a mcf file on a client.
# samfsconfig /dev/mapper* Next, inform the system of the new changes by using the samd config command. # samd config Create a mount point for the shared file system if one does not already exist. # mkdir /vsm1
The /etc/fstab file needs to be modified to either allow the file system to mount automatically at boot time or to disable the system from mounting automatically at boot time. Either enter an auto or noauto in the /etc/fstab file.
vsmfs1 /vsm1 samfs rw,auto,shared
Finally, mount the shared file system on the client if the metadata server is mounted.
# mount /vsm1
View the Metadata Server and the list of clients in the samu g display. For more information on the samu utility, see "Operator Utility samu"
Configuring NFS
In order to export a VSM file system for NFS, add an entry to the /etc/exports file. For example, the following line would export the /vsm1 file system in rw mode to all hosts on versity.lan.
/vsm1 *.versity.lan(rw) To implement the /etc/exports change, run the /usr/sbin/exportfs –a command.
Quotas What are file system Quotas?

File system quotas are used to control all space used by the users. Every user is allocated a certain amount of space and a certain number of inodes and the user cannot exceed that number. After quotas are enabled, they can easily be adjusted as needed.
Quotas are specified by ID. Each user or group has an ID that is used to set the quota for that user. By default, the quota mount option is enabled. If the file system detects the presence of quota files in the root directory at mount time, it enables quotas. Quotas can be disabled by setting the noquota mount option. Soft and Hard Limits
Limits are used to keep a user from exceeding an allotted amount of resources in the system. Soft limits can be reached and exceeded by a user but only for a small amount of time before the user must make sure that they drop down below the soft limit. When a user exceeds the soft limit, a timer will be triggered and the user only has until the timer reaches zero to drop their usage back below the soft limit. The timer is set by the administrator by using the samquota command. If the timer reaches zero and the user has not brought their usage below the soft limit, the system will prevent the user from adding additional data or files until the soft limit is met. The hard limit cannot be exceeded - no exceptions. If the user does exceed the soft limit, they still cannot exceed the hard limit. When a user does reach the hard limit, the EDQUOT error will be returned and their operation will not complete.
The user can view information about their quotas by using the squota command.
The administrator should determine the disk space and the number of inodes that should be allocated to each user. A simple rule of thumb, to be certain that the group does not exceed the total space, is to divide the space allocated by the number of users in the group. For example if 100Gbs has been allocated for a group of 4, each user would receive a limit of 25Gbs. In some circumstances not every user will need the full 25Gbs of allotted space. It is okay to add extra space for each user if there is certainty that not every user will require the full amount.
Disk Blocks and File Limits
All quotas in VSM are specified in blocks of 512-bytes and disk space is expressed in DAUs. The DAUs for a given file system may be discovered with the samfsinfo command. It is best to set block quotas in terms of multiples of the file system DAU to keep things easier to manage. If multiples of the DAU are not used, then the user can only utilize space that is rounded down from the nearest DAU.
There are two block limits, online and total. Online blocks are DAUs allocated to the
user on the disk cache, that is, all online files. Total blocks are DAUs allocated to the user on all files, whether they are online or offline.

The user can exceed the number of inodes they were allocated without using any
blocks if the user created all empty files. Similarly, the user could use a single inode and exceed the block quota if they created a file that was so large it consumed all data blocks in the quota. Configuring quotas in a file system
Determine how may users and how many groups are in the system.
1. Mount the file system and change to the root directory.
# mount /vsm1 # cd /vsm1
2. Verify the .quota_u and .quota_g files do not already exist. If they do not exist, use the dd command to create the quota files. Determine the size of the .quota_u file based on the number of users. Determine the size of the .quota_g file based on the number of groups. For example, for 1024 users, the size of .quota_u file should be (1024 * 128). For 600 groups, the size of the .quota_g file should be (600 * 128), rounded up the next 4k increment. # dd if=/dev/zero of=/vsm1 /.quota_u bs=4096 count=32 # dd if=/dev/zero of=/vsm1 /.quota_g bs=4096 count=19 3. Unmount the file system so that it can be remounted later with the quota files already created. #umount /vsm1 4. Check the file system using the samfsck command. This sets up the blocks used and files used by the users and groups. Note, samfsck –F is used to correct quotas. # samfsck -F /vsm1 5. Finally, mount the file system to complete the process. The file system reads the quota files at the time of mount. If the noquota mount option is not preset and either or both quota files exist, quotas are enabled. # mount /vsm1 Accounting & Infinite Quotas
When a user is granted an infinite quota, they will never be denied access to resources on the file system. Enable infinite quotas by setting zero for both the hard limit and the

soft limit. After specifying zero for the quota level, the system will track accounting information on all of the users without enforcing limits. The following example illustrates how to enable an infinite quota.
# samquota -G audio -b 0: s,h -f 0:s,h /vsm1 # samquota -G audio /vsm1
Online limits Total limits Type ID In Use Soft Hard In Use Soft Hard /vsm1 Files group 105 298 0 0 298 0 0 Blocks group 105 314 0 0 5065 0 0 Grace Period 0s 0s ---> Infinite quotas in effect.
Enable Default Quota Values Using the samquota command it is possible to enable default quotas for the user or group. -U 0 sets the default quota for all users and -G 0 sets the default quota for all groups. The following example illustrates how to enable default quotas: # samquota -U 0 -b 14000:s -b 16000:h -b 14G:s:t -b 17G:h:t / -f 2000:s -f 2400:h -t 2w /vsm1 -b limit:s --- sets the soft online block limit - Set to 14000 -b limit:h --- sets the hard online block limit - Set to 16000 -b limit:s:t --- sets the soft total block limit - Set to 14GB -b limit:h:t --- sets the hard total block limit - Set to 17GB -f limit:s --- sets the soft file limit - Set to 2000 files -f limit:h --- sets the hard file limit - Set to 2400 files -t_limit_ --- sets the timer grace period - Set to two weeks
Enable or Change Quota limits
It is best to enable default quotas for one user, then use that file as a template to enable quotas for the other users. The The following example illustrates how to edit an existing quota file to create a template. Use the -e option and either the -U for user or -G for group option. # samquota -G users -e /vsm1 > /tmp/quota_group_template # cat /tmp/quota_group_template
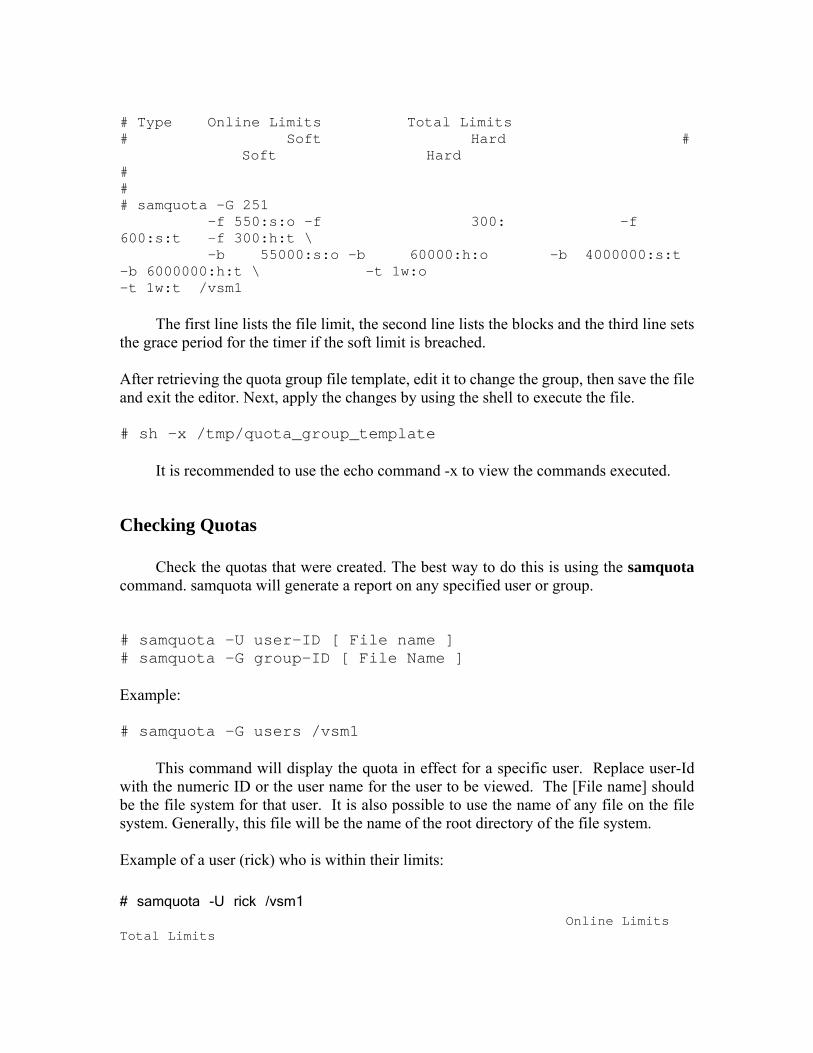
# Type Online Limits Total Limits # Soft Hard # Soft Hard # # # samquota -G 251 -f 550:s:o -f 300: -f 600:s:t -f 300:h:t \ -b 55000:s:o -b 60000:h:o -b 4000000:s:t -b 6000000:h:t \ -t 1w:o -t 1w:t /vsm1
The first line lists the file limit, the second line lists the blocks and the third line sets the grace period for the timer if the soft limit is breached. After retrieving the quota group file template, edit it to change the group, then save the file and exit the editor. Next, apply the changes by using the shell to execute the file. # sh –x /tmp/quota_group_template
It is recommended to use the echo command -x to view the commands executed.
Checking Quotas
Check the quotas that were created. The best way to do this is using the samquota command. samquota will generate a report on any specified user or group. # samquota -U user-ID [ File name ] # samquota -G group-ID [ File Name ] Example: # samquota -G users /vsm1
This command will display the quota in effect for a specific user. Replace user-Id with the numeric ID or the user name for the user to be viewed. The [File name] should be the file system for that user. It is also possible to use the name of any file on the file system. Generally, this file will be the name of the root directory of the file system. Example of a user (rick) who is within their limits:
# samquota -U rick /vsm1 Online Limits Total Limits
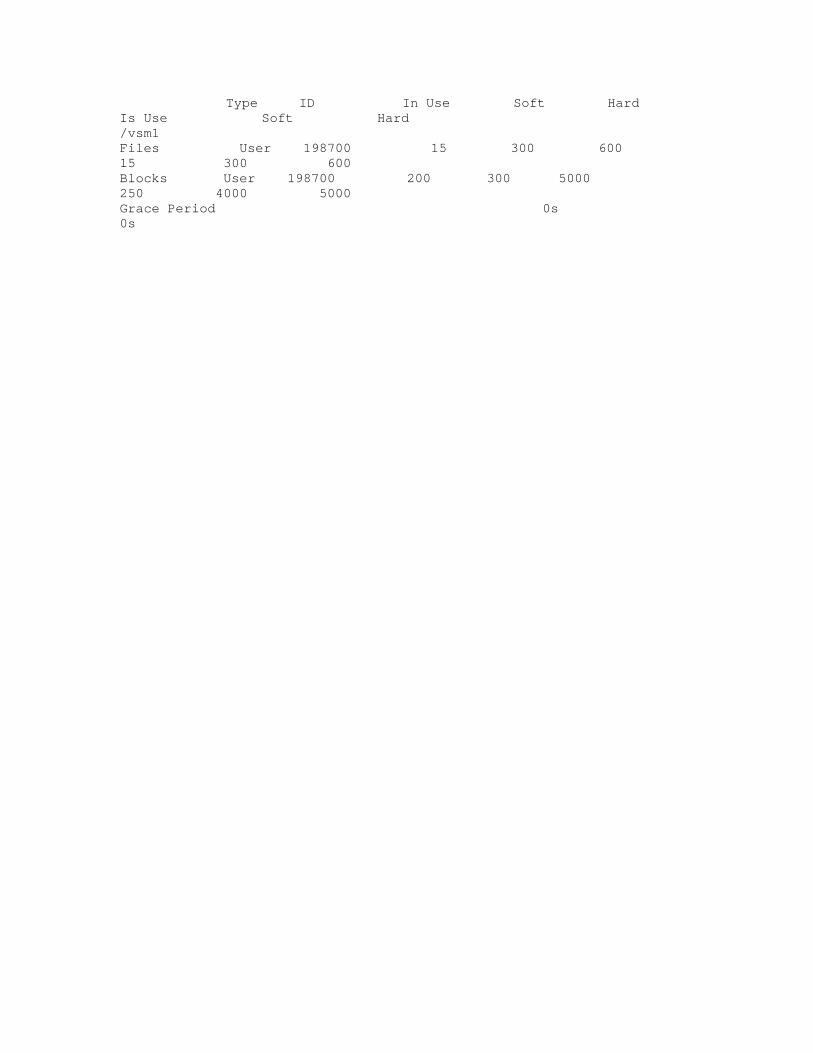
Type ID In Use Soft Hard Is Use Soft Hard /vsm1 Files User 198700 15 300 600 15 300 600 Blocks User 198700 200 300 5000 250 4000 5000 Grace Period 0s 0s

Example of a user (ann) who has exceeded their limits # samquota -U ann /vsm1 Online Limits Total Limits Type ID In Use Soft Hard Is Use Soft Hard /vsm1 Files User 198702 56 300 600 56 300 600 Blocks User 198702 3100* 3000 5000 35000 40000 50000 Grace Period 1w 1w ---> Online soft limits under enforcement (since 15s ago)
The plus sign ( + ) is used when the soft limit is being exceeded and will be enforced after the grace period. In this example, the plus size was replaced with the asterisk ( * ) which means the 1 week grace period was exhausted and online soft limits are under enforcement. Removing or Changing Quotas
First, retrieve the quota for a specific user or group. If the user or group needs more time to manage their account to lower their disk usage, change the soft limit grace period using the samquota command. Example: # samquota -U user-ID -t interval file # samquota -G group-ID -t interval file
Quota Arguments
user-ID Numeric ID or user name for the desired user.
group-ID Numeric ID or group name for desired group.
interval
Represents the grace period. To change the duration, specify the new time interval. By default the time is set to seconds (s) but it can be weeks (w), days (d), hours (h), or minutes (m).
file The name of the file system or any single file on the file system.

Archive Daemons
Daemons and Processes
The sam-fsd daemon is the master daemon and is the parent for all other VSM daemons. When the system is first started, the sam-fsd daemon runs automatically. When running any VSM file system, the sam-fsd daemon is always active. If the sam-fsd is not running, it can be restarted with the samd config command. If a change is made to any configuration file, the samd config command must be executed. This causes sam-fsd to reread the configuration files.
Each time a shared file system is mounted a sam-sharefsd starts and remains active.
The sam-sharefsd daemon’s parent is sam-fsd. The sam-fsd starts a new sam-sharefsd daemon each time a shared file system is mounted.
The system uses TCP sockets between the server and the host to communicate. A
listener socket is opened on the metadata server on the port sam-qfs (7105/tcp). The sam-qfs port entry is added to the /etc/services file when the rpm is installed. It is advised that users do not remove this port entry as it is needed by the file system to function properly. Users are advised to make sure this port number 7105 does not interfere with another service.
The following table lists the daemons and processes that can run on a VSM system. (next page)

Daemons and Processes
sam-amld
This daemon initializes the automated daemons sam-catserverd sam-scannerd sam-robotsd
sam-catserverd This daemon tracks all media in the libraries cataloged in the file system
sam-robotsd This daemon starts the automated media changer and monitors the control daemons
sam-scannerd This daemon monitors all the manually mounted media devices. The scanner checks each device for inserted archive media cartridges
sam-archiverd This daemon controls all archiving. This daemon is the parent of sam-arfind and sam-arcopy
sam-fsd This is the master daemon
sam-rftd This daemon transfers data between multiple host systems
sam-sharefsd This daemon controls a shared file system
sam-releaser This is an important process that releases disk space that is held by archived files on the file system
sam-stagealld This daemon controls all associative staging on the file system
sam-stagerd This daemon controls all staging of the file system
sam-rpcd This daemon controls the RPC (remote procedure call) APIs (application programming interface) server processes

The samd command is used to control the daemons and to read, check, and reset the configuration files:
samd Commands
samd config read, check, and reset the configuration files
samd buildmcf builds the mcf from an exisiting file system
samd start start up the robotic deamon, sam-amld
samd stop stop the robotic deamon, sam-amld
samd startsam start up the archiver and stager daemons
samd stopsam stop the archiver and stager daemons
samd umount [family_set]
stop the archiver and stager on this family_set and umount the file system
samd reload reload the VSM kernel module and restart sam-fsd
samd unload stop sam-fsd and unload the VSM kernel module
Trace Files
By default trace files are disabled. Trace files may be enabled by editing the defaults.conf file. Trace files are not necessary to run the file system. They are primarily used by VSM support for debugging purposes. Messages are written to trace files. These files contain information pertaining to the task performed by the different daemons.
Trace files are written to the /var/opt/vsm/trace directory. Each trace file is named for
the specific daemon from which the trace file was derived (i.e., sam-archiverd, sam-fsd, sam-rftd, etc...). This can be changed in the defaults.conf file.
Trace files contain information about each daemon. They hold the time and source and event from which they were created. There are default events and special events can be created by using the directives in the defaults.conf file. The default files contain the program name, process ID, and the time. This cannot be changed, more information can be included such as the date, the source file, and the event type. See man defaults.conf for a list of the default events and how to change or add events.
VSM prevents trace files from growing too large and consuming too many resources. The sam-fsd daemon monitors the size of the trace files and periodically executes the /opt/vsm/sbin/trace_rotate command. This script moves the trace files into sequentially numbered files. The script can easily be modified to fit individual needs.

Operator Utility - samu
This section documents the operator utility samu. It is used by the operator to monitor and control the VSM file system and archiving daemons.
Start the samu utility by entering the # samu command. The default help display
appears first. Next, the user may type the letter or :letter parameter assigned to the various displays listed below. samu h display ------------------------------------------------------------------------------------------------------------ Help information page 1/14 samu vsm-1.1.0-vsm187 18:35:18 Jun 3 2014 Displays: a Archiver status v Robot catalog c Device configuration w Pending stage queue d Daemon trace controls C Memory f File systems D Disk volume dictionary g Shared clients I Inode h Help information J Preview shared memory l Usage information L Shared memory tables m Mass storage status M Shared memory n Staging status N File system parameters p Removable media load requests P Active Services r Removable media S Sector data s Device status T SCSI sense data t Tape drive status U Device table u Staging queue more (ctrl-f) ------------------------------------------------------------------------------------------------------------

Along with the normal samu control keys (explained below), the help display has
additional navigation control keys:
samu Help Navigation
Ctrl-B Returns user to the previous page
Ctrl-F Takes user to the next page
Ctrl-D Moves ½ page forward
Ctrl-U Moves ½ page backward
Ctrl-K Moves the display format forward
samu uses "Hot Keys" for quick features. The hot keys are as follows:
samu Hot Keys
q Quits samu
: Enters the command
space bar Refreshes the display
^f Pages the display forward
^b Pages the display backward
^d Pages the display one half page forward
^u Pages the display one half page backward
^i Shows details of selected displays
^k Shows advanced display format
^l Clears the display
^r Toggle refresh
/ Search for VSN (v display)
% Search for barcode (v display)
$ Search for slot (v display)

The following table lists commands that change file system parameters and archiving parameters.
For the file system parameters, specify the file system equipment number (eq). The
eq number may be found in the f display.
For the archiving parameters, specify a device's equipment number. Use the device configuration display :c to access all devices attached to the system and the corresponding equipment numbers.
To execute the command, type :command eq [options] File System & Archiving Parameter Commands (next page)

File System & Archiving Parameter Commands
:idle eq Stops all activity on the device
:off eq Turns off the device
:on eq Turns on the device
-unavail eq Stops the file system from accessing the device by making it unavailable
:unload eq Unloads specified mounted media device
:ackmsg eq Acknowledges and clears the critical message in the device display
:noalloc eq Stops new allocations for the specified device
:alloc eq Reverses the noalloc command and allows allocation to said device
:rdlease eq interval Regulates the allowable time for the read leases
:wrlease eq interval Regulates the allowable time for the write leases
:aplease eq interval Regulates the allowable time for append leases
:mm_stripe eq value Regulates the DAU size for metadata stripe width
:suid eq Allows running programs to change their owner IDs
:nosuid eq Prevents running programs from changing their owner IDs
:stripe eq value Changes the stripe width for the file system to the number of DAUs specified
:sync_meta eq value
Regulates the time when metadata is written to disk
:trace eq Enables the trace feature for the file system
:notrace eq Disables the trace feature for the file system
:clear eq Clears the removable media mount display of the specified volume
:devlog eq opt Logs one or multiple events
:diskvols volume +flag | -flag
Regulates all flags that are placed into the disk volume dictionary
:fs eq Allows for a new default file system
:mount eq Specifies the mount system

File System & Archiving Parameter Commands (cont.)
:open eq Opens the disk device for access
:read hex_addr Reads a specific 1K sector of the disk deivce
:refresh n Regulates the the screen refresh time for the samu. n is in seconds
:snap [file] Copies the operator display to a file. snapshots is the default file
There is a display item "more (ctrl-f)" near the bottom of the display. When the display is too large for the physical display, it will break the information into pages. Simply use ctrl-f to scroll through the pages to view all the requested content.
The following are examples of the samu help display options from the detault samu utility help display in more detail and with selected display examples.
a The Archiver status
The following example illustrates the use of the a option and calls for the status of the archiver on the file system. To specify a file system, simply put the name of the file system after the -a option. samu a display
------------------------------------------------------------------------------------------------------------ Archiver status samu vsm-1.0.1-0 14:40:44 Apr 5 2014 sam-archiverd: Waiting for resources sam-arfind: vsmfs1 mounted at /vsm1 Files waiting to start 0 schedule 1,741,094 archiving 2,334,875 Monitoring file system activity. sam-arfind: vfsfs2 mounted at /DKARC01 Files waiting to start 0 schedule archiving 0 Filesystem defined sam-arcopy: vsmfs1.allfs1.2.627 li.001004 Copying file data5/dir686/file181 sam-arcopy: vsmfs1.allfs1.1.108 dk.DKARC01 Staging - file 16456 (373123) from li.001005 /vsm1/data3/dir223/file803 sam-arcopy: vsmfs1.allfs1.1.211 dk.DKARC01 Staging - file 37266 (341991) from li.001005 /vsm1/data3/dir752/file615 sam-arcopy: vsmfs1.allfs1.1.53 dk.DKARC01

Staging - file 14439 (63294) from li.053652 /vsm1/data2/dir691/file582 sam-arcopy: vsmfs1.allfs1.1.438 dk.DKARC01 Staging - file 0 (22743) from li.064200 /vsm1/data5/dir269/file997 Versity Software Inc VSM on exp-mdc1
------------------------------------------------------------------------------------------------------------
c The Device configuration display
The c option displays all devices connected to the file system and their corresponding equipment numbers. The device configuration display consists of the following six fields:
Device Configuration Fields
Ty Defines the type of device
Eq Displays the equipment number for each connected device
State Displays the current state of each connected device
Device_name Displays the name of the device used in its path
Fs Displays the family set equipment number
Family_set Displays name of the family set or the library of which the device belongs
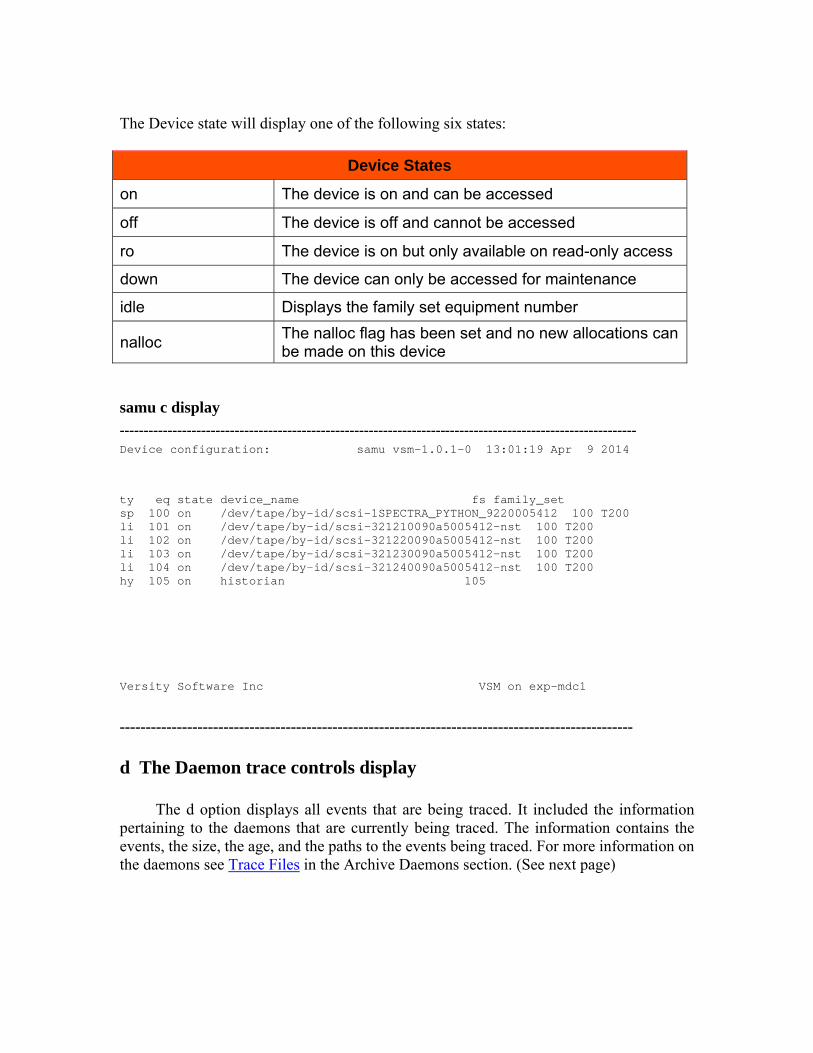
The Device state will display one of the following six states:
Device States
on The device is on and can be accessed
off The device is off and cannot be accessed
ro The device is on but only available on read-only access
down The device can only be accessed for maintenance
idle Displays the family set equipment number
nalloc The nalloc flag has been set and no new allocations can be made on this device
samu c display
------------------------------------------------------------------------------------------------------------ Device configuration: samu vsm-1.0.1-0 13:01:19 Apr 9 2014 ty eq state device_name fs family_set sp 100 on /dev/tape/by-id/scsi-1SPECTRA_PYTHON_9220005412 100 T200 li 101 on /dev/tape/by-id/scsi-321210090a5005412-nst 100 T200 li 102 on /dev/tape/by-id/scsi-321220090a5005412-nst 100 T200 li 103 on /dev/tape/by-id/scsi-321230090a5005412-nst 100 T200 li 104 on /dev/tape/by-id/scsi-321240090a5005412-nst 100 T200 hy 105 on historian 105 Versity Software Inc VSM on exp-mdc1
---------------------------------------------------------------------------------------------------
d The Daemon trace controls display
The d option displays all events that are being traced. It included the information pertaining to the daemons that are currently being traced. The information contains the events, the size, the age, and the paths to the events being traced. For more information on the daemons see Trace Files in the Archive Daemons section. (See next page)

samu d display ------------------------------------------------------------------------------------------------------------ Daemon trace controls samu vsm-1.0.1-0 13:01:39 Apr 9 2014 sam-amld /var/opt/vsm/trace/sam-amld cust err fatal misc proc debug debugerr date size 10M age 0 sam-archiverd /var/opt/vsm/trace/sam-archiverd cust err fatal misc proc debug debugerr date size 10M age 0 sam-catserverd /var/opt/vsm/trace/sam-catserverd cust err fatal misc proc debug debugerr date size 10M age 0 sam-fsd /var/opt/vsm/trace/sam-fsd cust err fatal misc proc debug debugerr date size 10M age 0 sam-rftd /var/opt/vsm/trace/sam-rftd cust err fatal misc proc debug debugerr date size 10M age 0 sam-recycler /var/opt/vsm/trace/sam-recycler cust err fatal misc proc debug debugerr date size 10M age 0 sam-sharefsd /var/opt/vsm/trace/sam-sharefsd cust err fatal misc proc debug debugerr date size 10M age 0 sam-stagerd /var/opt/vsm/trace/sam-stagerd cust err fatal misc proc debug debugerr date size 10M age 0 sam-shrink /var/opt/vsm/trace/sam-shrink cust err fatal misc proc debug debugerr date size 10M age 0 Versity Software Inc VSM on exp-mdc1 ---------------------------------------------------------------------------------------------------------

f The File systems display
The file system display shows all of the components of the file system. The file system display consists of nine different fields.
Device Configuration Fields
ty The type of device
eq The equipment number
state The current status of the device. The device can either be on, off, ro, down, idle, or nalloc
high The threshold percentage of the high disk use
low The threshold percentage of the low disk use
mountpoint The location where the file system is mounted
device_name The name of the device
status The device status code (for a list of codes please see device codes)
server The name of the host that the shared file system is mounted on
samu f display
------------------------------------------------------------------------------------------------------------ File systems samu vsm-1.0.1-0 14:55:34 Apr 5 2014 ty eq state device_name status high low mountpoint server ma 20 on vsmfs1 m---3c--r- 80% 70% /vsm1 exp-mdc mm 21 on /dev/mapper/tst-mdt0 mr 22 on /dev/mapper/tst-dc2 mr 23 on /dev/mapper/tst-dc3 ms 30 on vsmfs2 m---3----- 80% 70% /archive md 31 on /dev/mapper/tst-dc4 md 32 on /dev/mapper/tst-dc5 md 33 on /dev/mapper/tst-dc6 Versity Software Inc VSM on exp-mdc1
------------------------------------------------------------------------------------------------------------


g The Shared clients display
The g shared clients display lists all of the hosts in a shared file system along with their status. samu g display
------------------------------------------------------------------------------------------------------------ Shared clients samu vsm-1.0.1-0 14:55:37 Apr 5 2014 vsmfs1 is shared, server is exp-mdc1, 2 clients 4 max ord hostname seqno nomsgs status config conf1 flags 1 exp-mdc1 22 0 91 838740d 31 0 MNT SVR 2 exp-mdc2 413903 0 a1 838740d 21 0 MNT CLI Versity Software Inc VSM on exp-mdc1
------------------------------------------------------------------------------------------------------------
h The Help information display (see the Default samu help display)
l The Usage information display samu l display
------------------------------------------------------------------------------------------------------------ Usage information samu vsm-1.0.1-0 14:55:42 Apr 5 2014 uuid: 44C788ED-FAA8-E111-A47A-001E674E1B98 OS name: exp-mdc1 Architecture: x86_64 CPUs: 16 (16 online) License: Features: 20000000 Tue Dec 30 00:00:00 2014 library 100: capacity 8.8T bytes space 8.8T bytes, usage 1% library totals: capacity 8.8T bytes space 8.8T bytes, usage 1% filesystem vsmfs1: capacity 14.5T bytes space 14.1T bytes,usage 3% serv filesystem vsmfs2: capacity 21.8T bytes space 21.8T bytes,usage 1% filesystem totals: capacity 36.4T bytes space 36.0T bytes,usage 1%

Versity Software Inc VSM on exp-mdc1
------------------------------------------------------------------------------------------------------------
m The Mass storage status display samu m display
------------------------------------------------------------------------------------------------------------ Mass storage status samu vsm-1.0.1-0 14:55:45 Apr 5 2014 ty eq status use state ord capacity free ra part high l ma 20 m----3c--r 3% on 14.547T 14.133T 1M 16 80% 7 mm 21 1% on 0 418.687G 414.264G [43437760 inodes] mr 22 3% on 1 7.273T 7.067T mr 23 3% on 2 7.273T 7.067T ms 30 m----3---- 1% on 21.820T 21.820T 1M 16 80% 7 md 31 1% on 0 7.273T 7.273T md 32 1% on 1 7.273T 7.273T md 33 1% on 2 7.273T 7.273T Versity Software Inc VSM on exp-mdc1
------------------------------------------------------------------------------------------------------------
File System Display Codes
m---------- The file system has been mounted
M---------- The file system is currently being mounted
u---------- The file system is currently being unmounted
-A--------- The file system is currently being archived
--R-------- The file system is currently being released
---S------- The file system is currently being staged
----3------ The file system version
-----c----- The file system is shared
--------r-- mr devices
---------d- md devices


n The Staging status display samu n display
------------------------------------------------------------------------------------------------------------ Staging status samu vsm-1.0.1-0 14:40:51 Apr 5 2014 maxactive 10000 curr 2079 Log output to: /var/log/vsm/stager.log Stage request 1: li.064200 Resources not available VSN 064200 Stage request 2: li.053652 Loading VSN 053652 Stage request 3: li.001005 Positioning for file /vsm1/data3/dir223/file803 Staging queues starting at 1 ty pid user status wait files vsn li 2795 root pending 15:43 2076 064200 li 28627 root active 0:09 1 053652 li 17833 root active 0:02 2 001005 Versity Software Inc VSM on exp-mdc1
------------------------------------------------------------------------------------------------------------
p The Removable media load requests display samu p display
------------------------------------------------------------------------------------------------------------ Removable media load requests all both samu vsm-1.0.1-0 14:40 Apr 5 2014 count: 1 index type pid user rb flags wait count vsn 0 li 8971 root 50 ---f--- 0:09 053652 Versity Software Inc VSM on exp-mdc1

------------------------------------------------------------------------------------------------------------

r The Removable media display samu r display (see Device Codes table)
------------------------------------------------------------------------------------------------------------ Removable media status: all mu vsm-1.0.1-0 14:55:56 Apr 5 2014 ty eq status act use state vsn li 101 ---------p 0 0% notrdy empty li 102 ---------p 0 0% notrdy empty li 103 ---------p 0 0% notrdy empty li 104 ---------p 0 0% notrdy empty Versity Software Inc VSM on exp-mdc1
------------------------------------------------------------------------------------------------------------
s The Device status display samu s display
------------------------------------------------------------------------------------------------------------ Device status samu vsm-1.0.1-0 14:55:59 Apr 5 2014 ty eq state device_name fs status sp 100 on /dev/tape/by-id/scsi-1SPECTRA_PYTHON_920002 100 --------r move complete li 101 on /dev/tape/by-id/scsi-321210090a5005412-nst 100 --l----oPr Positioning to 0x30ce0f|2b 00 00 00 30 ce 0f 00 00 00 li 102 on /dev/tape/by-id/scsi-321220090a5005412-nst 100 ---------p empty li 103 on /dev/tape/by-id/scsi-321230090a5005412-nst 100 --l---wo-r creating EOF-Tape mark|10 00 00 00 01 00 li 104 on /dev/tape/by-id/scsi-321240090a5005412-nst 100 ---------p empty hy 105 on historian 105 ----------

Versity Software Inc VSM on exp-mdc1
------------------------------------------------------------------------------------------------------------

Device Codes
Device Codes
s--------- Media is currently being scanned
m--------- Automated library is operational
M--------- Maintenance mode
-E-------- The device received an unrecoverable error
-a-------- The device is in audit mode
--l------- Media is labeled
--L------- Media is currently being labeled
--N------- Foreign media
---I------ Waiting for the device to idle
---A------ Device requires attention
----C----- Requires cleaning
----U----- Unloading requested
-----R---- The device has been reserved
------w--- A process is busy writing to the media
-------o-- The device is now open
--------P- The device is positioning
--------F- Media is full
---------R The media is read only
---------r The device is spun up and ready
---------p The device is present
---------W The device is write protected

t The Tape drive status display samu t display (see Device Codes table)
------------------------------------------------------------------------------------------------------------ Tape drive status samu vsm-1.0.1-0 13:03:25 Apr 9 2014 ty eq status act use state vsn li 101 --l----oPr 2 100% ready 001005 Positioning to 0x30ce0f|2b 00 00 00 30 ce 0f 00 00 00 li 102 ---------p 0 0% notrdy empty li 103 --l---wo-r 1 69% ready 001004 creating EOF-Tape mark|10 00 00 00 01 00 li 104 ---------p 0 0% notrdy empty Versity Software Inc VSM on exp-mdc1
------------------------------------------------------------------------------------------------------------
u The Staging queue display samu u display
------------------------------------------------------------------------------------------------------------ Staging queue by media type: all samu vsm-1.0.1-0 14:42:03 Apr 5 2014 volumes 2 files 11 ty length fseq ino position offset vsn li 231.619k 10 2111425 242341 1c87ba 053652 li 595.729k 10 1149558 30caed 64556 001005 li 814.142k 10 3941057 50af3 3f56 064200 li 950.048k 10 3941059 50af3 45b4 064200 li 272.896k 10 3941061 50af3 4d22 064200 li 1014.347k 10 3941063 50af3 4f45 064200 li 482.513k 10 3941065 50af3 5733 064200 li 730.094k 10 3941067 50af3 5afa 064200 li 926.295k 10 3941069 50af3 60b0 064200 li 905.081k 10 3941071 50af3 67ee 064200 li 49.587k 10 3941073 50af3 6f02 064200

Versity Software Inc VSM on exp-mdc1
------------------------------------------------------------------------------------------------------------
v The Robot catalog display samu v display
------------------------------------------------------------------------------------------------------------ Robot VSN catalog by slot: eq 100samu vsm-1.0.1-0 14:56:06 Apr 5 2014 count 32 slot access time count use flags ty vsn 0 2014/02/19 11:03 1 1% -il-o-b----- li 000016 1 2014/02/19 11:05 1 1% -il-o-b----- li 000020 2 none 0 0% -il-o-b----- li 192437 3 none 0 0% -il-o-b----- li 192438 4 2014/02/19 11:02 2 0% -il-o-b----- li 192439 5 none 50 0% -il-oCb----- li CLNWC7 6 none 0 0% -il-o-b----- li 094620 7 none 0 0% -il-o-b----- li 094621 8 none 0 0% -il-o-b----- li 094622 9 none 0 0% -il-o-b----- li 094623 10 2014/04/04 17:25 4 99% -il-o-b----- li 064200 11 2014/04/04 17:19 3 100% -il-o-b----- li 053869 12 none 0 0% -il-o-b----- li 001006 13 14 2014/04/04 14:12 6 100% -il---b----- li 001005 15 2014/04/05 14:34 69 69% -il---b----- li 001004 16 none 0 0% -il-o-b----- li 001008 17 none 50 0% -il-oCb----- li CLN001 18 none 50 0% -il-oCb----- li CLN020 19 none 0 0% -il-o-b----- li 200002 20 none 0 0% -il-o-b----- li 200000 21 none 0 0% -il-o-b----- li 064208 22 Versity Software Inc VSM on exp-mdc1
------------------------------------------------------------------------------------------------------------
w The Pending stage queue display samu w display
------------------------------------------------------------------------------------------------------------ Pending stage queue by media type:all samu vsm-1.0.1-0 14:56 Apr 5 2014 volumes 1 files 4 ty length fseq ino position offset vsn li 561.754k 10 3941014 50af3 1 064200
li 157.584k 10 3941016 50af3 466 064200 li 537.941k 10 3941018 50af3 5a3 064200 li 151.717k 10 3941021 50af3 9d8 064200 Versity Software Inc VSM on exp-mdc1
------------------------------------------------------------------------------------------------------------
C The Memory display
The C (uppercase C) option is used for debugging. Only advanced users should attempt to use this display. This display shows information about a specific memory address. To view the memory address, the hexadecimal number of the memory address is required. Type :C hexadecimal-address samu C display - not shown
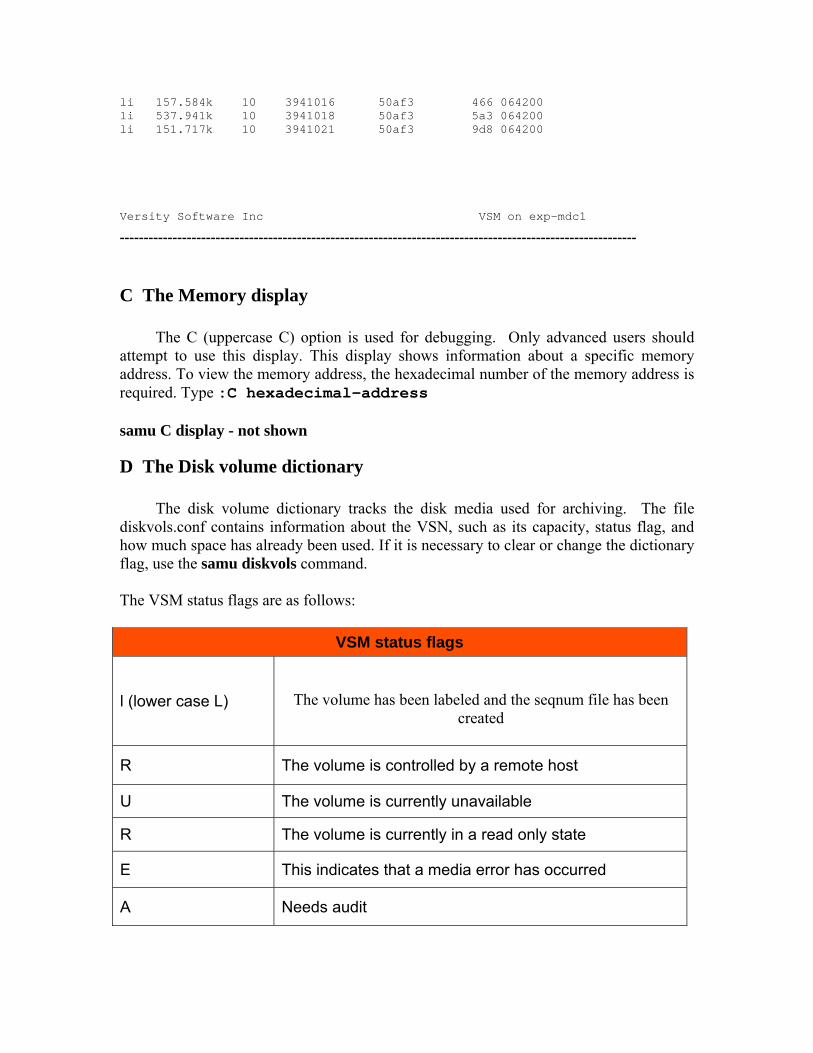
D The Disk volume dictionary
The disk volume dictionary tracks the disk media used for archiving. The file diskvols.conf contains information about the VSN, such as its capacity, status flag, and how much space has already been used. If it is necessary to clear or change the dictionary flag, use the samu diskvols command. The VSM status flags are as follows:
VSM status flags
l (lower case L)
The volume has been labeled and the seqnum file has been created
R The volume is controlled by a remote host
U The volume is currently unavailable
R The volume is currently in a read only state
E This indicates that a media error has occurred
A Needs audit

F Disk Archive is full
c Needs recycling

samu D display
------------------------------------------------------------------------------------------------------------ Disk volume dictionary samu vsm-1.0-0 15:54:52 Mar 30 2014 header version 460 volumes magic 340322 version 9 nkeys 1 ndata 1 index space capacity used flags volume 0 1612513280 2147483648 492019712 -------- DKARC01 clients magic 340322 version 9 nkeys 0 ndata 0
------------------------------------------------------------------------------------------------------------
I The Inode display
The inode display shows information on the running inodes. The inode display is for debugging the system and should only be used by advanced users. It is possible to display all of the inodes for a given file system by using the following command, :I inode-number samu prompts the user for the mount point once. Mount point: Enter the mount point, or change the mount point by typing :f mount_point The inode number must be a decimal number. When inside the inode display, use the following control keys to navigate the displays.
Navigating inode display
Ctrl-B Takes user to the previous inode
Ctrl-F Takes user to the next inode
Ctrl-K Brings up the display format
samu I display - not shown
J The Shared memory display

The shared memory display shows the segments for each preview queue. It is intended for debugging purposes and should only be navigated by advanced users.
The control keys differ slightly for the shared memory display, so please take note of the differences.
Control Keys - Shared Memory Display
Ctrl-B Previous page
Ctrl-F Next page
Ctrl-D One half page forward
Ctrl-U One half page backward
samu J display - not shown
The Storage Archive Processes
There are 4 storage archive processes: archive, release, stage, and recycle. The archive process copies files from the disk cache, making multiple copies based on the archive policies. The release process manages the disk cache according to set thresholds. The stage process retrieves the file from the archive tier and restores it back to the disk cache. The recycle process repacks the archive media.
Configuring The Archiver
One or both of the following archiving media will be used for the archive data storage:
● Disk archive in a file system ● Tape archive in a Robotic Tape Library
The archiver automatically makes copies of files on the online disk cache and places
them onto the archive media. To specify which files are archived, configure the archiver.cmd file. Specify which kinds of files are archived, when they are archived, and how many copies of each file to make and place on a variety of archive media. The archiver can archive at least four archive copies at a time.
The archiving component of VSM copies one file from the file system to another archive media, either a volume in a library or another file system. The archiver.cmd file may be configured to specify which files are to be archived immediately, at a later time, or never archived at all. Every file within the file system becomes a member to only one

archive set. The file's characteristics determine the archive set in which it is placed. Archive files are written in the open source GNU tar format.
The archiver.cmd is the archiver command file. It is critical that this file has no errors. If there are errors, the archiver will not run. Use the archiver –lv command to check the file for errors. The archiver.cmd is located at:
/etc/opt/vsm/archiver.cmd
The following is an example of the archiver.cmd file
----------------------------------------------------------------------------------------------------------- # # See also sam-archiverd(8), archiver(8), showqueue(8), archiver.cmd(4) # # archiver.cmd # # Global Directives # # interval = 30 notify = /etc/opt/vsm/scripts/archiver.sh logfile = /var/log/vsm/archiver.log examine = noscan archmax = dk 1G archmax = li 25G ovflmin = li 150G # # File System Directives # fs = samfs1 1 -norelease 1m 2 -norelease 1m fs = samfs2 1 10y allfs1 . 1 -norelease 1m 2 -norelease 1m # # Copy Parameters Directives # params # allsets -drives 1 allsets -drivemin 4294967296 allsets -rearch_stage_copy 1 allsets -sort path allsets -offline_copy stageahead allsets -queue_time_limit 4m

# allsets.1 -drives 9 allsets.1 -recycle_hwm 1 allsets.1 -recycle_dataquantity 1099511627776 allsets.1 -recycle_mingain 1 allsets.1 -startage 1m allsets.1 -startcount 400000 allsets.1 -startsize 1073741824 # allsets.2 -drives 2 allsets.2 -drivemin 53687091200 allsets.2 -recycle_hwm 1 allsets.2 -recycle_dataquantity 200G allsets.2 -recycle_mingain 25 allsets.2 -recycle_vsncount 9 allsets.2 -startage 1h allsets.2 -startcount 400000 allsets.2 -startsize 26843545600 # allsets.3 -drives 2 allsets.3 -drivemin 53687091200 allsets.3 -recycle_hwm 1 allsets.3 -recycle_dataquantity 200G allsets.3 -recycle_mingain 25 allsets.3 -recycle_vsncount 9 allsets.3 -startage 2h allsets.3 -startcount 400000 allsets.3 -startsize 26843545600 # endparams # # # VSN Pool Directives # vsnpools DK_COPY1 dk DKARC0.* TP_COPY2 li ^E010[1].* TP_COPY3 li ^E010[23].* endvsnpools # # # VSN Directives # vsns samfs1.1 dk -pool DK_COPY1 samfs1.2 li -pool TP_COPY2 samfs2.1 dk -pool DK_COPY1 allfs1.1 dk -pool DK_COPY1 allfs1.2 li -pool TP_COPY2 endvsns -----------------------------------------------------------------------------------------------------------

Before configuring the archiver.cmd file, there are certain things to take into consideration. The following information is meant as a guide to help users configure the archiver.cmd for optimal performance.
Users should consider how many file systems they will be using congruently. Using multiple file systems can increase the performance of the archiver. Scan time will be reduced when using multiple file systems compared to a single file system.
Archive file logs are used to recover data in the circumstance of a disaster failure even if the VSM is unavailable. Saving the archive logs to a secure location will make sure data can be recovered in the event of a failure.
The archive media contains one or more tar files with each tar file containing different file data. Each tar file is assigned to a volume serial number (VSN) or disk volume. Use this VSN or disk volume to identify the different tar files on the archive media.
A file is eligible to be archived after the data inside the file has been altered and closed. The archive age refers to the time period that has lapsed since the file was modified last. This archive age can be predefined for each archive copy.
The archiver will complete four steps for each file it is prepared to copy.
1. Identify each file to be archived 2. Create the archive request 3. Schedule the request for each file 4. Archive each file listed in the request
The first step the archiver performs is to identify each file to be archived. There is
one sam-arfind process per mounted file system. The process sam-arfind monitors that mounted file system to identify and determine which files need to be archived. This is the process that also determines when a file needs to be re-archived due to a change in data. Accessing the file does not cause re-archiving of the file. The file must be modified in some way to start the re-archiving process. The sam-arfind process also determines which archive set the file will become a part of by scanning the file's directory path, minimum file size, maximum file size, and the user/group name of the owner of the file.
If the age of the archive for the file and its copies has been exceeded, the archiver moves to step two and adds the file to the archive request set based on the file’s classification. There can be many different archive request sets. This allows users to schedule the archiver independently for many different classifications. If the age of the file has not been exceeded, then the file is added to the scan list along with the time when the age will be met. The scan list continuously runs and when a file has reached its specified age then it will be added to the archive request set.
A file may be offline at the time the archiver tries to access it. If this happens, the sam-
arfind process selects a volume(s) that should be used as the source for the archive copy.

Then the sam-arcopy process requests a stage of the file back to the disk cache in order to make another archive copy.
The archiver uses two methods to complete its actions--continuous
archiving and scanned archiving. Continuous archiving works with the file system to determine which files to be archived and which files do not need to be archived. Continuous archiving is set by default. To change this, edit the archiver.cmd file, by changing the following line from examine=noscan to examine=scan. When the default continuous method is initiated, it will begin with the following default start conditions.
● The archiver will run every two hours (2:00 HRS) ● The archiver will not run until at least 90% of the archmax value of data is
modified and ready for archiving ● The archiver will wait for 500,000 files to be ready until it archives These are all scheduling conditions that need to be met before the archiver will start;
when any one of them is met, the archiver will begin. Start conditions may be set for each archive set which override the defaults above by using the following command parameters. These parameters allow users to take full advantage of the archiver by configuring the timeliness in relation to the work that needs to be done by the archiver.
● -startage ● -startcount ● -startsize Scanned archiving is used to check the file system periodically in order to select files
for archiving. At midnight the sam-arfind process systematically checks all the files to determine which need to be archived.
The second step the archiver performs is to create an archive request set. An archive
request set is a group of files that all belong to one archive set. The outstanding archive request log is located at
/var/opt/vsm/archiver/file_sys/ArchReq The ArchReq file is a binary file. Users can use the showqueue command to display
the archive requests in a readable format. The sam-archiverd daemon oversees the archive requests regardless of whether scanned or continuous archiving is used. The sam-archiverd daemon composes the archive sets by selecting certain files from the ArchReq. Depending on individual parameters, not all files in the request list will be archived simultaneously. In this instance, the sam-archiverd will archive any remaining files in a different archive set..
The sam-archiverd daemon uses specific criteria to determine in which way to place
files into the archive request. By default, the daemon places all files in the archive request
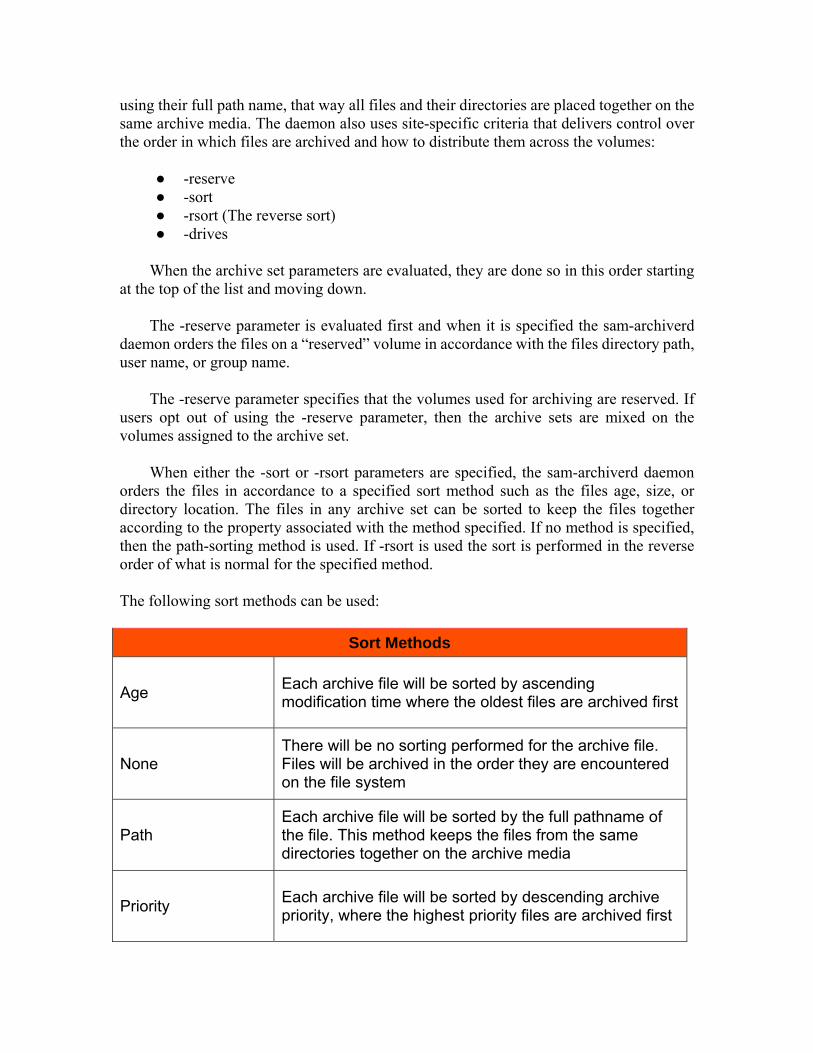
using their full path name, that way all files and their directories are placed together on the same archive media. The daemon also uses site-specific criteria that delivers control over the order in which files are archived and how to distribute them across the volumes:
● -reserve ● -sort ● -rsort (The reverse sort) ● -drives
When the archive set parameters are evaluated, they are done so in this order starting
at the top of the list and moving down. The -reserve parameter is evaluated first and when it is specified the sam-archiverd
daemon orders the files on a “reserved” volume in accordance with the files directory path, user name, or group name.
The -reserve parameter specifies that the volumes used for archiving are reserved. If
users opt out of using the -reserve parameter, then the archive sets are mixed on the volumes assigned to the archive set.
When either the -sort or -rsort parameters are specified, the sam-archiverd daemon
orders the files in accordance to a specified sort method such as the files age, size, or directory location. The files in any archive set can be sorted to keep the files together according to the property associated with the method specified. If no method is specified, then the path-sorting method is used. If -rsort is used the sort is performed in the reverse order of what is normal for the specified method. The following sort methods can be used:
Sort Methods
Age Each archive file will be sorted by ascending modification time where the oldest files are archived first
None There will be no sorting performed for the archive file. Files will be archived in the order they are encountered on the file system
Path Each archive file will be sorted by the full pathname of the file. This method keeps the files from the same directories together on the archive media
Priority Each archive file will be sorted by descending archive priority, where the highest priority files are archived first

Size Each archive file will be sorted by ascending file size, where the smallest files are archived first and the largest files archived last
In the instance that no sort method has been specified, the offline files are ordered by the volume to which archive copies reside. This will ensure that every file in every archive set on the same volume is staged simultaneously in the order in which they were originally stored on the archive media. If there is more than one archive copy of an offline file that is being made, the offline file will not be released until all the required copies are finished.
The third step consists of scheduling the archive requests. The sam-archiverd daemon controls the scheduling of the archive request. The following conditions cause the sam-archiverd daemon to schedule archive requests.
1. The archiving for an archive request has completed. 2. The state of the archiver changed. 3. The state of the media changed. 4. An archive request is entered into the scheduling queue.
The scheduling queue is ordered by priority. Each time the scheduler runs, it
examines the archive requests and determine whether or not they can be assigned to a sam-arcopy process and have their files copied to the archive media. In order for the archive request to be scheduled, the drive usage must be available for making file copies, and the volume usage must be available with enough space to hold the files in the archive request.
If the -drives parameter has been specified, then the selected files are divided among the multiple drives. The -drivemin value can be defined by either the -drivemin parameter or the archmax value. If the collective size of all the files in the archive request is lower than the -drivemin value, only one drive will be used. If the collective size of all the files in the archive request is larger than the -drivemin value, then the number of drives used will be determined by the collective size of all the files divided by the -drivemin value.
Depending on a variety of variables, the drives can take different amounts of time to archive files. The -drivemax parameter specifies the maximum number of bytes that will be written to the drive before that drive is rescheduled for more files to be archived. The -drivemax parameter, when used correctly, optimizes drive utilization.
Archiving needs at least a single volume to exist with enough space to hold the files in the archive request. If there is not enough space for at least part of the files in the archive request, then archiving cannot occur. When the specified volume is busy, then another volume is selected. This feature can be disabled with the -fillvsns parameter. If the -fillvsns parameter has been specified, then the archive request cannot be scheduled.
If in the instance the archive request is too large to fit on one single volume, then the archiver will select the files that will fit on the drive and place them there. In the instance

the files in the archive request are too large for the volume, the files will not be written to the volume. To help prevent this, have volume overflow selected for the archive request. Specify volume overflow for the archive set by using the -ovflmin parameter. Specify the volume overflow for the media by using the ovflmin=directive.
The ovflmin parameter sets the minimum size for a file that needs more than one volume for the media. When files are small enough to fit on the volume, they will be placed accordingly; but when a file is too large, the overflow will be written to multiple volumes. When ovflmin values for both the archive set and the media are specified, the value for the archive set takes precedence.
In the instance the size of the files is larger than the value specified in the ovflmin, additional volumes will be assigned for use. At this point, the volumes will be selected in the order of decreasing size to help minimize the number of volumes required. The archive request will wait for a volume to become available. If all volumes are busy, it will archive files to the first available volume.
The sam-archived daemon computes the scheduling priority for each archive request by adding the archive priority to multiples that are associated with various system resource properties. The properties are associated with the number of time (in seconds) for which the archive request has been in queue. The sam-archived daemon uses the now adjusted priorities to assign each ready archive request to be copied.
The fourth step consists of archiving the files in the archive request set. The sam-archived daemon marks the boundaries for each file when the archive request is ready to be archived. These boundaries help keep each archive file's size less than the specified -archmax value. In the instance a single file is larger than this value, the file becomes the only file in the archive file.
Archive Directives
The archiver.cmd file consists of two main areas - global directives and file system-specific directives. These two parts specify the general archive operations.
The top part of the archiver.cmd file are the global directives. These directives affect all the file systems defined in the mcf file. The bottom part of the archiver.cmd file consists of the file system-specific directives. These directives need to come after the global directives. The system specific directives can override the global directives for their given file system. They start with the fs=name directive that identifies the file system.
Controlling the Size of Archive Files Using the archmax Directive
The archmax directive is used to define the maximum size an archive file can be. User files are combined to create the archive file. Once the target-size has been reached,

no more user files can be added to the archive file. User files larger than archmax are written to a single archive file.
To edit the default values, use the following directive: archmax=media target-size
Media is the media type the files are located on and target-size is the maximum size desired for the archive file. The target-size is media-dependent.
Depending on individual file system needs, setting large or small archive file sizes will have advantages and disadvantages. As a good practice, the archmax directive should be set at no more than 5 percent of the media capacity.
Setting the Archiver buffer Size Using the bufsize Directive
A memory buffer is used by default to copy a file to archive media. Use bufsize directive to specify a non-default buffer size.
Configuring The Releaser
The releaser component maintains the file system's online disk cache automatically at the site-specified percentage usage thresholds. This is done by freeing disk blocks that are currently occupied by eligible archived files. Releasing is the process of freeing the primary disk storage that is currently being used by the archived file's data. The online disk cache uses "water marks" to determine when to release disk space.
There is a high-water mark and a low-water mark. When the high-water mark is reached, that is when online disk consumption reaches a certain level, the sam-releaser releases disk space that is being occupied by eligible archived files until the low-water mark is reached. Alternately, use the release command to immediately release a file's disk space. Configure the system to release files after they are archived or specify that the files are never released.
The system uses certain criteria when deciding which files are selected for release. The size of the file and its age are both considered when the system is making this decision.
Configure the high-water and low-water marks by setting the high=percent and
low=percent when setting the file system mount options. The default high is 80% and default low is 70%. The settings can be dynamically changed by changing the high and low parameters with samu. The samu settings are not persistent across mounts, so set the mount parameters at the same time.

The Releaser Process
When the high-water mark is reached, VSM file system invokes the releaser. The releaser reads the releaser.cmd file and collects the directives that control the release process. The releaser process then scans the file system to collect information about each file. At this point, the releaser begins releasing files in the priority order it has determined best suited. A file system can consist of thousands of files, of all different types. It can be wasteful for the system to keep track of the release priority for every single one of these files, because if the system releases only a few large files, the file system might fall below the low-water mark. It is important for the releaser to examine the priority of each file as to determine the best candidate for release. The releaser does this by identifying the first candidates and discarding subsequent candidates if they do not have a priority greater than the lowest-priority amongst the candidate list. The size of this candidate list is 100,000 if the number of inodes is >= 1 million or 30,000 if the number of inodes is < 1 million. The candidate list size can be changed by setting list_size in the releaser.cmd file.
Once the candidates have been selected and all other lower-level priority candidates ignored, the releaser selects the files with the highest priority to be released. As each file is released, the releaser checks to see if the low-water mark has been reached. This process continues until the low-water mark is reached, and then the releaser stops releasing files. In some instances, all original candidate files in the candidate list can be released and the file system will still be over the high-water mark. When this happens, the releaser identifies an additional candidate list and starts the process all over. The releaser exits and shuts down if there are no viable candidates. This can happen, for example, if the files in question do not yet have archive copies. If this does happen the releaser exits; after one minute passes, then the releaser starts again rechecking the files.
The age of a file is the amount of time that has elapsed from a certain event in the file's history to the present time. The file's inode tracks the following events which alter the age of a file:
1. The time when residence has changed 2. The time data has been accessed 3. The time when the data has been modified
The sls -D option displays these times.
The candidate is a file which is eligible to be released. The following is a list of circumstances that will exclude a file from being a candidate for release.
1. If the file is so small releasing it will have no substantial impact on space. 2. If the file was staged in the past at a time that makes it less than the
minimum residence time setting.

3. If the file has been flagged for partial release, through the release command's -p option causing it to already be partially released.
4. If the file has been marked as "never to be released". This is done using the release -n command.
5. If the file has been marked as damaged. 6. If the file has not been archived. 7. If the file is a directory, pipe, block, or a character-special file, or removable
media file. 8. If the file has an age that is negative. This can happen when the network file
system client has inaccurate clock settings. 9. If the file is being staged for additional copies, when the copy is complete
the file will become eligible for release.
10. If the archiver.cmd command file specifies the -norelease parameter for the
file and the required copies have not yet been made. 11. If the file is currently offline.
The priority of a file is represented by a numeric value. This priority indicates the rank of a candidate file based on the user-supplied weights. The overall ranking is achieved through the sum of the age priority and the size priority. Files that have a larger numeric value for their priority are released before the files with lower numeric values.
The weight is a numeric based value that evens out the priority calculation so it includes file attributes that are of interest and excludes file attributes which are not important. The weight is a floating-point value on a scale from 0.0 to 1.0. Exclude certain attributes by setting their weight to 0 in the releaser.cmd file. Partial Releasing and Partial Staging
Releasing and staging are complementary processes. When a file is partially released, a portion at the beginning of the file remains in the disk cache while the remaining parts of the file are released. Partially releasing a file is useful because it provides immediate access to data in the file stub without having to stage the file. The default partial size and the maximum size of the stub to remain online can be configured when mounting the file system using the following mount options:
Mount Options

-o partial=n Sets the default size (n) in kilobytes of a file stub that will remain online
-o maxpartial=n Sets the maximum size(n) in kilobytes for the file stub that will remain online. This value must be larger than or equal to the -o partial=n value
The stub size for a file can be set using the -p option on the release command. Users may also specify different stub sizes for individual files. This is achieved with the -s option on the release command. These values need to be less than the value set for the mount option maxpartial setting.
How much of a file that must be read before the rest of that file is staged of a partial release stub can be set at the time of the system mount using the -o partial_stage=n option.
Configuring The Stager About The Stager
The stager automatically copies the file data back to the online disk cache when a user or process requests the data. Staging is the process of copying file data that has been released back to online storage to make it available to the user.
Once the stager runs, it attempts to use all the drives in the library. The stager.cmd file can be configured to customize the stager's operations by inserting directives into the /etc/opt/vsm/stager.cmd file.
The stage buffer size is determined by the media type. It defaults to 16 * the media block size. The stage buffer is unlocked by default. The stage buffer size and lock status can be set in the stager.cmd file. The number of outstanding stage requests is based on memory size. It can vary from 5000 up to 500,000. It can be set in the stager.cmd by setting the maxactive parameter.
If an offline file is required by a user or application, its archive copy is staged to the disk cache. The application read operation tracks directly behind the stager operation so that if a file is needed immediately it can be accessed before the entire file is staged. If a stage error is returned, the system switches to another copy of the file and returns an error only after trying to stage all archived copies.
Stager.cmd

Directives may be used in the stager.cmd to override default behaviors. Each directive in the stager.cmd file must appear on its own line. The following directives are accepted by the stager.cmd file. (next page)

Stager.cmd Directives
directio = on/off
Off causes paged I/O to be used. If this directive is on, the directive sets direct I/O for all staging when the file size is equal or greater than the dio_min_size value. directio is set to "on" for shared.
dio_min_size = n
If the file size is less than the value of the dio_min_size, the stager defaults to paged I/O for non-shared VSM file systems. By default n = 8 megabytes.
drives = library count
Defines the number of drives that are to be used for staging on the media library. By default the count is equal to the actual number of drives in the library.
bufsize = media buffer_size [lock] Sets the stage buffer size for specific media types. Lock the buffer if lock is set.
logfile = filename [event]
The stager log contains reports for each file that has been staged. This directive defines the file that is to be used for the log file. By default there is no log file, this directive must be used to create one.
maxactive = number
Uses an integer number to set the maximum number of stage request that can be active at any given moment in the stager. 5000 is the minimum integer that can be set. The maximum integer is 500000. By default the number is based on the size of available memory, 5000 for every gigabyte.
maxretries = number
Limits the number of stage retries capable by the archive copy when errors arise to an integer number. The minimum integer that can be used is 0 and the maximum is 20. By default the integer is 3.
fs = file_system_family_set_name Specifies the following directives apply only to the defined file_system family_set_name until another fs is specified.

Preview Request
Processes request that media be loaded/unloaded. When there are more requests for tapes than available drives, the remaining requests are sent to the preview queue. The previews=value directive controls the number of entries that can be in the preview queue. The previews=value directive is located inside the defaults.config file which can be found at /etc/opt/vsm/defaults.config. The defaults.conf file is read when sam-fsd is started. Chhanges may be made at any time, but the changes do not take place until sam-fsd rereads the files and sam-amld is restarted. Here is the sequence to make that happen:
samd stop samd config samd start
By default, the preview requests are completed in a First In First Out order or "FIFO".
This order can be changed in the /etc/opt/vsm/preview.cmd.
The preview.cmd file is read at startup by the sam-amld daemon. The order in which this file queues the requests depends on whether the request is meant for staging or archiving. The user ultimately has control over the priority of VSNs and can decide the priority of preview requests for specific file systems. When editing the preview file, adhere to certain rules. Only one directive can be placed per line. Comment lines need to start with a # or else they could cause an error. Only two types of directives can be used in the preview file--global directives and file-system directives. When using global directives, they get placed at the top of the file and are applied to the whole file system. When more than one directive is used for a file system, the directives that are specific to that file system take precedence over the global directives. File system directives start with the fs = directive, which names the file system to which all the following directives apply. A single file can contain multiple blocks of directives. When one directive is read, that directive continues in effect until another directive is read or until the end of the file.
Setting the Global VSN and Age Directives
When editing the VSN and age priority directives remember these are global
directives and should be placed before any file system specific directives inside the preview.cmd file. It is necessary to update the vsn_priority directive. vsn_priority = value
This is a static priority factor directive that indicates its value by which the total priority increases when there exists a higher-priority volume. In order for this priority factor to be used, the volume needs to have its priority flag set before it is scheduled as a preview request. Use the chmed command to set the priority flag with the -p option. By default the value is set to 1000.0.

chmed can be used to clear or set flags and values in the library catalog entry. These values are crucial to correct operation of the VSM file system and should only be modified by administrators in particular circumstances. Be cautious when using this command as there is no way to check before hand to make sure the catalog remains consistent.
After setting the vsn priority, update the age_priority.
age_priority = factor
This is a static priority factor even though it acts like a dynamic priority factor. This factor is multiplied by the number of seconds for which a request is in preview request mode. The sum of this multiplication is then added to the overall priority of the request. In this way the longer a request waits the higher its priority becomes. Enabling this setting ensures that older requests are not pushed back by newer requests with high priorities.
When setting this factor to more than 1.0 the time factor becomes more important to
the calculation of the total priority. Setting this value below 1.0 decreases the importance of the time factor. To eliminate the time factor all together, set this value to 0.0. If a volume does not have a priority flag, it sits in the queue; its priority increases the longer it waits there. This volume's priority can keep increasing and eventually become higher than a VSN that has entered the queue later with the priority flag.
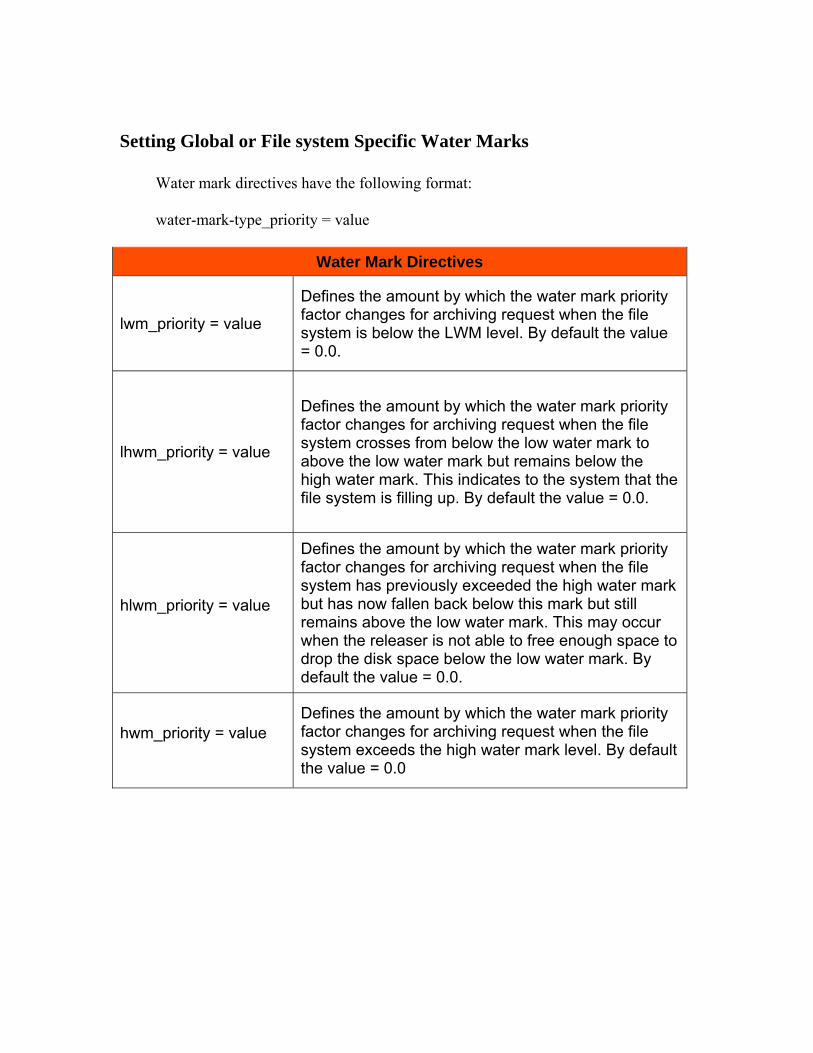
Setting Global or File system Specific Water Marks
Water mark directives have the following format:
water-mark-type_priority = value
Water Mark Directives
lwm_priority = value
Defines the amount by which the water mark priority factor changes for archiving request when the file system is below the LWM level. By default the value = 0.0.
lhwm_priority = value
Defines the amount by which the water mark priority factor changes for archiving request when the file system crosses from below the low water mark to above the low water mark but remains below the high water mark. This indicates to the system that the file system is filling up. By default the value = 0.0.
hlwm_priority = value
Defines the amount by which the water mark priority factor changes for archiving request when the file system has previously exceeded the high water mark but has now fallen back below this mark but still remains above the low water mark. This may occur when the releaser is not able to free enough space to drop the disk space below the low water mark. By default the value = 0.0.
hwm_priority = value
Defines the amount by which the water mark priority factor changes for archiving request when the file system exceeds the high water mark level. By default the value = 0.0

The following equation determines the water mark priority of the preview requests.
lwm_priority + lhwm_priority + hlwm_priority + hwm_priority = The water mark priority
Water mark preview request are either global directives or file system specific
directives. Together these four water mark priorities create a dynamic priority factor that includes a percentage value that indicates how full the file system is and at which levels the high and low water marks are set. The value that gets assigned to the preview request is determined on whether that factor is global, specific to a file system, or not set at all.
Water mark priorities are not used to calculate media requests for staging. They are
used to calculate requests for archiving. If the water mark priority factor is a positive number, it will raise the archive request above the staging request. Similarly when the water mark priority is negative, the overall priority for archive requests is reduced, which usually favors staging requests over archive requests.
When the file system crosses conditions that cause the system to change the
conditional definition, the priority of each volume associated with that file system is recalculated based on the appropriate water mark priority setting.
Priority Request Priority Scheme
vsn_priority + wm_priority + (age_priority * time_in_seconds_in_queue) = Total priority
The wm_priority value is the condition that was valid at the time: hwm_priority, lhwm_priority, lwm_priority, or lhwm_priority.The total priority of a preview request is the sum of all the priority factors. Since the data on the file system is not directly modified or affected by the settings in the preview.cmd file, it is safe to experiment and change the directives to find the settings that best suit individual needs.
The VSN drives can be limited, or file archiving can be performed in the background. Users can customize the settings in the preview.cmd file to help support any scenarios that influence the file system. See the preview.cmd for example settings.

Configuring The Recycler
The recycler finds old or expired archive copies and removes them from the system clearing up volumes for new copies. Archive copies are considered expired when a user modifies a file leaving the old archive copies associated with that file out of date. New archive copies of that file will be made allowing for the old ones to be purged from the system. The recycler will move all unexpired archive copies to a new volume and purge the remaining expired volumes. This process is transparent to the end users. The recycler process identifies and moves expired copies to a separate volume freeing up space on the current volume for new copies. If in the instance a volume contains nothing but expired files, configure the system to take different actions. The volume can be relabeled for immediate reuse or the volume can be exported to off-site storage to keep historical records of all file changes.
Archive volumes consist of the following:
● Current, relative data, comprised of archive images ● Expired data, comprised of archive images ● Unused space, comprised of free space not being used by any archive images
The recycler can be configured with site-specific parameters to keep a certain amount
of space occupied by expired data. It also can specify when to start purging data once that amount has been met. As the files in the file system are changed or deleted, the corresponding archive images expire and their classification changes from relative data to expired data. The actual physical space consumed by the archive images, expired or not, does not change.
The recycler helps keep the system up to date and relative by transforming used space
from expired data into free space without losing any current data. The recycler may be run as often as desired. It is designed to automatically run periodically without having to be invoked by the user. The recycler keeps logs of state information in the library catalogs and the inodes. The sls -D command displays information about the file copies, such as whether that file copy is scheduled for re-archiving or purging.
The first step in the recycler process has to finish before the archiver can re-archive the files. The recycler process consists of three steps:
1. The recycler starts the process by marking all the current archive images with the rearchive attribute. The files with this attribute will be rearchived on a different volume so the current volume can be used again.
2. If tape is being used for archiving, the recycler marks the archive volume with the recycle attribute to prevent any further writing to the volume.
3. Finally, the archiver moves all the marked images to another separate volume. This is called "re-archiving", and places all the current images on separate volumes other

than the expired volumes. The volume with the expired images can now relabeled so it can be reused and new data can be written on it.
The sam-recycler command is used to initiate the recycler process. There are two different methods used by the recycler to achieve its goal. Depending on the media type being used, this goal will be achieved either by automated library, or by archive set.
The following table describes these methods and when they are used.
Media Type Method Used Configurable File
Disks Archive set archiver.cmd
Removable media cartridges
Automated library recycler.cmd and recycler.sh
Removable media cartridges
Archive set recycler.cmd,recycler.sh, and archiver.cmd
When preparing to configure a recycler process, use the following table as a guide.
Do not recycle volumes that contain removable media files. A volume that contains removable media files can never be fully drained. Removable media files are created by using the request command.
The directives in the archiver.cmd control the recycling process using the archive set method. The directives in the recycler.cmd control the recycling process using the automated library method.
The recycler.cmd file controls the recycler behavior.
Do not run the recycler simultaneously while preforming maintenance on the file system. This can cause inaccurate information in the .inodes file, which the recycler uses to determine which files are expired. If this happens current files may be confused for expired files and they will be removed from the system prematurely.
Before the recycler is run make sure all the file systems are mounted correctly. If the recycler is running on an online disk, the file system containing the disk volumes must be mounted with the host system available. Warning
When using disk archiving in a multiple VSM server environment, take extreme care when configuring the recycler. Ensure that the diskvols.conf file for each VSM server is

pointing to a unique set of disk archiving directories. If any directories are shared by the VSM servers, the recycler will destroy the disk archive data.
Controlling the Recycler Process
To run the recycler, edit command files to enable or disable the recycler. Depending on the recycle method, either edit the archiver.cmd file (for archive set method), or the recycler.cmd file (for automated library method).
Edit the appropriate file then use the sam-recycler command to initiate the recycler.
# sam-recycler -dxv
When this command is issued, the recycler reads the recycler.cmd file. If any errors occur, they can be viewed in the VSM log located in the directory:
/var/log/vsm/sam-log
It is possible to set a crontab entry to run the recycler periodically. Type man cron(8).
Removable Media Cartridges
It is necessary to create a recycler.cmd file to recycle archive copies on cartridges in a library. To recycle using the archive set method, configure each library in the recycler.cmd file. Doing this will ensure the VSNs that do not fit into an archive set can still be recycled if necessary. To finish this operation, create a recycler.sh file.
recycler.cmd file
The recycler.cmd file holds the general directives for the recycler process. It may also hold directives for every library in the VSM environment. Root access is required to edit and add directives to the /etc/opt/vsm/recycler.cmd file.
When creating the log file, specify it in the recycler.cmd file. The file name is the location of the file that is to be used for the log. The following is an example of this line:
logfile = /var/log/vsm/archiver.log

Prevent recycling with the no_recycle directive
The no_recycle is a directive that disables the archiver from recycling volumes. the no_recycle directive has the following format:
no_recycle media-type VSN-regexP
Where the media-type is the kind of media the archiver is working on(tape or disk)
and the VSN-regexP specifies a regular expression for the VSNs or diskvols.
Specifying Recycling on an Automated Library
Various recycling parameters for the VSNs may be enabled with the library directive. The library directive has the following format:
library-name parameter
Where the library name specifies the library's name as defined in the family set field in the mcf file. Specify parameter keywords separated by spaces. The following keywords can be used for parameters. (next page)
Library Directive Parameters
-dataquantity size
Specifies the maximum amount of data the recycler is able to schedule for re-archiving in the process of clearing volumes for reuse. The default maximum value is 1 Gigabyte.
-ignore
This directive prevents specified volumes from being recycled. This may be used for testing.
-hwm percent This sets the high-water mark for the library, by default it is set to 95%.
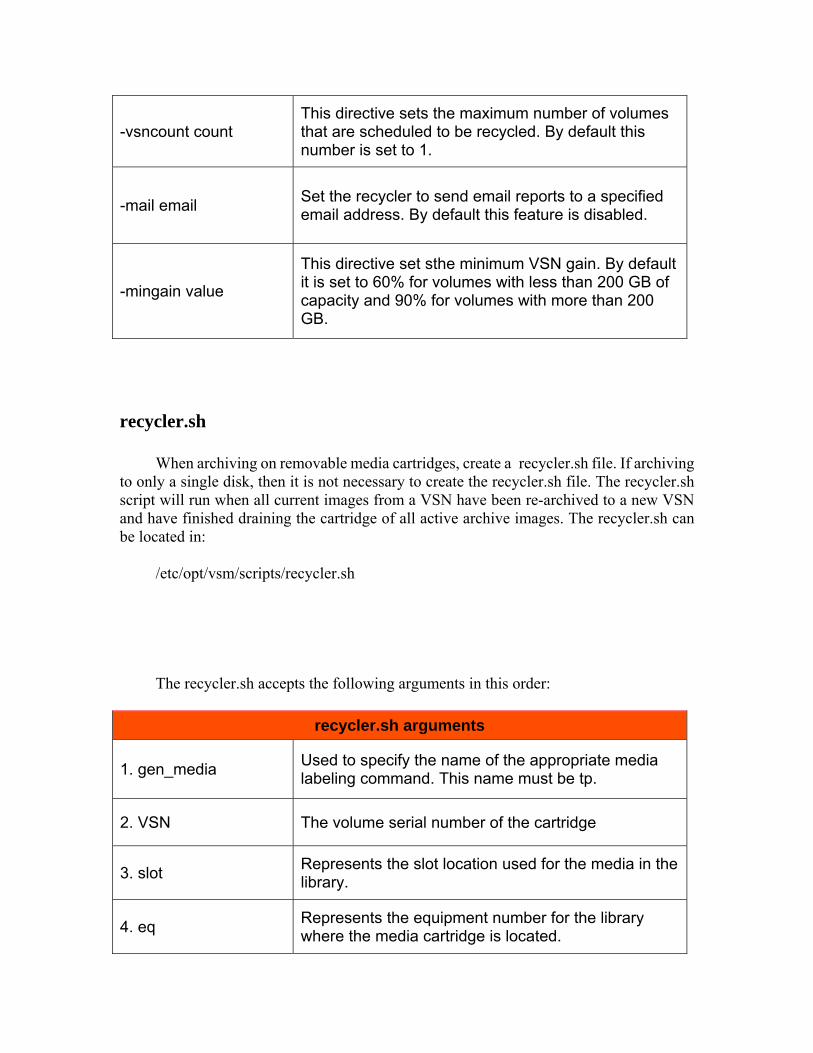
-vsncount count This directive sets the maximum number of volumes that are scheduled to be recycled. By default this number is set to 1.
-mail email Set the recycler to send email reports to a specified email address. By default this feature is disabled.
-mingain value
This directive set sthe minimum VSN gain. By default it is set to 60% for volumes with less than 200 GB of capacity and 90% for volumes with more than 200 GB.
recycler.sh
When archiving on removable media cartridges, create a recycler.sh file. If archiving to only a single disk, then it is not necessary to create the recycler.sh file. The recycler.sh script will run when all current images from a VSN have been re-archived to a new VSN and have finished draining the cartridge of all active archive images. The recycler.sh can be located in:
/etc/opt/vsm/scripts/recycler.sh
The recycler.sh accepts the following arguments in this order:
recycler.sh arguments
1. gen_media Used to specify the name of the appropriate media labeling command. This name must be tp.
2. VSN The volume serial number of the cartridge
3. slot Represents the slot location used for the media in the library.
4. eq Represents the equipment number for the library where the media cartridge is located.

5. media_type The actual media type. This may be used by chmed. For example, media_type = li for LTO media.
6. fs_name Represents the family set name of the library or historian.

Configure Recycling for Disk Archive Volumes Edit the archiver.cmd file to enable recycling if archiving to disk. When recycling to archive set, add the archive set directives to allow recycling between the params and endparams directives. If recycling on a library, skip this step. The following table describes the recycling directives that can be used in the archive set. (next page)
Recycling Directives
-recycle_ignore Prevents the specified archive set from being recycled. Useful for testing.
-rearch_stage_copy copy-number
Specifies the staging for re-archiving to take place from specified copies.
-recycle_dataquantity size Puts a limit on how much data the recycler schedules for re-archiving. By default the limit is ignored.
-recycle_ignore Stops the archive set from being recycled.
-recycle_mingain percent
Sets the minimum gain mark limiting the recycling of volumes for disk volumes. The mingain is represented in a percentage of all expired data associated with the volume. When the expired data exceeds the mingain value, the recycler will begin recycling the expired data. By default the mingain is set to 50%.

-recycle_minobs percent
This directive puts a limit on the recycler's selected tar files in a volume by setting a threshold limit for re-archiving processes of the disk archive volumes. When this percentage of all expired files in the archive tar file reaches this limit, the recycler will start moving current files into a new tar file. When this moving process is complete and all the current files have been moved, the old tar file is marked as a candidate and removed from the disk archive. By default this threshold level is set at 50%.
Advanced Topics
This section discusses advanced options that are not necessary for the system to run and should only be used by the system administrator.
Samfsdumps
Use the samfsdump command to back-up the metadata. This should be done on a regular basis. This will create a more secure system in the circumstance of a disaster failure and allow for recovery of the file system. All metadata for the files in the samfsdump is stored in a file. Set the samfsdump command to run in the cron file. Along with backing up data, it is best to always make at least two file copies on two separate volumes. In the circumstance of a physical failure with the archive media there will be another copy of the data.
Device logging
Device logging helps provide specific error information on the specified devices. This information can then be used to analyze and debug certain device problems. The logs can be used to determine a failing sequence of events for an automated library or tape drive. Device-logging does not gather information on soft media errors. The device logging messages are recorded to individual log files. Each automated library will have its own log file. A new log file is created for each tape drive, and the historian. All log files can be found in:
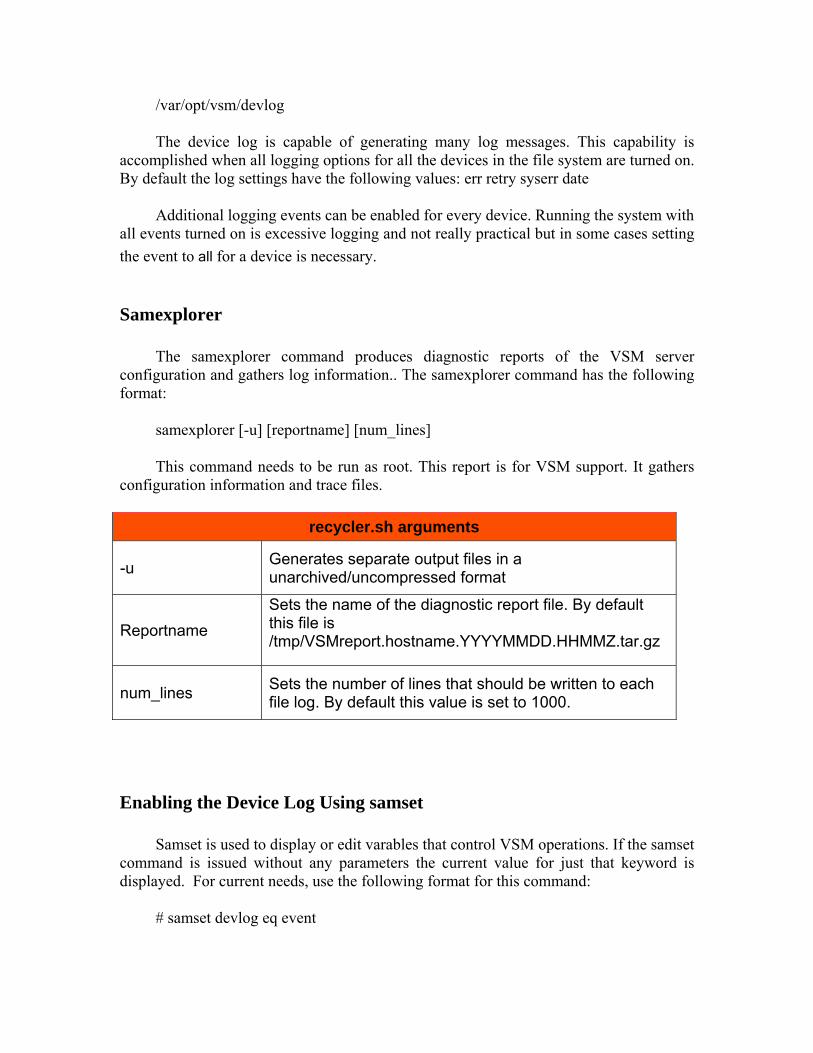
/var/opt/vsm/devlog
The device log is capable of generating many log messages. This capability is accomplished when all logging options for all the devices in the file system are turned on. By default the log settings have the following values: err retry syserr date
Additional logging events can be enabled for every device. Running the system with all events turned on is excessive logging and not really practical but in some cases setting
the event to all for a device is necessary.
Samexplorer
The samexplorer command produces diagnostic reports of the VSM server configuration and gathers log information.. The samexplorer command has the following format:
samexplorer [-u] [reportname] [num_lines]
This command needs to be run as root. This report is for VSM support. It gathers configuration information and trace files.
recycler.sh arguments
-u Generates separate output files in a unarchived/uncompressed format
Reportname
Sets the name of the diagnostic report file. By default this file is /tmp/VSMreport.hostname.YYYYMMDD.HHMMZ.tar.gz
num_lines Sets the number of lines that should be written to each file log. By default this value is set to 1000.
Enabling the Device Log Using samset
Samset is used to display or edit varables that control VSM operations. If the samset command is issued without any parameters the current value for just that keyword is displayed. For current needs, use the following format for this command:
# samset devlog eq event

eq represents the equipment ordinal of the device where log messages are to be written. For event, specify the events that should be logged.
The device log may also be enabled by modifying the defaults.conf file. Superuser permissions are required to modify the defaults.conf file. The final step is to add the devlog directive to the defaults.conf file.
Once the devlog directive has been added, save and exit the defaults.conf file then propagate the file.
# samd conf
Removable Media Files
Removable media files are files that are created using the request command. The request command creates a file that points to a tape. When the removable media file is opened, the tape is mounted. When the file is written or read, the tape is written or read.
Removable media files have permissions, user names, group names, and size characteristics. In this sense, they are similar to typical VSM files. They differ, though, as their data does not reside on the disk cache. In this way, removable media files that are much larger than the disk cache can be created and written to removable media cartridges. Multiple removable media files can reside on the same volume. If a removable media file spans across multiple volumes, it is called a volume overflow file. The volume overflow feature allows for a single large file to span across many volumes on different cartridges. This feature is helpful when there are files that are larger than the capacity of the media. Removable media files must be read and written sequentially.
A volume cannot be recycled if it contains removable media files. The recycler default behavior expects only archived files to reside on the volume that is assigned for archiving. Removable media files are never archived and are not supported over NFS.
To create a removable media or volume overflow file, use the request command with at least the following options:
request -m media_type -v vsn file
removable media file arguments
media_type The media type of the selected removable media cartridge.

vsn
Volume Serial Name. The VSN of the removable media cartridge. Create a volume overflow by specifying more than one VSN. The system allow up to 256 different VSNs to be specified. The slash ( / ) character should be used to separate VSN arguments.
file The file name of the removable media file.
The following command creates a removable media file:
# request -m li -v 200000 rmfile
The request command creates removable media files. The -m media option is a required option and specifies the media type. The VSNs can be specified in two ways: using the -v option or specifying the -l vsnfile option.
Error Reporting
The SEF or system error facility reporting system captures log data from the different tape drives in automated libraries, writes them to a log, and converts the reports into legible reports. This function consists of log files containing information from tape device log sense pages, and the sefreport command. The sefreport command is used for writing the log files to stdout in a legible format.
Enabling SEF
It is necessary to have superuser permissions to enable SEF reporting. SEF may be enabled at any time by creating the sefdata log file. Use the touch command to create this log file.
# touch /var/opt/vsm/sef/sefdata
Type samd stop, samd config, and samd start commands. Now SEF will be enabled because the sefdata file exists.
How to Generate a SEF output
First, verify that /opt/vsm/sbin exists in the command path. Use the sefreport command to generate the SEF output. The following options are the most commonly used options alongside the sefreport command.

sefreport command options
-d Generates additional device information. It will write an additional header line containing the equipment ordinal and the path name to the device for each record.
-v Generates information in verbose mode. This option appends information regarding equipment ordinal, page code, and VSN to each line of a record.
-t Generates log sense output with text.
# sefreport -d /var/opt/vsm/sef/sefdata > sef.output
Configuring Vendor-Specific Libraries
VSM supports StorageTek Automated Cartridge system Library software or ACSLS SCSI media changer mode. ACSLS SCSI Media Changer (SMC) is the library device driver that communicates the ACSLS and the STK SCSI attached libraries, SL500, SL3000, and SL8500. The SMC driver enables a logical library that represents a logical partition of a tape library. The ACSLS must be at least version 8.2. A minimum of 2 Gigabytes is required for ACSLS 8.3 to run. Additional memory is recommended for high-volume library environments, Multiple requests for mounting and unmounting operations are processed simultaneously and require more memory to run efficiently. 40 gigabytes of disk capacity should be made available to the file system in which ACSLS is going to be installed.
SCSI Media changer over Fibre Channel Interface
ACSLS provides a SCSI Media Changer over Fibre Channel Interface to allow access to the logical libraries. ACSLS is capable of servicing multiple SCSI clients at the same time. Each client has exclusive access to its assigned logical library. Every client that exists will have exclusive access to an assigned logical library. This exclusive access allows the client software to utilize the logical libraries as if they were different physical libraries. Each logical library can be assigned to only one single client. A client can be given access to multiple logical libraries. Only the volumes and drives assigned to the logical libraries can be accessed.
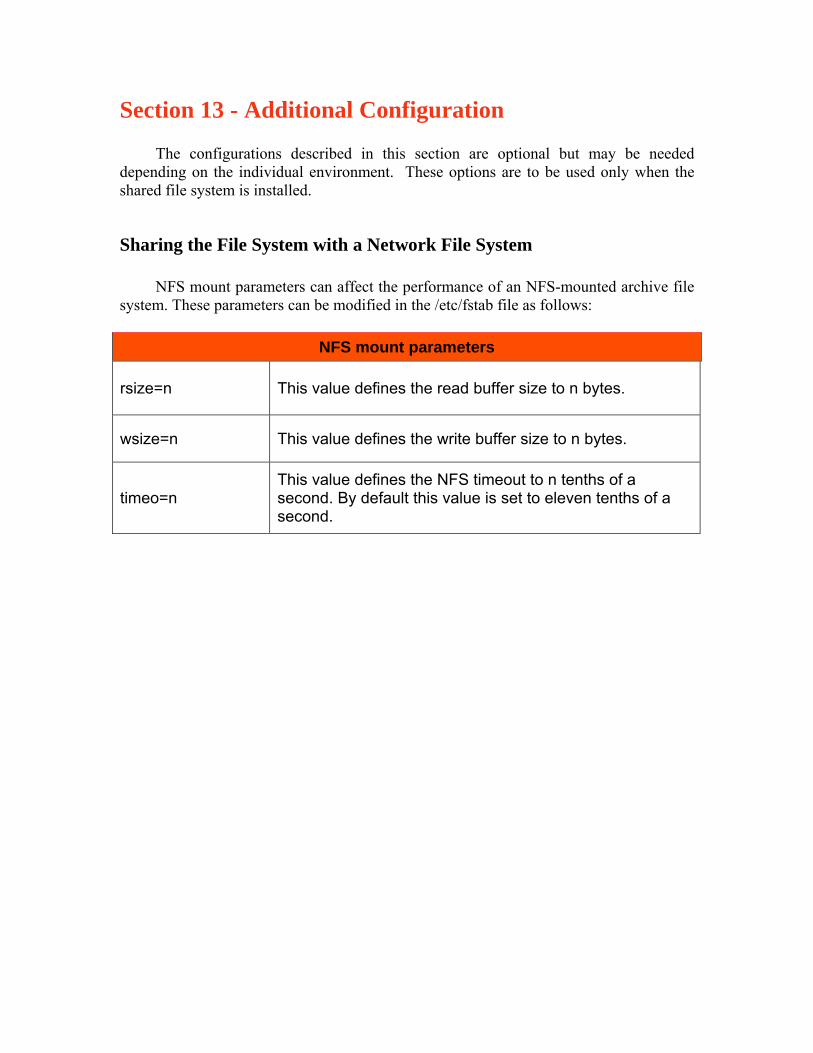
Section 13 - Additional Configuration
The configurations described in this section are optional but may be needed depending on the individual environment. These options are to be used only when the shared file system is installed.
Sharing the File System with a Network File System
NFS mount parameters can affect the performance of an NFS-mounted archive file system. These parameters can be modified in the /etc/fstab file as follows:
NFS mount parameters
rsize=n This value defines the read buffer size to n bytes.
wsize=n This value defines the write buffer size to n bytes.
timeo=n This value defines the NFS timeout to n tenths of a second. By default this value is set to eleven tenths of a second.
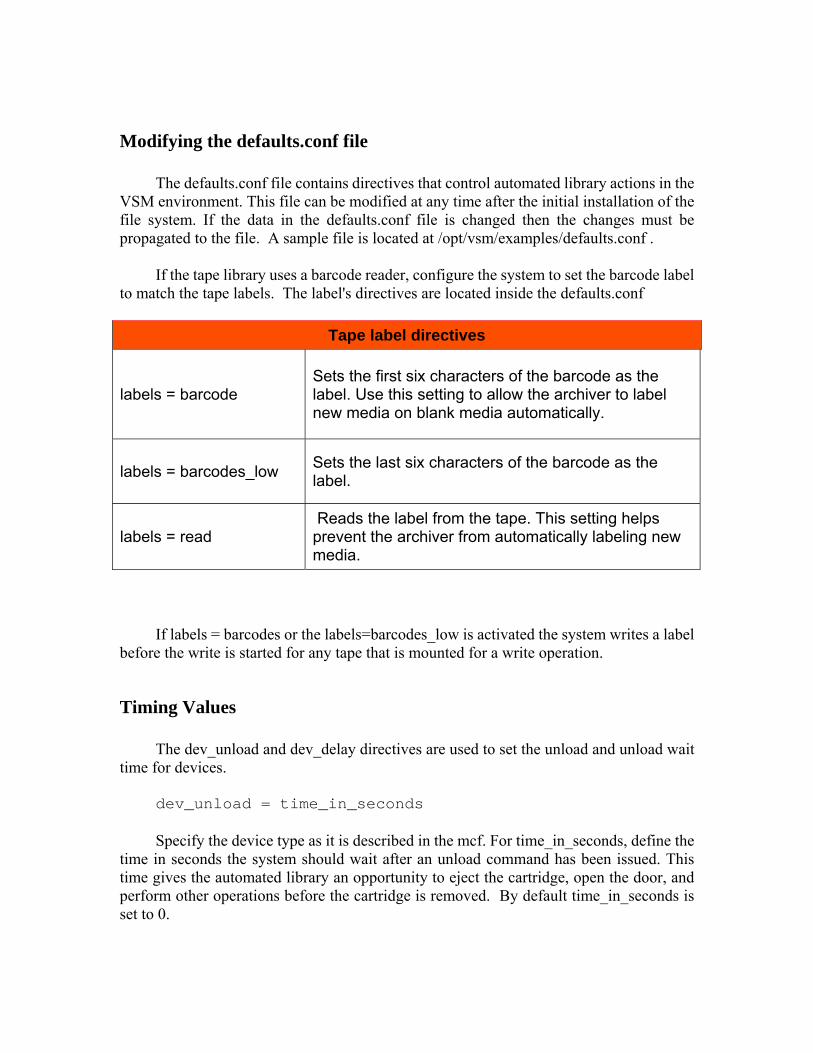
Modifying the defaults.conf file
The defaults.conf file contains directives that control automated library actions in the VSM environment. This file can be modified at any time after the initial installation of the file system. If the data in the defaults.conf file is changed then the changes must be propagated to the file. A sample file is located at /opt/vsm/examples/defaults.conf .
If the tape library uses a barcode reader, configure the system to set the barcode label to match the tape labels. The label's directives are located inside the defaults.conf
Tape label directives
labels = barcode Sets the first six characters of the barcode as the label. Use this setting to allow the archiver to label new media on blank media automatically.
labels = barcodes_low Sets the last six characters of the barcode as the label.
labels = read Reads the label from the tape. This setting helps prevent the archiver from automatically labeling new media.
If labels = barcodes or the labels=barcodes_low is activated the system writes a label before the write is started for any tape that is mounted for a write operation.
Timing Values
The dev_unload and dev_delay directives are used to set the unload and unload wait time for devices.
dev_unload = time_in_seconds
Specify the device type as it is described in the mcf. For time_in_seconds, define the time in seconds the system should wait after an unload command has been issued. This time gives the automated library an opportunity to eject the cartridge, open the door, and perform other operations before the cartridge is removed. By default time_in_seconds is set to 0.

dev_delay = time_in_seconds
Specify the device type as it is described in the mcf. For time_in_seconds define the minimum number of time in seconds that should elapse elapse between the time the cartridge is loaded and the time when that same cartridge is able to be unloaded. By default this value is set to 30.
Customizing Default Values
To customize the values inside the defaults.conf file use the following procedure.
Copy the sample defaults.conf file to a functional location.
# cp /opt/vsm/examples/defaults.conf /etc/opt/vsm/defaults.conf
Modify the new defaults file to include the lines that control the different parts of the system that are to be changed. Remember to remove the # character from the column that will be used.
Use the following commands to enable the sam-fsd daemon to recognize the changes
in the default.conf file.
# samd stop # samd config # samd start
Support
Contacting Versity support Web Site: https://versity.zendesk.com/hc/en-us Email: [email protected] Phone: 1 (866) 683-1051