version 8 cashier manual
DESCRIPTION
fidelioTRANSCRIPT

Cashier Manual
Version 8.6


Delphi is a trademark of Borland.
MSDOS, Windows-NT, Windows 2000, Windows XP and Microsoft Word are trademarks of Microsoft Corporation.
Oracle is a trademark of Oracle Corporation.
Crystal Report Writer is a trademark of Crystal Decisions.
All other brand and product names are trademarks or registered trademarks of their respective companies.
This document has been prepared by Micros-Fidelio (Ireland) Ltd. and is available to a select group of individuals for informational purposes. This is a confidential document that contains concepts, methods and other proprietary information. Readers are to treat the information herein as confidential.
© 2006 Micros-Fidelio (Ireland) Ltd. All rights reserved. No part of this document may be reproduced, transmitted or used in any form by any means – graphic, electronic or mechanical, including photocopying, recording, taping or information storage and retrieval systems or otherwise – without the prior consent of the copyright owners. Micros-Fidelio (Ireland) Ltd. makes no warranty of any kind with regard to this material, including but not limited to the implied warranties of marketability and fitness for a particular purpose. Micros-Fidelio (Ireland) Ltd. shall not be liable for errors contained herein or for incidental or consequential damages in connection with the furnishing, performance, or use of this material. Information in this document is subject to change without notice.
Author:
V8 Development Team
Printed in Germany
Micros-Fidelio (Ireland) Ltd.
Europadamm 2-6
41460 Neuss
Germany
Tel: +49 2131 137 0
Fax: +49 2131 137 464
© 2006 Micros-Fidelio (Ireland) Ltd. February 2006


Table Of Contents Introduction............................................................................................1
About Version 8 Cashiering .................................................1 Logging In...........................................................................1 Cashiering Shortcut Bar ......................................................2 Navigation keys...................................................................3 Using the blue drill down arrow ..........................................4 HTML View ..........................................................................4 The Quick Keys....................................................................7 The Date Field .....................................................................8
Changing the date .............................................................9 Logging off and Exiting Version 8......................................10
Cashiering .............................................................................................11 Billing................................................................................11
Opening a Guest Folio ...................................................... 13 Batch Printing ................................................................. 15 Financial Accounts ........................................................... 16 Payments ....................................................................... 18 Split .............................................................................. 19 Transfers........................................................................ 20 Reservation .................................................................... 21 Financial Account (FA) Settings ......................................... 21 Options.......................................................................... 22 Check Out Options........................................................... 31 Check Out ...................................................................... 34
Batch Posting ....................................................................35 Batch Posting.................................................................. 35
Posting..............................................................................36 Posting Journal .................................................................39
Posting Journal ............................................................... 39 Cashier Functions..............................................................43
Billing History ................................................................. 43 Cashier Status ................................................................ 45 Change Cashier Stock ...................................................... 46 Currency Exchange.......................................................... 48 Deposits......................................................................... 51 Exchange Rates............................................................... 52 Petty Cash...................................................................... 54 Telephone Booth ............................................................. 55 Batch Settlements ........................................................... 58
Close Cashier.....................................................................60 Passer By ..........................................................................64
Accounts Receivable..............................................................................67 Accounts ...........................................................................67
Accounts Search.............................................................. 68 Account Setup ................................................................ 71 Deleting an Account......................................................... 74 Deactivate/Activate ......................................................... 74
© 2006 Micros-Fidelio (Ireland) Ltd. February 2006 v

Version 8 Cashier Manual
Postings ......................................................................... 75 Aging............................................................................. 86 Reminders...................................................................... 86 All Reminders ................................................................. 87 Accounts Options............................................................. 88 Print/E-Mail All Statements ............................................... 89
Transactions......................................................................89 Transaction Search .......................................................... 90 Transaction Options ......................................................... 92
Credit Cards .................................................................... 102 Credit Card Search: ....................................................... 102 Credit Card Options: ...................................................... 104 Additional Options: ........................................................ 104
Document History ........................................................... 104 Document History Search ............................................... 104 Document History Options .............................................. 105
Reminder Letters & Statements ...................................... 106 Reminder Letters & Statements Configuration.................... 107 Batch Statement Examples ............................................. 108
Travel Agent Processing...................................................................... 111 Commissions ................................................................... 112 Adding Commission Manually.......................................... 112 Commission Details ......................................................... 114 Travel Agent Processing Setup........................................ 115
TAP Commission Accounts .............................................. 115 TAP Commission Rules ................................................... 116 TAP Commission Codes .................................................. 118 Travel Agent Profile Setup .............................................. 118
Tour Operator Invoice......................................................................... 119 Rebate Accounts ................................................................................. 123 Transponder........................................................................................ 125 Index .................................................................................................. 131
vi © 2006 Micros-Fidelio (Ireland) Ltd. February 2006

1
Introduction
About Version 8 Cashiering The Version 8 cashiering module is used to check in financial accounts, access the billing screen to select any in house guest or financial account and post, modify, or transfer charges, view invoices, print information folios or perform a check out.
To maintain proper control each receptionist or cashier usually has their own cashier number and in larger properties each cashier has their own cashier drawer. To administer this, Version 8 requires a cashier login each time postings or changes reflecting the cash drawer are made. Version 8 offers the possibility to configure cashier stocks in different currencies, with the functionality to administer stock per currency; it is possible to exchange currency to another currency than local. The close cashier function offers detailed reporting about each cashier's transactions of the day.
Logging In To use Version 8 you must first log into the system. You must have a valid user identification and password.
Logging into Version 8:
1. From the desktop, click the Fidelio Version 8 icon.
The Fidelio V8 Login screen appears.
2. Type your user identification (case sensitive) in the Login name box.
3. Tab to the Password box.
4. Type your secret password (case sensitive) in the Password box.
5. Click LOGIN, the Version 8 main menu screen appears.
You are now logged into the system.
© 2006 Micros-Fidelio (Ireland) Ltd. February 2006 Page 1
Version 8 Cashier Manual
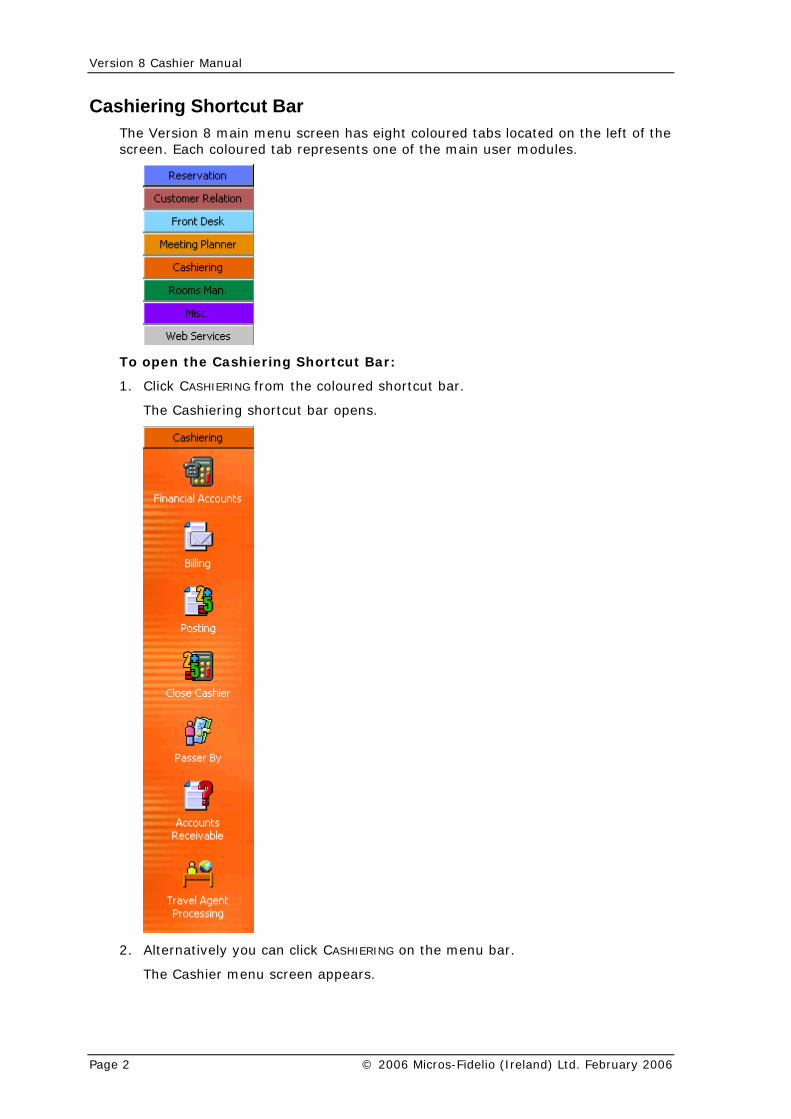
Cashiering Shortcut Bar The Version 8 main menu screen has eight coloured tabs located on the left of the screen. Each coloured tab represents one of the main user modules.
To open the Cashiering Shortcut Bar:
1. Click CASHIERING from the coloured shortcut bar.
The Cashiering shortcut bar opens.
2. Alternatively you can click CASHIERING on the menu bar.
The Cashier menu screen appears.
Page 2 © 2006 Micros-Fidelio (Ireland) Ltd. February 2006

Introduction
Navigation keys Accelerator keys
Version 8 has accelerator keys that allow you fast access to a box on a screen or dialog box. When a letter is underlined you can press the Alt + letter keys and the cursor moves into the appropriate box. For example, on the Profile Search screen the letter “A” is underlined in the Name field. By pressing the Alt + A keys, the cursor moves into the Name box.
To use the accelerator keys:
From the screen or dialog box, press Alt + letter
The cursor moves into the appropriate box.
Shortcut keys
Version 8 has shortcut keys that allow you to perform actions directly from the keyboard without having to use the mouse. Using these keys saves you time.
Version 8 Shortcut keys
Shortcut Key Description
F1 Displays the help.
Alt + F4 Closes the active window.
F10 Closes all active windows.
F12 Moves the cursor from a data field to the grid.
Alt + Down arrow Displays a combo box.
Tab Moves forward through the fields /options. Moves to the next field and confirms the entry.
Shift + Tab Moves backward through the fields/options.
Ctrl + Tab Moves forward through tabs.
Ctrl + Shift + Tab Moves backward through tabs.
Escape Cancels the current action. Removes a Combo box before a selection has been made.
Home Moves the cursor to the beginning of a field.
End Moves the cursor to the end of a field.
© 2006 Micros-Fidelio (Ireland) Ltd. February 2006 Page 3

Version 8 Cashier Manual
Using the blue drill down arrow Many fields have a blue drill down arrow next them indicating that there is additional information that can be displayed.
For example, on the House Status screen clicking the blue drill down arrow on the Out of Order line displays the Out of Order Rooms screen.
HTML View Version 8 offers the possibility to view information in HTML format. The main areas where information can be viewed in HTML format are as follows:
Reservation Navigator
Groups
Blocks
Profiles
Tasks and Activities
Events
Conference Reservation
Page 4 © 2006 Micros-Fidelio (Ireland) Ltd. February 2006

Introduction
View information in HTML format
In this example we will display information in HTML format on the profile screen.
1. Click the CUSTOMER RELATION menu and select PROFILES to display the customer profile screen.
2. This main customer profile screen is called the Navigator and is divided into 3 distinct areas:
Query - basic and advance profile search criteria
Query Results - the results of the query shown in a grid format
Tree Listing and HTML Page
A tree listing of all the details associated with this profile including address, communications, links, reservations or history
A freely definable HTML display which by default has a 'big' format where the details are displayed in a non-grid style format or a list format. The HTML display can be printed by using the right mouse click.
3. Enter the name to search for in the NAME box and click SEARCH.
4. The query results are shown in grid format in the middle section of the screen and the tree and HTML formats are shown in the lower section of the screen.
© 2006 Micros-Fidelio (Ireland) Ltd. February 2006 Page 5

Version 8 Cashier Manual
5. In this instance the HTML view displays a summary of the profile details. The tree listing is displayed by default expanded by one level. A plus sign next to a folder indicates that it can be expanded to show more folders; a minus sign indicates that it can be collapsed.
Expand the HTML tree
1. Click the expand icon to show all available folders.
Collapse the HTML tree
1. Click the collapse icon to collapse all folders to the uppermost level.
Refresh the HTML View
1. Click the refresh icon .
Clear the HTML View
1. Click the clear icon .
2. The Tree and HTML section of the screen is cleared completely of all details. However it is only cleared for the selected profile, as soon as another guest is selected the HTML view for that guest is displayed.
Change the display of the HTML
Two additional buttons on the html display allow you to change whether certain details are displayed in a non-grid style or in a list format. By default the 'big' view is displayed.
1. To view in list format click the button.
Page 6 © 2006 Micros-Fidelio (Ireland) Ltd. February 2006

Introduction
2. To view in a non-grid style click the button.
The Quick Keys Version 8 allows you to select the Quick Keys main menu from any screen. The quick keys are shortcuts to screens, searches, and desktop tools. Using these keys allows rapid access to information without having to leave the section that you are currently working on. For example, a customer is making a new reservation while at the same time asking questions about restaurants in the area. You can use the Telephone Book quick key for restaurant information instead of aborting the new reservation screen, looking up the restaurant information, closing the Telephone Book, and reopening the new reservation screen.
To access the Quick Keys main menu:
Click the QUICK KEYS menu option.
The Quick Keys menu is displayed.
© 2006 Micros-Fidelio (Ireland) Ltd. February 2006 Page 7

Version 8 Cashier Manual
The Date Field The format of the dates and the separators between the dates may vary from one hotel to another. The date format is defined in the Control Panel Windows Regional Settings/Options.
Typical date formats include the following:
MM/dd/yy
MM/dd/yyyy
yy/MM/dd
yyyy-MM-dd
dd-MMM-YY
You can type the date directly in the date field; however it must be typed exactly as per the pre-defined format.
There are many date fields in the system, for example, Arrival Date or From Date. The date can be either a specific date or an as of date.
A specific date is when you need to see what happened on that day. For example, you need to see which guests have departed 01/01/03.
Page 8 © 2006 Micros-Fidelio (Ireland) Ltd. February 2006

Introduction
An as of date is when you need to find out information starting from that date. For example, you need to read the room rack starting from 09/09/03 through 12/09/03.
Changing the date The date can be changed by typing a new date or with the use of the calendar.
To type a new date:
1. Place the cursor in the Date field box.
2. Type the new date in the Date field box, in the defined format including separators.
3. Press the Tab key, the date is changed.
To change a date using the calendar:
1. Click the drop down arrow next to the Date field box.
The calendar appears.
2. Change the month to a previous month or future month by clicking the horizontal arrows located on the top of the calendar or by pressing the Ctrl + Page Up or Ctrl + Page Down key.
3. Place the cursor on the date and click the left mouse button or move the keyboard arrow keys to locate the date and press Enter, the date is changed.
© 2006 Micros-Fidelio (Ireland) Ltd. February 2006 Page 9

Version 8 Cashier Manual
Logging off and Exiting Version 8 To log off Version 8:
1. Click the WINDOWS menu and the option CLOSE ALL to close all open screens and dialog boxes.
2. Click the LOGOUT option from the WINDOWS menu.
The Login screen appears.
A new user can now login.
3. To close the application completely click CANCEL.
Version 8 is closed and the desktop appears.
To exit Version 8:
1. Click the WINDOWS menu and the option CLOSE ALL to close all open screens and dialog boxes.
2. Click the EXIT APPLICATION option from the WINDOWS menu.
Version 8 is closed and the desktop appears.
Page 10 © 2006 Micros-Fidelio (Ireland) Ltd. February 2006

2
Cashiering
Billing The billing option is used to view or modify guest folios or financial accounts, post guest charges, transfer charges and check-out folios.
To speed up the billing process the guest room number can be entered on the cashier login screen to open the guest folio directly, bypassing the billing search screen. If no room number is entered then the billing search screen opens listing all checked-in guests and financial accounts.
How to access the billing search screen:
1. Click the CASHIER menu and select BILLING. or press CTRL+B.
Alternatively click the BILLING icon from the coloured cashiering toolbar.
The Cashier Login screen is displayed.
2. Enter your CASHIER NUMBER and PASSWORD, click LOGIN.
The billing search screen opens, listing by default all checked-in guests and financial accounts.
Note: The ROOM field is displayed when accessing the billing option to speed up the billing process. Enter the room number in the ROOM field to access the guest folio directly bypassing the billing search screen. All other cashiering options require only a cashier number and password.
Billing Search Screen:
The main billing search screen is divided into 3 distinct areas:
Query Results - the results of the query shown in a grid format, the default display lists all checked-in guests and financial accounts.
Query (Filters) - consists of 5 sections of search criteria. The filter section can be hidden by pressing on the HIDE/SHOW filters bar.
General - to search by Room number, Guest name, Group name, Reservation ID (Confirmation number) or Party (The parameter Party Functionality must be on under Global Settings->Reservation tab). Entering a filter here then pressing tab automatically loads the guest invoice regardless of the user setting defined under Miscellaneous->User Settings->Billing tab.
Reservation - to search by reservation status: In House, Expected Arrivals, Expected Departures, Checked Out, Future.
Financial Accounts - to search by FA status: In House, Expected Arrivals, Expected Departures, Checked Out, Future.
Balances - to search by folio balance: All, Zero Balance, Open Balance.
© 2006 Micros-Fidelio (Ireland) Ltd. February 2006 Page 11

Version 8 Cashier Manual
Date Filter - the APPLY check box activates the date filter and enables you to search for reservations limited by date range. The other filter options such as Expected Arrivals will show all expected arrivals for today's date and Future will show all future reservations without the possibility to limit the search by date. Selecting the APPLY check box allows you to search for example, for all reservations arriving on a specific date or all reservations which checked out on a specific day.
Note: Entering a filter in the GENERAL filter section and then pressing the tab key automatically loads the guest invoice regardless of the user setting defined under Miscellaneous->User Settings->Billing tab.
Billing Search Screen Options - the options available directly from the billing search screen.
Click this Button To perform this task
Select Select a guest or financial account.
New FA Open a new Financial Account.
Refresh Refresh the screen or to activate the query entered in the filters section.
Allowances Display the package allowances screen.
Options Select the Options button to display additional options.
C/O All 0 Bal. Check out all guest accounts with a zero balance.
Select All Select all the guests displayed in the billing search grid.
Batch Post Post the same charge for the same department, to several guests.
Batch Print Print information folios, as interim or advance bills, for all in-house guests and guests departing today or tomorrow.
Adjustments When selecting several in house guests and pressing the ADJUSTMENTS button a reduction can be posted as percentage to the selected invoices or a discount/adjustment percentage or amount can be posted to a specific invoice. The discount can be posted on a selected department code which can be configured on the department code setup
Daily charges To post room, tax and fixed charges for the selected in-house guests for a single day or for the entire stay.
Click REFRESH to refresh the billing search screen and activate the search.
Fast Access to the Billing menu or Check out - select a reservation or financial account from the billing search screen and right-click to display the pop-up menu for fast access to the billing and check out options.
Page 12 © 2006 Micros-Fidelio (Ireland) Ltd. February 2006

Cashiering
Opening a Guest Folio Version 8 assigns a folio to a guest or financial account upon check in. By default a single folio is created, however, on this folio it is possible to open an unlimited number of windows in order to create as many folios as required . Depending on guests requirements on the presentation of the folio, it can be split into 2, 3, 4 and more windows.
For example if the guest stays at your property on business then the company will most likely pay for the guests room & breakfast charges. In this case there will be 2 windows, one for the guests charges and one for the room & breakfast charges. If the guest needs to separate his telephone charges then the cashier can open a third window to route all telephone related charges.
From the selection grid, choose a room number or financial account and click SELECT or just double click on the room number to open the attached invoice.
The screen is split into 3 sections:
The upper section is a freely definable HTML format, the standard information contains reservation details, billing instructions, notes, actual balance and billing information, scroll up and down and left and right. If the reservation has multiple profiles linked then the names of the Multi Guests are displayed.
The middle section shows all the windows to which the invoice has been split and their relevant information. Click the REFRESH button to refresh the screen, click the ADD NEW WINDOW button to add new window views to the folio. The layout of the screen can be defined to either be horizontal or vertical. Next to the layout indicator the cashier number and cashier initials are displayed. Lamps indicate a multi-guest reservation, a share reservation or if the guest has a message.
The lower section of the screen has the following options:
Postings
PAYMENTS
SPLIT
TRANSFERS
Reservation
FA Settings
OPTIONS
C/O OPTIONS
CHECKOUT
Additional options are available on a pop-up menu by clicking the right mouse button on any place of this screen.
© 2006 Micros-Fidelio (Ireland) Ltd. February 2006 Page 13

Version 8 Cashier Manual
Available operations on the right mouse click
Click this Button
To perform this task
Add Guest View Opens additional guest bills. Select the guest from the Billing Guest search screen, the newly selected bills appear as additional tabs at the bottom of the uppermost bill. Clicking on a bill tab brings that bill to the top.
Close Guest View
Close the billing window, the guest name is no longer shown on tab at the bottom of the screen.
Cancel Postings
Cancel Selected Postings
Cancels the selected postings. Split postings from rate codes will be cancelled on the correct department codes. Cancelling a cancelled posting re-posts the charge.
Adjust Postings In Window
Offers a selection of already existing windows of the guest folio and an option to create a new window. Creating a new window will move both postings (selected and correction posting) to the new window. Selecting one of the existing windows will move both postings to the selected window.
Delete Selected Postings
This option may be used to delete postings from today postings which have not been printed. This option is controlled by the user right 'Delete Postings'.
Posting Details Displays the View Posting Details dialog box.
Split Selected To split a selected charge.
Transfer To transfer selected postings or specified department codes to another window, room or financial account. This can be done, by arrangement code and by period of time..
Select Postings To select all postings on the open invoice.
Checkout Selected Window
To check the guest or financial account out.
Checkout Selected Window with Forced Printing
This option is only available if the flag: Window Checkout with Forced Printing is activated under Setup->Configuration->Miscellaneous->Global Settings->Country Specifics tab Italian Settings. Selecting this option will check out the window and print an invoice regardless of the flag: Print invoice when balance is zero under Setup->Configuration->Miscellaneous->Global Settings->Billing tab. It will also print invoices with no postings at all.
Edit Selected Window
Displays the Billing Window Setup dialog box. If there are multiple guests linked to the reservation then it is possible to select one of the linked profiles from the INVOICE TO section of the billing window setup dialog box on an additional window.
Delete Selected Window
Deletes the selected window unless there are postings or billing instructions defined for that window.
Page 14 © 2006 Micros-Fidelio (Ireland) Ltd. February 2006

Cashiering
Click this Button
To perform this task
Payments Post a payment for the guest or financial account.
Postings Post a charge for the guest or financial account.
Guest Check Displays the guest check linked to the posting both while the guest is in house and also once the folio has been checked out. See Guest Checks
The NEXT and PREVIOUS buttons allow you to scroll through all the guest checks which are linked to this folio.
Click the PRINT button to print the details of a specific check.
Indicator lamps on the billing screen
When opening the billing screen indicator lamps will be displayed if the guest has:
Messages
Shares
Locators
Batch Printing Printing out several guest folios is quicker using the batch folio function. Batch printing enables you to print information folios, as interim or advance bills, for all in-house guests and guests departing today or tomorrow.
This function is useful for hotels that slip an advance bill under the guest's room door the night before check-out. It gives guests the opportunity to look over their folios prior to checking out. Also, a guest paying by credit card can simply sign the folio and leave the signed folio at the check-out desk, or use video check-out and keep the folio as an information copy.
How to batch print folios:
1. Click the CASHIER menu and select BILLING. or press CTRL+B.
The Cashier Login screen is displayed.
2. Enter your CASHIER NUMBER and PASSWORD, click LOGIN.
The billing search screen is displayed.
© 2006 Micros-Fidelio (Ireland) Ltd. February 2006 Page 15

Version 8 Cashier Manual
3. Use the filters to display the required guests.
4. Highlight the required records on the list.
5. Click BATCH PRINT, the batch printing dialog box is displayed.
6. Complete the fields as detailed in the Batch Printing dialog box.
7. Click PRINT, the selected invoices are printed.
Batch Printing dialog box
Field Definition
Order by Select whether the folios should be printed in room number or name order. Selecting none prints the folios in the order they are displayed on the billing search screen.
Descending Select whether the folios should be printed in descending order.
Folio Style Select the folio style.
Invoice Type Select either information folio or invoice.
Print only windows on guests' name
Select this checkbox if only the billing windows on the guests own name should be printed.
Post next room and fixed charges before print
Select this checkbox if the room and fixed charges should be posted before the folios are printed.
Financial Accounts The option New FA may be used to create a new financial account. This option is identical to the New Financial accounts selection on the reservation navigator.
All fields have to be filled. The new financial account option is also available from the Cashier drop down module, but there you need to enter a Cashier number, as this will directly open the Billing window.
Page 16 © 2006 Micros-Fidelio (Ireland) Ltd. February 2006

Cashiering
How to create a new financial account:
1. Click the CASHIER menu and select BILLING.
The Cashier Login screen is displayed.
2. Enter your CASHIER NUMBER and PASSWORD, click LOGIN.
The Billing Search screen is displayed.
3. Click NEW FA to display the New Financial Account dialog box.
4. In the GROUP box, click the drop-down arrow, and select the type of financial account required.
5. Click the button next to the PROFILE box to open the profile search screen, SELECT an existing profile or create a NEW one.
6. In the ACCOUNT NUMBER box, click the drop-down arrow, and select an account number, if the account number was defined with a description then this is updated in the NUMBER DESCRIPTION box.
7. If no default MARKET code has been defined, click the drop-down arrow and select a market code.
8. The DESCRIPTION box is automatically updated with the financial account number and description.
9. In the CREDIT LIMIT box, click the drop-down arrow, and select the credit limit required.
10. The LIMIT VALUE field is automatically updated with the value of the chosen CREDIT LIMIT, but this may be changed as required.
11. If TRANSPONDER functionality is active, then this box will be displayed. It is filled with the transponder card number if the financial account was created upon swiping or entering a transponder card.
12. Click OK, the POSTING screen is displayed and the required transactions may be processed.
13. Click the CLOSE button to return to the billing search screen.
© 2006 Micros-Fidelio (Ireland) Ltd. February 2006 Page 17

Version 8 Cashier Manual
Note: If the start date selected equals the system date and the OK button is clicked, the financial account will be checked in. If the start date does not match the system date the financial account status will be ‘Expected’.
New Financial Account dialog box
Fill in this field With this information
Group Select from the drop down list of predefined groups for Financial Accounts. The groups are setup under Configuration->Cashiering->Financial account groups.
DateRange If this option is selected it is possible to enter a date range (from/to) on the financial account. However it is not necessary to enter a date on a financial account.
Profile Each financial account must be linked to a profile. Click the profile drop-down arrow to open the profile search screen.
Account Number Each financial account must have an account number before you are able to check this into the system. Click on the drop-down arrow to get a list of predefined account numbers. Account numbers are setup under Setup->Configuration-> Cashiering->Financial Account numbers.
Number Desc. The description entered under Setup-> Configuration->Cashiering->Financial Account numbers for this Account Number will display.
Market Select from a list of predefined Market Codes. If this field is defined as mandatory then a market code has to be attached.
Description The description of the Financial Account displays the Group and Financial Account Number.
Credit Limit Select a credit limit from the listbox.
Limit Value The credit value associated with the selected credit limit is automatically displayed. This may be changed if required.
Transponder The transponder card number is displayed if the financial account was created upon swiping or entering a transponder card.
Payments Select the window you would like to enter a payment for and click the PAYMENTS buttons to enter the payment.
Page 18 © 2006 Micros-Fidelio (Ireland) Ltd. February 2006

Cashiering
Select the payment method from the drop-down list. Department codes can be configured as disabled for selection on this screen. This is done under SETUP->
CONFIGURATIONS->CASHIERING->DEPARTMENT CODES. By default the total amount of the selected window is displayed. Enter the amount if other than the total of the selected window. Click POST button to post the payment. Click CLEAR to clear the screen and cancel the entries. Click CREDIT CARDS to open the credit card tab from the reservation edit screen and view or attach a credit card to the reservation. With an EFT Interface and a Credit Card Reader attached to the workstation it is possible to swipe the card and attach it to the reservation of the guest. If a credit card was entered on the profile of the guest it will display on the credit card information box at the bottom of the screen.
Payment posting dialog box
Fill in this field With this information
Payment Department Select a payment department code from the drop-down list.
Amount Enter the amount of the payment, by default the total amount of the selected window will display.
Foreign Amount If a payment department code in a foreign currency was entered. This field will display the amount in the foreign currency.
Comment To enter comments/remarks concerning this payment.
Arrangement Select an arrangement code from the drop-down list.
Split Select a posting and click the SPLIT button to split a posting:
This option is used to split a charge into several charges. It is also available when clicking the right mouse button on the selected posting.
How to split a posting:
1. Click the CASHIER menu and select BILLING. or press CTRL+B.
The Cashier Login screen is displayed.
2. Enter your CASHIER NUMBER and PASSWORD, click LOGIN.
The billing search screen is displayed.
3. Highlight the required reservation and click the SELECT button.
4. Select the posting to be split and click the SPLIT button, the split dialog box is displayed
© 2006 Micros-Fidelio (Ireland) Ltd. February 2006 Page 19

Version 8 Cashier Manual
5. Enter the AMOUNT TO SPLIT.
6. Click OK, a new posting is made for the amount entered in the AMOUNT TO SPLIT box and the original posting adjusted by the remaining amount.
Transfers Select a posting and click the TRANSFERS button to transfer a charge to another room or transfer charges from one room to another window. It is also available when clicking the right mouse button on the selected posting:
It is also possible to click the transfer button without selecting a specific posting and enter multiple department codes or transfer charges by arrangement code to another room, financial account or another window of the same room.
Transfer Posting dialog box
Fill in this field With this information
Selected Room Displays the room number, guest name, and window number in view only format.)
Transfer charges from group members
Only available when the selected reservation is linked to group. Select this checkbox if charges are being transferred from group members.
Select from the drop down list the group members the charges should be transferred from.
To Room Enter the room or financial account number the posting is to be transferred to or select the room number or financial account from the billing search list.
Page 20 © 2006 Micros-Fidelio (Ireland) Ltd. February 2006

Cashiering
Fill in this field With this information
To Window This button only becomes available if the same room is selected again. So the charge is transferred only from one window to the other on the invoice.
New This button only becomes available if the same room is selected again. So the charge is transferred only from one window to the other on the invoice. Pressing the new button will open a new window on the selected room.
Name The name field is filled automatically as soon as a room number or financial account number is entered.
Transfer selected postings on the screen
Check this box if you would like to transfer the selected postings on the screen and open the folio for the guest or financial account the charge is transferred to.
Dept. Codes Select from list-box the department codes to transfer.
All Dept Codes Select this box if all charges should be transferred.
Arr. Codes Select from the list-box the arrangement codes that should be transferred. This requires that the transactions have been attached to an arrangement code.
Date Range Select from list box a date from which the charges should be transferred. All postings with this posting date will then be transferred.
Select from list box a date until which the charges should be transferred. All postings with this posting date(s) will then be transferred.
Reservation Click the RESERVATION button to edit the reservation of the selected billing window. Depending on the user rights, all available menu selections under OPTIONS from the reservation edit screen and all reservation tabs can be accessed.
Financial Account (FA) Settings If the selected account is a financial account then this option is available.
Click the FA SETTINGS button to edit the financial account of the selected billing window.
© 2006 Micros-Fidelio (Ireland) Ltd. February 2006 Page 21

Version 8 Cashier Manual
See Fidelio Suite 8 Reservations Manual:
Options
Options from the Guest Folio Click the OPTIONS button from the guest folio to perform the following transactions:
Page 22 © 2006 Micros-Fidelio (Ireland) Ltd. February 2006

Cashiering
Invoice Reprint This option is only available if the invoice has been printed previously. It is used to print a copy of the invoice without generating a new invoice number.
Note: Reprinting of invoices is user right controlled. See: Configuration->Users->User Definition->Rights->Cashiering->Billing History.
Information Folio Use information folio to print an information folio for the guest, this option is used to hand a printed invoice to the guest for verification of the posted charges.
Information Folio Style dialog box
Field Definition
Customer The name of the customer as displayed on the folio window.
Window The window number of the invoice.
Balance The balance of the window.
Style Select the style which should be used on the information print out.
Display telephone details on invoice
If checked the telephone details, such as telephone number called, will be printed on the information folio. With the parameter ‘DEFAULT TO DISPLAY TELEPHONE
DETAILS ON INVOICE’ ACTIVATED UNDER SETUP-> CONFIGURATION->MISCELLANEOUS->GLOBAL SETTINGS->BILLING TAB, the check box will be selected by default.
Print Click Print to print the Folio on the predefined Printer.
Preview Click Preview to view the Folio on the screen.
Don’t Print Click Don’t print, if you would like to export the invoice to billing history, without printing.
Paid Out Click the PAID OUT button to post charges to the guest folio for which money was taken out of the cash drawer. For example if a guest arrives by taxi and does not have cash money to pay the taxi, the receptionist or cashier might have to pay the taxi driver. This charge is then posted to the guest’s room, but as it is not hotel revenue it has to be posted on a non-revenue department code. Each time a paid out is posted to a guest folio, the amount is reduced from the cash flow of the cashier.
How to post a paid out:
1. Select the department code from the drop-down list. Only department codes defined with a Paid Out flag under Setup->Configuration->Cashiering->Department Codes will appear in the list.
2. Enter the amount of the paid out.
© 2006 Micros-Fidelio (Ireland) Ltd. February 2006 Page 23

Version 8 Cashier Manual
3. Click POST button to post the paid out.
4. Click CLEAR to clear the screen and cancel the entries.
5. Click the Close button to close the paid out screen.
Paid Out posting dialog box
Fill in this field With this information
Payment Department Select a paid out department code from the drop-down list.
Amount Enter the amount of the paid out.
Foreign Amount Not a valid field for a paid out posting.
Comment To enter comments/remarks concerning this payment.
Arrangement Select an arrangement code from the drop-down list.
Profile Select PROFILE to view and access the attached profile of the reservation or financial account. If there are several windows with different profiles, you need to select the window you would like to see the profile for first. The profile option gives full access to all the options on the customer profiles. Depending on the user right you can modify the attached profiles.
Billing Instructions Select BILLING INSTRUCTIONS to view and access the billing instructions screen. BILLING INSTRUCTIONS are used to enter instructions for certain department codes and automatically route them to a different billing window, room or financial account. For example the guest might be on a business trip and the company will pay for his room and breakfast charges. Then billing instructions would be entered for this specific department codes and they will be routed automatically to a different window. When the guest checks out, he will only have to pay his personal charges and not see the invoice for room and breakfast. When selecting Billing Instructions, a new window opens.
With equivalent user rights, you can enter a NEW BILLING Instruction, EDIT or DELETE existing Billing Instructions or CLOSE the window and return to the billing screen.
How to enter a new billing instruction:
1. Click the NEW button.
2. Select the WINDOW you would like the charge routed to.
The default for the new instruction will be in sequential order. Window 1 will always be reserved for all postings which are not routed to any window. When entering billing instructions for the first time, the default window is 2.
3. Enter the FROM DATE and TO DATE the billing instruction is valid for, the default dates are for the entire stay.
4. Select the DEPARTMENT CODES to be routed from the drop down list of available department codes. The * will select all department codes.
Use the EXCLUDE button to exclude department codes and the INCLUDE button to add department codes.
5. Select any or all of the following options:
Page 24 © 2006 Micros-Fidelio (Ireland) Ltd. February 2006

Cashiering
SAME ROOM - If checked, the charge will be routed to the same room, if unchecked the charge can be routed to another room
BILL VIEW - If you are using a video interface a check in this box would indicate that the guest is allowed to view this billing window from his room. Unchecked means the guest will not be able to view this window. Window one is the default window to view.
VIDEO CHECK OUT - If you are using a video interface a check in this box would indicate that the guest is allowed to check out from his room for this window. Unchecked means the guest is not allowed for video check out for this billing window. Usually the video check out option is only available for guests paying with a credit card.
6. Select the NAME for the billing window from the list of linked profiles.
7. In the OTHER NAME option you can select to route the department codes to another profile.
When selecting NAME or OTHER NAME and there are default billing instructions then the user is prompted with the message "Do you want to add default billing instruction codesof xxx?".
8. If the same room option is not selected then you could select OTHER ROOM, the search will default to arrivals of the same day and guests in house for that dates.
9. If the same room option is not selected then the charge could be routed to a financial account (OTHER ACCOUNT). Select from a list of available financial accounts or create a new Financial Account.
10. If the selected account has an accounts receivable number then the AR NUMBER is displayed.
11. If the method of payment for that window is a credit card then the credit card can be selected.
12. If the selected profile has a CONTACT attached, you can chose from a list of available contact profiles.
13. The primary address type of the name, other name or account is displayed automatically.
14. Click OK to save the billing instructions.
If changes were made to existing billing instructions, the user is prompted with a confirmation message to apply these changes.
The option Manual Card is only available if Transponder Handling is activated under Global Settings->Generic 2 tab and allows to manually enter a card number to automatically route all charges to the Financial Account linked to this card number. If the workstation is equipped with a card reader it is also possible to swipe the transponder card.
© 2006 Micros-Fidelio (Ireland) Ltd. February 2006 Page 25

Version 8 Cashier Manual
Note: If the parameter DEFAULT START DATE OF BILLING INSTRUCTIONS
TO SYSTEM DATE under Setup->Configuration->Miscellaneous->Global Settings->Billing Tab is set to on then when entering billing instructions the start date of the billing instructions will default to the system date - if it is set to off then the start date of the billing instructions will default to the start date of the reservation. This defines if the billing instructions will be independent of the reservation dates, but not before the actual system date and allows billing instructions to be applied to postings made on pre-arrival reservations.
Allowances Select ALLOWANCES to view the package usage for packages with allowance attached, that have been posted.
The screen is split into 2 sections:
The upper part displays information about the package setup
The lower part displays information about the package setup and the department code postings.
Allowance Grid
Field Heading Gives this information
Pkg The code of the posted package.
Description The description of the package.
From date The date from which the package is attached to the reservation.
Until date The date until which the package is attached to the reservation.
Value The package price.
Limit The amount the guest is allowed to consume.
Remainder The amount left on the allowance, not yet absorbed by the package.
Type The Type of the allowance: Normal = create daily. Float = create at the beginning of the stay and the guest can make use of the element anytime during the stay. Next day = create during night audit for the next day.
Reinstate This button will only be available on a reservation or financial account with the status ‘checked out’. It is possible to configure automatic distribution of a new Invoice number each time the REINSTATE option is used. To enable this, the parameter NEW INVOICE NUMBER AFTER REINSTATE under SETUP-> CONFIGURATION->
MISCELLANEOUS-> GLOBAL SETTINGS->BILLING TAB has to be activated.
Note: If a late charge has to be posted it is possible to reinstate the invoice, even if the room is occupied by a new reservation. The status of the reinstated reservation will be 'Vacant'.
Page 26 © 2006 Micros-Fidelio (Ireland) Ltd. February 2006

Cashiering
Post Daily Charges Select POST DAILY CHARGES to post daily charges, such as room rate, packages and fixed charges attached to the reservation. The user will be prompted with a confirmation message:
Select YES to post all days, NO to post only one day or ABORT to return to the billing window.
A message will confirm the posting of the rate and the fixed charges:
The posting date for all charges will be today's date.
Guest Comments Select GUEST COMMENTS to enter guest complaints or comments of the guest during his stay. You can also enter information from guest questionnaires. An unlimited number of guest comments can be entered.
Click NEW to enter a new guest comment, EDIT to edit an existing comment and DELETE to delete a Guest comment. Use the PREVIOUS and NEXT buttons to move to the previous or next comment of this guest. When entering a new guest comment, the system date and the user id are automatically entered. Choose the category and enter free formatted text with the comments of the guest.
Guest comments categories are setup under SETUP-> CONFIGURATION->
RESERVATION ->GUEST COMMENTS.
Click CLOSE to return to the selected billing window.
History & Future Select HISTORY & FUTURE to see past and future reservations for this guest as well as cancelled and no-show reservations. The History and Future dialog screen will open.
History & Future Columns
Column Heading Information given
Room # This is the room number the guest had assigned on his departure date.
Rate The rate entered under rate amount.
Arrival The actual/expected arrival date of the guest.
Departure The actual/ expected departure date of the guest.
Nights The number of nights the guest stayed or is expected to stay.
Adult Nights The number of nights multiplied with the number of adults on the reservation for the guest.
Revenue Total Revenue the guest produced, this is only available on the History part.
The screen view options depend on the statuses of the History and future reservations, the following possible statuses can be displayed:
History shows all past reservations if the guest had stayed before. This also includes reservations with the status ‘no-show’.
In House shows all reservations for this guest for the current day or checked in reservations.
© 2006 Micros-Fidelio (Ireland) Ltd. February 2006 Page 27

Version 8 Cashier Manual
Future shows all future reservations. Please note that the revenue column is not calculated on future reservations.
Cancellations shows all reservations which have been cancelled for this guest
The Expand and Collapse buttons can be used to change the view. It is also possible to change from Expand to Collapse and vice versa by selecting the ‘+’ or ‘-‘. This will change the view by reservation status. Each reservation can be edited by selecting the reservation and clicking Edit Reservation button. Click Close to return to the selected billing window.
Travel Agent Commissions This option allows to calculate and post manual commission records for reservations with a Travel Agent Profile attached. The department Code for the commission payment is taken from the default defined under Configuration->Miscellaneous->Global Settings->Travel Agent Processing tab. The commission record is calculated according to the commission rule attached to the Travel Agent Profile and send to the Travel Agent Processing Module. Press the Post button to post the commission payment, the amount will be marked as Paid Off in the Travel Agent Module.
Delete FA This option is only available on a financial account with no postings and no billing instructions attached.
To delete a financial account:
1. On the billing screen, click OPTIONS.
2. Then click DELETE FA, a confirmation message appears.
Page 28 © 2006 Micros-Fidelio (Ireland) Ltd. February 2006

Cashiering
3. Click YES to cancel the financial account, the financial account is deleted.
Note: The option DELETE FA is also displayed when selecting a financial account and clicking the right mouse button.
Manual Rate Code Posting This option allows you to post a room charge manually. All the charges related to the room charge are posted, including taxes, allowances, and package charges. This option is very useful for the posting of for example, day use conference packages where the guests do not stay overnight so the charges have to be charged manually.
Note: Advanced packages are not supported with manual rate code postings. Allowances for packages are only created with automated postings, either via Night Audit or the option Post Daily Charges. If a manual rate code posting is performed with a rate code attached to an advanced package, the package price will be posted but no allowance created.
To manually post a rate code as positive or a negative rate code
1. On the billing screen, click OPTIONS.
2. Then click MANUAL RATECODE POSTING. The manual rate code posting screen appears with the room type, arrival date, number of nights, number of adults and children defaulted with the values from the reservation.
3. Click the RATE CODE drop down arrow and choose the required rate code.
4. Click the ROOM TYPE drop down arrow and choose the required room type.
5. Select an ARRIVAL DATE to post the manual room charge.
© 2006 Micros-Fidelio (Ireland) Ltd. February 2006 Page 29

Version 8 Cashier Manual
6. Enter the number of NIGHTS to post the manual room charge.
7. Enter the number of ADULTS.
8. Enter the QUANTITY if more than one charge should be posted.
9. Select POST AS NEGATIVE if the rate code should be posted as correction.
10. Click PREVIEW to review the charges that will be posted.
11. Click POST to post the manual room charges. The room charges are posted and displayed in the lower window.
Adjustments This option is used to post a reduction/discount either as a percentage or as a specific amount. An adjustment may be posted to multiple guests via the billing search screen or may be posted to a single guest from within the guest folio.
How to post an adjustment
1. On the billing search screen select the guest or guests to which an adjustment is to be posted and click ADJUSTMENTS, or on the billing screen, click OPTIONS then click ADJUSTMENTS, to display the Adjustments dialog box.
3. The Room(s) option is completed automatically with the room numbers..
4. The date range defaults to today's date, if the adjustment is to be made on postings covering several days, then select the DATE RANGE option and enter the required dates.
5. Click the DEPT. option and choose the department on which the adjustment is to be calculated.
Page 30 © 2006 Micros-Fidelio (Ireland) Ltd. February 2006

Cashiering
6. Click the DISCOUNT DEPT. option and choose the department on which the adjustment is to be posted. This may be a specific department code defined to post discounts or it may be the same department code on which the adjustment is being calculated.
7. Select the WINDOW on which the adjustment is to be calculated.
8. The POSTING TEXT is completed by default but may be changed as required.
9. The COMMENT is completed with the text 'Manual Adjustment' but may be changed as required.
10. If the discount amount is to be calculated as a percentage then enter the PERCENTAGE or click the up and down arrows to select the required percentage.
11. If one room was selected then the TOTAL AMOUNT on which the adjustment will be calculated is displayed.
12. If a percentage was entered in the PERCENTAGE option and the adjustment is for one room then the TOTAL DISCOUNT amount to be posted is calculated and displayed. If a specific discount amount is to be posted then enter the actual amount to be discounted.
13. Click POST to post the manual discount. The discounts are posted and displayed in the lower window.
14. Click CLOSE to close the adjustment window.
Check Out Options Select C/O OPTIONS to access the options menu for check out.
Check out Reservation/Financial Account
Select CHECK OUT RESERVATION/FA to check the reservation or Financial Account out of the system. The payment dialog box will open if the balance of the guest is not zero. Enter the payment of the guest and click OK to open the Folio Style dialog screen.
Select the folio style for the guest, the folio style which is marked as default under SETUP->CONFIGURATION-> CASHIERING->FOLIO STYLES will be entered by default. Click the drop-down arrow to change the folio style.
Folio Style dialog screen
Field Definition
Customer The name of the customer as displayed on the folio window.
Window The window number of the invoice.
Balance The Balance of the window.
Style Select the folio style which should be used on the print out.
Display telephone details on invoice
If checked the telephone details, such as telephone number called, will be printed on the folio.
Print Click Print to print the Folio on the predefined Printer.
Preview Click Preview to view the Folio on the screen.
© 2006 Micros-Fidelio (Ireland) Ltd. February 2006 Page 31

Version 8 Cashier Manual
Field Definition
Don’t Print Click Don’t Print, if you would like to export the invoice to billing history, without printing.
Cancel C/O Click Cancel C/O to cancel check out.
Checkout with Forced Printing
Select this option to always print and invoice even if the flag: PRINT INVOICE WHEN
BALANCE IS ZERO under Setup->Configuration->Miscellaneous->Global Settings->Billing Tab is selected. However the invoice will not print if the folio had no postings at all.
Interim Bill
Select INTERIM BILL to post payments the guest settles during his stay. Version 8 will prompt the user with the payment dialog screen and then with the Folio Styles. From there it is possible to print the interim bill. Interim bills can be used for guests where the amount of the folio reaches the credit limit granted by the property. The guest can then settle his account but is not checked out of the system. It is also used for cases where the guest would like to pay his bill in advance.
Note: If the flag Payment is the priority in Number of Copies is activated under Global Settings->Billing tab, the number of copies defined on the selected payment type will be used for printing.
Don’t Close Folio
This option is only available if the parameter: CHECKOUT WITHOUT CLOSING FOLIO
ALLOWED is activated under Setup-> Configuration->Miscellaneous->Global Settings->Billing Tab. Select DON’T CLOSE FOLIO, if a guest checked out of the room, but has not settled his invoice yet. This option will vacant the room but not close the folio. The open folios can be found under expected departures.
Advance Postings
This option is only available if the parameter: ’ENABLE ADVANCED POSTINGS’ is activated under Setup-> Configuration-> Miscellaneous->Global Settings->Billing Tab. Select ADVANCE POSTINGS to post the fixed charges for the entire stay of the reservation or financial account. This functionality is similar to the post daily charges option, but other than the daily charges it will post the charges for the entire stay of the guest if the confirm message is answered with yes and no charges if the confirm message is answered with no. All the postings will have the posting date of the room night. For example if the guest has a reservation for 6 nights, there will be 6 postings each one with a different date.
Cancel Advance Postings
Select CANCEL ADVANCE POSTINGS to cancel the advance postings. This is also different to the post daily charges option. Once the daily fixed charges have been posted using Advance Postings, it is possible to roll back these postings if it happens on the same day. There is no possibility to roll back posting of daily charges when posted through the Options menu.
Page 32 © 2006 Micros-Fidelio (Ireland) Ltd. February 2006

Cashiering
Proforma Invoice
Select PROFORMA INVOICE to create either an advance invoice or a proforma invoice. A proforma invoice may be created for a reservation with more than one room, however an advanced invoice can only be created for a reservation with one room.
Advance Invoice
Selecting ADVANCE INVOICE prompts the user as follows:
If YES is selected then the charges are posted and printed on the advance invoice.
Note: The date of the postings is either today's date or a future date depending upon the global setting 'Set tax postings date to Fidelio date when printing Advanced Postings'.
The user is prompted to select a folio style and has the choice to print, preview or not print the invoice.
The advance invoice is created.
The advance invoice number can be viewed on the extras tab of the View Posting Details dialog box.
Proforma Invoice
Selecting PROFORMA INVOICE prompts the user as follows:
If YES is selected then temporary records are created and printed on the proforma invoice.
The user is prompted to select a folio style and has the choice to print, preview or not print the invoice.
© 2006 Micros-Fidelio (Ireland) Ltd. February 2006 Page 33

Version 8 Cashier Manual
The proforma invoice postings are then deleted, they do not affect the balance calculations.
The proforma invoice number can be viewed on the extras tab of the View Posting Details dialog box.
NOTE: THERE IS NO POSSIBILITY TO ROLL BACK POSTING OF DAILY CHARGES
WHEN POSTED THROUGH EITHER THE ADVANCE INVOICE OR PROFORMA
INVOICE OPTION.
Check Out Click the CHECK OUT button to directly check the guest or financial account out of the system. The payment dialog box will open if the balance of the guest is not zero. Enter the payment of the guest and click OK to open the folio style dialog screen.
Note: If no language was defined on the folio, the default language defined under Setup-> Configuration->CRM -> Languages will be used.
If a share reservation is checked out and the attached share reservations have the same departure date, a message informing the user that there are share reservations departing on the same day will be displayed.
Do not print zero balances
It is possible to set a parameter flag to not print zero balances. If the parameter ’PRINT INVOICE WHEN BALANCE IS ZERO’ under Setup->Configuration-> Miscellaneous->Global Settings->Billing Tab is not selected reservations and financial accounts can be checked out without printing the folio. Zero balances can occur if the guest settled his account in advance or if the guest only pays for his extras and did not produce any extra charges.
Click the CLOSE button to return to the billing search screen.
Page 34 © 2006 Micros-Fidelio (Ireland) Ltd. February 2006

Cashiering
Batch Posting
Batch Posting The option Batch Posting may be used when you need to post the same charge from the same department to several guests. For example, you may want to charge all members of a group for baggage handling on the day of arrival.
How to process a batch posting
1. Click the CASHIER menu and select BATCH POSTING.
The Cashier Login screen is displayed.
2. Enter your CASHIER NUMBER and PASSWORD, click LOGIN.
The Batch Posting dialog box is displayed.
3. Complete the options according to the Batch Posting dialog box.
4. Click POST to post the charges, the charges posted are displayed in the dialog box window.
© 2006 Micros-Fidelio (Ireland) Ltd. February 2006 Page 35

Version 8 Cashier Manual
Batch Posting dialog box
Field Definition
Dept. The department issuing the charge.
Amount The amount of the charge to be posted.
Room(s) The room or rooms to which the charge is to be posted.
Group The group to which the charge is to be posted.
Linked Profiles The charge will be posted to all the in-house guests linked to the selected profile.
Posting Text Any additional posting text to the department code description
Comment Any additional information which should appear next to the charge.
Quantity The quantity of the charge.
Arrangement The arrangement to be used on the folio, this can be selected from the list of defined arrangements.
Multiply by number of Adults
Select this checkbox if the charge should be multiplied by the number of adults in the room.
Multiple by number of Persons
Select this checkbox if the charge should be multiplied by the number of persons in the room.
Exclude Share reservations
Select this checkbox if share reservations should be excluded.
Exclude Due Out reservations
Select this checkbox if due out reservations should be excluded.
Posting This option is used to access the manual posting screen. The user can enter the room number or open the billing search screen by clicking the drop-down arrow.
Posting a manual charge:
1. Click the CASHIER menu and select POSTING or press Ctrl+E.
The Cashier Login screen is displayed.
2. Enter your CASHIER NUMBER and PASSWORD, click LOGIN.
The Manual Posting dialog box is displayed.
Page 36 © 2006 Micros-Fidelio (Ireland) Ltd. February 2006

Cashiering
The screen is divided into 2 sections:
The UPPER section of the screen displays information about the charge once it has been posted.
The LOWER section of the screen is for entering the details to post the charge.
3. Complete the lower part of the dialog box, according to the Manual Posting dialog box.
4. Click the POSTINGS button, the charge is posted and displayed in the upper grid.
5. Click CLOSE & SAVE to exit the manual posting screen.
Manual Posting Grid
Fill in this field With this information
Room The customers room number.
Name The last name and first name of the guest or financial account.
Dept. The department code and description.
Charge The amount posted on the department code. Depending on the tax configuration under SETUP->CONFIGURATION->CASHIERING->TAX DETAILthis charge is including tax or excluding tax. If the tax was configured to print as a separate line, then a second line will be shown with the tax record.
Currency The currency description if different than the base currency.
Remarks The comments entered on the manual posting will display here.
© 2006 Micros-Fidelio (Ireland) Ltd. February 2006 Page 37

Version 8 Cashier Manual
Fill in this field With this information
Window The window the charge is routed to.
Price The amount entered in the price field.
Quantity The quantity entered.
Covers The covers – information entered to count the number of menus served – if the posting was sent by interface this information comes from the POS system.
Arrangement The arrangement text.
Manual Posting dialog box
Fill in this field With this information
Name The first and last name of the guest. On financial accounts only 'Financial Account' and the account number will display.(View only)
Total Postings The total amount of the manual posting, updated when a transaction is activated with the Post button. If several postings have been made then the total of the postings on the screen is displayed. (View only)
Room The room number or financial account number.
Name The name of the guest.
Dept. Select the department code from list-box.
Descript Description of the department code, this can be changed by the user.
Additional Description field
This description contains the code [ ] and the description of the department code. It can not be changed by the user.
Arrival The arrival date of the guest or financial account.(View only)
Departure The departure date of the guest or financial account.(View only)
Rate Code The rate code entered on the reservation. (View only)
Packages The packages entered on the reservation. (View only)
Balance Displays the actual balance of all windows for this reservation or financial account.
Price Enter the amount to post on the department code. If a unit price has been entered for the selected department code, this box will be filled automatically with the default price.
Quantity If the department code entered is charged by a unit price it is possible to enter the quantity in this field. The default is 1.
Amount The amount is calculated. It is the price field multiplied with the quantity and this is the amount that will be posted.
Currency If the currency for the posted item is different than the local currency, select the required currency from the listbox.
Page 38 © 2006 Micros-Fidelio (Ireland) Ltd. February 2006

Cashiering
Fill in this field With this information
Exchange Rate This field is updated automatically with the exchange rate for fixed charges.
Foreign Price The amount which is being posted in the base currency if the department code is posted in a foreign currency.
Base Cur Total The total amount which is being posted in the base currency if the department code is posted in a foreign currency.
Comment Enter any required remarks about the posting.
Origin Currently not used on this screen.
Arrangement The arrangement code can be selected from the list. Arrangement codes are used to group various postings into one arrangement. With the corresponding Folio style, the invoice can then be produced by arrangement code rather than listing all department codes.
Window The window the charge is routed to. Click the NEW button to open a new window from the manual posting screen. If there are multiple guests linked to the reservation then it is possible to select one of the linked profiles from the INVOICE TO section of the billing window setup dialog box.
Covers The covers – information entered to count the number of menus served – if the posting was transferred by interface this information comes from the POS system. It can also be entered on the manual posting screen.
Pre-Arrivals Not in use.
Lock Guest Info This locks the information displayed about the guest on the manual posting screen.
Lock Department Info Select this option to disable the access to the department code list-box.
Posting Journal
Posting Journal Select POSTING JOURNAL from the cashier drop-down menu to view all postings by room number, arrangement, department code, cashier number or specific dates.
How to display the posting journal:
1. Click the CASHIER menu and select POSTING JOURNAL.
The Cashier Login screen is displayed.
2. Enter your CASHIER NUMBER and PASSWORD, click LOGIN.
The Journal dialog box is displayed.
© 2006 Micros-Fidelio (Ireland) Ltd. February 2006 Page 39

Version 8 Cashier Manual
4. To search for specific transactions, complete the search criteria in the GENERAL section and the dates required in the DATE FILTER section.
5. Click the REFRESH button to activate the search.
Journal dialog box
Field Definition
Room The room number of the guest or financial account.
Dept. The department code number the posting was made on.
Description The description of the department code.
Cashier The cashier number.
Arrangement If an arrangement code was attached to the posting it is displayed in this field.
Date The date of the posting.
Debit If the posting was on a debit department code it is displayed in this column.
Credit If the posting was on a credit department code it is displayed in this column.
POS Indicates if the posting came from a point of sale (POS) system.
User Displays the user name of the user who posted the transaction.
Hits The number of transactions found for the entered query.
Total The sum of the debit column.
The sum of the credit column.
General (query)
Room Enter a room number, if you would like to see all transactions for a specific room number.
Page 40 © 2006 Micros-Fidelio (Ireland) Ltd. February 2006

Cashiering
Field Definition
Dept. Select one or more department codes from the list-box, if you would like to see all transactions by department code.
Arr. Select one or more arrangement codes from the list-box, if you would like to see all transaction by arrangement code(s).
Cashier Select the one or more cashiers from the list-box, if you would like to see the transactions by cashier.
POS Nr. Enter a POS check number to locate a specific POS posting.
Date filter
From Select from the list-box a date from which you would like to see transactions.
To Select from the list-box a date until which you would like to see transactions.
How to view details of a specific posting:
1. Click the CASHIER menu and select POSTING JOURNAL.
The Cashier Login screen is displayed.
2. Enter your CASHIER NUMBER and PASSWORD, click LOGIN.
The Journal dialog box is displayed.
3. Select the required posting and click the DETAILS button.
The View Posting Details screen is displayed.
© 2006 Micros-Fidelio (Ireland) Ltd. February 2006 Page 41

Version 8 Cashier Manual
On this screen there are three tabs:
POSTING DETAILS - here it is possible to change the comment, the department code description and to attach a different arrangement.
EXTRAS - the real origin of the posting is displayed, but it is also possible to enter a name or select another profile that should be used on the folio as the 'origin' of the posting. The real origin is a view only field and the information from this field can be copied to the custom originator name using the Copy to Custom button.
HISTORY - displays all the movements of the selected posting.
4. Click CLOSE to close the posting details screen.
View Posting Details dialog box
Field Definition
Guest Name The Last and the first name of the guest or financial account.
Room Number/FA Account
The room number.
Cashier The cashier number and name.
Posted The date and time the posting was made.
Folio(s) The number of the folio.
Department The department code number and description.
Post Currency The currency that was attached to the posting.
Qty The quantity entered on the posting.
Price The price entered on the posting.
Exch. Rate The exchange rate used for the posting.
Origin The origin of the posting, if the charge was transferred from another room, the room number and name of the guest the charge came from will display in this field. If it was a posting on an invoice with billing instructions, the original name of the reservation will display.
Phone number The telephone details. This field will be filled with the information from the telephone system, if the interface has been configured to send this information.
Amount The total amount of the transactions. The quantity multiplied by the price.
Comment It is possible to enter a free definable comment to the posting. This comment will display in the remarks field on the bottom of the screen.
Description Displays the description of the posting, it can amended as required.
Arrangement An arrangement can be selected from the list-box.
Ledger Information on which ledger this transaction was made: Pre arrival, Guest Ledger or City Ledger.
Page 42 © 2006 Micros-Fidelio (Ireland) Ltd. February 2006

Cashiering
Posting Details Extra Tab dialog box
Field Definition
Real Origin Shows the name and the room number of the original posting.
Custom Originator Name
Enables the user to enter a name or select another profile that should be used on the folio as the 'origin' of the posting. This name is displayed as the 'origin' of the posting when viewed on the posting details tab.
Proforma Number Displays the proforma invoice number.
Cashier Functions
Billing History Billing history may be used to view and access folios which have been printed for guests or financial accounts checked out from the property. It may also be used to print the receipts of a specific cashier and to reprint the cashier close reports.
The billing history screen consists of 2 tabs:
Folios - may be used to view all invoice types printed by name and or date, this is the default display.
Miscellaneous Receipts - may be used to print the receipts of a specific cashier and to reprint the cashier closure reports.
Folios
The folios screen is divided into 2 sections:
Filter - consists of multiple basic search criteria, click the SEARCH button to activate the search.
Billing History - Folio Search Criteria dialog box
Field Definition
Name/Account The guest last name or the name of the financial account.
Date Select from the calendar a date or date range. By default today’s date will be selected. It is also possible to select None, if you just would like to search by name.
Invoice No. If you know the invoice number you would like to look at, enter the invoice number
Room No. The room number can be selected from the drop-down list.
Folio Styles The folio style can be selected from the drop-down list.
Invoice Printout Correction Reason
This field contains the reasons entered for corrections made on the invoice printout.
Filter Results - the results of the search shown in a grid format.
© 2006 Micros-Fidelio (Ireland) Ltd. February 2006 Page 43

Version 8 Cashier Manual
Billing History - Folio Display Grid
Field Definition
Invoice Name The guest last name or the name of the financial account.
Reservation/FA Name The name on the reservation.
Room/FA Name The room number or financial account number.
Invoice No. The invoice number.
Type The description of the invoice, for example: Invoice, Information Folio.
Invoice Date The date the invoice was printed.
Modification Date The date the invoice printout was modified.
Revision The revision number: each time an invoice printout is modified this is indicated by a number.
Modified by The user who modified the invoice.
Void A 'V' in this column indicates a voided invoice. Note: Void invoice functionality requires the parameter Void Invoice Handling under Setup->Miscellaneous->Global Settings->Billing tab to be activate.
The following options are available:
PREVIEW - used to edit or preview an invoice and to make changes to the printed text on the invoice. Select the required folio and click PREVIEW or select a single invoice and double click. Preview Folio Options
Click this button To
First Retrieve the first invoice from the selection list.
Prev Retrieve the previous invoice from the selection list.
Next Retrieve the next invoice from the selection list.
Last Retrieve the last invoice from the selection list.
Edit Edit the invoice and make changes to the print out. This is only possible if an editor program for example Netscape or Front Page has been set up under MISCELLANEOUS->USER SETTINGS-> PROFILE->FOLIO EDITOR EXECUTABLE. The program has to be accessible from the workstation. If changes have been made to the printout, the reasons for corrections have to be entered.
Print Print the invoice.
Setup To access the printer setup.
Cancel Cancel and return to the selection List.
Page 44 © 2006 Micros-Fidelio (Ireland) Ltd. February 2006

Cashiering
Print - used to print the folio, multiple folios may be selected using the Shift or Ctrl keys.
BILLING - used to access the folio with a valid cashier number and perform all possible transactions from the billing screen.
Miscellaneous Receipts
This option may be used to search for and print the receipts of a specific cashier. It may also be used to reprint the cashier closure reports.
Billing History - Miscellaneous Filter dialog box
Field Definition
Cashier The cashiers name or the name of the cashier shift.
Date Select from the calendar a date or date range. By default today's date is selected. It is also possible to select None, if you would like to search only by name.
Cashier Closure Select this option in order to display the cashier closure reports.
Note: Unprinted and zero balance invoices may be stored in billing history using the parameter STORE UNPRINTED FOLIOS DURING
N/A under Setup->Configuration->Miscellaneous->Global Settings-> Billing Tab. The default folio style defined under Setup->Configuration-Cashiering->Folio Styles is used to store folios where no folio style was selected for print out. If the parameter is activated each billing window will be stored under billing history during night audit. If the parameter is not activated, then those invoices which were checked out with a zero balance and not printed will not be stored in billing history.
Note: User rights control the previewing, editing and printing of invoices in billing history. See: Configuration->Users->User Definition->Rights->Cashiering->Billing History.
Cashier Status This option may be used to view the status of all cashiers. This screen is display only and shows the cashier number, current status, the maximum times the cashier may be opened, how often it was opened and if the cashier is for single use (1) or if multiple users are allowed for this cashier number (0).
Cashier Status dialog box
Field Definition
Number The cashier number.
Status The actual status of the cashier.
Name The name of the cashier.
Max. Open The maximal number of times the cashier can be opened on one day.
© 2006 Micros-Fidelio (Ireland) Ltd. February 2006 Page 45

Version 8 Cashier Manual
Field Definition
Open The amount of times the cashier has been opened.
Exclusive Open 0 indicates that the cashier is not exclusive, therefore more than one cashier can use this number. 1 indicates the cashier is used by one cashier exclusively.
Change Cashier Stock This option may be used to change the stock of a cashier either temporarily or permanently.
A permanent change is registered in the cashiers stock setup and from that point on the changed stock amount is registered as the permanent stock amount.
A temporary change to the cashier stock is made using the House Bank (main stock) functionality where the changes to the cashier stock are registered via internal financial accounts. Several configuration changes are required in order to activate house bank functionality.
The changing of cashier stock is most often temporary, for example if a cashier runs out of a specific currency and it is necessary to increase the cashier stock, or if a cashier has received a large mount of cash and would like to transfer the additional cash to the main cashier. In such cases the house bank option may be used to register the transfer of the cashier stock, such transactions are included in the cashier's shift drop for the day.
The two different ways to handle cashier stock are:
Change the cashier stock permanently.
Change the cashier stock temporarily using the house bank (main stock) functionality.
Change Cashier Stock permanently
1. Click the CASHIER menu and select CASHIER FUNCTIONS.
2. Select CHANGE CASHIER STOCK from the Cashier Functions menu.
The Cashier Login screen is displayed.
3. Enter your CASHIER NUMBER and PASSWORD, click LOGIN.
The Change Cashier Stock dialog box is displayed.
4. In the DEPT. box, click the drop-down arrow, and select the currency required. Only currencies for which this cashier has stock will be listed.
Page 46 © 2006 Micros-Fidelio (Ireland) Ltd. February 2006

Cashiering
5. In the AMOUNT box enter a positive amount.
6. In the COMMENT box enter a reason for the stock change (optional).
7. Select the PAY IN/TRANSFER FROM option to increase the cashier stock.
8. Select the PAY OUT/TRANSFER To option to decrease the cashier stock.
9. Click the CASHIER STOCK button to activate the stock change.
A message is displayed indicating by how much the cashier stock has been permanently changed.
Change Cashier Stock temporarily via the house bank
1. Click the CASHIER menu and select CASHIER FUNCTIONS.
2. Select CHANGE CASHIER STOCK from the Cashier Functions menu.
The Cashier Login screen is displayed.
3. Enter your CASHIER NUMBER and PASSWORD, click LOGIN.
The Change Cashier Stock dialog box is displayed.
4. In the DEPT. box, click the drop-down arrow, and select the currency required. Only currencies for which this cashier has stock will be listed.
5. In the AMOUNT box enter a positive amount.
6. In the COMMENT box enter a reason for the stock change (optional).
7. Select the PAY IN/TRANSFER FROM option to increase the cashier stock and transfer from the house bank (main stock).
8. Select the PAY OUT/TRANSFER To option to decrease the cashier stock and transfer to the house bank (main stock).
9. Click the HOUSE BANK button to activate the stock change.
A message is displayed indicating by how much the cashier stock has been changed.
Note: The house bank transfer is controlled by internal postings to the selected financial account profile and can be tracked separately. House bank functionality is most often used when a cashier runs out of cash and needs additional funds to be transferred from the house bank or alternatively if a cashier receives a large amount of cash and wants to transfer the additional cash to the house bank.
© 2006 Micros-Fidelio (Ireland) Ltd. February 2006 Page 47

Version 8 Cashier Manual
House bank configuration requirements
1. Define an internal cashier number (usually no. 99 or higher) under Setup->Configuration->Cashiering->Cashier Setup.
2. Configure a financial account group with the type PETTY CASH & CASHIER STOCK and defined as AUTONUMBER under Setup->Configuration->Cashiering->Financial Account Groups.
3. Select or create a default profile that can be used for the house bank transfer financial account under Setup->Configuration->Miscellaneous->Global Settings->Billing 2 tab
4. Select the internal cashier number under Configuration->Miscellaneous->Global Settings->Billing 2 tab.
Change Cashier Stock dialog box
Field Definition
Cashier: The cashier number which was used to open this menu
Dept.: The department code can be selected from the drop-down list of defined cash department codes for the selected cashier
Amount: The amount for the cashier stock increase/decrease entered only as a positive amount.
Comment: A comment/ reason for the change of stock
Pay in/ Transfer from Select this option to increase the cashier stock by the entered amount.
Pay out/ Transfer to Select this option to decrease the cashier stock by the entered amount
Cashier Stock Used to change the cashier stock amount permanently.
House bank Used to change the cashier stock using house bank (main stock) functionality. See House Bank configuration requirements.
Currency Exchange This option may be used to change foreign currency into local currency or into any other currency which is being held by the cashier as cashier stock.
How to process a currency exchange
1. Click the CASHIER menu and select CASHIER FUNCTIONS.
2. Select CURRENCY EXCHANGE from the Cashier Functions menu.
The Cashier Login screen is displayed.
3. Enter your CASHIER NUMBER and PASSWORD, click LOGIN.
The Currency Exchange dialog box is displayed.
Page 48 © 2006 Micros-Fidelio (Ireland) Ltd. February 2006

Cashiering
4. In the Room /Guest box type either the room number in the first box or the guest name in the second box.
Enter the ROOM number and click the three dots button, if the room is occupied the guest name is filled, if the room is not occupied or checked-out today the billing search screen is displayed and the user has to clear the room number and click refresh to display a list of guests.
Enter the GUEST name and press tab, if it is an exact match then the room number is completed. If it is not an exact match or there is more than one match then the billing search screen is displayed and the user can select the guest from the list. If no names are displayed then the user has to clear the name box and click refresh to display a list of guests.
5. In the AMOUNT IN box, click the drop-down arrow, and select the type of foreign currency required.
6. In the next box enter the amount of foreign currency to be exchanged.
The value of 1 unit of the local or exchange currency expressed in foreign currency and the value of 1 unit of the foreign currency expressed in the local or exchange currency is displayed.
If an exchange fee has been configured for this currency then the type of exchange rate fee and the percentage or flat rate amount is displayed.
7. In the WILL GIVE box, click the drop-down arrow, and select the type currency to be exchanged. The local currency is always referred to as cash and any other available currencies depend upon the setup of the cashiers stock.
8. The amount next to the currency is the value of the exchange.
9. The default COMMENT is the CurrXCH – and the guest name, however this is a free format field and may be overwritten.
10. If exchange rate fee is configured then in the -FEE box the amount of the exchange rate fee is displayed.
11. In the FINAL AMOUNT box the amount of currency exchange to be given to the guest minus any exchange rate fee is displayed.
12. Click OK to close the Currency Exchange dialog box.
13. A message is displayed asking if you want to print a receipt, select YES if a receipt is required.
© 2006 Micros-Fidelio (Ireland) Ltd. February 2006 Page 49

Version 8 Cashier Manual
The folio styles dialog box is displayed with the style Currency Exchange Receipt selected by default.
14. Click PRINT, the receipt is printed.
15. A message is displayed asking if you would like to make another Currency Exchange, select YES or NO as required.
Note: Currency receipts are configured under Setup->Configuration->Cashiering->Folio Styles.
Currency Exchange dialog box
Field Definition
Room/Guest In the room box enter the room number and tab twice, if the room is occupied the guest name will be completed, otherwise the billing search screen opens and the guest name can be selected from the list. Enter the name in the guest box and press the tab key, if the name is not an exact match then the billing search screen opens and the guest name can be selected from the list. It is not mandatory to enter either a room number or a guest name.
Amount in Select the foreign currency from the drop-down list of defined currencies and enter the amount in the foreign currency in the next field.
The display section shows The value of 1 unit of the local or exchange currency expressed in foreign currency and the value of 1 unit of the foreign currency expressed in the local or exchange currency.
Exchange Fee If an exchange fee has been configured for this currency then the type of exchange rate fee and the percentage or flat rate amount is displayed.
Fee The exchange rate fee amount.
Will give Select the currency to be exchanged from the drop-down list . The local currency is always referred to as cash. The available currencies for selection depend upon the setup of the cashiers stock. The amount shown next to the currency is the value of the exchange.
Comment Default comment is the CurrXCH – and the guest name. This is a free format field and may be overwritten.
-Fee The amount of the exchange rate fee (if configured).
Final Amount The amount of currency exchange to be given to the guest minus any exchange rate fee.
Page 50 © 2006 Micros-Fidelio (Ireland) Ltd. February 2006

Cashiering
Deposits This option may be used to view or enter deposits or deposit payments. A specific reservation may be selected in order to enter or view deposit request or payments. The filter options may be used to display all deposit requests for a specific date range or only those deposits which have been paid.
Deposits dialog box
Field Definition
Reservation Select the reservation to view for deposit payments or to enter a deposit payment from the billing search screen.
Date range Select this option to enter a date range
From Enter the from date or select a date from the calendar listbox.
To Enter the to date of select a date from the calendar listbox.
Only Paid Select this option to display only paid deposits.
Deposits Displays all deposits meeting the entered criteria.
Name The name of the guest
# The reservation number
Deposits Requested The amount of the deposit requested.
Payments The amount of deposit which has been received.
Open Deposit The amount of deposit which is still to be paid.
Invoice Balance The invoice balance, if an open invoice exist.
Due date The deposit due date.
Paid Indicates if the payment has been marked as paid on the reservation deposit screen.
The available options are:
Refresh - refreshes the search result grid.
Reset filter - resets the filter options.
Deposits - may be used to enter and view existing deposit requests or mark deposit requests as paid
Billing - with a valid cashier number may be used to access billing and enter a deposit payment..
Reservation - may be used to access a reservation and mark the deposit as paid.
© 2006 Micros-Fidelio (Ireland) Ltd. February 2006 Page 51

Version 8 Cashier Manual
Exchange Rates This option may be used to view or enter exchange rates, or to view exchange rates entered in the past.
Exchange Rate Setup grid
Field Definition
Name The defined currency code.
Description The full description of the currency.
Date The date the exchange rate was entered.
Rate The exchange rate expressed as the amount of foreign currency in one unit of base currency. For example if the base currency is Euro and the foreign currency is Dollars then the exchange rate entered here is the number of US Dollars in 1 Euro.
Cash Rate The exchange rate used when exchanging money for cash.
Ratecode Rate The exchange rate used when converting the rate code to another currency.
Backrate An 'X' in this column indicates that the exchange rate was expressed as the amount of base currency in one unit of the foreign currency. For example if the base currency is Euro and the foreign currency is Dollars then the exchange rate entered here is the number of Euros in 1 US Dollar.
Available Options: NEW - to enter a new exchange rate record.
EDIT - to edit an existing exchange rate record.
DELETE - to delete an exchange rate record.
REFRESH - refreshes the exchange rate setup grid.
Display Options: CURRENT ONLY - selected by default, this option displays only current and
valid exchange rates.
TODAY ONLY - select this check box and click REFRESH to view only exchange rates entered today.
HISTORY - select this check box and click REFRESH to view the exchange rates entered for past days.
How to enter a new exchange rate:
1. Click the CASHIER menu and select CASHIER FUNCTIONS.
2. Select EXCHANGE RATES from the Cashier Functions menu.
3. Click NEW, the exchange rates dialog box is displayed.
Page 52 © 2006 Micros-Fidelio (Ireland) Ltd. February 2006

Cashiering
4. In the CURRENCY box, click the drop-down arrow, and select the currency required.
5. In the FROM TIME box, click the drop-down arrow and select the date for which this exchange rate will be valid from.
6. The default method of entering exchange rates is foreign to local (1 unit of the foreign currency expressed in the base currency). Select the upper radio button if the exchange rate should be entered as local to foreign (1 unit of the local currency expressed in foreign currency).
7. In the RATE box enter the exchange rate to be used for currency exchange.
8. In the CASH RATE box enter the exchange rate to be used for cash.
9. In the RATE CODE box enter the exchange rate to be used for foreign currency rate codes and fixed charges.
10. Click OK, the new exchange rate appears on the Exchange Rate Setup grid.
Exchange Rates dialog box
Field Definition
Currency Select the currency from the drop-down list of defined foreign currencies. The foreign currency are defined under Setup-> Configuration-> Cashiering-> Department Codes.
From Time Enter the date that the exchange rate is valid from or select the date from the calendar.
Rate Enter the exchange rate used for currency exchange.
Cash Rate Enter the exchange rate used for cash. It is used for the cash stock.
Ratecode Rate Enter the exchange rate used on the rate code and for fixed charges. If your property quotes rates also in a foreign currency it is possible to use a fixed exchange rate for these postings.
1 EUR = xxx Select this option if the exchange rate should be entered as local to foreign (1 unit of the local currency expressed in foreign currency).
© 2006 Micros-Fidelio (Ireland) Ltd. February 2006 Page 53

Version 8 Cashier Manual
Field Definition
xxx Eur - 1 The default method of entering exchange rates is foreign to local (1 unit of the foreign currency expressed in the base currency).
Petty Cash The petty cash function is used for petty cash payments and receipts. For example, the front desk might be responsible for buying newspapers, or other general purchases, for the hotel.
As payments and receipts such as these do not belong to any specific guest bill, each type of expenditure is posted to a petty cash account.
How to post a petty cash transaction:
1. Click the CASHIER menu and select CASHIER FUNCTIONS.
2. Select PETTY CASH from the Cashier Functions menu.
The Cashier Login screen is displayed.
3. Enter your CASHIER NUMBER and PASSWORD, click LOGIN.
The Petty Cash dialog box is displayed.
4. Select a Petty Cash Account
5. The default department code for this account is entered in the DEPT: field, this department may be changed if required.
6. To pay out money select the PAY OUT option, to accept a payment select the PAY IN option.
7. In the AMOUNT box, enter the amount of the petty cash transaction.
If a foreign currency department code was selected then the amount will also be displayed in the FOREIGN field in the selected foreign currency.
7. Enter text in the COMMENT field if required.
Page 54 © 2006 Micros-Fidelio (Ireland) Ltd. February 2006

Cashiering
8. Select PRINT PETTY CASH FOLIO to print a petty cash folio.
9. Click POST to post the petty cash transaction, a prompt appears to indicate that the posting was successful.
10. Click YES to post another petty cash posting.
11. Click NO to close the Petty Cash dialog box.
Note: It is only possible to use a payment department code for petty cash if this payment type is configured with cashier stock.
Note: Templates configured with the section role PETTY CASH may be defined in the Folio Style setup and then set as the default folio on the Financial Account Group setup for Petty Cash. If not selected the default folio style will be used to print the petty cash transaction.
Telephone Booth This option may be used to charge or view calls made on telephone extensions with the types Booth (B) or House (H). Enter your search criteria and click REFRESH to activate the search.
The telephone booth dialog screen is displayed.
The screen is split into 3 sections
The Filter section, to enter search criteria
The Grid section, to display the search results in grid format
The buttons on the right, to CHARGE the call to a room, PAY or REFRESH the screen with the entered search criteria.
Telephone Booth Filters dialog box
Field Definition
Extension Enter the telephone extension number.
Date check box Select the date check box to activate the date filter.
Date Select the date for which you would like to see telephone calls.
If no filters have been entered and the REFRESH button is clicked, all history calls will be displayed. The calls are kept in the system for the number of days defined in the configuration of the interface program.
© 2006 Micros-Fidelio (Ireland) Ltd. February 2006 Page 55

Version 8 Cashier Manual
Telephone Booth Grid
Field Definition
Ext The extension number of the house or booth telephone. This will be the room number, if no room number has been assigned to the extension, the extension number will be displayed.
Date The date the telephone call was made.
Dialled No. The number dialled from this extension.
Length The length of the call, the format is HH:MM:SS.
Charge The total charge for the call. This is the number of units multiplied with the configured unit price or total charge as received from the PBX system. The charge format is dependant upon the capability of the PBX system.
Unit The number of units used, dependant upon the capability of the PBX system.
Type H indicates that this extension is a house phone and B indicates that this extension is a booth telephone.
How to charge a telephone booth call to a room:
1. Click the CASHIER menu and select CASHIER FUNCTIONS.
2. Select TELEPHONE BOOTH from the Cashier Functions menu.
The Cashier Login screen is displayed.
3. Enter your CASHIER NUMBER and PASSWORD, click LOGIN.
The Telephone Booth dialog box is displayed.
4. Select the relevant extension and click the CHARGE TO ROOM button.
5. The Billing Guest Search screen is displayed.
Page 56 © 2006 Micros-Fidelio (Ireland) Ltd. February 2006

Cashiering
6. Search for the appropriate guest or financial account, click SELECT.
7. Selecting the account sends a notification to the interface to route the charges to the room or account.
8. Click OK.
How to charge a telephone booth call to non-staying guest:
1. Click the CASHIER menu and select CASHIER FUNCTIONS.
2. Select TELEPHONE BOOTH from the Cashier Functions menu.
The Cashier Login screen is displayed.
3. Enter your CASHIER NUMBER and PASSWORD, click LOGIN.
The Telephone Booth dialog box is displayed.
4. Select the relevant extension and click the PAY button.
5. The profile search screen is displayed.
6. Search for or create the appropriate guest profile, click SELECT.
In order to post the charge a financial account is automatically created and checked in. A notification is then sent to the interface to route the charges to the financial account.
7. The Payment Posting screen is displayed.
© 2006 Micros-Fidelio (Ireland) Ltd. February 2006 Page 57

Version 8 Cashier Manual
8. Complete the payment details and click POST.
Batch Settlements The batch settlements function is for credit card interfaces that can handle batch settlements. This option may be used to view, modify or settle the pending records. If a check out or payment is made on the cashier billing or posting screen the record is added to the pending list.
Available Options: REFRESH - refreshes the batch settlement grid.
SELECT ALL - selects all records.
DESELECT ALL - de-selects all records.
START SETTLEMENT - starts the batch settlement procedure.
Display Options: PENDING - select this option to view all batch settlement records which are
waiting to be settled.
COMPLETED - select this option to view all batch settlement records which were successfully settled.
FAILED - select this option to view all batch settlement records which were not settled.
ALL - select this option to view all batch settlement records regardless of status.
How to run a batch settlement:
1. Click the CASHIER menu and select CASHIER FUNCTIONS.
2. Select BATCH SETTLEMENTS from the Cashier Functions menu.
The Cashier Login screen is displayed.
3. Enter your CASHIER NUMBER and PASSWORD, click LOGIN.
Page 58 © 2006 Micros-Fidelio (Ireland) Ltd. February 2006

Cashiering
The Batch Settlements dialog box is displayed.
4. To limit the settlement by date, select the DATE option and enter the required date or select a date from the calendar.
5. To limit the settlement by an amount greater than or equal to the entered amount, select the AMOUNT option and enter the amount.
6. To limit the settlement by card type, select the CARD TYPE option and select the required card from the drop-down list.
7. If any records other than those PENDING should be selected, then select the appropriate option.
8. Select the records that should be included in the batch.
All records can be selected and de-selected using the SELECT ALL and DESELECT
ALL buttons or individual records can be selected by marking the check box on each row.
9. Any text to be entered about the batch should be entered in the COMMENTS box.
10. Click the START SETTLEMENTS button, the Batch settlement Progress screen is displayed.
11. A message is displayed to indicate that the batch settlement is complete, click OK.
12. To exit Batch Settlements, click Close.
© 2006 Micros-Fidelio (Ireland) Ltd. February 2006 Page 59

Version 8 Cashier Manual
Note: If the Close button is pressed during batch settlement, the current transaction will finish before the batch is stopped. There is no cancel functionality to abort sending the batch.
Close Cashier When closing your cashier you need to ensure that the totals shown for each transaction type posted during your shift are correct and that the various currencies and checks in your cashier drawer tally with the closing balances as recorded by Version 8. If everything is in balance, you can then you confirm your “Shift Drop”, close the cashier and print the daily reports.
How to close your cashier:
1. Click the CASHIER menu and select CLOSE CASHIER.
The Cashier Login screen is displayed.
2. Enter your CASHIER NUMBER and PASSWORD, click LOGIN.
The Cashier Closure screen is displayed, listing the totals for each transaction type posted during your shift.
See: How to view transaction details
3. Once you have verified your postings, click OK.
The Cashier Closure dialog box is displayed, showing the amounts of cash, checks and foreign currency that should be in your cash drawer including your starting balance.
Page 60 © 2006 Micros-Fidelio (Ireland) Ltd. February 2006

Cashiering
4. Count the various currencies and checks in your cash drawer and verify that the totals agree with the totals shown on the Cashier Closure dialog box.
5. If the calculated shift drop equals the amount which you have calculated manually, then click the OK button to continue with the cashier closure. If the amount is not correct and you need to investigate without closing the cashier, click the CLOSE button to close the screen.
See: What to do if the amounts do not match
6. A message is displayed asking if you want to print out the report.
7. Click YES, to print out a copy of today's reports.
The cashier closing reports are printed and a message is displayed confirming the cashier closure.
8. Click OK to close the cashier closure screens.
© 2006 Micros-Fidelio (Ireland) Ltd. February 2006 Page 61

Version 8 Cashier Manual
Close cashier posting journal grid
Field Definition
Department The department code description.
Number The amount of times the department code was posted with this cashier number.
Base Amount The amount in local currency.
Foreign Amount The amount in the foreign currency.
Close cashier closing screen
Field Definition
Department The Cash Department code descriptions. Cash is local currency. The Foreign currencies are displayed with their description.
Beginning Balance The amount of cashier float (stock) for the selected currency that was in your cashier drawer when you began your shift.
+ Received today The amount received today for the selected currency.
+/- Over A positive amount here indicates that the cashier has more money than the shift-drop calculated by the system. A negative amount here indicates that the cashier has less money (short) than the shift-drop calculated by the system.
- Paid out Displays the amount posted on paid-out department codes.
- Minimum Stock This is the amount which is configured as the starting balance of the cashier. This amount (stock) has to remain in the cashier drawer.
Shift drop This is the amount of money the cashier has to take out of cashier drawer and deposit in the safe.
Next Start Displays the starting balance for the next day.
How to view transaction details:
1. To view the details of any type of transaction, select the transaction and click DETAILS.
The Journal for that department code opens, listing all charges posted.
Page 62 © 2006 Micros-Fidelio (Ireland) Ltd. February 2006
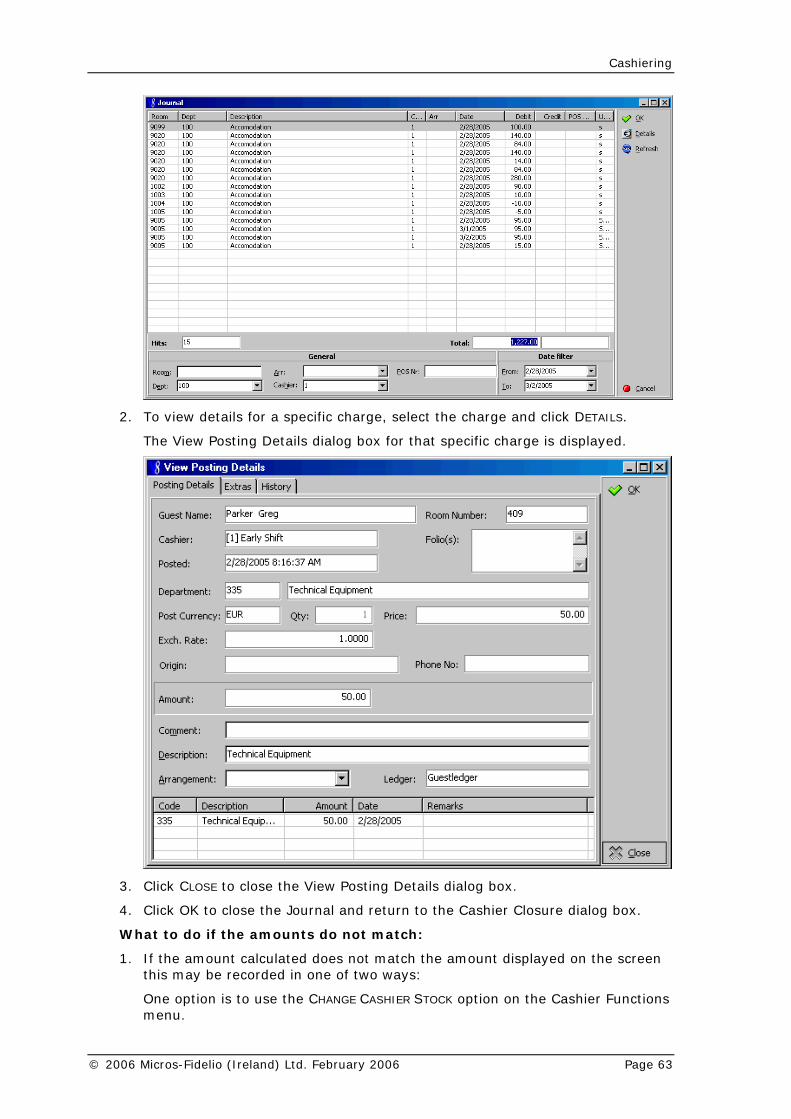
Cashiering
2. To view details for a specific charge, select the charge and click DETAILS.
The View Posting Details dialog box for that specific charge is displayed.
3. Click CLOSE to close the View Posting Details dialog box.
4. Click OK to close the Journal and return to the Cashier Closure dialog box.
What to do if the amounts do not match:
1. If the amount calculated does not match the amount displayed on the screen this may be recorded in one of two ways:
One option is to use the CHANGE CASHIER STOCK option on the Cashier Functions menu.
© 2006 Micros-Fidelio (Ireland) Ltd. February 2006 Page 63

Version 8 Cashier Manual
The second option is to use the MODIFY option available on the Cashier Closure screen. (The parameter ENABLE MODIFY BUTTON ON CASHIER CLOSURE has to be enabled under the Global Settings->Billing Tab.)
Note: The policy regarding the recording of cashier overs/shorts varies from hotel to hotel.
2. To modify the amounts recorded by the system, select the department code to be adjusted and click the MODIFY button.
3. Enter the new amount in the displayed dialog box and click OK to record the adjusted amount.
Modifying the amount in the shift drop will result in a difference which is reflected in the field +/- OVER. If the cash amount in the drawer is higher then it is a positive amount, if the cash amount is less then it will be a negative amount.
Note: If the reset functionality is enabled then the caption of the cashier closure screen will show 'Reset Stock is set'
Passer By The passer by option may be used to post a charge, accept a payment and produce an invoice for a non-resident guest at the property. In addition, you might use this feature in the case where a registered guest generates a charge at the front desk, for instance by sending a fax to his office, and wants to settle the charge straight away instead of having it added to his hotel bill.
When you post a passer by charge, the guest is temporarily “checked in” to the hotel. Normally a passer by settles the bill straight away, and as soon as the balance is zero the guest is checked out and a receipt printed.
How to post a passer by charge:
1. Click the CASHIER menu and select PASSER BY.
The Cashier Login screen is displayed.
2. Enter your CASHIER NUMBER and PASSWORD, click LOGIN.
The New Financial Account dialog box is displayed.
Page 64 © 2006 Micros-Fidelio (Ireland) Ltd. February 2006

Cashiering
3. In the GROUP box, click the drop-down arrow, and select the type of financial account required.
4. Click the button next to the PROFILE box to open the Profile search screen, SELECT an existing profile or create a NEW one.
5. In the ACCOUNT NUMBER box, click the drop-down arrow, and select an account number, if the account number was defined with a description then this is updated in the NUMBER DESCRIPTION box.
6. If no default MARKET code has been defined, click the drop-down arrow and select a market code.
7. The DESCRIPTION box is automatically updated with the financial account number and description.
8. In the CREDIT LIMIT box, click the drop-down arrow, and select the credit limit required.
9. The LIMIT VALUE field is automatically updated with the value of the chosen CREDIT LIMIT, but this may be changed as required.
10. If TRANSPONDER functionality is active, then this box will be displayed. It is filled with the transponder card number if the financial account was created upon swiping or entering a transponder card.
11. Click OK, the POSTING screen is displayed.
12. Use the POSTING button to post the required charges.
13. Use the CHECKOUT button to check out the account.
The financial account is closed.
© 2006 Micros-Fidelio (Ireland) Ltd. February 2006 Page 65

Version 8 Cashier Manual
New Financial Account dialog box
Fill in this field With this information
Group Select from the drop down list of predefined groups for financial accounts. The groups are setup under Configuration->Cashiering->Financial account groups.
DateRange If this box is selected it is possible to enter a date range (from/to) on the financial account. However it is not necessary to enter a date on a financial account.
Profile Each financial account must be linked to a profile. Click the profile drop-down arrow to open the profile search screen.
Account Number Each financial account must have an account number before you are able to check this into the system. Click on the drop-down arrow to get a list of predefined account numbers. Account numbers are setup under Setup->Configuration-> Cashiering->Financial Account numbers.
Number Desc. The Description entered under Setup-> Configuration->Cashiering->Financial Account numbers for this Account Number will display.
Market Select from a list of predefined Market Codes. If this field is defined as mandatory then a market code has to be attached.
Description The description of the financial account displays the group and financial account number.
Credit Limit Select a credit limit from the listbox.
Limit Value The credit value associated with the selected credit limit is automatically displayed. This may be changed if required.
Transponder The transponder card number is displayed if the financial account was created upon swiping or entering a transponder card.
Note: The financial account needs to be checked out right after posting the transactions. To keep financial accounts in the system use the Financial Accounts option.
Page 66 © 2006 Micros-Fidelio (Ireland) Ltd. February 2006

3
Accounts Receivable The Accounts Receivable module is fully integrated into Version 8.
To access accounts receivable:
Click the CASHIER menu and select ACCOUNTS RECEIVABLE.
The Accounts Receivable screen is displayed.
The screen is divided into 4 sections, each represented by a tab:
Accounts
Transactions
Credit Cards
Document History
Accounts The accounts section is used to create new accounts, to edit, delete and activate or deactivate existing account profiles, and to view all information associated with the selected account profile. Adjustments may be posted and transactions accessed. The aging option enables users to view all outstanding transactions by aging periods and reminder letters and statements may be generated. The user log may be viewed and traces and notes entered or acted upon.
The accounts screen is divided into three distinct areas:
© 2006 Micros-Fidelio (Ireland) Ltd. February 2006 Page 67

Version 8 Cashier Manual
Query - consists of multiple basic accounts search criteria and an advanced query option. The search can be further narrowed by setting the view selections.
Query Results - the results of the query shown in a grid format. On top of the grid additional columns display the total, the total to transfer (from the holding area) and the transferred amount of the selected balances and of all accounts balances.
HTML page - free definable HTML display which by default has a list format or a 'big' format where the details are displayed in a non-grid style format. The HTML File can be printed by using the clicking the right-mouse button.
Accounts Search Entering an accounts receivable query:
The query screen is split into three sections:
The basic search criteria
The advanced query options
The profile view selection
The basic search criteria:
You may fill in multiple fields to narrow the search criteria. If no data is entered, the list of accounts displayed is in alphabetical order. The fields are explained in the table below:
Accounts Receivable Search dialog box
Fill in this field With this information
A/R Account The name of the account
A/R Account # The number of the account
Account Type The type of account.
The advanced query options:
The advanced query consists of three selection fields:
The first allows you to select from a drop-down list of query possibilities.
The second limits the query to a second level or gives a choice of conditions.
The third field requires either a free-format value or for the user to select a possible value from a drop-down list.
The fields are explained in the table below:
Advanced Query dialog box
Field Choice/Condition Value
Account Type equal to/ not equal to All account types defined in the system.
Account Number
Start with/ equal to Enter a valid account number
Account Start with/ equal to Enter a name or letter the account should start with.
Page 68 © 2006 Micros-Fidelio (Ireland) Ltd. February 2006

Accounts Receivable
Field Choice/Condition Value
Contact Start with/ equal to Enter a name of the contact or letter the contact name should start with.
Address Start with/ equal to Enter a value the address should start with or a condition which should equal the entered address.
Include in Batch Statement
equal to/ not equal to Enter a choice: false or true. False = NO True =YES
Permanent Account
equal to/ not equal to Enter a choice: false or true. False = NO True =YES
The accounts view selection:
The accounts view selection allows you to limit the accounts display from the default of all accounts to all active or inactive accounts or to only view accounts with an open balance or accounts with no balance. The view options are an 'and' selection. For example it is possible to set the view option to view accounts with no balance and inactive. The default view option is open balance and active accounts.
Account View Options
Profile View Shows
Open Balance Only accounts that have an open balance.
No Balance Only accounts that have no balance or where the balance is equal to 0.
All All regardless of the balances.
And
Active Only active accounts.
Inactive Only inactive accounts (The "Active" field on the profile has been unchecked).
All All accounts regardless of status.
Wildcards
The search criteria can also be entered using wildcards (%). For example, M%ller will return Miller, Muller, %Bank will return Investment Bank, American Bank and Fidelio% will return Fidelio Gmbh or Fidelio Inc.
Search Name functionality
Names entered with an umlaut or special character, such as 'Müller' will automatically update the search name field with the name without umlaut or special character, such as 'Muller'. When entering Muller in the name field and pressing the Search button, the search will return 'Muller' and 'Müller' .
© 2006 Micros-Fidelio (Ireland) Ltd. February 2006 Page 69

Version 8 Cashier Manual
Activating the search:
To activate the search the user must click the SEARCH button. Due to the time it may take to search on a large database two different search options have been implemented. Clicking the SEARCH button will return the maximum number of accounts defined in the configuration, with the question to display more if there are more to be displayed. Clicking the FULL SEARCH button will display all accounts matching the criteria.
A list of accounts that match what you have specified is displayed. For example if you specify a search for the Account Name Micros, the account list grid shows a list of all accounts where the name starts with Micros. The query criteria can be easily reset by clicking the CLEAR button.
Narrowing the Search:
Once the search has been performed the search can be further narrowed by using the FIND IN GRID button.
The find button allows the user to:
Search on all or specific columns within the grid
Search for specific text and to control the direction of the search.
Match the case or search for whole words only.
Search Results:
The search results are displayed in a grid format. The grid order display can be customised by clicking on the field on which the display order should be sorted.
Accounts Grid Search Result dialog box
Field Definition
Account # The number of the account.
Name The name of the account.
Total Balance The total balance on this account, this is actual open balance in A/R plus balance to transfer from the holding area.
Balance to Transfer All invoices that have been checked out using a city ledger payment method will be transferred to a holding area. Accounting can then control each folio detail and transfer the folio (s) to Accounts Receivable.
Balance Transferred The amount that has already been transferred to the Accounts Receivable module.
Type The code of the account type.
Address The address selected on the account.
Contact The last and first name of the contact.
Active Indicates if the account is active or not. Green Check = Active Red Cross = Inactive
Page 70 © 2006 Micros-Fidelio (Ireland) Ltd. February 2006

Accounts Receivable
Account Setup To create a new accounts receivable account a customer profile must either be created or selected. Once this is done the accounts receivable account setup dialog box is displayed.
Selecting or creating a customer profile:
1. Click the CASHIER menu and select ACCOUNTS RECEIVABLE.
The Accounts Receivable screen is displayed.
2. Click the NEW button, as each account needs to be linked to a customer profile then the profile search screen is displayed.
3. Enter the search criteria for the profile, click the SEARCH button.
All profiles matching the entered criteria are shown in the grid.
4. Point to the required profile on the grid and click SELECT to select the profile.
The AR Account Setup dialog box is displayed.
4. If the required profile was not found, click the NEW PROFILE button to enter a new profile.
5. Complete the profile details then click OK.
The AR Account Setup dialog box is displayed.
AR Account Setup:
Once the profile has been created or selected, the AR Account Setup screen is displayed:
© 2006 Micros-Fidelio (Ireland) Ltd. February 2006 Page 71

Version 8 Cashier Manual
The AR Account Setup screen consists of four tabs:
A/R Account
Statement and Reminder Letters
Aging Periods
Document History
The A/R Account screen is divided into Profile, Account, Contact and Address information.
Accounts Setup dialog box
Fill in this Field With this information
Profile Information
Name The last name of the accounts profile.
First name The first name entered on the accounts profile.
Language The language entered on the accounts profile.
Account information
Page 72 © 2006 Micros-Fidelio (Ireland) Ltd. February 2006

Accounts Receivable
Fill in this Field With this information
A/R Account # The number of the A/R account. The number of the A/R account may be assigned a specific format - this is defined in the view V8_AR_ARnumberformat. Under Global settings the A/R number may be set to be mandatory and a specific view attached for the automatic number creation.
Account Type The type of account, select from the listbox of defined account types.
Credit Limit The credit limit for this account type. The default amount is taken from the configuration setup, but can be changed if required.
Include in Batch Statement
Indicates if the selected account will be considered when printing batch statements.
Permanent Account Indicates that the account is a permanent account.
Obsolete Account Accounts that are no longer in use and have been deactivated. This field is view only and is checked as soon as an account has been deactivated or the profile has been set to inactive.
Contact The displayed information is taken from the contact profile. Click the SELECT button to enter new contact information, the EDIT button to edit the contact profile and the CLEAR button to clear a profile link from the account.
Name The last name of the contact profile.
First Name The first name of the contact profile.
Language The language entered on the contact profile.
Letter Greeting The greeting entered under letter greeting of the contact profile.
Telephone The information entered under communication as primary. This is email, fax or telephone.
Country The country entered as primary address information on the contact profile.
Zip/City The zip code and city entered as primary address information on the contact profile.
Street The street entered as primary address information on the contact profile.
Address
Primary Indicates if the selected address is marked as the primary address on the profile.
Address Select the required address from the listbox. Click the NEW button to enter a new address, the EDIT button to edit an existing address and the DELETE ADDR button to delete an existing address.
© 2006 Micros-Fidelio (Ireland) Ltd. February 2006 Page 73

Version 8 Cashier Manual
Deleting an Account This option is controlled by a user right and can only be performed if there are no posting transactions and if no reminder letters have been printed for this account.
To delete an account:
1. Click the CASHIER menu and select ACCOUNTS RECEIVABLE.
The Accounts Receivable screen is displayed.
2. Point to the account to be deleted.
3. Click DELETE, a confirmation message is displayed.
4. Click YES to delete the account.
Deactivate/Activate This option can only be used if the account has no open balance. The option is controlled by a user right. If the account is currently activate then the deactivate button is available. If the account is currently deactivated then the activate button is available.
To deactivate an account:
1. Click the CASHIER menu and select ACCOUNTS RECEIVABLE.
The Accounts Receivable screen is displayed.
2. Point to the account to be deactivated.
3. Click DEACTIVATE, a confirmation message is displayed.
4. Click YES to deactivate the account.
To activate an account:
1. Click the CASHIER menu and select ACCOUNTS RECEIVABLE.
The Accounts Receivable screen is displayed.
2. Point to the account to be activated.
3. Click ACTIVATE, a confirmation message is displayed.
Page 74 © 2006 Micros-Fidelio (Ireland) Ltd. February 2006

Accounts Receivable
4. Click YES to activate the account.
Postings The postings option allows access to all transactions of the selected account and offers the same functionality as the transactions tab on the accounts screen. It is controlled by a user right and access requires a valid cashier number and password.
How to access account transactions:
1. Click the CASHIER menu and select ACCOUNTS RECEIVABLE.
The Accounts Receivable screen is displayed.
2. Click POSTINGS, enter your CASHIER NUMBER and PASSWORD, click LOGIN.
The Accounts Transactions screen is displayed.
The upper part of the screen displays account information from the profile such as account name, account number, account type and address information in HTML format.
The lower part of the screen is divided into two sections, each one represented by a tab:
All Transactions - to view all transactions of the account.
Open Balance - to view only open balances for this account.
© 2006 Micros-Fidelio (Ireland) Ltd. February 2006 Page 75

Version 8 Cashier Manual
Account Transactions Grid
Field Definition
Date The date (Version 8 date) the invoice was transferred to A/R.
Time The time (PC time) the invoice was transferred to A/R.
Guest Name The name of the guest. The name on the profile associated with the posting.
Amount The total amount on the invoice.
Paid The amount paid on the invoice.
Open Balance The open balance on the invoice.
Invoice The invoice number.
To enter a new posting:
1. Click the CASHIER menu and select ACCOUNTS RECEIVABLE.
The Accounts Receivable screen is displayed.
2. Click POSTINGS, enter your CASHIER NUMBER and PASSWORD, click LOGIN.
The Accounts Transactions screen is displayed.
3. Click the NEW button, the AR New Posting screen is displayed.
4. In the DEPARTMENT box click the drop-down arrow and select a department code from the listbox.
The department code name and description are entered.
5. Enter the AMOUNT to post.
6. Click the drop-down arrow and select the CURRENCY in which the amount should be posted.
If the selected currency is not the local currency then the FOREIGN AMOUNT box is filled.
Page 76 © 2006 Micros-Fidelio (Ireland) Ltd. February 2006

Accounts Receivable
7. The COMMENT box is automatically filled with the AR information: AR # and AR Name, but it may be overwritten.
8. If the posting was for an F&B department code, the number of served COVERS may be entered (Optional).
9. Click the POST button.
The new charge is added to the open balance charge list.
New Posting dialog box
Field Definition
[AR number] and AR name Display
Department The department code, select from the list of defined department codes.
Description Description of the department code but can be changed
Origin Only available for department codes coming from POS.
Amount Enter the amount to post.
Currency Select the currency in which the amount should be posted from listbox.
Foreign amount If the selected currency is not the local currency, the amount in the selected foreign currency will display.
Comment The comment will be filled with the AR account number and name but can be overwritten with free definable text.
Covers If applicable, the number of served covers for F&B department codes can be entered here.
Note: This option is only available if the parameter ‘CREATE NEW
INVOICES’ under SETUP->CONFIGURATION-> MISCELLANEOUS->GLOBAL
SETTINGS->ACCOUNTS Receivable tab is activated.
To edit a posting:
1. Click the CASHIER menu and select ACCOUNTS RECEIVABLE.
The Accounts Receivable screen is displayed.
2. Click POSTINGS, enter your CASHIER NUMBER and PASSWORD, click LOGIN.
The Accounts Transactions screen is displayed.
3. Click the NEW button, the AR New Posting screen is displayed.
4. Point to a posting and click the EDIT button, the View Posting Details dialog box is displayed.
© 2006 Micros-Fidelio (Ireland) Ltd. February 2006 Page 77

Version 8 Cashier Manual
View Posting Details dialog box
Field Definition
Guest Name The name of the guest, this is the profile information from the reservation.
Room Number/Fin. Acc.
The room number of the guest or the financial account number.
Cashier The cashier number and name.
Folio The folio number.
Checked Out The date and time when the folio was checked out.
Department The department code and description.
Closed Time The date and time the debit was completely paid off.
Amount The amount that was transferred to accounts receivable.
Paid Amount The amount paid on the exiting debit.
Open Balance The open balance.
Comment A comment about the posting
Indicators on edit posting grid
There are two possible indicators on the edit posting grid:
D – Indicating a debit posting that was transferred to Accounts Receivable.
C – Indicating a credit posting that was transferred to Accounts Receivable.
To view account information:
1. Click the CASHIER menu and select ACCOUNTS RECEIVABLE.
The Accounts Receivable screen is displayed.
2. Click POSTINGS, enter your CASHIER NUMBER and PASSWORD, click LOGIN.
The Accounts Transactions screen is displayed.
Page 78 © 2006 Micros-Fidelio (Ireland) Ltd. February 2006

Accounts Receivable
3. Click the ACCOUNT button, the AR Account Setup screen opens displaying profile, address and contact information as well as attached Statements, Reminder Letters, Aging Periods and Document History.
To post an adjustment:
1. Click the CASHIER menu and select ACCOUNTS RECEIVABLE.
The Accounts Receivable screen is displayed.
2. Click POSTINGS, enter your CASHIER NUMBER and PASSWORD, click LOGIN.
The Accounts Transactions screen is displayed.
3. Point to the posting to be adjusted, click the ADJUST button, the AR Account Adjustment screen is displayed.
© 2006 Micros-Fidelio (Ireland) Ltd. February 2006 Page 79

Version 8 Cashier Manual
4. In the DEPARTMENT box click the drop-down arrow and select a department code from the listbox.
The department code name and description are entered.
5. Enter the AMOUNT to post for the adjustment, this could be a positive or negative amount.
6. Click the drop-down arrow and select the CURRENCY in which the adjustment should be posted.
If the selected currency is not the local currency then the FOREIGN AMOUNT box is filled.
7. The COMMENT box is automatically filled with the AR information: AR # and AR Name, but it may be overwritten.
8. If the posting was for an F&B department code, the number of served COVERS may be entered (Optional).
9. Click the POST button.
The adjustment is added to the Open Balance charge list.
Adjustment dialog box
Field Definition
[AR number] and AR name Display
Department Select from listbox of defined department codes.
Description Is filled with the description of the department code but can be changed.
Origin Only available for department codes coming from POS.
Amount Enter the amount to post.
Page 80 © 2006 Micros-Fidelio (Ireland) Ltd. February 2006

Accounts Receivable
Field Definition
Currency Select the currency in which the amount should be posted from listbox.
Foreign amount If the selected currency is not the local currency, the amount in the selected foreign currency will display.
Comment The comment will be filled with the AR account number and name but can be overwritten with free definable text.
Covers If applicable, the number of served covers for F&B department codes can be entered here.
Note: This option is only available if the parameter ‘CREATE NEW
INVOICES’ under SETUP->CONFIGURATION-> MISCELLANEOUS->GLOBAL
SETTINGS->ACCOUNTS RECEIVABLE tab is activated.
To post a payment:
1. Click the CASHIER menu and select ACCOUNTS RECEIVABLE.
The Accounts Receivable screen is displayed.
2. Click POSTINGS, enter your CASHIER NUMBER and PASSWORD, click LOGIN.
The Accounts Transactions screen is displayed.
3. Point to the posting to be paid, click the PAYMENT button, the AR Payment Posting screen is displayed.
4. In the PAYMENT DEPARTMENT box click the drop-down arrow and select a department code from the listbox.
The department code name and description are entered.
© 2006 Micros-Fidelio (Ireland) Ltd. February 2006 Page 81

Version 8 Cashier Manual
5. The amount of the charge being paid is filled in by default in the AMOUNT box.
If the selected payment department is not the local currency then the FOREIGN
AMOUNT box is filled.
6. If a credit card payment department was selected, complete the CREDIT CARD
NUMBER, EXPIRY DATE, HOLDER NAME and GUARANTEE CARD.
7. The COMMENT box is automatically filled with the AR information: AR # and AR Name, but it may be overwritten.
8. Click the POST button to apply the payment to the charge.
If the charge was fully paid then the transaction is removed from the Open Balance charge list.
Payment dialog box
Field Definition
[AR number] and AR name Display
Payment Department Select from listbox of defined payment department codes.
Amount Enter the amount of the payment.
Currency Select the currency for the department code to post from listbox.
Foreign amount If the selected payment department code was a foreign currency, the amount in the selected foreign currency will display.
Credit Card Number Enter the number of the credit card or swipe the card, if a credit card interface is installed and a credit card reader is attached to the PC.
Expiry Date If the credit card number was entered manually, the expiration date (MM/YY) of the card can be entered in this field.
Holder Name The name of the credit card Holder can be entered in this field.
Guarantee card This field is basically used on reservations to indicate that the card can be used as a guarantee for late arrival.
Comment The comment will be filled with the AR account number and name but can be overwritten with freely-definable text.
To apply a credit to account transactions:
1. Click the CASHIER menu and select ACCOUNTS RECEIVABLE.
The Accounts Receivable screen is displayed.
2. Click POSTINGS, enter your CASHIER NUMBER and PASSWORD, click LOGIN.
The Accounts Transactions screen is displayed.
3. Click the APPLY CREDIT button, the AR Payment Posting screen is displayed.
Page 82 © 2006 Micros-Fidelio (Ireland) Ltd. February 2006

Accounts Receivable
4. Select the method which should be used to apply the credit:
UNALLOCATED PAYMENT – the received payment does not belong to any of the existing debits.
NEW PAYMENT APPLIED TO OLDEST CHARGE – the payment will be applied to the oldest debit.
NEW PAYMENT APPLIED TO MARKED CHARGES – the payment can be distributed among the charges that have been selected.
5. In the PAYMENT DEPARTMENT box click the drop-down arrow and select a department code from the listbox.
The department code name and description are entered.
6. Enter the payment AMOUNT.
If the selected payment department is not the local currency then the FOREIGN
AMOUNT box is filled.
7. If a credit card payment department was selected, complete the CREDIT CARD
NUMBER, EXPIRY DATE, HOLDER NAME and GUARANTEE CARD.
8. The COMMENT box is automatically filled with the AR information: AR # and AR Name, but it may be overwritten.
9. Click the POST button to apply the payment
© 2006 Micros-Fidelio (Ireland) Ltd. February 2006 Page 83

Version 8 Cashier Manual
Any charges which are not fully paid are removed from the Open Balance charge list.
Note: When selecting positive and negative postings on an account and pressing the APPLY CREDIT button it is not possible to override the AMOUNT field with a different amount, a message on the bottom of the Apply Credit dialog box will inform the user that partial amounts for positive and negative postings should be applied separately (either only positive or only negative postings).
To transfer postings from one A/R account to another A/R account:
1. Click the CASHIER menu and select ACCOUNTS RECEIVABLE.
The Accounts Receivable screen is displayed.
2. Click POSTINGS, enter your CASHIER NUMBER and PASSWORD, click LOGIN.
The Accounts Transactions screen is displayed.
3. Select the charges to be transferred, click the TRANSFER button, the A/R Accounts Navigator screen is displayed.
4. Enter the account name or account number to which you would like to transfer the charges and click the SEARCH button.
5. Select the account to which you would like to transfer the charges and click the SELECT button, a confirmation message is displayed.
Page 84 © 2006 Micros-Fidelio (Ireland) Ltd. February 2006

Accounts Receivable
6. Click YES to transfer the transactions.
Note: On the transactions tab pressing the transfer button on the holding area will move the selected invoices from the holding area to accounts receivable.
Options:
Click on the OPTIONS button to access the following transactions:
Compress - Select this option to compress two or more AR invoices or AR postings to one single amount. The option will only be available if two or more invoices/transactions have been selected. The selected postings or invoices have to be at least one day old.
Compress All - Select this option to compress all invoices and postings of one AR account into one single amount.
Note: Once two invoices have been compressed, the single invoices can no longer be viewed from the options menu under postings in accounts receivable, but are still available from the cashiering menu under Cashier functions->Billing history.
View Invoice - Select a transaction then select this option to open the billing history screen. If the invoice has been printed at check out or stored during night audit in the billing history, then it is possible to view, print or to change the invoice from here. Invoices that were not print or stored in billing history can not be accessed, a message that the transaction was not associated with an invoice will be displayed.
Print Statement - Select this option to print a statement for this account. To print a statement for specific transactions, . select the required transactions and then choose OPTIONS->PRINT STATEMENT. If no transactions are selected, all transactions will be printed on the statement, otherwise only the selected transactions will be printed.
Print Reminder Letters - Select this option to generate reminder letters for the selected account.
Activity - Select this option to view the user log by postings.
Traces - Select this option to view or enter traces. Traces are messages to departments within your property. They are used to remind other departments or co workers of actions to take or information about the A/R account or transaction. Traces require an instruction (Trace text) and an instruction date.
Notes - Select this option to enter notes related to the transaction.
Transfer from Holding Area - only available if the Holding Area tab is selected, select this option to transfer the selected transaction from the Holding Area to Accounts Receivable.
© 2006 Micros-Fidelio (Ireland) Ltd. February 2006 Page 85

Version 8 Cashier Manual
Transfer all from Holding Area - only available if the Holding Area tab is selected, select this option to transfer all transactions from the Holding Area to Accounts Receivable.
Select All/Deselect All:
To select all transactions, click Select all.
To un-select all transactions, click Deselect All.
Aging This option displays an aging breakdown and a total of the currently outstanding transactions for the selected account. Aging periods are user definable and may be configured per account type under Setup->Configuration->Global settings->Accounts Receivable->Accounts Type.
How to view the aging periods.
1. Click the CASHIER menu and select ACCOUNTS RECEIVABLE.
The Accounts Receivable screen is displayed.
2. Point to the required account.
3. Click AGING, the A/R Aging Periods screen is displayed.
4. To view all transactions, click the ALL TRANSACTIONS tab.
5. To view the transaction details of a specific aging period, double-click on the required aging period.
Reminders This option is used to generate and print reminder letters for the selected account.
How to print a reminder letter.
1. Click the CASHIER menu and select ACCOUNTS RECEIVABLE.
The Accounts Receivable screen is displayed.
2. Point to the required account.
3. Click REMINDER, the A/R Reminder Letters screen is displayed.
Page 86 © 2006 Micros-Fidelio (Ireland) Ltd. February 2006

Accounts Receivable
4. Select the required letter or letters by selecting the check box next to the account name.
5. Click PREVIEW or PREVIEW ALL to display the letters on screen.
6. Click PRINT or PRINT ALL to print the letters.
Configuration:
Reminder Letter forms may be configured under the option MISCELLANEOUS->
REPORTS using the Internal Editor Functionality.
Standard cycles are defined under Setup->Configuration->Accounts Receivable->Reminder Letters and Statements.
Each account type is then assigned the Reminder Letter Cycle and corresponding Letter under Setup->Configuration->Accounts Receivable->Account Types.
All Reminders This option is used to generate and print all outstanding reminder letters.
How to print all reminder letters.
1. Click the CASHIER menu and select ACCOUNTS RECEIVABLE.
The Accounts Receivable screen is displayed.
2. Click ALL REMINDERS, the A/R Reminder Letters screen is displayed showing a list of all accounts with transactions and open reminder letters.
© 2006 Micros-Fidelio (Ireland) Ltd. February 2006 Page 87

Version 8 Cashier Manual
4. Select the required letter or letters by selecting the check box next to the account name.
5. Click PREVIEW or PREVIEW ALL to display the letters on screen.
6. Click PRINT or PRINT ALL to print the letters.
Configuration:
Reminder Letter forms may be configured under the option MISCELLANEOUS->
REPORTS using the Internal Editor Functionality.
Standard cycles are defined under Setup->Configuration->Accounts Receivable->Reminder Letters and Statements.
Each account type is then assigned the Reminder Letter Cycle and corresponding Letter under Setup->Configuration->Accounts Receivable-> Account Types.
The generation of the corresponding reminder letter is dependant upon the global settings and on the configuration of the reminder cycles that are attached to each account. See Global settings for Reminder Cycles.
Accounts Options Click on OPTIONS on the accounts screen to perform the following transactions:
Print Statement - Select this option to print a statement for this account.
Print/E-Mail All Statements - Select this option to print or email statements for all or selected accounts.
E-Mail Statement - Select this option to e-mail a statement for this account.
E-Mail Reminder Letters - Select this option to e-mail a reminder letter for this account.
Activity - Select this option to view the user log by account.
Traces - Select this option to view or enter traces that are related to the account.
Notes - Select this option to enter notes related to the account.
Page 88 © 2006 Micros-Fidelio (Ireland) Ltd. February 2006

Accounts Receivable
Print/E-Mail All Statements 1. Click the CASHIER menu and select ACCOUNTS RECEIVABLE.
The Accounts Receivable screen is displayed.
2. Click PRINT/E-MAIL ALL STATEMENTS, the A/R Statements screen is displayed showing a list of all accounts with open statements.
3. Select the required statements by selecting the check box next to the account name.
4. Click PREVIEW or PREVIEW ALL to display the statements on screen.
5. Click PRINT or PRINT ALL to print the statements.
6. Click E-MAIL or E-MAIL ALL to email the statements.
CONFIGURATION:
Statement forms may be configured under the option MISCELLANEOUS->
REPORTS using the Internal Editor Functionality.
Standard cycles are defined under Setup->Configuration->Accounts Receivable->Reminder Letters and Statements.
Each account type is then assigned to a specific statements under Setup->Configuration->Accounts Receivable->Account Types.
Transactions This option is used to view all transactions in accounts receivable, to access the holding area and to view or transfer invoices that have been checked out to city ledger from cashiering but have not yet been transferred to the accounts receivable module.
The transactions screen is divided into two distinct areas:
Query - consists of multiple basic search criteria, including transaction specific search options and an advanced query option.
Query Results - the results of the query shown in a grid format.
© 2006 Micros-Fidelio (Ireland) Ltd. February 2006 Page 89
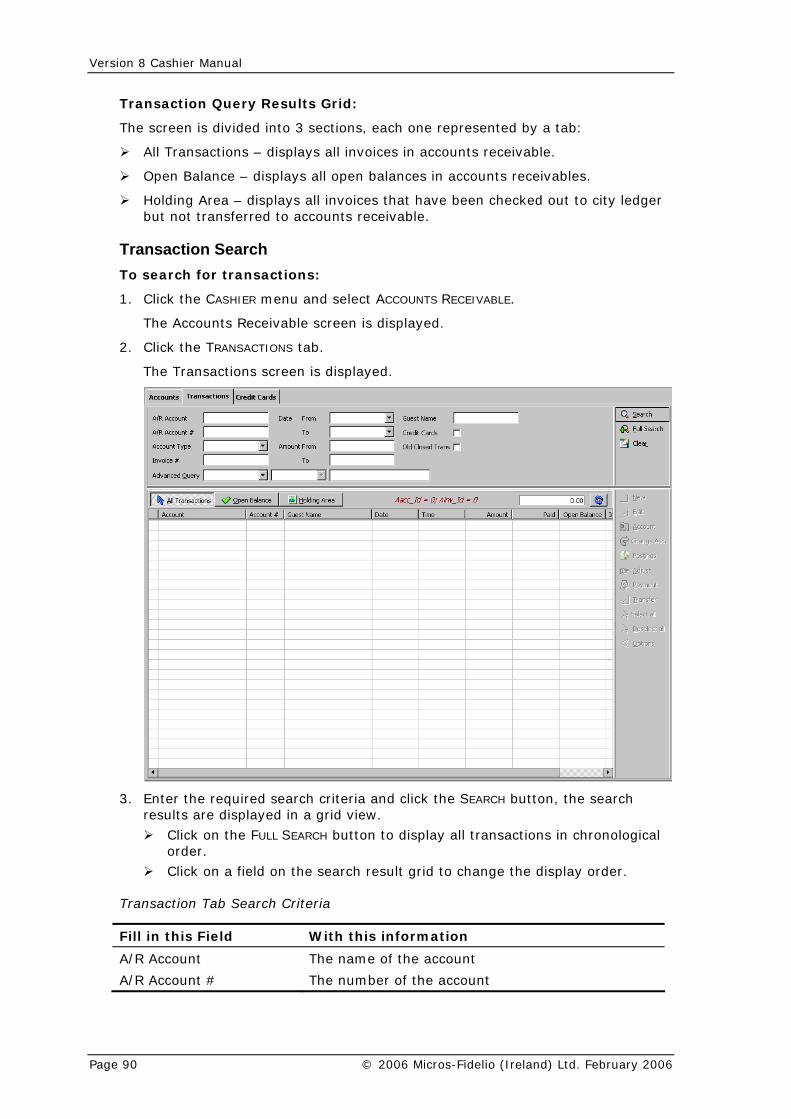
Version 8 Cashier Manual
Transaction Query Results Grid:
The screen is divided into 3 sections, each one represented by a tab:
All Transactions – displays all invoices in accounts receivable.
Open Balance – displays all open balances in accounts receivables.
Holding Area – displays all invoices that have been checked out to city ledger but not transferred to accounts receivable.
Transaction Search To search for transactions:
1. Click the CASHIER menu and select ACCOUNTS RECEIVABLE.
The Accounts Receivable screen is displayed.
2. Click the TRANSACTIONS tab.
The Transactions screen is displayed.
3. Enter the required search criteria and click the SEARCH button, the search results are displayed in a grid view.
Click on the FULL SEARCH button to display all transactions in chronological order.
Click on a field on the search result grid to change the display order.
Transaction Tab Search Criteria
Fill in this Field With this information
A/R Account The name of the account
A/R Account # The number of the account
Page 90 © 2006 Micros-Fidelio (Ireland) Ltd. February 2006

Accounts Receivable
Fill in this Field With this information
Account Type Select the defined account types from the drop-down list.
Invoice # If an invoice number is known it can be entered in this field. This is the invoice no. on the folio the guest received upon check out.
Date From Select a date from the calendar from which you would like to see the transactions.
To Select a date from the calendar until which you would like to see the transactions.
Amount From Used to enter a starting amount range for which you would like to view transactions.
To Enter the amount at which the search range should end.
Guest Name If the guest name is known, it can be entered in this field.
Credit Cards Select this check-box to include credit cards in the search result.
Old Closed Trans Select this check-box to include old closed transactions in the search result.
Transactions Tab Advanced Query Search Criteria
Field Choice/Condition Legal Values
Account Type
equal to/ not equal to All account types defined in the system.
Account Number
start with/ equal to Enter a valid account number
Account start with /equal to Enter a name or letter the account should start with.
Invoice Number
start with /equal to Enter the invoice number of the transaction or a number the invoice number should start with.
Posting Date equal to/ greater than/less than
Enter the posting date or a date that should be greater than or less than the selected date.
Open Balance
equal to/ not equal to/greater than/ less than
Enter an amount the open balance should equal to, not equal to, be greater than or less than the entered value.
Guest Name start with/ equal to Enter a letter the guest name should start with or enter a name that should equal the guest name.
Closed Time equal to/ not equal to/ greater than/ less than
Select a date from the calendar that should match the selected condition.
© 2006 Micros-Fidelio (Ireland) Ltd. February 2006 Page 91

Version 8 Cashier Manual
Transaction Options The options on the transactions screen are for the most part identical to the options on the posting screen:
The exceptions are as follows:
Transfer - if the Holding Area tab is displayed then pressing the TRANSFER button will transfer the selected invoices to accounts receivable
Options - if the Holding Area tab is displayed then pressing the OPTIONS button will open two additional options:
Transfer from Holding Area - transfers the selected transaction from the Holding Area to Accounts Receivable.
Transfer all from Holding Area - transfers all transactions from the Holding Area to Accounts Receivable.
To enter a new posting:
1. Click the CASHIER menu and select ACCOUNTS RECEIVABLE.
The Accounts Receivable screen is displayed.
2. Click POSTINGS, enter your CASHIER NUMBER and PASSWORD, click LOGIN.
The Accounts Transactions screen is displayed.
3. Click the NEW button, the AR New Posting screen is displayed.
4. In the DEPARTMENT box click the drop-down arrow and select a department code from the listbox.
The department code name and description are entered.
5. Enter the AMOUNT to post.
6. Click the drop-down arrow and select the CURRENCY in which the amount should be posted.
If the selected currency is not the local currency then the FOREIGN AMOUNT box is filled.
Page 92 © 2006 Micros-Fidelio (Ireland) Ltd. February 2006

Accounts Receivable
7. The COMMENT box is automatically filled with the AR information: AR # and AR Name, but it may be overwritten.
8. If the posting was for an F&B department code, the number of served COVERS may be entered (Optional).
9. Click the POST button.
The new charge is added to the open balance charge list.
New Posting dialog box
Field Definition
[AR number] and AR name Display
Department The department code, select from the list of defined department codes.
Description Description of the department code but can be changed
Origin Only available for department codes coming from POS.
Amount Enter the amount to post.
Currency Select the currency in which the amount should be posted from listbox.
Foreign amount If the selected currency is not the local currency, the amount in the selected foreign currency will display.
Comment The comment will be filled with the AR account number and name but can be overwritten with free definable text.
Covers If applicable, the number of served covers for F&B department codes can be entered here.
Note: This option is only available if the parameter ‘CREATE NEW
INVOICES’ under SETUP->CONFIGURATION-> MISCELLANEOUS->GLOBAL
SETTINGS->ACCOUNTS Receivable tab is activated.
To edit a posting:
1. Click the CASHIER menu and select ACCOUNTS RECEIVABLE.
The Accounts Receivable screen is displayed.
2. Click POSTINGS, enter your CASHIER NUMBER and PASSWORD, click LOGIN.
The Accounts Transactions screen is displayed.
3. Click the NEW button, the AR New Posting screen is displayed.
4. Point to a posting and click the EDIT button, the View Posting Details dialog box is displayed.
© 2006 Micros-Fidelio (Ireland) Ltd. February 2006 Page 93

Version 8 Cashier Manual
View Posting Details dialog box
Field Definition
Guest Name The name of the guest, this is the profile information from the reservation.
Room Number/Fin. Acc.
The room number of the guest or the financial account number.
Cashier The cashier number and name.
Folio The folio number.
Checked Out The date and time when the folio was checked out.
Department The department code and description.
Closed Time The date and time the debit was completely paid off.
Amount The amount that was transferred to accounts receivable.
Paid Amount The amount paid on the exiting debit.
Open Balance The open balance.
Comment A comment about the posting
Indicators on edit posting grid
There are two possible indicators on the edit posting grid:
D – Indicating a debit posting that was transferred to Accounts Receivable.
C – Indicating a credit posting that was transferred to Accounts Receivable.
To view account information:
1. Click the CASHIER menu and select ACCOUNTS RECEIVABLE.
The Accounts Receivable screen is displayed.
2. Click POSTINGS, enter your CASHIER NUMBER and PASSWORD, click LOGIN.
The Accounts Transactions screen is displayed.
Page 94 © 2006 Micros-Fidelio (Ireland) Ltd. February 2006

Accounts Receivable
3. Click the ACCOUNT button, the AR Account Setup screen opens displaying profile, address and contact information as well as attached Statements, Reminder Letters, Aging Periods and Document History.
To post an adjustment:
1. Click the CASHIER menu and select ACCOUNTS RECEIVABLE.
The Accounts Receivable screen is displayed.
2. Click POSTINGS, enter your CASHIER NUMBER and PASSWORD, click LOGIN.
The Accounts Transactions screen is displayed.
3. Point to the posting to be adjusted, click the ADJUST button, the AR Account Adjustment screen is displayed.
© 2006 Micros-Fidelio (Ireland) Ltd. February 2006 Page 95

Version 8 Cashier Manual
4. In the DEPARTMENT box click the drop-down arrow and select a department code from the listbox.
The department code name and description are entered.
5. Enter the AMOUNT to post for the adjustment, this could be a positive or negative amount.
6. Click the drop-down arrow and select the CURRENCY in which the adjustment should be posted.
If the selected currency is not the local currency then the FOREIGN AMOUNT box is filled.
7. The COMMENT box is automatically filled with the AR information: AR # and AR Name, but it may be overwritten.
8. If the posting was for an F&B department code, the number of served COVERS may be entered (Optional).
9. Click the POST button.
The adjustment is added to the Open Balance charge list.
Adjustment dialog box
Field Definition
[AR number] and AR name Display
Department Select from listbox of defined department codes.
Description Is filled with the description of the department code but can be changed.
Origin Only available for department codes coming from POS.
Amount Enter the amount to post.
Page 96 © 2006 Micros-Fidelio (Ireland) Ltd. February 2006

Accounts Receivable
Field Definition
Currency Select the currency in which the amount should be posted from listbox.
Foreign amount If the selected currency is not the local currency, the amount in the selected foreign currency will display.
Comment The comment will be filled with the AR account number and name but can be overwritten with free definable text.
Covers If applicable, the number of served covers for F&B department codes can be entered here.
Note: This option is only available if the parameter ‘CREATE NEW
INVOICES’ under SETUP->CONFIGURATION-> MISCELLANEOUS->GLOBAL
SETTINGS->ACCOUNTS RECEIVABLE tab is activated.
To post a payment:
1. Click the CASHIER menu and select ACCOUNTS RECEIVABLE.
The Accounts Receivable screen is displayed.
2. Click POSTINGS, enter your CASHIER NUMBER and PASSWORD, click LOGIN.
The Accounts Transactions screen is displayed.
3. Point to the posting to be paid, click the PAYMENT button, the AR Payment Posting screen is displayed.
4. In the PAYMENT DEPARTMENT box click the drop-down arrow and select a department code from the listbox.
The department code name and description are entered.
© 2006 Micros-Fidelio (Ireland) Ltd. February 2006 Page 97

Version 8 Cashier Manual
5. The amount of the charge being paid is filled in by default in the AMOUNT box.
If the selected payment department is not the local currency then the FOREIGN
AMOUNT box is filled.
6. If a credit card payment department was selected, complete the CREDIT CARD
NUMBER, EXPIRY DATE, HOLDER NAME and GUARANTEE CARD.
7. The COMMENT box is automatically filled with the AR information: AR # and AR Name, but it may be overwritten.
8. Click the POST button to apply the payment to the charge.
If the charge was fully paid then the transaction is removed from the Open Balance charge list.
Payment dialog box
Field Definition
[AR number] and AR name Display
Payment Department Select from listbox of defined payment department codes.
Amount Enter the amount of the payment.
Currency Select the currency for the department code to post from listbox.
Foreign amount If the selected payment department code was a foreign currency, the amount in the selected foreign currency will display.
Credit Card Number Enter the number of the credit card or swipe the card, if a credit card interface is installed and a credit card reader is attached to the PC.
Expiry Date If the credit card number was entered manually, the expiration date (MM/YY) of the card can be entered in this field.
Holder Name The name of the credit card Holder can be entered in this field.
Guarantee card This field is basically used on reservations to indicate that the card can be used as a guarantee for late arrival.
Comment The comment will be filled with the AR account number and name but can be overwritten with freely-definable text.
To apply a credit to account transactions:
1. Click the CASHIER menu and select ACCOUNTS RECEIVABLE.
The Accounts Receivable screen is displayed.
2. Click POSTINGS, enter your CASHIER NUMBER and PASSWORD, click LOGIN.
The Accounts Transactions screen is displayed.
3. Click the APPLY CREDIT button, the AR Payment Posting screen is displayed.
Page 98 © 2006 Micros-Fidelio (Ireland) Ltd. February 2006

Accounts Receivable
4. Select the method which should be used to apply the credit:
UNALLOCATED PAYMENT – the received payment does not belong to any of the existing debits.
NEW PAYMENT APPLIED TO OLDEST CHARGE – the payment will be applied to the oldest debit.
NEW PAYMENT APPLIED TO MARKED CHARGES – the payment can be distributed among the charges that have been selected.
5. In the PAYMENT DEPARTMENT box click the drop-down arrow and select a department code from the listbox.
The department code name and description are entered.
6. Enter the payment AMOUNT.
If the selected payment department is not the local currency then the FOREIGN
AMOUNT box is filled.
7. If a credit card payment department was selected, complete the CREDIT CARD
NUMBER, EXPIRY DATE, HOLDER NAME and GUARANTEE CARD.
8. The COMMENT box is automatically filled with the AR information: AR # and AR Name, but it may be overwritten.
9. Click the POST button to apply the payment
© 2006 Micros-Fidelio (Ireland) Ltd. February 2006 Page 99

Version 8 Cashier Manual
Any charges which are not fully paid are removed from the Open Balance charge list.
Note: When selecting positive and negative postings on an account and pressing the APPLY CREDIT button it is not possible to override the AMOUNT field with a different amount, a message on the bottom of the Apply Credit dialog box will inform the user that partial amounts for positive and negative postings should be applied separately (either only positive or only negative postings).
To transfer postings from one A/R account to another A/R account:
1. Click the CASHIER menu and select ACCOUNTS RECEIVABLE.
The Accounts Receivable screen is displayed.
2. Click POSTINGS, enter your CASHIER NUMBER and PASSWORD, click LOGIN.
The Accounts Transactions screen is displayed.
3. Select the charges to be transferred, click the TRANSFER button, the A/R Accounts Navigator screen is displayed.
4. Enter the account name or account number to which you would like to transfer the charges and click the SEARCH button.
5. Select the account to which you would like to transfer the charges and click the SELECT button, a confirmation message is displayed.
Page 100 © 2006 Micros-Fidelio (Ireland) Ltd. February 2006

Accounts Receivable
6. Click YES to transfer the transactions.
Note: On the transactions tab pressing the transfer button on the holding area will move the selected invoices from the holding area to accounts receivable.
Select All/Deselect All:
To select all transactions, click Select all.
To un-select all transactions, click Deselect All.
Options:
Click on the OPTIONS button to access the following transactions:
Compress - Select this option to compress two or more AR invoices or AR postings to one single amount. The option will only be available if two or more invoices/transactions have been selected. The selected postings or invoices have to be at least one day old.
Compress All - Select this option to compress all invoices and postings of one AR account into one single amount.
Note: Once two invoices have been compressed, the single invoices can no longer be viewed from the options menu under postings in accounts receivable, but are still available from the cashiering menu under Cashier functions->Billing history.
View Invoice - Select a transaction then select this option to open the billing history screen. If the invoice has been printed at check out or stored during night audit in the billing history, then it is possible to view, print or to change the invoice from here. Invoices that were not print or stored in billing history can not be accessed, a message that the transaction was not associated with an invoice will be displayed.
Print Statement - Select this option to print a statement for this account. To print a statement for specific transactions, . select the required transactions and then choose OPTIONS->PRINT STATEMENT. If no transactions are selected, all transactions will be printed on the statement, otherwise only the selected transactions will be printed.
Print Reminder Letters - Select this option to generate reminder letters for the selected account.
Activity - Select this option to view the user log by postings.
Traces - Select this option to view or enter traces. Traces are messages to departments within your property. They are used to remind other departments or co workers of actions to take or information about the A/R account or transaction. Traces require an instruction (Trace text) and an instruction date.
Notes - Select this option to enter notes related to the transaction.
© 2006 Micros-Fidelio (Ireland) Ltd. February 2006 Page 101

Version 8 Cashier Manual
Transfer from Holding Area - only available if the Holding Area tab is selected, select this option to transfer the selected transaction from the Holding Area to Accounts Receivable.
Transfer all from Holding Area - only available if the Holding Area tab is selected, select this option to transfer all transactions from the Holding Area to Accounts Receivable.
Credit Cards This option is used to view, print and to bill outstanding balances to the credit card companies.
Once the invoice has been sent to the credit card company the credit card records are usually compressed and kept as one single record under the accounts tab until the payment from the credit card company is received.
Other than the city ledger payments which are transferred from cashiering to the holding area, the credit card payments where the credit card type is marked as ‘Transfer via A/R' under SETUP->CONFIGURATION->CASHIERING->CREDIT CARD TYPES, are directly transferred to accounts receivable and can be looked up at any time under the corresponding credit card account.
Credit Card Search: To search for credit cards of a specific credit card company account:
1. Click the CASHIER menu and select ACCOUNTS RECEIVABLE.
The Accounts Receivable screen is displayed.
2. Click the CREDIT CARD tab.
The Credit Card Transactions screen is displayed.
3. Enter the CREDIT CARD COMPANY name or click the drop-down arrow and select the credit card name from the listbox.
Page 102 © 2006 Micros-Fidelio (Ireland) Ltd. February 2006

Accounts Receivable
4. Type the required date in the INVOICE FROM box or click the drop-down arrow and select a date from the calendar.
5. Type the required date in the INVOICE TO box or click the drop-down arrow and select a date from the calendar.
6. Enter any ADVANCED QUERY options.
7. Click the SEARCH button, the search results are displayed in a grid view.
Credit Card Company Search dialog box
Field Definition
Credit Card Company Select the credit card company from the listbox of defined credit card types which are marked as ‘Transfer via A/R’.
Invoice From Select a start date from the calendar from which the credit card transaction for the selected account should be viewed.
Invoice To Select an end date from the calendar until which the credit card transaction for the selected account should be viewed.
Advanced Query Search with the conditions:
Guest Name Is equal to or start with the entered name.
Invoice Number Is equal to or start with the entered number.
Posting Date Is equal to, greater than or less than the selected date.
Open Balance Is equal to, greater than or less than the entered amount.
Credit Cards Grid View
Field Definition
Check box Check box for selection.
Account The account name.
Account # The account number.
Guest Name The name of the guest on the reservation that was transferred to Account Receivables.
Date The date the transaction was transferred and checked out from cashiering.
Time The time the transaction was transferred and checked out from cashiering.
Amount The amount which was entered as credit card payment.
Paid The amount paid by the credit card company.
Open Balance The open balance on this transaction.
Invoice The invoice number
© 2006 Micros-Fidelio (Ireland) Ltd. February 2006 Page 103

Version 8 Cashier Manual
Credit Card Options: The following options are available on the credit card screen:
View - select this option to view the details of a credit card transaction.
Account - select this option to view account information. See A/R Account Setup.
Compress - select this option to compress two or more credit card transactions and transfer the single invoice to the accounts tab. This is used to combine several credit card invoices into one single amount which is than billed to the credit card company. The option will only be available if two or more invoices/transactions have been selected. The selected postings or invoices have to be at least one day old.
Compress All - select this option to compress all credit card transactions and transfer the single invoice to the accounts tab.
Note: For the compress transaction a valid cashier number and password has to be entered.
Compressed records can not be uncompressed.
Additional Options: Click on OPTIONS on the credit card screen to perform the following transactions:
View Invoice- Select this option to view the invoice associated with the credit card transaction.
Activity - Select this option to view the user log entries linked to the credit card transaction. (V8.4 and higher)
Traces - Select this option to view or enter traces that are related to the credit card transaction.
Notes - Select this option to enter notes related to the credit card transaction.
Document History The document history option stores all reminders and statements printed or sent via email. The reminder letters or statements can be previewed, re-printed or re-sent via email.
The document history screen is divided into two distinct areas:
Query - consists of multiple basic search criteria, including search by date, document name, account name, account number and account type.
Query Results - the results of the query shown in a grid format.
Document History Search To search document history:
1. Click the CASHIER menu and select ACCOUNTS RECEIVABLE.
The Accounts Receivable screen is displayed.
2. Click the DOCUMENT HISTORY tab.
The Document History screen is displayed.
Page 104 © 2006 Micros-Fidelio (Ireland) Ltd. February 2006

Accounts Receivable
3. Enter the required search criteria and click the SEARCH button, the search results are displayed in a grid view.
Click on the FULL SEARCH button to display all documents in chronological order.
Click on a field on the search result grid to change the display order.
Document History Tab Search Criteria
Fill in this Field With this information
Date From Select a date from the calendar from which you would like to see the documents.
To Select a date from the calendar until which you would like to see the documents.
Document Name The name of the document.
A/R Account The name of the account
A/R Account # The number of the account
Account Type Select the defined account types from the drop-down list.
Document History Options The following options are available on the document history screen:
Preview - select this option to preview the document on screen. The preview screen includes the option to re-send or re-print the document.
Print - select this option to re-print the document.
E-Mail - select this option to re-send the document.
© 2006 Micros-Fidelio (Ireland) Ltd. February 2006 Page 105
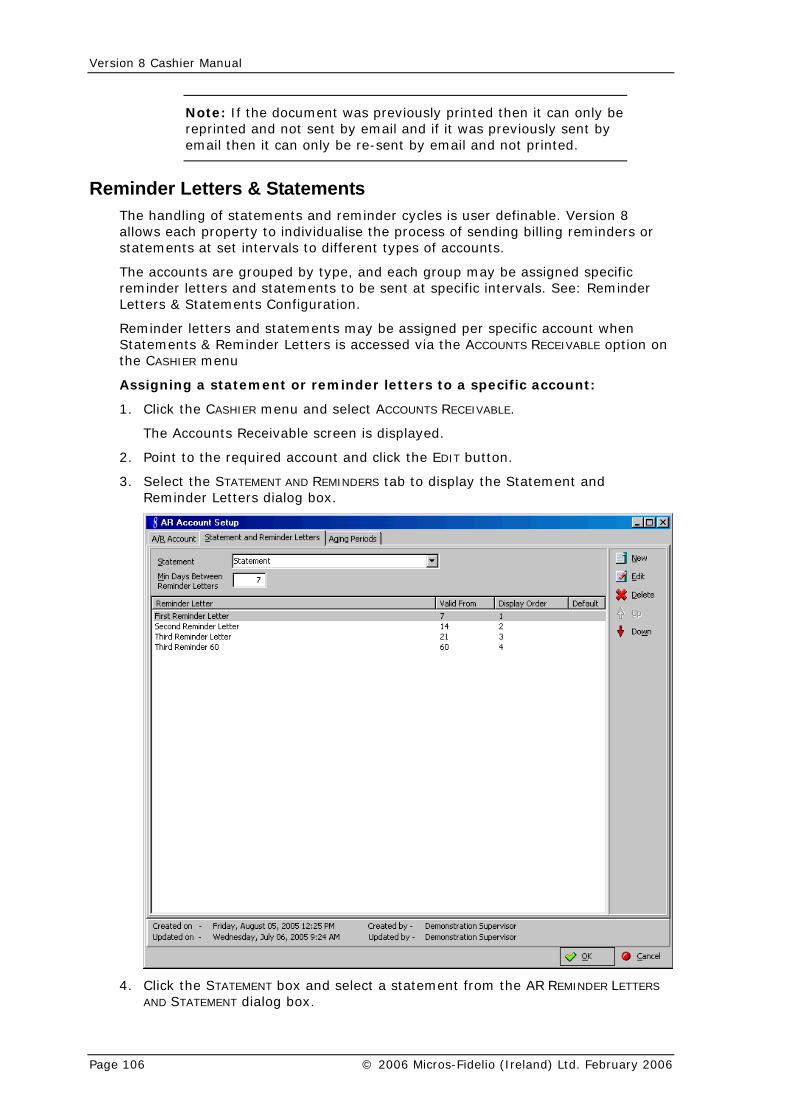
Version 8 Cashier Manual
Note: If the document was previously printed then it can only be reprinted and not sent by email and if it was previously sent by email then it can only be re-sent by email and not printed.
Reminder Letters & Statements The handling of statements and reminder cycles is user definable. Version 8 allows each property to individualise the process of sending billing reminders or statements at set intervals to different types of accounts.
The accounts are grouped by type, and each group may be assigned specific reminder letters and statements to be sent at specific intervals. See: Reminder Letters & Statements Configuration.
Reminder letters and statements may be assigned per specific account when Statements & Reminder Letters is accessed via the ACCOUNTS RECEIVABLE option on the CASHIER menu
Assigning a statement or reminder letters to a specific account:
1. Click the CASHIER menu and select ACCOUNTS RECEIVABLE.
The Accounts Receivable screen is displayed.
2. Point to the required account and click the EDIT button.
3. Select the STATEMENT AND REMINDERS tab to display the Statement and Reminder Letters dialog box.
4. Click the STATEMENT box and select a statement from the AR REMINDER LETTERS
AND STATEMENT dialog box.
Page 106 © 2006 Micros-Fidelio (Ireland) Ltd. February 2006

Accounts Receivable
5. To add a reminder letter, click NEW, the AR REMINDER LETTERS AND STATEMENT dialog box is displayed.
6. Point to the required letter and click SELECT, the letter is added to the Reminder Letter list.
7. Use the up and down arrows to adjust the order in which the reminder letters should be sent.
Account Type Statement and Reminder Letters dialog box
Field Definition Legal Values
Statement Name of the report that is to be used as a statement
Select from listbox
Min Days Between Reminder Letters
Minimum number of days between reminder letters
Up to 4 digits.
Note: Versions prior to V8.4 offer only statement functionality, and statement forms written with Crystal Reports. Printing is possible from MISCELLANEOUS->REPORTS and not from the accounts receivable module.
Version 8.4 and higher offers the full functionality of reminder letters & statements from the within the Accounts Receivable option.
Reminder Letters & Statements Configuration The steps involved in configuring reminder letters and statements are detailed below:
Reminder letter and statements may be configured under the option Miscellaneous->Reports using the Internal Editor Functionality.
The reminder letters must exist as a report under the section AR REMINDERS and statements must exist under the section AR STATEMENTS.
Once the reminder letter and statement forms are created they can be assigned as a statement or assigned to a reminder cycle under Setup-> Configuration->Accounts Receivable->Reminder Letters and Statements.
Each account type is then assigned a statement and the required reminder letters under Setup->Configuration->Accounts Receivable-> Account Types.
In addition, Version 8 can be configured to use separate reminder letters, so that a second reminder is never sent unless the first one has been sent to the account, regardless of the number of days the invoice has been outstanding.
If the parameter Global Settings-Accounts Receivable->Separate Reminder Letters is activated, reminder letters can be printed per reminder level for one account. This will ensure that different reminder levels will not print on one letter.
If the parameter Global Settings-Accounts Receivable->Separate Reminder Letters is not activated, reminder letters are printed per account, even if two reminder levels are on one letter.
© 2006 Micros-Fidelio (Ireland) Ltd. February 2006 Page 107

Version 8 Cashier Manual
To determine if a reminder letter is due, Version 8 uses the VALID FROM figure (number of days that have elapsed since the initial invoice was sent) on the Reminder Letters and Statements setup in conjunction with the MIN DAYS BETWEEN
REMINDER LETTERS on the Account Type Setup->Reminder Letters and Statements tab.
Note: Versions prior to V8.4 offer only statement functionality, and statement forms written with Crystal Reports. Printing is possible from MISCELLANEOUS->REPORTS and not from the accounts receivable module.
Version 8.4 and higher offers the full functionality of reminder letters & statements from the within the Accounts Receivable option.
Batch Statement Examples Batch Statement Report - as configured with the Internal Editor Functionality..
Page 108 © 2006 Micros-Fidelio (Ireland) Ltd. February 2006

Accounts Receivable
Batch Statement Report - as printed from within Accounts Receivable or via the menu option MISCELLANEOUS->REPORTS.
Batch Statement Report - as configured with Crystal Reports.
© 2006 Micros-Fidelio (Ireland) Ltd. February 2006 Page 109

Version 8 Cashier Manual
Page 110 © 2006 Micros-Fidelio (Ireland) Ltd. February 2006

4
Travel Agent Processing The travel agent processing module is fully integrated into Version 8. It is used for calculating, processing and paying agent commissions.
To view travel agent commissions:
Click the CASHIER menu and select TRAVEL AGENT PROCESSING.
The Commissions screen is displayed.
The screen is divided into three distinct areas:
Query – consists of basic search criteria, such as the Agent Name and IATA Number.
Filter – limits the search to look for either paid or open (unpaid) commission records. The default filter is open commission records.
Query results – the results of the query shown in a grid format, including the Travel Agent Name, IATA Number and commission amount due to be paid.
The query result consists of two screens, each one represented by a tab:
Commissions – displays a list of all travel agent or source profiles linked to a travel agent commission code and currency. Each agent or source profile that is displayed is attached to an individual or group reservation.
Details – all stay details for individual or group reservations linked to the travel agent or source profile.
© 2006 Micros-Fidelio (Ireland) Ltd. February 2006 Page 111

Version 8 Cashier Manual
Note: IATA stands for International Air Transport Association. Only airlines operating air services are eligible for IATA membership. Travel agents can register as IATA approved agents. The agents receive a unique numeric code which enables instant recognition for each and every agency location. Some properties only accept agents that are IATA approved, as this offers more security concerning the liability of an agent.
Commissions When accessing the option Travel Agent Processing the commission page is opened by default. A list of travel agents and source profiles linked to a travel agent commission code and a travel agent currency is displayed. Each agent or source profile that is displayed is attached to an individual or group reservation.
How to enter a commission query:
1. Click the CASHIER menu and select TRAVEL AGENT PROCESSING.
The Commission screen is displayed.
2. Type the AGENT NAME or the agents IATA NUMBER.
3. Click SEARCH.
Agents meeting the entered search criteria are displayed.
Commission Filters
The search can be further narrowed with the following filter options:
Paid Off – displays all paid commission records.
Open – displays all commissions due to be paid, this is the default setting
Commission Options
Click this Option To do this
Select All Select all agents, a check mark is placed against each agent name.
Deselect All Deselect all agents, the check marks against the agent names are removed.
Calculate New Refresh the screen and recalculate all commission records. Use this option if partial commission records have been marked as paid for one agent or if manual commission records have been added.
Mark as paid Pay the commission records and mark the selected agents as paid.
Add Manually To add a commission record manually.
Adding Commission Manually Commission records are transferred during the night audit after the guest or group that was linked to a commissionable agent or source profile has checked out. However, in the case where an agent profile was not linked or a commission code or travel agent currency was not entered, it may be necessary to add a commission record manually.
Page 112 © 2006 Micros-Fidelio (Ireland) Ltd. February 2006

Travel Agent Processing
How to enter a manual commission record:
1. Click the CASHIER menu and select TRAVEL AGENT PROCESSING.
The Commission screen is displayed.
2. Search for and select the AGENT NAME on the commissions grid.
3. Click the ADD MANUALLY button to display the Manual Commissions dialog box.
4. In the CATEGORY box select a bank account to pay commission for the selected agent.
5. Select the NAME of the guest from the reservation navigator of history stays.
6. Enter the COMMISSION AMOUNT.
7. Click Save to save the commission record.
Manual Commissions dialog box
Fill in this Field With this information
Name The name of the agent, click the Search button to search for the travel agent profile.
IATA If the agent profile has an IATA number, it will be displayed in this field.
Category The bank account from which the commission is paid.
Name The name of the guest, click the Search button to search for the guest profile on the reservation navigator.
Arrival The arrival date of the guest will be displayed.
Nights The number of nights will be displayed in this field.
Commission amount The commission amount.
© 2006 Micros-Fidelio (Ireland) Ltd. February 2006 Page 113

Version 8 Cashier Manual
Commission Details How to view a commission detail:
1. Click the CASHIER menu and select TRAVEL AGENT PROCESSING.
The Commission screen is displayed.
2. Type the AGENT NAME or the agents IATA NUMBER.
3. Select the required filter, OPEN commission records is selected by default.
4. Click SEARCH to display all the agents meeting the entered search criteria.
5. Select an agent profile, click the DETAILS tab to display the commission detail grid. All guests stay details that were linked to the agent profile and have been checked out are displayed.
Commission Detail grid
This Column Displays this information
Res Nr. The reservation number.
Guest Name The last and first name of the profile on the reservation.
Arrival The arrival date of the reservation.
Departure The departure date of the reservation.
Amount The commission amount.
Paid off Date The date the commission record was marked as paid.
Page 114 © 2006 Micros-Fidelio (Ireland) Ltd. February 2006

Travel Agent Processing
Commission Detail options
Click this Option To do this:
Edit Edit a commission detail record.
Delete Delete a commission detail record, a delete comment must be entered.
Mark as Paid Pay a commission detail.
Commission Edit dialog box
Field Displays this information
Name The last and first name of the profile on the reservation.
Res No. The reservation number.
Arrival The arrival date of the reservation.
Departure The departure date of the reservation.
Manual Detail Amount
The amount which should be added to the calculated commission amount displayed.
Commission Amount
The calculated commission amount including any manually entered amounts.
Travel Agent Processing Setup To transfer the commission records to the Travel Agent Processing module, it is necessary to configure the following:
TAP Commission codes
TAP Commission Rules
TAP Commission Accounts
In addition each agent or source profile that is to be paid commission for the reservations booked must be assigned a travel agent commission code and a travel agent currency.
Under Setup->Configuration->Miscellaneous->Global Settings->Travel Agent Processing tab, it must be defined who should receive commission in the case that there is a source and a travel agent profile attached to a reservation. It is possible to pay commissions to a travel agent, a source or both a travel agent and a source.
TAP Commission Accounts This option provides a simple method for setting up bank accounts for the payment of travel agent commission checks. While some properties may need only a single account for this purpose, others may need multiple accounts for multiple currencies, or an account for printing bank transfers as opposed to printing checks, or even an account for data transfer only, for which an export file is created, but no checks printed.
Commission accounts are defined under Setup->Configuration->CRM->TAP Commission Accounts.
© 2006 Micros-Fidelio (Ireland) Ltd. February 2006 Page 115

Version 8 Cashier Manual
Commission Accounts dialog box
Field Definition Legal Values
Number (Required)
Account number of the commission account.
Up to 30 alphanumeric characters.
Description (Required)
Description of the commission account.
Up to 30 characters of text.
Currency Currency associated with this account.
Select from listbox.
Payment Method
Type of payment associated with this account.
Select one of the radio buttons Check, Bank draft or ASCII file export.
Min. Processing Amount (Required)
Minimum amount of commission required to process the commission payment.
Currency amount up to 30 digits with 4 decimal places.
Min. Process Age
Minimum age of the commission before being processed.
Integer between 1 and 999.
Hold Indicates whether the commissions should be automatically placed on hold. This allows you to review the commission details before releasing and paying them.
Check: YES Blank: NO
Default Travel agents without a currency code assigned on the profile are automatically assigned to the default commission account.
Check: YES Blank: NO
Note: One travel agent commission account has to be set as default
TAP Commission Rules The amount of commission received by a travel agent or source depends not only on the percentage of the commission, but also on other factors such as what items are commissionable, whether VAT must be added to the commission, and special adders or multipliers for items such as suites. Adders are usually used for flat rates and multipliers to calculate percentage from specific department codes.
The system handles all these details automatically through the creation of commission rules. A rule may be defined according to the agreement with a particular travel agent or source and then assigned to that agent's profile or according to the definition of a rate and assigned to that rate.
Commission rules are defined under Setup->Configuration->CRM->TAP Commission Rules.
Page 116 © 2006 Micros-Fidelio (Ireland) Ltd. February 2006

Travel Agent Processing
Commission Rules dialog box
Field Definition Legal Values
Code (Required)
Code of the commission rule. Up to 3 alphanumeric characters.
Description (Required)
Description of the commission rule.
Up to 30 characters of text.
Department Codes
All department codes which can be used to calculate commission for this rule.
Addition/Multiplier Indicates whether the formula should be added or used as a multiplier.
Select either Radio Button.
Addition Type
Per Department Code
Only available if Addition was selected. The value will be added per department code.
Select either Radio Button: Department Code Night or Stay
Per Night Only available if Addition was selected. The value will be added per night.
Per Stay Only available if Addition was selected. The value will be added per stay.
Multiplier
Calculate on Net Revenue
Indicates whether the VAT should be deducted before calculating the commission.
Check: VAT will be deducted Blank: The gross amount will be used to calculate commission.
Value Enter a value for the calculation. If Addition was selected, the amount will be added. If Multiplier was selected an amount for the multiplication has to be entered, for example 0.10 to calculate 10 percent commission on the defined department codes.
Inactive Indicates if the commission rule is active or not.
Blank: Active Check: Inactive
© 2006 Micros-Fidelio (Ireland) Ltd. February 2006 Page 117

Version 8 Cashier Manual
TAP Commission Codes This option is used to define the commission codes that will be used to calculate the travel agent commission.
Note: To setup commission codes, the commission rules must be defined first.
TAP commission codes are defined under Setup->Configuration->CRM->TAP Commission Codes.
Commission Codes dialog box
Field Definition Legal Values
Code (Required)
Code of the commission code. Up to 3 alphanumeric characters.
Description (Required)
Description of the commission code. Up to 30 characters of text.
Commission Calculation Rule
Defines which commission calculation rule should be used for this commission code.
Select from listbox.
Date Range Indicates whether this commission code is valid between certain dates.
Check the checkbox and select valid dates from the calendar that appears in each listbox.
Default Indicates whether this commission type is the default.
Check: YES Blank: NO
Inactive Indicates if the commission code is active or not.
Blank: Active Check: Inactive
Travel Agent Profile Setup To setup the travel agent or source profile and to make sure that commission records are transferred to the travel agent processing module during night audit, the source or agent profile has to have a TAP CURRENCY and TAP CODE.
How to setup the travel agent profile:
1. Click the CUSTOMER RELATION menu and select PROFILES to display the Customer Profiles screen.
2. Search for and select the required profile.
3. Click EDIT PROFILE , the main profile screen is displayed.
4. Click the MORE FIELDS tab.
5. In the TAP CURRENCY box click the drop-down arrow and select the currency in which the agent will receive commission payments.
6. In the TAP CODE box click the drop-down arrow and select the commission code which should be used to calculate commission.
7. Click OK to close the profile.
Page 118 © 2006 Micros-Fidelio (Ireland) Ltd. February 2006

5
Tour Operator Invoice A tour operator invoice is an invoice which is issued for all checked in rooms of the same tour operator. The purpose of this is usually in order to receive the payment earlier, for example the contract with the tour operator may state that the invoice will be issued on the day of arrival and not after the guests departure. In order to be included on a tour operator invoice the reservation has to have a profile linked which has a profile type which is set up as Tour Operator.
When a tour operator invoice is issued, it displays the full revenue of the stay, but the revenue itself is actually posted on a daily basis. So it works in a similar manner to advanced postings.
This tour operator invoice option is only available if the parameter TOUR OPERATOR
INVOICE is activated under Setup->Configuration->Miscellaneous->Global Settings->Billing. Fixed charges are only posted if the parameter POST FIXED
CHARGES FOR TOUR OPERATOR INVOICE is also activated. In addition the profile types which are considered tour operators must be marked as such under Setup->Configuration->CRM->Profile Type, however it is not possible to setup individual profiles as tour operator
How to produce a tour operator invoice:
1. Click the CASHIER menu and select TOUR OPERATOR INVOICE.
The Cashier Login screen is displayed.
2. Enter your CASHIER NUMBER and PASSWORD, click LOGIN.
The Tour Operator Invoice dialog box is displayed.
3. In the TOUR OPERATOR box, click the drop-down arrow, the profile search screen is opened, locate the tour operator profile for which you would like to produce the invoice, click SELECT.
All expected and in house guests with this source or travel agent profile attached will display. guests are displayed in date and then name order
4. Click the SELECT ALL NOT COMPLETE button to select all guests which are checked-in and have not yet been printed on the tour operator invoice
© 2006 Micros-Fidelio (Ireland) Ltd. February 2006 Page 119

Version 8 Cashier Manual
5. Click OK to open a FINANCIAL ACCOUNT for the selected tour operator profile.
6. Select an existing financial account or complete the NEW FINANCIAL ACCOUNT dialog box and click OK.
A message is displayed showing how many charges were posted to how many reservations.
7. The billing screen for the financial account is displayed after the advanced postings have been posted.
8. The financial account can then be checked out or an information folio can be printed.
Note: The rate and fixed charges posted are dependant upon the parameter settings under Setup-> Configuration-> Miscellaneous->Global settings->Billing tab.
How to correct a tour operator invoice
It is possible to post a correction to a tour operator invoice after the advance postings have been posted.
Click the NEGATIVE button to post all the room charges in negative for the selected guests. This is only available after the advanced postings have been posted.
Tour Operator Invoice dialog box
Field Definition
Tour Operator Enter the name of the tour operator or select from the listbox. The search will display only travel agents and source profiles which are marked as tour operator.
Select all not Complete
Click this button to select all guests which have not yet been printed on the tour operator invoice.
Guests A list of expected and in house guests attached to the selected tour operator.
Room The room number of the guest.
Page 120 © 2006 Micros-Fidelio (Ireland) Ltd. February 2006

Tour Operator Invoice
Field Definition
Arrival – Departure
The arrival and departure date of the guest.
Status The status of the guest’s reservation. For example expected, checked in or checked out.
Completed Indicates which guests charges have been printed on a tour operator invoice. COMPLETE - charges have been printed on the tour operator invoice. BLANK - charges have not been printed on the tour operator invoice.
© 2006 Micros-Fidelio (Ireland) Ltd. February 2006 Page 121


6
Rebate Accounts A rebate account is a financial account issued for each profile linked to a rebate card. Properties providing special membership schemes to external guests, for example to their spa/pool or wellness area, can link free nights and discounts on department codes to the membership scheme.
The posting functionality for rebate cards can be activated by Global Settings-> Billing 2 tab->Posting functionality for rebate cards.
How to view rebate accounts:
1. Click the CASHIER menu and select REBATE ACCOUNTS.
The Rebate Account screen is displayed
2. Type the guests NAME, the CARD NUMBER, the MEMBERSHIP TYPE or press the
ADVANCED button to search by ACCOUNT NUMBER or BALANCE value.
3. Select the required view options, OPEN ACCOUNTS, INVOICE, 0 BALANCE, VALID, INCL. HISTORY, NO INVOICE, NO 0 BALANCE and INVALID.
4. Click SEARCH to display all rebate accounts entered in the search criteria.
5. Select an account and click the BILLING button to access billing.
6. Select an account and click the EDIT button to view the financial account details.
© 2006 Micros-Fidelio (Ireland) Ltd. February 2006 Page 123


7
Transponder Transponder handling is used in resort properties operating on a no-cash basis. The guests receive a card upon check-in which can be used for all purposes and services the property provides.
A transponder is a control device that picks up and automatically responds to an incoming signal. The term is a combination of the words transmitter and responder. Version 8 uses a passive transponder that allows a computer to identify an object. Magnetic labels, such as those on credit cards are common examples. The Version 8 transponder functionality has been tested with Legic Cards and Legic Card Readers. A passive transponder must be used with an active sensor that decodes and transcribes the data the transponder contains.
Note: This option is only available if the option Transponder Handling is activated under Setup->Configuration-> Miscellaneous->Global Setting->Generic2 tab.
The transponder screen is divided into 6 sections, each represented by a tab:
Transponder Read
Billing Lookup
Family Creation
Group Creation
More Transponder
History
Transponder Read
The options on this tab determine what happens when the guest card is either read or manually entered. Whether a new financial account should be created or if to search for and link to an existing financial account, the credit limits and the default search criteria.
Transponder Read dialog box
Field Definition
New FA Defines if a new financial account is created.
Link to existing FA Defines if the card number should be linked to an existing financial account.
Select Credit Limit Defines the credit limit, it can be selected from the drop-down list.
Overwrite existing credit limit link
Defines if existing credit limits should be overwritten with the amount entered in the credit limit field.
© 2006 Micros-Fidelio (Ireland) Ltd. February 2006 Page 125

Version 8 Cashier Manual
Field Definition
Credit Limit The amount defined on the selected credit limit. The amount can be changed and will overwrite the credit limit of the selected credit limit if previous overwrite field has been selected.
In House Select this check-box to include in house guests in the search.
Future Search criteria for future guests. For a new financial account this option is selected by default.
Room Search criteria for the room number.
Name Search criteria for name.
From Search criteria for the date. For a new financial account this option is selected by default.
Clear log Used to clear the log file.
Copy Used to copy the log file.
Billing Lookup
This option is used to read or enter card numbers and search for existing transponder financial accounts with the corresponding card information. Select the OPEN BILLING SCREEN check box to open the invoice directly. If the check box is not selected, then the account information is displayed.
Family Creation
If family cards are to be used, a default family template has to be defined under Setup->Configuration->Cashiering->Transponder Handling->Family Templates. When the family is created one account is defined as the master (party leader) and all other accounts are sub-accounts. Billing instructions are automatically defined to transfer charges from all the sub-accounts to the master account.
The Family Creation tab is only displayed if the parameter FAMILY CREATION
FUNCTIONALITY is activated under Setup->Configuration->Miscellaneous->Global Settings->Generic2 tab.
Family Creation dialog box
Field Definition
Select Template Select a family template from the list of defined family templates. Click the New button to define a new template.
Check Profiles Defines if existing profiles should be checked.
All have the same Last Name
Select this check box if all family members to be entered have the same last name.
Party Leader Defines the party leader, the master bill will be created for the party leader.
Credit Limit The credit limit name and amount will display for all members of the family template. It can be changed by selecting a different credit limit from the drop-down list next to each member.
Scan Cards Used to scan and create cards for all family members.
Page 126 © 2006 Micros-Fidelio (Ireland) Ltd. February 2006

Transponder
Note: On the billing search screen for family members all the financial accounts for the family will open.
How to create a family:
1. Click the CASHIER menu and select TRANSPONDER HANDLING.
The Transponder Handling screen is displayed.
2. Select the FAMILY CREATION tab.
3. Select the TEMPLATE from the drop-down list.
4. Select CHECK PROFILES.
5. Select ALL HAVE THE SAME LAST NAME.
6. Enter all the names.
7. Change the credit limits if required.
8. Click the SCAN CARDS button.
The family is created.
Group Creation
This option is used for parties or groups. When the group is created one account is defined as the master (party leader) and all other accounts are sub-accounts. Billing instructions are automatically defined to transfer charges from all the sub-accounts to the master account.
The Group Creation tab is only displayed if the parameter TRANSPONDER
ARRANGEMENT FUNCTIONALITY (GROUPS) is activated under Setup->Configuration->Miscellaneous->Global Settings->Generic2 tab.
Group Creation dialog box
Field Definition
Profile Select a profile for the group.
Create new FA Defines if a new financial account is created.
Select FA Defines if an existing financial account should be selected.
Template Select the group template from the list of defined Group/Bus templates. If SHOW ONLY LINKED
ARRANGEMENTS is selected, only the arrangements defined on the profile will be shown. Click the New button to define a new template. Click the Edit button to edit the selected template.
Show only Linked Arrangement
Defines if only templates linked to the selected profile should be available for selection. Templates are linked under Profiles->More Fields tab-> Transponder Standard Arrangement.
Detailed Profiles Select this box to enter profiles for each group member.
Check Profiles Only available if DETAILED PROFILEs is selected. Defines if existing profiles should be checked.
Number Select this check box if all group members to be entered have the same last name.
© 2006 Micros-Fidelio (Ireland) Ltd. February 2006 Page 127
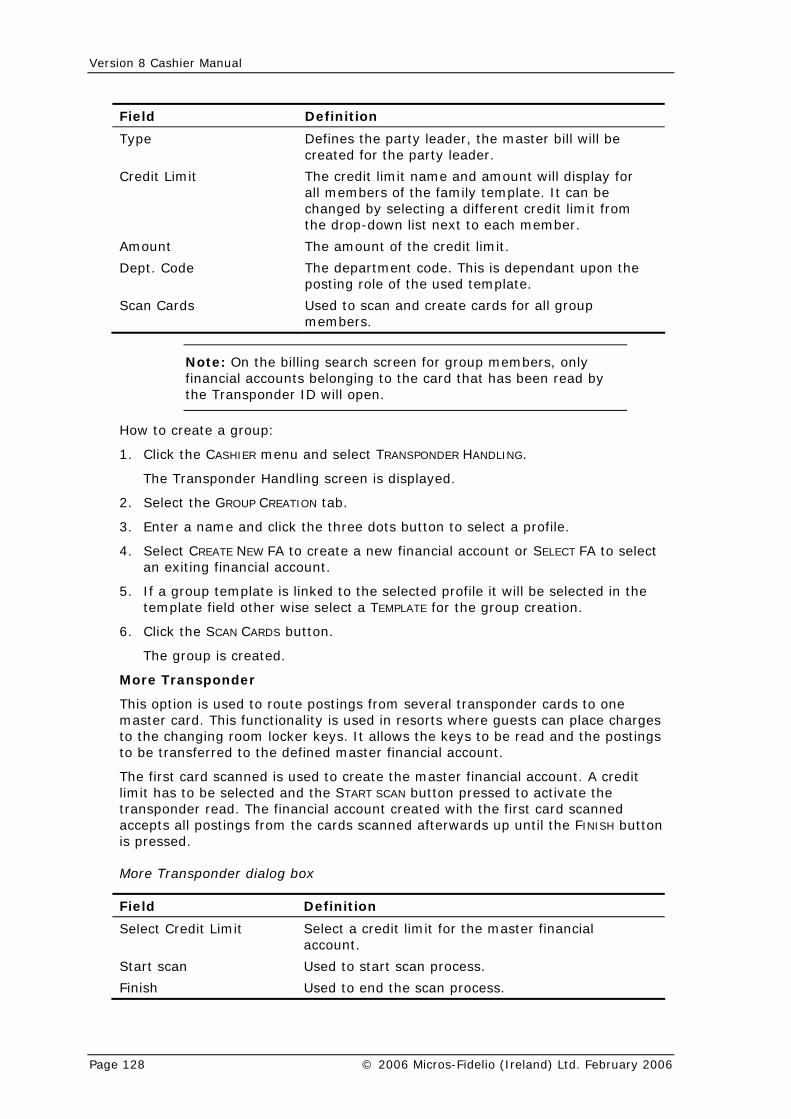
Version 8 Cashier Manual
Field Definition
Type Defines the party leader, the master bill will be created for the party leader.
Credit Limit The credit limit name and amount will display for all members of the family template. It can be changed by selecting a different credit limit from the drop-down list next to each member.
Amount The amount of the credit limit.
Dept. Code The department code. This is dependant upon the posting role of the used template.
Scan Cards Used to scan and create cards for all group members.
Note: On the billing search screen for group members, only financial accounts belonging to the card that has been read by the Transponder ID will open.
How to create a group:
1. Click the CASHIER menu and select TRANSPONDER HANDLING.
The Transponder Handling screen is displayed.
2. Select the GROUP CREATION tab.
3. Enter a name and click the three dots button to select a profile.
4. Select CREATE NEW FA to create a new financial account or SELECT FA to select an exiting financial account.
5. If a group template is linked to the selected profile it will be selected in the template field other wise select a TEMPLATE for the group creation.
6. Click the SCAN CARDS button.
The group is created.
More Transponder
This option is used to route postings from several transponder cards to one master card. This functionality is used in resorts where guests can place charges to the changing room locker keys. It allows the keys to be read and the postings to be transferred to the defined master financial account.
The first card scanned is used to create the master financial account. A credit limit has to be selected and the START SCAN button pressed to activate the transponder read. The financial account created with the first card scanned accepts all postings from the cards scanned afterwards up until the FINISH button is pressed.
More Transponder dialog box
Field Definition
Select Credit Limit Select a credit limit for the master financial account.
Start scan Used to start scan process.
Finish Used to end the scan process.
Page 128 © 2006 Micros-Fidelio (Ireland) Ltd. February 2006

Transponder
History
The history tab may be used to view a specified number of closed financial accounts or to scan a card and to view the number of closed financial accounts which are linked to that card.
History dialog box
Field Definition
Show the last closed FAs Enter the number of closed financial accounts to be viewed, for example enter 5 to view the last 5 closed financial accounts.
Show Used to activate the search or to scan a card to see all the closed financial accounts linked to that card number.
Open accounts automatically on the Billing Screen
Select this option to directly open the closed financial accounts on the billing screen.
Open Selected Accounts Used to open selected accounts from the list of closed financial accounts in the search result grid.
Additional Options
Manual Card
This option may be used to enter a card number manually. On the tabs for Family creation, Group creation and More Transponder, pressing the SCAN CARD button will allow cards to be entered manually. The option to enter cards manually is also given on all transponder buttons and options in cashiering when opening a transponder account.
Entering transponder card numbers manually is restricted by a user right. If the user right MANUALLY ENTER CARD NUMBERS under Setup->Configuration->Users->Rights->Transponder Handling is activated, the Manual Card button will be available on the Transponder Handling screen from the Cashiering drop-down menu.
CLEAR LOG - This option is used to clear the log file.
Billing
If the billing screen is opened and a transponder card scanned, the corresponding financial account will be opened.
© 2006 Micros-Fidelio (Ireland) Ltd. February 2006 Page 129

Index
© 2006 Micros-Fidelio (Ireland) Ltd. February 2006 Page 131

A Accelerator keys .......................................3 Accounts
Account Information ......................78, 94 Adjustment ....................................79, 95 Edit Posting ...................................77, 93 New Posting ..................................76, 92 Payment ............................81, 82, 97, 98 Posting Options...........................85, 101 Transfer.......................................84, 100
Accounts Receivable Accessing Accounts Receivable .........67 Accounts
About Accounts ...............................67 Account Information ..................78, 94 Accounts Options ............................88 Accounts Search .............................68 Accounts Setup ...............................71 Activate an Account.........................74 Adjustment.................................79, 95 Apply Credit ...............................82, 98 Deactivate an Account ....................74 Delete an Account ...........................74 Edit Posting ...............................77, 93 New Posting ..............................76, 92 Payment ....................................81, 97 Posting Options .......................85, 101 Postings...........................................75 Transfer ...................................84, 100
Accounts Options................................88 Aging ...................................................86 Credit Cards
Additional Options .........................104 Credit Card Options.......................104 Credit Card Search........................102 Using in Accounts Receivable.......102
Print all Statements.............................89 Reminder Letters...........................86, 87 Transactions
About Transactions .........................89 Account Information ..................78, 94 Adjustment.................................79, 95 Apply Credit ...............................82, 98 Edit Posting ...............................77, 93 Holding Area....................................89 New Posting ..............................76, 92 Payment ....................................81, 97 Posting Options .......................85, 101 Transaction Options ........................92 Transaction Search .........................90 Transfer ...................................84, 100
Adjustments ............................................30 Advance Invoice .....................................31 Advance Postings ...................................31 Aging Periods .........................................86 Allowances..............................................26
B Batch Posting......................................... 35 Batch Printing......................................... 15 Batch Settlements.................................. 58 Batch Statement Examples ................. 108 Billing
Opening a Guest Folio ....................... 13 Billing History
Folios.................................................. 43 Miscellaneous Receipts ..................... 43
Billing Instructions .................................. 24 Billing Options
Adjustments........................................ 30 Allowances ......................................... 26 Billing Instructions .............................. 24 Delete FA ........................................... 28 Guest Comments ............................... 27 History & Future ................................. 27 Information Folio................................. 23 Invoice Reprint ................................... 23 Manual Rate Code Posting ................ 29 Paid Outs............................................ 23 Post Daily Charges ............................ 27 Profile ................................................. 24 Reinstate ............................................ 26 Travel Agent Commission .................. 28
Blue drill down arrow................................ 4
C Cashier
Reservation ........................................ 21 Cashier Status ....................................... 45 Cashiering
Options Adjustments.................................... 30 Allowances...................................... 26 Billing Instructions........................... 24 Delete FA........................................ 28 Guest Comments............................ 27 History & Future.............................. 27 Information Folio............................. 23 Invoice Reprint................................ 23 Manual Rate Code Posting............. 29 Paid Outs........................................ 23 Post Daily Charges......................... 27 Profile.............................................. 24 Reinstate......................................... 26 Travel Agent Commission .............. 28
Change Cashier Stock Configuration Requirements .............. 46 Permanently ....................................... 46 Temporarily ........................................ 46
Changing the date Typing a new date................................ 9 Using the calendar ............................... 9
© 2006 Micros-Fidelio (Ireland) Ltd. February 2006 Page 132

Index
Check Out Advance Invoice..................................31 Advance Postings ...............................31 Checking out a guest ..........................34 Do not print zero balances ..................34 Don't Close Folio.................................31 Interim Bill ...........................................31 Proforma Invoice.................................31 Reservation/Financial Account ...........31
Close Cashier Closing your cashier ...........................60 Viewing transaction details .................60 What to do if the amounts do not match............................................................60
Comments ..............................................27 Commissions
Add Manual Commission Records....112 Commission Details ..........................114 Delete Commission Detail.................114 Edit Commission Detail .....................114 Pay Commission ...............................112 Pay Commission Detail .....................114
Configuration of Reminder Letters & Statements ........................................107
Credit Cards Credit Card Options in Accounts Receivable ........................................104 Credit Card Search in Accounts Receivable ........................................102 Using in Accounts Receivable ..........102
Currency Exchange ................................48
D Date field
Changing a date using the calendar .....9 Control Panel Windows Regional Settings/Options....................................8 Typing a new date.................................9
Delete FA................................................28 Deposits..................................................51 Don't Close Folio ....................................31
E Exhange Rates .......................................52 Exiting Version 8.....................................10
F FA Settings .............................................21 Finanacial Account Settings ...................21 Financial Account
Passer-By............................................64 Financial Accounts..................................16
G Guest Comments....................................27
H History & Future ..................................... 27 HTML
Change the HTML display.................... 4 Collapse HTML Tree ............................ 4 Expand HTML Tree.............................. 4 View HTML display .............................. 4
HTML View .............................................. 4
I Information Folio .................................... 23 Interim Bill .............................................. 31 Introduction
About Version 8 Cashiering ................. 1 Invoice
Tour Operator Invoice ...................... 119 Invoice Reprint ....................................... 23
L Logging In ................................................ 1 Logging Out
Exiting Version 8 ................................ 10 Logging off Version 8 ......................... 10
M Manual Commission Records.............. 112 Manual Rate Code Posting.................... 29
N Navigation keys
Accelerator keys................................... 3 Quick keys............................................ 7 Shortcut keys........................................ 3
O Opening a Guest Folio........................... 13
P Paid Outs ............................................... 23 Passer-By .............................................. 64 Payments ............................................... 18 Petty Cash ............................................. 54 Post Daily Charges ................................ 27 Posting Journal
Displaying........................................... 39 Viewing posting details....................... 39
Postings Posting a manual charge ................... 36
Profile..................................................... 24 Proforma Invoice.................................... 31
Q Quick keys ............................................... 7
© 2006 Micros-Fidelio (Ireland) Ltd. February 2006 Page 133

Version 8 Cashier Manual
R Rate Code Posting..................................29 Rebate Accounts ..................................123 Reinstate.................................................26 Reminder Letters ..............................86, 87 Reminder Letters & Statements
Assigning to a specific account.........106 Batch Statement Examples...............108 Configuration.....................................107
S Shortcut keys ............................................3 Split .........................................................19 Statement Printing ..................................89 Statements
see Reminder Letters & Statements.106
T TAP
Adding Commission Manually...........112 Commission Accounts ......................115 Commission Codes...........................118 Commission Details ..........................114 Commission Rules ............................116 Commissions.....................................112 Travel Agent Processing Setup ........115 Travel Agent Profile Setup ................118 Viewing Travel Agent Commissions .111
Telephone Booth ....................................55
Transactions Account Information ..................... 78, 94 Adjustment ................................... 79, 95 Edit Posting .................................. 77, 93 Holding Area....................................... 89 New Posting ................................. 76, 92 Payment ........................... 81, 82, 97, 98 Posting Options.......................... 85, 101 Transaction Options ........................... 92 Transaction Search ............................ 90 Transfer ...................................... 84, 100
Transfers................................................ 20 Transponder
Billing Lookup................................... 125 Family Creation ................................ 125 Group Creation................................. 125 History .............................................. 125 Manual Card..................................... 125 More Transponder............................ 125 Transponder Read ........................... 125
Travel Agent Commission...................... 28 Travel Agent Commissions.................. 112 Travel Agent Processing
Commissions Add Manual Commission Records112 Commission Detail........................ 114 Delete Commission Detail ............ 114 Edit Commission Detail ................ 114 Pay Commission........................... 112 Pay Commission Detail ................ 114
Setup ................................................ 115
Page 134 © 2006 Micros-Fidelio (Ireland) Ltd. February 2006