verizon voip – integrated communications package mail...version 2.09 verizon voip – ... 7 rewind...
TRANSCRIPT
For training/documentation, please visit us @ http://customertraining.verizonbusiness.com or call 1‐800‐622‐1049
© 2009 Verizon. All Rights Reserved. The Verizon and Verizon Business names and logos and all other names, logos, and slogans identifying Verizon’s products and services are trademarks and service marks or registered trademarks and service marks of Verizon Trademark Services LLC or its affiliates in the United States and/or other countries. Microsoft, Windows, Internet Explorer, Excel, and Access are either registered trademarks or trademarks of Microsoft Corporation in the United States and/or other countries. All other trademarks and service marks are the property of their respective owners.
Version 2.09
Verizon VoIP – Integrated Communications Package Voice Mail User Guide
2
Table of Contents
Table of Contents .......................................................................2
Access/Set Up Voice Mail Box .....................................................3
Change Account Options ...................................................................... 3
Voice Mail over the Phone..........................................................4
Listen to Messages....................................................................................4
Send a Message........................................................................................5
Work with Greetings .................................................................................5
Account Options .......................................................................................5
Voice Mail over the Web ............................................................7
Log In and Access the Message Center........................................................7
Navigate the Inbox....................................................................................7
Check Voice Mail Messages .......................................................................8
Forward Messages ....................................................................................9
Contact Numbers....................................................................................10
Greetings ...............................................................................................11
Personal ................................................................................................12
Phone Settings .......................................................................................13
Notification ............................................................................................14
Distribution Lists.....................................................................................16

3
ACCESS/SET UP VOICE MAIL BOX
There are a few different ways you can access your voice mail.
Dial your phone number or extension and press the * key when your voice mail answers. The default PIN is the last four digits of your extension. If your extension is less than four digits, add a zero to the front. For example, if your extension is 415, dial 0415. ‐OR‐
Dial your voice mail access number (provided by your administrator), enter your mailbox number followed by #, and then enter your PIN followed by #. ‐OR‐
Press the Messages button on your phone, if configured.
Change Account Options The first time you access your voice mail box, the system automatically prompts you to change your PIN, set up your personal greetings, and record your name.
Change Your PIN
1. Press 4 ‐ Account Options.
2. Press 1 ‐ Change PIN.
3. Follow the prompts and select a new PIN. Your PIN must be 4 – 8 digits.
Change Your Greetings
1. Press 1 ‐ Personal Greeting.
2. Press 2 – Alternate Greeting.
3. Press 3 – Not Accepting Messages
4. Press 4 – Default Greeting.
5. Press 8 – Out‐of‐Hours Greeting.
6. Follow the prompts to record your greeting.
Change Your Recorded Name
Your name and personal greeting can be re‐recorded at any time.
1. Press 3 ‐ Work with Greetings.
2. Press 5 ‐ Change Your Recorded Name.
3. Follow the prompts to record your name.
4
VOICE MAIL OVER THE PHONE
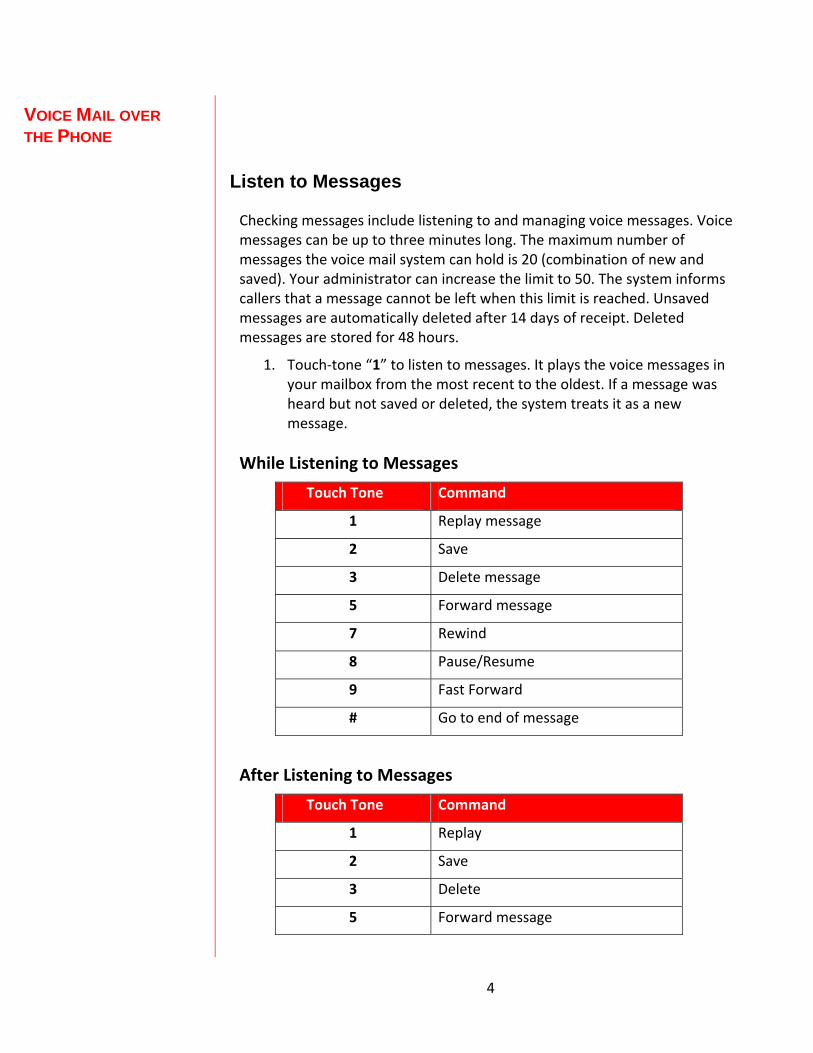
Listen to Messages
Checking messages include listening to and managing voice messages. Voice messages can be up to three minutes long. The maximum number of messages the voice mail system can hold is 20 (combination of new and saved). Your administrator can increase the limit to 50. The system informs callers that a message cannot be left when this limit is reached. Unsaved messages are automatically deleted after 14 days of receipt. Deleted messages are stored for 48 hours.
1. Touch‐tone “1” to listen to messages. It plays the voice messages in your mailbox from the most recent to the oldest. If a message was heard but not saved or deleted, the system treats it as a new message.
While Listening to Messages
Touch Tone Command
1 Replay message
2 Save
3 Delete message
5 Forward message
7 Rewind
8 Pause/Resume
9 Fast Forward
# Go to end of message
After Listening to Messages
Touch Tone Command
1 Replay
2 Save
3 Delete
5 Forward message

5
7 Play last 9 seconds
8 Listen to header
9 Access deleted messages
0 Repeat the menu options
# Play next message
Send a Message
You can record a message over the phone and send it to any combination of contacts or contact lists (internal only). You also have the option of marking it as urgent. This is the only instance where you can mark a message as urgent.
Sending a message is not the same as forwarding a message. Sending a message over the phone is one you record yourself to send. You are not forwarding an existing voice mail.
2. Touch‐tone “2” to send a message. The system prompts you to enter a mailbox number.
3. Enter the contact’s mailbox number to add a contact.
Work with Greetings
1. Touch tone “3” to work with greetings.
1 Personal
2 Alternate
3 Not accepting messages
4 System greeting
5 Change recorded name
8 Out‐of‐hours
Account Options
1. Touch tone “4” to access your account options.
1 Change PIN
2 Change Find Me Follow Me
3 Message header on/off
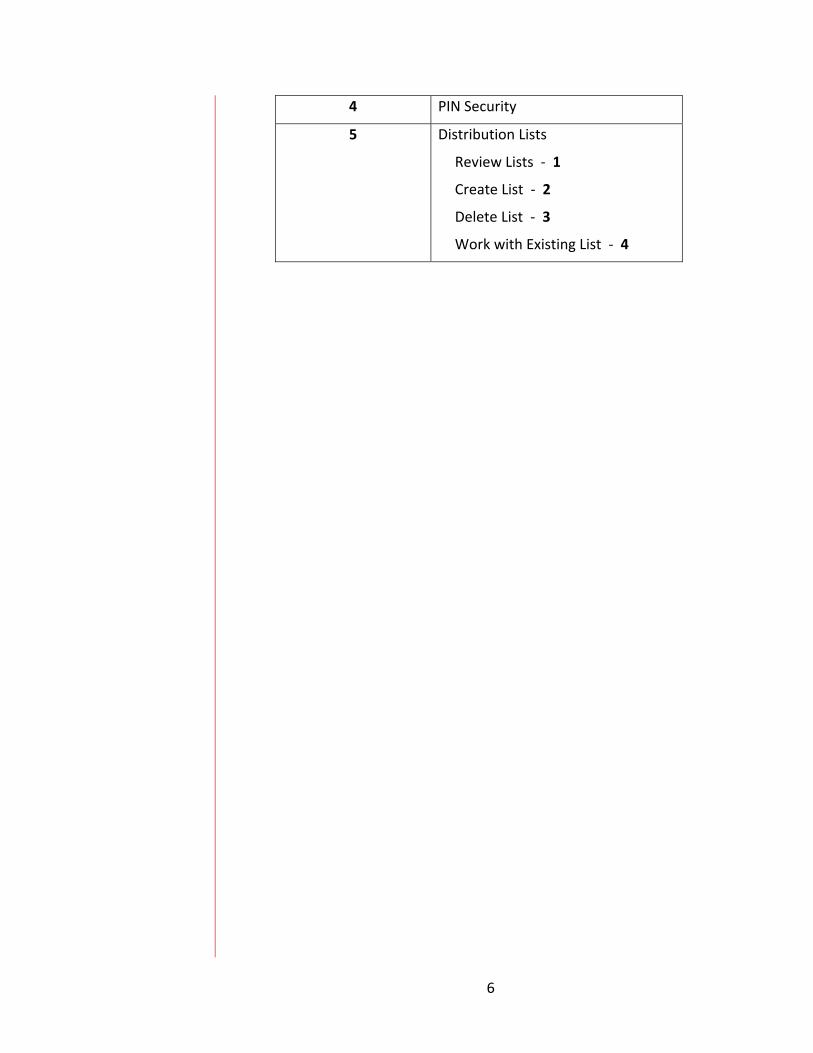
6
4 PIN Security
5 Distribution Lists
Review Lists ‐ 1
Create List ‐ 2
Delete List ‐ 3
Work with Existing List ‐ 4

7
VOICE MAIL OVER THE WEB
You can retrieve voice mails and change personal settings via the Web. To listen to voice mail on the Web, you need a sound card, speakers, and a 28.8 bps or faster modem.
Log In and Access the Message Center
1. Log in to the Verizon Integrated Communications Package at https://icp.verizonbusiness.com/integratedcommunicationspackage/ with the user name and password provided by your administrator.
2. Select Message Center | Access Message Center from the drop‐down menu at the top of the page.
Your voice mail opens in another browser window.
Navigate the Inbox
Your Inbox lists all of your voice messages with the most recent first. Messages that you have not yet listened to are in bold type. Messages remain in your Inbox for 30 days, but can be kept longer when saved (clicking Save resets the number of days to 30).
8
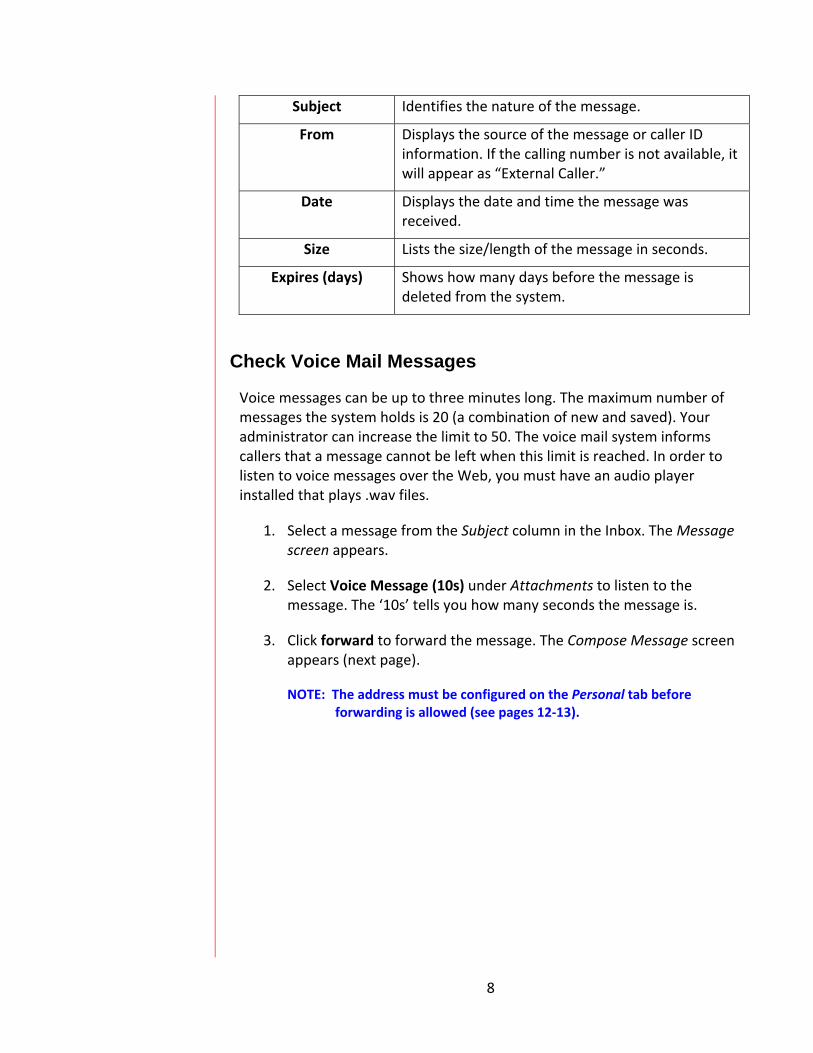
Subject Identifies the nature of the message.
From Displays the source of the message or caller ID information. If the calling number is not available, it will appear as “External Caller.”
Date Displays the date and time the message was received.
Size Lists the size/length of the message in seconds.
Expires (days) Shows how many days before the message is deleted from the system.
Check Voice Mail Messages
Voice messages can be up to three minutes long. The maximum number of messages the system holds is 20 (a combination of new and saved). Your administrator can increase the limit to 50. The voice mail system informs callers that a message cannot be left when this limit is reached. In order to listen to voice messages over the Web, you must have an audio player installed that plays .wav files.
1. Select a message from the Subject column in the Inbox. The Message screen appears.
2. Select Voice Message (10s) under Attachments to listen to the message. The ‘10s’ tells you how many seconds the message is.
3. Click forward to forward the message. The Compose Message screen appears (next page).
NOTE: The address must be configured on the Personal tab before forwarding is allowed (see pages 12‐13).

9
Forward Messages Forwarding a message is not the same as sending a message over the phone. This is being forwarded to an email address. Sending a message over the phone is one you record yourself to send.
1. Type one or more email addresses in the to field.
2. Check Normal or Urgent as a priority.
3. Type any comments you want to include in the Message box.
4. Click Send. The main Inbox screen reappears.
NOTE: .wav files are sent as attachments when forwarding.
10
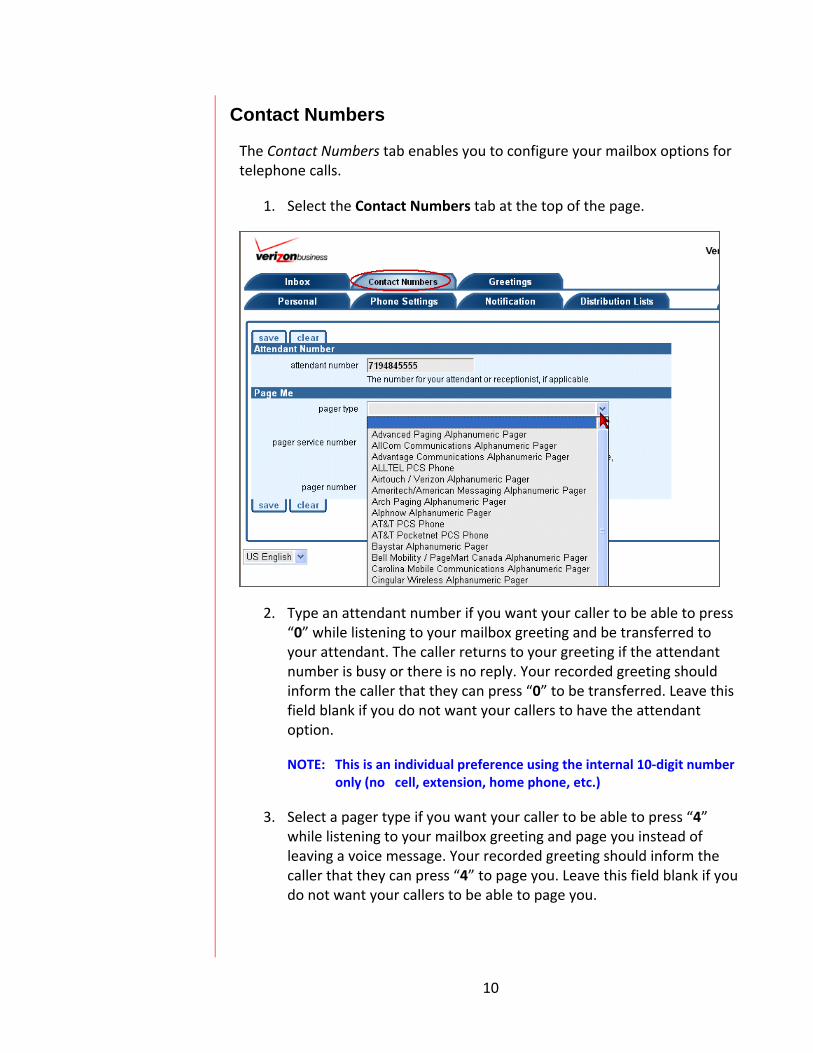
Contact Numbers
The Contact Numbers tab enables you to configure your mailbox options for telephone calls.
1. Select the Contact Numbers tab at the top of the page.
2. Type an attendant number if you want your caller to be able to press “0” while listening to your mailbox greeting and be transferred to your attendant. The caller returns to your greeting if the attendant number is busy or there is no reply. Your recorded greeting should inform the caller that they can press “0” to be transferred. Leave this field blank if you do not want your callers to have the attendant option.
NOTE: This is an individual preference using the internal 10‐digit number only (no cell, extension, home phone, etc.)
3. Select a pager type if you want your caller to be able to press “4” while listening to your mailbox greeting and page you instead of leaving a voice message. Your recorded greeting should inform the caller that they can press “4” to page you. Leave this field blank if you do not want your callers to be able to page you.
11
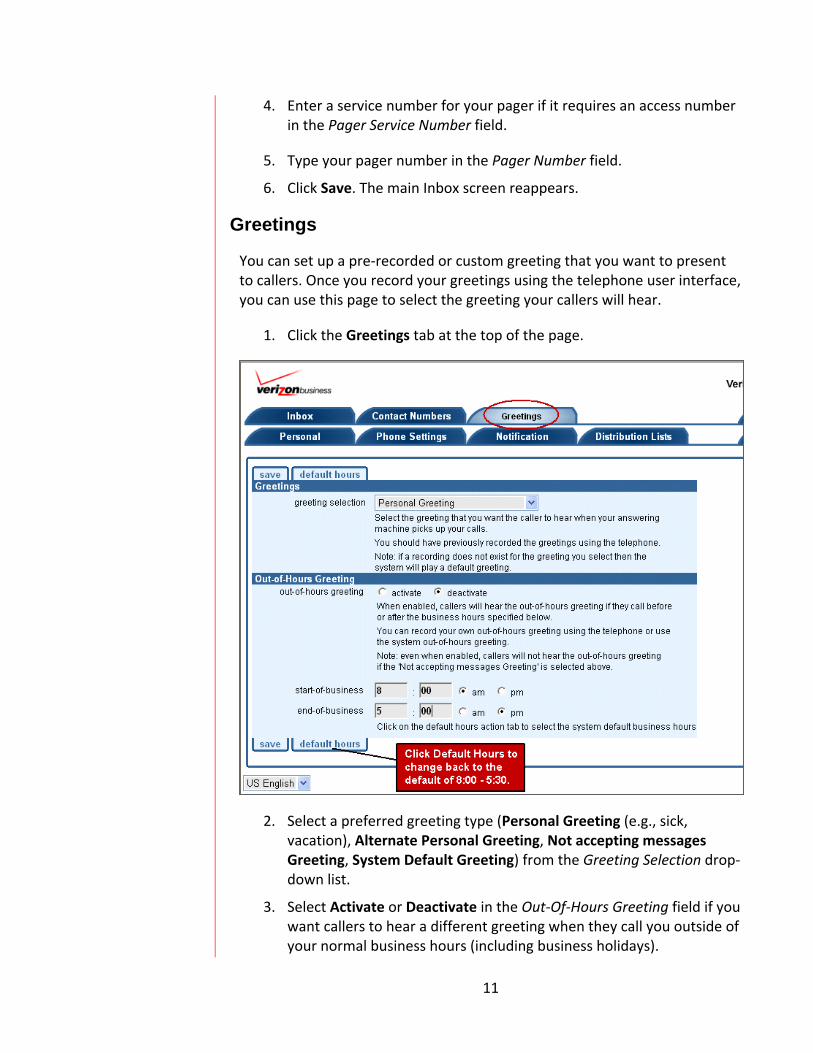
4. Enter a service number for your pager if it requires an access number in the Pager Service Number field.
5. Type your pager number in the Pager Number field.
6. Click Save. The main Inbox screen reappears.
Greetings
You can set up a pre‐recorded or custom greeting that you want to present to callers. Once you record your greetings using the telephone user interface, you can use this page to select the greeting your callers will hear.
1. Click the Greetings tab at the top of the page.
2. Select a preferred greeting type (Personal Greeting (e.g., sick, vacation), Alternate Personal Greeting, Not accepting messages Greeting, System Default Greeting) from the Greeting Selection drop‐down list.
3. Select Activate or Deactivate in the Out‐Of‐Hours Greeting field if you want callers to hear a different greeting when they call you outside of your normal business hours (including business holidays).

12
4. Enter your start and end times in the Start‐Of‐Business and End‐Of‐Business fields to specify your normal business hours.
5. Click Save.
Personal
The Personal screen displays your contact data, such as email and PIN information. You can modify or update email information and email preferences when receiving and forwarding messages. You can also change your PIN and select a time zone.
1. Click the Personal tab at the top of the page.
2. Enter up to three of your email addresses.
3. Select On or Off in the Email Notification field.
4. Select Send attachment or Do not send attachment from the Email Attachment field.
5. Specify your preferred audio file type in the Attachment Format field.
13
6. Change your PIN in the Change PIN section.
7. Select your time zone from the Time Zone drop‐down list.
8. Click Save.
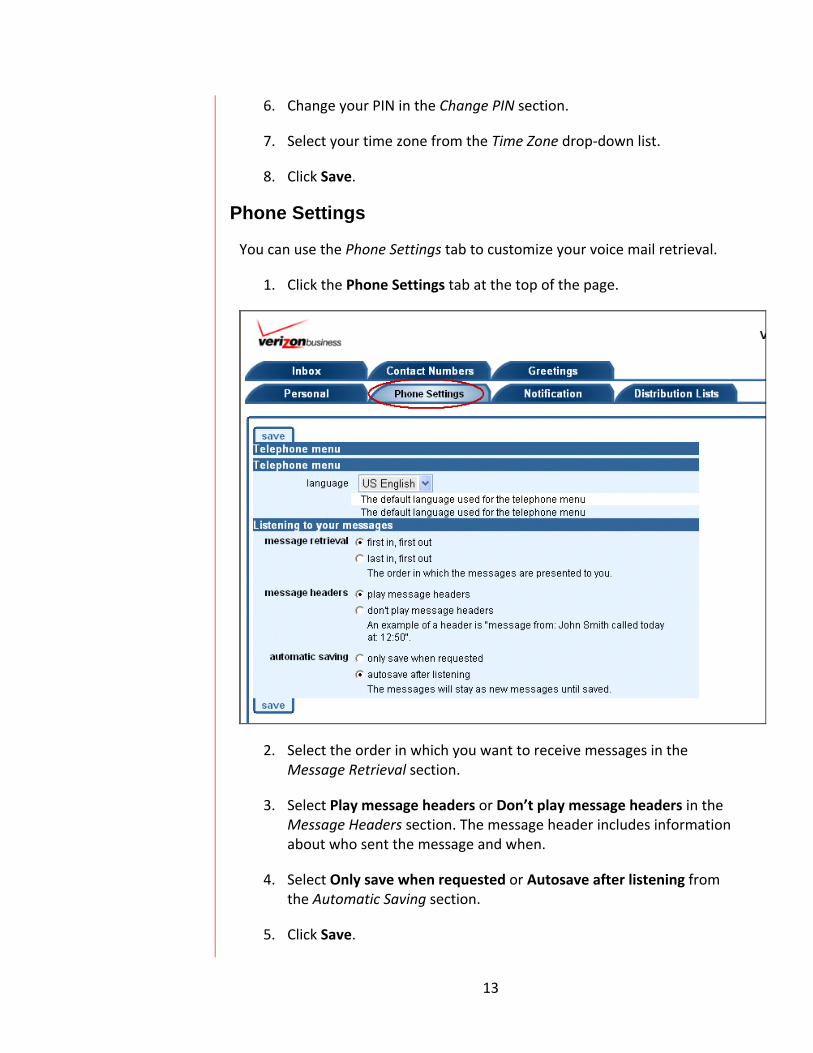
Phone Settings
You can use the Phone Settings tab to customize your voice mail retrieval.
1. Click the Phone Settings tab at the top of the page.
2. Select the order in which you want to receive messages in the Message Retrieval section.
3. Select Play message headers or Don’t play message headers in the Message Headers section. The message header includes information about who sent the message and when.
4. Select Only save when requested or Autosave after listening from the Automatic Saving section.
5. Click Save.
14
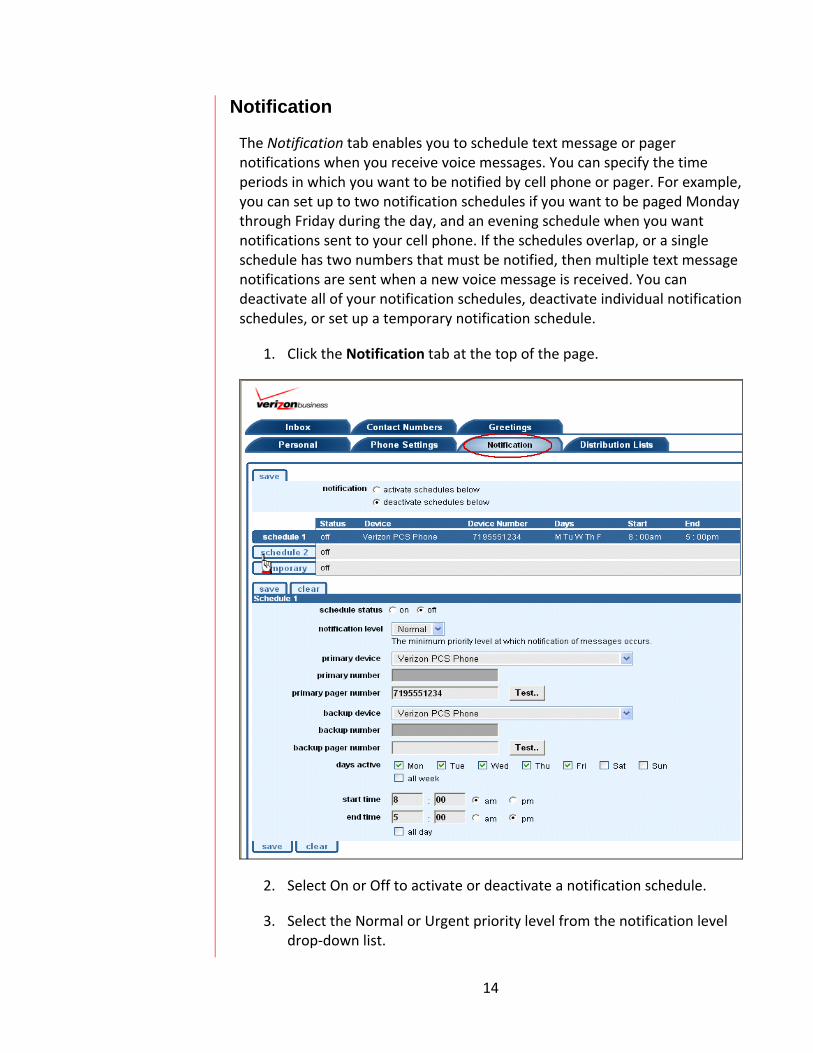
Notification
The Notification tab enables you to schedule text message or pager notifications when you receive voice messages. You can specify the time periods in which you want to be notified by cell phone or pager. For example, you can set up to two notification schedules if you want to be paged Monday through Friday during the day, and an evening schedule when you want notifications sent to your cell phone. If the schedules overlap, or a single schedule has two numbers that must be notified, then multiple text message notifications are sent when a new voice message is received. You can deactivate all of your notification schedules, deactivate individual notification schedules, or set up a temporary notification schedule.
1. Click the Notification tab at the top of the page.
2. Select On or Off to activate or deactivate a notification schedule.
3. Select the Normal or Urgent priority level from the notification level drop‐down list.

15
4. Select a pager type from the Primary Device drop‐down list, if applicable.
5. Type a number other than a pager number in the Primary Number field if you did not select a pager and want to use a cell phone or other telephone number, if applicable.
6. Type your pager number in the Primary Pager Number field you selected a pager as your primary device.
7. Click the Test button to receive a test notification to ensure it is set up properly.
8. Select a pager from the Backup Device drop‐down list, if applicable.
9. Type a number other than a pager number in the Backup Number field if you did not select a pager and want to use a cell phone or other telephone number, if applicable.
10. Type your pager number in the Backup Pager Number field if you selected a pager as your primary device.
11. Select the active days for your notification rule from the Days Active section.
12. Enter your start and end times in the Start Time and End Time fields, if applicable.
‐OR‐
Select All day.
13. Click Save.

16
Distribution Lists
The Distribution List tab enables you to create a list that you can use to send the same voice message to multiple mailboxes when using the telephone user interface. Members of a distribution list must have voice mail boxes on the Verizon VoIP platform. The following instructions tell you how to create a distribution list.
1. Click the Distribution Lists tab at the top of the page.
2. Type a list number in the List Number field.
3. Click Create New Distribution List. A screen appears enabling you to add your phone numbers to the list.

17
4. Type a number in the Telephone Number field.
5. Click Add.
6. Repeat steps 4‐5 to add more telephone numbers to your distribution list.
7. Click Close.