veridiumid 1.8 single node deployment in aws€¦ · veridiumid 1.8 single node deployment in aws 2...
TRANSCRIPT

Copyright © Veridium IP Ltd., November 2019. All rights reserved.
VeridiumID 1.8 Single Node Deployment in AWS
You can deploy VeridiumID as a single node POC (proof-of concept) configuration
in your AWS (Amazon Web Services) account.
A single node of VeridiumID services is suitable for testing and proof of concept
and does not offer high availability or data replication. This configuration is
licensed for testing with one device which is a Veridium Authenticator mobile
phone app that runs on Android and iOS phones and is required to enroll and
authenticate using biometrics.
Default Parameters
Here are default parameters, values and service URLs.
Setting
Name
Value
VM Specs Choose m4.xlarge or larger AWS instance type.
Username veridiumid
ssh key Choose a keypair provided in your AWS account.
Service URLS: These are URLs generated by the build derived from your inputs
Websecadmin
URL
https://admin.EnvironmentFriendlyName.EnvironmentBaseDomainN
ame/websecadmin/ng
Websec URL https://EnvironmentFriendlyName.EnvironmentBaseDomainName/w
ebsec/help/
DMZ URL https://dmz.EnvironmentFriendlyName.EnvironmentBaseDomainNa
me/dmzwebsec/help
DemoBank
URL
https://demobank.EnvironmentFriendlyName.EnvironmentBaseDoma
inName/OLBDemoServer/web
Shibboleth
URL
https://shib.EnvironmentFriendlyName.EnvironmentBaseDomainNa
me/idp Note. EnvironmentFriendlyName and EnviromentBaseDomainName are input parameters that
the user enters in the Cloud Formation template. You must have a valid SAN certificate for this
domain name in Cloud Formation. Use subject alternative names for each service.

VeridiumID 1.8 Single Node Deployment in AWS
2 November 26, 2019
Prerequisites
Here are things you need to set up or prepare in advance.
• You need an Amazon Web Services (AWS) account.
• You must be familiar with AWS concepts for creating and managing your
VPC (virtual public cloud).
• You access these services and tools in the AWS environment: EC2, S3, and
VPC full access from the user deploying VeridiumID.
• Existing SSH keypair for accessing the seed machine and VeridiumID VM
consoles. You can generate the keypair using Amazon EC2 tools.
• If you want to validate user identities as part of the enrollment workflow,
you must have an LDAP server. LDAP (or Active Directory) can be deployed
in the cloud or on-premises.
• For browser-based administration your administrators need a PC and
browser. VeridiumID supports most modern browsers including Chrome,
Firefox, Safari, Microsoft Edge, and Opera.
• If you send SMS codes as part of the enrollment workflow, you need an
SMS service account such as Twilio.
• To send notifications as part of the enrollment workflows you need an
account with Notification Services APNS (Apple Push Notification Service)
and FCM (Firebase Cloud Messaging, formerly Google Cloud Messaging.)
Endpoint Names
• VeridiumID uses multiple unique hostnames for different service
endpoints. For this example, EnvironmentFriendlyName is ”poc” and
EnvironmentBaseDomainName is "example.com” (see Default
Parameters table for more details):
Websecadmin URL: https://admin.poc.example.com/websecadmin/ng
Websec URL: https://poc.example.com/websec/help
DMZ URL: https://dmz.poc.example.com/dmzwebsec/help
DemoBank URL: https://demobank.poc.example.com/OLBDemoServer/web
Shibboleth URL: https://shib.poc.example.com/idp

VeridiumID 1.8 Single Node Deployment in AWS
November 26, 2019 3
Multiple unique hostnames require a SAN certificate containing a subject
alternative name for each endpoint.
• Obtain a valid, globally recognized SSL certificate that matches the
hostname(s) used by the server. Your certificate must be in PEM format
and include any Intermediate and Root certificates in the chain as well as
the unencrypted private key in this order (as appropriate for the issued
certificate):
<Unencrypted Private Key>
<Certificate>
<Intermediate CA>
<Root CA>
Note If you choose to use a self-signed certificate, you must ensure that your
mobile devices trust the certificate. To do this manually, follow this procedure
to Install Self-Signed Certificates on Mobile Devices.
• Obtain licenses from your Veridium sales engineer. As licenses are based
on the certificate digest, you must have the certificate before Veridium can
generate the licenses.
Note. The server has limited functionality without a valid license.

VeridiumID 1.8 Single Node Deployment in AWS
4 November 26, 2019
VeridiumID Deployment VPC
VeridiumID platform cloud formation topology schema is shown here.
Veridium’s deployment strategy uses Ansible to deploy the entire infrastructure
(persistence and application layers).

VeridiumID 1.8 Single Node Deployment in AWS
November 26, 2019 5
Create a VeridiumID Server Stack
This procedure creates a single-node VeridiumID server stack.
Procedure
1. After you subscribe and launch cloudformation stack, the Create stack
page appears with the template URL already filled. Click Next.
2. In the Specify Stack Details screen, enter these parameters:
Stack Name: For example, poc02.
DomainFullChainCertificateS3Uri: Path to the certificate location of
the domain name you want to deploy. The path must be accessible from
your AWS account. For example:
s3://example_s3Bucket/path/to/fullchain.pem
Note: For S3 URIs, you use the aws-cli to download the certificate and key. The account
which creates the cloudformation stack needs access to the s3 file.
DomainPrivateKeyS3Uri: Path to the SSL certificate private key
location for the certificate of the domain name you want to deploy. Must
be accessible from your AWS account. For example:
s3://example_s3Bucket/path/to/privkey.pem
EnvironmentSshKey: Name of the ssh key used to connect to the seed
node.
InstanceType: Specify the type of instance to use. This can usually be a
low resources machine with stable network throughput. Choose
m4.xlarge or larger.
EnvironmentBaseDomainName: The base domain name for which
you are providing a certificate.
EnvironmentFriendlyName: The friendly name of the deployment.
The friendly environment name and the base domain name will be
concatenated to provide URLs to VeridiumID services.
TrustedAdminSources: IP Addresses from which admin access is
allowed. For example, xxx.xxx.xxx.xxx/32.
6. Click Next.

VeridiumID 1.8 Single Node Deployment in AWS
6 November 26, 2019
7. The Configure stack options page opens. You do not need to set any
options. Click Next.
8. The review settings and details page open. Review to make sure the
settings are correct.
9. Scroll down and click the checkbox for I acknowledge the AWS
CloudFormation might create IAM resources with custom names.
Then click Create stack.
10. On the stack details page, click the Resources tab and Events tab to
monitor resource creation progress.
11. When the stack build completes in about 35 minutes. the stack details
page shows CREATE_COMPLETE as in this screen shot.
VeridiumID 1.8 Single Node Deployment in AWS
November 26, 2019 7
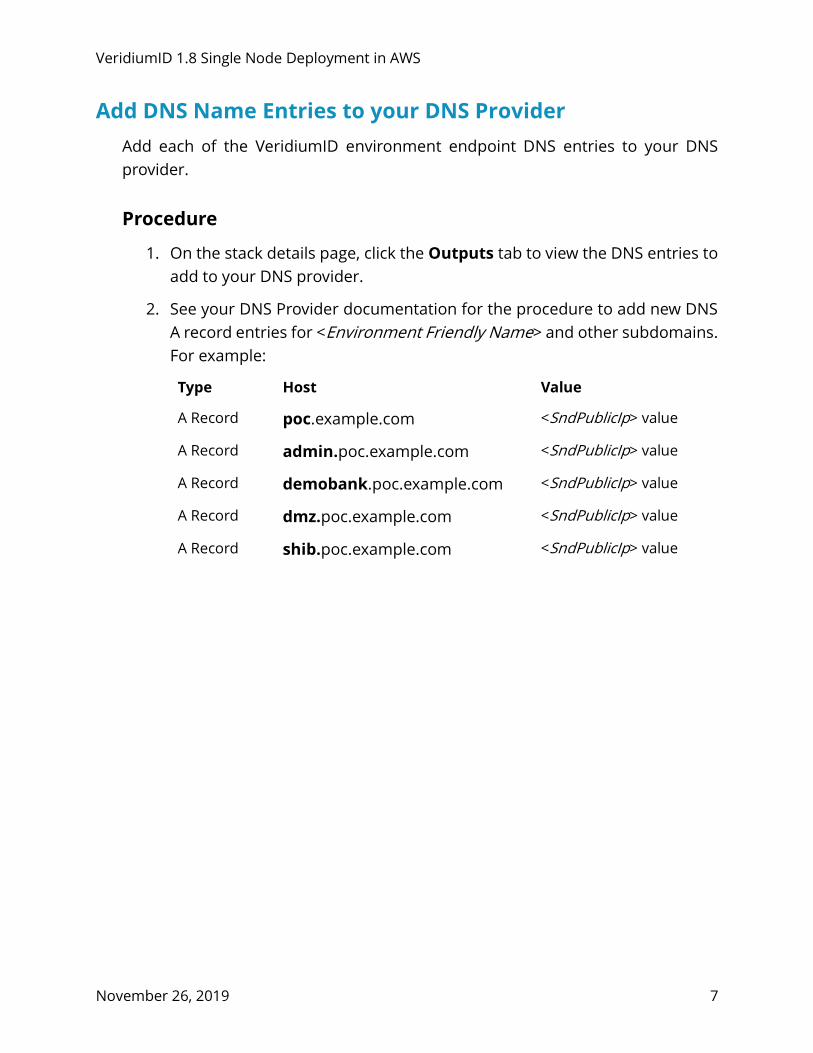
Add DNS Name Entries to your DNS Provider
Add each of the VeridiumID environment endpoint DNS entries to your DNS
provider.
Procedure
1. On the stack details page, click the Outputs tab to view the DNS entries to
add to your DNS provider.
2. See your DNS Provider documentation for the procedure to add new DNS
A record entries for <Environment Friendly Name> and other subdomains.
For example:
Type Host Value
A Record poc.example.com <SndPublicIp> value
A Record admin.poc.example.com <SndPublicIp> value
A Record demobank.poc.example.com <SndPublicIp> value
A Record dmz.poc.example.com <SndPublicIp> value
A Record shib.poc.example.com <SndPublicIp> value

VeridiumID 1.8 Single Node Deployment in AWS
8 November 26, 2019
Access the Administration Dashboard
This procedure generates an administrator certificate. You import the certificate
into your browser or key store to access the administration dashboard.
Before you begin
• On the stack details page, click the Outputs tab to view the URL to access
the Administration Dashboard.
Procedure
1. Access the WebsecAdminURL in an anonymous or incognito browser
session.
2. When prompted to choose a certificate, click Cancel.
The server displays a screen to generate and download an Administrator
certificate. You load the certificate into your browser for authentication
purposes.
3. On the Stacks page Outputs tab, copy the SystemPassword to the
clipboard.
4. In the browser, enter a name for the certificate file.
5. Enter a password to protect the certificate. You enter this password when
you load the certificate into your browser.
6. Confirm the password by entering it again. Remember the password.
7. Paste the SystemPassword from the clipboard into the System password
field.
8. Click Save. The certificate downloads to your local Downloads folder.
9. Close and restart the anonymous or incognito browser.
10. Load the certificate into your browser or key store, entering the password
when prompted.
11. Copy and paste the WebsecAdminURL value into the browser or key store.
12. Choose the certificate you loaded when prompted.
The server displays the Administration Dashboard.

VeridiumID 1.8 Single Node Deployment in AWS
November 26, 2019 9
Dashboard Items of Interest
Note these items in the Administration Dashboard.
Integrations lists the connections with external systems set up in your
deployment. Click Edit to view the QR code that a Veridium Authenticator app
scans to pair with the integration.
Configuration shows objects where you enter or manage parameters the
server uses to communicate with external systems.
License shows licenses and any usage limits set up for your deployment.
Reports generates records of system statistics. You can export generated
reports to PDF.
Test Server Operation using the BankingDemo
Use these procedures to test enrollment and authentication.
• Download, install, and open the Veridium Authenticator app on your
iPhone or Android phone.
• Enroll in the Banking Demo Integration.
• Authenticate to complete a Banking Demo transaction
Download the Veridium Authenticator App to your Phone
Procedure
1. Download and install the Veridium Authenticator app on your Android
phone or iPhone from the Apple store or Google Play store.
Search for veridiumid at the download store to find the app.
2. Tap Install on your phone and allow access requested by the app.
3. Tap Open when prompted.
Enroll in the BankingDemo
Use this procedure to test enrollment and authentication.

VeridiumID 1.8 Single Node Deployment in AWS
10 November 26, 2019
Procedure
1. In the administration dashboard, click Integrations.
2. Click Edit in the Banking Demo integration to display its Pairing QR code:
3. Open the Veridium Authenticator app on your phone.
4. Tap SCAN QR CODE on the Veridium Authenticator app and scan the
pairing QR code displayed in the administration dashboard.
5. Enter any email address when prompted to complete the enrollment.
On successful enrollment,
the server adds a profile to
your Veridium
Authenticator app.
Profile

VeridiumID 1.8 Single Node Deployment in AWS
November 26, 2019 11
Authenticate to Complete a Banking Demo Transaction
Follow this procedure to authenticate.
Mobile Banking Demo
1. Tap your profile.
The banking demo screen opens.
2. Tap Mobile Login.
3. Follow the prompts to Authenticate.
On success, the mobile banking app
opens on your phone.
4. Press X or your phone’s Back button
to exit the mobile banking app.
Online Banking Demo
Navigate your desktop/laptop browser
to the test banking site on your
appliance using the DemoBankURL
from the Output Tab of the stack details
page.
1. Click QR CODE in the browser.
2. Tap your profile.
3. Tap Desktop Login.
4. Scan the QR CODE displayed in the
browser.
5. Follow the prompts to Authenticate.
On success, the online banking site
opens in your browser.
6. Close the browser window to exit
the online banking demo..

VeridiumID 1.8 Single Node Deployment in AWS
12 November 26, 2019
Configure Active Directory Binding
Set LDAP values relevant to your VPC environment.
Procedure
1. In the navigation pane, click Configuration>Services.
2. Click LDAP.
3. Update values for these parameters:
“credentialsUsername": [email protected]
"credentialsPassword": "securepassword"
"baseDN": "DC=domain,DC=com" <determines where you want to start
the search for users> See the VeridiumID Administration section 'LDAP and
Active Directory Searches' for more information.
"URL": "ldap://10.10.10.10:389",
4. If you use secure LDAP (LDAPS) use these parameters:
"URL”:” ldaps://10.10.10.10:636 “
“securityProtocol": "ssl"
5. Click Save.
6. In the navigation pane, click Configuration>Friend Services
Configuration.
7. Next to Admin Active Directory, click + Generate Certificate.
Other Useful Utilities
After you finish deploying VeridiumID, you might find the following utilities useful
for troubleshooting. While connecting to your stack, please use the SSH key
provided in the deployment input procedure.
• file transfer utility like WinSCP or scp to transfer files.
• ssh client like PuTTy to access the VeridiumID server command line.
• a utility like telnet or nc (netcat) to test for open ports.

VeridiumID 1.8 Single Node Deployment in AWS
November 26, 2019 13
Install Self-Signed Root Certificate on Mobile
Devices
You can install and use self-signed certificates on iOS and Android phones using
the appropriate procedure.
Before you begin
• Download or email the VeridiumID server certificate’s root CA certificate to
your phone. Tap the file or attachment to install the certificate.
Install (and Remove) Self-Signed Certificates on iPhone
This procedure is for later model iPhones.
Procedure
1. Open your Settings on the Home screen, select General.
2. Tap Profiles and device management.
The certificate appears as a downloaded profile.
3. Tap the profile.
The phone checks the certificate and displays Verified.
4. Tap Install.
The phone installs the certificate and displays Verified.
5. Use this same screen to Remove the profile when finished using it.
Install (and Remove) Self-Signed Certificates on Android
Phones
This procedure is for a Samsung Galaxy S9.
Procedure
1. Tap the downloaded certificate in your Downloads folder.
2. Enter a name for the certificate and tap OK.

VeridiumID 1.8 Single Node Deployment in AWS
14 November 26, 2019
3. Your phone installs the certificate.
4. To view or remove the certificate tap Settings. Then:
a. Tap Biometrics and security > Other security settings/.
b. Tap User certificates.
c. Tap the certificate.
Use this screen to view or remove the certificate.