venta airwasher lw 15
TRANSCRIPT
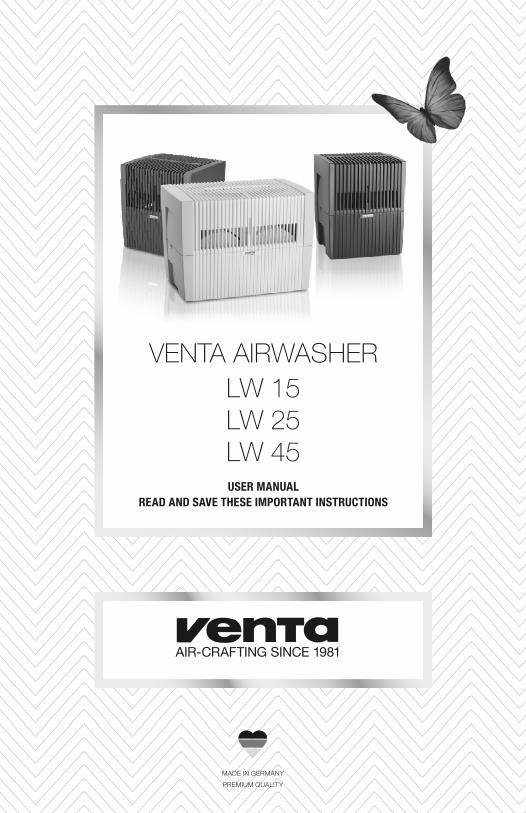
AIR-CRAFTING SINCE 1981
MADE IN GERMANY
PREMIUM QUALITY
LW 15LW 25LW 45USER MANUAL
READ AND SAVE THESE IMPORTANT INSTRUCTIONS
VENTA AIRWASHER
2
CONTENTS:
Important Safeguards -------------------------------------------------------------- 3
Quick Start Guide ------------------------------------------------------------------ 4
Letter to Our Customers ---------------------------------------------------------- 9
Parts List---------------------------------------------------------------------------- 10
Maintenance and Cleaning ------------------------------------------------------- 11
Additional Products --------------------------------------------------------------- 12
Additional Information ------------------------------------------------------------ 14
Troubleshooting ------------------------------------------------------------------- 15
FAQ --------------------------------------------------------------------------------- 16
Servicing Your Airwasher --------------------------------------------------------- 18
Warranty --------------------------------------------------------------------------- 20
VENTA AIRWASHERUser ManualFOR MODELS LW15, LW25, LW45
3
IMPORTANT SAFEGUARDS
WARNING!It is important that you read, fully understand, and observe the following safety precautions and warning. Read these instructions periodically. Care-less or improper use of your Venta Airwasher may cause serious or even fatal injury. Keep this User Manual with your Airwasher. Be sure anyone using your Airwasher understands the information contained in this manual.
• Children should not operate the Airwasher.
Venta Cleaner, Venta Aromatherapy, or before moving/handling the unit.
• Plug into 110-120 V AC outlet only. Do not use your Airwasher if the switch-ing power supply or plus is damaged. Do not replace a damaged switching power supply or plug. Only Venta may replace the switching power supply or plug.
• The Airwasher can only be operated with the Model No. BI13-240050-CdU switching power supply (included).
• Do not attempt any repair work. Maintenance or servicing the Venta Airwasher, other than described in this use manual, should only be done by
your warranty.
• Do not insert any objects into the air intake of the unit. It may damage the -
ues to rotate for a short period of time.
• Do not use or store where it can fall or be pulled into a bathtub, sink, water, or other liquid. Do not reach for a unit that has fallen into water or other liquid. Do not immerse in water or other liquid, even when the unit is
cloth. Do not handle the switching power supply or the unit with wet hands.
• Use only genuine Venta Aromatherapy. Using non-Venta Aromatherapy will void the warranty.
Read and follow separate instructions and Warnings for Venta Water TreatmentAdditive, Venta Cleaner, and Venta Aromatherapy.
Please WhatsApp GA Sales & Services Sdn Bhd to +6012-908-7334or email : [email protected] for additional information.
4
Easy Setup Guide
Welcome to the Venta Family!Setting up your Airwasher is much simpler than you would expect. Just follow these 7 steps and your Airwasher will be up-and-running in less than 10 minutes!
1. UnpackingFirst things first, remove bottle(s) of Water Treatment Additive from the corner of your packaging. Keep these handy as you’ll need them in a bit. Unpack your Airwasher setting the Styrofoam aside. You may want to return the Styrofoam to the box and keep the box for any future Airwasher storage needs.
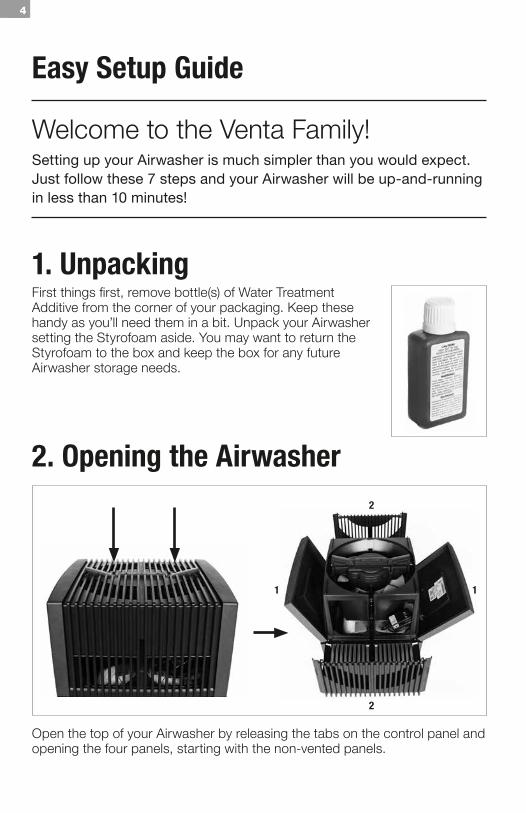
2. Opening the Airwasher
Open the top of your Airwasher by releasing the tabs on the control panel and opening the four panels, starting with the non-vented panels.
1 1
2
2
5
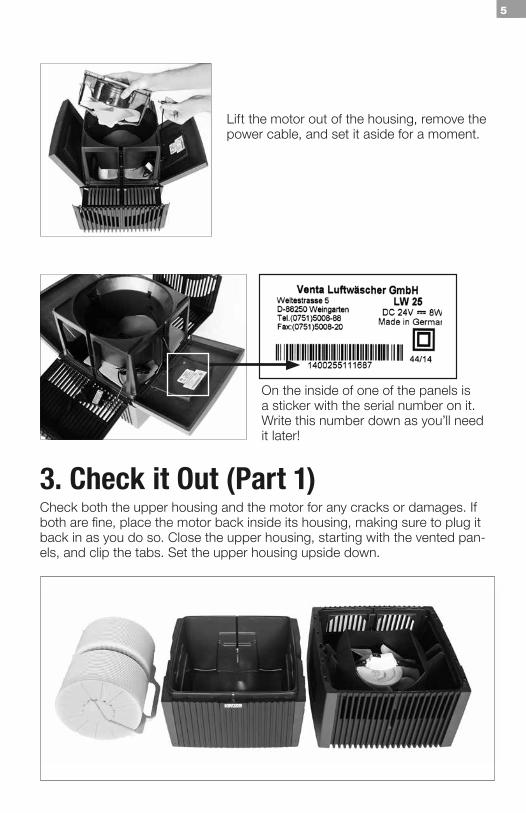
Lift the motor out of the housing, remove the power cable, and set it aside for a moment.
On the inside of one of the panels is a sticker with the serial number on it. Write this number down as you’ll need it later!
3. Check it Out (Part 1)Check both the upper housing and the motor for any cracks or damages. If both are fine, place the motor back inside its housing, making sure to plug it back in as you do so. Close the upper housing, starting with the vented pan-els, and clip the tabs. Set the upper housing upside down.
6
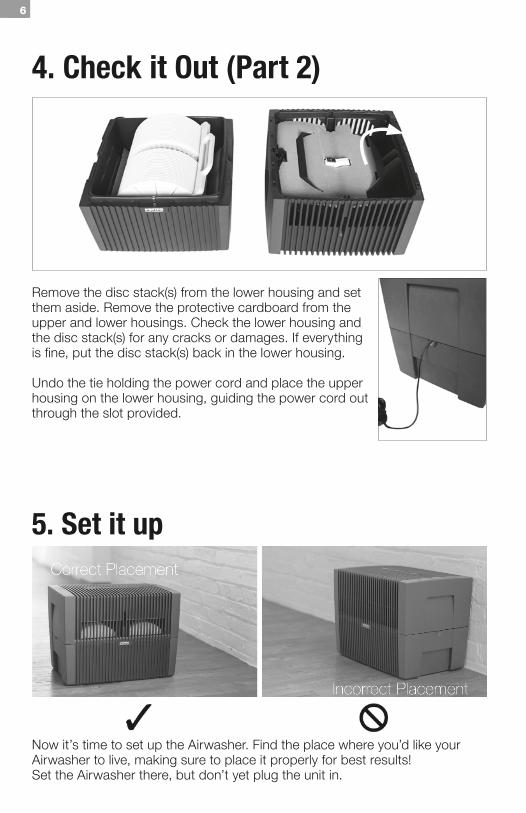
4. Check it Out (Part 2)
Remove the disc stack(s) from the lower housing and set them aside. Remove the protective cardboard from the upper and lower housings. Check the lower housing and the disc stack(s) for any cracks or damages. If everything
Undo the tie holding the power cord and place the upper housing on the lower housing, guiding the power cord out through the slot provided.
5. Set it up
Now it’s time to set up the Airwasher. Find the place where you’d like your Airwasher to live, making sure to place it properly for best results! Set the Airwasher there, but don’t yet plug the unit in.
7
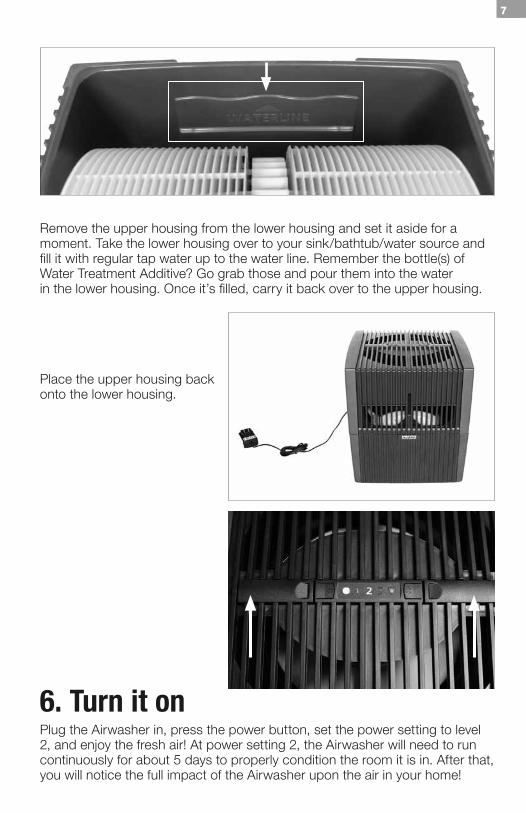
Remove the upper housing from the lower housing and set it aside for a moment. Take the lower housing over to your sink/bathtub/water source andfill it with regular tap water up to the water line. Remember the bottle(s) of Water Treatment Additive? Go grab those and pour them into the water in the lower housing. Once it’s filled, carry it back over to the upper housing.
Place the upper housing back onto the lower housing.
6. Turn it onPlug the Airwasher in, press the power button, set the power setting to level 2, and enjoy the fresh air! At power setting 2, the Airwasher will need to runcontinuously for about 5 days to properly condition the room it is in. After that, you will notice the full impact of the Airwasher upon the air in your home!
8
7. Activate your WarrantyRemember that serial number you wrote down earlier? Use that serial number to complete the registration card here in the manual to register your unit and activate your 2-year warranty!
Congratulations! Your Airwasher is now fully functioning!
HELPFUL HINTS
• Dishwashers: The Venta Airwasher’s lower housing, disc stack(s), and upper
into a dishwasher on the cool or rinse cycle. It is recommended that it not be washed with dishes. The motor assembly cannot be submerged in water or placed in the dishwasher. DO NOT USE detergent, mild soap, bleach, or household cleaners.
• Cleaning of disc stack(s): If a dishwasher isn’t an option, cleaning the disc stack(s) can be done by soaking disc stack(s) in hot water with Venta Cleaner or white vinegar for approx. 30 minutes. This will help loosen any buildup of calcium or lime that may have accrued. Always rinse with warm water after cleaning.
• Vinegar and Water Solution: Should be either 50:50 or 3:1 ratio of white vinegar and water used instead of Venta Cleaner.
• Do not use the appliance in an environment with temperatures consistently over 95 degrees Fahrenheit.
9
Dear Customer,
fresh water. With proper maintenance, the Venta Airwasher will consistently perform at a high level, providing perfect indoor air.
WHY IS THE VENTA 2-IN-1 SYSTEM A UNIQUE AND REVOLUTIONARY TECHNOLOGY?
1. It cleans and improves dry, dirty indoor air by washing it with water. No
2. It adds vital humidity through cold evaporation, recognized as the best
3.
WHY IS THE VENTA 2-IN-1 SYSTEM A SUPERIOR METHOD TO CLEAN THE AIR?
Smaller particles, such as the ones that cause odors, are trapped in the water and eliminated, leaving only pure air.
Your investment in the Venta Airwasher will certainly prove worthwhile. With-out proper humidity in your air, your body doesn’t function the way it should
can’t take in as much oxygen, and your skin loses its elasticity. With the Venta Airwasher, not only will you be protecting yourself and your family from these common issues, but you’ll also be protecting plants and pets. Furthermore, the Airwasher can help preserve the beauty of precious antiques, musical
-
Over half of all Venta Airwashers are sold on the basis of recommendationby satisfied customers. Our goal is that you are completely satisfied and thatyou recommend the Venta Airwasher to your family and friends.
10
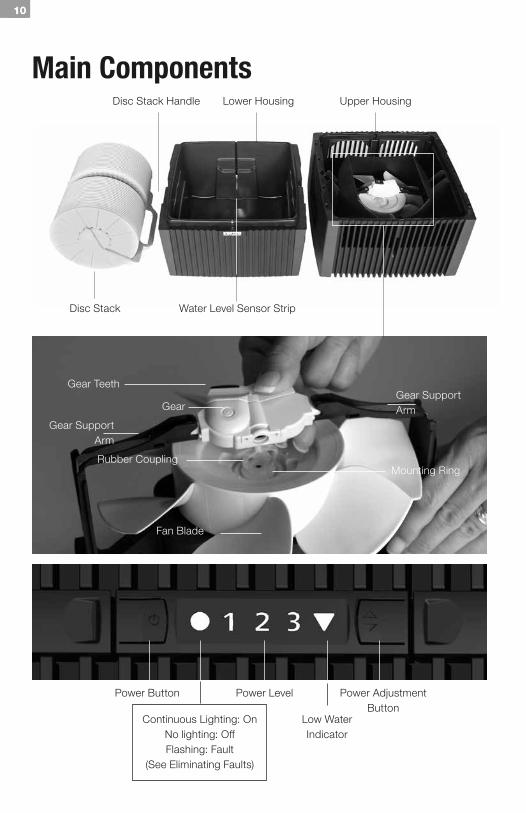
Main Components
Disc Stack
Disc Stack Handle
Water Level Sensor Strip
Upper HousingLower Housing
Fan Blade
Gear Teeth
Gear Support ArmRubber Coupling
Mounting Ring
Power Button
Continuous Lighting: OnNo lighting: OffFlashing: Fault
(See Eliminating Faults)
Power Level
Low Water Indicator
Power Adjustment Button
Gear Support ArmGear
11
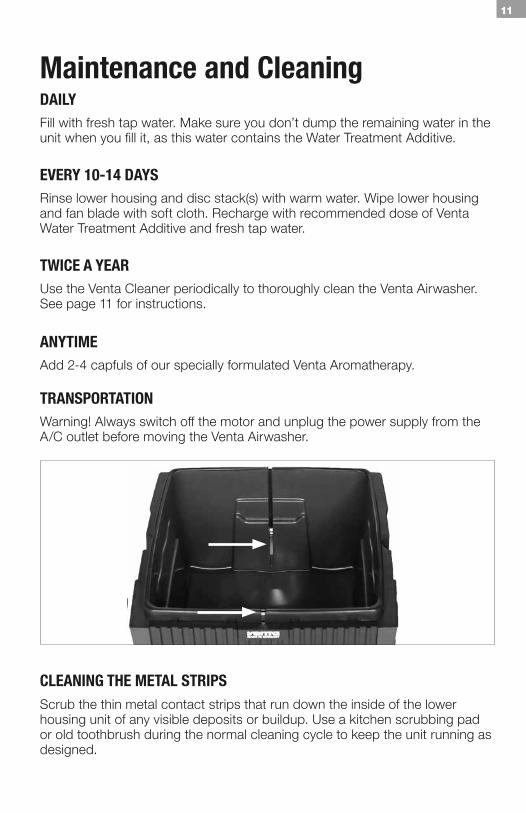
Maintenance and CleaningDAILYFill with fresh tap water. Make sure you don’t dump the remaining water in the
EVERY 10-14 DAYSRinse lower housing and disc stack(s) with warm water. Wipe lower housing and fan blade with soft cloth. Recharge with recommended dose of Venta Water Treatment Additive and fresh tap water.
TWICE A YEARUse the Venta Cleaner periodically to thoroughly clean the Venta Airwasher. See page 11 for instructions.
ANYTIMEAdd 2-4 capfuls of our specially formulated Venta Aromatherapy.
TRANSPORTATION
A/C outlet before moving the Venta Airwasher.
CLEANING THE METAL STRIPSScrub the thin metal contact strips that run down the inside of the lower housing unit of any visible deposits or buildup. Use a kitchen scrubbing pad or old toothbrush during the normal cleaning cycle to keep the unit running as designed.
12
Venta Water Treatment Additive
CAUTION!
KEEP OUT OF REACH OF CHILDREN
EMERGENCY FIRST AID TREATMENT: Contains Quaternary Ammonium-
oughly with water. In the event of skin contact, rinse with water. Harmful if swallowed. Do not induce vomiting. Seek medical attention.Venta WTA is recommended for use with the Venta Airwasher only. Shelf life when stored in a cool location away from sunlight: 30 months. After opening, use within 12 months.WTA is not suitable for ultrasonic, heat vaporizing, or atomizing-type vaporizer
CONTAINS: Water, wetting agents, softening agents, and preservatives.
WARNING! Venta WTA is not intended to be used with detergents, cleaning agents, or other chemicals. This will deactivate the additive. In cases when all water has evaporated, Venta WTA remains in the lower housing – it does not evaporate (like salt in sea water). Simply add more tap water and the WTA will activate.
DIRECTIONSFill lower housing with water daily. Approximately every 10-14 days (depend-ing on individual air and water quality) add a dose of WTA. The lower housing should be periodically rinsed and cleaned approximately every 10-14 days.
side of the label.
APPLICATIONSVenta Water Treatment Additive (WTA) is designed to maintain hygienic condi-tions in the lower housing and to keep the evaporation process functioning at the highest level. The use of WTA is recommended for the best performance
-tion of hard calcium deposits. Simply rinse and wipe out any sediment when changing the water. WTA serves three (3) purposes:
• It improves the performance of the Airwasher by creating sheeting action on
• It helps remove calcium and lime buildup.
• It kills bacteria and mold.
13
Venta CleanerUse every six months or more frequently if needed.1. For thorough cleaning, fill lower housing with water before adding the entire
contents of the bottle. Run the appliance on the lowest setting for approxi-mately two hours.
2. Empty lower housing and rinse disc stack(s) and lower housing with warm water.
3. Fill lower housing with water and add one dose of WTA.
CAUTION! KEEP OUT OF REACH OF CHILDRENEMERGENCY FIRST AID TREATMENT: In the event of contact with eyes flush thoroughly with water. In the event of skin contact, rinse with water. Contains: Water and citric acid.
WARNING! Venta Cleaner is recommended for use with the Venta Airwasher and Kuubel XL-T only. Shelf life when stored in a cool location away from sunlight: 30 months. After opening, use within 12 months. Venta Cleaner is not suitable for ultrasonic, heat vaporizing, or atomizing-type vaporizer humidifiers.
Venta Cleaner is not intended to be used with detergents, cleaning agents, orother chemicals.
Venta AromatherapyDistinctive aromatherapy blends are specially formulated for your Venta Airwasher and are water soluble. Not suitable for Airwasher and Purifier models with Hygiene Disc.
DIRECTIONSAdd 2-4 capfuls of aromatherapy oil directly to the water in the lower housing.Effectiveness: Depending on room size, about 2-4 hours.
CAUTION! KEEP OUT OF REACH OF CHILDRENCOMBUSTIBLE: Keep away from flame and heat.EYE AND SKIN IRRITANT: Avoid contact with eyes, skin, and clothing. Pro-longed contact with skin may cause allergic reaction.DO NOT ingest.FIRST AID TREATMENT: If in eyes, immediately flush eyes with water andseek medical attention. If on skin, wash with soap and water. If swallowed,DO NOT induce vomiting. Rinse mouth with water and call a physician orpoison control center immediately.CONTAINS: Fragrance oils. Wash hands after handling.
14
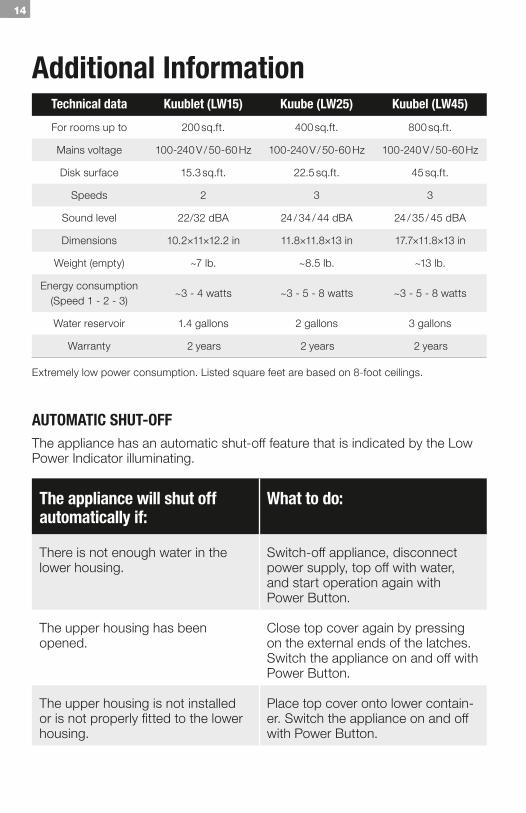
Additional Information
Extremely low power consumption. Listed square feet are based on 8-foot ceilings.
AUTOMATIC SHUT-OFF
Power Indicator illuminating.
Technical data Kuublet (LW15) Kuube (LW25) Kuubel (LW45)
For rooms up to 200 sq.ft. 400 sq.ft. 800 sq.ft.
Mains voltage 100-240 V / 50-60 Hz 100-240 V / 50-60 Hz 100-240 V / 50-60 Hz
Disk surface 15.3 sq.ft. 22.5 sq.ft. 45 sq.ft.
Speeds 2 3 3
Sound level 22/32 dBA 24 / 34 / 44 dBA 24 / 35 / 45 dBA
Dimensions 10.2×11×12.2 in 11.8×11.8×13 in 17.7×11.8×13 in
Weight (empty) ~7 lb. ~8.5 lb. ~13 lb.
Energy consumption (Speed 1 - 2 - 3)
~3 - 4 watts ~3 - 5 - 8 watts ~3 - 5 - 8 watts
Water reservoir 1.4 gallons 2 gallons 3 gallons
Warranty 2 years 2 years 2 years
The appliance will shut off automatically if:
What to do:
There is not enough water in the lower housing.
and start operation again with Power Button.
The upper housing has been opened.
Close top cover again by pressing on the external ends of the latches.
Power Button.
The upper housing is not installed
housing.
Place top cover onto lower contain-
with Power Button.
15
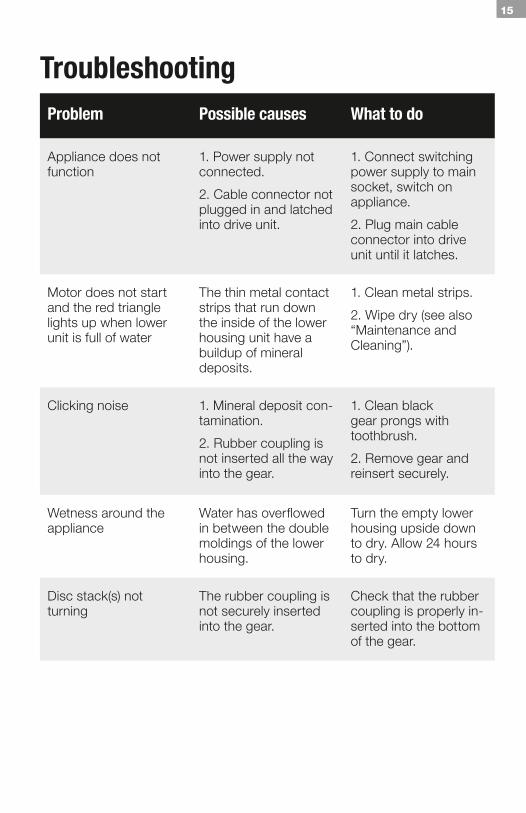
TroubleshootingProblem Possible causes What to do
Appliance does not function
1. Power supply not connected.
2. Cable connector not plugged in and latched into drive unit.
1. Connect switching power supply to main socket, switch on appliance.
2. Plug main cable connector into drive unit until it latches.
Motor does not start and the red triangle lights up when lower unit is full of water
The thin metal contact strips that run down the inside of the lower housing unit have a buildup of mineral deposits.
1. Clean metal strips.
2. Wipe dry (see also “Maintenance and Cleaning”).
Clicking noise 1. Mineral deposit con-tamination.
2. Rubber coupling is not inserted all the way into the gear.
1. Clean black gear prongs with toothbrush.
2. Remove gear and reinsert securely.
Wetness around the appliance in between the double
moldings of the lower housing.
Turn the empty lower housing upside down to dry. Allow 24 hours to dry.
Disc stack(s) not turning
The rubber coupling is not securely inserted into the gear.
Check that the rubber coupling is properly in-serted into the bottom of the gear.
16
Frequently Asked QuestionsHOW DOES THE VENTA AIRWASHER HUMIDIFY?The Venta Airwasher operates by the process of cold evaporation, so you will not see any residue, vapors, or mists. The disc stack(s) rotates in the water creating a surface area of over 45 sq. ft. (Kuubel (LW45)). When dry air meets the surface area of the disc stack(s), the water evaporates and is sent out into the room. By using the cold evaporation process, any excess humidity can be virtually ruled out.
HOW DOES THE VENTA AIRWASHER PURIFY?Airborne particles, such as dust, pollen, and smoke are drawn in and passed over the rotating disc stack(s). The particles adhere to the wet disc stack(s) and are pulled down into the water. Water evaporates, while dirt and dust do not. The collected particles remain at the bottom of the lower housing and can be rinsed/wiped out at your convenience.
WHAT LEVEL OF HUMIDITY CAN BE EXPECTED AND HOW OFTEN SHOULD THE LOWER HOUSING BE FILLED?Under ideal conditions, a humidity level of 40-55 % can be expected. Some factors affecting humidity level are: heating/cooling, home insulation, layout of the home, air circulation, and the amount of water in the appliance. For severely dry areas or during the first days of use, you may notice the water evaporates more quickly and/or a lower humidity level will be reached. The water level of the lower housing should be checked and topped off daily.
WHEN IS THE BEST TIME TO RUN THE VENTA AIRWASHER?Always! The Venta Airwasher is designed to be a year-round, 24/7 product. Because we wanted it to run year-round, we made the Airwasher’s power consumption as minimal as possible. For the best results, your Airwasher should never be turned off or stored for long periods of time.
WHERE IS THE BEST PLACE FOR THE VENTA AIRWASHER?If possible, the Venta Airwasher should be placed in the center of the room, or along a wall away from windows and a heat source. When using your Venta Airwasher for multiple rooms (larger model Venta Airwashers) it should be placed centrally between rooms. Allow 18-20 inches above and on either side of the Venta Airwasher to allow air circulation.
WILL OPENING OUTSIDE DOORS AND WINDOWS AFFECT THE EFFICIENCY OF THE VENTA AIRWASHER?The appliance works best in closed rooms to maintain a consistent level of humidity. Just as windows and doors are closed when air conditioning is run-ning, doors between rooms may be left open to allow for air circulation.
17
IS IT NECESSARY TO USE THE VENTA WATER TREATMENT ADDITIVE?The WTA helps prevent mineral deposits from becoming too hard and dif-
sheet on the disc stack(s) instead of “beading” up, allowing maximum use of every square inch of the disc stack(s). The WTA also helps prevent odors and improves the performance of the Venta Airwasher. Not suitable for Airwasher
WHAT HAPPENS IF THE WATER EVAPORATES AND THE APPLIANCE CONTINUES TO RUN?
First and foremost, the Venta Airwasher is only humidifying and purifying when water is in the appliance. However, the WTA holds dirt and dust par-
SHOULD MORE WATER TREATMENT ADDITIVE BE ADDED WHEN THE APPLIANCE HAS RUN DRY?
No, because the ingredients of the WTA do not evaporate. Simply add fresh water to reactivate the WTA. One dose will help keep the Venta Airwasher from scaling up with mineral deposits for 10-14 days.
WHAT HAPPENS WHEN THE VENTA AIRWASHER HAS NOT BEEN RUN FOR AN EXTENDED PERIOD OF TIME?
Simply give the appliance a general cleaning with the Venta Cleaner before using it again. Tip: Use of the Venta Cleaner is recommended before storing the appliance for an extended period of time to remove any mineral deposits that can harden over time.
MY VENTA AIRWASHER APPEARS TO NOT BE HUMIDIFYING MY ROOM AS DESIRED
Our goal is to achieve 100% customer satisfaction. Initial product perfor-mance is largely based on room size and the overall humidity level of the contents of the room. Dry furnishings (textiles, leather, wood, books, etc.) will require a longer period of time to absorb moisture until their humidity level is increased to a satisfactory level. Therefore, we highly recommend that you take this into consideration when evaluating the performance of your product.
an optimal humidity level. It’s important that you are adding water to your unit
product, please call us.
Should you require further clarifications / assistance, kindly contact us viaWhatsApp +6012-908-7334, email : [email protected]
18
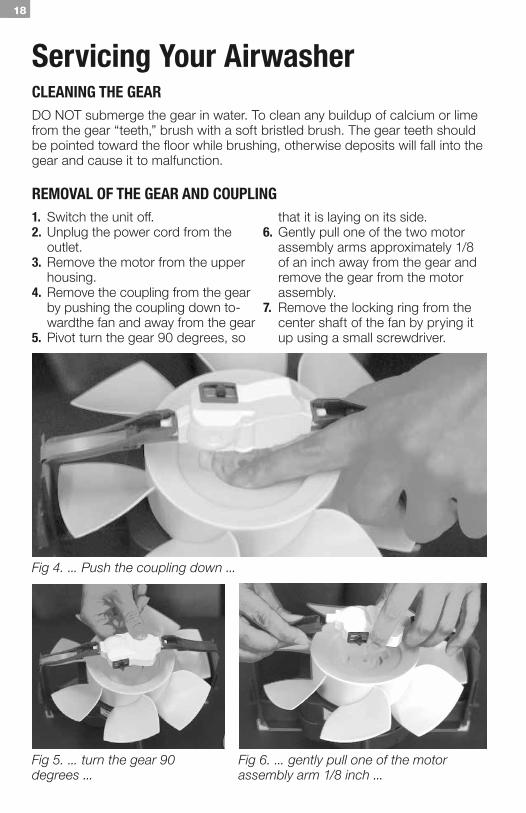
Servicing Your AirwasherCLEANING THE GEARDO NOT submerge the gear in water. To clean any buildup of calcium or lime from the gear “teeth,” brush with a soft bristled brush. The gear teeth should be pointed toward the floor while brushing, otherwise deposits will fall into the gear and cause it to malfunction.
REMOVAL OF THE GEAR AND COUPLING1. Switch the unit off.2. Unplug the power cord from the
outlet.3. Remove the motor from the upper
housing.4. Remove the coupling from the gear
by pushing the coupling down to-wardthe fan and away from the gear
5. Pivot turn the gear 90 degrees, so
that it is laying on its side.6. Gently pull one of the two motor
assembly arms approximately 1/8 of an inch away from the gear and remove the gear from the motor assembly.
7. Remove the locking ring from the center shaft of the fan by prying it up using a small screwdriver.
Fig 4. ... Push the coupling down ...
Fig 5. ... turn the gear 90 degrees ...
Fig 6. ... gently pull one of the motor assembly arm 1/8 inch ...
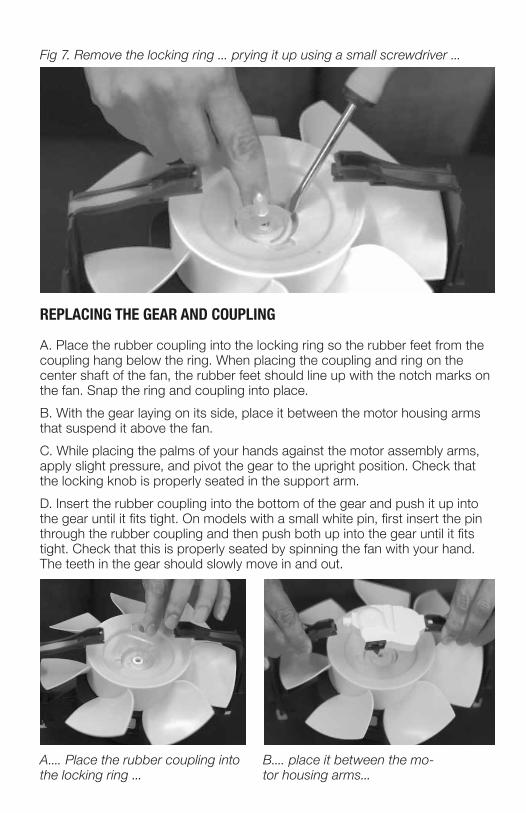
REPLACING THE GEAR AND COUPLING
A. Place the rubber coupling into the locking ring so the rubber feet from the coupling hang below the ring. When placing the coupling and ring on the center shaft of the fan, the rubber feet should line up with the notch marks on the fan. Snap the ring and coupling into place. B. With the gear laying on its side, place it between the motor housing arms that suspend it above the fan. C. While placing the palms of your hands against the motor assembly arms, apply slight pressure, and pivot the gear to the upright position. Check that the locking knob is properly seated in the support arm.D. Insert the rubber coupling into the bottom of the gear and push it up into the gear until it fits tight. On models with a small white pin, first insert the pin through the rubber coupling and then push both up into the gear until it fits tight. Check that this is properly seated by spinning the fan with your hand. The teeth in the gear should slowly move in and out.
A.... Place the rubber coupling into the locking ring ...
B.... place it between the mo-tor housing arms...
Fig 7. Remove the locking ring ... prying it up using a small screwdriver ...

20
For products purchased within Malaysia, carefully package the product inits original packaging and send it by local Courier Services, Pos Laju, etc
with air freight / shipping and insurance, others chargeable costs prepaid to:GA Sales & Services Sdn Bhd,
No. 27, Jalan PP 11/4, Alam Perdana Industrial Park,Taman Putra Perdana 47130 Puchong, Selangor, Malaysia.
Two-Year Limited WarrantyCALL VENTA CUSTOMER SERVICE TO TROUBLESHOOT ANY ISSUES, BEFORE ATTEMPTING TO RETURN PRODUCT TO RETAILER.
If you have any questions regarding this warranty, please WhatsApp to +6012-908-7334 or email : [email protected]
For product registration please return the enclosed Warranty Card.
Venta warrants that for a period of 2 years from the date of purchase, this product will be free from defects in material and workmanship. Venta, at its option will repair or replace this product or any component of the product to be defective during the warranty period. Replacement will be made with a new or remanufactured product or component. If the product is no longer available, replacement may be made with a similar product of equal or greater value. This is your exclusive warranty. This warranty is valid for the original retail purchaser from the date of initial retail purchase and is not transferable. Your registration card must be completed and returned to activate your warranty. Also keep the original sales receipt, as proof of purchaseis required to obtain warranty.
This warranty does not cover normal wear of parts or damage resulting from any of the following: Negligent use or misuse of the product, use on improper voltage or current, use contrary to the operating instructions, disassembly, repair or alteration by anyone other than GA Sales & Services Sdn Bhd.
Venta shall not be liable for any incidental or consequential damages caused by the breach of any express or implied warranty. Except to the extent prohib-
particular purpose is limited in duration to the duration of the above warranty.
Further, the warranty does not cover Acts of God, such as fire, flood,hurricanes, tornadoes etc.
AIR-CRAFTING SINCE 1981
Art
.-N
o. 7
850
0-3
6, ©
201
8/0
3_V
01
CUSTOMER SERVICE: GA Sales & Services Sdn BhdMalaysia HeadquartersNo. 27, Jalan PP 11/4Alam Perdana Industrial ParkTaman Putra Perdana47130 Puchong, Selangor, MalaysiaWhatsapp: +6012-908-7334Email: [email protected]