veil & transparency masking tutorial - photography … · · 2017-02-21veil &...
TRANSCRIPT

ReMask 3
For more ReMask tutorials and resources please visit: http://www.topazlabs.com/tutorials
Veil & Transparency Masking Tutorial
2
In the following steps, we will show you how to achieve these same creative results with your own photos following this model.
This workflow focuses on two parts:
1. The basic tri-map creation to get the main extraction - which is the couple.
2. The transparency focus to preserve the bride’s veil while removing the blue gradient background.
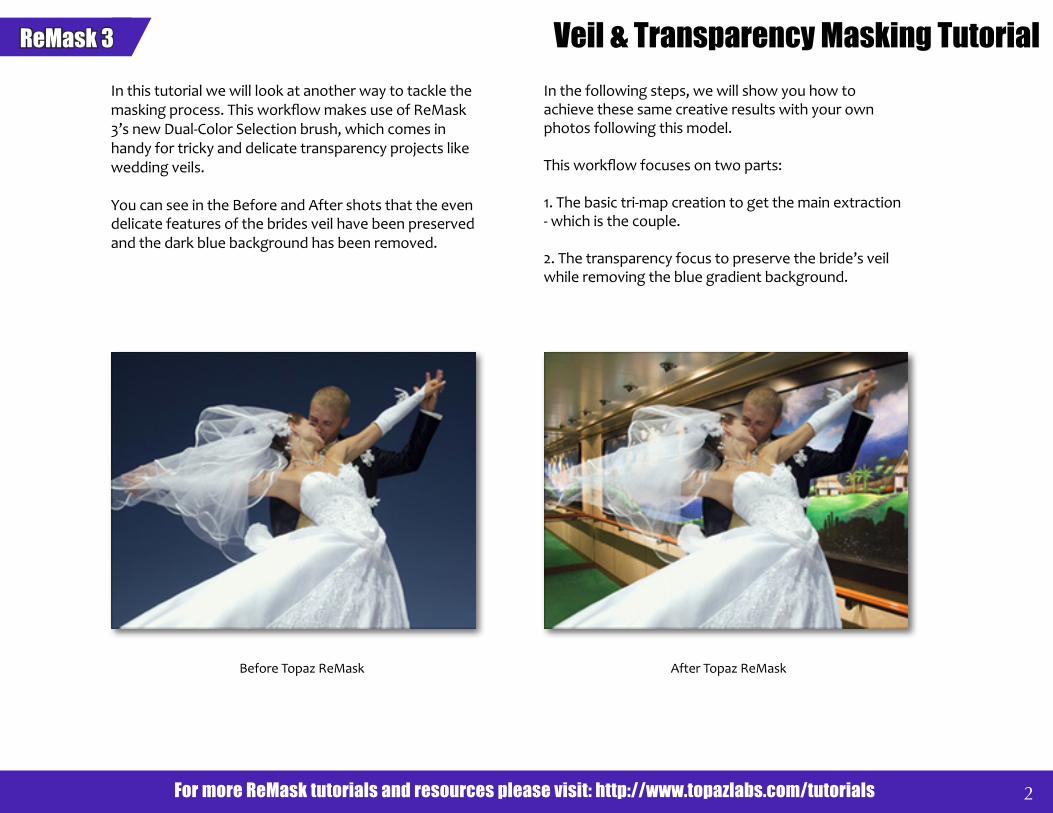
In this tutorial we will look at another way to tackle the masking process. This workflow makes use of ReMask 3’s new Dual-Color Selection brush, which comes in handy for tricky and delicate transparency projects like wedding veils.
You can see in the Before and After shots that the even delicate features of the brides veil have been preserved and the dark blue background has been removed.
Before Topaz ReMask After Topaz ReMask

ReMask 3
For more ReMask tutorials and resources please visit: http://www.topazlabs.com/tutorials 3
Veil & Transparency Masking Tutorial1. Open an image file.
2. To begin the masking process go to your Filter Menu -> Topaz Labs and then select ReMask 3 .
When ReMask 3 loads it will automatically open to the Tri-map view and your image will be filled with green.
So only the red (remove) and blue (compute) selec-tions will need to be added. Once your tri-map is com-plete the green will be the portion of your image that will be kept.
4. If desired, use your zoom buttons and hand tool to pan navigate the image to find a good starting point.

ReMask 3
For more ReMask tutorials and resources please visit: http://www.topazlabs.com/tutorials 4
Veil & Transparency Masking Tutorial
5. Select the Blue Brush tool and use the brush size slider to select your desired brush size.
6. Next, we will outline the edges around the couple.
7. Fill the outside of your blue selection with red. (The red will be the portion of your image that will be cut.)
The tri-map is now complete and ready to be pro-cessed.

ReMask 3
For more ReMask tutorials and resources please visit: http://www.topazlabs.com/tutorials 5
Veil & Transparency Masking Tutorial8. Click on the Compute button to compute your tri-map and create your mask.
If we switch to the Mask view this will allow us to see the basic mask. As you can see there a few areas of the mask that need to be cleaned up...around the couples hands and arms.
The mask view is really good to be in when cleaning up your image. We will also activate the split screen and select the keep tab as well..this will allow us to see ex-actly what is going on during the cleanup process. You are welcome to use any of the views during your own workflow.

ReMask 3
For more ReMask tutorials and resources please visit: http://www.topazlabs.com/tutorials 6
Veil & Transparency Masking Tutorial9. Select the Red (basic) brush tool and make sure that the Magic Brush box is checked (enabled).
10. Set the desired brush size. A small brush size is ideal for refining with the Magic Brush...usually somewhere between 1 and 5 works best.
11. We are going to zoom in on the hands and arms of the wedding couple, will still have leftover color from the blue background, and start to make slow, short stokes in the blue area. This will remove the immediate affected blue area around the stroke. Repeat as neces-sary.
Now that the basic tri-map and extraction have been
MaskKeep

ReMask 3
For more ReMask tutorials and resources please visit: http://www.topazlabs.com/tutorials 7
Veil & Transparency Masking Tutorialcompleted, we can begin working on isolating the brides veil and separating it from the blue background. To achieve this, we will be creating and computing a second tri-map.
12. We will start by selecting the basic blue brush tool and we are going to brush over the brides veil.
12. We will start by selecting the basic blue brush tool
This time we will be using the Dual-Color Selection brush to complete the select the keep and remove colors.
13. When we select the Dual-Color Selection brush it will automatically activate the color pickers. The first color
MaskKeep

ReMask 3
For more ReMask tutorials and resources please visit: http://www.topazlabs.com/tutorials 8
Veil & Transparency Masking Tutorialselected should be the foreground (keep) color and then the second color selection will be for the background (remove).
14. When selecting the keep and remove colors be sure to select the true color values. So instead of clicking on the white in the veil - which is contaminated from the blue of the background, we are going to
click on the whitest portion of the brides dress.
14. The blue background is vibrant and pretty consistent so we can click just about anywhere in the image to select it.
15. Then begin brushing over the veil...the yellow dots that appear represent transparency.

ReMask 3
For more ReMask tutorials and resources please visit: http://www.topazlabs.com/tutorials 9
Veil & Transparency Masking Tutorial16. After we have finished brushing the keep and re-move selections in the brides veil click on the Compute button to allow ReMask to analyze the new tri-map and create the extraction.
17. Now, if desired, we can use the sliders in the Mask Adjustment and Foreground Color sections to further
refine our mask.
Once the mask refinements are complete we can click OK to process the image and save it back in Photoshop.
From there we can add in a new background or make any additional image enhancements.
ImageKeep

ReMask 3
For more ReMask tutorials and resources please visit: http://www.topazlabs.com/tutorials 10
Veil & Transparency Masking Tutorial
Before Topaz ReMask
ReMask 3
For more ReMask tutorials and resources please visit: http://www.topazlabs.com/tutorials 11
Veil & Transparency Masking Tutorial
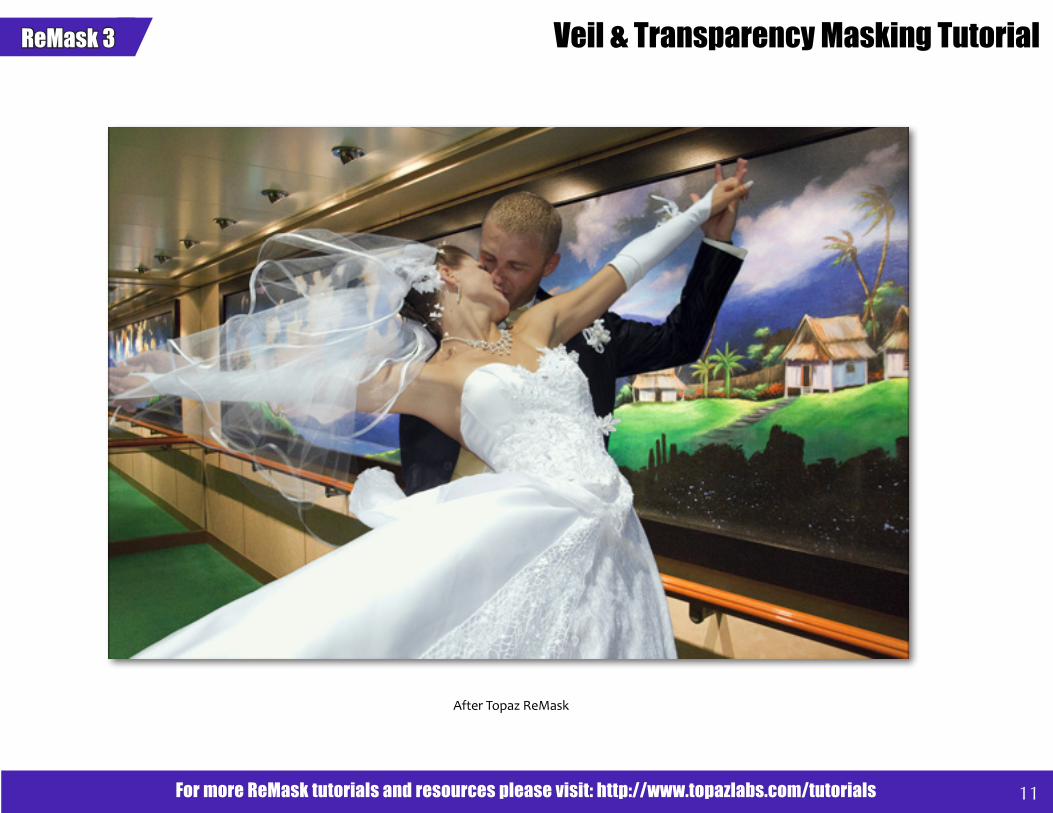
After Topaz ReMask