vehco vehicle client (app/onboard) september 2015 · volvo fh4. login, start page in co-driver, and...
TRANSCRIPT

Vehco Vehicle Client (App/OnBoard)
September 2015

Co-Driver

Installation

Installation
Examples of positions of screen in vehicles:
Scania R P T
Volvo FH4

Login, Start page in Co-Driver, and
LogoutCOM4

Login
An anonymous user logs in automatically when the OBC starts.
When the ”common” user (driver) logs in manually, than the anonymous user
automatically logs out.
When the driver logs out, than the anonymous user automatically logs in
again.
The anonymous user makes it possible to always get information from the
vehicle even if the driver does not log in, for instance temporary staff.
Driver card login: when inserting the driver card the driver will be
automatically logged in, if the driver card number is added in Weboffice.

If another driver cards is inserted when a driver still is logged in (if selected
Continue at card withdrawal), there are two options.
If the new driver card match, the last user is logged out and the new user is
logged in automatically.
If the new driver card does not match, it will raise a question if the new user
wants to log in manually or continue to be logged in as the old user. Always log in
as yourself!
Login
Login
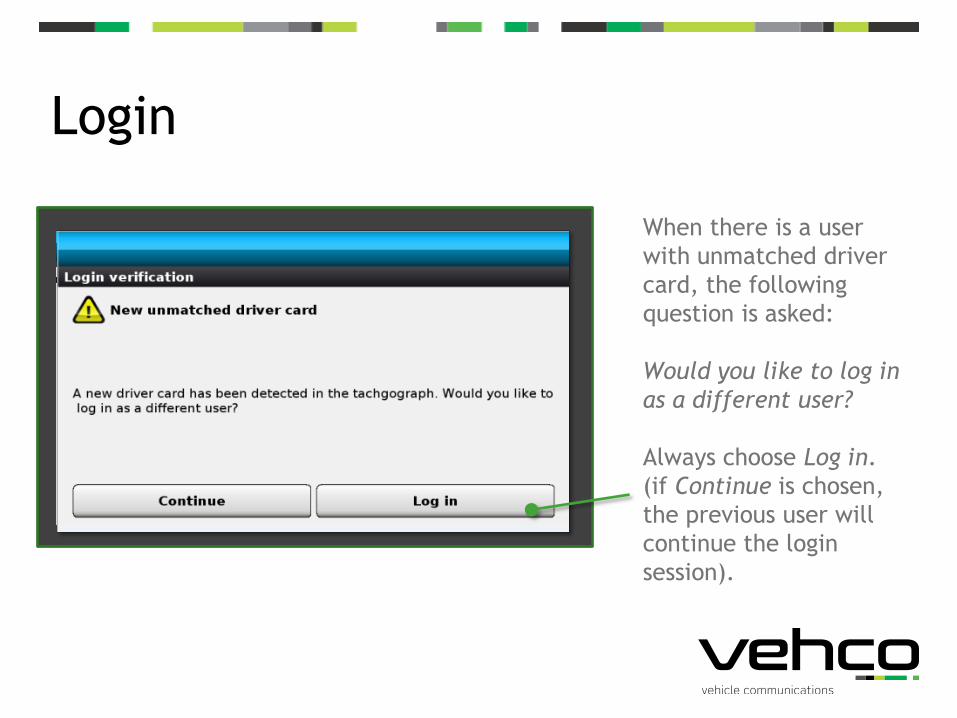
When there is a user
with unmatched driver
card, the following
question is asked:
Would you like to log in
as a different user?
Always choose Log in.
(if Continue is chosen,
the previous user will
continue the login
session).

Login manually
When the user is not
automatically logged in,
he can log in manually:
1. Enter your user number
directly on the screen.
2. Then press OK.
If you want to turn off the display, press the button Display
off. The computer will still be on.
When you later will turn on the display, just press anywhere on
the display to turn on the display.
If you enter anything incorrect, press
Err (Error) and rewrite the number
again.

Login manually
1. Enter you password
directly on the screen.
Every character is
displayed with a star.
2. Press Done.
If you want to turn off the display, press the button Display
off. The computer will still be on.
When you later will turn on the display, just press anywhere on
the display to turn on the display.
If you enter anything incorrect, press
Err (Error) and rewrite the number
again.

Co-Driver Start page
Under Vehicle you can see
the identity of the vehicle.
After login the start page
will be shown.
Under User you can see
which driver that is logged
in right now.
Press the button Start menu to open the start menu
with the services available in Co-Driver.

On the start page four services are shown, to find the
rest, press the button Start menu.
Co-Driver Start page
From the start page you
• see the status of the
system
• reach the four most
common services
• may change the
brightness of the screen
• have a short cut to the
support info
• have a shortcut to
Settings
• have a shortcut to
manual log off

Co-Driver Status indicators
• Network connection
• GPS coverage
• Vehicle connection
• Tachograph connection
At the start page there
are status indicators.

Co-Driver Status indicators
Function
area
Network
Connection
GPS
coverage
Vehicle
connection
Tahcograph
connection
Green
indication
Connected to Vehco
server
Fixed GPS position Vehicle connection OK Tahcograph connection
OK
Yellow
indication
Internet connection
OK, but device not
logged in to Vehco
server
GPS enabled but no fixed
position (bad GPS
coverage)
Ignition is off Tahcograf connection ok,
no driver card in
tachograph
Red
indication
No network, not
connected to internet
GPS not available
(Android: not enabled in
settings) or other error
No vehicle connection Not connected to
tachograph
Inactive No vehicle connection
(hardcoded vehicle:
connection to vehicle is not
enabled)
None of modules
DRT, RTD or
Tachograph
autentication enabled

Fault tracing network connection
Status icon: red indication on network connection
Status: No GSM connection– No messages can be sent or received
Cause:– The vehicle is outside the coverage or operational disturbances at the operator
– The software in the computer has ”crashed”
– PIN code request is activated on the SIM card or the subscription by the operator has
changed.
Action:– Check if the vehicle is outside the coverage
– Restart the computer

Fault tracing GPS connection
Status icon: Red indication on GPS connection
Status: No GPS reception– No position is recorded for the actual time
– Navigation does not work
Cause:– The ignition is not turned on
– The vehicle is ”in shadow” of the satellite signal
– Blown fuse
– The software in the computer has ”crashed”
Action:– Turn on the ignition
– Move the vehicle to get reception with satellite signal
– Check fuses
– Restart the computer

Fault tracing vehicle connection
Status icon: Red indication on vehicle connection
Status: Connection to vehicle data is missing– If the identity of the vehicle is shown in the field Vehicle on the Start page:
• No driving data is recorded– If the identity of the vehicle is not shown in the field Vehicle on the Start page. Instead 3
dashes (- - -) are shown:• No driving data is recorded• The services that need vehicle information are not available
Cause:– The ignition is not turned on– Blown fuse– The software in the computer has ”crashed”
Action:– Turn on the ignition– Check fuses– Restart the computer– Disconnect the main power

Fault tracing tachograph connection
Status icon: Red indication on tachograph connection
Status: Not connected to tachograph– Tachograph autentication does not work and user must log in manually
– Drive resting time does not work
– Remote tacho download does not work
Cause:– Stoneridge tachograph is set to wrong D8 format (SE2400).
– Wiring issue
Action:– Change D8 format from SE2400 to SRE
– Check wiring and make sure OEM D8 cable isn’t grounded.

Log out automatically
Automatic Log out
If you remove a pre-
registered driver card you
should press Log out which
will start the log out
procedure.
If you do not press Log out
and instead press Continue,
this action keeps you logged
in to Vehco even if the
driver card is taken out.
This is not to be
recommended.
If you take no action, you will automatically be logged
out after 1 minute.
Log out manually
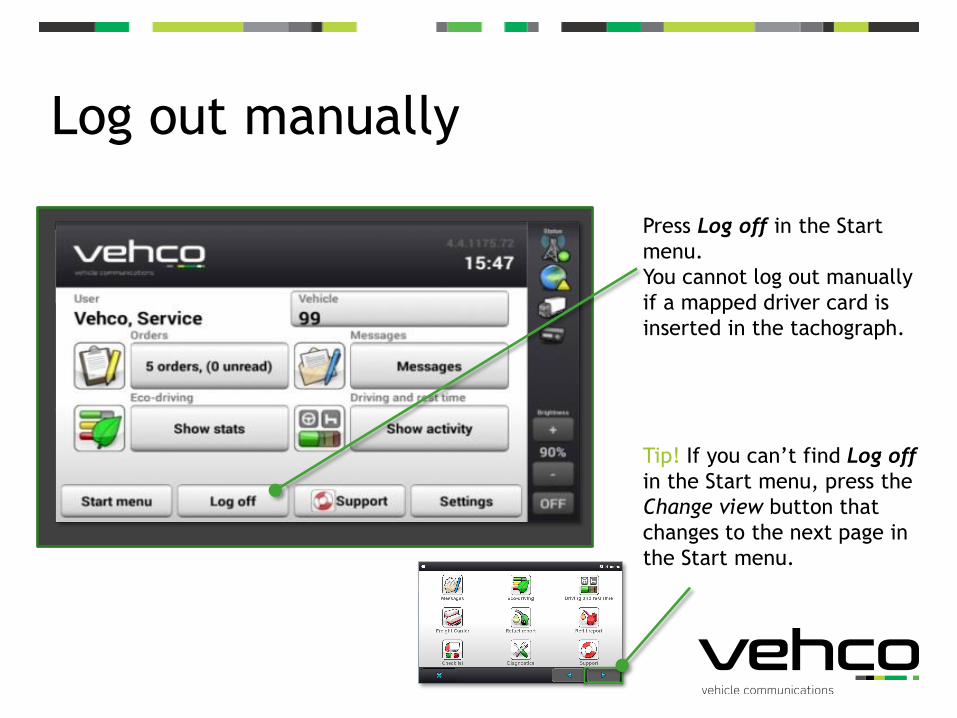
Press Log off in the Start
menu.
You cannot log out manually
if a mapped driver card is
inserted in the tachograph.
Tip! If you can’t find Log off
in the Start menu, press the
Change view button that
changes to the next page in
the Start menu.

SettingsCOM4

Sidebar settings
On all new pages there is a
sidebar to the right.
Sidebar contains a shortcut
to the settings module and
settings that always are
available.
Change the brightness of
the screen:
Press the + button or −
button.
The current brightness level
is displayed in the area
between the buttons.Off button is blurred for COM4 and may
not be used.

Settings
Open Settings:
• Press on Settings in the
Start menu.

Settings Interface mode
Change interface mode:
• Press on the Day mode
button or Night mode
button to change the
display mode of the
interface.
Day mode:
Night
mode:
NOTE! Night mode is
only valid for screens
of the services that
support this mode.

Settings Alert notification mode
Change alert notification
mode:
• Press the Sound button,
Sound and blinking
button, or Blinking
button to change the
mode for what happens
when a new message
arrive.
You can test the selected
mode by pressing the Test
button.

Settings Language settings
• To change languages,
press Language setting.

Settings Language settings
• Change to the language of
your choice.

Settings Language settings
• You have to restart for the
language settings to
change.
• This language choice stays
on the vehicle, it doesn’t
follow the user.

Messages

Messages
User message
Vehicle message
If you receive a user message: The message is
sent to you personally and it is only you who
can read it. Even if you log on in a different
vehicle, you can access your user messages.
THIS OPTION BRING TRUCKING HAS DECIDED
NOT TO HAVE.
If you receive a vehicle message: The message
is sent to the vehicle (and not to you
personally). All users who have ever logged on
to the vehicle can read it.

Messages Vehicle message
Vehicle messages are indicated by a vehicle
icon at the bottom left.
• You, as user, cannot delete vehicle
messages. Vehicle messages are
automatically deleted by the server after a
certain period of time.
• A vehicle message cannot be forwarded.
• If you reply to a vehicle message, your reply
will be sent to the whole office (all office
users).

Messages
Open messages:
• Click on Messages in the
Start Menu.

Messages Main Menu
New messageClick on this button if you want to
create a new message.
InboxClick on this button if you want to
open your Inbox.
The button also displays how many
unread messages you have and how
many user messages and vehicle
messages you have in your Inbox.
OutboxClick on this button if you want to
open your Outbox.
The button displays how many sent
messages and how many unsent
messages you have (waiting to be sent
when there is network connectivity)
in your Outbox.
For example: There are 1 messages in your Inbox, of
which 2 are user messages (can only be read by you)
and 1 is a vehicle message (can be read by anyone
who drives the vehicle).

Messages Creating a new message
1. Click on the New
message button.

Messages Creating a new message
Select recipient:
2. Select User if you want
to send the message to
a user
or
select Office team if
you want to send a
message to all office
users.

Messages Creating a new message
Select recipient user
3. For office message, you
may choose a main
recepient, but all in the
office can see the
message.

Messages Creating a new message
Write message:
4. Click in the text field to
open the integrated
keyboard.
5. Enter your text and click
the Done button.

Messages Creating a new message
Write message:
6. When you have finished,
click the Send button.
Attach GPS position:
Click on the Attach current position button before clicking
the Send button.
The GPS position is added to the message in parentheses.
For example: (Position: La 57.6817N; Lo 12.008E)

Messages New messageNew message:
When you receive a new
message, a pop-up window will
be displayed.
• Click on Read now if you
want to read the message
now (If there are several
messages: Click on Go to
Inbox)
or
click on Read later if you
want to read it/them later.
If you select Read later, the window will open again in
5 minutes (configurable) as a reminder until you
choose to read the message or open your Inbox.

Messages Inbox
Inbox:
The messages* you have
received are listed in your
Inbox. The list is sorted into
chronological order.
* Only the 50 most recent messages
are downloaded from the server.You can get to your Inbox by either clicking on the
Inbox button in the main menu or clicking on the Go
to Inbox button in the pop-up window for new
messages.

Messages Inbox
For example:
The message is a read vehicle message with an attached position
that you have answered.
Unread messages
Read messages
Answered messages
Forwarded messages
NB! A vehicle message cannot be forwarded.
Message with attached GPS position
Vehicle message The message is sent to the
vehicle (and not to you personally).

Messages Reading a message
Open and read the received
message in the Inbox:
1. Click on the message in
your Inbox that you want to
open and read.

Messages Reading a message
2. Read the received
message.
If it is a long message, you
can scroll up or down by
clicking on the up or down
button.
If the message includes an attached GPS position: Click on the
Navigate button to open the Navigation module that helps you
navigate to the GPS position.

Messages Replying to a message
Open and send a reply to the
received message in the Inbox:
1. Click on the message in
your Inbox that you want to
reply to.
NB! A reply to a vehicle
message will always be sent
to the whole office.
2. Click on the Reply button.

Messages Replying to a message
Select the reply message:
3. Click on the appropriate
reply message.
There are 3 pre-set quick reply
messages or the option of entering
your own text message.
If you select a quick reply, the reply
message will be sent immediately.
If you select Enter Text Message:
Click in the text field to open the
integrated keyboard. Enter your
text and click the Done button.
Then click on the Send button.

Messages Forwarding and deleting
Since Bring Trucking only have vehcile messages, there is no possibility for the
vehicle users to forward or delete the messages.

Messages Outbox
Outbox:
Your sent and unsent messages*
are listed in your Outbox. The
list is sorted into chronological
order.
The messages that have not
been sent are waiting to be
sent as soon as there is
network connectivity.
* Only the 50 most recent messages are
downloaded from the server.You can access the Outbox by clicking the Outbox
button in the main menu.

Messages Outbox
For example:
The message is an unsent reply to a vehicle message with an
attached position. The message will be sent as soon as there is
network connectivity.
Sent message
Unsent message
Sent message with attached GPS position
Sent in response to vehicle message
NB! A reply to a vehicle message will always
be sent to the whole office.
Messages Resending a message
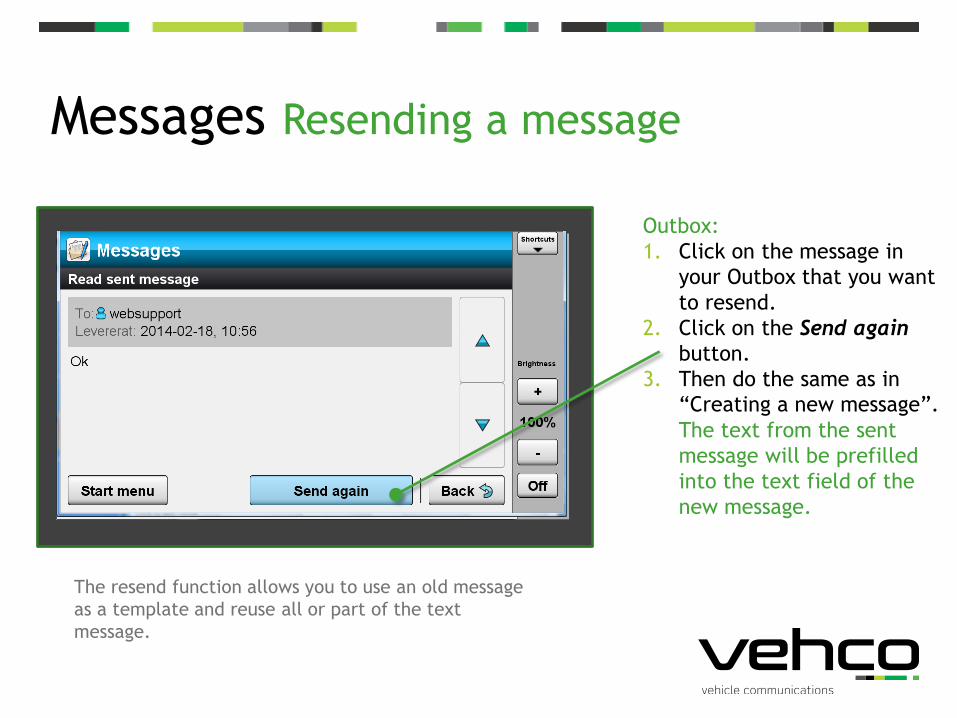
Outbox:
1. Click on the message in
your Outbox that you want
to resend.
2. Click on the Send again
button.
3. Then do the same as in
“Creating a new message”.
The text from the sent
message will be prefilled
into the text field of the
new message.
The resend function allows you to use an old message
as a template and reuse all or part of the text
message.

Refuel report

Refuel report - purpose
Refuel reports can be handled in Co-Driver OBC instead of manually on paper and sent directly to the office.
The administrative work concerning fuel monitoring decreases to a minimum.
Refuel reports are submitted to the office of each refill. Easy to monitor fuel
consumption per vehicle and per driver.
NOTE! The Refuel report is valid only for fuel
For other fluids (such as AdBlue, washer fluid) use the Refill report.

Refuel report
Open Refuel report:
• Press on Refuel report in
the Start menu.

Refuel report Step 1
Step 1:
1. Enter how much you
have refueled by
pressing the number
keys.
2. Then press the Next
button.
If you enter a faulty
number, press the C
button and enter the
number again.

Refuel report Step 2
Step 2:
1. Enter your mileage
setting by pressing the
number keys.
NOTE! For COM4, the
odometer value read
from the device is
already shown. It can be
changed manually.
2. Then press the Next
button.
If you enter a faulty
number, press the C
button and enter the
number again.

Refuel report Step 3
Step 3:
• Select where you have
refueled by pressing one
of the buttons.
You can step down or up in the
list of available options by
pressing the down or up button.
If you can’t find the refuel site
in the list, select the alternative
Others in the bottom of the list.

Refuel report Step 4
Comments:
• You can write a
comment about your
refuel by pressing the
space.

Refuel report Step 4
Comments:
• A keyboard then opens
up.
• Enter your comment.
• Then press the Done
button.
Key for space Key to cancel and
delete a character in
the text field

Refuel report Step 5
Steg 5:
1. Check the information in the
overview. If something is faulty, press the
Back button (one or more times)
and change.

Refuel report Step 5
Step 5:
2. Select refuel type by
pressing the Full tank
button or the Not full tank
button.
3. Press the Send button to
send the refuel report.

Refill report

Refill report
Open Refill report:
• Press on Refill report
in the Start menu.

Refill report Step 1
Step 1:
• Choose what you have
refilled by pressing
the correct button.
You can step down or up in the
list of available options by
pressing the down or up button.
If you can’t find the refill site in
the list, select the alternative
Other fluid in the bottom of the
list.

Refill report Step 2
1. Enter how much you
have refueled by
pressing the number
keys.
2. Then press the Next
button.
If you enter a faulty
number, press the C
button and enter the
number again.

Refill report Step 3
1. Enter your mileage
setting by pressing
the number keys.
NOTE! For COM4, the
odometer value read
from the device is
already shown. It can
be changed manually.
2. Then press the Next
button.
If you enter a faulty
number, press the C
button and enter the
number again.

Refill report Step 4
• Select where you have
refueled by pressing one
of the buttons.
You can step down or up in
the list of available options
by pressing the down or up
button.
If you can’t find the refuel
site in the list, select the
alternative Other in the
bottom of the list

Refill report Comment
Comments:
• You can write a
comment about your
refuel by pressing the
space.
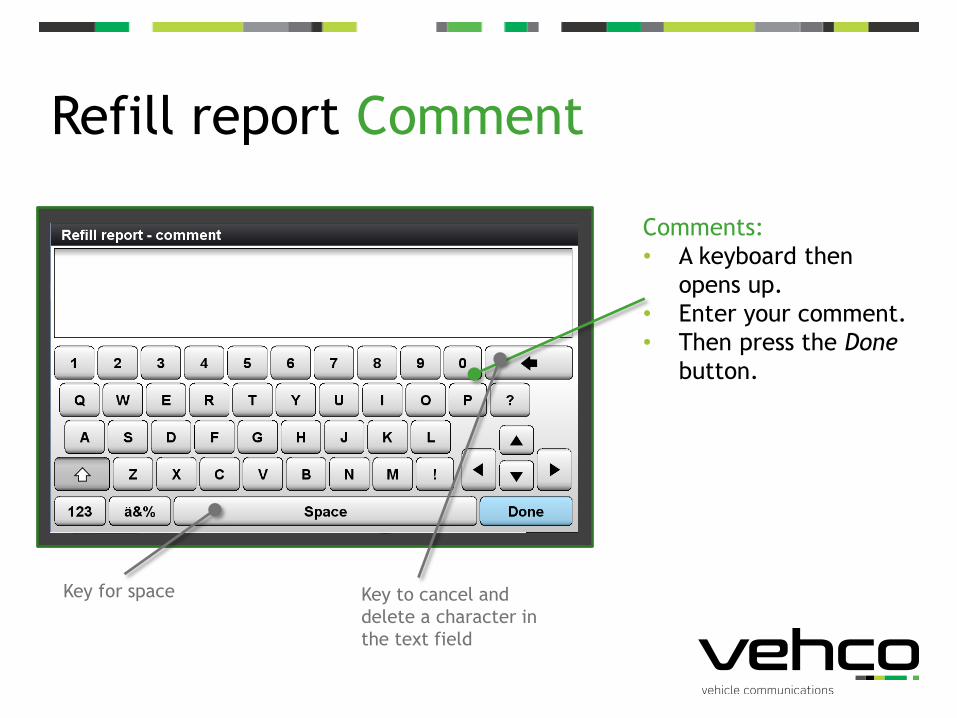
Refill report Comment
Comments:
• A keyboard then
opens up.
• Enter your comment.
• Then press the Done
button.
Key for space Key to cancel and
delete a character in
the text field

Refill report Step 5
1. Check the
information in the
overview. If something is faulty,
press the Back button
(one or more times) and
change.
2. Press the Send button to
send the refuel report.

Eco-driving

Eco-driving Background
Fuel consumption is affected by several different things:
• Vehicle characteristics (engine, axles, weight, height, etc.)
• External factors (road conditions, weather, topography, etc.)
• Driver behavior
The driver can only impact his/her behavior
Measuring the behavior is more fair than to measure consumption

Eco-driving General
All measurements are relative
• The result is compared with the driving time and driving distance
Feedback in real-time
• Right now values – coaches the driver while driving
Color indications – easy to understand
• Red indicates a worse behavior
• Green indicates a good behavior
• Yellow indicates that you are heading a ”registration”
Measurements in percent – easy to understand and relate to
• Red percent should be reduced
• Green percent should be increased

Eco-driving
Open Eco-driving:
• Press on Eco-driving in
the Start menu.

6 measurement and fuel
consumption
o Rollout
o Overspeed
o Idling
o Coasting
o Harsh braking
o Wasted energy
Eco-driving Right now values
Right now values – coaches the driver while driving

Press on the Settings
button to change the
order of the
measurements or to
remove any measurement
on the screen.
Eco-driving Right now values
Right now values – coaches the driver while driving
Fuel consumption – Avg: this is the fuel consumption and
the average fuel consumption on this truck and this user.

Switch between showing
Right now values and Total
values:
• Press the switch button
to switch between the
different windows.
Eco-driving General
Switch window

Shows a summary (since the
last reset) and provides a
basis for reports in
Weboffice.
Reset when you want by
pressing the Reset button.
Resets only in vehicle, the
information is still available in
Weboffice.
Eco-driving Total values
Total values – a summary
Press on the Help button to get a brief information about
the different measurement.

In the Help function there is
an explanation about all the
measurements.
An example:
Eco-driving Help

Interactive web reports that are
possible to export to Excel or PDF.
Eco-driving Reports in Weboffice

Eco-driving Measurement
Rollout
Overspeed
Idling
Coasting
Harsh braking
Wasted energy

Eco-driving Rollout
Rollout is calculated when:
The vehicle speed decrease slowly (less than1 m/s²)
The brake pedal is not applied
The accelerator pedal is not applied (no fuel consumption)
To maximize rollout:
Focus on planning stops ahead and lower the speed in a preferred way when
possible without braking. Good performance: 75-100%.

Eco-driving Rollout
Footb
rake
Start
Stop
Reta
rder/
VEB
Rollout
Release the accelerator pedal and start to engine brakeSee that you will need to stop ahead

Eco-driving Rollout
Start
Stop
Start
Stop
Reta
rder/
VEB
Reta
rder/
VEB
Release the accelerator pedal early and start to engine brake
See that you will need to stop ahead
Rollout
Rollout
Footb
rake
Footb
rake

Eco-driving Rollout
Start
Stop
Start
Stop
Reta
rder/
VEB
Reta
rder/
VEB
50%
80%
Rollout
Rollout
Footb
rake
Footb
rake

Eco-driving Overspeed
Overspeed is calculated when:
The vehicle speed is over 83 km/h.
Note! If the vehicle is driving downward a slope faster than 83 km/h no
overspeed is calculated since no fuel is consumed.
To minimize overspeed:
Focus on keeping the right top speed and not driving too fast, and keeping a
constant speed.
0% means that you have not driven over 83 km/h. 100% means that you have
driven over 83 km/h the whole time (which is practically impossible).

Eco-driving Idling
Idling is calculated when:
The vehicle is standing still more than 1 minute
The engine is running
To minimize idling:
Focus on turning off the engine when the vehicle is standing still. Good
performance: 5-8%.
An engine at idle has higher emissions than an engine that is working normally.

Eco-driving Coasting
Coasting is calculated when:
The vehicle is moving without fuel consumption
The brake pedal is not applied
The accelerator pedal is not applied (no fuel consumption)
Cruise control is not used
To maximize coasting:
Try to keep this value as high as possible. Focus on using the topography or
other possibilities that to bring the vehicle forward – without using the
accelerator pedal or cruise control.
When the vehicle is mowing forward without using accelerator pedal or cruise
control, the Right now bar is green and increases for each meter.

Eco-driving Harsh braking
Harsh braking is calculated when :
The speed is strongly reduced with a brake
The measurement show how many harsh brakes of the total number of brakes
that has been performed. Harsh braking is especially interesting for when
transporting people or sensitive goods in dense traffic situations.
To minimize harsh braking:
Focus on planning the driving and braking ahead and that braking is done in a
smooth way. Good performance: 10%

Eco-driving Wasted energy
Wasted energy is about to avoid that the fuel you have invested in speed
during acceleration is wasted as heat during braking.
The energy that is consumed during acceleration to a certain speed is
compared with the energy that is lost as heat in the brakes when the speed is
reduced.
To minimize wasted energy:
Focus on braking only when necessary – especially at high speeds.
If you have 50% wasted energy, it means that half of the invested energy is
wasted as heat through the brakes at slow-downs.
50 km/h
0 km/h 0 km/h
Acceleration by
accelerator pedal Brake
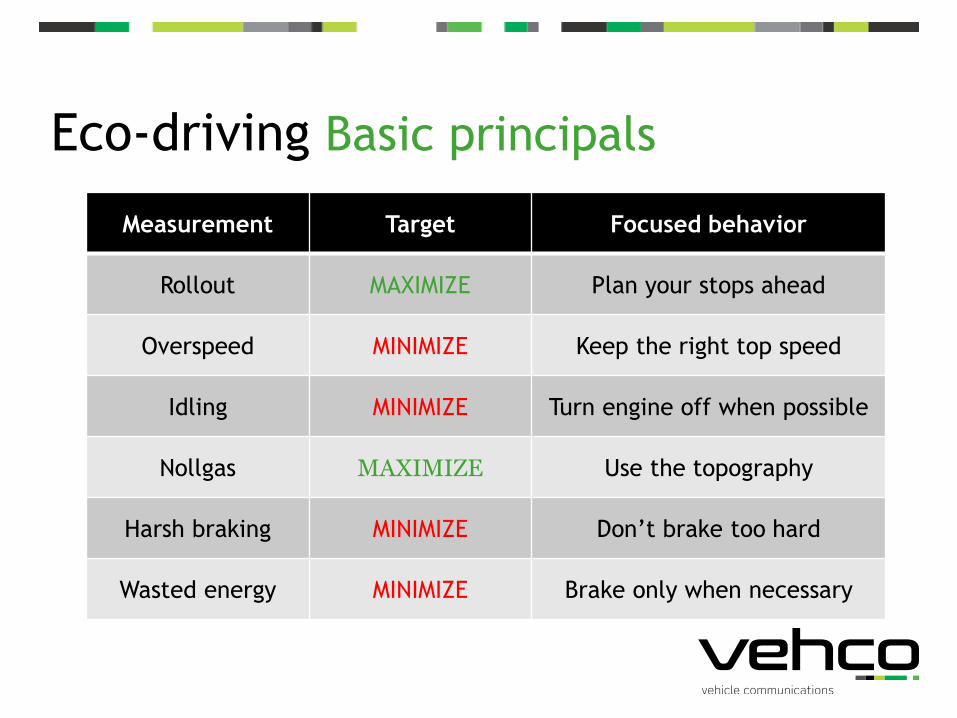
Measurement Target Focused behavior
Rollout MAXIMIZE Plan your stops ahead
Overspeed MINIMIZE Keep the right top speed
Idling MINIMIZE Turn engine off when possible
Nollgas MAXIMIZE Use the topography
Harsh braking MINIMIZE Don’t brake too hard
Wasted energy MINIMIZE Brake only when necessary
Eco-driving Basic principals

Eco-driving Target values
Rollout – Good value: more than 75%
Overspeed – Good value: less than 5%
Idling – Good value: less than 5%
Coasting - Good value: more than 75%
Harsh braking - Good value: less than 10%
Wasted energy - Good value: less than 30%

NavigationSygic

NavigationOpen Navigation:
Press Navigation in the Start
menu.

Navigation – first page
Press anywhere on the map in order
to get to the menu.
Here you see if you have a valid
GPS signal.
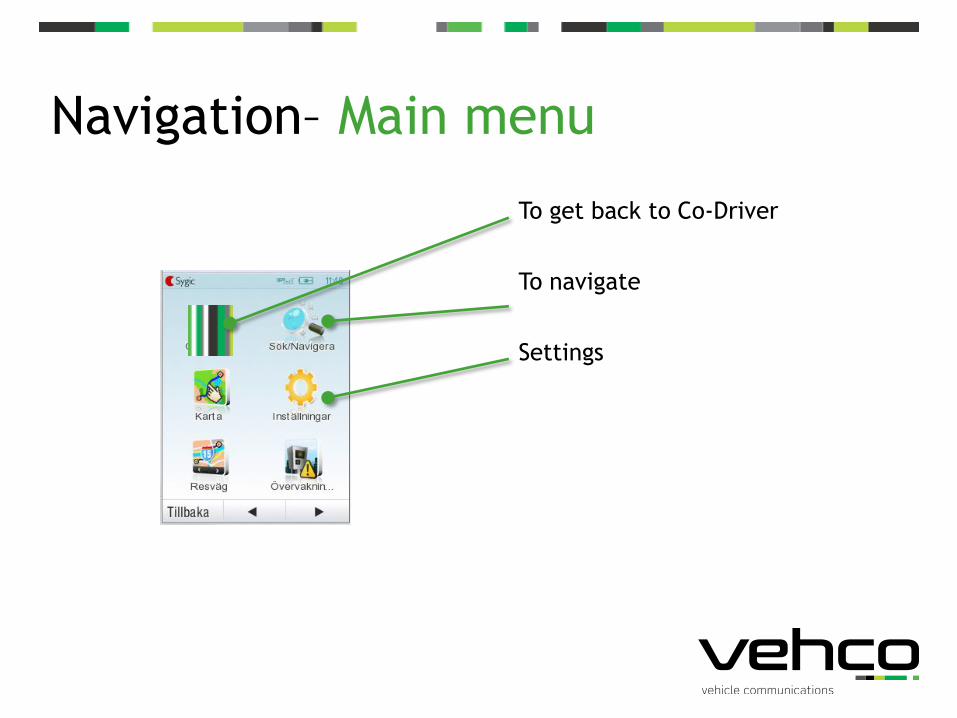
Navigation– Main menu
To get back to Co-Driver
To navigate
Settings

Navigation – first address
Press here in order to choose an address.
Press here

Navigation
Start by entering
the city.
Then enter street. And street number. Note! Don’t forget to
press Route me! to start
the navigation.

Navigation
If Sygic finds your current position it will
calculate the route automatically. Otherwise
you will get the following options to choose
from:
Wait for valid GPS signal
Last valid position
Select from map

Navigation
Sygic shows the route!
Press Done.
To close Sygic click anywhere on the map and choose the Vehco symbol.

Navigation – truck attributes
The truck attributes predefined on Navigation
are:•kgweightTotal = 26000
•kgweightAxel = 8000
•Mmlength = 10000
•Mmwidth = 2600
•Mmheight = 4500
•kmhmaxSpeed = 90
If you want to change them for your specific
truck:•Press the map to get to the menu
•Press Settings
•Press settings for truck
•See to that ”use the trucks attributes” is on ”yes”
•Set wanted parameters

Driving- and rest time

Driving- and rest time
This service is based on regulationförordning (EG) nr 561/2006, where DRT
rules for EU is described as
The calculation of one minute driving has changed in Commission Regulation
(EU) No 1266/2009• Tachograph older than October 2011 have a way to calculate and newer have a different.
Provides both the driver and office information on activities and overview
of how much legal driving time remaining.
Improved resource planning in the office.
The driver gets info / warnings at risk of violations and can comment
violations.

Driving- and rest time – general
Tachograph delivers Driver card id and event changes to On-board computer
On Board computer uses the data to calculations according to the DRT regulation
Result is shown in number and in coloured bars
• Green bar means you are within legal limits.
• Yellow bar means you are utilizing an exception.
• Red bar means rule violation. You must enter mandatory explanation.
– 3 views are availible:
• Current situation (today’s state)
• Week overview (this week’s state)
• Previous weeks (State for the 3 previous weeks)

Driving- and rest time
Open Driving- and rest
time:
• Press Driving- and rest
time in Start menu.

Driving- and rest time – current period
Current period (state of today)
Visual display of activity right now and what rule that is important to
consider.
The background colour shows the current limits.
The driver is provided by information on three different levels:
Info
Caution
Violation
The On-board computer displays a summary of today’s driving.
The On-board computer shows the current period regarding split rest or
daily rest.

Driving- and rest time – current period
Current user (name).
Time (correct time).
The symbole follows the digital tachograph’s state.
Button to Week overview.
Button for other functions (Ferry rule, Out of scope, Multi manning)

Driving- and rest time – current period
Duration of current activity.
Time remaining until activity change is necessary or possible.
Current activity in green, yellow or red. The colour indicates the level of the driving.
Tips (gray text) or warnings (black text, yellow triangle) on what needs to be considered. A rule violation is displayed with a red triangle after a mandatory popup for explanation.

Driving- and rest time – current period
Summary of today’s driving.
Summary of rest periods during the current driving period.
Rest period during current
period.

Driving- and rest time – week overview
Week overview shows a summary of current week’s driving and daily rests.
The colour of the bars show if the driving has been within limits (green), using an exception (yellow) or was a rule violation (red).
The summary lists all used exceptions: 10h driving days, 9h reduced daily rests or reduced weekly rest.
In the scenario next page the 4th reduced daily rest turns red, since three 9h rests already were used (driver has already been warned about this under current period view).
Red background colour shows the limit of max driving time current week.

Driving- and rest time – week overview
Total driving current week.
Driving time left before violation is a fact. The time is adjusted to last week’s driving and necessary compensations for reduced weekly rest etc.
Number of 10h driving days left (green)

Driving- and rest time – week overview
Daily rest length current week. Full bar indicates minimum 11h.
Number of 9h daily rests used (yellow).
Shows if last weekly rest was reduced (yellow).
Button to show 3 previous week’s driving/weekly rest.
This rest lasted only 10h58min.

Driving- and rest time – previous weeks
Shows the summarized driving time and the weekly rest of the last three weeks.
Colour of bars indicates if driving is legal (green) or if a violation has been done (red).
Background colour shows the current limits.
Reduced weekly rest is shown in (yellow), together with information about how long the reduction is.
Reduced weekly rest that later needs compensation is shown in column to the right (as is violations).

Driving- and rest time – previous weeks
Total driving last week.
Previous week’s weekly rest.
Warnings (yellow) or violations (red) for the week in focus.
Total driving two weeks ago.
Total driving three weeks ago.

Driving- and rest time - menu
Week overview.
Activates / deactivates ferry rule.
Shows information concerning passive driver. Availability (when multi manning).
Activates / deactivates out of scope.

Driving- and rest time – ferry rule
When interrupting daily rest to enter/leave a ferry or a train, ferry rule should be activated and when done again deactivated.
Rest period is extended with the time the ferry rule was activated.

Driving- and rest time – example scenario
1. The driver in the
example starts to
drive at 12:56. The
on-board computer
awaits the 1-min rule
to calculate
correctly.

Driving- and rest time – example scenario
2. During driving
information is shown
about when next
brake is due, in this
case 17:27, after 1h
48 min more of
driving.

Driving- and rest time – example scenario
3. Driver stops and
starts other work. In
this case the time
shows when daily rest
needs to be started
(in 12h 17min).

Driving- and rest time – example scenario
4. Driver goes to rest. In
this case it shows
how long it is before
45min rest is reached
(43min) and at which
time a 15 minute
break is fulfilled (at
3:55pm).

Driving- and rest time – example scenario
5. Text switches to show
how much more
driving is allowed
without completing
the rest period, in
this case 1h 47min.
Text switches every
10 seconds.

Driving- and rest time – example scenario
6. Driver returns to
driving. Text shows
again when next rest
period must start, in
this example at
5:31pm, 1h 47 min
from now.

Driving- and rest time – example scenario
7. When the driver has
15min left to a
mandatory rest, the
info message is
escalated to a
warning, formulated
as the break MUST
start at 5:31pm.

Driving- and rest time – example scenario
8. If warning is ignored
and the rule is
violated, the driver
receives a popup
showing which rule
has been violated.
Mandatory an
explanation is
needed.

Driving- and rest time – example scenario
9. When the driver stops he can enter the explanation with the screen keyboard that is shown.

Driving- and rest time – example scenario
10.Driver’s explanation
is shown and sent
when pushing OK.

Driving- and rest time – example scenario
11.If driving continues
after the
explanation, the
current period is
shown with a red bar
and a red warning
symbol.

Driving- and rest time – example scenario
12.When driver starts
resting the remaining
driving time is
indicated as 0:00.
The bar for daily
driving shows the
driving period as red.

Driving- and rest time – example messages
Tip (gray text) Awaiting one minute rule
Another 1:11 driving allowed
15 min / 45 min / 11 h rest completed 5:46pm
Next rest 1:14pm
Warnings (black text / ) You must rest until 8:34am
Next brake must start at 5:31pm
Violation 11h driving has exceeded
Exceptions have been used 9h daily rest used

Driving- and rest time – in Weboffice
The informationen shown in login overview userlist (many drivers) and in the
sidepanel on the map (driver in selected vehicle)
Current activity and duration of it
Day driving duration and remaining driving time
Week driving duration and remaining driving time
10h driving days used
9h daily rest period used
Reduced weekly rest used
Usage of exceptions
The dispatcher can quickly get an overview in the Login overview’s user list
over remaining driving time, even for drivers being off.
Result: Quicker decisions, easier resource planning and fewer unconscious
violations.

Driving- and rest time – in Weboffice
The informationen is shown graphically in coloured bars
Green bar means the driver is within legal limits
Yellow bar means the driver is using an exception
Red bar means rule violation.
Background colour shows the current limits
Symbols
Within legal limits
Exception has been used
Rule has been violated
Warning

Driving- and rest time – in Weboffice
View from Login overview – User list
- the side panel has the same information as the side panel on the map

Freight carrierCOM4

Freight carrier
Open Freight carrier:
Press Freight carrier in
the start menu.

Freight carrier
You may couple and
uncouple carriers and
these actions may be
seen both in the vehicle
screen and in Weboffice.
The last activities may be
seen in the list.
Right now, this vehicle
has one carrier coupled,
REG NR.

Freight carrier – couple
When you want to couple a
carrier, press Couple carrier.
That leads you to a screen where you manually
enter the reg number / ID on the carrier, a
possible comment and press Couple.

Freight carrier – uncouple
When uncoupling a
carrier, click on it.
That leads you to a
screen where you may
add a comment, and
press Uncouple.