vcs fabric hands-on training - 瑞富國際資訊股份 … · 2015-02-07 · verifying vcs mac...
TRANSCRIPT

VCS FABRIC HANDS-ON TRAINING
VDX Switch Quick Config Guide

教育訓練
•管理VDX
•設定Management IP (Static Route)
• NOS firmware download
•設定VCS Mode (Fabric Cluster Mode)
•設定VCS Mode (Logical Chassis Mode)
•設定VLAN (VLAN IP)
•設定L2 Edge Port (Tagged, Untagged, vLAG)
•設定ACL
• Password Recovery
內容

管理VDX

查詢設備資訊
• sw0# show chassis
show chassis

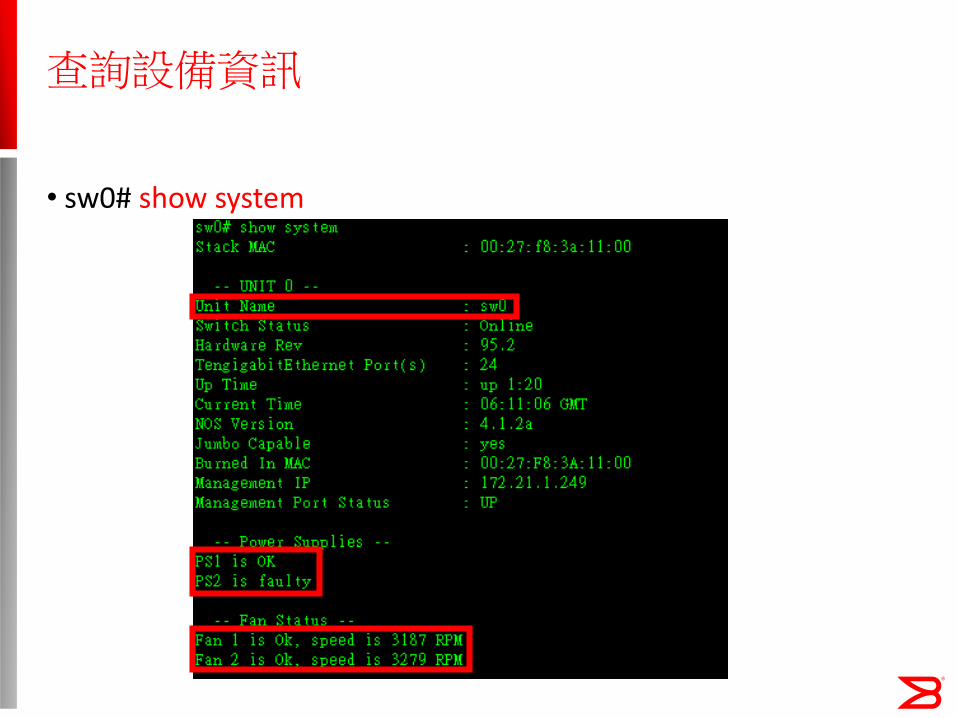
查詢設備資訊
• sw0# show version
查詢設備資訊
• sw0# show system

logging
•將log導出至syslog server
sw0(config)# logging syslog-server 192.168.100.101
•設定log顯示的等級
sw0(config)# logging raslog console INFO

產生support檔案
• sw0# copy support ftp host 192.168.100.100 user userpassword user123 directory /
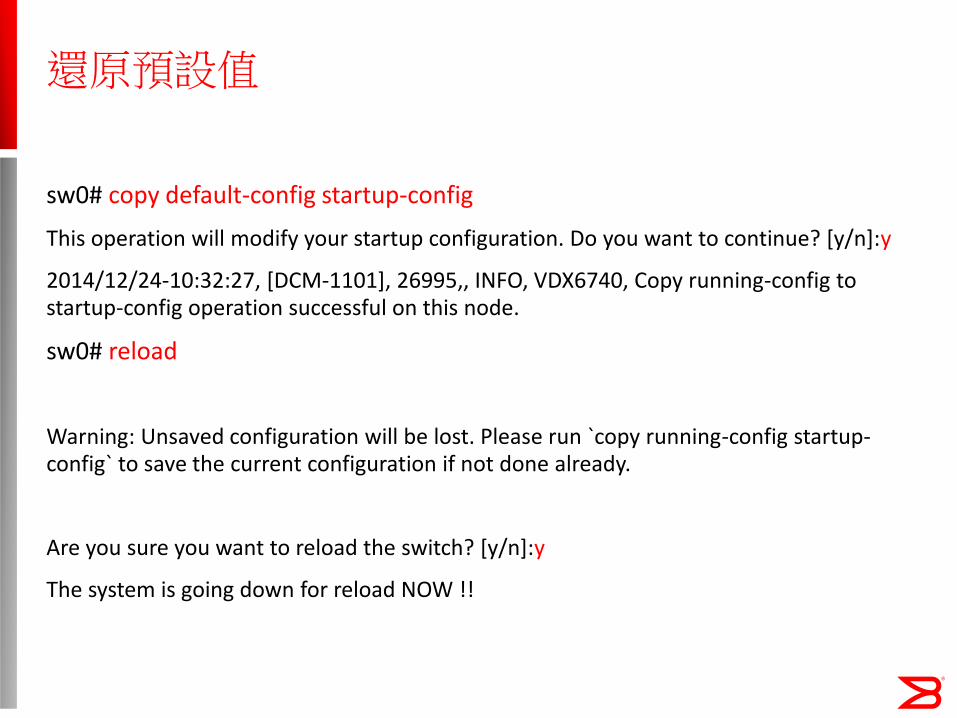
還原預設值
sw0# copy default-config startup-config
This operation will modify your startup configuration. Do you want to continue? [y/n]:y
2014/12/24-10:32:27, [DCM-1101], 26995,, INFO, VDX6740, Copy running-config to startup-config operation successful on this node.
sw0# reload
Warning: Unsaved configuration will be lost. Please run `copy running-config startup-config` to save the current configuration if not done already.
Are you sure you want to reload the switch? [y/n]:y
The system is going down for reload NOW !!

管理VDX License
sw0# show license rbridge-id: 1 xxxxxxxxxxxxxxxxxxxxxxxxxxxxxxxxxxxxxxxx
FCoE Base license Feature name:FCOE_BASELicense is valid
xxxxxxxxxxxxxxxxxxxxxxxxxxxxxxxxxxxxxxxxPorts on Demand license - additional 8 port upgrade license Feature name:PORTS_ON_DEMAND_1License is valid
xxxxxxxxxxxxxxxxxxxxxxxxxxxxxxxxxxxxxxxxVCS Fabric license Feature name:VCS_FABRICLicense is valid
檢視目前已安裝的License
管理VDX License
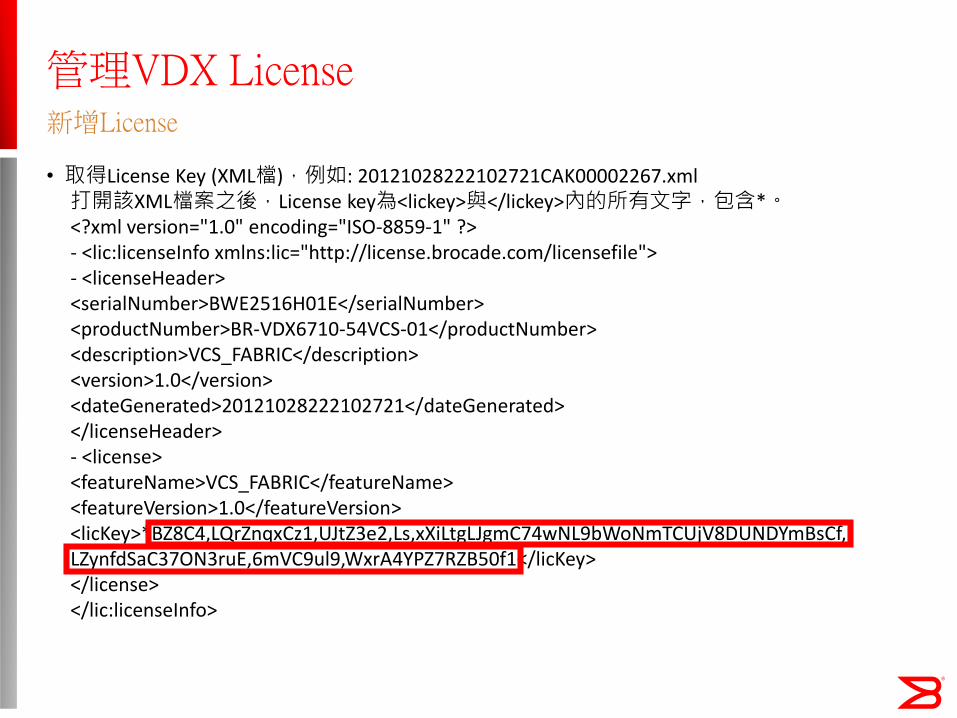
• 取得License Key (XML檔),例如: 20121028222102721CAK00002267.xml 打開該XML檔案之後,License key為<lickey>與</lickey>內的所有文字,包含*。<?xml version="1.0" encoding="ISO-8859-1" ?> - <lic:licenseInfo xmlns:lic="http://license.brocade.com/licensefile"> - <licenseHeader> <serialNumber>BWE2516H01E</serialNumber> <productNumber>BR-VDX6710-54VCS-01</productNumber> <description>VCS_FABRIC</description> <version>1.0</version> <dateGenerated>20121028222102721</dateGenerated> </licenseHeader> - <license> <featureName>VCS_FABRIC</featureName> <featureVersion>1.0</featureVersion> <licKey>*BZ8C4,LQrZnqxCz1,UJtZ3e2,Ls,xXiLtgLJgmC74wNL9bWoNmTCUjV8DUNDYmBsCf,LZynfdSaC37ON3ruE,6mVC9ul9,WxrA4YPZ7RZB50f1</licKey> </license> </lic:licenseInfo>
新增License

管理VDX License
• 新增License sw0# license add licStr *BZ8C4,LQrZnqxCz1,UJtZ3e2,Ls,xXiLtgLJgmC74wNL9bWoNmTCUjV8DUNDYmBsCf,LZynfdSaC37ON3ruE,6mVC9ul9,Wxr8A4YPZ7RZB50f1”
• 移除License (Feature Name) sw0# license remove licStr “VCS_FABRIC”
新增License

設定Management IP

設定Management IP
•出廠預設值 (RBrigeID 1 , VCSID 1) Out of band MGMT預設為interface Management 1/0 sw0# conf tsw0(config)# interface Management 1/0 sw0(config-Management-1/0)# ip address 192.168.2.5/24
•設定default gateway (default gateway和Layer 3配置,在rbridge-id下進行設定) sw0(config)# rbridge-id 1sw0(config-rbridge-id-1)# ip route 0.0.0.0/0 192.168.2.1
• In band管理,可以透過VLAN bind IP(VE)進行。
out band和in band

NOS firmware download
NOS Firmware Download
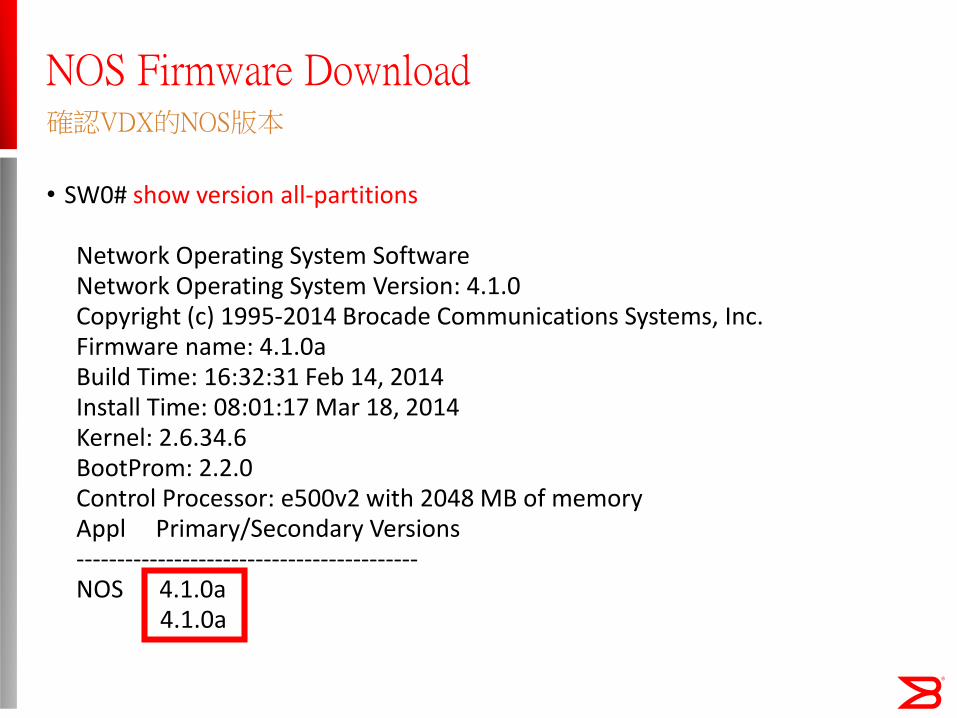
• SW0# show version all-partitions
Network Operating System Software Network Operating System Version: 4.1.0 Copyright (c) 1995-2014 Brocade Communications Systems, Inc. Firmware name: 4.1.0a Build Time: 16:32:31 Feb 14, 2014 Install Time: 08:01:17 Mar 18, 2014 Kernel: 2.6.34.6 BootProm: 2.2.0 Control Processor: e500v2 with 2048 MB of memory Appl Primary/Secondary Versions ------------------------------------------NOS 4.1.0a
4.1.0a
確認VDX的NOS版本

NOS Firmware Download
• NOS可透過FTP、SCP或SFTP進行版本更新
•請用NOS解壓縮後資料夾的根目錄,作為FTP的路徑,如下圖所示
更新VDX的NOS版本

NOS Firmware Download
• SW0# firmware download interactive
Server name or IP address: 192.168.2.150File name: /Protocol (ftp, scp, sftp): ftpUser: adminPassword: ********Reboot system after download? [y/n]:yDo Auto-Commit after Reboot? [y/n]:yPerforming system sanity check...
更新VDX的NOS版本 (Cont.)

NOS Firmware Download
•若是downgrade,有時會出現錯誤,
更新VDX的NOS版本 (Cont.)

NOS Firmware Download
•請輸入以下指令。
sw0(config)# fcoe
sw0(config-fcoe)# fabric-map default
sw0(config-fcoe-fabric-map)# enodes-config global
•之後再重新更新NOS即可
更新VDX的NOS版本 (Cont.)

設定VCS Mode (Fabric Cluster Mode)


變更RBridge ID和VCS ID,指令後面不需要帶 enable 範例:VDX6720# vcs rbridgeid 12 vcsid 10 [enter]
VDX6740預設是enable的,只需要更改rbridgeid即可。VDX6740# vcs rbridgeid 2 vcsid 2

VDX-6710# sh vcsConfig Mode : Local-Only VCS Mode : Fabric Cluster VCS ID : 2 Total Number of Nodes : 2

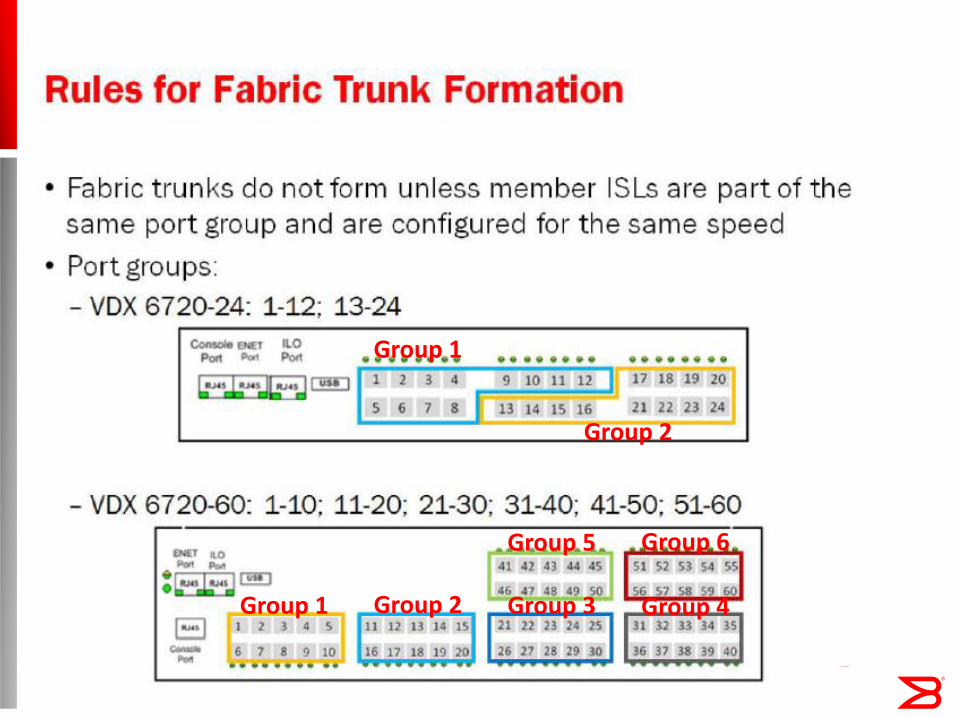
Group 1
Group 2
Group 1 Group 2 Group 3 Group 4
Group 5 Group 6

-VDX6740-48: 1-16; 17-32; 33-40 49-50; 41-48 51-52
Group 1 Group 2
Group 3
Group 4


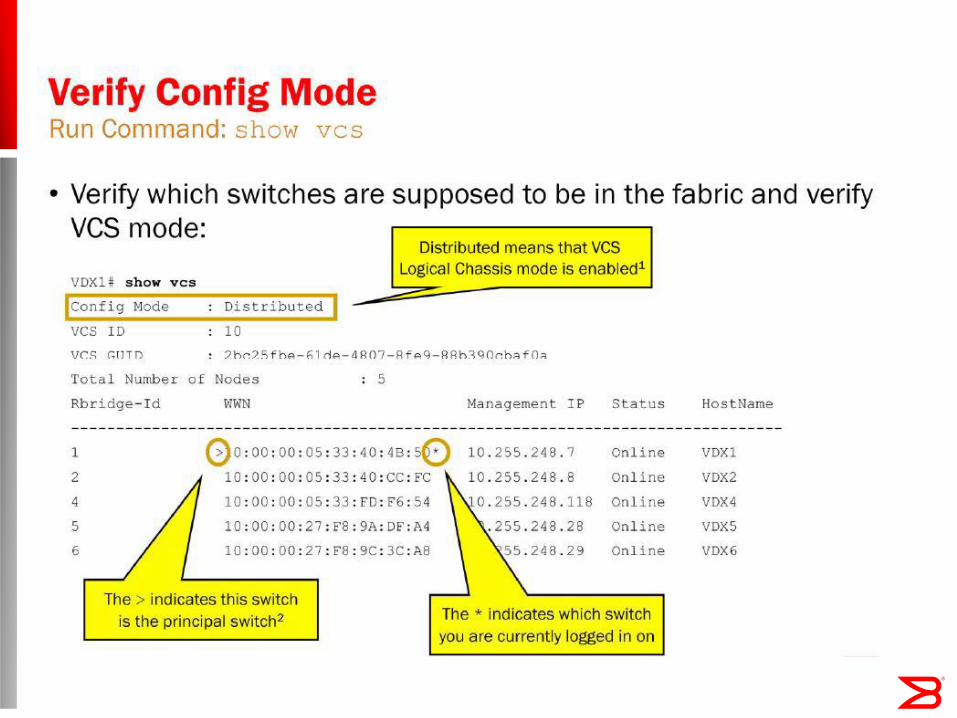
VCS Id: 100 Config Mode: Local-Only
*>
Inducates which switch you are logged in on


設定VCS Mode (Logical Chassis)

Configure your Fabric in logical-chassis mode
Define unique rbridge ID for each VDX


ECMP
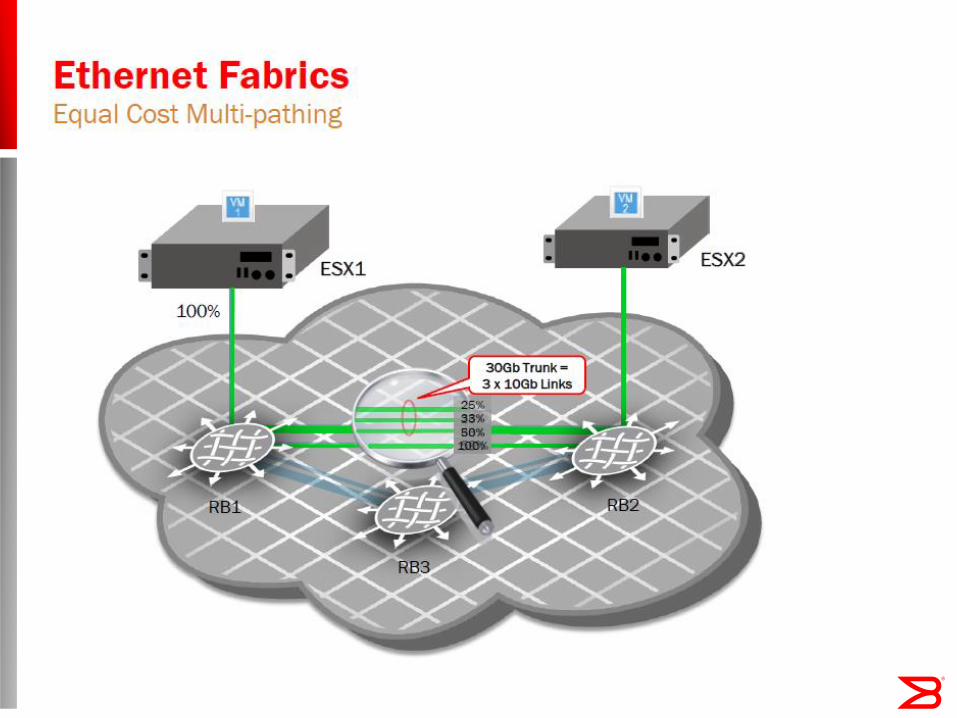
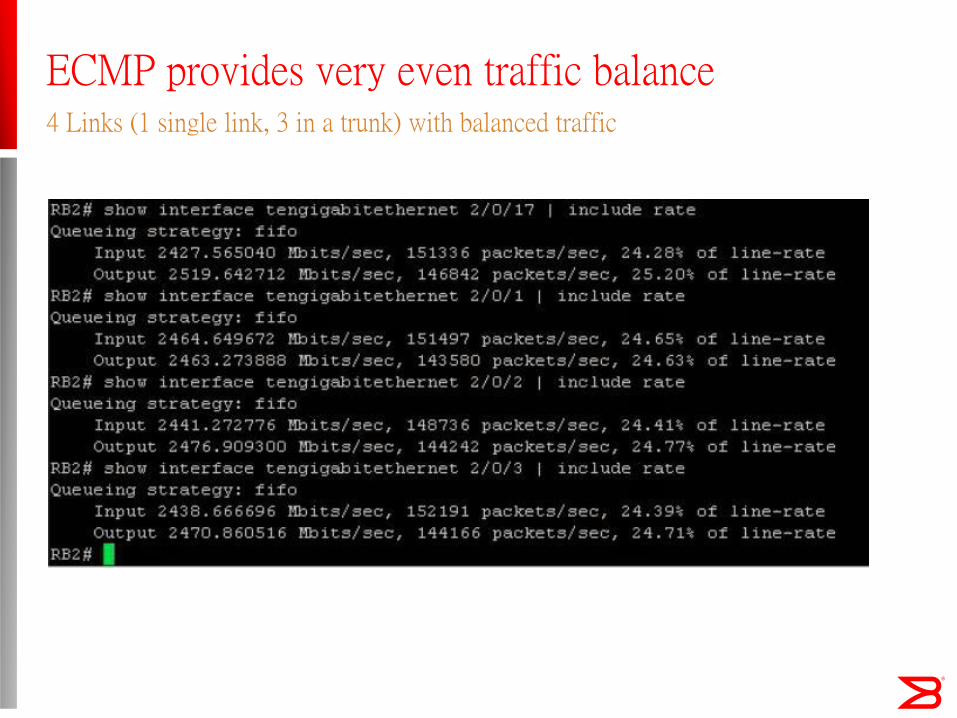
ECMP provides very even traffic balance 4 Links (1 single link, 3 in a trunk) with balanced traffic

ECMP Redistribution After removing one link, traffic immediately rebalanced
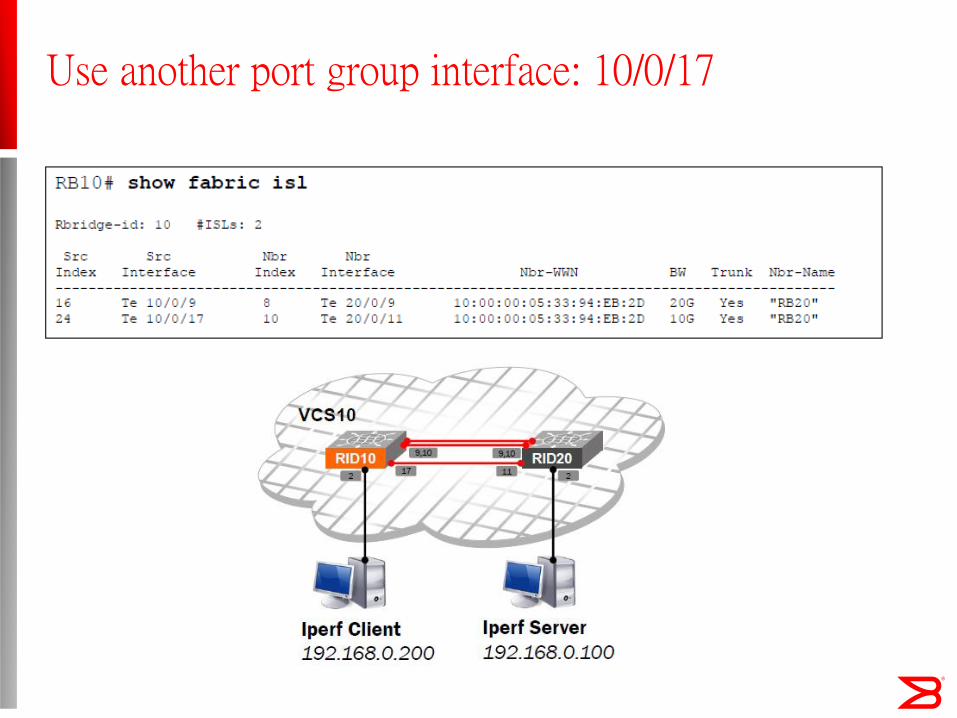
Use another port group interface: 10/0/17

Use another port group interface: 10/0/17

Verifying Interface Usage

Traffic Generation with multiple sessions Iperf Client & Server Configuration

Verifying Interface Usage

設定VLAN

設定VLAN
•當有多台VDX互串時,在不同的VCS Mode,VLAN設定注意事項
1.Fabric Cluster Mode
在此模式底下,VLAN需要到個別VDX交換器進行配置。
2.Logical Chassis Cluster Mode
在此模式底下,只能在principal node (coordinator)VDX交換器設定配置VLAN,相關VLAN設定會自動複製到Cluster內的所有VDX交換器。
VLAN設定注意事項

設定VLAN
•新增單一VLAN
VDX6720(config)# interface Vlan 10
•新增多個連續VLAN
VDX6720(config)# interface Vlan 10-12
•新增多個非連續VLAN
VDX6720(config)# interface Vlan 20,30
新增VLAN

view VLAN information
• Use the show vlan brief command

設定VLAN VLAN bind IP (Interface VE)

設定Edge Port Tagged, Untagged, vLAG (port-channel)

設定Edge Port (L2)
VDX Edge port 預設為L3
檢視目前Edge port設定

設定Edge Port (L2)
•設定Edge port 為 L2,且為Untagged VDX6720(config)# interface TenGigabitEthernet 1/0/10 VDX6720(conf-if-te-1/0/10)# switchportVDX6720(conf-if-te-1/0/10)# switchport mode access VDX6720(conf-if-te-1/0/10)# switchport access vlan 5
•檢視之前Edge port設定,於config 下,要前置do VDX6730(conf-if-te-1/0/10)# do sh run int te 1/0/10 interface TenGigabitEthernet 1/0/10
fabric isl enable fabric trunk enable switchportswitchport mode access switchport access vlan 5 spanning-tree shutdown no shutdown !
設定Edge port 為 Layer 2 switch port,Untagged

設定Edge Port (L2)
•設定Edge port 為 L2,且為tagged VDX6720(config)# interface TenGigabitEthernet 1/0/11 VDX6720(config)# int te 1/0/11 VDX6720(conf-if-te-1/0/11)# switchportVDX6720(conf-if-te-1/0/11)# switchport mode trunkVDX6720(conf-if-te-1/0/11)# switchport trunk allowed vlan ?
Possible completions: add Allow these VLANs to Xmit/Rx through the Layer2 interface all Allow all Dot1Q VLANs to Xmit/Rx through the Layer2 interface except Allow all VLANs except this vlan range to Xmit/Rx through the
Layer2 interface none Allow no Dot1Q VLANs to Xmit/Rx through the Layer2 interface remove Remove a VLAN range that Xmit/Tx through the Layer2 interface
VDX6720(conf-if-te-1/0/11)# switchport trunk allowed vlan all
設定Edge port 為 Layer 2 switch port,tagged

設定Edge Port (L2)
•檢視之前Edge port設定,於config 下,要前置doVDX6720(conf-if-te-1/0/11)# do sh run int te 1/0/11 interface TenGigabitEthernet 1/0/11
fabric isl enable fabric trunk enable switchportswitchport mode trunk switchport trunk allowed vlan all switchport trunk tag native-vlanspanning-tree shutdown no shutdown !
設定Edge port 為 Layer 2 switch port,tagged

Verifying Interface Status
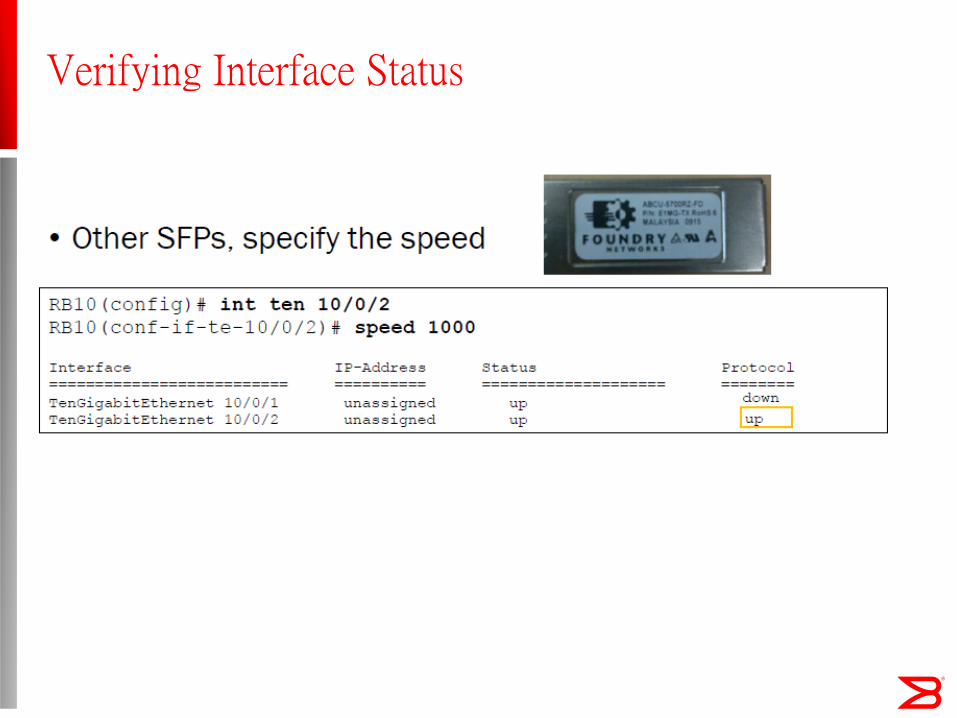
Verifying Interface Status

Verifying Interface Status

Verifying Interface Status
設定Edge Port 為 vLAG (port-channel)
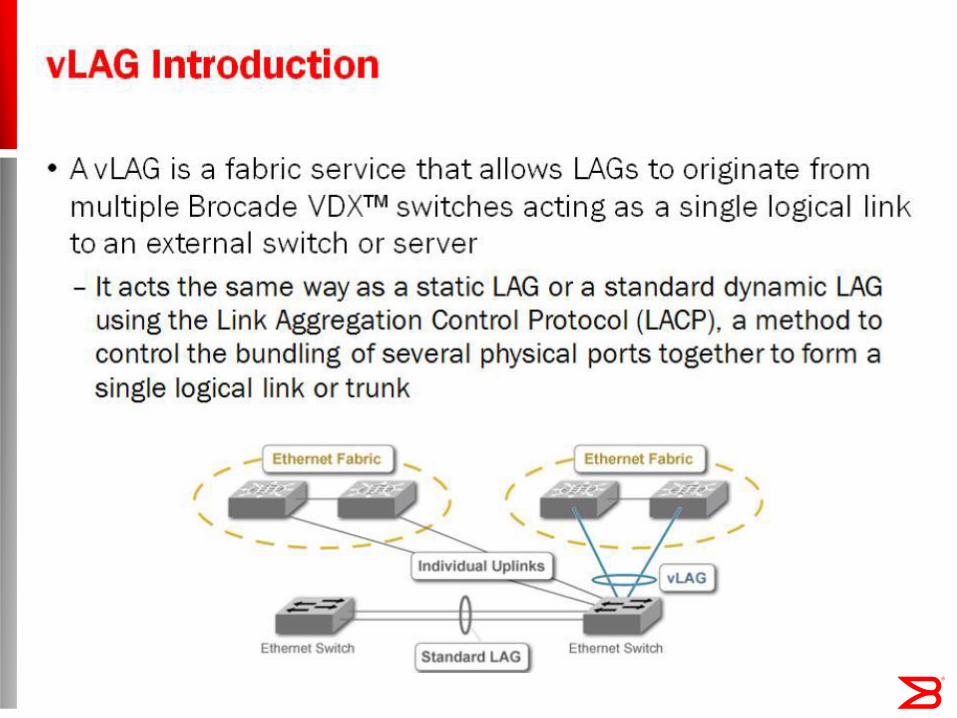
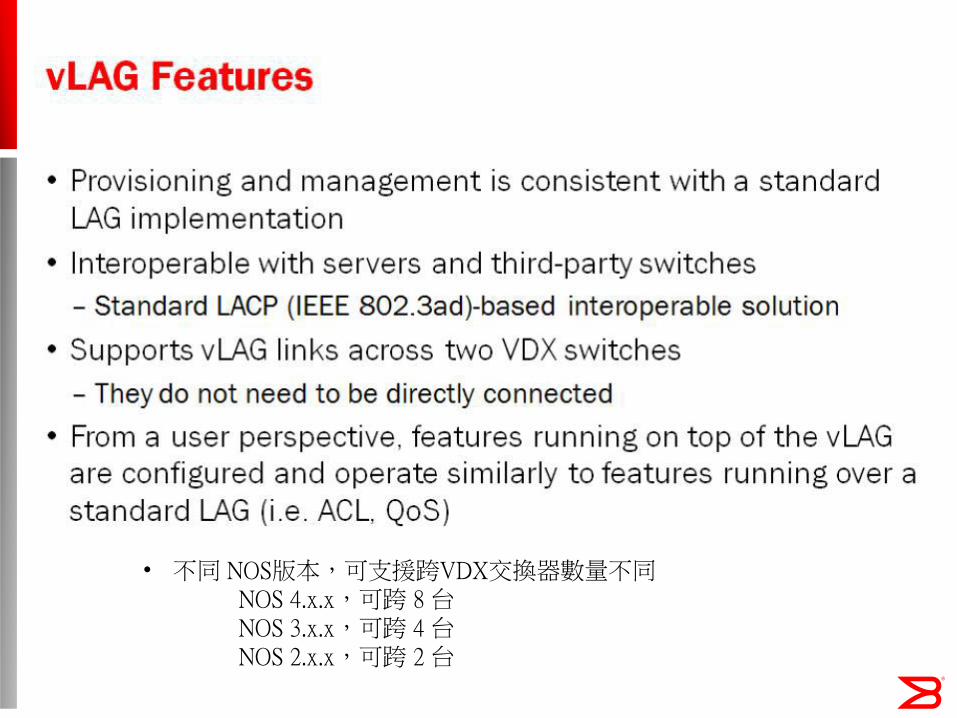
• 不同 NOS版本,可支援跨VDX交換器數量不同NOS 4.x.x,可跨 8 台NOS 3.x.x,可跨 4 台NOS 2.x.x,可跨 2 台


Port-channel L2 常用設定


Inter-VLAN Routing

Integrated Switching and Routing
• Switch within a VLAN(port-to-port)
• Route between VLANs (VLAN-to-VLAN) 1.Configure port-based VLAN 2.Define Virtual Interface (VE) 3.Assign an IP address to the VE

Inter-VLAN Configuration

Verifying Inter-VLAN

Verifying Inter-VLAN

Inter-VLAN Configuration Configure at least two VDXs as Routers for Redundancy

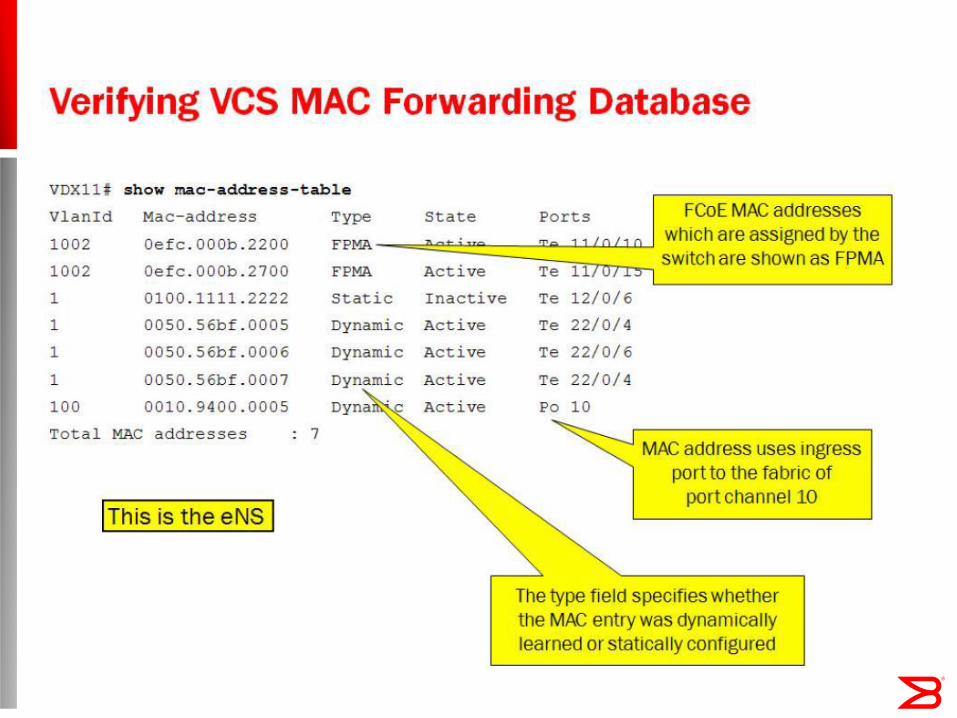
Verifying VCS MAC Forwarding Database

ACL
NOS v3.0.0 ACL Feature Overview

ACL

Configuring Standard ACLs

Configuring Extended ACLs

Extended ACL Examples (cont.)
General Guidelines for Using ACLs

Display ACL Status Example (cont.)
• Status on all ACLs bound to an interface
• Status on an ACL on all interfaces on which it is bound

Display ACL statistics example

Configuring Standard ACLs(L2)
• Example:block host with mac address aaaa.bbbb.cccc
sw0(config)# mac access-list standard test1sw0(conf-macl-std)# deny host aaaa.bbbb.ccccorsw0(conf-macl-std)# deny aaaa.bbbb.cccc ffff.ffff.ffff
sw0(config)# interface TenGigabitEthernet 41/0/5sw0(conf-if-te-41/0/5)# mac access-group test1 in

Configuring Extended ACLs(L2)
• Example:block host from with mac address aaaa.bbbb.cccc to any
sw0(config)# mac access-list standard test2sw0(conf-macl-std)# deny host aaaa.bbbb.cccc any
sw0(config)# interface TenGigabitEthernet 41/0/7sw0(conf-if-te-41/0/5)# mac access-group test2 in

Password Recovery

Password Recovery
•開機時,看到Hit ESC to stop autoboot:5時,按下ESC,
•跳出選單後,選擇3) Enter command shell.
VDX6710 6720 6730

Password Recovery
•出現命令列後,輸入=> setenv OSLoadOptions "single"=> saveenv=> boot
•此時設備會重新啟動
VDX6710 6720 6730

Password Recovery
•等到出現sh-2.04#
VDX6710 6720 6730

Password Recovery
•依序輸入sh-2.04# mount -o remount,rw /sh-2.04# mount /dev/hda2 /mntsh-2.04# /sbin/passwddefaultsh-2.04# bootenv OSLoadOptions "quiet;quiet"sh-2.04# reboot -f
•設備會再次重新啟動
VDX6710 6720 6730

Password Recovery
•啟動完成後,出現登入畫面,使用root/fibranne登入
VDX6710 6720 6730

Password RecoveryVDX6710 6720 6730

Password Recovery
•按enter繼續,出現更換root的密碼的要求,至少要8個字元,輸入完成後出現sw0:root>
VDX6710 6720 6730

Password Recovery
•輸入noscli進入CLI介面sw0:root> noscli
VDX6710 6720 6730

Password Recovery
•進入configuration模式更改admin的密碼,並儲存至startup-config
sw0# configuresw0(config)# username admin password passwordsw0# copy running-config startup-config
VDX6710 6720 6730
Password Recovery
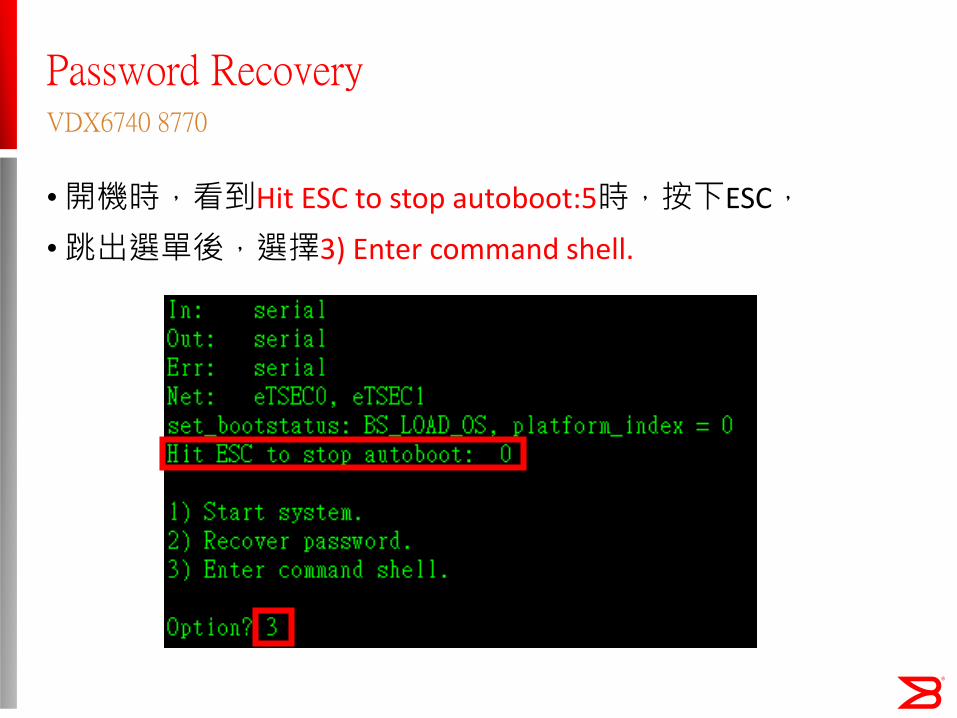
•開機時,看到Hit ESC to stop autoboot:5時,按下ESC,
•跳出選單後,選擇3) Enter command shell.
VDX6740 8770

Password Recovery
•出現命令列後,輸入=> setenv bootargs "root=/dev/sda1 rootfstype=ext4 quiet S"=> saveenv=> boot
•此時設備會重新啟動
VDX6740 8770

Password Recovery
•等到出現sh-2.04#
VDX6740 8770

Password Recovery
•依序輸入sh-2.04# mount -vo remount,rw,noatime /sh-2.04# mount /dev/sda2 /mntsh-2.04# /sbin/passwddefaultsh-2.04# bootenv bootargs "root=/dev/sda1 rootfstype=ext4 quiet"sh-2.04# partman -r
•設備會再次重新啟動
VDX6740 8770

Password Recovery
•啟動完成後,出現登入畫面,使用root/fibranne登入
VDX6740 8770
Password RecoveryVDX6740 8770

Password Recovery
•按enter繼續,出現更換root的密碼的要求,至少要8個字元,輸入完成後出現sw0:root>
VDX6740 8770

Password Recovery
•輸入noscli進入CLI介面sw0:root> noscli
VDX6740 8770
Password Recovery
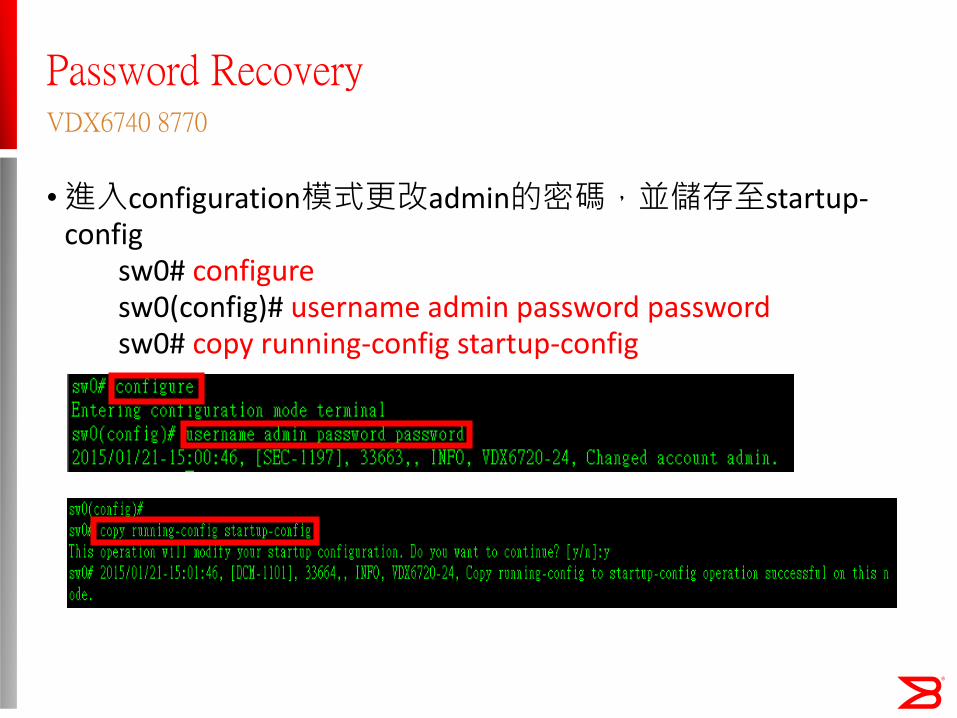
•進入configuration模式更改admin的密碼,並儲存至startup-config
sw0# configuresw0(config)# username admin password passwordsw0# copy running-config startup-config
VDX6740 8770

Thank You!