using vcloud express and infrastructure as a service (iaas ... · ... terremark’s shares,which...
TRANSCRIPT

1
Using vCloud Express and Infrastructure as a Service (IaaS)
By Dave Peru, May 2012 (www.dperu.com, [email protected])
1.0 – Introduction, Cloud Services Defined
What is a Infrastructure as a Service (IaaS) ? IaaS is using internet based services to host our web application. The
diagram below will help you better understand the cloud service model:
* This is a modified version of a diagram taken from “Windows Azure” by Roberto Brunetti
Examples of IaaS: Terremark vCloud Express, Amazon EC2
Examples of PaaS: Microsoft Azure, Google Apps, Amazon AWS
Examples of SaaS: Salesforce.com, Facebook.com
Application
Data
Additional Installations
Operating System
On-premises Data Center
Server
Disk
Network
Application
Data
Additional Installations
Operating System (Updates)
Infrastructure as a Service (IaaS)
Server
Disk
Network
Application
Data
Framework (Requires Rewrite)
Operating System
Platform as a Service (PaaS)
Server
Disk
Network
Application (Less Control)
Data
Additional Whatever
Operating System
Software as a Service (SaaS)
Server
Disk
Network

2
1.1 – Pros and Cons of using Cloud Services versus On-Premises Data Center
Using IaaS provides a number of benefits over a traditional on-premises data center. However, as you probably know
there are no “right” design decisions. There are only different sets of trade-offs.
On-Premise Data Center IaaS PaaS SaaS
Pros Cons Pros Cons Pros Cons Pros Cons
Total control
Capital Expense
Operation Expense, not capital expense
Disk drive net-lag
No installations required from framework and below
May require application rewrite to PaaS framework
No installations required
No customizations or competitive advantage
Own your own bus
People issues
Better service, no network people
Storage is expensive
No network people
Storage is expensive
No software developers
Storage is expensive
Dedicated resources
Physical hardware, layout, and installation may take months
Control of virtual firewall and load balancing
Multi-tenant
Scaling with less configuration
Customer support
Black box
Customer support
Pay once
Power and air conditioning
Provision new servers very quickly
Never stop paying
Proven architecture
Never stop paying
Start working immediately
Never stop paying
Security Security Security Security Security Security Security Security
2.0 – About Terremark
Verizon purchased Terremark January 2011:
“Terremark, which competes with providers such as Savvis or Rackspace to offer managed services and IaaS, has seen its shares rise by 71
percent from this time last year. However, Terremark’s shares,which closed today at $14.05, are still about half the price of Savvis’.
Additionally, Verizon and Terremark are both big VMware customers, offering public clouds based on VMware’s vCloud tools. Verizon plans to
operate the new unit as a wholly-owned subsidiary, retaining the Terremark name and with Terremark’s current management team continuing
to manage the company. A Terremark spokeswoman says the Terremark executive team, including CEO Manny Medina, will stay in place,
and the current business model will stay the same.”
http://gigaom.com/cloud/why-verizon-bought-terremark-for-1-4b/
Terremark offers managed services and IaaS. They have two pricing models for IaaS. Their “Enterprise Cloud” allows
IaaS to be purchased in a fixed per month allocation. Their “vCloud Express” offering is more like Amazon’s EC2 where
you can purchase and be charged based on what you use.
2.1 – Why Terremark vCloud Express?
Here are my reasons for choosing Terremark:
1. Pricing is competitive with other IaaS providers.
2. Their architecture has some innovative features
3. Fly-wheel UPS systems
4. VMware-VMotion
5. Virtualized firewall isolates tenants from each other
6. Support for RDP
7. Cisco VPN, CohesiveFT for VPN tunneling
8. Existing code will deploy to Terremark’s IaaS no changes (no different than your own data center)
9. Feature rich and easy to use control panel
10. Good on security (customer list includes US government agencies)
3
2.2 – VMware’s VMotion
VMware’s VMotion is like RAID 1 drives, but for blades, motherboards, and network cards.
“Second, the active memory and precise execution state of the virtual machine is rapidly transferred over a high speed network, allowing the
virtual machine to instantaneously switch from running on the source ESX host to the destination ESX host. VMotion keeps the transfer period
imperceptible to users by keeping track of on-going memory transactions in a bitmap. Once the entire memory and system state has been
copied over to the target ESX host, VMotion suspends the source virtual machine, copies the bitmap to the target ESX host, and resumes
the virtual machine on the target ESX host. This entire process takes less than two seconds on a Gigabit Ethernet network.”
http://www.vmware.com/files/pdf/VMware-VMotion-DS-EN.pdf
2.3 – Terremark vCloud Express versus Terremark Enterprise Cloud Services
The architectures are identical. With vCloud Express the business model is a pay-as-you-go. You provision and
consume resources paying on a per use basis. With Enterprise Cloud Services, you enter into a contract agreement
where you pay a fixed dollar amount per month for a fixed set of resources you can then allocate from. If you exceed
your allocations, then you will be billed surcharges for what you consume.
The other nice thing about Enterprise Cloud is Terremark will install large data devices like NAS drives within their
network to be made accessible to your instances. You can also arrange for a VPN router configuration so your Enterprise
Cloud instances are part of your internal enterprise network namespace. Essentially, this is extending the security
perimeter with IP firewall tunneling. Dedicated lines can also be arranged to increase bandwidth capabilities. Of course,
extending the enterprise perimeter will require a number of security audits and approvals. The best approach is the get
your own company’s security people to talk with Terremark’s security people. Even then, guard dogs and blast proof
walls may not be enough to overcome corporate politics!
Terremark also provides a number of other services to the enterprise customer so check with their website for your needs.
3.0 – Security Issues
Marketing information from Terremark:
Terremark understands that assuring the confidentiality, integrity and availability of
mission critical information is a top priority for enterprises and government agencies. Our multi-layer approach to delivering security services enables our customers to purchase appropriate risk
reduction services in order to achieve a desired state of protection at all levels within their Enterprise Cloud
environment. Multi-layer security services can be delivered in the cloud to defend your web sites, applications and
data from malicious attacks by combining the most advanced state-of-the-art tools, services and instrumentation,
all managed by a team of trained, experienced and certified security professionals. Terremark’s ability to deliver
advanced security services on the Enterprise Cloud has significantly differentiated it from other platforms, as well
as made it the cloud of choice for government customers such as Data.gov and USA.gov.
Our managed security services can be overlaid in the cloud and can address the following areas of protection and
instrumentation:
Security Services
· Firewall: Customer Managed, Terremark Managed, Co-Managed
· Intrusion Detection Systems: Network and Host Based
· Intrusion Prevention Systems: Network and Host Based
· Logging: Export to Client or Terremark’s Log Aggregation Servers and Security Event and Information
Manager
· Managed Secure information Event and Information manager and 24/7 SOC monitoring
· Encryption: Various Solutions for data in motion and at rest and in archive (VPN’s, Database and Tape
Encryption)
· Managed File Integrity monitoring
· Managed Application Layer Firewalls: Host and Network Based
4
· Managed Scanning: Vulnerability Analysis for Network, Application and Database
· Managed Netflow Aggregation and Anomalous Behavior Monitoring
· Managed Full Network Packet/Disk/Memory Image Capture and Forensics
· Managed Incident Response
· Managed End User Analytics and Root Cause Analysis
· Extensive and successful experience supporting clients with FIPS, NIST 800-53, PCI, HIPAA, ISO
27000, SAS70 Type II, HB 1386
· Complete Suite of Professional Services Available
“A new data center complex under construction in northern Virginia is protected by armed guards, bomb-sniffing dogs,
and blast-proof walls.”
http://www.informationweek.com/news/government/cloud-saas/222002940
Microsoft Azure and Amazon EC2 do not have bomb sniffing guard dogs and blast-proof walls!
3.1 – Support for Compliance Standards
Text from blog post response by Terremark support:
Payment Card Industry (PCI) Compliance - Terremark is a PCI compliant hosting provider which means that we comply with all the
hosting provider PCI requirements and have passed our annual audits. (see usa.visa.com/.../cisp-list-of-pcidss-compliant-service-
providers.pdf). Our hosting provider PCI compliance applies to all our managed hosting and cloud properties. However, simply
hosting your applications with a PCI compliant hosting provider does not automatically qualify you to pass PCI requirements. In
order to achieve all the requirements of PCI you must meet certain criteria and have specific security systems in place to protect
your card holder data (e.g. IDS, patching, log review, etc). At this time Terremark does not make available some of our more
advanced managed security products on vCloud Express. Our Enterprise Cloud platform is better suited for companies that need to
pass PCI compliance.
SAS70 Type II - All of managed hosting solutions, including vCloud Express and Enterprise Cloud, are compliant with the SAS70
Type II certification. We go to great lengths to ensure our controls and processes allow us to achieve this certification.
Health Insurance Portability and Accountability Act (HIPPA) - Terremark's vCloud Express and Enterprise Cloud platforms do not
automatically certify you for HIPPA compliance. Since you are in control of your customer's data you are ultimately responsible for
achieving HIPPA compliance. However, due to our PCI, SAS70 Type II compliance, and Privacy Policies we "help" customers meet
the service provider requirements for HIPPA.
3.2 – Our Specific Security Questions:
Here is Terremark’s response to some security questions:
- Virtual, Physical and Environmental Security - yes
- N+2 Redundant System – even better, N+N redundant
- 24/7/365 on-site Monitoring - yes
- State-of-the Art Data Backup and Recovery – yes, but not vCloud customers, only the infrastructure. vCloud customers are responsible for
their own backup.
- Continuous Network and System Performance
Monitoring (yes) and Predictive Fault Detection (some)
- ISO 27000 (we are compliant but not certified) and SAS70 Type II (SAS70 is being replaced by SAE 16, and yes) Certified
If you have additional security questions then contact Terremark’s sales and support staff directly.
3.3 – Virtual Firewall and Network Addressing
Within the Terremark infrastructure, your virtual machine instances are grouped in pods. Pods have multiple tenants that
all share the pod resources from the same pod resource pool. Each tenant gets a set of network addresses that get
assigned to each instance. For example, in my account, the range of addresses is the following:
10.114.77.131 through 10.114.77.190, a total of 60 unique IP addresses

5
These addresses are only visible to virtual machine instances within the same virtual firewall zone. Other tenants in the
pod cannot “ping” machine instances having these addresses. They are totally inaccessible to other tenants.
4.0 – Using Terremark vCloud Express, Getting Started
We will talk more about security in section 6. For now, here’s a screen shot of Terremark’s vCloud Express web portal:
After you log in, you see the following control panel:
This is the “Environment” tab in the upper right. You can click on “MY ACCOUNT” for account stuff. And “SIGN OUT” to
sign out or just kill the browser.
Below the vCloud Express title, there are three tabs. The first tab titled “Resources” shows your environment’s resources
in use. The second tab “Servers” allows you create and modify resources. The third tab, “Network” allows you to expose
your servers to the public, configure the virtual firewall, and setup which server instances will be grouped together in load
balancing.
4.1 – Creating a Server Instance
Click on the “Servers” tab, you will see the “Servers” page:
The upper right side button control the way the servers are listed:
6
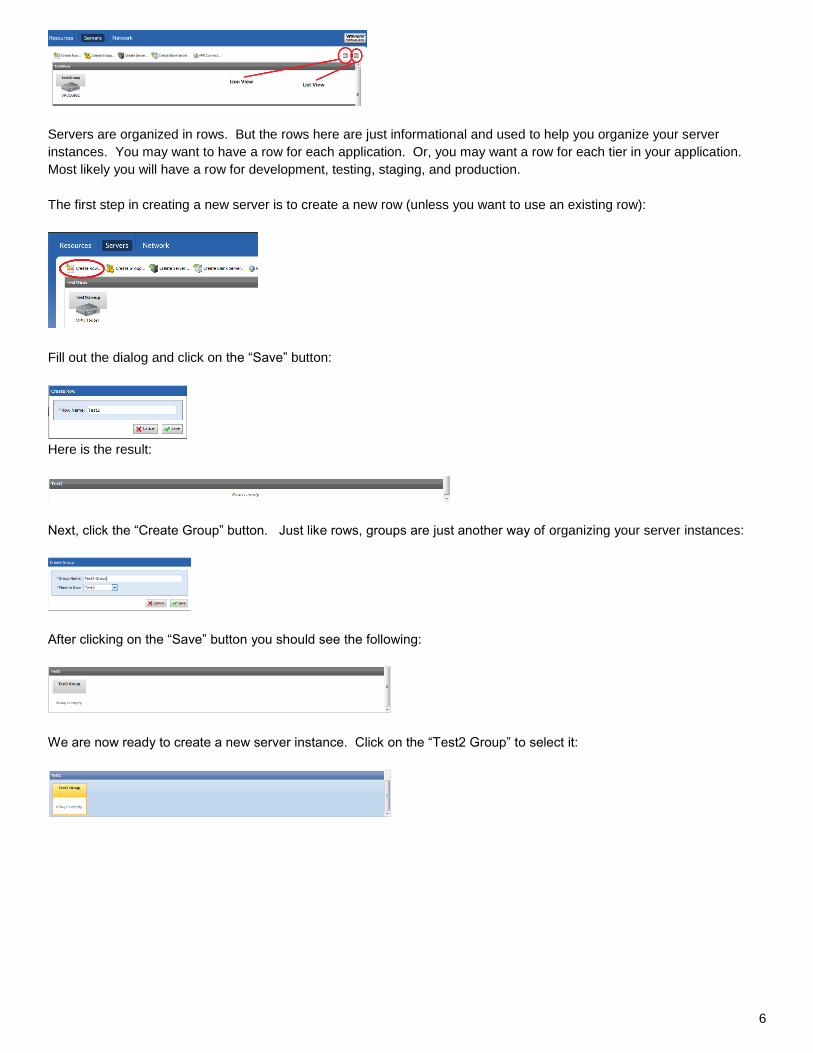
Servers are organized in rows. But the rows here are just informational and used to help you organize your server
instances. You may want to have a row for each application. Or, you may want a row for each tier in your application.
Most likely you will have a row for development, testing, staging, and production.
The first step in creating a new server is to create a new row (unless you want to use an existing row):
Fill out the dialog and click on the “Save” button:
Here is the result:
Next, click the “Create Group” button. Just like rows, groups are just another way of organizing your server instances:
After clicking on the “Save” button you should see the following:
We are now ready to create a new server instance. Click on the “Test2 Group” to select it:

7
Next, click on the “Create Server” button:
Select “OS Only”, “Windows”, and “Windows 2008 Web R2 (64-bit)” as shown above. Then click on the “Next” button to
continue:
Fill out VPU count and memory size, click “Next” button.
Fill out server name, admin password, and click “Next”.
Select row and group to place server instance.
8
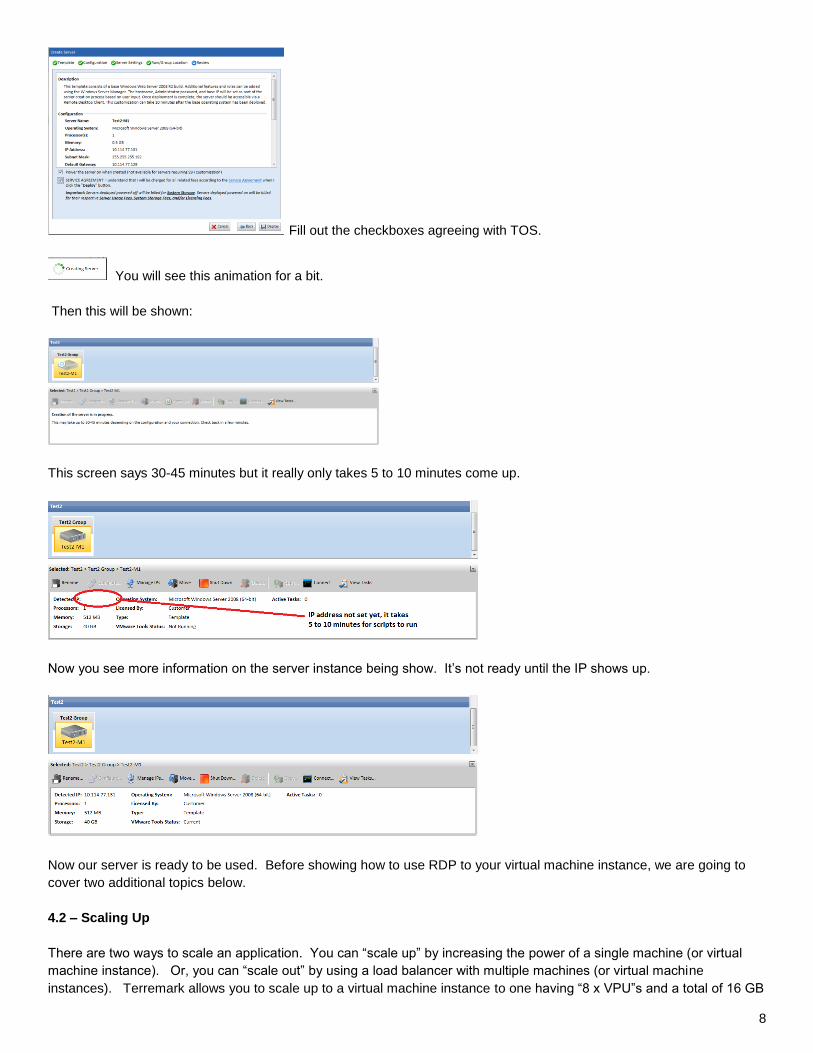
Fill out the checkboxes agreeing with TOS.
You will see this animation for a bit.
Then this will be shown:
This screen says 30-45 minutes but it really only takes 5 to 10 minutes come up.
Now you see more information on the server instance being show. It’s not ready until the IP shows up.
Now our server is ready to be used. Before showing how to use RDP to your virtual machine instance, we are going to
cover two additional topics below.
4.2 – Scaling Up
There are two ways to scale an application. You can “scale up” by increasing the power of a single machine (or virtual
machine instance). Or, you can “scale out” by using a load balancer with multiple machines (or virtual machine
instances). Terremark allows you to scale up to a virtual machine instance to one having “8 x VPU”s and a total of 16 GB
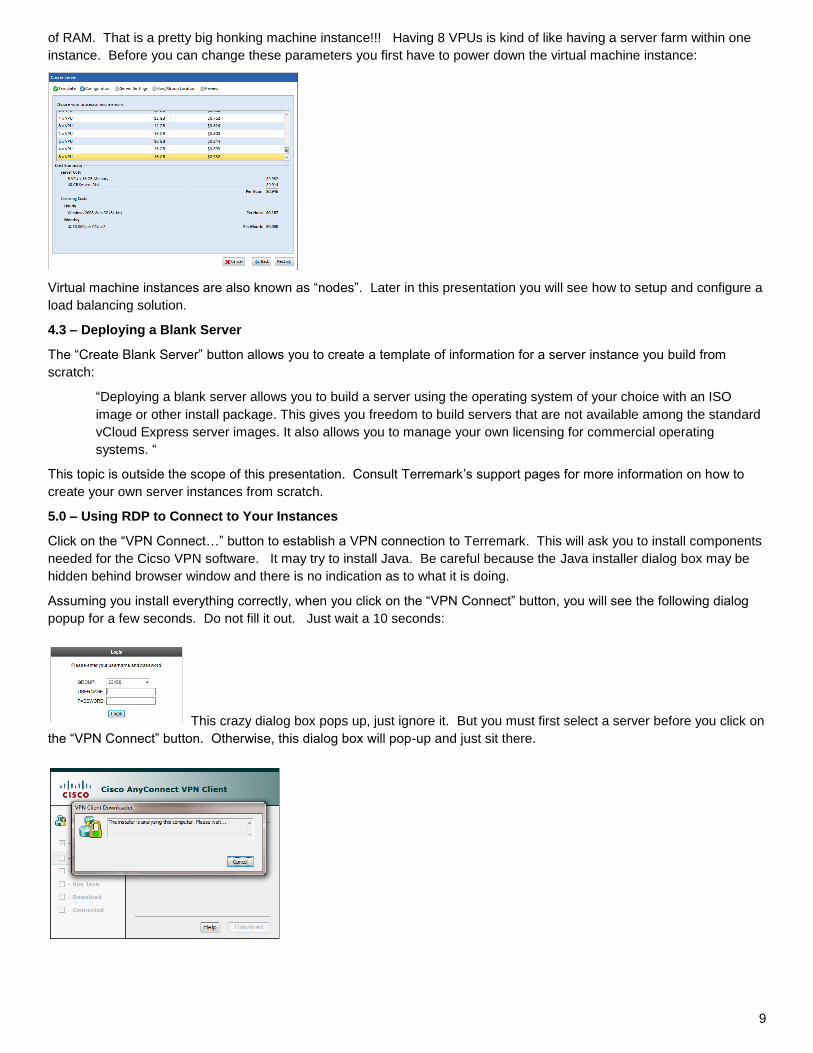
9
of RAM. That is a pretty big honking machine instance!!! Having 8 VPUs is kind of like having a server farm within one
instance. Before you can change these parameters you first have to power down the virtual machine instance:
Virtual machine instances are also known as “nodes”. Later in this presentation you will see how to setup and configure a
load balancing solution.
4.3 – Deploying a Blank Server
The “Create Blank Server” button allows you to create a template of information for a server instance you build from
scratch:
“Deploying a blank server allows you to build a server using the operating system of your choice with an ISO
image or other install package. This gives you freedom to build servers that are not available among the standard
vCloud Express server images. It also allows you to manage your own licensing for commercial operating
systems. “
This topic is outside the scope of this presentation. Consult Terremark’s support pages for more information on how to
create your own server instances from scratch.
5.0 – Using RDP to Connect to Your Instances
Click on the “VPN Connect…” button to establish a VPN connection to Terremark. This will ask you to install components
needed for the Cicso VPN software. It may try to install Java. Be careful because the Java installer dialog box may be
hidden behind browser window and there is no indication as to what it is doing.
Assuming you install everything correctly, when you click on the “VPN Connect” button, you will see the following dialog
popup for a few seconds. Do not fill it out. Just wait a 10 seconds:
This crazy dialog box pops up, just ignore it. But you must first select a server before you click on
the “VPN Connect” button. Otherwise, this dialog box will pop-up and just sit there.

10
Run RDP:
Don’t let the session timeout. If the Cisco VPN session times out you may have to restart your machine.
5.1 – Configure RDP to Have Local Drive Access
When you pull up file explorer within your virtual machine instance, you should see your local drives. You can use your
local drives to copy software into the cloud.
If your local files do not show up, you have to manually configure RDP to allow local drive access:
Click on the “Local Resources” tab:
11
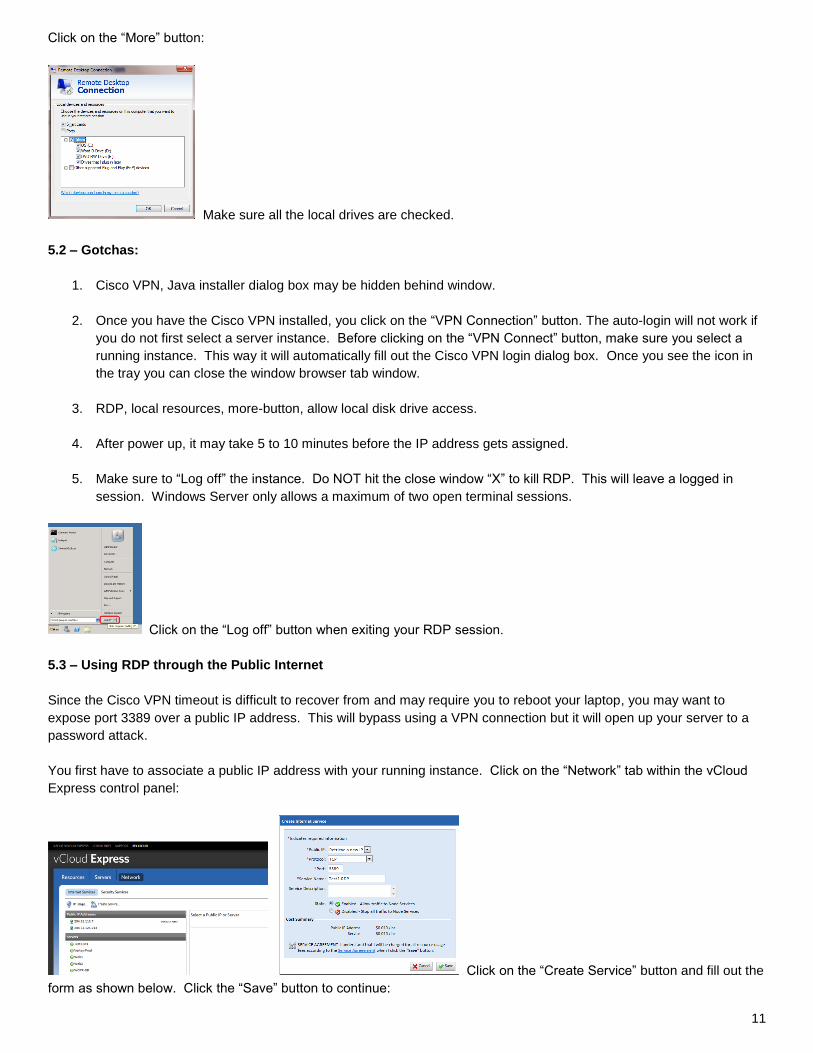
Click on the “More” button:
Make sure all the local drives are checked.
5.2 – Gotchas:
1. Cisco VPN, Java installer dialog box may be hidden behind window.
2. Once you have the Cisco VPN installed, you click on the “VPN Connection” button. The auto-login will not work if
you do not first select a server instance. Before clicking on the “VPN Connect” button, make sure you select a
running instance. This way it will automatically fill out the Cisco VPN login dialog box. Once you see the icon in
the tray you can close the window browser tab window.
3. RDP, local resources, more-button, allow local disk drive access.
4. After power up, it may take 5 to 10 minutes before the IP address gets assigned.
5. Make sure to “Log off” the instance. Do NOT hit the close window “X” to kill RDP. This will leave a logged in
session. Windows Server only allows a maximum of two open terminal sessions.
Click on the “Log off” button when exiting your RDP session.
5.3 – Using RDP through the Public Internet
Since the Cisco VPN timeout is difficult to recover from and may require you to reboot your laptop, you may want to
expose port 3389 over a public IP address. This will bypass using a VPN connection but it will open up your server to a
password attack.
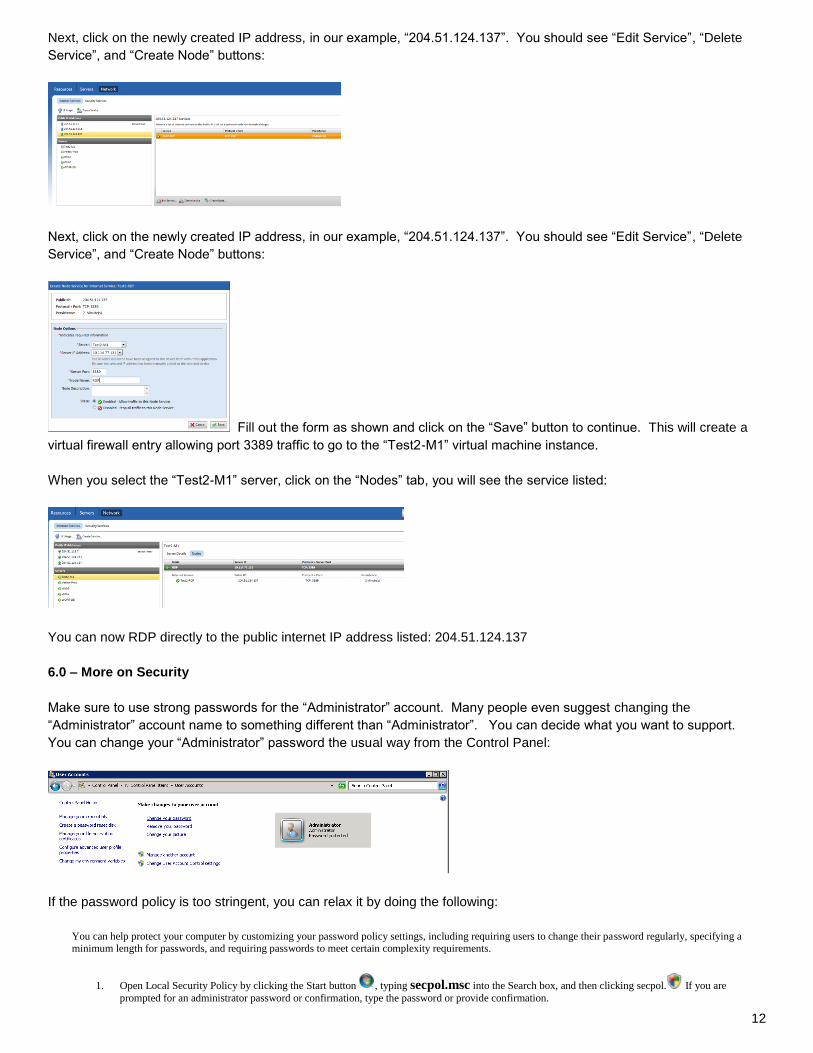
You first have to associate a public IP address with your running instance. Click on the “Network” tab within the vCloud
Express control panel:
Click on the “Create Service” button and fill out the
form as shown below. Click the “Save” button to continue:
12
Next, click on the newly created IP address, in our example, “204.51.124.137”. You should see “Edit Service”, “Delete
Service”, and “Create Node” buttons:
Next, click on the newly created IP address, in our example, “204.51.124.137”. You should see “Edit Service”, “Delete
Service”, and “Create Node” buttons:
Fill out the form as shown and click on the “Save” button to continue. This will create a
virtual firewall entry allowing port 3389 traffic to go to the “Test2-M1” virtual machine instance.
When you select the “Test2-M1” server, click on the “Nodes” tab, you will see the service listed:
You can now RDP directly to the public internet IP address listed: 204.51.124.137
6.0 – More on Security
Make sure to use strong passwords for the “Administrator” account. Many people even suggest changing the
“Administrator” account name to something different than “Administrator”. You can decide what you want to support.
You can change your “Administrator” password the usual way from the Control Panel:
If the password policy is too stringent, you can relax it by doing the following:
You can help protect your computer by customizing your password policy settings, including requiring users to change their password regularly, specifying a minimum length for passwords, and requiring passwords to meet certain complexity requirements.
1. Open Local Security Policy by clicking the Start button , typing secpol.msc into the Search box, and then clicking secpol. If you are
prompted for an administrator password or confirmation, type the password or provide confirmation.
13
2. In the Navigation pane, double-click Account Policies, and then click Password Policy. 3. Double-click the item in the Policy list that you want to change.
6.1 – Listening Ports and Local O/S Firewalls
Since our machine instances are going to be running in a multi-tenant environment, it is important to understand TCP/IP
port vulnerabilities. When running your Windows instances, each open TCP/IP port with a listening agent is a security
risk. To see all the “listening ports”, use the “netstat –a” command:
6.2 – Configuring Windows Firewall
In addition to the Terremark virtual firewall, it’s probably a good idea to configure the Windows operating system firewall.
However, you have to be careful how you do this. If you turn the firewall on before you configuring it, you will not be able
to RDP back into your running instance! Guess how I figured out this little tidbit!?! Half the time I learn by making
mistakes and the other half of the time I just get lucky!
Here’s a script that will allow you to setup and turn on the firewall without destroying your ability to connect to your
instance:
netsh advfirewall firewall add rule name="Open Port 3389" dir=in action=allow protocol=TCP localport=3389
netsh advfirewall firewall add rule name="Open Port 80" dir=in action=allow protocol=TCP localport=80
netsh advfirewall firewall add rule name="Open Port 443" dir=in action=allow protocol=TCP localport=443
netsh advfirewall set currentprofile state on
Put these lines in a file “configure_firewall.bat” and run it from a command prompt on your running instance.
Next, in the Control Panel, click on the firewall icon:
You should see the following: Click on the “Use recommended
settings” button.

14
You should now see the following:
The firewall is now configured. This is somewhat overkill since the Terremark virtual firewall will filter out everything first.
Remember, now that you have the local O/S firewall working, if you want to open up a new service say for port 21 or port
1433, after you configure the virtual firewall make sure you configure the Windows firewall also. The bigger the burn the
longer the memory!!!
6.2 – Pinch Program and Penetration Testing
The next thing we are going to talk about is penetration testing. On my website www.dperu.com there’s a link for zip file
for a program called “pinch.exe”. The password for the zip file is “password”.
The pinch.exe program is a simple five line program that does a socket connect attempt and then disconnects if
successful or times out. Sometimes “ping” is turned off. And using “telnet” is invasive because it allows protocol elements
to be exchanged. The pinch.exe program does simple non-intrusive port penetration testing.
From a running Terremark instance, below show the pinch program testing ports on another instance:
Here’s from my laptop pinching the public IP address we setup in the earlier section of this document:
I have used the pinch program to test connectivity to other tenants in the Terremark IP address space. In all my attempts,
I was never able to make any connections to any 10-dot addresses or any of the ports in the name space.

15
6.3 – Change the Workgroup Name
The default workgroup for Terremark instances is “Workgroup”. Changing the workgroup is a key security protection. If
you share a folder, Windows will open all the firewall rules to allow file sharing access. Then any machine capable of
routing packets to your box can get access to shares if they have the same account name and workgroup name. I have
not tested this but I believe the passwords do not have to match on the two machines! Do not expose NetBIOS ports
through the virtual firewall without at least making sure you have strong passwords.
Right click over the “Computer” icon and select properties from the pop-up menu:
Select the “Computer Name” tab, and then click on the “Change” button. Set the Workgroup name to your specification:
Click the OK button and you will then see the welcome pop-up dialog:
Click OK and then you will see the following pop-up:
Click OK, and then click OK again. But this time make sure you click on the “Restart Later” button as shown below. The
problem with doing a “Restart Now” from Windows is the instance does not always recover. You will then have to use the
control panel to stop and start the instance several times to get the instance back.
Never click “Restart Now”, follow the instructions below.
16
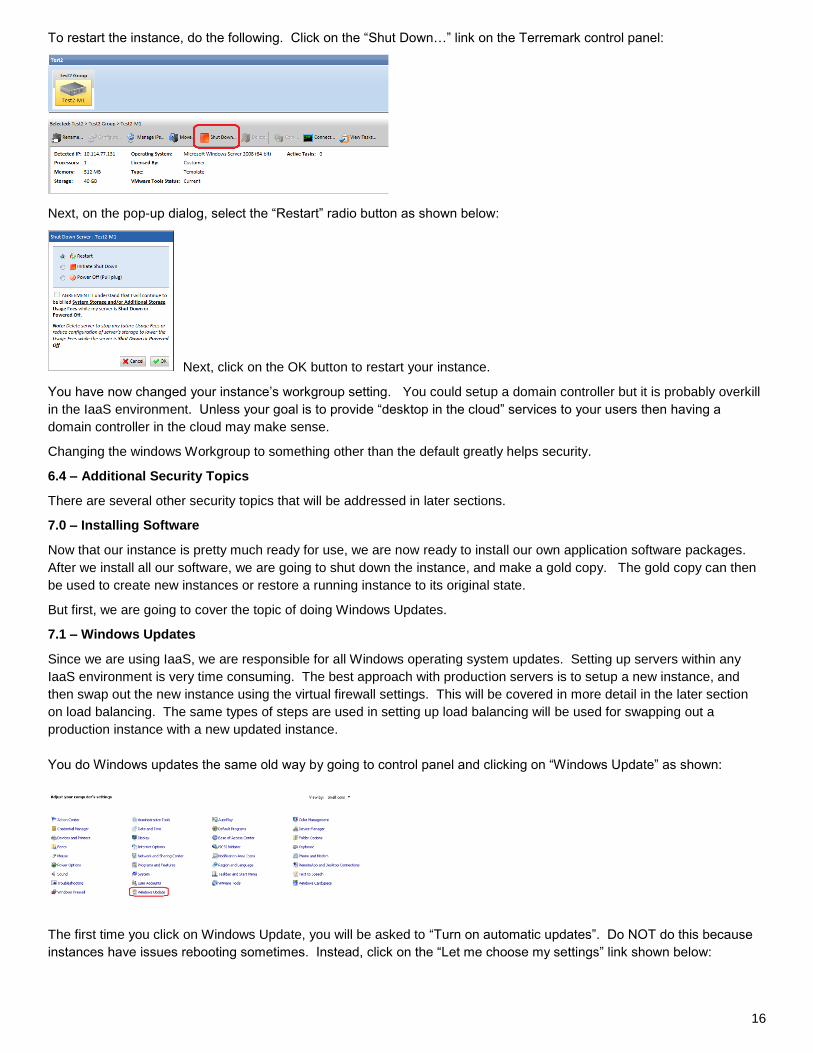
To restart the instance, do the following. Click on the “Shut Down…” link on the Terremark control panel:
Next, on the pop-up dialog, select the “Restart” radio button as shown below:
Next, click on the OK button to restart your instance.
You have now changed your instance’s workgroup setting. You could setup a domain controller but it is probably overkill
in the IaaS environment. Unless your goal is to provide “desktop in the cloud” services to your users then having a
domain controller in the cloud may make sense.
Changing the windows Workgroup to something other than the default greatly helps security.
6.4 – Additional Security Topics
There are several other security topics that will be addressed in later sections.
7.0 – Installing Software
Now that our instance is pretty much ready for use, we are now ready to install our own application software packages.
After we install all our software, we are going to shut down the instance, and make a gold copy. The gold copy can then
be used to create new instances or restore a running instance to its original state.
But first, we are going to cover the topic of doing Windows Updates.
7.1 – Windows Updates
Since we are using IaaS, we are responsible for all Windows operating system updates. Setting up servers within any
IaaS environment is very time consuming. The best approach with production servers is to setup a new instance, and
then swap out the new instance using the virtual firewall settings. This will be covered in more detail in the later section
on load balancing. The same types of steps are used in setting up load balancing will be used for swapping out a
production instance with a new updated instance.
You do Windows updates the same old way by going to control panel and clicking on “Windows Update” as shown:
The first time you click on Windows Update, you will be asked to “Turn on automatic updates”. Do NOT do this because
instances have issues rebooting sometimes. Instead, click on the “Let me choose my settings” link shown below:

17
Select “Check for updates but let me choose whether to download and install them” as shown:
Checking for updates seems really slow to me in the IaaS environment. This may be because the server instance is using
NAS drives for the system disk.
Again, downloading updates takes a lot longer in the IaaS environment. This is probably caused by additional net-lag
introduced by having diskless servers and the amount of data being downloaded. There are some advantages to owning
your own bus!
Once your updates are installed, do NOT click on the “Restart now” button. Instead follow the instructions below:
To restart the instance, do the following. Click on the “Shut Down…” link on the Terremark control panel:
Next, on the pop-up dialog, select the “Restart” radio button and then click OK. Sometimes updates will fail in the IaaS
environment. You may have to check for updates several times before you instance is completely up-to-date.

18
7.2 – Installing IIS and WCF
Next we are going to install IIS on the instance. Open the Control Panel and click on the Programs and Features link:
Next, click on the “Turn Windows features on or off” link as shown below:
Click on the “Add Roles” button as shown.
Click on the “Next” button to continue.
Select “Web Server (IIS)” and click the “Next” button.
Just click the “Next” button here to continue.

19
Select “ASP.NET”, then click “Next”.
Click “Install” to continue.
IIS is now being installed.
IIS is now installed. Click on the “Close” button.
We now need to install WCF and SMTP. Below “Roles”, click on the “Features” link:

20
Select “WCF” and “SMTP Server” checkboxes.
Click “Next” to continue. You should see the following:
Click “Next” button to continue.
Just click “Next” at this point.
Next, just click the “Install” button.
Wait for the installation to complete.
21
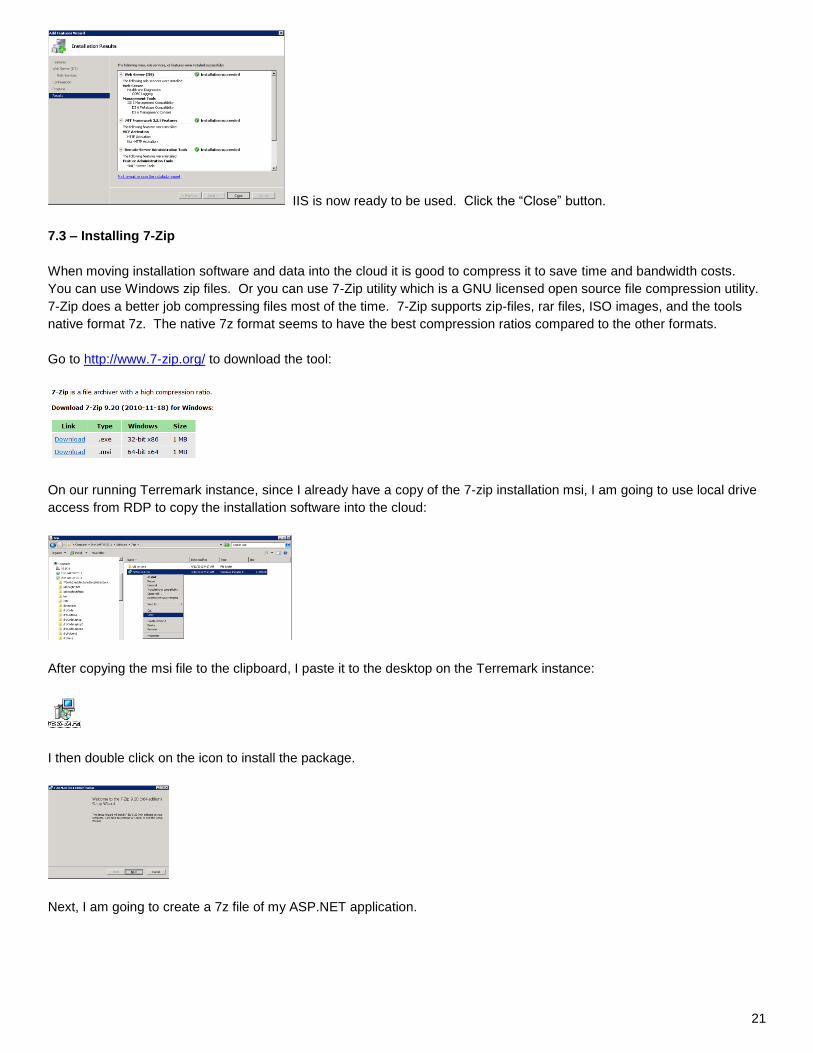
IIS is now ready to be used. Click the “Close” button.
7.3 – Installing 7-Zip
When moving installation software and data into the cloud it is good to compress it to save time and bandwidth costs.
You can use Windows zip files. Or you can use 7-Zip utility which is a GNU licensed open source file compression utility.
7-Zip does a better job compressing files most of the time. 7-Zip supports zip-files, rar files, ISO images, and the tools
native format 7z. The native 7z format seems to have the best compression ratios compared to the other formats.
Go to http://www.7-zip.org/ to download the tool:
On our running Terremark instance, since I already have a copy of the 7-zip installation msi, I am going to use local drive
access from RDP to copy the installation software into the cloud:
After copying the msi file to the clipboard, I paste it to the desktop on the Terremark instance:
I then double click on the icon to install the package.
Next, I am going to create a 7z file of my ASP.NET application.

22
7.4 – Installing Our Application
Here is a simple web page we are going to use as our application example. Here is the listing for “Default.aspx”:
1 <%@ Page Language="C#" AutoEventWireup="true" CodeFile="Default.aspx.cs" Inherits="_Default" %>
2 <!DOCTYPE html PUBLIC "-//W3C//DTD XHTML 1.0 Transitional//EN" "http://www.w3.org/TR/xhtml1/DTD/xhtml1-transitional.dtd">
3 <html xmlns="http://www.w3.org/1999/xhtml">
4 <head runat="server">
5 <title>Default.aspx</title>
6 </head>
7 <body>
8 <form id="form1" runat="server">
9 <div>
10 <asp:Label ID="Label1" runat="server" Text="" />
11 </div>
12 </form>
13 </body>
14 </html>
Here is the listing for the “Default.aspx.cs” code:
1 using System;
2 using System.Web;
3 using System.Web.Security;
4 using System.Web.UI;
5 using System.Web.UI.HtmlControls;
6 using System.Web.UI.WebControls;
7 using System.Web.UI.WebControls.WebParts;
8
9 public partial class _Default : System.Web.UI.Page
10 {
11 protected void Page_Load(object sender, EventArgs e)
12 {
13 Label1.Text = DateTime.Now.ToString();
14 }
15 }
The only default setting changed in the web.config file is the following line:
<authentication mode="Forms" />
Here is the page in action from Visual Studio’s “View in browser”:
Next, we are going to do is publish our application to a local laptop directory. I’ve created a folder
“d:\PublishedWebsitesForCloudDeployment”. Under this folder I created another folder called “test1.domain.com”. Next,
from Visual Studio, I publish to the “test1.domain.com” folder:
Select “Publish Web Site” from the top level menu, click OK.

23
We now use 7-Zip to create a 7z file of our application. Select the directory, click on the “Add” icon.
Just take the default, and click on the OK button.
We now copy the 7z file into a folder on our Terremark instance:
Right click over the 7z file, select “Extract Here” from popup menu.
7.5 – Configuring IIS to Use Host Headers
The next step is to run Internet Information (IIS) Manger and create a new website. Double click on the icon shown
below:
Right click over the “Sites” folder, select “Add Web Site…” from the popup menu.
Fill out the form as shown, then click on the OK button.
After you click the OK button, it may take some time before the site goes green.

24
Next, from a command prompt, use the “ipconfig” command to find out your
current instance’s IP address. Right this down.
Next, edit the HOSTS file using Notepad.exe so we can add a fake or local DNS entry:
Add the DNS entry for
your host header.
7.6 – Testing Our Application
When you enter your domain name in the browser, it should now bring up our site:
7.7 – Making Our Application Publically Accessible
From the Terremark control panel, click on the Network tab. Select the IP address we created from Section 5.3, in our
example, 204.51.124.137 as shown:
You should see the following.
25
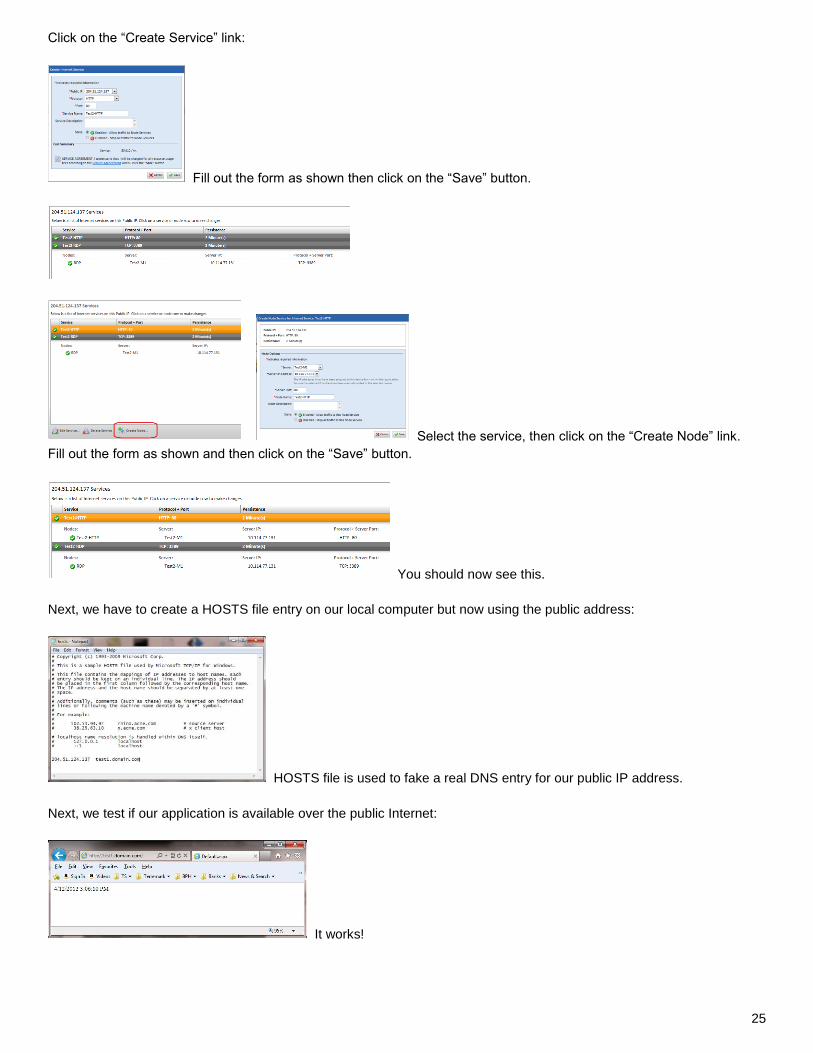
Click on the “Create Service” link:
Fill out the form as shown then click on the “Save” button.
Select the service, then click on the “Create Node” link.
Fill out the form as shown and then click on the “Save” button.
You should now see this.
Next, we have to create a HOSTS file entry on our local computer but now using the public address:
HOSTS file is used to fake a real DNS entry for our public IP address.
Next, we test if our application is available over the public Internet:
It works!

26
8.0 – More Security, Stop the Default Website, Use Host Headers
When we installed our application, we used Internet Information (IIS) Manger to create our website. When you create a
website, you specify host header values for HTTP requests that would be handled by a specific website. The screenshot
shown below shows the “Edit Bindings” dialog that pops up from Internet Information (IIS) Manger when you click on the
“Binding…” link:
By having a specific host header entry, in our example “test1.domain.com”, all other HTTP traffic is ignored.
When install IIS, a default website will be created. This default website is a huge security risk. By default, the default
website does not require any host headers. For example, our public IP address was 204.51.124.137. By having the
default site running you will immediately see attacks against your server in the IIS log for the default website. A best
security practice is to shut off the default website:
This shows all the bindings the default website will be used for an HTTP
response. Click on the “Stop” link in Internet Information (IIS) Manger to shut down the default website:
After you stop it you will see the green arrow and “Start” link enabled.
8.1 – Port 1433 Security Risks
You have to be careful if you expose port 1433 to the public Internet. Starting with SQL Server 2008, the “sa” account is
now disabled by default. If you do expose port 1433 to the public Internet and you check SQL Server Logs you will find a
bunch of failed security login attempts on the “sa” account.
Double click one of the log files to check for any failed log in attempts.
You could change the port to something different than 1433, but that really
doesn’t help much. See the section 8.3 on why changing the port doesn’t really help. It general, it is not a good idea to

27
expose port 1433 to the public internet since the attacks are so fierce, it may actually become a denial of service attack.
Database performance will degrade as a result of so many failed log-in attempts!
8.2 – Port 3389 Security Risks
To see if someone is making a password attacks go to the Control Panel. Then go to Administrator Tools. Open Event
Viewer and go to the Security section:
You can then see all the failed login attacks from attack bots. Use something other than “Administrator” for the
administrator account.
8.3 – Algorithms versus Keys
You can use a different port for SQL Server or RDP, but the first rule of computer security is to assume your hacker
knows your security algorithm. And therefore, key management becomes the most import aspect in a good security
design. So far in this document we have identified a number of security issues. But the strength of our security really
comes down to our key management. Here are the keys that matter most:
1. Terremark account password used when logging into the portal
2. Account passwords, if port 3389 is exposed to the public internet
3. “sa” password, or any other SQL account, if port 1433 is exposed to the public internet
The strength of our security design all comes down to using strong passwords and managing our keys securely. Certainly
using obscure account names will also help as well as using strong passwords.
9.0 – “Gold” Copy, Making New Copies of Servers
Making a copy of an instance will copy everything including the contents of the extra persistent drives. The only thing
that is not copied is parts of the Administrator’s profile which is dynamically created the first time based on the password
credentials you provide.
First, power down the server instance, you should see the icon as follows:
After shut down, click on the “Copy” button:
Click “Next” to continue.
Select one of the available private cloud IP addresses.

28
Fill out the form and the “Next” button.
Check the agreements boxes and click on “Deploy” button.
You should now see the following:
This may take up to 30 to 40 minutes to complete. Once the gold copy as an IP assigned it is in the ready
state. Just shut it down so you will not be charge for hourly usage. But you will still be charge for storage.
10.0 – Additional Disk Storage
Our original configuration of the instance came with 40 gig of C persistent storage space. If you need a larger additional
drive, first power off the instance. Then click on the “Configure” button link:
Next, click on the “Disks” tab shown above. Then click
on the “Add Disk” button. Select the size of the disk as shown below (25 gig increments). Click Save button.

29
After you get the disk size selected, check the service agreement and then click on the “Save” button. Next, “Power On”
the instance. Next, you have to configure the partition. Go to Control Panel and click on Computer Management icon:
Just click OK on the first time popup.
Disk 1 now shows up, but it is not partitioned or formatted.
Next, right click over the CD-ROM to change the drive letter:
You should now see the CD-ROM as drive E.
Right click over Disk 1, select “New Simple Volume…” from the popup menu.
Select all the defaults:
Click on the “Finish” button on the wizard:
The drive is now ready. This shows properties from file Explorer.

30
10.1 – Delete Additional Disk Storage
Power down the instance and then you click on the “Configure…” button link, click on the icon shown below to delete an
additional disk. Check the service agreement checkbox and then click on the Save button:
11.0 – Working with the Load Balancer
In order to scale an application you can either increase the power of your machine. Or you divide workloads up between
several machines organized into a load balancing group. Load balancing is normally done in the data center using
special routers and hardware. When using Terremark’s IaaS, Terremark’s virtual firewall also acts as a load balancer.
Setting up loading balancing is very simple. You can do it with just a few mouse clicks. The first thing we do is shut
down our instance. Then we make a copy. Then bring the second instance back up. The screen shot below shows our
two instances in the Test2 row. The Test2 row and the Test2 Group is just informational. You have to do more to setup
the load balancing:
Next, click on the “Network” tab. Then click on the public IP that we want to use for setting up load balancing:
Next, is the right area pane, select the “Service” as shown below:
Next, once you select the service, you will see the “Create Node” button link. Click on it and fill out the form for the
second instance:
Click the save button when finished. You are done. You will see the following and your load
balancing is now set:

31
Two instances are now configured for load balancing.
11.1 – BuzzRunner and Load Testing
You can get BuzzRunner from www.dperu.com. This tool allows you to put a load on your server farm. To get this to
work, add a HOSTS file entry on the machine running BuzzRunner to fake a DNS entry:
204.51.124.137 test1.domain.com
When you run BuzzRunner, set the URL and 40 threads. Click the GO button:
Since the load balancer has a sticky bit, all the traffic goes to one instance, that is, the 10.114.77.132 instance. If you wait
5 minutes, and run it again, it will use the next instance in the load balancing set. You can run a second process. But the
result is the same. You could create 10 cloud instances and run BuzzRunner on all of them to put a serious load on your
server farm!
11.2 – Membership and Roles
Since Terremark’s load balancing sticks with the same instance until timeout, you can use session as you normally would
even though you are using a load balancer. The same is true with Membership and Roles forms based login. If the
loading balancing algorithm were not “sticky”, you would have to setup and create a “machineKey” that is set to the same
key in the web.config for all the instances in the server farm. Here’s an example of the lines you would include:
<system.web> <machineKey validationKey="A04F6E9EF7324EF8B1CF154DC6EF5607E278DBE19033632CADE230407D178DE61F0D2AEF267FF5693D42AC907EC5E21F0DBDA399EF08086C1AC6075B8B6B2C19" decryptionKey="3CD73DCE8E53D6D2249DA37350FDEC7131556796B380389537D7477DD6BC62F7" validation="SHA1" decryption="AES" />
Here is a URL on how to generate your own machineKey:
http://www.codeproject.com/Articles/221889/How-to-Generate-Machine-Key-in-IIS7
If you were going to use the same Membership and Roles login to access more than one application, then you will still
have to create a Machine-Key to share with all your applications.

32
11.3 – Sticky Bits and Session
Since the load balancer is sticky to the instance the user comes in on, you can use ASP.net session as you would for a
single instance. However, it is probably a good idea to synchronize the load balancer’s timeout with the ASP.net session
timeout. To configure the load balancer’s timeout, click on “Edit Service” button after you select the service:
After selecting the service, click on “Edit Service”
The “Persistence” value can be 2 to 5 minutes.
Next, in the web.config, set the session timeout also to 5 minutes:
<system.web>
<sessionState timeout="5"/>
You may want longer but in a high volume website you 5 minutes is probably the maximum you would ever want to hold a
session. It would be nice if the value were set to zero it would put the load balancer is a true round robin mode. Oh well, I
asked for this feature.
12.0 – Using a Database Server
Next, we are going to show how to setup a database to be used by our server instances in the load balancing set. Create
a new server, but this time choose “OS + Database”, “Windows”, and “Windows 2008 Standard R2 with SQL 2008 Web
R2 (64-bit)”. The web edition of SQL Server will only cost you an additional $19 per month which will show up on your bill.
SQL Server Web edition has everything you need for using a database to drive your web pages. It does not have some of
the other tools and features like SSIS, SSAS, etc. But it does come with SQL Server Management Studio. Standard
Edition has a $250 per month additional software license fee.
After creating the instance, log into the first time. Clean up the profile. Launch Management Studio once and get through
all the initializations. Do all the operating system updates as described previously in this document. You are now ready
to install a database.
12.1 – Installing the Database
Here are the steps for installing a database:

33
1. Create a local database used for development.
2. Create a “bak” file.
3. Create a blank database on the instance.
4. Use 7-zip to create a 7z file of the “bak” file.
5. Copy the 7z file into the cloud
6. Decompress the 7z, restore the “bak” file to the blank database on the instance
I like to move the databases out of the “Program Files” folder and into a known location. Moving the database out from
under the “Program Files” folder requires detaching and then re-attaching the database.
12.2 – Configure HOSTS File Entries
At this time, there are no DNS services available to Terremark server instances in the 10.x.x.x. namespace. Instead, we
simply fake DNS entries using the HOSTS file. Each server instance in the load balancing set has the following HOSTS
file entry:
10.114.77.135 db.domain.com
12.3 – Database Test Page
For testing the database we are going to show image-rotator. The images will be pulled from local files. Each time the
page is refreshed, the next file in the list will be used. The list of files to show will come from a database table.
Here’s a partial listing of the web.config file used in our testing:
21 <appSettings>
22 <add key="ImagePath" value="c:\cats2"/>
23 </appSettings>
24
25 <connectionStrings>
26 <clear/>
27 <add name="N3UG" connectionString="Data Source=db.domain.com;Initial Catalog=N3UG;User ID=n3ug1;Password=gandalf"
providerName="System.Data.SqlClient"/>
28 </connectionStrings>
29
30 <system.web>
31
32 <sessionState timeout="5"/>
Here’s the code for the main test page:
1 <%@ Page Language="C#" AutoEventWireup="true" CodeFile="Test1.aspx.cs" Inherits="Test1" %>
2
3 <!DOCTYPE html PUBLIC "-//W3C//DTD XHTML 1.0 Transitional//EN" "http://www.w3.org/TR/xhtml1/DTD/xhtml1-transitional.dtd">
4
5 <html xmlns="http://www.w3.org/1999/xhtml">
6 <head runat="server">
7 <title>Test1.aspx</title>
8 </head>
9 <body>
10 <form id="form1" runat="server">
11 <div>
12 <asp:Image ID="Image1" runat="server" ImageUrl="GetImage.aspx" />
13 </div>
14 </form>
15 </body>
16 </html>
And here’s the code for “GetImage.aspx”:
1 <%@ Page Language="C#" AutoEventWireup="true" CodeFile="GetImage.aspx.cs" Inherits="GetImage" %>

34
And here’s the code for “GetImage.aspx.cs” that will rotate the images:
20 public partial class GetImage : System.Web.UI.Page
21 {
57 protected void Page_Load(object sender, EventArgs e)
58 {
59 try
60 {
61 Response.ClearHeaders();
62 Response.ClearContent();
63
64 // Create pathFileName:
65 //
66 StringBuilder sb = new StringBuilder();
67 sb.Append(ConfigurationManager.AppSettings["ImagePath"].ToString());
68 if (sb.ToString().Substring(sb.ToString().Length - 1, 1) != "/")
69 {
70 if (sb.ToString().Substring(sb.ToString().Length - 1, 1) != "\\")
71 {
72 sb.Append("/");
73 }
74 }
75 sb.Append(GetNextFileName());
76 string pathFileName = sb.ToString();
77
78 // Authorization and access control code goes here...
79 //
80
81 // Write out HTTP headers:
82 //
83 Response.ContentType = "application/octet-stream";
84 Response.AppendHeader("content-disposition", "attachment; filename=" + pathFileName);
85
86 // Write file to HTTP output stream:
87 //
88 Response.TransmitFile(pathFileName); // Fastest way to serve files in IIS.
89 }
90 catch (Exception ex)
91 {
92 Response.ContentType = "text/plain";
93 Response.Write(ex.Message);
94 return;
95 }
96 }
97
98 private int GetTotalFileCount()
99 {
100 ImageListFP fp = new ImageListFP();
101 ImageListBLL imageListBLL = new ImageListBLL();
102 return imageListBLL.GetCount(fp);
103 }
104
105 private string GetNextFileName()
106 {
107 ImageListFP fp = new ImageListFP();
108 ImageListBLL imageListBLL = new ImageListBLL();
109 PagingParameters pp = new PagingParameters();
110 pp.StartRowIndex = CurrentFileIndex;
111 pp.MaximumRows = 1;
112 ++CurrentFileIndex;
113 if (CurrentFileIndex >= TotalFileCount)
114 {
115 CurrentFileIndex = 1;
116 }
117 List<ImageList> imageListRecords = imageListBLL.GetAll(fp, pp, "ImageListId");
118 if (imageListRecords == null || imageListRecords.Count == 0)
119 {

35
120 return null;
121 }
122 else
123 {
124 return imageListRecords[0].FileName;
125 }
126 }
127 }
Here’s the code in action:
Response.TransmitFile may be the fast most efficient way to serve images and large data files from the cloud.
13.0 – Additional Security Precautions
You can configure the Window’s firewall on your database server to only to accept connections from cloud based IP
addresses of your virtual machine instances participating in your load balancer.
This is probably overkill but sometimes overkill will cut down the amount of fussing made by the security guys.
13.1 – Session Security
Here’s a note from Microsoft on the session security:
Security Note
SessionID values are sent in clear text, whether as a cookie or as part of the URL. A malicious user could get access to the session of another
user by obtaining the SessionID value and including it in requests to the server. If you are storing sensitive information in session state, it is
recommended that you use SSL to encrypt any communication between the browser and server that includes the SessionID value.
To help improve security, you may want to save some meta-information in session. The values in the following server
variables contain the kind of meta-information about the HTTP request:
REMOTE_ADDR
REMOTE_HOST
LOGON_USER
HTTP_USER_AGENT

36
If these values do not match on the next request, then you reject it. You can do this check in a MasterPage to make sure
it is done for all pages. It will not be as strong as using SSL, but it will reduce the risk of someone doing a simple man-in-
the-middle attack. By validating these values on each request it will require a hacker to be a little more sophisticated in
spoofing the headers.
As stated previously, the first rule of internet security is to assume your hacker knows your security algorithm. So it is a
better best practice to provide additional user authentication within an SSL session for any HTTP transactions containing
meaningful or sensitive data.
13.2 – Encrypting Sections of the web.config File
It’s probably more overkill but you may want to encrypt the connection string section of the web.config file as well as other
sections. You can search the Internet for instructions on how to do this.
13.3 – Setting Up a VPN Tunnel
It is best to eliminate exposing any ports like 3389 (RDP) to the public Internet. If you want to create a permanent VPN
tunnel to your private cloud space at Terremark, you have setup and configure an IPsec device to establish a connection.
We have not done this yet so the exact steps are still a work in progress. Here’s a quote for a support Email on the
subject:
I've confirmed that with Cohesive FT (according to their support group) you can connect to your vCloud Express servers without connecting to
our VPN first using their product. I'm still following up on how much it costs, because it looks like the free edition only allows 5 connections.
Which means of course the there is an extra cost associated with the commercial version.
Here is what the support person told me:
"VPN-Cubed can provide connectivity between the cloud deployment and the customer datacenter locations via IPsec connectivity. VPN-
Cubed can connect to any IPsec device that supports: IKE1 or IKE2, AES256 or AES128 or 3DES, SHA1 or MD5, and NAT-
Traversal. Assuming there is such a device at each office location, users would be able to RDP directly to the servers over a secure end-to-
end connection."
So this solution means an IPsec Device at each location.
Here’s another Email talking about CohesiveFT support and documentation:
Whenever you are installing one of the CohesiveFT installs, the last step is a confirmation page that shows the default login and username,
etc. It also includes a link to the documentation for that particular template. Here is the one for the commercial edition:
http://www.cohesiveft.com/dnld/VPN-Cubed_IPsec-to-Terremark_Lite,SME,ENT_Edition_2010218.pdf
It looks pretty good, including info on how to organize the Vms in a logical structure with groups and rows. When I talked to support yesterday,
they did tell me that any presales support questions could be answered by [email protected].
By having a VPN tunnel to your private cloud space, you will not have to expose port 3389 (RDP) or port 1433 (SQL
Server) to the public Internet. This is a very good security precaution preventing a class of password attacks.
13.4 – Strong Passwords
Your best defense against security breaches is to use strong passwords and change them often.
37
14.0 – Billing Reports
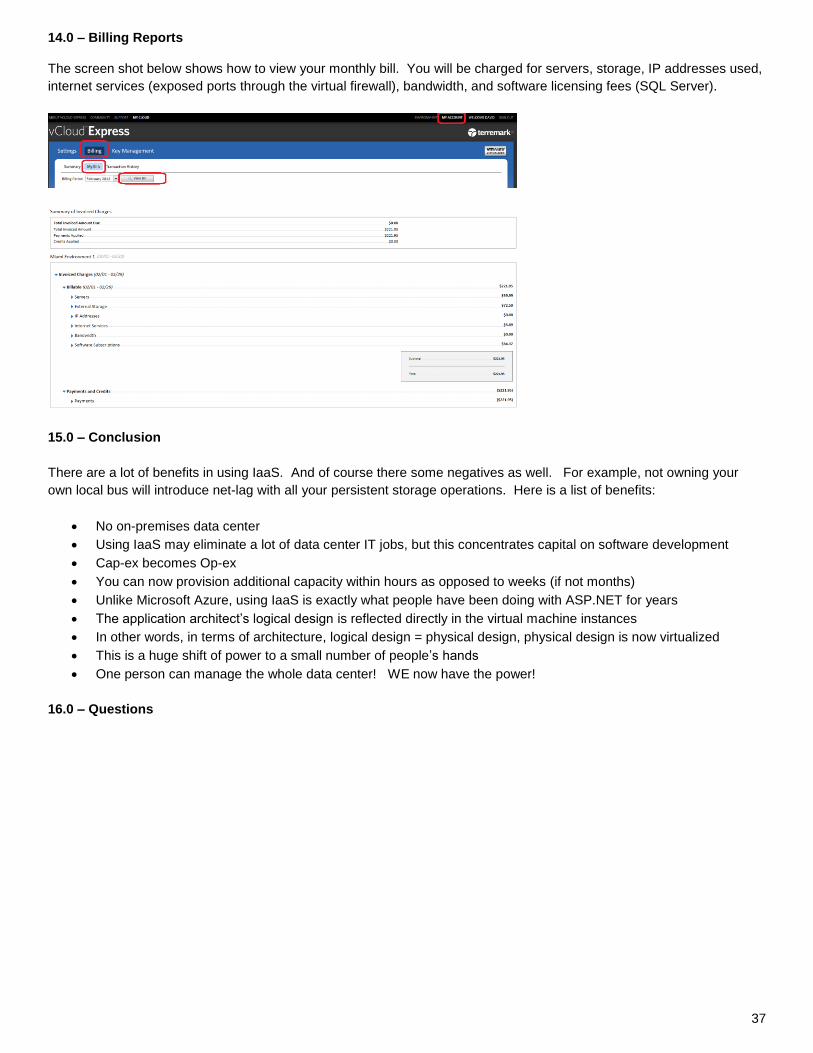
The screen shot below shows how to view your monthly bill. You will be charged for servers, storage, IP addresses used,
internet services (exposed ports through the virtual firewall), bandwidth, and software licensing fees (SQL Server).
15.0 – Conclusion
There are a lot of benefits in using IaaS. And of course there some negatives as well. For example, not owning your
own local bus will introduce net-lag with all your persistent storage operations. Here is a list of benefits:
No on-premises data center
Using IaaS may eliminate a lot of data center IT jobs, but this concentrates capital on software development
Cap-ex becomes Op-ex
You can now provision additional capacity within hours as opposed to weeks (if not months)
Unlike Microsoft Azure, using IaaS is exactly what people have been doing with ASP.NET for years
The application architect’s logical design is reflected directly in the virtual machine instances
In other words, in terms of architecture, logical design = physical design, physical design is now virtualized
This is a huge shift of power to a small number of people’s hands
One person can manage the whole data center! WE now have the power!
16.0 – Questions