using the wae device manager gui up the configuration files the backup tab enables you to back up...
TRANSCRIPT
Cisco WOL-12063-01
C H A P T E R10
Using the WAE Device Manager GUIThis chapter describes how to use the WAE Device Manager GUI, which is a separate interface from the WAAS Central Manager GUI. The WAE Device Manager is a web-based management interface that allows you to control and monitor an individual WAE device in your network.The WAAS Central Manager device does not have a WAE Device Manager interface. In many cases, the same device settings are found in both the WAE Device Manager and the WAAS Central Manager GUI. For this reason, we recommend that you always configure device settings from the WAAS Central Manager GUI if possible.
When you change device settings in the WAE Device Manager, the changes are propagated to the WAAS Central Manager and override the group settings for that device. If you later decide that you want the group settings to override the settings that you configured from the WAE Device Manager, you can use the group override features in the WAAS Central Manager GUI. For more information, see the “Overriding Group Configuration Settings” section on page 3-10.
Note Throughout this chapter, the term WAAS device is used to refer collectively to the WAAS Central Managers and WAEs in your network. The term WAE refers to WAE appliances and WAE Network Modules (the NME-WAE family of devices).
This chapter contains the following sections:
• Launching the WAE Device Manager, page 10-2
• A Quick Tour of the WAE Device Manager, page 10-3
• WAE Management Workflow, page 10-3
• Managing a Cisco WAE, page 10-4
• Managing the WAFS Core, page 10-20
• Managing a WAFS Edge Device, page 10-22
• Monitoring the WAE, page 10-26
• Viewing WAE Logs, page 10-36
10-1ide Area Application Services Configuration Guide
Chapter 10 Using the WAE Device Manager GUILaunching the WAE Device Manager
Launching the WAE Device ManagerEach WAAS device is managed separately using the WAE Device Manager web-based interface. You can launch the WAE Device Manager remotely from any location on the Cisco WAAS network using Internet Explorer.
To launch the WAE Device Manager, use one of the following methods:
• Go to https://Device_IP_Address:8443/mgr
The Login window of the WAE Device Manager appears. Enter your username and password in the fields provided and click Login. The default username is admin and the default password is default.
• From the WAAS Central Manager GUI, choose Device > Devices, click the Edit icon next to the device that you want to manage, and click the Device GUI button in the middle of the window.
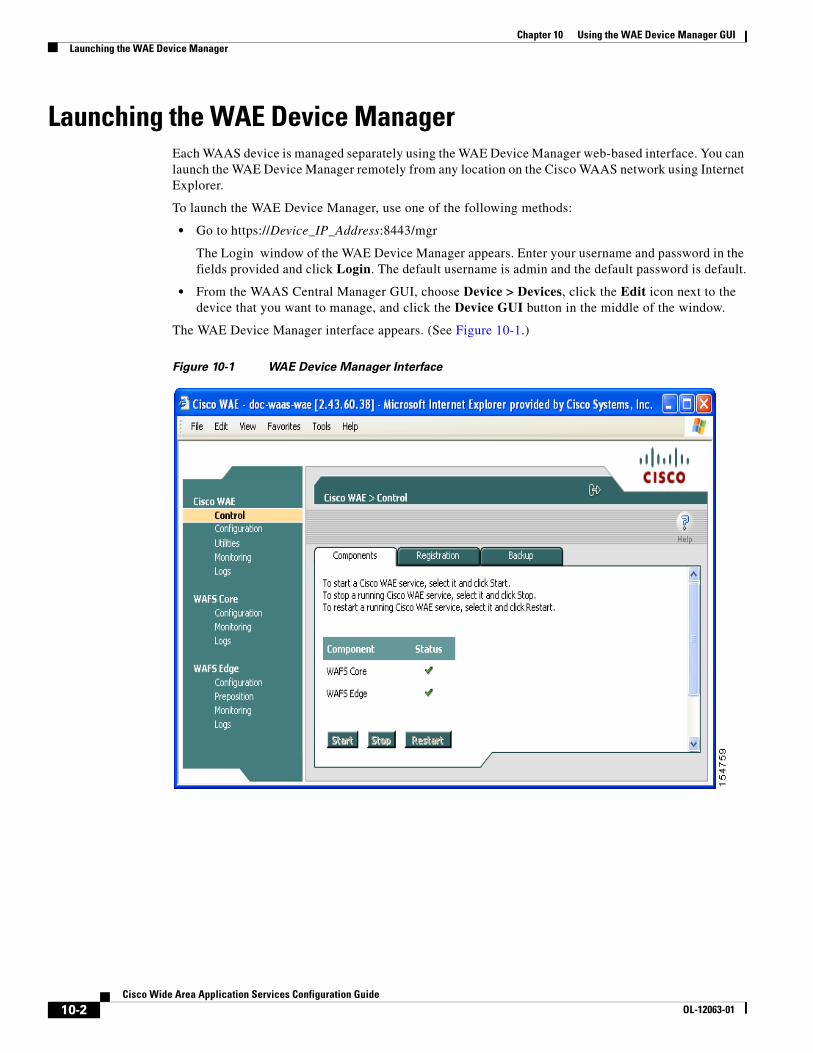
The WAE Device Manager interface appears. (See Figure 10-1.)
Figure 10-1 WAE Device Manager Interface
10-2Cisco Wide Area Application Services Configuration Guide
OL-12063-01
Chapter 10 Using the WAE Device Manager GUIA Quick Tour of the WAE Device Manager
A Quick Tour of the WAE Device Manager The WAE Device Manager is divided into two sections. The area on the left displays the navigation area. The area on the right displays information about the options that you have selected from the navigation area.
The navigation area allows you to navigate the management screens for different WAE components. The navigation area includes the following options:
• Cisco WAE—Allows you to start and stop the WAE components, register and unregister the WAE, back up and restore configuration files, and use various WAE utilities. For more information, see the “Managing a Cisco WAE” section on page 10-4.
• WAFS Core—Allows you to view the list of file servers connected to the WAFS Core and specify file server details, such as the access username and password. For more information, see the “Managing the WAFS Core” section on page 10-20.
• The WAFS Core option only appears if you have configured this WAAS device as a core device. For more information, see Chapter 11, “Configuring WAFS.”
• WAFS Edge—Allows you to configure the CIFS settings, perform name registrations, monitor preposition tasks, and view WAFS Core connections. For more information, see the “Managing a WAFS Edge Device” section on page 10-22.
The WAFS Edge option appears only if you have configured this WAAS device as a WAFS Edge. For more information, see Chapter 11, “Configuring WAFS.”
The options in the navigation area include suboptions, which when selected, display additional tabs in the display area. Mandatory fields in the display area are indicated with an asterisk. If you click Save without entering a value in a mandatory field, an error message is displayed. Click the Back link to return to the window where the error occurred.
Information displayed in tables can be sorted by clicking the column headers. Clicking the header a second time sorts the information in reverse order.
As you navigate in the WAE Device Manager, your current location is always displayed across the top of the display area.
To log out of the WAE Device Manager, click the icon on the upper-right side of the display area.
Note JavaScripts, cookies, and popup windows must be enabled in the web browser to use the WAE Device Manager.
WAE Management WorkflowAfter WAEs have been deployed and registered (as described in the Cisco Wide Area Application Services Quick Configuration Guide), use the WAE Device Manager to perform the following actions:
• Start and stop components as described in the “Starting and Stopping Components” section on page 10-5.
• Register and unregister the WAE as described in the “Registering and Unregistering a WAE” section on page 10-6.
• Back up and restore configuration files as described in the “Backing Up the Configuration Files” section on page 10-8.
10-3Cisco Wide Area Application Services Configuration Guide
OL-12063-01

Chapter 10 Using the WAE Device Manager GUIManaging a Cisco WAE
• Configure Windows authentication as described in the “Configuring Windows Authentication” section on page 10-11.
• Define component-specific notification recipients as described in the “Defining Notification Settings” section on page 10-17.
• Run WAE maintenance utilities as described in the “Utilities Option” section on page 10-18.
• View the details, current status, and history of preposition tasks performed on WAFS Edge devices as described in the “Preposition Option” section on page 10-24.
• View SNMP-generated information and graphs about each WAE component as described in the “Monitoring the WAE” section on page 10-26.
• View the logs for each WAE component as described in the “Viewing WAE Logs” section on page 10-36.
Managing a Cisco WAEYou use the Cisco WAE menu item in the navigation area to perform basic operations such as viewing the status of WAE components and stop or start components on the WAE. Figure 10-2 shows the Cisco WAE Control window.
Figure 10-2 Cisco WAE Control Window
10-4Cisco Wide Area Application Services Configuration Guide
OL-12063-01
Chapter 10 Using the WAE Device Manager GUIManaging a Cisco WAE
The Cisco WAE menu item includes the following options:
• Control—Enables you to control the WAE and its components as described in the “Control Option” section on page 10-5.
• Configuration—Enables you to perform basic configuration tasks as described in the “Configuration Option” section on page 10-9.
• Utilities—Enables you to run various maintenance utilities on the WAE as described in the “Utilities Option” section on page 10-18.
• Monitoring—Enables you to view tables and graphs about the CPU and disk utilization in the WAE as described in the “Monitoring the WAE” section on page 10-26.
• Logs—Enables you to view event logs for various WAE subsystems as described in the “Viewing WAE Logs” section on page 10-36.
Control OptionThe Control option displays the following tabs:
• Components—Enables you to view the working status of each WAE component. You can start, stop, and restart any component. For more information, see the “Starting and Stopping Components” section on page 10-5.
• Registration—Enables you to register or unregister the WAE with the WAAS Central Manager. For more information, see the “Registering and Unregistering a WAE” section on page 10-6.
• Backup—Enables you to download and save WAE configuration files and to restore these files back to the WAE, if required. For more information, see the “Backing Up the Configuration Files” section on page 10-8 and the “Restoring the Configuration Files” section on page 10-8.
Starting and Stopping Components
The Components tab enables you to view which components are running and which components are not, and allows you to start, stop, and restart components.
From this tab you can click Refresh to update the status of each component and update the WAE Device Manager interface to reflect recent changes made to the device from the WAAS Central Manager GUI. For example, if the device is configured to be a WAFS Edge device while you are logged into the WAE Device Manager, that change is not reflected until you either click Refresh or log in again to the WAE Device Manager.
Note If a component is not running, most of its configuration can be performed offline. However, any configuration changes made to the component will take effect only after it is restarted.
To start and stop components, follow these steps:
Step 1 In the Components tab of the Cisco WAE Control window, select the component that you want to activate and click Start.
After a few seconds, a green checkmark appears next to the selected component, indicating its status is running, as shown in Figure 10-3.
10-5Cisco Wide Area Application Services Configuration Guide
OL-12063-01

Chapter 10 Using the WAE Device Manager GUIManaging a Cisco WAE
Figure 10-3 Components Tab—Starting Components
• To stop a component, choose the component from the list and click Stop.
After a few seconds, a red appears next to the selected component, indicating that it is no longer running.
• To restart a WAE component, choose the component from the list and click Restart.
• To display the current status of the WAE components, click Refresh.
Registering and Unregistering a WAE
The Registration tab enables you to register the WAE with the specified WAAS Central Manager or unregister the WAE. After the WAE is registered, you can view and manage it from the WAAS Central Manager GUI.
To register the WAE, follow these steps:
Step 1 In the Cisco WAE Control window, click the Registration tab. (See Figure 10-4.)
10-6Cisco Wide Area Application Services Configuration Guide
OL-12063-01

Chapter 10 Using the WAE Device Manager GUIManaging a Cisco WAE
Figure 10-4 Cisco WAE Control —Registration Tab
Step 2 In the Central Host field, verify that the address of the WAAS Central Manager is displayed. If no address appears in this field, then the WAE is not registered with a Central Manager.
Step 3 Click Register to register the WAE.
The “Registration will update the WAE properties in the WAAS Central Manager. Are you sure?” message is displayed. Click OK. If successful, the “Appliance registered successfully” message is displayed.
Step 4 Click Unregister to unregister the Cisco WAE.
If successful, the “Appliance unregistered successfully” message is displayed.
Note When you unregister a WAE, any policies defined for it in the WAAS Central Manager GUI are removed.
10-7Cisco Wide Area Application Services Configuration Guide
OL-12063-01

Chapter 10 Using the WAE Device Manager GUIManaging a Cisco WAE
Backing Up the Configuration Files
The Backup tab enables you to back up and restore the configuration files of the WAE.
To back up the WAE configuration, follow these steps:
Step 1 In the Cisco WAE Control window, click the Backup tab. (See Figure 10-5.)
Figure 10-5 Cisco WAE Control —Backup Tab
Step 2 In the Download configuration backup area, click Download.
Step 3 In the File Download window, click Save.
Step 4 In the Save As window, browse to where you want to save the file. You can also change the filename.
Step 5 Click Save.
The WAE configuration files are downloaded to the selected destination folder and stored in a single, compressed file.
For information about restoring files from a backup, see the Restoring the Configuration Files section.
Restoring the Configuration Files
The Backup tab enables you to restore the configuration files of the WAE. Restoring the configuration returns the WAE to its previous state when the backup was performed.
To restore the configuration files, follow these steps:
Step 1 In the Restore configuration from backup area, click Browse to navigate to the location of the backup file that you want to restore.
10-8Cisco Wide Area Application Services Configuration Guide
OL-12063-01
Chapter 10 Using the WAE Device Manager GUIManaging a Cisco WAE
Step 2 Click Upload to restore the selected configuration files.
Note After the upload is completed, the WAE will be reloaded.
Configuration OptionThe Configuration option for the Cisco WAE menu item displays the following tabs:
• SNMP—Allows you to enable event MIB and logging traps on the WAE. For more information, see the “Configuring SNMP Settings” section on page 10-9.
• Networking—Allows you to view WAE settings defined during initial device setup described in the Cisco Wide Area Application Services Quick Configuration Guide. For more information, see the “Viewing Network Settings” section on page 10-10.
• Windows Authentication—Allows you to define the settings required by the WAE for Windows authentication to enable device login, disconnected mode, and CLI configuration. For more information, see the “Configuring Windows Authentication” section on page 10-11.
• Notifier—Allows you to define the e-mail address to which notifications are sent when alerts are generated by the WAE. For more information, see the “Defining Notification Settings” section on page 10-17.
Note The same Notifier option is available in the WAFS Edge and WAFS Core components.
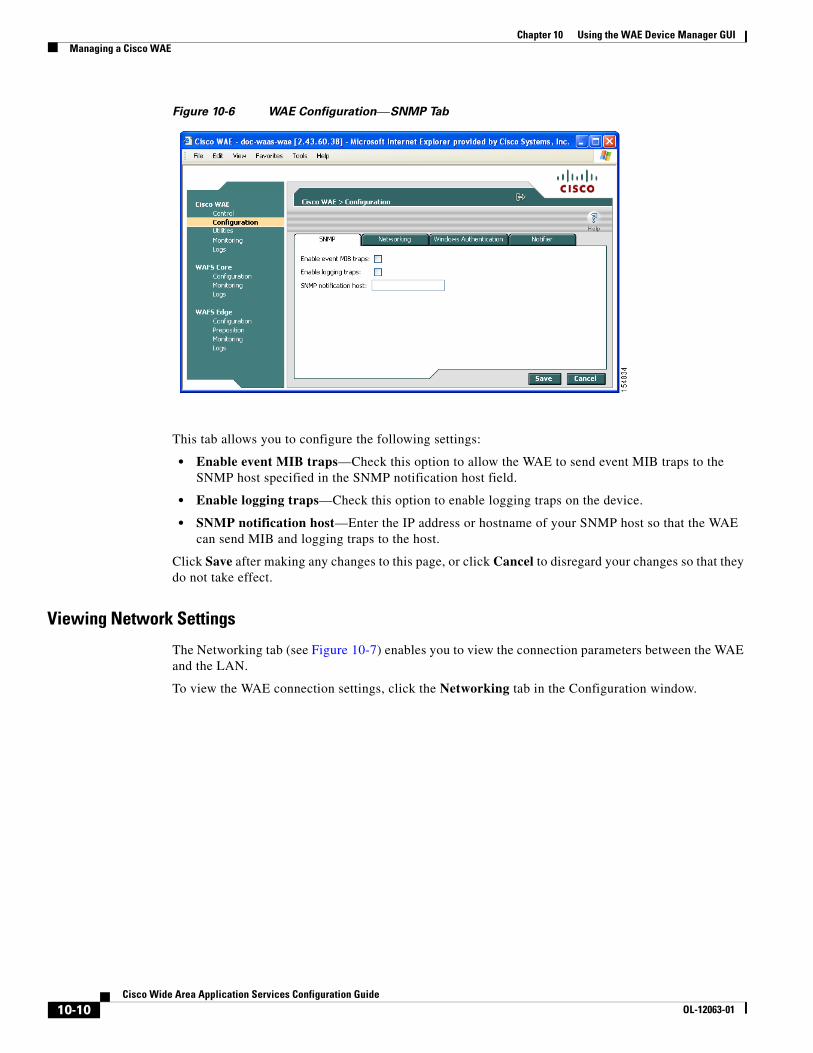
Configuring SNMP Settings
The SNMP tab allows you to configure the SNMP settings on the Cisco WAE. To configure the SNMP settings, click the SNMP tab in the Configuration window. The SNMP tab appears. (See Figure 10-6.)
10-9Cisco Wide Area Application Services Configuration Guide
OL-12063-01
Chapter 10 Using the WAE Device Manager GUIManaging a Cisco WAE
Figure 10-6 WAE Configuration—SNMP Tab
This tab allows you to configure the following settings:
• Enable event MIB traps—Check this option to allow the WAE to send event MIB traps to the SNMP host specified in the SNMP notification host field.
• Enable logging traps—Check this option to enable logging traps on the device.
• SNMP notification host—Enter the IP address or hostname of your SNMP host so that the WAE can send MIB and logging traps to the host.
Click Save after making any changes to this page, or click Cancel to disregard your changes so that they do not take effect.
Viewing Network Settings
The Networking tab (see Figure 10-7) enables you to view the connection parameters between the WAE and the LAN.
To view the WAE connection settings, click the Networking tab in the Configuration window.
10-10Cisco Wide Area Application Services Configuration Guide
OL-12063-01

Chapter 10 Using the WAE Device Manager GUIManaging a Cisco WAE
Figure 10-7 Cisco WAE Configuration—Networking Tab
The Networking tab contains the following information:
• Machine name—The hostname of the WAE.
• DHCP—Whether a DHCP server is available on the network.
• IP Address
• Net mask
• Default Gateway
• DNS Server 1
• DNS Server 2
• Domain Name
• MAC Address
• Time Zone
Configuring Windows Authentication
The WAAS Central Manager GUI and the WAE Device Manager use Pluggable Authentication Modules (PAM) for user login authentication. Administrative users defined in the WAAS Central Manager GUI are distributed to the WAE Device Managers. Administrative user authentication is performed only upon login to the WAAS Central Manager GUI or the WAE Device Manager. Each WAE has a default GUI and CLI user with the username admin and password default. This user account cannot be deleted, but the password can be changed.
10-11Cisco Wide Area Application Services Configuration Guide
OL-12063-01
Chapter 10 Using the WAE Device Manager GUIManaging a Cisco WAE
Note In situations where the CLI user account information conflicts with the management GUI configuration, the management GUI configuration will overwrite any conflicting CLI user account information at the time of configuration distribution. A warning is displayed to CLI users after configuring CLI user account settings to inform users of this behavior.
This section contains the following topics:
• “Understanding Login Authentication and Authorization Through the Local Database” section on page 10-12
• “Supported Authentication Methods” section on page 10-12
• “LDAP Server Signing” section on page 10-12
• “Setting Up Windows Authentication” section on page 10-13
• “Checking the Status of Windows Authentication” section on page 10-15
Understanding Login Authentication and Authorization Through the Local Database
Local user authentication and authorization use locally configured usernames and passwords to authenticate administrative user login attempts. The login and passwords are local to each WAE.
By default, local user login authentication is enabled as the primary authentication method. You can disable local user login authentication only after enabling one or more of the other administrative login authentication methods. However, when local user login authentication is disabled, and you disable all other administrative login authentication methods, local user login authentication is reenabled automatically.
Windows Domain authentication is another user login authentication method. You can use the console, Telnet, FTP, SSH, or HTTP (WAFS Central Manager and WAE Device Manager interfaces) to authenticate Windows Domain users.
Supported Authentication Methods
When you enable Windows authentication on your WAE, you can configure additional settings that make the authentication process of your users, WAE, and print services more secure when they register with the domain controller.
WAFS supports the following Windows authentication methods on the WAE:
• NTLMv2 authentication—A Windows authentication protocol that is built into most Windows operating systems.
• Kerberos—A Windows authentication protocol that uses secret-key cryptography and is built into Windows 2003 Server.
LDAP Server Signing
Lightweight Directory Access Protocol (LDAP) server signing is a configuration option of the Microsoft Windows Server’s Network security settings. This option controls the signing requirements for LDAP clients such as the WAE. LDAP signing is used to verify that an intermediate party did not tamper with the LDAP packets on the network and to guarantee that the packaged data comes from a known source.
The WAAS software supports both print services’ and login authentication with Windows 2003 domains when the LDAP server signing requirements option for the Domain Security Policy has been set to “Require signing.” LDAP server signing allows the WAE to join the domain and authenticate users securely.
10-12Cisco Wide Area Application Services Configuration Guide
OL-12063-01
Chapter 10 Using the WAE Device Manager GUIManaging a Cisco WAE
Note When you configure your Windows domain controller to require an LDAP signature, you must also configure LDAP server signing on the WAE from the CLI by using the smb-conf section "global" name "ldap ssl" value "start_tls" global configuration command. You cannot enable this option using the WAE Device Manager interface. For information on using the smb-conf command, see the Cisco Wide Area Application Services Command Reference.
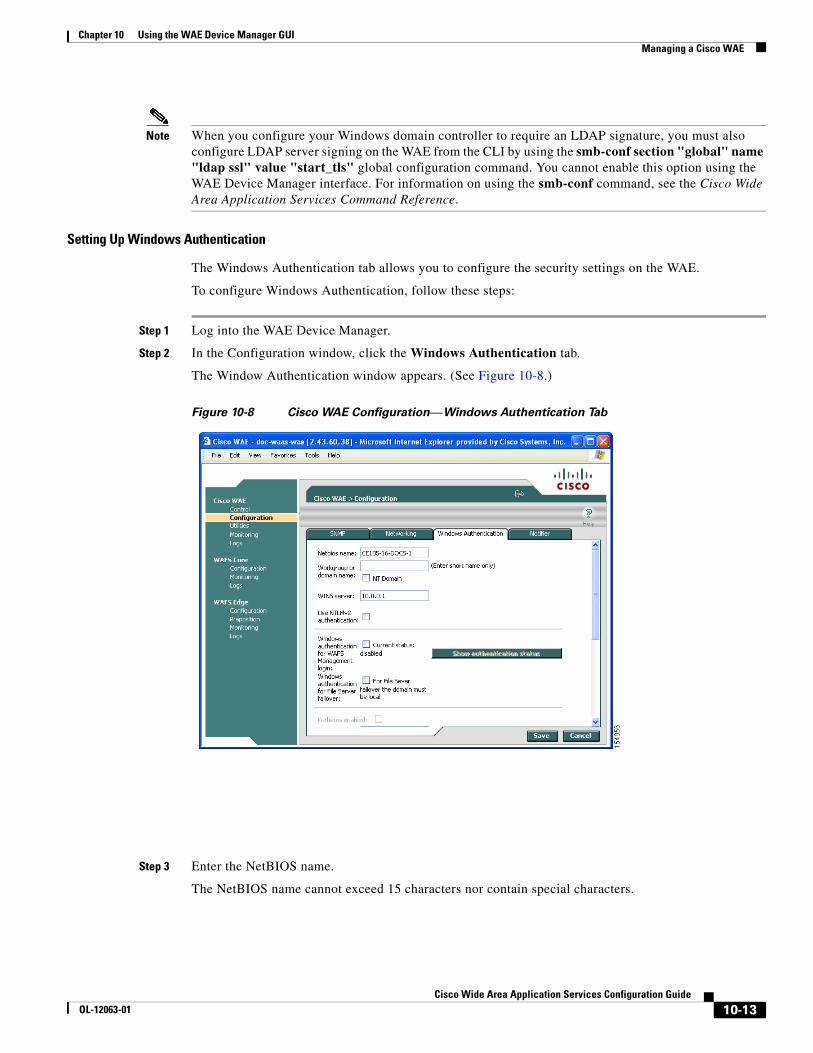
Setting Up Windows Authentication
The Windows Authentication tab allows you to configure the security settings on the WAE.
To configure Windows Authentication, follow these steps:
Step 1 Log into the WAE Device Manager.
Step 2 In the Configuration window, click the Windows Authentication tab.
The Window Authentication window appears. (See Figure 10-8.)
Figure 10-8 Cisco WAE Configuration—Windows Authentication Tab
Step 3 Enter the NetBIOS name.
The NetBIOS name cannot exceed 15 characters nor contain special characters.
10-13Cisco Wide Area Application Services Configuration Guide
OL-12063-01
Chapter 10 Using the WAE Device Manager GUIManaging a Cisco WAE
Note By default, the NetBIOS name field is automatically populated with the hostname of the file engine. If this hostname changes, the NetBIOS field is not automatically updated with the new name.
Step 4 Enter the workgroup or domain name in the short name format, and check the NT Domain check box if the workgroup/domain is a Windows NT 4 domain.
For example, if your domain name is cisco.com, the short name format is cisco. If your workgroup or domain is a Windows 2000 or Windows 2003 domain, do not check the NT Domain check box.
If the NT Domain check box is checked, the domain name and short name format can contain a period (.), but be careful not to enter the fully qualified name for the NT domain.
Step 5 Enter the IP address or hostname for the WINS server that you are using.
Step 6 Check the Use NTLMv2 authentication check box to enable NTLMv2 authentication.
Note Enable NTLMv2 support only if all clients have their security policy set to “Send NTLMv2 responses only/Refuse LM and NTLM.” Using NTLM v2 when the clients do not require it could cause authentication to fail.
Step 7 Choose the following options as needed:
• Windows authentication for WAFS Management login—Check this check box to use Windows Domain to authenticate Telnet, FTP, console, SSH, and user interface (WAAS Central Manager GUI and WAE Device Manager) logins to WAFS.
When you add users through the WAAS Central Manager GUI, you are given the option to configure users as local users who have their login password stored on the WAE. Local users are authenticated by the WAE, but nonlocal users are commonly verified using Windows Domain authentication.
• Windows authentication for file server failover—Check this check box to enable disconnected mode for this device. (This option appears only for Edge WAEs.) For more information, see the “Preparing Your WAAS Network for WAN Failures” section on page 11-37.
Step 8 If you are using Kerberos authentication, check the Kerberos enabled check box and then specify the following information:
• The fully qualified name of the Kerberos realm. All Windows 2000 domains are also Kerberos realms, but the realm name is always the all uppercase version of the domain name.
• The fully qualified name or IP address of the Key Distribution Center. You can also specify a port using the following format: ip address or name:port number. For example, 10.10.10.2:88.
• The organizational unit.
You can only enable Kerberos authentication if at least one of the boxes described in Step 7 is checked. After you enable Kerberos, make sure that the clock on your WAE is within 5 minutes of the clock on your domain controller. Otherwise, your domain controller will refuse to use Kerberos for authentication.
If you are using a Windows 2000 (with SP4) or Windows 2003 (with SP1) domain controller, you should enable Kerberos authentication.
Step 9 If your domain controller has been configured to require LDAP server signing, you need to use the WAAS CLI to enable LDAP server signing on the WAE by using the smb-conf section "global" name "ldap ssl" value "start_tls" global configuration command. For information on using the smb-conf command, see the Cisco Wide Area Application Services Command Reference.
10-14Cisco Wide Area Application Services Configuration Guide
OL-12063-01
Chapter 10 Using the WAE Device Manager GUIManaging a Cisco WAE
Step 10 Check the Register WAE with Domain Controller check box.
Note You need to register the WAE with the domain controller whenever you enable or disable Kerberos, enable Windows authentication, or change the NetBios name, workgroup, or Kerberos realm.
A series of fields display under the check box. Enter the following information in these fields:
• Domain controller (enter the name, not the IP address)
You can only enter the NetBios name of the domain controller when Kerberos is disabled. If Kerberos is enabled, you can enter the fully qualified domain name of the domain controller.
• Domain administrator username (enter the username, domain\username, or domain+username)
• Domain administrator password
Step 11 Click Save.
The Windows Authentication settings are saved, and the WAE is registered with the domain controller.
Step 12 Verify if Windows Authentication is working correctly. See the “Checking the Status of Windows Authentication” section on page 10-15.
Checking the Status of Windows Authentication
After you enable Windows Authentication, you can check the status of Windows Authentication and view the results of built-in tests that can help you resolve authentication issues.
A Windows Authentication problem can occur if you incorrectly configure the settings described in the “Setting Up Windows Authentication” section on page 10-13. Problems can also occur if the configuration of your domain controller changes.
The Authentication Details window shows the following information:
• A list of winbind Authentication tests
• The results of each test
• A pass or fail indicator
• Troubleshooting tips to help you resolve why a test failed
To check the status of Windows Authentication, follow these steps:
Step 1 On the Windows Authentication tab, click Show authentication status.
A message appears that explains the authentication status could take a while to display and that the WAE’s performance could be impacted while the authentication status is being obtained.
Step 2 In the message dialog box, click OK to proceed or click Cancel to not display the authentication details.
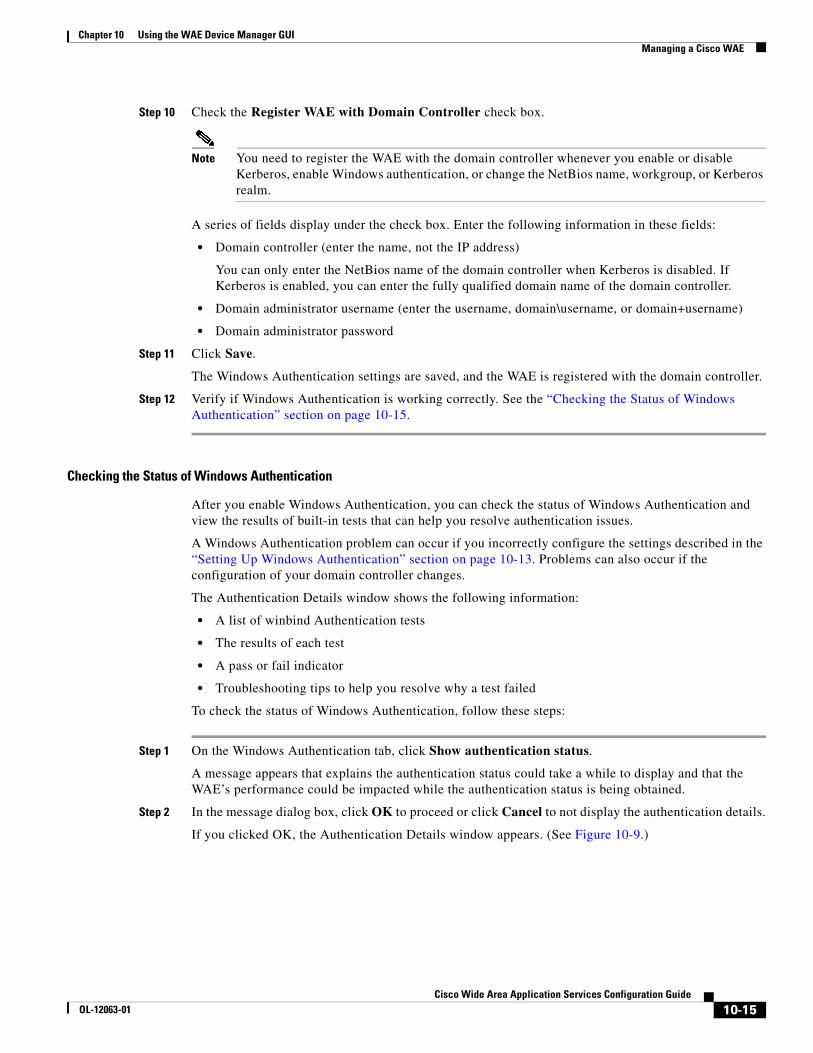
If you clicked OK, the Authentication Details window appears. (See Figure 10-9.)
10-15Cisco Wide Area Application Services Configuration Guide
OL-12063-01
Chapter 10 Using the WAE Device Manager GUIManaging a Cisco WAE
Figure 10-9 Authentication Details Window
Step 3 Check the Authentication status field at the top of the window.
If the status field displays “OK” then Windows Authentication is functioning correctly. If this field displays “Not OK,” then proceed to the next step.
Step 4 View the status of each test, and resolve any failures using the provided troubleshooting tips.
Table 10-1 describes these tests.
Step 5 Click Refresh to make sure that all the tests complete successfully.
Table 10-1 Authentication Test Descriptions
Test Descriptionwbinfo -t Verifies that the workstation trust account created when the Samba server is
added to the Windows domain is working.
wbinfo -a Tests the domain credentials based on the specified username and password. To run this test, enter the appropriate username and password, and then click Refresh. Wait for the test results to be displayed.
wbinfo -D Shows information from Samba about the domain.
wbinfo --sequence Shows the sequence numbers of all known domains.
Time skew Shows the time offset between the WAE and the KDC server. The time offset must be within 5 minutes; otherwise, the Windows KDC server refuses to use Kerberos for authentication. You can use the WAAS CLI to configure the time on the WAE.
This test is performed only when Kerberos authentication is enabled.
10-16Cisco Wide Area Application Services Configuration Guide
OL-12063-01
Chapter 10 Using the WAE Device Manager GUIManaging a Cisco WAE
Defining Notification Settings
The Notifier tab allows you to define the e-mail address to which notifications are sent when alerts are generated by the WAE.
To define notification settings, follow these steps:
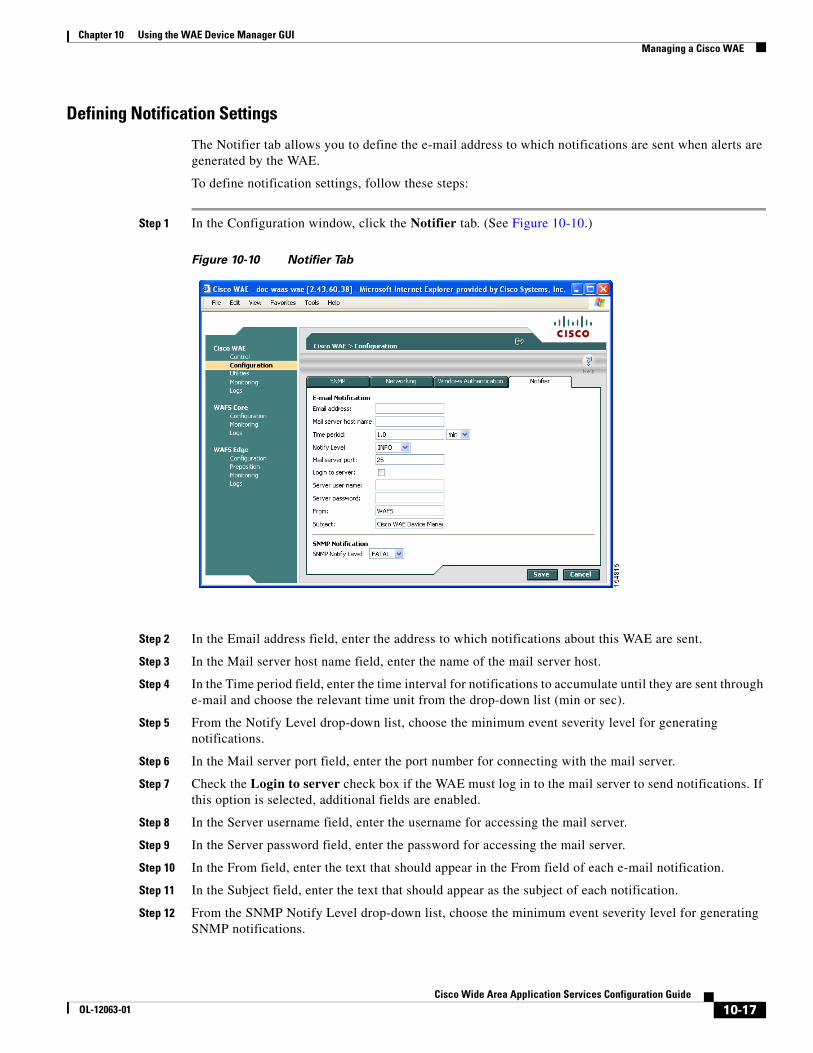
Step 1 In the Configuration window, click the Notifier tab. (See Figure 10-10.)
Figure 10-10 Notifier Tab
Step 2 In the Email address field, enter the address to which notifications about this WAE are sent.
Step 3 In the Mail server host name field, enter the name of the mail server host.
Step 4 In the Time period field, enter the time interval for notifications to accumulate until they are sent through e-mail and choose the relevant time unit from the drop-down list (min or sec).
Step 5 From the Notify Level drop-down list, choose the minimum event severity level for generating notifications.
Step 6 In the Mail server port field, enter the port number for connecting with the mail server.
Step 7 Check the Login to server check box if the WAE must log in to the mail server to send notifications. If this option is selected, additional fields are enabled.
Step 8 In the Server username field, enter the username for accessing the mail server.
Step 9 In the Server password field, enter the password for accessing the mail server.
Step 10 In the From field, enter the text that should appear in the From field of each e-mail notification.
Step 11 In the Subject field, enter the text that should appear as the subject of each notification.
Step 12 From the SNMP Notify Level drop-down list, choose the minimum event severity level for generating SNMP notifications.
10-17Cisco Wide Area Application Services Configuration Guide
OL-12063-01

Chapter 10 Using the WAE Device Manager GUIManaging a Cisco WAE
Step 13 Click Save.
Utilities OptionThe Utilities option displays the following tabs:
• Support—Allows you to dump WAE data to an external location for support purposes. For more information, see the “Running Support Utilities” section on page 10-18.
• WAFS Cache Cleanup—Allows you to remove all files from the WAFS cache. For more information, see the “Running the Cache Cleanup Utility” section on page 10-19.
• File Server Rename—Allows you to rename a file server in the WAFS cache. For more information, see the “Running the File Server Rename Utility” section on page 10-20.
Running Support Utilities
The Support tab displays product information about the WAE, including the WAAS software version and build number running on the device.
The Support tab also allows you to download a system report that provides a snapshot of the current state of the WAE and its operation, including the configuration log files of various components. You can send this report to Cisco Technical Support (TAC) if you need assistance.
Note Downloading a full system report can impact the performance of the WAE. For this reason, we recommend downloading the system report during nonpeak hours or limiting the date range of the report.
To download the system report, follow these steps:
Step 1 In the Utilities window, click the Support tab.
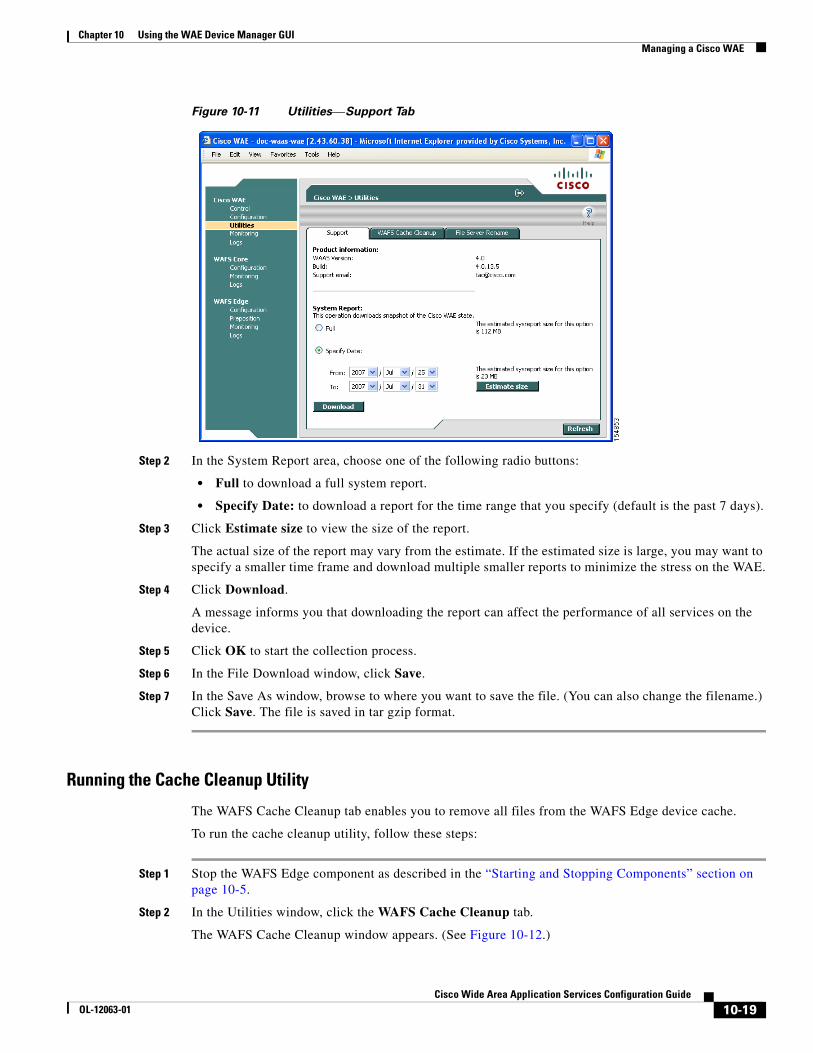
The Support window appears. (See Figure 10-11.)
10-18Cisco Wide Area Application Services Configuration Guide
OL-12063-01
Chapter 10 Using the WAE Device Manager GUIManaging a Cisco WAE
Figure 10-11 Utilities—Support Tab
Step 2 In the System Report area, choose one of the following radio buttons:
• Full to download a full system report.
• Specify Date: to download a report for the time range that you specify (default is the past 7 days).
Step 3 Click Estimate size to view the size of the report.
The actual size of the report may vary from the estimate. If the estimated size is large, you may want to specify a smaller time frame and download multiple smaller reports to minimize the stress on the WAE.
Step 4 Click Download.
A message informs you that downloading the report can affect the performance of all services on the device.
Step 5 Click OK to start the collection process.
Step 6 In the File Download window, click Save.
Step 7 In the Save As window, browse to where you want to save the file. (You can also change the filename.) Click Save. The file is saved in tar gzip format.
Running the Cache Cleanup Utility
The WAFS Cache Cleanup tab enables you to remove all files from the WAFS Edge device cache.
To run the cache cleanup utility, follow these steps:
Step 1 Stop the WAFS Edge component as described in the “Starting and Stopping Components” section on page 10-5.
Step 2 In the Utilities window, click the WAFS Cache Cleanup tab.
The WAFS Cache Cleanup window appears. (See Figure 10-12.)
10-19Cisco Wide Area Application Services Configuration Guide
OL-12063-01

Chapter 10 Using the WAE Device Manager GUIManaging the WAFS Core
Figure 10-12 Utilities—WAFS Cache Cleanup Tab
Step 3 In the Cache Removal field, click Run to erase the contents of the cache.
Running the File Server Rename Utility
The File Server Rename tab enables you to change the resource location for all resources of a given file server name, on the WAFS Edge device.
To run the file server rename utility, follow these steps:
Step 1 Stop the WAFS Edge component as described in the “Starting and Stopping Components” section on page 10-5.
Step 2 In the Utilities window, click the File Server Rename tab.
Step 3 In the Current File Server name field, enter the current name.
Step 4 In the New File Server name field, enter the new name and click Run for the new name to take effect.
Managing the WAFS CoreThe WAFS Core option in the navigation area allows you to modify selected WAFS Core settings. The WAFS Core option includes the following menu items:
• Configuration—Allows you to view the file servers to which the WAFS Core is connected. It also enables you to specify notification settings. For more information, see the “Configuration Option” section on page 10-21.
• Monitoring—Allows you to view WAFS Core statistics in tables and graphs as described in the “Monitoring the Cisco WAE Component” section on page 10-30.
• Logs—Allows you to view the event log related to the WAFS Core. For more information, see the “Viewing Cisco WAE Logs” section on page 10-38.
10-20Cisco Wide Area Application Services Configuration Guide
OL-12063-01
Chapter 10 Using the WAE Device Manager GUIManaging the WAFS Core
Configuration OptionThe Configuration option for the WAFS Core component displays the following tabs:
• CIFS Servers—Allows you to view read-only information about the CIFS file servers to which the WAFS Core will connect. For more information, see the “Viewing CIFS Servers” section on page 10-21.
• Notifier—Allows you to define the e-mail address to which notifications are sent when alerts are generated by the WAFS Core. For more information, see the “Defining Notification Settings” section on page 10-17.
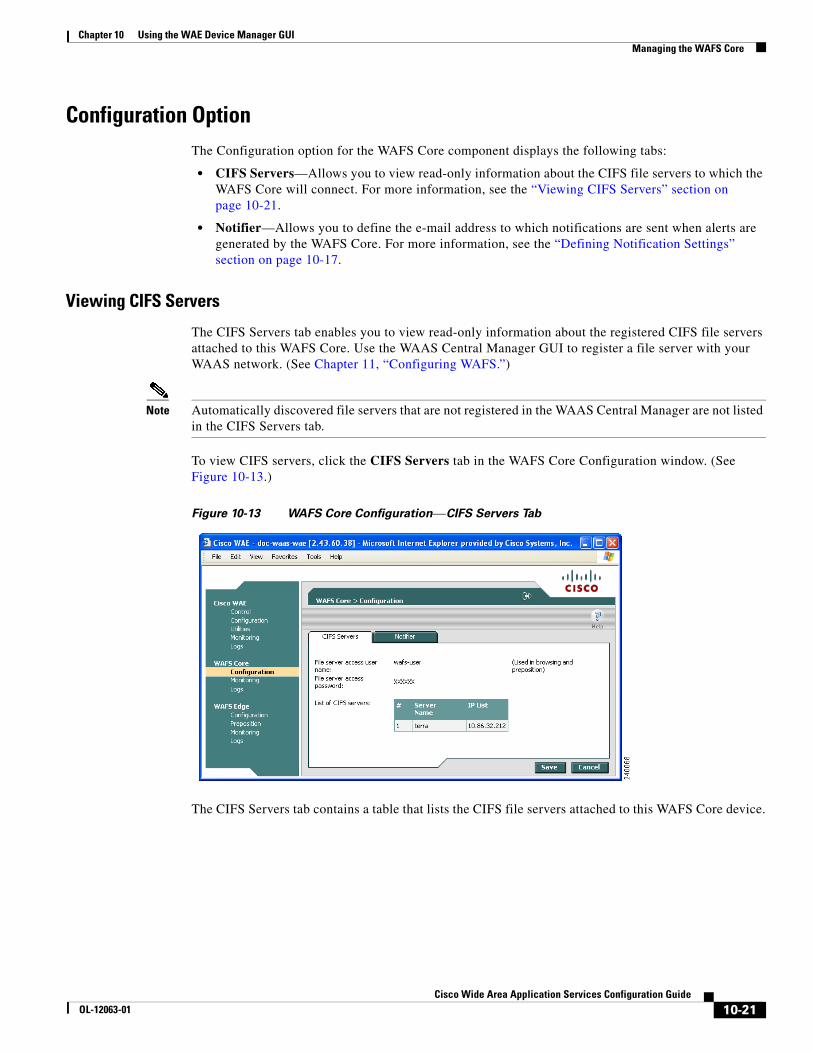
Viewing CIFS Servers
The CIFS Servers tab enables you to view read-only information about the registered CIFS file servers attached to this WAFS Core. Use the WAAS Central Manager GUI to register a file server with your WAAS network. (See Chapter 11, “Configuring WAFS.”)
Note Automatically discovered file servers that are not registered in the WAAS Central Manager are not listed in the CIFS Servers tab.
To view CIFS servers, click the CIFS Servers tab in the WAFS Core Configuration window. (See Figure 10-13.)
Figure 10-13 WAFS Core Configuration—CIFS Servers Tab
The CIFS Servers tab contains a table that lists the CIFS file servers attached to this WAFS Core device.
10-21Cisco Wide Area Application Services Configuration Guide
OL-12063-01

Chapter 10 Using the WAE Device Manager GUIManaging a WAFS Edge Device
Managing a WAFS Edge DeviceThe WAFS Edge menu item in the navigation area allows you to modify selected WAFS Edge device settings. In addition, you can define a specific recipient for notifications generated by the WAFS Edge device and monitor preposition tasks.
The WAFS Edge option includes the following menu items:
• Configuration—Allows you to configure the WAFS Edge device. For more information, see the “Configuration Option” section on page 10-22.
• Preposition—Allows you to monitor the progress of preposition policies created in the WAAS Central Manager GUI. In addition, you can optionally terminate preposition tasks. For more information, see the “Preposition Option” section on page 10-24.
• Monitoring—Allows you to view WAFS Edge device statistics in tables and graphs as described in the “Monitoring the Cisco WAE Component” section on page 10-30.
• Logs—Allows you to view the event log related to the WAFS Edge device. For more information, see the “Viewing Cisco WAE Logs” section on page 10-38.
Configuration OptionThe Configuration option displays the following tabs:
• Connectivity—Allows you to view read-only information about the WAFS Cores to which the WAFS Edge device is connected. For more information, see the “Viewing WAFS Core Connections” section on page 10-22.
• CIFS—Allows you to view read-only information about the name registration parameters used by the WAFS Edge device to connect to the Windows environment. For more information, see the “Viewing CIFS Settings” section on page 10-23.
• Print Services—Allows you to configure print services for the WAFS Edge device. For more information on configuring print services, see Chapter 13, “Configuring and Managing WAAS Print Services.”
• Notifier—Allows you to define the e-mail address to which notifications are sent when alerts are generated by the WAFS Edge device. For more information on e-mail notifications, see the “Defining Notification Settings” section on page 10-17.
Viewing WAFS Core Connections
The Connectivity tab enables you to view read-only information about the WAFS Core connections for this WAFS Edge device.
10-22Cisco Wide Area Application Services Configuration Guide
OL-12063-01
Chapter 10 Using the WAE Device Manager GUIManaging a WAFS Edge Device
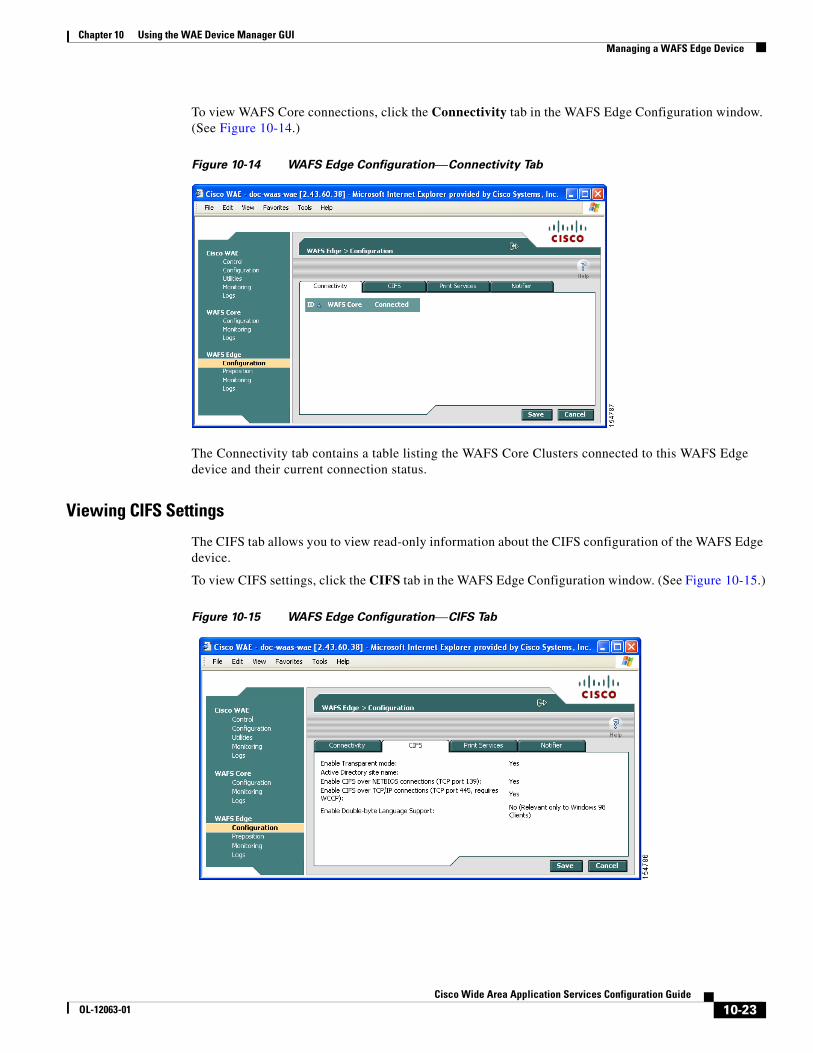
To view WAFS Core connections, click the Connectivity tab in the WAFS Edge Configuration window. (See Figure 10-14.)
Figure 10-14 WAFS Edge Configuration—Connectivity Tab
The Connectivity tab contains a table listing the WAFS Core Clusters connected to this WAFS Edge device and their current connection status.
Viewing CIFS Settings
The CIFS tab allows you to view read-only information about the CIFS configuration of the WAFS Edge device.
To view CIFS settings, click the CIFS tab in the WAFS Edge Configuration window. (See Figure 10-15.)
Figure 10-15 WAFS Edge Configuration—CIFS Tab
10-23Cisco Wide Area Application Services Configuration Guide
OL-12063-01

Chapter 10 Using the WAE Device Manager GUIManaging a WAFS Edge Device
The CIFS tab contains a list of CIFS configuration settings for the WAFS Edge device. CIFS can be configured only from the Central Manager. For details see the “Configuring the Edge Devices” section on page 11-12.
Preposition OptionThe Preposition option allows you to view the details and current status of preposition policies created in the WAAS Central Manager GUI. These policies define which files are proactively placed in the WAFS Edge device cache according to a prearranged schedule. Prepositioning enables system administrators to strategically place large, frequently accessed files at the network edge during off-peak hours, increasing efficiency and providing end users with quick first-time access of those files.
You can view information such as the root directory containing the files being prepositioned, the schedule for each policy, and the status of the most recent task for each policy. You can also view a detailed task history for each policy, and manually terminate any tasks in progress.
To view preposition policies for this WAFS Edge device, follow these steps:
Step 1 In the navigation area, click Preposition.
The WAFS Edge > Preposition window appears. (See Figure 10-16.)
Figure 10-16 WAFS Edge > Preposition Window
The Preposition window contains a table that displays all the preposition policies assigned to this WAFS Edge device. For each policy, the following information is displayed:
• ID—The ID number of the selected policy.
• Description—The descriptive name assigned to the policy.
• Root Directory—The source directory for the content being prepositioned.
• Schedule—The defined schedule for the policy.
• Started—When this policy was last invoked by the system.
• Duration—The elapsed time of the latest task.
10-24Cisco Wide Area Application Services Configuration Guide
OL-12063-01

Chapter 10 Using the WAE Device Manager GUIManaging a WAFS Edge Device
• Status—The current status of the policy, updated every time the refresh button is clicked. If the task defined by the policy is currently being run, its status is In Progress. A preposition task in progress can be terminated.
Step 2 Select a policy in the table and click View to view a detailed task history (iterations of a selected policy).
The Preposition Task Details window appears. (See Figure 10-17.)
Figure 10-17 Preposition Task Details
The top half of the Preposition Policy window displays the following details about the selected policy:
• Create Date—When the policy was created.
• Last Modified—When the policy was last modified.
• Total size—The limit placed on the total size of the files being prepositioned, if any.
• Min file size—The minimum size of files in the root directory (and subdirectories if they are part of the preposition policy) that are affected by the policy.
• Max file size—The maximum size of files in the root directory (and subdirectories if they are part of the preposition policy) that are affected by the policy.
• Perform on—Which files to preposition from the selected location—those files that have changed since the last preposition, those files changed during a defined interval, or all files.
The lower half of the Preposition Policy window contains a table that displays the most recent tasks performed by the selected policy (up to the last 10 iterations), including the following information:
• Total data—The total amount of data to be transferred by the policy.
• # matching files—The number of files matching the defined filter of the policy.
• Amount copied—The total amount of data copied by the policy during its most recent run. (This amount may be less than the amount in the Total data field if the policy is currently in progress, or if the policy did not complete its run, for example, due to time constraints placed on its operation.)
• # files copied—The number of files copied by the policy during its most recent run.
• Throughput—The throughput achieved by the policy in Kilobits per second (Kbps).
10-25Cisco Wide Area Application Services Configuration Guide
OL-12063-01
Chapter 10 Using the WAE Device Manager GUIMonitoring the WAE
• Termination reason—The reason that the policy was terminated, if relevant. Policies can be terminated due to time or space constraints placed on the policy or to a decision by the administrator to manually terminate its operation.
Step 3 Click Close to return to the Policies window.
Note To update the information displayed in the Policies window, click Refresh.
Terminating a Preposition Task
You can terminate a preposition task that is in progress at any time. This action does not delete the preposition policy that generated the task; the system will still perform the task described by the policy when the next scheduled time arrives.
To terminate a preposition task, follow these steps:
Step 1 In the Policies window, select a preposition policy with a status of In Progress and click Terminate. A confirmation message is displayed.
Step 2 Click Yes to terminate the task. If View is clicked to display the Preposition Policy window, the table that displays the task history contains a message indicating that the latest task was terminated by the administrator.
Monitoring the WAEThe Monitoring option available for the Cisco WAE, WAFS Core, and WAFS Edge components enables you to view detailed tables that describes the current state of the WAE. It also provides graphs that display historical data about the selected components. These graphs enable you to track WAE statistics for a day, week, month, or an entire year.
Note WAE statistics and graphs are generated by the freeware MRTG utility. For details, go to http://people.ee.ethz.ch/~oetiker/webtools/mrtg/.
The monitoring options differ for each WAE component as described in Table 10-2.
For more information about monitoring, see the following sections:
• About Monitoring Graphs, page 10-27
Table 10-2 Monitoring Options by Component
Component Monitored Statistics
Cisco WAE CPU and disk drive utilization
WAFS Core Connectivity
WAFS Edge Connectivity, CIFS traffic, and cache
10-26Cisco Wide Area Application Services Configuration Guide
OL-12063-01
Chapter 10 Using the WAE Device Manager GUIMonitoring the WAE
• Monitoring the Cisco WAE Component, page 10-30
• Monitoring a WAFS Core, page 10-30
• Monitoring a WAFS Edge Device, page 10-32
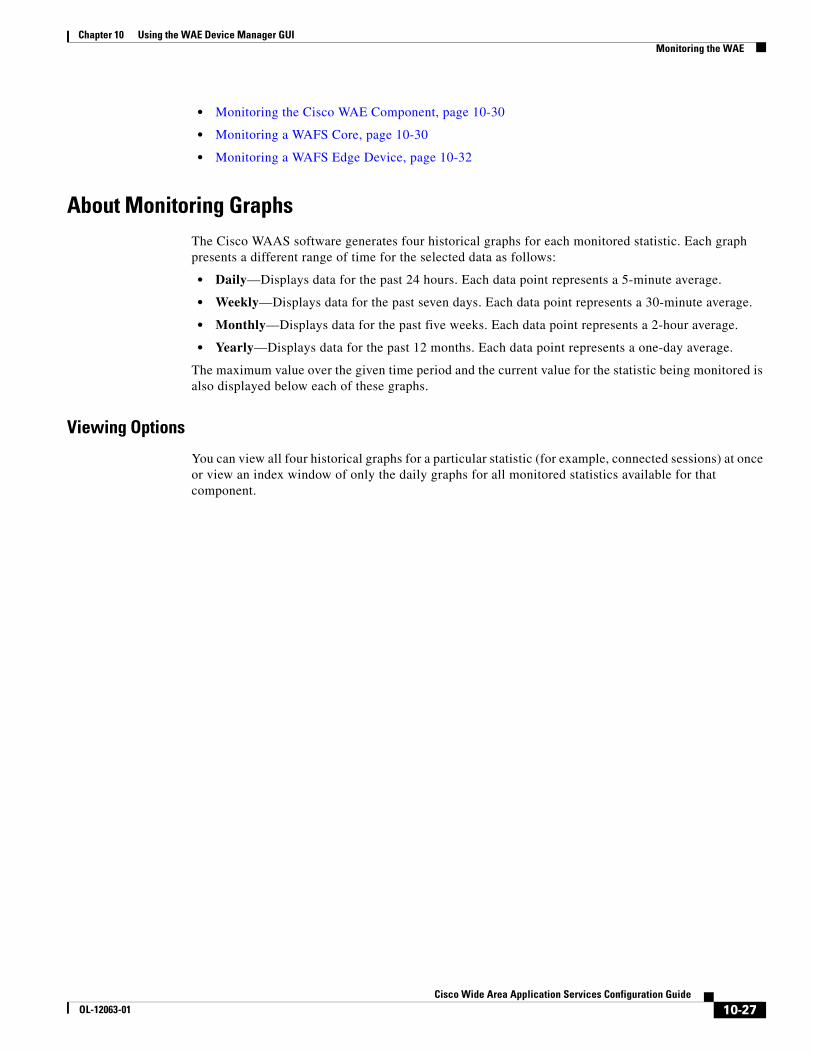
About Monitoring GraphsThe Cisco WAAS software generates four historical graphs for each monitored statistic. Each graph presents a different range of time for the selected data as follows:
• Daily—Displays data for the past 24 hours. Each data point represents a 5-minute average.
• Weekly—Displays data for the past seven days. Each data point represents a 30-minute average.
• Monthly—Displays data for the past five weeks. Each data point represents a 2-hour average.
• Yearly—Displays data for the past 12 months. Each data point represents a one-day average.
The maximum value over the given time period and the current value for the statistic being monitored is also displayed below each of these graphs.
Viewing Options
You can view all four historical graphs for a particular statistic (for example, connected sessions) at once or view an index window of only the daily graphs for all monitored statistics available for that component.
10-27Cisco Wide Area Application Services Configuration Guide
OL-12063-01
Chapter 10 Using the WAE Device Manager GUIMonitoring the WAE
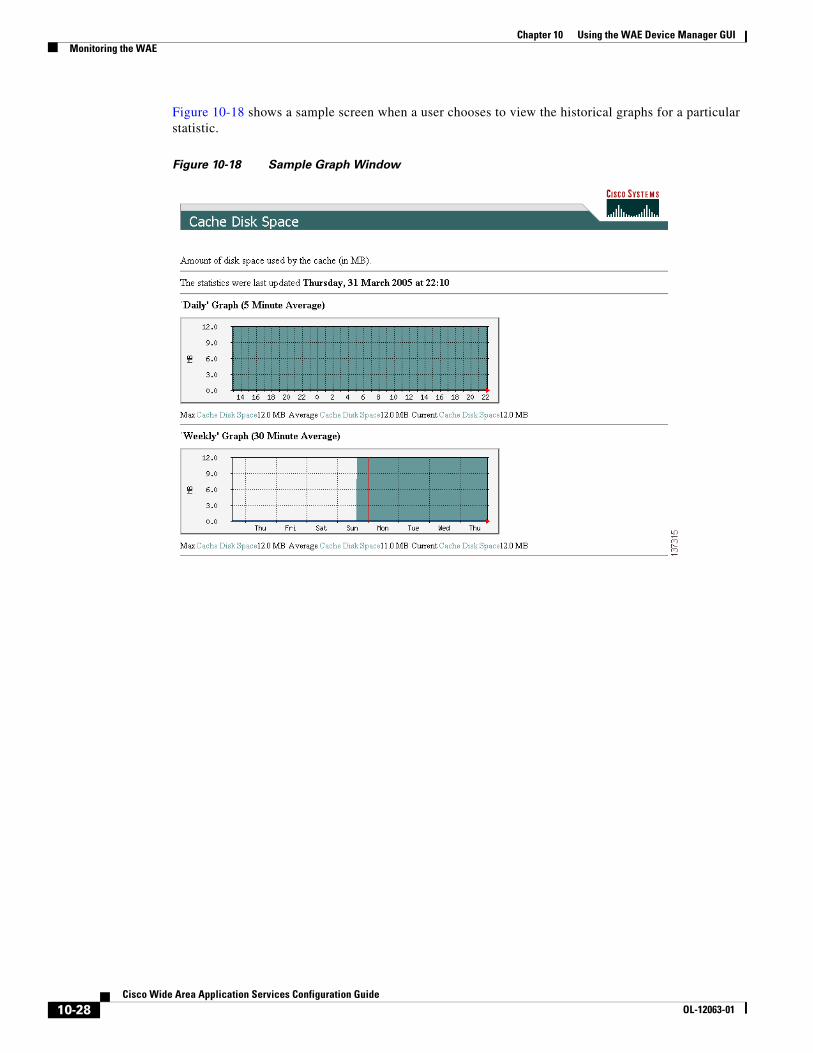
Figure 10-18 shows a sample screen when a user chooses to view the historical graphs for a particular statistic.
Figure 10-18 Sample Graph Window
10-28Cisco Wide Area Application Services Configuration Guide
OL-12063-01
Chapter 10 Using the WAE Device Manager GUIMonitoring the WAE
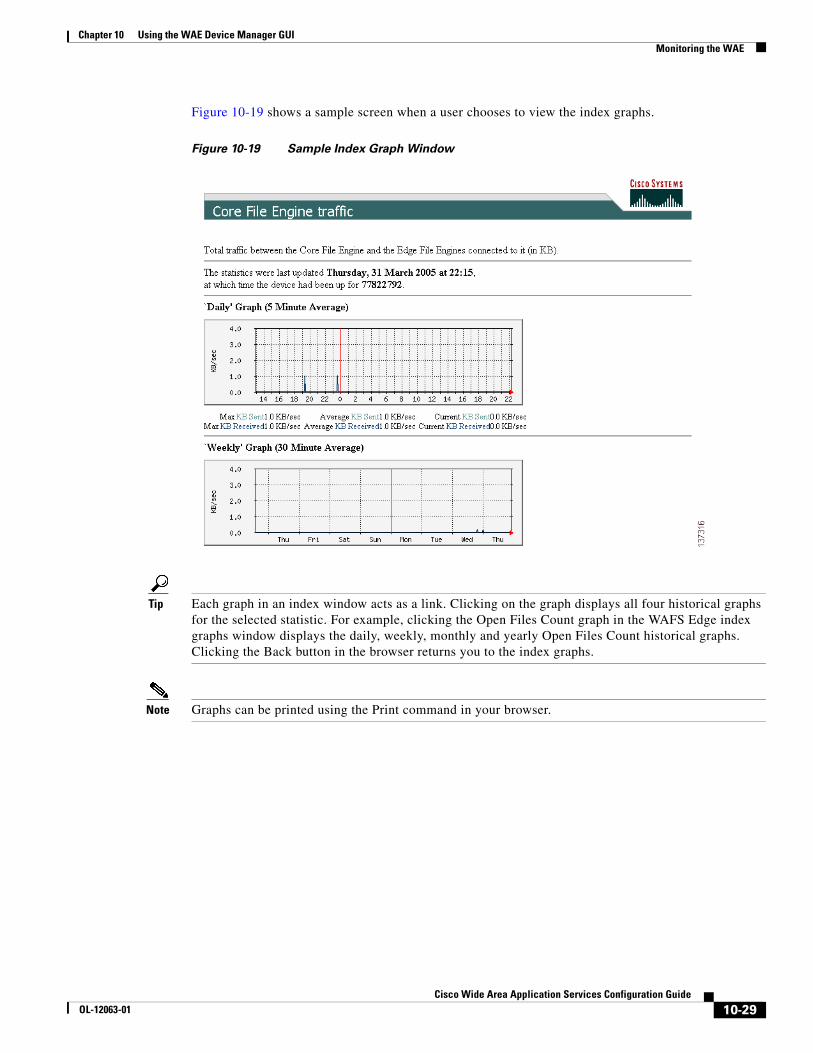
Figure 10-19 shows a sample screen when a user chooses to view the index graphs.
Figure 10-19 Sample Index Graph Window
Tip Each graph in an index window acts as a link. Clicking on the graph displays all four historical graphs for the selected statistic. For example, clicking the Open Files Count graph in the WAFS Edge index graphs window displays the daily, weekly, monthly and yearly Open Files Count historical graphs. Clicking the Back button in the browser returns you to the index graphs.
Note Graphs can be printed using the Print command in your browser.
10-29Cisco Wide Area Application Services Configuration Guide
OL-12063-01

Chapter 10 Using the WAE Device Manager GUIMonitoring the WAE
Monitoring the Cisco WAE ComponentThe Monitoring option for the Cisco WAE component displays a table with the statistics monitored on a WAE. From this table, you can display historical graphs that indicate the central processing unit (CPU) utilization and disk drive utilization on the WAE.
CPU utilization is a measure of the amount of bandwidth used by the CPU versus the total bandwidth available. The amount is expressed as a percentage. Disk drive utilization is a measure of the amount of disk space that is being used on all disk drives versus the total disk space available. This amount is also expressed as a percentage.
To monitor the WAE component, follow these steps:
Step 1 In the navigation area, click Monitoring under the Cisco WAE menu item.
The Cisco WAE Monitoring window appears. (See Figure 10-20.)
Figure 10-20 Cisco WAE Monitoring Window
Step 2 Do one of the following:
• Choose the statistic that you want to view (by clicking in its row), and then click View to display a popup window that contains the historical graphs for that statistic.
• Click View All to display the index window with the daily graphs for both statistics on the WAE component.
Monitoring a WAFS CoreThe Monitoring option for the WAFS Core menu item displays the following two tabs:
• Connectivity—Displays a table of connectivity statistics for the WAFS Core. This table is displayed by default.
• Graphs—Displays a list of graphs that are available for the WAFS Core.
10-30Cisco Wide Area Application Services Configuration Guide
OL-12063-01
Chapter 10 Using the WAE Device Manager GUIMonitoring the WAE
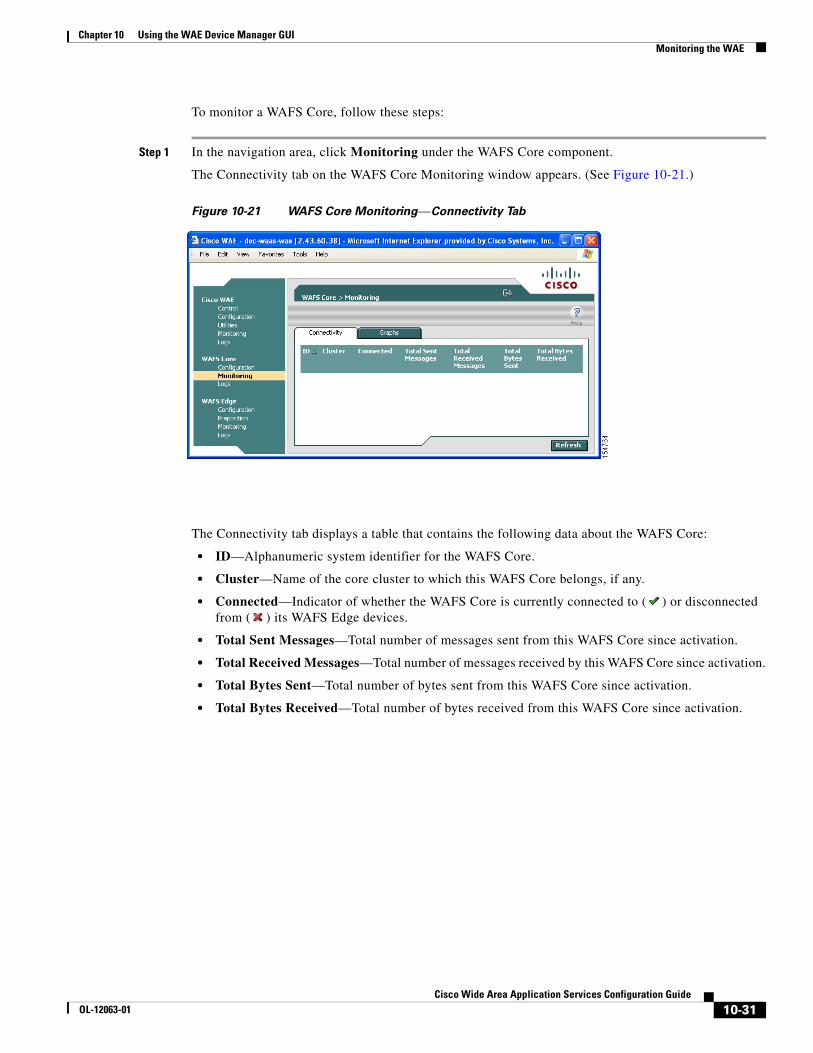
To monitor a WAFS Core, follow these steps:
Step 1 In the navigation area, click Monitoring under the WAFS Core component.
The Connectivity tab on the WAFS Core Monitoring window appears. (See Figure 10-21.)
Figure 10-21 WAFS Core Monitoring—Connectivity Tab
The Connectivity tab displays a table that contains the following data about the WAFS Core:
• ID—Alphanumeric system identifier for the WAFS Core.
• Cluster—Name of the core cluster to which this WAFS Core belongs, if any.
• Connected—Indicator of whether the WAFS Core is currently connected to ( ) or disconnected from ( ) its WAFS Edge devices.
• Total Sent Messages—Total number of messages sent from this WAFS Core since activation.
• Total Received Messages—Total number of messages received by this WAFS Core since activation.
• Total Bytes Sent—Total number of bytes sent from this WAFS Core since activation.
• Total Bytes Received—Total number of bytes received from this WAFS Core since activation.
10-31Cisco Wide Area Application Services Configuration Guide
OL-12063-01
Chapter 10 Using the WAE Device Manager GUIMonitoring the WAE
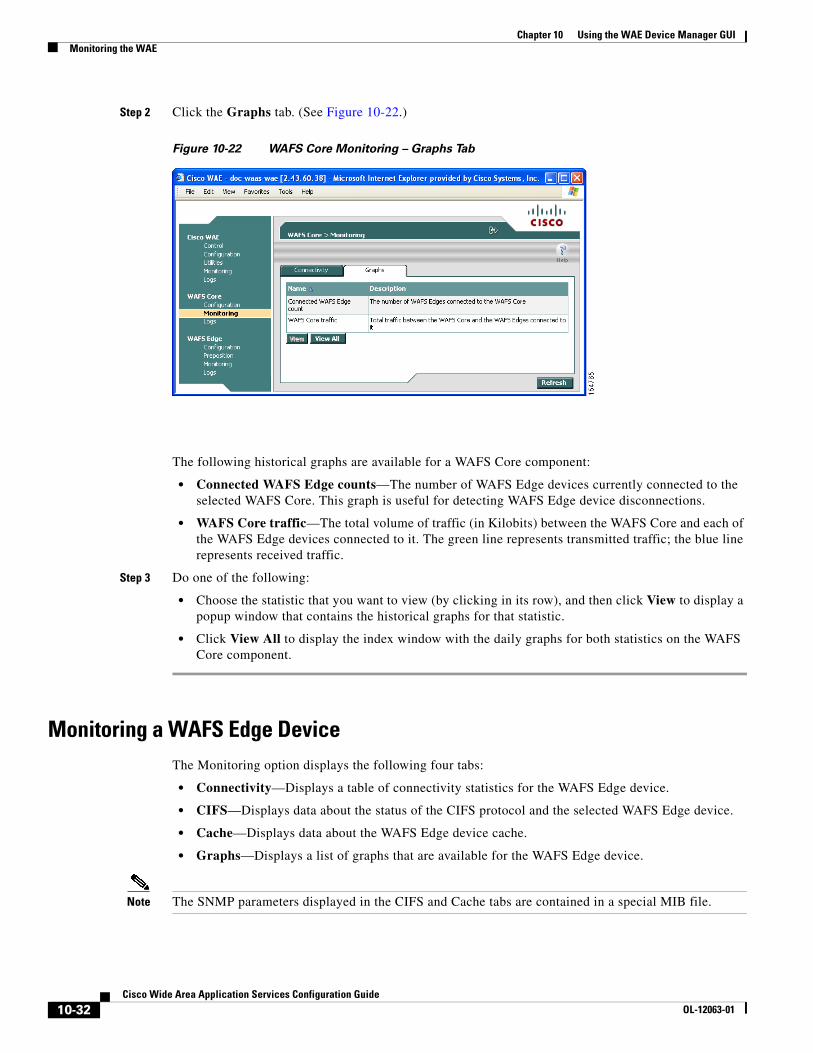
Step 2 Click the Graphs tab. (See Figure 10-22.)
Figure 10-22 WAFS Core Monitoring – Graphs Tab
The following historical graphs are available for a WAFS Core component:
• Connected WAFS Edge counts—The number of WAFS Edge devices currently connected to the selected WAFS Core. This graph is useful for detecting WAFS Edge device disconnections.
• WAFS Core traffic—The total volume of traffic (in Kilobits) between the WAFS Core and each of the WAFS Edge devices connected to it. The green line represents transmitted traffic; the blue line represents received traffic.
Step 3 Do one of the following:
• Choose the statistic that you want to view (by clicking in its row), and then click View to display a popup window that contains the historical graphs for that statistic.
• Click View All to display the index window with the daily graphs for both statistics on the WAFS Core component.
Monitoring a WAFS Edge DeviceThe Monitoring option displays the following four tabs:
• Connectivity—Displays a table of connectivity statistics for the WAFS Edge device.
• CIFS—Displays data about the status of the CIFS protocol and the selected WAFS Edge device.
• Cache—Displays data about the WAFS Edge device cache.
• Graphs—Displays a list of graphs that are available for the WAFS Edge device.
Note The SNMP parameters displayed in the CIFS and Cache tabs are contained in a special MIB file.
10-32Cisco Wide Area Application Services Configuration Guide
OL-12063-01

Chapter 10 Using the WAE Device Manager GUIMonitoring the WAE
To monitor an WAFS Edge device, follow these steps:
Step 1 In the navigation area, click Monitoring under the WAFS Edge menu.
The WAFS Edge Monitoring window appears. (See Figure 10-23.)
Figure 10-23 WAFS Edge Monitoring—Connectivity Tab
The Connectivity tab displays a table that contains the following data about the WAFS Edge device:
• ID—Alphanumeric system identifier for the WAFS Edge device.
• Cluster—Name of the Core cluster to which this WAFS Edge device is connected, if any.
• Connected—Indicator of whether the WAFS Edge device is currently connected to ( ) or disconnected from ( ) the WAFS Core.
• Total Messages Sent —Total number of messages sent from this WAFS Edge device since activation.
• Total Messages Received—Total number of messages received by this WAFS Edge device since activation.
• Total Bytes Sent—Total number of bytes sent from this WAFS Edge device since activation.
• Total Bytes Received—Total number of bytes received by this WAFS Edge device since activation.
Step 2 Click the CIFS tab.
The CIFS tab displays the following CIFS-related information:
• Total KBytes read—Total number of kilobytes read by clients (both through the cache and remotely) from this WAFS Edge device using the CIFS protocol.
• Total KBytes written—Total number of kilobytes written by clients to this WAFS Edge device using the CIFS protocol.
• Remote requests count—Total number of client CIFS requests that were forwarded remotely over the WAN to the WAFS Core. The name of this statistic is a link that you can use to display its historical graphs (without first going to the Graphs tab). Local requests are also shown on these graphs.
10-33Cisco Wide Area Application Services Configuration Guide
OL-12063-01
Chapter 10 Using the WAE Device Manager GUIMonitoring the WAE
• Local requests count—Total number of client CIFS requests handled locally by this WAFS Edge device. The name of this statistic is a link that you can use to display its historical graphs (without first going to the Graphs tab). Remote requests are also shown on these graphs.
• Total remote time—Total amount of time, in milliseconds, spent by this WAFS Edge device to process all client CIFS requests that were sent remotely to the WAFS Core.
• Total local time—Total amount of time, in milliseconds, spent by this WAFS Edge device to process all client CIFS requests that were handled locally.
• Connected sessions count—Total number of CIFS sessions connected on this WAFS Edge device. The name of this statistic is a link that you can use to display its daily, weekly, monthly, and yearly graphs (without first going to the Graphs tab).
• Open files count—Total number of open CIFS files on this WAFS Edge device. The name of this statistic is a link that you can use to display its daily, weekly, monthly, and yearly graphs (without first going to the Graphs tab).
Step 3 Click the Cache tab.
The Cache tab displays the following information:
• Maximum cache disk size—Maximum amount of disk space (in gigabytes) allocated to the WAFS Edge device cache.
• Current cache disk usage—Current amount of disk space (in kilobytes) used by the WAFS Edge device cache. The name of this statistic is a link that you can use to display its historical graphs (without first going to the Graphs tab).
• Maximum cache resources—Maximum number of resources (files and directories) allowed in the WAFS Edge device cache.
• Current cache resources—Current number of resources contained in the WAFS Edge device cache. The name of this statistic is a link that you can use to display its historical graphs (without first going to the Graphs tab).
• Evicted resources count—Number of resources that have been evicted from the cache since the Edge WAE was started.
• Last eviction time—Time when a cache eviction last occurred.
• Cache size high watermark—Percentage of disk usage that causes the WAFS Edge device to begin evicting resources.
• Cache size low watermark—Percentage of disk usage that causes the WAFS Edge device to stop evicting resources.
• Cache resources high watermark—Percentage of total cache resources that causes the WAFS Edge device to begin evicting resources.
• Cache resources low watermark—Percentage of total cache resources that causes the WAFS Edge device to stop evicting resources.
• Last evicted resource age—Amount of time that the last-evicted resource spent in the WAFS Edge device cache.
• Last evicted resource access time—Last time that the last-evicted resource was accessed.
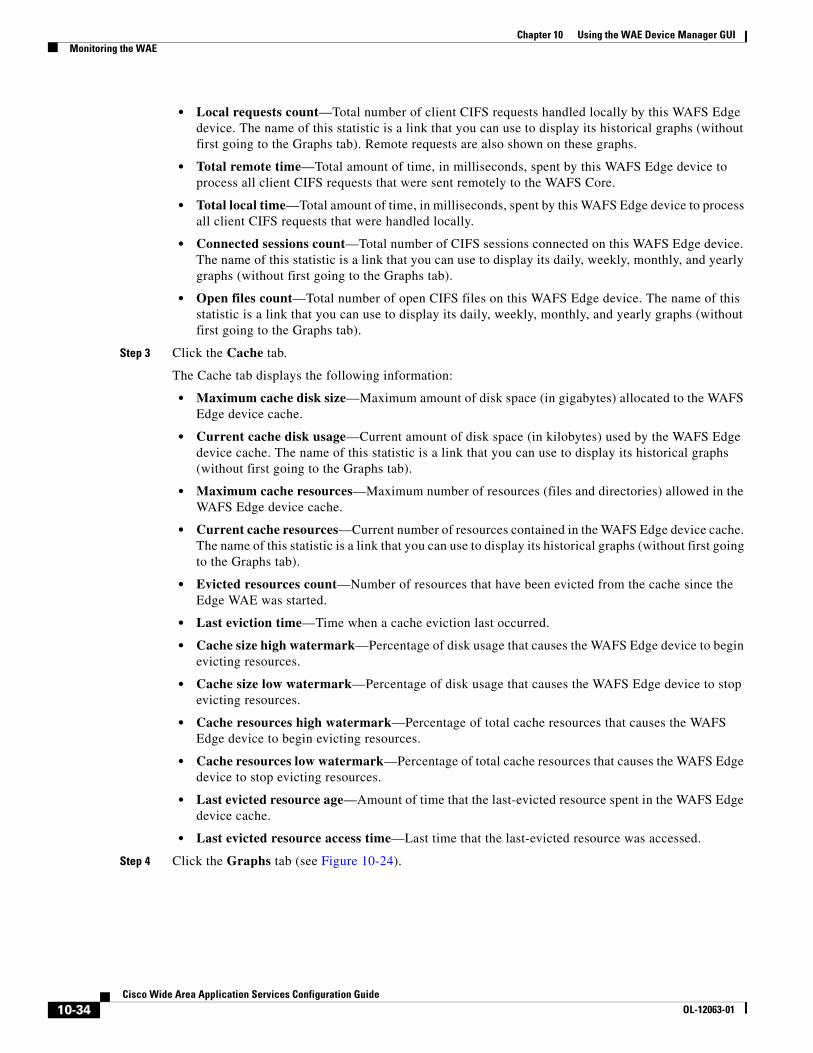
Step 4 Click the Graphs tab (see Figure 10-24).
10-34Cisco Wide Area Application Services Configuration Guide
OL-12063-01
Chapter 10 Using the WAE Device Manager GUIMonitoring the WAE
Figure 10-24 WAFS Edge Monitoring – Graphs Tab
The following historical graphs are available for the WAFS Edge device:
• Cache Disk Space—Amount of disk space (in megabytes) used by the WAFS Edge device cache.
• Cache Hit Rate—Percentage of user requests answered by the cache (as opposed to sending a request remotely over the WAN to the file server for the user-requested content).
• Cache Resources—Total number of cache resources (files and directories) contained in the cache.
• Cache Usage—Percentage of disk space and percentage of resources used by the cache, based on defined limits.
• Connected WAFS Core count—Number of WAFS Cores connected to the selected WAFS Edge device.
Note The WAFS Edge device can be connected to multiple WAFS Cores for potential higher availability.
• Open Files Count—Total number of open CIFS files.
• Requests Count—Average rate of requests handled locally (client requests answered through the Edge WAE cache) and average rate of requests handled remotely (client requests answered through the remote file server). The request count is displayed in requests per second.
• Connected Sessions count—Number of open CIFS sessions on the selected WAFS Edge devices.
• WAFS Edge - WAFS Core traffic—Total volume of traffic (in kilobytes) between the WAFS Edge device and each of the WAFS Cores connected to it. The green line represents transmitted traffic; the blue line represents received traffic.
• WAFS Edge - client average throughput—Total volume of traffic between the WAFS Edge device and the clients it serves, divided by total uptime (including idle time). Displayed in kilobytes per second.
10-35Cisco Wide Area Application Services Configuration Guide
OL-12063-01
Chapter 10 Using the WAE Device Manager GUIViewing WAE Logs
Step 5 Do one of the following actions:
• Choose a graph in the table and then click View to display a popup window with all four historical graphs for the selected statistic.
• Click View All to display the index window with the daily graphs for the WAFS Edge device.
Viewing WAE LogsYou can view event information logged by the Cisco WAE, WAFS Core, and WAFS Edge components. The event information available varies based on the component that you are viewing.
For more information about viewing WAE logs, see the following sections:
• About WAE Logs, page 10-36
• Viewing Cisco WAE Logs, page 10-38
About WAE LogsYou can configure what you want displayed for each log file and save the log to a file locally as described in the following sections:
• Setting Display Criteria, page 10-36
• Viewing Log Entries, page 10-37
• Saving Log File Information, page 10-37
Setting Display Criteria
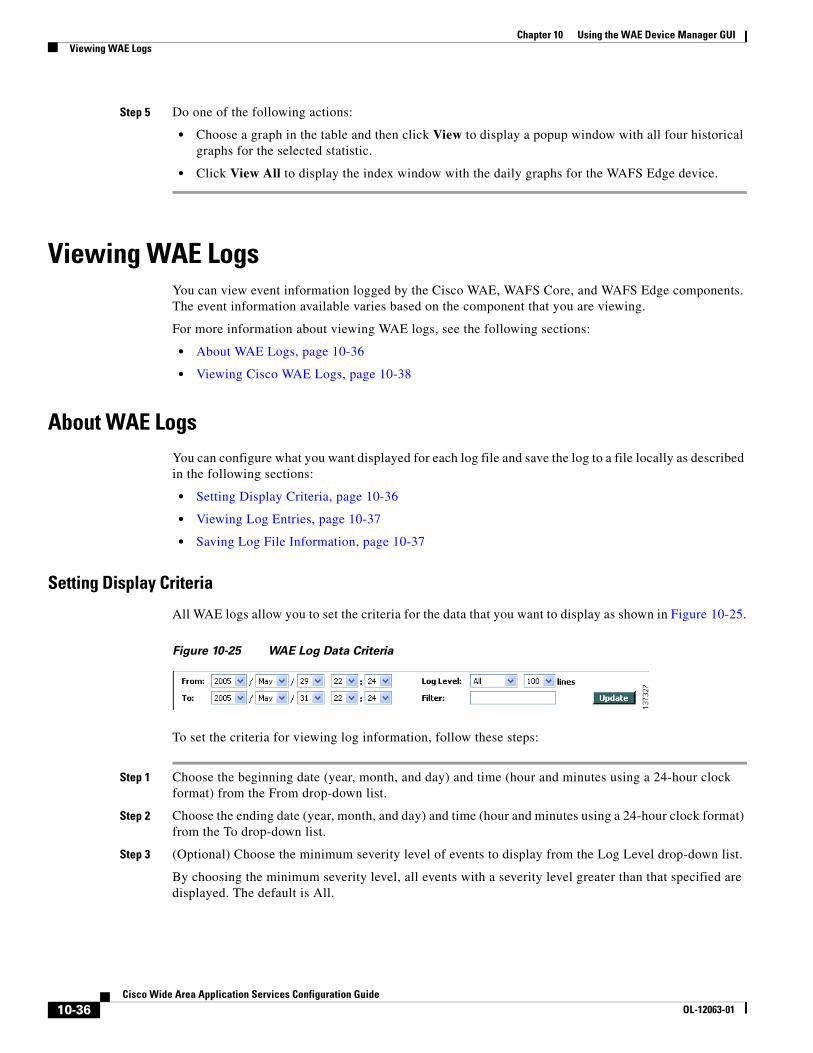
All WAE logs allow you to set the criteria for the data that you want to display as shown in Figure 10-25.
Figure 10-25 WAE Log Data Criteria
To set the criteria for viewing log information, follow these steps:
Step 1 Choose the beginning date (year, month, and day) and time (hour and minutes using a 24-hour clock format) from the From drop-down list.
Step 2 Choose the ending date (year, month, and day) and time (hour and minutes using a 24-hour clock format) from the To drop-down list.
Step 3 (Optional) Choose the minimum severity level of events to display from the Log Level drop-down list.
By choosing the minimum severity level, all events with a severity level greater than that specified are displayed. The default is All.
10-36Cisco Wide Area Application Services Configuration Guide
OL-12063-01
Chapter 10 Using the WAE Device Manager GUIViewing WAE Logs
Step 4 (Optional) Choose the number of events (one per line) to appear on a single page of the log from the Lines drop-down list.
The default is 100 events.
Step 5 (Optional) Enter a filter string by which the log can be further filtered.
Step 6 Click Update.
Viewing Log Entries
Each log entry contains the date and time that the event occurred, the severity level of the event, and a description containing the log message. The log message format varies based on the type of event.
The severity level of an event indicates the seriousness of the event. Six choices are defined and provide the follow information:
• All—Events of all severity levels are displayed.
• Debug—Indicates events have occurred that match those specified for debugging purposes.
• Info—Indicates an event occurred regarding the proper operation of the component. No user action is required with this type of event.
• Warning—Indicates a minor problem occurred on a component. The component should be able to overcome the incident without user intervention.
• Error—Indicates a problem occurred that affected the proper operation of the component. User intervention is likely required.
• Fatal—Indicates a severe problem occurred on a component that may have caused it to stop operating. User intervention is required.
Saving Log File Information
You can save a log as a text file and download it to your local drive.
To save a log as a text file, follow these steps:
Step 1 Set up your log with the date range and time frame that you want to save, using the From and To drop-down lists. (See the “Setting Display Criteria” section on page 10-36.)
Step 2 Set up the severity level of the events you want to view.
For more information, see the “Setting Display Criteria” section on page 10-36.
Step 3 Click Update.
Step 4 Click Download.
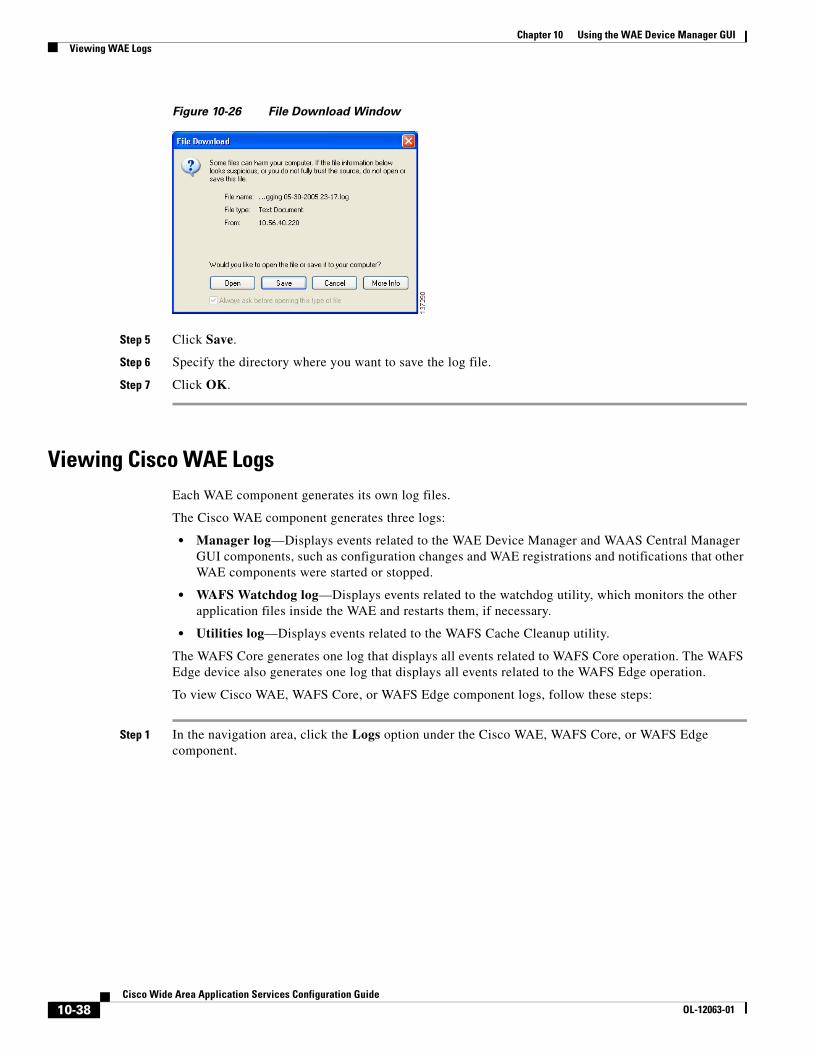
The File Download window appears (See Figure 10-26.)
10-37Cisco Wide Area Application Services Configuration Guide
OL-12063-01
Chapter 10 Using the WAE Device Manager GUIViewing WAE Logs
Figure 10-26 File Download Window
Step 5 Click Save.
Step 6 Specify the directory where you want to save the log file.
Step 7 Click OK.
Viewing Cisco WAE LogsEach WAE component generates its own log files.
The Cisco WAE component generates three logs:
• Manager log—Displays events related to the WAE Device Manager and WAAS Central Manager GUI components, such as configuration changes and WAE registrations and notifications that other WAE components were started or stopped.
• WAFS Watchdog log—Displays events related to the watchdog utility, which monitors the other application files inside the WAE and restarts them, if necessary.
• Utilities log—Displays events related to the WAFS Cache Cleanup utility.
The WAFS Core generates one log that displays all events related to WAFS Core operation. The WAFS Edge device also generates one log that displays all events related to the WAFS Edge operation.
To view Cisco WAE, WAFS Core, or WAFS Edge component logs, follow these steps:
Step 1 In the navigation area, click the Logs option under the Cisco WAE, WAFS Core, or WAFS Edge component.
10-38Cisco Wide Area Application Services Configuration Guide
OL-12063-01

Chapter 10 Using the WAE Device Manager GUIViewing WAE Logs
Figure 10-27 shows the Logs window for the Cisco WAE component.
Figure 10-27 Cisco WAE Component Logs Window
Step 2 If you selected the Cisco WAE, click the Manager, Watchdog, or Utilities tab to choose the log that you want to view.
Step 3 Set up your display criteria using the From, To, Level, and Lines drop-down lists. (See the “Setting Display Criteria” section on page 10-36.)
Step 4 (Optional) Set a filter on the log so that only events containing specific words or phrases are displayed by entering the relevant free text in the Filter text box.
Step 5 Click Update. The Logs window is refreshed according to your selected criteria.
Note Navigation arrows ( ) appear at the bottom of each log window when the number of events is greater than the number of lines selected per window.
10-39Cisco Wide Area Application Services Configuration Guide
OL-12063-01

Chapter 10 Using the WAE Device Manager GUIViewing WAE Logs
10-40Cisco Wide Area Application Services Configuration Guide
OL-12063-01