using the leveling functionality in primavera p6 - · pdf fileusing the leveling functionality...
TRANSCRIPT
Using The Leveling Functionality in Primavera P6
1 | P a g e
By Dan Stamness TEPCO, LLC www.tepco.us Resource leveling is a process that helps you ensure that sufficient resources are available to perform the activities in your project according to the plan. During resource leveling, an activity is only scheduled to occur when its resource demands can be met. To accomplish this, tasks may be delayed to resolve resource availability conflicts.
A major part of turnaround and project scheduling is understanding resource requirements and resource availability.
• Reviewing resource requirements and defining resource availability (Max Units/Time) is an iterative process.
• Resource allocation analysis must be conducted throughout the planning and scheduling process.
• Understanding resource limits is necessary for P6 leveling.
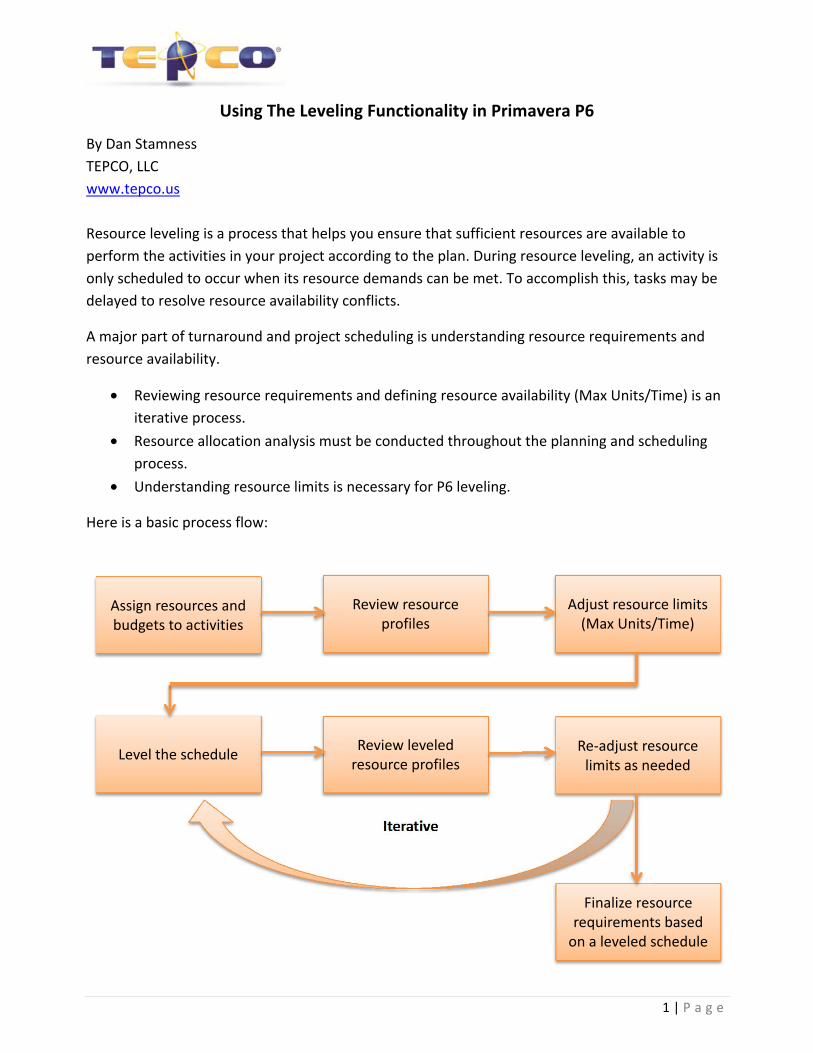
Here is a basic process flow:
Assign resources and budgets to activities
Review resource profiles
Adjust resource limits (Max Units/Time)
Level the schedule Review leveled resource profiles
Re-adjust resource limits as needed
Finalize resource requirements based
on a leveled schedule
Iterative

Using The Leveling Functionality in Primavera P6
2 | P a g e
When you level a project in P6, activities are moved to the right on the Gantt chart in an attempt to remove over-allocation.
• Leveling the project is not permanent and can be undone by rescheduling the project. There is no danger in leveling a project.
• While resource leveling provides one way to resolve resource conflicts, you may also want to consider alternative solutions, such as changing activity relationships or reallocating resources.
Prior to using the leveling functionality in P6, consider the following:
• Ensure resource assignments have been made to the activities. • Has management defined a definite timeframe for the turnaround or project window? If
so, have constraints been applied to the start and finish milestones for the phases? Constraints determine the available float that P6 will level within.
• Have the Max Units/Time for assigned resources been identified and entered into the Units & Prices tab in the resource details?
• Have you identified the Activity Leveling Priority code value on each activity?
NOTE! Leveling is not rocket science. Many P6 users try to use the leveling functionality to draw a very detailed picture that they want to see. P6 runs numerous algorithms during leveling at a complexity that few people could easily understand.
Some tend to over-use leveling priority codes or level only specific resources. Keep it simple and do not overcomplicate it. Leveling should only come after a well built and scheduled plan has been developed. It should be applied towards the end of the planning phase. Good leveling relies on activity attributes, including priority coding, resource assignments and limits, logic, constraints, and float. Ensure all of these attributes are in place prior to leveling.
Using The Leveling Functionality in Primavera P6
3 | P a g e
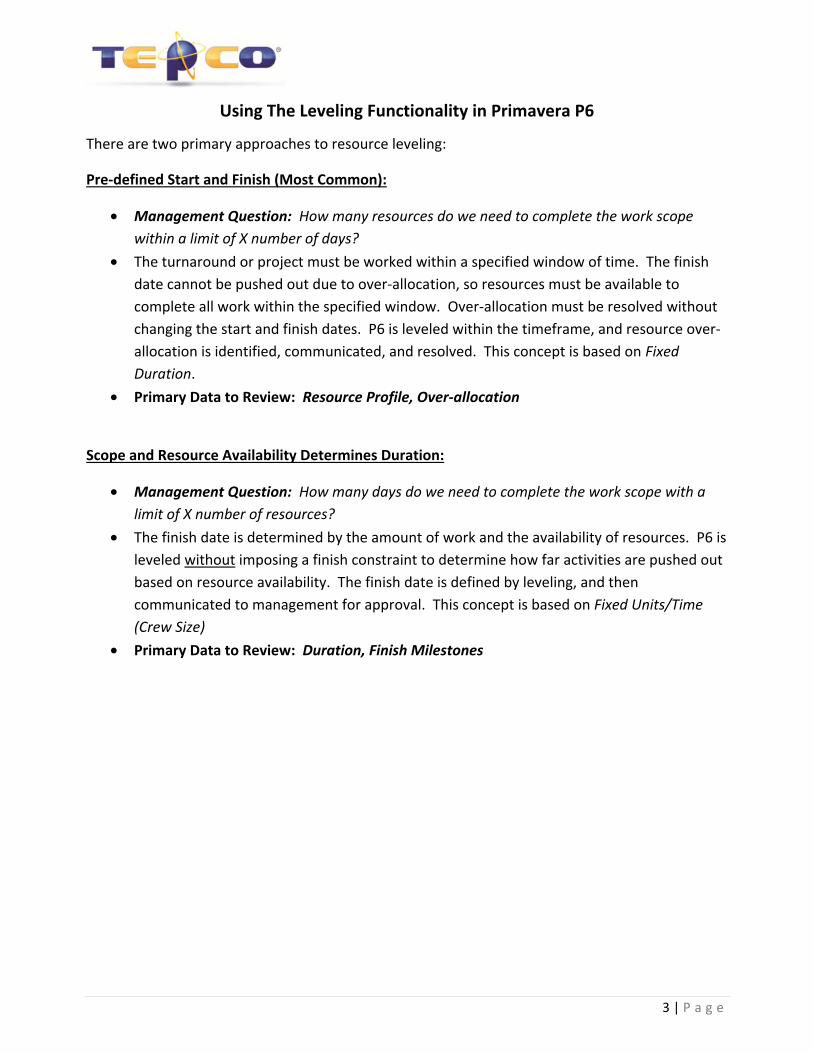
There are two primary approaches to resource leveling:
Pre-defined Start and Finish (Most Common):
• Management Question: How many resources do we need to complete the work scope within a limit of X number of days?
• The turnaround or project must be worked within a specified window of time. The finish date cannot be pushed out due to over-allocation, so resources must be available to complete all work within the specified window. Over-allocation must be resolved without changing the start and finish dates. P6 is leveled within the timeframe, and resource over-allocation is identified, communicated, and resolved. This concept is based on Fixed Duration.
• Primary Data to Review: Resource Profile, Over-allocation
Scope and Resource Availability Determines Duration:
• Management Question: How many days do we need to complete the work scope with a limit of X number of resources?
• The finish date is determined by the amount of work and the availability of resources. P6 is leveled without imposing a finish constraint to determine how far activities are pushed out based on resource availability. The finish date is defined by leveling, and then communicated to management for approval. This concept is based on Fixed Units/Time (Crew Size)
• Primary Data to Review: Duration, Finish Milestones
Using The Leveling Functionality in Primavera P6
4 | P a g e
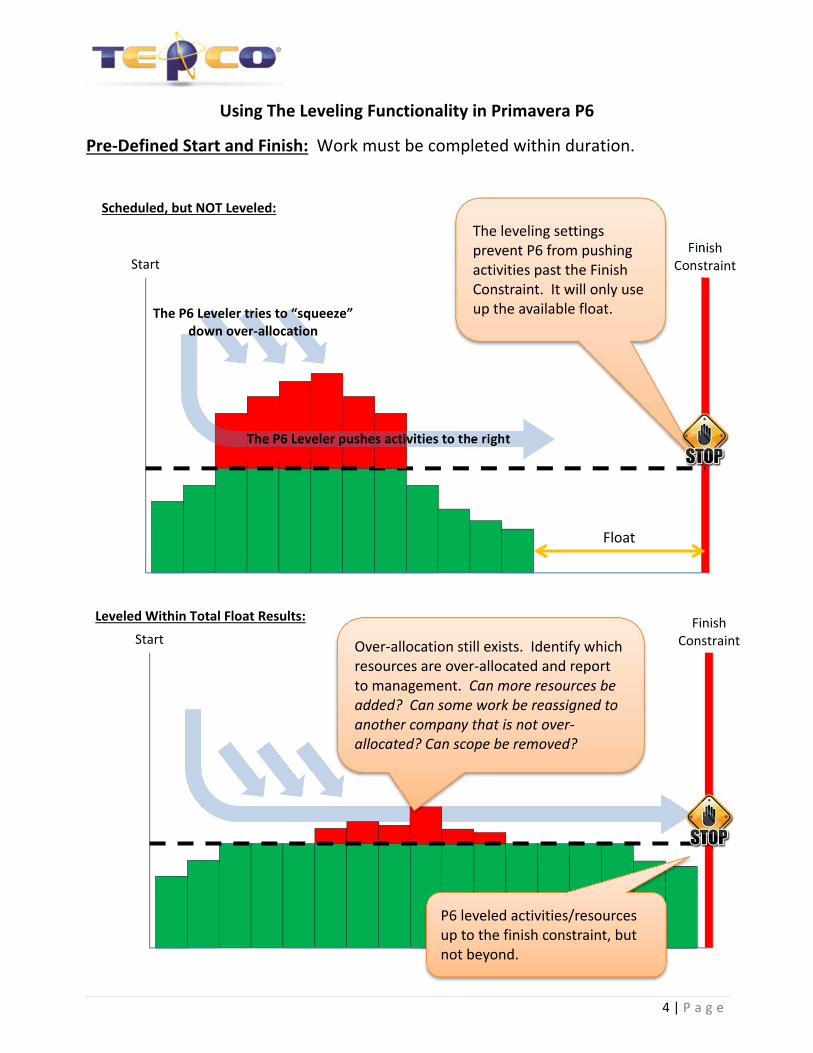
Pre-Defined Start and Finish: Work must be completed within duration.
Float
Start Finish
Constraint
The P6 Leveler pushes activities to the right
The P6 Leveler tries to “squeeze” down over-allocation
The leveling settings prevent P6 from pushing activities past the Finish Constraint. It will only use up the available float.
Start Finish
Constraint Leveled Within Total Float Results:
P6 leveled activities/resources up to the finish constraint, but not beyond.
Over-allocation still exists. Identify which resources are over-allocated and report to management. Can more resources be added? Can some work be reassigned to another company that is not over-allocated? Can scope be removed?
Scheduled, but NOT Leveled:
Using The Leveling Functionality in Primavera P6
5 | P a g e
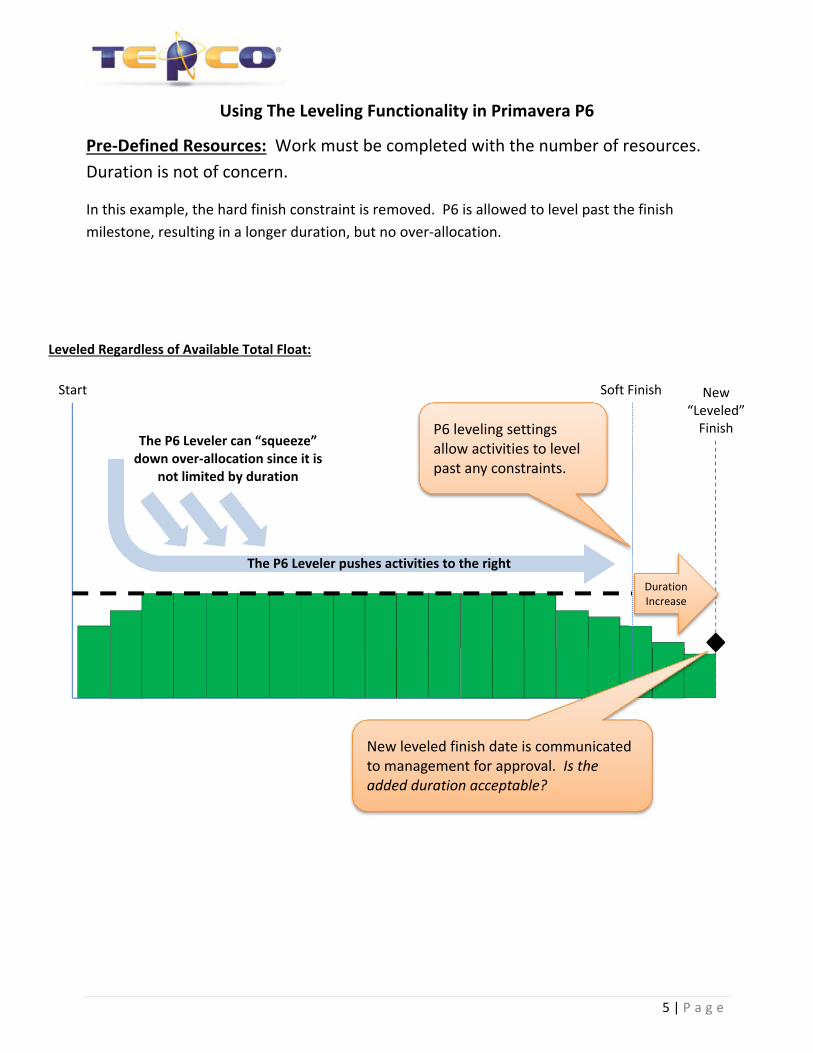
Pre-Defined Resources: Work must be completed with the number of resources. Duration is not of concern.
In this example, the hard finish constraint is removed. P6 is allowed to level past the finish milestone, resulting in a longer duration, but no over-allocation.
Start Soft Finish New “Leveled”
Finish
Duration Increase
P6 leveling settings allow activities to level past any constraints.
New leveled finish date is communicated to management for approval. Is the added duration acceptable?
Leveled Regardless of Available Total Float:
The P6 Leveler can “squeeze” down over-allocation since it is
not limited by duration
The P6 Leveler pushes activities to the right
Using The Leveling Functionality in Primavera P6
6 | P a g e
P6 Basic Leveling Examples:
The following examples explain how the P6 leveler will react based on how the option Level Resources Only Within Activity Total Float is set in the P6 leveling options.
The examples are based on three activities, each set with the Activity Leveling Priority 1, 2, and 3 respectively. The fourth activity is a finish milestone that all three activities are linked to, which will used be to describe the difference between leveling within float vs. leveling without float.
Example #1 – Scheduled, but Not Leveled:
This example contains three activities with 10 hours duration each on a 4x10 calendar, each linked to a finish milestone. The finish milestone has a Finish On constraint set to the end of the third day.
• Activity #1 is set as Leveling Priority 1 • Activity #2 is set as Leveling Priority 2 • Activity #3 is set as Leveling Priority 3
The activities are not linked to each other.
A scaffold resource is assigned to each task as a single head count. Since the three tasks are scheduled to work at the same time, the graph in the lower right indicates that we need three Brand Scaffold resources during the first day to complete the work.
Using The Leveling Functionality in Primavera P6
7 | P a g e
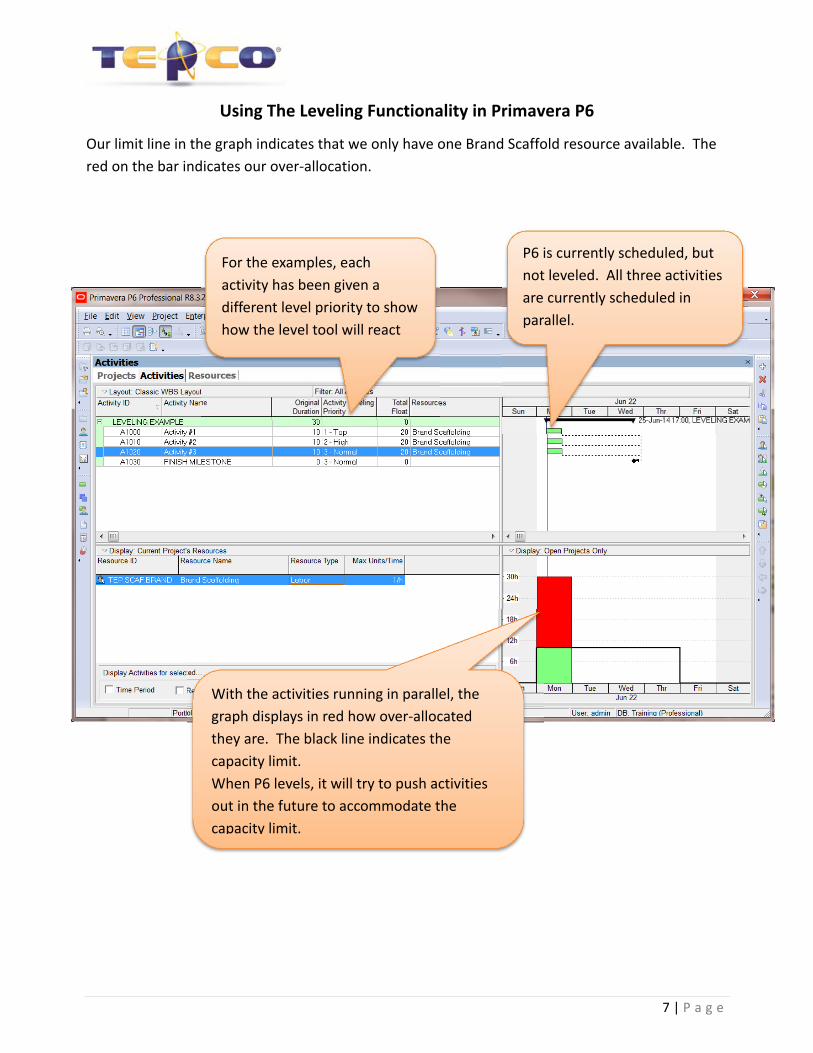
Our limit line in the graph indicates that we only have one Brand Scaffold resource available. The red on the bar indicates our over-allocation.
For the examples, each activity has been given a different level priority to show how the level tool will react
P6 is currently scheduled, but not leveled. All three activities are currently scheduled in parallel.
With the activities running in parallel, the graph displays in red how over-allocated they are. The black line indicates the capacity limit. When P6 levels, it will try to push activities out in the future to accommodate the capacity limit.
Using The Leveling Functionality in Primavera P6
8 | P a g e
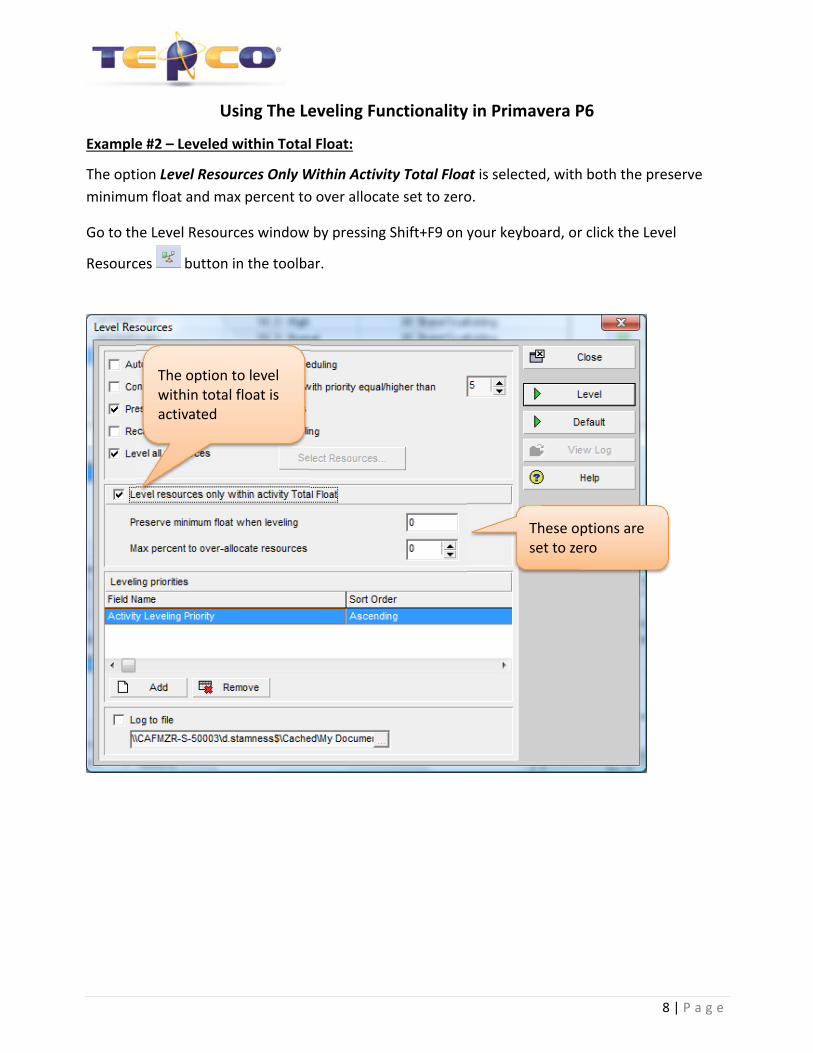
Example #2 – Leveled within Total Float:
The option Level Resources Only Within Activity Total Float is selected, with both the preserve minimum float and max percent to over allocate set to zero.
Go to the Level Resources window by pressing Shift+F9 on your keyboard, or click the Level
Resources button in the toolbar.
The option to level within total float is activated
These options are set to zero
Using The Leveling Functionality in Primavera P6
9 | P a g e
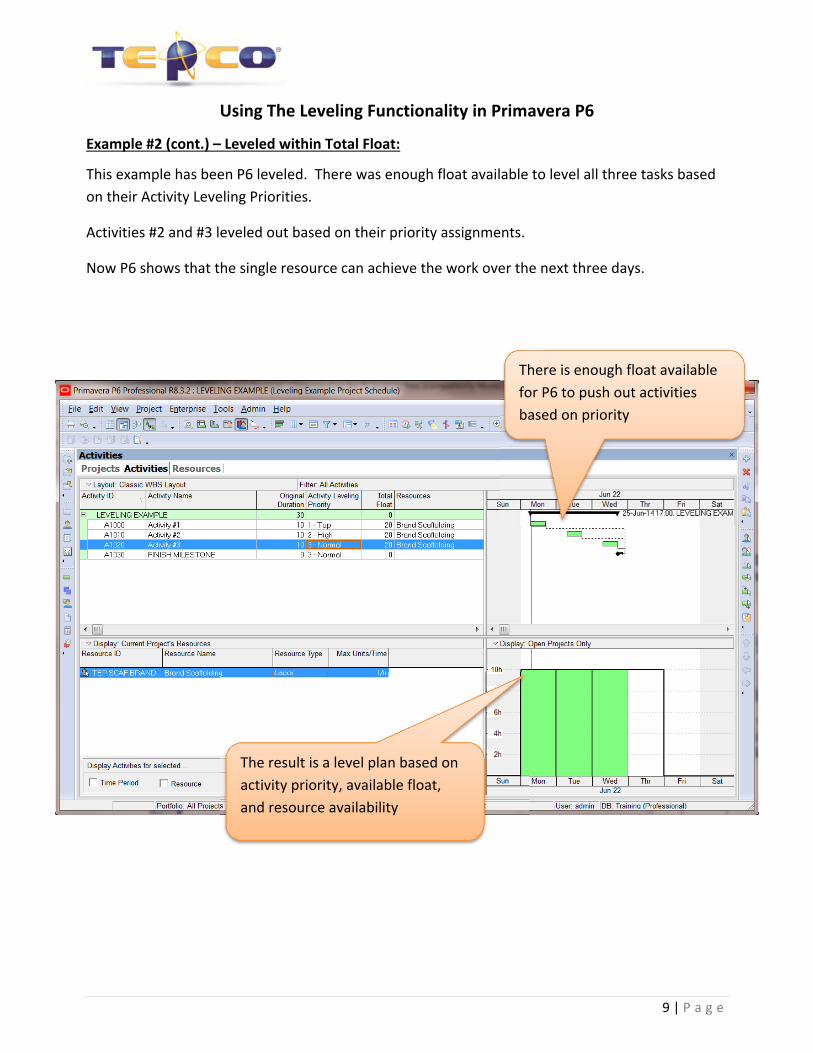
Example #2 (cont.) – Leveled within Total Float:
This example has been P6 leveled. There was enough float available to level all three tasks based on their Activity Leveling Priorities.
Activities #2 and #3 leveled out based on their priority assignments.
Now P6 shows that the single resource can achieve the work over the next three days.
There is enough float available for P6 to push out activities based on priority
The result is a level plan based on activity priority, available float, and resource availability
Using The Leveling Functionality in Primavera P6
10 | P a g e
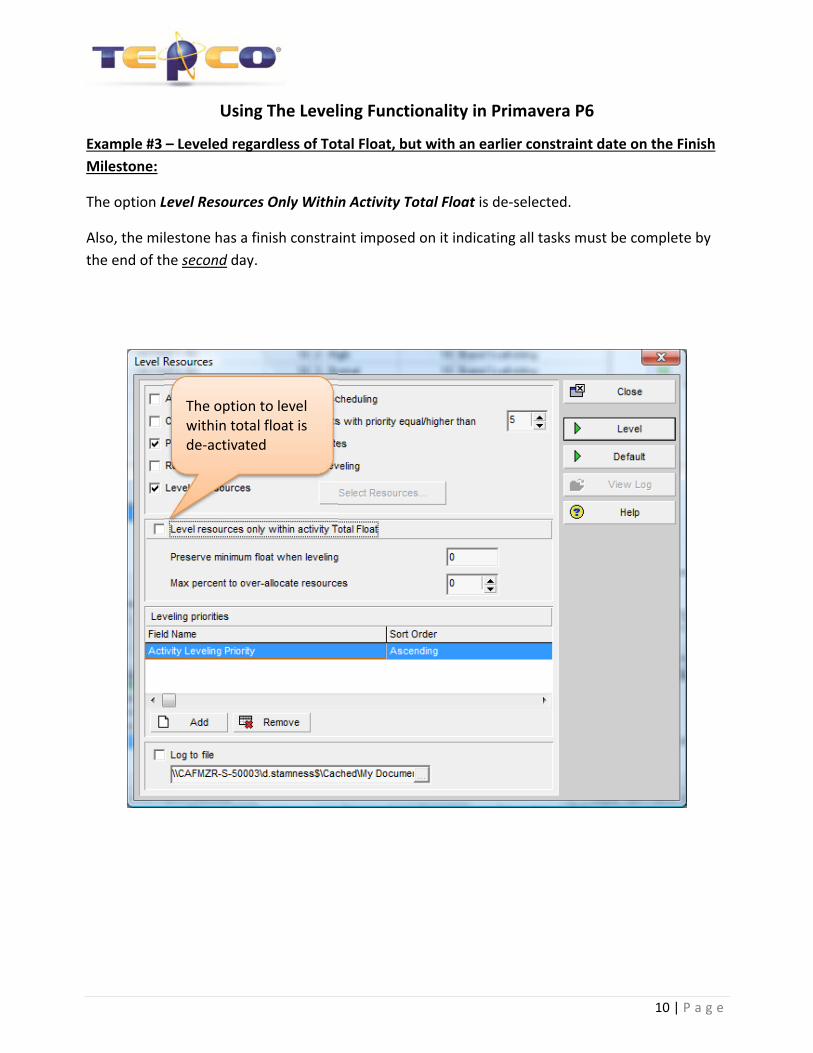
Example #3 – Leveled regardless of Total Float, but with an earlier constraint date on the Finish Milestone:
The option Level Resources Only Within Activity Total Float is de-selected.
Also, the milestone has a finish constraint imposed on it indicating all tasks must be complete by the end of the second day.
The option to level within total float is de-activated
Using The Leveling Functionality in Primavera P6
11 | P a g e
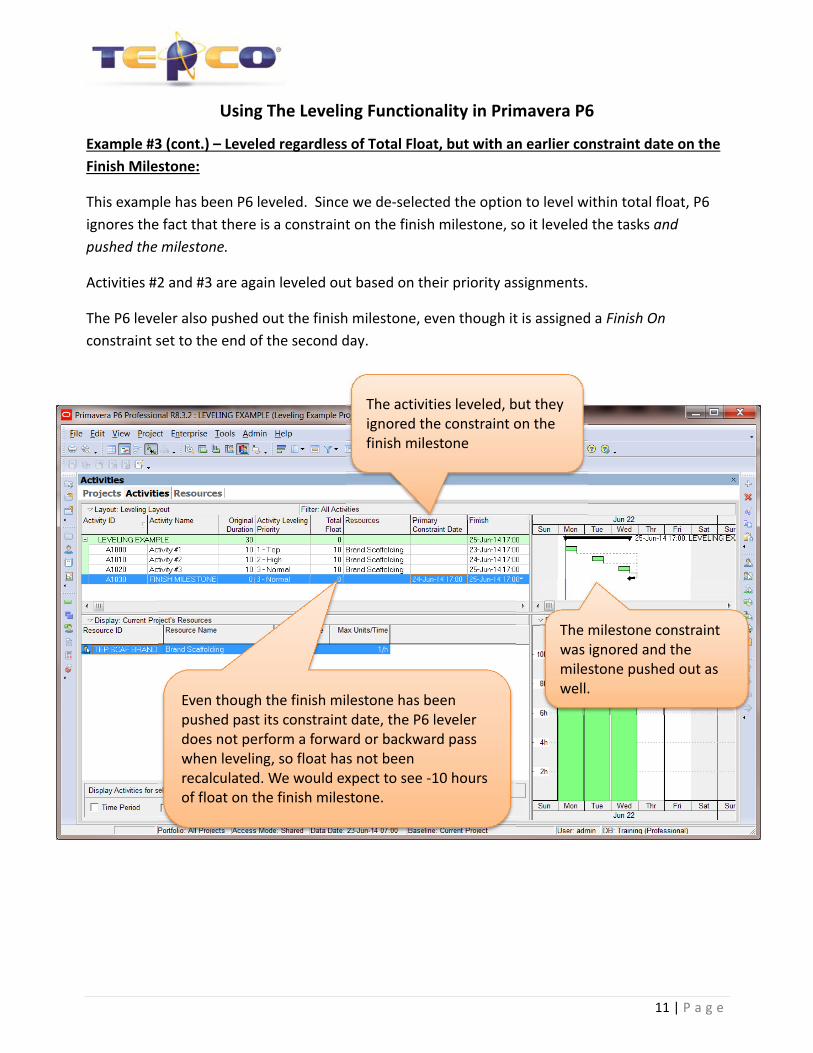
Example #3 (cont.) – Leveled regardless of Total Float, but with an earlier constraint date on the Finish Milestone:
This example has been P6 leveled. Since we de-selected the option to level within total float, P6 ignores the fact that there is a constraint on the finish milestone, so it leveled the tasks and pushed the milestone.
Activities #2 and #3 are again leveled out based on their priority assignments.
The P6 leveler also pushed out the finish milestone, even though it is assigned a Finish On constraint set to the end of the second day.
The activities leveled, but they ignored the constraint on the finish milestone
Even though the finish milestone has been pushed past its constraint date, the P6 leveler does not perform a forward or backward pass when leveling, so float has not been recalculated. We would expect to see -10 hours of float on the finish milestone.
The milestone constraint was ignored and the milestone pushed out as well.
Using The Leveling Functionality in Primavera P6
12 | P a g e
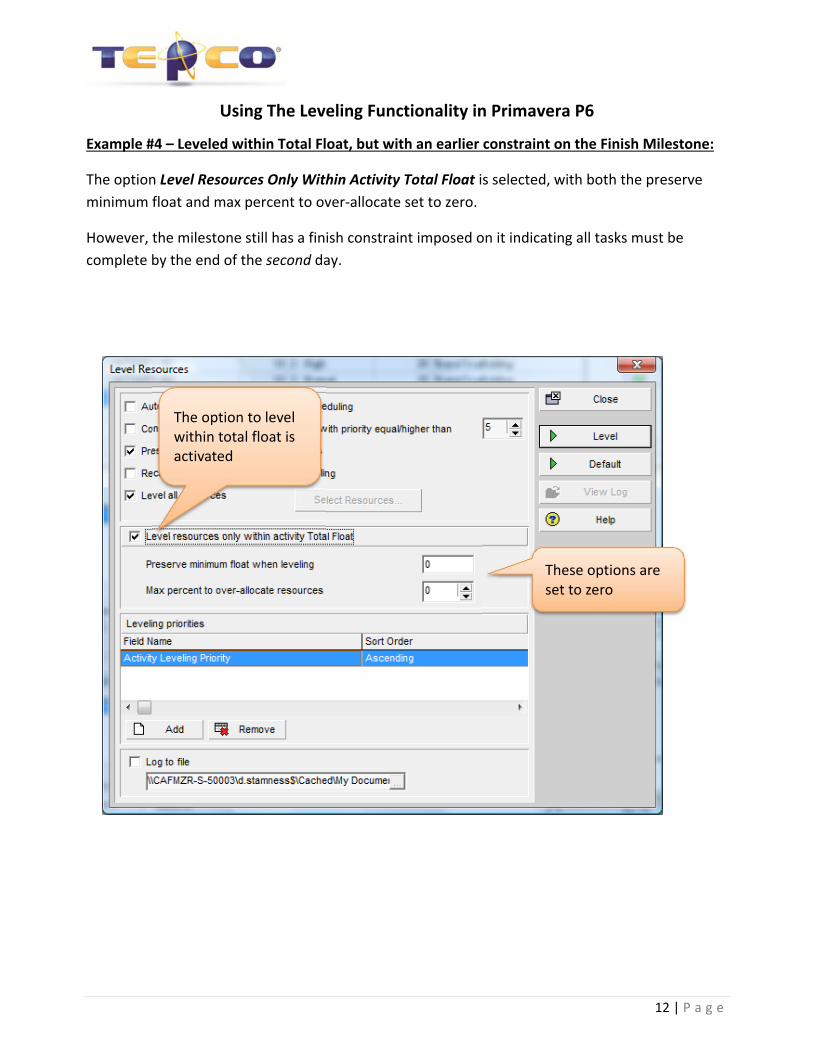
Example #4 – Leveled within Total Float, but with an earlier constraint on the Finish Milestone:
The option Level Resources Only Within Activity Total Float is selected, with both the preserve minimum float and max percent to over-allocate set to zero.
However, the milestone still has a finish constraint imposed on it indicating all tasks must be complete by the end of the second day.
The option to level within total float is activated
These options are set to zero
Using The Leveling Functionality in Primavera P6
13 | P a g e
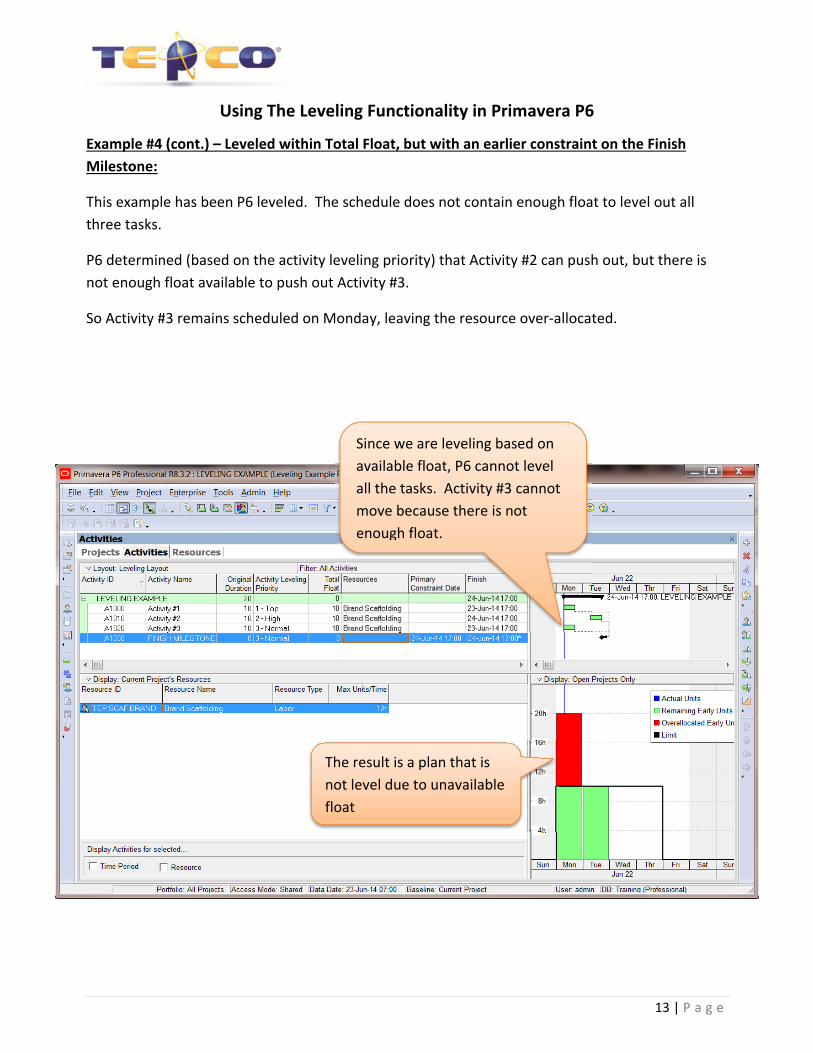
Example #4 (cont.) – Leveled within Total Float, but with an earlier constraint on the Finish Milestone:
This example has been P6 leveled. The schedule does not contain enough float to level out all three tasks.
P6 determined (based on the activity leveling priority) that Activity #2 can push out, but there is not enough float available to push out Activity #3.
So Activity #3 remains scheduled on Monday, leaving the resource over-allocated.
The result is a plan that is not level due to unavailable float
Since we are leveling based on available float, P6 cannot level all the tasks. Activity #3 cannot move because there is not enough float.
Using The Leveling Functionality in Primavera P6
14 | P a g e
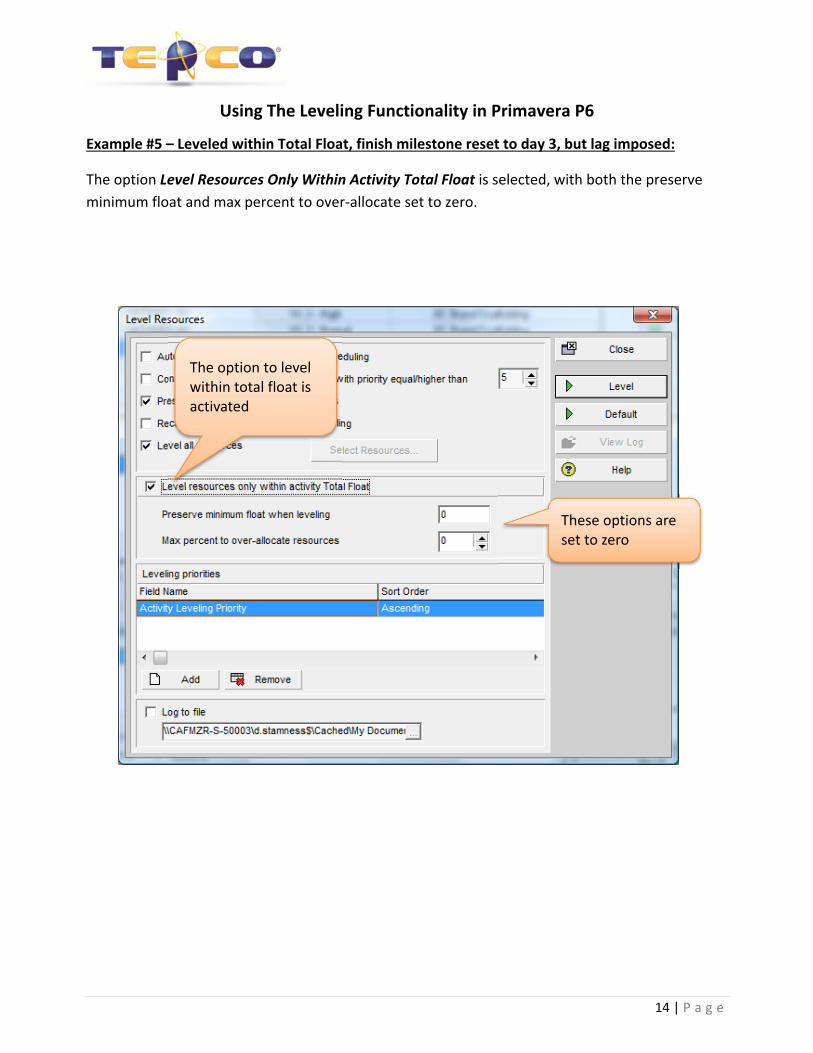
Example #5 – Leveled within Total Float, finish milestone reset to day 3, but lag imposed:
The option Level Resources Only Within Activity Total Float is selected, with both the preserve minimum float and max percent to over-allocate set to zero.
The option to level within total float is activated
These options are set to zero
Using The Leveling Functionality in Primavera P6
15 | P a g e
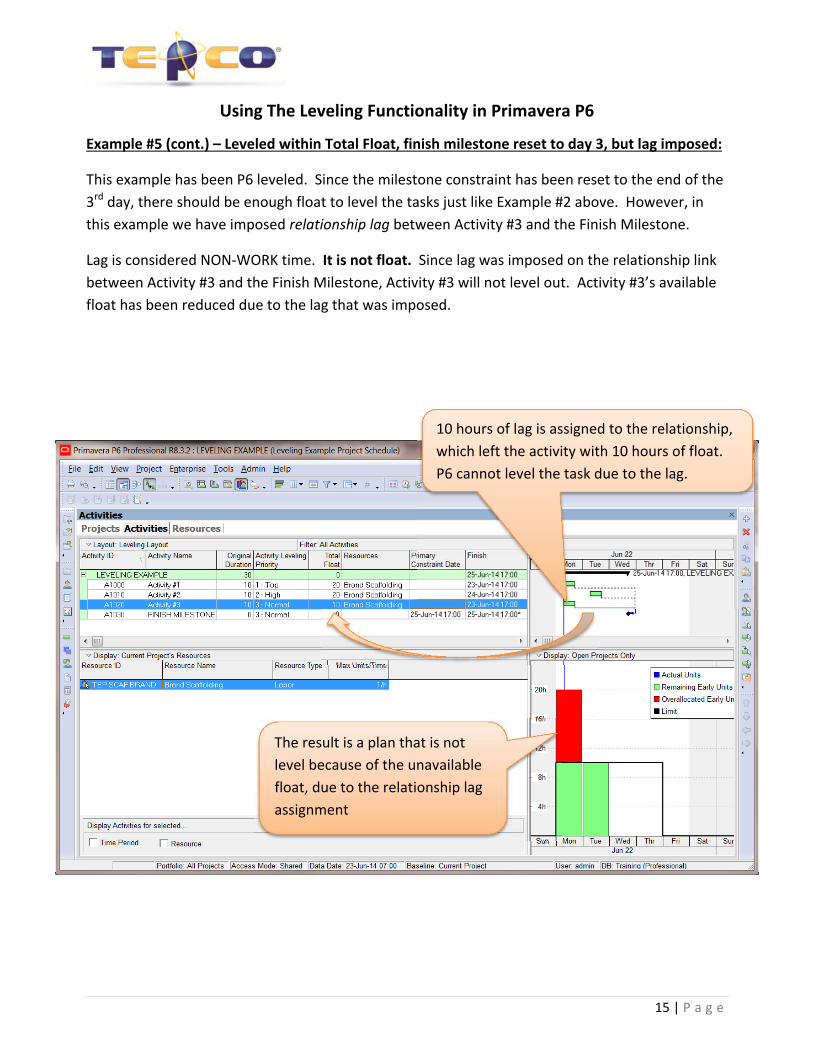
Example #5 (cont.) – Leveled within Total Float, finish milestone reset to day 3, but lag imposed:
This example has been P6 leveled. Since the milestone constraint has been reset to the end of the 3rd day, there should be enough float to level the tasks just like Example #2 above. However, in this example we have imposed relationship lag between Activity #3 and the Finish Milestone.
Lag is considered NON-WORK time. It is not float. Since lag was imposed on the relationship link between Activity #3 and the Finish Milestone, Activity #3 will not level out. Activity #3’s available float has been reduced due to the lag that was imposed.
10 hours of lag is assigned to the relationship, which left the activity with 10 hours of float. P6 cannot level the task due to the lag.
The result is a plan that is not level because of the unavailable float, due to the relationship lag assignment
Using The Leveling Functionality in Primavera P6
16 | P a g e
P6 Leveling Settings
Prior to leveling any project in P6, the leveling settings must be configured. Settings are saved with each individual project, so they must be set up for each P6 project the scheduler works with.
To view and modify the P6 leveling settings:
1) Open a project
2) Go to Tools, Level or press Shift-F9 on your keyboard. You can also press the Level button in the toolbar.
Level Resources Dialog Box Definitions:
• Automatically level resources when scheduling: Mark to automatically level resources each time you schedule a project.
• Consider assignments in other projects with priority equal/higher than: Mark to include resource assignments in other projects within the range of the leveling priority you specify when determining if a resource is over-allocated. Assignments in closed projects are considered. For example, if you mark the checkbox and specify a leveling priority of 5 in this field, the leveler considers all projects with a project leveling priority of 1,2,3,4, and 5. The leveling priority ranges from 1 (highest priority) to 100 (lowest priority). Set a project’s leveling priority on the General tab of the Projects Window.
• Preserve scheduled early and late dates: Mark to preserve the early and late dates that were calculated during project scheduling.
• Recalculate assignment costs after leveling: Mark to recalculate resource and role costs after leveling resources/roles in the projects. Use this option to calculate the costs of resource/role assignments that are assigned multiple rates.
• Level all resources: Mark to level all resources. When not marked, you can select which specific resources you want to level.
• Level resources only within activity Total Float: Mark to delay activities with resource conflicts only up to their late finish date.
• Preserve minimum float when leveling: The amount of float you want to maintain when activities are delayed because of resource conflicts. You can type a new number and time unit. NOTE: This field is always converted to hours, regardless of the time unit you enter.
• Max percent to over-allocate resources: The maximum percentage by which resource availability can be increased during resource leveling. This increased resource availability is used to level if resources on an activity cannot be leveled after using up the activity’s float limit. You can type a new percentage.
Using The Leveling Functionality in Primavera P6
17 | P a g e
Leveling Priorities:
• Field Name: Lists the fields by which to prioritize resources when leveling. Priorities are used only when more than one activity competes for the same resource at the same time.
• Sort Order: The order in which to level resources according to the field names displayed. Double-click the Sort Order field to choose Ascending, Descending, or Hierarchy (option only appears for fields that are hierarchical).
• Log to file: Mark to record your leveling results in a log file (.txt). Enter the name of the file in which you want to save your leveling results. Click to select a new file.
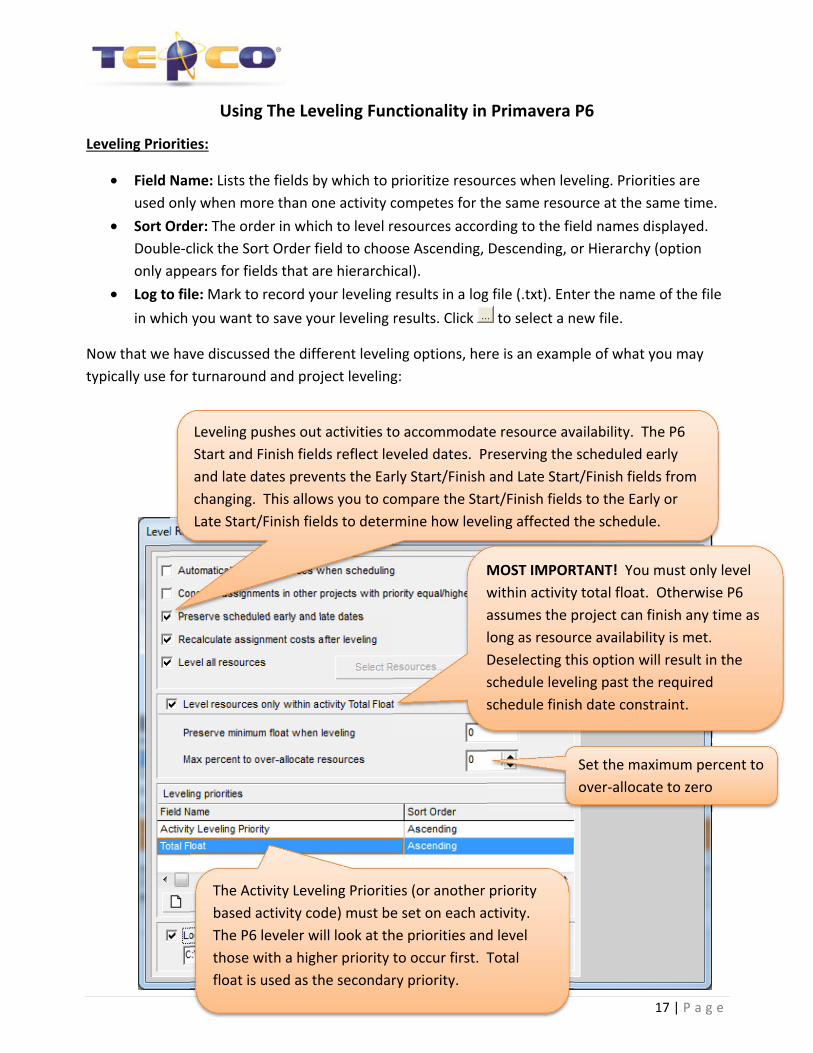
Now that we have discussed the different leveling options, here is an example of what you may typically use for turnaround and project leveling:
Leveling pushes out activities to accommodate resource availability. The P6 Start and Finish fields reflect leveled dates. Preserving the scheduled early and late dates prevents the Early Start/Finish and Late Start/Finish fields from changing. This allows you to compare the Start/Finish fields to the Early or Late Start/Finish fields to determine how leveling affected the schedule.
MOST IMPORTANT! You must only level within activity total float. Otherwise P6 assumes the project can finish any time as long as resource availability is met. Deselecting this option will result in the schedule leveling past the required schedule finish date constraint.
The Activity Leveling Priorities (or another priority based activity code) must be set on each activity. The P6 leveler will look at the priorities and level those with a higher priority to occur first. Total float is used as the secondary priority.
Set the maximum percent to over-allocate to zero
Using The Leveling Functionality in Primavera P6
18 | P a g e
Leveling All Resources VS. Leveling Selected Resources
The leveling window has an option to level all resources, or you can select to level specific resources. Some schedulers insist on selecting only those resources that they want to level.
Before you make this choice, ask yourself what the benefit is in selecting specific resources versus leveling them all. What does it buy you? In most cases, there is no harm in leveling all resources, even if you have an abundance of a particular craft on hand. Leveling all resources will provide a more gradual S-Curve Planned Value in the baseline. Just because a plan is leveled does not mean that you can’t aggressively work activities sooner than the leveled dates, if you have the capability to do so.
So don’t be afraid to level them all. If the planned value (baseline hours) in the S-Curve is fully leveled, you will find that setting and meeting upper level management expectations of planned hours per day (SPI) is much easier to manage.
Activity Leveling Priorities
P6 contains a built in code field called Activity Leveling Priority. By default, all activities are assigned the value 3 – Normal. If you intend on using the leveling functionality in P6 for the TAR, and intend on using the built in Activity Leveling Priority code values, these value must be set on each activity.
There are five activity leveling priorities in P6: 1 - Top 2 - High 3 - Normal 4 - Low 5 - Lowest
You are not limited to using the Activity Leveling Priority field in P6 for leveling. If you have priority standards in your organization that require more than the five code values, you can create them as an activity code and then use the activity code for leveling priorities.
Define your priorities! Your organization should define what each priority means. Typically high-risk equipment with unknown inspection results or historical data showing a low level of confidence in the equipment will get coded with “1 – TOP”. This would also include all critical path jobs.
Secondary risk and near critical jobs should get coded as “2 – HIGH”, and so on. Only extremely low risk work with a high amount of float will get assigned the low or lowest values.
Using The Leveling Functionality in Primavera P6
19 | P a g e
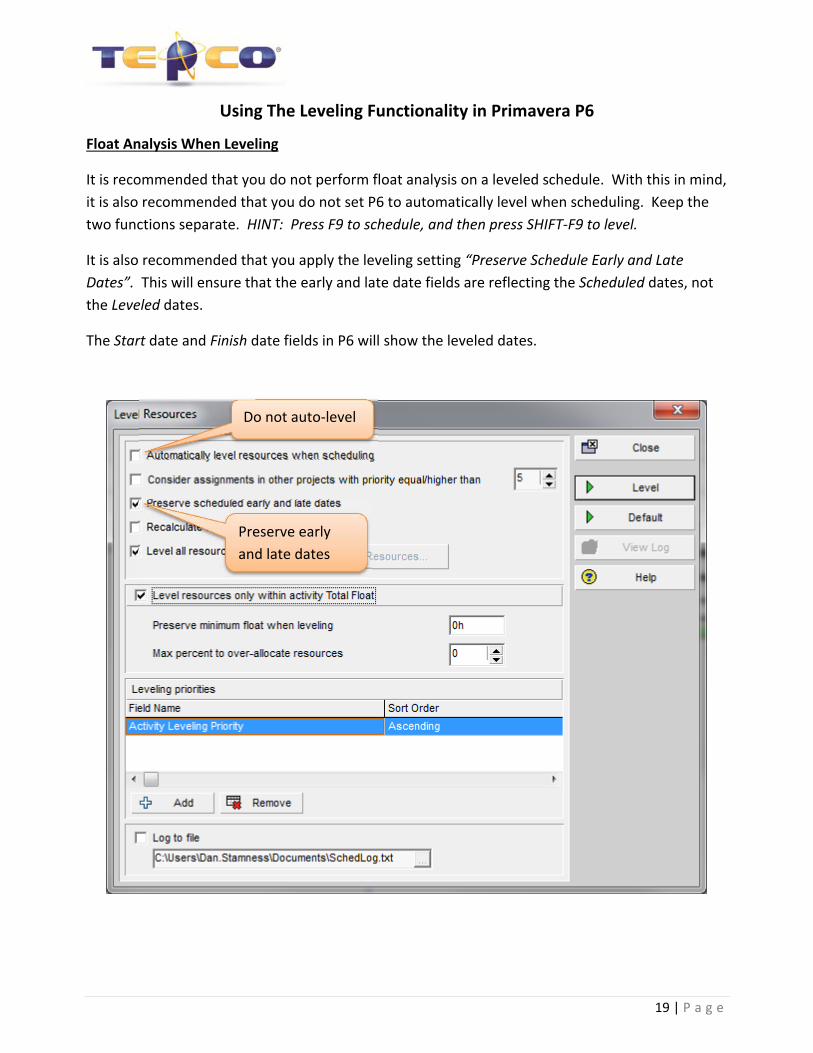
Float Analysis When Leveling
It is recommended that you do not perform float analysis on a leveled schedule. With this in mind, it is also recommended that you do not set P6 to automatically level when scheduling. Keep the two functions separate. HINT: Press F9 to schedule, and then press SHIFT-F9 to level.
It is also recommended that you apply the leveling setting “Preserve Schedule Early and Late Dates”. This will ensure that the early and late date fields are reflecting the Scheduled dates, not the Leveled dates.
The Start date and Finish date fields in P6 will show the leveled dates.
Preserve early and late dates
Do not auto-level
Using The Leveling Functionality in Primavera P6
20 | P a g e
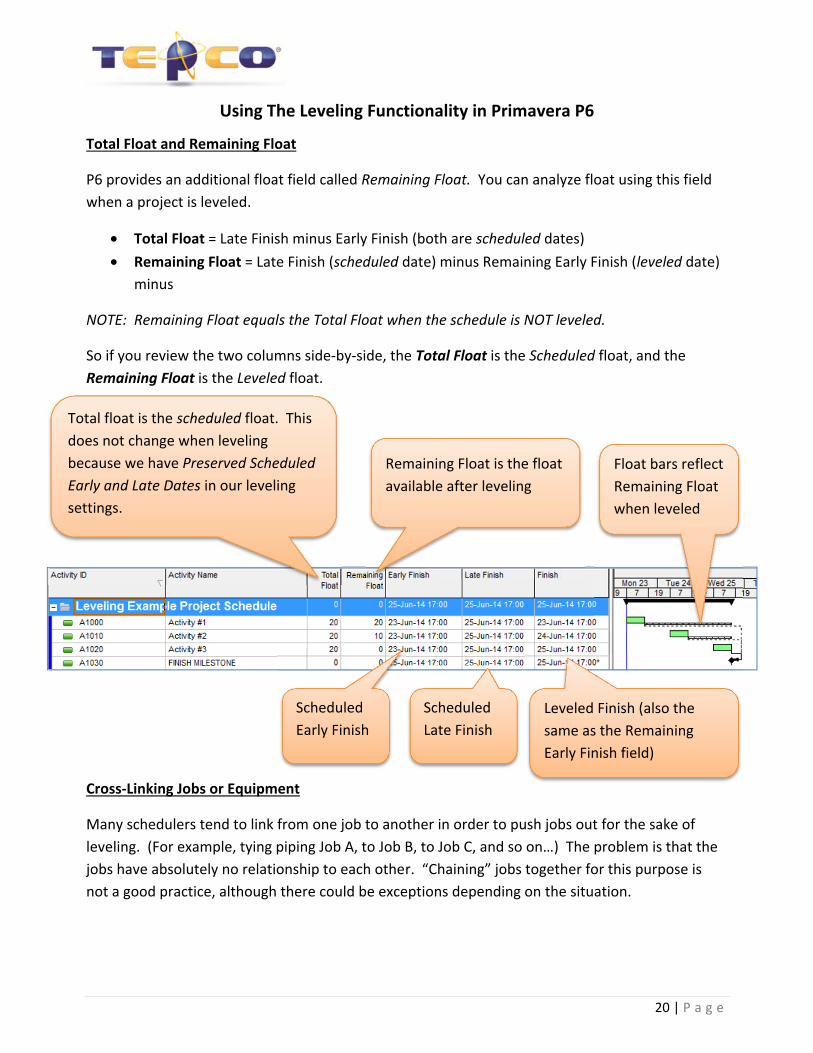
Total Float and Remaining Float
P6 provides an additional float field called Remaining Float. You can analyze float using this field when a project is leveled.
• Total Float = Late Finish minus Early Finish (both are scheduled dates) • Remaining Float = Late Finish (scheduled date) minus Remaining Early Finish (leveled date)
minus
NOTE: Remaining Float equals the Total Float when the schedule is NOT leveled.
So if you review the two columns side-by-side, the Total Float is the Scheduled float, and the Remaining Float is the Leveled float.
Cross-Linking Jobs or Equipment
Many schedulers tend to link from one job to another in order to push jobs out for the sake of leveling. (For example, tying piping Job A, to Job B, to Job C, and so on…) The problem is that the jobs have absolutely no relationship to each other. “Chaining” jobs together for this purpose is not a good practice, although there could be exceptions depending on the situation.
Total float is the scheduled float. This does not change when leveling because we have Preserved Scheduled Early and Late Dates in our leveling settings.
Remaining Float is the float available after leveling
Scheduled Early Finish
Scheduled Late Finish
Leveled Finish (also the same as the Remaining Early Finish field)
Float bars reflect Remaining Float when leveled
Using The Leveling Functionality in Primavera P6
21 | P a g e
Also, when linking jobs together in this manner, float is reduced for each job. The more that are chained together, the more the float is reduced. Eventually the combination of a bunch of small jobs linked together could turn into the primary critical path.
Cross-linking jobs should only be done when it logistically makes sense, not for the sake of leveling manpower. Doing so only prevents the P6 leveler from functioning properly.
An example of when you might cross-link jobs is when you must remove Exchanger A before you can get at Exchanger B. Exchanger A must be out of the way first. Another example is when you have valves on a column. If the column must be decommissioned, opened, cleaned, and approved for entry before working on the valves, then it’s a good idea to link the start of the valve work to the entry activity of the column.
Using Secondary Leveling Priority Codes
As another example, let’s say you have five columns that are all considered a high priority. They are all independent of each other, so there is not any cross-linking between them. Although they are all considered a high priority, one is high risk for discovery work. In this situation you may want to set up a secondary priority code for equipment. You could create an activity code called Equipment Leveling Priority and assign that priority code for secondary leveling criteria.
Changing Leveling Priorities During Execution
You can change your leveling priorities during execution. Using the previous five columns as an example, let’s say the first column is inspected and it’s discovered that no repairs are required. It might be best to change the remaining activities for the first column to a lower leveling priority, releasing the manpower urgency to the other four columns.
System Leveling Priorities
For turnaround scheduling, as equipment inspection starts to get near completion, you could change your leveling priorities to be based on system turnover priority. Operations have most likely identified the priority of the systems and when they would like them returned. You could set up another activity code called System Turnover Leveling Priority. Once you are to the point in execution where the team is nearing the turnover of equipment back to operations, the leveling parameters can be changed to level based on System Turnover Leveling Priority.
Setting the Resource Limits (Max Units/Time)
Resource allocation analysis must be conducted throughout the planning and scheduling process. Understanding resource limits is necessary for resource management and P6 leveling.
Using The Leveling Functionality in Primavera P6
22 | P a g e
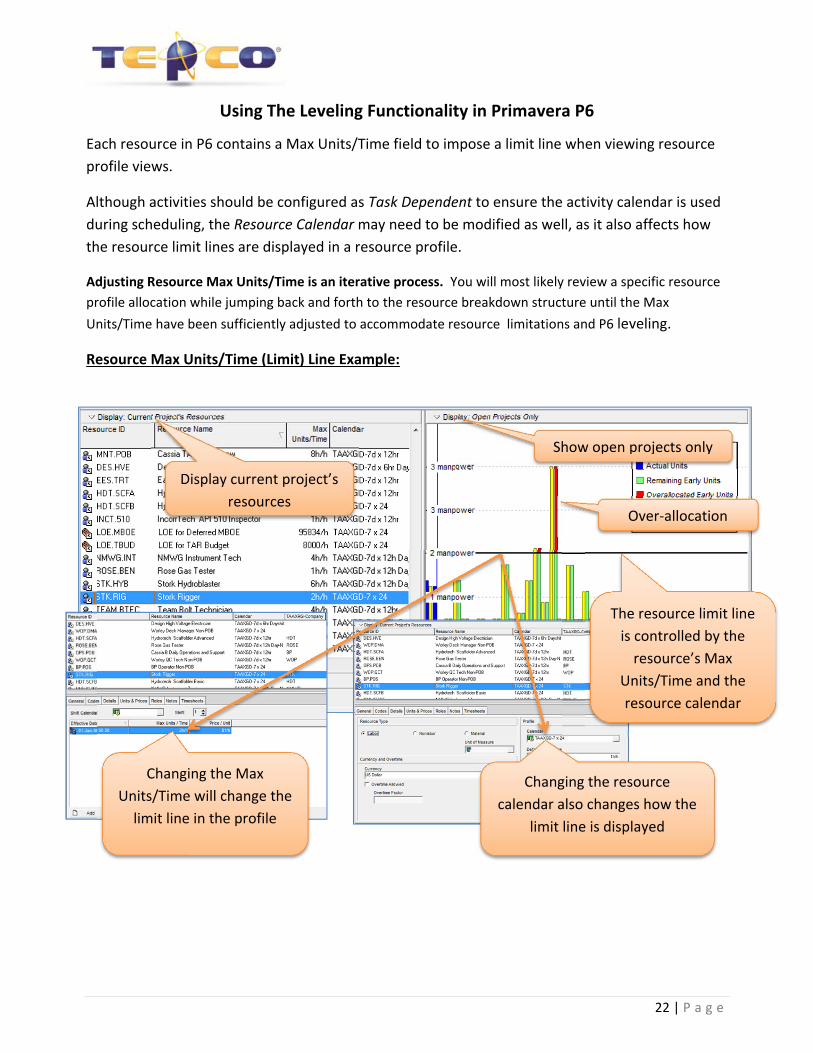
Each resource in P6 contains a Max Units/Time field to impose a limit line when viewing resource profile views.
Although activities should be configured as Task Dependent to ensure the activity calendar is used during scheduling, the Resource Calendar may need to be modified as well, as it also affects how the resource limit lines are displayed in a resource profile.
Adjusting Resource Max Units/Time is an iterative process. You will most likely review a specific resource profile allocation while jumping back and forth to the resource breakdown structure until the Max Units/Time have been sufficiently adjusted to accommodate resource limitations and P6 leveling.
Resource Max Units/Time (Limit) Line Example:
Display current project’s resources
Show open projects only
Over-allocation
The resource limit line is controlled by the
resource’s Max Units/Time and the resource calendar
Changing the Max Units/Time will change the
limit line in the profile
Changing the resource calendar also changes how the
limit line is displayed

Using The Leveling Functionality in Primavera P6
23 | P a g e
Steps for Adjusting the Resource Limit Line
1) Select the Resource Usage Profile button. 2) In the lower left pane, select the Display drop-down and ensure the view is filtered to
display Current Project’s Resources. 3) In the lower right pane, select the Display drop-down and ensure Show All Projects is NOT
selected. 4) Schedule (F9) the project. 5) Select a resource in the lower left pane and review their profile in the right pane. Adjust
your timescale as needed to show the profile. Notice how the limit line is too low to accommodate the amount of work in this example.
6) Go to the Resources view and select the resource. 7) Adjust the Resource Max Units/Time under the Units & Prices tab
The limit line is most likely too low for leveling
Adjust the Max Units/Time. Note that the resource contains multiple
Effective Dates
Using The Leveling Functionality in Primavera P6
24 | P a g e
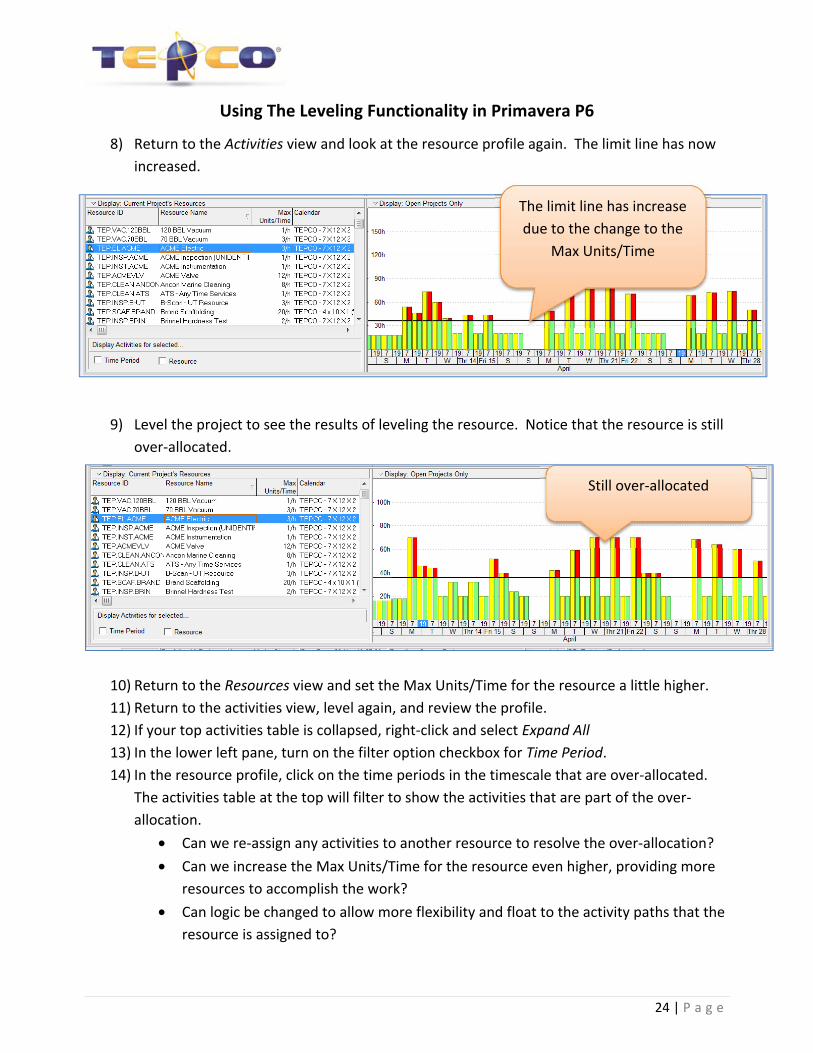
8) Return to the Activities view and look at the resource profile again. The limit line has now increased.
9) Level the project to see the results of leveling the resource. Notice that the resource is still over-allocated.
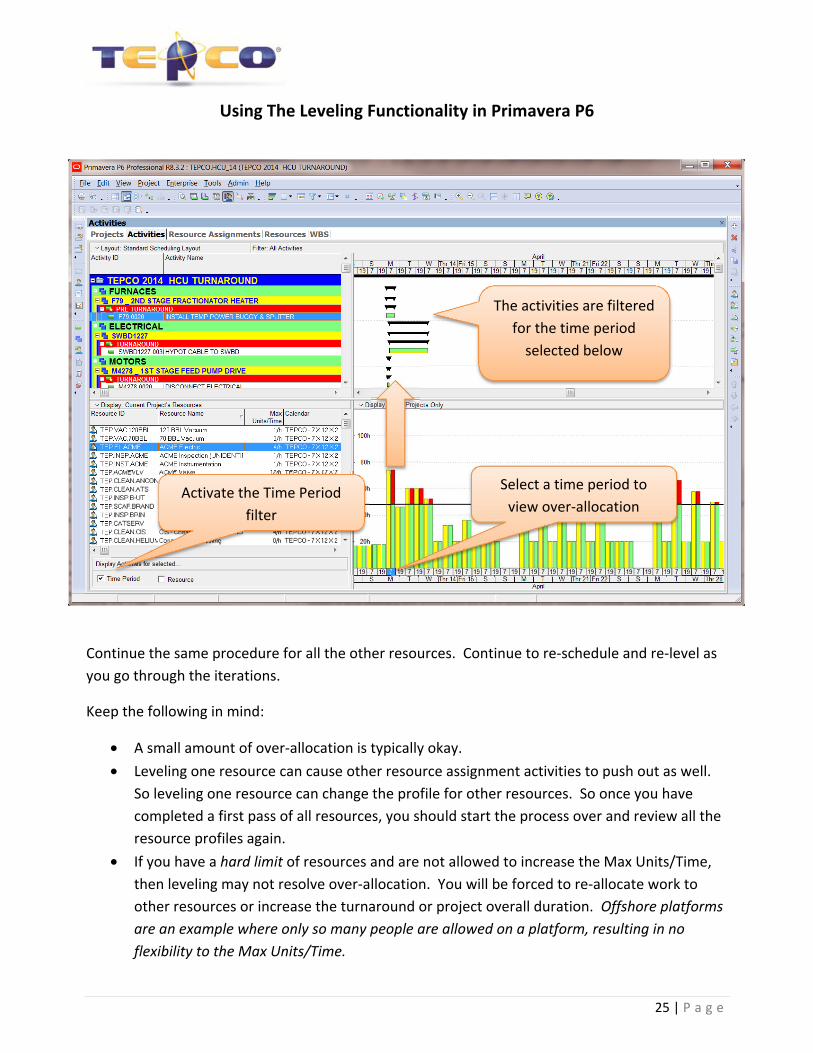
10) Return to the Resources view and set the Max Units/Time for the resource a little higher. 11) Return to the activities view, level again, and review the profile. 12) If your top activities table is collapsed, right-click and select Expand All 13) In the lower left pane, turn on the filter option checkbox for Time Period. 14) In the resource profile, click on the time periods in the timescale that are over-allocated.
The activities table at the top will filter to show the activities that are part of the over-allocation.
• Can we re-assign any activities to another resource to resolve the over-allocation? • Can we increase the Max Units/Time for the resource even higher, providing more
resources to accomplish the work? • Can logic be changed to allow more flexibility and float to the activity paths that the
resource is assigned to?
The limit line has increase due to the change to the
Max Units/Time
Still over-allocated
Using The Leveling Functionality in Primavera P6
25 | P a g e
Continue the same procedure for all the other resources. Continue to re-schedule and re-level as you go through the iterations.
Keep the following in mind:
• A small amount of over-allocation is typically okay. • Leveling one resource can cause other resource assignment activities to push out as well.
So leveling one resource can change the profile for other resources. So once you have completed a first pass of all resources, you should start the process over and review all the resource profiles again.
• If you have a hard limit of resources and are not allowed to increase the Max Units/Time, then leveling may not resolve over-allocation. You will be forced to re-allocate work to other resources or increase the turnaround or project overall duration. Offshore platforms are an example where only so many people are allowed on a platform, resulting in no flexibility to the Max Units/Time.
Activate the Time Period filter
Select a time period to view over-allocation
The activities are filtered for the time period
selected below
Using The Leveling Functionality in Primavera P6
26 | P a g e
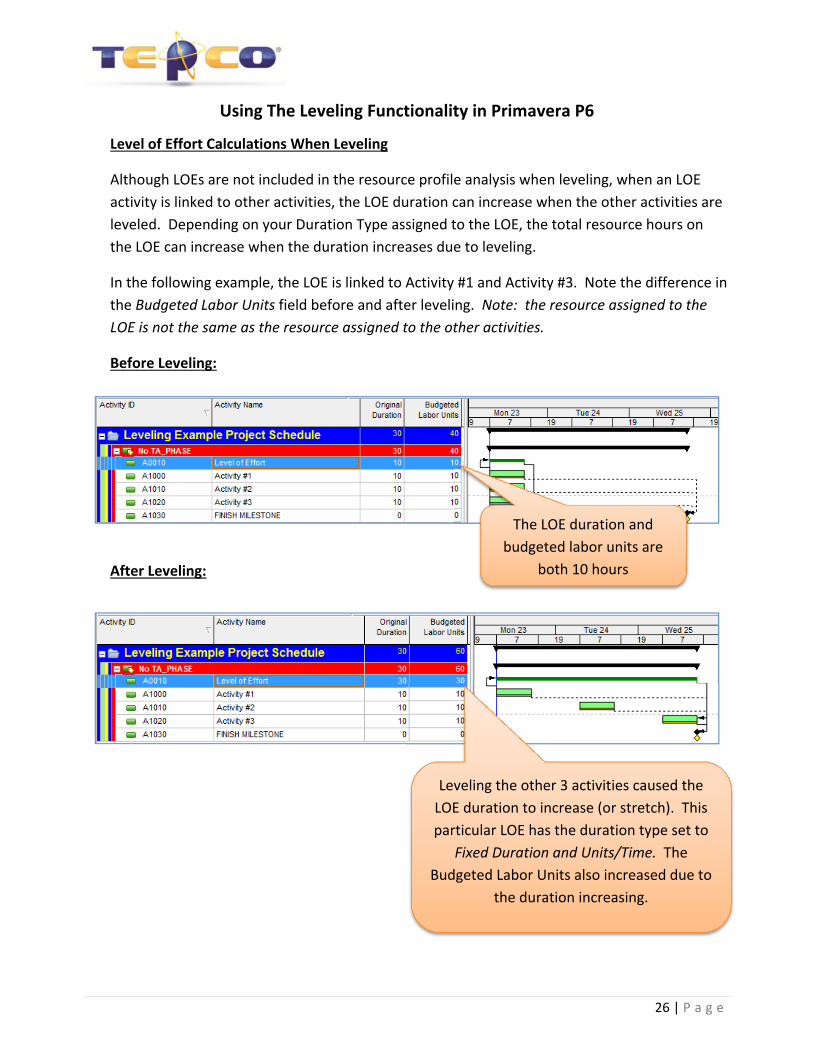
Level of Effort Calculations When Leveling
Although LOEs are not included in the resource profile analysis when leveling, when an LOE activity is linked to other activities, the LOE duration can increase when the other activities are leveled. Depending on your Duration Type assigned to the LOE, the total resource hours on the LOE can increase when the duration increases due to leveling.
In the following example, the LOE is linked to Activity #1 and Activity #3. Note the difference in the Budgeted Labor Units field before and after leveling. Note: the resource assigned to the LOE is not the same as the resource assigned to the other activities.
Before Leveling:
After Leveling:
The LOE duration and budgeted labor units are
both 10 hours
Leveling the other 3 activities caused the LOE duration to increase (or stretch). This particular LOE has the duration type set to
Fixed Duration and Units/Time. The Budgeted Labor Units also increased due to
the duration increasing.
Using The Leveling Functionality in Primavera P6
27 | P a g e
Since the manhours on an LOE could increase due to leveling, you will want to analyze your LOEs after leveling to ensure the increase in manhours is justified. An extreme increase may not be feasible. If so, you could change the LOE to Fixed Duration & Units before leveling to lock the total hours down. Keep in mind that the Units/Time will change instead when the duration changes.
If you’re a current Primavera user and would like advanced training on managing resource allocation and leveling, visit AdvancedP6Training and view TEPCO’s 1022 Primavera Advanced course. You may also contact TEPCO’s training department at (832) 514-4482.