using the active visual system - atginc.com the active visual system ® 1 about the active visual...
TRANSCRIPT

© 2015 Advanced Technologies Group, Inc.
Using the Active Visual
System®
AVS Training Series

Table of Contents
About the Active Visual System 1
Accessing the AVS 2
Navigating the AVS 5
Accessing Layouts 8
Accessing Reports 23
Contact Technical Support 26
Index 27
AVS Training Series
Using the Active Visual System®

Using the Active Visual System®1
About the Active Visual System
The Enterprise Active Visual System® (AVS) is ATG’s centralized Facility Information Platform. Executives at healthcare and higher education organizations across the U.S. rely on the AVS to incorporate knowledge-based facility information into their overall business plans.
A collection of cloud-based solutions, the AVS is used by ATG clients as a secure gateway to critical facility information. A web interface delivers facility information to client computers, tablets, and phones on demand, 24-7, without investment in new software, hardware, or specialized CAD training.
Authenticated users of the AVS can perform a variety of tasks, such as viewing and printing floor plans, running reports, and editing data, all via web browser.

Using the Active Visual System®
Go to www.atginc.com and click either the ‘Client Login’ or ‘Register’ link at the top right of the home page.
2
Accessing the AVS

Using the Active Visual System®
If you’ve chosen the ‘Client Login’ link on the home page and are already a registered user, enter your User Name and Password.*
This screen also provides links to register if you haven’t already done so (see next page), or to email registration information to someone else.
*User Name and Password are case sensitive
3
Logging In

Using the Active Visual System®
(If you’re already a registered user, you can skip to the next page.)
Fill out the AVS registration form completely.
You’ll receive a confirmation email shortly after submitting your information.
A separate email with your user name and password will be sent later when access has been approved.
4
Registering for a User Account

Using the Active Visual System®
Upon logging in, you’ll be directed to your AVS gateway. This gateway guides you through to all available facility information applications in order to access the specific data you need.
Using either the left-hand menus or the interactive maps, you can navigate to your desired facility location.*
*Items accompanied by green symbols indicate locations for which you have authorized access. Red symbols indicate locations within your organization that you cannot access without additional authorization.
5
Navigating the AVS

Using the Active Visual System®
For the purpose of this tutorial, examples focus on usage of the AVS on desktop and laptop computers. Tablet and phone users will notice a slight difference in mobile-optimized navigation.
A menu button (shown left) collapses the left-hand navigation to free up screen space on mobile devices. Collapsible drop-down menus (shown right) are available for continued text-based navigation. Interactive maps remain available throughout.
6
Navigating the AVS (Tablets/Phones)

Using the Active Visual System®
Upon navigating to building level, the left-hand menu will include a list of applications. Links to applications currently unavailable for that building will be inactive and grayed out.
7
Accessing Specific Applications

Using the Active Visual System®
Once you’ve selected your desired application, a menu of floor plan layouts is available. In this example, the ‘Architectural Layout’ application is shown, as it represents the framework for many of our solutions.
Layouts are available in three formats: PDF, DWF, and CAD. While it’s likely you will already have a PDF viewer installed, you may need to download and install the required viewers for DWF and CAD (see following page for further details).
8
Accessing Layouts

Using the Active Visual System®
The DWF and CAD (.dwg file extension) formats offer a number of tools for marking up layouts and saving copies locally.
Users who want to take advantage of these tools will need Autodesk® Design Review for viewing DWFs with a web browser and Autodesk® DWG True View for viewing CAD files on your desktop.
These viewers are free of charge and can be downloaded through the AVS. Clicking the icon at the top right of your interface will display a ‘Downloads’ link. The link will take you to a list of the latest available software.
On the ‘Downloads’ page, select either the Design Review or True View link. A dialogue box will appear and prompt you to run or save the file. Choose Run.* Follow the prompts until the software is installed.
*If you don’t have administrator rights to install software on your computer, please check with your IT department to install the viewer.
9
Installing the Autodesk DWF/CAD Layout Viewers
Using the Active Visual System®
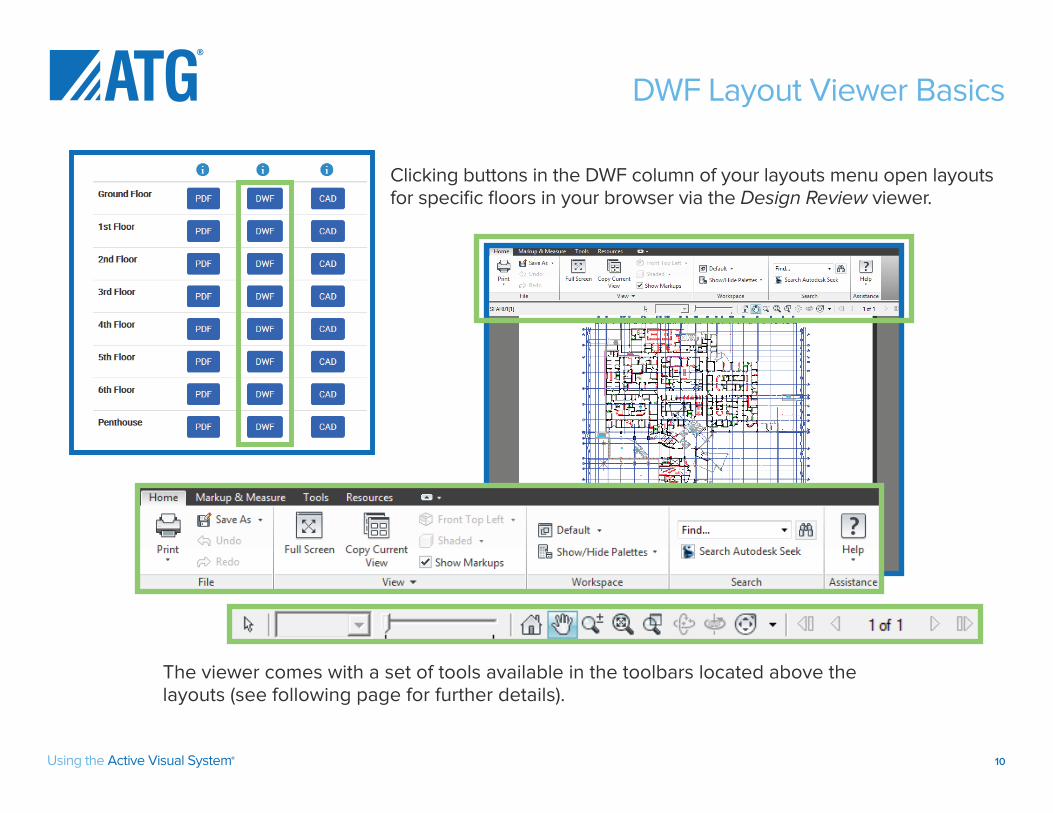
Clicking buttons in the DWF column of your layouts menu open layouts for specific floors in your browser via the Design Review viewer.
The viewer comes with a set of tools available in the toolbars located above the layouts (see following page for further details).
10
DWF Layout Viewer Basics

Using the Active Visual System®
To move DWF layouts, click, hold, and drag your mouse in any white or inactive area of the drawing while the ‘Pan’ icon (hand) is selected in the basic toolbar.
To zoom in or out of an area, use the middle scroller on your mouse or use the ‘Zoom’ icons included in the basic toolbar.
The ‘Home’ tab in the toolbar ribbon contains some basic features, such as Save, Print, Find, and Help.
Basic Toolbar
Toolbar Ribbon
11
Basic DWF Layout Tools

Using the Active Visual System®
Critical information regarding each room of your facility is available by clicking on that room within a floor layout.
This and the following examples focus on ‘Space Utilzation’ as is it is another foundational application.
Going back to your list of available applications, choose ‘Space Utilization’ from the menu.
Once on the ‘Space Utilization’ page, you will find a menu of floor layout options. This and the following examples focus again on viewing DWF layouts, however it should be noted that the same basic principles apply to PDF layouts.
12
Accessing Room Attributes Via Layouts

Using the Active Visual System®
Room Name
Room Number
Cost Center Number
Square Footage
Each room in a layout displays a number of basic attributes. The guide (above right) explains what each attribute represents. These basic attributes also act as a link to more detailed information on that particular room (see following page for further details).
13
Basic Room Attributes

Using the Active Visual System®14
Advanced Room Attributes
To view a more detailed listing of room attributes, click on the area in the layout showing the room’s basic attributes.
Note: ‘Gross S.F.’ in the example above represents usable space.

Using the Active Visual System®
A dialog box will appear. Under the ‘Print Range’ section, either select ‘Full Page’ or ‘Current View’ (as shown left). Adjust any other settings according to preference, and click ‘OK’.
Note: For best results when printing to a black & white printer, be sure to choose the ‘Black and white’ options from the ‘Print Color’ drop down menus.
*To print a specific area of a floor plan, simply zoom to that area.
To print either a full or selected view* of your layouts, first click on the ‘Print’ icon in the toolbar ribbon.
15
Printing Layouts

Using the Active Visual System®
The ‘Markup & Measure’ tab on the toolbar ribbon provides a toolbar for making notatations and measuring areas of your layouts (see following page for further details). Marked up copies of the layouts can then be saved locally to your computer. All drawings are read-only, so the original copies will remain unchanged.
16
Marking Up Layouts

Using the Active Visual System®
Text Markup – Allows text to be added anywhere on the drawing by clicking and dragging in an area of the layout where you want the text or label to appear.
Freehand Markup – Allows you to draw circles, squares, lines, and other various shapes on areas of the drawing by clicking and dragging over the layout.
Rectangle Callout – Allows you to enter text into a markup box in order to notate specific information for an element in the drawing.
Measure Length Between Two Points – Allows measurement of an area in a drawing by clicking on points of any chosen area. When done, hit the ‘Esc’ key on your keyboard and the total area, polyline, or length measurements will be displayed.
Stamps – Allows stamping on a drawing with various options, such as ‘Approved’, ‘Rejected’, ‘Not For Construction’, ‘Not To Scale’, ‘Preliminary’, ‘For Review’, and ‘Final’.
Custom Symbols – Allows placement of various symbols on the drawing.
The ‘Markup & Measure’ toolbar provides a variety of useful features:
17
Markup Tools

Using the Active Visual System®
The following examples demonstrate a few of the markup tools in use:
Rectangle callout w/ revision cloud
Measuring square footage of areas
Snapshot (found under the ‘Tools’ tabin the toolbar ribbon)
18
Using Markup Tools

Using the Active Visual System®
For many applications, a menu of available queries is provided for that specific application (‘Space Utilization’ in this example). This menu is located to the right of the layouts menu.
A hatch query provides an easy way to visually locate areas of your layouts based on various criteria.
First click on the ‘Hatch Query’ link in the menu and follow the instructions on the next page.
19
Hatching Layouts

Using the Active Visual System®
Building a hatch query consists of 3 simple steps:
1. Choose either ‘Auto Hatch’ or ‘Query Hatch’.* Then choose the field that you would like represented in color within your floor layout. 2. The selected query from step 1 automatically displays the floors in which the selected fields are available. Select the floor(s) you want to view.
3. Click on ‘Confirm Selection of Hatch Parameters’ - this will enable the link ‘Create Hatch Results’.
*‘Auto Hatch’ lets you create a quick, simple query based on a single data field that automatically assigns a single color to the corresponding area in the layout. ‘Query Hatch’ allows for multiple fields, as well as multiple color options.
20
Building a Hatch Query

Using the Active Visual System®
Once hatch parameters have been set and the ‘Confirm Selection of Hatch Parameters’ link has been enabled, click on that link.
Your query will processed and you will be directed to a page listing your hatched layout(s). Click on a link to view the desired drawing.
21
Selecting a Hatched Layout

Using the Active Visual System®
A legend provides color definitions represented in the hatch as well as the square footage summary.
Each field selected in the hatch query is represented by a color that provides a visual representation of the values in your floor layouts.
22
Understanding Hatched Layouts
Using the Active Visual System®
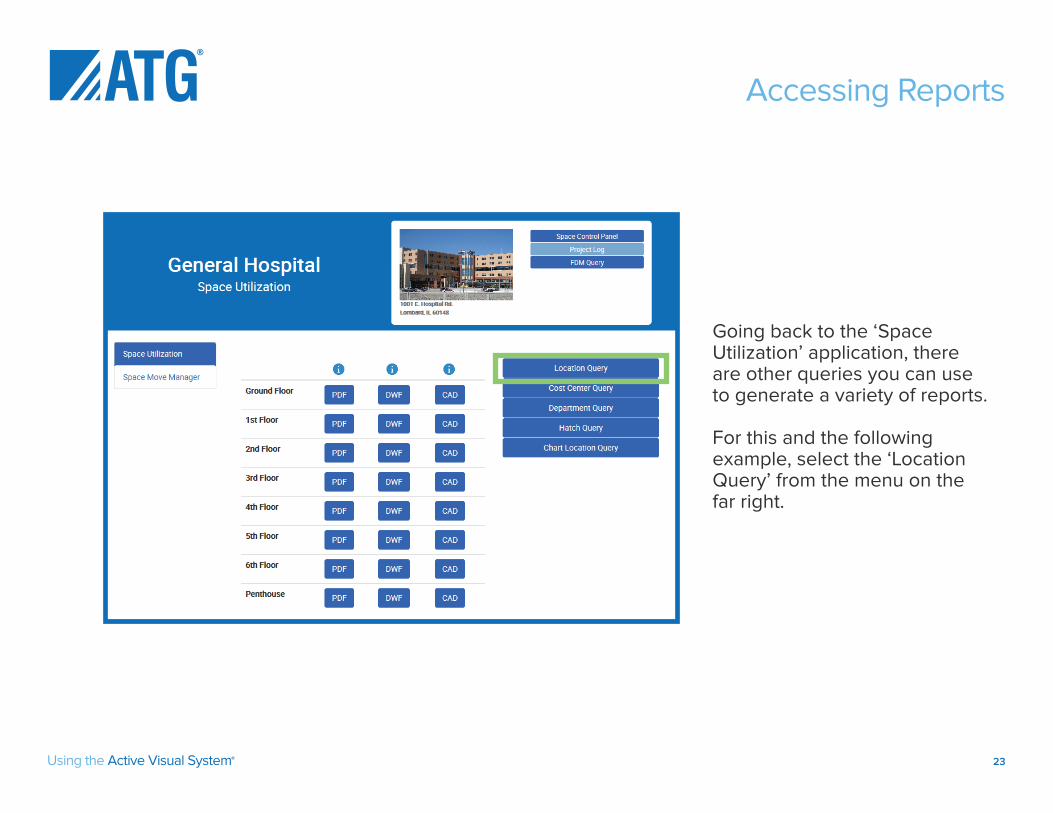
Going back to the ‘Space Utilization’ application, there are other queries you can use to generate a variety of reports.
For this and the following example, select the ‘Location Query’ from the menu on the far right.
23
Accessing Reports

Using the Active Visual System®
•Building •Floor •Room Number •Room Name •Site •Cost Center •Cost Center Description •Department •Department Description •Use Code •Use Description •Function Code •Function Description •Room Description •Division •Occupant •Occupancy •Phone Extension •Contact •Primary Contact •Change Date •Gross S.F. •Net S.F.
To build a query, first choose from list of pre-defined templates
Once query is complete, click ‘Create Report’.
All reports can be generated either in HTML or Excel formats
Click ‘And’ to insert your search criteria**
Narrow your search by choosing a field*
Select a field value
*The field data will vary by facility, but the fields include:
1 2
4
5 3
**If you want to search for more than one value, click ‘Or’. E.G., adding floors 01 Or 02 Or 03 will give you the location information for floors 01 through 03.
24
Building a Report Query

Using the Active Visual System®
After clicking ‘Create Report’ in the previous step, a report opens in a new window (or tab), displaying information based on your selected criteria.
The report displays a square footage summary for each floor, as well as the entire building.
25
Understanding Reports

For further information contact ATG Technical Support at: [email protected] or 630.829.8950
AVS Training Series
AVS Training Series

Index
About the Active Visual System 1Accessing the AVS 2Logging In 3Registering for a User Account 4Navigating the AVS 5Navigating the AVS (Tablets/Phones) 6Accessing Specific Applications 7Accessing Layouts 8Installing the Autodesk DWF/CAD Layout Viewers 9DWF Layout Viewer Basics 10Basic DWF Layout Tools 11Accessing Room Attributes Via Layouts 12Basic Room Attributes 13Advanced Room Attributes 14Printing Layouts 15Marking Up Layouts 16Markup Tools 17Using Markup Tools 18Hatching Layouts 19Building a Hatch Query 20Selecting a Hatched Layout 21Understanding Hatched Layouts 22Accessing Reports 23Building a Report Query 24Understanding Reports 25
Contact ATG Technical Support 26
Using the Active Visual System®
Using the Active Visual System®