using pages to create epub files -...
TRANSCRIPT

Using Pages to Create ePub Files Charlene Chausis, Adlai E. Stevenson High School ©2011
1
Using iWork Pages ’09 to Create ePub Files (Content from Apple’s Knowledge Base Article HT4168: http://support.apple.com/kb/ht4168) Important information to note ...
Pages ’09 allows users to export documents in ePub format for reading with the iBooks App on the iPhone, iPad, or iPod touch device. iBooks can display both ePub and PDF file formats, and you can export both from Pages. This tutorial explains the process for creating ePub files.
ePub documents can only be created from Pages Word Processing documents (not page layout).
Important features in ePub files created from Pages:
• Optimized for iBooks features such as changes in text size, font, and orientation (rotating your device between landscape or portrait).
• Support for video embedded in a document. • Support for iBooks notes. • Navigation using an automatically generated Table of Contents (when used with the ePub Starter file). • Note that some content is not supported by the ePub file format standard and will not be available in the
final ePub document: o Smart-fields. o Master/Background objects. o Headers and footers. o Floating graphics. o Footnotes (converted to endnotes). o Columns. o Comments. o Some image effects such as shadows. o Images beyond the 11MB of un-encoded image data allocation per chapter.
Remember:
Documents exported to ePub format will look different than their Pages counterparts. For the best results, use styles provided with the ePub template file. (To learn more about using paragraph styles in Pages, see the topics under the heading “Working with Styles” in the Pages built-in help.)
Before you begin:
Be sure all system updates have been installed. The “iWork Update 5” is needed to update Pages to version 4.0.5 (Apple menu > Software Update).
Gather resources for creating your ePub file.
Download pictures and movies for your ePub file to your desktop or into your iPhoto and/or iTunes libraries. Be sure to convert your digital files to smaller versions. Quicktime movies sized to 320 x 240, and under 15 MB are ideal (use the iTunes “Advanced” menu to convert movies to the iPad format.) For best results, keep the movie segments short.
To check the media size, select the icon in the Finder, and choose “File > Get info” to view the file information.

Using Pages to Create ePub Files Charlene Chausis, Adlai E. Stevenson High School ©2011
2
Getting Started
Download the “ePub Best Practices” file from http://images.apple.com/support/pages/docs/ePub_Best_Practices_EN.zip.
Open the “ePub Best Practices” file. Choose “File> Save as...” and save the file to your desktop with a new name.
You will see a Title page, Table of Contents (page 2) and “Chapter” pages (pages 3-4) for your content. The Title page will be used as your book cover on the shelf in iBooks.
You will “edit” ONLY the Title page, and the “Chapter” pages. The ePub template file will generate the Table of Contents automatically.
Click to activate the Title page in the sidebar.
Edit the text in the Title, Sub-title, Author and edition.
The image you see is a “place-holder.” To change this image, do not delete it; drag a new image into the frame (from iPhoto or your desktop), and your image will replace the sample shown.
Add content:
Click Page 3 in the sidebar to begin adding content to your ePub file.
Edit the Introduction. Type or paste your content to replace the text. If you copy text from another file or the Internet, be sure to use the Edit menu command to “Paste and Match Style” — this will save you time and effort!
1
2
3
4

Using Pages to Create ePub Files Charlene Chausis, Adlai E. Stevenson High School ©2011
3
Adding/Deleting Pages
Continue editing page 4 in the same manner (use the Edit > Paste and Match Style menu).
Always use Insert > Page Break to add new chapters, and apply Styles as needed for Chapter Name, Body, etc.
Inserting Pictures and Movies
Images and movies will display in ePub documents when viewed using iBooks on the iPad or iPhone. Images will display on other “e-reader” devices, but only iBooks will play videos placed in an ePub file.
Images and movies can be inserted from the menu (Insert > Choose), or by activating the Media browser, and dragging images or videos from your iTunes or iPhoto libraries, into your Pages file
IMPORTANT! All images and videos must be set as “inline” in the Inspector. SELECT EACH OBJECT TO BE SURE!
Optional: Adding Hyperlinks
Pages and ePub files also support Hyperlinks. To create a hyperlink:
a. Copy the URL from the address bar of the website (such as a Google live form or reference website)
b. Type the words you want to appear as the link in your ePub file. c. Highlight the words you typed. d. Click the Link tool in the Inspector e. Click the checkmark to “Enable as a hyperlink” f. Under Link To: Webpage, paste the URL address g. Press the Return key
5
Using Pages to Create ePub Files Charlene Chausis, Adlai E. Stevenson High School ©2011
4
Exporting to ePub Format
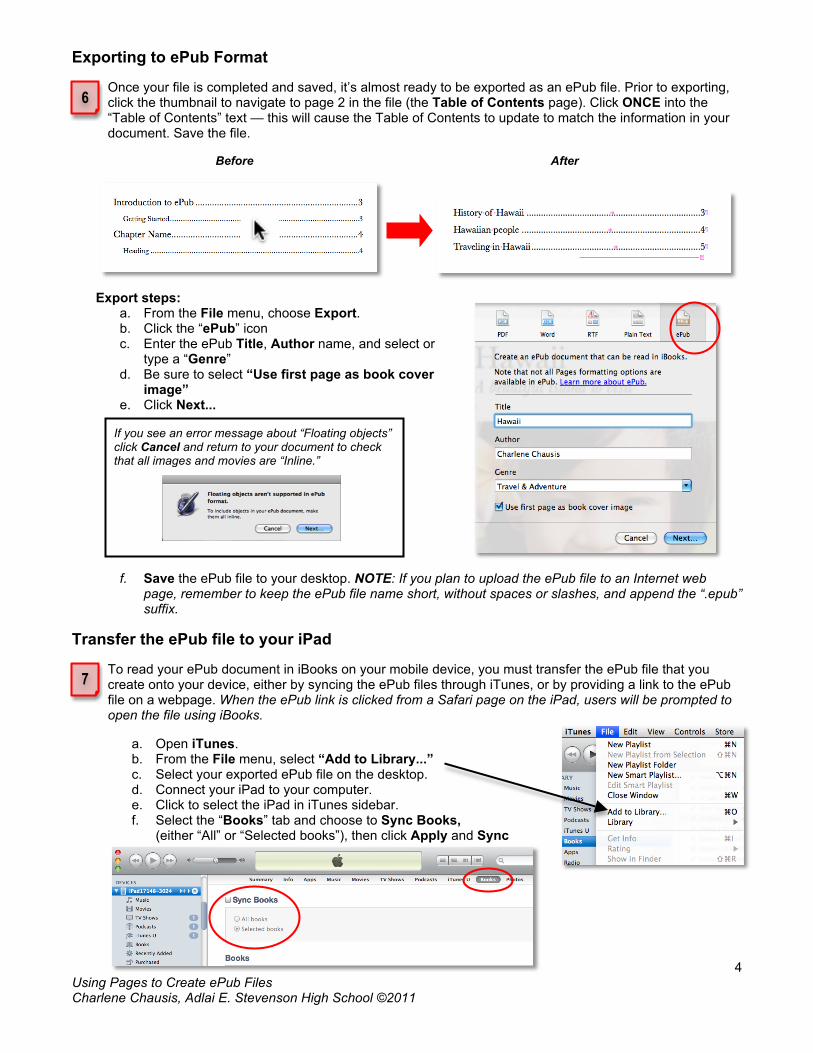
Once your file is completed and saved, it’s almost ready to be exported as an ePub file. Prior to exporting, click the thumbnail to navigate to page 2 in the file (the Table of Contents page). Click ONCE into the “Table of Contents” text — this will cause the Table of Contents to update to match the information in your document. Save the file.
Before After Export steps:
a. From the File menu, choose Export. b. Click the “ePub” icon c. Enter the ePub Title, Author name, and select or
type a “Genre” d. Be sure to select “Use first page as book cover
image” e. Click Next...
f. Save the ePub file to your desktop. NOTE: If you plan to upload the ePub file to an Internet web page, remember to keep the ePub file name short, without spaces or slashes, and append the “.epub” suffix.
Transfer the ePub file to your iPad
To read your ePub document in iBooks on your mobile device, you must transfer the ePub file that you create onto your device, either by syncing the ePub files through iTunes, or by providing a link to the ePub file on a webpage. When the ePub link is clicked from a Safari page on the iPad, users will be prompted to open the file using iBooks.
a. Open iTunes. b. From the File menu, select “Add to Library...” c. Select your exported ePub file on the desktop. d. Connect your iPad to your computer. e. Click to select the iPad in iTunes sidebar. f. Select the “Books” tab and choose to Sync Books,
(either “All” or “Selected books”), then click Apply and Sync
6
If you see an error message about “Floating objects” click Cancel and return to your document to check that all images and movies are “Inline.”
7