using novell solutions to provide integration with citrix products
TRANSCRIPT

Using Novell Solutions to ProvideIntegration with Citrix Products
October 7 , 2005
w w w . n o v e l l . c o m

Developed and written by:David Shepherd, Novell Consulting [email protected]
Reviewed by:Laurence Pitt, Novell Consulting UK.

Table of ContentsWindows 2000 Specifics...........................................................................................................12General Installation Considerations.......................................................................................... 13Novell Client oOverview.......................................................................................................... 13Installation Processes................................................................................................................ 13Post Installation Client Configuration.......................................................................................17
Disable NMAS Authentication............................................................................................ 17Changes to the Default Location Profile.............................................................................. 18SLP Configuration................................................................................................................20DNS Configuration...............................................................................................................20 ............................................................................................................................................. 21Net Identity Agent................................................................................................................ 21Microsoft DFS Related Issues.............................................................................................. 21Network Provider Order....................................................................................................... 21Contextless Login Configuration......................................................................................... 22Optional Additional Configuration...................................................................................... 22
Optimisze the Redirectors on the PC...............................................................................22Verify Duplex Settings ................................................................................................... 22Tweak NetBIOS Settings ................................................................................................22
Windows 2000 OS Registry Tweaks ....................................................................................... 24Disable Remote Computer Task Scheduler ............................................................................ 25Tweak the Novell's Name Resolution Timeout........................................................................ 25Disable Unused Protocol Search Methods................................................................................26Configuring Workstation Only Behaviour................................................................................26Introduction to ZENworks Desktop Management.................................................................... 27Installation of the Agent............................................................................................................28Installation of the ZENworks Desktop Management Agent aAfter Citrix MetaFramePresentation Server....................................................................................................................30Overview of iPrint.....................................................................................................................31Installation of the iPrint Agent..................................................................................................31What iIs UPHClean?.................................................................................................................32How UPHClean wWorks.......................................................................................................... 33Installation.................................................................................................................................33Introduction............................................................................................................................... 33Scope of the Problem................................................................................................................ 33ZENworks 7 Desktop Management Policies............................................................................ 33
Dynamic Local User Policy..................................................................................................34The Case of the Missing Terminal Server Policy Package in ZENworks 7 DesktopManagement. ...................................................................................................................... 35Windows 2000 Terminal Server Policy............................................................................... 36Windows 2003 and the Configuration of the Terminal Server Home Directory and theTerminal Server Profile Directory........................................................................................37
Introduction......................................................................................................................37Implementation by Group Policy. ........................................................................................38Setting the Profile Directory Without the uUse of Group Policies on Windows 2000/2003...38
Introduction............................................................................................................................... 41Citrix Management Console Configuration.............................................................................. 41Change to the Registry of the Citrix Server.............................................................................. 42Introduction............................................................................................................................... 43Implementation......................................................................................................................... 43

Caveats...................................................................................................................................... 45Introduction............................................................................................................................... 46Implementation......................................................................................................................... 46Setup of the Application Object................................................................................................46Creation of the Object............................................................................................................... 46Introduction............................................................................................................................... 53Configuration and Installation of ZISWIN............................................................................... 53Introduction............................................................................................................................... 54iPrint Implementation................................................................................................................54iPrint Configuration.................................................................................................................. 55Conclusion................................................................................................................................ 56Introduction............................................................................................................................... 56Implementation......................................................................................................................... 56Configuration............................................................................................................................ 56Issues......................................................................................................................................... 59Introduction............................................................................................................................... 59
Implementation.....................................................................................................................60Additional Files.................................................................................................................... 60File aAmendments................................................................................................................60Configuration........................................................................................................................63Conclusion............................................................................................................................63
Introduction............................................................................................................................... 65Configuration............................................................................................................................ 65
Changes to Login.js.............................................................................................................. 65Changes to: wi/Metaframe/serverscripts/include.js..............................................................73Changes to: wi/WEB-INF/webinterface.conf.......................................................................97
Introduction............................................................................................................................... 99Configuration.......................................................................................................................... 100Introduction............................................................................................................................. 101Challenges of the Solution...................................................................................................... 101
Access to Corporate Tree Resources..................................................................................101Access to Corporate Tree Mapped Drives..........................................................................101Access to Corporate Tree Printers......................................................................................102Provisioning Users and Applications................................................................................. 102
Benefits of the Solution...........................................................................................................102Introduction............................................................................................................................. 103Managing Citrix Through ConsoleOne...................................................................................104
Creation of a New Published Application..........................................................................104Looking at the Farm Object in eDirectory..........................................................................107
Practical Bbenefits of Ssynchronization from eDirectory to Citrix........................................ 108Introduction........................................................................................................................ 108Ease of Aadministration..................................................................................................... 108One Object for Both Eenvironments.................................................................................. 108Novell eDirectory for Farm Fault Tolerance...................................................................... 108NAL/MyApps as a Multi- Farm Application Launcher..................................................... 108Eradicate Some of the Citrix/Novell Integration Issues..................................................... 108
PrnSelect.cmd......................................................................................................................... 111Removeprn.vbs....................................................................................................................... 111Client.cmd............................................................................................................................... 111TEST.VBS.............................................................................................................................. 112Sample Sevica.ini File.............................................................................................................116Netdrive.vbs............................................................................................................................ 116

Index of TablesTable 1: LDAP required settings for Web Interface...........................................................................63Table 2: LDAP optional settings for Web Interface........................................................................... 63
Illustration IndexIllustration Figure 1: Client Iinstallation CD......................................................................................14IllustrationFigure 2: Client Iinstallation............................................................................................. 15IllustrationFigure 3: Installation Ooptions..........................................................................................15llustrationIFigure 4: Protocol Sselection............................................................................................ 16IllustrationFigure 5: Client Llogin Sscreen........................................................................................ 17Figure 6: Disable NMAS authentication............................................................................................ 18IllustrationFigure 7: Default Llocation Pprofile................................................................................. 19Figure 8: Display login script............................................................................................................. 19IllustrationFigure 9: SLP Cconfiguration........................................................................................... 20Illustration 10: Login Screen.............................................................................................................. 26Illustration 11: Set “Workstation OOnly”.......................................................................................... 26IllustrationFigure 12: “Workstation Only” #2.................................................................................... 27IllustrationFigure 13: Agent Iinstall - —Sselect Ooptions................................................................. 28Figure 14: Middle-tier configuration.................................................................................................. 29Figure 15: Novell Application Launcher setting................................................................................ 29Figure 16: Select ZENTREE.............................................................................................................. 30Figure 17: iPrint client screen.............................................................................................................31Figure 18: iPrint—printer selection....................................................................................................32Figure 19: User policy package.......................................................................................................... 34Figure 20: Dynamic Local User policy...............................................................................................35Figure 21: Terminal Server policy......................................................................................................36Figure 22: Terminal Server configuration.......................................................................................... 37Figure 23: Using the Desktop Preferences policy.............................................................................. 39Figure 24: Enabling roaming profiles.................................................................................................39Figure 25: Novell Directory Services preferred tree...........................................................................41Figure 26: Create a new application object........................................................................................ 44Figure 27: Name the application object..............................................................................................44Figure 28: Choose ICA or RDP..........................................................................................................45Figure 29: Citrix application template................................................................................................47Figure 30: Citrix application properties..............................................................................................51Figure 31: Application macros........................................................................................................... 52Figure 32: ZISWIN. properties...........................................................................................................53Figure 33: ZISWIN options................................................................................................................ 54Figure 34: Create a new application object...................................................................................... 104Figure 35: Create a simple application............................................................................................. 104Figure 36: Name the application...................................................................................................... 105Figure 37: Set application associations............................................................................................ 105Figure 38: Custom properties........................................................................................................... 106Figure 39: Application is in the Citrix farm..................................................................................... 106Figure 40: The farm in eDirectory....................................................................................................107Figure 41: Citrix server properties in ConsoleOne...........................................................................107
Executive SummaryThis document details how to integrate Novell and Citrix technologies using the latest productsavailable from both companies. It includes a summary of both current best practices and the newfunctionality that integrating the latest technologies from both companies provides. When properlyintegrated, these powerful solutions provide a functionally rich and manageable solution that is notpossible when they are implemented in isolation.
The discussion is divided into seven main areas:
1. Aims of the Integrated Solution
2. Software Requirements
3. Novell ZENworks® 7 Desktop Management and Citrix* MetaFrame
4. Installation and Configuration Considerations
5. Additional Novell/Citrix Solution Functionality
6. Web Interface and Novell Integration
7. Identity Manager 2.0 and Citrix MetaFrame* Presentation Server 3.0/4.0

Aims of the Integrated SolutionIt is important to provide additional functionality without negatively affecting the functionality orreliability of either component. The following list details the areas that are important to anycombination of the Novell and Citrix product sets:
1. Windows* Server 2003 must be supported as a Citrix MetaFrame Presentation Serverplatform.
2. A NetWare® 6.5 Server or Novell Open Enterprise Server running either the Linux* or theNetWare kernel houses the user's home directory/profile directory.
3. ConsoleOne® and Novell iManager enable user configuration and administration wherepossible.
4. To manage the Citrix MetaFrame Presentation Servers, group policies are applied fromwithin ZENworks 7 Desktop Management.
5. Novell iPrint supplements existing Citrix MetaFrame Presentation Server printingfunctionality.
6. Thin or thick applications are presented uniformly through the Novell Application Launcher(NAL, in ZENworks)/MyApps front end.
7. Citrix Load Balancing Services and Citrix Secure Gateway are fully supported.
8. Citrix Web Interface and the Novell environment are properly integrated.
9. The Citrix server farm should be supported if the servers are part of either an ActiveDirectory forest or a workgroup.
Software RequirementsThe remainder of this document is based on the following software versions:
1. Microsoft* Windows Terminal Server—Windows 2000 SP4/Windows 2003 SP1
2. Novell Open Enterprise Server V1.0 Service Pack 1 (SP1)—Linux/NetWare 6.5 SP4
3. ZENworks 7 Desktop Management
4. Citrix MetaFrame Presentation Server 3.0/4.0.
While there should be no issues with using Citrix MetaFrame Presentation Server Version2.0 (FR3), this version was not tested extensively as part of the production of this document. Allfuture references to Citrix MetaFrame Presentation Server will refer to either V3.0 or V4.0 unlessexplicitly stated.

Novell ZENworks 7 Desktop Management and CitrixMetaFrame
Introduction to ZENworksNovell ZENworks Desktop Management is a vital component of an integrated Novell and Citrixsolution. It provides application and policy distribution and management, and without it the use of aCitrix server farm that is not part of an Active Directory/Windows NT* domain would beimpossible. This section details the Citrix support that different versions of ZENworks DesktopManagement provide.
ZENworks for Desktops 4.01ZENworks for Desktops 4.01 was the desktop component of the ZENworks 6 Suite. If a customer islooking for a Terminal Server-only implementation, ZENworks for Desktops 4.01 providesworthwhile functionality. There are limitations, however, when it is integrated with CitrixMetaFrame Presentation Server.
1. Windows 2003 Server as part of the Citrix farm is not supported—The ZENworksManagement Agent that ships with ZENworks for Desktops 4.01 will not install correctly ona Windows 2003 Server. In addition, the ZENworks for Desktops 4.01 snap-ins do not allowmanagement of a Windows 2003 Server.
2. Citrix Load Balancing Services is not supported.
3. Citrix Secure Gateway receives minimal support.
Novell ZENworks 6.5 Desktop Management Service Pack 1bThe ZENworks 6.5 Suite updated the desktop management component to Novell ZENworks 6.5Desktop Management. The current release of the product is Novell ZENworks 6.5 DesktopManagement Service Pack 1b. This product includes the following functionality:
• Citrix MetaFrame Presentation Server 3.0 is supported.
• Microsoft Windows 2003 Server is supported as a Citrix server. The Novell ZENworks 6.5Desktop Management Agent installation and policy packages are now supported for 2003Server.
• A ZENworks 6.5 Desktop Management application object can launch a Citrix publishedapplication. This application object fully supports Citrix Load Balancing Services.
• Citrix Secure Gateway is supported. Support is provided via a Novell exteNd Director®standard portal gadget that is used to present the applications via a Web front end.
Novell ZENworks 7 Desktop ManagementIn most cases, Novell ZENworks 6.5 Desktop Management and Novell ZENworks 7 DesktopManagement manage Citrix servers the same way. For the rest of this document, any reference madeto ZENworks 7 Desktop Management will also apply to ZENworks 6.5 Desktop Management.
Please note that only SP1 of this product fully supports Citrix MetaFrame Presentation Server 4.0.The major differences with this release lie in the support for Linux as a host for imaging,workstation import and inventory services.


Installation and Configuration
Overview of Installation ProcessThis section details the configuration steps necessary for building a new Citrix server into a Novellintegrated server farm. The process is split into the following steps:
1. Decision to use Active Directory/NT domain or workgroup
2. Installation of the server operating system
3. Installation of the Novell ClientTM
4. Installation of the ZENworks Desktop Management Agent
5. Installation of the iPrint Agent
6. Installation and use of Microsoft User Profile Hive Cleanup Service (UPHClean)
7. Configuration of ZENworks 7 Desktop Management policies
8. Installation of Citrix MetaFrame Presentation Server
9. Installation of any outstanding hot fixes or OS patches
Should I use Active Directory/NT Domain or Workgroup?The first important decision when building a new Novell Integrated Citrix Farm is: Will ActiveDirectory or an NT domain be required? This is probably the single largest misunderstanding whenconsidering the integration of the technologies.
Unless the applications that the Citrix farm presents have an Active Directory requirement, such asExchange 2000/2003, there is no requirement to install Active Directory as part of the Citrix Farm.Novell eDirectoryTM is fully supported as the sole directory, and servers within the same farm areinstalled as workgroup servers.
No Citrix functionality is added to the environment if Active Directory is installed. However, ifthere is an application requirement for Active Directory, then the user accounts and passwords arerequired to be synchronized between the Microsoft and Novell directories.
Installation of the Server Operating SystemCitrix servers within a farm running Presentation Server can be based on either Windows 2000 SP4or Windows 2003 servers. This section will detail any specific issues relating to the installation ofthe Microsoft Windows Server OS, which has to underlay Citrix MetaFrame Presentation Server.
When the first server is installed into the farm, ensure that a valid Microsoft Terminal ServicesLicensing Server is available. This is separate from the Citrix Licensing Service that is shipped as acomponent of the latest version of the Citrix product. Each of these licensing servers needs to belicensed separately; if one is not licensed correctly, the functionality of the farm will be impacted.
If the server is being built on virtualized hardware (VMware Workstation, ESX, GSX), it isworthwhile to disable unused hardware such as the sound card and USB Support. Also, if VMwareWorkstation shared folders are active, this can cause an issue with roaming profiles in thevirtualized machine.

Windows 2000 SpecificsIf Windows 2000 is used, then it is important to understand the following minimum requirements:
• Windows 2000 Server SP4—Required as a prerequisite for Citrix MetaFrame PresentationServer 3.0 (without SP4, Citrix will not install)
• Internet Explorer 6.0 SP1—Requirement of the ZENworks 7 Desktop Management Agent
While Windows 2000 SP4 is the minimum supported platform for Citrix, certain post-SP4 hot fixesare recommended. Since the release of SP4 for Windows 2000, more than 150 separate post-SP4hot fixes have been released. Fortunately only a small subset are required to provide the bestperformance and functionality for Citrix.
These hotfixes are as follows and should be applied before Citrix is installed on the server. They aresuggested in addition to any files suggested by Windows Update. For details on a specific hot fix,go to http://support.microsoft.com and enter the article number as a search topic.
• Microsoft Knowledge Base Article – 829485
• Microsoft Knowledge Base Article – 827825
• Microsoft Knowledge Base Article – 324446
• Microsoft Knowledge Base Article – 816134
• Microsoft Knowledge Base Article – 817446
• Microsoft Knowledge Base Article – 818528
• Microsoft Knowledge Base Article – 821225
• Microsoft Knowledge Base Article – 822834
• Microsoft Knowledge Base Article – 823485
• Microsoft Knowledge Base Article – 823747
• Microsoft Knowledge Base Article – 824309
• Microsoft Knowledge Base Article – 825027
• Microsoft Knowledge Base Article – 827350
• Microsoft Knowledge Base Article – 828326
• Microsoft Knowledge Base Article – 830515
• Microsoft Knowledge Base Article – 832821
• Microsoft Knowledge Base Article – 839161
• Microsoft Knowledge Base Article – 841054
General Installation ConsiderationsOnce the installation of the operating system is completed, but before any additional software isinstalled, check that MSTSC.EXE can be used from a client machine to establish an RDPConnection to the newly created server.
When installing Microsoft Terminal Services, make certain that “Application” mode isselected and not “Remote Administration.”
When configuring the network adapter make certain that DNS is configured and that thesystems 'A' Record will be entered to a DNS Server. It is also important not to install any extraprotocols that will not be used. Do not install IPX if there is no requirement to do so.

Remember: Windows passwords are case sensitive and Novell passwords are case insensitive. It isalways best to enter a lower case password when entering the Windows administrator credentials.
Installation of the Novell Client
Novell Client OverviewThe Novell Client provides access to file services on Novell servers. These servers can be NetWareor Linux based. The Novell Client should be the first component installed following installation ofthe underlying operating system.
Novell Client version 4.91 SP1 for Windows, released with Novell Open Enterprise Server, isrecommended. All installation and testing for this document was based on the 4.91 SP1 release. Thefollowing patches are also recommended:
• 491psp_nwgina_1.exe• 491psp1_loginw32.exe• 491psp1_nwfs.exe
When this document was prepared, these patches were at the beta stage. Upon release they shouldbe applied in a Citrix server/Terminal Server environment.
Prior to the release of the Novell Client 4.9x, the client needed to be installed before the CitrixMetaFrame Presentation Server. The presence of the client was detected as part of the Citrixinstallation, which because Citrix implements its own GINA, ensured that the chaining of theNovell and Citrix GINAs was handled correctly. If the Novell Client was installed after Citrix, tworegistry keys had to be changed. However, the Novell Client 4.9x does now detect the use ofCTXGINA; if present, it manages the registry changes correctly.
Installation ProcessesBefore the Novell Client is installed, the Terminal Server should be placed into install mode. To dothis:
1. Log in as the local administrator of the server.
2. From the command line, run the CHANGE USER /INSTALL switch.
Once the command is run, the Novell Client setup program can be executed.
If installing the client from an installation CD, WINSETUP is executed. Select the Novell Client4.9x installation option.

Figure 1: Client installation CD
At this stage, a dialog box regarding license agreement is displayed. The screens that follow detailthe client installation:
Figure 2: Client installation
Select the “Custom Installation” option and click the “Next” button.

On this screen, “Novell Distributed Print Services” should be deselected unless iPrint is not beingused. If iPrint will be used, Novell Distributed Print Services™ is not required in a Citrixserver/Terminal Server environment.
Only the Novell International Cryptographic Infrastructure (NICI)” option should be selected.Ensure that the “Novell Modular Authentication” and “NetIdentity Agen” check boxes are notselected. Novell Modular Authentication Services (NMAS™) option will interfere with the abilityof Citrix Web Interface to pass credentials back to the Novell Client. If the NetIdentity option isselected, issues will occur when you come to installation of the ZENworks 7 Desktop ManagementAgent.
On the next screen, you will establish the protocol the client will use. Make sure that unless it isbeing used in the network, the IPX Protocol is deselected and “IP only” is selected.
Figure 3: Installation options
Figure 4: Protocol selection

Click the “Next” button. You are prompted to select a preferred connection type: “NDS” or“Bindery.” Select “NDS.” The client completes its installation.
When the client installation completes, reboot the Terminal Server. Following reboot, the NovellClient should be displayed as the primary GINA. The Ctrl-Alt-Del screen has now changed. If youperform Ctrl-Alt-Delete, the dialog box will ask for authentication to Novell eDirectory™.
Note: If you are installing the Novell Client on a Windows 2003 Server, you may see a “servicecould not be started” error on reboot. This error indicates that the Microsoft Load Balancing Servicehas been disabled on the network adapter associated with the Novell Client. This is re-enabled byediting the properties of the network adapter following the reboot and re-selecting the network loadbalancing service.
If the above screen is displayed on reboot of the server, then Novell Client has been successfullyinstalled.
Select the “Workstation only” check box and log in using the local administrator credentials.
Post Installation Client Configuration
Disable NMAS AuthenticationNMAS Authentication is enabled by default on the 4.9x Client. To allow for the correct pass-through of authentication from the Citrix client to the Citrix server, this functionality should bedisabled.
Figure 5: Client login screen

To access this screen, right-click the red “N” Novell Client icon on the taskbar and select “ClientProperties.” Select “Advanced Login” from the properties screen and then change “NMASAuthentication” from “On” to “Off.”
Changes to the Default Location ProfileFrom the above screen, select “Location Profiles.” Highlight the “Default Profile” and edit it.
Figure 6: Disable NMAS authentication

Figure 7: Default location profile
The following options need to be changed:
1. As a first option, make certain that “Save profile after successful login” is unchecked.
2. On the Windows tab, check that the “local username” field is blank.
3. On the NMAS tab, make certain that the “Enable NMAS” check box is unchecked.
Figure 8: Display login script
Once the system is completely installed and tested, switch off the display of the login scriptwindow. After all the changes to the default location profile screen have been made, click the “OK”button and return to the “Client Properties” screen.

SLP ConfigurationOptimal client performance is in large part dependent on proper name resolution. This sectiondescribes the processes by which the client resolves a service name to an IP address. The NovellClient normally either multicasts for a server with SLP configured or defines a static address, whichallows the client to find a directory agent.
For a Citrix server/Terminal Server, it is best to configure static directory agents within the ServiceLocation tab of the Novell Client properties.
Note: the entry in the example above uses an IP address for the directory agent, but this could justas easily be a Domain Name System (DNS) name. It is obviously beneficial to enter two SLPdirectory agents for the purposes of fault tolerance.
DNS ConfigurationIt could be beneficial to configure at least two DNS “A” records representing the tree name. Thisname could then be used by the Novell Client to resolve any requests for the tree name, enablingperhaps faster name resolution.
NetIdentity AgentThe NetIdentity Agent from the 4.9x Client must not be installed as part of any automated ormanual build procedure.
Microsoft DFS Related IssuesThe Microsoft Distributed File System (DFS) causes Novell Client performance issues. By default,all requests originating from Windows 2000 will first check a remote file system to see if it supports
Figure 9: SLP configuration

Microsoft DFS functionality. Due to the architecture of the underlying operating system, this checkis made using all of the installed network providers. In the Citrix configuration, both the Microsoftand Novell network providers are installed. When the network provider contacts the Novell servervolume, this check will fail, which causes a slowdown because of the timeout.
The default behavior of the OS can be altered so that it does not try the Microsoft DFS check. Thisinvolves the addition of a registry key within the following registry location:
HKEY_LOCAL_MACHINE\System\CurrentControlSet\Services\Mup
Registry Value:
DisableDFS REG_DWORD
Value 1
This registry setting will stop the base OS from checking for the existence of a Microsoft DFSvolume. Obviously, this change presupposes that there is no requirement for Microsoft DFSvolumes within the infrastructure.
IMPORTANT: Do not make this change on a Windows 2003 server. Modifying this registrykey will prevent the Workstation service from starting.On Windows 2003 Server, the following registry key seems to help the overall performance of theclient:
HKEY_LOCAL_MACHINE\System\CurrentControlSet\Services\Dfs\Parameters
Registry Value:
DisabeSiteAwareness REG_DWORD
Value 1
Network Provider OrderOn a default installation of the Novell Client to a Windows 2000/2003 system, there will be twonetwork providers. One provider will allow access to Microsoft resources and one to Novellresources. To enable optimal performance of the client, the novell provider must be listed first: itwill be the primary source of workstation authentication, and the correct provider order willimprove overall network performance from the client perspective.
Contextless Login ConfigurationContextless login is keyed to the user pressing the Tab key to trigger the contextless login process.If the Citrix client is passing any form of credentials to Novell for authentication purposes, theneffectively the Tab key “event” (when the user moves from user to the tree field in the client) neverhappens; and thus contextless login never happens. If Citrix Web Interface is being used to presentthin-client applications, the same problem occurs. Because of this, the Novell Client 4.9x context-less login is disabled.
If Citrix Web Interface or the Citrix client is not being used to pass on authentication credentials tothe eDirectory back end, enabling contextless login may be of benefit.

Optional Additional ConfigurationDifferent network environments can affect the performance of the Novell Client under differentcircumstances and loads. The effect of any of the registry settings below will vary accordingly.
Optimize the Redirectors on the PCIf unused directors are installed on a PC or rarely used directors are configured with a highpreference, you will see degraded performance. Common redirectors are the MS Client forMicrosoft Networks, Novell Client 32, and various Network File System (NFS) clients.
If any of these clients are not needed, they should be removed. If they are needed, make sure to onlybind the necessary protocols. A client with only IPX bound to the Novell client and IP to theMicrosoft and NFS clients may access network resources significantly faster than one that has IPand IPX bound to the Novell client as well as IP, IPX and NetBIOS bound to the MS client due tothe unneeded searches that MUP.SYS performs. Also, be sure to make the most used redirectors theprimary redirectors.
Verify Duplex Settings One common performance problem is incorrect duplex settings. Full duplex is only supported onswitches, not hubs. Make sure you are using switches and not hubs before setting your workstationsto full duplex. Also, it is important to match the duplex settings between the server, the switchesand the client. Make sure all are set to full duplex or half duplex. "Auto-Detect" often causesproblems due to a failure to properly recognize the correct duplex setting and should be avoided.This is especially important in TCP/IP environments, because TCP/IP has a longer retransmissiondelay by default than IPX. It is designed to work across the Internet as opposed to a local LAN.Therefore, any LAN problems causing retransmissions will be a larger problem in an IPenvironment than an IPX environment.
Tweak NetBIOS Settings A client can be configured to attempt to locate Microsoft resources using broadcasts, WindowsInternet Naming Service (WINS) servers, or a combination of both. The workstation can also beconfigured to use host files and DNS searches to locate resources. Inefficiencies can occur if amachine is configured to use both method (broadcasts and WINS).. The registry entries of:
HKEY_LOCAL_MACHINE\SYSTEM\CurrentControlSet\Services\NetBT\Parameters
Registry Value:
EnableLMHOSTS DWORD:00000000
EnableDNS DWORD:00000000
This will disable both DNS and LMHOST searches if they are not used. Changing the final 0 to a 1will enable the use of those options. The most efficient of all the NODE types is a P-NODE, whichuses only a WINS server, instead of broadcasting for name resolution.
The following registry entry will set your machine to a P-NODE:
HKEY_LOCAL_MACHINE\SYSTEM\CurrentControlSet\Services\NetBT\Parameters
Registry Value:
NodeType DWORD:00000002 (For WinNT Machines)
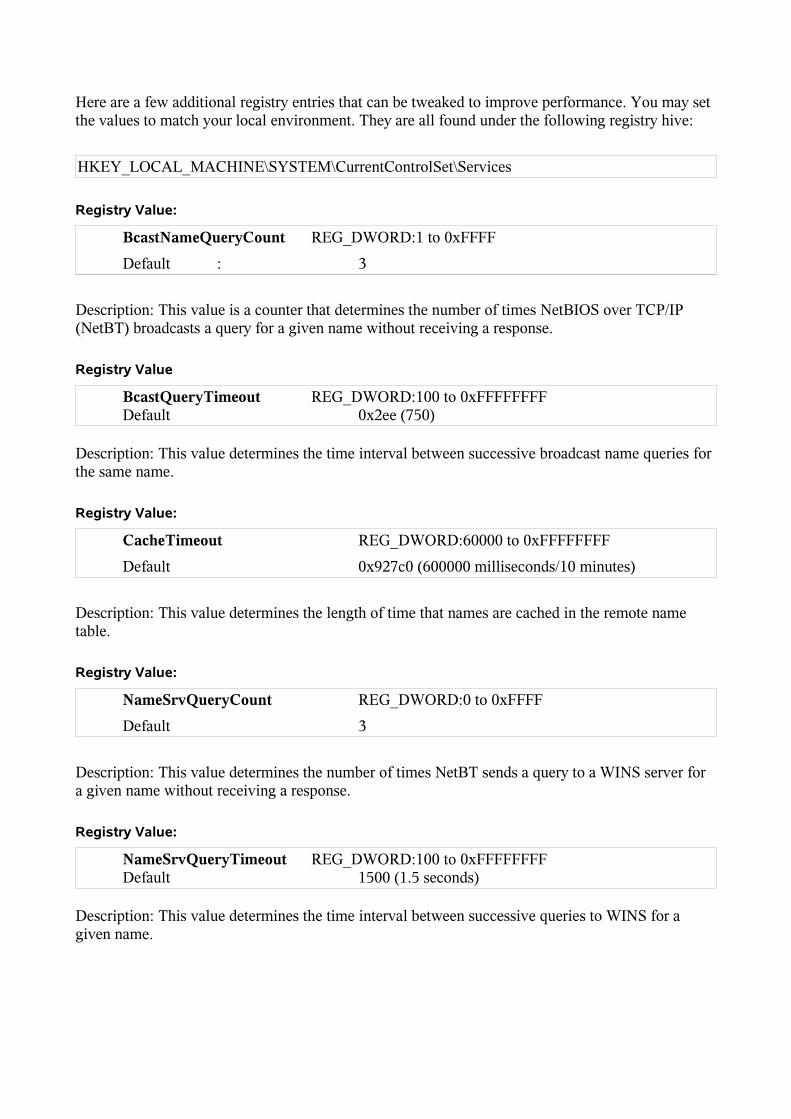
Here are a few additional registry entries that can be tweaked to improve performance. You may setthe values to match your local environment. They are all found under the following registry hive:
HKEY_LOCAL_MACHINE\SYSTEM\CurrentControlSet\Services
Registry Value:
BcastNameQueryCount REG_DWORD:1 to 0xFFFF
Default : 3
Description: This value is a counter that determines the number of times NetBIOS over TCP/IP(NetBT) broadcasts a query for a given name without receiving a response.
Registry Value
BcastQueryTimeout REG_DWORD:100 to 0xFFFFFFFFDefault 0x2ee (750)
Description: This value determines the time interval between successive broadcast name queries forthe same name.
Registry Value:
CacheTimeout REG_DWORD:60000 to 0xFFFFFFFF
Default 0x927c0 (600000 milliseconds/10 minutes)
Description: This value determines the length of time that names are cached in the remote nametable.
Registry Value:
NameSrvQueryCount REG_DWORD:0 to 0xFFFF
Default 3
Description: This value determines the number of times NetBT sends a query to a WINS server fora given name without receiving a response.
Registry Value:
NameSrvQueryTimeout REG_DWORD:100 to 0xFFFFFFFFDefault 1500 (1.5 seconds)
Description: This value determines the time interval between successive queries to WINS for agiven name.
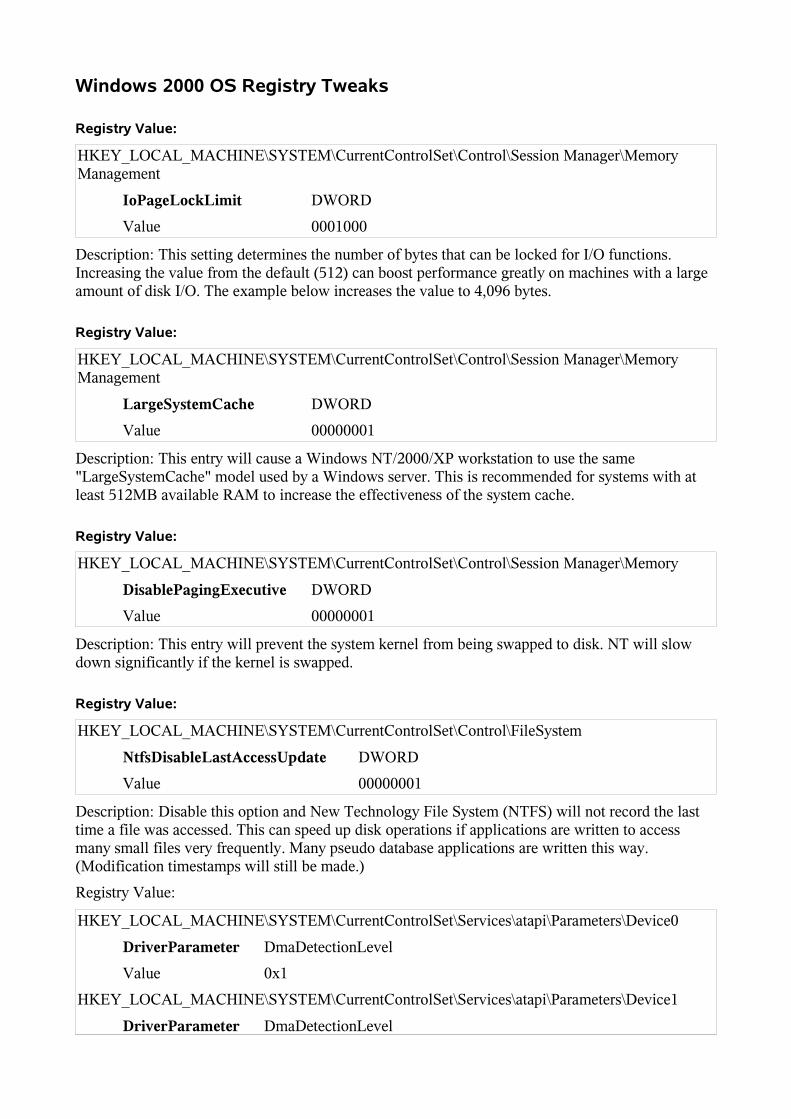
Windows 2000 OS Registry Tweaks
Registry Value:
HKEY_LOCAL_MACHINE\SYSTEM\CurrentControlSet\Control\Session Manager\MemoryManagement
IoPageLockLimit DWORD
Value 0001000
Description: This setting determines the number of bytes that can be locked for I/O functions.Increasing the value from the default (512) can boost performance greatly on machines with a largeamount of disk I/O. The example below increases the value to 4,096 bytes.
Registry Value:
HKEY_LOCAL_MACHINE\SYSTEM\CurrentControlSet\Control\Session Manager\MemoryManagement
LargeSystemCache DWORD
Value 00000001
Description: This entry will cause a Windows NT/2000/XP workstation to use the same"LargeSystemCache" model used by a Windows server. This is recommended for systems with atleast 512MB available RAM to increase the effectiveness of the system cache.
Registry Value:
HKEY_LOCAL_MACHINE\SYSTEM\CurrentControlSet\Control\Session Manager\Memory
DisablePagingExecutive DWORD
Value 00000001
Description: This entry will prevent the system kernel from being swapped to disk. NT will slowdown significantly if the kernel is swapped.
Registry Value:
HKEY_LOCAL_MACHINE\SYSTEM\CurrentControlSet\Control\FileSystem
NtfsDisableLastAccessUpdate DWORD
Value 00000001
Description: Disable this option and New Technology File System (NTFS) will not record the lasttime a file was accessed. This can speed up disk operations if applications are written to accessmany small files very frequently. Many pseudo database applications are written this way.(Modification timestamps will still be made.)
Registry Value:
HKEY_LOCAL_MACHINE\SYSTEM\CurrentControlSet\Services\atapi\Parameters\Device0
DriverParameter DmaDetectionLevel
Value 0x1
HKEY_LOCAL_MACHINE\SYSTEM\CurrentControlSet\Services\atapi\Parameters\Device1
DriverParameter DmaDetectionLevel

Value 0x1
Description: By default, Direct Memory Access (DMA) transfers are disabled for your system'sIntegrated Drive Electonics (IDE) hard drives. This can significantly decrease system performanceduring periods of high disk usage.
Disable Remote Computer Task Scheduler HKEY_LOCAL_MACHINE\SOFTWARE\Microsoft\Windows\CurrentVersion\Explorer\RemoteComputer\NameSpace\{D6277990-4C6A-11CF-8D87-00AA0060F5BF}
Description: By default, Windows 2000 will attempt to access the remote scheduler service onremote computers such as Win95, Win98, and Novell NetWare. This can cause long delays: morethan 30 seconds in some cases. This was scheduled to be fixed in Windows 2000 SP2, but was not.Use the Registry File excerpt below to delete this key, which will disable the feature.
See http://support.microsoft.com/support/kb/articles/Q245/8/00.asp for more information onthis setting.
Tweak the Novell Name Resolution Timeout
Registry Value:
HKLM\SOFTWARE\Novell\NetwareWorkstation\Policies\Network
Timeout in Seconds Value
Value 1 to 10
Description: This can also be set under the Advanced Settings tab of the Novell Client. It willchange the Name Resolution Timeout to 1 from 10.
Disable Unused Protocol Search MethodsBy default, the Novell Client attempts to use many different IP resolution methods that may not beconfigured for use on your network. Under the Protocol Preferences tab of the Novell Clientconfiguration, disable all resolution methods not used.
Configuring Workstation Only BehaviourWithin the Novell Client login box there exists a “Workstation only” check box. This allows you toauthenticate to a local Security Accounts Manager (SAM) user on the machine and not be promptedfor a Novell authentication.
Illustration 10: Login Screen
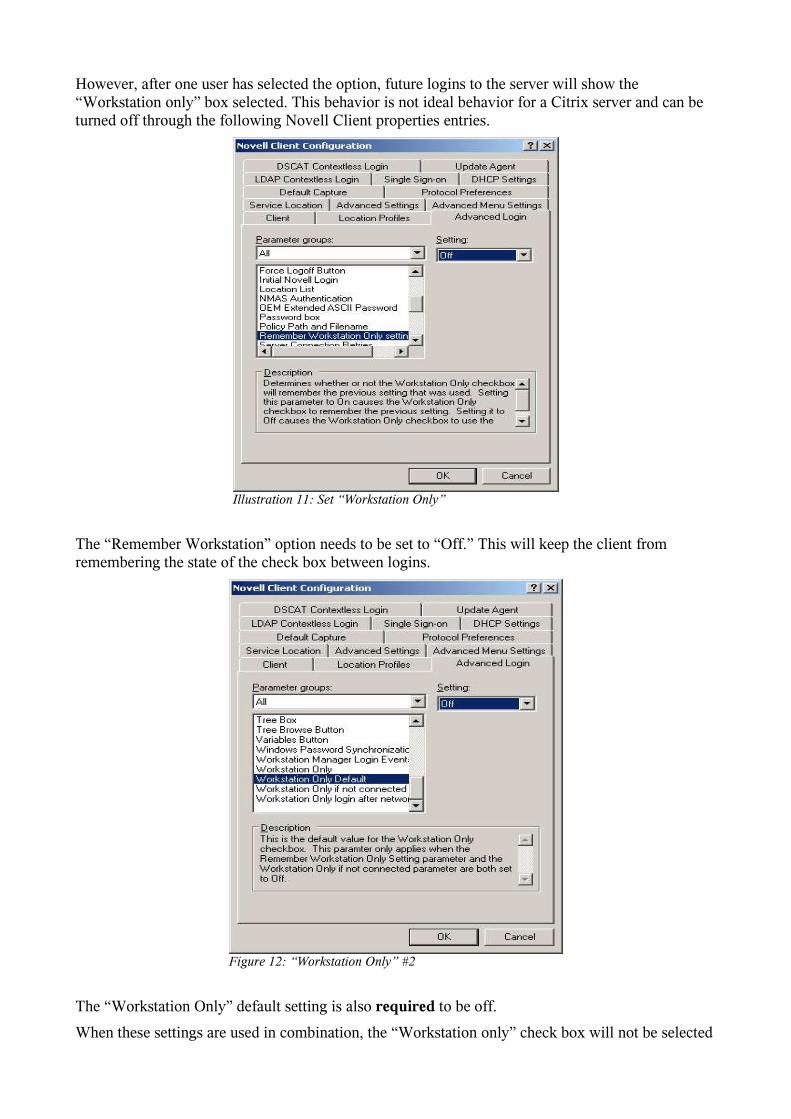
However, after one user has selected the option, future logins to the server will show the“Workstation only” box selected. This behavior is not ideal behavior for a Citrix server and can beturned off through the following Novell Client properties entries.
The “Remember Workstation” option needs to be set to “Off.” This will keep the client fromremembering the state of the check box between logins.
The “Workstation Only” default setting is also required to be off.
When these settings are used in combination, the “Workstation only” check box will not be selected
Illustration 11: Set “Workstation Only”
Figure 12: “Workstation Only” #2

by default; and if the check box is selected, the setting will be remembered only for that login.
Installation of the ZENworks 7 Desktop Management Agent
Introduction to ZENworks Desktop ManagementWith the release of ZENworks for Desktops 4.01, the ZENworks components of the Novell Clientbecame a separate piece of software called the ZENworks Desktop Management Agent. This agentenables the following key areas of functionality with respect to Citrix and Novell integration:
1. Dynamic Local User—Allows management of a Citrix farm without an NT domain orActive Directory at the back end
2. Group policy support without Active Directory
3. Application distribution and management
4. Application of a policy to set up and configure the Terminal Server Home and Profiledirectories as locations within the NetWare file system.
Installation of the AgentFor the agent to install successfully, Internet Explorer 6.0 SP1 needs to be installed. Although theMSI file for installation should be Citrix Server “aware,” it is still advisable to execute theCHANGE USER /INSTALL command before the installation starts, and the CHANGE USER /EXECUTE after the installation finishes.
The agent installation replaces the Novell Client NWGINA.DLL. If CHANGE USER /INSTALLis not used, this file will not get replaced. If the install was started from “Add or Remove Programs”in the Control Panel, these commands are executed automatically by the system.
Run the MSI file and agree to the license agreement, and the following screen is displayed:
The installation MSI does not offer the option to install remote management when the code is
Figure 13: Agent install—select options

installed on a Windows Terminal Server or Citrix box.
Leave the “ZENworks Middle Tier Preferences” field blank; click “Next.”
On this screen, leave both options blank because the Citrix server will not be running NovellApplication Launcher. Click “Next.”
Figure 15: Novell Application Launcher setting
Figure 14: Middle-tier configuration
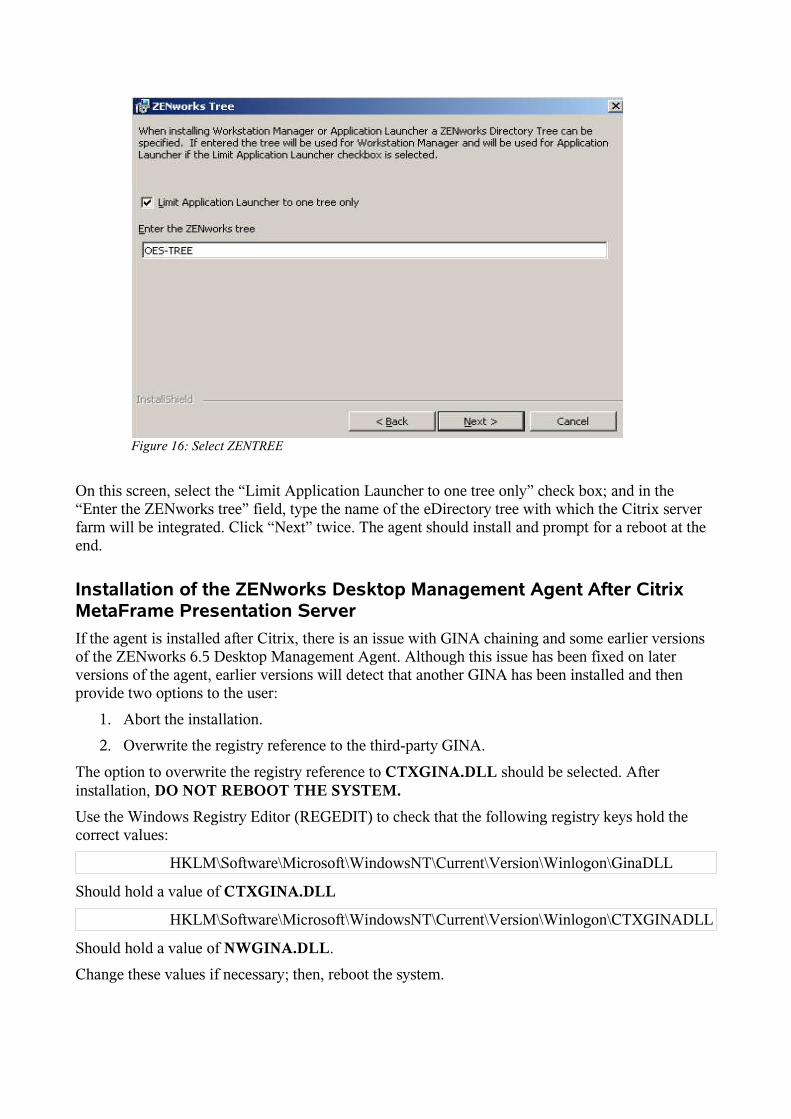
On this screen, select the “Limit Application Launcher to one tree only” check box; and in the“Enter the ZENworks tree” field, type the name of the eDirectory tree with which the Citrix serverfarm will be integrated. Click “Next” twice. The agent should install and prompt for a reboot at theend.
Installation of the ZENworks Desktop Management Agent After CitrixMetaFrame Presentation ServerIf the agent is installed after Citrix, there is an issue with GINA chaining and some earlier versionsof the ZENworks 6.5 Desktop Management Agent. Although this issue has been fixed on laterversions of the agent, earlier versions will detect that another GINA has been installed and thenprovide two options to the user:
1. Abort the installation.
2. Overwrite the registry reference to the third-party GINA.
The option to overwrite the registry reference to CTXGINA.DLL should be selected. Afterinstallation, DO NOT REBOOT THE SYSTEM.Use the Windows Registry Editor (REGEDIT) to check that the following registry keys hold thecorrect values:
HKLM\Software\Microsoft\WindowsNT\Current\Version\Winlogon\GinaDLL
Should hold a value of CTXGINA.DLL
HKLM\Software\Microsoft\WindowsNT\Current\Version\Winlogon\CTXGINADLL
Should hold a value of NWGINA.DLL.
Change these values if necessary; then, reboot the system.
Figure 16: Select ZENTREE

Installation of the Novell iPrint Agent
Overview of iPrintWith the introduction of iPrint, the printing functionality has been abstracted from the Novell Clientinto its own separately installed component. Although the Novell Client still provides support forNovell Distributed Print Services, the iPrint client can now be installed without any Novell Clientbeing present on the machine and yet provide printing functionality.
Installation of the iPrint AgentiPrint can deliver printers on a user basis and not just on a system-wide basis. This is vital in aCitrix server/Terminal Server environment, because one user removing a printer could remove theprinter for every user on the system.
The iPrint client needs to be installed on each Citrix server/Terminal Server within the farm. Theagent is installed from the file NIPP.EXE and should be executed after running the CHANGEUSER /INSTALL command at the command prompt on the terminal server. This componentshould be configured purely for the installation of user printers.
When the iPrint client is installed on a Citrix server/Terminal Server, it cannot be auto-updated.This is a feature of a normal workstation install.
After the installation of the Novell iPrint client, the client software is installed on the Start Menu,under the “Programs” menu. If selected, the following screen is displayed:
Please note that iCapture functionality is not currently supported on Citrix servers/Terminal Servers.Select the Terminal Server tab to display the following dialog box:
Figure 17: iPrint client screen

The iPrint client is only responsible for printing to network printers. However, Citrix can also re-direct print jobs to client side printers. To enable this operation, you should equipt the Citrixservers/Terminal Servers with the same printer drivers that are installed on the local workstation.Citrix MetaFrame does also offer the unidriver, which will provide some client printingfunctionality if a specific printer driver is not available.
For a Citrix server/Terminal Server environment, select “Install user printers only.” This will ensurethat the printers are deployed and managed as a user printer, which is useful for the followingreasons:
• Deployment of a user printer does not require administrator rights.
• Removal of a user printer does not remove the printer for every user on that server.
Also of benefit within a Citrix environment are control over the printer drivers available to iPrintand iPrint's ability to only deploy printer drivers that are Citrix server/Terminal Server “friendly.”
Installation and Use of the Microsoft UPHClean Service
What Is UPHClean?Roaming profiles are a critical component of a correctly configured Citrix server/Terminal Serverenvironment. However, roaming profiles can fail if an application running on the server does notcleanly release the registry at logout. This can cause issues when the user next authenticates to theCitrix session.
UPHClean is a freely downloadable program from Microsoft, available athttp://www.microsoft.com/downloads/details.aspx?FamilyID=1b286e6d-8912-4e18-b570-42470e2f3582&displaylang=en.
Figure 18: iPrint—printer selection

How UPHClean WorksOn Windows 2000/2003, UPHClean deals with application event log event 1000 from sourceUserenv where the message indicates that the profile is not unloading. The error is "Access isdenied." On Windows XP and Windows 2003, the equivalent events are 1517 and 1524 from sourceUserenv.
UPHClean monitors logged-off users that still have hives loaded. When that happens, the servicedetermines which applications have handles opened to the hives and releases them. It logs theapplication name and what registry keys where left open. After this the system finishes unloadingthe profile.
InstallationThe code is available as an MSI installation (UPHClean-setup.msi) and should be installed asfollows: either use CHANGE USER /INSTALL first and then run the MSI file or complete theinstallation through “Add or Remove Programs.”
After installation is complete, please reboot the server and check that the service has started withoutan error.
Configuration of ZENworks 7 Desktop Management Policies
IntroductionThis section discusses the configuration of ZENworks 7 Desktop Management policies with respectto Citrix server/Terminal Server integration. It details the policies required within a Citrix/Novellenvironment where Active Directory or an NT domain has not been deployed.
Scope of the ProblemIn an environment where there is no NT domain or Active Directory forest, the major issue becomeshow to manage the local SAM account database of each Citrix server/Terminal Server within thefarm. Although initial authentication with the Novell Client installed on the server is via a NetwareCore Protocol (NCP) connection, a Microsoft authentication is also required. Without an NTdomain or Active Directory forest, the SAM databases are unique to each server and notsynchronized, unless the usernames and passwords are manually kept in sync. This is compoundedby the requirement that the SAM username/password be synchronized to the eDirectoryusername/password.
ZENworks 7 Desktop Management PoliciesZENworks 7 Desktop Management allows user policies to be applied that are dependent on theoperating system of the user's connection. For example, if a user authenticates via a Citrixconnection, a particular package of policies could be applied for that session. However, if the sameuser performs a normal NT authentication via the Novell Client, then a different policy package canbe applied. One user can have a separate user policy package configured for the following OSvariations:
• Windows 98
• Windows NT
• Windows 2000
• Windows 2000 Terminal Server

• Windows 2003 Terminal Server
• Windows 2000/2003 Terminal Server
• Windows XP
This user policy package could be applied to the user object, a group or an eDirectory container.
The user policy package comprises a number of separate polices. The next section of this documentwill discuss each of the policies in turn and how they relate to the Citrix server/Terminal serverconfiguration.
Notice the Policies tab in the top right-hand corner of the screen shot. The policy detailed here willonly apply if the user attempts a Citrix server/Terminal Server connection to a Windows 2000Terminal Server.
Dynamic Local User PolicyAs discussed earlier, the Citrix server’s local SAM database of users is one of the largest areas ofmanagement in a world without Active Directory or an NT4 domain. The dynamic local user policyallows the ZENworks 7 Desktop Management Agent to create an NT user account “on the fly” afterthe Novell Client authenticates successfully. The credentials used for this account are the usernameand password that were entered for the Novell Client authentication. Thus, a connection can bemade to both the eDirectory tree and the Microsoft SAM account database without manuallysynchronising account names or passwords.
The Microsoft SAM account can also be set to be volatile. This would mean that when the userlogged out of eDirectory, the local SAM account would be removed from the Citrix server.However, with current versions of the code this can lead to a buildup of accounts under the localmachine's “Documents and Settings” directory, which would need clearing at some stage.
The dynamically created local NT account can be assigned to an NT group membership, which canbe useful for granting special file-system privileges on the server machine.
Figure 19: User policy package

The correct configuration and application of this policy is the single most important step to having aworking Citrix MetaFrame Presentation Server farm without Active Directory or an NT4 domain.With this policy in place the users for Citrix can be managed purely through ConsoleOne.
The Case of the Missing Terminal Server Policy Package in ZENworks 7 DesktopManagement ZENworks for Desktops 4.01 had a Windows 2000 Terminal Server policy package. This policypackage provided key configuration options for deployment of Windows 2000 Servers in Citrixserver/Terminal Server environments. With the advent of Windows 2003 Server the method used toconfigure the attributes covered by this policy changed and the configuration options became part ofthe overall group policy support. To this end, the existing Terminal Server policy package wasdropped from the ZENworks 6.5/7 ConsoleOne snap-ins. However, the Terminal Server policypackage is the only way to configure those attributes on a Windows 2000 Terminal Server runningCitrix.
Luckily, support for the policy package has not been dropped from the ZENworks 7 DesktopManagement Agent. This means that if the Agent sees the policy package it will honour thosesettings on a Windows 2000 Server.
This functionality does depend on there being a configured Terminal Server policy packagesomewhere in the tree. If a policy package has not been configured, then using ConsoleOne with theZENworks for Desktops 4.01 snap-ins will allow setup of the policy as part of the user package.This assumes that eDirectory has had the schema extensions from ZENworks for Desktops 4.01 andZENworks 7 Desktop Management applied. If this is a new tree with a fresh installation ofZENworks 7 Desktop Management, the schema extensions for this policy will not exist and willhave to be added separately. The relevant schema exists in a file called wmTermSv.sch on theZENworks for Desktops 4.01 media. This schema extension then can be added to the tree and thepolicy, configured as per the next section.
Windows 2000 Terminal Server PolicyThrough the ZENworks for Desktops 4.01 snap-ins applied to ConsoleOne, this policy providesimportant functionality for Windows 2000 Servers that are part of a Citrix farm.

Figure 20: Terminal Server policy
The “Connection” page allows the enforcement of specific Citrix server/Terminal Server settings.These include allowing the user to log on to the Citrix server/Terminal Server and whethershadowing for that user is enabled or disabled.
The second page of the policy is the login page. This controls where the user's Terminal Serverhome directory and profile directory are created. These directories can be different than the user'snormal network home directory and Windows profile. However, the Terminal Server homedirectory value should point to the same location as the user's Novell home directory attribute. Makecertain that the Terminal Server profile does not share the directory with the normal Windowsroaming profile.
Please note on the following screen shot the use of the %username% variable in the directory paths.This value refers to the Microsoft username as defined in the Citrix server's/Terminal Server's localSAM account database. Because we are using Dynamic Local User, however, the SAM accountname and the Novell account name will have the same value automatically.
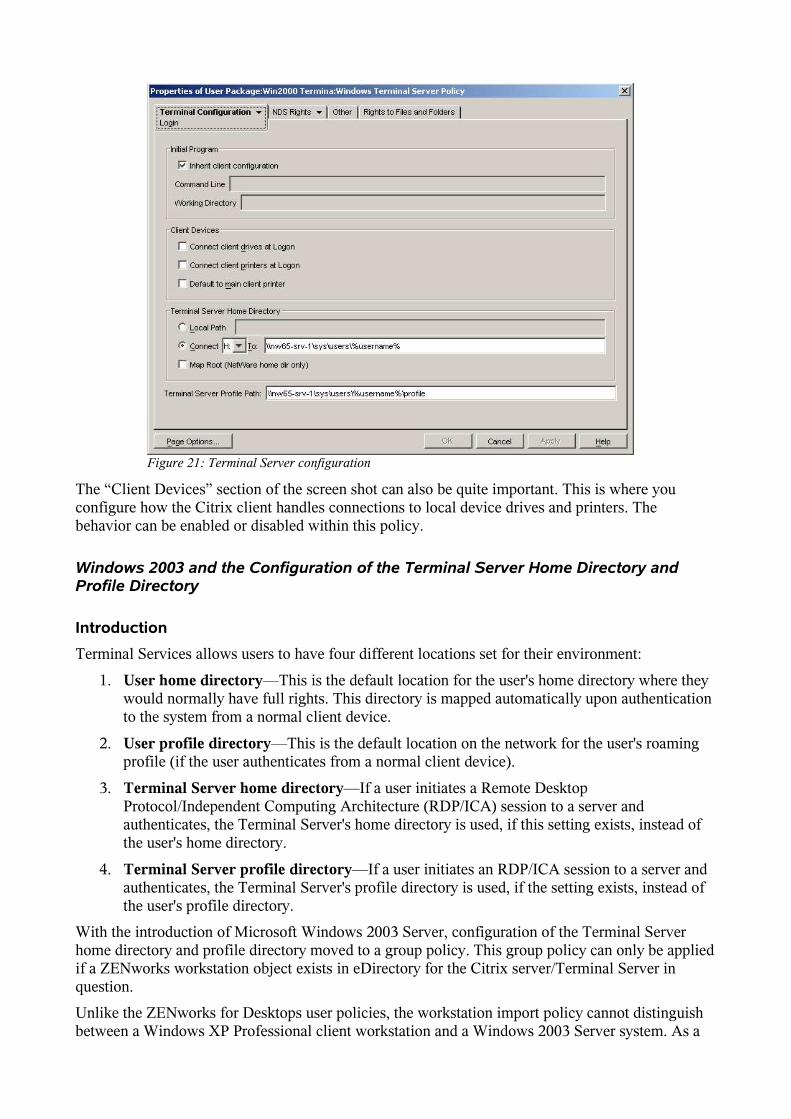
Figure 21: Terminal Server configuration
The “Client Devices” section of the screen shot can also be quite important. This is where youconfigure how the Citrix client handles connections to local device drives and printers. Thebehavior can be enabled or disabled within this policy.
Windows 2003 and the Configuration of the Terminal Server Home Directory andProfile Directory
IntroductionTerminal Services allows users to have four different locations set for their environment:
1. User home directory—This is the default location for the user's home directory where theywould normally have full rights. This directory is mapped automatically upon authenticationto the system from a normal client device.
2. User profile directory—This is the default location on the network for the user's roamingprofile (if the user authenticates from a normal client device).
3. Terminal Server home directory—If a user initiates a Remote DesktopProtocol/Independent Computing Architecture (RDP/ICA) session to a server andauthenticates, the Terminal Server's home directory is used, if this setting exists, instead ofthe user's home directory.
4. Terminal Server profile directory—If a user initiates an RDP/ICA session to a server andauthenticates, the Terminal Server's profile directory is used, if the setting exists, instead ofthe user's profile directory.
With the introduction of Microsoft Windows 2003 Server, configuration of the Terminal Serverhome directory and profile directory moved to a group policy. This group policy can only be appliedif a ZENworks workstation object exists in eDirectory for the Citrix server/Terminal Server inquestion.
Unlike the ZENworks for Desktops user policies, the workstation import policy cannot distinguishbetween a Windows XP Professional client workstation and a Windows 2003 Server system. As a

result, the eDirectory tree must be designed so that the Windows 2003 Citrix server/Terminal Servermachines will have any client-intended workstation policies applied against them.
Implementation by Group Policy With the introduction of ZENworks 7 Desktop Management, the ZENworks Automatic WorkstationImport (AWI) service is fully supported running on a SUSE™ Linux Enterprise Server 9 or NovellOpen Enterprise Server Linux platform.
As discussed earlier, the group policy entries for the workstation policy can only be applied to aworkstation group policy on a Windows 2003 Server. Any group policy changes that you makehave to be initiated on a Windows 2003 Server.
The ZENworks 7 Desktop Management snap-ins call the Microsoft GPEDIT program. This allowsthe group policy to be read from eDirectory and applied to the physical system, not just a sessionrunning on it. There is no requirement on Active Directory to implement group polices usingZENworks.
Within the computer configuration policy there exist two configuration options for the TerminalServer home directory and profile directory. These options can be found in the following location:
Computer Configuration\Administrative Templates\Terminal ServicesUnder this path there exist the following options:
Set Path for TS Roaming ProfilesThis option allows you to enter a share name in the form of a UNC path. This path is the rootlocation of the user's Terminal Server profile directory. Do not enter the name of anindividual user in this location, because the Terminal Server will append the name of theuser itself.
TS User Home DirectoryThis option also allows you to enter a share name in the form of a UNC path. This path is theroot location of the user's Terminal Server home directory. Do not enter the name of anindividual user to this location, because the Terminal Server will append the name of theuser itself.
NOTE: It is critical that the latest NWGINA fix for the client be applied for thisfunctionality to work correctly.
Setting the Profile Directory Without the Use of Group Policies on Windows2000/2003If either Microsoft group policies or ZENworks AWI is not a valid option for the environment, thereexists another possibility. The user profile directory can be set from within the user policy packagein ZENworks 7 Desktop Management.
The Windows Desktop Preferences policy enables roaming profile storage to be forced to a definedlocation.
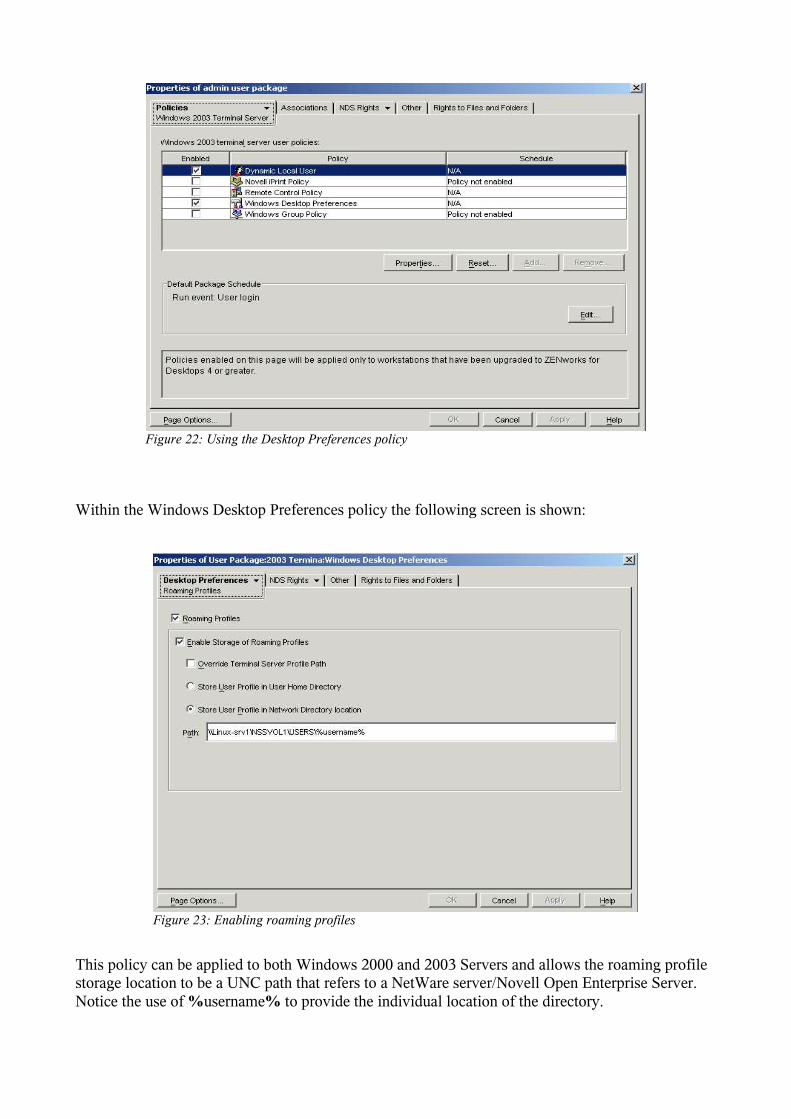
Within the Windows Desktop Preferences policy the following screen is shown:
This policy can be applied to both Windows 2000 and 2003 Servers and allows the roaming profilestorage location to be a UNC path that refers to a NetWare server/Novell Open Enterprise Server.Notice the use of %username% to provide the individual location of the directory.
Figure 22: Using the Desktop Preferences policy
Figure 23: Enabling roaming profiles


Installation of Citrix MetaFrame Presentation Server
IntroductionThe Citrix code should only be installed after the previous steps in the installation and configurationsection have been completed.
One component of the installation involves adding GINA to the Citrix server. CTXGINA.DLL isadded to the server to enhance the ability of Citrix to pass on information to subsequent GINAsinstalled on the same machine, such as NWGINA.DLL and the MSGINA.DLL.
This document only covers Novell-specific portions of the installation.
Citrix Management Console ConfigurationWithin the Citrix Management Console, select the Properties tab of the farm object. Select“MetaFrame Settings.” You will see the “Novell Directory Services Preferred Tree” field:
Figure 24: Novell Directory Services preferred tree

Change to the Registry of the Citrix ServerOnce the previous step has been completed there is one final change to make to the Citrix server'sregistry:
1. Locate the following key in the registry:HKEY_LOCAL_MACHINE\SOFTWARE\Citrix
2. Under this key create another key called “NDS”. Within this NDS key create a registry valueof type string. This value should be “SynchedDomainName” and will take one of two forms:
a) Active Directory or NT domain name—This form is used if the server is part of anActive Directory or NT Domain. Please note: if Active Directory is being installed, usethe short name, not the DNS type name.
b) NetBIOS server name of the Citrix server being installed—This form is used if theserver is being installed as a workgroup server.
If your Citrix farm is installed on Windows 2003 Server, this key must be set whether thefarm is integrated with Active Directory or not.

Additional Functionality Offered by a Novell/Citrix Solution
IntroductionThis section details some of the functionality provided by a Novell and Citrix integrated solution. Itwill discuss each of the following areas in turn:
1. Launching Citrix Published Applications from ZENworks 7 Desktop ManagementApplication Objects
2. Building a Better Mouse Trap
3. Imaging Citrix Servers using ZENworks 7 Desktop Management
4. iPrint in a Thin Client Environment.
5. iFolder and Citrix Integration
Launching Citrix Published Applications from ZENworks 7Desktop Management Application Objects
IntroductionWith the release of ZENworks 7 Desktop Management, a ZENworks Desktop Managementapplication object can call a Citrix published application. This allows the Novell ApplicationLauncher to be used as an interface for both thin and thick applications. The ZENworks 7 DesktopManagement application object can run a local application, but if if that application fails to launch itwill transparently fail over to a Citrix published application. Users cannot tell whether they arelaunching an application from the local machine or a Citrix published application.
ImplementationThis capability is dependent on there being a Citrix published application already configured withthe same name.
In ConsoleOne select “Create new application” from the taskbar. When the “New ApplicationObject” dialog box appears, select “A Terminal Server application” from the options provided andclick “Next.”

The following information is now presented in the dialog box:
The object should have the same name as the Citrix published application that it will call.
The next screen provides the option to select either an ICA or RDP session for the application.Notice that the published application name has already been populated.
Figure 25: Create a new application object
Figure 26: Name the application object

Another point of interest is the “Servers Hosting the Application” field. Every Citrix server in thefarm should not be listed here, but rather the address of one server in the farm that is running theCitrix Extensible Markup Language (XML) service. This service provides the ability, when aparticular application is selected, for the user to be redirected to a server holding the application.The original server called does not even need the actual published application called to be installed.It is, however, good practice to enter two IP addresses in this dialog box.
After you click the “Next” button, you create the rest of the application exactly as you would anyother ZENworks application. It is important to realize that you are creating a pointer to an existingCitrix published application, and that the rights to use that application need to be granted throughthe Citrix Management Console.
CaveatsThe following issues need to be kept in mind:
1. The user has to be authenticated to eDirectory. If the user is not connected to the tree andNovell Application Launcher is in disconnected mode, selecting the ZENworks applicationwill not transparently sign you on to the Citrix session. The login dialog box will bepresented to the user and the user will have to re-enter their password.
2. There is no support for a Citrix farm that is part of both eDirectory and Active Directory.The ZENworks 7 Desktop Management application object supports authentication to theCitrix server's SAM, but not to the Active Directory domain.
3. There is no support for the Citrix Java* client. Only the WIN32* ICA client is supported.
4. There is no support for Citrix Secure Gateway as part of the application object. SecureGateway is supported when you use the ZENworks 7 Desktop Management Launch Itemgadget. The Launch Item gadget is designed for a Novell exteNd Director standard portaland allows the display of both types of applications.
5. There are issues with running multiple instances of the same application object.
Figure 27: Choose ICA or RDP

Building a Better Mouse Trap
IntroductionThe Terminal Server application object has several key limitations. The new, more powerful methodof launching a Citrix published application provides the following capabilities that the previousmethod does not:
1. It supports a Citrix farm that is part of eDirectory and Active Directory.
2. It supports a Citrix farm that is just part of Active Directory. In this scenario, it is assumedthat the username and passwords are synchronized between the environments.
3. It supports for launching a ZENworks 7 Desktop Management application object that refersto a Citrix published application in a different tree.
4. It provides the ability to apply any Citrix client parameter to control how the application islaunched.
5. It support launching any number of instances of the same application.
ImplementationThis alternate method makes use of the ZENworks 7 Desktop Management ability to create an INIfile on the fly. Parameters are passed to the file that are set as macros within the applicationdefinition. As discussed earlier, the finished INI file is then used as input to WFCRUN32.EXE(which is part of the Citrix Program Neighborhood client install).
The Citrix Program Neighborhood client must be installed and configured to pass the local desktopcredentials back to the Citrix server.
Setup of the Application ObjectThe application object used has a number of settings applied to it. Thus, when a working applicationobject has been defined, it should be used as a template for the creation of other application objectsof the same type.
Creation of the ObjectThe first page of the application object is the same as any other ZENworks 7 Desktop Managementapplication:

Next is the Distribution Options tab. This tab is responsible for distributing the INI file down tothe client that is customized at run time by insertion of defined ZENworks 7 Desktop Managementmacros.
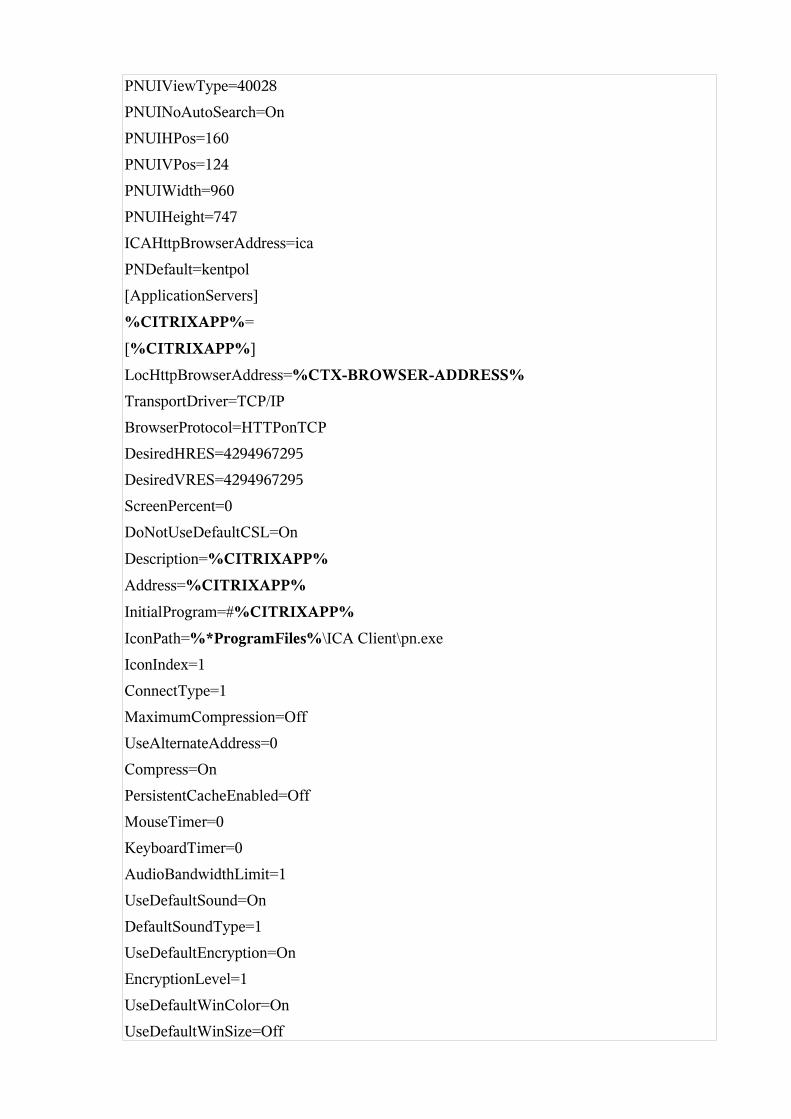
The INI file that ZENworks 7 Desktop Management is distributing to the client is displayed belowin full:
[WFClient]
Version=2
LogFile=%*TempDir%\ICA Client\%CITRIXAPP%.log
LogFileWin16=%CITRIXAPP%.log
LogFileWin32=%*AppData%\ICAClient\wfcwin32.log
LogAppend=Off
LogConnect=On
LogErrors=On
LogTransmit=Off
LogReceive=Off
LogKeyboard=Off
Hotkey1Char=F1
Hotkey1Shift=Shift
Hotkey2Char=F3
Hotkey2Shift=Shift
Hotkey3Char=F2
Hotkey3Shift=Shift
Figure 28: Citrix application template

Hotkey4Char=F1
Hotkey4Shift=Ctrl
Hotkey5Char=F2
Hotkey5Shift=Ctrl
Hotkey6Char=F2
Hotkey6Shift=Alt
Hotkey7Char=plus
Hotkey7Shift=Alt
Hotkey8Char=minus
Hotkey8Shift=Alt
Hotkey9Char=F3
HotKey10Shift=Ctrl
Hotkey10Char=F5
HotKey9Shift=Ctrl
Hotkey11Char=plus
Hotkey11Shift=Ctrl
DisableSound=Off
MouseTimer=0
KeyboardTimer=0
ColorMismatchPrompt_Have16_Want256=On
ColorMismatchPrompt_Have64K_Want256=On
ColorMismatchPrompt_Have16M_Want256=On
DosConnectTTY=On
ConnectTTY=Off
ConnectTTYDelay=1000
TcpBrowserAddress=
IpxBrowserAddress=
NetBiosBrowserAddress=
BrowserRetry=3
BrowserTimeout=1000
LanaNumber=0
ScriptDriver=SCRIPT.DDL
ScriptDriverWin16=SCRIPTW.DLL
ScriptDriverWin32=SCRIPTN.DLL
ScriptFile=
PersistentCacheEnabled=Off
PersistentCacheSize=30000000

PersistentCacheMinBitmap=8192
PersistentCachePath=%*AppData%\ICAClient\Cache
UpdatesAllowed=On
COMAllowed=On
CPMAllowed=On
VSLAllowed=On
CDMAllowed=On
MaximumCompression=Off
XmlAddressResolutionType=DNS-Port
ICASOCKSProtocolVersion=-1
ICASOCKSProxyHost=
ICASOCKSProxyPortNumber=1080
SSLEnable=Off
SSLProxyHost=*:443
SSLNoCACerts=0
SSLCiphers=ALL
SSOnUserSetting=On
DesiredColor=2
ScreenPercent=0
DesiredHRES=%HRES%DesiredVRES=%VRES%PNCacheVersion=1
KeyboardLayout=(User Profile)
KeyboardType=(DEFAULT)
RuntimePrompt=On
AutoReconnect=Off
SSOnCredentialType=Any
PersistentCachePercent=0
ApplicationSetManagerIconOff=Off
CustomConnectionsIconOff=Off
FindNewApplicationSetIconOff=Off
AddICAIconOff=Off
DragoutOff=Off
NoSavePwordOption=Off
PNUIShowTB=1
PNUIShowTBText=1
PNUIShowSB=1
PNUIViewType=40028
PNUINoAutoSearch=On
PNUIHPos=160
PNUIVPos=124
PNUIWidth=960
PNUIHeight=747
ICAHttpBrowserAddress=ica
PNDefault=kentpol
[ApplicationServers]
%CITRIXAPP%=
[%CITRIXAPP%]
LocHttpBrowserAddress=%CTX-BROWSER-ADDRESS%TransportDriver=TCP/IP
BrowserProtocol=HTTPonTCP
DesiredHRES=4294967295
DesiredVRES=4294967295
ScreenPercent=0
DoNotUseDefaultCSL=On
Description=%CITRIXAPP%Address=%CITRIXAPP%
InitialProgram=#%CITRIXAPP%IconPath=%*ProgramFiles%\ICA Client\pn.exe
IconIndex=1
ConnectType=1
MaximumCompression=Off
UseAlternateAddress=0
Compress=On
PersistentCacheEnabled=Off
MouseTimer=0
KeyboardTimer=0
AudioBandwidthLimit=1
UseDefaultSound=On
DefaultSoundType=1
UseDefaultEncryption=On
EncryptionLevel=1
UseDefaultWinColor=On
UseDefaultWinSize=Off

DesiredWinType=8
TWIMode=On
ZLKeyboardMode=0
ZLMouseMode=2
SavePNPassword=Off
UseLocalUserAndPassword=On
DisableCtrlAltDel=On
UIFlags=10
ICASOCKSProtocolVersion=0
ICASOCKSProxyPortNumber=0
ICASOCKSTimeout=0
SSLEnable=Off
SSLProxyHost=*:443
SSLNoCACerts=0
SSLCiphers=ALL
CGPAddress=*
This INI file was taken from an application that was defined through Citrix Program Neighborhoodand imported to ZENworks 7 Desktop Management. Notice that throughout the file there exist anumber of “%xx%” lines where “xx” is the name of a macro for which ZENworks 7 DesktopManagement holds the value.
Some of these macros are defined at runtime by values held in the application object and others aredefined by constants set up by the Windows operating system.
The next tab on the ConsoleOne snap-in holds the path to file configuration, another important partof how the object launches the Citrix published application:
Figure 29: Citrix application properties
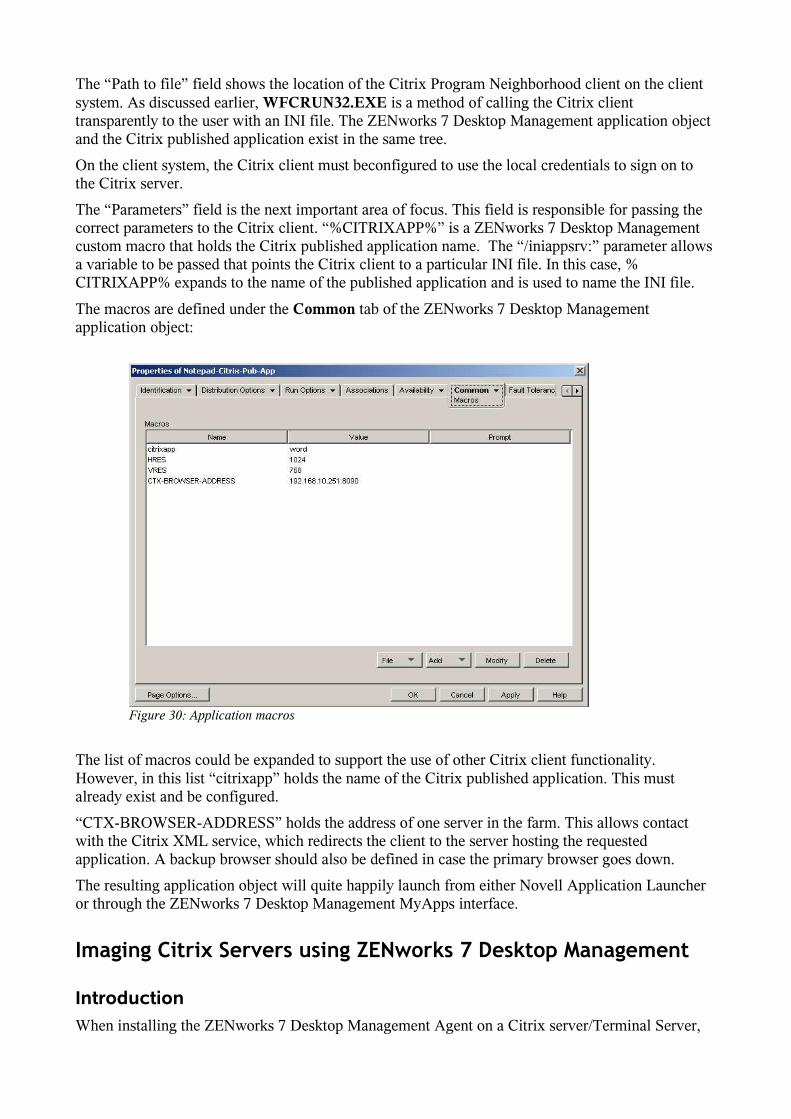
The “Path to file” field shows the location of the Citrix Program Neighborhood client on the clientsystem. As discussed earlier, WFCRUN32.EXE is a method of calling the Citrix clienttransparently to the user with an INI file. The ZENworks 7 Desktop Management application objectand the Citrix published application exist in the same tree.
On the client system, the Citrix client must beconfigured to use the local credentials to sign on tothe Citrix server.
The “Parameters” field is the next important area of focus. This field is responsible for passing thecorrect parameters to the Citrix client. “%CITRIXAPP%” is a ZENworks 7 Desktop Managementcustom macro that holds the Citrix published application name. The “/iniappsrv:” parameter allowsa variable to be passed that points the Citrix client to a particular INI file. In this case, %CITRIXAPP% expands to the name of the published application and is used to name the INI file.
The macros are defined under the Common tab of the ZENworks 7 Desktop Managementapplication object:
The list of macros could be expanded to support the use of other Citrix client functionality.However, in this list “citrixapp” holds the name of the Citrix published application. This mustalready exist and be configured.
“CTX-BROWSER-ADDRESS” holds the address of one server in the farm. This allows contactwith the Citrix XML service, which redirects the client to the server hosting the requestedapplication. A backup browser should also be defined in case the primary browser goes down.
The resulting application object will quite happily launch from either Novell Application Launcheror through the ZENworks 7 Desktop Management MyApps interface.
Imaging Citrix Servers using ZENworks 7 Desktop Management
IntroductionWhen installing the ZENworks 7 Desktop Management Agent on a Citrix server/Terminal Server,
Figure 30: Application macros

the imaging component is not installed or available for installation (the ZISWIN.EXE utility).Although ZENworks 7 Desktop Management does not support imaging a server platform, you canenable the imaging components on a Citrix sever/Terminal Server to add full imaging functionalityto your Citrix farm.
NOTE: This functionality, although tested successfully, is not supported by Novell onWindows Server platforms.
Configuration and Installation of ZISWINAfter all other Citrix server configuration has been completed, you must copy three additional filesto the Citrix server from a workstation installation of the ZENworks 7 Desktop Management Agent.These three files are:
• zisdctrl.ocx• ziswin.chm• ziswin.exe
These files should be copied from the c:\%WINSYSDIR% directory and placed in the same locationon the Citrix server/Terminal Server.
When you run ZISWIN.EXE the first time, you should see the following screen:
From this screen, select “Edit” and then “Options.” The following dialog box appears:
Figure 31: ZISWIN properties
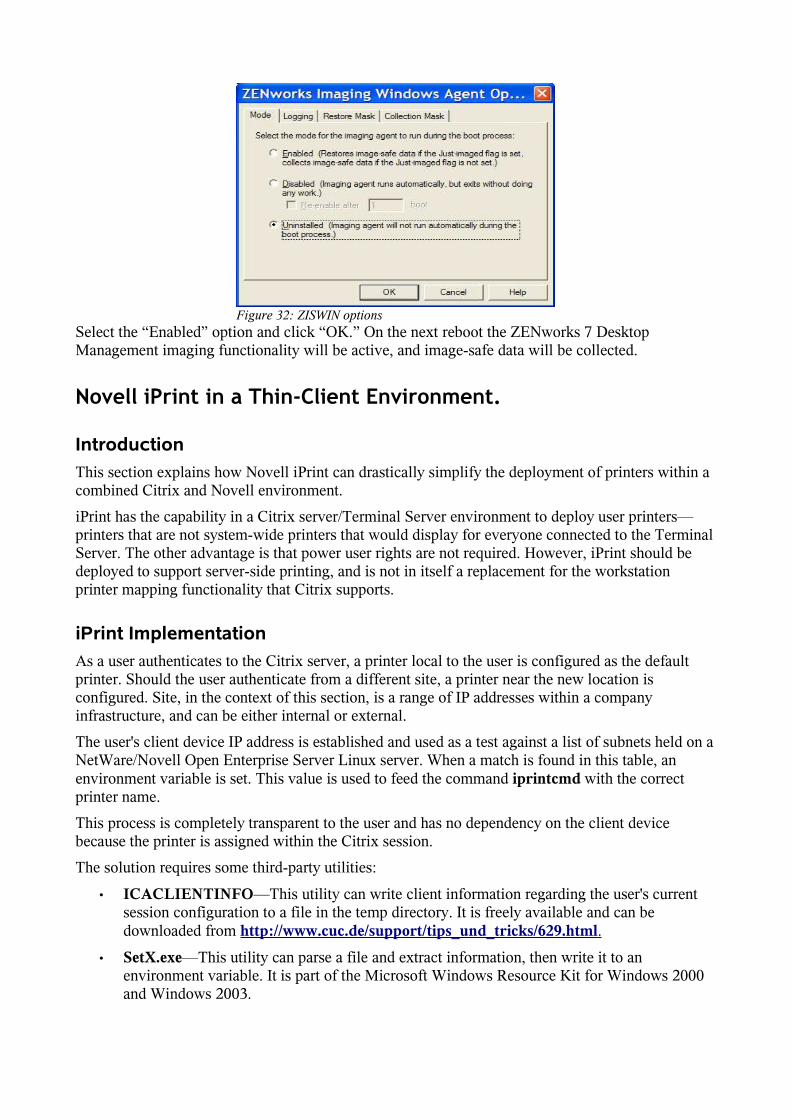
Select the “Enabled” option and click “OK.” On the next reboot the ZENworks 7 DesktopManagement imaging functionality will be active, and image-safe data will be collected.
Novell iPrint in a Thin-Client Environment.
IntroductionThis section explains how Novell iPrint can drastically simplify the deployment of printers within acombined Citrix and Novell environment.
iPrint has the capability in a Citrix server/Terminal Server environment to deploy user printers—printers that are not system-wide printers that would display for everyone connected to the TerminalServer. The other advantage is that power user rights are not required. However, iPrint should bedeployed to support server-side printing, and is not in itself a replacement for the workstationprinter mapping functionality that Citrix supports.
iPrint ImplementationAs a user authenticates to the Citrix server, a printer local to the user is configured as the defaultprinter. Should the user authenticate from a different site, a printer near the new location isconfigured. Site, in the context of this section, is a range of IP addresses within a companyinfrastructure, and can be either internal or external.
The user's client device IP address is established and used as a test against a list of subnets held on aNetWare/Novell Open Enterprise Server Linux server. When a match is found in this table, anenvironment variable is set. This value is used to feed the command iprintcmd with the correctprinter name.
This process is completely transparent to the user and has no dependency on the client devicebecause the printer is assigned within the Citrix session.
The solution requires some third-party utilities:
• ICACLIENTINFO—This utility can write client information regarding the user's currentsession configuration to a file in the temp directory. It is freely available and can bedownloaded from http://www.cuc.de/support/tips_und_tricks/629.html .
• SetX.exe—This utility can parse a file and extract information, then write it to anenvironment variable. It is part of the Microsoft Windows Resource Kit for Windows 2000and Windows 2003.
Figure 32: ZISWIN options

iPrint Configurationiprintcmd is used in a combination with a series of scripts that are called by the login script.
The following line within the login script is responsible for kicking off the printer deploymentprocess:
if <SESSIONNAME> <>”” and <SESSIONNAME> <>”Console” Then
#cmd /c z:prnselect.cmdEndThe IF statement is responsible for only running the script if the user has logged on from an ICAsession. If the user authenticates from the normal desktop machine, then the ICA printer script is notrun.
This script is split into a number of parts:
@ECHO OFFz:wscript z:removeprn.vbscmd /c z:client.cmdwscript z:test.vbs %var%wscript z:readreg.vbs
The first iprntcmd line is responsible for removing the old site's printer: if a user has changed sitethen a a new default printer needs to be established. removeprn.vbs is a piece of VBScript thatreads the NCS location from the registy and uses that information to remove the existing printer. Ifthe NCS location has already been set to NOT FOUND, ,this piece of code is not executed.
The client.cmd batch file ICACLIENTINFO writes a file which to the user's temp directorycontaining a number of settings relevant to the current session. This file is then parsed bySETX.EXE to extract the client device's IP address. SETX.EXE then assigns it to an environmentvariable.
Th test.vbs script takes the environment variable mentioned above and compares it against a tableheld in the server's public directory. This table holds a list of subnets and related printer names.Each entry in the table also has a subnet mask assigned to it to indicate which IP addresses belong towhich subnet.
Below is an example of a table entry:
10.1.103.0,PRNT-MGR\HP-4000-OFFICE,255.255.252.0The format of the file is as follows:
Subnet where printer is located, Iprint Manager\printer name, subnet mask of the printer subnet
If no match is found, the environment variable NCSLocation is set to NOTFOUND. Otherwise,NCSLocation is set to the value of the printer name held in the table.
The readreg.vbs script reads the state of NCSLocation and feeds this value into an iprntcmdcommand line that is then executed.
This process will assign the printer; and if the Citrix server/Terminal Server does not have a printerdriver locally installed, th eprocess will pull the driver from the NetWare server running the IPRINT

broker.
ConclusioniPrint in the thin-client world can allow the automatic assignment of a printer driver and printinglocation based on the user's location. This process is completely independent of the client deviceand automatic from the user's perspective. It only requires that the Citrix ICA client can be run.
iFolder 2.0 and Citrix Integration
IntroductioniFolder provides, among other capabilities, a method of backing up and safeguarding informationfrom a user's laptop to a central server. This functionality at first glance does not seem a natural fitwith Citrix and the thin-client environment. However, it enables a user to save data from within aCitrix session and have that data automatically updated on the iFolder server. This data is thensynchronized back to the user's client machine via the iFolder client installed on that device.iFolder works on deltas: it just sends the changed information over the wire if the applicationpermits this mode of operation.
ImplementationThe iFolder client is not supported in a Citrix server/Terminal Server environment. However,NetDrive, which is supported within the Citrix session, allows a drive letter to be mapped thatrepresents the user's iFolder store. From a client perspective, the relevant data is saved to that driveletter.
ConfigurationThis section discusses how the user's settings will be applied on a user-by-user basis with minimalintervention. The installation of NetDrive on a Citrix server/Terminal Server is not be discussed.
Settings are automatically applied to NetDrive as follows:
1. The user portion of the registry is checked to see if NetDrive has been configured for aparticular connection.
2. If it has not, then the registry settings are added to configure NetDrive for a connection tothe required iFolder server.
3. All the required settings are added except the password. This will need to be added later bythe user.
The process is based on a netdrive.vbs file that is executed from the system login script. This fileuses a registry file that was exported from an already configured user. The registry file should beexported from a manually configured NetDrive user. The path to export is:
HKEY_CURRENT_USER\Software\RiverFront\WebDrive\Connections\IfolderPlease note that the last part of this path will change to match the name given to theNetDrive connection. Also, check whether there is any username or passwordinformation stored in the netdrive.reg file. This information should be removed.
This file should be exported to netdrive.reg and placed in the NetWare server's public directory.

netdrive.vbs should also be placed in the public directory. The contents of this file are as follows:
' VBScript.
Set objArgs = Wscript.Arguments
user=objArgs(0)
' WScript.echo user
Set Sh = CreateObject("WScript.Shell")
Set WshShell=WScript.CreateObject("WScript.Shell")
On Error Resume Next
key ="HKEY_CURRENT_USER\Software\RiverFront\WebDrive\Connections\Ifolder\URL"readkey=sh.RegRead(key)
if Err.Number <>0 then
' WScript.Echo "Registry key does not exist"
WshShell.Run "regedit /s /i z:\netdrive.reg"
WshShell.RegWrite"HKCU\Software\RiverFront\WebDrive\Connections\Ifolder\UserName", user,"REG_SZ"else
' WScript.Echo "Registry key does exist so netdrive is not added"
end if
on error goto 0
Note the highlighted portions of the file. The connection name iFolder will need to be changedto match the name given to the NetDrive connection.This process should ensure that all of the parameters for NetDrive are preconfigured for a user onfirst login. The user would have to access the NetDrive program once to enter the user's passwordand perhaps the password as well (“Remember password” should be selected).

Citrix Web Interface and Novell Integration
IntroductionCitrix Web Interface provides a Web front end to Citrix published applications and allows non-Windows platforms such as Linux to view published applications and to launch the selectedapplication via a Citrix client. This client can be either a native or Java client. If a Java client isused, practically anything with a Web browser and a compliant Java Virtual Machine (JVM) canlaunch a session to a Citrix server.
Citrix Web Interface also integrates with the Citrix Secure Ticketing Agent and the Citrix SecureGateway components, and is a vital part of accessing the farm in a secure manner over the Internet.
This section will discuss Web Interface 3.0 and Web Interface 4.0 in detail. These versions shippedwith Citrix Metraframe Presentation Server 3.0 and 4.0, respectively.
Web Interface 3.0 was shipped on two platforms:
1. Windows 2000/2003 on IIS
2. Apache/Tomcat Java Server Pages (JSP) pages
Out of the box, Novell integration is only provided for IIS, and that integration is only fullyfunctional if the Novell Client is installed on the Web server. There is no Novell integration withthe Apache/Tomcat option, and only NT is supported.
Web Interface 4.0 was also shipped on the same two platforms. Support, however, is provided forcontextless login without the Novell Client being installed on the IIS Server.
Citrix Web Interface Version 3.0 and IIS Out of the Box
IssuesWith the Novell Client installed on the Web server, contextless lookup is supported. However, thisrequires port 524 access to at least one server in the tree. In addition, with large numbers of contextsthe authentication speed to the Web server slows down drastically.
Without the Novell Client installed, the full context of the user must be entered.
By default, Citrix Web Interface uses the Novell Client to trawl the tree for context information.This activity is primarily based on the Web server and so can affect Web server utilization.
Contextless Login Application for Web Interface
IntroductionDue to the issues just discussed, an alternative solution has been devised. CLAW was developedjointly by Novell Consulting and Centralis (http://www.centralis.co.uk), a leading provider ofNovell and Citrix integrated solutions in the United Kingdom. This modification to Web Interface isavailable free of charge from either http://www.novell.com/coolsolutions or directly from theCentralis Web site.
CLAW replaces the Novell Client by establishing the user's context via Lightweight DirectoryAccess Protocol (LDAP). This has a number of advantages over the out-of-the-box solution:
1. No port 524 connection is required to the tree.

2. The LDAP connection can be secured via Secure Sockets Layer (SSL).
3. It is much faster than using the Novell Client.
CLAW can provide the same functionality to Web Interface 2.0, but only Web Interface 3.0 will bediscussed here.
ImplementationIt is recommended that you back up the Web server as a first step.
Additional FilesThe following script file must be added to the Web Interface installation:
include/serverscripts/ldapcxlogin.cs
File AmendmentsThe following changes are required to the Web Interface default files:
File to modify: include/serverscripts/authentication.cs
At the top of the file, before:
<script runat="server">Insert:
<!-#include file="ldapcxlogin.cs"->
Replace:
//get the list of preferrec contexts from the properties filecontext = gPropKey.getProperty(GlobalConf.ConfKey_PreferredContext);
bContext = true;Insert:
//get the list of preferred contexts via LDAP searchcontext = sFindContext(ExplicitUser); new lineif (context != "") { // in order to remove the requirement for the Novell client, need // to process the context list before calling the nds com object // rather than after. contextArray = context.Split(',');new line numContexts = contextArray.Length; new linw // try sorting the num context array Array.Sort(contextArray); newContextArray = contextArray; if (numContexts == 1) { contextOne = newContextArray[0]; } else {

// multiple contexts were selected for this user readOnly = "readonly"; messageType = MSG_INFO; message = gPropKey.getStaticString("NDSMultiContext"); return; }} else { // Context lookup failed. messageType = MSG_ERROR; message = "Failed to find context via LDAP."; HandleAuthenticationErrorMessage(messageType, message); Response.End(); }
File to modify: include/serverscripts/authentication.cs
After the line:public void htmlWriteContextOptions() {
Insert:if (messageType == MSG_ERROR) {
// In the event of an error, don't show any contexts.Response.Write("<option selected> " +
gPropKey.getStaticString("lookupContextString"));setCookie(COOKIE_NDS, COOKIE_NDS_CONTEXT, null);return;}
File to modify: Site/Web.config
The compilation section should have the following assembly entry added:
<add assembly="System.DirectoryServices, Version=1.0.3300.0, Culture=neutral, PublicKeyToken=b03f5f7f11d50a3a" />
For example: <assemblies>
<add assembly="vjslib, Version=1.0.3300.0, Culture=Neutral, PublicKeyToken=b03f5f7f11d50a3a" /> <add assembly="System.DirectoryServices, Version=1.0.3300.0, Culture=neutral, PublicKeyToken=b03f5f7f11d50a3a" />
</assemblies>

ConfigurationConfiguration is completed through the WebInterface.conf configuration file.
Note: All changes to settings in WebInterface.conf require IISRESET to take effect.
The following entries are all required:
Setting Description Example NotesLDAP_Server Specifies the name or
address of the server wherethe LDAP service is located
LDAP_Server=10.1.0.1 If the LDAP service isrunning on a port otherthan the default (389),the actual port numberwill also need to bespecified. For example:
LDAP_Server=10.1.0.1:390
LDAP_SearchBase Directory container fromwhich the context searchshould begin
LDAP_SearchBase=o=MyOrg/ou=MyUnit
Multiple containers canbe specified byseparating them with acomma.
LDAP_User Login name of user withrights to query directoryservices for users
LDAP_User=o=MyOrg/cn=MyContextSearcher
LDAP_Pwd Password of above user LDAP_Pwd=xxxx
Table 1: LDAP required settings for Web Interface
The following entries are optional:
Setting Description ExampleLDAP_SSL If using SSL this should be
specified.LDAP_SSL=On(Default = Off)
LDAP_Matches Where multiple contexts arefond for the user, a maximumof five is returned by default.This value can be altered byadding the following with arequired value
LDAP_Matches=3(where 3 = required matches)
Table 2: LDAP optional settings for Web Interface
ConclusionUsing LDAP to provide context information allows the secure placement of Web Interface in ademilitarized zone (DMZ) without having to open port 524 to the Novell tree. Once SSL is enabled,the context lookup can take place in a safe, secure and efficient manner.
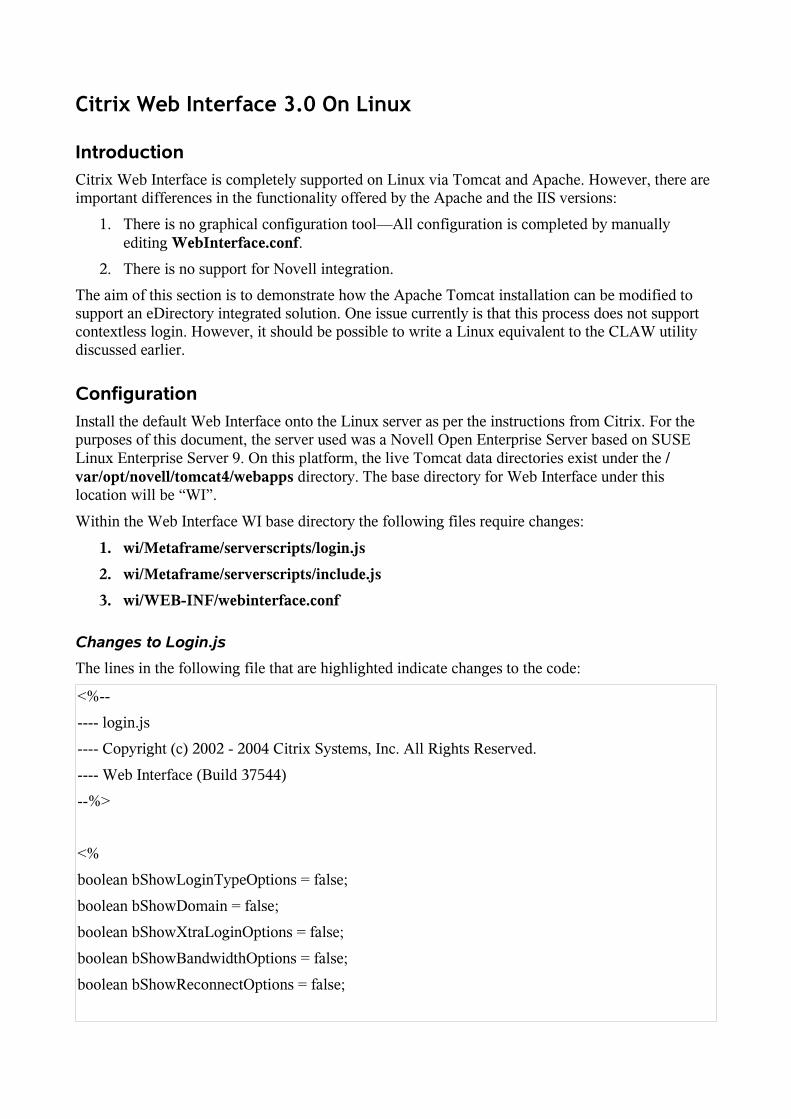
Citrix Web Interface 3.0 On Linux
IntroductionCitrix Web Interface is completely supported on Linux via Tomcat and Apache. However, there areimportant differences in the functionality offered by the Apache and the IIS versions:
1. There is no graphical configuration tool—All configuration is completed by manuallyediting WebInterface.conf.
2. There is no support for Novell integration.
The aim of this section is to demonstrate how the Apache Tomcat installation can be modified tosupport an eDirectory integrated solution. One issue currently is that this process does not supportcontextless login. However, it should be possible to write a Linux equivalent to the CLAW utilitydiscussed earlier.
ConfigurationInstall the default Web Interface onto the Linux server as per the instructions from Citrix. For thepurposes of this document, the server used was a Novell Open Enterprise Server based on SUSELinux Enterprise Server 9. On this platform, the live Tomcat data directories exist under the /var/opt/novell/tomcat4/webapps directory. The base directory for Web Interface under thislocation will be “WI”.
Within the Web Interface WI base directory the following files require changes:
1. wi/Metaframe/serverscripts/login.js2. wi/Metaframe/serverscripts/include.js3. wi/WEB-INF/webinterface.conf
Changes to Login.jsThe lines in the following file that are highlighted indicate changes to the code:
<%--
---- login.js
---- Copyright (c) 2002 - 2004 Citrix Systems, Inc. All Rights Reserved.
---- Web Interface (Build 37544)
--%>
<%
boolean bShowLoginTypeOptions = false;
boolean bShowDomain = false;
boolean bShowXtraLoginOptions = false;
boolean bShowBandwidthOptions = false;
boolean bShowReconnectOptions = false;

// String variables to control selection states of various form elements
String AnonymousSelected = "";
String ExplicitSelected = "";
String ExplicitLoginDisabled = "";
String DomainDisabled = "";
String NoneBandwidthSelected = "";
String HighBandwidthSelected = "";
String MediumHighBandwidthSelected = "";
String MediumBandwidthSelected = "";
String LowBandwidthSelected = "";
String ReconnectLoginChecked = "";
String DisconnectedSelected = "";
String DisconnectedActiveSelected = "";
String ReconnectLoginDisabled = "";
String EnableReconnectLoginDisabled = "";
String logoutId = "";
logoutId = request.getParameter(QSTR_LOGOUTID);
// If we are here, then we are not authenticated. Mark the session
// accordingly. Useful if the user navigates here without first logging out.
// Note that we don't want to do this if the user's using Safari, because
// Safari can end up on the login page by mistake whilst logged in.
if (!(icaBrowserType == 3 && !(logoutId != null && logoutId.equalsIgnoreCase(VAL_ON)))) {
session.removeAttribute(SV_AUTHENTICATED);
}
String clientName = (String) session.getAttribute(SV_CLIENT_NAME);
if ((clientName == null) || (clientName.trim().length() == 0)) {
clientName = GlobalConf.generateClientName();
session.setAttribute(SV_CLIENT_NAME, clientName);
hLoginTable.put(COOKIE_LOGIN_CLIENT_NAME, clientName);
out.println(writeLoginCookies(response, hLoginTable));

}
if (request.getMethod().equals("POST")) {
String loginType = request.getParameter(ID_LOGIN_TYPE).trim();
if (VAL_ON.equalsIgnoreCase(gPropKey.getProperty(GlobalConf.ConfKey_AllowCustomizeSettings)) && VAL_ON.equalsIgnoreCase(gPropKey.getProperty(GlobalConf.ConfKey_AllowBandwidthSelection))) {
String bandwidth = request.getParameter(ID_BANDWIDTH);
if (ClientSettings.validateBandwidth(bandwidth)) {
hLoginTable.put(COOKIE_LOGIN_BANDWIDTH, bandwidth);
out.println(writeLoginCookies(response, hLoginTable));
session.setAttribute(SV_BANDWIDTH, bandwidth);
}
}
if ((! VAL_ANONYMOUS.equals(loginType)) && isWorkspaceControlEnabled(session,hTable, icaObjectCodeInt) && VAL_ON.equalsIgnoreCase(gPropKey.getProperty(GlobalConf.ConfKey_AllowCustomizeReconnectAtLogin))) {
String reconnectAtLogin = null;
if (VAL_ON.equals(request.getParameter(ID_RECONNECT_LOGIN))) {
reconnectAtLogin = request.getParameter(ID_RECONNECT_LOGIN_OPTION);
} else {
reconnectAtLogin = VAL_NONE;
}
hTable.put(COOKIE_MODE_RECONNECT_LOGIN, gApp.urlEncode(reconnectAtLogin));
out.println(writeUserSettings(response, loginType, hTable));
}
if (VAL_EXPLICIT.equalsIgnoreCase(loginType)
&& gApp.allowLoginType(VAL_EXPLICIT)) {
logonMode = VAL_EXPLICIT;
String user = "", domain = "", password = "";
if (request.getParameter(ID_USER) != null) {
user = request.getParameter(ID_USER);
}

if (request.getParameter(ID_DOMAIN) != null) {
domain = "OES-TREE"; }
if (request.getParameter(ID_PASSWORD) != null) {
password = request.getParameter(ID_PASSWORD);
}
user = "."+user.trim()+".novell"; domain = "OES-TREE";
if (user == null || user.trim().length() == 0) {
messageType = MSG_ERROR;
message = gPropKey.getStaticString("BlankUsername");
} else if (domain.length() == 0) {
String domainName = ClearTextCredentials.getDomainFromUsername(user);
if ((domainName == null) || (domainName.length() == 0)) {
if (VAL_ON.equalsIgnoreCase(gPropKey.getProperty(GlobalConf.ConfKey_HideDomainField))) {
// WI is configured to hide the domain field and the
// user does not specify a domain in the username
// field. We attempt to fish out the first domain in
// the LoginDomains list as the default domain.
String d = GlobalConf.getFirstLoginDomain();
if (d != null) {
domain = "OES-TREE"; }
} else {
messageType = MSG_ERROR;
message = gPropKey.getStaticString("BlankDomain");
}
}
}
if (! ClearTextCredentials.checkCredentials(user, password, domain, "NDS")) {
messageType = "";
message = gPropKey.getStaticString("InvalidCredentials");
if ((message == null) || (message.length() == 0)) {

showForm = false;
session.setAttribute(SV_PREAUTH_USER, user);
session.setAttribute(SV_PREAUTH_DOMAIN, domain);
session.setAttribute(SV_PREAUTH_PASSWORD, password);
AppDataList appDataList = getAppList(session, request, logonMode, out);
if (appDataList == null) {
// Authentication failed. Error has already been set up.
return;
}
session.setAttribute(SV_APPLIST, appDataList);
session.setAttribute(SV_LOGON_MODE, logonMode);
session.setAttribute(SV_AUTHENTICATED, Boolean.TRUE);
if (VAL_EXPLICIT.equalsIgnoreCase(logonMode)) {
session.setAttribute(SV_USER, user);
session.setAttribute(SV_DOMAIN, domain);
session.setAttribute(SV_PASSWORD, password);
}
}
} else if (VAL_ANONYMOUS.equalsIgnoreCase(loginType)
&& gApp.allowLoginType(VAL_ANONYMOUS)) {
logonMode = VAL_ANONYMOUS;
showForm = false;
AppDataList appDataList = getAppList(session, request, logonMode, out);
if (appDataList == null) {
// Authentication failed. Error has already been set up.
return;
}
session.setAttribute(SV_APPLIST, appDataList);
session.setAttribute(SV_LOGON_MODE, logonMode);
session.setAttribute(SV_AUTHENTICATED, Boolean.TRUE);
}
} else {
if ((logonMode == null) || (logonMode.length() == 0)) {

if (gApp.allowLoginType(VAL_EXPLICIT)) {
logonMode = VAL_EXPLICIT;
} else if (gApp.allowLoginType(VAL_ANONYMOUS)) {
logonMode = VAL_ANONYMOUS;
showForm = false;
}
} else {
if (((logoutId == null) || (! logoutId.equalsIgnoreCase(VAL_ON)))
&& gApp.onlyLoginType(VAL_ANONYMOUS)) {
logonMode = VAL_ANONYMOUS;
showForm = false;
}
}
if (! showForm) {
AppDataList appDataList = getAppList(session, request, logonMode, out);
if (appDataList == null) {
// Authentication failed. Error has already been set up.
return;
}
session.setAttribute(SV_APPLIST, appDataList);
session.setAttribute(SV_LOGON_MODE, logonMode);
session.setAttribute(SV_AUTHENTICATED, Boolean.TRUE);
}
}
welcomeMessage1 = "PleaseLogin";
welcomeMessage2 = "PleaseLogin3";
welcomeMessage2 = (gApp.allowLoginType(VAL_ANONYMOUS) && gApp.allowLoginType(VAL_EXPLICIT)) ? "PleaseLogin5" : "PleaseLogin4";
bShowLoginTypeOptions = gApp.allowLoginType(VAL_ANONYMOUS);
if ((logonMode == null) || (logonMode.length() == 0)) {
messageType = MSG_ERROR;
message = gPropKey.getStaticString("AuthenticationError");
}

Vector domainNames = null;
if (showForm) {
if (VAL_ANONYMOUS.equalsIgnoreCase(logonMode)) {
AnonymousSelected = VAL_SELECTED;
ExplicitLoginDisabled = VAL_DISABLED;
DomainDisabled = VAL_DISABLED;
} else {
ExplicitSelected = VAL_SELECTED;
}
bShowDomain = (! VAL_ON.equalsIgnoreCase(gPropKey.getProperty(GlobalConf.ConfKey_HideDomainField)));
domainNames = getLoginDomains();
if (bRestrictDomains && (domainNames.size() == 0)) {
DomainDisabled = VAL_DISABLED;
}
bShowBandwidthOptions = VAL_ON.equalsIgnoreCase(gPropKey.getProperty(GlobalConf.ConfKey_AllowCustomizeSettings)) && VAL_ON.equalsIgnoreCase(gPropKey.getProperty(GlobalConf.ConfKey_AllowBandwidthSelection));
String bandwidth = (String) session.getAttribute(SV_BANDWIDTH);
if (VAL_BANDWIDTH_NONE.equals(bandwidth)) {
NoneBandwidthSelected = VAL_SELECTED;
} else if (VAL_BANDWIDTH_HIGH.equals(bandwidth)) {
HighBandwidthSelected = VAL_SELECTED;
} else if (VAL_BANDWIDTH_MEDIUM_HIGH.equals(bandwidth)) {
MediumHighBandwidthSelected = VAL_SELECTED;
} else if (VAL_BANDWIDTH_LOW.equals(bandwidth)) {
LowBandwidthSelected = VAL_SELECTED;
} else {
MediumBandwidthSelected = VAL_SELECTED;
}
bShowReconnectOptions = (isWorkspaceControlEnabled(session, hTable, icaObjectCodeInt)&& VAL_ON.equalsIgnoreCase(gPropKey.getProperty(GlobalConf.ConfKey_AllowCustomizeReconnectAtLogin)));

if (bShowReconnectOptions) {
String reconnectAtLogin = VAL_ANONYMOUS.equals(logonMode) ? (String)hPersistTable.get(COOKIE_MODE_RECONNECT_LOGIN) : (String) hTable.get(COOKIE_MODE_RECONNECT_LOGIN);
if ((reconnectAtLogin == null) || (reconnectAtLogin.length() == 0)) {
reconnectAtLogin = gPropKey.getProperty(GlobalConf.ConfKey_ReconnectAtLogin);
}
if (VAL_NONE.equalsIgnoreCase(reconnectAtLogin)) {
ReconnectLoginChecked = "";
ReconnectLoginDisabled = VAL_DISABLED;
DisconnectedActiveSelected = VAL_SELECTED;
DisconnectedSelected = "";
} else {
ReconnectLoginChecked = VAL_CHECKED;
ReconnectLoginDisabled = "";
if (VAL_DISCONNECTED.equalsIgnoreCase(reconnectAtLogin)) {
DisconnectedActiveSelected = "";
DisconnectedSelected = VAL_SELECTED;
} else {
DisconnectedActiveSelected = VAL_SELECTED;
DisconnectedSelected = "";
}
}
if (VAL_ANONYMOUS.equals(logonMode)) {
EnableReconnectLoginDisabled = VAL_DISABLED;
ReconnectLoginDisabled = VAL_DISABLED;
}
}
bShowXtraLoginOptions = (bShowBandwidthOptions || bShowReconnectOptions);
} else {
// Redirect to applist.jsp
hLoginTable.put(COOKIE_LOGIN_MODE, logonMode);
out.println(writeLoginCookies(response, hLoginTable));
out.println(getClientRedirectScript("top", PAGE_FRAMESET));
}
%>
Note: The line that assigns the variable user holds the fixed context of the user in this tree. This isthe point at which a future LDAP-based contextless login solution will be placed. The fixed context
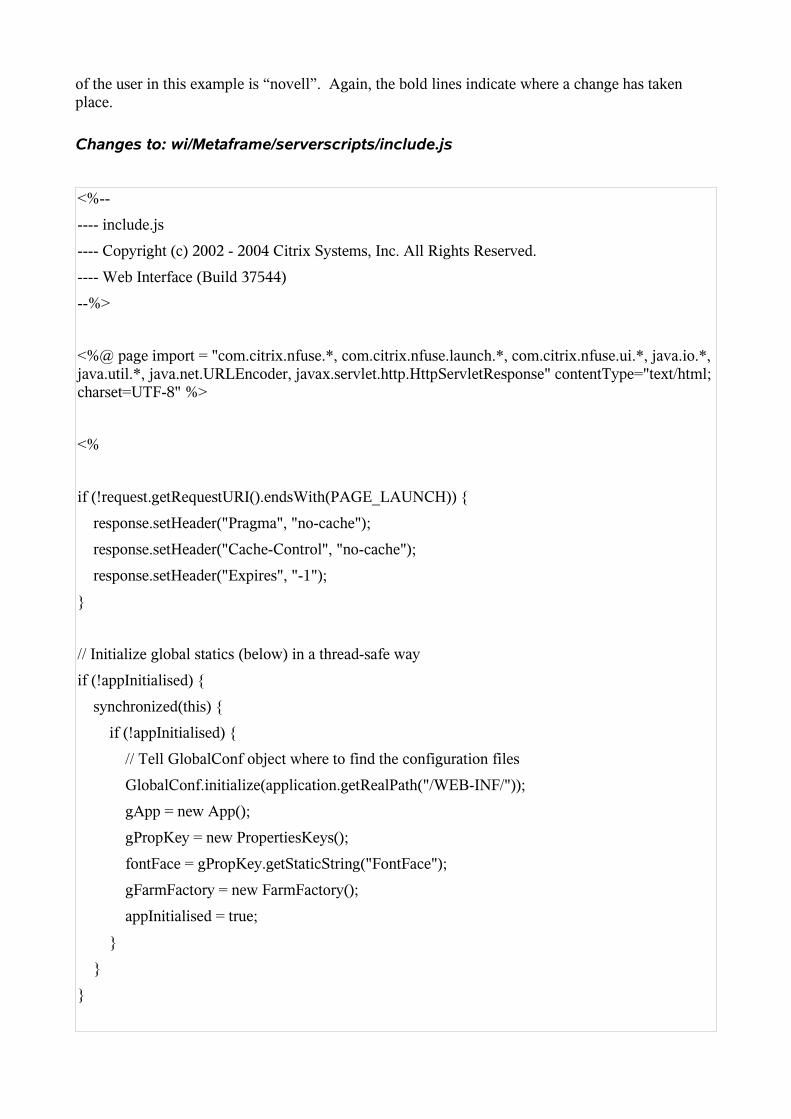
of the user in this example is “novell”. Again, the bold lines indicate where a change has takenplace.
Changes to: wi/Metaframe/serverscripts/include.js
<%--
---- include.js
---- Copyright (c) 2002 - 2004 Citrix Systems, Inc. All Rights Reserved.
---- Web Interface (Build 37544)
--%>
<%@ page import = "com.citrix.nfuse.*, com.citrix.nfuse.launch.*, com.citrix.nfuse.ui.*, java.io.*,java.util.*, java.net.URLEncoder, javax.servlet.http.HttpServletResponse" contentType="text/html;charset=UTF-8" %>
<%
if (!request.getRequestURI().endsWith(PAGE_LAUNCH)) {
response.setHeader("Pragma", "no-cache");
response.setHeader("Cache-Control", "no-cache");
response.setHeader("Expires", "-1");
}
// Initialize global statics (below) in a thread-safe way
if (!appInitialised) {
synchronized(this) {
if (!appInitialised) {
// Tell GlobalConf object where to find the configuration files
GlobalConf.initialize(application.getRealPath("/WEB-INF/"));
gApp = new App();
gPropKey = new PropertiesKeys();
fontFace = gPropKey.getStaticString("FontFace");
gFarmFactory = new FarmFactory();
appInitialised = true;
}
}
}
request.setCharacterEncoding("UTF-8");
// Find out the what Web server we are running on.
String webServerInfo = application.getServerInfo();
// Sets the following variables:
// - gApp: instance of App
// - gPropKey: instance of PropertiesKeys
// - logonMode: type of authentication to use (Anonymous and Explicit supported under jsp)
// - fontFace: font face to use obtained from config file
// - hTable: hashtable containing user settings
// - user, password, domain: user credentials
// - screenHRES, screenVRES: screen size (if set in cookie)
// - icaObjectCodeInt, icaClientCodeInt, icaBrowserType
Hashtable hTable = new Hashtable();
Hashtable hPersistTable = new Hashtable();
Hashtable hLoginTable = new Hashtable();
// We introduce this variable because it is used in the shared client-side script file.
String reconnectAtLoginUrl = null;
int screenHRES = -1;
int screenVRES = -1;
boolean showForm = true;
String messageKey = gApp.unUrlEncode(request.getParameter(QSTR_MSG_KEY));
String messageType = gApp.unUrlEncode(request.getParameter(QSTR_MSG_TYPE));
String messageArgs = request.getParameter(QSTR_MSG_ARGS);
String message = gApp.unUrlEncode(request.getParameter(QSTR_MSG));
String welcomeMessage1 = "";
String welcomeMessage2 = "";
boolean bSettings = gApp.allowCustomizeSettings();
String currentFolder = null;

// Values to set from cookies
String logonMode = null;
if (isAuthenticated(session)) {
logonMode = (String) session.getAttribute(SV_LOGON_MODE);
} else if (gApp.allowLoginType(VAL_EXPLICIT)) {
logonMode = VAL_EXPLICIT;
} else if (gApp.allowLoginType(VAL_ANONYMOUS)) {
logonMode = VAL_ANONYMOUS;
}
String langCode = gPropKey.getStaticString("LangCode");
String title = "";
String pageTitle = "";
String currPage = PAGE_LOGIN;
String workSpaceWidth = "286";
String helpLocation = "";
boolean bShowSettingsButton = false;
boolean bShowChangePasswdButton = false;
boolean bShowRefreshButton = false;
ClientInfo sClientInfo = (ClientInfo) session.getAttribute(SV_CLIENT_INFO);
if (sClientInfo == null) {
sClientInfo = new ClientInfo();
sClientInfo.initialize(request.getHeader("User-Agent"));
session.setAttribute(SV_CLIENT_INFO, sClientInfo);
}
int icaObjectCodeInt = sClientInfo.getICAObjectCode();
int icaClientCodeInt = sClientInfo.getICAClientCode();
int icaBrowserType = sClientInfo.getBrowserCode();
boolean icaClientAvailable = false;
// Read cookies
Cookie cookies[] = request.getCookies();
/*
* The above should return an empty array (not null pointer) when there are
* no cookies. However Tomcat 4 seems to return a null pointer initially so
* we sleep and retry in the hope that the cookies will eventually be
* returned. This seems to work.
*/
for (int loopCount = 0; loopCount < 100 && cookies == null; loopCount++) {
Thread.sleep(1);
cookies = request.getCookies();
}
for (int i=0; (cookies != null) && (i < cookies.length); i++) {
if (COOKIE_LOGIN.equalsIgnoreCase(cookies[i].getName())) {
readUserSettings(cookies[i].getValue(), hLoginTable);
String value = (String) hLoginTable.get(COOKIE_LOGIN_MODE);
if ((! isAuthenticated(session)) && gApp.allowLoginType(value)) {
// If not authenticated, we are displaying the login page and
// hence pick up the logon mode cookie.
logonMode = value;
}
value = (String) hLoginTable.get(COOKIE_LOGIN_BANDWIDTH);
if (VAL_ON.equalsIgnoreCase(gPropKey.getProperty(GlobalConf.ConfKey_AllowBandwidthSelection))) {
if (ClientSettings.validateBandwidth(value)) {
session.setAttribute(SV_BANDWIDTH, value);
}
}
value = (String) hLoginTable.get(COOKIE_LOGIN_CLIENT_NAME);
if ((value != null) && (value.length() != 0)) {
if (GlobalConf.validateClientName(value)) {
session.setAttribute(SV_CLIENT_NAME, value);
}
}
} else if (COOKIE_MODE_ANON.equalsIgnoreCase(cookies[i].getName()) &&
VAL_ANONYMOUS.equalsIgnoreCase(logonMode)) {

readUserSettings(cookies[i].getValue(), hTable);
} else if (COOKIE_MODE.equalsIgnoreCase(cookies[i].getName())) {
if (VAL_EXPLICIT.equalsIgnoreCase(logonMode)) {
readUserSettings(cookies[i].getValue(), hTable);
} else {
readUserSettings(cookies[i].getValue(), hPersistTable);
}
} else if (COOKIE_ICA_CLIENT_AVAILABLE.equalsIgnoreCase(cookies[i].getName())) {
icaClientAvailable = cookies[i].getValue().equalsIgnoreCase("true");
} else if (COOKIE_ICA_SCREEN_RESOLUTION.equalsIgnoreCase(cookies[i].getName())) {
try {
String sr = cookies[i].getValue();
int pos = sr.indexOf("x");
if (pos != -1) {
screenHRES = Integer.parseInt(sr.substring(0, pos));
screenVRES = Integer.parseInt(sr.substring(pos+1));
}
} catch (NumberFormatException e) {
} catch (IndexOutOfBoundsException e) {
}
} else if (COOKIE_ICA_CLIENT_PASS_THROUGH.equalsIgnoreCase(cookies[i].getName())){
// Find whether it is pass-through.
if (ClientSettings.validateICAClientPassThrough(cookies[i].getValue())) {
session.setAttribute(SV_ICA_IS_PASS_THROUGH, cookies[i].getValue());
}
}
}
boolean bRestrictDomains = VAL_ON.equalsIgnoreCase(gPropKey.getProperty(GlobalConf.ConfKey_RestrictDomains));
boolean bEmptyLoginDomains = (getLoginDomains().size() == 0);
//setTimeoutAlert
int advanceWarning = 5;
int alertInterval = 1;

int warningTimeout = 0;
int timeout = session.getMaxInactiveInterval() / 60;
if (timeout < 5) {
advanceWarning = timeout;
}
warningTimeout = (timeout - advanceWarning) * 60000;
%>
<%!
// Constants
static final String ID_FRAME_MAIN = "nfusemain";
static final String ID_FRAME_HIDDEN = "hiddenwindow";
static final String ID_FRAME_HIDDEN2 = "hiddenwindow2";
static final String PAGE_FRAMESET = "default.jsp";
static final String PAGE_LOGIN = "login.jsp";
static final String PAGE_LOGOUT = "logout.jsp";
static final String PAGE_APPLIST = "applist.jsp";
static final String PAGE_LAUNCH = "launch.jsp";
static final String PAGE_APPSETTINGS = "appsettings.jsp";
static final String PAGE_CHANGE_PASSWD = "changepassword.jsp";
static final String PAGE_APPEMBED = "appembed.jsp";
static final String PAGE_WEBCLIENT_DOWNLOAD = "Win32WebClientDownload.jsp";
static final String PAGE_DISCONNECT = "disconnect.jsp";
static final String PAGE_RECONNECT = "reconnect.jsp";
static final String PAGE_INSTALL_EMBED = "installembed.jsp";
static final String icaWebDir = "../ICAWEB/";
// Query string names
static final String QSTR_MSG_KEY = "NFuse_MessageKey";
static final String QSTR_MSG_TYPE = "NFuse_MessageType";
static final String QSTR_MSG = "NFuse_Message";
static final String QSTR_MSG_ARGS = "NFuse_MessageArgs";
static final String QSTR_CURRENT_FOLDER = "NFuse_CurrentFolder";

static final String QSTR_LOGOUTID = "NFuse_LogoutId";
static final String QSTR_TITLE = "Title";
static final String QSTR_LOGINID = "NFuse_LoginId";
static final String QSTR_LAUNCH_UID = "NFuse_UID";
static final String QSTR_LAUNCH_APPLICATION = "NFuse_Application";
static final String QSTR_LAUNCH_APP_FRIENDLY_NAME ="NFuse_AppFriendlyNameURLEncoded";
static final String QSTR_LAUNCH_APP_COMMAND_LINE = "NFuse_AppCommandLine";
static final String QSTR_LAUNCH_MIME_EXTENSION = "NFuse_MIMEExtension";
static final String QSTR_LAUNCH_WINDOW_WIDTH = "NFuse_WindowWidth";
static final String QSTR_LAUNCH_WINDOW_HEIGHT = "NFuse_WindowHeight";
static final String QSTR_HOSTID = "NFuse_HostId";
static final String QSTR_HOSTID_TYPE = "NFuse_HostIdType";
static final String QSTR_SESSIONID = "NFuse_SessionId";
static final String QSTR_APPLICATION = "NFuse_Application";
static final String QSTR_APP_FRIENDLY_NAME_URLENCODED ="NFuse_AppFriendlyNameURLENcoded";
static final String QSTR_APP_COMMAND_LINE = "NFuse_AppCommandLine";
// Cookie names
static final String COOKIE_LOGIN = "NFuseLogin";
static final String COOKIE_MODE = "NFuseMode";
static final String COOKIE_MODE_ANON = "NFuseModeAnon";
static final String COOKIE_ICA_CLIENT_AVAILABLE = "icaClientAvailable";
static final String COOKIE_ICA_CLIENT_PASS_THROUGH = "icaIsPassThrough";
static final String COOKIE_ICA_SCREEN_RESOLUTION = "icaScreenResolution";
// Cookie field names
static final String COOKIE_LOGIN_MODE = "NFuse_LogonMode";
static final String COOKIE_LOGIN_CLIENT_NAME = "NFuse_ClientName";
static final String COOKIE_LOGIN_BANDWIDTH = "NFuse_Bandwidth";
static final String COOKIE_MODE_RECONNECT_LOGIN = "NFuse_ReconnectAtLogin";
static final String COOKIE_MODE_RECONNECT_BUTTON = "NFuse_ReconnectButton";

static final String COOKIE_MODE_LOGOFF_APPS = "NFuse_LogoffApps";
static final String COOKIE_MODE_WINDOW_TYPE = "NFuse_WindowType";
static final String COOKIE_MODE_WINDOW_WIDTH = "NFuse_WindowWidth";
static final String COOKIE_MODE_WINDOW_HEIGHT = "NFuse_WindowHeight";
static final String COOKIE_MODE_WINDOW_SCALE = "NFuse_WindowScale";
static final String COOKIE_MODE_WINDOW_COLORS = "NFuse_WindowColors";
static final String COOKIE_MODE_AUDIO_TYPE = "NFuse_IcaAudioType";
static final String COOKIE_MODE_EMBED_METHOD = "NFuse_EmbedMethod";
static final String COOKIE_MODE_JICA_PACKAGES = "NFuse_JavaClientPackages";
static final String COOKIE_MODE_REMEMBER_FOLDER = "NFuse_RememberFolder";
static final String COOKIE_MODE_SHOW_FOLDER = "NFuse_ShowFolder";
static final String COOKIE_MODE_SHOW_ICON = "NFuse_ShowIcon";
static final String COOKIE_MODE_SHOW_NAME = "NFuse_ShowName";
static final String COOKIE_MODE_SHOW_DETAILS = "NFuse_ShowDetails";
static final String COOKIE_MODE_CURRENT_FOLDER = "NFuse_CurrentFolder";
// Session variable names
static final String SV_AUTHENTICATED = "Nfuse_Authenticated";
static final String SV_RECONNECT_LOGIN_DONE = "NFuse_ReconnectAtLoginDone";
static final String SV_APPLIST = "NFuse_AppList";
static final String SV_CURRENT_PAGE_URL = "NFuse_CurrentPageURL";
static final String SV_CURRENT_FOLDER = "NFuse_CurrentFolder";
static final String SV_APPNAME_SET = "NFuse_AppNameSet";
static final String SV_BANDWIDTH = "NFuse_Bandwidth";
static final String SV_LOGON_MODE = "NFuse_LogonMode";
static final String SV_USER = "NFuse_User";
static final String SV_DOMAIN = "NFuse_Domain";
static final String SV_PASSWORD = "NFuse_Password";
static final String SV_PREAUTH_USER = "NFuse_Preauth_User";
static final String SV_PREAUTH_DOMAIN = "NFuse_Preauth_Domain";
static final String SV_PREAUTH_PASSWORD = "NFuse_Preauth_Password";
static final String SV_ERROR = "NFuse_Error";

static final String SV_CLIENT_NAME = "NFuse_ClientName";
static final String SV_CLIENT_INFO = "NFuse_ClientInfo";
static final String SV_ICA_IS_PASS_THROUGH = "NFuse_ICAIsPassThrough";
// Message categories
static final String MSG_ERROR = "Error";
static final String MSG_INFO = "Info";
static final String MSG_WARNING = "Warning";
// Values of buttons
static final String VAL_OK = "ok";
static final String VAL_CANCEL = "cancel";
static final String ICA_CONN_CENTER_HRES = "400";
static final String ICA_CONN_CENTER_VRES = "400";
static final String DEFAULT_ICA_WINDOW_HRES = "640";
static final String DEFAULT_ICA_WINDOW_VRES = "480";
// Values of authentication methods
static final String VAL_EXPLICIT = "Explicit";
static final String VAL_ANONYMOUS = "Anonymous";
static final String VAL_NEVER = "Never";
static final String VAL_ALWAYS = "Always";
static final String VAL_EXPIRED_ONLY = "Expired-Only";
// Values of the connection speed
static final String VAL_BANDWIDTH_NONE = "None";
static final String VAL_BANDWIDTH_HIGH = "High";
static final String VAL_BANDWIDTH_MEDIUM_HIGH = "MediumHigh";
static final String VAL_BANDWIDTH_MEDIUM = "Medium";
static final String VAL_BANDWIDTH_LOW = "Low";
// Values of reconnect at login options

static final String VAL_DISCONNECTED = "Disconnected";
static final String VAL_DISCONNECTED_ACTIVE = "DisconnectedAndActive";
static final String VAL_CHECKED = " checked";
static final String VAL_SELECTED = " selected";
static final String VAL_DISABLED = " disabled";
static final String VAL_AUTO = "Auto";
static final String VAL_ON = "On";
static final String VAL_OFF = "Off";
static final String VAL_NONE = "None";
static final String VAL_JAVACLIENT = "ICA-JavaClient";
static final String VAL_RDP_ACTIVEX = "RDP-ActiveX";
static final String VAL_SEAMLESS = "seamless";
static final String VAL_TRUE = "True";
static final String VAL_FALSE = "False";
static final String VAL_ICO_NOT_PRESENT = "0";
static final String VAL_ICO_OLD = "1";
static final String VAL_ICO_IS_PASS_THROUGH = "2";
static final String VAL_ICO_NOT_PASS_THROUGH = "3";
static final String ID_ACTION = "action";
//================================================
// Constants used by the login page.
//================================================
static final String LOGIN_ENTRY_MAX_LENGTH = "256";
static final String ID_LOGIN_TYPE = "LoginType";
static final String ID_USER = "user";
static final String ID_PASSWORD = "password";
static final String ID_DOMAIN = "domain";
static final String ID_BANDWIDTH = "bandwidth";
static final String ID_RECONNECT_LOGIN = "ReconnectAtLogin";
static final String ID_RECONNECT_LOGIN_OPTION = "ReconnectAtLoginOption";
// The following ids are not used in JSP site but needed for client
// scripts shared with ASPX site
static final String ID_CONTEXT = "context";
static final String ID_TREE = "tree";
static final String ID_PASSCODE = "passcode";
static final String ID_TOKENCODE = "tokencode";
static final String ID_PIN_TYPE = "type";
static final String ID_PIN1 = "PIN1";
static final String ID_PIN2 = "PIN2";
static final String ID_FORM_SETTINGS = "NFuseSettings";
static final String ID_CHECK_REMEMBER_FOLDER = "RememberFolder";
static final String ID_CHECK_SHOW_FOLDER = "ShowFolder";
static final String ID_CHECK_SILENT_AUTHENTICATION = "SilentAuthentication";
static final String ID_CHECK_APP_ICONS = "ApplicationIcon";
static final String ID_CHECK_APP_NAME = "ApplicationName";
static final String ID_CHECK_APP_DESC = "ApplicationDetails";
static final String ID_CHECK_ENABLE_RECONNECT_LOGIN ="chkEnabledReconnectLogin";
static final String ID_RADIO_RECONNECT_LOGIN = "rdGrpReconnectLogin";
static final String ID_RADIO_RECONNECT_DA_LOGIN ="rdGrpReconnectDisconnectedActiveLogin";
static final String ID_RADIO_RECONNECT_DO_LOGIN ="rdGrpReconnectDisconnectedLogin";
static final String ID_CHECK_ENABLE_RECONNECT_BUTTON ="chkEnableReconnectButton";
static final String ID_RADIO_RECONNECT_BUTTON = "rdGrpReconnectButton";
static final String ID_RADIO_RECONNECT_DA_BUTTON ="rdGrpReconnectDisconnectedActiveButton";
static final String ID_RADIO_RECONNECT_DO_BUTTON ="rdGrpReconnectDisconnectedButton";
static final String ID_RADIO_LOGOFF = "rdGrpLogoff";
static final String ID_RADIO_LOGOFF_APPS = "rdGrpLogoffApps";
static final String ID_RADIO_LOGOFF_WIONLY = "rdGrpLogoffWIOnly";

// Constants for icon sizes
static final int ICON_WIDTH = 32;
static final int ICON_HEIGHT = 32;
// Provide an instance of App and PropertiesKeys
static App gApp;
static PropertiesKeys gPropKey;
static String fontFace;
static FarmFactory gFarmFactory;
static boolean appInitialised = false;
/**
* Get the current username, or the empty string if we're not
* authenticated.
*/
String getUsername(HttpSession session) {
String username = "";
if (isAuthenticated(session)) {
username = (String) getStringAttribute(session, SV_USER);
}
return username;
}
/**
* Get the current password, or the empty string if we're not
* authenticated.
*/
String getPassword(HttpSession session) {
String password = "";
if (isAuthenticated(session)) {
password = (String) getStringAttribute(session, SV_PASSWORD);
}
return password;
}
/**
* Get the current domain, or the empty string if we're not
* authenticated.
*/
String getDomain(HttpSession session) {
String domain = "";
if (isAuthenticated(session)) {
domain = (String) getStringAttribute(session, SV_DOMAIN);
}
return domain;
}
/**
* Gets a String attribute from the session, or the empty string if
* the attribute is null.
*/
String getStringAttribute(HttpSession session, String attrName) {
String attrValue = (String) session.getAttribute(attrName);
if (attrValue == null) {
attrValue = "";
}
return attrValue;
}
/**
* Converts the supplied multi-value cookie string (URL Query parameter format)
* into the given hash values.
*
* @param settings multi-value cookie string
* @param hTable hash table in which to place values
*/
void readUserSettings(String settings, Hashtable hTable) {
String next;
int index;
while (settings != null) {
// Get next key/value pair
index = settings.indexOf("&");
if (index >= 0) {
next = settings.substring(0, index);
settings = settings.substring(index + 1);
} else {
next = settings;
settings = null;
}
// Separate key and value
index = next.indexOf("=");
if (index >= 0) {
hTable.put(next.substring(0, index), gApp.unUrlEncode(next.substring(index + 1)));
}
}
}
/**
* Return a javscript fragment to set the user settings cookie. A temporary session
* cookie will be used if the user is anonymous, otherwise the cookie
* will persist between sessions.
*
* @param response the servlet response to add the cookie to.
* @param logonMode the type of authentication being used (Anonymous or Explicit).
* @param settings the String containing the user settings.
*/
String writeUserSettings(HttpServletResponse response, String logonMode, String
settings) {
String settingsCookie = (VAL_ANONYMOUS.equalsIgnoreCase(logonMode)?COOKIE_MODE_ANON: COOKIE_MODE);
return getJavascript("writeUserSettings(\"" + settingsCookie + "\",\"" + settings + "\")");
}
/**
* Return a javascript fragment to set the user settings cookie. A temporary session
* cookie will be used if the user is anonymous otherwise the cookie
* will persist between sessions.

*
* @param response the servlet response to add the cookie to.
* @param logonMode the type of authentication being used (Anonymous or Explicit).
* @param settings the hashtable containing the user settings.
*/
String writeUserSettings(HttpServletResponse response, String logonMode,
Hashtable settings) {
return writeUserSettings(response, logonMode, hashtableToCookieString(settings));
}
/**
* Return a javscript fragment to set the login cookie.
*
* @param response the servlet response to add the cookie to.
* @param settings the String containing the user settings.
*/
String writeLoginCookies(HttpServletResponse response, String settings) {
return getJavascript("writeUserSettings(\"" + COOKIE_LOGIN + "\",\"" + settings + "\")");
}
/**
* Return a javascript fragment to set the user settings cookie.
*
* @param response the servlet response to add the cookie to.
* @param settings the hashtable containing the user settings.
*/
String writeLoginCookies(HttpServletResponse response, Hashtable settings) {
return writeLoginCookies(response, hashtableToCookieString(settings));
}
String hashtableToCookieString(Hashtable settings) {
String settingsValue = "";
Enumeration e = settings.keys();
while (e.hasMoreElements()) {
String key = (String)e.nextElement();

String value = (String)settings.get(key);
if (value != null && value.length() > 0) {
if (settingsValue.length() > 0) {
settingsValue += "&";
}
settingsValue += (key + "=" + gApp.urlEncode(value));
}
}
return settingsValue;
}
/**
* Encode message as a query string and set the logout flag
*
* @param messageType constant describing the type of message
* @param message The text of the message
*
* @result the query string
*/
String getErrorQueryStr(String messageType, String message) {
return getPrefixedMessageQueryStr(QSTR_LOGOUTID + "=" + VAL_ON, messageType,message);
}
/**
* Encode message as a query string
*
* @param messageType constant describing the type of message
* @param message The text of the message
*
* @result the query string
*/
String getMessageQueryStr(String messageType, String message) {
return getPrefixedMessageQueryStr("", messageType, message);
}
String getPrefixedMessageQueryStr(String prefix, String messageType, String message) {

String queryStr = "?" + prefix;
if ((messageType != null) && (messageType.length() > 0)) {
messageType = gApp.urlEncode(messageType);
message = gApp.urlEncode(message);
queryStr += "&" + QSTR_MSG_TYPE + "=" + messageType +
"&" + QSTR_MSG + "=" + message;
}
return queryStr;
}
String getJavascript(String jscript) {
String result;
result = "<script language=\"javascript\">\n";
result = result + "<!--\n";
result = result + jscript + ";\n";
result = result + "//-->\n" + "</script>";
return result;
}
String getClientRedirectScript(String href) {
return getClientRedirectScript(null, href);
}
String getClientRedirectScript(String window, String href) {
String jscript = "";
if (window != null) {
jscript = window + ".";
}
jscript = jscript + "location = \"" + href + "\"";
return getJavascript(jscript);
}
/*
* Function to return the contents of the configuration setting
* LoginDomain as a Vector of strings.
*/
Vector getLoginDomains() throws PNException {
Vector domainNames = new Vector();
int domainListUPB = 0;
String domainStr = gPropKey.getProperty(GlobalConf.ConfKey_LoginDomains);
StringTokenizer st = new StringTokenizer(domainStr, ",");
while (st.hasMoreTokens()) {
String domain = st.nextToken().trim();
if (domain.length() > 0) {
domainNames.addElement(domain);
}
}
return domainNames;
}
boolean isAuthenticated(HttpSession session) {
boolean result = false;
if (session.getAttribute(SV_AUTHENTICATED) != null) {
result = ((Boolean) session.getAttribute(SV_AUTHENTICATED)).booleanValue();
}
return result;
}
boolean isBandwidthSelected(HttpSession session) throws PNException {
String bandwidth = (String) session.getAttribute(SV_BANDWIDTH);
return VAL_ON.equalsIgnoreCase(gPropKey.getProperty(GlobalConf.ConfKey_AllowBandwidthSelection)) && (bandwidth != null) && (bandwidth.length() != 0) && (! bandwidth.equals(VAL_BANDWIDTH_NONE));
}
/**
* Checks whther Workspace Control is enabled.
*/
boolean isWorkspaceControlEnabled(HttpSession session, Hashtable hTable, int icaObjectCodeInt)
throws PNException {
boolean result = false;
if (VAL_ON.equalsIgnoreCase(gPropKey.getProperty(GlobalConf.ConfKey_EnableWorkspaceControl))) {
// It is enabled in the configuration file, checks whether we are

// running in a pass-through mode.
String client = getClient(getEmbedMethod(session, hTable), icaObjectCodeInt);
ClientInfo sClientInfo = (ClientInfo) session.getAttribute(SV_CLIENT_INFO);
String icaIsPassThrough = sClientInfo.osPocketPC() ? VAL_ICO_NOT_PASS_THROUGH
: getStringAttribute(session, SV_ICA_IS_PASS_THROUGH);
if (VAL_ICO_NOT_PRESENT.equals(icaIsPassThrough)) {
// ICO is not present, we check whether we are using Java
// Client. If we are, we enable Workspace Control.
result = VAL_JAVACLIENT.equalsIgnoreCase(client);
} else {
// We are not running in pass-through, enable Workspace
// Control, except when using the RDP client.
result = VAL_ICO_NOT_PASS_THROUGH.equals(icaIsPassThrough)
&& (!VAL_RDP_ACTIVEX.equalsIgnoreCase(client));
}
}
return result;
}
AppDataList getAppList(HttpSession session, HttpServletRequest request, String logonMode,JspWriter out)
throws PNException, IOException {
Credentials credentials = getCredentials(session, logonMode);
AppDataList appList = null;
FarmProxy farmProxy = gFarmFactory.createFarmProxy();
String errorQueryStr = null;
if (farmProxy != null) {
if (farmProxy.initializeFarm(credentials)) {
farmProxy.setClientAddress(getClientAddress(request));
farmProxy.setClientAddressType("dot");
farmProxy.setClientName((String) session.getAttribute(SV_CLIENT_NAME));
appList = farmProxy.getAppDataList();
}
if (appList == null) {

String allowChangePassword = gApp.allowUserChangePassword();
boolean bChangePassword = allowChangePassword.equalsIgnoreCase(VAL_ALWAYS)
|| allowChangePassword.equalsIgnoreCase(VAL_EXPIRED_ONLY);
if ( ("CharlotteErrorCredentialsExpired".equalsIgnoreCase(farmProxy.getLastErrorId())
|| "CharlotteErrorCredentialsMustChange".equalsIgnoreCase(farmProxy.getLastErrorId()) )
&& VAL_EXPLICIT.equalsIgnoreCase(logonMode) && bChangePassword) {
out.println(getClientRedirectScript(PAGE_CHANGE_PASSWD + getMessageQueryStr(MSG_INFO, farmProxy.getLastError())));
} else {
errorQueryStr = getErrorQueryStr(MSG_ERROR, farmProxy.getLastError());
}
session.setAttribute(SV_AUTHENTICATED, Boolean.FALSE);
}
} else {
session.setAttribute(SV_AUTHENTICATED, Boolean.FALSE);
errorQueryStr = getErrorQueryStr(MSG_ERROR, gFarmFactory.getLastError());
}
if (errorQueryStr != null) {
out.println(getClientRedirectScript("top", PAGE_FRAMESET + errorQueryStr));
}
return appList;
}
Credentials getCredentials(HttpSession session, String logonMode) {
Credentials credentials = null;
if (logonMode.equalsIgnoreCase(VAL_EXPLICIT)) {
String user, domain, password;
if (isAuthenticated(session)) {
user = (String) session.getAttribute(SV_USER);
domain = (String) session.getAttribute(SV_DOMAIN);
password = (String) session.getAttribute(SV_PASSWORD);
} else {

user = (String) session.getAttribute(SV_PREAUTH_USER);
domain = (String) session.getAttribute(SV_PREAUTH_DOMAIN);
password = (String) session.getAttribute(SV_PREAUTH_PASSWORD);
}
ClearTextCredentials expCredentials = new ClearTextCredentials();
expCredentials.initialize(user, domain, password);
expCredentials.setDomainType("NDS"); credentials = expCredentials;
} else {
AnonCredentials AnonCredentials = new AnonCredentials();
credentials = AnonCredentials;
}
return credentials;
}
boolean bIsReconnectAtLoginDone(HttpSession session) {
boolean result = false;
if (session.getAttribute(SV_RECONNECT_LOGIN_DONE) != null) {
result = ((Boolean) session.getAttribute(SV_RECONNECT_LOGIN_DONE)).booleanValue();
}
return result;
}
String getReconnectFrameUrl(HttpSession session) {
String result = "html/timeoutrefresh.html";
String logonMode = (String) session.getAttribute(SV_LOGON_MODE);
if (isAuthenticated(session) && (! logonMode.equals(VAL_ANONYMOUS))
&& (! bIsReconnectAtLoginDone(session))) {
result = PAGE_RECONNECT + "?" + QSTR_LOGINID + "=" + gApp.urlEncode(VAL_ON);
}
return result;
}
/**
* Function to find the method for embedding defined by the user/admin

*
* @param propKey global property keys object
* @param hTable hash table of client settings
* @returns "", "JavaClient", "auto"
*/
public String getEmbedMethod(HttpSession session, Hashtable hTable)
throws PNException
{
String client = "ica-local";
ClientInfo clientInfo = (ClientInfo) session.getAttribute(SV_CLIENT_INFO);
if (!clientInfo.osPocketPC()) {
boolean bOverrideClient = gPropKey.getProperty(GlobalConf.ConfKey_AllowCustomizeClients).equalsIgnoreCase("on");
boolean validUserClient = false;
String userClient = (String)hTable.get("NFuse_LaunchMethod");
String adminClient = gPropKey.getProperty(GlobalConf.ConfKey_LaunchMethod);
String AllowedClients = gPropKey.getProperty(GlobalConf.ConfKey_LaunchClients);
// Validate the admin client, if not default to 'ica-Local'.
if (!validateClientType(adminClient)) {
adminClient = "ica-local";
}
if (bOverrideClient) {
// Validate the user client.
if (validateClientType(userClient)) {
StringTokenizer st = new StringTokenizer(AllowedClients, ",");
while (st.hasMoreTokens()) {
String validClient = st.nextToken().trim();
if (validClient.equalsIgnoreCase(userClient)) {
validUserClient = true;
break;
}
}
}
}
if (!bOverrideClient) {

//User is not allowed to override default to the admin client.
client = adminClient;
} else {
if (validUserClient) {
//User is allowed to override and their client is valid so use that.
client = userClient;
} else {
//User is allowed to override but their client is not valid so use the admin client.
client = adminClient;
}
}
}
//Ensure the currently selected client is valid for the OS and browser.
client = validClientForOS(session, client);
return client.equalsIgnoreCase("ica-local") ? "" : client;
}
public boolean validateClientType(String clientType) {
boolean valid = false;
if (clientType!=null) {
if (clientType.equalsIgnoreCase("ica-local") || clientType.equalsIgnoreCase("ica-embedded") ||
clientType.equalsIgnoreCase("ica-java") || clientType.equalsIgnoreCase("rdp-embedded")) {
valid = true;
}
}
return valid;
}
public String validClientForOS(HttpSession session, String clientType) {
String validClient = clientType;
ClientInfo clientInfo = (ClientInfo) session.getAttribute(SV_CLIENT_INFO);

//Only allow the RDP Embedded client on Windows + IE.
if ((!clientInfo.osWin32()) || (!clientInfo.isIE())) {
if (clientType.equalsIgnoreCase("rdp-embedded")) {
validClient = "ica-java";
}
}
//Only allow applications to be launched with the java client on Mac + Safari.
if (clientInfo.osMac() && clientInfo.isSafari()) {
validClient = "ica-java";
}
return validClient;
}
/**
* Checks whether to applications should be launched in embedded mode.
*/
public boolean bEmbedApps(HttpSession session, Hashtable hTable) throws PNException {
boolean result = true;
String embedMethod = getEmbedMethod(session, hTable);
if (embedMethod==null || embedMethod.equals("")) {
result = false;
}
return result;
}
public String getClientAddress(HttpServletRequest request) {
return request.getRemoteAddr();
}
public String getWorkspaceControlMessageType(String msgId) {
return (msgId.equalsIgnoreCase(PNException.ErrorId_WorkspaceControlReconnectNotSupportedOrTrusted)

|| msgId.equalsIgnoreCase(PNException.ErrorId_WorkspaceControlDisconnectNotSupportedOrTrusted)
|| msgId.equalsIgnoreCase(PNException.ErrorId_WorkspaceControlLogoffNotSupportedOrTrusted)
|| msgId.equalsIgnoreCase(PNException.ErrorId_WorkspaceControlReconnectPartial)
|| msgId.equalsIgnoreCase(PNException.ErrorId_WorkspaceControlDisconnectPartial)
|| msgId.equalsIgnoreCase(PNException.ErrorId_WorkspaceControlLogoffPartial))
? MSG_WARNING : MSG_ERROR;
}
public void sendRelativeRedirect(HttpServletResponse response, String location) {
response.setStatus(HttpServletResponse.SC_MOVED_TEMPORARILY);
response.setHeader("Location", location);
}
%>
<%@ include file="embed.js" %>
Changes to: wi/WEB-INF/webinterface.confThe other file that needs changing is webinterface.conf. This file is used to hold the settings thatWeb Interface uses.
# The UnrestrictedSessionFields property controls which session fields can
# be set by user supplied data. All session fields can be made unrestricted
# by commenting out this property.
UnrestrictedSessionFields=NFuse_Application,NFuse_AppCommandLine,NFuse_User,NFuse_Domain,NFuse_Password,NFuse_LogonMode,NFuse_ClientName,NFuse_WindowType,NFuse_WindowWidth,NFuse_WindowHeight,NFuse_WindowScale,NFuse_WindowColors,NFuse_EncryptionLevel,NFuse_ICAAudioType,NFuse_SoundType,NFuse_VideoType,NFuse_COMPortMapping,NFuse_ClientPrinting, NFuse_HostId, NFuse_HostIdType, NFuse_SessionId, NFuse_Template
SessionFieldLocations=PNAgent,Script,Template,Properties,Url,Post,Cookie
Timeout=60
Version=3.0
AlternateAddress=Off
CacheExpireTime=3600
SessionField.NFuse_TicketTimeToLive=200
AllowCustomizeWinSize=On
AllowCustomizeWinColor=Off
AllowCustomizeAudio=Off
AllowCustomizeSettings=On

AddressResolutionType=IPv4-port
OtherClient=default
#OverrideClientInstallCaption=[Place your text here]
Win32Client=default
Win16Client=default
SolarisUnixClient=default
MacClient=default
SgiUnixClient=default
HpUxUnixClient=default
IbmAixClient=default
ScoUnixClient=default
Tru64Client=default
LinuxClient=default
LoginType=NDS
LoginDomains=OES-TREE#RestrictDomains=Off
#HideDomainField=On
#UPNSuffixes=[Place your UPN suffixes here]
#NDSTreeName=OES-TREE
#SearchContextList=[NDS context1, NDS context2, ...]
AuthenticationMethods=Explicit
#ClientAddressMap=[clientAddress,AddressType,clientAddress,AddressType,...]
#ServerAddressMap=[normalAddress,translatedAddress,normalAddress,translatedAddress,...]
#InternalServerAddressMap=[normalAddress,translatedAddress,normalAddress,translatedAddress,...]
#ClientProxy=[clientAddress,proxyType,proxyAddress,clientAddress,proxyType,proxyAddress,...]
EnableSTALoadBalancing=On
AllowUserPasswordChange=never
AutoDeployWebClient=Off
IcaWebClientVersion=8,0,24737,0
RdpWebClientVersion=5,2,3790
RdpWebClientClassID=7584c670-2274-4efb-b00b-d6aaba6d3850
IcaWebClient=wficat.cab
RdpWebClient=msrdp.cab
IcaWebClientClassID=238f6f83-b8b4-11cf-8771-00a024541ee3
ShowClientInstallCaption=Auto
RequestICAClientSecureChannel=Detect-AnyCiphers

LaunchClients=Ica-Local,Ica-Java,Ica-Embedded
LaunchMethod=Ica-Local
AllowCustomizeClients=Off
JavaClientPackages=ConfigUI,PrinterMapping,SecureICA
AllowCustomizeJavaClientPackages=Off
IgnoreClientProvidedClientAddress=Off
AdditionalExplicitAuthentication=None
SessionField.NFuse_Farm1=192.168.10.251,Name:farm1,XMLPort:8090,Transport:HTTP,BypassDuration:60,LoadBalance:On
EnableLegacyICAClientSupport=On
ReconnectAtLogin=DisconnectedAndActive
AllowCustomizeReconnectAtLogin=On
ReconnectButton=DisconnectedAndActive
AllowCustomizeReconnectButton=On
EnableLogoffApplications=On
AllowCustomizeLogoff=On
EnableWorkspaceControl=On
The only section altered in this file is the LoginDomains=OES-TREE. When Citrix is integratedwith Novell, the domain becomes the eDirectory tree name: in this case, “OES-TREE”.
Citrix Web Interface 4.0
IntroductionWith the release of Citrix Presentation Server 4.0, the Novell Client is no longer required to providecontextless lookup from eDirectory. However, this is currently true only with regard to IIS and theWindows platform.
ConfigurationAs with the earlier versions of Web Interface, the configuration file is called webinterface.conf andis held in the c:\inetpub\wwwroot\citrix\metaframe\conf directory on the Windows 2000/2003Server. This Web application requires .NET installed and updated if necessary. WithinwebInterface.conf four entries refer explicitly to the Novell integration configuration:
LoginType=NDSThis statement sets up the instance of Web Interface to support eDirectory authentication.
NDSContextLookupServers=ldap://192.168.10.250This statement points the Web Interface server at one or more Novell LDAP servers toprovide the back end for the lookup of a user's context. More than one server can be addedto the list.
NDSContextLookupLoadbalancing=On

If more than one LDAP source is selected, this statement ensures that requests are splitbetween them.
NDSTreeName=oes-treeThis line sets the eDirectory tree name for the Web server.
This functionality makes use of an anonymous bind to authenticate to the directory. Caremust be taken to check that the public trustee grants enough information for this bind tosucceed but is also limited so that important information about the users is not leaked fromthe Web Interface server.

Novell Identity Manager 2 and Citrix MetaFrame PresentationServer
IntroductionNovell Identity Manager 2 is a powerful and far-reaching technology that enables eDirectory to beused as a metadirectory source for many different operating systems and applications. In the contextof a Citrix implementation, Identity Manager 2 could completely change how the technology isdeployed and implemented.
The Citrix Authentication Tree (CAT)
IntroductionIn a medium- to large-sized company, eDirectory will be partitioned and replicated to separategeographical locations. Corporate implementations may run multiple versions of the serveroperating system and directory service. There is little opportunity to upgrade the server OS andhardware without directly impacting the line-of-business corporate environment. These conditionscould make Citrix integration to the corporate tree unworkable.
For example, Citrix farms tend to be based at one geographic location. Farms split over multiplesites occur only within the largest installations. This setup could end up at odds with ageographically dispersed, heavily hierarchical corporate Novell directory environment.
A Citrix authentication tree, synchronized to the corporate environment using Identity Manager 2, isa possible solution. The solution allows the Citrix tree to exist at limited geographic locations andchanges the corporate environment only minimally to support the synchronization of accountinformation (including passwords) between trees. Administrators can provision a user account withCitrix applications from within the corporate tree. Identity Manager 2 would then synchronize thechanged information to the Citrix tree.
Challenges of the Solution
Access to Corporate Tree ResourcesEven though a user is authenticating to Citrix via the Citrix tree, there may still be a requirement toaccess corporate tree resources such as mapped drives and printers.
Access to Corporate Tree Mapped DrivesThe user login script in the Citrix tree can be made to reference the corporate tree via the TREEcommand. This command can take an eDirectory user attribute as a parameter. Identity Manager 2creates the attribute when the user is created, and holds the context of the user in the corporateeDirectory. When used as a parameter to the TREE command, this information allows the user toauthenticate transparently to the corporate tree from within the Citrix session.
The TREE command is always supplied in pairs. The first command switches the context of thelogin script to the corporate tree. Any environment variables used, such as %HOMEDIRECTORY%, would refer to the user's home directory within the corporate tree. The TREEcommand enables the user's environment to appear the same from within the thin-client session andfrom the normal workstation.

Access to corporate tree resources can also be managed by group so that no mappings take place ifthe user is not a member. This puts another layer of security between a user and the corporate tree.
Another advantage of this solution is that the profile directory for the Citrix server/Terminal Serverconnection is held within the flat authentication tree rather than the corporate tree. Since the AUTHtree is at the same physical location as the Citrix server farm, users will never have to pull theirroaming profile from a server that is remote from the Citrix server hosting their session. And freedfrom holding any Terminal Server profiles, the corporate tree is left responsible only for providing aCitrix user with their normal drive mappings.
Access to Corporate Tree PrintersMany printers in a corporate environment are connected by a dedicated print server box. Thisenables iPrint from the Citrix tree to refer to already installed printers within the corporate treeusing Line Printer Remote/Line Printer Daemon (LPR/LPD)-type functionality. It would also enableyou to limit the scope of network printers available from the thin-client session.
Provisioning Users and ApplicationsUsing Identity Manager 2 functionality, users and their attributes can be synchronized from one treeto another in accordance with pre-defined business rules. This synchronization includes allpassword-related information. Thus, you can manage users purely from within the corporate tree.
Groups can be synchronized in a similar manner. You can create a Citrix Access group andindividual groups to grant access to applications just within the corporate tree. This Citrix Accessgroup would only allow the creation of a synchronized corporate tree user within the Citrix tree ifthe user was a member of the group. Access to applications would operate the same way.
Application objects would be the most difficult to manage. You would have to create a Citrixpublished application within the Citrix tree. Within the corporate tree, you would create aZENworks application from an application template object (as described in the “Building a BetterMousetrap” section) and point that at the Citrix published application.
Benefits of the SolutionIf the corporate environment requires extensive directory service and OS version updates,implementing an Identity Manager 2 synchronized solution would significantly reduce the amountof work involved. Many companies' corporate trees provision critical line-of-business applications,and customers are justifiably wary of extensive changes.
Also, as discussed earlier, many corporate trees are geographically replicated and partitioned,whereas a Citrix farm tends to be based at one location. Although many Citrix farms have beensuccessfully integrated with existing corporate trees, the structure of the existing tree may not bebest suited to the integration. The CAT solution can markedly improve the outcome.
The other big benefit of the solution is that users in the CAT are in a much flatter structure than thecorporate tree. As such, the Citrix servers could be hard coded to look at one particular context onlyfor all user authentication.
If the requirement is also to allow external access to the Citrix farm from the Internet, thisarchitecture can provide another layer of security for users from the outside world. Users will onlymake a connection to corporate tree resources if they have first successfully authenticated to theCitrix tree and also have the group memberships required for corporate tree authentication to takeplace.
The CAT also breaks the one-to-one link between Citrix farms and eDirectory. In the past, if youhad two trees you would require two farms. Now, any number of separate eDirectory trees can talk

to the one Citrix authentication tree.
Synchronization of ZENworks 7 Desktop ManagementApplication Objects to Citrix Published Applications
IntroductionThis section of the document details a work in progress that should be finished in late 2005. Thenew functionality will use Identity Manager 2 to link eDirectory to the Citrix IndependentManagement Architecture (IMA) data store. This will enable the majority of applicationmanagement operations to be carried out through ConsoleOne.
This work is based on a custom-produced Identity Manager 2 driver that allows information to bestripped from an eDirectory event and used as parameters for a defined command on the remotesystem. The driver is Java based, and as such is not just applicable to Windows systems.
The custom driver is triggered by defined eDirectory events. Those events can call custom code on aCitrix server that is part of the farm. The custom code is based on VBScript calling MFCOM, whichis the Citrix server-side application programming interface (API). This API exposes almost all ofthe management functionality available through the Citrix Management Console. The end result isthat creating an object in eDirectory can automatically create and manage a Citrix publishedapplication. The other components of this solution are:
1. Schema extensions to handle Citrix published application properties, a Citrix farm objectand a Citrix server object
2. A ConsoleOne snap-in written using the advanced snap-in tool that is freely downloadablefrom Novell Cool Solutions*
Managing Citrix Through ConsoleOneThrough an auxiliary class placed on the ZENworks 7 Desktop Management application object,Citrix published application information is held on that object and subsequently synchronized toCitrix with Identity Manager 2.
Creation of a New Published ApplicationTo create a new published application, you use the standard process for creating a ZENworks 7Desktop Management application object. Select “Create New Application” from the taskbar inConsoleOne.

You create the application as a simple application and not as a Terminal Server application.
The name of the object also serves as the Citrix published application name.
Figure 33: Create a new application objectFigure 34: Create a simple application
Figure 35: Name the application

The application object is associated in the same way as any other ZENworks 7 DesktopManagement application object. The synchronized Citrix published application will have the sameassociations.
Once you click “Finish” on the final screen, examine the newly created application object. At thispoint it is just an empty object assigned to a container in eDirectory. For the object to besynchronized to Citrix, you need to fill in the published application information.
The previous screen shot shows the Citrix published application snap-in created with theConsoleOne advanced snap-in tool. You can enter Citrix-specific attributes to manage andsynchronize the object. If you click the “add” button in the dialog box for assigned servers, thefollowing dialog box is displayed:
This dialog box shows the Citrix farm and the servers that exist within the farm. All of theseobjects ar defined in eDirectory with two schema extensions.
Figure 36: Set application associations
Figure 37: Custom properties
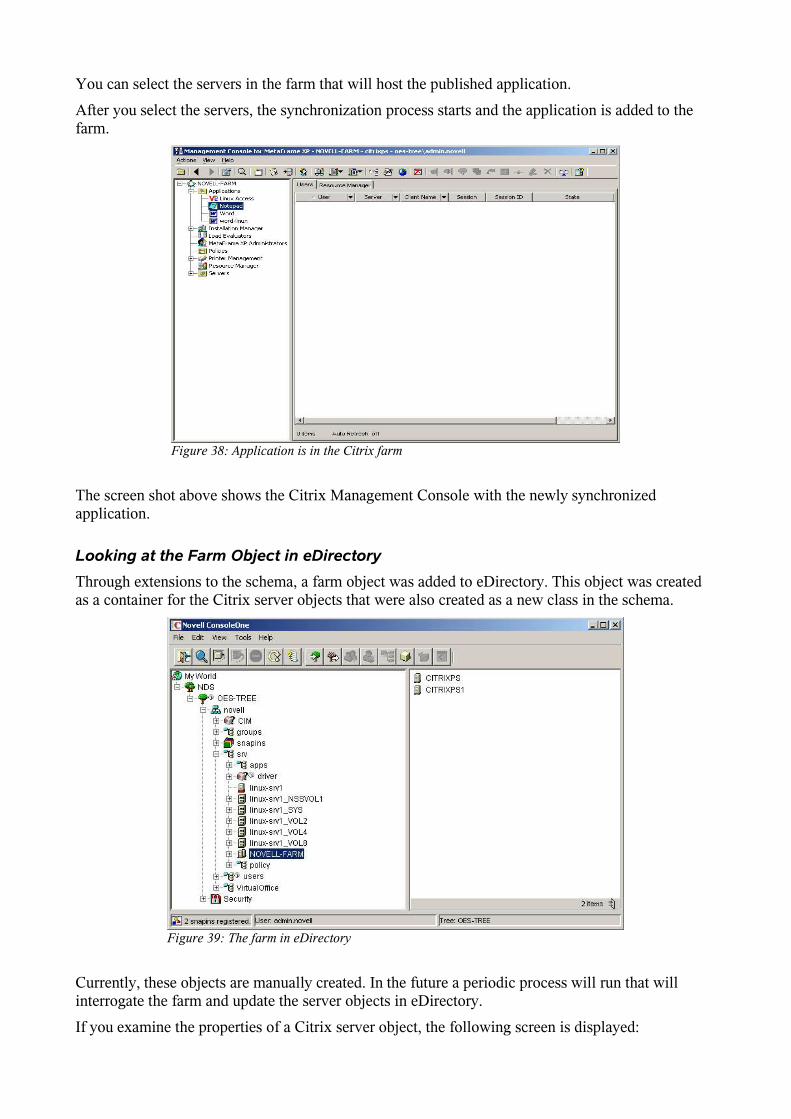
You can select the servers in the farm that will host the published application.
After you select the servers, the synchronization process starts and the application is added to thefarm.
The screen shot above shows the Citrix Management Console with the newly synchronizedapplication.
Looking at the Farm Object in eDirectoryThrough extensions to the schema, a farm object was added to eDirectory. This object was createdas a container for the Citrix server objects that were also created as a new class in the schema.
Currently, these objects are manually created. In the future a periodic process will run that willinterrogate the farm and update the server objects in eDirectory.
If you examine the properties of a Citrix server object, the following screen is displayed:
Figure 38: Application is in the Citrix farm
Figure 39: The farm in eDirectory

This screen shows the published applications assigned to a particular server, and allows the removalof a published application from a server. Also, notice the “Server Enabled” field. Changing thisfield to “False” will disable the server of the same name in the Citrix farm. Enabling option willthen enable the Citrix server at the back end.
Practical Benefits of Synchronization from eDirectory to Citrix
IntroductionA colleague within Novell Consulting® had this to say about the work described here:
“Cool, but what does it actually mean?” This section is an attempt to answer that particular question.
Ease of AdministrationConsoleOne becomes a standard front end for the helpdesk. The Citrix Management Console issubstantially less critical than before for day-to-day helpdesk personnel.
One Object for Both EnvironmentsBy combining these instructions with the section on launching applications, you can use the sameZENworks 7 Desktop Management object to control both how Novell Application Launcherdisplays the application and how Citrix Web Interface displays and executes the application.
Novell eDirectory for Farm Fault ToleranceBecause the objects held in eDirectory synchronized one way from eDirectory to the Citrix farm, thefollowing is possible:
If the farm is destroyed, a clean farm can be rebuilt, and the Identity Manager 2 driver can re-synchronize. This puts all of the published application definitions back as they were, with thecorrect user assignments.
NAL/MyApps as a Multi-Farm Application LauncherBecause the farm is an object in eDirectory, the possibility of multi-farm support also arises. Therewould be one instance of the Identity Manager 2 driver per farm, allowing Novell Application
Figure 40: Citrix server properties in ConsoleOne

Launcher to display and execute published applications from multiple farms.
Eradicate Some of the Citrix/Novell Integration IssuesWithout Identity Manager 2, the following issue can arise in a Novell integrated farm:
A Citrix published application is assigned an eDirectory group to identify the users of the publishedapplication. This eDirectory group is later moved or deleted. The farm cannot resolve the changeand so can only make the entry invalid. This is shown through the Citrix Management Console withan assignment made up of question marks. With Identity Manager 2 the deletion of the group is anevent that eDirectory picks up on and flags to the Identity Manager 2 driver. The driver then forcesthe access control list on the back-end Citrix application to be rewritten using eDirectory as thelegitimate source. eDirectory has in-built referential integrity, which means that any object beingmoved or deleted is automatically resolved by the system. This capability can enforce the correctresolution of object moves/deletions that are used to assign users to Citrix published applications.

Citrix and Its Role in a Linux Desktop MigrationCitrix provides a tried and trusted method of distributing Win32 applications to multiple clientarchitectures. You can then run these applications from a Linux desktop in a completely manageableand secure manner. Although there are tools based on the Wine toolkit, which would allow the“native” running of some Win32 applications under Linux, these tools bring with them their ownproblems.
Using Wine/CrossOver Office, it can be complicated or impossible to get a particular Win32application working on one machine. If and when that happens, you still have to manage multipleinstallations of a complex product over perhaps hundreds of separate Linux desktops.
Citrix in this environment would allow you to use a Web browser such as Mozilla* Firefox toauthenticate to the Citrix Web Interface server and then select the published application to whichusers are entitled. This has little impact on the local desktop outside of requiring the installation ofthe Citrix ICA client, which can be auto-installed from the Citrix Web server.
There will always be some specialist/custom Win32 applications that will never be ported to Linux,and normally these applications are critical to a company's function. Citrix would allow the Linuxdesktop users access to these applications without also requiring the management of complicatedsoftware on the desktop machines.

ConclusionCorrect integration of the Citrix and Novell technologies does provide a functionally rich andpowerful solution. Due to the strength of eDirectory and the supporting product set, integration canprovide functionality over and beyond that provided by a pure Active Directory environment.However, it is important to understand that the deployment of a Novell integrated farm does notexclude any Microsoft technology: Active Directory can still be a part of the farm for applicationsthat have that authentication requirement. The choice of a Novell integrated solution does not tie theenvironment to any particular platform. Much of the Novell technology mentioned is available on anumber of different hardware platforms.

Appendix A: Visual Basic Scripts
Scripts for Iprint Integration
PrnSelect.cmd@ECHO OFF
z:
wscript z:removeprn.vbs
cmd /c z:client.cmd
wscript z:test.vbs %var%
Removeprn.vbs' VBScript.
Set Sh = CreateObject("WScript.Shell")
key = "HKEY_CURRENT_USER\ENVIRONMENT\NCSLocation"
readkey=sh.RegRead(key)
if (readkey<>"NotFound") then
' WScript.Echo readkey
prm=split(readkey,"\")
' wscript.echo prm(0)
Set WshShell=WScript.CreateObject("WScript.Shell")
' WScript.Echo "iprntcmd http://"&prm(0)+":631/ipp/"&prm(1)+" /remove"
WshShell.Run "iprntcmd http://"&prm(0)+":631/ipp/"&prm(1)+" /remove"
end if
Client.cmdicaclientinfo>%tmp%\list.cfg
setx var -f %tmp%\list.cfg -a 14,1

TEST.VBS
Dim strIPClient, strIPClientBinString, strIPClientSubnetDim strIPLocationBinString, strIPLocationSubnet
Dim strSubnetMask, strSubnetMaskBinString
' Read the argument passed into the script containing the client IP address
' Set objArgs = WScript.Arguments
Set Sh = CreateObject("WScript.Shell")
key = "HKEY_CURRENT_USER\ENVIRONMENT\var"
readkey=sh.RegRead(key)
'wScript.Echo readkey
vArgs = Split(readkey, ":")
strIPClient = vArgs(1)
' WScript.Echo strIPClient
'strIPClient = "10.1.103.45" 'yes
'strIPClient = "10.1.104.1" 'no
' Convert the client IP address to binary
strIPClientBinString = AddressToBinString(strIPClient)
Dim fsoObject, open_file
Dim i, j
Dim vTable(9,2) ' Declare array of 10 rows and 3 colums
' Read a file containing a list of physical location IP addresses
Set fsoObject = CreateObject("Scripting.FileSystemObject")
Set open_file = fsoObject.OpenTextFile("z:\sevica.ini", 1)
i = 0
Do While False = open_file.AtEndOfStream
'WScript.Echo(open_file.ReadLine())
vArray = Split(open_file.ReadLine(), ",")
For j = 0 to UBound(vArray)

' WScript.Echo vArray(j)
vTable(i,j) = vArray(j)
Next
i = i + 1
Loop
open_file.Close
Set open_file = Nothing
Set fsoObject = Nothing
Dim WshShell
Dim bFound, k, intPos
Set WshShell = CreateObject("WScript.Shell")
bFound = False
For k = 0 to i - 1
' Convert the physical location IP address to binary
strIPLocationBinString = AddressToBinString(vTable(k,0))
' Convert the subnet mask to binary
strSubnetMaskBinString = AddressToBinString(vTable(k,2))
' Number of binary bits for subnet comparsion
intPos = InStr(strSubnetMaskBinString, "0") - 1
' WScript.Echo intPos
' Extract the IP client subnet value
strIPClientSubnet = Left(strIPClientBinString, intPos)
' WScript.Echo "IPClientSubnet = " & strIPClientSubnet
' Extract the physical location IP subnet value
strIPLocationSubnet = Left(strIPLocationBinString, intPos)
' WScript.Echo "IPLocationSubnet = " & strIPLocationSubnet
' Set the environment variable for NCSLocation
'If CompareIPClientToIPLocation(strIPClientSubnet, strIPLocationSubnet) Then

If strIPClientSubnet = strIPLocationSubnet Then
WScript.Echo "Found"
WshShell.RegWrite "HKEY_CURRENT_USER\ENVIRONMENT\NCSLocation", vTable(k,1), "REG_SZ"
bFound = True
Exit For
End If
Next
If Not bFound Then
WScript.Echo "Not Found"
WshShell.RegWrite "HKEY_CURRENT_USER\ENVIRONMENT\NCSLocation", "NotFound","REG_SZ"
End If
Set WshShell = Nothing
Function DecToBin(intDec)
' This function converts a decimal value to a string containing a binary respresentation of thevalue.
' It is limited to a maximum value of 65536 (1111 1111 1111 1111 in binary).
' This maximum can be changed by setting the intExp initial value.
Dim strResult
Dim intExp
strResult = ""
intExp = 65536
While intExp >= 1
If intDec >= intExp Then
intDec = intDec - intExp
strResult = strResult & "1"
Else
strResult = strResult & "0"
End If
IntExp = IntExp / 2
Wend

' The maximum value is 255 so take the last 8 binary bits.
strResult = Right(strResult, 8)
DecToBin = strResult
End Function
Function AddressToBinString(strValue)
' This function converts an address value to a string containing a binary respresentation of thevalue.
Dim strResult, vArray
strResult = ""
vArray = Split(strValue, ".")
For intIndex = 0 to UBound(vArray)
strResult = strResult & DecToBin(CInt(vArray(intIndex)))
Next
AddressToBinString = strResult
End Function
Function CompareIPClientToIPLocation(strIPClientSubnet, strIPLocationSubnet)
' This function checks if the IP client subnet is same as the IP physical location subnet.
If strIPClientSubnet = strIPLocationSubnet Then
CompareIPClientToPhysicalLoc = True
Else
CompareIPClientToPhysicalLoc = False
End If
End Function

Sample Sevica.ini File192.168.11.0,linux-srv1\testprinter,255.255.255.0
192.168.10.0,linux-srv1\hp-laser-site2,255.255.255.0
Script for Ifolder Integration
Netdrive.vbs' VBScript.
Set objArgs = Wscript.Arguments
user=objArgs(0)
' WScript.echo user
Set Sh = CreateObject("WScript.Shell")
Set WshShell=WScript.CreateObject("WScript.Shell")
On Error Resume Next
key = "HKEY_CURRENT_USER\Software\RiverFront\WebDrive\Connections\Ifolder\URL"
readkey=sh.RegRead(key)
if Err.Number <>0 then
' WScript.Echo "Registry key does not exist"
WshShell.Run "regedit /s /i z:\netdrive.reg"
WshShell.RegWrite"HKCU\Software\RiverFront\WebDrive\Connections\Ifolder\UserName", user, "REG_SZ"
else
' WScript.Echo "Registry key does exist so netdrive is not added"
end if
On Error Goto 0
Novell, ZENworks, NetWare, and ConsoleOne are registered trademarks; Novell Consulting is a registered servicemark; and eDirectory, Novell Client, Novell Distributed Print Services, and SUSE are trademarks of Novell, Inc. in theUnited States and other countries. *Linux is a registered trademark of Linus Torvalds. Citrix and MetaFrame areregistered trademarks of Citrix Systems, Inc. Microsoft, Windows, WindowsNT and WIN32 are registered trademarks;Active Directory is a trademark of Microsoft Corporation. WINS is a trademark of the Wollongong Group, Inc. Java isa registered trademark; JavaScript is a trademark of Sun Microsystems, Inc. Crossover Office is a registered trademarkof CodeWeavers, Inc. Mozilla is a trademark of Netscape Communications Corporation. All other third partytrademarks are the property of their respective owners.
