using microsoft word 2010 to create a legal research...
TRANSCRIPT

© Dianne Harrison Ferro Mesarch
Using Microsoft Word 2010 to Create a Legal Research Paper
SETTING DEFAULT FONTS AND LINE SPACING ................................................................................................................................... 2
CHANGING YOUR DEFAULT FONT ........................................................................................................................................................... 2
CHANGING YOUR DEFAULT LINE SPACING ................................................................................................................................................. 3
LISTS, INDENTATIONS, TABS AND THE RULER .................................................................................................................................... 4
CREATING A BULLETED OR NUMBERED LIST ............................................................................................................................................... 4
INDENTING PARAGRAPHS ..................................................................................................................................................................... 4
ADDING A TAB ................................................................................................................................................................................... 4
USING THE RULER TO BLOCK TEXT AND CUSTOMIZE INDENTS ........................................................................................................................ 5
INSERTING PAGE NUMBERS .............................................................................................................................................................. 6
MODIFYING PAGE NUMBERS ................................................................................................................................................................. 7
DELETING PAGE NUMBERS ................................................................................................................................................................... 7
INSERTING HEADERS OR FOOTERS .................................................................................................................................................... 8
MODIFYING HEADERS OR FOOTERS ......................................................................................................................................................... 9
DELETING HEADERS OR FOOTERS ............................................................................................................................................................ 9
INSERTING DIFFERENT TYPES OF PAGE NUMBERS ON DIFFERENT PAGES ........................................................................................ 10
INSERTING A SECTION BREAK ............................................................................................................................................................... 10
ADDING DIFFERENT TYPES OF PAGE NUMBERS TO DIFFERENT SECTIONS......................................................................................................... 11
INSERTING FOOTNOTES AND ENDNOTES ........................................................................................................................................ 12
INSERTING FOOTNOTES ...................................................................................................................................................................... 12
INSERTING ENDNOTES........................................................................................................................................................................ 12
EDITING THE TEXT WITHIN YOUR NOTES ................................................................................................................................................. 13
CONVERTING NOTES ......................................................................................................................................................................... 13
DELETING NOTES.............................................................................................................................................................................. 13
CREATING A TABLE OF CONTENTS ................................................................................................................................................... 14
ADDING HEADING STYLES TO YOUR DOCUMENT....................................................................................................................................... 14
INSERTING A TABLE OF CONTENTS......................................................................................................................................................... 15
CHANGING THE FORMAT OF YOUR TABLE OF CONTENTS ............................................................................................................................. 16
EDITING THE TEXT WITHIN YOUR TABLE OF CONTENTS ............................................................................................................................... 17
DELETING YOUR TABLE OF CONTENTS .................................................................................................................................................... 17
CREATING A TABLE OF AUTHORITIES ............................................................................................................................................... 18
WHAT IS A TABLE OF AUTHORITIES? ...................................................................................................................................................... 18
MARKING YOUR CITATIONS ................................................................................................................................................................ 18
DELETING A MARKED CITATION ........................................................................................................................................................... 19
CREATING A NEW CITATION CATEGORY .................................................................................................................................................. 19
INSERTING A TABLE OF AUTHORITIES ..................................................................................................................................................... 20
EDITING A TABLE OF AUTHORITIES ........................................................................................................................................................ 20
DELETING A TABLE OF AUTHORITIES ...................................................................................................................................................... 20

2 | P a g e
Setting Default Fonts and Line Spacing The default font in Word 2010 is Calibri, 11 pt. The default line spacing in Word 2010 is 1.15 with a 10 pt. space after each line. To change these settings, follow the instructions listed below.
Changing Your Default Font 1. Go to the Home tab. 2. Click on the Font sections dialog box launcher. 3. The Font dialog will appear.
4. Choose your font type from the Font section. 5. Choose your font size from the Size section. 6. Make any other adjustments you would like. 7. Click on the Set As Default button. 8. A warning dialog will appear.
9. Choose whether you want to set the default font as the default for just the open document or for all documents.
10. Click on the OK button. 11. Your default font will be set accordingly.

3 | P a g e
Changing Your Default Line Spacing 1. Go to the Home tab. 2. Click on the Paragraph sections dialog box launcher. 3. The Paragraph dialog will appear. 4. Go to the Indents and Spacing tab.
5. Type 0 in the After field in the Spacing section. 6. Change the Line Spacing field to Single in the Spacing section. 7. Click on the Default button. 8. A warning dialog will appear.
9. Choose whether you want to set the line spacing as the default for just the open document or for all documents.
10. Click on the OK button. 11. Your default line spacing will be set accordingly.

4 | P a g e
Lists, Indentations, Tabs and the Ruler By default, indents and tabs move text half an inch to the right. The tab function only indents the first line of a paragraph. The indent function indents all of the lines in a paragraph. Bulleted and numbered lists are a form of hanging indents, which places bullets or numbers to the left of the indented text. All of the indent icons are fond on the Home tab in the Paragraph section.
Creating a Bulleted or Numbered List 1. Select the text to which you want to add bullets or numbers.
2. Click on the Bullets icon -or-
3. Click on the Numbering icon.
4. Click on the Multilevel List icon to start a multilevel list. Note: Each of the above icons has a small, dropdown arrow to its right. Click on the arrow to customize your numbering and bulleting formats. Note 2: If you want to get rid of your bullets or numbers, simply select the bulleted or numbered text and click on the Numbering or Bullets icon again. These icons are toggles: when illuminated, they are active; otherwise they are not. To remove a multilevel list, click on the dropdown arrow to the Multilevel List icon’s right and choose the option None.
Indenting Paragraphs 1. Select the paragraph that you want to indent. 2. Click on the Increase Indent icon.
3. Your paragraph will be indented. 4. To get rid of your indent, click on the Decrease Indent icon.
Adding a Tab 1. Click at the beginning of the paragraph to which you want to add a tab. 2. Press on the Tab key in the keyboard. 3. The first line of the paragraph will be indented half an inch and there will be a tab marker (that looks like a
small L) placed on the half inch marker on your ruler. Note: If you want to change your tab alignment or add a leader, double click on the tab marker to display the Tabs dialog.

5 | P a g e
Using the Ruler to Block Text and Customize Indents You can use the Ruler to create and change tabs and indents. You can also use it to block text. To show or hide the horizontal and vertical rulers, click the View Ruler icon, located at the top of the vertical scroll bar.
Note: The vertical ruler, which is located on the left-hand side of the Microsoft Word window, will not appear if it is turned off. To enable it, do the following:
1. Click on the File tab. 2. Click on the Options link. 3. Click on the Advanced category. 4. Enable the Show Vertical Ruler In Print Layout View field in the Display section.
Creating a First-Line Indent (Tab) with the Ruler
1. Click at the beginning of the text to which you want to add a tab. 2. On the Ruler, drag the First Line Indent marker (the top triangle located on the left side of the ruler) to
the position where you want the text to start.
Creating a Hanging Indent with the Ruler
1. Select the paragraph in which you want to create a hanging indent. 2. On the horizontal ruler, drag the Hanging Indent marker (the bottom triangle located at the left side of
the ruler – not the rectangle) to the position where you want the hanging indent to start.
Changing the Left Margin of a Paragraph with the Ruler (To Block Text)
1. Select the paragraph that you want to indent. 2. On the horizontal ruler, drag the Left Indent marker (the bottom rectangle located on the left side of the
ruler) to the position where you want the left margin to begin.
Changing the Right Margin of a Paragraph with the Ruler (To Block Text)
1. Select the paragraph that you want to indent. 2. On the horizontal ruler, drag the Right Indent marker (the triangle located on the right side of the ruler)
to the position where you want the right margin to begin.
The View Ruler icon

6 | P a g e
Inserting Page Numbers 1. Go to the Insert tab. 2. Click on the Page Number icon, located in the Header and Footer group. 3. A submenu will appear, listing formatting and placement options.
4. Hold your cursor over your preferred number placement. 5. A gallery of predesigned page number placements will be displayed. 6. Scroll through the gallery and click on the page number placement option that you want. 7. The Header or Footer area will display, the page number will be inserted, and the contextual Header &
Footer Tools Design tab will open.
8. Click on the Close Header and Footer icon within the contextual Header & Footer Tools Design tab to return to your document.

7 | P a g e
Modifying Page Numbers Once your page numbers have been inserted, you can change their formatting.
1. Double-click on the page number to open the Header or Footer area. 2. Select the page number. 3. Click on the Page Number icon within the contextual Header & Footer Tools Design tab and choose the
Format Page Numbers option. 4. The Page Numbers Format dialog will open.
5. Format your numbers and click on the OK button. 6. The formatting changes will go into effect immediately. 7. Click on the Close Header and Footer icon within the contextual Header & Footer Tools Design tab to
return to your document.
Deleting Page Numbers 1. Go to the Insert tab.
2. Click on the Page Number icon.
3. A submenu will appear, listing formatting and placement options.
4. Click on the Remove Page Numbers option.
5. The page numbers will be removed from your document.

8 | P a g e
Inserting Headers or Footers 1. Go to the Insert tab. 2. Click on the Header or Footer icon, located in the Header and Footer group. 3. A gallery of predesigned headers and footers will be displayed.
4. Scroll through the gallery and click on the header or footer design that you want. 5. The header or footer area will be displayed, along with the contextual Header & Footer Tools Design tab.
6. Type your header or footer text where indicated. 7. Click on the Close Header and Footer icon. 8. The header or footer will be inserted on every page of the document.

9 | P a g e
Modifying Headers or Footers 1. Double-click on the header or footer to open the Header or Footer area. 2. Select the header text. 3. You can change the text itself, the text’s formatting, or use the contextual Header & Footer Tools Design
tab to change the header or footer’s actual settings (where it appears, its placement on the page, etc.)
4. When you are done formatting your header or footer, click on the Close Header and Footer icon within
the contextual Header & Footer Tools Design tab. 5. You will return to your document and your header or footer modifications will go into effect immediately.
Deleting Headers or Footers 1. Go to the Insert tab. 2. Click on the Header or Footer icon, located in the Header and Footer group. 3. The Header or Footer gallery will appear. 4. Click on the Remove Header or Remove Footer option. 5. The headers or footers will be removed from your document.
Note: If you have inserted different sections into a document or if you have the Different First Page field or the Different Odd & Even Pages field enabled, you will need to delete your headers or footers number from each section.

10 | P a g e
Inserting Different Types of Page Numbers on Different Pages
Inserting a Section Break You use section breaks to change the layout or formatting of pages within your document. For example, you can separate “sections” within your document so that the page numbering of each section starts at Page 1. You must divide the document into separate sections before you can insert different page number formats on different pages. To insert a section break, follow the instructions below.
1. Go to the Home tab and click on the Show/Hide icon, located in the Paragraph group, so that you can see the hidden formatting characters within your document.
2. Within your document, click where you want to insert the section break. 3. Go to the Page Layout tab. 4. Click on the Breaks icon, located in the Page Setup section. 5. The Break menu will appear.
6. Click on the Next Page option in the Section Break section. 7. A section break will be inserted.
8. Everything above the inserted section break will be Section 1 of the document; everything below will be Section 2 of the document.
9. You can format each of these sections separately. Note: You can always tell what section of your document you are in by looking at your Status bar, located at the bottom of your screen. If the Section option is not listed in your status bar, right-click on the bar and enable the Section option from the Customize Status Bar menu.

11 | P a g e
Adding Different Types of Page Numbers to Different Sections Once you have added a section break, you can add different page number formats to each section.
1. Go to the first page of the document. 2. Go to the Insert tab, click on the Page Number icon and choose your preferred number placement. 3. The page numbers will be inserted. 4. If desired, select the page number(s) and make any formatting changes. 5. Scroll to the footer area of Section 2 (below the section break). 6. Click on the Link to Previous icon in the Header and Footer Tools Design tab to break the connection
between the footer in Section 1 and the footer in Section 2. (Once the section connection has been broken, the Link to Previous icon will appear in the standard blue-gray and the Same as Previous tab will no longer appear in the upper-right corner of the header or footer area.)
7. Delete any page numbers that appear in the footer in Section 2. 8. Click on the Page Number icon in the Header and Footer Tools Design tab. 9. Choose the desired page number placement option. 10. If desired, select the page number(s) and make any formatting changes. 11. Your new page numbering will begin on the first page of Section 2. 12. Click on the Close Header and Footer icon.
Note: The Different First Page option is located in the Options group of the Header and Footer Tools Design tab. Note 2: The Link to Previous icon is a toggle. Click on it once to disable the feature, click on it again to enable it.

12 | P a g e
Inserting Footnotes and Endnotes
Inserting Footnotes 1. Open your document. 2. Place your cursor where you want to insert your first footnote. 3. Go to the References tab. 4. Click on the Insert Footnote icon.
5. Your cursor will automatically move to the bottom of the page, under the footnote line and to the right of the appropriate footnote number.
6. Type your footnote. 7. When you are done typing your footnote, click anywhere within the document. 8. When you are ready to add another footnote, place your cursor accordingly and click on the Insert
Footnote icon again.
Inserting Endnotes 1. Open your document. 2. Place your cursor where you want to insert your first endnote. 3. Go to the References tab. 4. Click on the Insert Endnote icon.
5. Your cursor will automatically move to the end of the document, under the endnote line and to the right of the appropriate endnote number.
6. Type your endnote. 7. When you are done typing your endnote, click anywhere within the document. 8. When you are ready to add another endnote, place your cursor accordingly and click on the Insert
Endnote icon again.

13 | P a g e
Editing the Text within Your Notes To edit a note, place your cursor within the note text and edit away. Note: NEVER try to change note formatting this way or you run the risk of corrupting all of your notes. To change note-text or note-number formatting, you must use styles.
Converting Notes 1. Open your document. 2. Go to the References tab 3. Click on the dialog box launcher of the Footnotes group. 4. The Footnote and Endnote dialog will appear.
5. Click on the Convert button. 6. You will be asked if you want to convert all notes. 7. Click on the OK button. 8. All of your footnotes will be converted to endnotes or vice versa. 9. Close out of the Footnote and Endnote dialog.
Note: Sometimes, when you convert footnotes to endnotes, the note number formatting changes. If this happens, simply open the Footnote and Endnote dialog and use the Number Format field to change the note number formatting.
Deleting Notes THIS IS VERY IMPORTANT! To delete a note, select its reference number from WITHIN THE BODY OF YOUR DOCUMENT and press the Delete key twice on the keyboard. Microsoft Word will automatically renumber the remaining notes. If you try to delete a note from within the note section of your document, you will corrupt your notes. There is no way to “uncorrupt” corrupted notes, other than deleting them all and manually re-entering them.

14 | P a g e
Creating a Table of Contents
Adding Heading Styles to Your Document The easiest way to create a table of contents is to use heading styles. To apply a heading style, follow the instructions below.
1. Open the document to which you want to add the table of contents. 2. Click on the Styles group dialog launcher. 3. The Styles task pane will open. 4. Click on the Options link. 5. The Style Pane Options dialog will appear.
6. Click on the downward pointing arrow to the right of the Select Styles to Show field. 7. Choose the All Styles option and click on the OK button. 8. All available styles will appear in the task pane. 9. In your document, select the text that you want to appear in your table of contents (usually a phrase or a
brief sentence). 10. Select the appropriate heading style from the Styles task pane. 11. The style will go into effect immediately.
Note: Once you apply a style to your document, the style should appear in the Style gallery.

15 | P a g e
Inserting a Table of Contents To build a table of contents, Microsoft Word searches for text that has been formatted as headings. It detects these headings, sorts them by level, and then dynamically creates a table of contents.
1. Determine where you want to insert your table of contents. 2. Click once in that location. 3. Go to the References tab. 4. Click on the Table of Contents icon. 5. A gallery of predesigned table of contents will appear.
6. Click on one of the options 7. A table of contents will be inserted into your document.
Note: If you do not have any headings in your document, the only way you can create a table of contents is to type it manually.

16 | P a g e
Changing the Format of Your Table of Contents 1. Click on your table of contents. 2. Go to the References tab. 3. Click on the Table of Contents icon. 4. Choose the Insert Table of Contents option from the submenu that appears. 5. The Table of Contents dialog will appear.
6. Click on the downward pointing arrow to the right of the Formats field. 7. Choose one of the available designs by clicking on its name. (An example of the formatting that you have
selected will appear in both the Print Preview and Web Preview fields.) 8. Determine the number of heading levels that you want to display in your table of contents in the Show
Levels field. 9. Click on the Options button to determine what style headings will appear in your table of contents. 10. Click on the Modify button to determine how the style headings will appear in your table of contents. 11. Click on the OK button. 12. You will be prompted to replace the original table of contents.
13. Click on the Yes button. 14. The newly modified table of contents will be inserted into your document.
Note: The Modify button will only be activated if the From Template option is the selection within the Formats field.

17 | P a g e
Editing the Text within Your Table of Contents Microsoft Word creates a table of contents dynamically. While the text of the table of contents cannot be edited directly, the sources that create it can. To update your table of contents, follow the instructions below.
1. Make whatever changes you want in the body of your document. 2. Double-click on your table of contents. 3. Your table of contents will be surrounded by a line and an Update Table icon will appear in its upper left-
hand corner.
4. Click on the Update Table icon. 5. An Update Table of Contents dialog will appear.
6. If the only change in your document involves pagination, enable the Update Page Numbers Only field and click on the OK button.
7. If you have changed text in your headings, added headings, or deleted headings, enable the Update Entire Table field and click on the OK button.
8. Your table of contents will update immediately.
Deleting Your Table of Contents 1. Go to the References tab. 2. Click on the Table of Contents icon. 3. Choose the Remove Table of Contents option. 4. Your table of contents will be deleted immediately.

18 | P a g e
Creating a Table of Authorities
What is a Table of Authorities? A table of authorities is a legal index: it lists the legal references in a document (cases, statutes, rules, etc.), along with the numbers of the pages on which the references appear.
Marking Your Citations In order to create a table of authorities, you must first mark your citations. To do so, follow the instructions below.
1. Open your document. 2. Display the non-printing characters in your document by clicking once on the Show/Hide icon, located in
the Paragraph group of the Home tab. 3. Select your first citation. 4. Go to the References tab and click on the Mark Citation icon in the Table of Authorities group. 5. The Mark Citation dialog will appear.
6. Edit the full citation as you want it to appear in the table of authorities in the Selected Text field. 7. Click on the downward pointing arrow to the right of the Category field to choose the category that
applies to the citation. 8. There are legally correct ways to type a short citation once a full citation has been used in your document.
Use the Short Citation field to input the correct short citation form. (This is a very good way to check your legal referencing work.)
9. Click on the Mark All button if this citation (including short citations) appears more than once in your document.
10. Click on the Mark button if this citation only appears once in your document. 11. The citation(s) will be marked. 12. Click on the Close button.
19 | P a g e
13. You will return to your document, where you will see the marked citation. Even though it looks odd, the citation mark is a non-printing character and will not display in the printed document.
14. Continue marking your citations.
Note: The coding within your marked citation will not appear in green font. The font is green in the example above to easily distinguish the coding from the actual citation.
Note 2: Do NOT edit or delete any of the coding around your marked citation, including the brackets, or you will corrupt it. If you miss-mark a citation, delete the marked citation and start again.
Deleting a Marked Citation 1. Display the non-printing characters in your document by clicking once on the Show/Hide icon, located in
the Paragraph group of the Home tab. 2. Select the entire marked citation, including the brackets {}. 3. Press the Delete key on your keyboard. 4. The marked citation will be deleted immediately.
Creating a New Citation Category If you want to rename the existing table of authorities’ categories, follow the instructions below.
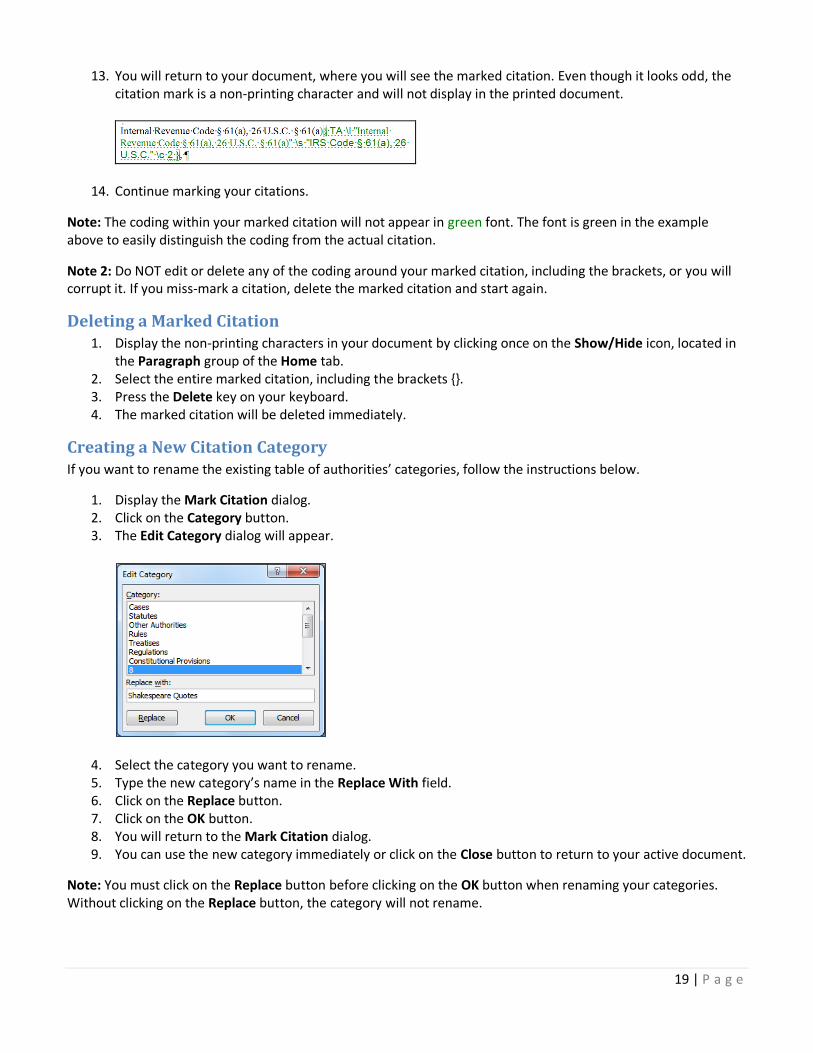
1. Display the Mark Citation dialog. 2. Click on the Category button. 3. The Edit Category dialog will appear.
4. Select the category you want to rename. 5. Type the new category’s name in the Replace With field. 6. Click on the Replace button. 7. Click on the OK button. 8. You will return to the Mark Citation dialog. 9. You can use the new category immediately or click on the Close button to return to your active document.
Note: You must click on the Replace button before clicking on the OK button when renaming your categories. Without clicking on the Replace button, the category will not rename.

20 | P a g e
Inserting a Table of Authorities To build a table of authorities, Microsoft Word searches for marked citations. After detecting them, it dynamically creates the table of authorities.
1. Determine where you want to insert your table of authorities. 2. Click once in that location. 3. Go to the References tab. 4. Click on the Insert Table of Authorities icon in the Table of Authorities group. 5. The Table of Authorities dialog will appear.
6. Choose the categories that you want to include in your table of authorities from within the Category field. 7. Click on the downward pointing arrow to the right of the Formats field. 8. Choose one of the available designs by clicking on its name. (An example of the formatting you have
selected will appear in the Print Preview section.) 9. Select any other table of authorities’ options you want. 10. Click on the OK button. 11. Your newly created table of authorities will be inserted into your document.
Editing a Table of Authorities Unfortunately, Microsoft’s Table of Authorities feature does not update as easily as the Table of Contents feature. The best way to update a table of authorities is to delete and then recreate it.
Deleting a Table of Authorities To delete your table of authorities, select the entire table of authorities and press the Delete key on your keyboard. The table of authorities will be deleted immediately.