using microsoft word 2007 for your dissertation - u-m
TRANSCRIPT

Using Microsoft Word 2010 for Your Dissertation A University of Michigan Library Instructional Technology Workshop
Need help? Visit the Faculty Exploratory or Knowledge Navigation Center on the 2nd floor of the Graduate Library.
[email protected] | http://guides.lib.umich.edu | [email protected]
rev: 8/18/11
1 of 18
Table of Contents
Introduction ................................................................................................................... 2
Changes in Office 2010 ................................................................................................................................ 2
Getting Help .................................................................................................................................................. 2
Tips .................................................................................................................................................................. 2
Inserting Footnotes and Endnotes ............................................................................... 3
Inserting Images, Charts, and Other Non-text Objects............................................. 3
Inserting Captions ......................................................................................................... 4
Using Cross-references ................................................................................................. 4
Working with Styles ....................................................................................................... 5
Applying a Style ............................................................................................................................................. 5
Choosing Which Styles to Use .................................................................................................................... 5
Modifying a Style ........................................................................................................................................... 6
Setting Up Heading 1 Example ................................................................................................................... 6
Setting Margins .............................................................................................................. 7
Two-Inch Margin Using Styles .................................................................................................................... 7
Automatic Chapter and Subsection Numbering ....................................................... 8
Customizing Your Numbers ....................................................................................................................... 8
Outline Numbering in Appendices ............................................................................................................ 9
Creating and Using Templates .................................................................................. 10
Combining Chapter Files into One Document ......................................................... 10
Finalizing Your Dissertation if You Haven’t Used Styles ............................................ 11
Adding Page Numbers ............................................................................................... 12
Step 1: Using Sections to Control Page Numbering .............................................................................. 12
Step 2: Breaking the Connection Between Sections .............................................................................. 13
Step 3: Adding the Page Numbers ............................................................................................................ 13
Working with Landscape Pages ................................................................................ 14
Creating a Landscape Section .................................................................................................................... 14
Disconnecting the Landscape Section ..................................................................................................... 14
Adding Page Numbers to the Landscape Page(s) .................................................................................. 15
Automatic Table of Contents ..................................................................................... 16
Automatic Lists of Figures, Tables and Equations ..................................................... 16
Commenting and Reviewing ..................................................................................... 17
Using Tracked Changes .............................................................................................................................. 17
Merging Comments and Changes into One Document ........................................................................ 18
Accepting and Rejecting Changes ............................................................................................................. 18

Using Microsoft Word 2010 for Your Dissertation A University of Michigan Library Instructional Technology Workshop
Need help? Visit the Faculty Exploratory or Knowledge Navigation Center on the 2nd floor of the Graduate Library.
[email protected] | http://guides.lib.umich.edu | [email protected]
rev: 8/18/11
2 of 18
INTRODUCTION To meet Rackham‟s Dissertation Formatting Guidelines – as well as any set by your school or department – you will need to modify the default, standard Word document. This handout is intended to show you how to use the tools to make the necessary modifications. While we do use some of the requirements from Rackham‟s formatting guidelines to demonstrate the tools, you must verify the formatting requirements with the appropriate office. For individual assistance, you can request an appointment at the Knowledge Navigation Center (email [email protected]) or take a workshop through our Digital Dissertations Series (http://teachtech.umich.edu).
CHANGES IN OFFICE 2010 Although Microsoft Office 2010 looks very similar to Office 2007, there are a couple of changes. One of the changes is that the Office Button has become the File Ribbon in Office 2010. The File Ribbon contains such standard features as Open, Close, Print, Save, etc. In addition, this menu allows you to quickly manage Word settings (Permissions, Sharing, Versions, Properties, and Options).
Within the View Ribbon, in the Show Group, there is a new option to view Headings of your document in a sidebar. Within the Navigation Pane, you can click a heading to go to that location and move items by dragging and dropping. Note that only items with a “Heading” style will appear in the Navigation Pane (see Working with Styles on page 5).
GETTING HELP
Attend a Word for Dissertation workshop.
Contact the Knowledge Navigation Center ([email protected] or 647-5836) to set up a consultation appointment with a staff member.
TIPS
Share your file(s) with your advisors using Tracked Changes (page 17).
If you use EndNote to manage your citations and create your bibliography, use only one EndNote library for your entire dissertation (see http://guides.lib.umich.edu/x3).
Use styles to control the formatting of your dissertation and create a template to use for all of your chapters. The bulk of this document revolves around the use of styles.
o Set the margins including the two-inch margin for chapters titles (see page 7).
o Define styles for Headings 1-3, Normal, Captions, and Quotes – these are most common; you may need others (see page 5).
o If headings need to be numbered (for example, 1.1, 1.2, 2.1, etc.), define a multi-level list (see page 8).
o If captions need to include the chapter number, define a multi-level list (see page 8).

Using Microsoft Word 2010 for Your Dissertation A University of Michigan Library Instructional Technology Workshop
Need help? Visit the Faculty Exploratory or Knowledge Navigation Center on the 2nd floor of the Graduate Library.
[email protected] | http://guides.lib.umich.edu | [email protected]
rev: 8/18/11
3 of 18
INSERTING FOOTNOTES AND ENDNOTES You can insert footnotes or endnotes as needed into your dissertation. You can use the method below, or you may want to explore the use of EndNote or RefWorks. Use these programs to store your citations and insert them into Word. They will automatically format both in-text citations and works-cited lists. However, you‟ll want to pick one method: EndNote, RefWorks or manual citation for the entire dissertation, or you may end up with more than one bibliography.
1. Put your cursor where you want to insert your new footnote or endnote.
2. On the References Ribbon, in the Footnotes Group, click either the Insert Footnote or Insert Endnote icon.
3. To adjust the settings of your footnote, including the numbering style, when to start and stop the numbering of your notes, etc., click on the Expand icon in the Footnotes Group of the References Ribbon.
You can have your footnotes and endnotes restart their numbering in each chapter. To do this, each chapter will need to be its own section. See page 12 for more information on creating sections. Remember, too, that you can format the style of your endnote/footnote as discussed in the Modifying a Style section.
INSERTING IMAGES, CHARTS, AND OTHER NON-TEXT OBJECTS If you want to insert images, figures, etc., we recommend .jpg or .tiff files of 200-600 dpi. While it is possible to copy and paste images into Word, we do not recommend this method since you may not be getting the highest-quality image when you copy and paste (the exception is a chart from Excel – those you can copy and paste).
On the Insert Ribbon, in the Illustrations Group, select the type of object you want to insert, navigate to the file (if appropriate) and click Insert or OK. The Charts icon ( ) will allow you to enter data and create a new chart within Word.
A new feature in the Insert Ribbon is the Screenshot tool, which allows you to take a picture of any open window (Available Windows gallery) or part of the screen (Screen Clipping).
Once an image is inserted, the Format Ribbon will appear, displaying editing and Text Wrapping tools.
Rackham guidelines say to not wrap text on the left and right of the image. In the Text Wrapping, be sure to choose either In Line with Text or Top and Bottom. Depending on what you choose, when you add a caption, the caption may end up in its own textbox.

Using Microsoft Word 2010 for Your Dissertation A University of Michigan Library Instructional Technology Workshop
Need help? Visit the Faculty Exploratory or Knowledge Navigation Center on the 2nd floor of the Graduate Library.
[email protected] | http://guides.lib.umich.edu | [email protected]
rev: 8/18/11
4 of 18
INSERTING CAPTIONS Word can automatically number your captions of tables, figures and equations.
1. Right-click the object you wish to caption and select Insert Caption… from the shortcut menu. For tables, right-click the crosshair icon that appears at the top-left corner of the table when your cursor is anywhere on top of it.
2. In the Caption dialog box, select the label that applies to the object you have selected (e.g. “Figure” or “Table”) and select the positioning of the caption (e.g. above or below the object).
3. Type your text in the Caption: box.
4. To include the chapter number in your caption (e.g. “Figure 3-2” or “Table 2.1”), you need to set up your Heading 1 style first (see the Automatic Chapter and Subsection Numbering on page 8). This is the only way Word understands where each chapter starts; otherwise, you will get an error. If you‟ve done that, then in the Caption dialog box,
a. Click the Numbering… button and check the Include Chapter Number box.
b. Select the separator you wish to have between your chapter number and the caption number and click OK.
5. Click OK to exit the dialog box.
If you do not like the appearance of your caption text, do not edit them one-by-one, but modify the style instead (see page 5 for more details).
Word will renumber your captions appropriately if you insert a new figure before other figures in your document.
USING CROSS-REFERENCES When you refer to a particular figure in your document, rather than typing in “Figure 2”, you can use a cross-reference, so if the figure number changes, the in-text reference will also change. This will also work to reference page numbers of headings and so on.
1. Put your cursor where you want the reference to be. On the References Ribbon, in the
Captions Group, click the Cross-reference ( ) icon.
2. Select the type of item you are referencing from the Reference type pulldown.
3. For figures, select Only Label and Number from the Insert reference to: pulldown, unless you want the entire caption to appear in the text.
4. Select the item you want to reference from the For which caption: section.
5. Click Insert and close the Cross-reference dialog box.
When your caption number changes, you can update the in-text references by right-clicking the in-text reference and selecting Update field.

Using Microsoft Word 2010 for Your Dissertation A University of Michigan Library Instructional Technology Workshop
Need help? Visit the Faculty Exploratory or Knowledge Navigation Center on the 2nd floor of the Graduate Library.
[email protected] | http://guides.lib.umich.edu | [email protected]
rev: 8/18/11
5 of 18
WORKING WITH STYLES You likely want certain pieces of text throughout you document to have the same formatting – for example, all the chapter titles should be centered, bold, a certain font and size, etc. Word styles define the appearance of text elements throughout your document and can be saved in a template that you can use to create new documents with the same settings (see page 10).
There are a several advantages to using styles:
Your document is consistent throughout, and you can make global changes easier.
Heading text can be used to automatically generate a table of contents.
You can view the headings in the Navigation Pane (View Ribbon), click to jump to a heading, or drag and drop chunks of text.
To see a list of the predefined styles in Word, look at the Styles Group in the Home Ribbon.
We suggest you set up your styles in a blank document, then save it as a template as described on page 10.
APPLYING A STYLE 1. Select the text to which you want to apply a style.
2. In the Home Ribbon, in the Style Group, click on the style you want to apply. If you don‟t see the style you want to use, click on the Expand icon in the lower right corner of the Style Group to see a more complete list.
CHOOSING WHICH STYLES TO USE We highly recommend using the built-in styles that come with Word 2010. Even if you don‟t like the way they look, their appearance can be modified to fit your own needs.
For chapter titles, appendix titles, and headings like “Dedication” and “Acknowledgements,” use Heading 1.
For main headings in your chapters, use Heading 2. For subheadings, use Heading 3, and so on. (Note: Headings 3 and above may not appear in your list of styles until you’ve used Heading 1 and Heading 2.)
For quotes, use Quote.
For body text, use Normal. This is the default for Word; if you start typing without specifying a style, it will be in the Normal style.

Using Microsoft Word 2010 for Your Dissertation A University of Michigan Library Instructional Technology Workshop
Need help? Visit the Faculty Exploratory or Knowledge Navigation Center on the 2nd floor of the Graduate Library.
[email protected] | http://guides.lib.umich.edu | [email protected]
rev: 8/18/11
6 of 18
MODIFYING A STYLE You can change the appearance of a style, including its line spacing, font, color, alignment… just about anything! If you change a style, that change will affect all text in your document in that style.
1. On the Home Ribbon, in the Styles Group, right-click on the style you want to change, and select Modify. If you don‟t see the style you want to change, click on the Expand icon to see a more complete list.
2. In the Modify Style dialog box, you can make any change you want to the style.
3. Click on the Format button in the bottom-left corner of the dialog box for even more options such as font, paragraph, numbering, etc.
SETTING UP HEADING 1 EXAMPLE Rackham has very specific requirements for most elements in your document. For example, your chapter titles and front matter titles (e. g., Dedication, Acknowledgements, etc.) need to be formatted in a particular way. Below is an example of how you can set that up using the Heading 1 style – please confirm your Heading 1 style with the Rackham guidelines to be sure nothing has changed and that we didn‟t miss anything!
1. On the Home Ribbon, in the Styles Group, right-click on the Heading 1 style and select Modify.
2. In the Modify Style dialog box (see picture above), in the Formatting: section,
a. Set the font to Times New Roman.
b. Set the font size to 12 point.
c. Set the text color to black.
d. Center the text.
e. Select single or double spaced lines.
3. Click on the Format button in the bottom-left corner of the dialog box and choose Paragraph (see right).
4. In the Indents and Spacing tab, type in 1 in. or 72 pt (these are equivalent values) in the Spacing Before: box. This adds the two-inch margin required for chapter titles (this one inch, then one inch from the margin).
5. Since the chapters and front matter have to start on a new page, you can build a page break into the style by going to the Line and Page Breaks tab and checking the box for Page Break Before.
Click OK until you are back to your document.
Using Microsoft Word 2010 for Your Dissertation A University of Michigan Library Instructional Technology Workshop
Need help? Visit the Faculty Exploratory or Knowledge Navigation Center on the 2nd floor of the Graduate Library.
[email protected] | http://guides.lib.umich.edu | [email protected]
rev: 8/18/11
7 of 18
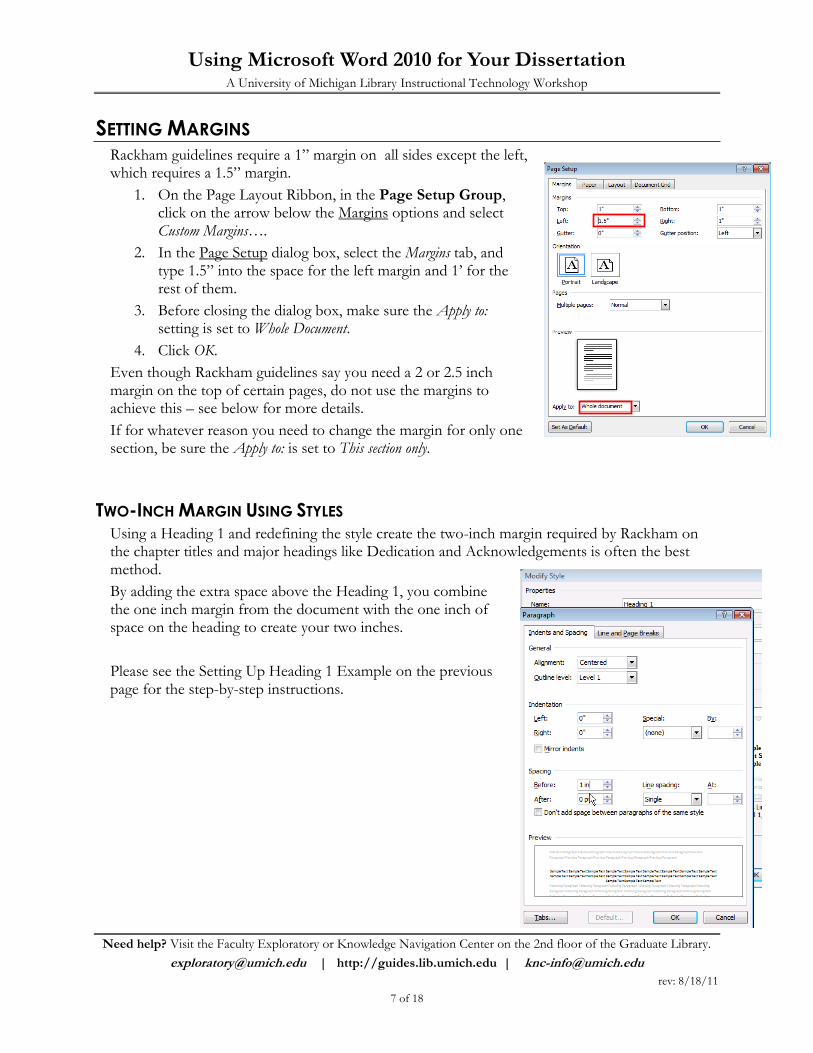
SETTING MARGINS Rackham guidelines require a 1” margin on all sides except the left, which requires a 1.5” margin.
1. On the Page Layout Ribbon, in the Page Setup Group, click on the arrow below the Margins options and select Custom Margins….
2. In the Page Setup dialog box, select the Margins tab, and type 1.5” into the space for the left margin and 1‟ for the rest of them.
3. Before closing the dialog box, make sure the Apply to: setting is set to Whole Document.
4. Click OK.
Even though Rackham guidelines say you need a 2 or 2.5 inch margin on the top of certain pages, do not use the margins to achieve this – see below for more details.
If for whatever reason you need to change the margin for only one section, be sure the Apply to: is set to This section only.
TWO-INCH MARGIN USING STYLES Using a Heading 1 and redefining the style create the two-inch margin required by Rackham on the chapter titles and major headings like Dedication and Acknowledgements is often the best method.
By adding the extra space above the Heading 1, you combine the one inch margin from the document with the one inch of space on the heading to create your two inches.
Please see the Setting Up Heading 1 Example on the previous page for the step-by-step instructions.

Using Microsoft Word 2010 for Your Dissertation A University of Michigan Library Instructional Technology Workshop
Need help? Visit the Faculty Exploratory or Knowledge Navigation Center on the 2nd floor of the Graduate Library.
[email protected] | http://guides.lib.umich.edu | [email protected]
rev: 8/18/11
8 of 18
AUTOMATIC CHAPTER AND SUBSECTION NUMBERING Important Note: Not everyone needs this type of numbering; if your discipline doesn’t require it, skip this section!
Word can automatically number sections (Chapter 1, 1.1, 1.2, etc.) of your document and include the chapter number in the captions (Figure 1.2, 2.2, etc.).
1. Make sure each of your chapter titles are in the Heading 1 style, and then click on one of your chapter titles.
2. If you just need the chapter number included in captions, on the On the Home Ribbon, in the Paragraph Group, click the Multilevel List icon and select the one with the words Chapter 1 in it from the List Library section. If you need subsections numbered (for example, 2.1, 2.2, 2.12, etc.) as well, then choose the list the 1 Heading 1; 1.1 Heading 2, etc. option (right side, middle row). Note that doing this once sets the formatting for all heading levels.
3. Click OK when you are finished.
4. If you typed in the text “Chapter #”, and now it is duplicating your efforts, delete the text you typed and leave the automatically generated chapter number.
5. To follow the automatically generated chapter number with the title of your chapter on a new line, click just before the text of your title, hold down the Shift key on the keyboard, and then press the Enter key.
Note: If you have any problems with word automatically adding outline numbering to parts of your front matter, simply delete it. Your chapter numbers will reset to show the correct number of chapters.
CUSTOMIZING YOUR NUMBERS If you want to change anything about the numbers – for example, you are using the 1.1, 1.2, etc. style but would like the word “Chapter” to display automatically in front of the Heading 1 number, you want to change Arabic numbers to Ordinal, or you want to change the spacing after the numbers, you can.
Click one of your headings, then go back to the Home Ribbon, and in the Paragraph Group click the Multilevel List icon (see screen shot above) and select Define New Multilevel List…. Click the More>> button, then select the relevant list level.
You can use the Number style for this level: pulldown menu to choose from a various styles, as seen in the
Automatically generated - keep
Manual, need to delete

Using Microsoft Word 2010 for Your Dissertation A University of Michigan Library Instructional Technology Workshop
Need help? Visit the Faculty Exploratory or Knowledge Navigation Center on the 2nd floor of the Graduate Library.
[email protected] | http://guides.lib.umich.edu | [email protected]
rev: 8/18/11
9 of 18
screenshot (below the Enter formatting for number: box).
In the screenshot, with the Level on the left set at 1, we added the word “Chapter”. Moving to the second level, you can change the period in between the level and sublevel to a dash or anything you want in the Number format box.
You can also see that a tab follows the number – you can change it to a space or none. You may have to adjust this if the alignment seems off.
OUTLINE NUMBERING IN APPENDICES You may also restart number for captions in your appendices or other separate areas of your dissertation. You will need to change your outline numbering settings before inserting your captions.
We are going to do a variant of the steps above, but instead of defining new levels for your list, you will be editing the first level from this point forward. This should work, but sometimes Word acts up, and even though you‟ve followed all the steps, it doesn‟t take. If that happens, set up an appointment with the KNC and we‟ll help you out.
1. Apply the Heading 1 style to the title of your Appendix.
2. On the Home Ribbon, go to the Paragraph Group, click the Multilevel List icon and select Define New Multilevel List…. Make sure the whole dialog box is showing by clicking on the More>> button (if it says <<Less instead, you are all set).
3. Under Enter formatting for new number:, replace “Chapter” with “Appendix.”
4. Choose the appropriate style, (such as A,B,C,…) from the Number style for this level: pulldown menu.
5. Set the correct letter or number in the Start at: pulldown.
6. In the Apply changes to: pulldown, choose This point forward.
7. Click OK to close the dialog box.

Using Microsoft Word 2010 for Your Dissertation A University of Michigan Library Instructional Technology Workshop
Need help? Visit the Faculty Exploratory or Knowledge Navigation Center on the 2nd floor of the Graduate Library.
[email protected] | http://guides.lib.umich.edu | [email protected]
rev: 8/18/11
10 of 18
CREATING AND USING TEMPLATES Now that you have all of these styles the way you want them, you can create a template to use for each chapter of your dissertation. The templates stores the information about your margins, styles, etc. so provides consistency across documents.
To create a template,
1. Open a blank Word document and adjust your styles (see page 5), margins (see page 8), and any automatic numbering features you want in your document.
2. On the File Ribbon, select Save as…, then select Word Template. Save it somewhere that you can find easily.
3. To modify your template later, open Word first, then open the template file – if you double-click on it, it will create a new document based on the template as described below.
To create a document from your template or apply it to an existing document,
1. Double-click on the template file you created in the steps above. This will open a new document based on that template.
2. If you already have a chapter written, you can insert that chapter into this new document to apply any style settings to it. To do this…
a. On the Insert Ribbon, in the Text Group, click on the arrow next to the Object icon and select Text from File….
b. Navigate to the document you wish to insert and click Insert.
COMBINING CHAPTER FILES INTO ONE DOCUMENT Though it is more convenient to keep chapters separate as you work on them, your final submission will need to be one long document. You can combine all of the files into one large document (see steps below), and then use information in the following sections to generate your table of contents, lists of figures, tables and equations, and take control your page numbers.
On the other hand, some people prefer to leave them as individual files, sometimes because combining your chapter files produces a file so massive that opening, editing, and saving it is prohibitively slow. If this is the case, you will need to manually create the table of contents, list of figures, and so on, and will need to set the pagination in each document.
1. Open the file that will begin your long document (e.g. “Chapter 1” or your front matter).
2. Scroll down to the very bottom of that document.
3. On the Insert Ribbon, in the Text Group, click on the arrow next to the Object icon and select Text from File….
4. Navigate to the document you wish to insert and click Insert.
5. Repeat steps 2 through 5 for the remaining documents.
If needed, you can add a section break in between the inserted files so they start on a new page, but if you‟ve built a page break into the Heading 1, you should get that automatically. See below for more information about sections.

Using Microsoft Word 2010 for Your Dissertation A University of Michigan Library Instructional Technology Workshop
Need help? Visit the Faculty Exploratory or Knowledge Navigation Center on the 2nd floor of the Graduate Library.
[email protected] | http://guides.lib.umich.edu | [email protected]
rev: 8/18/11
11 of 18
FINALIZING YOUR DISSERTATION IF YOU HAVEN’T USED STYLES If you have not been using styles in your document (or if you don‟t know what „styles‟ are) and are almost done with everything, then trying to incorporate styles now might be difficult. You can manually make a table of contents and list of figures as well as other adjustments to your margins and page numbers.
The table of contents and figures as well as page and caption numbering may be least painful if you combine all of your chapters into one large file. However, sometimes when the chapters are combined, the formatting can go haywire. If you try it and things go bad, then you might want to keep them separate and adjust the steps below as needed for each file.
If you combined the chapters into one file, follow the steps below to add the two-inch margin for chapter titles and a manual table of contents – inserting footnotes, pages numbers, etc. is the same for those who used styles and are in the rest of this document.
Two-Inch Margins
1. Click on the text that needs a 2 inch margin. In the Home Ribbon, click on the Expand icon in the Paragraph Group. The Paragraph dialog box will appear.
2. In the Spacing section of the Paragraph dialog box, set the Before setting to 1 in. or 72 pt (these are equivalent values). This one inch of space before your chapter heading, combined with the normal 1 inch margin will give you two inches of space.
3. Click OK until you are back at your document.
4. Repeat these steps on every page for which you need a two-inch margin.
Table of Contents
1. Put your cursor where the table of contents will appear.
2. Modify the tab settings to get the page numbers to line up correctly on the right side of the page.
a. In the Home Ribbon, click on the Expand icon in the Paragraph Group. The Paragraph dialog box will appear.
b. Click the Tabs… button. In the Tabs dialog box, type in 6” in the Tab Stop Position box, select Right as the alignment, then choose Option 2 (the “….”) as the leader.
c. Click OK.
d. Type in the text for the item in the table of contents, press the Tab key, then type in the page number.
e. Since we‟ve changed the tab setting, you can‟t use the Tab key to indent your text for the subheadings by ½ and inch
anymore. In this situation, click the Increase Indent icon ( ) in the Paragraph Group of the Home Ribbon to indent the text.

Using Microsoft Word 2010 for Your Dissertation A University of Michigan Library Instructional Technology Workshop
Need help? Visit the Faculty Exploratory or Knowledge Navigation Center on the 2nd floor of the Graduate Library.
[email protected] | http://guides.lib.umich.edu | [email protected]
rev: 8/18/11
12 of 18
ADDING PAGE NUMBERS Microsoft Word provides you with the option of selecting a numbering style (e.g. “Roman Numeral”, “Arabic”) and gives you the option of selecting the “starting at” number. You can set the page numbers for your entire document, or if you need more control, you can do it section-by-section as well.
If you want continuous pagination that is all in the same format, go to the Insert Ribbon, and in the Header & Footer Group, click on the Page Number icon. Choose the appropriate placement of the number and a style.
If you are writing a Rackham dissertation, you have more complicated pagination. For example, Rackham‟s guidelines require that the page numbers begin on the third or fourth page of your document (depending on if you include a graphical frontispiece) and the page number on that page should be Roman numeral “ii”. Page numbering should continue on in roman numerals until the first page of Chapter 1 is reached. At that point, the numbering should restart in Arabic (“1, 2, 3…”).
To accomplish this, we are going to divide the document into different “sections”, break them apart (so they can have different page number formatting), and then add the page numbers.
See sections below on how to achieve this.
STEP 1: USING SECTIONS TO CONTROL PAGE NUMBERING The following instructions demonstrate numbering a dissertation document according to Rackham‟s guidelines. These steps assume you are including a title page, a copyright page, dedication and acknowledgements and other front matter, and then the body of your dissertation.
1. Put your cursor before the first letter of “Dedication” or whatever is the first thing that comes after your copyright page.
2. On the Page Layout Ribbon, in the Page Setup Group, click on the arrow next to the
Breaks icon ( ) and select Next Page under the Section Breaks section.
3. If you turn on the paragraph markers, you should now see a section break on the previous page.
4. Put your cursor before the first letter of your first chapter and repeat steps 2 and 3.
You have just separated your dissertation into sections. If you want to see what section you are working in, a the left end of Status Bar (at the bottom of your Word document), Word tells you what page you are on, how many words are in your document, which section you are in, and so on.
If you don‟t see the section information, right-click on the Status Bar, and select Section in the menu that appears.

Using Microsoft Word 2010 for Your Dissertation A University of Michigan Library Instructional Technology Workshop
Need help? Visit the Faculty Exploratory or Knowledge Navigation Center on the 2nd floor of the Graduate Library.
[email protected] | http://guides.lib.umich.edu | [email protected]
rev: 8/18/11
13 of 18
STEP 2: BREAKING THE CONNECTION BETWEEN SECTIONS By default, the headers and footers of each section are connected to those of the sections before and after it. Therefore, if you want different page number styles to vary from one section to the next (such as Roman or Arabic), you‟ll need to break the connection between the sections. Particularly with landscaped pages, it is often helpful to break the connection in the header as well as in the footer.
1. Put your cursor on the first page that needs the Roman numeral.
2. On the Insert Ribbon, in the Header & Footer Group, click on the arrow under the Footer icon and select Edit Footer.
3. You should now be in the footer of that page; in the Header & Footer Tools Design Ribbon, in the Navigation Group, unlink this section‟s footer from previous sections‟ footer by clicking the highlighted Link to Previous icon.
4. Put your cursor in the header area, and again click the highlighted Link to Previous icon.
5. Scroll down to the first page of the body of your dissertation (the chapters), make sure your cursor is in the footer, and click the highlighted Link to Previous icon again.
6. Repeat for the header area.
You have now successfully unlinked footers of these sections. Any page numbers you put in the body of your document will not affect the page numbering of your front matter, and vice versa.
STEP 3: ADDING THE PAGE NUMBERS 1. Scroll up to the section that contains your front matter and click in the footer of any page
(don‟t do anything for your title page and other pages that don‟t require a page number).
2. On the Insert Ribbon, in the Header & Footer Group, click on the arrow next to the Page Number icon and select the positioning you‟d like. Generally, Bottom of the Page is the choice, and either Plain Number 2 (centered) or Plain Number 3 (right aligned).
3. To change to Roman Numerals, on the Insert Ribbon, in the Header & Footer Group, click on the arrow next to the Page Number icon and select Format Page Numbers… to set the “start at” number and the style of numbering.
4. Scroll down to the first page of the next section (where your chapters start) and click in the footer.
5. Repeat steps 2 and 3 to set the page numbers for this section. We have noticed in Office 2010 that sometimes when you insert the page number in the chapters‟ sections it automatically turns to Arabic. If that is the case, then you just need to follow step 3 to make it start at 1.

Using Microsoft Word 2010 for Your Dissertation A University of Michigan Library Instructional Technology Workshop
Need help? Visit the Faculty Exploratory or Knowledge Navigation Center on the 2nd floor of the Graduate Library.
[email protected] | http://guides.lib.umich.edu | [email protected]
rev: 8/18/11
14 of 18
WORKING WITH LANDSCAPE PAGES When you change the orientation of a section of page to landscape, the header and footer of that section do not change orientation. Instead, the header and footer are at the top and bottom of the page on your screen, but when you print, they are in the left and right margins of the page, not the top and bottom. Any page numbers in the header or footer will appear sideways on the left or right of the printed page. These steps will help you move the page numbers to the appropriate spot and turn them on their side so they print correctly.
CREATING A LANDSCAPE SECTION 1. Click on the last line of the page before the page you want to have landscape orientation.
2. On the Page Layout Ribbon, in the Page Setup Group, click on the arrow next to the Breaks icon and select Next Page under the Section Breaks section.
3. This will create a new page and a section break. If you need to, use the Delete key, not the Backspace key (sometimes called the backwards delete key), on the keyboard to bring the next page‟s content back up to the page you are currently on.
4. Click on the last line of the last page that you want to have landscape orientation (or if you don‟t have content yet press Return on the keyboard a few times), and repeat steps 2 and 3.
5. Click anywhere in section you want to have the landscape orientation.
6. On the Page Layout Ribbon, in the Page Setup Group, click on the arrow next to the Orientation icon and select Landscape. Word 2010 understands that you want landscape only for this section.
DISCONNECTING THE LANDSCAPE SECTION 1. Click somewhere in the first page of the section with landscape pages. On the Insert
Ribbon, in the Header & Footer Group, click on the arrow below the Header icon and select Edit Header.
2. In the Header & Footer Tools Design Ribbon, in the Navigation Group, unlink this section‟s Header from previous sections‟ headers by clicking the highlighted Link to Previous icon.
3. Click on the Go to Footer icon and repeat step 3.
4. Scroll down to the first portrait page following your landscape section and repeat steps 3 and 4 for this section.
You have now disconnected the headers and footers in the sections prior to and following the landscape section of pages. This will prevent any changes you make to the page numbers on the landscape pages from affecting the numbering on other pages.

Using Microsoft Word 2010 for Your Dissertation A University of Michigan Library Instructional Technology Workshop
Need help? Visit the Faculty Exploratory or Knowledge Navigation Center on the 2nd floor of the Graduate Library.
[email protected] | http://guides.lib.umich.edu | [email protected]
rev: 8/18/11
15 of 18
ADDING PAGE NUMBERS TO THE LANDSCAPE PAGE(S) 1. Delete the page numbers from the footer of
the landscape section.
2. On the Insert Ribbon, in the Header & Footer Group, click on the arrow next to the Page Number icon, choose Page Margin, and then in the Plain Number section, choose Large, left (unfortunately, they don‟t seem to have just a plain left option).
3. A large number will now appear in the left margin, and should be correctly centered.
4. Highlight the number, go to the Home Ribbon, and apply the Footer style so it matches all of your other footers.
a. Go to the Styles Group, click on the More icon ( ) and then Apply Styles.
b. Type in “Footer” in the Style Name: box, and then click Apply.
5. In the Drawing Tools Format Ribbon, in the Text Group, click on Text Direction icon until the number is rotated in the right orientation.

Using Microsoft Word 2010 for Your Dissertation A University of Michigan Library Instructional Technology Workshop
Need help? Visit the Faculty Exploratory or Knowledge Navigation Center on the 2nd floor of the Graduate Library.
[email protected] | http://guides.lib.umich.edu | [email protected]
rev: 8/18/11
16 of 18
AUTOMATIC TABLE OF CONTENTS You cannot generate any automatic tables without first using styles effectively throughout your document. Microsoft Word can scan your document and find everything in the Heading 1 style and put that on the first level of your table of contents, put any Heading 2‟s on the second level of your table of contents, and so on.
If you want an automatic table of contents you need to label all of your chapter titles and front matter headings (e.g. “Dedication” and “Acknowledgements”) in the style Heading 1. All major headings within your chapters should be labeled Heading 2. All subheadings should be labeled Heading 3, and so on.
If you have used Heading styles in your document, creating an automatic table of contents is easy.
1. Place your cursor where you want your table of contents to be.
2. On the References Ribbon, in the Table of Contents Group, click on the arrow next to the Table of Contents icon, and select Insert Table of Contents….
3. If you want to change the style of your table of contents (e.g. you want more space between the items on level 1 and level 2 of your table of contents, or you want all your level 1 items to be bold), click on the Modify button, select the TOC level you want to change, then click the Modify button to do so.
4. If you want to change which headings appear in your table of contents, you can do so by changing the number in the Show levels: pulldown.
5. Click OK to insert your table of contents.
The table of contents is a snapshot of the headings and page numbers in your document. At any time, you can update it by right-clicking on it and selecting Update field. Notice that once the table of contents is in your document, it will turn gray if you click on it. This indicates that it is getting information from somewhere else.
AUTOMATIC LISTS OF FIGURES, TABLES AND EQUATIONS If you have captioned your figures, table and equations using Microsoft Word‟s captioning feature (see Inserting Captions on page 4 for details), you can have Word generate your lists for you automatically.
1. Place your cursor where you want your list to be.
2. On the References Ribbon, in the Captions Group, click the Insert Table of Figures icon
( ) (even for lists of tables and equations).
3. In the Table of Figures dialog box, select the label for which you want to make a list from the Caption Label pulldown.
4. If you want to change the style of your table of contents (e.g. you want more space between each item in the list), click on the Modify button, select the Table of Figures style, then click the Modify button to do so. Click OK when you are done.
5. Click OK to insert your table of contents.
Repeat these steps to insert other lists into your document (Rackham requires separate lists for tables, equations, figures, and any other label you‟ve used).

Using Microsoft Word 2010 for Your Dissertation A University of Michigan Library Instructional Technology Workshop
Need help? Visit the Faculty Exploratory or Knowledge Navigation Center on the 2nd floor of the Graduate Library.
[email protected] | http://guides.lib.umich.edu | [email protected]
rev: 8/18/11
17 of 18
COMMENTING AND REVIEWING You will be sending your documents back and forth with your faculty advisors throughout your writing process. Before you send your document, you should enable the Track Changes feature. Any changes your advisors make to your document will be recorded, so you can approve or reject that change later.
On the Review Ribbon in the Tracking Group, click on the Track Changes icon to highlight it and enable it. Then, just type in your document as normal, and any change you make will be tracked. Different colors will represent different people commenting on the same document. The colors will change automatically with the different users. To disable track changes, repeat this step.
Use Comments if you have a general comment rather than a specific suggestion.
To turn off the balloons, click on the Balloons icon, under Show Markup and choose Show All Revisions Inline.
USING TRACKED CHANGES
With balloons turned on, all changes (except added text) display in the right margin, including comments. This includes formatting changes such as bold, italic, etc.
Without balloons turned on, all changes are right in the text. Move your cursor over a comment to see a popup box of the comment.

Using Microsoft Word 2010 for Your Dissertation A University of Michigan Library Instructional Technology Workshop
Need help? Visit the Faculty Exploratory or Knowledge Navigation Center on the 2nd floor of the Graduate Library.
[email protected] | http://guides.lib.umich.edu | [email protected]
rev: 8/18/11
18 of 18
MERGING COMMENTS AND CHANGES INTO ONE DOCUMENT Once everyone has made their changes and comments, you may need to combine everyone‟s documents into one final document for review.
1. On the Review Ribbon, in the Compare Group, click on the Compare icon and choose Combine.
2. In the resulting dialog box, choose your original document on left side and the revised document on the right side (click on the Folder icon to browse through your files).
3. Click OK to exit the dialog box.
4. Repeat as needed until everyone‟s documents are combined into one. Notice that a new, combined document is created each time – you only need to save the one that has everyone‟s changes together.
Each person‟s changes will appear in a different color, so you can easily see who said what. To look at the changes by a single individual, click on the arrow to the right of the Show Markup icon (in the Tracking Group), go down to Reviewers, and choose the single person you want to look at.
ACCEPTING AND REJECTING CHANGES Once you have all of the documents combined into one, you need to accept or reject all of the changes and comments. Normally, you will reject all comments – after you address the issue!
Use the Next and Previous icons in the Changes Group of the Review Ribbon to move back and forth to the various changes.
To accept a change, click on the changed text (or use the arrow to get to the change), and then click the Accept icon in the Changes Group of the Review Ribbon. You can accept all changes at once by clicking on the pulldown below the Accept icon and selecting Accept All Changes in Document.
To reject a change, click on the changed text, and then click the Reject icon in the Changes Group of the Review Ribbon. You can reject all changes at once by clicking on the pulldown below the Reject icon and selecting Reject All Changes in Document.
To view what your document would look like with all changes accepted, click on the top-most pulldown on the right side of the Tracking Group and select Final. Note that you will still need to accept or reject all the changes; this is just for viewing, you still need to accept or reject all of the changes before your document is complete.