using a crocker sharpener - imcclains.com · using a crocker sharpener crocker sharpeners are used...
TRANSCRIPT
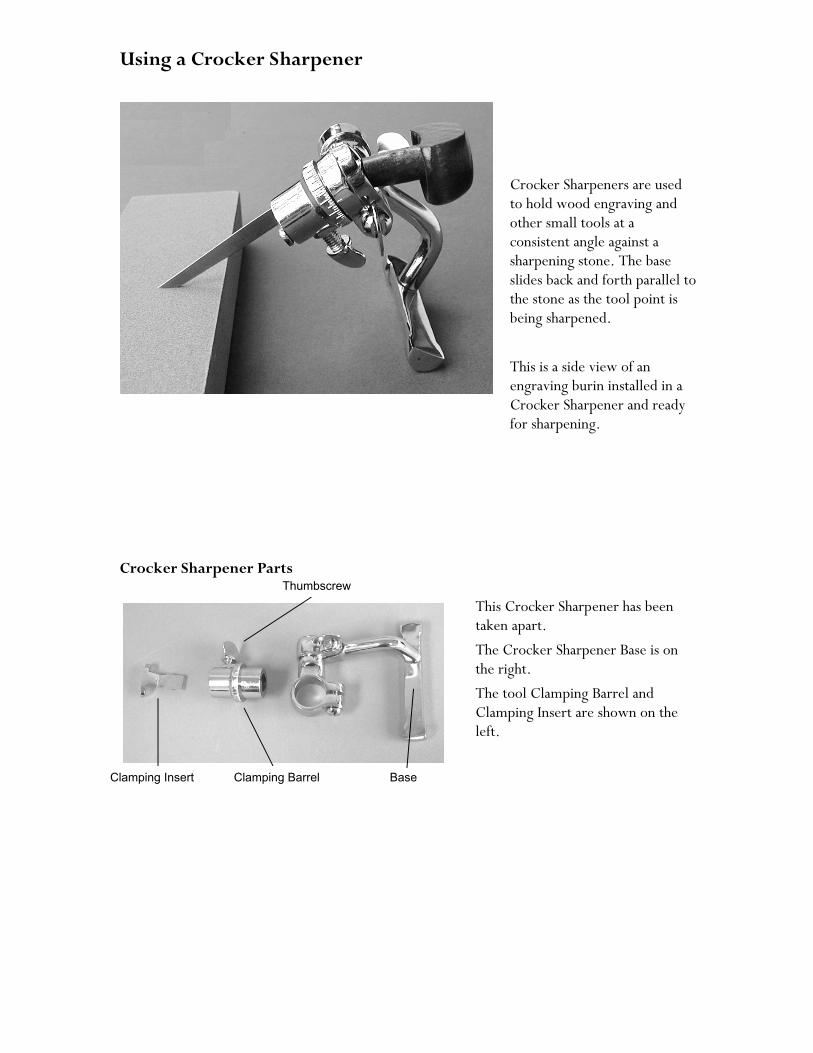
Using a Crocker Sharpener
Crocker Sharpeners are used to hold wood engraving and other small tools at a consistent angle against a sharpening stone. The base slides back and forth parallel to the stone as the tool point is being sharpened.
This is a side view of an engraving burin installed in aCrocker Sharpener and ready for sharpening.
Crocker Sharpener Parts
This Crocker Sharpener has been taken apart.
The Crocker Sharpener Base is on the right.
The tool Clamping Barrel and Clamping Insert are shown on the left.
Clamping Insert Clamping Barrel Base
Thumbscrew

Installing a Small Tool into a Crocker Sharpener
Small tool inserted into the Clamping Barrel
This view from above shows the Clamping Barrel installed in the Base with the tool in place.
A large V groove is clearly visible in the back of the Clamping Barrel. The top of the tool rests in this V groove on the inside of the Clamping Barrel. The Clamping Insert is placed on the tool so that its small V grooverests on the tool shank. This prevents the toolfrom rotating when the thumb screw is tightened.
View from the other end shows the Clamping Insert in place with the tool point protruding
To insert the tool:
1. Loosen the thumb screw. The Clamping Insert will come out.
2. Place the top edge of the engraving tool into the large V groove of the clamping barrel.
3. Place the Clamping Insert into the barrel with its small V groove on the tool with the tool tip protruding 1" to 1 ½".
4. Carefully tighten the thumb screw until the tool is firmly held in place.
Note how the Clamping Insert is placed just above the tool shank capturing the tool shank between the two V grooves in the photo on the left.
Installing a Large Tool Into A Crocker SharpenerA larger tool, like an elliptic tint or a smallchisel, can be held in the Clamping Barrel without the Clamping Insert.
This picture shows an elliptic tint tool held in the Clamping Barrel without using the Clamping Insert. It can be a little tricky to get the thumbscrew to center on the narrow edge of the tool's shank, but with a little patience you will be successful.

Hint: The tool does not have to be precisely aligned with the V groove on the inside of the Clamping Barrel so long as it is being held firmly.
Now the Crocker Sharpener is ready for final adjustments
Adjustments
Use the rotation and angle adjustments to align the flat face of the engraver with the flat plane of the sharpening stone.
There are two thumbscrews that can be loosened to either rotate the tool around the axis of the tool shank or to change the angle at which the tool face contacts the sharpening stone. Look at the tool tip very closely and make these adjustments until the entire face of the tool is resting flat on the surface of the stone. You may also have to loosen the Clamping Barrel thumbscrew to adjust how much the tool sticks out in order to reach a good alignment.
Sketch of the tool tip in alignment with the plane of the sharpening stone.
SharpeningYou can use oil stones or waterstones to sharpen engraving tools. When using waterstones, soak the stones before use and keep them wet during sharpening. In either case, the stones must be flat in order to achieve a flat plane on the engraver tip. Rub one stone against another to flatten both stones.
Angle adjustment
screw
Rotation adjustment
screw
Sharpening Stone
Tool Tip

After normal use, a tool can be sharpened using a medium stone first, followed by a fine stone. Slide the Crocker Sharpener with the tool installed back and forth on the medium stone. Lift the tool off the stone frequently and check the tip. A magnifying lens is very useful for this.
If the tool tip looks faceted, the angle of the tip was not adjusted quite right in the Crocker Sharpener. Re-adjust the tool until you can see that it is totally flat against the stone surface. Then stroke on the medium stone again to reestablish a single facet or plane before proceeding to the fine stone.
When the tip plane has been reestablished and any rounded corners are gone, stop using the medium stone and switch to the fine stone. Repeat the back and forth motion with frequent inspections of the tip. Stop when the tip area looks flat, smooth and free of scratches. If you can see or feel a burr on the sides of the tip, a quick swipe on a piece of fine sandpaper will remove it. The edges of the tip should appear crisp and sharp.
If a groove begins to appear in the surface of the stone, reposition the Sharpener on the stone, turn the stone end for end or turn it over to sharpen on a fresh, flat surface. Once all usable positions begin to groove, re-flatten the stones by rubbing them together (with lots of water, if they are waterstones) until they are flat again.
Additional detailed information and instructions on using the Crocker Sharpener can be found in the excellent book, Relief and Intaglio Printmaking Methods on Resingrave Blocks, by Richard Woodman, available from McClain's.
15685 SW 116th Avenue PMB 202King City, OR 97224-2695 USAwww.imcclains.com503-641-3555 (phone) 503-641-3555 (fax)800-832-4264 (orders)