users manual, user's manual mx-b450w, mx-b350w, mxb450w...
TRANSCRIPT

Functions of the machine and procedures for placing originals and loading paper
BEFORE USING THE MACHINE
COPIERUsing the copy function
PRINTERUsing the printer function
FACSIMILEUsing the fax function
SCANNERUsing the scan function
TROUBLESHOOTINGWhat to do when a paper misfeed or other problem occurs
SYSTEM SETTINGSConfiguring settings to make themachine easier to use
Click to jump to the table of contents of the desired chapter.
User's Manual
DIGITAL MULTIFUNCTIONAL SYSTEM
WEB PAGESMachine settings configured from the Web page
MODEL: MX-B350WMX-B450W

i
HOW TO USE THIS MANUALClick a button below to move to the page that you wish to view.The following explanation assumes that Adobe Acrobat Reader is being used (Some buttons do not appear in the default state.).
(1) Return to top page button
If an operation does not proceed as expected, click this button to start over again.
(2) Back one page button
Displays the previous page.
(3) Forward one page button
Displays the next page.
(4) Return to previously displayed page button
Displays the page that was displayed before the current page.
(5) Title button
Displays the page of the title indicated by the button.
(6) Contents button
Displays the contents of each chapter.For example, if the current page is part of the printer chapter, the table of contents of the printer chapter appears.
(1) (2) (3) (4)
(6)(5)(6)(5)
If a button does not appear, refer to Adobe Reader Help to display the button.
ii
ABOUT OPERATION MANUALThis manual explains how to use the MX-B350W/MX-B450W digital multifunctional system.
Please note• For information on installing the drivers and software cited in this manual, please refer to the Software Setup Guide.
• For information on your operating system, please refer to your operating system manual or the online Help function.
• The explanations of screens and procedures in a Windows environment are primarily for Windows® 10. The screens may be different depending on the version of the operating system or the software application.
• The explanations of screens and procedures in a Macintosh environment are based on Mac OS X v10.12 in the case of Mac OS X. The screens may be different depending on the version of the operating system or the software application.
• Wherever "MX-xxxx" appears in this manual, please substitute your model name for "xxxx".
• Considerable care has been taken in preparing this manual. If you have any comments or concerns about the manual, please contact your dealer or nearest SHARP Service Department.
• This product has undergone strict quality control and inspection procedures. In the unlikely event that a defect or other problem is discovered, please contact your dealer or nearest SHARP Service Department.
• Aside from instances provided for by law, SHARP is not responsible for failures occurring during the use of the product or its options, or failures due to incorrect operation of the product and its options, or other failures, or for any damage that occurs due to use of the product.
Warning• Reproduction, adaptation or translation of the contents of the manual without prior written permission is prohibited, except as
allowed under copyright laws.
• All information in this manual is subject to change without notice.
Illustrations and the operation panel and display shown in this manualThe peripheral devices are generally optional, however, some models include certain peripheral devices as standard equipment.
The explanations in this manual assume that paper feed unit is installed on the MX-B450W.
For some functions and procedures, the explanations assume that devices other than the above are installed.
Icons used in the manualsThe icons in the manuals indicate the following types of information:
The display screens, messages, and key names shown in the manual may differ from those on the actual machine due to product improvements and modifications.
This alerts you to a situation that could result in death or serious personal injury. This alerts you to a situation that could result in personal injury or damage to properties.
This explains how to stop or correct an operation.
This alerts you to a situation where there is a risk of machine damage or failure.
This describes a routine work relevant to setting mode.
This supplements function or operation procedure.

1-1
BEFORE USING THE MACHINE
PART NAMES AND FUNCTION . . . . . . . . . . . . . . . 1-2
• EXTERIOR . . . . . . . . . . . . . . . . . . . . . . . . . . . . 1-2
• INTERIOR, SIDE AND BACK . . . . . . . . . . . . . . 1-3• AUTOMATIC DOCUMENT FEEDER AND
DOCUMENT GLASS. . . . . . . . . . . . . . . . . . . . . 1-4
• OPERATION PANEL. . . . . . . . . . . . . . . . . . . . . 1-5
PERIPHERAL DEVICES . . . . . . . . . . . . . . . . . . . . . 1-7
DISPLAY . . . . . . . . . . . . . . . . . . . . . . . . . . . . . . . . . 1-8
• LEFT MENU AND RIGHT MENU . . . . . . . . . . . 1-8
• HOW TO USE THE DISPLAY . . . . . . . . . . . . . . 1-9
TURNING ON THE POWER. . . . . . . . . . . . . . . . . . . 1-11
Eco . . . . . . . . . . . . . . . . . . . . . . . . . . . . . . . . . . . . . . 1-12
• ECO FUNCTIONS OF THE MACHINE . . . . . . . 1-12
• AUTO POWER SHUT-OFF MODE . . . . . . . . . . 1-12
• PREHEAT MODE . . . . . . . . . . . . . . . . . . . . . . . 1-13• ENTER AUTO POWER SHUT-OFF AFTER
THE REMOTE JOB . . . . . . . . . . . . . . . . . . . . . . 1-13
USER AUTHENTICATION MODE . . . . . . . . . . . . . . 1-14• USING USER AUTHENTICATION MODE . . . . 1-14
UNIVERSAL DESIGN IN THE MACHINE . . . . . . . . 1-15• UNIVERSAL DESIGN RELATED TO
OPERATION . . . . . . . . . . . . . . . . . . . . . . . . . . . 1-15
• UNIVERSAL DESIGN RELATED TO HEARING . . . . 1-15
• UNIVERSAL DESIGN FEATURES . . . . . . . . . . . . . . 1-16
LOADING PAPER
IMPORTANT POINTS ABOUT PAPER . . . . . . . . . . 1-17
• NAMES AND LOCATIONS OF TRAYS. . . . . . . 1-17
• APPLICABLE PAPER TYPES. . . . . . . . . . . . . . 1-17
TRAY 1 - 2 . . . . . . . . . . . . . . . . . . . . . . . . . . . . . . . . 1-21
LOADING PAPER INTO THE BYPASS TRAY . . . . 1-24
TRAY SETTINGS . . . . . . . . . . . . . . . . . . . . . . . . . . . 1-29
HOW TO PLACE THE ORIGINAL
SELECTING A PROCEDURE FOR PLACING THE ORIGINAL DEPENDING ON THE TYPE AND STATUS OF THE ORIGINAL. . . . . . . . . . . . . . . . . . 1-30
AUTOMATIC DOCUMENT FEEDER . . . . . . . . . . . . 1-30
DOCUMENT GLASS . . . . . . . . . . . . . . . . . . . . . . . . 1-32
MAINTENANCE
CHECKING THE TOTAL OUTPUT COUNT AND TONER REMAINING. . . . . . . . . . . . . . . . . . . . . . . . 1-33
ADJUSTING THE DISPLAY CONTRAST . . . . . . . 1-33
REGULAR MAINTENANCE . . . . . . . . . . . . . . . . . . 1-34• CLEANING THE DOCUMENT GLASS AND
AUTOMATIC DOCUMENT FEEDER. . . . . . . . 1-34
• CLEANING THE BYPASS FEED ROLLER . . . 1-35
• CLEANING THE PAPER FEED ROLLER . . . . 1-35
REPLACEMENT OF TONER CARTRIDGE . . . . . . 1-36
CHARACTER ENTRY
CHARACTERS THAT CAN BE ENTERED . . . . . . 1-39
BEFORE USING THE MACHINE

1-2
BEFORE USING THE MACHINE►BEFORE USING THE MACHINE
PART NAMES AND FUNCTIONEXTERIOR
(1) Output tray (exit tray cabinet)Received faxes and printed papers are delivered to this tray.
(2) Automatic document feeder
It automatically feeds and scans multiple originals. 2-sided originals can be automatically scanned. ► AUTOMATIC DOCUMENT FEEDER (page 1-30)
(3) Operation panelThis panel hosts the [ENERGY SAVE] key/indicator, Printer mode indicator, FAX mode indicators, and operation keys.► OPERATION PANEL (page 1-5)
(4) USB port (A type)This is used to connect a USB device such as a USB memory device to the machine.Supports USB 2.0 (Hi-Speed).
(5) Bypass trayUse this tray to feed paper manually.When loading paper, also open the extension tray.► LOADING PAPER INTO THE BYPASS TRAY (page 1-24)
(6) HandleGrasp it when moving the machine.
(7) Tray 1Store paper in this tray.► TRAY 1 - 2 (page 1-21)
(8) Tray 2 (when a 600-sheet paper feed unit is installed)*
Store paper in this tray.► TRAY 1 - 2 (page 1-21)
(9) Front coverOpen this cover to replace a toner cartridge.► REPLACEMENT OF TONER CARTRIDGE (page 1-36)
* Optional
BEFORE USING THE MACHINE
(1) (5)(2) (3) (4)
(7)(6) (8) (9)

1-3
BEFORE USING THE MACHINE►BEFORE USING THE MACHINE
INTERIOR, SIDE AND BACK
(1) Fusing unit Heat is applied here to fuse the transferred image onto the paper.
(2) Photoconductive drum unitImages are formed on the photoconductive drum.
(3) LAN connectorConnect the LAN cable to this connector when the machine is used on a network.Use a shielded LAN cable.
(4) USB port (B type)
The machine does not use this connector.
(5) Toner cartridge
This cartridge contains toner.When the toner in a cartridge runs out, replace with new one.► REPLACEMENT OF TONER CARTRIDGE (page
1-36)
(6) Side coverOpen this cover to remove a paper misfeed.
(7) Telephone line jack (LINE)When the fax function of the machine is used, the telephone line is connected to this jack.
(8) Extension phone jack (TEL)When the fax function of the machine is used, an extension phone can be connected to this jack.
(9) The main power switchUse this switch to turn on the power for the machine.When using the fax, always keep this switch in the “ ” position.► TURNING ON THE POWER (page 1-11)
(10) Power plug
(11) Handle Grasp it when moving the machine.
(5) (6) (11)(7) (8) (9) (10)
(1) (2) (3) (4)
The fusing unit is hot. Take care not to burn yourself when removing a misfeed.
Do not touch or damage the photoconductive drum and the transfer roller.This may cause a defective image.

1-4
BEFORE USING THE MACHINE►BEFORE USING THE MACHINE
AUTOMATIC DOCUMENT FEEDER AND DOCUMENT GLASS
(1) Document feeding cover Open this cover to remove an original misfeed.This cover is also opened to clean the paper feed roller.► CLEANING THE PAPER FEED ROLLER (page 1-35)
(2) Original guides These guides help ensure that the original is scanned correctly.Adjust the guides to the width of the original.
(3) Document feeder trayPlace the original.Place the original with the print side facing up.► AUTOMATIC DOCUMENT FEEDER (page 1-30)
(4) Original exit tray The original is discharged to this tray after scanning.
(5) Scanning area Originals placed in the automatic document feeder are scanned here.► CLEANING THE DOCUMENT GLASS AND
AUTOMATIC DOCUMENT FEEDER (page 1-34)
(6) Document glass If you want to scan books or other thick originals that cannot be fed through the automatic document feeder, place them on this glass.► DOCUMENT GLASS (page 1-32)
(7) Paper feed roller This roller rotates to automatically feed the original.
(1) (3) (4)
(7)
(5) (6)(2)

1-5
BEFORE USING THE MACHINE►BEFORE USING THE MACHINE
OPERATION PANELThis section describes the names and functions of the respective parts of the operation panel.
(1) DisplayShows various messages. ► DISPLAY (page 1-8)
(2) [FAX] key / indicatorPress to select fax mode.
(3) [SCAN] key / indicatorPress to select scan mode.
(4) [COPY] key / indicatorPress to select copy mode.To check the total number of pages output in copy, print, and fax modes hold down the [COPY] key when the machine is in the standby state. The counts will appear while the key is held down.The toner level is shown at the bottom of the screen.
(5) Arrow keysPress to move the highlighting (which indicates that an item is selected) in the display.
(6) [OK] keyPress to enter the selected setting.
(7) Numeric keysEnter characters/numbers.
(8) [C] key Press to clear the set number of copies or stop a copy run.
(9) [ENERGY SAVE] key / indicatorPress to enter the energy save mode.
(10) [PROGRAM 1 / PROGRAM 2] keyPress to use the scanner settings already stored. ► USING STORED SETTINGS (PROGRAM) (page
5-19)
(11) [ZOOM] keyPress to select a reduction or enlargement copy ratio.► ENLARGE/REDUCE (page 2-10)
(12) [ID CARD COPY] keyEnable ID Card Copy. ► ID CARD COPY (page 2-17)
(13) [SPECIAL FUNCTION] keyPress to select Special Modes.
(14) [EXPOSURE] keyUse to select the exposure mode.► CHANGING THE EXPOSURE AND ORIGINAL
IMAGE TYPE (page 2-8)
(15) [STOP] keyPress this key to stop a copy job or scanning of an original.
(16) [START] key / indicatorPress this key to copy or scan an original in black and white. This key is also used to send a fax in fax mode.
(17) [CA] key Clears all selected settings and returns the machine to the default settings.
(2) (8)(3) (4) (9)(6)(5)(1) (7)
(15) (16)(10) (17)(12) (14)(13)(11)

1-6
BEFORE USING THE MACHINE►BEFORE USING THE MACHINE
(18) [COMM. SETTING] key
This is used to switch between memory transmission and direct transmission, and to switch between automatic reception and manual reception. ► Transmission settings (memory transmission mode
and direct transmission mode) (page 4-15)
(19) [SPEED] keyThis is used to dial by Speed dialing. ► TRANSMISSION BY AUTO-DIALING (SPEED
DIALING AND GROUP DIALING) (page 4-12))
(20) [FAX STATUS] keyThis is used to cancel a fax transmission or a stored fax transmission. ► CANCELING A FAX TRANSMISSION (page 4-21)
(21) Data notification indicatorThe indicator lights solidly or blinks to indicate the status of a job.
(22) [ADDRESS] keyUsed to search for address, numbers and other contact information stored for auto dialing.► SEARCHING FOR A PROGRAMMED
DESTINATION (USING THE [ADDRESS] KEY) (page 4-13)
(23) [BACK] keyPress to return the display to the previous screen.
(24) [LOGOUT] keyPress this key to log out after you have logged in and used the machine. When using the fax function, this key can also be pressed to send tone signals on a pulse dial line.
(25) Error indicatorLights solidly or blinks to indicate the status of the error.
(26) [SPEAKER] keyThis is used to dial without lifting an extension phone connected to the machine. (page 4-16)
(27) [REDIAL/PAUSE] keyThis is used to redial the last number dialed, and enter a pause when entering a fax number. ► CONVENIENT DIALING METHODS
(AUTO-DIALING) (page 4-6),
(28) [DUPLEX] keySelect the duplex copy/fax/scan mode.
(29) Printer mode indicator
• DATA indicatorBlinks when print data is being received. Lights steadily during printing.
(30) FAX mode indicators
• LINE indicatorLights up when a fax is being sent or received.
• DATA indicatorBlinks when a fax cannot be printed because there is no paper or otherwise. Lights steadily when there is an unsent fax.
(31) [READ-END] keyWhen copying in sort mode from the document glass, press this key when you have finished scanning the original pages and are ready to start copying.
(20)(19)(18)
(31)
(21) (25)
(28)
(23)(22) (24)
(27)(26) (30)(29)

1-7
BEFORE USING THE MACHINE►BEFORE USING THE MACHINE
PERIPHERAL DEVICESPeripheral devices can be installed on the machine to increase its range of functionality.The peripheral devices are generally optional. However, some models include certain peripheral devices as standard equipment.
(As of April, 2018)
Product name Product number
Description
600-sheet paper feed unit MX-CS14 Additional tray. A maximum of 600 sheets of paper can be loaded into the tray. One paper feed unit can be installed.
High stand MX-DS22 This is an additional dedicated stand. The stand has legs to prevent toppling.Low stand MX-DS23
Sharpdesk 1 license kit MX-USX1 This software enables integrated management of documents and computer files.
Sharpdesk 5 license kit MX-USX5
Sharpdesk 10 license kit MX-USX10
Sharpdesk 50 license kit MX-USX50
Sharpdesk 100 license kit MX-USXA0

1-8
BEFORE USING THE MACHINE►BEFORE USING THE MACHINE
DISPLAYThis section explains how to use the display.
LEFT MENU AND RIGHT MENUThe display on the machine has a right menu containing frequently used settings and a left menu for display of the settings and setting screens of each function.
Left Menu (Example: Copy mode)
(1) Message display
Messages are displayed regarding machine status and operation.
(2) Special function icon display
Icons of enabled Special Modes will appear.
(3) Paper size display
Displays the selected paper size.
(4) Exposure display
Indicates the selected exposure mode.
(5) Copy ratio display
Displays the copy ratio for reduction or enlargement.
(6) Original size display
When the original size is specified in "Original Size" in the right menu, this shows the specified size. The following icons appear when the original is placed.None: Document Glass
: Automatic document feeder (one-sided scanning).
: Automatic document feeder (two-sided scanning)
Left Menu Right Menu
1-sided to 2-sided copy
2-sided to 2-sided copy
2-sided to 1-sided copy
Sort function
Suppress BG
2-Up copy
4-Up copy
Card shot
ID card copy
Sharpness
(1)(6)(2)
(3)(4)(5)
1-9
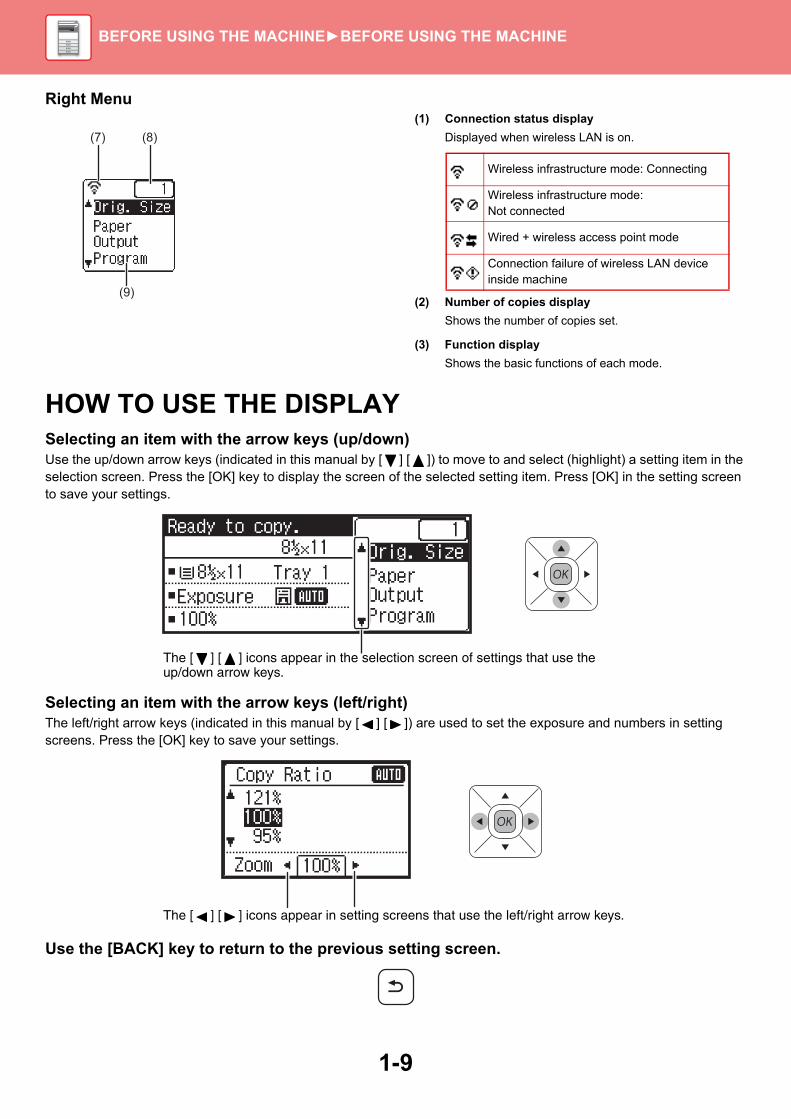
BEFORE USING THE MACHINE►BEFORE USING THE MACHINE
Right Menu(1) Connection status display
Displayed when wireless LAN is on.
(2) Number of copies display
Shows the number of copies set.
(3) Function display
Shows the basic functions of each mode.
HOW TO USE THE DISPLAYSelecting an item with the arrow keys (up/down)Use the up/down arrow keys (indicated in this manual by [ ] [ ]) to move to and select (highlight) a setting item in the selection screen. Press the [OK] key to display the screen of the selected setting item. Press [OK] in the setting screen to save your settings.
Selecting an item with the arrow keys (left/right)The left/right arrow keys (indicated in this manual by [ ] [ ]) are used to set the exposure and numbers in setting screens. Press the [OK] key to save your settings.
Use the [BACK] key to return to the previous setting screen.
(7) (8)
(9)
Wireless infrastructure mode: Connecting
Wireless infrastructure mode: Not connected
Wired + wireless access point mode
Connection failure of wireless LAN device inside machine
The [ ] [ ] icons appear in the selection screen of settings that use the up/down arrow keys.
The [ ] [ ] icons appear in setting screens that use the left/right arrow keys.

1-10
BEFORE USING THE MACHINE►BEFORE USING THE MACHINE
Data notification indicator and error indicatorThe data notification indicator and the error indicator lights solidly or blinks to indicate the status of the machine.
Error indicator (red) Data notification indicator (green)
Pattern 1 Pattern 2
Solidly Errors that do not stop machine operation, such as almost out of toner.
Job in progress, such as paper feeding or output.
Ready state or other state where jobs can be accepted.
Blinks Errors that stop machine operation, such as misfeeds and out of toner.
A fax is being received(Fax reception hold, print standby, printing a fax)
On/Blinking Priority
Blinking Priority Blinking Priority Blinking Priority
• To set the status indicated by the data notification indicatorSelect [System Settings (administrator)] → [Device Control] → [Status Light Setting].
• To set the error indicationSelect [System Settings (administrator)] → [Device Control] → [Error Light Setting].
• Specify whether or not the data notification indicator blinks while a fax is being receivedSelect [System Settings (administrator)] → [Device Control] → [Blink Setting for Received Data].

1-11
BEFORE USING THE MACHINE►BEFORE USING THE MACHINE
TURNING ON THE POWERThis section describes how to turn on/off the machine's power and how to restart the machine.The power switch is located on the left side of the machine.
Turning on the powerTurn the main power switch to the " " position.
Turning off the powerTurn the main power switch to the " " position.
Restart the machineTurn the main power switch off and then on.
Turn off the main power switch and unplug the power cord if you suspect a machine failure, if there is a bad thunderstorm nearby, or when you are moving the machine.
• When using the fax function, always keep the main power switch in the " " position.
• Print and other functions cannot be used during a brief period of time after the power is turned on or after the machine is wakened from sleep mode. This time is required to allow the machine to prepare for normal printing, and is called the warmup time.
The main power switch

1-12
BEFORE USING THE MACHINE►BEFORE USING THE MACHINE
Eco
ECO FUNCTIONS OF THE MACHINEThese functions help save power consumption by managing operations of sections prone to high power consumption. The machine provides two power-saving modes.
AUTO POWER SHUT-OFF MODEThis mode turns off the power to the operation panel and the fusing unit, and makes the machine wait in the lowest power consumption state.Auto Power Shut-Off Timer will activate when the set duration of time elapses in waiting status without executing a job.Compared to preheat mode, the power-saving rate is considerably higher but the wakeup time is longer.
The [ENERGY SAVE] key blinks when the machine is in Auto Power Shut-Off Timer.
Auto Power Shut-Off Timer is also activated by pressing the [ENERGY SAVE] key while the [ENERGY SAVE] key is not lit.This mode is cleared when print data is being received, fax data is being output, or when the [ENERGY SAVE] key is pressed while it is blinking.
Function Description Page
AUTO POWER SHUT-OFF MODE
If no operations take place, this mode will turn off the power to the operation panel and the fusing unit, and makes the machine wait in the lowest power consumption state.Although the power-saving rate is higher, the wakeup time is longer.When "ENTER AUTO POWER SHUT-OFF AFTER THE REMOTE JOB" is enabled, the machine returns to auto power shut-off mode after being wakened from auto power-shut off mode and printing a job.
1-12
PREHEAT MODE This mode lowers the temperature of the fusing unit and makes the machine wait in low power consumption state.Compared to Auto Power Shut-Off Timer, the power-saving rate is lower, but the wakeup time is shorter.
1-13
To set Auto Power Shut-Off Timer:In "System Settings (administrator)" , select [Energy Save] → [Auto Power Shut-Off Timer].
[ENERGY SAVE] key/indicator

1-13
BEFORE USING THE MACHINE►BEFORE USING THE MACHINE
PREHEAT MODEThis mode lowers the temperature of the fusing unit and makes the machine wait in low power consumption state.Preheat mode will activate when the set duration of time elapses in waiting status without executing a job.Compared to Auto Power Shut-Off Mode, the amount of energy saved is less and the wakeup time is shorter.In preheat mode the display turns off. Normal operation automatically resumes when a key on the operation panel is pressed, an original is placed, or a print job or fax is received.
ENTER AUTO POWER SHUT-OFF AFTER THE REMOTE JOBPrinting or outputting received fax data in Auto Power Shut-Off Timer turns on the power, and then the machine returns to Auto Power Shut-Off Mode immediately after completing the print job.
To set preheat mode:In "System Settings (administrator)", select [Energy Save] → [Preheat Mode].
To set "Enter Auto Power Shut-Off after the Remote Job":In "System Settings (administrator)" , select [Energy Save] → [Enter Auto Power Shut-Off after the Remote Job].
1
LL
H
L
Printed
Sleep mode Print Sleep mode
Fusing unit is turned off
Fusing unit is turned on
Fusing unit is turned off

1-14
BEFORE USING THE MACHINE►BEFORE USING THE MACHINE
USER AUTHENTICATION MODEWhen user authentication mode is enabled, a count is kept of the pages printed by each account. The page counts can be viewed in the display. Users that can transmit faxes (up to 30) can be established and transmission time and other information can be tracked for each account. The User Usage List (page 7-15) can be printed out which shows the time used for transmission and pages transmitted by each account.This function is enabled in the system settings. (User Authentication (page 7-12)) Up to 30 can be stored.
USING USER AUTHENTICATION MODEWhen user authentication mode is turned on, the account number entry screen is displayed. Enter your account number (five-digit identification number) as explained below before performing a copy, fax, or scan operation.
1Enter your account number (five digits) with the numeric keys.As the account number is entered, the hyphens (-) change to asterisks ( ). If you enter an incorrect digit, press [C] key and re-enter the correct digit.
2When the copy job is finished, press the [LOGOUT] key ( ).
• When a valid account number is entered, the current count of the account will appear in the message display of the base screen. After 6 seconds (factory default setting), the base screen appears. (►page 1-8)* In copy mode, the number of sheets remaining until the limit is
reached is also shown if Function Limit Setting (page 7-12) is enabled in the system settings.
• If you enter an user number for copy mode has also been programmed for fax mode, you can change to fax mode after completing the copy operation and continue with the fax operation without re-entering your user number. If you enter an user number for copy mode that has not been programmed for fax mode, enter your user number for fax mode after you press the [FAX] key to change to fax mode.
• If an invalid account number is entered in step 1, the account number entry screen reappears.
• When A Warning when Login Fails (page 7-12) in the system settings is enabled, a warning message will appear and operation will not be permitted for 1 minute if an invalid account number is entered 3 times in a row.
00,057,600Prints:

1-15
BEFORE USING THE MACHINE►BEFORE USING THE MACHINE
UNIVERSAL DESIGN IN THE MACHINEThe structure of the machine and the software are designed to allow all people to use the machine with ease.
UNIVERSAL DESIGN RELATED TO OPERATIONGrip handle on paper traysThe grip-type handles allow easy use from above or below. By simply placing your hand on a handle and gently pulling forward, a tray can be withdrawn. The trays can be manipulated in a natural manner.
Changing of key response timeThe response time of the keys can be changed as needed. In "System Settings (administrator)", select [Operation Settings] → [Key Press Time] and [Disable Auto Key Repeat].
• Key Press TimeThis setting is used to set the duration of time that a key must be pressed to take effect. The time can be set from 0 to 1.5 seconds in increments of 0.5 seconds.By lengthening the time setting, key input can be prevented when a key is pressed accidentally. Keep in mind, however, that when a longer setting is selected more care is required when pressing keys to ensure that key input is registered.
• Disable Auto Key RepeatThis is used to disable key repeat.Key repeat causes a setting to change continuously not only each time the key is pressed but while a key is pressed.
UNIVERSAL DESIGN RELATED TO HEARING
Audible alert sounds when changing settingsWhen moving through copy ratio or exposure settings, the user is alerted by an audible sound at the default setting (copy ratio 100%, exposure 3). In "System Settings (administrator)", select [Operation Settings] → [Keys Touch Sound] and [Keys Touch Sound At Initial Point].
• Keys Touch SoundControls the key touch sound level, or turns the sound off. You can also have three peeps sound at initial values when setting the ratio in copy mode or when adjusting the exposure in any mode.
• Keys Touch Sound At Initial PointWhen you specify the exposure in the exposure adjustment screen of each mode, a bleep sounds three times when the reference value is reached.
Screen in which setting is effective Initial value
Ratio setting screen in base screen of copy mode Ratio 100%

1-16
BEFORE USING THE MACHINE►BEFORE USING THE MACHINE
UNIVERSAL DESIGN FEATURESThe machine has design features and settings that are compatible with universal design.
Easy-to-use user interface• Multi-language display
The language used in the display can be changed to another language such as English or French.Select the desired language in "System Settings (administrator)" →[Operation Settings] →[Language Setting].► Language Setting (page 7-14)
Intuitive operation• Easy operation by storing programs
The program function lets you store groups of settings for copying, fax, and other functions. By storing groups of settings that you frequently use, you can easily select those settings.► FREQUENTLY USED SETTINGS (PROGRAMS) (page 2-24)► USING A PROGRAM (page 4-49)► USING STORED SETTINGS (PROGRAM) (page 5-19)
Easier operation at the machine• Darkened output tray color
Output tray colors are darkened to make it easy to distinguish the tray to which a job has been output.• On right side of operation panel
Located on the right side of the operation panel, this allows smooth removal of paper without interfering with the output tray.
Simple toner replacement• Toner box can be opened with one hand
The box that contains a toner cartridge can be easily opened with one hand.

1-17
BEFORE USING THE MACHINE►LOADING PAPER
IMPORTANT POINTS ABOUT PAPER
NAMES AND LOCATIONS OF TRAYS
APPLICABLE PAPER TYPESThis section describes paper types that can be used and those that cannot be used.All types of paper other than plain paper are referred to as special media.
LOADING PAPER
• Various types of paper are commercially available, some of which cannot be used on the machine.Before using any paper, consult the dealer or nearest SHARP Service Department.
• The image quality and toner fusibility of paper may change due to ambient conditions, operating conditions, and paper characteristics, resulting in image quality inferior to that of Sharp standard paper.Before using any paper, consult the dealer or nearest SHARP Service Department.
• The use of non-recommended or non-usable paper may result in skewed feeding, misfeeds, poor toner fusing (the toner does not adhere to the paper well and can be rubbed off), or machine failure.
• The use of non-recommended paper may result in misfeeds or poor image quality. Before using non-recommended paper, check whether printing can be performed properly.
Tray 1
Tray 2(when a 600-sheet paper feed unit is installed)
Bypass tray

1-18
BEFORE USING THE MACHINE►LOADING PAPER
Useable paper
Specifications of plain paper, heavy paper and thin paper
Specifications of paper that can be used for two-sided printing
Plain PaperPlain Paper 1 16 lbs. bond to 24 lbs. bond (60 g/m2 to 89 g/m2)
Plain Paper 2 24 lbs. bond to 28 lbs. bond (90 g/m2 to 105 g/m2)
Heavy paperHeavy paper 1 28 lbs. bond to 65 lbs. cover (106 g/m2 to 176 g/m2)
Heavy paper 2 65 lbs. cover to 80 lbs. cover (177 g/m2 to 220 g/m2)
Thin paper 13 lbs to 16 lbs (55 g/m2 to 59 g/m2)
• For paper specifications, see the specifications in the "Start Guide".
• Recycled paper, colored paper and pre-punched paper must meet the same specifications as plain paper.Before using any paper, consult the dealer or nearest SHARP Service Department.
• If the paper that was output is significantly curled, remove the paper from the cassette, turn the paper over so it is face down, and resume use.
Paper Type Plain, Recycled, Color, Letter Head, Pre-Printed, Punched
Paper Size 8-1/2" x 14", 8-1/2" x 13-1/2", 8-1/2" x 13-2/5", 8-1/2" x 13", 8-1/2" x 11", 5-1/2" x 8-1/2", A4, B5, A5

1-19
BEFORE USING THE MACHINE►LOADING PAPER
Types of paper that can be set in each tray
*1 when a 600-sheet paper feed unit is installed*2 "Plain Paper 1" is plain paper 16 to 24 lbs. bond (60 to 89 g/m2), "Plain Paper 2" is plain paper 24 to 28 lbs. bond
(90 to 105 g/m2).*3 "Heavy Paper 1" is heavy paper up to 65 lbs. cover (176 g/m2), "Heavy Paper 2" is heavy paper up to 80 lbs. cover
(220 g/m2).
• For detailed information on the sizes and types of paper that can be loaded into each tray of the machine, see "SPECIFICATIONS" in the "Start Guide".
• Recycled paper, colored paper and pre-punched paper must meet the same specifications as plain paper.Before using any paper, consult the dealer or nearest SHARP Service Department.
Tray 1 Tray 2*1 Bypass tray
Plain Paper 1*2 Permitted Permitted Permitted
Plain Paper 2*2 Permitted Permitted Permitted
Heavy Paper 1*3 - Permitted Permitted
Heavy Paper 2*3 - Permitted Permitted
Thin Paper - Permitted Permitted
Pre-Printed Permitted Permitted Permitted
Recycle Paper Permitted Permitted Permitted
Letter Head Permitted Permitted Permitted
Pre-Punched Permitted Permitted Permitted
Color Permitted Permitted Permitted
Labels - - Permitted
Glossy Paper - - Permitted
Transparency - - Permitted
Envelope - - Permitted

1-20
BEFORE USING THE MACHINE►LOADING PAPER
Setting orientation of the print sideThe setting orientation varies for the print side of paper, depending on the tray used. For "Letter Head" and "Pre-Printed", set the paper in the reverse orientation. Place with the print side facing the direction indicated below.
Paper that cannot be used• Embossed paper• Tab paper• Special media for an ink jet printer
(fine paper, glossy paper, glossy film, etc.)• Carbon paper or thermal paper• Pasted paper• Paper with clips• Paper with fold marks• Torn paper• Oil-feed transparency film• Thin paper less than 15 lbs (55 g/m2)• Heavy paper as thick as 80lbs. cover (220 g/m2) over• Irregularly shaped paper• Stapled paper• Damp paper• Curled paper• Paper whose print side or reverse side has been already printed on by another printer or multifunction device.• Paper with a wave-like pattern due to moisture absorption• Paper with creases• Paper with dust
Non-recommended paper• Iron-on transfer paper• Perforated paper
Tray In normal status With letter head or pre-printed paper set
Trays 1 - 2 Facing up Facing down
Bypass Facing down Facing up

1-21
BEFORE USING THE MACHINE►LOADING PAPER
TRAY 1 - 2 A maximum of 500 sheets of paper from size 5-1/2" x 8-1/2" to 8-1/2" x 11" (A6 to A4) can be loaded into tray 1. (150 sheets when the paper is A6)A maximum of 600 sheets of paper from size 5-1/2" x 8-1/2" to 8-1/2" x 14" (A5 to A4) can be loaded into tray 2.
If you loaded paper of a different type or size from the paper previously loaded, be sure to check the settings in "TRAY SETTINGS (page 1-29)". Incorrect setting affects automatic paper selection action. It may cause print failure, printing on paper of a wrong size or type or paper misfeeds.
Do not place heavy objects on the tray or press down on the tray.
To set the paper type or sizePress the [SPECIAL FUNCTION] key and set in [Paper Size Set] or [Paper Type Setup].►TRAY SETTINGS (page 1-29)
1Tray 1
Tray 2
Pull out the paper tray.Gently pull the tray out until it stops.To load paper, go to step 3. To load a different size of paper, go to the next step.
When using the tray 1, push the center of the pressure plate down until it locks into place.

1-22
BEFORE USING THE MACHINE►LOADING PAPER
2Adjust guide plates A and B to match the longitudinal and transversal dimensions of the paper to be loaded.The guide plates A and B are slidable. Squeeze the separator plate lever and slide to the desired paper size.Adjust to the non-standard paper size so that the paper will not be too loose or too tight.
• When loading 8-1/2" x 14" paper in tray 2, remove divider plate A.Move divider plate A all the way to the paper feed opening (right side), and pull up.
• When setting 8-1/2" x 14" size paper in tray 2, check if the holder in the cassette is positioned at A4 (8-1/2" x 14” in tray 2).
• When setting 8-1/2" x 11" size paper in tray 2, remove the 2 regulation plates with green color on the front and back side of the tray before setting the paper. The plates are contained in the inside storage space of the back side of the tray.
3Fan the paper.Fan the paper well before loading it. If the paper is not fanned, multiple sheets may feed at once and cause a misfeed.
A
B
A6
A4
Holder
Storage spaceRegulation plate

1-23
BEFORE USING THE MACHINE►LOADING PAPER
4Insert the paper into the tray.Load the paper with the print side facing up. The stack must not be higher than the indicator line (Tray 1: maximum of 500 sheets (Maximum of 150 sheets of A6 paper), tray 2: maximum of 600 sheets).
• If a paper misfeed occurs, turn the paper over and/or around, and reload.
• If the paper is curled, fix the curl before loading the paper.
• Adjust the divider plate so that there is no gap between the paper and divider plate.
• Do not add paper.
• Do not load the paper as shown below.
5Gently push the paper tray into the machine.Push the tray firmly all the way into the machine slowly.Forcefully inserting the paper may cause skewed feeding and paper misfeeds.
1-24
BEFORE USING THE MACHINE►LOADING PAPER
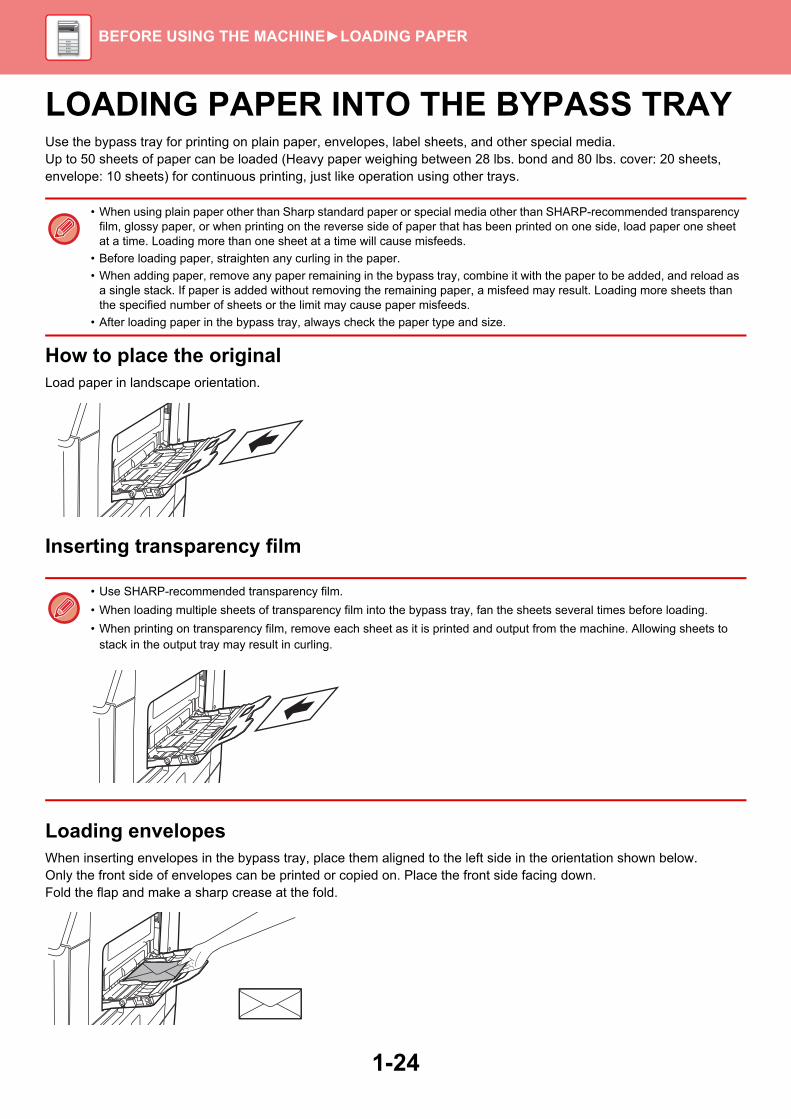
LOADING PAPER INTO THE BYPASS TRAYUse the bypass tray for printing on plain paper, envelopes, label sheets, and other special media.Up to 50 sheets of paper can be loaded (Heavy paper weighing between 28 lbs. bond and 80 lbs. cover: 20 sheets, envelope: 10 sheets) for continuous printing, just like operation using other trays.
How to place the originalLoad paper in landscape orientation.
Inserting transparency film
Loading envelopesWhen inserting envelopes in the bypass tray, place them aligned to the left side in the orientation shown below.Only the front side of envelopes can be printed or copied on. Place the front side facing down.Fold the flap and make a sharp crease at the fold.
• When using plain paper other than Sharp standard paper or special media other than SHARP-recommended transparency film, glossy paper, or when printing on the reverse side of paper that has been printed on one side, load paper one sheet at a time. Loading more than one sheet at a time will cause misfeeds.
• Before loading paper, straighten any curling in the paper.
• When adding paper, remove any paper remaining in the bypass tray, combine it with the paper to be added, and reload as a single stack. If paper is added without removing the remaining paper, a misfeed may result. Loading more sheets than the specified number of sheets or the limit may cause paper misfeeds.
• After loading paper in the bypass tray, always check the paper type and size.
• Use SHARP-recommended transparency film.
• When loading multiple sheets of transparency film into the bypass tray, fan the sheets several times before loading.
• When printing on transparency film, remove each sheet as it is printed and output from the machine. Allowing sheets to stack in the output tray may result in curling.

1-25
BEFORE USING THE MACHINE►LOADING PAPER
Important points when using envelopes• Do not print on both sides of an envelope. This may result in misfeeds or poor print quality.• Restrictions apply to some types of envelopes. For more information, consult a qualified service technician.• Some operating environments may cause creasing, smudging, misfeeds, poor toner fusing, or machine failure.• Fold the flap of the envelope and make a sharp crease at the fold. A misfeed may occur if the flap is up.• Do not use the following envelopes:
• Those with a metal piece, a plastic hook or a ribbon hook• Those with a string for closing• Those with a window• Those with a lining• Those with an uneven surface, finished with titling or emboss• Duplex envelopes or those with adhesive or other synthetic material for sealing• Hand-made envelopes• Those containing air inside• Those damaged with a crease, fold mark or tear
• Envelopes with the corner gluing position on the back not aligned with the corner edge should not be used as it may cause creasing.
• Print quality is not guaranteed in the area 13/32" (10 mm) around the edges of the envelope.• Print quality is not guaranteed on parts of envelopes where there is a large step-like change of thickness, such as on
four-layer parts or parts less than three layers.• Print quality is not guaranteed on envelopes having peel off flaps for sealing the envelopes.
Important points when using label sheets• For more information, consult the dealer or nearest SHARP Service Department.• Some labels may have to be loaded into the bypass tray in the specified orientation. Follow such instructions.
If a form is already printed on the labels, and the print images and the preprinted form do not line up, adjust the application or printer driver settings to rotate the print images.
• Do not use the following types of label sheets.• Label sheets without an adhesive copy or label copy• Label sheets with adhesive exposed• Label sheets with a specified feeding direction that is not supported by the machine• A label sheet that has already been fed or has some labels removed• Label sheets consisting of multiple sheets• Label sheets that do not support laser printing• Label sheets that cannot withstand heat• Label sheets that have perforations in the backing paper• Label sheets with slits in the backing paper• Non-standard label sheets • Label sheets with adhesive that has deteriorated due to prolonged storage or otherwise• Label sheets with cutouts that expose the backing paper• Curled or otherwise deformed label sheets• Torn or creased label sheets
Can be used
Cannot be used

1-26
BEFORE USING THE MACHINE►LOADING PAPER
Fusing unit pressure adjusting leversIn some cases damage to the envelopes or smudging may occur even if envelopes within the specifications are used. This problem may be alleviated by shifting the fusing unit pressure adjusting levers from their "normal pressure position" to the "lower pressure position". Follow the procedure on the this page.
1Open out the side cover.Gently open the cover.
2Move the fusing unit pressure adjusting levers (two) to the lower pressure position as shown.
3Close the side cover.
4Return the lever to the normal position when finished feeding envelopes.
AB
Normal position
Lower pressure positionBA
A B

1-27
BEFORE USING THE MACHINE►LOADING PAPER
Loading paper
Be sure to return the levers to the "normal pressure position" before printing or copying on paper other than envelopes. Otherwise, fusing problems, paper misfeeds, or equipment failure may occur.
The fusing unit is hot. Take care not to burn yourself when operating the fusing unit pressure adjusting levers.
1Open the bypass tray and the extension tray.
Do not place heavy objects on the bypass tray or press down on the tray.
2Push the center of the pressure plate down until it locks into place.
3Load the paper with the print side facing down.Insert the paper along the bypass tray guides all the way into the bypass tray until it stops slowly. Inserting the paper with excessive force may cause the leading edge to fold back. Inserting the paper too loosely may cause skewed feeding or misfeeds.The paper must not exceed the maximum number of sheets and must not be higher than the indicator line.

1-28
BEFORE USING THE MACHINE►LOADING PAPER
4Set the bypass tray guides correctly to the width of the paper.Adjust the bypass tray guides so that they slightly contact the loaded paper.
• Do not forcefully push in paper that you are loading. This may cause misfeeds.
• If the bypass tray guides are set wider than the paper, move the bypass tray guides in until they correctly fit the width of the paper. If the bypass guides are set too wide, the paper may skew or be creased.
1-29
BEFORE USING THE MACHINE►LOADING PAPER
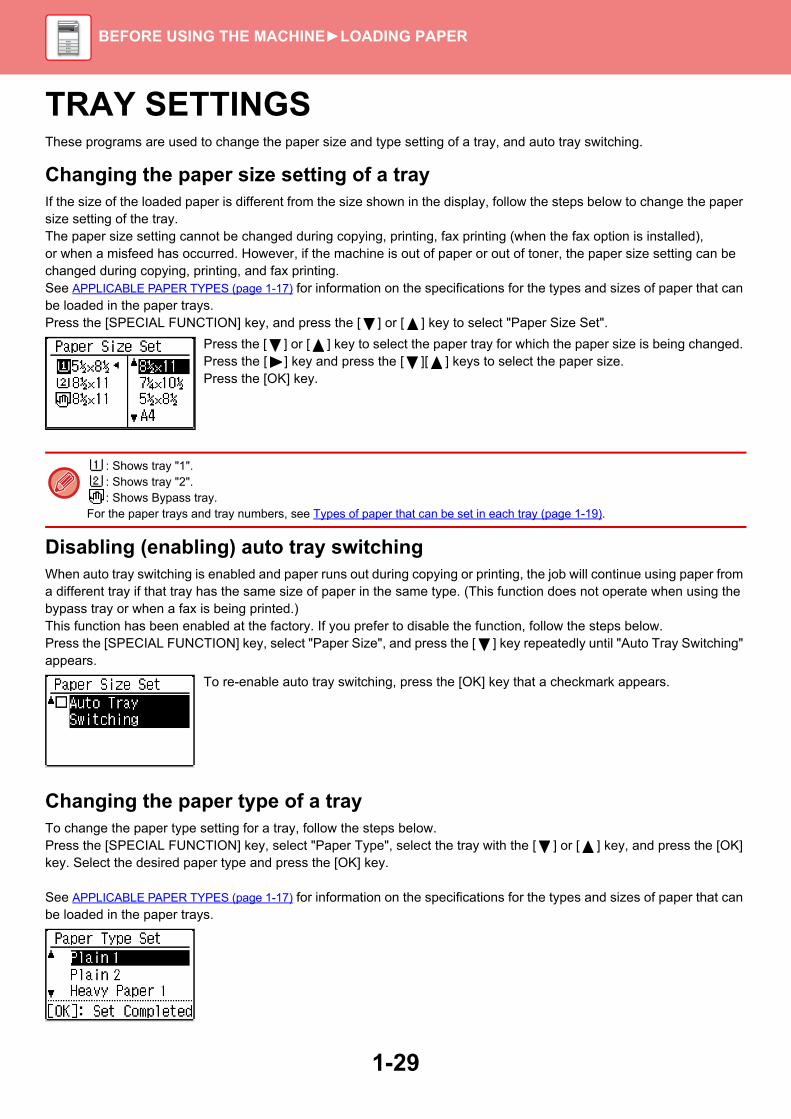
TRAY SETTINGSThese programs are used to change the paper size and type setting of a tray, and auto tray switching.
Changing the paper size setting of a trayIf the size of the loaded paper is different from the size shown in the display, follow the steps below to change the paper size setting of the tray.The paper size setting cannot be changed during copying, printing, fax printing (when the fax option is installed), or when a misfeed has occurred. However, if the machine is out of paper or out of toner, the paper size setting can be changed during copying, printing, and fax printing.See APPLICABLE PAPER TYPES (page 1-17) for information on the specifications for the types and sizes of paper that can be loaded in the paper trays.Press the [SPECIAL FUNCTION] key, and press the [ ] or [ ] key to select "Paper Size Set".
Press the [ ] or [ ] key to select the paper tray for which the paper size is being changed. Press the [ ] key and press the [ ][ ] keys to select the paper size. Press the [OK] key.
Disabling (enabling) auto tray switchingWhen auto tray switching is enabled and paper runs out during copying or printing, the job will continue using paper from a different tray if that tray has the same size of paper in the same type. (This function does not operate when using the bypass tray or when a fax is being printed.) This function has been enabled at the factory. If you prefer to disable the function, follow the steps below. Press the [SPECIAL FUNCTION] key, select "Paper Size", and press the [ ] key repeatedly until "Auto Tray Switching" appears.
To re-enable auto tray switching, press the [OK] key that a checkmark appears.
Changing the paper type of a trayTo change the paper type setting for a tray, follow the steps below.Press the [SPECIAL FUNCTION] key, select "Paper Type", select the tray with the [ ] or [ ] key, and press the [OK] key. Select the desired paper type and press the [OK] key.
See APPLICABLE PAPER TYPES (page 1-17) for information on the specifications for the types and sizes of paper that can be loaded in the paper trays.
: Shows tray "1".: Shows tray "2".: Shows Bypass tray.
For the paper trays and tray numbers, see Types of paper that can be set in each tray (page 1-19).

1-30
BEFORE USING THE MACHINE►HOW TO PLACE THE ORIGINAL
SELECTING A PROCEDURE FOR PLACING THE ORIGINAL DEPENDING ON THE TYPE AND STATUS OF THE ORIGINALPlace the original in the automatic document feeder. Depending the type and status of the original, use the document glass. Follow the instructions to select the method for placing the original.To place it in the automatic document feeder, see "AUTOMATIC DOCUMENT FEEDER (page 1-30)".
AUTOMATIC DOCUMENT FEEDERThis section explains how to place originals in the automatic document feeder.
HOW TO PLACE THE ORIGINAL
• Before inserting originals into the document feeder tray, be sure to remove any staples or paper clips.
• If originals have damp spots due to correction fluid, ink or paste up glue, wait until the originals are dry before making copies. Otherwise the interior of the machine or the document glass may be soiled.
• Do not use the following originals. Original misfeeds and smudges may result.Transparency film or other transparent material for backup copy, tracing paper, carbon paper, thermal paper or originals printed with thermal transfer ink ribbon should not be fed through the document feeder. Originals to be fed through the feeder should not be damaged, crumpled, folded, loosely pasted together, or have cut-out holes. Originals with multiple punched holes other than two-hole or three-hole punched paper may not feed correctly.
• The condition, material, shape, or fabrication method of some business cards may prevent correct feeding or scanning.
• When using originals with two or three holes, place them so that the punched edge is at a position away from the feed slot of the document feeder tray. Specify the orientation of the original using [Original].
Hole positionsFeed slot

1-31
BEFORE USING THE MACHINE►HOW TO PLACE THE ORIGINAL
Allowed original sizes
When the original is a non-standard size, see the appropriate explanation below for the mode you are using.► COPIER: "SPECIFYING THE SIZE OF THE ORIGINAL (page 2-11)"► FAX: "BASIC PROCEDURE FOR SENDING FAXES (page 4-8)"► SCANNER: "BASIC TRANSMISSION PROCEDURE (page 5-5)"
Allowed original weights1-sided scanning: 13 to 28 lbs Bond (50 to 105 g/m2)2-sided scanning: 13 to 28 lbs Bond (50 to 105 g/m2)Business card: 0.1 to 0.2 mm
Minimum original size Maximum original size
Standard size5-1/2" (longitudinal) × 8-1/2" (transversal)105 mm (longitudinal) × 148 mm, or A6Non-standard size(Minimum size that can be specified manually)4-1/4" (longitudinal) × 5-1/2" (transversal)105 mm (longitudinal) × 140 mm (transversal)Business card2" (longitudinal) x 3-1/2" (transversal)51 mm (longitudinal) x 89 mm (transversal)
Standard size8-1/2" (longitudinal) × 14" (transversal)210 mm (longitudinal) × 297 mm (transversal) or A4Non-standard size(Maximum size that can be specified manually)Copy mode/Scanner mode:8-1/2" (longitudinal) × 14" (transversal)216 mm (longitudinal) × 356 mm (transversal)Fax mode:8-1/2" (longitudinal) × 19-5/8" (transversal)216 mm (longitudinal) × 500 mm (transversal)
1 Make sure that there is no original on the document glass.
2Place the original.Up to 50 sheets can be inserted.Business card:Up to 25 sheets can be inserted.After scanning is finished on the automatic document feeder, remove originals from the original exit tray.
Align the edges evenly and face them up
Insert to the end
Fit to the Original Size
Below the indicator line

1-32
BEFORE USING THE MACHINE►HOW TO PLACE THE ORIGINAL
DOCUMENT GLASSThis section describes the steps for setting the original on the document glass.
Allowed original sizes
When the original is a non-standard size, see the appropriate explanation below for the mode you are using.► COPIER: "SPECIFYING THE SIZE OF THE ORIGINAL (page 2-11)"► FAX: "BASIC PROCEDURE FOR SENDING FAXES (page 4-8)"► SCANNER: "BASIC TRANSMISSION PROCEDURE (page 5-5)"
• Close the automatic document feeder slowly. Abruptly closing the automatic document feeder may damage it.
• Take care that your fingers are not pinched when closing the automatic document feeder.
Maximum original size
Standard size8-1/2" (longitudinal) x 14" (transversal)210 mm (longitudinal) x 297 mm (transversal) or A4Non-standard size8-1/2" (longitudinal) x 14" (transversal)216 mm (longitudinal) x 356 mm (transversal)
1Open the automatic document feeder.
2Load the paper with the print side facing down.Place the original face down and align the top left corner of the original with back left (at the tip of the mark ) of the document glass.
3Close the automatic document feeder.After placing the original, close the automatic document feeder. If the unit is left open, parts outside of the original will be copied in black, causing excessive use of toner.
If originals have damp spots due to correction fluid, ink or paste up glue, wait until the originals are dry before making copies. Otherwise the interior of the machine or the document glass may be soiled.
X
Y
Mark
Document glass scale

1-33
BEFORE USING THE MACHINE►MAINTENANCE
This section explains how to check the total count or toner remaining, adjust the display contrast, clean the machine, and replace the toner cartridge.
CHECKING THE TOTAL OUTPUT COUNT AND TONER REMAININGTo check the total number of pages output in copy, print, and fax modes hold down the [COPY] key when the machine is in the standby state. The counts will appear while the key is held down. The total output count can be used as a guideline for cleaning. When the total output count exceed "99,999,999", the counts return to "0".The toner level is shown at the bottom of the screen.
ADJUSTING THE DISPLAY CONTRASTThe contrast of the display can be adjusted as explained below.
MAINTENANCE
• You can also check by pressing the [SPECIAL FUNCTION] key and selecting "Total Count" in the function menu screen.
• Each two-sided sheet that is output is counted as two pages.
• Blank copies and blank prints are included in the count.
• If the last page of a two-sided printing job is blank, it is not included in the count.
1Press the [SPECIAL FUNCTION] key.The function screen appears.
2Select "Display Contrast" with the [ ] or [ ] key.
3Press the [OK] key.The screen contrast setting screen appears.
4Adjust the contrast with the [ ] or [ ] key.To reset the contrast to the default setting, press the [C] key.
5Press the [SPECIAL FUNCTION] key.You will return to the base screen.
Total Count
Toner Remaining

1-34
BEFORE USING THE MACHINE►MAINTENANCE
REGULAR MAINTENANCETo ensure that the machine continues to provide top quality performance, periodically clean the machine.
CLEANING THE DOCUMENT GLASS AND AUTOMATIC DOCUMENT FEEDERIf the document glass or document backplate sheet becomes dirty, the dirt will appear as dirty spots, colored lines, or white lines in the scanned image. Keep these parts clean at all times.Wipe the parts with a clean, soft cloth.If necessary, moisten the cloth with water or a small amount of neutral detergent. After that, wipe with a clean dry cloth.Examples of lines in the image
Document glass Document backplate sheet
Do not use a flammable spray to clean the machine. If gas from the spray comes in contact with hot electrical components or the fusing unit inside the machine, fire or electrical shock may result.
Do not use thinner, benzene, or similar volatile cleaning agents to clean the machine. These may degrade or discolor the housing.
Black lines White lines

1-35
BEFORE USING THE MACHINE►MAINTENANCE
SCANNING AREAIf black lines or white lines appear in images scanned using the automatic document feeder, clean the scanning area (the thin long glass next to the document glass).
CLEANING THE BYPASS FEED ROLLERIf paper misfeeds frequently occur when feeding envelopes or heavy paper through the bypass tray, wipe the surface of the feed roller with a clean soft cloth moistened with water or a neutral detergent.
CLEANING THE PAPER FEED ROLLERIf lines or other dirt appear on the scanned original when the automatic document feeder is used, wipe the surface of the roller with a clean soft cloth moistened with water or a neutral detergent.
1Open the automatic document feeder and clean the document scanning area on the document glass with the soft cloth.

1-36
BEFORE USING THE MACHINE►MAINTENANCE
REPLACEMENT OF TONER CARTRIDGEAlways replace the toner cartridge after the "Change the toner cartridge." message appears. You should keep one set of replacement toner cartridges on hand so that you can replace a toner cartridge immediately when toner runs out.
Replacement messageWhen this message appears, prepare a toner cartridge for replacement.
When you press the any key, the dialog above will be deleted and the screen will change to the following screen.
If you continue printing, the following message appears.When this message appears, prepare a toner cartridge for replacement and replace it.In this state, printing is possible.However, this message does not appear during printing.
When you press the any key, the dialog above will be deleted and the screen will change to the following screen.
If you continue to use the machine, the follow message will appear when the toner runs out.
Once the machine enters this state, printing can not be carried out until the toner cartridge is replaced.
Toner Low.(Do not replace cartridgeuntil requested.)
Change the tonercartridge.
Change the tonercartridge.

1-37
BEFORE USING THE MACHINE►MAINTENANCE
1Open the front cover.
2Pull the toner cartridge toward you.Gently pull out the toner cartridge horizontally. If the cartridge is pulled out abruptly, toner may spill out.
Hold the toner cartridge with both hands as shown and slowly pull it out of the machine.
3Take out a new toner cartridge from its package and shake it horizontally five or six times.
4Slowly insert the new toner cartridge on the level.
5Press in firmly until you hear a "click" sound.

1-38
BEFORE USING THE MACHINE►MAINTENANCE
6Close the front cover.After the toner cartridge is replaced, the machine automatically enters image adjustment mode. Do not open the front cover while this is occurring.
• Do not throw a toner cartridge into a fire. Toner may fly and cause burns.
• Store toner cartridges out of reach of small children.
• If a toner cartridge is stored upright, the toner may harden and become unusable. Always store toner cartridges on their side.
• If a toner cartridge other than a SHARP-recommended toner cartridge is used, the machine may not attain full quality and performance and there is a risk of damage to the machine. Be sure to use a SHARP-recommended toner cartridge.
• Depending on your conditions of use, the color may become light or the image blurred.
• Your service technician will collect used toner cartridges.
• To view the approximate amount of toner remaining (indicated in %), hold down the [COPY] key during printing or in standby mode. When the percentage falls to "25-0%", keep a toner cartridge for replacement purposes before toner runs out.

1-39
BEFORE USING THE MACHINE►CHARACTER ENTRY
This section explains how to enter and edit characters for names of rapid dial numbers, Speed Dial numbers, and group keys, as well as account names, program names, and search characters for the address list.
CHARACTERS THAT CAN BE ENTEREDCharacters that can be entered for namesThe following characters can be entered:• Up to 36 characters can be entered for a name.
However, up to 18 characters can be entered for an account name or sender's name.• Upper case alphabet, lower case alphabet, numbers, special characters, symbols.
Characters that can be used for search charactersThe following characters can be used:• Up to 10 characters can be entered for search characters.• Upper case alphabet, lower case alphabet, numbers, special characters.
CHARACTER ENTRY
• Search characters are normally the first 10 characters of the name entered for a destination.
• Search characters are used when storing and using auto dial keys and numbers.
• When a destination name includes a symbol, the symbol cannot be stored as a search character.
• Search characters can be edited.

1-40
BEFORE USING THE MACHINE►CHARACTER ENTRY
Characters are entered by pressing the numeric keys on the operation panel. The letters entered with each numeric key are shown below.
Characters that can be entered
KeyCharacters that can be entered for
namesCharacters that can be used for
search characters
1 1 Space 1 Space
2 a b c 2 A B C a b c 2 A B C
3 d e f 3 D E F d e f 3 D E F
4 g h i 4 G H I g h i 4 G H I
5 j k l 5 J K L j k l 5 J K L
6 m n o 6 M N O m n o 6 M N O
7 p q r s 7 P Q R S p q r s 7 P Q R S
8 t u v 8 T U V t u v 8 T U V
9 w x y z 9 W X Y Z w x y z 9 W X Y Z
*}{][?>=;:,+)('&%$"!/_-.@#
0 0 0
Use to enter special characters. Use to enter special characters.
To enter two characters in succession that require the same key, press the [ ] key to move the cursor after entering the first character.Example: Entering "ab" (when directly entering an e-mail address)
Press the [2] key once, press the [ ] key once to move the cursor, and then press the [2] key twice.

2-1
BEFORE USING THE MACHINE AS A COPIER
COPY MODE . . . . . . . . . . . . . . . . . . . . . . . . . . . . . . 2-2
COPYING SEQUENCE . . . . . . . . . . . . . . . . . . . . . . 2-3
SELECTING THE PAPER TRAY FOR COPYING . . . 2-4
BASIC PROCEDURE FOR MAKING COPIES
COPYING . . . . . . . . . . . . . . . . . . . . . . . . . . . . . . . . . 2-5
• USING THE AUTOMATIC DOCUMENT FEEDER FOR COPYING . . . . . . . . . . . . . . . . . 2-5
• USING THE DOCUMENT GLASS FOR COPYING . . . . . . . . . . . . . . . . . . . . . . . . . . . . . 2-6
• CANCELING A COPY JOB . . . . . . . . . . . . . . . . 2-6
AUTOMATIC DUPLEX COPYING . . . . . . . . . . . . . . 2-7
CHANGING THE EXPOSURE AND ORIGINAL IMAGE TYPE . . . . . . . . . . . . . . . . . . . . . . . . . . . . . . 2-8
• AUTOMATIC ADJUSTMENT OF EXPOSURE AND ORIGINAL TYPE. . . . . . . . . . . . . . . . . . . . 2-8
• MANUAL ADJUSTMENT OF EXPOSURE AND ORIGINAL TYPE . . . . . . . . . . . . . . . . . . . . . . . . 2-8
ENLARGE/REDUCE . . . . . . . . . . . . . . . . . . . . . . . . 2-10
SPECIFYING THE SIZE OF THE ORIGINAL . . . . . 2-11
MAKING COPIES USING THE BYPASS TRAY . . . 2-13
• SPECIFYING A TYPE AND SIZE OF PAPER LOADED ON BYPASS TRAY . . . . . . . . . . . . . . . . . 2-13
CONVENIENT COPY FUNCTIONS
OUTPUT . . . . . . . . . . . . . . . . . . . . . . . . . . . . . . . . . 2-15
• SORT SETTING. . . . . . . . . . . . . . . . . . . . . . . . 2-15
• ID CARD COPY . . . . . . . . . . . . . . . . . . . . . . . . 2-17
• RESOLUTION SETTINGS . . . . . . . . . . . . . . . . 2-18
SPECIAL MODES
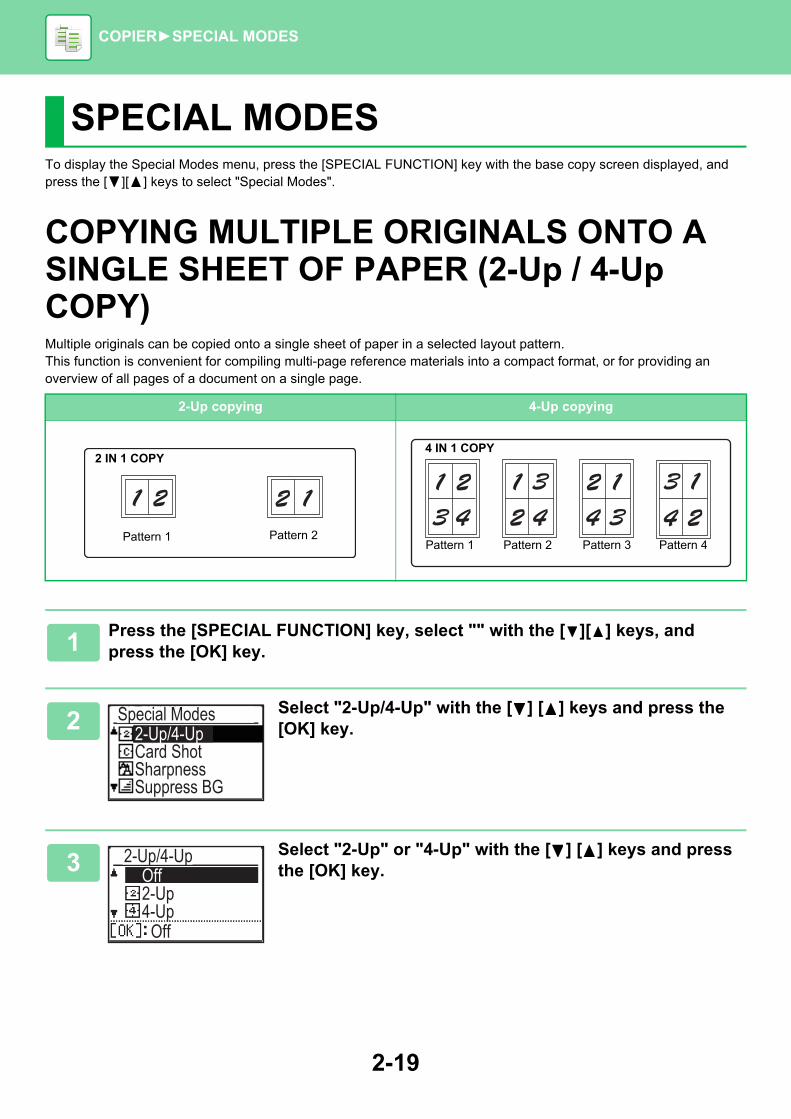
COPYING MULTIPLE ORIGINALS ONTO A SINGLE SHEET OF PAPER (2-Up / 4-Up COPY) . 2-19
COPYING BOTH SIDES OF A CARD AS A SINGLE PAGE (CARD SHOT) . . . . . . . . . . . . . . . . 2-21
ADJUSTING THE SHARPNESS OF AN IMAGE (SHARPNESS) . . . . . . . . . . . . . . . . . . . . . . . . . . . . 2-22
ADJUSTING THE BACKGROUND BY MAKING LIGHT AREAS OF THE ORIGINAL DARKER OR LIGHTER (SUPPRESS BG) . . . . . . . . . . . . . . . . . . 2-23
PROGRAMS
FREQUENTLY USED SETTINGS (PROGRAMS) . 2-24
• STORING A PROGRAM . . . . . . . . . . . . . . . . . 2-24
• CHANGING A PROGRAM . . . . . . . . . . . . . . . . 2-25
• DELETING A PROGRAM. . . . . . . . . . . . . . . . . 2-26
• USING A PROGRAM . . . . . . . . . . . . . . . . . . . . 2-26
COPIER

2-2
COPIER►BEFORE USING THE MACHINE AS A COPIER
COPY MODEPress the [COPY] key on the operation panel to change to copy mode.
BEFORE USING THE MACHINE AS A COPIER

2-3
COPIER►BEFORE USING THE MACHINE AS A COPIER
COPYING SEQUENCEThis section explains the basic procedure for copying. Select settings in the order shown below to ensure that the copy operation takes place smoothly.For detailed procedures for selecting the settings, see the explanation of each setting in this chapter.
1Switch to copy mode.► COPY MODE (page 2-2)
2Place the original.Place the original in the document feeder tray of the automatic document feeder, or on the document glass.► AUTOMATIC DOCUMENT FEEDER (page 1-30)► DOCUMENT GLASS (page 1-32)
3Select functions.Specify the original scan size, exposure, resolution, etc.If necessary, you can refer to the following functions for the setting.
• Paper Select ►page 2-4• 2-Sided Copy ►page 2-7• Copy Ratio ►page 2-10• Original ►page 2-11• Exposure ►page 2-8• N-Up ►page 2-19• Card Shot ►page 2-21
4Press the [START] key to start copying.When making only one set of copies, you do not need to specify the number of copies.
• To cancel all settings, press the [CA] key.When the [CA] key is pressed, all settings selected to that point are cleared and you will return to the base screen.
• To cancel a copy job, press the [C] key or [CA] key. If you press the [C] key, the copy settings are retained. If you press the [CA] key, the settings are canceled. If you press the [STOP] key while copying is in progress, a confirmation screen appears asking if you want to cancel the copy job.
• To make two or more sets of copies:Press the copies display key to specify the number of copies.

2-4
COPIER►BEFORE USING THE MACHINE AS A COPIER
SELECTING THE PAPER TRAY FOR COPYINGTo change the tray you want to use in order to use the bypass tray or tray 2 (if installed), select "Paper Select" in the right menu of the base screen of copy mode, and press the [OK] key.Press the [ ] [ ] keys to select the tray, and press the [OK] key.
• If the selected tray runs out of paper during a copy job and there is another tray that has the same size and type of paper, that tray will be automatically selected and the copy job will continue.
• If the "Ready to copy." message does not appear in the base screen of copy modeIf a list is being printed in the system settings, copying is not possible. Wait until list print finishes and then start copying.
Paper Select8½x118½x115½x8½
Set Completed

2-5
COPIER►BASIC PROCEDURE FOR MAKING COPIES
COPYING
USING THE AUTOMATIC DOCUMENT FEEDER FOR COPYING
BASIC PROCEDURE FOR MAKING COPIES
1Place the original in the document feeder tray of the automatic document feeder.► AUTOMATIC DOCUMENT FEEDER (page 1-30)
2Check the paper (tray) you want to use for copying, and press the keys for any other settings you want to select.• Paper Select ►page 2-4• 2-Sided Copy ►page 2-7• Copy Ratio ►page 2-10• Original ►page 2-11• Exposure ►page 2-8• N-Up ►page 2-19• Card Shot ►page 2-21
3Press the [START] key to start copying.When making only one set of copies, you do not need to specify the number of copies.
To make two or more sets of copies:Press the number of copies key to specify the number of copies.

2-6
COPIER►BASIC PROCEDURE FOR MAKING COPIES
USING THE DOCUMENT GLASS FOR COPYING
CANCELING A COPY JOBTo cancel the copying, press [C] key or [CA] key. When [C] key is pressed the copy settings are maintained and when [CA] key is pressed the copy settings are all deleted. When [STOP] key is pressed while the copy is in process, the confirmation screen whether or not to cancel the copying appears on the display.
1Place the original on the document glass.► DOCUMENT GLASS (page 1-32)
2Check the paper (tray) you want to use for copying, and press the keys for any other settings you want to select.• Paper Select ►page 2-4• 2-Sided Copy ►page 2-7• Copy Ratio ►page 2-10• Original ►page 2-11• Exposure ►page 2-8• N-Up ►page 2-19• Card Shot ►page 2-21
3Press the [START] key to start copying.When making only one set of copies, you do not need to specify the number of copies.
To make two or more sets of copies:Press the number of copies key to specify the number of copies.

2-7
COPIER►BASIC PROCEDURE FOR MAKING COPIES
AUTOMATIC DUPLEX COPYINGThe machine is capable of performing the following type of auto duplex copying. When copying, the machine will automatically turn over the originals and paper, allowing you to make 2-sided copies with ease.
To change to the 2-sided copy screen, press the [DUPLEX] key on the operation panel with the base screen of copy mode displayed.
Select "1 to 2", "2 to 2", or "2 to 1" with the [ ][ ] keys and press the [OK] key.When scanning the original on the document glass, press the [START] key after scanning the front side, turn the original over on the glass, and press the [START] key. Duplex copying starts.
To change the orientation of the copy image on the front and back sides of the paper, set "Binding Change" to "On" with the [ ][ ] keys.
Original → Paper Usable paper
Document glass
One-sided original → Two sides
8-1/2" x 14", 8-1/2" x 11", 5-1/2" x 8-1/2"(A4, B5, A5)
Document feeder
One-sided original → Two sides
Duplex original→ Two sides
Duplex original→ One side
8-1/2" x 14", 8-1/2" x 13-1/2", 8-1/2" x 13-2/5", 8-1/2" x 13", 8-1/2" x 11", 5-1/2" x 8-1/2"(A4, B5, A5)
12
1 2
Portrait original
Orientation of the placed original
Binding Change is used
The top and bottom of the images on the front and back are reversed.
Binding Change is not used
The top and bottom of the images on the front and back are the same.

2-8
COPIER►BASIC PROCEDURE FOR MAKING COPIES
CHANGING THE EXPOSURE AND ORIGINAL IMAGE TYPE
AUTOMATIC ADJUSTMENT OF EXPOSURE AND ORIGINAL TYPEAutomatic exposure adjustment operates by default to automatically adjust the exposure level and original type as appropriate for the original being copied. ([Auto] is displayed.)
MANUAL ADJUSTMENT OF EXPOSURE AND ORIGINAL TYPEThis section explains how to select the original type depending on the original to be copied or manually adjust the exposure.
To change the default exposure:In "System Settings (administrator)", select [Copy] → [Default Exposure].
To change the default exposure:In "System Settings (administrator)", select [Copy] → [Default Exposure].
1Press the [Exposure] key.► COPY MODE (page 2-2)
2Select the copy exposure.Select the original type with the [ ][ ]keys. Three exposure modes are available: "Text", "Text/Print Photo" and "Photo".
Original image type select keys• Text ............................Use this mode for regular text documents.• Text/Printed Photo .....This mode provides the best balance for copying an original which contains both text and
printed photographs, such as a magazine or catalogue.• Photo..........................This mode is best for copying printed photographs, such as photos in a magazine or catalogue.

2-9
COPIER►BASIC PROCEDURE FOR MAKING COPIES
3Adjust the exposure of the selected original type.Set "Auto" or "Manual" (5 levels) for the exposure. If needed, adjust the exposure with the [ ][ ] keys.
Guidelines for the exposure level when [Text] is selected for "Exposure/Original Type" 1 to 2: Dark originals such as a newspaper3: Normal density originals 4 to 5: Originals written in pencil or light colored text
4Press the [OK] key.

2-10
COPIER►BASIC PROCEDURE FOR MAKING COPIES
ENLARGE/REDUCEPlace the original, and press the [ZOOM] key on the operation panel to change to the ratio selection screen.Specifying a ratio from 25% to 400%: Preset ratios/zoom.(When the document feeder is being used, the zoom copy ratio range is 25% to 200%.)
1Press the [ZOOM] key.► COPY MODE (page 2-2)
2Select [Zoom].Select the ratio with the [ ][ ] keys.
3To set the ratio in increments of 1%, set a numerical value with the [ ][ ] keys.
4Press the [OK] key.

2-11
COPIER►BASIC PROCEDURE FOR MAKING COPIES
SPECIFYING THE SIZE OF THE ORIGINALWhen you want to change the original size, select "Original Size" on the right menu and press the [OK] key.
Orientation of the originalPlace the original as shown below.
Specifying the size of the original
Set the orientation and size of the original before scanning the original.
Document glass Document feeder
1Select "Original Size" in the right menu of the base screen of copy mode and press the [OK] key.
2Select Inch or AB with the [ ][ ] keys.
3 Select the size with the [ ][ ] keys.For a standard original size, select Original Size, press the [OK] key, and specify the original size.The set original size will appear in the Original Size field of the base screen.If you are using a special original size, go to step 4.
4For a special paper size, select "Size Input" and press the [OK] key.
abc
abc

2-12
COPIER►BASIC PROCEDURE FOR MAKING COPIES
5Specify the original size.
(1) Select "X" (width) with the [ ] or [ ] key .
(2) Enter the width with the [ ] or [ ] key, then do the same for the length (Y).
(3) Press the [OK] key.The original size is set. "Custom" appears in the original size field of the base screen.

2-13
COPIER►BASIC PROCEDURE FOR MAKING COPIES
MAKING COPIES USING THE BYPASS TRAYIn addition to plain paper, the bypass tray allows you to make copies on transparency film, envelopes, and other special media.
SPECIFYING A TYPE AND SIZE OF PAPER LOADED ON BYPASS TRAY
For detailed information on paper that can be loaded into the bypass tray, see "APPLICABLE PAPER TYPES (page 1-17)". For precautions on loading paper into the bypass tray, see "LOADING PAPER INTO THE BYPASS TRAY (page 1-24)".
1Select "Paper" in the right menu of the base screen of copy mode and press the [OK] key.
2Select "Paper" with the [ ][ ] keys, and press the [OK] key.
3Press the [SPECIAL FUNCTION] key, select "Paper Type Set", and select the type of paper to be used in the bypass tray.Select the paper type with the [ ][ ] keys. When finished, press the [OK] key.To use an envelope, go to step 7.
4Press the [SPECIAL FUNCTION] key, select "Paper Size Set", and select the paper size used in the bypass tray.Select the paper size with the [ ][ ] keys. If the paper size is a standard size, select Paper Size, press the [OK] key, and specify the paper size.The specified paper size appears in the paper size field of the base screen.To use a special paper size, go to step 5.
5● Special paper size
Select "mm" or "inch" and press the [OK] key.
Paper Select8½x118½x118½x11
Set Completed
Paper Type SetPlain 1 Plain 2 Heavy Paper 1
Set Completed
Paper Size Set8½x11
5½x8½inch
7¼x10½
Paper Size Set
A4
5½x8½inch
7¼x10½

2-14
COPIER►BASIC PROCEDURE FOR MAKING COPIES
6Specify the paper size.
(1) Select “X” (horizontal) or “Y” (vertical) with the [ ][ ] keys.
(2) Specify the size of each with the [ ][ ] keys.In “mm”, you can specify the size in increments of 1 mm. In “inch”, you can specify the size in increments of 1/8 inch.
(3) Press the [OK] key.The paper size is set. “Custom” appears in the paper size field of the base screen.
7● Envelope
Select the envelope size to be used with the [ ][ ] keys, and press the [OK] key.The envelope size is set. "Envelope" appears in the paper size field of the base screen.
Envelope Size

2-15
COPIER►CONVENIENT COPY FUNCTIONS
OUTPUT
SORT SETTING• Sorts the scanned original on a set basis, and outputs them.• Groups the scanned original on a page basis, and outputs them.
CONVENIENT COPY FUNCTIONS
AutoEnables the sort mode when the original is placed in the automatic document feeder, and enables the group mode when the original is placed on the document glass.
Sort Sorts the scanned original on a set basis, and outputs them.
Group Groups the scanned original on a page basis, and outputs them.
1Select "Output" in the right menu of the base screen of copy mode and press the [OK] key.
2Select "No Sort" or "Sort" with the [ ] [ ] keys
Originals
When 5 is set for the number of copies
Finished
Originals Finished
When 5 is set for the number of copies

2-16
COPIER►CONVENIENT COPY FUNCTIONS
3Press the [OK] key.
• If the memory becomes full while the originals are being scanned, "Memory is full." will appear in the display. To start copying the originals that have been scanned to that point, press the [START]. To cancel the copy job, press the [CA] key.
• The auto select setting for the sort function of the automatic document feeder can be changed in "Sort Auto Select" in the system settings (►page 7-17).

2-17
COPIER►CONVENIENT COPY FUNCTIONS
ID CARD COPYYou can copy the front and back sides of ID card onto a page through this function.The layout of the ID card copy, set the "ID Card Setting (page 7-17)" of SYSTEM SETTINGS.
• Set Horizontally: Copies in the horizontal orientation (fixed position), regardless of the paper size.• Set Vertically: Copies in the vertical orientation (fixed position), regardless of the paper size.
1Press the [ID CARD COPY] key on the operation panel.
2Place the ID card on the upper left-hand corner of the document glass, and press the [START] key.
3Turn the ID card over and press the [START] key.
• The ID card copy function cannot be used at the same time as the 2-sided copy, 2-Up/4-Up copy, sort copy, and card shot functions.
• Paper sizes that can be used with ID Card Copy are standard sizes.
• In ID card copy mode, scan area and scan number (1 page) cannot be changed. Scan area is: X: 86 + 5 mm (1/4") (margin), Y: 54 + 5mm (1/4") (margin).
• Auto tray switch is invalid in ID card copy mode. Please select paper and tray manually.
Front
Back
Copies
Set VerticallySet Horizontally
Original

2-18
COPIER►CONVENIENT COPY FUNCTIONS
RESOLUTION SETTINGSYou can adjust the resolution for scanning an original on the document glass or in the auto document feeder, and select high image quality or high speed as appropriate for your needs.
1Press the [SPECIAL FUNCTION] key, select "Resolution" with the [ ][ ] keys, and press the [OK] key.
2Select "Document Feeder" with the [ ] [ ] keys and press the [OK] key.
You can also select the document glass, however the document glass is fixed at 600 x 600 dpi, you can not change the setting.
3Select "600×300dpi" or "600×600dpi" with the [ ] [ ] keys and press the [OK] key.
Document Feeder
2-19
COPIER►SPECIAL MODES
To display the Special Modes menu, press the [SPECIAL FUNCTION] key with the base copy screen displayed, and press the [ ][ ] keys to select "Special Modes".
COPYING MULTIPLE ORIGINALS ONTO A SINGLE SHEET OF PAPER (2-Up / 4-Up COPY) Multiple originals can be copied onto a single sheet of paper in a selected layout pattern.This function is convenient for compiling multi-page reference materials into a compact format, or for providing an overview of all pages of a document on a single page.
SPECIAL MODES
2-Up copying 4-Up copying
1Press the [SPECIAL FUNCTION] key, select "" with the [ ][ ] keys, and press the [OK] key.
2Select "2-Up/4-Up" with the [ ] [ ] keys and press the [OK] key.
3Select "2-Up" or "4-Up" with the [ ] [ ] keys and press the [OK] key.
Pattern 1 Pattern 2
2 IN 1 COPY
Pattern 1 Pattern 2 Pattern 3 Pattern 4
4 IN 1 COPY
Special Modes2-Up/4-UpCard ShotSharpnessSuppress BG
2-Up/4-Up
2-UpOff
Off4-Up

2-20
COPIER►SPECIAL MODES
4Select the layout with the [ ][ ] keys and press the [OK] key.See above for the layouts that can be selected.
• 2-Up / 4-Up copy cannot be used in combination with the following functions. The function selected first will take precedence.Card shot, ID card copy
• A special paper size cannot be used for 2-Up / 4-Up copy.
• An appropriate ratio setting will be automatically selected based on the original size, the paper size, and the selected number of images.Certain combinations of original size, paper size, and number of images may result in images being cut off.
4-UpPattern 1

2-21
COPIER►SPECIAL MODES
COPYING BOTH SIDES OF A CARD AS A SINGLE PAGE (CARD SHOT)This function copies the front and reverse sides of a card on one sheet, not on separate sheets.This function is convenient for making copies for identification purposes and helps save paper.
1Press the [SPECIAL FUNCTION] key, select "Special Modes" with the [ ][ ] keys, and press the [OK] key.
2Select "Card Shot" with the [ ] [ ] keys and press the [OK] key.
3Specify the card size in the Card Shot screen.Select horizontal (X) or vertical (Y) with the [ ][ ] keys, specify the dimension with the [ ][ ] keys, and press the [OK] key. Repeat for the other dimension.
• The horizontal and vertical dimensions can each be set to value from 1 to 8-1/2".
• Paper cannot be fed from the bypass tray.
• The card shot function cannot be used in combination with 2-Up / 4-Up copy, and ID card copy.
• The default settings for the horizontal and vertical dimensions in this screen can be set in Card Shot Default (page 7-17) in the system settings.
Back
Front
Example of a portrait copy Example of a landscape copy

2-22
COPIER►SPECIAL MODES
ADJUSTING THE SHARPNESS OF AN IMAGE (SHARPNESS)This function adjusts the sharpness to make a sharper or softer image.
Sharpness must be specified before scanning the original.
1Press the [SPECIAL FUNCTION] key, select "Special Modes" with the [ ][ ] keys, and press the [OK] key.
2Select "Sharpness" with the [ ] [ ] keys and press the [OK] key.
3Select "Off", "Soft", or "Sharp" with the [ ][ ] keys and press the [OK] key.
To cancel the sharpness setting:Select "Off" with the [ ][ ] keys and press the [OK] key.
Softer
Sharper
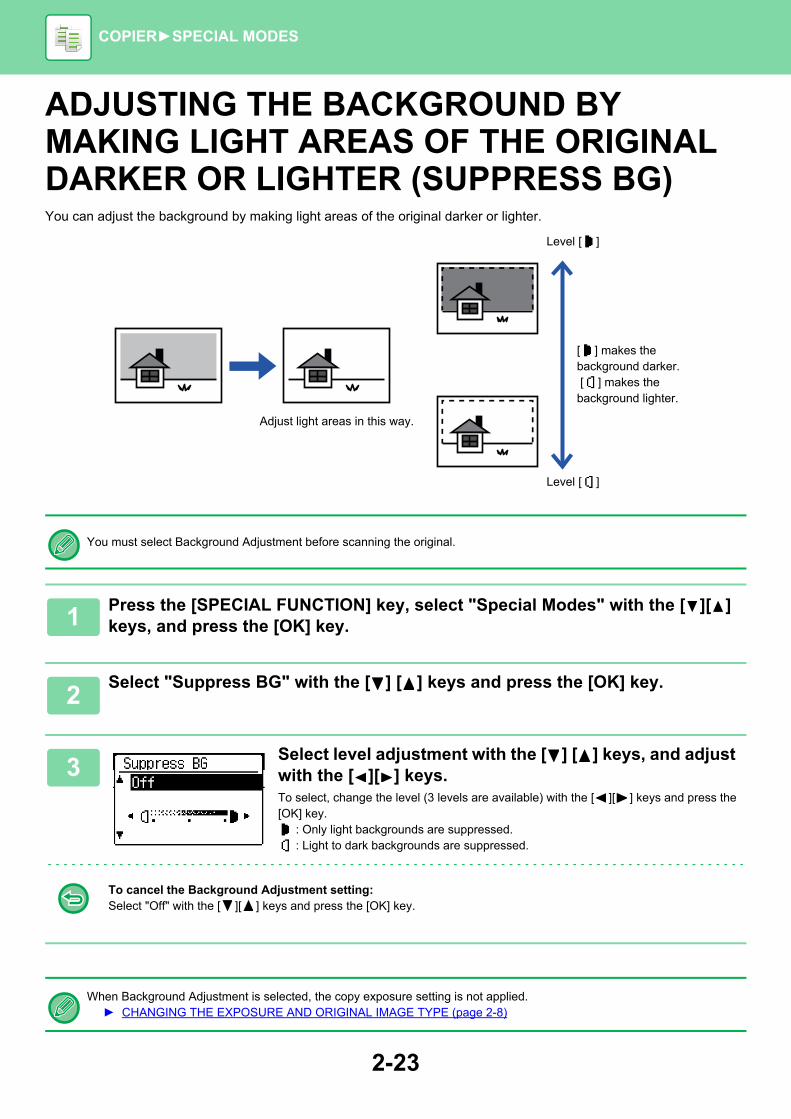
2-23
COPIER►SPECIAL MODES
ADJUSTING THE BACKGROUND BY MAKING LIGHT AREAS OF THE ORIGINAL DARKER OR LIGHTER (SUPPRESS BG)You can adjust the background by making light areas of the original darker or lighter.
You must select Background Adjustment before scanning the original.
1Press the [SPECIAL FUNCTION] key, select "Special Modes" with the [ ][ ] keys, and press the [OK] key.
2Select "Suppress BG" with the [ ] [ ] keys and press the [OK] key.
3Select level adjustment with the [ ] [ ] keys, and adjust with the [ ][ ] keys.To select, change the level (3 levels are available) with the [ ][ ] keys and press the [OK] key.
: Only light backgrounds are suppressed. : Light to dark backgrounds are suppressed.
To cancel the Background Adjustment setting:Select "Off" with the [ ][ ] keys and press the [OK] key.
When Background Adjustment is selected, the copy exposure setting is not applied.► CHANGING THE EXPOSURE AND ORIGINAL IMAGE TYPE (page 2-8)
Adjust light areas in this way.
Level [ ]
[ ] makes the background darker. [ ] makes the background lighter.
Level [ ]
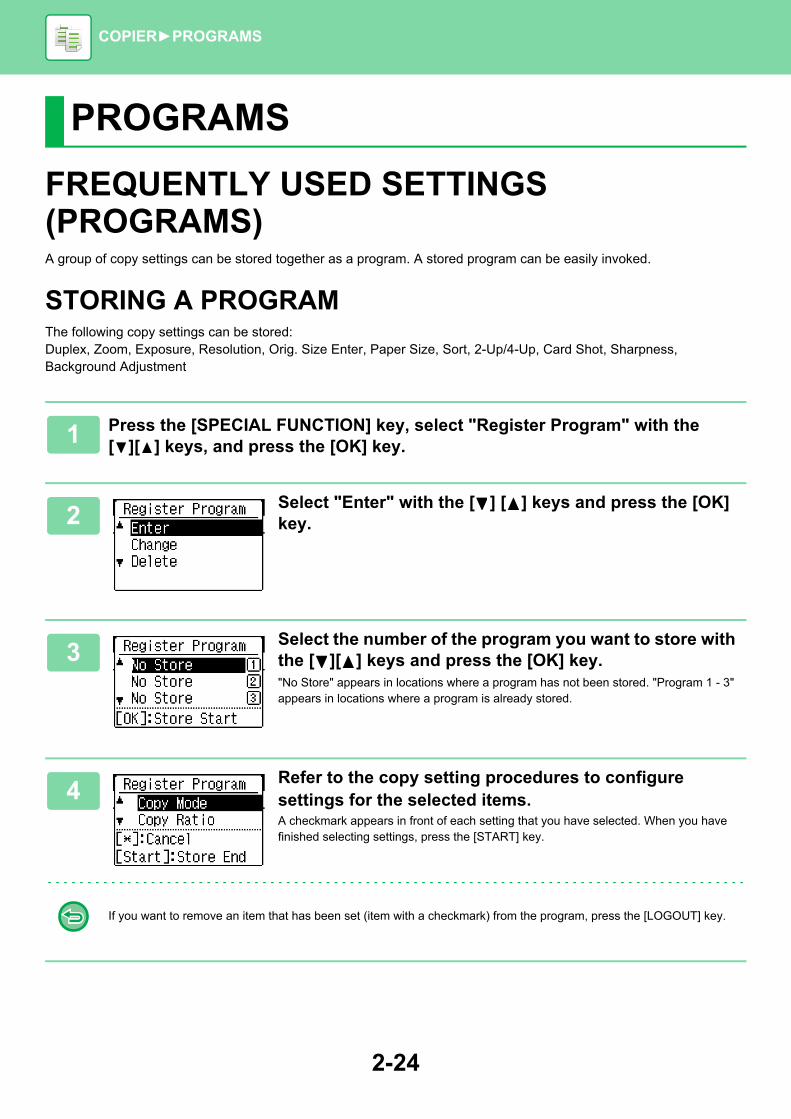
2-24
COPIER►PROGRAMS
FREQUENTLY USED SETTINGS (PROGRAMS)A group of copy settings can be stored together as a program. A stored program can be easily invoked.
STORING A PROGRAMThe following copy settings can be stored:Duplex, Zoom, Exposure, Resolution, Orig. Size Enter, Paper Size, Sort, 2-Up/4-Up, Card Shot, Sharpness, Background Adjustment
PROGRAMS
1 Press the [SPECIAL FUNCTION] key, select "Register Program" with the [ ][ ] keys, and press the [OK] key.
2Select "Enter" with the [ ] [ ] keys and press the [OK] key.
3Select the number of the program you want to store with the [ ][ ] keys and press the [OK] key."No Store" appears in locations where a program has not been stored. "Program 1 - 3" appears in locations where a program is already stored.
4Refer to the copy setting procedures to configure settings for the selected items.A checkmark appears in front of each setting that you have selected. When you have finished selecting settings, press the [START] key.
If you want to remove an item that has been set (item with a checkmark) from the program, press the [LOGOUT] key.

2-25
COPIER►PROGRAMS
CHANGING A PROGRAM
• Up to three programs can be stored.• Some setting combinations are not possible.
(For example, 2-Up/4-Up and Card Shot)
1 Press the [SPECIAL FUNCTION] key, select "Register Program" with the [ ][ ] keys, and press the [OK] key.
2Select "Change" with the [ ] [ ] keys and press the [OK] key.
3Select the number of the program you want to modify with the [ ] [ ] keys, and press [OK]. Modify the settings as explained in step 4 of STORING A PROGRAM (page 2-24), and resave the program.

2-26
COPIER►PROGRAMS
DELETING A PROGRAM
USING A PROGRAM
1 Press the [SPECIAL FUNCTION] key, select "Register Program" with the [ ][ ] keys, and press the [OK] key.
2Select "Delete" with the [ ] [ ] keys and press the [OK] key.
3Select "Delete" with the [ ][ ] keys and press the [OK] key.The selected program location changes to "No Store".
1Select "Program" in the right menu of the base screen of copy mode and press the [OK] key.
2Select the number of the program you want to use with the [ ][ ] keys and press the [OK] key.The settings in the selected program are applied to the copy job.

3-1
The explanations in this chapter are based on American English and the North American version of the software.Software for other countries and regions may vary slightly from the North American version.
PRINTER FUNCTION OF THE MACHINE
PRINTING IN A WINDOWS ENVIRONMENT
BASIC PRINTING PROCEDURE. . . . . . . . . . . . . . . 3-4
• PRINTER DRIVER SETTINGS SCREEN / REFERRING TO HELP . . . . . . . . . . . . . . . . . . . . . 3-6
• SELECTING THE PAPER. . . . . . . . . . . . . . . . . 3-7
• PRINTING ON ENVELOPES . . . . . . . . . . . . . . 3-8
PRINTING WHEN THE USER AUTHENTICATION FUNCTION IS ENABLED. . . . . . . . . . . . . . . . . . . . . 3-9
FREQUENTLY USED FUNCTIONS. . . . . . . . . . . . . 3-10
• SAVING SETTINGS AT THE TIME OF PRINTING . . . . . . . . . . . . . . . . . . . . . . . . . . . . . 3-10
• USING SAVED SETTINGS . . . . . . . . . . . . . . . . 3-11
• CHANGING THE PRINTER DRIVER DEFAULT SETTINGS. . . . . . . . . . . . . . . . . . . . . . . . . . . . . 3-11
PRINTING IN A Mac OS ENVIRONMENT
BASIC PRINTING PROCEDURE. . . . . . . . . . . . . . . 3-13
• SELECTING THE PAPER. . . . . . . . . . . . . . . . . 3-14
• PRINTING ON ENVELOPES . . . . . . . . . . . . . . 3-15
PRINTING WHEN THE USER AUTHENTICATION FUNCTION IS ENABLED. . . . . . . . . . . . . . . . . . . . . 3-16
FREQUENTLY USED FUNCTIONS
SELECTING THE RESOLUTION. . . . . . . . . . . . . . . 3-18
2-SIDED PRINTING . . . . . . . . . . . . . . . . . . . . . . . . . 3-19
FITTING THE PRINT IMAGE TO THE PAPER . . . . 3-20
PRINTING MULTIPLE PAGES ON ONE PAGE . . . 3-22
CONVENIENT PRINTING FUNCTIONS
CONVENIENT FUNCTIONS FOR CREATING PAMPHLETS AND POSTERS . . . . . . . . . . . . . . . . 3-24
• CREATE A PAMPHLET (BOOKLET). . . . . . . . 3-24
• PRINTING WITH MARGIN SHIFT SETTING (MARGIN). . . . . . . . . . . . . . . . . . . . . . . . . . . . . 3-26
• CREATE A LARGE POSTER (POSTER PRINTING) . . . . . . . . . . . . . . . . . . . . . . . . . . . . 3-28
FUNCTIONS TO ADJUST THE SIZE AND ORIENTATION OF THE IMAGE . . . . . . . . . . . . . . . 3-29
• ADJUST PRINT POSITION ON ODD AND EVEN PAGES SEPARATELY (PRINT POSITION) . . . . . . . . . . . . . . . . . . . . . . . . . . . . 3-29
• ROTATING THE PRINT IMAGE 180 DEGREES (ROTATE 180 DEGREES) . . . . . . 3-30
• ENLARGING/REDUCING THE PRINT IMAGE (ZOOM SETTING/ENLARGE OR REDUCE) . . . 3-31
• PRINT A MIRROR-IMAGE (MIRROR-IMAGE REVERSE/ VISUAL EFFECTS) . . . . . . . . . . . . 3-33
IMAGE ADJUSTING FUNCTION . . . . . . . . . . . . . . 3-34
• ADJUST THE BRIGHTNESS AND CONTRAST OF THE IMAGE (IMAGE ADJUSTMENT) . . . . 3-34
• PRINTING FAINT TEXT AND LINES IN BLACK (TEXT TO BLACK/VECTOR TO BLACK) . . . . 3-35
• SELECTING IMAGE SETTINGS TO MATCH THE IMAGE TYPE . . . . . . . . . . . . . . . . . . . . . . 3-36
FUNCTIONS TO COMBINE TEXT AND IMAGES. . . 3-38
• ADDING A WATERMARK TO PRINTED PAGES (WATERMARK) . . . . . . . . . . . . . . . . . 3-38
• PRINTING AN IMAGE OVER THE PRINT DATA (IMAGE STAMP) . . . . . . . . . . . . . . . . . . 3-40
• OVERLAY A FIXED FORM ON THE PRINT DATA (OVERLAYS) . . . . . . . . . . . . . . . . . . . . . 3-41
PRINTER
3-2
PRINTER
PRINT FUNCTIONS FOR SPECIAL PURPOSES. . . 3-43
• INSERTING COVERS (COVER PAGE) . . . . . . 3-43
• INSERT PRESET DATA BEFORE OR AFTER EACH PAGE (PAGE INTERLEAVE) . . . . . . . . . 3-45
• CHANGING THE RENDERING METHOD AND PRINTING JPEG IMAGES (USE DRIVER TO RENDER JPEGS) . . . . . . . . . . . . . . . . . . . . . . . 3-46
CONVENIENT PRINTER FUNCTIONS . . . . . . . . . . 3-47
• SAVING AND USING PRINT FILES (RETENTION) . . . . . . . . . . . . . . . . . . . . . . . . . . 3-47
PRINTING WITHOUT THE PRINTER DRIVER
EXTENSION OF PRINTABLE FILES. . . . . . . . . . . . 3-50
DIRECTLY PRINTING A FILE IN USB MEMORY. . . 3-51
DIRECTLY PRINTING FROM A COMPUTER . . . . . 3-53
• FTP PRINT . . . . . . . . . . . . . . . . . . . . . . . . . . . . 3-53
APPENDIX
PRINTER DRIVER SPECIFICATIONS LIST . . . . . . 3-54

3-3
PRINTER►PRINTER FUNCTION OF THE MACHINE
To enable printing from your computer, a printer driver must be installed.See the table below to determine which printer driver to use in your environment.
Windows environment
Mac OS Environment
PRINTER FUNCTION OF THE MACHINE
Printer driver type
PCL6The machine support the Hewlett-Packard PCL6 printer control languages.
PS• This printer driver supports the PostScript® 3™ page description language developed by Adobe Systems Incorporated, and
enables the machine to be used as a PostScript® 3™ compatible printer.• If it is desired to use the Windows standard PS printer driver, the PPD driver must be used.
• To install the printer driver and configure settings in a Windows environment, see the Software Setup Guide.
• The User's Manual mainly uses PCL6 printer driver screens to explain how to print in a Windows environment. The printer driver screens may differ slightly depending on the printer driver you are using.
Printer driver type
PSThis printer driver supports the PostScript® 3™ page description language developed by Adobe Systems Incorporated, and enables the machine to be used as a PostScript® 3™ compatible printer.
To install the printer driver and configure settings in a Mac OS environment, see the Software Setup Guide.
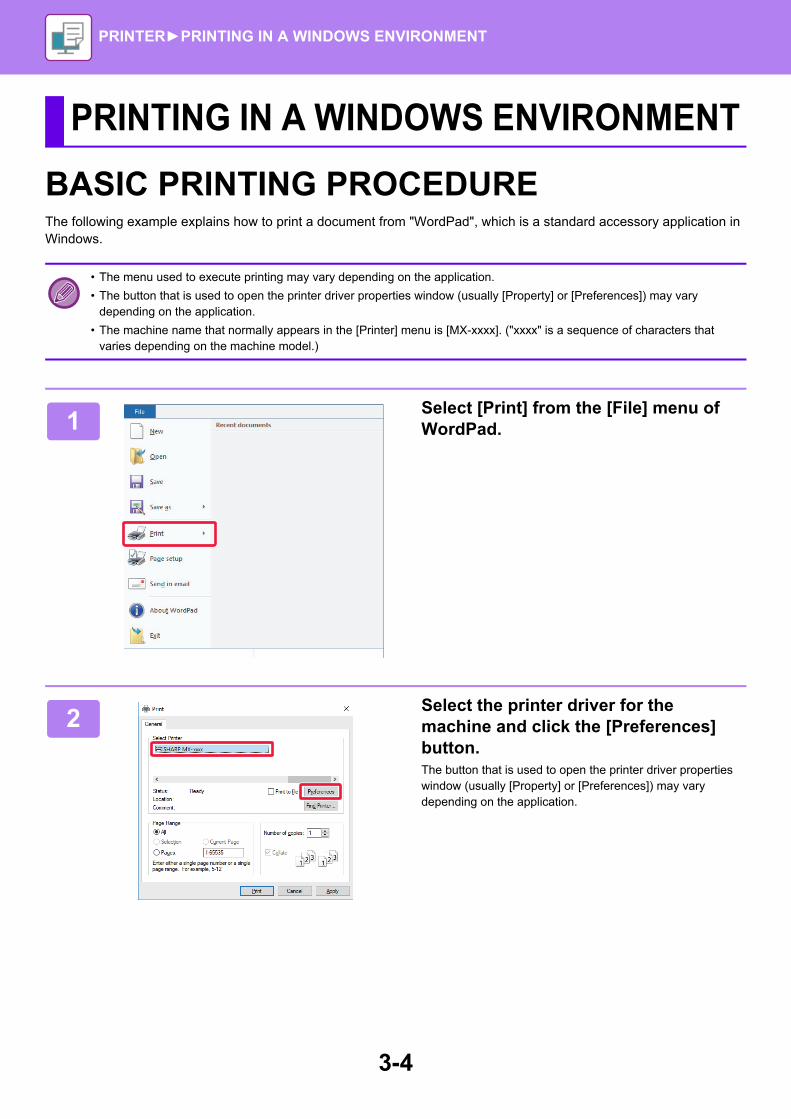
3-4
PRINTER►PRINTING IN A WINDOWS ENVIRONMENT
BASIC PRINTING PROCEDUREThe following example explains how to print a document from "WordPad", which is a standard accessory application in Windows.
PRINTING IN A WINDOWS ENVIRONMENT
• The menu used to execute printing may vary depending on the application.
• The button that is used to open the printer driver properties window (usually [Property] or [Preferences]) may vary depending on the application.
• The machine name that normally appears in the [Printer] menu is [MX-xxxx]. ("xxxx" is a sequence of characters that varies depending on the machine model.)
1Select [Print] from the [File] menu of WordPad.
2Select the printer driver for the machine and click the [Preferences] button.The button that is used to open the printer driver properties window (usually [Property] or [Preferences]) may vary depending on the application.

3-5
PRINTER►PRINTING IN A WINDOWS ENVIRONMENT
3Select print settings.
(1) Click the [Main] tab.
(2) Select the original size.• You can register up to seven user-defined sizes in
the menu. To store an original size, select [Custom Paper] or one of [User1] to [User7] from the menu, and click the [OK] button.
• To select settings on other tabs, click the desired tab and then select the settings.► PRINTER DRIVER SETTINGS SCREEN /
REFERRING TO HELP (page 3-6)• If an original size larger than the largest paper size
that the machine supports is set, select the paper size for printing in “Output Size”.
• If an "Output Size" different from the "Original Size" is selected, the print image will be adjusted to match the selected paper size.
(3) Click the [OK] button.
4Click the [Print] button.Printing begins.
(2)
(3)
(1)

3-6
PRINTER►PRINTING IN A WINDOWS ENVIRONMENT
PRINTER DRIVER SETTINGS SCREEN / REFERRING TO HELPThe printer driver settings screen consists of 8 tabs. Click a tab to select the settings on that tab.You can check information on each of the settings in the Help screen. Click the [Help] button at the bottom right of the screen.
(1) Tabs: Click to change the tabs shown.• [Main]: Frequently used functions are grouped on this tab. The settings are also on other tabs,
and each setting on this tab is linked to the corresponding setting on the other tab.• [Paper Source]: Set the size and type of paper used for printing, and the paper tray.• [Layout]: Select functions related to the layout such as two-sided printing and booklet.• [Job Handling]: Set retention and user authentication.• [Inserts]: Select cover insertion functions.• [Stamp]: Select the watermark or stamp function.• [Image Quality]: Select various image quality settings.• [Detailed Settings]: Select tandem print and other detailed print settings.
(2) FavoritesSettings configured on each tab at the time of printing can be saved as Favorite.►FREQUENTLY USED FUNCTIONS (page 3-10)
(3) [Defaults]
Return the settings on the currently selected tab to their default state.
(4) Setup ItemsDisplays the settings on each tab.
(5) Information icon( )
Some restrictions exist on the combinations of settings that can be selected in the printer driver properties window. When a restriction exists on a selected setting, an information icon ( ) will appear next to the setting. Click the icon to view an explanation of the restriction.
(2)
(1)
(3)
(4)
(5)
(6)
(7)
(8)

3-7
PRINTER►PRINTING IN A WINDOWS ENVIRONMENT
(6) Print imageThis lets you visually check how the current settings affect the print image. Finishing settings is indicated by icons.
(7) Machine imageThis shows the options that are installed on the machine, and the paper trays and output trays that are used.
(8) [Help] button
Displays the Help window of the printer driver.
SELECTING THE PAPERBefore printing, check the paper sizes, paper types, and paper remaining in the machine's trays. To check the most recent tray information, click the [Tray Status] button in the [Paper Source] tab.The "Output Size" setting and the "Paper Tray" setting are related as follows:
• When "Paper Tray" is set to [Auto Select]The tray that contains paper of the size and type selected in "Output Size" and "Paper Type" is automatically selected.
• When "Paper Tray" is set to any setting other than [Auto Select]The specified tray is used for printing regardless of the "Output Size" setting.When you have set "Paper Type" to [Bypass Tray], be sure to select "Paper Type". Check the paper type that is set for the bypass tray of the machine, check that paper of that type is actually loaded into the bypass tray, and then select the appropriate paper type.
• When "Paper Type" is set to [Auto Select]A tray with plain paper or recycled paper of the size specified in "Output Size" is automatically selected. (The factory default setting is plain paper only.)
• When "Paper Type" is set to anything other than [Auto Select]A tray with the specified type of paper and the size specified in "Output Size" is used for printing.
• Help can be displayed for a setting by clicking the setting and pressing the [F1] key.
• You can click the button in the upper right corner of the settings screen and then click a setting to show Help for that setting in a sub-window.
Special media such as envelopes can also be placed in the bypass tray.For the procedure for loading paper in the bypass tray, see "LOADING PAPER INTO THE BYPASS TRAY (page 1-24)".
When [Administrator Settings (administrator)] → [Default Settings] → [Bypass Settings] → [Enable Detected Paper Size in Bypass Tray] (disabled by factory default) or [Enable Selected Paper Type in Bypass Tray] (disabled by factory default) is enabled in "Web page", printing will not take place if the paper size or paper type specified in the printer driver is different from the paper size or paper type specified in the settings of the bypass tray.

3-8
PRINTER►PRINTING IN A WINDOWS ENVIRONMENT
PRINTING ON ENVELOPESThe bypass tray can be used for envelope printing.
(1) Click the [Paper Source] tab.
(2) Select the envelope size from the "Output Size" menu.When [Output Size] is set to envelope, [Paper Type] is automatically set to [Envelope].When "Original Size" is set to envelope on the [Main] tab and "Output Size" is set to [Same as Original Size], "Paper Type" is automatically set to [Envelope].
(3) Select [Bypass Tray] in "Paper Tray".When [Administrator Settings (administrator)] → [Default Settings] → [Bypass Settings] → [Enable Selected Paper Type in Bypass Tray ] (enabled by factory default) is enabled in "Web page", set the paper type of the bypass tray to [Envelope].
• For the types of paper that can be used in the bypass tray, see "APPLICABLE PAPER TYPES (page 1-17)".
• For the procedure for loading paper in the bypass tray, see "LOADING PAPER INTO THE BYPASS TRAY (page 1-24)".
• For more information on the procedure for loading paper, see "SELECTING THE PAPER (page 3-7)".
• It is recommended that you carry out a test print to check the print result before using an envelope.
• When using media such as envelopes that can be loaded only in a specific orientation, you can rotate the image 180 degrees. For more information, see "ROTATING THE PRINT IMAGE 180 DEGREES (ROTATE 180 DEGREES) (page 3-30)".
(1)
(2)
(3)
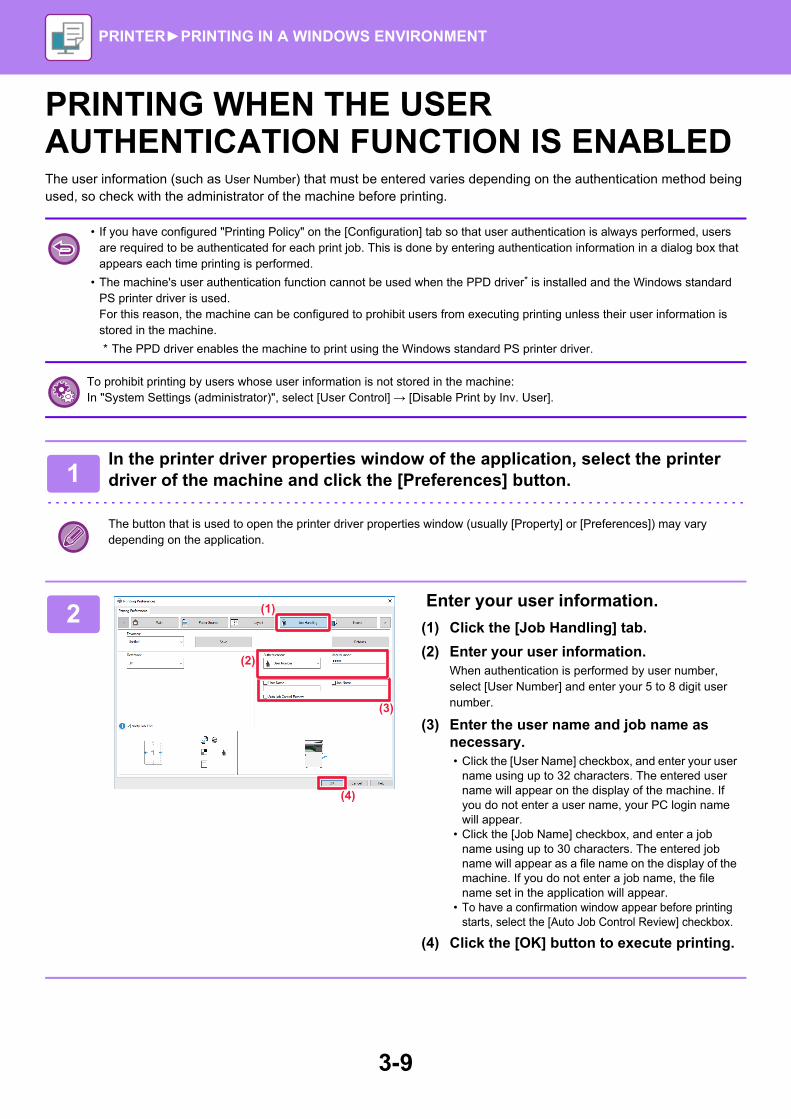
3-9
PRINTER►PRINTING IN A WINDOWS ENVIRONMENT
PRINTING WHEN THE USER AUTHENTICATION FUNCTION IS ENABLEDThe user information (such as User Number) that must be entered varies depending on the authentication method being used, so check with the administrator of the machine before printing.
• If you have configured "Printing Policy" on the [Configuration] tab so that user authentication is always performed, users are required to be authenticated for each print job. This is done by entering authentication information in a dialog box that appears each time printing is performed.
• The machine's user authentication function cannot be used when the PPD driver* is installed and the Windows standard PS printer driver is used.For this reason, the machine can be configured to prohibit users from executing printing unless their user information is stored in the machine.
* The PPD driver enables the machine to print using the Windows standard PS printer driver.
To prohibit printing by users whose user information is not stored in the machine:In "System Settings (administrator)", select [User Control] → [Disable Print by Inv. User].
1In the printer driver properties window of the application, select the printer driver of the machine and click the [Preferences] button.
The button that is used to open the printer driver properties window (usually [Property] or [Preferences]) may vary depending on the application.
2 Enter your user information.
(1) Click the [Job Handling] tab.
(2) Enter your user information.When authentication is performed by user number, select [User Number] and enter your 5 to 8 digit user number.
(3) Enter the user name and job name as necessary.• Click the [User Name] checkbox, and enter your user
name using up to 32 characters. The entered user name will appear on the display of the machine. If you do not enter a user name, your PC login name will appear.
• Click the [Job Name] checkbox, and enter a job name using up to 30 characters. The entered job name will appear as a file name on the display of the machine. If you do not enter a job name, the file name set in the application will appear.
• To have a confirmation window appear before printing starts, select the [Auto Job Control Review] checkbox.
(4) Click the [OK] button to execute printing.
(2)
(1)
(3)
(4)

3-10
PRINTER►PRINTING IN A WINDOWS ENVIRONMENT
FREQUENTLY USED FUNCTIONS
SAVING SETTINGS AT THE TIME OF PRINTINGSettings configured on each of the tabs at the time of printing can be saved as Favorite. Saving frequently used settings or complex settings under an assigned name makes it easy to select those settings the next time you need to use them.Settings can be saved from any tab of the printer driver properties window. Settings configured on each tab are listed at the time of saving, allowing you to check the settings as you save them.
Deleting saved settingsIn step 2 of "USING SAVED SETTINGS (page 3-11)", select the user settings that you want to delete and click the [Delete] button.
1Select the machine's printer driver from the print window of the application, and click the [Preferences] button.
The button that is used to open the printer driver properties window (usually [Property] or [Preferences]) may vary depending on the application.
2Register Print Settings.
(1) Configure the print settings on each tab.
(2) Click the [Save] button.
3Check and save the settings.
(1) Check the displayed settings.
(2) Enter a name for the settings using up to 20 characters.
(3) Click the [OK] button.
(2)
(1)
(2)
(1)
(3)

3-11
PRINTER►PRINTING IN A WINDOWS ENVIRONMENT
USING SAVED SETTINGSYou can specify the saved favorites through just one click to apply frequently used settings or complicated settings to your printing.
CHANGING THE PRINTER DRIVER DEFAULT SETTINGSYou can change the default settings of the printer driver.Changes you have made in the printer driver properties window when you execute printing from the application are returned to the default settings specified here when you exit the application.
1Select the machine's printer driver from the print window of the application, and click the [Preferences] button.
The button that is used to open the printer driver properties window (usually [Property] or [Preferences]) may vary depending on the application.
2Select favorite settings.
(1) Select the favorite settings you want to use.
(2) Click the [OK] button.
3Start printing.
1Click the [Start] button, select [Settings] → [Device] → [Devices and Printers].
In Windows 8.1/Windows Server 2012, right-click the [Start] button, select [Control Panel] → [View devices and printers] (or [Devices and Printers]).In Windows 7/Windows Server 2008, click the [Start] button, select [Devices and Printers].
(1)
(2)

3-12
PRINTER►PRINTING IN A WINDOWS ENVIRONMENT
2Right-click the printer driver icon of the machine and select [Printing preferences].
3Configure the settings and click the [OK] button.For explanations of the settings, see printer driver Help.

3-13
PRINTER►PRINTING IN A Mac OS ENVIRONMENT
BASIC PRINTING PROCEDUREThe following example explains how to print a document from the standard accessory application "TextEdit" in Mac OS X.
PRINTING IN A Mac OS ENVIRONMENT
• To install the printer driver and configure settings in a Mac OS environment, see the Software Setup Guide.
• The menu used to execute printing may vary depending on the application.
1Select [Page Setup] from the [File] menu and select the printer.If the printer drivers appear as a list, select the name of the printer driver to be used from the list.
2Select paper settings.
(1) Make sure that the correct printer is selected.
(2) Select paper settings.Paper size, paper orientation, and enlarge/reduce settings can be selected.
(3) Click the [OK] button.
3Select [Print] from the [File] menu.
MX-xxxxMX-xxMX-xxMMMMXMX-xxMX-xxMXMXXXXX-xXX-xxXMX-xx-MX-xxX-xxxxMMMX-xxMX-xxMXMMXXXXXXXX-xxxxxMMX xxMMMMMMXXMXXXX xxxxxxMMMMMMMMMXXXMXXX xxxxxxxX xxxMMMMMMMMXX xxxxxxxxxxxMXMMMMMMMXXXX xxxxxxxxxMMXMMMMMMMMXXXXXXX x-xxxxxMMMMMMMMXMXXXXXXX-xxxxxxxxxMMXMMMXXXXXMX-xxxxxxxxxxxMMMMMMMXXXXXXX--xxxxxxxxxxxMMMMXXXXXX xxxxxxxxxxxxxxxxxxxxxxxxxxxxxxxxxxxxxxxxxxxxxxxxxxxxxxxxxxxxxxxxxxxxxxxxxxxxxxxxxxxxxxxxxxxxxxxxxxxxxxxxxxxxxxxxxxxxxxx
(1)
(2)
(3)

3-14
PRINTER►PRINTING IN A Mac OS ENVIRONMENT
SELECTING THE PAPERThis section explains the [Paper Feed] settings in the print settings window.• When [Auto Select] is selected:
A tray that is set for plain or recycled paper (only plain paper in the factory default setting) of the size specified in "Paper Size" on the page setup screen is automatically selected.
• When a paper tray is specified:The specified tray is used for printing regardless of the "Paper Size" setting on the page setup screen.For the bypass tray, also specify the paper type. Check that the paper type that is set for the bypass tray of the machine, check that paper of that type is actually loaded into the bypass tray, and then select the appropriate bypass tray (paper type).
• When a paper type is specified:A tray with the specified type of paper and the size specified in "Paper Size" on the page setup screen is used for printing.
4Select print settings.
(1) Make sure that the correct printer is selected.
(2) Select an item from the menu and configure the settings as needed.
(3) Click the [Print] button.
Special media such as envelopes can also be placed in the bypass tray.For the procedure for loading paper in the bypass tray, see "LOADING PAPER INTO THE BYPASS TRAY (page 1-24)".
When [Administrator Settings (administrator)] → [Default Settings] → [Bypass Settings] → [Enable Detected Paper Size in Bypass Tray] (disabled by factory default) or [Enable Selected Paper Type in Bypass Tray] (disabled by factory default) is enabled in "Web page", printing will not take place if the paper size or paper type specified in the printer driver is different from the paper size or paper type specified in the settings of the bypass tray.
(1)
(2)
(3)

3-15
PRINTER►PRINTING IN A Mac OS ENVIRONMENT
PRINTING ON ENVELOPESThe bypass tray can be used for envelope printing.
Select the envelope size in the settings of the application ("Page Setup" in many applications) and then perform the following steps.
• For the types of paper that can be used in the bypass tray, see "APPLICABLE PAPER TYPES (page 1-17)".
• For the procedure for loading paper in the bypass tray, see "LOADING PAPER INTO THE BYPASS TRAY (page 1-24)".
• For more information on the procedure for loading paper, see "SELECTING THE PAPER (page 3-14)".
• When using media such as envelopes that can be loaded only in a specific orientation, you can rotate the image 180 degrees. For more information, see "ROTATING THE PRINT IMAGE 180 DEGREES (ROTATE 180 DEGREES) (page 3-30)".
• It is recommended that you carry out a test print to check the print result before using an envelope.
1Select print settings.
(1) Select the envelope size from the "Paper Size" menu.
(2) Select [Paper Feed].
(3) Select the [Bypass Tray (Envelope)] from the "All Pages From" menu.
When [Administrator Settings (administrator)] → [Default Settings] → [Bypass Settings] → [Enable Selected Paper Type in Bypass Tray] (enabled by factory default) is enabled in "Web page", set the paper type of the bypass tray to [Envelope].
(2)
(1)
(3)

3-16
PRINTER►PRINTING IN A Mac OS ENVIRONMENT
PRINTING WHEN THE USER AUTHENTICATION FUNCTION IS ENABLEDThe user information (such as login name and password) that must be entered varies depending on the authentication method being used, so check with the administrator of the machine before printing.
The menu used to execute printing may vary depending on the application.
To prohibit printing by users whose user information is not stored in the machine:In "System Settings (administrator)", select [User Control] → [Disable Print by Inv. User].
1In the application, select [Print] from the [File] menu.

3-17
PRINTER►PRINTING IN A Mac OS ENVIRONMENT
2Enter your user information.
(1) Make sure that the machine's printer name is selected.
(2) Select [Job Handling].
(3) Click the [Authentication] tab.
(4) Enter your user information.When authentication is carried out using the user number, enter your user number (5 to 8 digits) in "User Number".
(5) Enter the user name and job name as necessary.• User Name
Enter your user name using up to 32 characters. The entered user name will appear on the display of the machine. If you do not enter a user name, your PC login name will appear.
• Job NameEnter a job name using up to 80 characters. The entered job name will appear as a file name on the display of the machine. If you do not enter a job name, the file name set in the application will appear.
(6) Click the [Print] button.
(3)
(4)
(1)
(2)
(5)
(6)

3-18
PRINTER►FREQUENTLY USED FUNCTIONS
SELECTING THE RESOLUTIONThe following two selections are available for "Print Mode" (resolution):
(1) Click the [Image Quality] tab.
(2) Select "Print Mode".
(1) Select [Printer Features] and then select [Advanced].
(2) Select "Print Mode".
FREQUENTLY USED FUNCTIONS
600 dpi This mode is suitable for printing data such as regular text or a table.
600 dpi (High Quality) The print quality of photos and text are high.
Windows
Mac OS
(2)
(1)
(1)
(2)

3-19
PRINTER►FREQUENTLY USED FUNCTIONS
2-SIDED PRINTINGThe machine can print on both sides of the paper. This function is useful for many purposes, and is particularly convenient when you want to create a simple pamphlet. 2-sided printing also helps conserve paper.
(1) Click the [Main] tab.
(2) Select the paper orientation.
(3) Select [Long Edge] or [Short Edge].
Paper orientation
Print results
Portrait
Long Edge Short Edge
Landscape
Short Edge Long Edge
The pages are printed so that they can be bound at the left or right side.
The pages are printed so that they can be bound at the top.
Windows
If necessary, you can select the method of implementing 2-sided printing. Click the [Other Settings] button on the [Detailed Settings] tab, and select the mode from "Duplex Style".
(2)
(3)
(1)

3-20
PRINTER►FREQUENTLY USED FUNCTIONS
(1) Select [Layout].
(2) Select [Long-Edge binding] or [Short-Edge binding].
FITTING THE PRINT IMAGE TO THE PAPERThis function automatically enlarges or reduces the print image to match the size of the paper loaded in the machine.This function is convenient when enlarging an Invoice or A5 size document to letter or A4 size to make it easier to view, or when printing a document on paper that is different in size from the original document.
The following example explains how to print an Invoice (or A5) size document on a letter (or A4) size paper.
Mac OS
If A0, A1 or A2 size is selected in "Original Size", A4 (or Letter) is automatically selected in "Output Size".
(2)
(1)
Invoice (A5)
Letter (A4)
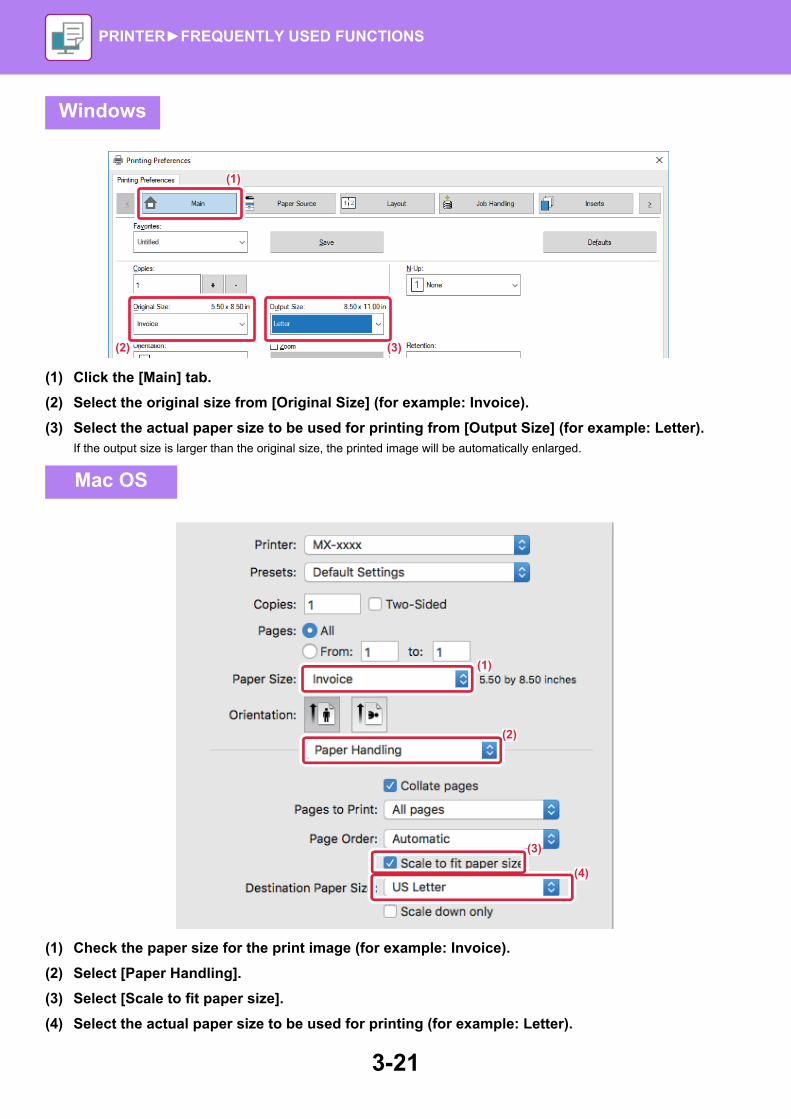
3-21
PRINTER►FREQUENTLY USED FUNCTIONS
(1) Click the [Main] tab.
(2) Select the original size from [Original Size] (for example: Invoice).
(3) Select the actual paper size to be used for printing from [Output Size] (for example: Letter).If the output size is larger than the original size, the printed image will be automatically enlarged.
(1) Check the paper size for the print image (for example: Invoice).
(2) Select [Paper Handling].
(3) Select [Scale to fit paper size].
(4) Select the actual paper size to be used for printing (for example: Letter).
Windows
Mac OS
(2)
(1)
(3)
(2)
(1)
(3)
(4)

3-22
PRINTER►FREQUENTLY USED FUNCTIONS
PRINTING MULTIPLE PAGES ON ONE PAGEThis function reduces the print image and prints multiple pages on a single sheet of paper. You can print only the first page in the original size and print multiple reduced pages on the subsequent sheets.For example, when [2-Up] (2 pages per sheet) or [4-Up] (4 pages per sheet) is selected, the following print results will be obtained, depending on the selected page order.This is convenient when you want to print multiple images such as photos on a single sheet of paper, and when you want to conserve paper. When used in combination with 2-sided printing, this function saves more paper.
N-Up(Pages per sheet)
Print results
Left to Right Right to LeftTop To Bottom(When the print orientation is landscape)
2-Up(2 pages per sheet)
N-Up(Pages per sheet)
Right, and Down Down, and Right Left, and Down Down, and Left
4-Up(4 pages per sheet)
• [N-Up] that can be set on the [Layout] tab can also be set on the [Main] tab. ("Order" can only be set in the [Layout] tab.)
• Note the following when printing multiple pages on one sheet:
• The page orders for 6-Up, 8-Up, 9-Up, and 16-Up are the same as for 4-Up.
• In a Windows environment, the page order can be viewed in the print image in the printer driver properties window.
• In a Mac OS environment, the page orders are displayed as selections.
• In a Mac OS environment, the number of pages that can be printed on a single sheet is 2, 4, 6, 9, or 16. Printing 8 pages on one sheet is not supported.
The function for printing only the first page normally can only be used in the PCL6 printer driver.

3-23
PRINTER►FREQUENTLY USED FUNCTIONS
(1) Click the [Layout] tab.
(2) Select the number of pages per sheet.
(3) Select the order of the pages.
(4) If you wish to print borderlines, click the [Border] checkbox so that the checkmark appears.• To print the first page normally (as a cover), select the [N-Up with cover] checkbox ( ). (PCL6 only)• When [100% N-Up] is selected ( ) for jobs such as N-Up copying of two A5 size pages onto one A4 sheet, the pages will be
printed at the full size of the original. If you select [Border] at this time, only the border will be printed.
(1) Select [Layout].
(2) Select the number of pages per sheet.
(3) Select the order of the pages.
(4) If you wish to print borderlines, select the desired type of borderline.
Windows
Mac OS
(3)
(1)
(2)
(4)
(2)
(1)
(3)
(4)

3-24
PRINTER►CONVENIENT PRINTING FUNCTIONS
CONVENIENT FUNCTIONS FOR CREATING PAMPHLETS AND POSTERS
CREATE A PAMPHLET (BOOKLET)The pamphlet function prints on the front and back of each sheet of paper so that the sheets can be folded and bound to create a pamphlet.
(1) Click the [Layout] tab.(2) Select [Standard] in "Booklet".
The printed image will be enlarged or reduced to fit the paper selected in "Output Size".
(3) Select the specified output size and the binding edge.
CONVENIENT PRINTING FUNCTIONS
Windows
(2)
(1)
(3)
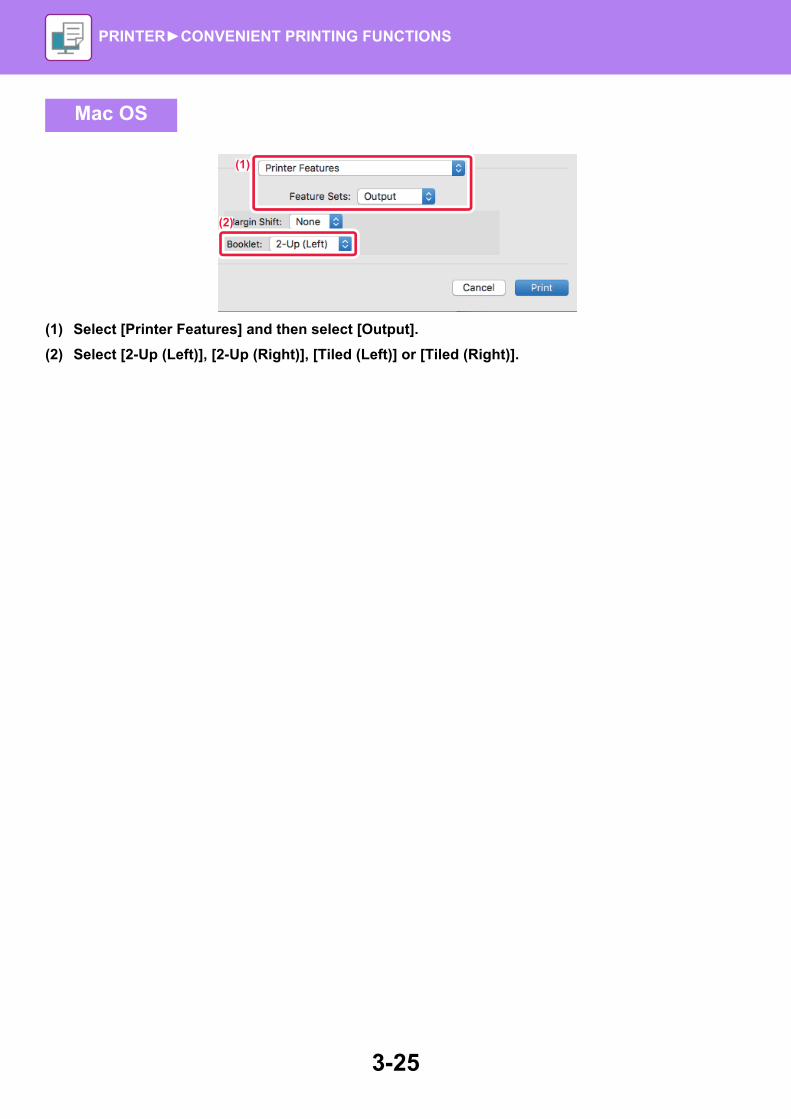
3-25
PRINTER►CONVENIENT PRINTING FUNCTIONS
(1) Select [Printer Features] and then select [Output].
(2) Select [2-Up (Left)], [2-Up (Right)], [Tiled (Left)] or [Tiled (Right)].
Mac OS
(2)
(1)

3-26
PRINTER►CONVENIENT PRINTING FUNCTIONS
PRINTING WITH MARGIN SHIFT SETTING (MARGIN)This function shifts the print image to increase the margin at the left, the right, or the top of the paper.
By shifting the image, the part of the image that is outside the print area will not be printed.
(1) Click the [Layout] tab.
(2) Click the [Print Position] button.
(3) Select [Margin Shift].
(4) Select the shift width.Select from the "Margin Shift" menu. If you wish to configure another numeric setting, select the setting and click buttons or directly enter the number.
Windows
(2)
(1)
(3) (4)
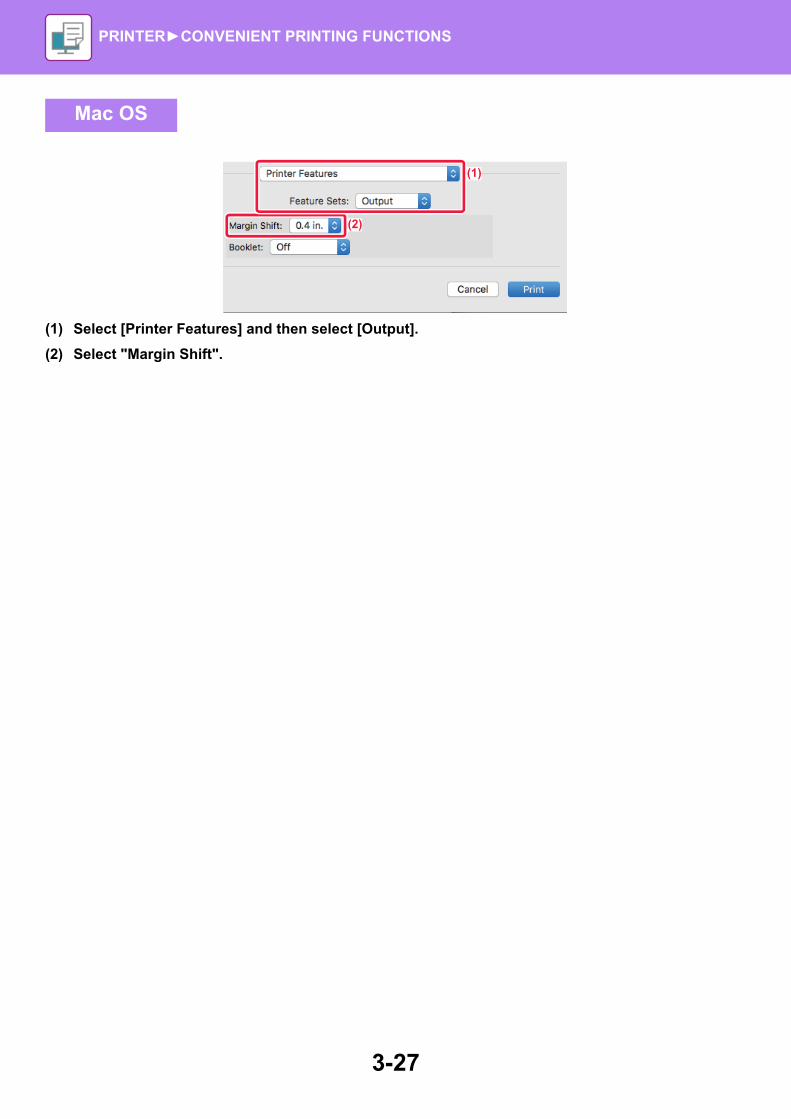
3-27
PRINTER►CONVENIENT PRINTING FUNCTIONS
(1) Select [Printer Features] and then select [Output].
(2) Select "Margin Shift".
Mac OS
(2)
(1)

3-28
PRINTER►CONVENIENT PRINTING FUNCTIONS
CREATE A LARGE POSTER (POSTER PRINTING)One page of print data is enlarged and printed using multiple sheets of paper (4 sheets (2 x 2), 9 sheets (3 x 3) or 16 sheets (4 x 4)). The sheets can then be attached together to create a large poster.To enable precise alignment of the edges of the sheets during attachment, borderlines can be printed or overlapping edges can be created (overlap function).
(1) Click the [Layout] tab.
(2) Select the number of sheets to be used in "Poster Printing".If you wish to print borderlines and/or use the overlap function, click the corresponding checkboxes so that the appears.
This function is available in a Windows environment.
Windows
(2)
(1)

3-29
PRINTER►CONVENIENT PRINTING FUNCTIONS
FUNCTIONS TO ADJUST THE SIZE AND ORIENTATION OF THE IMAGE
ADJUST PRINT POSITION ON ODD AND EVEN PAGES SEPARATELY (PRINT POSITION)This function sets different print positions (margins) separately for odd and even pages and prints the pages.
(1) Click the [Layout] tab.
(2) Click the [Print Position] button.
(3) Select [Custom].
(4) Set the amount of shifting of the print position for odd-numbered pages and even-numbered pages.
(5) Click the [OK] button.
This function is available in a Windows environment.
Windows
(2)
(1)
(3)(4)
(5)

3-30
PRINTER►CONVENIENT PRINTING FUNCTIONS
ROTATING THE PRINT IMAGE 180 DEGREES (ROTATE 180 DEGREES)This feature rotates the image 180 degrees so that it can be printed correctly on paper that can be loaded in only one orientation (such as envelopes or paper with punch holes).
(1) Click the [Main] tab.
(2) Select [Portrait (Rotated)] or [Landscape (Rotated)] in "Orientation".
(1) Select [Layout]
(2) Select the [Reverse page orientation] checkbox so that appears.
Windows
Mac OS
ABCD
ABCD
(1)
(2)
(2)
(1)

3-31
PRINTER►CONVENIENT PRINTING FUNCTIONS
ENLARGING/REDUCING THE PRINT IMAGE (ZOOM SETTING/ENLARGE OR REDUCE)This function enlarges or reduces the image to a selected percentage.This allows you to enlarge a small image or add margins to the paper by slightly reducing an image.
(1) Click the [Main] tab.
(2) Click the [Zoom] checkbox so that appears, and click the [Settings] button.
(3) Enter the percentage.By clicking the button, you can specify the value in increments of 1%. In addition, select [Upper Left] or [Center] for the base point on the paper.
(4) Click the [OK] button.
When using the PS printer driver (Windows), you can set the width and length percentages separately to change the proportions of the image.
Windows
(2)
(1)
(3)
(4)

3-32
PRINTER►CONVENIENT PRINTING FUNCTIONS
(1) Select [Page Setup] from the [File] menu and enter the ratio (%).
(2) Click the [OK] button.
Mac OS
(2)
(1)

3-33
PRINTER►CONVENIENT PRINTING FUNCTIONS
PRINT A MIRROR-IMAGE (MIRROR-IMAGE REVERSE/VISUAL EFFECTS)The image is reversed to create a mirror image.This function is conveniently used to print a design for a woodblock print or other printing medium.
(1) Click the [Detailed Settings] tab.(2) If you wish to reverse the image horizontally, select [Horizontal]. If you wish to reverse the image
vertically, select [Vertical].
(1) Select [Layout].(2) Select the [Flip horizontally] checkbox ( ).
In a Windows environment, this function is only available when using the PS printer driver.
Windows
Mac OS
BB
(2)
(1)
(2)
(1)

3-34
PRINTER►CONVENIENT PRINTING FUNCTIONS
IMAGE ADJUSTING FUNCTION
ADJUST THE BRIGHTNESS AND CONTRAST OF THE IMAGE (IMAGE ADJUSTMENT)This function adjusts the brightness and contrast in the print settings when a photo or other image is printed.This function makes simple corrections even if image editing software is not installed on your computer.
(1) Click the [Image Quality] tab.
(2) Click the [Image Adjustment] button.
(3) To adjust objects (text, graphics, photos) individually, select the [Adjust at each object] checkbox ( ) and select the object.
(4) Drag the slide bar or click buttons to adjust the image.
This function is available in a Windows environment.
Windows
(2)
(1)
(3)
(4)
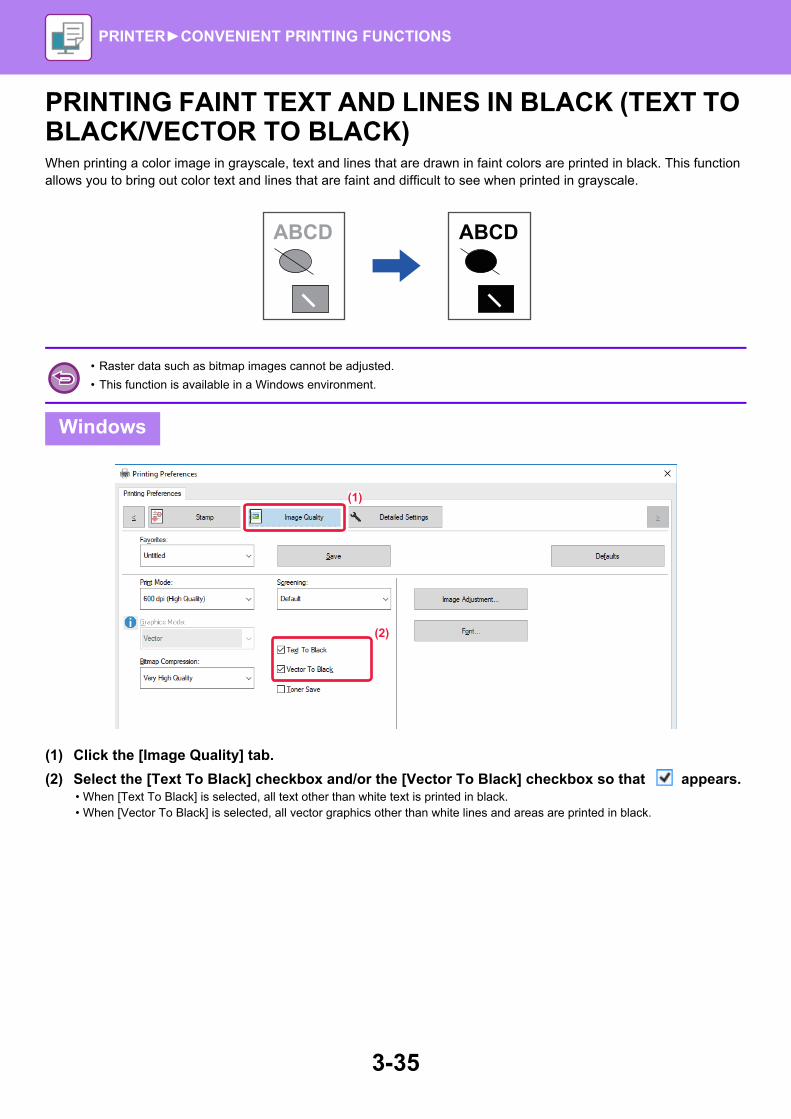
3-35
PRINTER►CONVENIENT PRINTING FUNCTIONS
PRINTING FAINT TEXT AND LINES IN BLACK (TEXT TO BLACK/VECTOR TO BLACK)When printing a color image in grayscale, text and lines that are drawn in faint colors are printed in black. This function allows you to bring out color text and lines that are faint and difficult to see when printed in grayscale.
(1) Click the [Image Quality] tab.
(2) Select the [Text To Black] checkbox and/or the [Vector To Black] checkbox so that appears.• When [Text To Black] is selected, all text other than white text is printed in black.• When [Vector To Black] is selected, all vector graphics other than white lines and areas are printed in black.
• Raster data such as bitmap images cannot be adjusted.
• This function is available in a Windows environment.
Windows
ABCD ABCD
(2)
(1)

3-36
PRINTER►CONVENIENT PRINTING FUNCTIONS
SELECTING IMAGE SETTINGS TO MATCH THE IMAGE TYPEPreset settings are available in the machine's printer driver for various uses.
(1) Click the [Image Quality] tab.
(2) Specify the settings.
Graphics mode Select the graphics mode from "Raster" or "Vector".
Bitmap compression The data compression ratio of bitmap is set. If the ratio is higher, the image quality becomes lower.
Screening Select the screening to modify the image to suit specific preferences, according to the appropriate image processing method.
Windows
(1)
(2)

3-37
PRINTER►CONVENIENT PRINTING FUNCTIONS
(1) Select [Printer Features].
(2) Click the [Advanced2] tab.
(3) Specify the settings.
Mac OS
(2)
(1)
(3)

3-38
PRINTER►CONVENIENT PRINTING FUNCTIONS
FUNCTIONS TO COMBINE TEXT AND IMAGES
ADDING A WATERMARK TO PRINTED PAGES (WATERMARK)This function adds faint shadow-like text as a watermark in the background of the printed image. The size and angle of the watermark text can be adjusted.The watermark text can be selected from the previously registered text in the list. When necessary, you can enter text to create an original watermark.
(1) Click the [Stamp] tab.
(2) Select [Watermark] from "Stamp" and click the [Settings] button.
(3) Select the watermark to be used and click the [OK] button.
Windows
If you want to create a new watermark, enter the text of the watermark in the text box and click the [Add] button.
CONFIDEN
TIAL
(2)
(1)(3)

3-39
PRINTER►CONVENIENT PRINTING FUNCTIONS
(1) Select [Watermarks].
(2) Click the [Watermark] checkbox and configure watermark settings.• Configure detailed watermark settings such as selection of the text.• Adjust the size and angle of the text by dragging the slide bar .
Mac OS
(2)
(1)
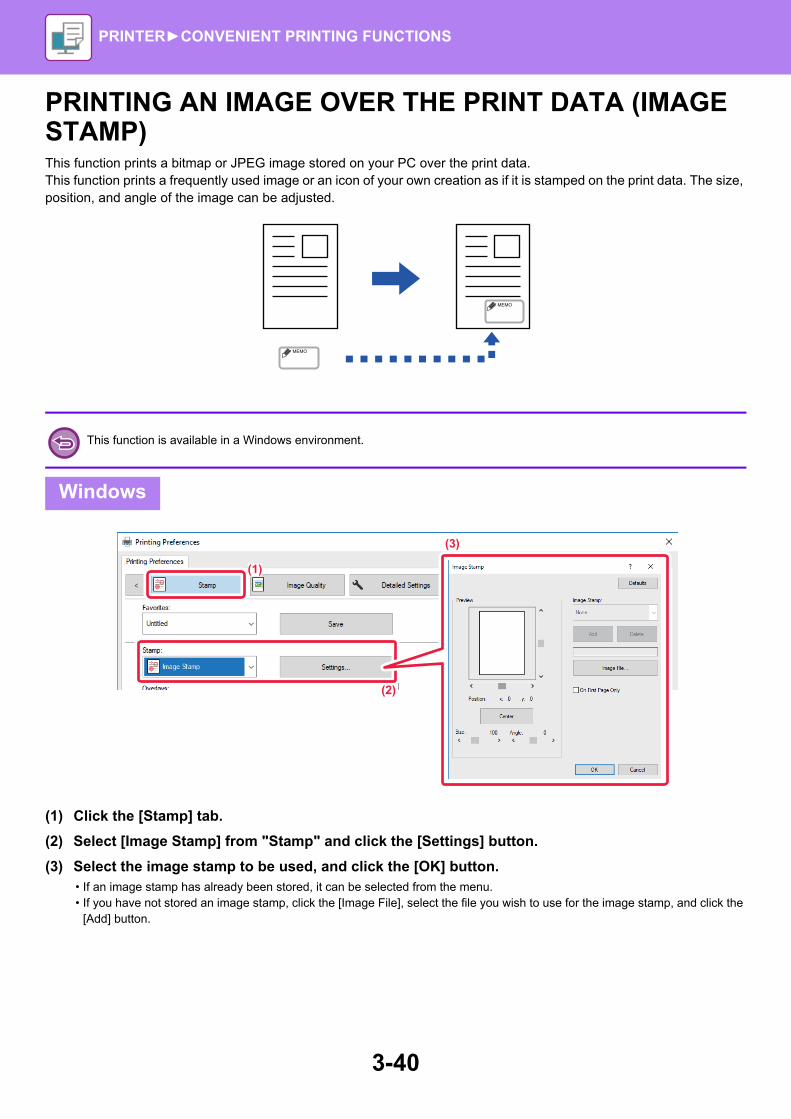
3-40
PRINTER►CONVENIENT PRINTING FUNCTIONS
PRINTING AN IMAGE OVER THE PRINT DATA (IMAGE STAMP)This function prints a bitmap or JPEG image stored on your PC over the print data.This function prints a frequently used image or an icon of your own creation as if it is stamped on the print data. The size, position, and angle of the image can be adjusted.
(1) Click the [Stamp] tab.
(2) Select [Image Stamp] from "Stamp" and click the [Settings] button.
(3) Select the image stamp to be used, and click the [OK] button.• If an image stamp has already been stored, it can be selected from the menu.• If you have not stored an image stamp, click the [Image File], select the file you wish to use for the image stamp, and click the
[Add] button.
This function is available in a Windows environment.
Windows
MEMO
MEMO
(2)
(1)
(3)

3-41
PRINTER►CONVENIENT PRINTING FUNCTIONS
OVERLAY A FIXED FORM ON THE PRINT DATA (OVERLAYS)This function overlays data on a fixed form you have prepared.By creating table rulings or a decorative frame in an application different from that of the text file and registering the data as an overlay file, an attractive print result can be easily obtained without the need for complex manipulations.
Creating an overlay file
(1) Open the driver properties window from the application that is used for creating overlay data.
(2) Click the [Stamp] tab.
(3) Click the [Settings] button.
(4) Click the [New] button and specify the name and folder to be used for the overlay file that you wish to create.The file will be created when the settings are completed and printing is started.
This function is available in a Windows environment.
Windows
XXXX
XXX 1 100XXXX 10 150XXX 0 120XXXX 10 250
XXXX
XXX 1 100XXXX 10 150XXX 0 120XXXX 10 250
(3)
(2)
(4)

3-42
PRINTER►CONVENIENT PRINTING FUNCTIONS
Printing with an overlay file
(1) Open the driver properties window from the application that is used for printing with an overlay file.
(2) Click the [Stamp] tab.
(3) Select an overlay file.A previously created or stored overlay file can be selected from the menu.
• When printing is started, a confirmation message will appear. The overlay file will not be created until the [Yes] button is clicked.
• When you click the [Open] button, the existing overlay file is registered.
(3)
(2)

3-43
PRINTER►CONVENIENT PRINTING FUNCTIONS
PRINT FUNCTIONS FOR SPECIAL PURPOSES
INSERTING COVERS (COVER PAGE)The front cover of a document is printed on paper that is different from the other pages. Use this function when you wish to print only the front cover on heavy paper.
(1) Click the [Inserts] tab.
(2) Select [Cover Page] from [Inserts Option], and click the [Settings] button.
(3) Select the paper insertion settings.Enable [Cover Page], and select the paper tray and the paper type you will use.
Windows
When [Bypass Tray] is selected in "Paper Tray", be sure to select the "Paper Type" and load that type of paper in the bypass tray.
5
4
3
2
1
(2)
(1)
(3)

3-44
PRINTER►CONVENIENT PRINTING FUNCTIONS
(1) Select [Printer Features].
(2) Select [Cover Page].
(3) Select the cover insertion settings.Select the print setting, paper tray, and paper type for the front cover.
Mac OS
(2)
(1)
(3)

3-45
PRINTER►CONVENIENT PRINTING FUNCTIONS
INSERT PRESET DATA BEFORE OR AFTER EACH PAGE (PAGE INTERLEAVE)This function inserts a preset data item into every page during printing.You can easily create documents with opened page spread that is made up of text on the left-hand page and a memo space on the right-hand page.
(1) Click the [Stamp] tab.
(2) Click the [Settings] button.
(3) Select [Page Interleave] from the "Printing Method".
(4) Set the overlay data to be inserted and set its insertion position.
• This function is available in a Windows environment.
• This function can be used when the PCL6 printer driver is used.
Windows
You have to create page data to be inserted in advance.For the procedure for creating page data, see "Creating an overlay file (page 3-41)" in "OVERLAY A FIXED FORM ON THE PRINT DATA (OVERLAYS) (page 3-41)".
Pre-set data
(2)
(1)
(3) (4)

3-46
PRINTER►CONVENIENT PRINTING FUNCTIONS
CHANGING THE RENDERING METHOD AND PRINTING JPEG IMAGES (USE DRIVER TO RENDER JPEGS)In some situations, a document containing a JPEG image may not be printed correctly. This can be solved by changing the way the JPEG image is rendered.When you print an original containing JPEG images, this function allows you to select whether the images are rendered in the printer driver or the machine.
(1) Click the [Detailed Settings] tab.
(2) Click the [Other Settings] button.
(3) Click the [Use driver to render JPEGs] checkbox so that appears.
(4) Click the [OK] button.
• This function is available in a Windows environment.
• When images are rendered in the printer driver, it may take time until the printing is completed.
Windows
(2)
(1)
(3)
(4)

3-47
PRINTER►CONVENIENT PRINTING FUNCTIONS
CONVENIENT PRINTER FUNCTIONS
SAVING AND USING PRINT FILES (RETENTION)This function is used to store a print job as a file on the machine, allowing the job to be printed from the operation panel.When printing from a computer, a PIN code (5 to 8 digits) can be set to maintain the secrecy of information in a stored file.When a PIN code is set, the PIN code must be entered to print a stored file from the machine.
(1) Click the [Job Handling] tab.
(2) Select [On] in "Retention".To enter a PIN code (5 to 8 digit number), click the [PIN Code] checkbox .
• Print data is erased when the power is turned off.
• Print data that exceeds 5 MB cannot be saved.
• A maximum of 5 files can be saved.
Windows
(2)
(1)

3-48
PRINTER►CONVENIENT PRINTING FUNCTIONS
(1) Select [Job Handling].
(2) Select [Retention].After you have entered a PIN code (a 5 to 8-digit number), click the button to lock the PIN code. This allows you to readily set the same PIN code the next time you use it.
Printing a job stored by retentionWhen retention is performed, the display appears as follows:
(1) Select the print job with the [ ][ ] keys.
If the screen appears as below, press the [ ] key to display the list of print hold jobs.
(2) Press the [OK] key.
Mac OS
(2) (1)

3-49
PRINTER►CONVENIENT PRINTING FUNCTIONS
(3) Print or delete the print job with the [ ][ ] keys.
Select "Print" to print the job.Select "Delete" to delete the job without printing it.Selecting "No Print" returns you to step 1.
(4) Press the [OK] key.The print job is printed or deleted. If a PIN code is set, the job will be printed or deleted after you enter the PIN code with the numeric keys and press the [OK] key.
Please enter Pin code.
Pin code

3-50
PRINTER►PRINTING WITHOUT THE PRINTER DRIVER
EXTENSION OF PRINTABLE FILESWhen you do not have the printer driver installed on your PC, or when the application used to open a file that you wish to print is not available, you can print directly to the machine without using the printer driver.The file types (and corresponding extensions) that can be printed directly are shown below.
PRINTING WITHOUT THE PRINTER DRIVER
File Type TIFF JPEG PCL PS
PDF, Encrypt PDF,
Compact PDF, PDF/A, Compact PDF/A
Extension tiff, tif jpeg, jpg, jpe, jfif pcl, prn, txt ps, prn pdf
• Some files may not print correctly even if shown in the above table.
• A PDF that has a password cannot be printed.
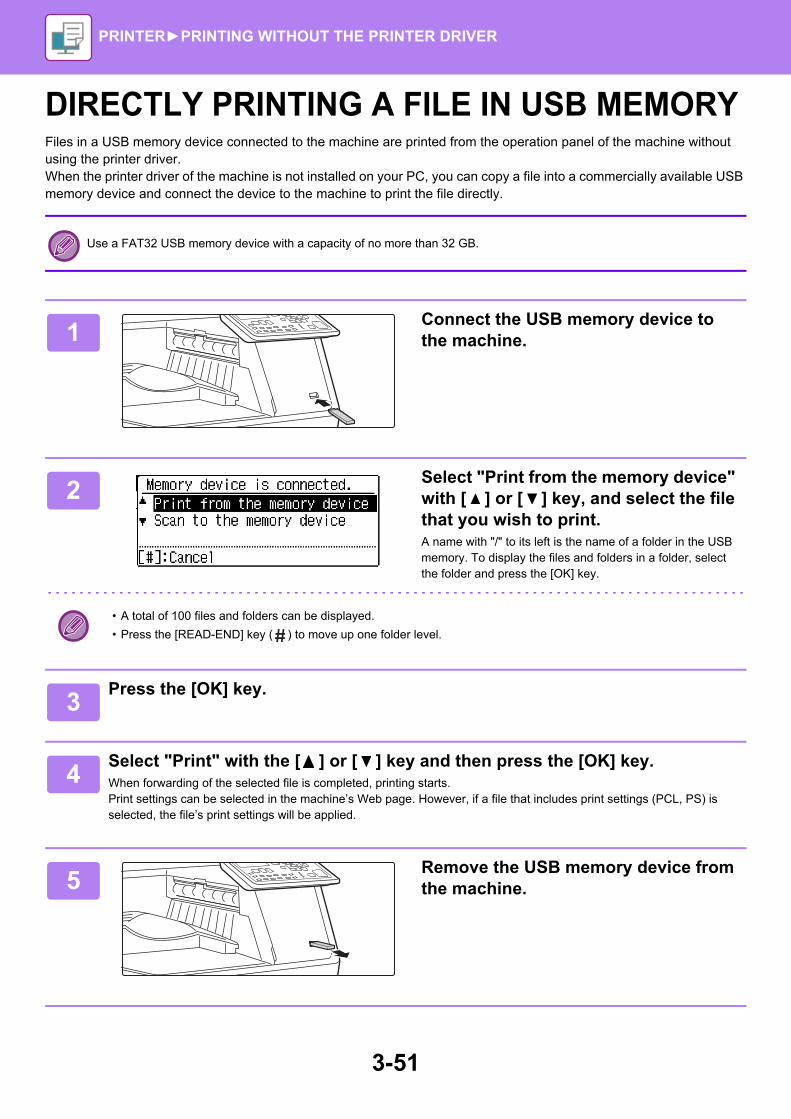
3-51
PRINTER►PRINTING WITHOUT THE PRINTER DRIVER
DIRECTLY PRINTING A FILE IN USB MEMORYFiles in a USB memory device connected to the machine are printed from the operation panel of the machine without using the printer driver.When the printer driver of the machine is not installed on your PC, you can copy a file into a commercially available USB memory device and connect the device to the machine to print the file directly.
Use a FAT32 USB memory device with a capacity of no more than 32 GB.
1Connect the USB memory device to the machine.
2Select "Print from the memory device" with [ ] or [ ] key, and select the file that you wish to print. A name with "/" to its left is the name of a folder in the USB memory. To display the files and folders in a folder, select the folder and press the [OK] key.
• A total of 100 files and folders can be displayed.
• Press the [READ-END] key ( ) to move up one folder level.
3Press the [OK] key.
4Select "Print" with the [ ] or [ ] key and then press the [OK] key.When forwarding of the selected file is completed, printing starts.Print settings can be selected in the machine’s Web page. However, if a file that includes print settings (PCL, PS) is selected, the file’s print settings will be applied.
5Remove the USB memory device from the machine.

3-52
PRINTER►PRINTING WITHOUT THE PRINTER DRIVER
CANCELING A PRINT JOB FROM THE MACHINEWhen [STOP] key is pressed while showing "Printing" on the display after starting a print job, the confirmation screen whether or not to cancel the print job will appear. Then select "Yes" to cancel the printing.

3-53
PRINTER►PRINTING WITHOUT THE PRINTER DRIVER
DIRECTLY PRINTING FROM A COMPUTER
FTP PRINTYou can print a file from your PC by simply dragging and dropping the file onto the FTP server of the machine.
Performing FTP printType "ftp://" and then the IP address of the machine in the address bar of your PC's Web browser as shown below.Example: ftp://192.168.1.28In Windows, enter ftp://<IP address of machine> in Explorer, and drag and drop the file you want to print to that window.Printing will automatically begin.
• If you selected a PS or PCL file that includes print conditions, the print conditions in the file will be given priority.
• When user authentication is enabled in the settings of the machine, the print function may be restricted. For more information, ask your administrator.
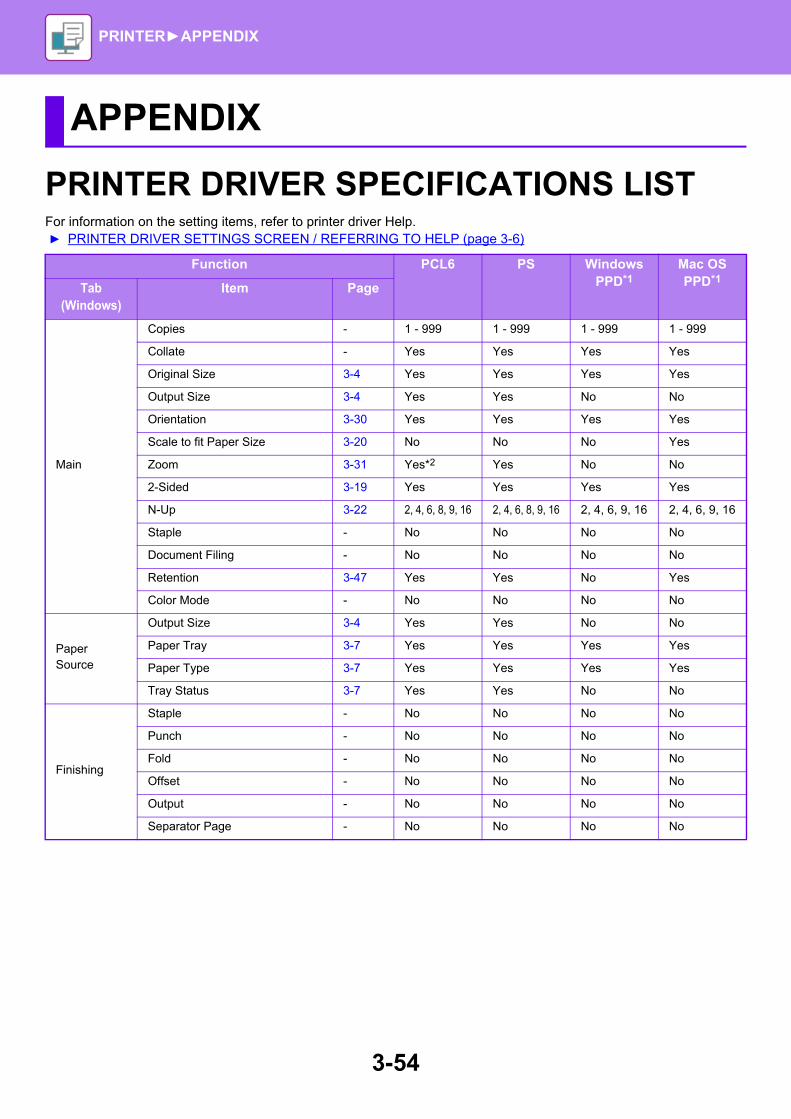
3-54
PRINTER►APPENDIX
PRINTER DRIVER SPECIFICATIONS LISTFor information on the setting items, refer to printer driver Help.► PRINTER DRIVER SETTINGS SCREEN / REFERRING TO HELP (page 3-6)
APPENDIX
Function PCL6 PS Windows PPD*1
Mac OS PPD*1
Tab (Windows)
Item Page
Main
Copies - 1 - 999 1 - 999 1 - 999 1 - 999
Collate - Yes Yes Yes Yes
Original Size 3-4 Yes Yes Yes Yes
Output Size 3-4 Yes Yes No No
Orientation 3-30 Yes Yes Yes Yes
Scale to fit Paper Size 3-20 No No No Yes
Zoom 3-31 Yes*2 Yes No No
2-Sided 3-19 Yes Yes Yes Yes
N-Up 3-22 2, 4, 6, 8, 9, 16 2, 4, 6, 8, 9, 16 2, 4, 6, 9, 16 2, 4, 6, 9, 16
Staple - No No No No
Document Filing - No No No No
Retention 3-47 Yes Yes No Yes
Color Mode - No No No No
Paper Source
Output Size 3-4 Yes Yes No No
Paper Tray 3-7 Yes Yes Yes Yes
Paper Type 3-7 Yes Yes Yes Yes
Tray Status 3-7 Yes Yes No No
Finishing
Staple - No No No No
Punch - No No No No
Fold - No No No No
Offset - No No No No
Output - No No No No
Separator Page - No No No No
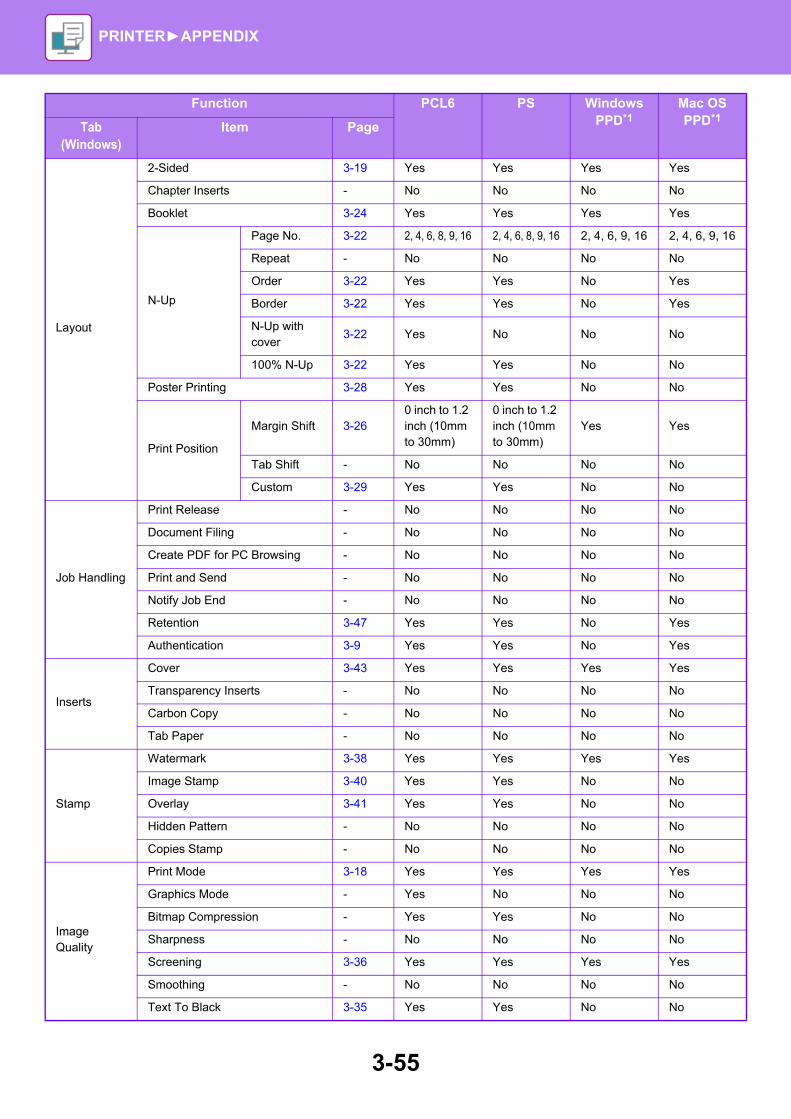
3-55
PRINTER►APPENDIX
Layout
2-Sided 3-19 Yes Yes Yes Yes
Chapter Inserts - No No No No
Booklet 3-24 Yes Yes Yes Yes
N-Up
Page No. 3-22 2, 4, 6, 8, 9, 16 2, 4, 6, 8, 9, 16 2, 4, 6, 9, 16 2, 4, 6, 9, 16
Repeat - No No No No
Order 3-22 Yes Yes No Yes
Border 3-22 Yes Yes No Yes
N-Up with cover
3-22 Yes No No No
100% N-Up 3-22 Yes Yes No No
Poster Printing 3-28 Yes Yes No No
Print Position
Margin Shift 3-260 inch to 1.2 inch (10mm to 30mm)
0 inch to 1.2 inch (10mm to 30mm)
Yes Yes
Tab Shift - No No No No
Custom 3-29 Yes Yes No No
Job Handling
Print Release - No No No No
Document Filing - No No No No
Create PDF for PC Browsing - No No No No
Print and Send - No No No No
Notify Job End - No No No No
Retention 3-47 Yes Yes No Yes
Authentication 3-9 Yes Yes No Yes
Inserts
Cover 3-43 Yes Yes Yes Yes
Transparency Inserts - No No No No
Carbon Copy - No No No No
Tab Paper - No No No No
Stamp
Watermark 3-38 Yes Yes Yes Yes
Image Stamp 3-40 Yes Yes No No
Overlay 3-41 Yes Yes No No
Hidden Pattern - No No No No
Copies Stamp - No No No No
Image Quality
Print Mode 3-18 Yes Yes Yes Yes
Graphics Mode - Yes No No No
Bitmap Compression - Yes Yes No No
Sharpness - No No No No
Screening 3-36 Yes Yes Yes Yes
Smoothing - No No No No
Text To Black 3-35 Yes Yes No No
Function PCL6 PS Windows PPD*1
Mac OS PPD*1
Tab (Windows)
Item Page

3-56
PRINTER►APPENDIX
*1 The specifications of each function in Windows PPD and Mac OS PPD vary depending on the operating system version and the application.
*2 The horizontal and vertical proportion cannot be set separately.*3 This setting may not operate in some applications and operating systems.
Image Quality
Vector To Black 3-35 Yes Yes No No
Toner Save *3 - Yes Yes Yes Yes
Color Mode - No No No No
Image Type - No No No No
Advanced Color - No No No No
Image Adjustment 3-34 Yes Yes No No
Font - Yes Yes Yes No
Line Width - No No No No
Boldness Adjustment - No No No No
Detailed Settings
Mirror Image 3-33 No Yes Yes Yes
PS Error Information - No Yes Yes No
PS Pass-Through - No Yes No No
Job Compression - No Yes No No
Tandem Print - No No No No
Disable Blank Page Print - No No No No
Custom Image Registration - No No No No
Other Settings
• Input Resolution - Yes Yes No No
• Shade Pattern - Yes No No No
• Spool Data Format - Yes Yes No No
• Printable Area - No No No No
• Rip Style - No No No No
• Duplex Style 3-19 Yes Yes No No
• CMYK Image Enhancement - No No No No
• Job Name Shortening - Yes Yes No No
• Use driver to render JPEGs 3-46 Yes Yes No No
• Thicken Fine Lines - No No No No
• Fine Text - No No No No
• Fine Edge - No No No No
• Text/Line control - No No No No
• Text/Line knockout control - No No No No
• Photo Image - No No No No
• Image Enhancement - No No No No
Function PCL6 PS Windows PPD*1
Mac OS PPD*1
Tab (Windows)
Item Page

4-1
BEFORE USING THE MACHINE AS A FAX
TO USE THIS PRODUCT CORRECTLY AS A FACSIMILE. . . . . . . . . . . . . . . . . . . . . . . . . . . . . . . . 4-2
POINTS TO CHECK AND PROGRAM AFTER INSTALLATION . . . . . . . . . . . . . . . . . . . . . . . . . . . . 4-3
BASIC TRANSMISSION METHODS
FAX MODE (BASE SCREEN) . . . . . . . . . . . . . . . . . 4-4
ORIGINALS . . . . . . . . . . . . . . . . . . . . . . . . . . . . . . . 4-5
• ORIGINALS THAT CAN BE FAXED . . . . . . . . . 4-5
CONVENIENT DIALING METHODS (AUTO-DIALING) . . . . . . . . . . . . . . . . . . . . . . . . . . . 4-6
FAX TRANSMISSION METHODS . . . . . . . . . . . . . . 4-7
• ADDRESS REVIEW FUNCTION. . . . . . . . . . . . 4-7
SENDING A FAX . . . . . . . . . . . . . . . . . . . . . . . . . . . 4-8
• BASIC PROCEDURE FOR SENDING FAXES . 4-8
• TRANSMISSION BY AUTO-DIALING (SPEED DIALING AND GROUP DIALING) . . . . . . . . . . . 4-12
• SEARCHING FOR A PROGRAMMED DESTINATION (USING THE [ADDRESS] KEY) 4-13
• FAXING A TWO-SIDED ORIGINAL . . . . . . . . . 4-14
• HOW TO SELECT THE RESOLUTION . . . . . . 4-19
• CHANGING THE EXPOSURE . . . . . . . . . . . . . 4-20
• CANCELING A FAX TRANSMISSION . . . . . . . 4-21
FAX RECEPTION
RECEIVING FAXES . . . . . . . . . . . . . . . . . . . . . . . . . 4-25
• RECEIVING A FAX . . . . . . . . . . . . . . . . . . . . . . 4-25
• MANUAL FAX RECEPTION . . . . . . . . . . . . . . . 4-27
CONVENIENT FAX FUNCTIONS
FUNCTION KEY . . . . . . . . . . . . . . . . . . . . . . . . . . . . 4-28
• FAX PRINT HOLD FUNCTION . . . . . . . . . . . . . 4-28
• AUTOMATIC TRANSMISSION AT A SPECIFIED TIME . . . . . . . . . . . . . . . . . . . . . . . 4-29
• SENDING THE SAME DOCUMENT TO MULTIPLE DESTINATIONS IN A SINGLE OPERATION . . . . . . . . . . . . . . . . . . . . . . . . . . . 4-30
• SENDING OPTIONS . . . . . . . . . . . . . . . . . . . . . 4-32
• POLLING MEMORY. . . . . . . . . . . . . . . . . . . . . 4-34
• STORING, EDITING, AND DELETING AUTO-DIAL NUMBERS (SPEED DIAL NUMBERS, AND GROUP DIALS) . . . . . . . . . . 4-37
• STORING, EDITING AND DELETING PROGRAMS. . . . . . . . . . . . . . . . . . . . . . . . . . . 4-43
PRINTING LISTS OF PROGRAMMED INFORMATION AND SETTINGS . . . . . . . . . . . . . . 4-45
• INCLUDING SENDER INFORMATION ON FAXES (OWN NUMBER SENDING) . . . . . . . . 4-46
• FORWARDING FUNCTION. . . . . . . . . . . . . . . 4-47
USING SETTINGS STORED AS A PROGRAM . . . 4-49
• USING A PROGRAM . . . . . . . . . . . . . . . . . . . . 4-49
FORWARDING RECEIVED DATA TO A NETWORK ADDRESS (INBOUND ROUTING SETTINGS) . . . . . . . . . . . . . . . . . . . . . . . . . . . . . . . 4-50
• CONFIGURING THE BASIC SETTINGS. . . . . 4-50
• SETTINGS THE DESTINATION . . . . . . . . . . . 4-52
SENDING A FAX DIRECTLY FROM A COMPUTER (PC-Fax) . . . . . . . . . . . . . . . . . . . . . . . . . . . . . . . . . 4-54
USING AN EXTENSION PHONECONNECTING AN EXTENSION PHONE. . . . . . . . 4-55
• CONNECTING AN EXTENSION PHONE . . . . 4-55
• USING AN EXTENSION PHONE. . . . . . . . . . . 4-56
OTHER FUNCTIONSWHEN A TRANSACTION REPORT IS PRINTED . 4-58
• INFORMATION APPEARING IN THE TYPE/NOTE COLUMN. . . . . . . . . . . . . . . . . . . 4-58
REPORT AT REGULAR INTERVALS (COMMUNICATION ACTIVITY REPORT) . . . . . . . 4-60
WHEN AN ALARM SOUNDS AND A WARNING MESSAGE IS DISPLAYED. . . . . . . . . . . . . . . . . . . 4-60
• SELF-DIAGNOSTIC FUNCTION . . . . . . . . . . . 4-60
• MESSAGES DURING NORMAL OPERATION 4-61
FACSIMILE
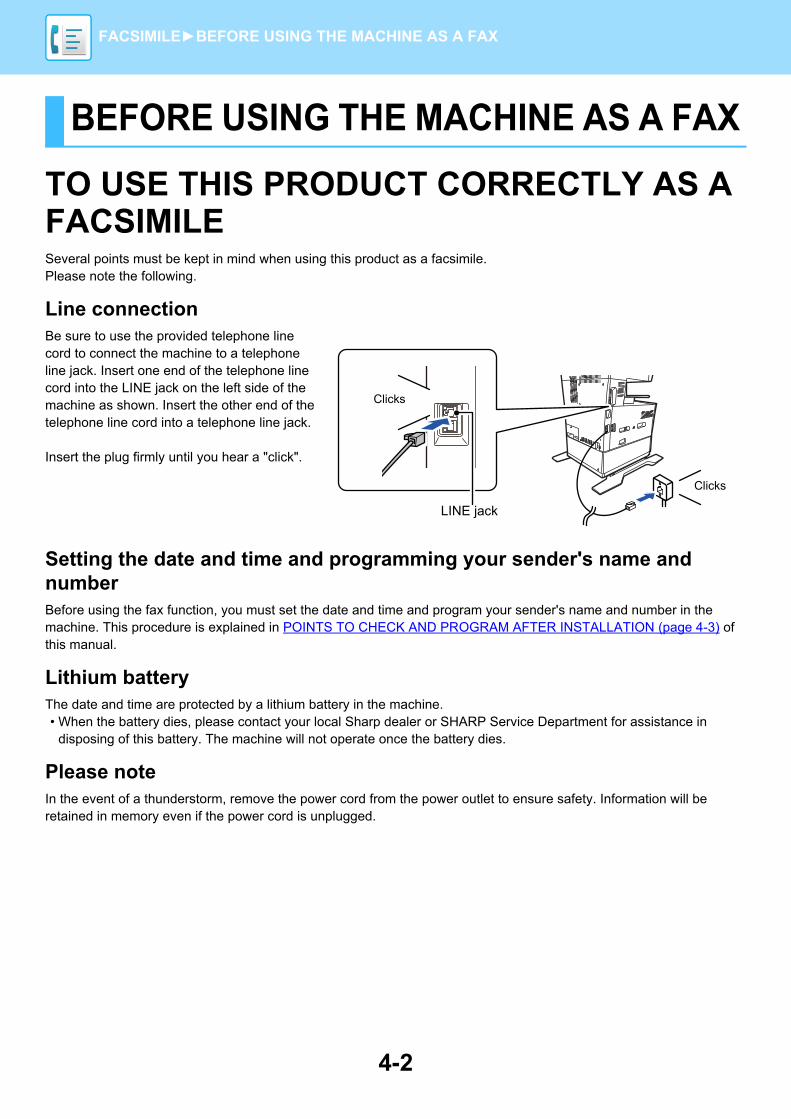
4-2
FACSIMILE►BEFORE USING THE MACHINE AS A FAX
TO USE THIS PRODUCT CORRECTLY AS A FACSIMILESeveral points must be kept in mind when using this product as a facsimile.Please note the following.
Line connectionBe sure to use the provided telephone line cord to connect the machine to a telephone line jack. Insert one end of the telephone line cord into the LINE jack on the left side of the machine as shown. Insert the other end of the telephone line cord into a telephone line jack.
Insert the plug firmly until you hear a "click".
Setting the date and time and programming your sender's name and numberBefore using the fax function, you must set the date and time and program your sender's name and number in the machine. This procedure is explained in POINTS TO CHECK AND PROGRAM AFTER INSTALLATION (page 4-3) of this manual.
Lithium batteryThe date and time are protected by a lithium battery in the machine.• When the battery dies, please contact your local Sharp dealer or SHARP Service Department for assistance in
disposing of this battery. The machine will not operate once the battery dies.
Please noteIn the event of a thunderstorm, remove the power cord from the power outlet to ensure safety. Information will be retained in memory even if the power cord is unplugged.
BEFORE USING THE MACHINE AS A FAX
LINE jack
Clicks
Clicks

4-3
FACSIMILE►BEFORE USING THE MACHINE AS A FAX
POINTS TO CHECK AND PROGRAM AFTER INSTALLATIONAfter installing the machine and before using it as a fax machine, check the following points and program the required information.
Set the date and timeThe machine has an internal clock. It is important to set the correct date and time because they are used for such features as Timer Transmission. (►page 4-29)The date and time are set in the system settings. (►page 7-10)The date and time appear in the display. Make sure the correct date and time appear. If the date and time are wrong, please correct them.
Program the sender's name and sender's numberThe name and fax number of the user of the machine is programmed in Own Passcode Set (page 7-19) in the system settings. (Only one name and number can be programmed.)The programmed name and number are printed at the top of each transmitted fax page. The sender's number is also used as an identification number when you use the Polling function to request transmission from another fax machine (see SENDING OPTIONS (page 4-32)).
Paper sizes that can be used for fax modeThe machine can use 8-1/2" x 14", 8-1/2" x 13", 8-1/2"x13-2/5", 8-1/2"x13-1/2", 8-1/2" x 11", 5-1/2"x 8-1/2", A4, B5 and A5 size paper; (8-1/2"x13-1/2", 5-1/2"x 8-1/2", B5 and A5 size paper cannot be used in fax mode.)
For this reason, if only paper sizes that can be used in other modes but not in fax mode are loaded in the machine, received faxes cannot be printed. (For other points regarding fax reception, see RECEIVING FAXES (page 4-25).)
You can check your programmed name and number by printing out the "Administrator Settings List" in the system settings.► List Setting (page 7-18)
For the procedures for loading paper in the trays, LOADING PAPER (page 1-17).

4-4
FACSIMILE►BASIC TRANSMISSION METHODS
FAX MODE (BASE SCREEN)The base screen of fax mode is displayed by pressing the [FAX] key when the copy mode, or scan mode screen appears.
The base screen of fax mode
(1) Message display
Messages appear here to indicate the current status of the machine.
(2) Date and time display
This shows the date and time.
(3) Transmission mode display ►page 4-15
There are three transmission modes: memory transmission, direct transmission, and manual transmission. This shows the currently selected transmission mode.
(4) Exposure display
This shows the exposure for scanning the original.
(5) Resolution display
This shows the resolution for scanning the original.
(6) Free memory display
This shows the percentage of fax memory that is free.
(7) Reception mode display
There are two modes for receiving faxes: automatic reception and manual reception.This shows the currently selected reception mode.
(8) Original display
This displays an icon to indicate the original scanning mode when an original has been placed.
: One-sided original scanning in the document feeder.
: Two-sided original scanning in the document feeder.
None: Document glassThis also shows the currently selected original scanning size.
(9) Original Size ►page 4-8
This is used to set the original scanning size.
(10) Resolution ►page 4-19
This menu is used to select resolution settings.
(11) Broadcast ►page 4-30
This is used to perform a broadcast transmission.
(12) Program ►page 4-43
Select this menu to use a program.
BASIC TRANSMISSION METHODS
(2)
(3)
(4)
(5)
(1)
(7)
(8)
(9)
(10)
(11)
(12)
(6)
Left Menu Right Menu
The following functions also operate when a mode other than fax mode is selected:• Automatic reception• Manual reception• Timer Transmission• Transmission of stored memory transmission jobs• Voice calls (when the extension phone is installed)• Remote reception

4-5
FACSIMILE►BASIC TRANSMISSION METHODS
ORIGINALS
ORIGINALS THAT CAN BE FAXEDFor originals that can be set, see HOW TO PLACE THE ORIGINAL (page 1-30).
* Long originalsDepending on the resolution setting and the width of the original, there may not be sufficient space in memory to hold a long original. When a long original cannot be entirely scanned, use direct transmission or manual transmission (on-hook dialing).
Originals 8-1/2" x 14" or 8-1/2" x 11"or A4 can be placed in the document glass and 8-1/2"/A4 width and up to 500mm long can be placed in the automatic document feeder.

4-6
FACSIMILE►BASIC TRANSMISSION METHODS
CONVENIENT DIALING METHODS (AUTO-DIALING)The fax function includes a convenient auto dial feature (Speed dialing and group dialing). By programming frequently dialed numbers, you can call and send faxes to these locations by means of a simple dialing operation.► TRANSMISSION BY AUTO-DIALING (SPEED DIALING AND GROUP DIALING) (page 4-12)
There are two types of auto-dialing: Speed dialing, and group dialing. To program auto-dial numbers, see STORING, EDITING, AND DELETING AUTO-DIAL NUMBERS (SPEED DIAL NUMBERS, AND GROUP DIALS) (page 4-37).
• Speed dialing (300 stations)A stored destination can be dialed by pressing the [SPEED] key, entering a 3-digit number (000 to 299), and pressing the [START] key. A name (maximum 36 characters) can be stored for each destination.
• Group dialingMultiple numbers can be stored in a Speed Dial number. This is convenient for communicating with a group of other fax machines.
• RedialingThe machine retains the last fax or phone number dialed. This number can be redialed by simply pressing the [REDIAL] key and then the [START] key.
• If you pressed a numeric key during the previous call, the [REDIAL] key may not dial the correct number.
• Redialing is not possible to broadcast transmission (►page 4-30), serial polling (►page 4-32), timer transmission (►page 4-29) or group dialing (►page 4-12) destinations.
• ON-HOOK DIALINGThis feature allows you to dial without lifting an extension phone connected to the machine. Press the [SPEAKER] key, listen for the dial tone through the speaker, and then dial.
• Faxes must be sent manually when using on-hook dialing. (►page 4-16)
• Up to 100 destinations can be stored in each group dial number, and a combined total of 300 Speed Dial and group dial numbers can be stored.
• Stored Group dialing and Speed dial destinations can be called up using a search name entered when the key or destination was stored. ► TRANSMISSION BY AUTO-DIALING (SPEED DIALING AND GROUP DIALING) (page 4-12)
• To prevent dialing a wrong number and sending a fax to an incorrect destination, check the message display carefully when you store the number. You can also check stored numbers by printing out the programmed information after storing the number.► PRINTING LISTS OF PROGRAMMED INFORMATION AND SETTINGS (page 4-45)

4-7
FACSIMILE►BASIC TRANSMISSION METHODS
FAX TRANSMISSION METHODSThere are three basic methods for fax transmission: memory transmission, direct transmission, and manual transmission. When memory transmission is used, the document is temporarily stored in memory before being transmitted. When direct transmission or manual transmission is used, the document is transmitted without being stored in memory. The default transmission setting can be set to "Memory TX" or "Direct TX" using "Send Mode" (►page 7-20) in the system settings. To manually switch between "Memory TX" and "Direct TX", use the [COMM. SETTING] key. (See Faxing by direct transmission (page 4-15).)The following explanations generally assume that memory transmission is being used.
ADDRESS REVIEW FUNCTIONThe Address Review function allows you to check fax destinations to prevent transmission to an incorrect destination.When a fax number is entered with the numeric keys or selected with the [REDIAL] key, a screen appears after you enter the number prompting you to reenter the number for confirmation.• When a Speed Dial number (►page 4-12) is used for transmission, a screen appears for confirmation of the stored
name and number.• When a group dial number (►page 4-12) is used for transmission, a screen appears for confirmation of all numbers
stored in the group.This function can be set in "Address Review" in the system settings (►page 7-20).
• When the Address Review function is turned on, the [SPEAKER] key can only be used for manual reception (►page 4-16). If you press the [SPEAKER] key when the machine rings to signal an incoming call, a screen appears to confirm whether you want to start reception. The speaker key on a connected extension phone can be used.
• If the "Only apply to direct entry" checkbox is selected when the Address Review function is turned on, the Address Review screen only appears when a number is entered with the numeric keys or the [REDIAL] key.

4-8
FACSIMILE►BASIC TRANSMISSION METHODS
SENDING A FAX
BASIC PROCEDURE FOR SENDING FAXES
Using the document feeder
1Make sure that the machine is in fax mode.The FAX indicator is lit when the machine is in fax mode. If the indicator is not lit, press the [FAX] key. If user authentication has been enabled for the fax function in the system settings, a message will appear prompting you to enter your user number when you switch to fax mode. Enter your account number (5 digits) with the numeric keys.► User Authentication (page 7-12)
2Place the original(s).Place the original in the document feeder tray of the automatic document feeder.► AUTOMATIC DOCUMENT FEEDER (page 1-30)
This is a single transmission operation, and therefore originals cannot be scanned in succession from both the document feeder and the document glass.
3Specify the original size.One-side scanningWhen the original is placed in the document feeder, the icon changes to [AUTO]. The original size cannot be changed by selecting "Orig. Size" in the right menu.Two-side scanningFor the procedure for specifying the original size see FAXING A TWO-SIDED ORIGINAL (page 4-14).
AUTO: ....... One-sided scanning in the document feeder.8-1/2" x 11: Two-sided scanning in the document feeder.
8-1/2" x 11: ..... Document glass
• Regardless of the width of the auto document feeder, AB-size documents are scanned at A4 width (210mm), and inch-size documents are scanned at 8-1/2" width.
• Originals up to 500 mm long can be sent automatically.
4If needed, adjust the resolution and exposure settings.
4-9
FACSIMILE►BASIC TRANSMISSION METHODS
5Dial the fax number.
• The entered number appears in the message display. Up to 50 digits can be entered. If you make a mistake, press the [C] key and then enter the correct number.
• Redialing and automatic dialing can also be used (►page 4-6, ►page 4-12).
• To enter a pause, see Entering a pause (page 4-11).
6Press the [OK] key.
7When the reenter screen appears, reenter the fax number.► ADDRESS REVIEW FUNCTION (page 4-7)
8Press the [OK] key.
9Press the [START] key.Scanning begins.If scanning is completed normally, the display returns to the base screen.• If the line is free, the machine will dial the receiving machine and begin transmission as soon as the first page is
scanned. ► Quick On-line (page 4-17)
• If there is a previously stored job or a job is in progress, or if the line is being used, all pages of the original are scanned into memory and stored as a transmission job. (This is called memory transmission: the destination is automatically called and the document transmitted after previously stored jobs are completed.)

4-10
FACSIMILE►BASIC TRANSMISSION METHODS
Using the document glass
1Make sure that the machine is in fax mode.The FAX indicator is lit when the machine is in fax mode. If the indicator is not lit, press the [FAX] key. If user authentication has been enabled for the fax function in the system settings, a message will appear prompting you to enter your user number when you switch to fax mode. Enter your account number (5 digits) with the numeric keys.► User Authentication (page 7-12)
2Place the original.Place the original on the document glass.► DOCUMENT GLASS (page 1-32)
This is a single transmission operation, and therefore originals cannot be scanned in succession from both the document feeder and the document glass.
3Specify the original size.Select the "Original Size" on the right menu.The paper size that can be selected is 8-1/2" x 11", 8-1/2" x 14" or A4.
4If needed, adjust the resolution and exposure settings.
5Dial the fax number.
• The entered number appears in the message display. Up to 50 digits can be entered. If you make a mistake, press the [C] key and then enter the correct number.
• Redialing and automatic dialing can also be used (►page 4-6, ►page 4-12).
• To enter a pause, see Entering a pause (page 4-11).
6Press the [OK] key.

4-11
FACSIMILE►BASIC TRANSMISSION METHODS
Entering a pauseIf a pause is necessary when dialing an international number, press the [PAUSE] key. (This key functions as a [PAUSE] key when entering a number.)If you press the [PAUSE] key once, a hyphen ("-") appears and a 2-second pause* is inserted.After entering a number, you can also press the [PAUSE] key to enter a hyphen and then enter another number using the numeric keys. (This connects the numbers together, and is called Chain dialing.)* The duration of each pause can be changed in the system settings. (See Pause Time (page 7-19).)
7When the reenter screen appears, reenter the fax number.► ADDRESS REVIEW FUNCTION (page 4-7)
8Press the [OK] key.
9Press the [START] key.Scanning begins.
10If you have another page to scan, change pages and then press the [START] key.• Repeat this sequence until all pages have been scanned.• You can change the resolution and exposure settings as needed for each.
11After the last page is scanned, press the [READ-END] key ( ).Open the document feeder and remove the original. When the original is removed or any key operation is performed, the display returns to the base screen.The destination is automatically called and the document transmitted after any previously stored jobs are completed.
To cancel transmissionTo cancel transmission while "Reading" appears or before the [READ-END] key ( ) is pressed, press the [C] or [CA] key. To cancel a transmission job that is already stored, press the [FAX STATUS] key and cancel the job as explained on (►page 4-21).
• A job number (3 digits) appears in the display with "Read End" when memory transmission is performed. If you make a note of this number after performing a broadcast transmission, you can use the number to check the results of the transmission in the transaction report or activity report.
• If the power is turned off or a power failure occurs while an original is being scanned in the document feeder, the machine will stop and an original misfeed will occur. After power is restored, remove the original as explained in MISFEED IN THE DOCUMENT FEEDER (page 6-14).
Group dials cannot be used for chain dialing.
4-12
FACSIMILE►BASIC TRANSMISSION METHODS
TRANSMISSION BY AUTO-DIALING (SPEED DIALING AND GROUP DIALING)Instead of entering a full fax number with the numeric keys, you can send a fax by pressing the [SPEED] key and entering a 3-digit number. To use an automatic dialing, the 3-digit number and name and fax number of the destination must first be stored. See CONVENIENT DIALING METHODS (AUTO-DIALING) (page 4-6) for information on auto-dialing and STORING, EDITING, AND DELETING AUTO-DIAL NUMBERS (SPEED DIAL NUMBERS, AND GROUP DIALS) (page 4-37) for information on programming auto-dial destinations.
1Enter the 3-digit number with numeric keys.• Enter the 3-digit number entered when the Speed Dial number or Group Dial was programmed. • If you make a mistake, press the [C] key and then enter the correct number. If you enter a 3-digit number that is not
programmed in the machine, press the [C] key and then enter the correct number. If you do not know the Speed Dial number, print out the "Speed # List" or "Group List". ► PRINTING LISTS OF PROGRAMMED INFORMATION AND SETTINGS (page 4-45).
2Press the [OK] key.Check the destination. If correct, press the [OK] key again.
To cancel transmissionTo cancel transmission while "Reading" appears or before the [READ-END] key ( ) is pressed, press the [C] or [CA] key. To cancel a transmission job that is already stored, press the [FAX STATUS] key and cancel the job as explained on Canceling a fax transmission (page 4-21).
• A job number (3 digits) appears in the display with "Read End" when transmission is performed. If you make a note of this number after performing a broadcast transmission, you can use the number to check the results of the transmission in the transaction report or activity report.

4-13
FACSIMILE►BASIC TRANSMISSION METHODS
SEARCHING FOR A PROGRAMMED DESTINATION (USING THE [ADDRESS] KEY)At the time of dialing, you can enter letters to search for a destination stored in a Speed Dial number, or Group dial.
1Press the [ADDRESS] key and enter the search letters (you can also skip entry of search letters and go directly to the next step to display the first destination in the address list).Up to 10 of the following types of characters can be entered.Upper case letters, lower case letters, numbers, special characters ► CHARACTER ENTRY (page 1-39)
2Press the [OK] key and select the desired destination with the [ ] or [ ] key.• The search results appear in the following order: upper case letters, lower case letters, special characters, and
numbers.• If not all letters of the destination name appear, press the [READ END] key to display the full name. Press the [READ
END] key once again to return to the original screen.
• To cancel transmission while "Reading" appears or before the [READ-END] key ( ) is pressed, press the [C] or [CA] key. To cancel a transmission job that is already stored, press the [FAX STATUS] key and cancel the job as explained on Canceling a fax transmission (page 4-21).
• A job number (3 digits) appears in the display with "Read End" when transmission is performed. If you make a note of this number after performing a broadcast transmission, you can use the number to check the results of the transmission in the transaction report or activity report.

4-14
FACSIMILE►BASIC TRANSMISSION METHODS
FAXING A TWO-SIDED ORIGINALFollow the steps below to automatically transmit both sides of a two-sided original.
1Press the [DUPLEX] key on the operation panel and select "2-Sided".
2Select "Portrait-Booklet", "Portrait-Tablet", "Landscape-Booklet", and "Landscape-Tablet" with the [ ] or [ ] key.
• Booklets and tablets Two-sided originals that are bound at the side are booklets, and two-sided originals that are bound at the top are tablets.
• Duplex scanning is canceled when the transmission is completed, or when the [CA] key is pressed.
• Duplex scanning of two-sided originals is only possible when a Document feeder is used. Automatic scanning of both sides of an original is not possible when the document glass is used.
• The image of the back side of the original is rotated 180 degrees if needed at the time of transmission, and thus there is no need to change the orientation at the receiving machine.
• To cancel duplex scanning, select "1-Sided" in step 1 and then press the [OK] key.
• Only the following two-sided document sizes can be used:8-1/2 "x 14", 8-1/2 "x 13-1/2", 8-1/2 "x 13-2/5", 8-1/2 "x 13", 8-1/2" x 11",A4
3Press [OK] key.
BOOKLET TABLET

4-15
FACSIMILE►BASIC TRANSMISSION METHODS
Transmission settings (memory transmission mode and direct transmission mode)Transmission modes include memory transmission, where the original is temporarily scanned into memory before transmission, and direct transmission, where the original is transmitted directly without being scanned into memory.There are two types of memory transmission: Storing transmission jobs (memory transmission) (page 4-17), where all pages of the original are scanned into memory before transmission begins, and Quick On-line (page 4-17), where the destination is dialed after the first page is scanned and the remaining pages are transmitted as they are scanned.During a memory transmission, it may happen that the memory becomes full while the originals are being scanned.See If the memory becomes full during transmission of a stored transmission job (page 4-17), and see If the memory becomes full during a quick online transmission (page 4-17)If there are too many pages and memory transmission is not possible, you can press the [COMM. SETTING] key to switch from memory transmission to direct transmission. When direct transmission is used, transmission begins after the current job is completed, allowing you to give priority to a transmission job. As such, direct transmission is a convenient means of performing an interrupt transmission when there are a large number of stored transmission jobs.To switch between memory transmission and direct transmission, see the following "Faxing by direct transmission".
Faxing by direct transmission
When transmission is performed manually using an extension phone connected to the machine or using on-hook dialing, direct transmission is automatically selected. (Memory transmission is not possible.)
1Press the [COMM.SETTING] key.
The communication settings screen appears.
2Select "TX" with the [ ] or [ ] key.
The communication settings screen can also be displayed from the function selection screen.Press the [SPECIAL FUNCTION] key to display the special function selection screen, select "Comm. Setting" with the [ ] or [ ] key, and press the [OK] key.
3Select "Direct TX" with the [ ] or [ ] key and press the [OK] key.
4Dial the fax number and press the [START] key.When using the document glass, multiple original pages cannot be transmitted in a single transmission.
• To change from "Direct Transmission" back to "Memory Transmission", select "Memory TX" in step 3.
• To cancel a direct transmission, press the [C] key.

4-16
FACSIMILE►BASIC TRANSMISSION METHODS
Faxing by manual transmission (using the [SPEAKER] key)
1Press the [SPEAKER] key.When this key is pressed, a message regarding volume adjustment will appear briefly followed by the dial entry screen. You can adjust the speaker volume (high, middle, or low) by pressing the [ ] or [ ] key. Note that this will not change the volume setting in the system settings. Ringing will be heard from the speaker on the rear side of the machine when the [SPEAKER] key is used for dialing.
2Dial the fax number and press the [START] key.
• When the Address Review (page 7-20) function is turned on, the [SPEAKER] key cannot be used for transmission.
• To cancel dialing using the [SPEAKER] key when you need to redial the number or because transmission was interrupted, press the [SPEAKER] key once again.
• As the original is not stored in memory when direct transmission and manual transmission are used, the following functions cannot be used. Broadcast transmission SENDING THE SAME DOCUMENT TO MULTIPLE DESTINATIONS IN A SINGLE OPERATION (page 4-30), AUTOMATIC TRANSMISSION AT A SPECIFIED TIME (page 4-29), Recall Setting (Busy) (page 7-20), duplex scanning, Address Review, and others.
• When a fax is sent by direct transmission or manual transmission, the fax is sent after the connection with the receiving machine is established.
3Select "TX" and press the [OK] key.

4-17
FACSIMILE►BASIC TRANSMISSION METHODS
Storing transmission jobs (memory transmission)When the line is in use, the transmission job is temporarily stored in memory. When the current job and any previously stored jobs are completed, transmission begins automatically. (This is called memory transmission.) This means that transmission jobs can be stored in memory by performing a transmission operation while the machine is occupied with another transmission/reception operation. A combined total of 50 memory transmission and timer transmission jobs (►page 4-29) can be stored at once. After transmission, the scanned document data is cleared from memory. You can check transmission jobs stored in memory in the fax job status screen. (►page 4-21) Note that depending on the number of pages stored in memory and the transmission settings, it may not be possible to store 50 jobs in memory.• The procedure for storing a transmission job is the same as the procedure in BASIC PROCEDURE FOR SENDING
FAXES (page 4-8).• If you have not yet pressed the [START] key, you can cancel a transmission job by pressing the [C] key.• If you have already pressed the [START] key, see "Canceling a stored transmission job" (►page 4-21).
If the original is still being scanned after the [START] key is pressed, you can press the [C] key to cancel the transmission.
• If you store a transmission job in direct transmission mode, you will not be able to store any further transmission jobs.After transmission, the scanned document data is cleared from memory. You can check transmission jobs stored in memory in the fax job status screen. (►page 4-21)
If the memory becomes full during transmission of a stored transmission jobIf the memory becomes full while scanning the first page of a document, the transmission job is automatically canceled.If the memory becomes full while scanning the second page or a following page, scanning stops. In this case, you can either press the [C] key to cancel the transmission, or press the [OK] key to transmit only those pages which were completely scanned.
Quick On-lineWhen you use the document feeder to send a multi-page document and there are no previously stored jobs waiting or in progress (and the line is not being used), the machine dials the destination after the first page is scanned and begins transmitting scanned pages while the remaining pages are being scanned. This transmission method is called Quick On-line. When a quick online transmission is being performed, the message display shows "Reading" - "Dialing" - "Comm." - "Sending" in that order until scanning of the remaining pages is completed. When all pages have been scanned, "Read End" appears before the above messages appear.If the receiving party is busy, the quick online transmission will change into a stored transmission job (memory transmission).► Storing transmission jobs (memory transmission) (page 4-17).
If the memory becomes full during a quick online transmissionIf the memory becomes full while scanning the first page of a document, the transmission job is automatically canceled. If the memory becomes full while scanning the second page or a following page, those pages which were completely scanned will be transmitted.
The machine is initially set (factory setting) to perform Quick On-line transmission. If desired, you can disable this function in the system settings. (See Quick On Line TX (page 7-20).) When an original is transmitted using the following methods, the job will be stored in memory. (Quick On-line transmission will not be performed.)• Sending a fax from the document glass.• SENDING THE SAME DOCUMENT TO MULTIPLE DESTINATIONS IN A SINGLE OPERATION (page 4-30)• AUTOMATIC TRANSMISSION AT A SPECIFIED TIME (page 4-29)
4-18
FACSIMILE►BASIC TRANSMISSION METHODS
If the receiving party is busyIf the receiving party is busy, the transmission is temporarily canceled and then automatically re-attempted after a brief interval. (Two attempts are made at an interval of 3 minutes.*1)If you do not want the machine to re-attempt the transmission, press the [FAX STATUS] key and cancel the job. (►page 4-21)*1 The settings can be changed in the system settings. (See Recall Setting (Busy) (page 7-20))
If an error occurs that prevents transmissionIf an error occurs that prevents transmission or the receiving machine does not answer the call within 45 seconds*2, the transmission is stopped and then automatically re-attempted later. One attempt is made at an interval of 1 minute.*2) If you do not want the machine to re-attempt the transmission, press the [FAX STATUS] key and cancel the job. (►page 4-21) This machine also supports error correction mode (ECM) and is set to automatically resend any part of a fax that is distorted due to noise on the line.*3
*2 The settings can be changed in the system settings. (See Ring Timeout In Auto TX (page 7-20) and Recall Set (Err) (page 7-20).)
*3 If the other fax machine does not support ECM or ECM is not operating, error correction will not take place.

4-19
FACSIMILE►BASIC TRANSMISSION METHODS
HOW TO SELECT THE RESOLUTIONThe resolution can be changed to match the text size of the original, and the original type, such as a photo. Select "Resolution" in the right menu of the base screen of fax mode and press the [OK] key.
Standard Select for an original with normal size text.
FineSelect for an original with small text or detailed diagrams. The original will be scanned at twice the density of "Standard".
Super FineSelect for an original with intricate pictures or diagrams. A higher-quality image will be produced than with the "Fine" setting.
Fine / Halftone Super Fine /
Halftone
Use for photo or shaded color originals (color documents, etc.). Transmits a clearer image than with "Fine" or "Super Fine" alone.The transmission time is slightly longer when halftone is selected.
• The factory default settings for the resolution and contrast are "Standard" and "Auto", respectively.The default settings for the resolution and contrast can be changed in the system settings Set Res. Con. (page 7-20). When using the document glass to scan multiple original pages, you can change the resolution and contrast each time you change pages. When using the auto document feeder, you cannot change the resolution and contrast after scanning has started.
• Even if you send a fax at "Fine" or "Super Fine", the receiving fax may not be capable of receiving and printing the fax at that resolution.
• To cancel a resolution setting, press the [CA] key.

4-20
FACSIMILE►BASIC TRANSMISSION METHODS
CHANGING THE EXPOSUREThe exposure can be changed to match the darkness of the original.
1Select the [EXPOSURE] key.
2Adjust the exposure.
(1) Select the item with the [ ] or [ ] key.
(2) Adjust the exposure with the [ ] or [ ] key.To dark the exposure, select the [ ] key, and to lighten the exposure, select the [ ] key.
(3) Select the [OK] key.

4-21
FACSIMILE►BASIC TRANSMISSION METHODS
CANCELING A FAX TRANSMISSIONTo cancel a transmission that is in progress or a stored transmission job, follow the steps below. A transmission in progress or a stored transmission job is canceled from the fax status screen. (Printing of a received fax cannot be canceled.)
Canceling a fax transmission
To cancel a transmission while the original is being scanned ("Reading" appears in the message display) or before the key is pressed ([READ-END] key ( ) when scanning the original from the document glass), the [C] or [CA] key can be pressed.
1Press the [FAX STATUS] key.When a transmission is in progress, the job being transmitted is displayed.If the displayed job is not the job that you wish to cancel, it is likely that the job to be canceled is a stored job waiting for transmission. Press the [BACK] key to display the fax status selection screen and then follow the procedure in "Canceling a stored transmission job" on Canceling a stored transmission job (page 4-23) to cancel the job.
When a transmission is not in progress, the following fax status selection screen appears.
2Press the [C] key.
3Select "Yes" with the [ ] or [ ] key.
4Press the [OK] key.The transmission is canceled.
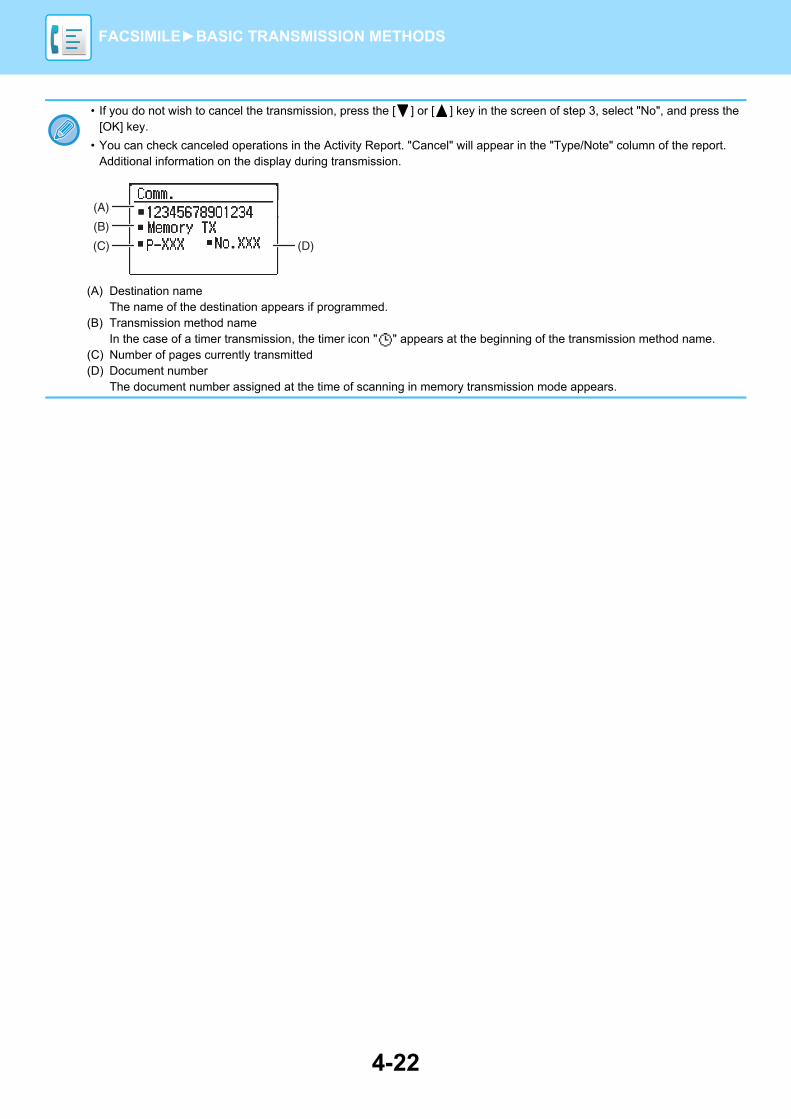
4-22
FACSIMILE►BASIC TRANSMISSION METHODS
• If you do not wish to cancel the transmission, press the [ ] or [ ] key in the screen of step 3, select "No", and press the [OK] key.
• You can check canceled operations in the Activity Report. "Cancel" will appear in the "Type/Note" column of the report. Additional information on the display during transmission.
(A) Destination nameThe name of the destination appears if programmed.
(B) Transmission method nameIn the case of a timer transmission, the timer icon " " appears at the beginning of the transmission method name.
(C) Number of pages currently transmitted(D) Document number
The document number assigned at the time of scanning in memory transmission mode appears.
(A)
(B)
(C) (D)
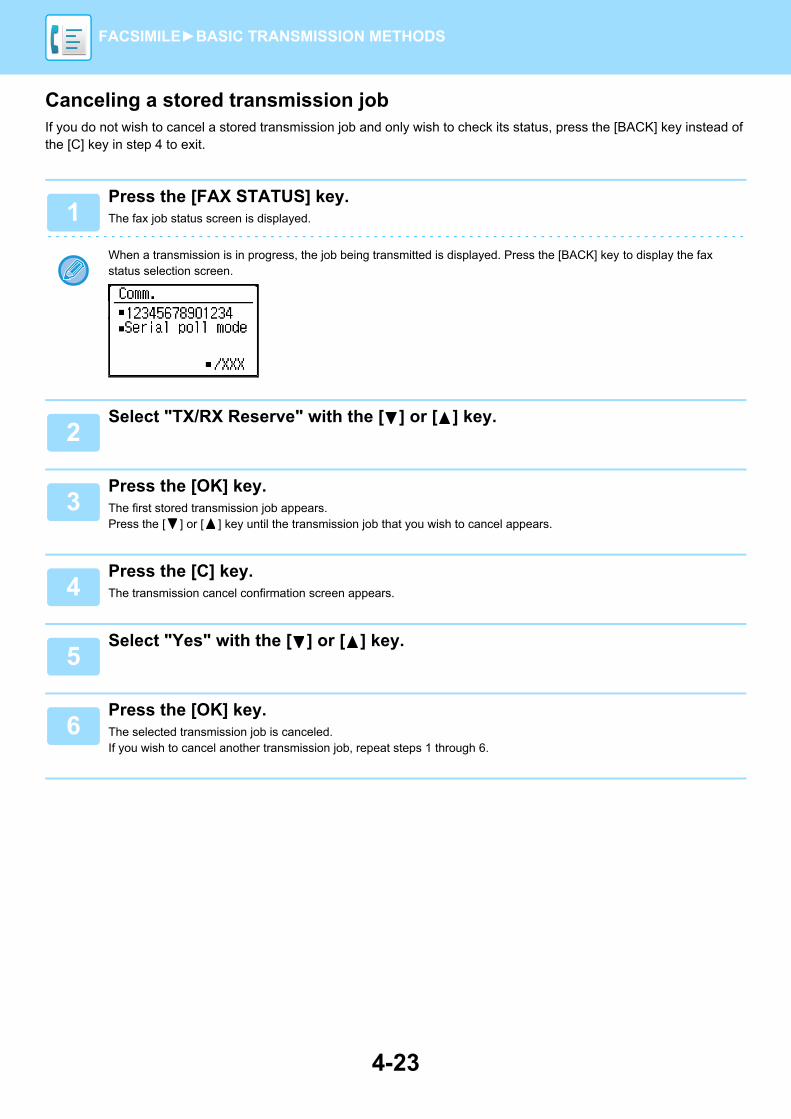
4-23
FACSIMILE►BASIC TRANSMISSION METHODS
Canceling a stored transmission jobIf you do not wish to cancel a stored transmission job and only wish to check its status, press the [BACK] key instead of the [C] key in step 4 to exit.
1Press the [FAX STATUS] key.The fax job status screen is displayed.
When a transmission is in progress, the job being transmitted is displayed. Press the [BACK] key to display the fax status selection screen.
2Select "TX/RX Reserve" with the [ ] or [ ] key.
3Press the [OK] key.The first stored transmission job appears.Press the [ ] or [ ] key until the transmission job that you wish to cancel appears.
4Press the [C] key.The transmission cancel confirmation screen appears.
5Select "Yes" with the [ ] or [ ] key.
6Press the [OK] key.The selected transmission job is canceled.If you wish to cancel another transmission job, repeat steps 1 through 6.
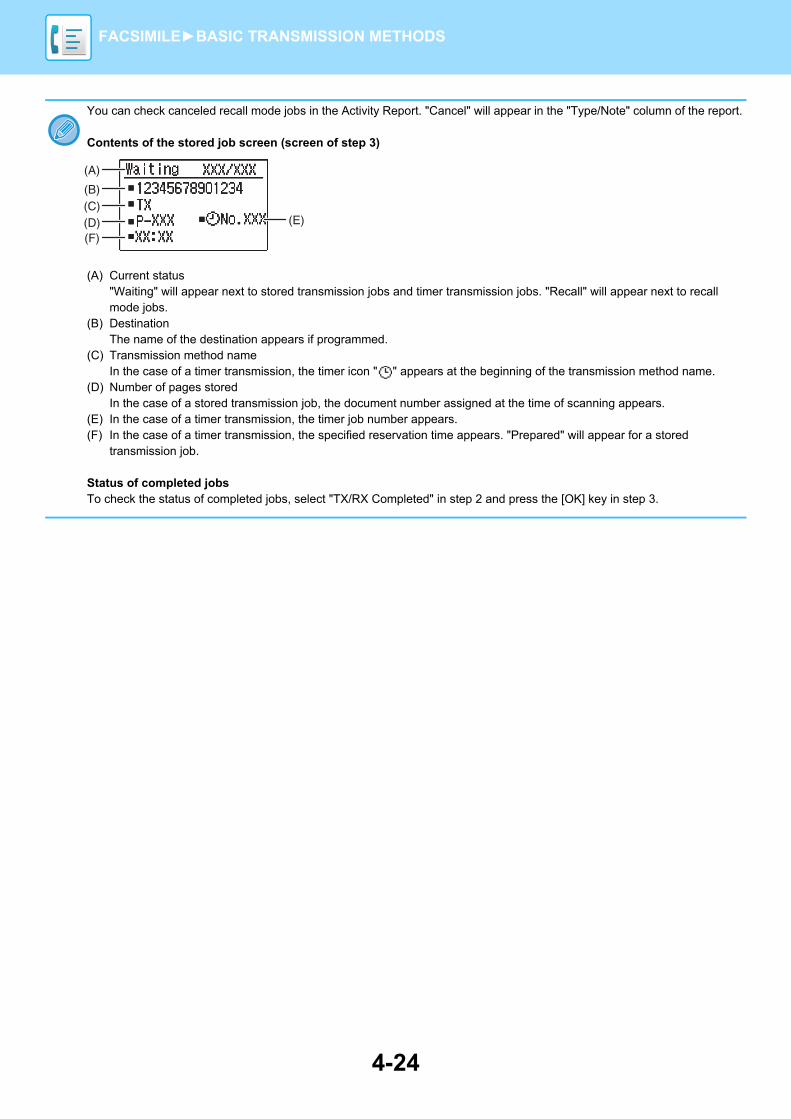
4-24
FACSIMILE►BASIC TRANSMISSION METHODS
You can check canceled recall mode jobs in the Activity Report. "Cancel" will appear in the "Type/Note" column of the report.
Contents of the stored job screen (screen of step 3)
(A) Current status"Waiting" will appear next to stored transmission jobs and timer transmission jobs. "Recall" will appear next to recall mode jobs.
(B) DestinationThe name of the destination appears if programmed.
(C) Transmission method nameIn the case of a timer transmission, the timer icon " " appears at the beginning of the transmission method name.
(D) Number of pages storedIn the case of a stored transmission job, the document number assigned at the time of scanning appears.
(E) In the case of a timer transmission, the timer job number appears.(F) In the case of a timer transmission, the specified reservation time appears. "Prepared" will appear for a stored
transmission job.
Status of completed jobsTo check the status of completed jobs, select "TX/RX Completed" in step 2 and press the [OK] key in step 3.
(B)(C)
(A)
(D)(F)
(E)
4-25
FACSIMILE►FAX RECEPTION
RECEIVING FAXESWhen another fax machine sends a fax to your machine, your machine will ring*, automatically receive the fax, and begin printing. (This is called automatic reception.)If you do not wish to have received faxes printed immediately, use the print hold function to hold received faxes in memory for printing at your convenience (all received faxes will be printed at once). To enable this function and print received faxes, see FAX PRINT HOLD FUNCTION (page 4-28).
RECEIVING A FAX
FAX RECEPTION
• You can store a transmission job while fax reception is in progress. (See Storing transmission jobs (memory transmission) (page 4-17)).
• You can connect your telephone to receive a fax after talking, or automatically switch between phone and fax depending on the type of call that is received. (page 4-56 to page 4-57)
• To print received fax pages on both sides of the paper, enable Duplex Reception (page 7-21) in the system settings.
• If a extension phone is not connected to the machine, use automatic reception.
• If the Duplex Reception (page 7-21) function is on, you can press the [SPEAKER] key when the machine rings to select whether the fax will be received. Select "Yes" to receive the fax or "No" to reject the fax with [ ] [ ] , and press the [OK] key.
• In order to receive faxes, paper must be loaded in the paper tray. See LOADING PAPER (page 1-17) to load appropriate paper.
1The machine will ring* and reception will automatically begin.The LINE indicator lights up.
If an extension phone is connected and the other party is sending a fax by manual transmission (►page 4-57), you can lift the handset before fax reception starts and speak to the other party.* Number of rings
The machine has been set to ring twice before beginning automatic reception. You can change the number of rings to any number from 0 to 15 in the system settings.► #Of Rings At. RX (page 7-21)
If the number of rings is set to 0, the machine will receive faxes without ringing.
2Reception ends.• When reception ends, the machine sounds a beep.• Received faxes are output to the output tray.
When approximately 150 sheets accumulate in a tray, a message appears in the display and fax printing stops.If this happens, remove the sheets. Printing will resume momentarily.

4-26
FACSIMILE►FAX RECEPTION
Fax Reception / Data lampWhen a fax is received in memory, or the machine is starting to print a received fax, the Fax Reception / Data lamp blinks.The timing at which this lamp starts blinking depends on the system settings. (See Blink Setting for Received Data (page 7-13))
If received data cannot be printedIf the machine runs out of paper or toner, or a paper misfeed occurs, or if the machine is printing a print or copy job, received faxes will be held in memory until printing becomes possible. The received faxes are automatically printed when printing is possible. When received faxes are held in memory, the FAX [DATA] light blinks. You can also use the forwarding function to have another fax machine print the received faxes. ► FORWARDING FUNCTION (page 4-47)
In order to receive faxes, paper must be loaded in the paper tray. Load appropriate paper as explained in LOADING PAPER (page 1-17).
• If you receive a fax that is larger than the loaded paper, the system setting uses Received Data Print Condition (page 7-21) to print it out in the following manner:If "Reduction" is set up, the image is automatically reduced before printing.*1
If "Division" is set up, the image is split onto multiple sheets of paper and printed on them at actual size.*1
If "Actual Size" is set up, the image is printed at actual size without being split.*2
*1 If the loaded paper is of the B5 size or less, the received image may not be printed depending upon the width and length of the image data.
*2 The received image won't be printed until you load the paper larger than the actual size.
• In fax mode, printing is not possible on 8-1/2" x 14" and 8-1/2" x 13" sizes.
• If the paper runs out while a fax is being printed, printing will automatically continue using the closest size of paper in another tray.
• If you change the size of paper loaded in a tray, change the tray's paper size setting.
• Faxes cannot be printed correctly if the actual paper size is different from the paper size setting. Be sure to set the tray's paper size setting to the same paper size as the paper loaded in the tray. For example, if you receive an 11" x 17" (B4) size fax when 8-1/2" x 14" (A4) paper is loaded in the tray and the tray's paper size setting is 11" x 17" (B4), the fax will be printed on 8-1/2" x 14" (A4) paper and part of the image may be cut off If the paper loaded in the tray is larger than the paper size setting, paper larger than the recognized fax size will be used. (A message prompting you to check the tray's paper size setting will appear.)
• Received faxes cannot be printed on paper inserted in the bypass tray.
• Received data cannot be printed while the transmission original being scanned. It will be printed automatically after the scanning is finished.

4-27
FACSIMILE►FAX RECEPTION
MANUAL FAX RECEPTIONYou can decide whether to receive a fax (this is called "manual reception" in this manual).
Setting the reception mode
Manually receiving a faxTo receive the fax, press the [START] key and select "RX".
1Press the [COMM. SETTING] key in the initial state of Fax mode.
The communication setting screen can also be displayed from the function selection screen.Press the [SPECIAL FUNCTION] key to display the function selection screen, select "Comm. Setting" with the [ ] [ ] keys, and press the [OK] key.
2Select "Manual" and press the [OK] key.
To return to auto reception, select "Auto" in step 1 above.

4-28
FACSIMILE►CONVENIENT FAX FUNCTIONS
FUNCTION KEYThis is the initial setting that appears when the [SPECIAL FUNCTION] key is pressed in fax mode.
FAX PRINT HOLD FUNCTIONFaxes are normally printed as soon as they are received.This function is used to hold received faxes in memory rather than printing them as they are received. Faxes held in memory are printed manually all at once.
Select the "Fax Print Hold" function.
Enabling fax print hold
Select "Setting ", and then select "On".To disable fax print hold, select "Off".
Printing received faxes held in memorySelect "Fax print hold", and then select "Print".
CONVENIENT FAX FUNCTIONS
• When fax print hold is enabled and received faxes are held in memory, the DATA indicator above the [FAX] key on the operation panel blinks and a message appears in the display. (When the received faxes are printed, the indicator stops blinking and the message no longer appears.)
• If the remaining free memory reaches 0%, fax reception will no longer be possible. For this reason, it is important to constantly make sure that sufficient free memory remains and frequently print received faxes. The percentage of free memory remaining appears in the base screen of fax mode. (►page 4-4)
If fax print hold is prohibited using Disable Fax Print Hold (page 7-19) in the system settings, it will not be possible to enable it.
4-29
FACSIMILE►CONVENIENT FAX FUNCTIONS
AUTOMATIC TRANSMISSION AT A SPECIFIED TIMEThis feature enables you to set up a transmission or polling operation to be performed automatically at a specified time up to a week in advance. This is convenient when you will be out of the office or for transmission at off-peak nighttime rates. A combined total of 50 timer transmission and memory transmission jobs can be stored.
• After a timer transmission is performed, the information (image, destination, etc.) is automatically cleared from memory.
• To perform a timer transmission, the original must be scanned into memory. It is not possible to leave the original in the document feeder or on the document glass and have it scanned at the specified time of transmission.
• The date and time is set in the machine using the system settings. (See Date & Time Set (page 7-10).)
• Only one polling timer operation can be set up at a time. If you wish to set up multiple timer polling operations, combine the machines to be polled into one serial polling operation with a timer setting (see Serial polling mode (page 4-33)).
1Select "Timer Mode" and press the [OK] key.If a time has been specified, a checkmark appears in front of "Timer Mode". To cancel a specified time, press the [LOGOUT] key ( ) in the above display with "Timer Mode" highlighted.The current time appears in the screen. If the current time is not correct, press the [CA] key to cancel the operation and see Date & Time Set (page 7-10) to correct the time setting.
2Select the day of the week with the [ ] or [ ] key.The selected day is highlighted. If you select "No Select Days", the transmission will be performedas soon as the specified time arrives. To return to the "Time Setting" display, press the [BACK] key.
• To cancel a timer operation after the above procedure has been completed, follow the procedure in CANCELING A FAX TRANSMISSION (page 4-21).
• A timer job number is automatically assigned to the operation. This number can be used to cancel a stored job. (See the note Canceling a stored transmission job screen (screen of step 3) on page 4-23.)
• Other operations can be performed after a timer operation is set up. If another operation is in progress when the specified time arrives, the timer transmission will begin when the job in progress is completed.

4-30
FACSIMILE►CONVENIENT FAX FUNCTIONS
SENDING THE SAME DOCUMENT TO MULTIPLE DESTINATIONS IN A SINGLE OPERATIONThis feature is used to send a fax to multiple destinations in a single operation. The original to be transmitted is scanned into memory and then successively transmitted to the selected destinations. This feature is convenient for such purposes as distributing a report to company branches. Up to 100 destinations can be selected. When transmission to all destinations has been completed, the document is automatically cleared from memory.
• If you frequently use broadcasting to send faxes to the same group of destinations, it is convenient to program those destinations into a group dial. The procedure for programming group dials is explained on page 4-37.
• When a group dial is used to send a fax, the fax is broadcast (transmitted) to the destinations programmed in the group dial. For example, if five destinations are programmed in a group dial and the key is pressed for a broadcast transmission, the broadcast transmission will have five destinations.
1Enter a full fax number with the numeric keys or press an auto-dial key (Speed Dial number, or group key) to select the first destination.► TRANSMISSION BY AUTO-DIALING (SPEED DIALING AND GROUP DIALING) (page 4-12)
The destination selection screen appears. To clear a mistake when entering a full number with the numeric keys, press the [C] key to clear one digit at a time. A destination selected with a Speed Dial number, or group dial is indicated by an icon and a number. To clear an entry, press the [C] key.
2Press the [OK] key and then select the next destination by entering a full fax number or pressing an auto-dial key.After entering a full number with the numeric keys, press the [OK] key to complete the entry. If you pressed an auto-dial key in step 1, it is not necessary to press the [OK] key. You can immediately press another auto-dial key for the next destination. Repeat steps 1 and 2 to select the remaining destinations.
Destination A (recipient)
Destination B (recipient)
Destination C (recipient)
Beep
Reception
Beep
Reception
Beep
Reception
Successive transmission
The document is scanned into memory
Sender
Select the broadcast transmission function.
4-31
FACSIMILE►CONVENIENT FAX FUNCTIONS
• If you need to delete a number for which entry has already been completed by pressing the [OK] key, use the [ ] or [ ] key to select the number and then press the [C] key.
• If the selected destinations exceed the display range of the message screen, press the [ ] or [ ] key to scroll through and check the destinations.
• Destinations can also be selected using the address directory and the [REDIAL] key. Note, however, that the [REDIAL] key can only be used to select the first destination (it must be used before any other destinations are selected).
• If you use two group dials that have 50 stations each, the total number of destinations entered will be 100.
3Continue from step 7 of BASIC PROCEDURE FOR SENDING FAXES (page 4-8).After entering a full number with the numeric keys, press the [OK] key to complete the entry. If you pressed an auto-dial key in step 1, it is not necessary to press the [OK] key. You can immediately press another auto-dial key for the next destination. Repeat steps 1 and 2 to select the remaining destinations.
To cancel a broadcast transmissionTo cancel a broadcast transmission when selecting destinations, press the [CA] key. To cancel transmission after the transmission procedure has been completed, follow the procedure in CANCELING A FAX TRANSMISSION (page 4-21).

4-32
FACSIMILE►CONVENIENT FAX FUNCTIONS
SENDING OPTIONSThis function allows your machine to call another fax machine and initiate reception of a document in that machine. A timer setting can also be specified to have the operation take place at night or at another specified time. (See AUTOMATIC TRANSMISSION AT A SPECIFIED TIME (page 4-29).)
Group dials and the SENDING THE SAME DOCUMENT TO MULTIPLE DESTINATIONS IN A SINGLE OPERATION (page 4-30) can be used to successively poll multiple fax machines in a single operation (this is called "serial polling"). Up to 100 machines can be polled.In this case, the sequence of operations in the above diagram is successively repeated for each sending machine selected.When using the Public Box function, do not set the fax reception mode to "Manual". (See MANUAL FAX RECEPTION (page 4-27).)
If the other machine is using polling security (see Restricting polling access (polling security) (page 4-36)), your fax number (sender's number) must be programmed in the system settings (see Own Passcode Set (page 7-19)) and your number must also be programmed in the other machine.
1Select "Sending Options".
2Select "Polling".
3Press the [OK] key and enter the fax number of the other machine with the numeric keys specify a Speed Dial number (a group dial cannot be used).
The other machineYour machine
(2) Permits polling
(3) Document data previously scanned into memory
(1) Polling (ask other machine to send document)
(4) Document data is automatically sent to your machine

4-33
FACSIMILE►CONVENIENT FAX FUNCTIONS
Serial polling modeSetting for polling reception from multiple fax machines.Select "Serial polling" steps 1 to 2 of the polling procedure SENDING OPTIONS (page 4-32).Before pressing the [START] key in step 3, repeat steps 1 and 2 for each machine that you wish to poll.
4Press the [OK] key. Press the [START] key. "Polling reservation has been set." appears in the screen. After communicating with the other machine, your machine prints the received fax.
To cancel the operationDuring communication: Cancel as explained in Canceling a fax transmission (page 4-21).While the job is stored: Cancel as explained in Canceling a stored transmission job (page 4-23).
The receiving machine bears the expense (phone charges) of polling transmission.This function can only be used when the other machine is Super G3 or G3 compatible and has a polling function.

4-34
FACSIMILE►CONVENIENT FAX FUNCTIONS
POLLING MEMORYThis feature allows your machine to automatically send a document previously scanned into memory when another machine calls and polls your machine.
Scanning a document into polling memoryThis section explains how to scan a document into the polling memory. If other documents have already been stored in the polling memory, the new document will be appended to those documents. If the previous documents are no longer needed, they can be replaced.
The machine that requests transmission bears the expense (phone charges) of the call.When using the Public Box function, do not set the fax reception mode to "Manual". (See MANUAL FAX RECEPTION (page 4-27).)
1Select "Memory Polling".
2Press the [OK] key and select "1 Time" or "Repeat".If you select "1 Time", the document data is automatically cleared from memory after your machine is polled once. If you select "Repeat", the document data in memory can be used repeatedly.• If there are no previously stored documents in the polling memory, the above screen
appears. • If there are previously stored documents in the polling memory, a screen will appear
to let you select what action to take.
(1) If you wish to append the new document, select "Add" with the [ ] or [ ] key, press the [OK] key, and then go to step 2.
(2) If you wish to replace the previous document with the new document, select "Change" with the [ ] or [ ] key, press the [OK] key, and then go to step 2.
The other machineYour machine
(1) Polling (request transmission)
(4) Document data is automatically sent to other machine
(2) Permits polling
(3) Document data previously scanned into memory

4-35
FACSIMILE►CONVENIENT FAX FUNCTIONS
3Press the [OK] key and press the [START] key.• Scanning begins.• If you are scanning from the document glass and have another page to scan, change pages and press the [START]
key. Repeat until all pages have been scanned and then press the [READ END] key.
4Make sure that the reception mode is set to auto reception. (Setting the reception mode (page 4-27))Transmission begins when the other machine calls and polls your machine.
To cancel scanningTo cancel scanning of a document while scanning is in progress, press the [CA] key. To erase the documents in the Public Box, follow the procedure in Deleting documents from the polling memory (page 4-36).

4-36
FACSIMILE►CONVENIENT FAX FUNCTIONS
Printing documents in the polling memoryTo check the document that is stored in the public box, follow these steps to print it out.
Deleting documents from the polling memoryThis procedure is used to delete documents from the polling memory when they are no longer needed.
Restricting polling access (polling security)If you wish to prevent unauthorized fax machines from polling your machine, enable the polling security function. When this function is enabled, polling permission will only be granted if the fax number of the polling machine (programmed in that machine as the sender's number) matches one of the fax numbers you have programmed in your machine as passcode numbers. Up to 10 fax numbers can be programmed as passcode numbers.
To enable the polling security function and program passcode numbers, see Polling Passcode # Mode (page 7-22) in the system settings.
1Follow steps 1 of Scanning a document into polling memory (page 4-34) and then follow the steps below.
2Select "Print" with the [ ] or [ ] key and press the [OK] key.Printing begins automatically.
1Select "Delete".
2Press the [OK] key.A screen appears asking you to confirm the deletion.
3Select "Yes" with the [ ] or [ ] key and press the [OK] key.The documents are deleted from the polling memory.
Deletion is not possible while the polling memory is being used.
• If you do not use the polling security function, the document will be sent to any fax machine that polls you.
• To use polling memory with polling security enabled, the sender's number of the polling machine must be programmed in that machine and in your machine.

4-37
FACSIMILE►CONVENIENT FAX FUNCTIONS
STORING, EDITING, AND DELETING AUTO-DIAL NUMBERS (SPEED DIAL NUMBERS, AND GROUP DIALS)Auto dial numbers are stored in the auto dial storing screen. Follow the steps below to display the auto dial storing screen, and then store an auto dial number.
1Select "Entry" and press the [OK] key.
2Select "Dial" with the [ ] or [ ] keyand press the [OK] key.
3Select "Speed", "Group", or "Change/Delete" with the [ ] or [ ] key.
4Press the [SPEED] key and enter the fax number of the destination with the numeric keys.• Enter the desired Speed Dial number (000 to 299) with the numeric keys.• Up to 50 digits can be entered for the fax number. If you need to insert a pause between any of the digits, press the
[REDIAL/PAUSE] key. The pause appears as a hyphen (-). To set the duration of the pause, see Pause Time (page 7-19).
5Enter search characters (see CHARACTER ENTRY (page 1-39)).
6To finish the storing procedure, press the [START] key. If you wish to program an option such as chain dialing, transmission speed, or international transmission mode, press the [OK] key.• If you pressed the [START] key, you will return to step 3. If you wish to store another or Speed Dial number, repeat
steps 3 to 6. If you have finished storing auto-dial numbers, press the [BACK] key.• If you pressed the [OK] key, go to the appropriate page for the option that you wish to program.• To select "CHAIN DIAL", go to Chain Dialing (page 4-38).• To set the "TRANSMISSION SPEED", go to Transmission speed setting (page 4-38).• To set the "INTERNATIONAL TRANSMISSION MODE", go to International transmission mode setting (page 4-39).
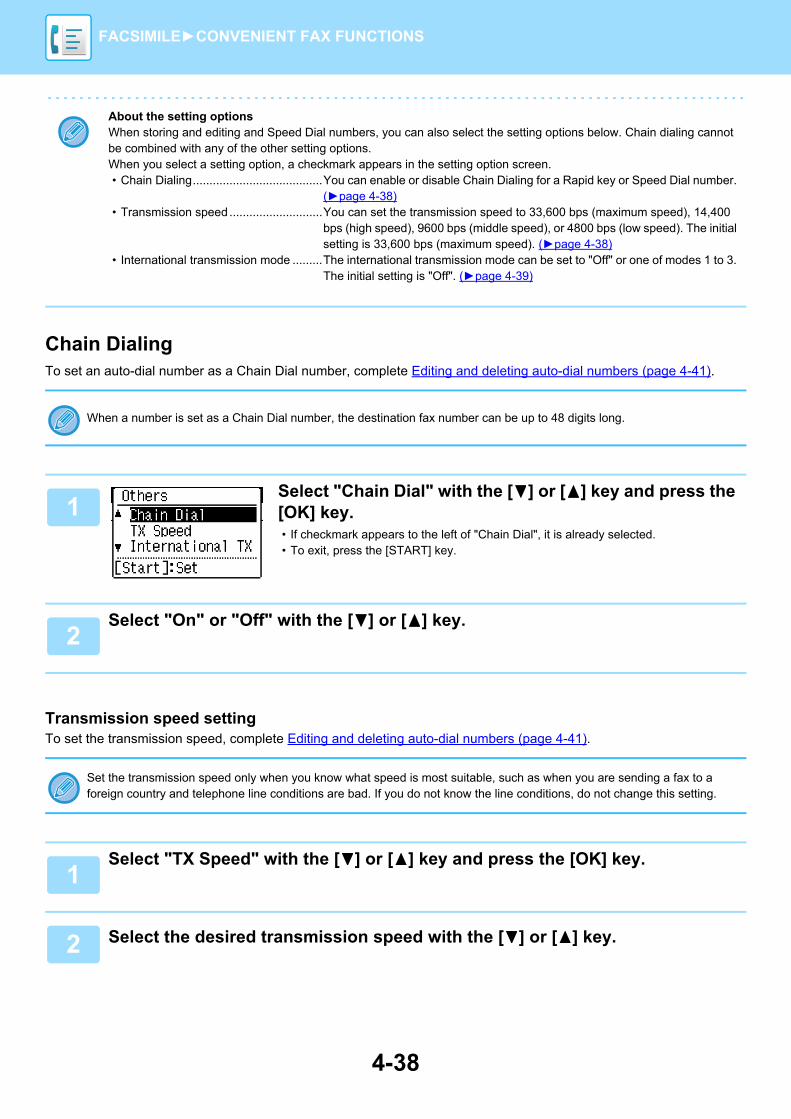
4-38
FACSIMILE►CONVENIENT FAX FUNCTIONS
Chain DialingTo set an auto-dial number as a Chain Dial number, complete Editing and deleting auto-dial numbers (page 4-41).
Transmission speed settingTo set the transmission speed, complete Editing and deleting auto-dial numbers (page 4-41).
About the setting optionsWhen storing and editing and Speed Dial numbers, you can also select the setting options below. Chain dialing cannot be combined with any of the other setting options.When you select a setting option, a checkmark appears in the setting option screen.• Chain Dialing.......................................You can enable or disable Chain Dialing for a Rapid key or Speed Dial number.
(►page 4-38)• Transmission speed............................You can set the transmission speed to 33,600 bps (maximum speed), 14,400
bps (high speed), 9600 bps (middle speed), or 4800 bps (low speed). The initial setting is 33,600 bps (maximum speed). (►page 4-38)
• International transmission mode .........The international transmission mode can be set to "Off" or one of modes 1 to 3. The initial setting is "Off". (►page 4-39)
When a number is set as a Chain Dial number, the destination fax number can be up to 48 digits long.
1Select "Chain Dial" with the [ ] or [ ] key and press the [OK] key.• If checkmark appears to the left of "Chain Dial", it is already selected.• To exit, press the [START] key.
2Select "On" or "Off" with the [ ] or [ ] key.
Set the transmission speed only when you know what speed is most suitable, such as when you are sending a fax to a foreign country and telephone line conditions are bad. If you do not know the line conditions, do not change this setting.
1Select "TX Speed" with the [ ] or [ ] key and press the [OK] key.
2 Select the desired transmission speed with the [ ] or [ ] key.

4-39
FACSIMILE►CONVENIENT FAX FUNCTIONS
International transmission mode settingTo set the international transmission mode, complete Editing and deleting auto-dial numbers (page 4-41).
If you select a speed other than 33,600 bps (maximum speed), a checkmark will appear next to "TX Speed" when you return to the option setting screen. This setting is not effective for polling transmission.To remove the checkmark and return the transmission speed setting to "33,600 bps (maximum speed)", press the [LOGOUT] key ( ).
• When sending a fax to a foreign country, telephone line conditions can sometimes distort the fax or interrupt the transmission. Selecting the right international transmission mode can help alleviate these problems.
• If errors frequently occur when sending a fax to a foreign country, try each of modes 1 to 3 and select the mode that enables the best transmission.
1Select "International TX" with the [ ] or [ ] key press the [OK] key.
2Select the desired mode with the [ ] or [ ] key.
If you select a setting other than "Off", a checkmark will appear next to "International TX" when you return to the option setting screen.To remove the checkmark and return the international transmission mode to "Off", press the [LOGOUT] key ( ).

4-40
FACSIMILE►CONVENIENT FAX FUNCTIONS
Storing a group dialTo store a group dial number, perform the steps below in the auto dial storing screen.
1Press the [SPEED] key.Enter the desired Group Dial number (000 to 299) with the numeric keys.If you press a number that has already been stored, a warning message will appear.
Group key dialing is an automatic dialing function where by multiple destinations are programmed into a Rapid key. If you frequently send faxes to the same group of destinations using broadcast transmission, which is used to send the same document to multiple destinations in a single operation (►page 4-30), it is convenient to program those destinations into a group key.
2 Enter a group name (see CHARACTER ENTRY (page 1-39)).
3Store the destinations using Speed Dial numbers, and the numeric keys.• To store a Speed Dial number, press the [SPEED] key and then enter the desired Speed Dial number (000 to 299)
with the numeric keys. If you press an incorrect key, press the [C] key and then press the correct key.• Chain dialing, transmission speed, and international transmission mode options cannot be selected. If you need to
select an option for the destination, store the destination in Speed Dial number and then store the destination in the group dial. Up to 50 digits can be entered for the fax number. If you need to insert a pause between any of the digits, press the [REDIAL/PAUSE] key to enter a pause. The pause appears as a hyphen (-). To set the duration of the pause, see Pause Time (page 7-19). When you have finished entering the fax number, press the [OK] key.
4Repeat step 3 for all of the destinations that you wish to store in the group dial, and press the [START] key.Up to 100 destinations can be stored in a group dial.

4-41
FACSIMILE►CONVENIENT FAX FUNCTIONS
Editing and deleting auto-dial numbersTo edit or delete a stored number, perform the steps below in the auto dial storing screen.
Editing a Speed Dial number
Deleting a Speed Dial number
The Speed Dial number is being used in a transmission in progress or in a stored transmission, a Speed Dial number cannot be edited or cleared.
1Select "Speed" with the [ ] or [ ] key and Select "Change" with the [ ] or [ ] key.
2 Press the [SPEED] key and edit the destination fax number with the numeric keys.• Press the [SPEED] key and then enter the Speed Dial number (000 to 299) that you wish to edit with the numeric
keys.• Move the cursor to the digit(s) that you wish to edit with the [ ] or [ ] key, and then enter the correct digit(s) with the
numeric keys.• To delete a digit, move the cursor to the digit that you wish to delete with the [ ] or [ ] key and then press the [C]
key.
3To finish the storing procedure, press the [START] key. If you wish to program an option such as chain dialing, transmission speed, or international transmission mode, press the [OK] key. (See CHARACTER ENTRY (page 1-39).)
1Select "Delete" and press the [SPEED] key.Press the [SPEED] key and then enter the Speed Dial number (000 to 299) that you wish to delete with the numeric keys.
2 Select "Delete" with the [ ] or [ ] key.
If you select "No Delete", you can press the key to check the destination name. If you are deleting the destination, check the destination name and then delete the destination.

4-42
FACSIMILE►CONVENIENT FAX FUNCTIONS
Editing and deleting group dialsTo edit or delete a group dial, follow steps 1 through 3 on pages STORING, EDITING, AND DELETING AUTO-DIAL NUMBERS (SPEED DIAL NUMBERS, AND GROUP DIALS) (page 4-37) and then follow the steps below.
Editing a group dial
Deleting a group dial
A group dial cannot be edited or deleted in the following cases.
• The group dial is stored in a program
1Select "Group" with the [ ] or [ ] key and Select "Change" with the [ ] or [ ] key.
2 Press the group dial number that you wish to edit, and edit the group name, the search characters. (See CHARACTER ENTRY (page 1-39).)
3When you have finished editing the destinations, press the [START] key.
1Select "Delete" with the [ ] or [ ] key and press the group that you wish to edit.
2 Select "Delete" with the [ ] or [ ] key.
If you select "No Delete", you can press the key to check the destination name. If you are deleting the destination, check the destination name and then delete the destination.

4-43
FACSIMILE►CONVENIENT FAX FUNCTIONS
STORING, EDITING AND DELETING PROGRAMSYou can store a address setting, transmission method*, original size enter, duplex scanning, resolution and exposure, own number sending, transmission settings. This will allow you to use the settings for a transmission by means of a simple operation (see USING SETTINGS STORED AS A PROGRAM (page 4-49)).* Transmission methods: normal transmission, broadcast transmission, polling, serial polling.
To register a program, perform the steps below in the auto dial storing screen.
Storing a program
A screen setting and timer transmission setting cannot be stored in a program.
1Select "Entry" and select "Register Program" with the [ ] or [ ] key.
2Select "Enter", "Change", or "Delete" with the [ ] or [ ] key.• To store a program, select "Enter" and press the [OK] key.
Continue from step 3 of Storing a program (page 4-43).• To edit a program, select "Change" and press the [OK] key.
Next, follow the steps in Editing programs (page 4-44).• To delete a program, select "Delete" and press the [OK] key.
Next, follow the steps in Deleting programs (page 4-44).
3Select the program that you wish to store with the [ ] or [ ] key, and enter the program name. (See CHARACTER ENTRY (page 1-39))If you select a program that has already been stored, a message appears. Select a program that has not been stored, or clear the program (►page 4-44) and then select it.
4Select the item that you wish to store in the program with the [ ] or [ ] key.• A transmission method, original size enter, dual pages, resolution/exposure settings,
sender's name, and transmission settings can be stored. • A transmission method must be stored. The storing procedure cannot be completed
unless a transmission method is stored.• For the procedures for selecting each of the settings, refer to the explanations of the
settings.• To cancel a setting selection, select the setting that you wish to cancel and then press
the key.• Some settings cannot be used in combination with others. If you select a prohibited
combination of settings, a message will appear in the display.

4-44
FACSIMILE►CONVENIENT FAX FUNCTIONS
Editing programsIf you need to edit a previously stored program, follow these steps.
Deleting programsBefore deleting a program, print the "Program List" to check the contents. (►page 4-45) To delete a previously stored program, follow these steps.
3Select the program that you wish to edit with the [ ] or [ ] key.
4 Edit the program name (see CHARACTER ENTRY (page 1-39)).• See step 3 of Storing a program (page 4-43).• If you do not wish to edit the program name, go to the next step.
5Select the stored setting that you wish to edit with the [ ] or [ ] key.• See steps 4 of Storing a program (page 4-43).• If you do not wish to edit the stored settings, press the [START] key and then press the [BACK] key to exit.
3Select the program that you wish to delete with the [ ] or [ ] key.
4 Select "Delete" with the [ ] or [ ] key.

4-45
FACSIMILE►CONVENIENT FAX FUNCTIONS
PRINTING LISTS OF PROGRAMMED INFORMATION AND SETTINGSYou can print lists showing programmed information and settings.The following lists can be printed.• Destination Lists: Shows the destinations stored in auto dial numbers in the order of their search characters.• Group List: Shows the destinations stored in each group dial number.• Program List: Shows the operations stored in each program.• Timer List: Shows timer transmissions and recall transmissions.• Mem. Polling List: Shows the documents stored for memory polling.
For other lists that can be printed, refer to List Print (page 7-15).
1Press the [SPECIAL FUNCTION] key.
2 Select "Data List Print" and select "Fax" with the [ ] or [ ] key.
3Select the list that you wish to print with the [ ] or [ ] key.See the explanation of the lists that can be printed above.

4-46
FACSIMILE►CONVENIENT FAX FUNCTIONS
INCLUDING SENDER INFORMATION ON FAXES (OWN NUMBER SENDING)This function prints the date, time, your programmed name, your programmed fax number, and the transmitted page number at the top center of each page that you fax. All pages that you fax include this information.
Example of fax page printed out by the receiving machine
(1) Date and time: programmed in the system settings (see Date & Time Set (page 7-10)).(2) Sender's name: programmed in the system settings (see Own Passcode Set (page 7-19)).(3) Sender' number: programmed in the system settings (see Own Passcode Set (page 7-19)).(4) Transmitted page number: 3-digit number appearing in the format, "page number/total pages".
(Only the page number appears if you use manual transmission, direct transmission, or quick on-line transmission.)
Position of sender informationYou can select whether the sender information is added outside the document data or inside the document data in the system settings (see Print Station # In Rcvd Data (page 7-20)). The factory default setting is outside the document data.
Outside the scanned data (document data)None of the transmitted image is cut off; however, the transmitted image is longer than the scanned image, and thus when both the sender and the receiver
use the same size of paper, the printed fax may either be reduced or split up and printed on two pages.
Inside the scanned data (document data)The top edge of the scanned image will be cut off by the sender's information; however, when both the sender and the receiver use the same size of paper, the
printed fax will neither be reduced nor split up and printed on two pages.
Sending without sender informationYou can select whether or not sender information is added each time you send a fax. The procedure for sending one fax without sender information when the system settings are set to add sender information to each fax transmission (factory default setting) is explained here. (When performing a Broadcast Transmission (►page 4-30) after configuring this setting, the fax will be sent to all destinations without sender information.)
AP-1-2018-SUN 03:00 PM SHARP PLANNING DIV. FAX No. 0666211221 P. 001/001
(1) (2) (3) (4)
Direction of transmission
Len
gth
of
scan
ned
dat
a
Leng
th o
f tr
ansm
itte
d d
ata
Direction of transmission
Len
gth
of
scan
ned
dat
a
Len
gth
of
tran
smitt
ed
data
1Select "Own # Sending" with the [ ] or [ ] key and press the [OK] key.When a checkmark appears in the “Own # Sending” checkbox, this function is enabled. If you press [OK] with a checkmark in the checkbox, the function will be disabled.

4-47
FACSIMILE►CONVENIENT FAX FUNCTIONS
FORWARDING FUNCTIONWhen printing is not possible because of a paper, toner, or other problem, you can forward received faxes to another fax machine if that machine has been appropriately programmed in your machine. This function can be conveniently used in an office or other workplace where there is another fax machine connected to a different phone line. When a fax has been received to memory, the FAX [DATA] light blinks (see If received data cannot be printed (page 4-26)).
• All received faxes are forwarded; a particular fax cannot be selected for forwarding.
• Faxes that have been received to memory by the fax print hold function (►page 4-28) are also forwarded.
• The result of forwarding is indicated in the activity report (see REPORT AT REGULAR INTERVALS (COMMUNICATION ACTIVITY REPORT) (page 4-60)).
Yo
ur
mac
hin
eTr
ansf
er
des
tinat
ion
(2) Printing not possible because of paper or toner problem
(3) "Transfer" instruction
(5) Printing
(1) Fax transmission to your machine
(4) Automatic dialing and transmission to programmed transfer destination
Oth
er m
ach
ine

4-48
FACSIMILE►CONVENIENT FAX FUNCTIONS
USING THE FORWARDING FUNCTIONProgramming the fax number of the forwarding destinationThe number of the forwarding destination is programmed in the system settings (see Received Data FW. Station Set (page 7-22)). Only one fax number can be programmed. The forwarding function cannot be used unless a number is programmed.
Forwarding received faxes
1Select "FW. RX Data" with the [ ] or [ ] key and press the [OK] key.
2Select "Transfer" with the [ ] or [ ] key and press the [OK] key.
To cancel a forwarding operation• Press the [FAX STATUS] key, and then cancel forwarding in the same way as a regular fax transmission.
(See CANCELING A FAX TRANSMISSION (page 4-21).) The fax(es) that was going to be forwarded will return to print standby status in your machine.
• If forwarding is not possible because the other machine is busy or a transmission error occurs, recall attempts will be made according to the recall times setting. If forwarding is still not successful after the set number of recall attempts are made, the fax(es) will return to print standby status in your machine.
• When forwarding is performed, all faxes that have been received in memory to that point are forwarded. The page that was being printed when the problem occurred and all following pages will be forwarded.
• After a fax is forwarded, the fax data is automatically cleared from memory.
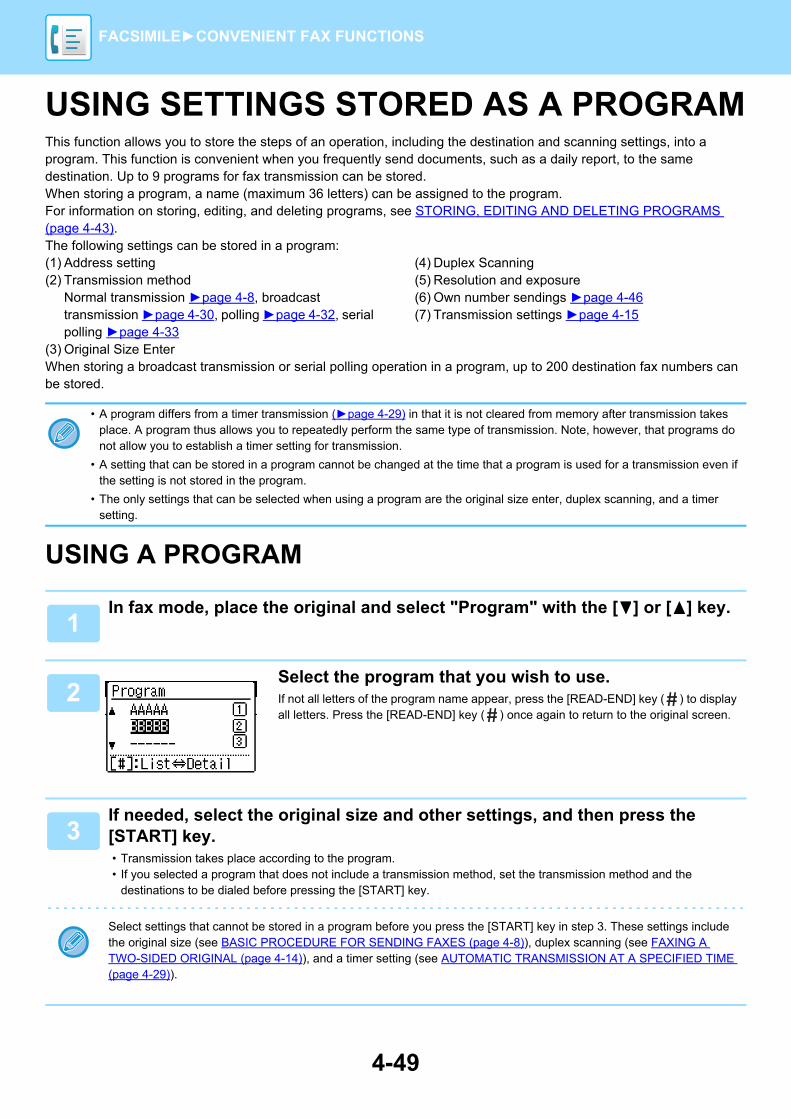
4-49
FACSIMILE►CONVENIENT FAX FUNCTIONS
USING SETTINGS STORED AS A PROGRAMThis function allows you to store the steps of an operation, including the destination and scanning settings, into a program. This function is convenient when you frequently send documents, such as a daily report, to the same destination. Up to 9 programs for fax transmission can be stored.When storing a program, a name (maximum 36 letters) can be assigned to the program.For information on storing, editing, and deleting programs, see STORING, EDITING AND DELETING PROGRAMS (page 4-43).The following settings can be stored in a program:(1) Address setting(2) Transmission method
Normal transmission ►page 4-8, broadcast transmission ►page 4-30, polling ►page 4-32, serial polling ►page 4-33
(3) Original Size Enter
(4) Duplex Scanning(5) Resolution and exposure(6) Own number sendings ►page 4-46(7) Transmission settings ►page 4-15
When storing a broadcast transmission or serial polling operation in a program, up to 200 destination fax numbers can be stored.
USING A PROGRAM
• A program differs from a timer transmission (►page 4-29) in that it is not cleared from memory after transmission takes place. A program thus allows you to repeatedly perform the same type of transmission. Note, however, that programs do not allow you to establish a timer setting for transmission.
• A setting that can be stored in a program cannot be changed at the time that a program is used for a transmission even if the setting is not stored in the program.
• The only settings that can be selected when using a program are the original size enter, duplex scanning, and a timer setting.
1In fax mode, place the original and select "Program" with the [ ] or [ ] key.
2Select the program that you wish to use.If not all letters of the program name appear, press the [READ-END] key ( ) to display all letters. Press the [READ-END] key ( ) once again to return to the original screen.
3If needed, select the original size and other settings, and then press the [START] key.• Transmission takes place according to the program.• If you selected a program that does not include a transmission method, set the transmission method and the
destinations to be dialed before pressing the [START] key.
Select settings that cannot be stored in a program before you press the [START] key in step 3. These settings include the original size (see BASIC PROCEDURE FOR SENDING FAXES (page 4-8)), duplex scanning (see FAXING A TWO-SIDED ORIGINAL (page 4-14)), and a timer setting (see AUTOMATIC TRANSMISSION AT A SPECIFIED TIME (page 4-29)).

4-50
FACSIMILE►CONVENIENT FAX FUNCTIONS
FORWARDING RECEIVED DATA TO A NETWORK ADDRESS (INBOUND ROUTING SETTINGS)You can have received faxes automatically forwarded to a specified E-mail address or shared folder. As an example, this function can be used to route received faxes to a specified E-mail address or a specified folder without printing the faxes.All Inbound Routing settings are configured in the Web page.The following explanation assumes that the Web page has been accessed with administrator rights.For the procedure for accessing the Web pages, see HOW TO ACCESS THE WEB PAGE (page 8-2).To activate Inbound Routing, configure the basic settings before specifying the destination.
In the menu frame, click [Inbound Routing Settings]. Click the [Submit] button after settings
CONFIGURING THE BASIC SETTINGSConfigure the basic settings of Inbound Routing.
Enabling the Inbound Routing functionSelect [Enable] in [Inbound Routing].
Changing the print style of received dataSelect a print style in [Print Style Setting].
Item Settings Description
Inbound Routing Enable, Disable Enable or disable the Inbound Routing function.
Print Style Setting Always Print, Print at Error Select a print style of received data.

4-51
FACSIMILE►CONVENIENT FAX FUNCTIONS
Set a file name for forwarding received dataSelect from the pull-down menu of items used for the file name.To add a desired text string, select the "Characters" and enter the string in "Preset of Character" using up to 64 characters.
Select the item to be used as the file name in "File Name Setting".
Setting whether to print the transaction reportSelect whether to print the transaction report when forwarding received data.
Specify the print condition in "Transaction Report Print Select Setting".
Item Description
Serial Number Selecting Serial Number adds the unit serial number to the file name.
Sender Name Selecting Sender Name adds the sender name to the file name.
Date & Time Selecting Date & Time adds the date and time to the file name.
Session Page Counter Selecting Session Page Counter adds the counter to the file name.
Unique Identifier Selecting Unique Identifier adds the unique identifier to the file name.
Characters To add a character string to the file name, select this checkbox and enter the text string in "Preset of Character" using up to 64 characters.
Preset of Character Enter a text string to be used in "Characters" using up to 64 characters.
Item Settings Description
Transaction Report Print Select Setting
Always Print, Print at Error, Do not Print
Select a print style of the transaction report.

4-52
FACSIMILE►CONVENIENT FAX FUNCTIONS
SETTINGS THE DESTINATIONSpecify a sending source of received data and forwarding destination E-mail address or network folder to configure a forwarding table.Up to 10 forwarding tables can be configured.
For each forwarding table, set the following items:• Forward Condition (enabling/disabling forwarding, and the conditions to determine forwarding)• Sender number (fax number)• Forwarding destinations (network folder)• Forwarding destinations (E-mail address)
Viewing the destination list
Settings the destination
• The names of the destination number (Forward destination 1 to 10) cannot be changed.
• The E-mail address or the network folder can be specified for a forwarding destination. Scan to FTP, Scan to Desktop, and fax number cannot be specified.
1Click [Destination].The destination list appears.
Item Description
Inbound Routing Displays whether Inbound Routing function is enabled.
Number Displays the forwarding destination number (Forward Destination 1 to 10).Each of setup menu is displayed by clicking each number.
Forward Condition Displays the forward condition of the destination (enabling/disabling and determining the destination setting).
[Delete] button To delete the forwarding condition stored in a destination number, select the "Number" checkbox of the destination number and click the [Delete] button.
[Clear Checked] button Clicking this clears all "Number" checkboxes.
1Click [Destination] and click the destination number to be set.
2 Select [Enable] in "Forward Condition" and select the determining condition for forwarding.Select [Forward (All)] or [Forward (Sender)].
3If you wish to forward received data from a specific sender, enter the sender's fax number in "Sender Number".Enter the fax number using up to 20 digits. To enter the fax number from the fax addresses stored in the machine, click the [Select from Address Book] button. The "Fax Destination" screen appears, and you can select the sender's number from the fax address list.

4-53
FACSIMILE►CONVENIENT FAX FUNCTIONS
Forward Condition
Sender Number
Forward Destination (Max. 10)
4 Enter the destination E-mail address or network folder in "Forward Destination (Max.10)".Up to ten E-mail address or network folder can be specified as the destination.Two types of methods are available for entering the destination. The set E-mail address or network folder are displayed in "Forwarding Destination Settings".• Entering an E-mail address or network folder directly
Click the [Direct Entry] button. When the "Forwarding Destination Settings (Direct Entry)" appears, enter an E-mail address or network folder information ("Hostname or IP Address", "User Name", "Password", "E-mail", "E-mail address"), and click the [Submit] button.
• Selecting an E-mail address or network folder from the address bookClick the [Select From Address Book] button. The "Destination List" screen appears, and you can select an E-mail address or network folder from the list.
To delete a set E-mail address or network folder, select the checkbox at the left of the E-mail address or network folder you wish to delete, and then click the [Delete] button.
Item Settings Description
ForwardCondition
Enable, Disable Enable or disable the destination to be set in this screen.
Forward (All), Forward (Sender)
Select the determination condition for forwarding the received FAX data.
Item Description
Fax No. Enter the sender's fax number if you have selected "Forward (Sender)" in "Forward Conditions" setting. Up to 20 digits can be entered.
[Select From Address Book] button Click this button to select the fax number from the fax addresses stored in this machine.
Item Description
Forwarding Destination Settings Displays the stored destinations. If no destination is stored, "Not Set" appears.
[Delete] button Deletes the selected destination.
[Direct Entry] button Click this button to enter an E-mail address or network folder directly.
[Select From Address Book] button Click this button to select an E-mail address or network folder from the address list stored in the machine.

4-54
FACSIMILE►CONVENIENT FAX FUNCTIONS
SENDING A FAX DIRECTLY FROM A COMPUTER (PC-Fax)A document in a computer can be transmitted via the machine as a fax. Faxes are sent using the PC-Fax function in the same way as documents are printed. Select the PC-Fax driver as the printer driver on your computer and then select the Print command in the software application. Image data for transmission will be created and sent as a fax.
• To use the PC-Fax function, the PC-Fax driver must be installed. For more information, see the Software Setup Guide
• This function can only be used on a Windows computer.
• This function can only be used for transmission. Faxes cannot be received to your computer.
Fax transmission

4-55
FACSIMILE►USING AN EXTENSION PHONE
CONNECTING AN EXTENSION PHONEYou can connect a telephone to the machine and use it as an extension phone to place and receive calls like any normal phone. Fax reception can also be activated from an extension phone connected to the machine. (remote operation)
CONNECTING AN EXTENSION PHONEInsert the end of the extension phone cord into the extension phone jack on the left side of the machine.
Make sure you hear a "click" sound indicating that the cord is securely connected.
USING AN EXTENSION PHONE
Only use an extension telephone that can be connected to a modular jack.If the shape of the cord plug is not compatible with the jack, consult your dealer or nearest Sharp customer service center.
Extension phone jack
Clicks
Clicks

4-56
FACSIMILE►USING AN EXTENSION PHONE
USING AN EXTENSION PHONEUsing an extension phone for voice callsAn extension phone connected to the machine can be used to place and receive voice calls just like a normal phone.An extension phone can be used while another mode is being used (copying, etc.).
Activating fax reception from an extension phone (remote reception)After receiving a call on the extension phone, you can activate fax reception from the extension phone. This is called "remote reception". After speaking, or when you hear a fax tone through the extension phone, perform the following procedure with the extension phone still lifted. (If you made the call, remote reception will not be possible.)
• It may not be possible to make a call on your line during a power outage. This depends on the type of line (optical line, etc.).
• If the fax reception mode is set to auto reception, you must lift the phone to answer a call before the machine automatically begins reception. The machine is initially set to answer calls on two rings. The number of rings can be changed to any number from 0 to 15 in the system settings. ► #Of Rings Man.RX (page 7-21)
• A call cannot be placed on hold.
The following procedure is not possible if you are on a pulse dial line and your extension phone cannot produce tone signals. To find out whether your extension phone can produce tone signals, refer to the manual for your extension phone.
1If you are on a pulse dial line, set your phone to issue tone signals.Refer to your phone's manual to set the phone to issue tone signals.If your phone is already set to issue tone signals, proceed to the next step.
2 Press the key once and the key twice on the extension phone.Fax reception is activated.
3Replace the extension phone.
The one-digit number that is used to activate fax reception from an extension phone (initially set to "5") is called the "remote reception number". You can change this number to any number from 0 to 9 in the system settings. ► Remote Reception (page 7-19)
4-57
FACSIMILE►USING AN EXTENSION PHONE
Sending a fax after talking on the phone (Manual transmission)If the other fax machine is set to manual reception, you can talk to the other party and then send a fax without breaking the connection.
Receiving a fax after talking (Manual reception)When an extension phone is connected to the machine and you have set the reception mode to Manual (►page 4-27), you can talk to a person sending a fax manually and then begin fax reception without breaking the connection.
Automatic redialing (►page 4-18) will not take place if the line is busy.
1Follow steps 1 to 4 of BASIC PROCEDURE FOR SENDING FAXES (page 4-8) and then follow the steps below.
2Lift the extension phone.
3Dial the number of the other party.
4Speak to the other party when they answer.
5After the other party switches to fax reception, press your [START] key.Transmission begins.
If you have loaded the original on the document glass, you can only send one page by manual transmission.
Canceling a fax transmission...Press the [C] key. A screen appears asking you to cancel a fax transmission. Select "Yes" with the [ ] [ ] keys, and press the [OK] key.
6Replace the extension phone.

4-58
FACSIMILE►OTHER FUNCTIONS
WHEN A TRANSACTION REPORT IS PRINTEDThe machine has been set to automatically print a transaction report to notify you of the result when a transmission is not successful or when the Broadcast transmission function is used.When transmission is not successful and a transaction report similar to the following is printed,"FOLLOWING DATA CANNOT BE SENT. PLEASE HAND THIS REPORT TO XXX.", read the report and take appropriate action.The transaction report is set at the factory to print at the times indicated in gray below, however, the times at which the report is printed can be changed in the system settings. ► List Setting (page 7-18)• Normal transmission: ALWAYS PRINTS / /NEVER PRINTS • Broadcast transmission: /ERROR ONLY/NEVER PRINTS• Original image print setting*: ALWAYS PRINTS / /NEVER PRINTS• Reception: ALWAYS PRINTS /ERROR ONLY/
The Transaction Report shows the date of transmission, the time transmission began, the other party's name, the duration of the operation, the number of pages, the type of transmission, the result, the department, and other information.* You can select whether or not part of the transmitted original is printed with transaction reports that are printed for
normal transmissions and broadcast transmissions.
INFORMATION APPEARING IN THE TYPE/NOTE COLUMNInformation such as the type of transmission and type of error appears in the TYPE/NOTE column of the REPORT AT REGULAR INTERVALS (COMMUNICATION ACTIVITY REPORT) (page 4-60). The following notes may appear.
OTHER FUNCTIONS
The list count appears in the "#" column of the Transaction Report and a serial number appears in the FILE column. (These numbers are not related to the transaction.)
Sending result Explanation
OK Transmission was completed successfully.
BUSY Transmission was not successful because the line was busy.
CANCEL A transmission was canceled while in progress or a stored transmission job was canceled.
P. FAIL The power was turned off or a power failure occurred.
NO RX POLL A polling request was denied because the polling machine did not have its own fax number programmed.
PASS CODE # ERR A polling request was denied because the other machine's fax number had not been stored as a polling passcode in your machine.
ORIG ERROR When you attempted to send a fax from the document feeder in direct transmission mode, a misfeed occurred.
ERROR ONLY
ALWAYS PRINTS
ERROR ONLYNEVER PRINTS

4-59
FACSIMILE►OTHER FUNCTIONS
ERRORXXXXXX Line conditions prevented the transmission from taking place normally.A code used by service technicians appears.
XX-XX OK When group dialing or broadcast transmission was performed,xxx- : Indicates total number of transmissions.xxx OK: Indicates completed transmissions.
Reception result Explanation
OK Reception was completed successfully
P. FAIL The power was turned off or a power failure occurred.
MEMORY FULL The image memory became full during substitute reception to memory.
LENGTH OVER The transmitted document was over 800 mm long and therefore could not be received.
NO RX ROLL When polling was attempted,Your fax number (sender's number) was not programmed in your machine.Your fax number was not programmed as a polling passcode number in the other machine.
RX NO POLL When polling was attempted,The other machine did not have a polling function.The other machine did not have a document stored in polling memory.
ERRORXXXXXX Line conditions prevented the reception from taking place normally.A code used by service technicians appears.
XX-XX OK When serial polling ended normally,xxx- : Indicates total number of transmissions.xxx OK: Indicates completed transmissions.
JUNK FAX ERR Fax reception was denied by the reception denial function.
Sending result Explanation
First two digits
Last four digits
First two digits
Last four digits

4-60
FACSIMILE►OTHER FUNCTIONS
REPORT AT REGULAR INTERVALS(COMMUNICATION ACTIVITY REPORT)Your machine keeps a record of the most recent 50 transactions (both transmissions and receptions) that were performed. The record includes the date of the transaction, the other party's name, the duration, and result. You can have the report automatically printed when the number of transactions exceeds 50, or at a specified time. This allows you to check the machine's activity at regular intervals.The machine is initially set (factory default setting) to not print the report. To have the report printed, change the setting in the system settings. ► List Setting (page 7-18)
WHEN AN ALARM SOUNDS AND A WARNING MESSAGE IS DISPLAYEDWhen an error occurs during a transaction, an alarm will sound and a message will appear in the display.If one of the following messages appears, follow the instructions in the table.If another messages appears, see INDICATORS AND DISPLAY MESSAGES (page 6-12).
SELF-DIAGNOSTIC FUNCTIONThe machine has a self-diagnostic function that automatically stops operation if a problem occurs in the machine. If a problem occurs in fax mode, the following display appears.
• Refer to the table on WHEN A TRANSACTION REPORT IS PRINTED (page 4-58) for the notes that appear in the TYPE/NOTE column.
• The activity report can also be printed out on demand.► PRINTING LISTS OF PROGRAMMED INFORMATION AND SETTINGS (page 4-45)
Message(alarm sounds)
Meaning of message Solution Page
XXXXXXLine error.
An error prevented completion of the transaction.
Try the transaction again. –
Message display Action
Call for service. code:xx xx.
Turn off the power and then turn it back on. If the error is not cleared, note the 2-digit main code and the 2-digit sub-code and then contact your dealer.
Main code Sub code

4-61
FACSIMILE►OTHER FUNCTIONS
MESSAGES DURING NORMAL OPERATION
Message Meaning of message
SENT xx%No.001 P-xxx
This appears when a direct transmission ends ("xx" indicates the number of pages).
READING xx%No.001 P-xxx
The original is being scanned into memory (during memory transmission).
Stand-by. 100%22 AUG FRI 10:25
The machine is in the standby state.
ENTER DIAL # This appears when the [SPEAKER] key has been pressed.
5-1
BEFORE USING THE MACHINE AS A NETWORK SCANNER
ABOUT THE SCANNER FUNCTIONS . . . . . . . . . . 5-2
SCANNER SEQUENCE
THE BASE SCREEN OF SCANNER MODE . . . . . . 5-4
SENDING AN IMAGE. . . . . . . . . . . . . . . . . . . . . . . . 5-5
• BASIC TRANSMISSION PROCEDURE . . . . . . 5-5• SELECTING A DESTINATION (USING THE
[ADDRESS] KEY) . . . . . . . . . . . . . . . . . . . . . . . 5-8
• TRANSMITTING A TWO-SIDED ORIGINAL. . . 5-10
STORING SCANNING SETTINGS. . . . . . . . . . . . . . 5-11
• SETTING THE SCANNING SIZE . . . . . . . . . . . 5-11
• SELECTING THE RESOLUTION . . . . . . . . . . . 5-12
• SELECTING THE FILE FORMAT . . . . . . . . . . . 5-13
• SELECTING THE COLOR MODE. . . . . . . . . . . 5-13
• ADJUSTING THE SCANNING EXPOSURE . . . 5-14• ENABLING SCANNING MARGINS (VOID
AREA) . . . . . . . . . . . . . . . . . . . . . . . . . . . . . . . . 5-14• ADJUSTING THE BACKGROUND BY MAKING
LIGHT AREAS OF THE ORIGINAL DARKER OR LIGHTER (SUPPRESS BG) . . . . . . . . . . . . 5-15
• ADJUSTING THE SHARPNESS OF AN IMAGE (SHARPNESS) . . . . . . . . . . . . . . . . . . . . . . . . . 5-16
• SCANNING BUSINESS CARDS (BUSINESS CARD SCAN) . . . . . . . . . . . . . . . . . . . . . . . . . . 5-17
• IMAGE ORIENTATION AND STANDARD ORIGINAL PLACEMENT ORIENTATION. . . . . 5-18
• STORING AND EDITING/DELETING A PROGRAM . . . . . . . . . . . . . . . . . . . . . . . . . . . . 5-19
• USING STORED SETTINGS (PROGRAM) . . . 5-19
SCANNING FROM YOUR COMPUTER (PC SCAN)
SCANNING FROM A TWAIN-COMPLIANT APPLICATION . . . . . . . . . . . . . . . . . . . . . . . . . . . . . 5-20
SAVING IN USB MEMORY DEVICE
USB MEMORY SCAN . . . . . . . . . . . . . . . . . . . . . . . 5-24
• USING THE USB MEMORY SCAN FUNCTION 5-24
SCANNER

5-2
SCANNER►BEFORE USING THE MACHINE AS A NETWORK SCANNER
ABOUT THE SCANNER FUNCTIONSWith this machine a document or photo can be scanned into an image file.You can then send the data file to the file server or your computer using the inter-corporate network (Intranet) or the Internet. To send originals using the scanner function, specify the stored destination (delivery address information name) from the operation panel (display) of the machine.
BEFORE USING THE MACHINE AS A NETWORK SCANNER
1. Scanning from a TWAIN-compliant application
3. Sending the scanned data to FTP server
4. Sending the scanned data to a computer connected to the same network2. Storing the scanned image
to a USB flash memory
5. Sending the scanned data by E-mail

5-3
SCANNER►BEFORE USING THE MACHINE AS A NETWORK SCANNER
Scanning from a TWAIN-compliant applicationA TWAIN-compliant application on a computer connected to the same network as the machine is used to scan a document or image.To use PC Scan, the scanner driver must be installed from the "Software CD-ROM" that accompanies the machine.For more information on scanning from a TWAIN-compliant application, see SCANNING FROM YOUR COMPUTER (PC SCAN) (page 5-20).
Storing the scanned image to a USB flash memoryThe scanned image can be stored to a USB flash memory installed on the machine. This is called "USB Memory Scan" in this manual. For more information on USB Memory Scan, see USB MEMORY SCAN (page 5-24).
Sending the scanned data to FTP serverThe scanned image can be sent to a memory storage device on a network (a designated directory on an FTP server). (This is called "Scan to FTP" in this manual.)
Sending the scanned data to a computer connected to the same networkThe scanned file is sent to a shared folder on a Windows computer on the same network as the machine. (This is called "Scan to Network Folder" in this manual.)
The scanned file is sent to a specified folder on your computer. (This is called "Scan to Desktop" in this manual.)For information on Scan to Desktop, which is used to send a scanned file to a specified folder of your computer, consult your dealer.
Sending the scanned data by E-mailThe scanned image can be sent to an e-mail recipient. (This is called "Scan to E-mail" in this manual.)

5-4
SCANNER►SCANNER SEQUENCE
THE BASE SCREEN OF SCANNER MODEThe base screen of scan mode is displayed by pressing the [SCAN] key from the base screen of copy mode or fax mode.
Base screen of scan mode
(1) Message display
Messages appear here to indicate the current status of the machine.
(2) Destination display
This shows the selected destination.There are scanner transmission modes:Scan to E-mail, Scan to Network Folder, Scan to FTP, Scan to Desktop, and USB Memory Scan.This shows the currently selected destination and transmission mode.
(3) Original scanning mode / Original size display
Shows the currently selected original scanning mode and scanning size.
: One-sided scanning in the document feeder.: Two-sided scanning in the document feeder.
None: Document glass
(4) File format display
This shows the image data file type and file method to be created.
(5) Resolution display
The shows the scanning resolution.
(6) Original size ►page 5-11
This is used to set the size of the original to be transmitted.
(7) Resolution ►page 5-12
This is used to select the scanning resolution.
(8) Color Mode ►page 5-13
Set the color mode. Select full color, grayscale, and Mono2.
(9) Format ►page 5-12
This is used to select the image data file type and file method to be created.
SCANNER SEQUENCE
If a screen appears asking you what type of connection you are using after you press the [SCAN] key, select "Network" with the [ ] or [ ] key and press the [OK] key.
(2)
(3)
(4)
(5)
(1)
(7)(8)(9)
(6)

5-5
SCANNER►SCANNER SEQUENCE
SENDING AN IMAGE
BASIC TRANSMISSION PROCEDURE
Using the document feeder
Scanner transmission job cannot be accepted while printing a fax receiving data. Start scanning after the fax data printing is
finished.
1Make sure the machine is in scan mode.When the SCAN indicator is lit, the machine is in scan mode. If the indicator is not lit, press the [SCAN] key. If auditing mode has been enabled for the scan function in the system settings, a message will appear prompting you to enter your account number when you switch to scan mode. Enter your account number (five digits) with the numeric keys. ► User Authentication (page 7-12)
2Place the original(s).Place the original in the document feeder tray of the automatic document feeder.► AUTOMATIC DOCUMENT FEEDER (page 1-30)
3Check the original size.To change the original size, change as explained in STORING SCANNING SETTINGS (page 5-11).
4If needed, select the resolution setting.► SELECTING THE RESOLUTION (page 5-12)
The initial factory setting is [200dpi].
5If needed, select the format.► SELECTING THE FILE FORMAT (page 5-13)
The initial factory setting• Color / Grayscale : PDF M• B/W : PDF G4
6If you select "B/W", adjust the exposure in B/W mode if needed. ► SELECTING THE COLOR MODE (page 5-13)
7Press the [ADDRESS] key.

5-6
SCANNER►SCANNER SEQUENCE
Using the document glass
8Select the destination selection method. ► SELECTING A DESTINATION (USING THE [ADDRESS] KEY) (page 5-8)
Select from the following three destination selection methods:• Address book (page 5-8)
Select one of the stored destinations directly from the operation panel.• Address entry (page 5-9)
Directly enter the e-mail address. (Only for Scan to E-mail.)• Address search (page 5-9)
Access a directory data base on the Internet or your intranet and search for a destination e-mail address.During a global address search, multiple addresses can be entered to perform a broadcast transmission.When you have finished searching for the destination, you will return to the following base screen.
• Information on the destination can be stored in the Web page.
• The sender name is normally set to the name stored in "Reply E-mail Address" in "SMTP Setup" in the Web page.
9Press the [START] key.Scanning begins.If scanning is completed normally, the following screen is appears briefly and then the display returns to the base screen.
Canceling transmission► Canceling transmission (page 5-8)
• If a misfeed occurs during scanning in scan mode, scanning will be canceled and the data scanned will be deleted. Remove the misfed original and reload the originals from the beginning.
1Make sure the machine is in scan mode.When the SCAN indicator is lit, the machine is in scan mode. If the indicator is not lit, press the [SCAN] key. If auditing mode has been enabled for the scan function in the system settings, a message will appear prompting you to enter your account number when you switch to scan mode. Enter your account number (five digits) with the numeric keys. ► User Authentication (page 7-12)
2Place the original.Place the original on the document glass.DOCUMENT GLASS (page 1-32)

5-7
SCANNER►SCANNER SEQUENCE
3Check the original size.To change the original size, change as explained in STORING SCANNING SETTINGS (page 5-11).
4If needed, select the resolution setting.► SELECTING THE RESOLUTION (page 5-12)
The initial factory setting is [200dpi].
5If needed, select the format.► SELECTING THE FILE FORMAT (page 5-13)
The initial factory setting• Color / Grayscale : PDF M• B/W : PDF G4
6If you select "B/W", adjust the exposure in B/W mode if needed. ► SELECTING THE COLOR MODE (page 5-13)
7Press the [ADDRESS] key.
8Select the destination selection method.► SELECTING A DESTINATION (USING THE [ADDRESS] KEY) (page 5-8)
Select from the following three destination selection methods:• Address book (page 5-8)
Select one of the stored destinations directly from the operation panel.• Address entry (page 5-9)
Directly enter the e-mail address. (Only for Scan to E-mail.)• Address search (page 5-9)
Access a directory data base on the Internet or your intranet and search for a destination e-mail address.During a global address search, multiple addresses can be entered to perform a broadcast transmission.When you have finished searching for the destination, you will return to the following base screen.
• Information on the destination can be stored in the Web page.
• The sender name is normally set to the name stored in "Reply E-mail Address" in "SMTP Setup" in the Web page.
9Press the [START] key.Scanning begins.
10If you have another page to scan, change pages and then press [START] key.• Repeat this sequence until all pages have been scanned.• If no action is taken for one minute (the [START] key is not pressed), scanning automatically ends and transmission
begins.

5-8
SCANNER►SCANNER SEQUENCE
Canceling transmission• To cancel the transmission while "Reading" appears or before the [READ-END] key ( ) is pressed, press the [C] or
[CA] key.• If the power is turned off or a power failure occurs while a document is being scanned in the document feeder, the
machine will stop and a document misfeed will occur. After the power is restored, remove the misfed original as explained in "MISFEED REMOVAL (page 6-14)".
• When performing a Scan to E-mail transmission, note the following points:Be careful not to send image data files that are too large. Your mail server's system administrator may have placed a limit on the amount of data that can be sent in one e-mail transmission. If this limit is exceeded, the e-mail will not be delivered to the recipient. Even if there is no limit and your e-mail is successfully delivered, a large data file may take a long time to be received and place a heavy burden on the recipient's network, depending on the recipient's network (Internet) environment. If large image data files are repeatedly sent, the resulting burden on the network may slow down the speed of other, unrelated data transmissions and in some cases, may even cause the mail server or network to go down. In cases where you need to send a large file or multiple images, try lowering the resolution or reducing the scanned original size.
SELECTING A DESTINATION (USING THE [ADDRESS] KEY)A destination can be selected using one of three methods: Selecting from "ADDRESS BOOK", using "ADDRESSENTRY", or "ADDRESS SEARCH".
Address book
11When the final original page has been scanned, press the [READ-END] key ( ).Open the document feeder and remove the document. When the original is removed or any key operation is performed, the display returns to the base screen.
Canceling transmission► Canceling transmission (page 5-8)
• Multiple destination scan be selected for a Scan to E-mail transmission. (E-mail and Group (E-mail) destinations can be selected at the maximum of 20 destinations, which will consequently allow broadcasting up to 300 individual destinations in total. )
• Only one destination can be selected for a Scan to Network, Scan to FTP or Scan to Desktop transmission.
1Press the [ADDRESS] key, and select the "Address Book".
2Change tabs as needed with the [ ] or [ ] key and select the desired destination with the [ ] or [ ] key.You can switch between information on the selected destination and the destination list by pressing the [READ-END] key ( ).

5-9
SCANNER►SCANNER SEQUENCE
Address entry
Address search
3Press the [READ-END] key ( ).A checkmark appears by the selected destination. To cancel the selection, press the [READ-END] key ( ) once again to remove the checkmark. To select multiple destinations, repeat steps.
1Press the [ADDRESS] key, and select "Address Entry" with the [ ] key, and press the [OK] key.
2Enter the destination address.
3Press the [OK] key.
1Press the [ADDRESS] key, and select "Global Address Search" with the [ ] key, and press the [OK] key.
2Enter the search characters.
3Select the desired destination with the [ ] or [ ] key.
4Press the [OK] key.

5-10
SCANNER►SCANNER SEQUENCE
TRANSMITTING A TWO-SIDED ORIGINALThe original field of the display shows the original scanning size.The current original scan mode setting is indicated by an icon.
: One-sided scanning in the document feeder.: Two-sided scanning in the document feeder.
None: Document glass
Follow these steps to automatically transmit a two-sided original.
Only the following two-sided document sizes can be used:Standard sizes8-1/2" x 14", 8-1/2" x 13-1/2", 8-1/2" x 13-2/5", 8-1/2" x 13", 8-1/2" x 11", 5-1/2" x 8-1/2", A4, B5, A5Non-standard sizesInch sizes X: 6-3/4 to 14 inches, Y: 5-1/2 to 8-1/2 inchesAB sizes X: 170 to 356 mm, Y: 140 to 216 mm
1Place the original(s) in the document feeder tray, and check the original size.For information on placing an original, see HOW TO PLACE THE ORIGINAL (page 1-30).
2Press the [DUPLEX] key, and Select "2-Sided" with the [ ] or [ ] key, and press the [OK] key.
3Select "Portrait-Booklet", "Portrait-tablet", "Landscape-Booklet", "Landscape-tablet" with the [ ] or [ ] key, and press the [OK] key.
4Press the [OK] key.
• Booklets and tablets Two-sided originals that are bound at the side are booklets, and two-sided originals that are bound at the top are tablets.
• Duplex scanning is cancelled when the transmission is completed, or when the [CA] key is pressed.
• Duplex scanning of two-sided originals is only possible when a Document feeder is used. Automatic scanning of both sides of an original is not possible when the document glass is used.
• The image of the back side of the original is rotated 180 degrees if needed at the time of transmission, and thus there is no need to change the orientation at the receiving machine.
• To cancel duplex scanning, select "1-Sided" in step 1 and then press the [OK] key.
• Only the following two-sided document sizes can be used:8-1/2" x 14", 8-1/2" x 13-1/2", 8-1/2" x 13-2/5", 8-1/2" x 13", 8-1/2" x 11", A4
BOOKLET TABLET

5-11
SCANNER►SCANNER SEQUENCE
STORING SCANNING SETTINGSSets of scanning settings (scan size, resolution, file type, etc.) can be changed for use in various scanning applications.
SETTING THE SCANNING SIZEThe default scanning size is 8-1/2" x 11". (If SCANNING BUSINESS CARDS (BUSINESS CARD SCAN) (page 5-17) has been selected, the scanning size is set to business card size.)If you change the original size, follow the steps below to change the setting after you have placed the original in the document feeder or on the document glass (►page 1-30).
1Select "Original Size" with the [ ] or [ ] key, and then select the original size.To select an inch size, press the [ ] key.
The original scanning size can be set manually. In the Inch original size selection screen, select [Size Input] and press the [OK] key to display the screen below.Select the width (X) or the length (Y) with [ ] or [ ] key, and adjust in increments of 1/8" or 1 mm with [ ] or [ ] key.Input rangeX: 5-1/2" to 14" / 140 to 356 mm*Y: 5-1/2" to 8-1/2" / 140 to 216 mm* 5-1/2" x 11-5/8" / 140 to 297 mm when the document glass is used
To cancel a manual original size setting, press the [CA] key.If it is not possible to select the actual original size, select a size that is larger than the actual original size. If a smaller size is selected, part of the original will not be transmitted.

5-12
SCANNER►SCANNER SEQUENCE
SELECTING THE RESOLUTIONThe scanning resolution can be selected. After selecting scan mode and placing the original (steps 1 to 3 on page 5-5), perform the procedure below.The factory default setting for the resolution is "200dpi".If you need to change the resolution, follow these steps.
1Select "Resolution" with the [ ] or [ ] key, and then select the resolution.
2Press the [OK] key.
Resolution
• The default resolution setting is 200 dpi. For typical text documents, a resolution of 200 dpi or 300 dpi produces sufficiently legible image data. (A resolution of 200 dpi corresponds to the generally used "Fine" in fax mode. For this reason, the 600 dpi setting should only be used in cases where high-clarity image reproduction is required, such as an original that includes photographs or illustrations.
• The default setting can be changed in the system settings. ►page 7-23

5-13
SCANNER►SCANNER SEQUENCE
SELECTING THE FILE FORMATAfter selecting scan mode and placing the original (steps 1 to 3 on page 5-5), perform the procedure below.The factory default settings are "PDF" for the file type and "Multi" for the file creation method (multiple scanned images are combined into one file).If you need to change the file format, follow these steps.
SELECTING THE COLOR MODEChange the color mode used to scan the original.Select "Full color", "Mono2" or "Grayscale"Full colorThe original is scanned in full color.Mono2Colors in the original are scanned as black or white.GrayscaleThe colors in the original are scanned in black and white as shades of gray (grayscale).
1Select "Format" with the [ ] or [ ] key, and select "Color / Grayscale" or "Mono2", and press the [OK] key.
2Select the file type with the [ ] or [ ] key, and select the file creation method.When "Single" is selected, a one-page file is created for the scanned image.When "Multi" is selected, all scanned images can be combined into a single file.
3Press the [OK] key.
• When the file type is set to "TIFF", the file creation method can only be select.To open the scanned image without using the software program in the accompanied CD-ROM, the recipient must have a viewer program that can open the image format (file type) that was selected as explained above. If the recipient cannot open the image, try sending the image in a different format.
1Select "Color Mode" with the [ ] or [ ] key, and select "Full Color", "Grayscale", or "Mono2", and press the [OK] key.
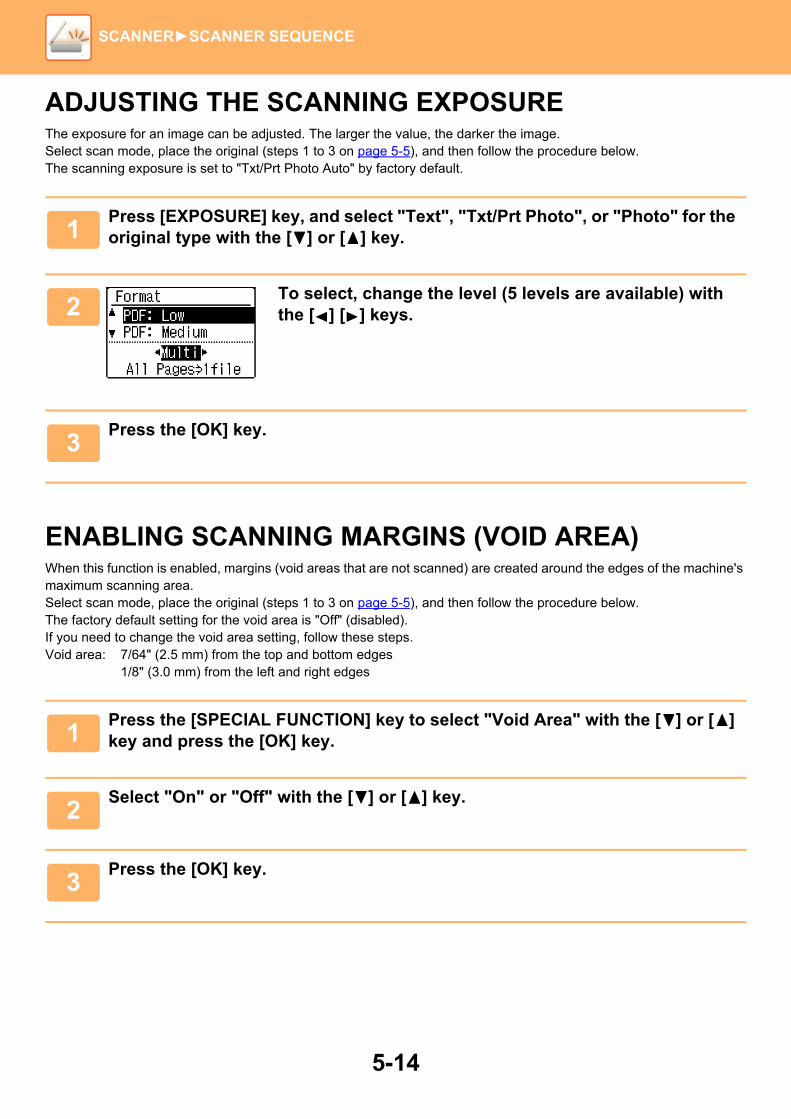
5-14
SCANNER►SCANNER SEQUENCE
ADJUSTING THE SCANNING EXPOSUREThe exposure for an image can be adjusted. The larger the value, the darker the image.Select scan mode, place the original (steps 1 to 3 on page 5-5), and then follow the procedure below.The scanning exposure is set to "Txt/Prt Photo Auto" by factory default.
ENABLING SCANNING MARGINS (VOID AREA)When this function is enabled, margins (void areas that are not scanned) are created around the edges of the machine's maximum scanning area.Select scan mode, place the original (steps 1 to 3 on page 5-5), and then follow the procedure below.The factory default setting for the void area is "Off" (disabled).If you need to change the void area setting, follow these steps.Void area: 7/64" (2.5 mm) from the top and bottom edges
1/8" (3.0 mm) from the left and right edges
1Press [EXPOSURE] key, and select "Text", "Txt/Prt Photo", or "Photo" for the original type with the [ ] or [ ] key.
2To select, change the level (5 levels are available) with the [ ] [ ] keys.
3Press the [OK] key.
1Press the [SPECIAL FUNCTION] key to select "Void Area" with the [ ] or [ ] key and press the [OK] key.
2Select "On" or "Off" with the [ ] or [ ] key.
3Press the [OK] key.

5-15
SCANNER►SCANNER SEQUENCE
ADJUSTING THE BACKGROUND BY MAKING LIGHT AREAS OF THE ORIGINAL DARKER OR LIGHTER (SUPPRESS BG)You can adjust the background by making light areas of the original darker or lighter.
You must select Background Adjustment before scanning the original.
1Press the [SPECIAL FUNCTION] key, select "Special Modes" with the [ ][ ] keys, and press the [OK] key.
2Select "Suppress BG" with the [ ] [ ] keys and press the [OK] key.
3Select level adjustment with the [ ] [ ] keys, and adjust with the [ ][ ] keys.To select, change the level (3 levels are available) with the [ ][ ] keys and press the [OK] key.
: Only light backgrounds are suppressed. : Light to dark backgrounds are suppressed.
To cancel the Background Adjustment setting:Select "Off" with the [ ][ ] keys and press the [OK] key.
Adjust light areas in this way.
Level [ ]
[ ] makes the background darker. [ ] makes the background lighter.
Level [ ]

5-16
SCANNER►SCANNER SEQUENCE
ADJUSTING THE SHARPNESS OF AN IMAGE (SHARPNESS)This function adjusts the sharpness to make a sharper or softer image.
Sharpness must be specified before scanning the original.
1Press the [SPECIAL FUNCTION] key, select "Special Modes" with the [ ][ ] keys, and press the [OK] key.
2Select "Sharpness" with the [ ] [ ] keys and press the [OK] key.
3Select "Off", "Soft", or "Sharp" with the [ ][ ] keys and press the [OK] key.
To cancel the sharpness setting:Select "Off" with the [ ][ ] keys and press the [OK] key.
Softer
Sharper

5-17
SCANNER►SCANNER SEQUENCE
SCANNING BUSINESS CARDS (BUSINESS CARD SCAN)Business cards can be scanned.Only when using this feature, it is possible to read the business card from the automatic document feeder.
Original glass Document feeder tray
1Press the [SPECIAL FUNCTION] key, and press the [ ] or [ ] key to select "Bus. Card Scan".The original size is set to business card size (custom).
2Press the [OK] key.
• When business card scan mode is selected, the original size cannot be changed.
• When business card scan mode is selected, duplex scanning cannot be used.
• When using the automatic document feeder, it may not be possible to feed or read the card correctly depending on its condition/material/shape/processing method.

5-18
SCANNER►SCANNER SEQUENCE
IMAGE ORIENTATION AND STANDARD ORIGINAL PLACEMENT ORIENTATIONWhen using the document glass, the original should be placed face down in the far left corner of the glass with the top edge of the original at the left edge of the glass.When using the document feeder, the original should be placed face up in the middle of the document feeder tray, with the top of the original to the left.
Document glass Document feeder Scanning result

5-19
SCANNER►SCANNER SEQUENCE
STORING AND EDITING/DELETING A PROGRAMThis function lets you store a transmission address and scanning settings. The address and settings can be called up when you scan a document, saving you the trouble of selecting the address and settings. Up to two programs can be stored for scanning.• Address Setting • Original Size • Resolution • Format • Exposure • Original scanning mode can be stored in a program.
USING STORED SETTINGS (PROGRAM)Press the [Program 1] or [Program 2] key. See BASIC TRANSMISSION PROCEDURE (page 5-5).
1Press the [SPECIAL FUNCTION] key and select "Register Program" with the [ ] or [ ] key, and press the [OK] key.The original size is set to business card size (custom).
2Select "Enter", "Change", "Delete", and press the [OK] key.
● Register program
(1) Select "No Store", and press the [OK] key.
(2) Select the program you want to store with the [ ] or [ ] key, and press the [OK] key.Setting each screen will be displayed.
(3) Press the [OK] key to perform the required settings.Return to step 2.
(4) Press the [START] key.Programs are stored.
● Change program
(1) Select the program you want to change, and press the [OK] key.Change the settings same operation as for registration.
● Delete program
(1) Select the program you want to delete, and press the [OK] key.
(2) Select "Delete", and press the [OK] key.
Special Function
Register ProgramSharpness
PC Scan

5-20
SCANNER►SCANNING FROM YOUR COMPUTER (PC SCAN)
SCANNING FROM A TWAIN-COMPLIANT APPLICATIONThe machine supports the TWAIN standard, making it possible to scan from TWAIN-compliant applications. Scanning in PC scan mode is only possible when the scanner driver has been installed from the "Software CD-ROM" using the integrated installer. For the procedures for installing the scanner driver and configuring settings, see the Software Setup Guide.
SCANNING FROM YOUR COMPUTER(PC SCAN)
1Place the original(s) that you wish to scan on the document glass/document feeder. Press the [SPECIAL FUNCTION] key, select "PC SCAN", and press the [OK] key.
2After starting TWAIN-compliant application, click the "File" menu and select a menu to scan.
The method for accessing the menu to select the scanner depends upon the application. For more information, refer to the manual or the help file of your application.
3Select "SHARP MFP TWAIN V", and click the "Select" button.
Depending on your system, "SHARP MFP TWAIN V 1.0 (32-32)" may appear in the above "Select Source" screen.
4Select the menu to acquire an image from the application’s "File" menu.The scanner driver setup screen will appear. ► Scanner driver settings (page 5-22)

5-21
SCANNER►SCANNING FROM YOUR COMPUTER (PC SCAN)
5In the "Scanning Source" menu, select the location where you placed the original in Step 1.If you placed a two-sided original in the document feeder, select "SPF (Duplex-Book)" or "SPF (Duplex-Tablet)" according to the binding position of the original.
If you selected "SPF (Duplex-Book)" or "SPF (Duplex-Tablet)" in the "Scanning Source" menu, select whether the orientation of the placed original is "Left edge is fed first" or "Top edge is fed first".
6Click the "Preview" button.The preview image will appear.
• If the angle of the image is not correct, reset the original, and click the "Preview" button again.
• If the preview image is not oriented correctly, click the "Rotate" button in the preview screen. This rotates the preview image 90 degrees clockwise, allowing you to correct the orientation without resetting the original. ► Preview screen (page 5-23)
• If you set multiple pages in the document feeder, the machine previews only the top page of the originals, and then sends it to the original exit area. Return the previewed original to the document feeder before starting the scanning job.
7Specify the scanning area and set the scan preferences.For information on specifying the scan area and setting the scan preferences, see scanner driver Help.► Scanner driver settings (page 5-22)
Scanning a large area at high resolution results in a large quantity of data and a prolonged scanning time. It is recommended that you set appropriate scanning preferences for the type of original being scanned, i.e., Web page (monitor), Photo, FAX, or OCR.
8When you are ready to begin scanning, click the "Scan" button.Scanning begins and the image is acquired into the application that you are using.In the application, assign a file name and save the file.
To cancel a scanning job after the "Scan" button has been clicked, press the [Esc] key on your keyboard or the [C] key or [CA] key on the operation panel.
9Press the [BACK] key on the operation panel.

5-22
SCANNER►SCANNING FROM YOUR COMPUTER (PC SCAN)
Scanner driver settingsThe scanner driver setup screen consists of the "Set-up screen", which lets you select scan settings, and the "Preview screen", which shows the scanned image. For details on the scan settings, click the "Help" button in the preview screen to display Help.
(1) "Scanning Position" menu("Scanning Source" in some regions)
Select the location where the original is placed. Selections are "Platen" (document glass), "SPF (Simplex)", "SPF (Duplex-Book)" or "SPF (Duplex-Tablet)".► SCANNING FROM A TWAIN-COMPLIANT
APPLICATION (page 5-20)
(2) "Scanning Mode" menu
Select "Preset" or "Custom Settings" ("Standard" or "Professional" in some regions) for the scanning mode.The "Preset (or Standard)" screen lets you select the original type as well as monitor, photo, fax, or OCR according to the purpose of scanning.If you wish to change the default settings for these four buttons, or select custom settings such as the image type and resolution before scanning, switch to the "Custom Settings (or Professional)" screen.For details on the settings, click the "Help" button in the preview screen to display Help.
(3) "Image Area" menu
Set the scanning area. To scan the original size detected by the machine, select "Auto". The scanning area can also be specified as desired in the preview window.
(4) "Zoom Preview" checkbox
When this is selected, the selected part of the preview image will be enlarged when the "Preview" button is clicked.To return to the regular view, remove the checkmark.[Zoom Preview] cannot be used when [SPF] is selected in the "Scanning Position" menu.
(5) "Preview" button
Previews the document.If [Preview] is canceled by immediately pressing the [Esc] key on your keyboard, nothing will appear in the preview screen.
(6) "Scan" button("Scanning" in some regions)
Click to scan an original using the selected settings. Before clicking the "Scan" button, make sure the settings are correct.To cancel a scanning job after the "Scan" button is clicked, press the [Esc] key on your keyboard.
(7) "Close" button
Click to close the scanner driver setup screen.
(1)
(2)
(3)
(4)(5)
(6)
(7)
Set-up screen

5-23
SCANNER►SCANNING FROM YOUR COMPUTER (PC SCAN)
(1) Preview screen
Click the "Preview" button in the Set-up screen to display the scanned image. You can specify the scanning area by dragging the mouse inside the window. The inside of the frame that is created when you drag the mouse will be the scanning area. To cancel a specified scanning area and clear the frame, click anywhere outside the frame.
(2) "Rotate" button
Click to rotate the preview image 90 degrees clockwise. This allows the orientation to be corrected without resetting the original. Upon scanning, the image file is created in the orientation shown in the preview screen.
(3) "Image Size" button
Click to open a dialog box that allows you to specify the scanning area by entering numbers. Pixels, mm, or inches can be selected for the units of the numbers. By initially specifying a scanning area, numbers can be entered to change that area relative to the top left corner as a fixed origin.
(4) "Auto Scan Area Judgement" button
Click when the preview screen is displayed to automatically set the scanning area to the entire preview image.
Click the "Auto Scan Area Judgement" button to automatically set the scanning area to the entire preview image.
Preview image
Preview screen
(5) "Help" button
Click to display the help file for the scanner driver.
(1)
(2)
(3)
(4)
(5)
Preview screen

5-24
SCANNER►SAVING IN USB MEMORY DEVICE
USB MEMORY SCAN
USING THE USB MEMORY SCAN FUNCTIONA scanned image can be sent (save) to a commercially available USB flash memory that has been connected to the machine.
Using the document feeder
SAVING IN USB MEMORY DEVICE
1Make sure the machine is in scan mode.When the SCAN indicator is lit, the machine is in scan mode. If the indicator is not lit, press the [SCAN] key. If auditing mode has been enabled for the scan function in the system settings, a message will appear prompting you to enter your account number when you switch to scan mode. Enter your account number (five digits) with the numeric keys.► User Authentication (page 7-12)
2Place the original(s).Place the original in the document feeder tray of the automatic document feeder.► AUTOMATIC DOCUMENT FEEDER (page 1-30)
You cannot place originals in both the document feeder tray and on the document glass and send them in a single transmission.
3Press the [ADDRESS] key.
4Select "USB Memory Scan" using the [ ] key, press the [OK] key.

5-25
SCANNER►SAVING IN USB MEMORY DEVICE
Using the document glass
5Connect the USB flash memory to the machine.
If a USB flash memory is inserted into the machine prior to step 4, the following screen will appear.
Instead of performing steps 3 and 4, you can select "Scan to the memory device" with the [ ] or [ ] key in the above screen and press the [OK] key to select theUSB flash memory as the destination.
6Press the [START] key.Scanning begins.If scanning is completed normally, "Complete." is appears briefly and then the display returns to the base screen.
1Make sure the machine is in scan mode.When the SCAN indicator is lit, the machine is in scan mode. If the indicator is not lit, press the [SCAN] key. If auditing mode has been enabled for the scan function in the system settings, a message will appear prompting you to enter your account number when you switch to scan mode. Enter your account number (five digits) with the numeric keys.► User Authentication (page 7-12)
2Place the original.Place the original on the document glass.► DOCUMENT GLASS (page 1-32)
You cannot place originals in both the document feeder tray and on the document glass and send them in a single transmission.

5-26
SCANNER►SAVING IN USB MEMORY DEVICE
3Press the [ADDRESS] key.
4Select "USB Memory Scan" using the [ ] key, press the [OK] key.
5Connect the USB flash memory to the machine.
If a USB flash memory is inserted into the machine prior to step 4, the following screen will appear.
Instead of performing steps 3 and 4, you can select "Scan to the memory device" with the [ ] or [ ] key in the above screen and press the [OK] key to select the USB flash memory as the destination.
6Press the [START] key.Scanning begins.
7If you have another page to scan, change pages and then press [START] key.• Repeat this sequence until all pages have been scanned.• If no action is taken for one minute (the [START] key is not pressed), scanning automatically ends and transmission
begins.
8When the final original page has been scanned, press the [READ-END] key ( ).Open the document feeder and remove the document. When the original is removed or any key operation is performed, the display returns to the base screen.

6-1
TROUBLESHOOTING
• NETWORK PROBLEMS . . . . . . . . . . . . . . . . . . 6-2
• MACHINE/COPYING PROBLEMS . . . . . . . . . . 6-3
• PRINTING AND SCANNING PROBLEMS . . . . 6-6
• FAX PROBLEMS. . . . . . . . . . . . . . . . . . . . . . . . 6-10
INDICATORS AND DISPLAY MESSAGES. . . . . . . 6-12
IF YOUR E-MAIL IS RETURNED. . . . . . . . . . . . . . . 6-13
PAPER JAM
MISFEED REMOVAL . . . . . . . . . . . . . . . . . . . . . . . . 6-14
• MISFEED IN THE DOCUMENT FEEDER. . . . . 6-14
• MISFEED IN THE BYPASS TRAY . . . . . . . . . . 6-16
• MISFEED IN THE MACHINE . . . . . . . . . . . . . . 6-17
• MISFEED IN THE PAPER TRAY 1 . . . . . . . . . . 6-21
• MISFEED IN THE PAPER TRAY 2 (Option) . . . 6-22
TROUBLESHOOTING

6-2
TROUBLESHOOTING►TROUBLESHOOTING
This chapter describes troubleshooting and misfeed removal.If you encounter a problem when using the machine, check the following troubleshooting guide before calling for service. If you cannot resolve the problem using the troubleshooting guide, turn off the main switch, disconnect the power cord from the power outlet, and contact your dealer.
NETWORK PROBLEMS
TROUBLESHOOTING
If you experience difficulty using the machine, check the following troubleshooting guide before calling for service. Many problems can be easily resolved by the user. If you are unable to solve the problem using the troubleshooting guide, turn off the power switch and unplug the machine, and contact your SHARP Service Department."**-**" represents a code consisting of numbers and letters. When contacting your dealer, inform your dealer of the code that is displayed.
Problem Cause and solution Page
The machine does not connect to the network.
The LAN cable is disconnected.→ Make sure that he LAN cable is firmly inserted in the connectors
on the machine and your computer. To connect the cable, see the "Software setup guide".
1-3
Is the machine configured for use on the same network as the computer?→ The machine cannot be used if it is not connected to the same
network as the computer, or if it is not configured for use on the network.For more information, consult your network administrator.
–

6-3
TROUBLESHOOTING►TROUBLESHOOTING
MACHINE/COPYING PROBLEMSThe following problems are related to the general operation of the machine and copying.
Problem Cause and solution Page
The machine does not operate.
The machine is not plugged into a power outlet.→ Plug the machine into a grounded outlet.
–
Power switch OFF.→ Turn the power switch ON.
1-11
The machine is warming up.→ The machine requires some time to warm up after the power
switch is turned on. While the machine is warming up, copy settings can be selected but copying is not possible. Wait until "Ready to copy." appears.
1-11
The front cover or the side cover is not completely closed.→ Close the front cover or the side cover.
–
The machine is in auto power shut-off mode.→ When auto power shut-off mode has activated, only the
[ENERGY SAVE] indicator blinks; all other indicators and the display are off. The machine returns to normal operation when the [ENERGY SAVE] key is pressed, when a print job or fax is received, or when scanning from a computer is started.* Except when print hold for the fax function is enabled.
1-12
Misfeed occurs.→ To remove the misfeed, see "MISFEED REMOVAL".
6-14
The tray is out of paper.→ Load paper.
1-17
The power is on, but copying does not take place.
→ Press the [COPY] key to select copy mode.2-2
Copies are too dark or too light.
An appropriate exposure for the original has not been selected.→ Select a suitable exposure mode with the [EXPOSURE] key and
set an appropriate exposure level with the [ ] or [ ] key.→ If the copy is too light or too dark even though "AUTO" was
selected with the [EXPOSURE] key, adjust the automatic exposure level.
2-8
The text is blurred when I make a copy.
Select a suitable exposure for the original in the copy exposure screen.→ Change the exposure to "Text" with the [EXPOSURE] key.
2-8
Blank copies.
The original is not placed face up in the document feeder or face down on the document glass.→ Place the original face up in the document feeder or face down on
the document glass.
1-30
Part of the image is cut off or there is too much blank space.
The original was not placed in the correct position.→ Place the original correctly.
1-30
The size of paper loaded in the tray was changed without changing the tray's paper size setting.→ Be sure to change the tray's paper size setting whenever you
change the size of paper loaded in the tray.
1-29

6-4
TROUBLESHOOTING►TROUBLESHOOTING
Wrinkles appear in the paper or the image disappears in places.
The paper is outside of the specified size and weight range.→ Use copy paper within the specified range.
1-17
Paper curled or damp.→ Do not use curled or crimped paper. Replace with dry copy paper.
During periods when the machine is not used for a long time, remove the paper from the tray and store it in a dark place in a bag to prevent moisture absorption.
–
The fusing unit pressure adjusting levers were not returned to their original positions→ If the fusing unit pressure adjusting levers are not returned, poor
toner adhesion, smudging, and lines may occur. Be sure to press both levers down to return to their original positions.
1-26
Paper misfeed.
The paper is outside of the specified size and weight range.→ Use copy paper within the specified range.
1-17
Paper curled or damp.→ Do not use curled or crimped paper. Replace with dry copy paper.
During periods when the machine is not used for a long time, remove the paper from the tray and store it in a dark place in a bag to prevent moisture absorption.
–
Paper is not loaded properly.→ Make sure the paper is properly installed.
1-17
Pieces of paper inside machine.→ Remove all pieces of misfed paper.
6-14
Several sheets of paper stick together.→ Fan the paper well before loading it.
–
A paper misfeed has occurred in the tray.→ Turn the paper over and/or turn it around, and reload.
6-21
Too much paper is loaded in the tray.→ If the stack of paper is higher than the indicator line on the tray,
remove some of the paper and reload so that the stack does not exceed the line.
1-21
The guides on the bypass tray do not match the width of the paper.→ Adjust the guides to match the width of the paper.
If the paper guide presses too hard against the paper, a misfeed may occur. Adjust the guide so that it lightly contacts the paper.
1-24
The bypass tray extension is not pulled out.→ When loading paper, open the extension.
1-24
The bypass paper feed roller is dirty.→ Clean the roller.
1-35
Copies are smudged or dirty.
The document glass or the underside of the document feeder is dirty.→ Clean regularly.
1-34
Original smudged or blotchy.→ Use a clean original.
–
White or black lines appear on copies.The scanner glass for the document feeder is dirty.→ Clean the long, narrow scanning glass.
1-34
Problem Cause and solution Page

6-5
TROUBLESHOOTING►TROUBLESHOOTING
Paper size for a paper tray cannot be set.
Press the [COPY] key to select copy mode. 2-2
Copying or printing is performed.→ Set the paper size after copying or printing is complete.
–
The machine has stopped temporarily due to running out of paper or a misfeed.→ Load paper or remove the misfeed, and then set the paper size.
6-14
A copy job stops before it is finished.
The paper output tray is full.→ Remove the output in the paper output tray to resume printing.
–
The tray is out of paper.→ Load paper.
1-17
The display turns off.
Any other indicators turned off.→ If other indicators are lit, the machine is in "Preheat mode". Press
any key on the operation panel to resume normal operation.1-13
[ENERGY SAVE] indicator blinks.→ The machine is in auto power shut-off mode. Press the [ENERGY
SAVE] key to resume normal operation.1-12
Lighting fixture flickers.
The same power outlet being used is for the lighting fixture and the machine.→ Connect the machine to a power outlet which is not used for other
electric appliances.
–
Problem Cause and solution Page

6-6
TROUBLESHOOTING►TROUBLESHOOTING
PRINTING AND SCANNING PROBLEMSIn addition to this section, troubleshooting information can also be found in the README files for each of the software programs. To view a README file, see "SOFTWARE SETUP GUIDE".
Problem Cause and solution Page
The machine does not print.(DATA indicator does not blink.)
The machine is not correctly connected with your computer.→ Check both ends of the printer cable and make sure you have a
solid connection. Try a known good cable. For information on cables, see "SPECIFICATIONS (START GUIDE)".
1-3
Copy job is performed.→ Wait until the copy job is complete.
–
Your machine is not selected correctly in the current application for the print job.→ When choosing "Print" from the "File" menu located in
applications, be sure you have selected "SHARP MX-XXXX" (where XXXX is the model name of your machine) printer displayed in the "Print" dialog box.
–
The printer driver has not been installed properly.→ Follow these steps to check and see if the printer driver is
installed.1 Click the "Start" button →"Settings" button →"Devices" →
"Printers and Scanner".In Windows 7, click the"Start" button, click "Devices and Printers".
2 If the "SHARP MX-XXXX" printer driver icon is shown but you still cannot print, the printer driver may not have been installed correctly. In this case, delete the software and then reinstall it.
–
The port setting is not correct.→ Printing is not possible if the printer driver port setting is not
correct. Set the port correctly. For more information, see the Software Setup Guide.
–
Printing is disabled. → If "CANCEL JOBS OF INVALID ACCOUNTS" is enabled in the
system settings, printing will not be possible. Consult the administrator.
7-12
The machine does not print.(DATA indicator was blinking.)
The tray size settings are not the same on the machine and in the printer driver.→ Make sure that the same tray paper size is set on the machine
and in the printer driver. To change the tray's paper size setting on the machine, see TRAY SETTINGS (page 1-29) or see Software Setup Guide to change it in the printer driver.
3-73-14
The specified size of paper has not been loaded.→ Load the specified size of paper in the paper tray.
1-17
Printing is slow.
Simultaneous use of two or more application software programs.→ Start printing after quitting all unused application software
programs.
–
6-7
TROUBLESHOOTING►TROUBLESHOOTING
The printed image is light and uneven.
The paper is loaded so that printing takes place on the back side of the paper.→ Some paper types have a front and back side. If the paper is
loaded so that printing takes place on the back side, toner will not adhere well to the paper and a good image will not be obtained.
1-17
The printed image is dirty.
You are using paper that is outside the specified size and weight range.→ Use copy paper within the specified range.
1-17
Paper curled or damp.→ Do not use curled or crimped paper. Replace with dry copy paper.
During periods when the machine is not used for a long time, remove the paper from the tray and store it in a dark place in a bag to prevent moisture absorption.
–
You did not set sufficient margins in the paper settings of your application.→ The top and bottom of the paper may be dirty if the margins are
set outside of the specified print quality area.→ Set the margins in the software application within the specified
print quality area.
–
Black dots or smudges appear on the printed output.→ Run fixing cleaning mode. The letter "V" is printed on a sheet of
paper and the fusing unit is cleaned.7-13
The printed image is skewed or it runs off the paper.
The paper loaded in the tray is not the same size as that specified in the printer driver.→ Check if the "Paper Size" options suit the size of the paper loaded
in the tray.If the "Fit To Paper Size" setting is activated, make sure that the paper size selected from the drop-down list is the same as the size of the loaded paper.
–
The orientation of document setting is not correct.→ Click the "Main" tab in the printer driver setup screen, and verify if
the "Image Orientation" option is set to your requirements.–
Paper is not loaded properly.→ Make sure the paper is properly loaded.
1-17
You did not correctly specify the margins for the application in use.→ Check the layout of the document margins and the paper size
settings for the application you are using. Also check if the print settings are specified correctly to suit the paper size.
–
Problem Cause and solution Page

6-8
TROUBLESHOOTING►TROUBLESHOOTING
Poor scanning quality.
The document glass or the underside of the document feeder is dirty.→ Clean regularly.
1-34
Original smudged or blotchy.→ Use a clean original.
–
You have not specified a suitable resolution.→ Make sure that the resolution setting in the scanner driver is
appropriate for the original.–
You have not specified a suitable value for the "B/W Threshold" setting.→ If you are scanning with a TWAIN-compliant application, make
sure that a suitable value is specified for the "B/W Threshold" setting. A larger threshold value makes your output darker, while a small threshold value makes it lighter. To adjust the threshold automatically, click the "Auto Threshold" button on the "Image" tab of the "Professional" screen.
–
The brightness and contrast settings are not suitable.→ If you are scanning with a TWAIN-compliant application and the
resulting image has unsuitable brightness or contrast (for example it is too bright), click the "Auto Brightness/Contrast Adjustment" button on the "Color" tab of the "Professional" screen. Click the "Brightness/Contrast" button to adjust the brightness and the contrast while viewing the scanned output image on the screen.
–
The original is not placed face up in the document feeder or face down on the document glass.→ Place the original face up in the document feeder or face down on
the document glass.
1-30
The original was not placed in the correct position.→ Place the original correctly.
1-30
Unable to scan the image.
Your application is not TWAIN compliant.→ If your application is not TWAIN compliant, scanning will not be
possible. Make sure your application is TWAIN compliant.–
You have not selected the scanner driver of the machine in your application.→ Make sure that the machine’s scanner driver is selected in your
TWAIN-compliant application.
–
You have not specified all scanning preferences appropriately.→ Scanning a large area at high resolution results in a large amount
of data and extended scanning times. The scanning preferences should be set appropriately for type of original to be scanned, i.e., Text, Text/Graphics, Photograph.
–
The recipient does not receive a transmitted data.
There is a mistake in the stored destination information or the wrong destination was selected.→ Make sure that the correct destination information is stored.
If there is a mistake, correct it. * If delivery by e-mail (Scan to E-mail) is unsuccessful, an error
message such as "Undelivered Message" may be sent to the designated administrator's e-mail address. This information may help you determine the cause of the problem.
8-7
Problem Cause and solution Page

6-9
TROUBLESHOOTING►TROUBLESHOOTING
The recipient does not receive data sent by e-mail (Scan to E-mail).
Check the Web page to see if a limit has been set for the size of image files sent using Scan to E-mail (the factory default setting is "Unlimited"). A limit can be set from 1 MB to 10 MB. Consult the administrator of the Web page to select a suitable limit.
8-7
The amount of data that can be sent in one e-mail transmission is sometimes limited by the administrator of the mail server. Even if the file size is within the limit explained above, if it exceeds the limit set by the administrator of the mail server, the file will not be delivered to the recipient.Decrease the amount of data sent in the e-mail transmission (reduce the number of pages scanned). (Ask your mail server administrator what the data limit is for one e-mail transmission.)
–
Transmission takes a long time.When there is a large amount of image information, the data file is also large and transmission takes a long time.
–
The [START] indicator is not lit in the USB Memory Scan mode.
The USB flash memory is not recognized or not inserted, or any device other than USB flash memory is inserted in the USB port.→ Check the USB port.
–
"Check the USB memory." appears in the display during USB Memory Scan.
Any device other than USB flash memory is inserted in the USB port, the USB flash memory is write-protected, or it was taken off during USB Memory Scan.→ Check your USB flash memory and use it properly.
–
"Memory is full. Job is canceled." appears in the display during USB Memory Scan.
The memory of the USB flash memory became full.→ Use the USB flash memory with sufficient memory. –
Problem Cause and solution Page

6-10
TROUBLESHOOTING►TROUBLESHOOTING
FAX PROBLEMSIf you experience a problem with the fax function, first check the following table.
Problem Cause and solution Page
The machine does not operate.
Is the machine power switch turned on?→ Turn the power switch ON.
1-11
Does the display show an error message?→ Clear the error as instructed by the message.
4-60
Dialing is not possible.
Is the correct dial mode set for your line?→ Check your line and set the correct dial mode.
7-19
Is the telephone line properly connected?→ Check the connections.
4-2
Is the machine power switch turned on?→ Turn the power switch ON.
1-11
Is the machine in fax mode?→ Press the [FAX] key to set the machine to fax mode.
4-8
Cannot send a fax.
Does the receiving fax machine have paper?→ Check with the operator of the receiving machine.
–
Is the receiving machine ready to receive?→ Check with the operator of the receiving machine.
–
Are you using a transmittable original size?→ Check the transmittable sizes.
1-30
Was the original size detected correctly?→ Check size of the original.
1-30
The message "Reading canceled. Please retry sending operation." appears.→ If you attempt transmission while the message "Warming-up."
appears, the transmission may not take place correctly. Repeat the transmission.
–
The transmitted image prints out blank at the receiving side.
Was the original placed so that the correct side is scanned?→ Make sure the original is placed so that the correct side is
scanned.1-30
If the receiving machine is using thermal paper, was the thermal paper loaded with the wrong side out?→ Check with the operator of the receiving machine.
–
The transmitted image is distorted.
Were line conditions poor due to thunder or another reason?→ Try the transmission again.
–
Were the resolution and exposure settings suitable?→ Check the resolution and exposure settings.
–
White or black lines appear in the transmitted image.
Is the document glass or the scanning glass for the document feeder (the long, narrow glass) dirty?→ Clean the document glass or the scanning glass for the document
feeder.
1-34
Transmission does not take place at the specified time.
Is the machine's clock set to the correct time?→ Set the clock to the correct time.
7-10

6-11
TROUBLESHOOTING►TROUBLESHOOTING
Printing does not take place after reception.
Does an error message appear regarding adding paper, replenishing toner, or a misfeed? (This means that printing is not possible.)→ Restore printing capability as instructed by the display message.
Printing will begin.
4-60
Is forwarding (Inbound Routing function) selected in the Web page for a received fax?→ If you need to print a received fax, ask your administrator.
When the Inbound Routing function is enabled in the Web pages, received faxes are automatically forwarded to a specified address. If "Print at Error" is selected when Inbound Routing is enabled, received faxes will only be printed when an error occurs.
–
A received fax prints out blank.Was the wrong side of the original scanned in the transmitting machine?→ Check with the operator of the transmitting machine.
–
The received image is faint.Is the original faint?→ Ask the other party to re-send the fax using a suitable exposure
setting.–
The received image is distorted.Were line conditions poor due to thunder or another reason?→ Ask the other party to send the fax again.
–
Te
lep
ho
ne
A dial tone is not heard through the speaker.
Is the volume set to "low"?→ Set the speaker volume to "middle" or "high".
7-19
The machine does not ring.Has the ringer volume been turned off?→ Set the ringer volume to "low", "middle", or "high".
7-19
Dialing is not possible.Is the telephone line properly connected?→ Check the connections.
4-2
Problem Cause and solution Page

6-12
TROUBLESHOOTING►TROUBLESHOOTING
INDICATORS AND DISPLAY MESSAGESIf one of the following messages appears in the display, take prompt action as instructed by the message.
< >: Tray number< >: Size of paper that should be loaded
And if one of the following error codes appears in the display at communication error when sending the scanned image, take corresponding solution as mentioned below.
Message Action
Maintenance It is time for regular maintenance. Contact your SHARP Service Department.
Maintenance required. Call for service. Maintenance required soon. Contact your SHARP Service Department.
Call for service. – Turn off the power and then turn it back on. If this does not clear the message, write down the 2-digit main code and 2-digit sub-code (" - "), turn off the power, and promptly contact your SHARP Service Department.
Toner Low.(Do not replace cartridgeuntil requested.)
The toner cartridge must be replaced soon.
Check the toner cartridge. Check to see if the toner cartridge has been installed properly.
Change the toner cartridge. Replace the toner cartridge as explained in REPLACEMENT OF TONER CARTRIDGE (page 1-36).
Remove paper from the center tray. The number of sheets in the output tray has reached the limit. Remove the paper.
Load < > paper into tray < >. The paper size specified for the tray is different from the actual size.► LOADING PAPER (page 1-17)
Error Code
Solution Page
CE-00CE-01
Turn off the power and then turn it back on. Consult with your network administrator to make sure that no problems exist on the network or in the server. If the error is not cleared after turning the power off and on, turn off the power and contact your dealer.
–
CE-02CE-04
The scanned image was not sent because a connection to the server could not be established. Make sure that the SMTP server settings or Scan to FTP destination settings in the Web page are correct.The procedure for configuring the SMTP server is explained in "Configuring SMTP, DNS and LDAP server settings", and the procedure for editing Scan to FTP destination information is explained in "Editing and deleting programmed transmission destinations".
8-7 8-15
CE-03The scanned image was not sent because the server was busy or there was too much traffic on line. Wait briefly and then try again.
–
CE-05The scanned image was not sent because the directory of the destination FTP server was not correct. Make sure that the correct FTP server information is configured in the Web page.
8-7
CE-06Scan data cannot be sent as E-mail address that is stored in the Destination List is not adequate.Check if the stored destination information is correct.
8-7
CE-09
The size of the scanned image file exceeds the limit set in "Maximum Size of E-mail attachments" in the Web page. Reduce the number of original pages scanned into the file, or change the limit set in "Maximum Size of E-mail attachments". Or it may exceed the limit of the file size at the mail server. Reduce the volume of the original, otherwise change the resolution or the color mode to make the scanned file size smaller.
8-13
CE-11The memory became full during scanning. Scan less pages, lower the resolution, or change the color mode so that the file size is smaller, and try scanning again.
8-13

6-13
TROUBLESHOOTING►TROUBLESHOOTING
IF YOUR E-MAIL IS RETURNEDIf a Scan to E-mail transmission is not successful, an e-mail informing you of this fact is sent to the return address configured in the SMTP server. If this happens, read the e-mail and determine the cause of the error, and then repeat the transmission.
CE-12The maximum number of destinations of a global address search has been exceeded.Increase the number of search characters to narrow the range of the global address search.
8-13
CE-14 Check if the USB flash memory is not set to write-protect. –
CE-15 Check that the USB flash memory has enough free space to accept the data size to be scanned. –
CE-16 Check that the USB flash memory has no problem. –
CE-17Check that the file names in the USB flash memory do not exceed 256 characters per file, or check that the USB flash memory has no problem.
–
Error Code
Solution Page

6-14
TROUBLESHOOTING►PAPER JAM
MISFEED REMOVALWhen a misfeed occurs during copying, the message " Clear paper path." and the location of the misfeed will appear.Check the location and remove the misfeed.
MISFEED IN THE DOCUMENT FEEDER
PAPER JAM
The paper may tear when you remove a misfeed. In this event, be sure to remove all torn pieces of paper from the machine.
1
● Section A
Remove the misfed original.Remove the original from the document feeder.Check sections A, B, and C in the left shows the illustration (see the next page), and remove the misfed original.
Push the release lever up, and remove the misfed original from the document feeder tray. Pull down the release lever.
(See below)
page 6-17
page 6-17
page 6-22page 6-16

6-15
TROUBLESHOOTING►PAPER JAM
● Section B
Open the document feeder and rotate the release roller in the direction of the arrow to feed the original out.If you are unable to remove the original, remove from part C.
● Section C
Remove the misfed original from the exit area.
2Press the [OK] key to make the misfeed location indicator stop blinking.
3Return the originals indicated by the number in the display to the document feeder tray and press the [START] key.Copying will resume from the originals that still remained when the misfeed occurred.

6-16
TROUBLESHOOTING►PAPER JAM
MISFEED IN THE BYPASS TRAY
1Remove any paper remaining in the bypass tray.
2Gently remove the misfed paper from the bypass tray.
3Grasp the side cover open/close handle, and gently open the side cover.
4Turn the paper feed knob and feed out the paper that is inside.► Misfeed in the paper feed area A (page 6-18)
5Close the auxiliary tray and then the bypass tray, grasp the side cover open/close handle, and gently open and close the side cover.The message " Clear paper path." will be cleared and copying will be possible.
(1)
(2)

6-17
TROUBLESHOOTING►PAPER JAM
MISFEED IN THE MACHINETo remove a misfeed from inside the machine, open the side cover, check whether the misfeed occurred in "A", "B", or "C" below, and follow the misfeed removal procedure.
1Open the bypass tray and the side cover.
If paper remains in the bypass tray, remove the paper.► MISFEED IN THE BYPASS TRAY (page 6-16)
2Check the misfeed location. Remove the misfed paper following the instructions for each location in the illustration below.
If paper is misfed here, go toMisfeed in the transport area C (page 6-20).
If paper is misfed here, go to Misfeed in the paper feed area A (page 6-18).
If the misfed paper is visible here, go to Misfeed in the fusing area B (page 6-19).
Area B
Area A
Area C

6-18
TROUBLESHOOTING►PAPER JAM
Misfeed in the paper feed area A
1Carefully remove the misfed paper. Turn the roller rotating knob in the direction of the arrow to assist in removing it.Be careful not to tear the misfed paper during removal.
The fusing unit is hot. Do not touch the fusing unit when removing misfed paper. Doing so may cause a burn or injury.
When removing misfed paper, do not touch or damage the photoconductive drum and the transfer roller.
2Close the side cover.The message " Clear paper path." will be cleared and copying will be possible.
• When closing the side cover, press on around the handle.
• If the message does not clear, check again to make sure that no pieces of paper remain.
Roller rotating knob Fusing unit
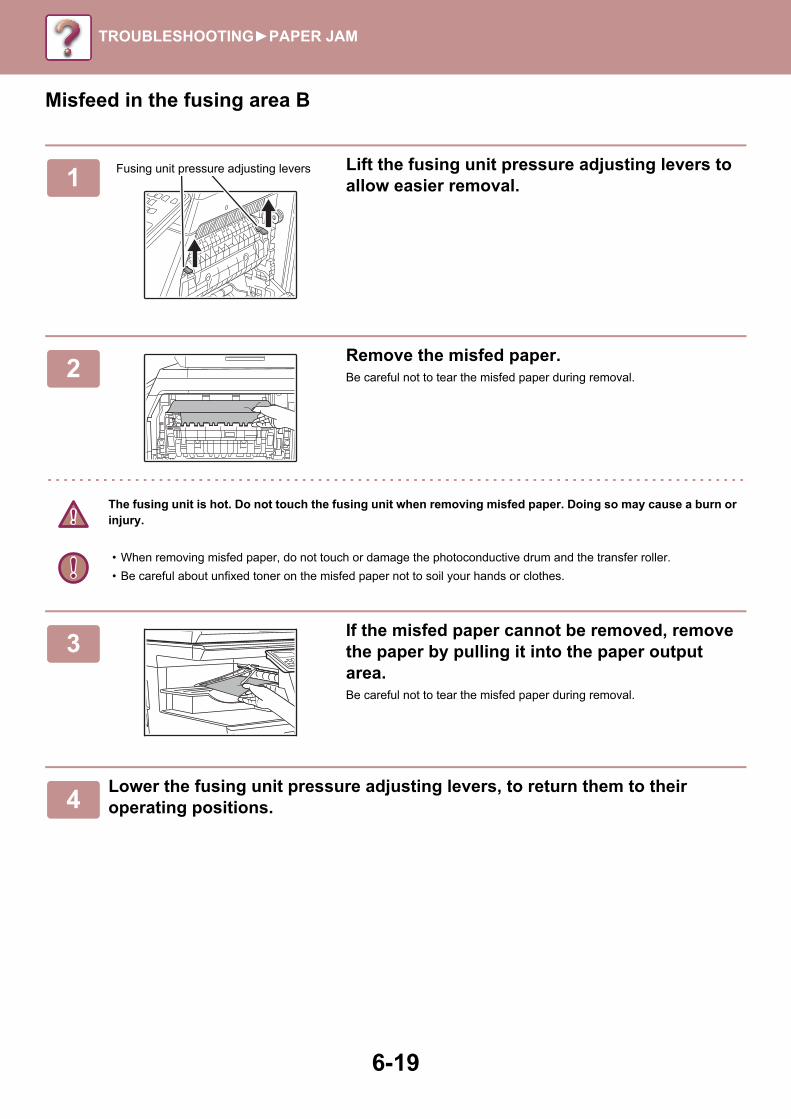
6-19
TROUBLESHOOTING►PAPER JAM
Misfeed in the fusing area B
1Lift the fusing unit pressure adjusting levers to allow easier removal.
2Remove the misfed paper.Be careful not to tear the misfed paper during removal.
The fusing unit is hot. Do not touch the fusing unit when removing misfed paper. Doing so may cause a burn or injury.
• When removing misfed paper, do not touch or damage the photoconductive drum and the transfer roller.
• Be careful about unfixed toner on the misfed paper not to soil your hands or clothes.
3If the misfed paper cannot be removed, remove the paper by pulling it into the paper output area.Be careful not to tear the misfed paper during removal.
4Lower the fusing unit pressure adjusting levers, to return them to their operating positions.
Fusing unit pressure adjusting levers
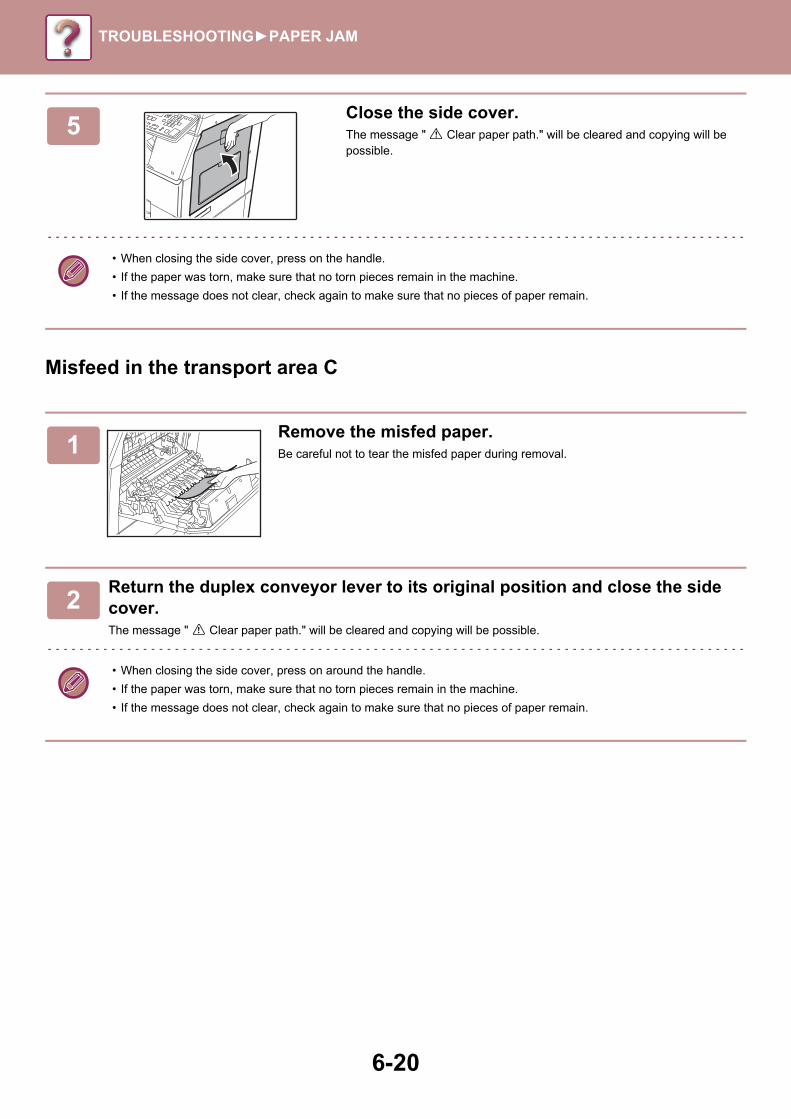
6-20
TROUBLESHOOTING►PAPER JAM
Misfeed in the transport area C
5Close the side cover.The message " Clear paper path." will be cleared and copying will be possible.
• When closing the side cover, press on the handle.
• If the paper was torn, make sure that no torn pieces remain in the machine.
• If the message does not clear, check again to make sure that no pieces of paper remain.
1Remove the misfed paper.Be careful not to tear the misfed paper during removal.
2Return the duplex conveyor lever to its original position and close the side cover.The message " Clear paper path." will be cleared and copying will be possible.
• When closing the side cover, press on around the handle.
• If the paper was torn, make sure that no torn pieces remain in the machine.
• If the message does not clear, check again to make sure that no pieces of paper remain.

6-21
TROUBLESHOOTING►PAPER JAM
MISFEED IN THE PAPER TRAY 1
Make sure that there is no misfed paper in the tray before pulling it out.► MISFEED IN THE MACHINE (page 6-17)
1Open the side cover and remove the misfed paper.► MISFEED IN THE MACHINE (page 6-17)
2Lift and pull out the upper paper tray and remove the misfed paper.Be careful not to tear the misfed paper during removal.
3Push the upper paper tray in completely.Push the tray in completely.
4Grasp the side cover open/close handle, and gently open and close the side cover.The message " Clear paper path." will be cleared and copying will be possible.
• When closing the side cover, press on the handle.
• If the message does not clear, check again to make sure that no pieces of paper remain.
(1)
(2)
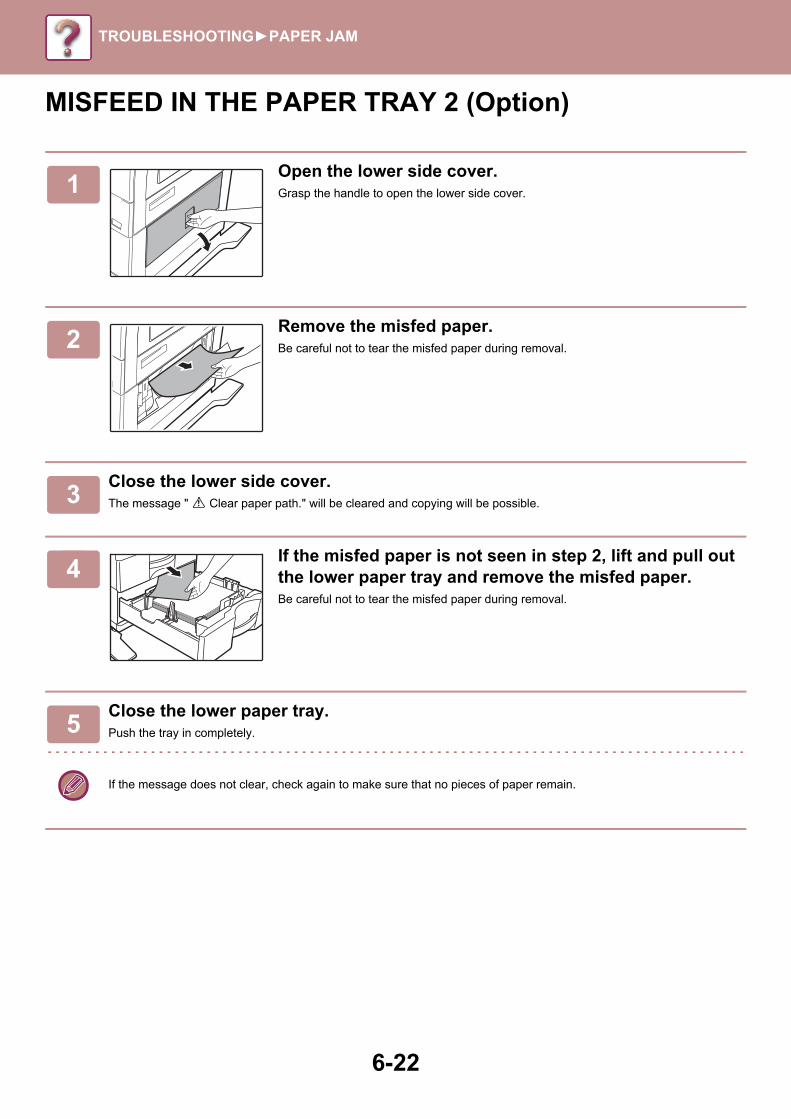
6-22
TROUBLESHOOTING►PAPER JAM
MISFEED IN THE PAPER TRAY 2 (Option)
1Open the lower side cover.Grasp the handle to open the lower side cover.
2Remove the misfed paper.Be careful not to tear the misfed paper during removal.
3Close the lower side cover.The message " Clear paper path." will be cleared and copying will be possible.
4If the misfed paper is not seen in step 2, lift and pull out the lower paper tray and remove the misfed paper.Be careful not to tear the misfed paper during removal.
5Close the lower paper tray.Push the tray in completely.
If the message does not clear, check again to make sure that no pieces of paper remain.
7-1
PURPOSE OF THE SYSTEM SETTINGS
PROGRAMS RELATED TO ALL FUNCTIONS OF THE MACHINE . . . . . . . . . . . . . . . . . . . . . . . . . . . . . 7-2
PROGRAMMING AN ADMINISTRATOR PIN CODE . . . . . . . . . . . . . . . . . . . . . . . . . . . . . . . . . . . . 7-2
• PROGRAMMING AN ADMINISTRATOR PIN CODE . . . . . . . . . . . . . . . . . . . . . . . . . . . . . . . . 7-2
SYSTEM SETTINGS LIST
USING THE SYSTEM SETTINGS
SYSTEM SETTINGS• Change Admin PIN . . . . . . . . . . . . . . . . . . . . . . 7-10
• Initial Setting . . . . . . . . . . . . . . . . . . . . . . . . . . . 7-10
• Network . . . . . . . . . . . . . . . . . . . . . . . . . . . . . . . 7-10
• User Control. . . . . . . . . . . . . . . . . . . . . . . . . . . . 7-12
• Device Control . . . . . . . . . . . . . . . . . . . . . . . . . . 7-13
• Operation Setting. . . . . . . . . . . . . . . . . . . . . . . . 7-14
• Energy Save . . . . . . . . . . . . . . . . . . . . . . . . . . . 7-15
• List Print. . . . . . . . . . . . . . . . . . . . . . . . . . . . . . . 7-15
• Auto Calibration . . . . . . . . . . . . . . . . . . . . . . . . . 7-16
• Security Settings . . . . . . . . . . . . . . . . . . . . . . . . 7-16
• Copier . . . . . . . . . . . . . . . . . . . . . . . . . . . . . . . . 7-17
• Printer . . . . . . . . . . . . . . . . . . . . . . . . . . . . . . . . 7-17
• Fax. . . . . . . . . . . . . . . . . . . . . . . . . . . . . . . . . . . 7-18
• Scanner . . . . . . . . . . . . . . . . . . . . . . . . . . . . . . . 7-23
SYSTEM SETTINGS

7-2
SYSTEM SETTINGS►PURPOSE OF THE SYSTEM SETTINGS
The system settings are used by the administrator of the machine to enable or disable functions to suit the needs of your workplace.
PROGRAMS RELATED TO ALL FUNCTIONS OF THE MACHINEThese programs are used to enable user authentication mode, adjust power consumption, and manage peripheral devices.When user authentication mode is enabled for a function, a valid account number must be entered in order to use the function. (If a valid account number is not entered, the function cannot be used.)When user authentication mode is enabled for the printer function, an account number must be entered at the user's computer when the print command is selected. (Depending on the system settings, a job may be printed even if an incorrect account number is entered, and thus care must be taken when managing printer page counts.) If "Disable Print by Inv. User" is enabled in the system settings, printing will be prohibited if an invalid account number is entered.)
PROGRAMMING AN ADMINISTRATOR PIN CODEThe administrator PIN code is a 5-digit number that must be entered in order to access the system settings. The administrator (administrator of the machine) should change the default administrator PIN code that was set at the factory to a new 5-digit number. Be sure to remember the new administrator PIN code, as it must be entered each time the system settings are subsequently used. (Only one administrator PIN code can be programmed.)Refer to the Start Guide for the factory default administrator PIN code.To change the administrator PIN code, see "PROGRAMMING AN ADMINISTRATOR PIN CODE (page 7-2)".
PROGRAMMING AN ADMINISTRATOR PIN CODE
PURPOSE OF THE SYSTEM SETTINGS
1Press the [SPECIAL FUNCTION] key.The special function screen will appear.
2Select "System Settings" with the [ ] or [ ] key.
3Press the [OK] key.The administrator PIN code entry screen appears.

7-3
SYSTEM SETTINGS►PURPOSE OF THE SYSTEM SETTINGS
4Use the numeric keys to enter the five-digit administrator PIN code.• If this is the first time you are programming the administrator PIN code, enter the factory default code. (Refer to the
Start Guide)• " " appears for each digit that you enter.• The special modes screen will appear with "Change Admin PIN" selected.
5Press the [OK] key.The administrator PIN code change screen appears.
6Enter the new 5-digit administrator PIN code with the numeric keys.Any 5 digits can be used for the administrator PIN code.
7Press the [OK] key.• The previously programmed administrator PIN code is replaced by the new administrator PIN code.• Press the [CA] key to return to the base screen.
PIN

7-4
SYSTEM SETTINGS►SYSTEM SETTINGS LIST
Programs for general use of the machine
Programs for Copy Mode
Programs for Printer Mode
SYSTEM SETTINGS LIST
Program name PageChange Admin PIN
Change Admin PIN 7-10
Initial SettingDate & Time Set 7-10
Daylight Saving Time 7-10
NetworkConfirmation of Network 7-10
Connection Type 7-10
Wired settings 7-10
Wireless (Infrastructure) 7-11
Wireless (Access Point) 7-11
User ControlUser Authentication 7-12
User Registration 7-12
Function Limit Setting 7-12
Account Limit Setting 7-12
User Count Display 7-12
User Count Reset 7-12
A Warning when Login Fails 7-12
Disable Print by Inv. User 7-12
Device ControlPaper Weight 7-13
Fusing Cleaning 7-13
Plain Paper Settings 7-13
Status Light Setting 7-13
Error Light Setting 7-13
Blink Setting for Received Data 7-13
Operation SettingAuto Clear 7-14
Disable Display Timeout 7-14
Language Setting 7-14
Message Time 7-14
Key Touch Sound 7-14
Keys Touch Sound At Initial Point 7-14
Key Press Time 7-14
Disable Auto Key Repeat 7-14
Disable Paper Size Set 7-14
Energy SaveAuto Power Shut-Off 7-15
Auto Power Shut-Off Timer 7-15
Preheat Mode 7-15
Enter Auto Power Shut-Off after the Remote Job
7-15
Toner Save Mode (Copy) 7-15
Toner Save Mode (Print) 7-15
List PrintFax Settings 7-15
Inbound Routing 7-15
User Usage List 7-15
Activity Report 7-15
Junk Fax # List 7-15
User Info. Print 7-15
Auto CalibrationAuto Calibration 7-16
Security SettingsIPsec Settings 7-16
Initialize Private Data and Data in Machine
7-16
Program name PageCopier
ID Card Setting 7-17
Card Shot Default 7-17
Default Tray Set 7-17
Default Exposure 7-17
Sort Auto Select 7-17
Limit Of Copies 7-17
Program name PagePrinter
Notice Page 7-17
Program name Page

7-5
SYSTEM SETTINGS►SYSTEM SETTINGS LIST
Programs for Fax Mode Programs for Scanner Mode
Program name Page
Fax
List Setting
Print Selection 7-18
Auto Listing 7-18
Initial Setting
Dial Mode 7-19
Pause Time 7-19
Own Passcode Set 7-19
Set Volume 7-19
TX/RX End Sound 7-19
End Sound Length 7-19
Distinctive Ring 7-19
Remote Reception 7-19
Disable Fax Print Hold 7-19
Sending Function
Orig. Size Enter 7-20
Set Res. Con. 7-20
Send Mode 7-20
Quick On Line TX 7-20
Print Station # In Rcvd Data 7-20
Address Review 7-20
Recall Setting (Busy) 7-20
Recall Set (Err) 7-20
Ring Timeout In Auto TX 7-20
Rcv. Function
#Of Rings At. RX 7-21
#Of Rings Man.RX 7-21
Tray Selection 7-21
Received Data Print Condition 7-21
Auto Rcv Reduce To Regular Size 7-21
Duplex Reception 7-21
FW. RX Data 7-22
Received Data FW. Station Set 7-22
Anti Junk Fax 7-22
Enter Junk Fax # 7-22
Polling Security
Polling Security 7-22
Polling Passcode # Mode 7-22
Program name Page
Scanner 7-23
Disable USB Scan 7-23
New Default 7-23

7-6
SYSTEM SETTINGS►SYSTEM SETTINGS LIST
Administrator settings menuThe system settings are accessed via the following menu structure.Refer to this menu when enabling or disabling the settings that are explained beginning on page 7-10.Some settings contain an additional level of settings (a settings screen).
Level 1 Level 2 Level 3
Change Admin PIN
Initial Setting Date & Time Set
Daylight Saving Time
Copier ID Card Setting
Card Shot Default
Default Tray Set
Default Exposure
Sort Auto Select
Limit Of Copies
Printer Notice Page
Scanner Disable USB Scan
New Default
Fax List Setting Print SelectionAuto Listing
Initial Setting Dial ModePause TimeOwn Passcode SetSet VolumeTX/RX End SoundEnd Sound LengthDistinctive RingRemote ReceptionDisable Fax Print Hold
Sending Function Orig. Size EnterSet Res. Con.Send ModeQuick On Line TXPrint Station # In Rcvd DataAddress ReviewRecall Setting (Busy)Recall Set (Err)Ring Timeout In Auto TX
Adm
inis
trat
or P
IN c
ode
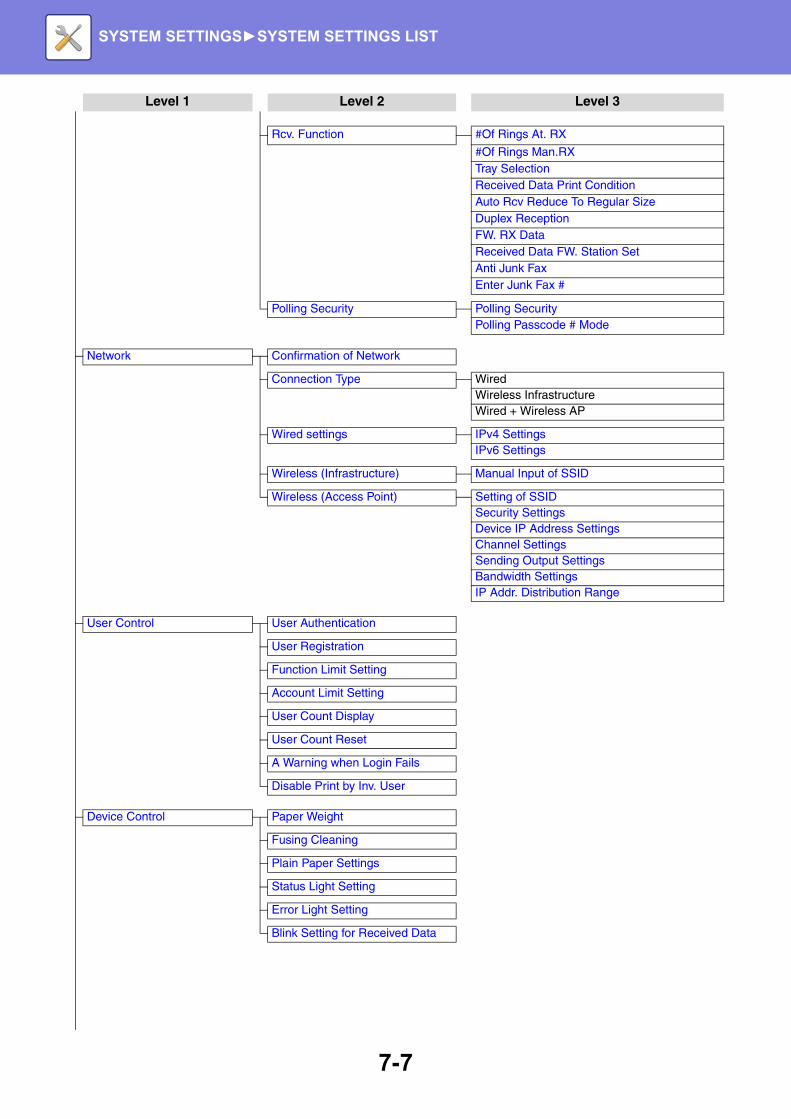
7-7
SYSTEM SETTINGS►SYSTEM SETTINGS LIST
Rcv. Function #Of Rings At. RX
#Of Rings Man.RXTray SelectionReceived Data Print ConditionAuto Rcv Reduce To Regular SizeDuplex ReceptionFW. RX DataReceived Data FW. Station SetAnti Junk FaxEnter Junk Fax #
Polling Security Polling SecurityPolling Passcode # Mode
Network Confirmation of Network
Connection Type WiredWireless InfrastructureWired + Wireless AP
Wired settings IPv4 SettingsIPv6 Settings
Wireless (Infrastructure) Manual Input of SSID
Wireless (Access Point) Setting of SSIDSecurity SettingsDevice IP Address SettingsChannel SettingsSending Output SettingsBandwidth SettingsIP Addr. Distribution Range
User Control User Authentication
User Registration
Function Limit Setting
Account Limit Setting
User Count Display
User Count Reset
A Warning when Login Fails
Disable Print by Inv. User
Device Control Paper Weight
Fusing Cleaning
Plain Paper Settings
Status Light Setting
Error Light Setting
Blink Setting for Received Data
Level 1 Level 2 Level 3
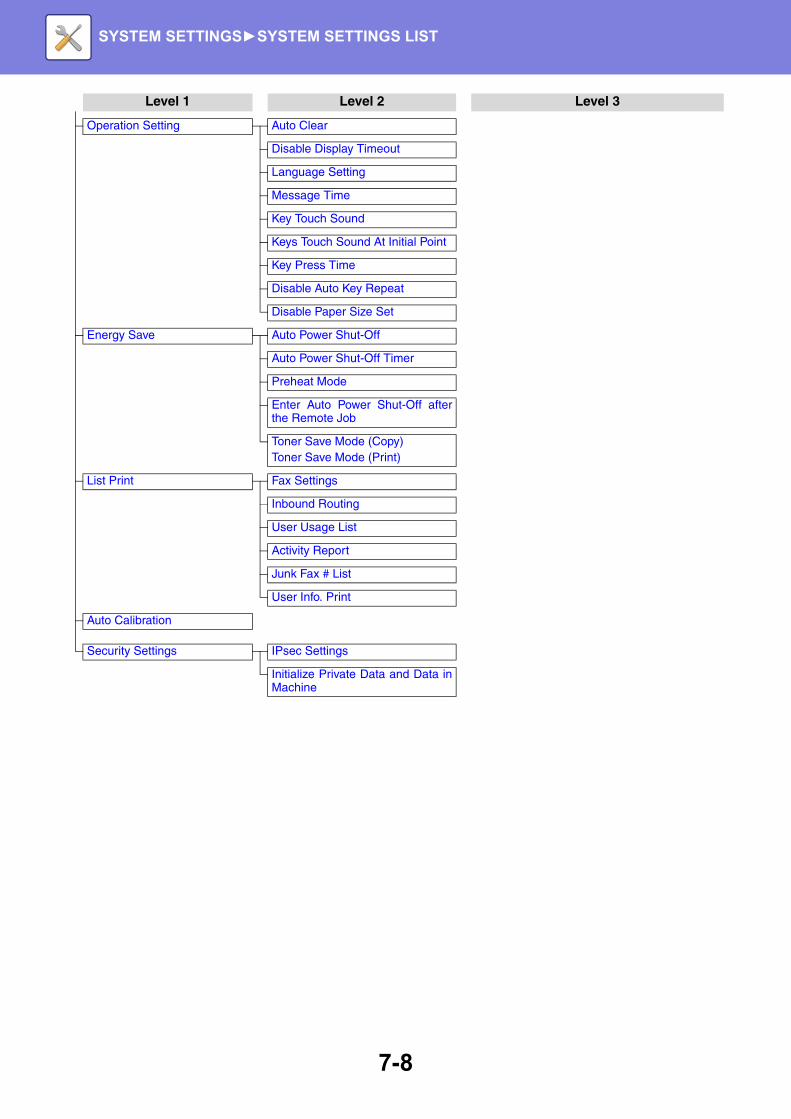
7-8
SYSTEM SETTINGS►SYSTEM SETTINGS LIST
Operation Setting Auto Clear
Disable Display Timeout
Language Setting
Message Time
Key Touch Sound
Keys Touch Sound At Initial Point
Key Press Time
Disable Auto Key Repeat
Disable Paper Size Set
Energy Save Auto Power Shut-Off
Auto Power Shut-Off Timer
Preheat Mode
Enter Auto Power Shut-Off afterthe Remote Job
Toner Save Mode (Copy)Toner Save Mode (Print)
List Print Fax Settings
Inbound Routing
User Usage List
Activity Report
Junk Fax # List
User Info. Print
Auto Calibration
Security Settings IPsec Settings
Initialize Private Data and Data inMachine
Level 1 Level 2 Level 3

7-9
SYSTEM SETTINGS►USING THE SYSTEM SETTINGS
USING THE SYSTEM SETTINGS
1Press the [SPECIAL FUNCTION] key.
2Select "System Settings" with the [ ] or [ ] key and press the [OK] key.
3Enter the administrator PIN code with the numeric keys.• " " appears for each digit that you enter.• The mode selection screen appears.
4Select the desired mode with the [ ] or [ ] key.
5Press the [OK] key.
6Select the desired setting with the [ ] or [ ] key.
7Press the [OK] key and follow the instructions in the setting screen.Several settings will have checkboxes in front of them. To enable a function (make a checkmark appear), press the [OK] key. To disable the setting, press the [OK] once again to remove the checkmark. To configure a setting that has a checkbox, go to step 8.
8To use another setting for the same mode, select the desired setting with the [ ] or [ ] key.To use a setting for a different mode, press the [BACK] key and select the desired mode. To exit the system settings, press the [CA] key.
Enter adminPIN Code.
Admin PIN Code:
PINInitial SettingCopierPrinter
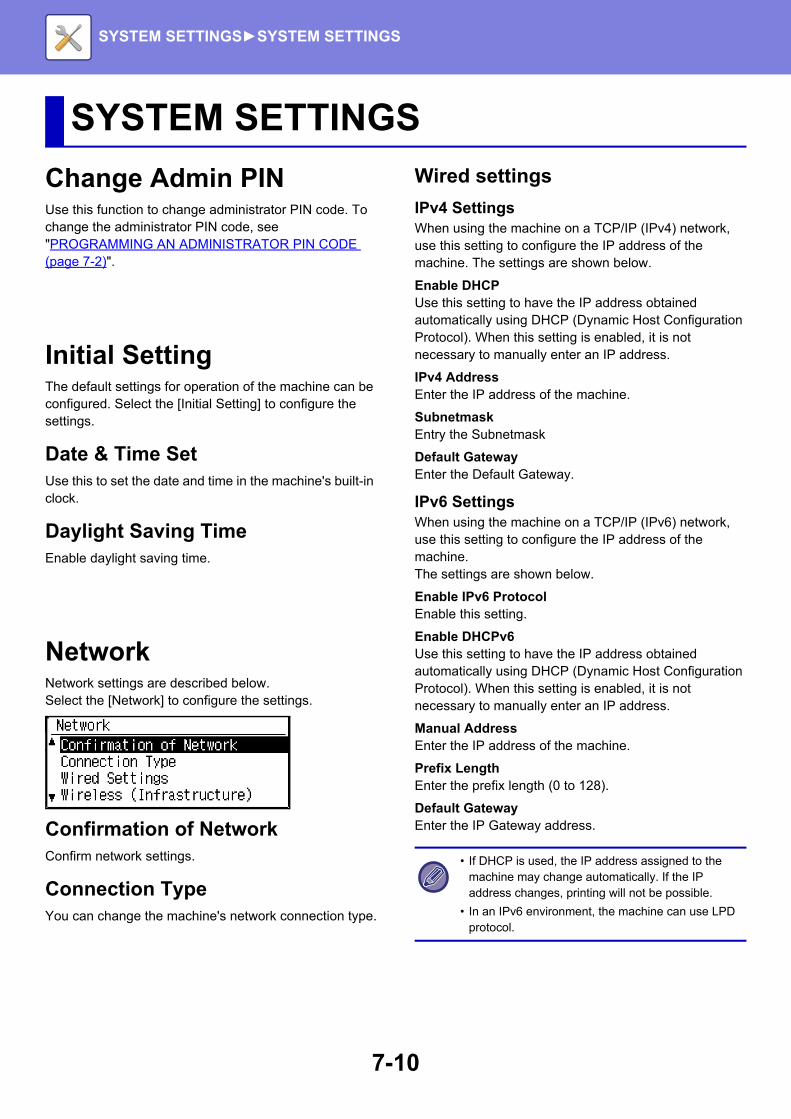
7-10
SYSTEM SETTINGS►SYSTEM SETTINGS
Change Admin PINUse this function to change administrator PIN code. To change the administrator PIN code, see "PROGRAMMING AN ADMINISTRATOR PIN CODE (page 7-2)".
Initial SettingThe default settings for operation of the machine can be configured. Select the [Initial Setting] to configure the settings.
Date & Time SetUse this to set the date and time in the machine's built-in clock.
Daylight Saving TimeEnable daylight saving time.
NetworkNetwork settings are described below.Select the [Network] to configure the settings.
Confirmation of NetworkConfirm network settings.
Connection TypeYou can change the machine's network connection type.
Wired settings
IPv4 SettingsWhen using the machine on a TCP/IP (IPv4) network, use this setting to configure the IP address of the machine. The settings are shown below.
Enable DHCPUse this setting to have the IP address obtained automatically using DHCP (Dynamic Host Configuration Protocol). When this setting is enabled, it is not necessary to manually enter an IP address.
IPv4 AddressEnter the IP address of the machine.
SubnetmaskEntry the Subnetmask
Default GatewayEnter the Default Gateway.
IPv6 SettingsWhen using the machine on a TCP/IP (IPv6) network, use this setting to configure the IP address of the machine.The settings are shown below.
Enable IPv6 ProtocolEnable this setting.
Enable DHCPv6Use this setting to have the IP address obtained automatically using DHCP (Dynamic Host Configuration Protocol). When this setting is enabled, it is not necessary to manually enter an IP address.
Manual AddressEnter the IP address of the machine.
Prefix LengthEnter the prefix length (0 to 128).
Default GatewayEnter the IP Gateway address.
SYSTEM SETTINGS
• If DHCP is used, the IP address assigned to the machine may change automatically. If the IP address changes, printing will not be possible.
• In an IPv6 environment, the machine can use LPD protocol.

7-11
SYSTEM SETTINGS►SYSTEM SETTINGS
Wireless (Infrastructure)(Only on models with wireless LAN)
This sets connection using wireless infrastructure mode.
Manual Input of SSIDEnter up to 32 half-width characters for the SSID.
• Security TypeSelect the security type. (none/WEP/WPA/WPA2-mixed Personal/WPA2 Personal)
• Setting of EncryptSelect the encryption method based on the "Setting of Security Type" setting.(none, WEP, AES/TKIP, AES)
• Security Key SettingsSet the security key used for wireless connection.
Wireless (Access Point)(Only on models with wireless LAN)
This sets connection using wireless access point mode.
Setting of SSIDEnter up to 32 half-width characters for the SSID.
Security Settings
• Security TypeSelect the security type. (none/WEP/WPA/WPA2-mixed Personal/WPA2 Personal)
• Setting of EncryptSelect the encryption method based on the "Setting of Security Type" setting.(none, WEP, AES/TKIP, AES)
• Security Key SettingsSet the security key used for wireless connection.
Device IP Address SettingsSet the IP address of the access point.
Channel SettingsSet the channel used for the access point.
Sending Output SettingsSet the transmission output of the access point.
Bandwidth SettingsSet the frequency band of the access point.
IP Addr. Distribution RangeSet the lease range and lease period of the IP address used for the access point.
WEP 5 half-width numeric digits, 10 hexadecimal (64 bit) digits, 13 half-width numeric digits, or 26 hexadecimal (128 bit) digits
WPA/WPA2-mixedPersonal
8 to 63 half-width numeric digits or 64 hexadecimal digits
WPA2Personal
WEP 5 half-width numeric digits, 10 hexadecimal (64 bit) digits, 13 half-width numeric digits, or 26 hexadecimal (128 bit) digits
WPA/WPA2-mixedPersonal
8 to 63 half-width numeric digits or 64 hexadecimal digits
WPA2 Personal
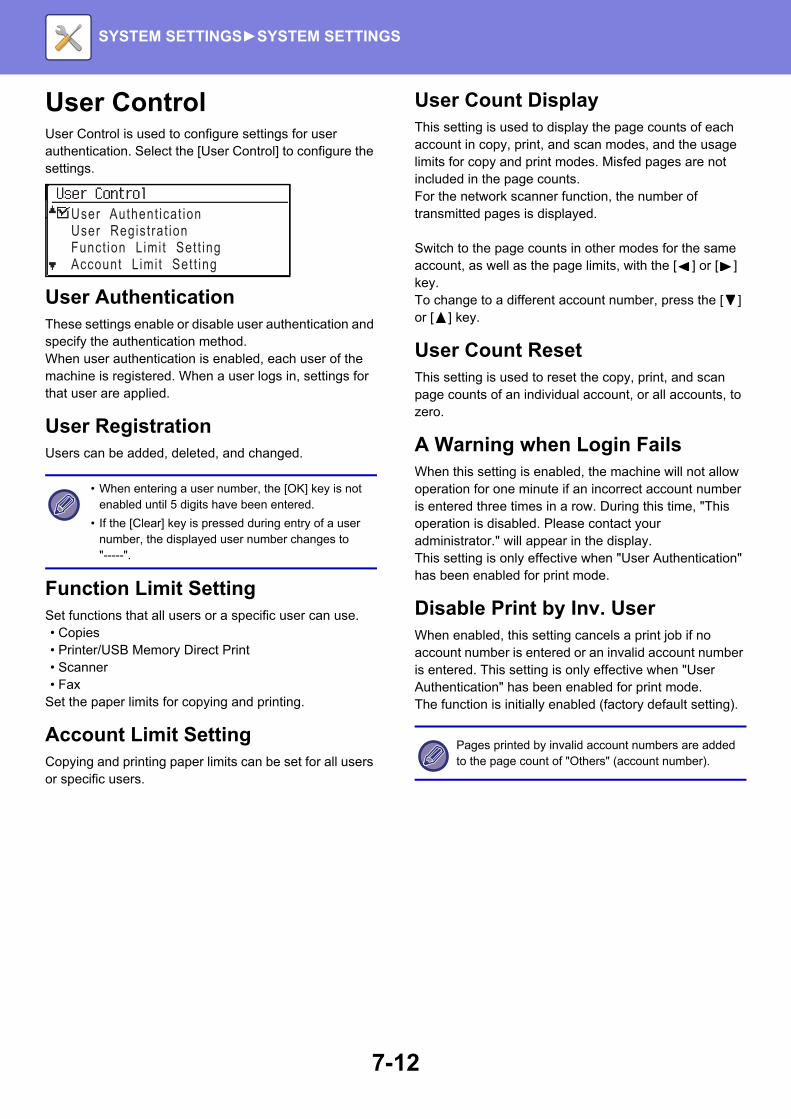
7-12
SYSTEM SETTINGS►SYSTEM SETTINGS
User ControlUser Control is used to configure settings for user authentication. Select the [User Control] to configure the settings.
User AuthenticationThese settings enable or disable user authentication and specify the authentication method. When user authentication is enabled, each user of the machine is registered. When a user logs in, settings for that user are applied.
User RegistrationUsers can be added, deleted, and changed.
Function Limit SettingSet functions that all users or a specific user can use.• Copies• Printer/USB Memory Direct Print• Scanner• Fax
Set the paper limits for copying and printing.
Account Limit SettingCopying and printing paper limits can be set for all users or specific users.
User Count DisplayThis setting is used to display the page counts of each account in copy, print, and scan modes, and the usage limits for copy and print modes. Misfed pages are not included in the page counts.For the network scanner function, the number of transmitted pages is displayed.
Switch to the page counts in other modes for the same account, as well as the page limits, with the [ ] or [ ] key.To change to a different account number, press the [ ] or [ ] key.
User Count ResetThis setting is used to reset the copy, print, and scan page counts of an individual account, or all accounts, to zero.
A Warning when Login FailsWhen this setting is enabled, the machine will not allow operation for one minute if an incorrect account number is entered three times in a row. During this time, "This operation is disabled. Please contact your administrator." will appear in the display.This setting is only effective when "User Authentication" has been enabled for print mode.
Disable Print by Inv. UserWhen enabled, this setting cancels a print job if no account number is entered or an invalid account number is entered. This setting is only effective when "User Authentication" has been enabled for print mode.The function is initially enabled (factory default setting).
• When entering a user number, the [OK] key is not enabled until 5 digits have been entered.
• If the [Clear] key is pressed during entry of a user number, the displayed user number changes to "-----".
User Authent icat ionUser Regist rat ionFunct ion L imi t Set t ingAccount L imi t Set t ing
Pages printed by invalid account numbers are added to the page count of "Others" (account number).

7-13
SYSTEM SETTINGS►SYSTEM SETTINGS
Device ControlThese settings are used to configure settings for hardware functions of the machine. To access one of these settings, select "Device Control" in the mode selection screen, select the desired setting in the device control screen, and press the [OK] key.
Paper WeightThe temperature of toner fusing is controlled according to the weight of the paper that is used.Apply this setting to plain, recycled, punched, pre-printed, letter head, colour, and user type paper.Select from 60g/m2 - 79g/m2 and 80g/m2 - 105g/m2.
Fusing CleaningUse this function to clean the machine's fusing unit when dots or other dirt appear on the printed side of the paper. When this function is executed, "V" printed paper is output and the fusing unit is cleaned.
Plain Paper SettingsIn this machine, paper type is divided between plain paper 1 and plain paper 2.When printing on plain paper with a printer driver that is not compatible with plain paper 1 and plain paper 2, you can set which paper type to use for printing
Status Light SettingSet the operation of the data notification indicator on the machine. Select from "Pattern 1", "Pattern 2", or "Not Use". For explanations of the patterns, refer to Data notification indicator and error indicator (page 1-10).
Error Light SettingSet the operation of the error indicator when an error occurs on the machine. Select whether the indicator lights or blinks depending on the error status, only blinks, or is not used.
Blink Setting for Received DataSet whether the data notification indicator blinks when fax data has been received or received data is held.
• Be sure to use only paper that is in the same weight range as the weight range set here. Do not mix in other standard paper that differs from the set range.
• When settings are changed, the changes will take effect after the machine is restarted. To restart the machine, see TURNING ON THE POWER (page 1-11).
If improvement is not noticed after the first time you use the function, try executing the function again.
Paper Weight
Plain Paper Settings

7-14
SYSTEM SETTINGS►SYSTEM SETTINGS
Operation SettingThese settings are used to configure various settings related to the operation panel. To access one of these programs, select "Operation Setting" in the mode selection screen, select the desired setting in the operation setting screen, and press the [OK] key.
Auto ClearThis function returns the copy settings to the default settings if the operation panel is not used for the duration of time set with this setting following the end of a copy job. Time selections are "0 sec.", "10 sec.", "20 sec.", "60 sec.", "90 sec." and "120 sec.".The factory default setting is 60 seconds.
Select the desired time with the [ ] or [ ] key.If you do not want auto clear to operate, select "0".
Disable Display TimeoutThis setting is used to select whether or not the display will automatically return to the base screen if no keys are pressed on the operation panel for the time set in the above "Auto Clear" function setting in scan or fax mode.The factory default setting is automatic return to the base screen.
Language SettingThis setting is used to select the display language.
Message TimeThis setting is used to set the length of time that messages appear in the display (this applies to messages that appear for a certain length of time and then automatically disappear.) Select from "Short (3 sec.)", "Normal (6 sec.)", or "Long (9 sec.)".The factory default setting is "Normal (6 sec.)".
Key Touch SoundThis setting is used to set the length of the key touch sound that is heard each time a key is pressed.The initial factory setting is "Short".Select the desired length with the [ ] or [ ] key.To turn the key touch sound off, select "Off".
Keys Touch Sound At Initial PointThis setting is used to select whether or not a beep will sound at preset base settings as you press a key to select a setting.The factory default setting is no beep.
Key Press TimeThis setting is used to set the duration of time that a key must be pressed to take effect.A longer setting can be selected to prevent keys pressed accidentally from taking effect. Keep in mind, however, that when a longer setting is selected more care is required when pressing keys to ensure that the key input is registered.The initial factory setting is "Minimum".
Disable Auto Key RepeatThis setting is used to stop a setting from changing continuously when the [ ] or [ ] key is held down, such as when setting the zoom ratio or the original size (auto key repeat will not operate). When this setting is enabled, a key must be pressed repeatedly instead of holding it down.Auto key repeat is initially set to operate (factory default setting).
Disable Paper Size SetThis setting is used to disable "Paper Size Set" in the Special Modes menu. When disabled, "Paper Size Set" cannot be used when the [Special Function] key is pressed, which prevents users other than the administrator from easily changing the paper size setting."Disable Paper Size Set" is initially disabled (factory default setting).
The Auto Clear function is disabled when scanned data is stored under the following status: When the last page has not been scanned during the 2-Up or 4-Up copy process (one page has been scanned for a two-page set or three pages have been scanned in a four-page set), or only one side has been scanned in the ID card copy process.

7-15
SYSTEM SETTINGS►SYSTEM SETTINGS
Energy SaveThese settings are used to configure energy saving settings. To access one of these settings, select "Energy Save" in the mode selection screen, and select the desired setting in the energy save screen, and then press the [OK] key.
Auto Power Shut-OffThis setting is used to enable auto power shut-off mode, which automatically turns off the power to the fusing unit if the operation panel is not used for a certain duration of time.Enabling auto power shut-off mode helps conserve energy, preserve natural resources, and reduce environmental pollution.The function is initially enabled.
Auto Power Shut-Off TimerThis setting is used to set the duration of time until auto power shut-off mode activates when the operation panel is not used. Using this function helps conserve energy, preserve natural resources, and reduce environmental pollution."1 min.", "3 min.", "5 min.", "10 min.", "15 min.", "30 min.", "45 min.", "60 min.", "75 min.", "90 min.", "105 min." or "120 min." can be selected for the duration of time. Select a setting that suits your work conditions.The factory default setting is 1 minute.
Preheat ModeThis setting is used to set the duration of time until preheat mode, which automatically lowers the fusing unit temperature, activates when the operation panel is not used. Using this function helps conserve energy, preserve natural resources, and reduce environmental pollution. "1 min.", "3 min.", "5 min.", "10 min.", "15 min.", "30 min.", "45 min.", "60 min.", "75 min.", "90 min.", "105 min." or "120 min." can be selected for the duration of time. Select a setting that suits your work conditions.The factory default setting is 1 minute.
Enter Auto Power Shut-Off after the Remote JobThis function works in Auto Power Shut-Off mode. When the machine completes a print job received from the PC or outputs received fax data, the machine immediately returns to the Auto Power Shut-Off mode.
Toner Save Mode (Copy)
Toner Save Mode (Print)You can reduce the amount of toner used for copying/printing.
List PrintThis is used to print lists and reports that are only for use by the administrator of the machine.Select [List Print] to choose the list and the report you want to print.
Rather than disabling the auto power shut-off feature, it is recommended that you first try lengthening the time set in "Auto Power Shut-Off Timer" (see below). In most cases a suitable timer setting will allow work to proceed with minimal delay and still enable you to enjoy the benefits of power conservation.
Toner Save Mode (Print) is only effective when the machine's printer driver is not used. When the printer driver is used, the printer driver setting takes precedence. This function may not operate in some applications and operating systems.
Fax Settings Shows the current state of the system settings, as well as the sender name, sender number, polling passcode numbers, and forwarding numbers.
Inbound Routing
Shows the inbound routing settings for routing received faxes on your network.
User Usage List Shows the communication time and number of pages transmitted by each user.
Activity Report Shows a log of past communication performed on the machine (date of communication, name of other party, time required, result, etc.).
Junk Fax # List Shows the stored fax numbers from which reception in Anti Junk Fax (page 7-22) is blocked.
User Info. Print The user name, user number, paper used, paper limits, and function permission settings can be printed for each user.

7-16
SYSTEM SETTINGS►SYSTEM SETTINGS
Auto CalibrationIf the print tones are off, you can correct the tones. By scanning the printed test pattern, tones can be automatically corrected.
After the [OK] is selected and a test patch is printed, a message appears prompting you to begin automatic calibration. Place the test patch on the document glass as shown below (so that the light patch at the edge of the page is to the left).
Lay copy paper (about five sheets) that is the same size as the test patch on top of the placed test patch, gently close the automatic document feeder, and select the [OK].
Security SettingsThe following settings are related to security.Select the [Security Settings] to configure the settings.
IPsec SettingsIPsec can be used for data transmission/reception on a network.
IKEv1 SettingsConfigure the IKEv1 settings.
Enable IPsecSpecify whether or not IPsec is used for transmission.
IKEv1 SettingsConfigure the IKEv1 settings.
Pre-Shared KeyEnter the Pre-Shared Key to be used for IKEv1.
SA Lifetime (time)Set the SA lifetime.
IKE LifetimeSet the IKE lifetime.
Initialize Private Data and Data in MachineThe system-set values can be restored to the factory default state after eliminating the data stored in the machine.
• All information displayed in the fax status• Image data in memory boxes• Unsent fax data• Current values set for system settings• Current values set for network settings• User information > User registration information• User information > Paper limits• User information > Function usage restrictions• User information > User counts
(Excluding default users)• Fax / scanner addresses• Groups• User index (scanner)• Programs• Auto forwarding of received faxes• Public box data• Sender information• Reception rejection numbers• Forwarding information• Product key
If the tones are still off after "Auto Calibration" is performed, repeating Auto Calibration may provide improvement.
Align the upper left corner of the original with the mark.

7-17
SYSTEM SETTINGS►SYSTEM SETTINGS
CopierThese settings are used to enable various copy functions. To access one of these programs, select "Copier" in the mode selection screen, select the desired setting in the copy settings screen, and press the [OK] key.
ID Card SettingThe layout pattern for copying of the ID card can be changed during the ID card copy process.Refer to the illustration in ID CARD COPY (page 2-17) for the available layout patterns.
Card Shot DefaultThis setting is used to set the default dimensions that appear when the card shot size entry screen is displayed.The factory default settings are 3-3/8" (86 mm) for the width (X) and 2-1/8" (54 mm) for the length (Y).Select X or Y and adjust the corresponding default value with the [ ] or [ ] key.
Default Tray SetThis setting is used to set which tray is selected by default.Trays that appear for selection will vary depending on the optional trays that have been installed.The factory default setting is "Tray 1".
Default ExposureThis setting is used to select the original type and exposure mode that is initially selected when the [EXPOSURE] key is pressed.Three exposure modes are available: "Text", "Text/Print Photo" and "Photo".Depending on the settings, set "Auto" or one of five levels for the exposure.Select the original type with the [ ][ ] keys, adjust the exposure if needed with the [ ][ ] keys, and press the [OK] key.
Sort Auto SelectThis setting is used to select the default output mode when the document feeder is used for copying.The initial factory setting is "Sort".
Limit Of CopiesThis setting is used to set the limit for the number of copies that can be set (and that can appear in the display) for one copy job.The factory default setting is "999 copies".
PrinterSettings related to the printer function can be configured.Select the [Printer] to configure the settings.
Notice PageSet whether a notice page is printed when printing does not take place due to an error such as memory full.

7-18
SYSTEM SETTINGS►SYSTEM SETTINGS
FaxSystem settings for the fax function are explained below.
List SettingThis setting is used to print lists showing current system settings and other programmed information.Select the [List Setting] to configure the settings.
Print SelectionThis setting is used to select the conditions for printing out transaction reports for normal transmission,broadcast transmission, original print and reception.
Normally the settings indicated by shading above are selected."Transmission", "Broadcast", "Original Image Print Setting", or "Reception" can be selected.• If you selected "Transmission", select "Always Prints",
"Error Only", or "Never Prints".• If you selected "Broadcast", select "Always Prints",
"Error Only", or "Never Prints".• If you selected "Original Image Print Setting", select
"Always Prints", "Error Only", or "Never Prints".• If you selected "Reception", select "Always Prints",
"Error Only", or "Never Prints".
Auto ListingThis setting is used to have the activity report that is stored in the machine's memory printed out at regular intervals.You can choose to have the report automatically printed each time the number of stored transactions exceeds 50, or have the report printed at a specified time every day (only once per day). You can also enable both print methods.The report is normally set to not print out. To have the report automatically printed when the number of stored transactions (the combined total of transmissions and receptions) exceeds 50, select "Auto Print Rept At Limit(50)".To have the report printed at a specified time, enable "Print Time Set" and enter the desired time.• The setting is enabled and a checkmark appears in
the checkbox.• If this procedure is performed when the setting is
enabled, the checkmark will be cleared and the setting disabled.
Transmission BroadcastOriginal ImagePrint Setting
Always Prints Always Prints Always Prints
Error Only Error Only Error Only
Never Prints Never Prints Never Prints
Reception
Always Prints
Error Only
Never Prints
"Original Image Print Setting" is used to have part of the first page of the transmitted document printed on the transaction report. This setting is not effective when the transaction report is set to not print out.
• To cancel a "Print Time Set" setting, select "Cancel":
• Select "Cancel" with the [ ] or [ ] key and then press the [OK] key.
• If "Auto Print Rept At Limit(50)" is not enabled and the number of recorded transactions exceeds 50, each new transaction will delete the oldest transaction.
• The activity report can also be printed out on demand. (See PRINTING LISTS OF PROGRAMMED INFORMATION AND SETTINGS (page 4-45).)

7-19
SYSTEM SETTINGS►SYSTEM SETTINGS
Initial SettingThese settings are used to change the default settings (initially set at the factory) for the various fax functions to settings that better meet your needs.Select the [Initial Setting] to configure the settings.
Dial ModeThis setting is used to set the appropriate dial mode forthe line connected to the machine. Select tone for a tone dial line or pulse for a pulse dial line.
Pause TimeThis setting is used to select the duration of pauses that are inserted in destination fax numbers.Normally the setting is 2 seconds, which means that each time the [PAUSE] key is pressed when dialing or storing a fax number, a pause of 2 seconds is inserted.The pause time can be set to any number of seconds from 1 to 15.
Own Passcode SetUse this setting to setting the fax number of the machine and the name of the user. The programmed name and number are printed at the top of each fax page you send. The number is also used as a passcode when performing polling reception SENDING OPTIONS (page 4-32)".You can check your programmed name and number by printing out the List Print (page 7-15)A maximum of 20 digits can be stored for the fax number.• A maximum of 18 letters can be stored for the name.
Set VolumeThis setting is used to adjust the on-hook volume, the ringing volume, the line monitor volume, the TX/RX end sound volume, and the original scanning end sound volume.• "High", "Middle" or "Low" can be selected for the on
hook volume.• "High", "Middle", "Low" or "Off" can be selected for
volumes other than the on hook volume.
TX/RX End SoundThis setting is used to select the beep pattern that signals the end of transmission or reception. "Pattern 1", "Pattern 2" or "Pattern 3" can be selected.Before pressing the [OK] key to store your selection, you can press the key to listen to the selected pattern.
End Sound LengthThis setting is used to select the length of the end sound in seconds. Selections are "2.0 sec", "2.5 sec", "3.0 sec", "3.5 sec", and "4.0 sec". "3.0 sec" is normally selected.
Distinctive RingIf multiple telephone numbers have been assigned to your telephone line, the number called can be identified by its ringing pattern. By using one number for voice calls and another number for faxes, you can tell which type of call you are receiving by the ringing pattern. You can set your machine to automatically receive faxes when your fax number is called by setting the pattern that corresponds to your fax number. Normally "Off" is selected.
Remote Reception(Only when an extension phone is connected)
When a call is received on an extension phone connected to the machine, fax reception can be activated by entering a 1-digit number and pressing twice on the phone's keypad. This 1-digit number is called the remote reception number, and you can set it to any number from "0" to "9". Normally the remote reception number is set to "5".
Disable Fax Print HoldThis setting is used to disable the fax print hold function, which holds received faxes in memory instead of printing them as they are received. ►page 4-28Normally the fax print hold function is disabled.• The setting (which disables fax print hold) is enabled
and a checkmark appears in the checkbox.• If this procedure is performed when the setting is
enabled, the checkmark will be cleared and the setting disabled (fax print hold is enabled).
To clear the programmed fax number and name, follow these steps:(1) Select "Delete" and then press the [OK] key.(2) Select "Delete" with the [ ] or [ ] key and then
press the [OK] key.
Item Factory default setting
On Hook Volume Middle
Ringer Volume Low
Line Monitor Vol Off
TX/RX End Volume Low
Scan End Volume Middle
If a remote number has been previously stored, the newly entered remote number overwrites the old number.

7-20
SYSTEM SETTINGS►SYSTEM SETTINGS
Sending FunctionThese settings are used to change the default settings (initially set at the factory) for the various fax transmission functions to settings that better meet your needs.Select the [Sending Function] to configure the settings.
Orig. Size EnterSet the size of originals scanned on the document glass. Normally 8-1/2" x 11" is set.
Set Res. Con.This setting is used to adjust the resolution and the exposure level when scanning an original to be faxed. The initial setting is standard resolution and auto exposure mode.
Send ModeThis setting is used to select whether the default mode for sending faxes is memory transmission or direct transmission. The initial setting is "Memory TX".
Quick On Line TXThis setting is used to select whether or not quick on-line transmission (transmission while original pages are being scanned into memory) takes place when a memory transmission is performed.If quick on-line transmission is disabled, transmission will not begin until all original pages have been scanned into memory.Normally quick on-line transmission is enabled.When this function is disabled, transmission will not begin until all pages of the document have been scanned. Note that this setting does not apply to manual transmission. (See Storing transmission jobs (memory transmission) (page 4-17).)• Quick on-line is enabled and a checkmark appears in
the checkbox.• If this procedure is performed when quick on-line is
enabled, the checkmark will be cleared and quick on-line disabled.
Print Station # In Rcvd DataThis setting lets you select the position (inside or outside the original image) of the date and sender's information that are printed at the top of each fax page you send. Normally outside the original image is selected. To have your name and number printed inside the original image, select "In Data".For more detailed information on the position of each setting, see INCLUDING SENDER INFORMATION ON FAXES (OWN NUMBER SENDING) (page 4-46).
Address ReviewYou can specify whether a screen appears for confirmation of the destination when sending a fax.
Recall Setting (Busy)This setting is used to set the number of recall attempts and the interval between recall attempts when a transmission is not successful due to the line being busy or other reason.Normally the machine is set to make 2 recall attempts at intervals of 3 minutes.If you do not wish to have recalling take place, set the number of attempts to "0".
Recall Set (Err)When sending a fax, this setting is used to select whether or not the machine will automatically re-attempt the call if the transmission fails due to a line error. Normally the machine is set to make 1 recall attempt at intervals of 3 minutes.If you do not wish to have recalling take place, set the number of attempts to "0".
Ring Timeout In Auto TXWhen sending a fax by automatic transmission (see Storing transmission jobs (memory transmission) (page 4-17)), this setting lets you select the amount of time that the machine waits before breaking the connection when the other machine does not answer your machine's call. If the other machine does not respond within this set time, your machine will automatically break the connection.Time selections are "30 sec.", "45 sec." and "60 sec.".Normally "45 sec." is selected.
When the "Only apply to direct entry" checkbox is selected, the Address Review screen only appears when the fax number is entered with the numeric keys or the [REDIAL] key.
Even if this setting is enabled, the machine will not re-attempt the call when a fax is sent by manual transmission.
• If the recall interval is set to "0", the machine will immediately call again after the connection is broken due to the line error.
• Even if this setting is enabled, the machine will not re-attempt the call when a fax is sent by manual transmission.

7-21
SYSTEM SETTINGS►SYSTEM SETTINGS
Rcv. FunctionThese settings are used to change the default settings (initially set at the factory) for the various fax reception functions to settings that better meet your needs.Select the [Rcv. Function] to configure the settings.
#Of Rings At. RXWhen the reception mode is set to auto, this setting is used to select the number of rings on which the machine automatically receives a call and begins fax reception. (See RECEIVING FAXES (page 4-25).)• Any number of rings from 0 to 15 can be selected.*
Normally "2" is selected.• If you make a mistake, move the cursor to the mistake
with the [ ] [ ] keys and reenter.
#Of Rings Man.RX(This function may not be available in some regions)
You can set the number of rings on which the machine changes to auto reception when there is an incoming fax call in manual reception mode.
Tray SelectionThis setting is used to select which output trays can be used for received faxes. All output trays are initially enabled.• The selected tray is enabled and a checkmark
appears in the checkbox.• If this procedure is performed when the tray is
enabled, the checkmark will be cleared and the tray disabled.
Received Data Print ConditionThis setting determines the selection condition for paper when printing received documents. Select one of the three conditions below. "Reduction" is normally selected.• Reduction
Each received image is printed at actual size when possible. When not possible, the image is automatically reduced before printing.
• DivisionEach received image is printed at actual size.If necessary, the image is split onto multiple sheets of paper.
• Actual SizeThe received fax image is printed at its actual size (without dividing it onto multiple sheets of paper). If the same size of paper or larger paper is not loaded, the fax will be received in memory and will not be printed until a suitable size of paper is loaded.
Auto Rcv Reduce To Regular SizeWhen you receive a fax that includes the sender's name and number, the received image is slightly larger than the standard size*. This setting lets you select whether or not the received image is automatically reduced before printing to fit the standard size. Normally this setting is enabled.*Standard sizes are sizes such as 8-1/2" x 11" and 5-1/2" x 8-1/2".
Duplex ReceptionThis setting is used to select whether or not received faxes are printed on both sides of the paper. When two-sided printing is enabled and a fax that is two pages or longer is received (the pages must be the same size), the fax will be printed on both sides of the paper.Even if the pages are in different orientations, the pages are rotated appropriately to enable printing on both sides of the paper.• The setting is enabled (two-sided printing will take
place) and a checkmark appears in the checkbox.• If the procedure is performed when the setting is
enabled, the checkmark will be cleared and the setting disabled.
• If the number of rings is set to 0, the machine will receive faxes without ringing.
• When the number of rings is set to 14 or 15, reception may not be possible depending on the functions and settings of the other machine.
• The trays that can be enabled will vary depending on the options that are installed.
• The trays cannot all be disabled.
• If this setting is disabled (no reduction) and the received data print condition is set to division, the image may be clipped.
• If auto receive reduce is disabled, an image larger than the standard size will be cut off. However, the image will be clearer because it will be printed at the same size as the original.
7-22
SYSTEM SETTINGS►SYSTEM SETTINGS
FW. RX DataThis setting is used to select whether or not received faxes are forwarded to a fax machine programmed as explained in Received Data FW. Station Set (page 7-22) in the event that the machine cannot print the faxes. The setting is initially disabled.• The setting is enabled and a checkmark appears in
the checkbox.• If the procedure is performed when the setting is
enabled, the checkmark will be cleared and the setting disabled.
Received Data FW. Station SetWhen a problem prevents the machine from printing a received fax, the fax forwarding function ►page 4-47 can be used to forward the received fax to another fax machine. Use this setting to setting the fax number of the destination fax machine. Only one fax number can be programmed (maximum of 50 digits).
Anti Junk FaxWhen this setting is enabled, reception from fax numbers programmed using the "Enter Junk Fax # (page 7-22)" setting will be blocked.This setting is normally disabled.• The setting is enabled and a checkmark appears in
the checkbox.• If this procedure is performed when the setting is
enabled, the checkmark will be cleared and the setting disabled.
Enter Junk Fax #This setting is used to program fax numbers from which you wish to block reception. Up to 50 fax numbers can be stored (maximum of 20 digits each). To block reception from the programmed fax numbers, the "Anti Junk Fax" setting must be enabled.
Polling SecurityThese settings are used for the public box.Select the [Polling Security] to configure the settings.
Polling SecurityWhen performing polling memory (see Restricting polling access (polling security) (page 4-36)), this setting is used to select whether any machine will be allowed to poll your machine, or only machines that have been programmed in your machine. Normally this setting is enabled.• The setting is enabled and a checkmark appears in
the checkbox.• If this procedure is performed when the setting is
enabled, the checkmark will be cleared and the setting disabled.
Polling Passcode # ModeWhen "Polling Security" is enabled, use this setting to program (or delete) the fax numbers of the machines that are allowed to poll your machine. Programmed fax numbers are called passcodes. Up to 10 fax numbers can be programmed. To check the programmed numbers, print the List Print (page 7-15).If you make a mistake, move the cursor to the mistake with the [ ] or [ ] keys and enter the correct number.
This setting only operates when the fax number of the machine that is to receive the forwarded faxes is programmed.
To delete the number, follow these steps:(1) Select "Delete" and then press the [OK] key.(2) Select "Delete" with the [ ] or [ ] key and then
press the [OK] key.
To delete a number, follow these steps: Before deleting a number, use the List Setting (page 7-18) to check the control number that identifies the fax number (01 to 50) that you wish to delete. The control number must be entered to delete the fax number. (The fax number will not appear in the display. If the wrong control number is accidentally entered, a fax number other than the fax number that you wish to delete will be deleted.)(1) Select "Delete" and then press the [OK] key.(2) Select the 2-digit control number (01 to 50) that
identifies the fax number that you wish to delete with the [ ] or [ ] key and then press the [OK] key.
(3) Select "Delete" with the [ ] or [ ] key and then press the [OK] key.
To clear a passcode number, follow these steps:(1) Select "Delete" and then press the [OK] key.(2) Enter the control number that identifies the
number you wish to clear, and then press the [OK] key.
(3) Select "Delete" with the [ ] or [ ] key and then press the [OK] key.

7-23
SYSTEM SETTINGS►SYSTEM SETTINGS
ScannerSystem settings for the scanner function are explained below.Select the [Scanner] to configure the settings.
Disable USB ScanSelect whether or not scanning from a computer and scanning from the machine are disabled when a USB connection is used.Default setting is "No" (disabled).
New DefaultThis is used to change the default settings for the original size, resolution, color mode, and format. (For details, see STORING SCANNING SETTINGS (page 5-11).)• For details on each setting, see the pages below.
"Original Size Enter"►page 5-8"Resolution"►page 5-8"Color mode"►page 5-13"Format"►page 5-13

8-1
WEB FUNCTIONS IN THE MACHINE
ABOUT THE WEB PAGES . . . . . . . . . . . . . . . . . . . 8-2
• HOW TO ACCESS THE WEB PAGE . . . . . . . . 8-2
ABOUT THE WEB PAGES (FOR USERS) . . . . . . . 8-3
CONFIGURING THE PRINTER CONDITION SETTINGS . . . . . . . . . . . . . . . . . . . . . . . . . . . . . . . . 8-4
• HOW TO CONFIGURE THE SETTINGS . . . . . 8-4
• PRINTER CONDITION SETTING MENU . . . . . 8-5
• PRINTER CONDITION SETTINGS. . . . . . . . . . 8-5
CONFIGURING THE SCANNER CONDITION SETTINGS . . . . . . . . . . . . . . . . . . . . . . . . . . . . . . . . 8-7
• STORING DESTINATIONS. . . . . . . . . . . . . . . . 8-7
• BASIC SETTINGS FOR NETWORK SCAN (FOR THE ADMINISTRATOR) . . . . . . . . . . . . . 8-13
ABOUT THE WEB PAGES (FOR THE ADMINISTRATOR). . . . . . . . . . . . . . . . . . . . . . . . . . 8-14
CONFIGURING SMTP, DNS AND LDAP SERVER SETTINGS . . . . . . . . . . . . . . . . . . . . . . . . . . . . . . . . 8-15
PROTECTING INFORMATION PROGRAMMED IN THE WEB PAGE ([Passwords]) . . . . . . . . . . . . . . . 8-16
ADMINISTRATOR SETTINGS. . . . . . . . . . . . . . . . . 8-17
• CONFIGURING A SETTING IN THE ADMINISTRATOR SETTINGS . . . . . . . . . . . . . 8-17
• ADMINISTRATOR SETTINGS . . . . . . . . . . . . . 8-17
E-MAIL STATUS AND E-MAIL ALERT SETTINGS 8-19
• INFORMATION SETUP. . . . . . . . . . . . . . . . . . . 8-19
• SMTP SETUP . . . . . . . . . . . . . . . . . . . . . . . . . . 8-19
• STATUS MESSAGE SETUP. . . . . . . . . . . . . . . 8-20
WEB PAGES
8-2
WEB PAGES►WEB FUNCTIONS IN THE MACHINE
ABOUT THE WEB PAGESThe machine includes a built-in Web server. The Web server is accessed using a Web browser on your computer. The Web pages include both pages for users and pages for the administrator. In the user Web pages, users can monitor the machine, and select printer configuration settings. In the administrator Web pages, the administrator can configure the machine's settings, and passwords. Only the administrator is allowed to configure these settings.
HOW TO ACCESS THE WEB PAGEUse the following procedure to access the Web pages.
WEB FUNCTIONS IN THE MACHINE
1Open the Web browser on your computer.Recommended Web browsers:Internet Explorer: 11 or later (Windows®)Firefox (Windows®), Safari (Mac OS®),Chrome (Windows®):Latest version or immediately previous major release
2In the "Address" field of your Web browser, enter the IP address that has been configured in the machine.When the connection is completed, the Web page will appear in your Web browser.► ABOUT THE WEB PAGES (FOR USERS) (page 8-3)
3When finished, close the Web pages.When you have finished using the Web pages, click the (close) button in the top right corner of the page.

8-3
WEB PAGES►WEB FUNCTIONS IN THE MACHINE
ABOUT THE WEB PAGES (FOR USERS)When you access the user Web pages in the machine, the following page will appear in your browser.A menu frame appears on the left side of the page. When you click an item in the menu, a screen appears in the right frame that allows you to configure settings for that item.
(1) Menu frame
Click a setting in the menu to configure it.
(2) System Information
Shows the current status of the machine and model name.
• Device StatusShows the current status of the machine, paper trays, output trays, toner and other supplies, and page counts.Out of paper and other warnings appear in red.
• Device ConfigurationShows what options are installed.
• Network StatusShows the network status. Information on "General" and "TCP/IP" is shown on the respective pages.
(3) List Print
You can print out the various settings that you have selected.
(4) Condition Settings
Configure basic printer settings and printer language settings.► CONFIGURING THE PRINTER CONDITION
SETTINGS (page 8-4)
(5) Admin Mode
To open the Web pages for the administrator, click here and then enter the administrator's user name and password.► ABOUT THE WEB PAGES (FOR THE
ADMINISTRATOR) (page 8-14) ► PROTECTING INFORMATION PROGRAMMED IN
THE WEB PAGE ([Passwords]) (page 8-16)
(6) Display Language Setting
Select the desired language setting from the pull-down menu.
(6)
(2)(1)
(3)
(4)(5)

8-4
WEB PAGES►WEB FUNCTIONS IN THE MACHINE
CONFIGURING THE PRINTER CONDITION SETTINGSThe printer condition settings allow basic printer settings to be configured. The following items can be set:
• "Default Settings" ►page 8-5: Basic settings that are mainly used when the printer driver is not used.• "PCL Settings" ►page 8-6: PCL symbol set, font, line feed code, and other settings.
HOW TO CONFIGURE THE SETTINGSTo display the Condition Settings screen, click [Condition Settings] in the menu frame.
(1) Condition Settings
This displays the page for configuring the printer condition settings.
(2) Default Settings/ PCL/PS
Select the type of condition settings that you wish to configure.
(3) Settings
The factory default settings are displayed.Change the settings as desired by selecting from drop-down lists. ► PRINTER CONDITION SETTINGS (page 8-5)
(4) Submit
Click to store the Web page settings in the machine.
When the printer driver is used and the same settings are configured both in the printer driver and in the above screens, the settings configured in the printer driver override the settings in the above screens. If a setting is available in the printer driver, use the printer driver to configure the setting.
(2)
(3)
(4)
(1)

8-5
WEB PAGES►WEB FUNCTIONS IN THE MACHINE
PRINTER CONDITION SETTING MENU
PRINTER CONDITION SETTINGSFactory default settings are indicated in bold.
Default Settings
Condition Settings
Default Settings Factory default settings
Orientation Portrait
Default Paper Size Letter
Default Paper Type Plain 1
Default Resolution 600dpi (High Quality)
Disable Blank Page Print
Disable
2-Sided Print 2-Sided (Book)
Fit To Page ON
Condition Settings
PCL Settings Factory default settings
Symbol Set PC-8
Font 0: Courier (internal font)
Line Feed Code CR=CR; LF=LF; FF=FF
PS Settings Factory default settings
Print PS Errors Disable
Item Settings Description
Orientation Portrait, Landscape This sets the orientation of the printed page. Select [Portrait] when the image is longer in the vertical direction, or [Landscape] when the image is longer in the horizontal direction.
Default Paper Size Letter, Invoice, Executive, A4, B5, A5,
Set the default paper size used for printing.
Default Paper Type Plain 1, Plain 2, Letter head, Pre-printed, Pre-punched, Recycled, Color
Set the type of paper used for printing.
Default Resolution 600dpi, 600dpi (High Quality)
Set the printing resolution.
Disable Blank Page Print Enable, Disable When this is specified, blank pages with no print data will not be printed.
2-Sided Print 1-Sided,2-Sided (Book), 2-Sided (Tablet)
When [2-Sided (Book)] is selected, two-sided printing takes place so as to allow binding at the left side. When [2-Sided (Tablet)] is selected, two-sided printing takes place so as to allow binding at the top. (Only for models that support two-sided printing.)
Fit To Page ON, OFF Set whether the printed image is fit to the size of the paper.
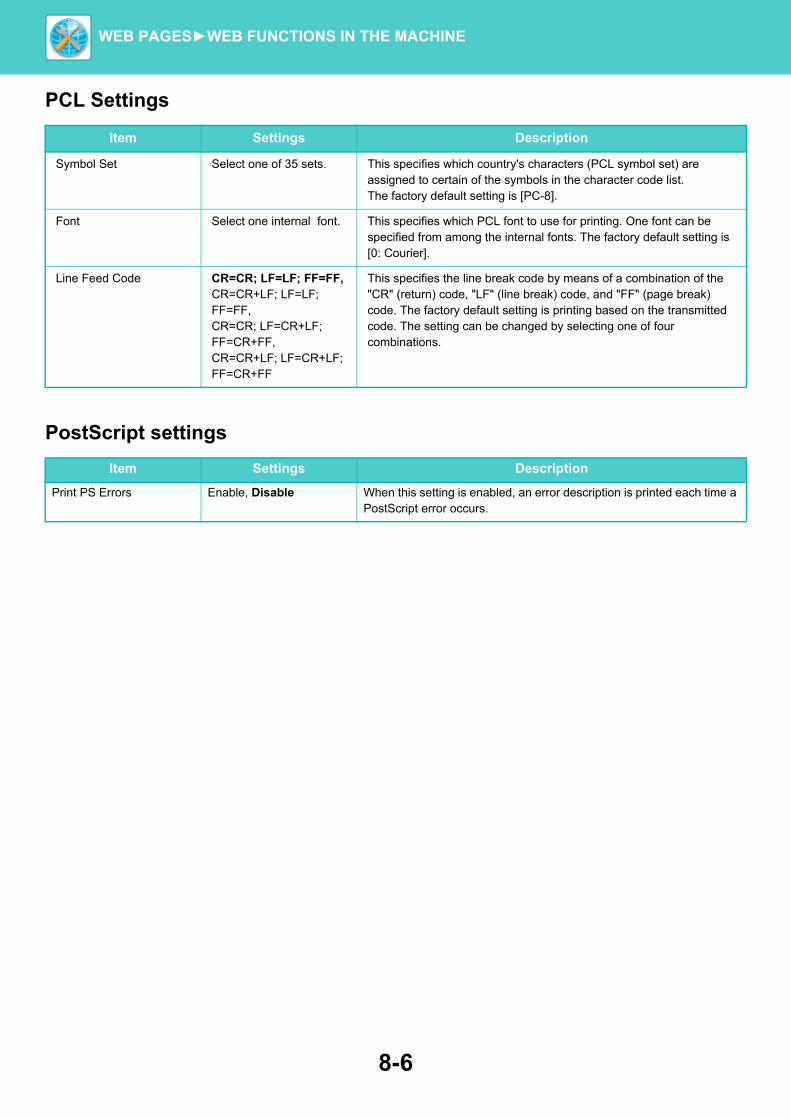
8-6
WEB PAGES►WEB FUNCTIONS IN THE MACHINE
PCL Settings
PostScript settings
Item Settings Description
Symbol Set Select one of 35 sets. This specifies which country's characters (PCL symbol set) are assigned to certain of the symbols in the character code list. The factory default setting is [PC-8].
Font Select one internal font. This specifies which PCL font to use for printing. One font can be specified from among the internal fonts. The factory default setting is [0: Courier].
Line Feed Code CR=CR; LF=LF; FF=FF,CR=CR+LF; LF=LF; FF=FF,CR=CR; LF=CR+LF; FF=CR+FF,CR=CR+LF; LF=CR+LF; FF=CR+FF
This specifies the line break code by means of a combination of the "CR" (return) code, "LF" (line break) code, and "FF" (page break) code. The factory default setting is printing based on the transmitted code. The setting can be changed by selecting one of four combinations.
Item Settings Description
Print PS Errors Enable, Disable When this setting is enabled, an error description is printed each time a PostScript error occurs.

8-7
WEB PAGES►WEB FUNCTIONS IN THE MACHINE
CONFIGURING THE SCANNER CONDITION SETTINGS
STORING DESTINATIONSTo store scanning destinations, click [Destination] in the Web page menu frame. This screen can also be used to edit or delete stored destinations.► Editing and deleting programmed transmission destinations (page 8-12)
A total of 200 destinations* can be stored, including E-mail, Network folder FTP, Desktop, and Group destinations.** Multiple e-mail addresses can be stored as a group (up to 100). Note that this may reduce the maximum number of
destinations (normally 200) that can be stored.
Storing destinations for Scan to E-mailClick [E-mail], and enter the destination information.
For each setting, see the following table.
E-mail destination information
To perform Scan to E-mail, the SMTP server settings must first be established.► CONFIGURING SMTP, DNS AND LDAP SERVER SETTINGS (page 8-15)
Item Description
Name (Required) Enter the name of the destination (up to 36 characters).
Initial (Optional) Enter initial text for the destination (maximum of 10 characters). When the destination list is displayed in the destination control screen, the initial text is used to group the destinations.
Custom Index Names can be assigned to the custom indexes as desired (►page 8-3), allowing convenient grouping of destinations.Drop down list: Select a custom index for the destination to be stored.User checkbox: When this is selected, the destination is stored in the user tab of the
address book. (►page 5-8)
E-mail Address (Required) Enter the e-mail address of the destination (up to 64 characters). If an LDAP server is being used, you can click the [Global Address Search] button to search for an address on the LDAP server.
Click here to store destinations.

8-8
WEB PAGES►WEB FUNCTIONS IN THE MACHINE
Storing destinations for Scan to FTPClick [FTP], and enter the destination information.
For the settings, see the following table.
FTP destination information
* If you entered a host name in "Hostname or IP Address", you will need to enter the DNS server settings.► CONFIGURING SMTP, DNS AND LDAP SERVER SETTINGS (page 8-15)
Item Description
Name (Required) Enter the name of the destination (up to 36 characters).
Initial (Optional) Enter initial text for the destination (maximum of 10 characters). When the destination list is displayed in the destination control screen, the initial text is used to group the destinations.
Custom Index Names can be assigned to the custom indexes as desired (►page 8-3), allowing convenient grouping of destinations.Drop down list: Select a custom index for the destination to be stored.User checkbox: When this is selected, the destination is stored in the user tab of the
address book. (►page 5-8)
Hostname or IP Address (Required)*
Enter the IP address or host name of the FTP server (maximum of 127 characters).
User Name (Optional) Enter the login user name for the FTP server (maximum of 32 characters).
Password (Optional) Enter the login password for the FTP server (maximum of 32 characters).
Directory (Optional) If you wish to specify a destination directory on the FTP server, enter the directory(maximum of 200 characters).
Enable SSL Select this checkbox to use SSL communication.
Use PASV mode Select this checkbox to use PASV mode.

8-9
WEB PAGES►WEB FUNCTIONS IN THE MACHINE
Storing destinations for Network folderClick [Network folder], and enter the destination information.
For the settings, see the following table.
Network folder destination information
* If you entered a host name in "Hostname or IP Address", you will need to enter the DNS server settings.► CONFIGURING SMTP, DNS AND LDAP SERVER SETTINGS (page 8-15)
Item Description
Name (Required) Enter the name of the destination (up to 36 characters).
Initial (Optional) Enter initial text for the destination (maximum of 10 characters). When the destination list is displayed in the destination control screen, the initial text is used to group the destinations.
Custom Index Names can be assigned to the custom indexes as desired (►page 8-3), allowing convenient grouping of destinations.Drop down list: Select a custom index for the destination to be stored.User checkbox: When this is selected, the destination is stored in the user tab of the
address book. (►page 5-8)
Hostname or IP Address (Required)*
Enter the IP address or host name of the network folder (maximum of 127 characters).
User Name (Optional) Enter the login user name for the network folder (maximum of 32 characters).
Password (Optional) Enter the login password for the network folder (maximum of 32 characters).

8-10
WEB PAGES►WEB FUNCTIONS IN THE MACHINE
Storing destinations for Scan to DesktopThe destination for Scan to Desktop is stored by the Sharp Network Scanner Tool Setup Wizard when "Network Scanner Tool" is installed in your computer. For this reason, there is no need to store the Scan to Desktop destination in the Web page. (Network Scanner Tool can be downloaded from the Sharp website.)For information on Scan to Desktop system requirements, installing the Network Scanner Tool, and storing the destination, see the "Sharpdesk installation guide".Normally your computer is stored as the destination by the method indicated above.The following page for storing Scan to Desktop destination information appears when [Destination] is selected in the menu frame, followed by [Desktop]. This page is used mainly by the system administrator in the following circumstance.• When another machine that also has the network expansion kit is added to your network and you wish to send an
image scanned on the new machine to a destination stored on the existing machineSee Editing and deleting programmed transmission destinations (page 8-12) to select the Scan to Desktop destination information that you wish to use on the new machine and enter the displayed information in this screen in the new machine. (When you have completed all entries, click [Submit].)If there are several destinations that you wish to use on the new machine, repeat this procedure as needed.
If the information entered here differs from the information entered on the host computer, transmission/reception will not be possible.For the settings, see the following table.
Scan to Desktop destination information
* If you entered a host name in "Hostname or IP Address", you will need to enter the DNS server settings.► CONFIGURING SMTP, DNS AND LDAP SERVER SETTINGS (page 8-15)
Item Description
Name (Required) Enter the name of the destination (up to 36 characters).
Initial (Optional) Enter initial text for the destination (maximum of 10 characters). When the destination list is displayed in the destination control screen, the initial text is used to group the destinations.
Custom Index Names can be assigned to the custom indexes as desired (►page 8-3), allowing convenient grouping of destinations.Drop down list: Select a custom index for the destination to be stored.User checkbox: When this is selected, the destination is stored in the user tab of the
address book. (►page 5-8)
Hostname or IP Address (Required)*
Enter the IP address or host name of the FTP server (maximum of 127 characters).
Port Number (Required) Enter a port number from 0 to 65535 for the desktop network scanner tool.
Process Directory (Optional)
Enter the destination directory name for the file (maximum of 200 characters). The file will be processed in this directory after it is received.
User Name (Optional) Enter the login user name for the network scanner tool (maximum of 32 characters).
Password (Optional) Enter the login password for the network scanner tool (maximum of 32 characters).
Enable SSL Select this checkbox to use SSL communication.

8-11
WEB PAGES►WEB FUNCTIONS IN THE MACHINE
Storing Groups (Scan to E-mail)You can send a scanned image to multiple e-mail destinations in a single Scan to E-mail operation. If you frequently transmit to a fixed group of destinations, you can store the destinations as a group.
Click [Group(E-mail)], and enter the destination information.
For the settings, see the following table.
Storing a group of destinations
Up to 100 destinations can be stored in one group.
Item Description
Name (Required) Enter a name for the group (up to 36 characters).
Initial (Optional) Enter initial text for the destinations (maximum of 10 characters). When the destination list is displayed in the destination control screen, the initial text is used to group the destinations.
Custom Index Names can be assigned to the custom indexes as desired (►page 8-3), allowing convenient grouping of destinations.Drop down list:Select a custom index for the destination to be stored.User checkbox:When this is selected, the destination is stored in the user tab of the address book. (►page 5-8)
Address(es) (Required) Select the address of each destination from the "E-mail" list box. Programmed e-mail destinations appear in each of the destination lists. To select multiple destinations, click each address while holding down the [Ctrl] key on the keyboard. If you need to cancel an address that has been selected, click the address again while holding down the [Ctrl] key.If an LDAP server is being used, you can click the [Global Address Search] button to search for an address on the LDAP server. Multiple e-mail addresses can be entered. Separate the e-mail addresses with a comma (,), semi-colon (;), space ( ), or colon (:).

8-12
WEB PAGES►WEB FUNCTIONS IN THE MACHINE
Editing and deleting programmed transmission destinationsTo edit or delete programmed destinations, click [Destination] in the menu frame of the Web page.
To edit the selected destination, click [Edit] at the bottom of the Destinations List.The programming screen of the destination selected appears. Edit the information in the same way as you initially stored it.
To delete the selected destination, click [Delete] at the bottom of the Destinations List.
Printing lists of programmed destinationsYou can print lists showing the destinations that have been programmed.The following lists can be printed.• Destination List: Shows the information programmed in e-mail, FTP, desktop, and group destinations.• Print group list: Shows only the information programmed in group (e-mail) destinations.
To print the individual list, click [Sending Address List Print] at the bottom of the destinations list.
To print the group list, click [Print Group List] at the bottom of the destinations list.
If you attempt to delete a programmed destination in the following situations, a warning message will appear and deletion will not be possible.
• The destination is included in a group.If the destination is being used for a current transmission, cancel the transmission or wait until it is completed and then delete the destination. If the destination is included in a group, delete the destination from the group and then delete the destination.

8-13
WEB PAGES►WEB FUNCTIONS IN THE MACHINE
BASIC SETTINGS FOR NETWORK SCAN (FOR THE ADMINISTRATOR)To use the Network Scan function, setting from the Web page is required.Click the menu frame and configure the required settings. A password is required to access this screen.These settings should only be configured by the network administrator.
1Click [Network Scanning] in the menu frame.The Network Scanning setup page appears.
2Select the scanner mode.In the "Enable Scanner Delivery to:" field, click the checkbox so that a checkmark appears in the checkbox.
3Select the method for assigning a file name to a scanned image.Select the method for assigning a file name to a scanned image. In "File Naming", click the items that you wish to use in the file name. "Date & Time" is initially selected.
4Click [Submit].After entering the settings, be sure to click [Submit] to store them.

8-14
WEB PAGES►WEB FUNCTIONS IN THE MACHINE
ABOUT THE WEB PAGES (FOR THE ADMINISTRATOR)In addition to the menus that appear for users, other menus that can only be used by the administrator appear in the administrator Web pages.A menu frame appears on the left side of the page. When you click an item in the menu, a screen appears in the right frame that allows you to configure settings for that item. Settings that can only be configured by the administrator are explained here.
(1) Information
Configure machine identification information for the status & alert E-mail function.► INFORMATION SETUP (page 8-19)
(2) Passwords
To protect the Web site, the system administrator can establish passwords. Enter a password that you would like to establish and click the [Submit] button.One password can be established for the administrator and one password can be established for users.► PROTECTING INFORMATION PROGRAMMED IN
THE WEB PAGE ([Passwords]) (page 8-16)
(3) Administrator Settings
Setting changes can be prohibited and interface settings can be configured.► ADMINISTRATOR SETTINGS (page 8-17)
(4) Status Message
Configure parameters required for sending status messages, such as destination addresses and time schedules.► STATUS MESSAGE SETUP (page 8-20)
(5) Alerts Message
Store destination addresses for alert messages.► ALERTS MESSAGE SETUP (page 8-20)
(6) Security
Unused ports can be disabled for greater security and port numbers can be changed.
(7) Services
Configure information concerning the e-mail , DNS, SNMP, Kerberos and mDNS system.► SMTP SETUP (page 8-19)
(8) Print Port
Configure settings for LPD, Raw, WSD and FTP print.
(9) LDAP
Configure settings for LDAP.
(1)(2)
(4)(5)
(6)
(3)
(7)
(8)
(9)
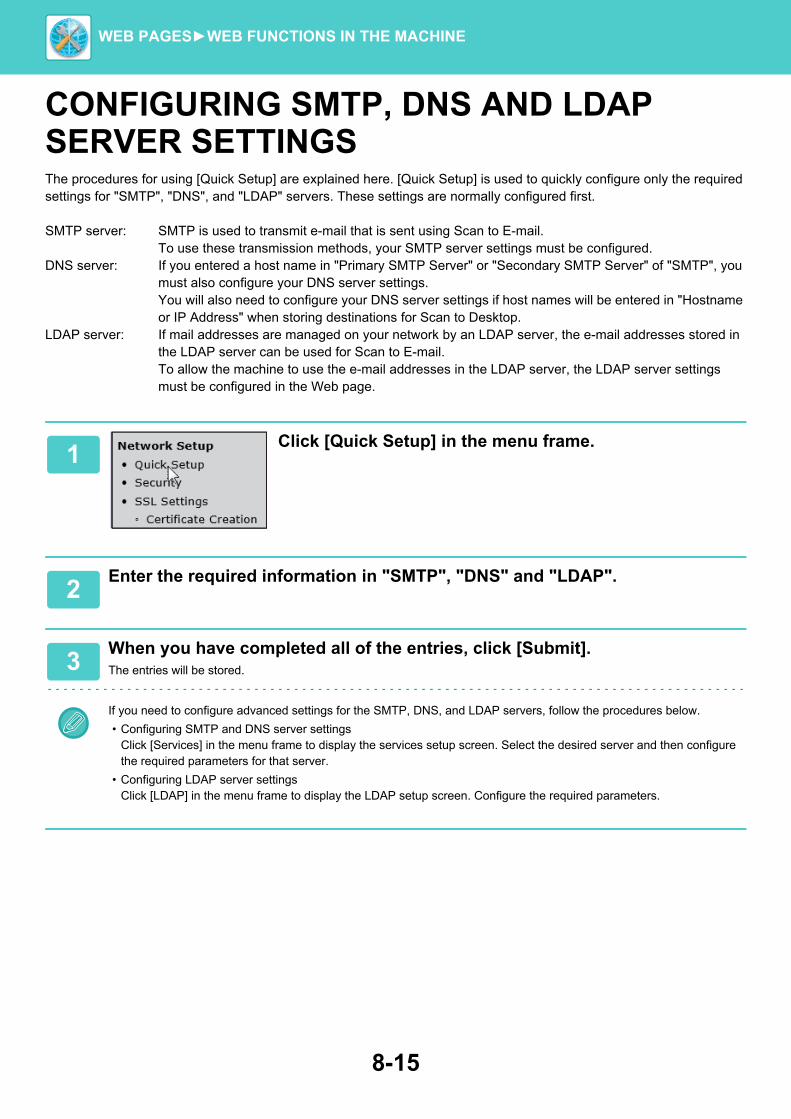
8-15
WEB PAGES►WEB FUNCTIONS IN THE MACHINE
CONFIGURING SMTP, DNS AND LDAP SERVER SETTINGSThe procedures for using [Quick Setup] are explained here. [Quick Setup] is used to quickly configure only the required settings for "SMTP", "DNS", and "LDAP" servers. These settings are normally configured first.
SMTP server: SMTP is used to transmit e-mail that is sent using Scan to E-mail. To use these transmission methods, your SMTP server settings must be configured.
DNS server: If you entered a host name in "Primary SMTP Server" or "Secondary SMTP Server" of "SMTP", you must also configure your DNS server settings.You will also need to configure your DNS server settings if host names will be entered in "Hostname or IP Address" when storing destinations for Scan to Desktop.
LDAP server: If mail addresses are managed on your network by an LDAP server, the e-mail addresses stored in the LDAP server can be used for Scan to E-mail.To allow the machine to use the e-mail addresses in the LDAP server, the LDAP server settings must be configured in the Web page.
1Click [Quick Setup] in the menu frame.
2Enter the required information in "SMTP", "DNS" and "LDAP".
3When you have completed all of the entries, click [Submit].The entries will be stored.
If you need to configure advanced settings for the SMTP, DNS, and LDAP servers, follow the procedures below.
• Configuring SMTP and DNS server settingsClick [Services] in the menu frame to display the services setup screen. Select the desired server and then configure the required parameters for that server.
• Configuring LDAP server settingsClick [LDAP] in the menu frame to display the LDAP setup screen. Configure the required parameters.

8-16
WEB PAGES►WEB FUNCTIONS IN THE MACHINE
PROTECTING INFORMATION PROGRAMMED IN THE WEB PAGE ([Passwords])Passwords can be set (click [Passwords] in the menu frame) to restrict Web page access and protect settings. The administrator must change the password from the factory default setting. The administrator must also take care to remember the new password. The next time the Web pages are accessed, the new password must be entered.A password can be set for the administrator and a password can be set for users.
1Click [Passwords] in the menu frame.
2Enter the current password in "Admin Password".When establishing a password for the first time, enter "admin" in "Admin Password".
Be sure to enter "admin" in lower case (passwords are case sensitive).
3Enter passwords in "User Password" and "Admin Password".• A maximum of 255 characters and/or numbers can be entered for each password (passwords are case sensitive).• Be sure to enter the same password in "Confirm Password" as you did in "New Password".
4When you have finished entering all items, click [Submit].The entered password is stored.After setting the password, turn the machine power off and then back on.
When prompted to enter a user name, a user should enter "users" and an administrator should enter "admin" in "User Name". In "Password", the respective password for the entered user name should be entered.

8-17
WEB PAGES►WEB FUNCTIONS IN THE MACHINE
ADMINISTRATOR SETTINGSThe administrator settings are used to prohibit changes to the [Condition Settings] and to configure interface settings.• "Default settings": Select the setting for which you wish to prohibit changes.• "Paper Weight" : The temperature of toner fusing is controlled according to the weight of the paper that is used.• "Interface settings": Enable monitoring of data sent to the network port and set restrictions.
CONFIGURING A SETTING IN THE ADMINISTRATOR SETTINGS
ADMINISTRATOR SETTINGSWhen "YES, NO" appears in the "Settings" column, "YES" is selected when a checkmark appears in the checkbox of the item, and "NO" is selected when checkmark does not appear.
Default settings
1Click [Administrator Settings] in the menu frame.The "Default Settings" screen of the [Administrator Settings] will appear. If you wish to select a setting in the "Default Settings" screen, go to step 3.
2Click the desired setting, and make a selection for the setting in the screen that appears.See "ADMINISTRATOR SETTINGS (page 8-17)" for descriptions of the settings.
3Click [Submit] to store the entered information.
Item Settings Description
Prohibit Test Page Printing YES, NO This setting is used to prohibit printing of a printer test page.
Disable Default Setting Changes
YES, NO This setting is used to prohibit changes to the default condition settings.
A4/Letter Size Auto Change YES, NO When printing an 8-1/2" x 11" size image, this setting allows A4 size paper to be used if 8-1/2" x 11" size paper is not loaded.
Enable Detected Paper Size in Bypass Tray
YES, NO This is used to prohibit printing when the paper size specified for a print job is different from the paper size inserted in the bypass tray.
Enable Selected Paper Type in Bypass Tray
YES, NO This is used to prohibit printing when the paper type specified for a print job is different from the paper type inserted in the bypass tray.
List Prints 1-Sided, 2-Sided Print
When printing lists and reports, switch between 1-sided printing and 2-sided printing.
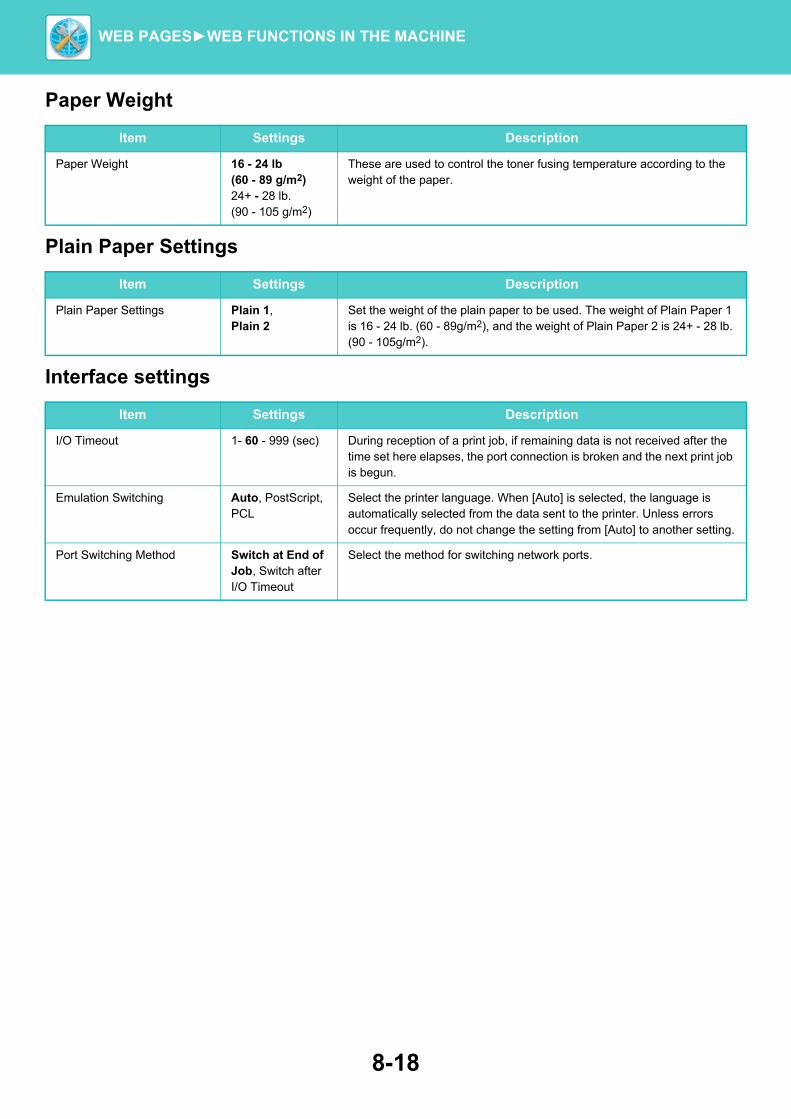
8-18
WEB PAGES►WEB FUNCTIONS IN THE MACHINE
Paper Weight
Plain Paper Settings
Interface settings
Item Settings Description
Paper Weight 16 - 24 lb(60 - 89 g/m2)24+ - 28 lb.(90 - 105 g/m2)
These are used to control the toner fusing temperature according to the weight of the paper.
Item Settings Description
Plain Paper Settings Plain 1,Plain 2
Set the weight of the plain paper to be used. The weight of Plain Paper 1 is 16 - 24 lb. (60 - 89g/m2), and the weight of Plain Paper 2 is 24+ - 28 lb. (90 - 105g/m2).
Item Settings Description
I/O Timeout 1- 60 - 999 (sec) During reception of a print job, if remaining data is not received after the time set here elapses, the port connection is broken and the next print job is begun.
Emulation Switching Auto, PostScript, PCL
Select the printer language. When [Auto] is selected, the language is automatically selected from the data sent to the printer. Unless errors occur frequently, do not change the setting from [Auto] to another setting.
Port Switching Method Switch at End of Job, Switch after I/O Timeout
Select the method for switching network ports.

8-19
WEB PAGES►WEB FUNCTIONS IN THE MACHINE
E-MAIL STATUS AND E-MAIL ALERT SETTINGSThese functions send information on machine use (print count, copy count, etc.) and error conditions (paper misfeed, out of paper, out of toner, etc.) via e-mail to the administrator of the machine or the dealer.
INFORMATION SETUPMachine identification information for the status and alert e-mail functions is configured in the "Information Setup" screen. The entered information will be included in status and alert e-mail messages.
SMTP SETUPThe Status and alert e-mail functions use SMTP (Simple Mail Transport Protocol) to send e-mail. The following procedure is used to set up the e-mail environment. This must be done by the system administrator or other person familiar with the network.
1Click [Information] in the menu frame.The "Information Setup" screen will appear.
2Enter the machine information.
3Click [Submit] to store the entered information.
1Click [Services] in the menu frame.The "Services Setup" screen will appear.
2Click [SMTP].
3Enter the information required to set up the e-mail environment.
4Click [Submit] to store the entered information.
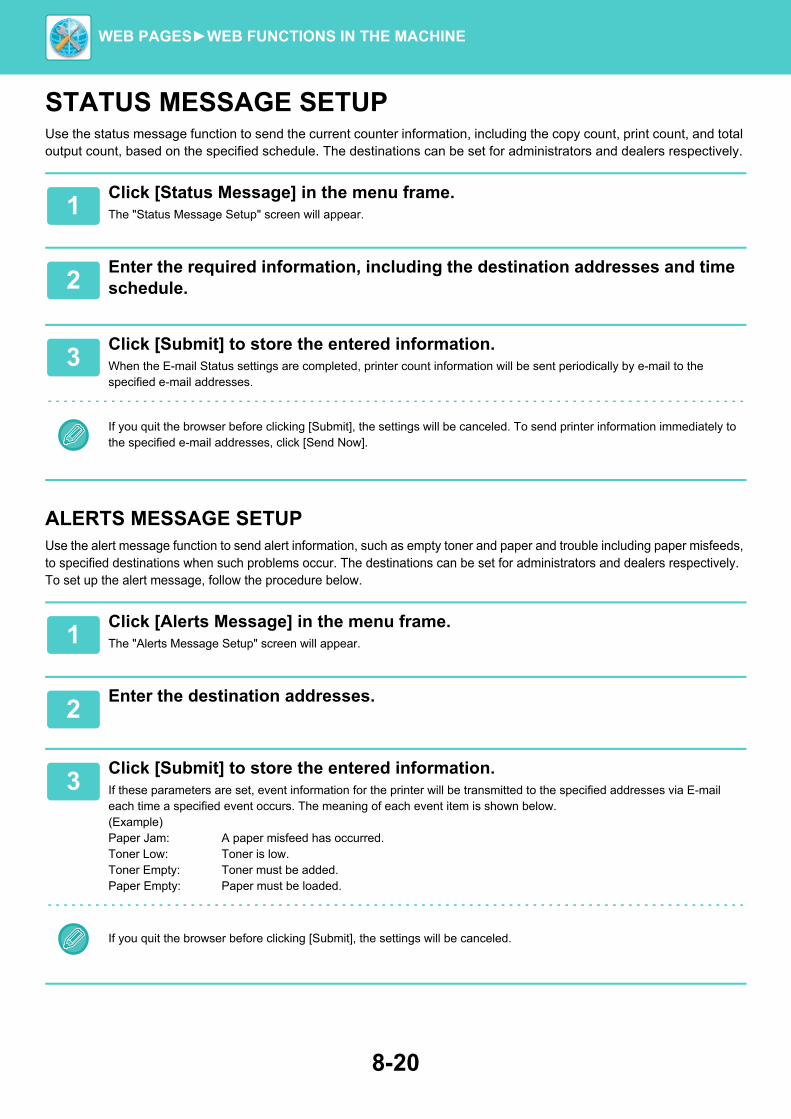
8-20
WEB PAGES►WEB FUNCTIONS IN THE MACHINE
STATUS MESSAGE SETUPUse the status message function to send the current counter information, including the copy count, print count, and total output count, based on the specified schedule. The destinations can be set for administrators and dealers respectively.
ALERTS MESSAGE SETUPUse the alert message function to send alert information, such as empty toner and paper and trouble including paper misfeeds, to specified destinations when such problems occur. The destinations can be set for administrators and dealers respectively.To set up the alert message, follow the procedure below.
1Click [Status Message] in the menu frame.The "Status Message Setup" screen will appear.
2Enter the required information, including the destination addresses and time schedule.
3Click [Submit] to store the entered information.When the E-mail Status settings are completed, printer count information will be sent periodically by e-mail to the specified e-mail addresses.
If you quit the browser before clicking [Submit], the settings will be canceled. To send printer information immediately to the specified e-mail addresses, click [Send Now].
1Click [Alerts Message] in the menu frame.The "Alerts Message Setup" screen will appear.
2Enter the destination addresses.
3Click [Submit] to store the entered information.If these parameters are set, event information for the printer will be transmitted to the specified addresses via E-mail each time a specified event occurs. The meaning of each event item is shown below.(Example)Paper Jam: A paper misfeed has occurred.Toner Low: Toner is low.Toner Empty: Toner must be added.Paper Empty: Paper must be loaded.
If you quit the browser before clicking [Submit], the settings will be canceled.

LICENSE INFORMATION
Information on the Software License for This Product
Software compositionThe software included in this product is comprised of various software components whose individual copyrights are held by SHARP or by third parties.
Software developed by SHARP and open source softwareThe copyrights for the software components and various relevant documents included with this product that were developed or written by SHARP are owned by SHARP and are protected by the Copyright Act, international treaties, and other relevant laws. This product also makes use of freely distributed software and software components whose copyrights are held by third parties. These include software components covered by a GNU General Public License (hereafter GPL), a GNU Lesser General Public License (hereafter LGPL) or other license agreement.
Obtaining source codeSome of the open source software licensors require the distributor to provide the source code with the executable software components. GPL and LGPL include similar requirements. For information on obtaining the source code for the open source software and for obtaining the GPL, LGPL, and other license agreement information, visit the following website:http://sharp-world.com/products/copier/source/download/index.htmlWe are unable to answer any questions about the source code for the open source software. The source code for the software components whose copyrights are held by SHARP is not distributed.
Software Copyrights
Copyright (c) 2000 Carnegie Mellon University. All rights reserved.Redistribution and use in source and binary forms, with or without modification, are permitted provided that the following conditions are met:
1.Redistributions of source code must retain the above copyright notice, this list of conditions and the following disclaimer.
2.Redistributions in binary form must reproduce the above copyright notice, this list of conditions and the following disclaimer in the documentation and/or other materials provided with the distribution.
3.The name "Carnegie Mellon University" must not be used to endorse or promote products derived from this software without prior written permission. For permission or any other legal details, please contact Office of Technology Transfer Carnegie Mellon University 5000 Forbes Avenue Pittsburgh, PA 15213-3890 (412) 268-4387, fax: (412) [email protected]
4.Redistributions of any form whatsoever must retain the following acknowledgment:"This product includes software developed by Computing Services at Carnegie Mellon University (http://www.cmu.edu/computing/)."
CARNEGIE MELLON UNIVERSITY DISCLAIMS ALL WARRANTIES WITH REGARD TO THIS SOFTWARE, INCLUDING ALL IMPLIED WARRANTIES OF MERCHANTABILITY AND FITNESS, IN NO EVENT SHALL CARNEGIE MELLON UNIVERSITY BE LIABLE FOR ANY SPECIAL, INDIRECT OR CONSEQUENTIAL DAMAGES OR ANY DAMAGES WHATSOEVER RESULTING FROM LOSS OF USE, DATA OR PROFITS, WHETHER IN AN ACTION OF CONTRACT, NEGLIGENCE OR OTHER TORTIOUS ACTION, ARISING OUT OF OR IN CONNECTION WITH THE USE OR PERFORMANCE OF THIS SOFTWARE.

Copyright (c) 1995 - 2008 Kungliga Tekniska Högskolan (Royal Institute of Technology, Stockholm, Sweden). All rights reserved.All rights reserved. Export of this software from the United States of America may require a specific license from the United States Government. It is the responsibility of any person or organization contemplating export to obtain such a license before exporting.
WITHIN THAT CONSTRAINT, permission to use, copy, modify, and distribute this software and its documentation for any purpose and without fee is hereby granted, provided that the above copyright notice appear in all copies and that both that copyright notice and this permission notice appear in supporting documentation, and that the name of M.I.T. not be used in advertising or publicity pertaining to distribution of the software without specific, written prior permission. Furthermore if you modify this software you must label your software as modified software and not distribute it in such a fashion that it might be confused with the original MIT software. M.I.T. makes no representations about the suitability of this software for any purpose. It is provided "as is" without express or implied warranty.
THIS SOFTWARE IS PROVIDED "AS IS" AND WITHOUT ANY EXPRESS OR IMPLIED WARRANTIES, INCLUDING, WITHOUT LIMITATION, THE IMPLIED WARRANTIES OF MERCHANTIBILITY AND FITNESS FOR A PARTICULAR PURPOSE.
Individual source code files are copyright MIT, Cygnus Support, OpenVision, Oracle, Sun Soft, FundsXpress, and others.
Project Athena, Athena, Athena MUSE, Discuss, Hesiod, Kerberos, Moira, and Zephyr are trademarks of the Massachusetts Institute of Technology (MIT). No commercial use of these trademarks may be made without prior written permission of MIT.
"Commercial use" means use of a name in a product or other for-profit manner. It does NOT prevent a commercial firm from referring to the MIT trademarks in order to convey information (although in doing so, recognition of their trademark status should be given).
OpenSSL License---------------
Copyright (c) 1998-2004 The OpenSSL Project. All rights reserved.Redistribution and use in source and binary forms, with or without modification, are permitted provided that the following conditions are met:
1.Redistributions of source code must retain the above copyright notice, this list of conditions and the following disclaimer.
2.Redistributions in binary form must reproduce the above copyright notice, this list of conditions and the following disclaimer in the documentation and/or other materials provided with the distribution.
3.All advertising materials mentioning features or use of this software must display the following acknowledgment: "This product includes software developed by the OpenSSL Project for use in the OpenSSL Toolkit. (http://www.openssl.org/)"
4.The names "OpenSSL Toolkit" and "OpenSSL Project" must not be used to endorse or promote products derived from this software without prior written permission. For written permission, please contact [email protected].
5.Products derived from this software may not be called "OpenSSL" nor may "OpenSSL" appear in their names without prior written permission of the OpenSSL Project.
6.Redistributions of any form whatsoever must retain the following acknowledgment: "This product includes software developed by the OpenSSL Project for use in the OpenSSL Toolkit. (http://www.openssl.org/)"

THIS SOFTWARE IS PROVIDED BY THE OpenSSL PROJECT "AS IS" AND ANY EXPRESSED OR IMPLIED WARRANTIES, INCLUDING, BUT NOT LIMITED TO, THE IMPLIED WARRANTIES OF MERCHANTABILITY AND FITNESS FOR A PARTICULAR PURPOSE ARE DISCLAIMED. IN NO EVENT SHALL THE OpenSSL PROJECT OR ITS CONTRIBUTORS BE LIABLE FOR ANY DIRECT, INDIRECT, INCIDENTAL, SPECIAL, EXEMPLARY, OR CONSEQUENTIAL DAMAGES (INCLUDING, BUT NOT LIMITED TO, PROCUREMENT OF SUBSTITUTE GOODS OR SERVICES; LOSS OF USE, DATA, OR PROFITS; OR BUSINESS INTERRUPTION) HOWEVER CAUSED AND ON ANY THEORY OF LIABILITY, WHETHER IN CONTRACT, STRICT LIABILITY, OR TORT (INCLUDING NEGLIGENCE OR OTHERWISE) ARISING IN ANY WAY OUT OF THE USE OF THIS SOFTWARE, EVEN IF ADVISED OF THE POSSIBILITY OF SUCH DAMAGE.
This product includes cryptographic software written by Eric Young ([email protected]). This product includes software written by Tim Hudson ([email protected]).
Original SSLeay License---------------
Copyright (C) 1995-1998 Eric Young ([email protected]) All rights reserved.This package is an SSL implementation written by Eric Young ([email protected]). The implementation was written so as to conform with Netscapes SSL.
This library is free for commercial and non-commercial use as long as the following conditions are aheared to. The following conditions apply to all code found in this distribution, be it the RC4, RSA,lhash, DES, etc., code; not just the SSL code. The SSL documentation included with this distribution is covered by the same copyright terms except that the holder is Tim Hudson ([email protected]).
Copyright remains Eric Young's, and as such any Copyright notices in the code are not to be removed. If this package is used in a product, Eric Young should be given attribution as the author of the parts of the library used. This can be in the form of a textual message at program startup or in documentation (online or textual) provided with the package.
Redistribution and use in source and binary forms, with or without modification, are permitted provided that the following conditions are met:
1.Redistributions of source code must retain the copyright notice, this list of conditions and the following disclaimer.
2.Redistributions in binary form must reproduce the above copyright notice, this list of conditions and the following disclaimer in the documentation and/or other materials provided with the distribution.
3.All advertising materials mentioning features or use of this software must display the following acknowledgement: "This product includes cryptographic software written by Eric Young ([email protected])" The word 'cryptographic' can be left out if the rouines from the library being used are not cryptographic related :-).
4.If you include any Windows specific code (or a derivative thereof) from the apps directory (application code) you must include an acknowledgement: "This product includes software written by Tim Hudson ([email protected])"
THIS SOFTWARE IS PROVIDED BY ERIC YOUNG "AS IS" AND ANY EXPRESS OR IMPLIED WARRANTIES, INCLUDING, BUT NOT LIMITED TO, THE IMPLIED WARRANTIES OF MERCHANTABILITY AND FITNESS FOR A PARTICULAR PURPOSE ARE DISCLAIMED. IN NO EVENT SHALL THE AUTHOR OR CONTRIBUTORS BE LIABLE FOR ANY DIRECT, INDIRECT, INCIDENTAL, SPECIAL, EXEMPLARY, OR CONSEQUENTIAL DAMAGES (INCLUDING, BUT NOT LIMITED TO, PROCUREMENT OF SUBSTITUTE GOODS OR SERVICES; LOSS OF USE, DATA, OR PROFITS; OR BUSINESS INTERRUPTION) HOWEVER CAUSED AND ON ANY THEORY OF LIABILITY, WHETHER IN CONTRACT, STRICT LIABILITY, OR TORT (INCLUDING NEGLIGENCE OR OTHERWISE) ARISING IN ANY WAY OUT OF THE USE OF THIS SOFTWARE, EVEN IF ADVISED OF THE POSSIBILITY OF SUCH DAMAGE.
The licence and distribution terms for any publically available version orderivative of this code cannot be changed. i.e. this code cannot simply becopied and put under another distribution licence [including the GNU Public Licence.]
D3DES License---------------
Copyright (c) 1988,1989,1990,1991,1992 by Richard Outerbridge. (GEnie : OUTER; CIS : [71755,204]) Graven Imagery, 1992.
GNU GENERAL PUBLIC LICENSEVersion 2, June 1991
Copyright (C) 1989, 1991 Free Software Foundation, Inc., 51 Franklin Street, Fifth Floor, Boston, MA 02110-1301 USA Everyone is permitted to copy and distribute verbatim copies of this license document, but changing it is not allowed.
Preamble
The licenses for most software are designed to take away your freedom to share and change it. By contrast, the GNU General Public License is intended to guarantee your freedom to share and change free software--to make sure the software is free for all its users. This General Public License applies to most of the Free Software Foundation's software and to any other program whose authors commit to using it. (Some other Free Software Foundation software is covered by the GNU Lesser General Public License instead.) You can apply it to your programs, too.
When we speak of free software, we are referring to freedom, not price. Our General Public Licenses are designed to make sure that you have the freedom to distribute copies of free software (and charge for this service if you wish), that you receive source code or can get it if you want it, that you can change the software or use pieces of it in new free programs; and that you know you can do these things.
To protect your rights, we need to make restrictions that forbid anyone to deny you these rights or to ask you to surrender the rights. These restrictions translate to certain responsibilities for you if you distribute copies of the software, or if you modify it.
For example, if you distribute copies of such a program, whether gratis or for a fee, you must give the recipients all the rights that you have. You must make sure that they, too, receive or can get the source code. And you must show them these terms so they know their rights.
We protect your rights with two steps: (1) copyright the software, and (2) offer you this license which gives you legal permission to copy, distribute and/or modify the software.
Also, for each author's protection and ours, we want to make certain that everyone understands that there is no warranty for this free software. If the software is modified by someone else and passed on, we want its recipients to know that what they have is not the original, so that any problems introduced by others will not reflect on the original authors' reputations.

Finally, any free program is threatened constantly by software patents. We wish to avoid the danger that redistributors of a free program will individually obtain patent licenses, in effect making the program proprietary. To prevent this, we have made it clear that any patent must be licensed for everyone's free use or not licensed at all.
The precise terms and conditions for copying, distribution and modification follow.
GNU GENERAL PUBLIC LICENSE TERMS AND CONDITIONS FOR COPYING, DISTRIBUTION AND MODIFICATION
0. This License applies to any program or other work which contains a notice placed by the copyright holder saying it may be distributed under the terms of this General Public License. The "Program", below, refers to any such program or work, and a "work based on the Program" means either the Program or any derivative work under copyright law: that is to say, a work containing the Program or a portion of it, either verbatim or with modifications and/or translated into another language. (Hereinafter, translation is included without limitation in the term "modification".) Each licensee is addressed as "you".
Activities other than copying, distribution and modification are not covered by this License; they are outside its scope. The act of running the Program is not restricted, and the output from the Program is covered only if its contents constitute a work based on the Program (independent of having been made by running the Program). Whether that is true depends on what the Program does.
1. You may copy and distribute verbatim copies of the Program's source code as you receive it, in any medium, provided that you conspicuously and appropriately publish on each copy an appropriate copyright notice and disclaimer of warranty; keep intact all the notices that refer to this License and to the absence of any warranty; and give any other recipients of the Program a copy of this License along with the Program.
You may charge a fee for the physical act of transferring a copy, and you may at your option offer warranty protection in exchange for a fee.
2. You may modify your copy or copies of the Program or any portion of it, thus forming a work based on the Program, and copy and distribute such modifications or work under the terms of Section 1 above, provided that you also meet all of these conditions:
a) You must cause the modified files to carry prominent notices stating that you changed the files and the date of any change.
b) You must cause any work that you distribute or publish, that in whole or in part contains or is derived from the Program or any part thereof, to be licensed as a whole at no charge to all third parties under the terms of this License.
c) If the modified program normally reads commands interactively when run, you must cause it, when started running for such interactive use in the most ordinary way, to print or display an announcement including an appropriate copyright notice and a notice that there is no warranty (or else, saying that you provide a warranty) and that users may redistribute the program under these conditions, and telling the user how to view a copy of this License. (Exception: if the Program itself is interactive but does not normally print such an announcement, your work based on the Program is not required to print an announcement.)
These requirements apply to the modified work as a whole. If identifiable sections of that work are not derived from the Program, and can be reasonably considered independent and separate works in themselves, then this License, and its terms, do not apply to those sections when you distribute them as separate works. But when you distribute the same
sections as part of a whole which is a work based on the Program, the distribution of the whole must be on the terms of this License, whose permissions for other licensees extend to the entire whole, and thus to each and every part regardless of who wrote it.
Thus, it is not the intent of this section to claim rights or contest your rights to work written entirely by you; rather, the intent is to exercise the right to control the distribution of derivative or collective works based on the Program.
In addition, mere aggregation of another work not based on the Program with the Program (or with a work based on the Program) on a volume of a storage or distribution medium does not bring the other work under the scope of this License.
3. You may copy and distribute the Program (or a work based on it, under Section 2) in object code or executable form under the terms of Sections 1 and 2 above provided that you also do one of the following:
a) Accompany it with the complete corresponding machine-readable source code, which must be distributed under the terms of Sections 1 and 2 above on a medium customarily used for software interchange; or,
b) Accompany it with a written offer, valid for at least three years, to give any third party, for a charge no more than your cost of physically performing source distribution, a complete machine-readable copy of the corresponding source code, to be distributed under the terms of Sections 1 and 2 above on a medium customarily used for software interchange; or,
c) Accompany it with the information you received as to the offer to distribute corresponding source code. (This alternative is allowed only for noncommercial distribution and only if you received the program in object code or executable form with such an offer, in accord with Subsection b above.)
The source code for a work means the preferred form of the work for making modifications to it. For an executable work, complete source code means all the source code for all modules it contains, plus any associated interface definition files, plus the scripts used to control compilation and installation of the executable. However, as a special exception, the source code distributed need not include anything that is normally distributed (in either source or binary form) with the major components (compiler, kernel, and so on) of the operating system on which the executable runs, unless that component itself accompanies the executable.
If distribution of executable or object code is made by offering access to copy from a designated place, then offering equivalent access to copy the source code from the same place counts as distribution of the source code, even though third parties are not compelled to copy the source along with the object code.
4. You may not copy, modify, sublicense, or distribute the Program except as expressly provided under this License. Any attempt otherwise to copy, modify, sublicense or distribute the Program is void, and will automatically terminate your rights under this License. However, parties who have received copies, or rights, from you under this License will not have their licenses terminated so long as such parties remain in full compliance.
5. You are not required to accept this License, since you have not signed it. However, nothing else grants you permission to modify or distribute the Program or its derivative works. These actions are prohibited by law if you do not accept this License. Therefore, by modifying or distributing the Program (or any work based on the Program), you indicate your acceptance of this License to do so, and all its terms and conditions for copying, distributing or modifying the Program or works based on it.
6. Each time you redistribute the Program (or any work based on the Program), the recipient automatically receives a license from the original licensor to copy, distribute or modify the Program subject to these terms and conditions. You

may not impose any further restrictions on the recipients' exercise of the rights granted herein. You are not responsible for enforcing compliance by third parties to this License.
7. If, as a consequence of a court judgment or allegation of patent infringement or for any other reason (not limited to patent issues), conditions are imposed on you (whether by court order, agreement or otherwise) that contradict the conditions of this License, they do not excuse you from the conditions of this License. If you cannot distribute so as to satisfy simultaneously your obligations under this License and any other pertinent obligations, then as a consequence you may not distribute the Program at all. For example, if a patent license would not permit royalty-free redistribution of the Program by all those who receive copies directly or indirectly through you, then the only way you could satisfy both it and this License would be to refrain entirely from distribution of the Program.
If any portion of this section is held invalid or unenforceable under any particular circumstance, the balance of the section is intended to apply and the section as a whole is intended to apply in other circumstances.
It is not the purpose of this section to induce you to infringe any patents or other property right claims or to contest validity of any such claims; this section has the sole purpose of protecting the integrity of the free software distribution system, which is implemented by public license practices. Many people have made generous contributions to the wide range of software distributed through that system in reliance on consistent application of that system; it is up to the author/donor to decide if he or she is willing to distribute software through any other system and a licensee cannot impose that choice.
This section is intended to make thoroughly clear what is believed to be a consequence of the rest of this License.
8. If the distribution and/or use of the Program is restricted in certain countries either by patents or by copyrighted interfaces, the original copyright holder who places the Program under this License may add an explicit geographical distribution limitation excluding those countries, so that distribution is permitted only in or among countries not thus excluded. In such case, this License incorporates the limitation as if written in the body of this License.
9. The Free Software Foundation may publish revised and/or new versions of the General Public License from time to time. Such new versions will be similar in spirit to the present version, but may differ in detail to address new problems or concerns.
Each version is given a distinguishing version number. If the Program specifies a version number of this License which applies to it and "any later version", you have the option of following the terms and conditions either of that version or of any later version published by the Free Software Foundation. If the Program does not specify a version number of this License, you may choose any version ever published by the Free Software Foundation.
10. If you wish to incorporate parts of the Program into other free programs whose distribution conditions are different, write to the author to ask for permission. For software which is copyrighted by the Free Software Foundation, write to the Free Software Foundation; we sometimes make exceptions for this. Our decision will be guided by the two goals of preserving the free status of all derivatives of our free software and of promoting the sharing and reuse of software generally.
NO WARRANTY
11. BECAUSE THE PROGRAM IS LICENSED FREE OF CHARGE, THERE IS NO WARRANTY FOR THE PROGRAM, TO THE EXTENT PERMITTED BY APPLICABLE LAW. EXCEPT WHEN OTHERWISE STATED IN WRITING THE COPYRIGHT HOLDERS AND/OR OTHER PARTIES PROVIDE THE PROGRAM "AS IS" WITHOUT WARRANTY OF ANY KIND, EITHER EXPRESSED OR IMPLIED, INCLUDING, BUT NOT LIMITED TO, THE IMPLIED WARRANTIES OF MERCHANTABILITY AND FITNESS FOR A PARTICULAR PURPOSE. THE ENTIRE RISK AS TO

THE QUALITY AND PERFORMANCE OF THE PROGRAM IS WITH YOU. SHOULD THE PROGRAM PROVE DEFECTIVE, YOU ASSUME THE COST OF ALL NECESSARY SERVICING, REPAIR OR CORRECTION.
12. IN NO EVENT UNLESS REQUIRED BY APPLICABLE LAW OR AGREED TO IN WRITING WILL ANY COPYRIGHT HOLDER, OR ANY OTHER PARTY WHO MAY MODIFY AND/OR REDISTRIBUTE THE PROGRAM AS PERMITTED ABOVE, BE LIABLE TO YOU FOR DAMAGES, INCLUDING ANY GENERAL, SPECIAL, INCIDENTAL OR CONSEQUENTIAL DAMAGES ARISING OUT OF THE USE OR INABILITY TO USE THE PROGRAM (INCLUDING BUT NOT LIMITED TO LOSS OF DATA OR DATA BEING RENDERED INACCURATE OR LOSSES SUSTAINED BY YOU OR THIRD PARTIES OR A FAILURE OF THE PROGRAM TO OPERATE WITH ANY OTHER PROGRAMS), EVEN IF SUCH HOLDER OR OTHER PARTY HAS BEEN ADVISED OF THE POSSIBILITY OF SUCH DAMAGES.
END OF TERMS AND CONDITIONS
How to Apply These Terms to Your New Programs
If you develop a new program, and you want it to be of the greatest possible use to the public, the best way to achieve this is to make it free software which everyone can redistribute and change under these terms.
To do so, attach the following notices to the program. It is safest to attach them to the start of each source file to most effectively convey the exclusion of warranty; and each file should have at least the "copyright" line and a pointer to where the full notice is found.
<one line to give the program's name and a brief idea of what it does.> Copyright (C) <year> <name of author>
This program is free software; you can redistribute it and/or modify it under the terms of the GNU General Public License as published by the Free Software Foundation; either version 2 of the License, or (at your option) any later version.
This program is distributed in the hope that it will be useful, but WITHOUT ANY WARRANTY; without even the implied warranty of MERCHANTABILITY or FITNESS FOR A PARTICULAR PURPOSE. See the GNU General Public License for more details.
You should have received a copy of the GNU General Public License along with this program; if not, write to the Free Software Foundation, Inc., 51 Franklin Street, Fifth Floor, Boston, MA 02110-1301 USA.
Also add information on how to contact you by electronic and paper mail.
If the program is interactive, make it output a short notice like this when it starts in an interactive mode:
Gnomovision version 69, Copyright (C) year name of author Gnomovision comes with ABSOLUTELY NO WARRANTY; for details type `show w'. This is free software, and you are welcome to redistribute it under certain conditions; type `show c' for details.
The hypothetical commands `show w' and `show c' should show the appropriate parts of the General Public License. Of course, the commands you use may be called something other than `show w' and `show c'; they could even be mouse-clicks or menu items--whatever suits your program.

You should also get your employer (if you work as a programmer) or your school, if any, to sign a "copyright disclaimer" for the program, if necessary. Here is a sample; alter the names:
Yoyodyne, Inc., hereby disclaims all copyright interest in the program `Gnomovision' (which makes passes at compilers) written by James Hacker.
<signature of Ty Coon>, 1 April 1989 Ty Coon, President of Vice
This General Public License does not permit incorporating your program into proprietary programs. If your program is a subroutine library, you may consider it more useful to permit linking proprietary applications with the library. If this is what you want to do, use the GNU Lesser General Public License instead of this License.
GNU LESSER GENERAL PUBLIC LICENSE
Version 2.1, February 1999
Copyright (C) 1991, 1999 Free Software Foundation, Inc. 51 Franklin Street, Fifth Floor, Boston, MA 02110-1301 USA Everyone is permitted to copy and distribute verbatim copies of this license document, but changing it is not allowed.
[This is the first released version of the Lesser GPL. It also counts as the successor of the GNU Library Public License, version 2, hence the version number 2.1.]
Preamble
The licenses for most software are designed to take away your freedom to share and change it. By contrast, the GNU General Public Licenses are intended to guarantee your freedom to share and change free software--to make sure the software is free for all its users.
This license, the Lesser General Public License, applies to some specially designated software packages--typically libraries--of the Free Software Foundation and other authors who decide to use it. You can use it too, but we suggest you first think carefully about whether this license or the ordinary General Public License is the better strategy to use in any particular case, based on the explanations below.
When we speak of free software, we are referring to freedom of use, not price. Our General Public Licenses are designed to make sure that you have the freedom to distribute copies of free software (and charge for this service if you wish); that you receive source code or can get it if you want it; that you can change the software and use pieces of it in new free programs; and that you are informed that you can do these things.
To protect your rights, we need to make restrictions that forbid distributors to deny you these rights or to ask you to surrender these rights. These restrictions translate to certain responsibilities for you if you distribute copies of the library or if you modify it.
For example, if you distribute copies of the library, whether gratis or for a fee, you must give the recipients all the rights that we gave you. You must make sure that they, too, receive or can get the source code. If you link other code with the

library, you must provide complete object files to the recipients, so that they can relink them with the library after making changes to the library and recompiling it. And you must show them these terms so they know their rights.
We protect your rights with a two-step method: (1) we copyright the library, and (2) we offer you this license, which gives you legal permission to copy, distribute and/or modify the library.
To protect each distributor, we want to make it very clear that there is no warranty for the free library. Also, if the library is modified by someone else and passed on, the recipients should know that what they have is not the original version, so that the original author's reputation will not be affected by problems that might be introduced by others.
Finally, software patents pose a constant threat to the existence of any free program. We wish to make sure that a company cannot effectively restrict the users of a free program by obtaining a restrictive license from a patent holder. Therefore, we insist that any patent license obtained for a version of the library must be consistent with the full freedom of use specified in this license.
Most GNU software, including some libraries, is covered by the ordinary GNU General Public License. This license, the GNU Lesser General Public License, applies to certain designated libraries, and is quite different from the ordinary General Public License. We use this license for certain libraries in order to permit linking those libraries into non-free programs.
When a program is linked with a library, whether statically or using a shared library, the combination of the two is legally speaking a combined work, a derivative of the original library. The ordinary General Public License therefore permits such linking only if the entire combination fits its criteria of freedom. The Lesser General Public License permits more lax criteria for linking other code with the library.
We call this license the "Lesser" General Public License because it does Less to protect the user's freedom than the ordinary General Public License. It also provides other free software developers Less of an advantage over competing non-free programs. These disadvantages are the reason we use the ordinary General Public License for many libraries. However, the Lesser license provides advantages in certain special circumstances.
For example, on rare occasions, there may be a special need to encourage the widest possible use of a certain library, so that it becomes a de-facto standard. To achieve this, non-free programs must be allowed to use the library. A more frequent case is that a free library does the same job as widely used non-free libraries. In this case, there is little to gain by limiting the free library to free software only, so we use the Lesser General Public License.
In other cases, permission to use a particular library in non-free programs enables a greater number of people to use a large body of free software. For example, permission to use the GNU C Library in non-free programs enables many more people to use the whole GNU operating system, as well as its variant, the GNU/Linux operating system.
Although the Lesser General Public License is Less protective of the users' freedom, it does ensure that the user of a program that is linked with the Library has the freedom and the wherewithal to run that program using a modified version of the Library.

The precise terms and conditions for copying, distribution and modification follow. Pay close attention to the difference between a "work based on the library" and a "work that uses the library". The former contains code derived from the library, whereas the latter must be combined with the library in order to run.
GNU LESSER GENERAL PUBLIC LICENSE TERMS AND CONDITIONS FOR COPYING, DISTRIBUTION AND MODIFICATION
0. This License Agreement applies to any software library or other program which contains a notice placed by the copyright holder or other authorized party saying it may be distributed under the terms of this Lesser General Public License (also called "this License"). Each licensee is addressed as "you".
A "library" means a collection of software functions and/or data prepared so as to be conveniently linked with application programs (which use some of those functions and data) to form executables.
The "Library", below, refers to any such software library or work which has been distributed under these terms. A "work based on the Library" means either the Library or any derivative work under copyright law: that is to say, a work containing the Library or a portion of it, either verbatim or with modifications and/or translated straightforwardly into another language. (Hereinafter, translation is included without limitation in the term "modification".)
"Source code" for a work means the preferred form of the work for making modifications to it. For a library, complete source code means all the source code for all modules it contains, plus any associated interface definition files, plus the scripts used to control compilation and installation of the library.
Activities other than copying, distribution and modification are not covered by this License; they are outside its scope. The act of running a program using the Library is not restricted, and output from such a program is covered only if its contents constitute a work based on the Library (independent of the use of the Library in a tool for writing it). Whether that is true depends on what the Library does and what the program that uses the Library does.
1. You may copy and distribute verbatim copies of the Library's complete source code as you receive it, in any medium, provided that you conspicuously and appropriately publish on each copy an appropriate copyright notice and disclaimer of warranty; keep intact all the notices that refer to this License and to the absence of any warranty; and distribute a copy of this License along with the Library.
You may charge a fee for the physical act of transferring a copy, and you may at your option offer warranty protection in exchange for a fee.
2. You may modify your copy or copies of the Library or any portion of it, thus forming a work based on the Library, and copy and distribute such modifications or work under the terms of Section 1 above, provided that you also meet all of these conditions:
a) The modified work must itself be a software library.
b) You must cause the files modified to carry prominent notices stating that you changed the files and the date of any change.

c) You must cause the whole of the work to be licensed at no charge to all third parties under the terms of this License.
d) If a facility in the modified Library refers to a function or a table of data to be supplied by an application program that uses the facility, other than as an argument passed when the facility is invoked, then you must make a good faith effort to ensure that, in the event an application does not supply such function or table, the facility still operates, and performs whatever part of its purpose remains meaningful.
(For example, a function in a library to compute square roots has a purpose that is entirely well-defined independent of the application. Therefore, Subsection 2d requires that any application-supplied function or table used by this function must be optional: if the application does not supply it, the square root function must still compute square roots.)
These requirements apply to the modified work as a whole. If identifiable sections of that work are not derived from the Library, and can be reasonably considered independent and separate works in themselves, then this License, and its terms, do not apply to those sections when you distribute them as separate works. But when you distribute the same sections as part of a whole which is a work based on the Library, the distribution of the whole must be on the terms of this License, whose permissions for other licensees extend to the entire whole, and thus to each and every part regardless of who wrote it.
Thus, it is not the intent of this section to claim rights or contest your rights to work written entirely by you; rather, the intent is to exercise the right to control the distribution of derivative or collective works based on the Library.
In addition, mere aggregation of another work not based on the Library with the Library (or with a work based on the Library) on a volume of a storage or distribution medium does not bring the other work under the scope of this License.
3. You may opt to apply the terms of the ordinary GNU General Public License instead of this License to a given copy of the Library. To do this, you must alter all the notices that refer to this License, so that they refer to the ordinary GNU General Public License, version 2, instead of to this License. (If a newer version than version 2 of the ordinary GNU General Public License has appeared, then you can specify that version instead if you wish.) Do not make any other change in these notices.
Once this change is made in a given copy, it is irreversible for that copy, so the ordinary GNU General Public License applies to all subsequent copies and derivative works made from that copy.
This option is useful when you wish to copy part of the code of the Library into a program that is not a library.
4. You may copy and distribute the Library (or a portion or derivative of it, under Section 2) in object code or executable form under the terms of Sections 1 and 2 above provided that you accompany it with the complete corresponding machine-readable source code, which must be distributed under the terms of Sections 1 and 2 above on a medium customarily used for software interchange.
If distribution of object code is made by offering access to copy from a designated place, then offering equivalent access to copy the source code from the same place satisfies the requirement to distribute the source code, even though third parties are not compelled to copy the source along with the object code.
5. A program that contains no derivative of any portion of the Library, but is designed to work with the Library by being compiled or linked with it, is called a "work that uses the Library". Such a work, in isolation, is not a derivative work of the Library, and therefore falls outside the scope of this License.

However, linking a "work that uses the Library" with the Library creates an executable that is a derivative of the Library (because it contains portions of the Library), rather than a "work that uses the library". The executable is therefore covered by this License. Section 6 states terms for distribution of such executables.
When a "work that uses the Library" uses material from a header file that is part of the Library, the object code for the work may be a derivative work of the Library even though the source code is not. Whether this is true is especially significant if the work can be linked without the Library, or if the work is itself a library. The threshold for this to be true is not precisely defined by law.
If such an object file uses only numerical parameters, data structure layouts and accessors, and small macros and small inline functions (ten lines or less in length), then the use of the object file is unrestricted, regardless of whether it is legally a derivative work. (Executables containing this object code plus portions of the Library will still fall under Section 6.)
Otherwise, if the work is a derivative of the Library, you may distribute the object code for the work under the terms of Section 6. Any executables containing that work also fall under Section 6, whether or not they are linked directly with the Library itself.
6. As an exception to the Sections above, you may also combine or link a "work that uses the Library" with the Library to produce a work containing portions of the Library, and distribute that work under terms of your choice, provided that the terms permit modification of the work for the customer's own use and reverse engineering for debugging such modifications.
You must give prominent notice with each copy of the work that the Library is used in it and that the Library and its use are covered by this License. You must supply a copy of this License. If the work during execution displays copyright notices, you must include the copyright notice for the Library among them, as well as a reference directing the user to the copy of this License. Also, you must do one of these things:
a) Accompany the work with the complete corresponding machine-readable source code for the Library including whatever changes were used in the work (which must be distributed under Sections 1 and 2 above); and, if the work is an executable linked with the Library, with the complete machine-readable "work that uses the Library", as object code and/or source code, so that the user can modify the Library and then relink to produce a modified executable containing the modified Library. (It is understood that the user who changes the contents of definitions files in the Library will not necessarily be able to recompile the application to use the modified definitions.)
b) Use a suitable shared library mechanism for linking with the Library. A suitable mechanism is one that (1) uses at run time a copy of the library already present on the user's computer system, rather than copying library functions into the executable, and (2) will operate properly with a modified version of the library, if the user installs one, as long as the modified version is interface-compatible with the version that the work was made with.
c) Accompany the work with a written offer, valid for at least three years, to give the same user the materials specified in Subsection 6a, above, for a charge no more than the cost of performing this distribution.
d) If distribution of the work is made by offering access to copy from a designated place, offer equivalent access to copy the above specified materials from the same place.
e) Verify that the user has already received a copy of these materials or that you have already sent this user a copy.

For an executable, the required form of the "work that uses the Library" must include any data and utility programs needed for reproducing the executable from it. However, as a special exception, the materials to be distributed need not include anything that is normally distributed (in either source or binary form) with the major components (compiler, kernel, and so on) of the operating system on which the executable runs, unless that component itself accompanies the executable.
It may happen that this requirement contradicts the license restrictions of other proprietary libraries that do not normally accompany the operating system. Such a contradiction means you cannot use both them and the Library together in an executable that you distribute.
7. You may place library facilities that are a work based on the Library side-by-side in a single library together with other library facilities not covered by this License, and distribute such a combined library, provided that the separate distribution of the work based on the Library and of the other library facilities is otherwise permitted, and provided that you do these two things:
a) Accompany the combined library with a copy of the same work based on the Library, uncombined with any other library facilities. This must be distributed under the terms of the Sections above.
b) Give prominent notice with the combined library of the fact that part of it is a work based on the Library, and explaining where to find the accompanying uncombined form of the same work.
8. You may not copy, modify, sublicense, link with, or distribute the Library except as expressly provided under this License. Any attempt otherwise to copy, modify, sublicense, link with, or distribute the Library is void, and will automatically terminate your rights under this License. However, parties who have received copies, or rights, from you under this License will not have their licenses terminated so long as such parties remain in full compliance.
9. You are not required to accept this License, since you have not signed it. However, nothing else grants you permission to modify or distribute the Library or its derivative works. These actions are prohibited by law if you do not accept this License. Therefore, by modifying or distributing the Library (or any work based on the Library), you indicate your acceptance of this License to do so, and all its terms and conditions for copying, distributing or modifying the Library or works based on it.
10. Each time you redistribute the Library (or any work based on the Library), the recipient automatically receives a license from the original licensor to copy, distribute, link with or modify the Library subject to these terms and conditions. You may not impose any further restrictions on the recipients' exercise of the rights granted herein. You are not responsible for enforcing compliance by third parties with this License.
11. If, as a consequence of a court judgment or allegation of patent infringement or for any other reason (not limited to patent issues), conditions are imposed on you (whether by court order, agreement or otherwise) that contradict the conditions of this License, they do not excuse you from the conditions of this License. If you cannot distribute so as to satisfy simultaneously your obligations under this License and any other pertinent obligations, then as a consequence you may not distribute the Library at all. For example, if a patent license would not permit royalty-free redistribution of the Library by all those who receive copies directly or indirectly through you, then the only way you could satisfy both it and this License would be to refrain entirely from distribution of the Library.

If any portion of this section is held invalid or unenforceable under any particular circumstance, the balance of the section is intended to apply, and the section as a whole is intended to apply in other circumstances.
It is not the purpose of this section to induce you to infringe any patents or other property right claims or to contest validity of any such claims; this section has the sole purpose of protecting the integrity of the free software distribution system which is implemented by public license practices. Many people have made generous contributions to the wide range of software distributed through that system in reliance on consistent application of that system; it is up to the author/donor to decide if he or she is willing to distribute software through any other system and a licensee cannot impose that choice.
This section is intended to make thoroughly clear what is believed to be a consequence of the rest of this License.
12. If the distribution and/or use of the Library is restricted in certain countries either by patents or by copyrighted interfaces, the original copyright holder who places the Library under this License may add an explicit geographical distribution limitation excluding those countries, so that distribution is permitted only in or among countries not thus excluded. In such case, this License incorporates the limitation as if written in the body of this License.
13. The Free Software Foundation may publish revised and/or new versions of the Lesser General Public License from time to time. Such new versions will be similar in spirit to the present version, but may differ in detail to address new problems or concerns.
Each version is given a distinguishing version number. If the Library specifies a version number of this License which applies to it and "any later version", you have the option of following the terms and conditions either of that version or of any later version published by the Free Software Foundation. If the Library does not specify a license version number, you may choose any version ever published by the Free Software Foundation.
14. If you wish to incorporate parts of the Library into other free programs whose distribution conditions are incompatible with these, write to the author to ask for permission. For software which is copyrighted by the Free Software Foundation, write to the Free Software Foundation; we sometimes make exceptions for this. Our decision will be guided by the two goals of preserving the free status of all derivatives of our free software and of promoting the sharing and reuse of software generally.
NO WARRANTY
15. BECAUSE THE LIBRARY IS LICENSED FREE OF CHARGE, THERE IS NO WARRANTY FOR THE LIBRARY, TO THE EXTENT PERMITTED BY APPLICABLE LAW. EXCEPT WHEN OTHERWISE STATED IN WRITING THE COPYRIGHT HOLDERS AND/OR OTHER PARTIES PROVIDE THE LIBRARY "AS IS" WITHOUT WARRANTY OF ANY KIND, EITHER EXPRESSED OR IMPLIED, INCLUDING, BUT NOT LIMITED TO, THE IMPLIED WARRANTIES OF MERCHANTABILITY AND FITNESS FOR A PARTICULAR PURPOSE. THE ENTIRE RISK AS TO THE QUALITY AND PERFORMANCE OF THE LIBRARY IS WITH YOU. SHOULD THE LIBRARY PROVE DEFECTIVE, YOU ASSUME THE COST OF ALL NECESSARY SERVICING, REPAIR OR CORRECTION.
16. IN NO EVENT UNLESS REQUIRED BY APPLICABLE LAW OR AGREED TO IN WRITING WILL ANY COPYRIGHT HOLDER, OR ANY OTHER PARTY WHO MAY MODIFY AND/OR REDISTRIBUTE THE LIBRARY AS PERMITTED ABOVE, BE LIABLE TO YOU FOR DAMAGES, INCLUDING ANY GENERAL, SPECIAL, INCIDENTAL OR CONSEQUENTIAL DAMAGES ARISING OUT OF THE USE OR INABILITY TO USE THE LIBRARY (INCLUDING BUT NOT LIMITED TO LOSS OF DATA OR DATA BEING RENDERED INACCURATE OR LOSSES SUSTAINED BY

YOU OR THIRD PARTIES OR A FAILURE OF THE LIBRARY TO OPERATE WITH ANY OTHER SOFTWARE), EVEN IF SUCH HOLDER OR OTHER PARTY HAS BEEN ADVISED OF THE POSSIBILITY OF SUCH DAMAGES.
END OF TERMS AND CONDITIONS
How to Apply These Terms to Your New Libraries
If you develop a new library, and you want it to be of the greatest possible use to the public, we recommend making it free software that everyone can redistribute and change. You can do so by permitting redistribution under these terms (or, alternatively, under the terms of the ordinary General Public License).
To apply these terms, attach the following notices to the library. It is safest to attach them to the start of each source file to most effectively convey the exclusion of warranty; and each file should have at least the "copyright" line and a pointer to where the full notice is found.
<one line to give the library's name and a brief idea of what it does.> Copyright (C) <year> <name of author>
This library is free software; you can redistribute it and/or modify it under the terms of the GNU Lesser General Public License as published by the Free Software Foundation; either version 2.1 of the License, or (at your option) any later version.
This library is distributed in the hope that it will be useful, but WITHOUT ANY WARRANTY; without even the implied warranty of MERCHANTABILITY or FITNESS FOR A PARTICULAR PURPOSE. See the GNU Lesser General Public License for more details.
You should have received a copy of the GNU Lesser General Public License along with this library; if not, write to the Free Software Foundation, Inc., 51 Franklin Street, Fifth Floor, Boston, MA 02110-1301 USA
Also add information on how to contact you by electronic and paper mail.
You should also get your employer (if you work as a programmer) or your school, if any, to sign a "copyright disclaimer" for the library, if necessary. Here is a sample; alter the names:
Yoyodyne, Inc., hereby disclaims all copyright interest in the library `Frob' (a library for tweaking knobs) written by James Random Hacker.
<signature of Ty Coon>, 1 April 1990 Ty Coon, President of Vice
That's all there is to it!
GNU GENERAL PUBLIC LICENSE
Version 3, 29 June 2007
Copyright (C) 2007 Free Software Foundation, Inc. <http://fsf.org/>Everyone is permitted to copy and distribute verbatim copies of this license document, but changing it is not allowed.
Preamble
The GNU General Public License is a free, copyleft license for software and other kinds of works.
The licenses for most software and other practical works are designed to take away your freedom to share and change the works. By contrast, the GNU General Public License is intended to guarantee your freedom to share and change all versions of a program--to make sure it remains free software for all its users. We, the Free Software Foundation, use the GNU General Public License for most of our software; it applies also to any other work released this way by its authors. You can apply it to your programs, too.
When we speak of free software, we are referring to freedom, not price. Our General Public Licenses are designed to make sure that you have the freedom to distribute copies of free software (and charge for them if you wish), that you receive source code or can get it if you want it, that you can change the software or use pieces of it in new free programs, and that you know you can do these things.
To protect your rights, we need to prevent others from denying you these rights or asking you to surrender the rights. Therefore, you have certain responsibilities if you distribute copies of the software, or if you modify it: responsibilities to respect the freedom of others.
For example, if you distribute copies of such a program, whether gratis or for a fee, you must pass on to the recipients the same freedoms that you received. You must make sure that they, too, receive or can get the source code. And you must show them these terms so they know their rights.
Developers that use the GNU GPL protect your rights with two steps:(1) assert copyright on the software, and (2) offer you this License giving you legal permission to copy, distribute and/or
modify it.
For the developers' and authors' protection, the GPL clearly explains that there is no warranty for this free software. For both users' and authors' sake, the GPL requires that modified versions be marked as changed, so that their problems will not be attributed erroneously to authors of previous versions.
Some devices are designed to deny users access to install or run modified versions of the software inside them, although the manufacturer can do so. This is fundamentally incompatible with the aim of protecting users' freedom to change the software. The systematic pattern of such abuse occurs in the area of products for individuals to use, which is precisely where it is most unacceptable. Therefore, we have designed this version of the GPL to prohibit the practice for those products. If such problems arise substantially in other domains, we stand ready to extend this provision to those domains in future versions of the GPL, as needed to protect the freedom of users.
Finally, every program is threatened constantly by software patents. States should not allow patents to restrict development and use of software on general-purpose computers, but in those that do, we wish to avoid the special danger that patents applied to a free program could make it effectively proprietary. To prevent this, the GPL assures that patents cannot be used to render the program non-free.
The precise terms and conditions for copying, distribution and modification follow.
TERMS AND CONDITIONS
0. Definitions.

"This License" refers to version 3 of the GNU General Public License.
"Copyright" also means copyright-like laws that apply to other kinds of works, such as semiconductor masks.
"The Program" refers to any copyrightable work licensed under this License. Each licensee is addressed as "you". "Licensees" and "recipients" may be individuals or organizations.
To "modify" a work means to copy from or adapt all or part of the work in a fashion requiring copyright permission, other than the making of an exact copy. The resulting work is called a "modified version" of the earlier work or a work "based on" the earlier work.
A "covered work" means either the unmodified Program or a work based on the Program.
To "propagate" a work means to do anything with it that, without permission, would make you directly or secondarily liable for infringement under applicable copyright law, except executing it on a computer or modifying a private copy. Propagation includes copying, distribution (with or without modification), making available to the public, and in some countries other activities as well.
To "convey" a work means any kind of propagation that enables other parties to make or receive copies. Mere interaction with a user through a computer network, with no transfer of a copy, is not conveying.
An interactive user interface displays "Appropriate Legal Notices" to the extent that it includes a convenient and prominently visible feature that (1) displays an appropriate copyright notice, and (2) tells the user that there is no warranty for the work (except to the extent that warranties are provided), that licensees may convey the work under this License, and how to view a copy of this License. If the interface presents a list of user commands or options, such as a menu, a prominent item in the list meets this criterion.
1. Source Code.
The "source code" for a work means the preferred form of the work for making modifications to it. "Object code" means any non-source form of a work.
A "Standard Interface" means an interface that either is an official standard defined by a recognized standards body, or, in the case of interfaces specified for a particular programming language, one that is widely used among developers working in that language.
The "System Libraries" of an executable work include anything, other than the work as a whole, that (a) is included in the normal form of packaging a Major Component, but which is not part of that Major Component, and (b) serves only to enable use of the work with that Major Component, or to implement a Standard Interface for which an implementation is available to the public in source code form. A "Major Component", in this context, means a major essential component (kernel, window system, and so on) of the specific operating system (if any) on which the executable work runs, or a compiler used to produce the work, or an object code interpreter used to run it.
The "Corresponding Source" for a work in object code form means all the source code needed to generate, install, and (for an executable work) run the object code and to modify the work, including scripts to control those activities. However, it does not include the work's System Libraries, or general-purpose tools or generally available free programs which are used unmodified in performing those activities but which are not part of the work. For example, Corresponding Source includes interface definition files associated with source files for the work, and the source code for shared libraries and dynamically linked subprograms that the work is specifically designed to require, such as by intimate data communication or control flow between those subprograms and other parts of the work.
The Corresponding Source need not include anything that users can regenerate automatically from other parts of the Corresponding Source.

The Corresponding Source for a work in source code form is that same work.
2. Basic Permissions.
All rights granted under this License are granted for the term of copyright on the Program, and are irrevocable provided the stated conditions are met. This License explicitly affirms your unlimited permission to run the unmodified Program. The output from running a covered work is covered by this License only if the output, given its content, constitutes a covered work. This License acknowledges your rights of fair use or other equivalent, as provided by copyright law.
You may make, run and propagate covered works that you do not convey, without conditions so long as your license otherwise remains in force. You may convey covered works to others for the sole purpose of having them make modifications exclusively for you, or provide you with facilities for running those works, provided that you comply with the terms of this License in conveying all material for which you do not control copyright. Those thus making or running the covered works for you must do so exclusively on your behalf, under your direction and control, on terms that prohibit them from making any copies of your copyrighted material outside their relationship with you.
Conveying under any other circumstances is permitted solely under the conditions stated below. Sublicensing is not allowed; section 10 makes it unnecessary.
3. Protecting Users' Legal Rights From Anti-Circumvention Law.
No covered work shall be deemed part of an effective technological measure under any applicable law fulfilling obligations under article 11 of the WIPO copyright treaty adopted on 20 December 1996, or similar laws prohibiting or restricting circumvention of such measures.
When you convey a covered work, you waive any legal power to forbid circumvention of technological measures to the extent such circumvention is effected by exercising rights under this License with respect to the covered work, and you disclaim any intention to limit operation or modification of the work as a means of enforcing, against the work's users, your or third parties' legal rights to forbid circumvention of technological measures.
4. Conveying Verbatim Copies.
You may convey verbatim copies of the Program's source code as you receive it, in any medium, provided that you conspicuously and appropriately publish on each copy an appropriate copyright notice; keep intact all notices stating that this License and any non-permissive terms added in accord with section 7 apply to the code; keep intact all notices of the absence of any warranty; and give all recipients a copy of this License along with the Program.
You may charge any price or no price for each copy that you convey, and you may offer support or warranty protection for a fee.
5. Conveying Modified Source Versions.
You may convey a work based on the Program, or the modifications to produce it from the Program, in the form of source code under the terms of section 4, provided that you also meet all of these conditions:
a) The work must carry prominent notices stating that you modified it, and giving a relevant date.
b) The work must carry prominent notices stating that it is released under this License and any conditions added under section
7. This requirement modifies the requirement in section 4 to "keep intact all notices".
c) You must license the entire work, as a whole, under this License to anyone who comes into possession of a copy. This License will therefore apply, along with any applicable section 7 additional terms, to the whole of the work, and all its parts, regardless of how they are packaged. This License gives no permission to license the work in any other way, but it does not invalidate such permission if you have separately received it.

d) If the work has interactive user interfaces, each must display Appropriate Legal Notices; however, if the Program has interactive interfaces that do not display Appropriate Legal Notices, your work need not make them do so.
A compilation of a covered work with other separate and independent works, which are not by their nature extensions of the covered work, and which are not combined with it such as to form a larger program, in or on a volume of a storage or distribution medium, is called an "aggregate" if the compilation and its resulting copyright are not used to limit the access or legal rights of the compilation's users beyond what the individual works permit. Inclusion of a covered work in an aggregate does not cause this License to apply to the other parts of the aggregate.
6. Conveying Non-Source Forms.
You may convey a covered work in object code form under the terms of sections 4 and 5, provided that you also convey the machine-readable Corresponding Source under the terms of this License, in one of these ways:
a) Convey the object code in, or embodied in, a physical product (including a physical distribution medium), accompanied by the Corresponding Source fixed on a durable physical medium customarily used for software interchange.
b) Convey the object code in, or embodied in, a physical product (including a physical distribution medium), accompanied by a written offer, valid for at least three years and valid for as long as you offer spare parts or customer support for that product model, to give anyone who possesses the object code either (1) a copy of the Corresponding Source for all the software in the product that is covered by this License, on a durable physical medium customarily used for software interchange, for a price no more than your reasonable cost of physically performing this conveying of source, or (2) access to copy the Corresponding Source from a network server at no charge.
c) Convey individual copies of the object code with a copy of the written offer to provide the Corresponding Source. This alternative is allowed only occasionally and noncommercially, and only if you received the object code with such an offer, in accord with subsection 6b.
d) Convey the object code by offering access from a designated place (gratis or for a charge), and offer equivalent access to the Corresponding Source in the same way through the same place at no further charge. You need not require recipients to copy the Corresponding Source along with the object code. If the place to copy the object code is a network server, the Corresponding Source may be on a different server (operated by you or a third party) that supports equivalent copying facilities, provided you maintain clear directions next to the object code saying where to find the Corresponding Source. Regardless of what server hosts the Corresponding Source, you remain obligated to ensure that it is available for as long as needed to satisfy these requirements.
e) Convey the object code using peer-to-peer transmission, provided you inform other peers where the object code and Corresponding Source of the work are being offered to the general public at no charge under subsection 6d.
A separable portion of the object code, whose source code is excluded from the Corresponding Source as a System Library, need not be included in conveying the object code work.
A "User Product" is either (1) a "consumer product", which means any tangible personal property which is normally used for personal, family, or household purposes, or (2) anything designed or sold for incorporation into a dwelling. In determining whether a product is a consumer product, doubtful cases shall be resolved in favor of coverage. For a particular product received by a particular user, "normally used" refers to a typical or common use of that class of product, regardless of the status of the particular user or of the way in which the particular user actually uses, or expects or is expected to use, the product. A product is a consumer product regardless of whether the product has substantial commercial, industrial or non-consumer uses, unless such uses represent the only significant mode of use of the product.
"Installation Information" for a User Product means any methods, procedures, authorization keys, or other information required to install and execute modified versions of a covered work in that User Product from a modified version of its

Corresponding Source. The information must suffice to ensure that the continued functioning of the modified object code is in no case prevented or interfered with solely because modification has been made.
If you convey an object code work under this section in, or with, or specifically for use in, a User Product, and the conveying occurs as part of a transaction in which the right of possession and use of the User Product is transferred to the recipient in perpetuity or for a fixed term (regardless of how the transaction is characterized), the Corresponding Source conveyed under this section must be accompanied by the Installation Information. But this requirement does not apply if neither you nor any third party retains the ability to install modified object code on the User Product (for example, the work has been installed in ROM).
The requirement to provide Installation Information does not include a requirement to continue to provide support service, warranty, or updates for a work that has been modified or installed by the recipient, or for the User Product in which it has been modified or installed. Access to a network may be denied when the modification itself materially and adversely affects the operation of the network or violates the rules and protocols for communication across the network.
Corresponding Source conveyed, and Installation Information provided, in accord with this section must be in a format that is publicly documented (and with an implementation available to the public in source code form), and must require no special password or key for unpacking, reading or copying.
7. Additional Terms.
"Additional permissions" are terms that supplement the terms of this License by making exceptions from one or more of its conditions. Additional permissions that are applicable to the entire Program shall be treated as though they were included in this License, to the extent that they are valid under applicable law. If additional permissions apply only to part of the Program, that part may be used separately under those permissions, but the entire Program remains governed by this License without regard to the additional permissions.
When you convey a copy of a covered work, you may at your option remove any additional permissions from that copy, or from any part of it. (Additional permissions may be written to require their own removal in certain cases when you modify the work.) You may place additional permissions on material, added by you to a covered work, for which you have or can give appropriate copyright permission.
Notwithstanding any other provision of this License, for material you add to a covered work, you may (if authorized by the copyright holders of that material) supplement the terms of this License with terms:
a) Disclaiming warranty or limiting liability differently from the terms of sections 15 and 16 of this License; or
b) Requiring preservation of specified reasonable legal notices or author attributions in that material or in the Appropriate Legal Notices displayed by works containing it; or
c) Prohibiting misrepresentation of the origin of that material, or requiring that modified versions of such material be marked in reasonable ways as different from the original version; or
d) Limiting the use for publicity purposes of names of licensors or authors of the material; or
e) Declining to grant rights under trademark law for use of some trade names, trademarks, or service marks; or
f) Requiring indemnification of licensors and authors of that material by anyone who conveys the material (or modified versions of it) with contractual assumptions of liability to the recipient, for any liability that these contractual assumptions directly impose on those licensors and authors.
All other non-permissive additional terms are considered "further restrictions" within the meaning of section 10. If the Program as you received it, or any part of it, contains a notice stating that it is governed by this License along with a term that is a further restriction, you may remove that term. If a license document contains a further restriction but permits

relicensing or conveying under this License, you may add to a covered work material governed by the terms of that license document, provided that the further restriction does not survive such relicensing or conveying.
If you add terms to a covered work in accord with this section, you must place, in the relevant source files, a statement of the additional terms that apply to those files, or a notice indicating where to find the applicable terms.
Additional terms, permissive or non-permissive, may be stated in the form of a separately written license, or stated as exceptions; the above requirements apply either way.
8. Termination.
You may not propagate or modify a covered work except as expressly provided under this License. Any attempt otherwise to propagate or modify it is void, and will automatically terminate your rights under this License (including any patent licenses granted under the third paragraph of section 11).
However, if you cease all violation of this License, then your license from a particular copyright holder is reinstated (a) provisionally, unless and until the copyright holder explicitly and finally terminates your license, and (b) permanently, if the copyright holder fails to notify you of the violation by some reasonable means prior to 60 days after the cessation.
Moreover, your license from a particular copyright holder is reinstated permanently if the copyright holder notifies you of the violation by some reasonable means, this is the first time you have received notice of violation of this License (for any work) from that copyright holder, and you cure the violation prior to 30 days after your receipt of the notice.
Termination of your rights under this section does not terminate the licenses of parties who have received copies or rights from you under this License. If your rights have been terminated and not permanently reinstated, you do not qualify to receive new licenses for the same material under section 10.
9. Acceptance Not Required for Having Copies.
You are not required to accept this License in order to receive or run a copy of the Program. Ancillary propagation of a covered work occurring solely as a consequence of using peer-to-peer transmission to receive a copy likewise does not require acceptance. However, nothing other than this License grants you permission to propagate or modify any covered work. These actions infringe copyright if you do not accept this License. Therefore, by modifying or propagating a covered work, you indicate your acceptance of this License to do so.
10. Automatic Licensing of Downstream Recipients.
Each time you convey a covered work, the recipient automatically receives a license from the original licensors, to run, modify and propagate that work, subject to this License. You are not responsible for enforcing compliance by third parties with this License.
An "entity transaction" is a transaction transferring control of an organization, or substantially all assets of one, or subdividing an organization, or merging organizations. If propagation of a covered work results from an entity transaction, each party to that transaction who receives a copy of the work also receives whatever licenses to the work the party's predecessor in interest had or could give under the previous paragraph, plus a right to possession of the Corresponding Source of the work from the predecessor in interest, if the predecessor has it or can get it with reasonable efforts.
You may not impose any further restrictions on the exercise of the rights granted or affirmed under this License. For example, you may not impose a license fee, royalty, or other charge for exercise of rights granted under this License, and you may not initiate litigation (including a cross-claim or counterclaim in a lawsuit) alleging that any patent claim is infringed by making, using, selling, offering for sale, or importing the Program or any portion of it.
11. Patents.

A "contributor" is a copyright holder who authorizes use under this License of the Program or a work on which the Program is based. The work thus licensed is called the contributor's "contributor version".
A contributor's "essential patent claims" are all patent claims owned or controlled by the contributor, whether already acquired or hereafter acquired, that would be infringed by some manner, permitted by this License, of making, using, or selling its contributor version, but do not include claims that would be infringed only as a consequence of further modification of the contributor version. For purposes of this definition, "control" includes the right to grant patent sublicenses in a manner consistent with the requirements of this License.
Each contributor grants you a non-exclusive, worldwide, royalty-free patent license under the contributor's essential patent claims, to make, use, sell, offer for sale, import and otherwise run, modify and propagate the contents of its contributor version.
In the following three paragraphs, a "patent license" is any express agreement or commitment, however denominated, not to enforce a patent (such as an express permission to practice a patent or covenant not to sue for patent infringement). To "grant" such a patent license to a party means to make such an agreement or commitment not to enforce a patent against the party.
If you convey a covered work, knowingly relying on a patent license, and the Corresponding Source of the work is not available for anyone to copy, free of charge and under the terms of this License, through a publicly available network server or other readily accessible means, then you must either (1) cause the Corresponding Source to be so available, or (2) arrange to deprive yourself of the benefit of the patent license for this particular work, or (3) arrange, in a manner consistent with the requirements of this License, to extend the patent license to downstream recipients. "Knowingly relying" means you have actual knowledge that, but for the patent license, your conveying the covered work in a country, or your recipient's use of the covered work in a country, would infringe one or more identifiable patents in that country that you have reason to believe are valid.
If, pursuant to or in connection with a single transaction or arrangement, you convey, or propagate by procuring conveyance of, a covered work, and grant a patent license to some of the parties receiving the covered work authorizing them to use, propagate, modify or convey a specific copy of the covered work, then the patent license you grant is automatically extended to all recipients of the covered work and works based on it.
A patent license is "discriminatory" if it does not include within the scope of its coverage, prohibits the exercise of, or is conditioned on the non-exercise of one or more of the rights that are specifically granted under this License. You may not convey a covered work if you are a party to an arrangement with a third party that is in the business of distributing software, under which you make payment to the third party based on the extent of your activity of conveying the work, and under which the third party grants, to any of the parties who would receive the covered work from you, a discriminatory patent license (a) in connection with copies of the covered work conveyed by you (or copies made from those copies), or (b) primarily for and in connection with specific products or compilations that contain the covered work, unless you entered into that arrangement, or that patent license was granted, prior to 28 March 2007.
Nothing in this License shall be construed as excluding or limiting any implied license or other defenses to infringement that may otherwise be available to you under applicable patent law.
12. No Surrender of Others' Freedom.
If conditions are imposed on you (whether by court order, agreement or otherwise) that contradict the conditions of this License, they do not excuse you from the conditions of this License. If you cannot convey a covered work so as to satisfy simultaneously your obligations under this License and any other pertinent obligations, then as a consequence you may not convey it at all. For example, if you agree to terms that obligate you to collect a royalty for further conveying from those to whom you convey the Program, the only way you could satisfy both those terms and this License would be to refrain entirely from conveying the Program.
13. Use with the GNU Affero General Public License.

Notwithstanding any other provision of this License, you have permission to link or combine any covered work with a work licensed under version 3 of the GNU Affero General Public License into a single combined work, and to convey the resulting work. The terms of this License will continue to apply to the part which is the covered work, but the special requirements of the GNU Affero General Public License, section 13, concerning interaction through a network will apply to the combination as such.
14. Revised Versions of this License.
The Free Software Foundation may publish revised and/or new versions of the GNU General Public License from time to time. Such new versions will be similar in spirit to the present version, but may differ in detail to address new problems or concerns.
Each version is given a distinguishing version number. If the Program specifies that a certain numbered version of the GNU General Public License "or any later version" applies to it, you have the option of following the terms and conditions either of that numbered version or of any later version published by the Free Software Foundation. If the Program does not specify a version number of the GNU General Public License, you may choose any version ever published by the Free Software Foundation.
If the Program specifies that a proxy can decide which future versions of the GNU General Public License can be used, that proxy's public statement of acceptance of a version permanently authorizes you to choose that version for the Program.
Later license versions may give you additional or different permissions. However, no additional obligations are imposed on any author or copyright holder as a result of your choosing to follow a later version.
15. Disclaimer of Warranty.
THERE IS NO WARRANTY FOR THE PROGRAM, TO THE EXTENT PERMITTED BY APPLICABLE LAW. EXCEPT WHEN OTHERWISE STATED IN WRITING THE COPYRIGHT HOLDERS AND/OR OTHER PARTIES PROVIDE THE PROGRAM "AS IS" WITHOUT WARRANTY OF ANY KIND, EITHER EXPRESSED OR IMPLIED, INCLUDING, BUT NOT LIMITED TO, THE IMPLIED WARRANTIES OF MERCHANTABILITY AND FITNESS FOR A PARTICULAR PURPOSE. THE ENTIRE RISK AS TO THE QUALITY AND PERFORMANCE OF THE PROGRAM IS WITH YOU. SHOULD THE PROGRAM PROVE DEFECTIVE, YOU ASSUME THE COST OF ALL NECESSARY SERVICING, REPAIR OR CORRECTION.
16. Limitation of Liability.
IN NO EVENT UNLESS REQUIRED BY APPLICABLE LAW OR AGREED TO IN WRITING WILL ANY COPYRIGHT HOLDER, OR ANY OTHER PARTY WHO MODIFIES AND/OR CONVEYS THE PROGRAM AS PERMITTED ABOVE, BE LIABLE TO YOU FOR DAMAGES, INCLUDING ANY GENERAL, SPECIAL, INCIDENTAL OR CONSEQUENTIAL DAMAGES ARISING OUT OF THE USE OR INABILITY TO USE THE PROGRAM (INCLUDING BUT NOT LIMITED TO LOSS OF DATA OR DATA BEING RENDERED INACCURATE OR LOSSES SUSTAINED BY YOU OR THIRD PARTIES OR A FAILURE OF THE PROGRAM TO OPERATE WITH ANY OTHER PROGRAMS), EVEN IF SUCH HOLDER OR OTHER PARTY HAS BEEN ADVISED OF THE POSSIBILITY OF SUCH DAMAGES.
17. Interpretation of Sections 15 and 16.
If the disclaimer of warranty and limitation of liability provided above cannot be given local legal effect according to their terms, reviewing courts shall apply local law that most closely approximates an absolute waiver of all civil liability in connection with the Program, unless a warranty or assumption of liability accompanies a copy of the Program in return for a fee.

END OF TERMS AND CONDITIONS
How to Apply These Terms to Your New Programs
If you develop a new program, and you want it to be of the greatest possible use to the public, the best way to achieve this is to make it free software which everyone can redistribute and change under these terms.
To do so, attach the following notices to the program. It is safest to attach them to the start of each source file to most effectively state the exclusion of warranty; and each file should have at least the "copyright" line and a pointer to where the full notice is found.
<one line to give the program's name and a brief idea of what it does.> Copyright (C) <year> <name of author>
This program is free software: you can redistribute it and/or modify it under the terms of the GNU General Public License as published by the Free Software Foundation, either version 3 of the License, or (at your option) any later version.
This program is distributed in the hope that it will be useful, but WITHOUT ANY WARRANTY; without even the implied warranty of MERCHANTABILITY or FITNESS FOR A PARTICULAR PURPOSE. See the GNU General Public License for more details.
You should have received a copy of the GNU General Public License along with this program. If not, see <http://www.gnu.org/licenses/>.
Also add information on how to contact you by electronic and paper mail.
If the program does terminal interaction, make it output a short notice like this when it starts in an interactive mode:
<program> Copyright (C) <year> <name of author> This program comes with ABSOLUTELY NO WARRANTY; for details type `show w'. This is free software, and you are welcome to redistribute it under certain conditions; type `show c' for details.
The hypothetical commands `show w' and `show c' should show the appropriate parts of the General Public License. Of course, your program's commands might be different; for a GUI interface, you would use an "about box".
You should also get your employer (if you work as a programmer) or school, if any, to sign a "copyright disclaimer" for the program, if necessary.
For more information on this, and how to apply and follow the GNU GPL, see <http://www.gnu.org/licenses/>.
The GNU General Public License does not permit incorporating your program into proprietary programs. If your program is a subroutine library, you may consider it more useful to permit linking proprietary applications with the library. If this is what you want to do, use the GNU Lesser General Public License instead of this License. But first, please read
<http://www.gnu.org/philosophy/why-not-lgpl.html>.
---------------------------------------------------------------------------libtiff---------------------------------------------------------------------------Copyright (c) 1988-1997 Sam LefflerCopyright (c) 1991-1997 Silicon Graphics, Inc.
Permission to use, copy, modify, distribute, and sell this software and its documentation for any purpose is hereby granted without fee, provided that (i) the above copyright notices and this permission notice appear in all copies of the software and related documentation, and (ii) the names of Sam Leffler and Silicon Graphics may not be used in any advertising or publicity relating to the software without the specific, prior written permission of Sam Leffler and Silicon Graphics.
THE SOFTWARE IS PROVIDED "AS-IS" AND WITHOUT WARRANTY OF ANY KIND, EXPRESS, IMPLIED OR OTHERWISE, INCLUDING WITHOUT LIMITATION, ANY WARRANTY OF MERCHANTABILITY OR FITNESS FOR A PARTICULAR PURPOSE.
IN NO EVENT SHALL SAM LEFFLER OR SILICON GRAPHICS BE LIABLE FOR ANY SPECIAL, INCIDENTAL, INDIRECT OR CONSEQUENTIAL DAMAGES OF ANY KIND, OR ANY DAMAGES WHATSOEVER RESULTING FROM LOSS OF USE, DATA OR PROFITS, WHETHER OR NOT ADVISED OF THE POSSIBILITY OF DAMAGE, AND ON ANY THEORY OF LIABILITY, ARISING OUT OF OR IN CONNECTION WITH THE USE OR PERFORMANCE OF THIS SOFTWARE.
--------------------------------------------------------------------------libjpeg--------------------------------------------------------------------------This software is based in part on the work of the Independent JPEG Group.

SOFTWARE LICENSEPLEASE READ THIS LICENSE CAREFULLY BEFORE USING THE SOFTWARE. BY USING THE SOFTWARE, YOU ARE AGREEING TO BE BOUND BY THE TERMS OF THIS LICENSE.
1. LicenseThe application, demonstration, system and other software accompanying this License, whether on disk, in read only memory, or on any other media (the "Software") and related documentation are licensed to you by SHARP. You own the disk on which the Software is recorded but SHARP and/or SHARP's Licensors retain title to the Software and related documentation. This License allows you to use the Software on one or more computers connected to a single printer and make one copy of the Software in machine-readable form for backup purposes only. You must reproduce on such copy the SHARP copyright notice, the copyright notice of SHARP’s Licensors and any other proprietary legends of SHARP and/or its Licensors that were on the original copy of the Software. You may also transfer all your license rights in the Software, the backup copy of the Software, the related documentation and a copy of this License to another party, provided the other party reads and agrees to the terms and conditions of this License.
2. Restrictions The Software contains copyrighted material, trade secrets and other proprietary material which is owned by SHARP and/or its Licensors and in order to protect them you may not decompile, reverse engineer, disassemble or otherwise reduce the Software to a human-perceivable form. You may not modify, network, rent, lease, loan, distribute or create derivative works based upon the Software in whole or in part. You may not electronically transmit the Software from one computer to another or over a network.
3. TerminationThis license is effective until terminated. You may terminate this License at any time by destroying the Software and related documentation and all copies thereof. This License will terminate immediately without notice from SHARP and/or SHARP’s Licensors if you fail to comply with any provision of this License. Upon termination you must destroy the Software and related documentation and all copies thereof.
4. Export Law AssurancesYou agree and certify that neither the Software nor any other technical data received from SHARP, nor the direct product thereof, will be exported outside the United States except as authorized and as permitted by the laws and regulations of the United States. If the Software has been rightfully obtained by you outside of the United States, you agree that you will not re-export the Software nor any other technical data received from SHARP, nor the direct product thereof, except as permitted by the laws and regulations of the United states and the laws and the regulation of the jurisdiction in which you obtained the Software.
5. Government End UsersIf you are acquiring the Software on behalf of any unit or agency of the United States Government, the following provisions apply. The Government agrees:
(i) if the Software is supplied to the Department of Defense (DoD), the Software is classified as "Commercial Computer Software" and the Government is acquiring only "restricted rights" in the Software and its documentation as that term is defined in Clause 252.227-7013 (c)(1) (Oct., 1988) of the DFARS; and
(ii) if the Software is supplied to any unit or agency of the United States Government other than DoD, the Software is classified as "Commercial" that term is defined at 48 C.F.R. 2.101 and as "Commercial Computer Software" that term is defined in 48 C.F.R. 12.212, and the Government's rights in the Software and its documentation will be as defined in Clause 52.227-19 (c)(2) of the FAR or, in the case of NASA, in Clause 18-52.227-86 (d) of the NASA Supplement to the FAR.

6. Limited Warranty on Media.SHARP warrants the disks on which the Software is recorded to be free from defects in materials and workmanship under normal use for a period of ninety (90) days from the date of purchase as evidenced by a copy of the receipt. The entire liability of SHARP and/or its Licensors and your exclusive remedy will be replacement of the disk which fails to meet the limited warranty provided by this Clause 6. A disk will be replaced when it is returned to SHARP or a SHARP authorized representative with a copy of the receipt. SHARP will have no responsibility to replace a disk damaged by accident, abuse or misapplication.ANY IMPLIED WARRANTIES ON THE DISKS, INCLUDING THE IMPLIED WARRANTIES OF MERCHANTABILITY AND FITNESS FOR A PARTICULAR PURPOSE, ARE LIMITED IN DURATION TO NINETY (90) DAYS FROM THE DATE OF DELIVERY. THIS WARRANTY GIVES YOU SPECIFIC LEGAL RIGHTS, AND YOU MAY ALSO HAVE OTHER RIGHTS WHICH VARY FROM JURISDICTION TO JURISDICTION.
7. Disclaimer of Warranty on SoftwareYou expressly acknowledge and agree that use of the Software is at your sole risk. The Software and related documentation are provided "AS IS" and without warranty of any kind and SHARP and SHARP's Licensor(s) (for the purpose of provisions 6 and 7, SHARP and SHARP's Licensor(s) shall be collectively referred to as "SHARP") EXPRESSLY DISCLAIM ALL WARRANTIES, EXPRESS OR IMPLIED, INCLUDING, BUT NOT LIMITED TO, THE IMPLIED WARRANTIES OF MERCHANTABILITY AND FITNESS FOR A PARTICULAR PURPOSE. SHARP DOES NOT WARRANT THAT THE FUNCTIONS CONTAINED IN THE SOFTWARE WILL MEET YOUR REQUIREMENTS, OR THAT THE OPERATION OF THE SOFTWARE WILL BE UNINTERRUPTED OR ERROR-FREE, OR THAT DEFECTS IN THE SOFTWARE WILL BE CORRECTED. FURTHERMORE, SHARP DOES NOT WARRANT OR MAKE ANY REPRESENTATIONS REGARDING THE USE OR THE RESULTS OF THE USE OF THE SOFTWARE OR RELATED DOCUMENTATION IN TERMS OF THEIR CORRECTNESS, ACCURACY, RELIABILITY, OR OTHERWISE. NO ORAL OR WRITTEN INFORMATION OR ADVICE GIVEN BY SHARP OR A SHARP AUTHORIZED REPRESENTATIVE SHALL CREATE A WARRANTY OR IN ANY WAY INCREASE THE SCOPE OF THIS WARRANTY. SHOULD THE SOFTWARE PROVE DEFECTIVE, YOU (AND NOT SHARP OR A SHARP AUTHORIZED REPRESENTATIVE) ASSUME THE ENTIRE COST OF ALL NECESSARY SERVICING, REPAIR OR CORRECTION, SOME JURISDICTIONS DO NOT ALLOW THE EXCLUSION OF IMPLIED WARRANTIES, SO THE ABOVE EXCLUSION MAY NOT APPLY TO YOU.
8. Limitation of LiabilityUNDER NO CIRCUMSTANCES INCLUDING NEGLIGENCE, SHALL SHARP BE LIABLE FOR ANY INCIDENTAL, SPECIAL OR CONSEQUENTIAL DAMAGES THAT RESULT FROM THE USE OR INABILITY TO USE THE SOFTWARE OR RELATED DOCUMENTATION, EVEN IF SHARP OR A SHARP AUTHORIZED REPRESENTATIVE HAS BEEN ADVISED OF THE POSSIBILITY OF SUCH DAMAGES. SOME JURISDICTIONS DO NOT ALLOW THE LIMITATION OR EXCLUSION OF LIABILITY FOR INCIDENTAL OR CONSEQUENTIAL DAMAGES SO THE ABOVE LIMITATION OR EXCLUSION MAY NOT APPLY TO YOU. In no event shall SHARP's total liability to you for all damages, losses, and causes of action (whether in contract, tort (including negligence) or otherwise) exceed the amount paid by you for the Software.
9. Controlling Law and SeverabilityFor a portion of the Software related with Apple Macintosh and Microsoft Windows, this license shall be governed by and construed in accordance with the laws of the state of California and Washington, respectively. If for any reason a court of competent jurisdiction finds any provision of this License, or portion thereof, to be unenforceable, that provision of the License shall be enforced to the maximum extent permissible so as to effect the intent of the parties, and the remainder of this License shall continue in full force and effect.
10. Complete AgreementThis License constitutes the entire agreement between the parties with respect to the use of the Software and related documentation, and supersedes all prior or contemporaneous understandings or agreements, written or oral, regarding such subject matter. No amendment to or modification of this License will be binding unless in writing and signed by a duly authorized representative of SHARP.

2018D-US1