user's manual - products for independent living, blind, low vision
TRANSCRIPT

User's Manual

Dear Prodigy System Owner:
You have chosen one of the best blood glucose monitoring systems available. This booklet has important information about the system. Please read it carefully.
Your system provides you with accurate, plasma-calibrated test results. This feature makes it easy for you and your doctor to compare your meter results with laboratory results.
Blood glucose monitoring plays an important role in diabetes control. A long-term study showed that keeping blood glucose levels close to normal can reduce the risk of diabetes complications by up to 60%.* The results you get with the system can help you and your healthcare professional monitor and adjust your treatment plan to gain better control of your diabetes.
A warranty registration card is included with your system. Please complete it and mail it to us.
* American Diabetes Association position statement on the Diabetes Control and Complications Trial (1993).
1

The system is intended for use outside the body (in vitro diagnostic use). It should be used only for testing glucose (sugar) and only with fresh capillary whole blood samples. The system is intended for use in the home and in clinical settings. It should not be used for the diagnosis of diabetes or for the testing of newborns.
CAUTION:
Before using any product to test your blood sugar (blood glucose), read all instructions and practice the test. Do all quality control checks as directed and consult with a diabetes healthcare professional. These recommendations apply to all blood glucose monitoring systems and are supported by the Diabetes Educator Section of the Canadian Diabetes Association.
2

Important Information
• Severe dehydration and excessive water loss may cause false low results. If you believe you are suffering from severe dehydration, consult a healthcare professional immediately.
• Test results below 60 mg/dL (3.3 mmol/L) mean low blood glucose (hypoglycemia). Test results greater than 240 mg/dL (13.3 mmol/L) mean high blood glucose (hyperglycemia). If you get results below 60 mg/dL or above 240 mg/dL, and do not have symptoms, first repeat the test. If you have symptoms or continue to get results that fall below 60 mg/dL or above 240 mg/dL, follow the treatment advice of your healthcare professional.
• If you are experiencing symptoms that are not consistent with your blood glucose test results and you have followed all instructions described in the Prodigy owner's booklet, call your healthcare professional.
• A red blood cell count (hematocrit) that is very high (above 60%) or very low (below 20%) can cause false results.
• Elevated blood triglyceride, reducing substances such as uric acid and ascorbic acid at normal blood concentration, or acetaminophen, dopa, methyldopa, L-dopa, and tolbutamide at normal blood concentrations do not significantly affect the test results.
• This system maybe used at altitudes up to 10,742 feet (3275m) without an effect on test results.
3

TABLE OF CONTENTS
IMPORTANT INFORMATION 03 GETTING STARTED 05
The Prodigy Blood Glucose Monitoring System 05 Prodigy Blood Glucose Meter 06 Meter Display Segments 07 Prodigy Test Strips 08
BEFORE TESTING 10 Checking the Display 10 Coding the Meter 10 Checking the System With Prodigy Control Solutions 12
TESTING YOUR BLOOD 17 Step-by-Step Test Procedure 17 Special Messages 19 Using the Meter Memory 20
COMPARING METER AND LABORATORY RESULTS 22 SETTING THE METER AND DELETING THE MEMORY 24
Setting the Time, Date, Unit of measurement, 25 Unit of temperature and Memory deletion Downloading Test results to your PC 27
CARING FOR YOUR METER 27 Maintenance 27 Power 28
DISPLAY MESSAGES AND 29 PROBLEM - SOLVING GUIDE SPECIFICATIONS 31
Performance Characteristics 31 WARRANTY 32 EXPECTED TEST RESULTS 33 SYMBOL INFORMATION 34
4

GETTING STARTED The Prodigy Diabetes Blood Glucose Test System
The Prodigy system consists of three main products: the Prodigy blood glucose meter, Prodigy test strips, and Prodigy control solutions. These products have been designed, tested, and proven to work together as a system to produce accurate blood glucose test results. Use only Prodigy test strips and Prodigy control solutions with the blood glucose meter.
CAUTION:
Check your system to be sure the outer carton seal is not missing or broken. If either of these conditions occurred, please return your system to the place of purchase.
5

Prodigy Blood Glucose Meter
-TEST SLOT The test slots is where you insert the test strip for testing. The meter will turn on automatically when you insert a test strip.
-SET BUTTON The Set button (in the back of the meter) is used to set the date, time, units and other meter functions.
-DISPLAY Your test results are displayed here. The display guides you through the test using symbols and simple messages.
MAIN BUTTON The main button in front of the meter is used to set up the meter, enter the memory mode, change the value of date and time, unit setting, memory deleting and to turn the meter on and off.
6
CODE BUTTON The code button at the side is used to CODE the meter to the strip.

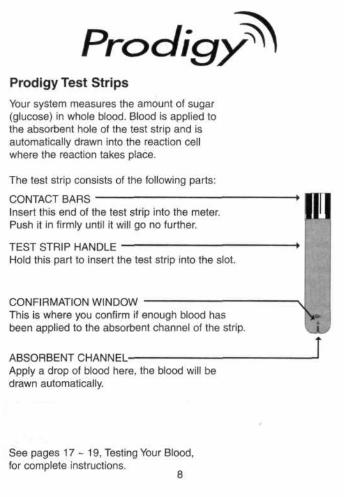

Pro Important Test Strip Information • Store test strip packages in a cool, dry place below 104°F (40°C). Keep
away from direct sunlight and heat. • Store your test strips in their original vial only. • After removing a test strip from the vial, immediately replace the vial cap
and close it tightly.
• With clean, dry hands, you may touch the test strip anywhere on its sur face when removing it from the vial or inserting it into the meter.
• Use each test strip immediately after removing it from the vial.
• Write the discard date on the vial label when you first open it. Discard remaining test strips 90 days after first opening date.
• Apply only blood sample or control solution to the absorbent hole. Applying other substances to the absorbent hole will cause inaccurate results.
• Do not use test strips beyond the expiration date printed on the package since they may cause inaccurate results.
• Do not bend, cut, or alter a test strip in any way.
CAUTION:
Keep the test strips away from children; the strips can be a potential choking hazard. Never chew or swallow a test strip.
9

BEFORE TESTING
Checking the Display
Each time you insert a test strip into the meter to turn the meter on , the meter will display "CH" with the strip symbol briefly. This tells you that the system is performing several self-checks.
For meter model No. 51720, you will hear a voice message, "the code number is (number).'
Coding the Meter
The Code Button is used to calibrate the test strips with the meter for accurate results Please code the meter before using it for the first time and then every time you change to another vial of test strips. Each time you test, check that the code number on the meter display matches the code number on the test strip vial.
Code Button
CAUTION:
If the code number displayed on the meter does not match the number printed on the vial, test results may be inaccurate .
10

STEP 1 Enter the Code Mode
Start with the meter turned off. Press the Code Button. The Code symbol and "SEL" will appear on the LCD display, followed by the code number, with the number blinking.
STEP 2 Match the Code Numbers
Compare the code number flashing on the LCD display with the code number on the test strip vial. If the two code numbers match, you may begin testing. If they do not match, follow Step 3. When you first use the meter, you need to code the meter before testing.
STEP 3 Code the Meter
Press and release the Code Button to advance one number. When the code you need appears on the display, press the Main Button to set the code and turn off the meter. If you do not press any button in two minutes, the meter will turn off automatically..
11
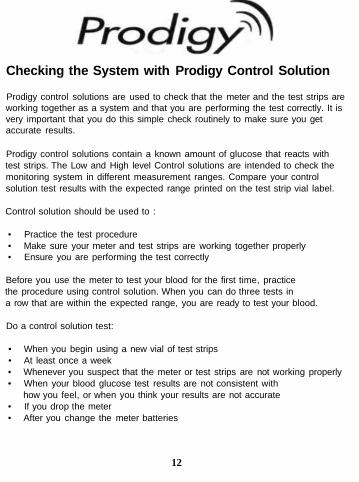
Checking the System with Prodigy Control Solution
Prodigy control solutions are used to check that the meter and the test strips are working together as a system and that you are performing the test correctly. It is very important that you do this simple check routinely to make sure you get accurate results.
Prodigy control solutions contain a known amount of glucose that reacts with test strips. The Low and High level Control solutions are intended to check the monitoring system in different measurement ranges. Compare your control solution test results with the expected range printed on the test strip vial label.
Control solution should be used to :
• Practice the test procedure • Make sure your meter and test strips are working together properly • Ensure you are performing the test correctly
Before you use the meter to test your blood for the first time, practice the procedure using control solution. When you can do three tests in a row that are within the expected range, you are ready to test your blood.
Do a control solution test:
• When you begin using a new vial of test strips • At least once a week • Whenever you suspect that the meter or test strips are not working properly • When your blood glucose test results are not consistent with
how you feel, or when you think your results are not accurate • If you drop the meter • After you change the meter batteries
12
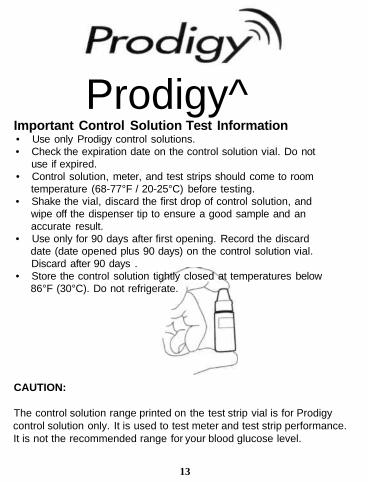
Prodigy^ Important Control Solution Test Information • Use only Prodigy control solutions. • Check the expiration date on the control solution vial. Do not
use if expired. • Control solution, meter, and test strips should come to room
temperature (68-77°F / 20-25°C) before testing. • Shake the vial, discard the first drop of control solution, and
wipe off the dispenser tip to ensure a good sample and an accurate result.
• Use only for 90 days after first opening. Record the discard date (date opened plus 90 days) on the control solution vial. Discard after 90 days .
• Store the control solution tightly closed at temperatures below 86°F (30°C). Do not refrigerate.
CAUTION:
The control solution range printed on the test strip vial is for Prodigy control solution only. It is used to test meter and test strip performance. It is not the recommended range for your blood glucose level.
13

CAUTION:
Every time you perform a control solution test, you must enter into the "CTL" test mode so that the test will not be stored in the meter memory.
14

STEP 2 Apply Control Solution Shake the control solution vial well. Remove the cap. Squeeze the vial, discard the first drop, and wipe off the dispenser tip to ensure an accurate result. Squeeze the vial again to get another drop and place the drop on your finger tip first. Then, apply the drop to the absorbent hole of the test strip (where it meets the narrow channel) until the drop is drawn into the test strip, the confirmation window is filled, and the meter begins to count down.
CAUTION:
To avoid contaminating the control solution with the content of the test strip, you have to place a drop of control solution on a clean surface or on your finger tip first. Then touch the test strip to the drop.
15

Prodigy^ STEP 3 Result Appears in 6 Seconds. The meter will count down and the control solution test result will appear. Compare the result with the range printed on the test strip vial . The result should fall within this range. For meter model No. 51720 you will hear a voice message, "the blood glucose is (number) (unit)". Comparing control solution results If test results fall outside the range printed on the test strip vial, repeat the test. Out-of-range results may be caused by one or more of the following: • Error in performing the test • Failure to shake the control solution vial vigorously • Expired or contaminated control solution • Control solution that is too warm or too cold • Failure to discard the first drop of control solution and wipe the
dispenser tip clean • Improper coding of the meter • Test strip deterioration • Meter malfunction CAUTION:
If you continue to get control solution test results that fall outside of the range printed on the vial, the system may not be working properly. Do not use the system to test your blood if you continue to get test results that fall outside of the range. If you are unable to resolve the problem, call the Technical Support Line at 1-800-243-2636.
16

TESTING YOUR BLOOD
Be sure to read this section and the test strip package insert found in the test strip box carefully before testing. Make sure you have all items needed to test:
A. Blood Glucose Meter B. Test Strip C. Lancing Device D. Sterile Lancet
Step-by-Step Test Procedure
STEP 1 Insert the test strip Insert the test strip with contact bars end first and facing up into the test port fully. The bars must be all the way into the meter to avoid an inaccurate result. The meter will turn on automatically. "CH" and strip symbol will appear briefly on this display. Next, the ambient temperature will appear and followed by the symbol with the code number. Code the meter if necessary.
For meter model No. 51720 you will hear a voice message: "please apply blood into the strip".

NOTE: If you do not apply a blood sample within 3 minutes, the meter will turn itself off. You must remove the test strip and insert it back into the meter to restart the test procedure.
STEP 3 Accurate Results in 6 Seconds Your blood glucose test result will appear after the meter counts down. Blood glucose test results are automatically stored in the meter memory. Turn the meter off by removing the test strip. Discard the used test strip carefully to avoid contamination.
For meter model No. 51720 you will hear a voice message, "the blood glucose is (number) (unit)".
Plasma calibrated result (example)
The Prodigy meter provides accurate, plasma-calibrated test results that can be compared directly with laboratory results.
18

Special Messages Some special symbols or messages will appear depending on your test result.
1) When below 20 mg/dL (1.1 mmol/L), "Lo" will appear on the meter display instead of numbers.
2) When between 20 to 70 mg/dL (1.1 and 3.9 mmol/L), the "low" symbol will appear with your test result. Lo or "low" symbol indicates hypoglycemia (low blood glucose.) You should immediately treat hypoglycemia as recommended by your healthcare professional.
3) When within optimal range, which means 70 to 120 mg/dL (3.9 to 6.6 mmol/L), a smile will appear with your test result.
4) When between 120 to 240 mg/dL (6.6 and 13.3 mmol/L), the "high" symbol will appear with your test result.
5) When above 240 mg/dL (13.3 mmol/L), "KETONE?" symbol will appear on the meter display. This indicates there is a possibility of Ketone accumulation if you are type 1 diabetic. Please seek immediate medical assistance.
6) When above 600 mg/dL (33.3 mmol/L), "Hi" will appear on the meter display instead of number. This indicates severe hyperglycemia. Please seek immediate medical assistance.
19

Prodigy^ USING THE METER MEMORY Your Meter stores the 450 most recent blood glucose test results with date and time in its memory. It also provides you with 7,14,21,28,60 and 90 day averages of your blood glucose test results. You can review the test results in memory with these easy steps. STEP 1 Enter the Memory Mode With the meter turned off, press the main button twice. The 7 day average will appear, indicating that you are in the memory mode. If you continue to press The Main Button, the 14, 21, 28, 60 and 90 day average will appear. You can then review the last 450 tests in the memory. The 7 day average is calculated from the blood glucose results obtained during the last 7 days. It also indicates how many blood glucose tests have been performed within this period, e.g., 58 (58 tests in the last 7 days).
When using the meter for the first time, "—" will appear, showing that there are no test results in memory.
20

The 14-day average is calculated from the blood glucose results obtained during the last 14 days. It, too, indicates how many blood glucose tests have been performed, e.g., 24 (24 tests in the last 14 days). When using the meter for the first time, "14 DAYa—" will appear, showing that there are no test results in memory . It's all the same to the 21, 28, 60 and 90 day average.
STEP 2 Recall Test Results After the 90-day average, the most recent test result with date and time will be shown. Press the Main Button once and the next most recent test result will appear. Each time you press and release the main button, the meter will recall up to your last 450 test results in order. When the memory is full, the oldest result is dropped as the newest is added.
When reaching the last set of result, "End" will be shown on LCD display, and the meter turns off automatically.
NOTE: If no button is pressed for 2 minutes, the meter will show "OFF" and turn off automatically.
STEP 3 Exit The Memory Mode Press the Main Button for three seconds to turn off the meter.
21

Prodigy^ COMPARING METER AND LABORATORY RESULTS Test results from meter and laboratory are both expressed in plasma-equivalent units. However, the result you obtain from your meter may differ somewhat from your laboratory result due to normal variation. Meter results can be affected by factors and conditions that do not affect laboratory results in the same way. (See test strip package insert for typical accuracy and precision data, and for important information on limitations.) To make an accurate comparison between meter and laboratory results, follow the guidelines below. Before you go to the lab: • Perform a control solution test to make sure that the meter is
working properly • It is best to fast for at least eight hours before doing comparison
tests • Take your meter with you to the lab
While at the lab: • Make sure that the samples for both tests (the meter test and the lab
test) are taken and tested within 15 minutes of each other
22

Prodigy^ • Wash your hands before obtaining a blood sample • Never use your meter with blood that has been collected in a gray-
top test tube • Use fresh capillary blood only
You may still have a variation from the result because blood glucose levels can change significantly over short periods, especially if you have recently eaten, exercised, taken medication, or experienced stress. In addition, if you have eaten recently, the blood glucose level from a finger stick can be up to 70 mg/dL (3.9 mmol/L) higher than blood drawn from a vein (venous sample ) used for a lab tesf. Therefore, it is best to fast for eight hours before doing comparison tests. Factors such as the amount of red blood cells in the blood (a high or low hematocrit) or the loss of body fluid (severe dehydration) may also cause a meter result to be different from a laboratory result. References 1. Surwit, R.S., and Feinglos, M.N.:
Diabetes Forecast (1988), April, 49-51. 2. Sacks, D.B.: "Carbohydrates." Burtis,
C.A., and Ashwood, E.R.( ed.), Tietz Textbook of Clinical Chemistry. Philadelphia: W.B. Saunders Company (1994),959.
23

Setting the Time, Date, Unit of Measurement Unit of Temperature and Memory Deletion
To set the time, you must first enter the setting mode. Start with the meter off. Then press the Set Button located in the batteries compartment. The meter is now in the set mode.
STEP 1. Set the Year First, all symbols on LCD will be displayed. Then the year will appear, with the number flashing. Press and release the Main Button to advance one year. To move faster, hold the Main Button down. With the correct year on the display, press the Set Button and the date will appear on the display with the month segment flashing.
STEP 2. Set the Month Press and release the Main Button until the correct month appears. To move faster, hold the Main Button down. With the correct month on the display, press the setting button and the day segment will start flashing.
24
SETTING THE METER AND DELETING THE MEMORY
Before you start using the meter for first time you may need to setup the time, date, unit of measurement and unit of temperature and language. You also may need to enter the set mode and reset the meter if you need to change the time or if you remove the batteries.

STEP 3 Set the Day Press and release the Main Button until the correct day appears. To move faster, hold the Main Button down. With the correct day on the display, press the Set Button and the time will appear on the display with the hour segment flashing.
"Before setting the time, you must have first set the date.
STEP 4 Set the Hour Press and release the Main Button to advance one hour. To move faster, hold the Main Button down. With the correct hour on the display, press the Set Button and the minutes segment will start flashing.
STEP 5. Set the Minutes Press and release the Main Button to advance one minute. To move faster, hold the Main Button down. With the correct minute on the display, press the Set Button and the current unit of measurement will start flashing.
NOTE: Your meter displays 7, 14, 21, 28, 60 and 90 day averages which you can access from the meter memory. These averages are calculated from results obtained during the 7, 14, 21, 28, 60 and 90 days preceding the current date and time settings. When the date and time are changed, the 7, 14, 21, 28, 60 and 90 day averages may change.
Your meter can display test results in milligrams per deciliter (mg/dL) or mil-limoles per litre (mmol/L). The mg/dL unit is standard in the United States. The mmol/L unit is standard in Canada.
25

STEP 6. Select mg/dL or mmol/L. Press and release the Main Button until the unit of measurement you are choosing appears on the display. Press the Set Button and the current unit of temperature will start flashing.
STEP 7. Select °C or °F Press and release the Main Button until the unit of temperature you are choosing appears on the display. Press the Set Button and the meter will display "dEL" with flashing "mem" symbol.
STEP 8. Delete memory and exit the setting mode "dEL" and flashing M symbol appears on the display. When you press the Main Button, "dEL' will flash too. Press the Main Button again to delete all the meter Memory records. When the meter displays the smile,it means that the memory is deleted. You can press the Set Button to turn off the meter. If you do not want to delete the memory, do not press the Main Button, but press the Set Button again to turn off the meter.
26

DOWNLOADING TEST RESULTS TO YOUR COMPUTER
Prodigy allows you to download all your test results in your computer helping you or your health care professional track changes in your blood glucose level over time. To start downloading your results you need to connect the downloading cable* to your computer and to the Prodigy meter Download Port, and install a free software to your PC that will let you complete this process easily. You can get the free copy of this software on our web-site at: www.diagnosticdevicesinc.com 'Downloading cable sold separately.
CARING FOR YOUR METER
Maintenance
Your meter does not require special maintenance. As no blood or control solution comes in contact with the meter, there is no special cleaning required. Take care to avoid getting dirt, dust, blood, control solution or water inside the meter through the test port or data port. Store the meter in its carrying bag after each use. A cloth dampened with water and mild detergent can be used to wipe down the outside of the meter. Your meter is a precision instrument. Please handle it with care.
27

Power Your Prodigy Blood Glucose monitoring system uses two (2) AAA 1.5.V alkaline batteries (included with your system) that need to be installed in the meter before use. The new batteries will provide you with enough power to perform about 3,000 tests. When replacing the batteries, use only (2) AAA 1.5.V alkaline batteries.
The meter will alert you when the power is getting low by displaying two different messages:
1. The symbol I appears on the display when the meter is turned on and all other display messages are functional. From the time the symbol first appears, there is enough power left for about 50 tests. The test results will be accurate, but it is time to change the batteries.
2. The symbol I appears with the E-b symbol on the displays by itself. This means that the batteries will not provide enough power for a test. You must change the batteries.
Replacing the batteries a. Make sure that the meter is turned off. b. Turn the meter over and locate the battery compartment. c. Press the buckle on battery cover and lift up to remove cover. d. Remove the old batteries. Insert two (2) AAA 1.5.V alkaline batteries,
making sure you follow the batteries diagram for a proper installation. e. Replace battery cover back into place.
NOTE: Replacing the batteries does not affect the meter's memory (previous test results stored in memory). However, the time and date settings may need to be updated.
28

DISPLAY MESSAGES AND PROBLEM-SOLVING GUIDE
Following is a summary of some display messages and symbols. These messages help to identify certain problems but do not appear in all cases when a problem has occurred. Improper use may cause an inaccurate result without producing an error message or a symbol. In the event of a problem, refer to the information under action.


31
SPECIFICATIONS Dimension: 41.6mm x 82.3mm x 21.4mm Power source: two (2) AAA 1,5V alkaline batteries Battery life: Over 3,000 determinants Display: Large LCD Memory : 450 measurement results with date and time Auto electrode inserting detection Auto sample loading detection Auto reaction time count-down Sleeping mode: Power consumption less than 20uA Auto turn-off after 3 minutes without action Temperature warning Operating condition: 50°F-104°F (10°C ~40°C) Operating humidity range: 10-90% R.H. (non-condensing) Storage/Transportation condition: -4°F~158°F (-20°C ~70°C), 5%~95% R.H. Measurement Units: Either mg/dL or mmol/L Measurement Range: 20-600mg/dL (1.1~33.3mmol/L)
Performance characteristics • Accuracy: Whole blood glucose test results were compared with YSI-2300
glucose analyzers. 100% were with 15 mg/dL (0.83 mmol/L) at concentration < 75 mg/dL (4.2 mmol/L) and 100% with glucose concentration < 75 mg/dL (4.2 mmol/L) were with ±20% of the reference values. The study shows that the Prodigy glucose monitoring system compares well with a laboratory system.
• Precision: This study shows the intermediate precision and repeatability of less than 5%.
• Traceability of glucose monitoring system: The results of Prodigy glucose monitoring system were compared to parallel results obtained on YSI 2300, which is the manufacturer's standard measurement procedure. The study shows that the Prodigy glucose monitoring system correlated very well with manufacturer's reference method.
• The device has certified to meet the following standards: 98/79/EC, IEC 60601-1, IEC 61010-1, IEC 60601-1-2, IEC61326, and ISO 15197

WARRANTY
The Prodigy Blood Glucose Monitoring System is warranted to be free of defects in material and workmanship for a period of one (1) year from the date of purchase. This warranty extends only to the original purchaser and is not transferable.
For warranty assistance, please contact:
Diagnostic Devices Inc. Technical Support 1-800-243-2636
32
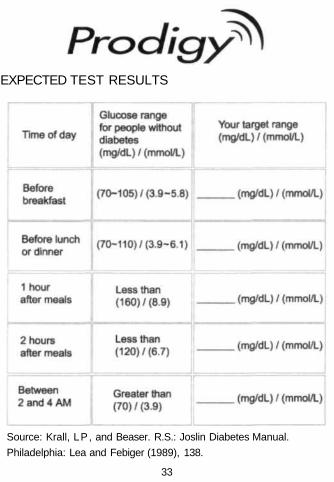
EXPECTED TEST RESULTS
Source: Krall, LP, and Beaser. R.S.: Joslin Diabetes Manual.
Philadelphia: Lea and Febiger (1989), 138.
33

Symbols convey information essential for proper use
34