user’s manual - primera · this device complies with part 15 of the fcc rules. operation is...
TRANSCRIPT

USER’S MANUAL
© 2015 All rights reserved.
For the most recent version of this manual please visit http://www.primeratrio.com/download
511402‐061015

Page | 2
Notices: The information in this document is subject to change without notice. NO WARRANTY OF ANY KIND IS MADE WITH REGARD TO THIS MATERIAL, INCLUDING, BUT NOT LIMITED TO, THE IMPLIED WARRANTIES OF MERCHANTABILITY AND FITNESS FOR A PARTICULAR PURPOSE. No liability is assumed for errors contained herein or for incidental or consequential damages in connection with the furnishing, performance, or use of this material. This document contains proprietary information that is protected by copyright. All rights are reserved. No part of this document may be photocopied, reproduced, or translated into another language without prior written consent.
Trademark Acknowledgments: Primera and Primera Trio are registered trademarks of Primera Technology, Inc. Windows is a registered trademark of Microsoft Corporation. All other trademarks are the property of their respective owners.
Printing History
Edition 1.0, #511402, Copyright 2015, All rights reserved.
FCC Compliance Statement: This device complies with part 15 of the FCC rules. Operation is subject to the following two conditions: (1) this device may not cause harmful interference, and (2) this device must accept any interference received, including interference that may cause undesired operation.
For Users in the United States: This product is intended to be supplied by a UL listed Direct Plug-In Power Supply marked "Class 2"or a UL listed ITE Power Supply marked "LPS" with output rated 7.5VDC, 4.5A or higher. This equipment has been tested and found to comply with the limits for a Class A digital device, pursuant to Part 15 of the FCC Rules. In a domestic environment this product may cause radio interference, in which case the user may be required to take adequate measures. This equipment generates, uses, and can radiate radio frequency energy and, if not installed and used in accordance with the instructions, may cause harmful interference to radio communications. However, there is no guarantee that interference will not occur in a particular installation. If this equipment does cause harmful interference to radio or television reception, which can be determined by turning the equipment off and on, the user is encouraged to try to correct the interference by one or more of the following measures:
• Re-orient or relocate the receiving antenna. • Increase the separation between the equipment and receiver. • Connect the equipment into an outlet on a circuit different from that to which the receiver is
connected. • Consult the dealer or an experienced radio/TV technician for help.
Use of shielded cables is required to comply with the Class A limits of Part 15 of the FCC Rules. You are cautioned that any changes or modifications not expressly approved in this manual could void your authority to operate and/or obtain warranty service for this equipment. For Users in Canada: This digital apparatus does not exceed the Class A limits for radio noise for digital apparatus set out on the Radio Interference Regulations of the Canadian Department of Communications. Le present appareil numerique n'emet pas de bruits radioelectriques depassant les limites applicables aux appareils numeriques de la class A prescrites dans le Reglement sur le brouillage radioelectrique edicte par le ministere des Communications du Canada.

Page | 3
Table of Contents
Section 1: Overview ...................................................................................................................................... 4
1A. Indentifying the Parts ......................................................................................................................... 5
1B. Software Overview ............................................................................................................................. 7
1C. Information, Updates and Language Settings. ................................................................................... 8
Section 2: Change Cartridge ......................................................................................................................... 9
Section 3: Stow Cartridge for Travel ........................................................................................................... 12
Section 4: Load Paper ................................................................................................................................. 15
Section 5: Print............................................................................................................................................ 17
5A. Print from Primera Trio Application ................................................................................................. 17
5B. Print from Other Applications ........................................................................................................... 18
5C. Printer Settings (Calibrate, Clean, Change & Stow) .......................................................................... 19
5D. Printing Preferences (Print Quality and Speed) ................................................................................ 21
5E. Print Borderless Photo ...................................................................................................................... 24
Section 6: Scan ............................................................................................................................................ 26
6A. Scan a document, photo, receipt, etc. .............................................................................................. 26
6B. Scanner Settings ................................................................................................................................ 28
6C. Manage Scanner Presets ................................................................................................................... 29
6D. Editing a Scan before Saving ............................................................................................................. 34
6E. Scanning a Multi‐Page Document ..................................................................................................... 35
6F. Clean and Calibrate the Scanner ....................................................................................................... 37
Section 7: Copy ........................................................................................................................................... 39
7A. Copy a document, photo, receipt, etc. ............................................................................................. 39
7B. Copy Settings .................................................................................................................................... 42
Section 8: Battery Installation and Use ...................................................................................................... 45
Section 9: Maintenance, Troubleshooting and Tech Support .................................................................... 49
9A. Replacing the Cover .......................................................................................................................... 49
9B. Cleaning the Ink Cartridge ................................................................................................................ 52
9C. Technical Support ............................................................................................................................. 53
9D. Troubleshooting ............................................................................................................................... 54
Section 10: Specifications ........................................................................................................................... 56
Index ........................................................................................................................................................... 58
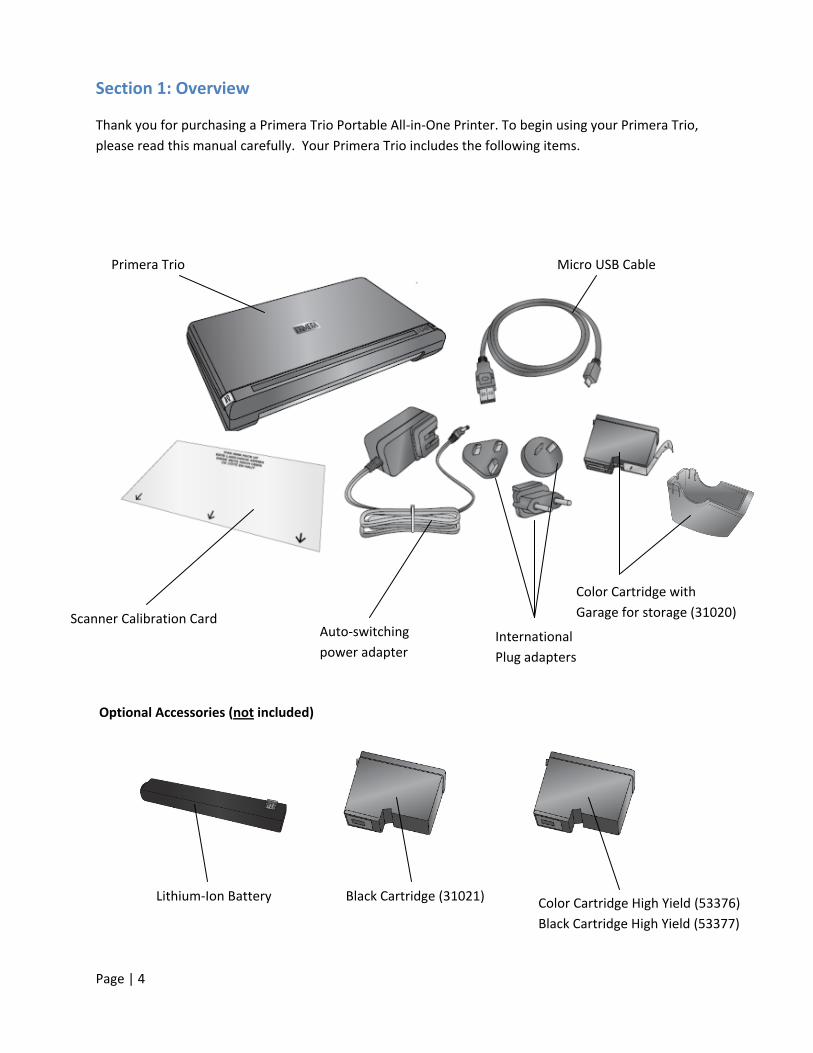
Section 1: Overview
Thank you for purchasing a Primera Trio Portable All‐in‐One Printer. To begin using your Primera Trio, please read this manual carefully. Your Primera Trio includes the following items.
Primera Trio Micro USB Cable
Page | 4
Color Cartridge with Garage for storage (31020)
Optional Accessories (not included)
International Plug adapters
Auto‐switching power adapter
Scanner Calibration Card
Color Cartridge High Yield (53376) Black Cartridge High Yield (53377)
Lithium‐Ion Battery Black Cartridge (31021)

1A. Indentifying the Parts Paper Tray Extension
Page | 5
Paper Release
Adjustable Paper Guide
Cartridge
Cartridge Carriage Latch
Retry Button ‐Press once to move cartridge to change or stow position.
Replaceable Cover
Battery Compartment (See section 8)
Cartridge Carriage
Power Button ‐While printing, press to cancel the print job.
Scanner

Rear View
Micro USB Port To print boarding passes, documents with barcodes or 4x6 photos, feed media here.
Power Port
Page | 6

1B. Software Overview
Printer Status (Errors are displayed here)
Page | 7
Scan Preview (Last scanned document will appear here)
Information (Printer and Software and Updates) Settings
Print (Prints the currently selected Scan in the scan preview)
Copy (Starts a Copy)
Scan (Starts a Scan)
Battery Charge Indicator (Appears only if Battery is installed and printer is using battery power)
AC Power Indicator (Appears if AC power plug is connected)
Ink Level Indicator (Click to open Cartridge Settings)

1C. Information, Updates and Language Settings.
You can access printer driver, firmware and software version information by clicking on the Info Icon.
Page | 8
Click “Check for updates” to connect to the internet and check for any new software, driver or firmware updates. If updates are available you will be prompted to install them. Follow the steps to install new software.
The software automatically checks for updates daily. To change the frequency of the checks, click on the settings icon and then “General Settings.” You may also check for beta versions. Check the box to enable this feature.
Language and Units. Set the Language by choosing it from the drop down menu. You may also set the units of measure here.

Section 2: Change Cartridge 1. Press the Retry button.
2. The cartridge will move into the change position on the left side of the printer.
Page | 9
STOP! The cartridge must be on the far left side of the printer before continuing. Failure to heed this warning will result in damage to the printer.

3. Lift the print carriage latch all the way open. The cartridge will move forward slightly once the latch is opened all the way.
Page | 10
4. Remove the cartridge by lifting straight up.
Cartridge Carriage Latch

5. Locate a new cartridge and remove it from its packaging. Be sure to remove the tape covering the print head nozzles after you remove the cartridge from the cartridge garage.
Page | 11
6. Insert the new cartridge
7. Close the cartridge carriage latch. You will hear a click when the latch is completely closed.
Remove tape
Cartridge Garage
Cartridge Carriage Latch
Click!
Note: If the latch does not close easily push down lightly on the cartridge first.

Section 3: Stow Cartridge for Travel Warning! Before closing the cover you must stow the cartridge (turn it sideways) so that you can close the cover.
1. Press the power button.
2. The carriage will move the cartridge into the stow position on the left side of the printer.
Page | 12
STOP! The cartridge must be on the far left side of the printer before continuing. Failure to heed this warning will result in damage to the printer.

3. Lift the Cartridge Carriage Latch into the stow position. In the stow position the cartridge carriage latch is just behind the back edge of the cartridge as shown below. You will see the cartridge move forward slightly when the latch is in the correct position.
Page | 13
4. Grasp the cartridge carriage latch, while in the stow position, and turn the carriage to the side. The carriage latch will fit into the corresponding notch in the base of the printer.
Note: The stow position is the only position where the carriage is allowed to turn easily. If the carriage does not turn easlily it is not in the right position.
Notch

5. You may now flip down the Paper Tray Extension and close the cover.
Page | 14
6. Finally, to power off the printer, unplug the USB and power cable (if connected).
1 2
3

Section 4: Load Paper Up to ten sheets of paper can be loaded into the sheet feeder on the printer.
1. To load standard letter or A4 paper, first make sure the Adjustable Paper Guide is moved to the far left.
Page | 15
2. Add the paper so that it is tight against the right Fixed Paper Guide.
Adjustable Paper Guide
Fixed Paper Guide
10x Sheets
Important Note: Do not push the paper into the printer! The paper should set in the tray without any extra force. If force is required to insert the paper you may have too many sheets. Multiple sheets will feed through the printer if too many sheets are inserted or paper is pushed into the printer.

3. Move the Adjustable Paper Guide tight up against the edge of the paper.
Page | 16
4. Once the guide is set for standard paper, you will not need to move it again each time you load paper. Simply load the paper as described above and push it past the paper stop on the guide as shown below.
Adjustable Paper Guide
Paper Stop
Note: Push the paper past the stop each time you load paper. The paper stop prevents the paper from falling forward in the printer.

Section 5: Print You can print from any application or you can print previously scanned items from the Primera Trio software.
5A. Print from Primera Trio Application 1. To print a previously scanned item, choose it from the preview drop down menu.
Page | 17
2. Click the Print button
3. The Primera Trio will now print the image shown in the preview using default printer settings. Printer settings can be changed using the instructions in section 5C.

5B. Print from Other Applications You may also print from any application including Adobe Reader, MS Word, MS Excel, MS PowerPoint, and web browsers such as Chrome, Firefox, or Internet Explorer.
1. Find the file menu and choose printer or hold down the CTRL key + P. A print dialog window will appear.
Page | 18
2. Set the number of copies. Up to ten sheets can be placed in the sheet feeder. You may print more copies but you will receive a prompt to refill the sheet feeder if you print more than ten copies.
3. (Optional) You can adjust printer quality settings or page size by clicking the “Properties” button. See section 5C for more information on printing preferences. You may also access the printing preferences via the Primera Trio Application. The same settings are available in both locations.
4. When you are ready to print click the “Print” or “OK” button. The Trio Application will open and the “Printing in Progress” message will appear.
Adobe Reader MS Word

5C. Printer Settings (Calibrate, Clean, Change & Stow) To access printer settings click on the gear icon at the top of the Primera Trio application.
Page | 19
The Printer Settings window will open. Click the back button to go back.
Show print setting before printing. Check this box to make the printing preferences window appear before printing. Most programs already allow this functionality. This is only necessary if you would like to print directly from the Primera Trio Application and you would like to print multiple copies.
Fit to printable area/Keep original size. Set this setting to “Keep original size” unless you are printing a full size (8.5” x 11”) document that has a margin less than ¼ inch (6.35 mm). If this is the case, select “Fit to printable area.”

Cartridge Settings. Click the Cartridge Settings button to open a new window which displays the current cartridge level and other cartridge related functions.
• Order Ink. Links to the Primera Trio Store • Change. Opens animated instructions explaining how to change cartridges. • Stow. Opens animated instructions explaining how to stow cartridges for travel. • Clean. Prints a cleaning pattern to which can help unclog cartridges or determine which color
nozzles are clogged. • Align. Click this button to perform a manual alignment print. Do this to fix quality problems.
Alignments are automatically run every time a new cartridge is installed. The software will prompt you to run an alignment if it is necessary. Alignment requires a letter or A4 size piece of paper. The printer will print several blocks of color on the page. It may move the paper forward and backward during this procedure. A red LED light will illuminate the page as the sensor scans for the position and quality of the boxes being printed. The paper will feed out of the printer complete when the scan is complete.
• Printing Preferences. Links to the Windows Primera Trio Printing Preferences described in section 5D.
Page | 20

5D. Printing Preferences (Print Quality and Speed) Printing Preferences can be set to improve the quality or speed of the print, adjust paper size, saturation, color matching and other functions. The printing preferences can be accessed from multiple locations. No matter which way you access the printing preferences they will all have the same effects.
To access in Windows 7 go to the Start Menu. Choose Devices and Printers from the right side of the menu. Right click on Primera Trio from the list of available printers. Choose Printing Preferences from the menu.
To access in Windows 8 search for “Printers” from the Metro Tile screen. Choose Devices and Printers from the search results. Right click on Primera Trio from the list of available printers. Choose Printing Preferences from the menu.
To access from any Windows program capable of printing, go to file – print or click the Print button. A print dialog will open. Before clicking OK to print, click on the properties, preferences, or settings button. The name of this button will vary from program to program.
To access from the Primera Trio software click on the gear icon at the top of the Primera Trio application.
Page | 21
The Printer Settings window will open.

No matter how you access it, the same Primera Trio Printing Preferences Screen will open. The various available settings are described below.
• Paper Size. Change this setting to match the paper size installed in the printer. Many standard sizes are available including Letter, Legal, 4x6, Envelope #10, A4, A5, A6, and Hagaki. Set this setting to “Custom” to print on any size page less than 8.5 inches wide and 24 inches high.
• Orientation. Change the orientation to Portrait or Landscape. • Print Quality. Print Quality can be adjusted to improve or decrease quality or change the print
speed. Draft Quality is the fastest print speed with lowest quality. Photo Quality is the highest quality with the slowest print speed.
• Color Matching. Color matching can be adjusted to achieve the best match for Photos, Graphics or Documents. Depending on what you are printing, the best setting may be one that does not necessarily match the type you are printing.
• Ink Saturation. Ink saturation controls the amount of ink placed on the paper. If you notice ink bleeding out from the edges of text or graphics you may decrease ink saturation to fix this
Page | 22

Page | 23
problem. The proper amount of ink necessary to get the best print is determined by the amount of ink the print media can accept.
• Cartridge Alignment. You can perform the same cartridge alignment here that is available from the Primera Trio Software. Do this to fix quality problems. Alignments are automatically run every time a new cartridge is installed. The software will prompt you to run an alignment if it is necessary. Alignment requires a letter or A4 size piece of paper. The printer will print several blocks of color on the page. It may move the paper forward and backward during this procedure. A red LED light will illuminate the page as the sensor scans for the position and quality of the boxes being printed. The paper will feed out of the printer complete when the scan is complete.
• Clean Cartridge & Check Ink… You can check ink levels and clean the cartridge from this screen. This is the same clean print available in the Primera Trio software which prints a cleaning pattern which can help unclog cartridges or determine which color nozzles are clogged.
• Enable Bi‐di Printing. When this setting is set to “Yes” the printer will print when the cartridge moves in both directions. This is a faster printing method. When this setting is set to “No” the printer will print in only one direction.

5E. Print Borderless Photo You may print a 4x6 inch borderless full coverage photo by feeding Primera photo paper through the back of the printer. Follow these instructions.
1. Load the photo paper between reference lines on the back of the printer.
Page | 24
Reference Lines

2. Push the paper until you feel some resistance from the internal paper rollers.
Page | 25
3. Once loaded, the paper will partially cover both arrows. You don’t have to worry about centering the paper exactly or lining it up with the reference lines. As long as the paper is completely between both reference lines the printer will automatically sense the paper size and position and adjust the print accordingly.
4. Press and hold the Retry button to feed in the paper and start the auto size and position sensor. Tip! You may put some pressure on the back edge of the paper until you feel the paper begin to feed.
5. Open your file in any program. Go to File‐ Print. Select the Primera Trio as the printer.
6. Set the page size to 4x6 (4x6 inches).
7. Click “OK” to Print.
Press & Hold Retry Button

Section 6: Scan
6A. Scan a document, photo, receipt, etc. You may scan any document, photo, receipt, or business card that can fit inside the 8.5 inch scanner slot. For smaller documents you may crop them to size after the scan or set a predetermined scan size to speed up the scan process. Follow these instructions.
1. Press the power button on the printer to turn it on.
2. Open the Primera Trio Software. Click on the Scan button.
Page | 26

3. Insert the document to be scanned with the information you want scanned facing away. The edge of the document should be touching the right side of scanner slot. The top of the document or photo should be inserted first.
Page | 27
4. The scanner will automatically begin scanning the document.
5. When the scan is complete the folder location will automatically open with the scanned document highlighted. The default location in Windows for scanned documents is Pictures – Trio Scans.
Top of Document First
Tip! You may also start a scan at any point by inserting the document to be scanned. The scanner will automatically scan at the default settings. You do not need to press the Scan button in the software.
Paper Edge Touch Here
Note: To change any scanner settings see the next section. You can change the following:
• Quality settings • Scanned documents location • File type of scanned document • Toggle the appearance of the
edit/crop window after scanning • Toggle the appearance of the settings
window before scanning

6B. Scanner Settings To access scanner settings click on the gear icon at the top of the Primera Trio application.
Page | 28
The Scanner Settings window will open. Click the back button to go back.
• Manage Scanner Presets. This opens a new window which allows you to change the default scanner settings or create and save presets. A preset could be a combination of all the scanner settings that you prefer for scanning a specific type of image or document.
• Show scan presets before every scan. When checked this will display the scanner presets every time you press the Scan button. This will give you the opportunity to change settings before every scan.
• Show advanced scan dialog after every scan. When checked this will display the editing window after each scan. This will allow you to crop, rotate and name the scan file before it is saved.
• Calibrate. Click Calibrate to run a scanner calibration. You will need the scanner calibration card.
• Clean Scanner. Click to clean the scanner if ink, adhesive or other matter has become lodged in the scanner slot. You will need scanner cleaning sheets which are available online or at most office supply stores.

6C. Manage Scanner Presets
Presets. A Preset is a group of settings that are saved together under one name. All settings in this window will save with the preset name currently displayed. The preset name can be changed by simply highlighting the text and typing a new name. The “Default” name can also be changed. You may create multiple presets by clicking the “New” button. A new name of “Preset 2” will be created. Again, you may change this name by simply typing a new name. Once a second Preset is created you will have the option to set that preset as the default . Check the box next to “Use this preset as default when the Scan button is pressed.”
File Type. You may choose any of the file types below as the file type for your scanned image. Some types are better than others for various applications.
• PDF – Choose this format if you would like to scan a multi‐page document or any text based document. The file size is very small for most documents. It is not possible to crop or rotate a PDF document after it has been scanned. However, you can still edit PDFs in any editing software capable of editing a PDF.
• JPG – This is a compressed format that is a good choice for photographic images and text. The file size is very small.
• PNG – This is a compressed format that is a good choice for graphical images and text. The file size is very small.
• TIF ‐ This is an uncompressed format that is a good choice for photographs. The file size is very large.
• GIF ‐ This is a compressed format that is a good choice for graphical images and text. The file size is very small.
Page | 29

• BMP ‐This is an uncompressed format that is a good choice for graphical images and text. The file size is very large.
Scan Color Mode. You may choose Color, Grey or Black and White. Color is the default setting and recommended unless you would like to reduce the file size of your scanned image/document. Use Grey to create a grayscale image that uses multiple shades of grey. Use Black and White to increase the contrast of a document.
Resolution. Higher Resolution will increase quality and increase the time it takes to scan an image. Lower resolution will decrease the quality and decrease the time it takes to scan an image.
Resolution Speed (8.5 x 11) Use 75 32.5 Draft Document 100 33.5 Draft Document 150 35.5 Document 200 36.5 Document with Photos 300 38.3 Minimum Photo Quality 600 1:54 Maximum Photo Quality
*All scans are done in Color Mode. Black and White and Gray will be slightly slower.
Scan Area Size. Set the scan area to match the area of the document or photo you would like to scan. If you want to scan at high resolution you can greatly reduce your scanning time if you shrink your scan area to scan only the area that you need. This feature is also useful if you are scanning the same size receipt or photo over and over again.
There are several preset sizes accessible using the drop down menu at the top of the window. Select one or set a custom size.
Page | 30

To change the scan size to a custom size drag the red markers to the desired position or directly type position. The black square is the anchor point that corresponds to the first scanned right side of the scanned image. You may scan any area inside the maximum scan area. It does not need to start with the anchor point.
Anchor Point
Page | 31
Color Settings. Click the Color Settings ribbon to adjust contrast, brightness and color effects.
8.5 x 11 Inch Page
4x 6 Inch Page Scan Area Free of Anchor Point

Brightness/Contrast. Enter negative or positive value between ‐100 and 100 or use the slider bar.
Color Mode:
• None. No color effects mode will be used. • Perceptual. Creates a realistic color effect. • Saturation. Creates a saturated color effect. • Relative Colorimetric. (Default) Creates a balanced color effect. • Absolute Colorimetric. Creates a warmer color effect.
Scan Save Settings. These settings control the action of the software after a scan has been completed.
Page | 32

Launch Explorer after scan is completed.
Page | 33
A Windows Explorer window will open after the scan is complete with the already saved file highlighted. This will allow you to easily move a file to a new location after it has been scanned. For example, if you are scanning receipts you may want to file each receipt in a different folder location depending on the type of receipt.
Show Save dialog after scan is completed. A Windows Explorer save dialog window will appear after the scan which will allow you to change the location and filename of the scanned image. This will only appear if you have unchecked the “Show advanced scan dialog after every scan” box on the main scanner settings window.
Filename Prefixes. You can change the prefix that will automatically be added to the filename of the scanned image. Any prefix that is created can always be changed if you have checked “Show Save dialog after scan completed” or “Show advanced scan dialog after every scan.” An example of the filename which will be created is also shown in this window.
• Base Name. You may change the prefix name to any name or a name that corresponds to a Preset name. For example, you may have a Preset created for photos. In this case you may also want to change the Base Name to Photos. Every time you scan a photo using the photo preset, the Photo prefix will be used. After the prefix a number will automatically be added.
• Digits. Set the number of digits that will be used to display the number after the Base Name. • Date‐Time Name. Select this option if you want a Date and Time Stamp used as your file name
instead of the Base Name.
Default Save Location. Click browse to establish the default save location for scanned items.

6D. Editing a Scan before Saving If you choose “Show advanced scan dialog after every scan” the editing window will display after each scan. This will allow you to crop, rotate and name the scan file before it is saved.
Page | 34
Crop Area
Marquee Selector
Click and drag the selector arrows
Rotate. To rotate the image click either the right or left rotation buttons.
Crop. To crop, use the marquee selector to draw a box around the area you would like to crop. To start drawing the box, press and hold the left mouse button. Continue to hold the left mouse button and move the mouse to draw the box. When you are satisfied with the location of the box, let go of the left mouse button. If you want to try again simply repeat the process. You may also click and drag the red arrows to crop the image. Once you are ready to crop press the “Crop” button.
Save. To save the image first browse to the location you would like to save it. The default location is displayed above the save name box. Next, type a name in the box and click “Save”.
Crop Button
Rotate Buttons

6E. Scanning a Multi‐Page Document 1. To scan a multi‐page document you must set the scan file type to PDF in scanner settings. To access scanner settings click on the gear icon at the top of the Primera Trio application.
Page | 35
2. The Scanner Settings window will open.
3. Click on the “Manage Scanner Presets” button. Select PDF (Portable Document Format).
4. Close the “Manage Scanner Presets” window by clicking the X and then Click the “back” button to go back to the main window.

5. Scan a document according to the instructions in section 6A. After the first page has been scanned the following question will appear. “Do you have more pages in this document to scan?” Click “Yes” to add another page.
6. Load the page when prompted. After the page has scanned you will be prompted with the same question. Continue to click “Yes” after each successive scan until there are no more pages to scan in your document. Finally, click “No”. A multi‐page PDF will be saved to your default location.
Note: It is not possible to crop or rotate a PDF document using the Primera Trio software.
Page | 36

6F. Clean and Calibrate the Scanner A calibration sheet comes with the printer. Cleaning paper can be purchased at any office store.
Clean the scanner if you notice repeated vertical lines in your scan that do not go away from one scan to the next.
When to Clean?
Calibrate if your scanned text or images are offset or blurry. When to Calibrate?
1. To clean or calibrate the scanner open scanner settings. To access scanner settings click on the gear icon at the top of the Primera Trio application.
Page | 37
2. The Scanner Settings window will open. Click on Calibrate or Clean Scanner. You will be prompted to insert the cleaning paper or calibration sheet.

3a. Insert the calibration sheet as shown. Make sure the arrows are facing toward you. The sheet may move backward and forward several times during the calibration.
Page | 38
3b. Insert the cleaning sheet as shown. You will only need to use a half sheet. It does not matter which direction you insert the cleaning sheet.
When complete you will receive a message that the procedure was successful.

Section 7: Copy
7A. Copy a document, photo, receipt, etc. You may copy any document, photo, receipt, or business card that can fit inside the 8.5 inch scanner slot. For smaller documents you may crop them to size after the scan or set a predetermined scan size to speed up the scan process. Follow these instructions.
1. Press the Power Button on the printer to turn it on.
2. Open the Primera Trio Software. Click on the Copy button.
Page | 39

3. Add paper as described in Section 4 of this manual.
4. Insert the document to be copied with the information you want copied facing away. The edge of the document should be touching the right side of the scanner slot. The top of the document or photo should be inserted first.
Page | 40
5. The scanner will automatically begin scanning the document.
Top of Document First
Paper Edge Touch Here

6. Unless you have checked “Show Advanced Copy Dialog” in the Copy Settings the printing will automatically start as soon as the scan has completed. See section 7B for more information on the Advanced Copy Dialog.
Important Note: The printer will print the copy using the default printer settings found in Printer Settings – Printing Preferences. See section 5C for more information.
Page | 41

7B. Copy Settings To access copy settings click on the gear icon at the top of the Primera Trio application.
Page | 42
Click on the Copy Settings ribbon. The Copy Settings window will open. Click the Back button to go back to the main window.
Scan Color Mode. You may choose Color or Gray. Color is the default setting and recommended unless you would like to reduce the file size of your scanned image/document. Use Gray to create a grayscale image that uses multiple shades of grey.
Resolution. Higher Resolution will increase quality and increase the time it takes to scan an image. Lower resolution will decrease the quality and decrease the time it takes to scan an image.
Brightness/Contrast. Enter negative or positive value between ‐100 and 100 or use the slider bar.
Temporary Scan file location. Click Browse to change the temporary location where the scan file will be located.

Color Mode:
• None. No color effects mode will be used. • Perceptual. Creates a realistic color effect. • Saturation. Creates a saturated color effect. • Relative Colorimetric. (Default) Creates a balanced color effect. • Absolute Colorimetric. Creates a warmer color effect.
Show Advanced Copy Dialog. If this option is checked the advanced editing window will be display before the printing starts. This will allow you to crop, rotate and name the scan file before it is printed.
Crop Area
Marquee Selector
Click and drag the selector arrows
Page | 43
Rotate. To rotate the image click either the right or left rotation buttons.
Crop. To crop, use the marquee selector to draw a box around the area you would like to crop. To start drawing the box, press and hold the left mouse button. Continue to hold the left mouse button and move the mouse to draw the box. When you are satisfied with the location of the box, let go of the left mouse button. If you want to try again simply repeat the process. You may also click and drag the red arrows to crop the image. Once you are ready to print press the “Copy” button.
Scan Area Size. Click edit to set the scan area to match the area of the document or photo you would like to scan. If you want to scan at a high resolution you can greatly reduce your scanning time if you
Crop Button
Rotate Buttons

shrink your scan area to scan only the area that you need. This feature is also useful if you are scanning the same size receipt or photo over and over again.
To change the size, drag the red markers to the desired position or directly type position. The black square is the anchor point that corresponds to the first scanned right side of the scanned image. You may scan any area inside the maximum scan area. It does not need to start with the anchor point.
Anchor Point
Page | 44
8.5 x 11 Inch Page
4x6 Inch Page Scan Area Free of Anchor Point

Section 8: Battery Installation and Use The optional lithium‐ion battery can be installed to print or scan without the AC power adapter connected. Once installed the battery is automatically used any time the AC power cable is disconnected.
Page | 45
Installation Instructions
1. Find the battery:
2. Disconnect AC power and USB.
3. Locate the Battery Cover release latch on the right side near the paper in feed area.
The battery automatically charges any time the printer is connected to AC power or connected to a powered USB cable. Charge Time AC Power = 1 hour 45 minutes Charge Time USB (Printer Off) = 10 hours 30 minutes
Charging the Battery
Use only Primera Battery Part #31033

4. Pinch and pull the release latch and pull up on the cover.
5. Locate the battery compartment and the battery cable.
Page | 46
6. Insert the battery into the compartment as shown with connector facing up and to the right.
Battery Compartment
Battery Cable
Connector

7. Connect the Battery Cable to the Connector. Make sure the cable is routed inside the correct notch.
Page | 47
8. Replace the Cover.
Important Notes:
1. The battery will be partially charged when you receive it. It is recommended that you charge the battery using the AC adapter for 1 hour and 45 minutes or with the USB cable for 10 hours before using it the first time.
2. The battery is protected against overcharging so you can leave power or USB connected even after it is fully charged.
3. When the battery is installed, if both USB cable and AC Power are disconnected the printer will automatically shut off completely to conserve battery power.
Cable should be routed inside this notch.

Page | 48
4. The Primera Trio will automatically power off or go to sleep according to the following: When using Battery only: When plugged into a USB cable, after 30 minutes of no activity the Primera Trio will do the following: a. If battery percentage remaining is greater than 50%, the printer goes into Sleep Mode (only the LED shuts off). While in this mode the battery is slowly charging as long as the USB is still connected. If a print is sent to the printer, it will wake up and start printing. b. If battery percentage remaining is less than 50%, the printer shuts down completely. This is to prevent completely draining your battery. When using AC power: When plugged into the power adapter, the Primera Trio goes into sleep mode after 30 minutes of no activity but never shuts down completely. The battery will charge in this state very quickly if it is installed and the USB is connected.
Battery Warnings:
1. The Primera Trio lithium‐ion battery cannot be transported in checked baggage on commercial airline flights. The battery must be carried with you into the airplane cabin. In the cabin, the flight crew can better monitor conditions, and have access to the batteries or device if a problem does occur.
2. If you would like to store the printer in your checked baggage, you may remove the battery from the printer before it is placed in your checked baggage. Take the battery with you onto the airplane. The battery contains all the necessary information and markings that airport/airline personnel may require.
3. Use only the battery designed specifically for the Primera Trio. 4. When discarding a battery, contact your local waste disposal provider regarding local
restrictions on the disposal or recycling of batteries. Though the lithium‐ion rechargeable battery is mercury‐free, it might require recycling or proper disposal at end‐of‐life.
5. The battery might explode if incorrectly replaced or disposed of in fire. 6. Do not short‐circuit the battery. 7. To avoid risk of fire, burns, or damage to the battery, do not allow a metal object to touch the
battery contacts. 8. Do not disassemble the battery. The battery has no serviceable parts inside. 9. Handle a damaged or leaking battery with extreme care. If you come in contact with the
electrolyte, wash the exposed area with soap and water. If it contacts the eye, flush the eye with water for 15 minutes and seek medical attention.

Section 9: Maintenance, Troubleshooting and Tech Support 9A. Replacing the Cover The Trio Cover can be replaced with a variety of colors. It’s easily removed and replaced. Follow the instructions below:
1. Open the cover and remove the paper. 2. Pull out on the edge of the cover near the hinge until the pin pulls out of notch.
Page | 49
Notch
Pin

3. Gently lift the cover up and then move it to the right to release the other pin.
Page | 50
4. Locate the replacement cover. Fit the right side pin into the notch and lower the left side down.

5. Snap the left side pin into the notch.
Page | 51

9B. Cleaning the Ink Cartridge It may be necessary to clean the ink cartridge nozzles if you notice reduced print quality, or if you suspect an cartridge nozzle has become slightly dried out or clogged. If you are having print quality problems, follow the steps below:
1. Remove the print cartridge.
2. Moisten a lint‐free cloth with water.
3. Hold the cloth against the nozzles for three seconds. This will "wick" some additional ink onto the damp cloth.
4. Wipe in the direction shown.
5. Repeat the process.
Note: Even new cartridges may need cleaning. If the cartridge is older than 90 days, even if it is sealed in its packaging, the nozzles can begin to dry out.
Page | 52

Page | 53
9C. Technical Support If you need help contact technical support via one of the methods listed below.
Source Location
Trio Knowledge Base www.primeratrio.com/support
Email www.primeratrio.com/contact_trio_support.php
Chat www.primeratrio.com/support (Mon ‐ Fri 8 a.m. ‐ 6 p.m CST)
Phone Phone Support 763‐475‐6669 (Mon ‐ Fri 8 a.m. ‐ 6 p.m CST)

9D. Troubleshooting Lines appear in the scan. This usually indicates a small piece of dust or dirt was caught in the scanner during the scan. Try the scan again. It usually goes away because the dirt or dust was on the photo or document itself and falls off between scans. If it consistently appears in the same place you may need to perform a Scanner cleaning procedure.
Extra Cartridges are drying out. When switching between the color and black cartridges be sure to put the cartridge which is not currently in the printer inside the cartridge garage which came with the cartridge.
Printer Stops Printing.
1. Check for a paper Jam. Clear the paper jam and press the Retry (left side) button to resume printing.
2. Look for flashing lights. If the retry button is flashing press it to retry the print. 3. Reset the printer. Press the power button to power off the printer. Press it again power it back
on. Printing will resume if the print job is still in the queue.
Replacing the Ink Saturation Pads, nozzle wiper and capping station. The ink saturation pad, nozzle wiper and capping station (maintenance sled) can all be replaced simultaneously. With the cartridge in the parked position, push the sled out of position using the hole on the bottom of the printer. It may be necessary to use the back of pen or pencil to push the sled out. The left side of the sled will lift out of the printer first. You can then unhook the right side. Install the new sled by pushing the right side into the printer first and then snapping in the left side. Contact Tech Support to order replacement Ink Saturation Pads.
Clearing Paper Jams. If paper becomes jammed in the printer press the paper release button and pull the paper through the printer.
Page | 54
Paper Release Button

Page | 55
Interpreting Indicator Lights.
Power Button:
Steady On Normal powered on mode. Flashing slightly Off Normal Powered on and busy mode. Flashing slightly On 2 minute warning for turning off with battery power. Steady Off Printer is Off if using battery or in Sleep mode if plugged in.
Retry (!) Button:
Flashing ON/OFF Indicates the printer is waiting for your input. Check for any on screen error messages. Perform the indicated action and then press the retry button to resume or try again.
Off Normal mode.
Multiple sheets are feeding. When loading the printer with paper, do not push the paper into the printer! The paper should set in the tray without any extra force. If force is require to insert the paper you may have too many sheets. Multiple sheets will feed through the printer if too many sheets are inserted or paper is pushed into the printer.
Scanned documents are feeding crooked. Make sure you are feeding the documents into the scanner so the right edge is just touching the right side of the scanner slot. Smaller documents and receipts are more susceptible to crooked feeding. It may be necessary to hold your finger against the left side of the receipt/document to ensure that it feeds straight through the scanner.

Page | 56
Section 10: Specifications
All-IN-ONE FUNCTIONS Print, Scan, Copy
PRINT SPEED1 (draft, letter): 3.1 ppm black, 2.4 ppm color
ISO Speeds: Up to 2.4 ppm black, 1.7 ppm color
PRINT RESOLUTION Up to 4800 x 1200 dpi
DUPLEX PRINT OPTIONS Manual
PRINT TECHNOLOGY Thermal Inkjet
INK TYPES Dye-based color and black
BORDERLESS PRINTING Yes; up to 4 x 6-in, A6, up to 5-in wide
COPY SPEED ISO Speeds: Up to 1.7 ppm black, up to 1.1 ppm color
COPY RESOLUTION Up to 600 x 600 dpi color and black
SCAN FILE FORMAT BITMAP (.bmp), JPEG (.jpg), PDF (.pdf), PNG (.png), TIFF (.tif), GIF (.gif)
SCAN SPEED Up to 1.4 ppm (300 dpi, b&w); Up to 1.6 ppm (300 dpi, color)
SCAN RESOLUTION Hardware: Up to 600 x 600 dpi
Optical: Up to 600 dpi
SCAN SIZE MAXIMUM Up to 8.5 x 14-in (216 x 356 mm)
BIT DEPTH/GRAYSCALE LEVELS
24-bit/256
STANDARD CONNECTIVITY USB 1.1 (USB 2.0/3.0 compatible)
MEDIA SIZES SUPPORTED Letter, legal, A4, A5, A6, 4” x 6” photo, U.S. #10 envelope, Hagaki, custom
SCANNER CAPACITY One (sheet, receipt, business card, etc.)
PAPER HANDLING Up to 10 sheets input tray. Input slot on the back for feeding one sheet and printing onto
light cardstocks, envelopes, and photo paper
CUSTOM MEDIA SIZES 3 x 3-in to 8.5 x 14-in (76.2 x 101.6 to 215.90 x 355.6 mm)
MINIMUM SYSTEM REQUIREMENTS (Windows®)
Windows Vista™, 7, 8, 8.1 with latest service packs
Intel® Celeron® processor or faster (or equivalent)
2GB RAM
1GB hard drive space
USB 1.1 or higher
MINIMUM SYSTEM REQUIREMENTS (Mac®)
OS X v10.7 or higher
2 GB RAM
1 GM hard drive space
USB 1.1 or higher

Page | 57
PRODUCT DIMENSIONS W x D x H: 11.4 x 6.5 x 1.8-in
(290 x 165 x 46 mm)
PRODUCT WEIGHT With no battery: 2.6 lbs. (1.2 kg)
With battery: 2.8 lbs. (1.3 kg)
POWER Power supply type: external universal power adapter
Input voltage: 100 to 240 VAC
Output voltage: 7.5 VDC @ 3.2A
WARRANTY One-year parts and labor including one year of phone, chat and email support
EXTENDED WARRANTIES Two-year NBD exchange with Level 2 Tech Support
Three-year NBD exchange with Level 2 Tech Support
WHAT'S IN THE BOX Primera Trio Printer, Primera 31020 color ink cartridge, CD with printer and scanner
drivers, application software and user documentation, AC adapter with power cord and
plug adapters for EU, AP, UK, 3-foot micro-USB to USB cable, and scanner calibration
sheet, quick reference guide
PRIMERA SERVICES AND SUPPORT
One year of phone, chat and email support
ACCESSORIES Snap-on cover in silver matte, clear-coated, white, blue, or pink (black is standard)
Lithium-ion battery
12v vehicle adapter
Vehicle mounting kit: includes black painted metal bracket, mounting screws and 12v
vehicle power adapter cable and plug
Laptop bag
Neoprene zippered sleeve with pocket
Extended warranty
4 x 6-in photo paper
REPLACEMENT INK CARTRIDGES
Primera 53335 High-Yield Color Cartridge (580 pages, draft), (260 pages, ISO)2
Primera 53336 High-Yield Black Cartridge (495 pages, draft), (185 pages, ISO)2
Primera 31020 Standard Yield Color Cartridge (175 pages, draft), (70 pages, ISO)2
Primera 31021 Standard Yield Black Cartridge (360 pages, draft), (135 pages, ISO)2
1 Either after first page or first set of ISO test pages using ISO/IEC 24734. 2Replacement cartridge yields are based on ISO/IEC 24711 tests in default mode printing continuously.
Specifications subject to change

Page | 58
Index Adobe Reader, 18 Align Cartridge, 20 anchor point (Scan Page), 31 Battery Warnings, 48 BMP (Scan file type), 30 Calibrate Scanner, 28 Capping Station, 54 Cartridge Alignment, 23 Cartridge Settings, 20 Charge time (Battery), 45 Check for updates, 8 Clean Scanner, 28 Color Matching., 22 crooked, 55 Crop, 43 Crop the Scan, 34 Enable Bi‐di Printing, 23 Fit to printable area/Keep original size, 19 GIF (Scan file type), 29 Ink Saturation, 22 Ink Saturation Pads, 54 JPG (Scan file type), 29 Launch Explorer after scan is completed, 33 Lines appear in the scan, 54 Manage Scanner Presets, 28 MS Word, 18 Nozzle Wipe, 54
Order Ink, 20 Orientation, 22 Paper Jams (Clearing), 54 Paper Size, 22 PDF (Scan file type), 29 PNG (Scan file type), 29 Power Button, 9 Power Off thePrinter, 14 Print Quality, 22 Rotate, 43 Rotate the Scan, 34 Scan Area Size, 30, 43 Scan Color Mode, 30 Scan Filename Prefixes, 33 Scan Save Settings, 32 Scanner Brightness/Contrast, 32 Scanner Color Mode, 32 Scanner Color Settings, 31 Scanner Default Save Location, 33 Scanner File Type, 29 Scanner Presets, 29 Scanner Resolution, 30 Show print setting before printing, 19 Show Save dialog after scan is completed, 33 Show scan presets before every scan, 28 Stow Position, 12 TIF (Scan file type), 29