user’s manual - go-gddq. · pdf fileexclusion clauses • the contents of ......
TRANSCRIPT

User’s Manual
897N100125B 2007.6
Extraction Flow
Preparation Extraction with QuickGene-Mini80(Pages 16 to 25)
Prepare lysate usingthe Isolation Kits.
Applying lysate into theCartridges Wash Elution of DNA/
RNA
Third Edition
Cover.fm Page i Tuesday, April 17, 2007 8:37 AM

Cover.fm Page ii Tuesday, April 17, 2007 8:37 AM

897N100125B QuickGene-Mini80 User's Manual 2007.6 i
IntroductionThank you for purchasing the Nucleic Acid Isolation Device QuickGene-Mini80 (hereafter, called "QuickGene-Mini80"). DNA or RNA can be easily extracted by using QuickGene-Mini80.This guide contains important information regarding the safe use of QuickGene-Mini80. Read this manual carefully before using the device. Keep this manual after reading it, for reference whenever necessary.
About Infectious Wastes
When handling or disposing of infectious materials, follow the laboratory guideline or the law regarding infectious waste to perform proper incineration, fusion, sterilization, and/or disinfection. When you use a third party to dispose of it, outsource this work an operator licensed to handle medical waste subject to special control, and give them the manifest of the medical waste at the same time.
Exclusion clauses • The contents of this manual may be updated without notice. • The FUJIFILM Corporation assumes no liability for infringement of third party copyrights or other
rights arising from the use of any information in this manual. • The FUJIFILM Corporation assumes no liability for device failure or damage due to installation,
relocation, remodeling, maintenance, and repairs performed by parties other than the FUJIFILM Corporation or agencies specified by the FUJIFILM Corporation.
• The FUJIFILM Corporation assumes no liability for failure or damage due to use of third-party products.
• The FUJIFILM Corporation assumes no liability for device failure or damage due to remodeling, maintenance, repairs, etc. using repair parts other than genuine parts specified by the FUJIFILM Corporation.
• The FUJIFILM Corporation assumes no liability for device failure or damage due to failure to observe the precautions and operation procedures described in this manual.
• The FUJIFILM Corporation assumes no liability for device failure or damage due to using the device in an environment that does not meet the operational requirements (power, installation environment, etc.) described in this manual.
• The FUJIFILM Corporation assumes no liability for device failure or damage due to natural disasters such as fire, earthquakes, floods, or lightning.
• No part of the contents of this manual may be reproduced without permission from the FUJIFILM Corporation.
Trademarks Company names and product names are trademarks or registered trademarks of their respective owners.
All Rights Reserved, Copyright © FUJIFILM Corporation 2006-2007
Universal biologicalhazard symbol
Min80.fm Page i Tuesday, April 17, 2007 8:45 AM

ii 897N100125B QuickGene-Mini80 User's Manual 2007.6
NotationsThis manual contains important information regarding the safe use of QuickGene-Mini80.Read this information carefully before using QuickGene-Mini80, and start operation.The meanings of safety precaution marks are as follows:
WARNING:"WARNING" indicates a dangerous condition that may lead to death or serious injury.
BIOHAZARD: "BIOHAZARD" indicates exposure to a biological agent or condition that may be infectious or harmful.
CAUTION:
"CAUTION" indicates the possibility of danger that may lead to minor or moderate personal injury. "CAUTION" may also indicate an accident of property damage.
Important:"Important" shows the important notes for usage, as well as prohibited actions.
Note:"Note" indicates the notes, procedures that should be obeyed, and supplementaryinformation for use.
Min80.fm Page ii Tuesday, April 17, 2007 8:45 AM

897N100125B QuickGene-Mini80 User's Manual 2007.6 iii
引言
感谢您购买核酸分离设备 QuickGene-Mini80(以下称为 "QuickGene-Mini80")。使用 QuickGene-Mini80 可轻松提取出 DNA 或 RNA。
本手册中包含了有关 QuickGene-Mini80 安全操作的重要信息,请在使用设备之前仔细阅读。
阅读完毕,请妥善保存本手册,以备必要时查阅。
关于传染性废料
处理或弃置传染性材料时,请遵照有关传染性废弃物的试验室准则或相关法
律进行正确的焚化、熔解、杀菌和/或消毒。
如果是交由第三方来完成上述作业,则应将其外包给对特控医疗垃圾有处理
许可权的操作人员,并同时移交相应的货单。
免责条款
• 本手册的内容如有更新,恕不事先通知。
• 对于因使用本手册中的任何信息而导致侵犯第三方版权或其他权利的行为,FUJIFILM Corporation 恕不承担责任。
• 对于由非 FUJIFILM Corporation 或其指定机构所进行的安装、移位、改装、维护及维修等事宜,
FUJIFILM Corporation 恕不对因此而导致的设备故障或损坏承担责任。
• 对于因使用第三方产品而导致的故障或损坏,FUJIFILM Corporation 恕不承担责任。
• 对于使用非 FUJIFILM Corporation 所指定的正品作为维修件而进行的改装、维护及维修等事宜,
FUJIFILM Corporation 恕不对因此而导致的设备故障或损坏承担责任。
• 对于因不遵守本手册中所述的注意事项和操作规程而导致设备出现故障或被损坏的情况,
FUJIFILM Corporation 恕不承担责任。
• 对于因设备工作环境(电源、安装环境等)不满足本手册中所述的操作要求而导致设备出现故障
或被损坏的情况,FUJIFILM Corporation 恕不承担责任。
• 对于因火灾、地震、洪水或雷电等自然灾害而导致设备出现故障或被损坏的情况,FUJIFILM Corporation 恕不承担责任。
• 未经 FUJIFILM Corporation 允许,不得复制本手册的任何部分。
商标
公司名称及产品名称均为其各自所有者的商标或注册商标。
版权所有 © FUJIFILM Corporation 2006-2007,保留所有权利。
Universal biologicalhazard symbol通用生物危害性
标记
Min80.fm Page iii Tuesday, April 17, 2007 8:45 AM
iv 897N100125B QuickGene-Mini80 User's Manual 2007.6
标志
本手册中包含了有关 QuickGene-Mini80 安全操作的重要信息。请在使用 QuickGene-Mini80 之前仔
细阅读,然后再行操作。
安全注意事项的含义如下所述 :
WARNING: "WARNING" 指示发生时可导致死亡或严重伤害的危险情况。
BIOHAZARD: "BlOHAZARD" 指示暴露于生物制剂或是面对可能具有传染性或危害性的境况。
CAUTION: "CAUTION" 指示发生时可导致轻微或中度人身伤害的潜在危险。
"CAUTION" 还可指示意外财产损失。
Important :“Important”指示重要的使用说明及严禁的操作。
Note :“Note”指示注解信息、应遵守的操作规程及补充性的使用信息。
Min80.fm Page iv Tuesday, April 17, 2007 8:45 AM
897N100125B QuickGene-Mini80 User's Manual 2007.6 v
IntroductionMerci d’avoir acheté le Dispositif d’isolation d’acide nucléique QuickGene-Mini80 (appelé ci-après "QuickGene-Mini80"). L’extraction de l’ADN ou l’ARN peut être facilement effectuée à l’aide du QuickGene-Mini80.Ce guide contient des informations importantes concernant l’utilisation en toute sécurité du QuickGene-Mini80. Lisez attentivement ce manuel avant d’utiliser l’appareil. Après lecture, conservez ce manuel pour pouvoir vous y référer ultérieurement si nécessaire.
A propos des déchets infectieux
Lorsque vous manipulez ou mettez au rebut des produits infectieux, veillez à respecter les directives du laboratoires ou la loi sur les déchets infectieux pour en effectuer l’incinération, la fusion, la stérilisation, et/ou la désinfection correctes. Lorsqu’un tiers est chargé de la mise au rebut, veillez à la confier à une entreprise habilitée à traiter les produits médicaux sujets à contrôle spécifique et à fournir en même temps le manifeste des produits concernés.
Clauses d’exclusion • Le contenu de ce manuel peut être mis à jour sans préavis. • FUJIFILM Corporation ne peut être tenu pour responsable de la violation aux copyrights de tiers
ou à d’autres droits émanant de l’utilisation d’une information quelconque contenue dans ce manuel.
• FUJIFILM Corporation ne peut être tenu pour responsable d’une défaillance ou de dommages de l’appareil causés par l’installation, la relocalisation, la modification, la maintenance et les réparations effectuées par des tiers autres que FUJIFILM Corporation ou des agences agréées par FUJIFILM Corporation.
• FUJIFILM Corporation ne peut être tenu pour responsable d’une défaillance ou de dommages dus à l’utilisation de produits tiers.
• FUJIFILM Corporation ne peut être tenu pour responsable d’une défaillance ou de dommages de l’appareil dus à la modification, la maintenance, les réparations, etc. utilisant des pièces de rechange qui ne sont pas des pièces d’origine spécifiées par FUJIFILM Corporation.
• FUJIFILM Corporation ne peut être tenu pour responsable d’une défaillance ou de dommages de l’appareil dus à la non-observation des procédures de fonctionnement et des précautions décrites dans ce manuel.
• FUJIFILM Corporation ne peut être tenu pour responsable d’une défaillance ou de dommages de l’appareil au cas où il est utilisé dans un environnement qui ne répond pas aux conditions de fonctionnement (alimentation, environnement de l’installation, etc.) décrites dans ce manuel.
• FUJIFILM Corporation ne peut être tenu pour responsable d’une défaillance ou de dommages de l’appareil dus à des catastrophes naturelles, telles qu’un incendie, un tremblement de terre, des inondations ou des éclairs.
• Aucune partie de ce manuel ne peut être reproduite sans l’autorisation de FUJIFILM Corporation.
Marques Les noms de compagnies et de produits sont des marques ou des marques déposées de leurs propriétaires respectifs.
Tous droits réservés, Copyright © FUJIFILM Corporation 2006-2007
Universal biologicalhazard symbol
Min80.fm Page v Tuesday, April 17, 2007 8:45 AM

vi 897N100125B QuickGene-Mini80 User's Manual 2007.6
ConventionsCe manuel contient des informations importantes concernant l’utilisation en toute sécurité du QuickGene-Mini80. Lisez attentivement ces informations avant d’utiliser et de faire fonctionner le QuickGene-Mini80.Les significations des symboles de sécurité utilisés sont les suivantes :
WARNING:"WARNING" signale des conditions de dangerosité qui, si elles n’étaient pas évitées, pourraient entraîner la mort ou des blessures graves.
BIOHAZARD: "BIOHAZARD" indique l’exposition à un agent biologique ou à une situation qui peut être infectieuse ou nocive.
CAUTION:
"CAUTION" signale un danger possible qui, s’il n’était pas évité, pourrait
entraîner des blessures corporelles mineures ou légères. "CAUTION" pourrait aussi indiquer un risque de dommage matériel.
Important :"Important" : signale des remarques importantes concernant l’utilisation et les actionsinterdites.
Note:"Note" : les remarques concernent les procédures à respecter, elles fournissent aussides informations complémentaires.
Min80.fm Page vi Tuesday, April 17, 2007 8:45 AM
897N100125B QuickGene-Mini80 User's Manual 2007.6 vii
EinführungWir danken Ihnen für den Kauf des Geräts zur Nukleinsäureisolierung QuickGene-Mini80 (im Folgenden als „QuickGene-Mini80“ bezeichnet).Mit QuickGene-Mini80 können DNA und RNA leicht extrahiert werden. Diese Anleitung enthält wichtige Informationen zur sicheren Verwendung von QuickGene-Mini80. Lesen Sie die Anleitung vor der Verwendung des Geräts sorgfältig durch.Bewahren Sie diese Anleitung nach dem Lesen zum späteren Nachschlagen auf.
Hinweise zu infektiösen Abfällen
Befolgen Sie bei der Handhabung oder Entsorgung von infektiösen Abfällen die Laborrichtlinien sowie die geltenden Gesetze und Vorschriften, und führen Sie die Verbrennung, Einschmelzung, Sterilisation und/oder Desinfektion entsprechend durch. Wenn Sie die Entsorgung durch Dritte ausführen lassen, beauftragen Sie zugelassene Entsorgungsfirmen für medizinischen Sondermüll, und stellen Sie ihnen die relevanten Informationen zur Sondermüll-Abfallbehandlung zur Verfügung.
Ausschlussklauseln • Der Inhalt dieser Anleitung kann jederzeit ohne Vorankündigung geändert werden. • Die FUJIFILM Corporation übernimmt keine Haftung für Verletzungen von Copyright- oder
anderen Rechten Dritter, die aus der Verwendung jeglicher Informationen dieser Anleitung entstehen können.
• Die FUJIFILM Corporation übernimmt keine Haftung für Geräte-Ausfälle oder -Beschädigungen, die durch Installation, Standortveränderung, Veränderungen, Wartung oder Instandsetzung entstehen, sofern diese nicht durch die FUJIFILM Corporation oder von der FUJIFILM Corporation genannte Auftragnehmer durchgeführt wurden.
• Die FUJIFILM Corporation übernimmt keine Haftung für Ausfälle und Beschädigungen, die durch Verwendung von Produkten von Drittherstellern verursacht wurden.
• Die FUJIFILM Corporation übernimmt keine Haftung für Geräte-Ausfälle und -Beschädigungen, die durch Veränderungen, Wartung, Instandsetzung usw. unter Verwendung von Ersatzteilen verursacht wurden, die nicht von der FUJIFILM Corporation angegebene Originalteile sind.
• Die FUJIFILM Corporation übernimmt keine Haftung für Geräte-Ausfälle und -Beschädigungen, die auf die Nichtbeachtung der in dieser Anleitung beschriebenen Vorsichtsmaßregeln und Betriebsverfahren zurückzuführen sind.
• Die FUJIFILM Corporation übernimmt keine Haftung für Geräte-Ausfälle und -Beschädigungen, die auf den Betrieb des Geräts unter Bedingungen zurückzuführen ist, die den in dieser Anleitung beschriebenen Betriebsanforderungen (Stromversorgung, Betriebsumgebung etc.) nicht entsprechen.
• Die FUJIFILM Corporation übernimmt keine Haftung für Geräte-Ausfälle und -Beschädigungen, die auf Naturkatastrophen wie Feuer, Erdbeben, Überschwemmung oder Blitzschlag zurückzuführen sind.
• Kein Teil dieser Anleitung darf ohne Erlaubnis der FUJIFILM Corporation reproduziert werden.
Warenzeichen Firmen- und Produktnamen sind Warenzeichen oder eingetragene Warenzeichen der jeweiligen Inhaber.
Alle Rechte vor behalten, Copyright © FUJIFILM Corporation 2006-2007
Universal biologicalhazard symbol
Min80.fm Page vii Tuesday, April 17, 2007 8:45 AM
viii 897N100125B QuickGene-Mini80 User's Manual 2007.6
WarnhinweiseDiese Anleitung enthält wichtige Informationen zur sicheren Verwendung von QuickGene-Mini80. Lesen Sie diese Informationen sorgfältig durch, bevor Sie QuickGene-Mini80 in Betrieb nehmen.Die Bedeutung der verschiedenen Sicherheitshinweise wird im Folgenden erläutert:
WARNING:„WARNING“ weist auf gefährliche Betriebsbedingungen hin, die zu ernsthaften Verletzungen oder Verletzungen mit Todesfolge führen können.
BIOHAZARD: „BIOHAZARD“ kennzeichnet die Gefährdung durch biologische Agenzien oder Verhältnisse, die infektiös oder gesundheitsschädlich sein können.
CAUTION: „CAUTION“ weist auf gefährliche Betriebsbedingungen hin, die zu leichten bis mittleren Verletzungen führen können. „CAUTION“ kann darüber hinaus das Risiko einer Sachbeschädigung kennzeichnen.
Important:„Important“ kennzeichnet wichtige Bedienungshinweise sowie zu unterlassendeVorgehensweisen.
Note:„Note“ kennzeichnet Hinweise, Vorgehensweisen, die befolgt werden sollten, undzusätzliche Informationen zur Bedienung.
Min80.fm Page viii Tuesday, April 17, 2007 8:45 AM

897N100125B QuickGene-Mini80 User's Manual 2007.6 ix
Safety InformationThis chapter describes safety precautions.For your safety and that of others, follow the guidelines provided in the following pages concerning the use of QuickGene-Mini80.
About Mark Check all descriptions with the mark attached.
About Instrument
WARNING:• Ignoring the following notations may lead to fire or electric shock. - In countries other than US and Canada, do not use the power cable attached for the US
and Canadian models.- In countries other than US and Canada, use a power cable that meets your country’s
standard, or contact your local distributor.- Use the AC adapter provided.- Do not use the power cable attached for the US and Canadian models for other products.- Do not use QuickGene-Mini80 with voltage other than the voltage specified on the
device. Do not overload the power outlet with too many devices. - Do not use QuickGene-Mini80 with a damaged power plug or a loose socket. - If there is dust on the prongs of the power plug or on the plug socket, remove it with a
dry cloth. - When you disconnect the plug from the outlet, be sure to hold the power plug itself. Do
not pull the power cable.- For maintenance, disconnect the power plug from the outlet.- Do not touch the power plug when you hear the crash of thunder.
• Do not pour any liquid on QuickGene-Mini80. Do not place any objects containing liquid on QuickGene-Mini80. Doing so may cause a device failure, fire, or electric shock.
• In the event the device overheats, starts to smoke or smells strange, immediately unplug the power cable.
CAUTION:• Never attempt to remodel QuickGene-Mini80 without the manufacturer’s permission. Doing so may cause fire or electric shock.
• Do not place or drop objects on QuickGene-Mini80. Also refrain from bumping or knocking it, as doing so may cause a failure or malfunction of QuickGene-Mini80.
• If any liquid materials are left inside the device, wipe it up a soft paper tissue, etc. Otherwise, QuickGene-Mini80 may be damaged.
• When replacing the pressure heads, be sure to wear gloves. • If ethanol is spilled inside the device, immediately unplug the power cable. • Repairs to QuickGene-Mini80 should only be performed by such agencies
as are specifically authorized by the FUJIFILM Corporation. • Only original the FUJIFILM Corporation replacement parts should be used. • If the equipment is used in a manner not specified by the manufacturer, the
protection provided by the equipment may be impaired.
Min80.fm Page ix Tuesday, April 17, 2007 8:45 AM

x 897N100125B QuickGene-Mini80 User's Manual 2007.6
About isolation kits Referred to as "kit/kits" hereafter in this section.
CAUTION: • When handling any of the kits, refer to the respective handbook. • Reagents in each kit should be handled by observing the safety
information and precautions regarding the kit.• Extraction should be performed in an appropriate laboratory or
workplace.
Note:The kits are not supplied with QuickGene-Mini80. Select the desired kit(s) and order it (them) separately.
About Reagents Not Included in the Kits
CAUTION: • When handling any reagent not included in the kits, observe the safety information and precautions of the reagent.
• Extraction should be performed in an appropriate laboratory or workplace. Some reagents should be handled in a draft chamber.
About Cleaning/Washing Solution
CAUTION: • For handling any cleaning/washing solution for the QuickGene-Mini80 and accessories, observe the safety information and precautions regarding the solution.
• Keep ethanol away from fire. It is highly flammable.
BIOHAZARD: • Always wear appropriate gloves, a mask, and safety goggles when cleaning/washing.
About Samples
BIOHAZARD: • Always wear appropriate gloves, a mask, and safety goggles etc. when handling any infectious samples.
isolation kits
For DNA
DNA whole blood kit
DNA tissue kit
Plasmid kit
For RNA
RNA tissue kit
RNA cultured cell kit
RNA cultured cell HC kit
RNA blood cell kit
Min80.fm Page x Tuesday, April 17, 2007 8:45 AM

897N100125B QuickGene-Mini80 User's Manual 2007.6 xi
Product Use Limitations• The FUJIFILM Corporation assumes no liability for results regardless of the
application. • It is the user’s responsibility to validate the performance of the Isolation Kits and
QuickGene-Mini80. • QuickGene-Mini80 is a device for research and study only.
When you use QuickGene-Mini80, read this manual thoroughly and follow the safety management regulations of your facilities (laboratory).
Min80.fm Page xi Tuesday, April 17, 2007 8:45 AM
xii 897N100125B QuickGene-Mini80 User's Manual 2007.6
安全信息
本章介绍安全注意事项。
为了您和他人的安全,请遵守下文中有关使用 QuickGene-Mini80 方面的指导原则。
关于 标记请确认所有附带 标记的说明。
关于设备
WARNING:• 忽视以下标志可导致火灾或电击。
- 在美国和加拿大以外的国家和地区,请勿使用美国和加拿大机型附带的电源电缆。
- 在美国和加拿大以外的国家或地区,请使用符合该地区标准的电源电缆,或与当地经销商联系。
- 使用附带的电源适配器。
- 请勿将美国和加拿大机型附带的电源电缆用于其它产品。
- 电压未满足设备所指定的值时,不要使用 QuickGene-Mini80。电源插座上不要插接过多设备,以免过载。
- QuickGene-Mini80 不得使用破损的插头或松垮的插座。
- 如果在电源插头片或插座上有灰尘,请用干布将其去除。
- 从插座上拔下插头时,务必握住插头本身,切勿扯拽电源线。
- 维护时,应从插座上拔下电源插头。
- 听到雷声时不要触碰电源插头。
• 不要将任何液体泼溅到QuickGene-Mini80 上,不要在QuickGene-Mini80 上放置任何含有液体的物品。否则将可能导致设备故障,或者引起火灾或电击。
• 如果设备过热、开始冒烟或发出怪味,应立即拔下电源线。
CAUTION:• 未经制造商允许,切勿试图改装 QuickGene-Mini80。否则将可能引起火灾或电击。
• 不要在QuickGene-Mini80 上放置物品或将物品丢到QuickGene-Mini80 上,同时禁止撞击或敲打 QuickGene-Mini80,否则将可能导致其出现故障。
• 如果设备内遗留有液体,请用柔软的棉纸等进行擦拭,否则将可能损坏QuickGene-Mini80。
• 更换压头时,请务必戴手套。
• 如果有乙醇被洒到设备内部,应立即拔下电源线。
• 只有 FUJIFILM Corporation 的指定授权机构才能承担 QuickGene-Mini80 的维修事宜。
• 只能使用 FUJIFILM Corporation 的原装更换件。
• 如果使用制造商未指定的设备,将可能使设备提供的保护无效。
Min80.fm Page xii Tuesday, April 17, 2007 8:45 AM

897N100125B QuickGene-Mini80 User's Manual 2007.6 xiii
关于离析的组件在本部分下文中叫做“组件”。
CAUTION: • 处理任何组件时,请参见相应的手册。 • 处理每个组件中的试剂时,需遵守关于该组件的安全信息和安全注意事项。
• 应在相应的实验室或工作场所进行萃取。
Note :这些组件并未随 QuickGene-Mini80 提供。请选择需要的组件并单独订购。
关于组件中未包括的试剂
CAUTION: • 处理组件中未包括的试剂时,需遵守关于试剂的安全信息和安全注意事项。
• 应在相应的实验室或工作场所进行萃取。 一些试剂应在通风室内进行处理。
关于清洁 / 洗涤液
CAUTION: • 处理QuickGene-Mini80和其附件的清洁/洗涤液时,需遵守关于溶液的安全信息和安全注意事项。
• 由于乙醇非常容易燃烧,请将其远离火焰。
BIOHAZARD: • 清洁 / 洗涤时,请务必穿戴适当的手套、面具和护目镜。
关于样品
BIOHAZARD: • 处理任何传染性样品时,请务必穿戴适当的手套、面具和护目镜等。
离析组件
对于 DNA
DNA 全血组件
DNA 组织组件
质体组件
对于 RNA
RNA 组织组件
RNA 培养细胞组件
RNA 培养细胞 HC 组件
RNA 血细胞组件
Min80.fm Page xiii Tuesday, April 17, 2007 8:45 AM

xiv 897N100125B QuickGene-Mini80 User's Manual 2007.6
产品使用限制• 无论应用情况如何,FUJIFILM Corporation 恕不对结果承担责任。
• 用户应负责验证离析组件及 QuickGene-Mini80 的性能。
• QuickGene-Mini80 是一种仅用于科学研究的设备。
使用 QuickGene-Mini80 时,请全文阅读本手册并遵照所在机构(实验室)的安全管理规程进行操
作。
Min80.fm Page xiv Tuesday, April 17, 2007 8:45 AM

897N100125B QuickGene-Mini80 User's Manual 2007.6 xv
Informations concernant la sécuritéCe chapitre décrit les précautions de sécurité.Pour votre sécurité et celles des autres, veuillez suivre les indications fournies dans les pages suivantes et qui concernant l’utilisation du QuickGene-Mini80.
A propos de Mark Vérifiez toutes les descriptions de la marque ( Mark) fournies.
A propos des instruments
WARNING:• Si les recommandations suivantes ne sont pas prises en compte, un
incendie ou une décharge électrique peut se produire.- En dehors des Etats-Unis et du Canada, n’utilisez pas le câble d’alimentation fourni
avec les modèles vendus aux Etats-Unis et au Canada.- En dehors des Etats-Unis et du Canada, utilisez un cordon d’alimentation conforme
aux réglementations de votre pays ou contactez votre revendeur local.- Utilisez l’adaptateur secteur fourni.- N’utilisez pas sur d’autres produits le câble d’alimentation fourni avec les modèles
vendus aux Etats-Unis et au Canada. - N’utilisez pas le QuickGene-Mini80 avec un voltage différent de celui spécifié sur
l’appareil. Ne branchez pas trop d’appareils sur la prise électrique. - N’utilisez pas le QuickGene-Mini80 si la fiche est endommagée ou si la prise n’est pas
solidement fixée.- Si de la poussière recouvre les broches de la prise ou de la fiche, retirez-la à l’aide d’un chiffon sec.- Lorsque vous retirez la fiche de la prise, faites-le en tenant fermement la prise. Ne tirez pas le câble. - Pour tout entretien, débranchez la fiche de la prise murale. - Ne touchez pas la fiche lorsque le tonnerre gronde.
• Ne versez aucun liquide sur le QuickGene-Mini80. Ne placez aucun objet contenant du liquide sur le QuickGene-Mini80.Vous risquez, en le faisant, de provoquer une panne, un incendie ou une décharge électrique.
• En cas de surchauffe de l’appareil, ou s’il dégage de la fumée ou une odeur bizarre, débranchez immédiatement le câble d’alimentation.
CAUTION:• N’essayez en aucun cas de modifier le QuickGene-Mini80 sans l’autorisation du fabricant.Cela pourrait entraîner un incendie ou une décharge électrique.
• Ne placez et ne faites tomber aucun objet sur le QuickGene-Mini80. De même, évitez de lui faire subir des chocs ou des coups, cela pourrait entraîner des défaillances et un mauvais fonctionnement du QuickGene-Mini80.
• Si un quelconque liquide s’introduit dans l’appareil, épongez-le avec une serviette en papier, etc.Sinon, le QuickGene-Mini80 pourrait être endommagé.
• Lorsque vous remplacez les têtes de pression, veillez à porter des gants.• Si de l’éthanol est renversé à l’intérieur du dispositif, debranchez
immediatement le cable d’alimentation. • Des réparations du QuickGene-Mini80 ne doivent être effectuées que par
des agences spécifiquement autorisées par FUJIFILM Corporation.• Seules les pièces détachées originales provenant de FUJIFILM Corporation
doivent être utilisées.• Si ce matériel est utilisé de manière non spécifiée par le fabricant, la
protection fournie par le matériel peut s’en trouver diminuée.
Min80.fm Page xv Tuesday, April 17, 2007 8:45 AM

xvi 897N100125B QuickGene-Mini80 User's Manual 2007.6
À propos des kits d’isolation appelés ci-après “kit/kits” dans cette section.
CAUTION: • Lorsque vous manipulez l’un de ces kits, consultez le manuel respectif.• Les réactifs de chaque kit doivent être manipulés en respectant les
consignes de sécurité et les précautions relatives au kit.• L’extraction doit être effectuée dans un laboratoire ou un lieu approprié.
Note: les kits ne sont pas fournis avec QuickGene-Mini80. Sélectionnez le ou les kits de votre choix et commandez-les séparément.
À propos des réactifs non inclus dans les kits
CAUTION: • Lorsque vous manipulez l’un des réactifs non inclus dans les kits, respectez les consignes de sécurité et les précautions relatives aux réactifs.
• L’extraction doit être effectuée dans un laboratoire ou un lieu approprié. Certains réactifs doivent être manipulés dans une enceinte pare-vent.
À propos de la solution de nettoyage
CAUTION: • Pour manipuler une solution de nettoyage du QuickGene-Mini80 et de ses accessoires, respectez les consignes de sécurité et les précautions relatives à la solution.
• Éloignez l’éthanol de toute source d’incendie. Il est hautement inflammable.
BIOHAZARD: • Portez toujours des gants appropriés, un masque et des lunettes de protection lorsque vous procédez au nettoyage.
À propos des échantillons
BIOHAZARD: • Portez toujours au minimum des gants appropriés, un masque et des lunettes de protection lorsque vous manipulez des échantillons infectieux.
Kits d’isolation
Pour l’ADN
Kit ADN sang total
Kit ADN tissu
Kit plasmides
Pour l’ARN
Kit ARN tissu
Kit ARN cellules de culture
Kit ARN cellules de culture humaines
Kit ARN cellules sanguines
Min80.fm Page xvi Tuesday, April 17, 2007 8:45 AM

897N100125B QuickGene-Mini80 User's Manual 2007.6 xvii
Limitations d’utilisation du produit• FUJIFILM Corporation n’assume aucune responsabilité de résultats quelle que soit
l’application.• Il est de la responsabilité de l’utilisateur de valider les performances des Kits d’isolation
et QuickGene-Mini80.• QuickGene-Mini80 est un appareil uniquement destiné à la recherche et l’étude.
Lors de l’utilisation du QuickGene-Mini80, lisez d’abord ce manuel entièrement et respectez les règlements de gestion de risque de votre lieu de travail (laboratoire).
Min80.fm Page xvii Tuesday, April 17, 2007 8:45 AM
xviii 897N100125B QuickGene-Mini80 User's Manual 2007.6
SicherheitsinformationenIn diesem Kapitel sind die Sicherheitsmaßregeln beschrieben.Um Verletzungen zu vermeiden, befolgen Sie bitte die Bedienungsrichtlinien für QuickGene-Mini80 auf den folgenden Seiten.
Informationen zum -ZeichenPrüfen Sie alle Beschreibungen, die mit dem -Zeichen versehen sind.
Informationen zum Gerät
WARNING:• Bei Missachtung der folgenden Warnhinweise besteht Brand- und
Stromschlaggefahr. - Verwenden Sie das beiliegende, nur für amerikanische und kanadische Modelle
geeignete Netzkabel nicht außerhalb der USA und Kanada.- Verwenden Sie außerhalb der USA und Kanada ein Netzkabel, das Ihrer Landesnorm
entspricht, oder wenden Sie sich an Ihren lokalen Händler. - Verwenden Sie das mitgelieferte Netzteil.- Verwenden Sie das beiliegende, nur für amerikanische und kanadische Modelle
geeignete Netzkabel nicht für andere Produkte. - Betreiben Sie QuickGene-Mini80 ausschließlich mit der am Gerät angegebenen
Netzspannung. Überlasten Sie die Steckdose nicht durch Anschließen von zu vielen Geräten.
- Verwenden Sie QuickGene-Mini80 nicht mit einem beschädigten Netzstecker oder einer lockeren Steckdose.
- Falls die Kontakte des Netzsteckers oder die Steckdose staubig sind, entfernen Sie den Staub mit einem trockenen Tuch.
- Wenn Sie den Netzstecker aus der Steckdose ziehen, fassen Sie stets den Netzstecker direkt an. Ziehen Sie nicht am Netzkabel.
- Ziehen Sie vor der Durchführung von Wartungsarbeiten den Netzstecker ab. - Fassen Sie den Netzstecker bei Gewitter nicht an.
• Verschütten Sie keine Flüssigkeiten über QuickGene-Mini80. Stellen Sie keine Flüssigkeitsbehälter auf QuickGene-Mini80 ab. Dadurch könnte es zu einem Ausfall des Gerätes, zu einem Brand oder Stromschlag kommen.
• Wenn sich das Gerät überhitzt oder wenn Rauch oder ungewöhnliche Gerüche auftreten, ziehen Sie sofort das Netzkabel ab.
Min80.fm Page xviii Tuesday, April 17, 2007 8:45 AM

897N100125B QuickGene-Mini80 User's Manual 2007.6 xix
CAUTION:• Versuchen Sie nicht, QuickGene-Mini80 ohne die Erlaubnis des Herstellers zu verändern.Dadurch könnte es zu einem Brand oder Stromschlag kommen.
• Legen Sie keine Gegenstände auf QuickGene-Mini80 ab, und lassen Sie keine Gegenstände darauf fallen. Setzen Sie es außerdem keinen Stößen oder ähnlichen Erschütterungen aus, da es dadurch zu einem Ausfall oder zu einer Fehlfunktion von QuickGene-Mini80 kommen könnte.
• Wenn im Gerät irgendwelche Flüssigkeiten zurückbleiben, wischen Sie es mit einem weichen Papiertuch aus.Andernfalls kann es zu einer Beschädigung von QuickGene-Mini80 kommen.
• Tragen Sie beim Auswechseln der Druckmessköpfe stets Handschuhe.• Falls Ethanol in das Gerät verschüttet wird, ziehen Sie sofort das
Netzkabel ab. • Reparaturarbeiten an QuickGene-Mini80 sollten nur von Firmen ausgeführt
werden, die von der FUJIFILM Corporation ausdrücklich dafür autorisiert sind.
• Dabei sollten nur Original-Ersatzteile von der FUJIFILM Corporation verwendet werden.
• Wenn das Gerät anders als auf die vom Hersteller vorgesehene Weise verwendet wird, können die Sicherheitseigenschaften des Geräts beeinträchtigt werden.
Min80.fm Page xix Tuesday, April 17, 2007 8:45 AM

xx 897N100125B QuickGene-Mini80 User's Manual 2007.6
Über Isolations-Kits Nachstehend als „Kit/Kits“ bezeichnet.
CAUTION: • Nähere Informationen zum Umgang mit den Kits finden Sie im entsprechenden Handbuch.
• Der Umgang mit den Reagenzien in den Kits sollte unter Befolgung der Sicherheitshinweise und Vorsichtsmaßregeln des jeweiligen Kits erfolgen.
• Die Extraktion sollte in einem geeigneten Laboratorium oder einem entsprechendem Arbeitsplatz durchgeführt werden.
Note:Die Kits werden nicht mit QuickGene-Mini80 ausgeliefert. Wählen Sie die gewünschten Kits aus und bestellen Sie sie getrennt.
Über nicht in den Kits enthaltene Reagenzien
CAUTION: • Beim Umgang mit einem Reagens, das nicht in den Kits enthalten ist, sind die Sicherheitsinformationen und Vorsichtsmaßregeln des jeweiligen Reagens zu befolgen.
• Die Extraktion sollte in einem geeigneten Laboratorium oder an einem entsprechenden Arbeitsplatz durchgeführt werden. Mit einigen Reagenzien sollte in einer Abzugskammer gearbeitet werden.
Über Reinigungs-/Waschlösung
CAUTION: • Bei der Anwendung von Reinigungs-/Waschlösungen beim QuickGene- Mini80 und den Zubehörteilen sind die Sicherheitsinformationen und Vorsichtsmaßregeln für die Lösung zu beachten.
• Halten Sie Ethanol fern von Feuer. Es ist leicht entflammbar.
BIOHAZARD: • Beim Reinigen/Waschen immer geeignete Handschuhe, einen Mundschutz und eine Schutzbrille tragen.
Über die Proben
BIOHAZARD: • Beim Umgang mit infektiösen Proben immer geeignete Handschuhe, einen Mundschutz und eine Schutzbrille tragen.
Isolations-Kits
Für DNA
DNA Vollblut Kit
DNA Gewebe Kit
Plasmid Kit
Für RNA
RNA Gewebe Kit
RNA Kulturzellen Kit
RNA Kulturzellen HC Kit
RNA Blutzellen Kit
Min80.fm Page xx Tuesday, April 17, 2007 8:45 AM

897N100125B QuickGene-Mini80 User's Manual 2007.6 xxi
Einschränkungen der Produktverwendung• Die FUJIFILM Corporation übernimmt keine Haftung für die Ergebnisse, unabhängig von
der Anwendung.• Es liegt in der Verantwortung des Anwenders, die Eignung des Isolations-Kits und
QuickGene-Mini80 zu überprüfen.• QuickGene-Mini80 ist nur für den Einsatz in Forschung und Lehre vorgesehen.
Wenn Sie QuickGene-Mini80 einsetzen, lesen Sie diese Anleitung sorgfältig durch, und befolgen Sie die Sicherheitsbestimmungen Ihrer Einrichtung (Labor).
Min80.fm Page xxi Tuesday, April 17, 2007 8:45 AM

xxii 897N100125B QuickGene-Mini80 User's Manual 2007.6
Min80.fm Page xxii Tuesday, April 17, 2007 8:45 AM
897N100125B QuickGene-Mini80 User's Manual 2007.6 xxiii
1
2
3
4
5
A
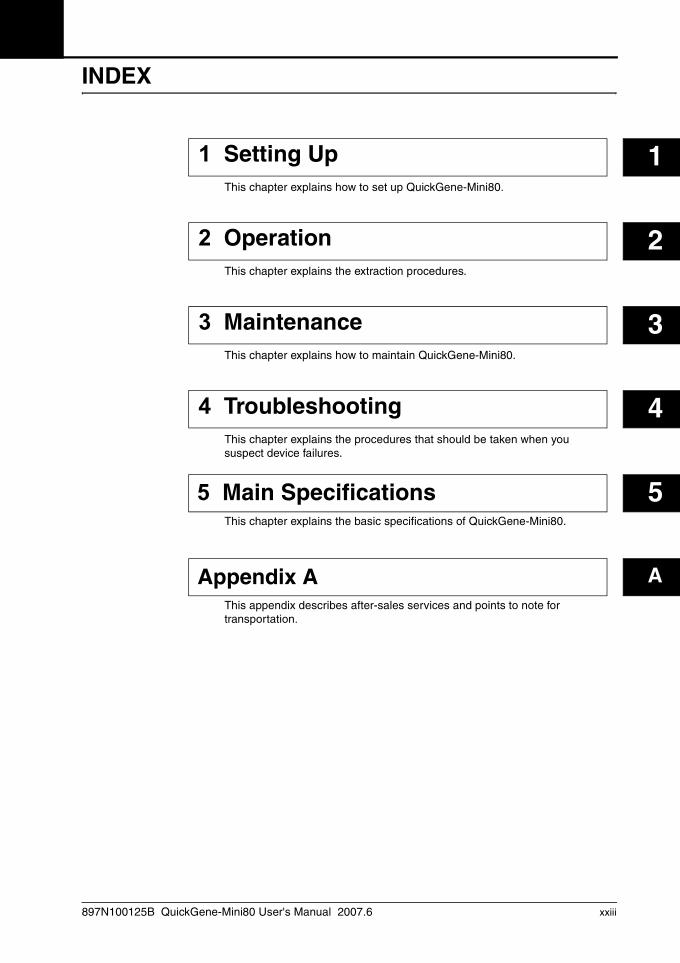
INDEX
1 Setting UpThis chapter explains how to set up QuickGene-Mini80.
2 OperationThis chapter explains the extraction procedures.
3 MaintenanceThis chapter explains how to maintain QuickGene-Mini80.
4 TroubleshootingThis chapter explains the procedures that should be taken when you suspect device failures.
This chapter explains the basic specifications of QuickGene-Mini80.
This appendix describes after-sales services and points to note for transportation.
5 Main Specifications
Appendix A
QuickGene_Mini80_E.book Page xxiii Tuesday, April 17, 2007 8:43 AM

xxiv 897N100125B QuickGene-Mini80 User's Manual 2007.6
QuickGene_Mini80_E.book Page xxiv Tuesday, April 17, 2007 8:43 AM

897N100125B QuickGene-Mini80 User's Manual 2007.6 xxv
Contents
1 Setting Up
1.1 Operating Environment/Use Conditions ........................................ 11.2 Checking QuickGene-Mini80 and Accessories ............................. 31.3 Remove the Packing Materials........................................................ 41.4 Overall View ...................................................................................... 51.5 Basic Functions................................................................................ 81.6 Basic Operation ................................................................................ 91.7 Precautions on Transportation ..................................................... 101.8 Precautions on Storage ................................................................. 11
2 Operation
2.1 Turning the Power ON and OFF .................................................... 132.2 Preparation...................................................................................... 152.3 Extraction........................................................................................ 16
3 Maintenance
3.1 Cleaning QuickGene-Mini80.......................................................... 273.2 Cleaning the Parts.......................................................................... 283.3 How to Clean/Replace the Pressure Heads ................................. 28
4 Troubleshooting
5 Main Specifications
Appendix A
A.1 Replacement/Optional Parts.......................................................... 35A.2 Product Guarantees ....................................................................... 35A.3 About Services ............................................................................... 36A.4 Notes for Transporting/Shipping QuickGene-Mini80.................. 36
QuickGene_Mini80_E.book Page xxv Tuesday, April 17, 2007 8:43 AM

xxvi 897N100125B QuickGene-Mini80 User's Manual 2007.6
QuickGene_Mini80_E.book Page xxvi Tuesday, April 17, 2007 8:43 AM
1 Setting Up
897N100125B QuickGene-Mini80 User's Manual 2007.6 1
1
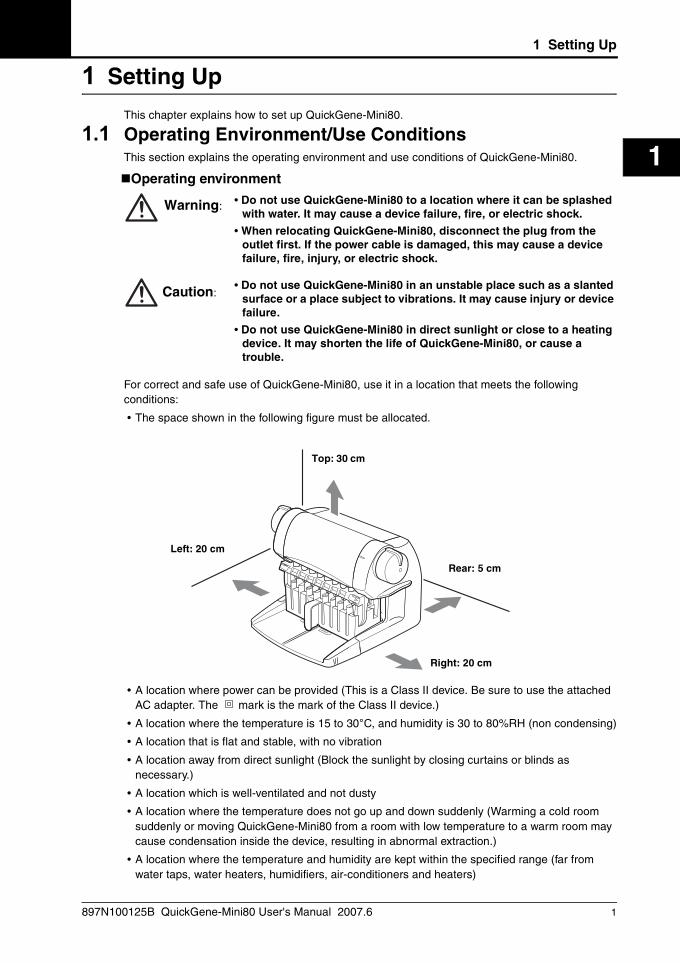
1 Setting Up
This chapter explains how to set up QuickGene-Mini80.
1.1 Operating Environment/Use ConditionsThis section explains the operating environment and use conditions of QuickGene-Mini80.
Operating environment
Warning: • Do not use QuickGene-Mini80 to a location where it can be splashed with water. It may cause a device failure, fire, or electric shock.
• When relocating QuickGene-Mini80, disconnect the plug from the outlet first. If the power cable is damaged, this may cause a device failure, fire, injury, or electric shock.
Caution:• Do not use QuickGene-Mini80 in an unstable place such as a slanted
surface or a place subject to vibrations. It may cause injury or device failure.
• Do not use QuickGene-Mini80 in direct sunlight or close to a heating device. It may shorten the life of QuickGene-Mini80, or cause a trouble.
For correct and safe use of QuickGene-Mini80, use it in a location that meets the following conditions:
• The space shown in the following figure must be allocated.
• A location where power can be provided (This is a Class II device. Be sure to use the attached AC adapter. The mark is the mark of the Class II device.)
• A location where the temperature is 15 to 30°C, and humidity is 30 to 80%RH (non condensing)
• A location that is flat and stable, with no vibration
• A location away from direct sunlight (Block the sunlight by closing curtains or blinds as necessary.)
• A location which is well-ventilated and not dusty
• A location where the temperature does not go up and down suddenly (Warming a cold room suddenly or moving QuickGene-Mini80 from a room with low temperature to a warm room may cause condensation inside the device, resulting in abnormal extraction.)
• A location where the temperature and humidity are kept within the specified range (far from water taps, water heaters, humidifiers, air-conditioners and heaters)
Top: 30 cm
Left: 20 cm
Rear: 5 cm
Right: 20 cm
QuickGene_Mini80_E.book Page 1 Tuesday, April 17, 2007 8:43 AM

1 Setting Up
2 897N100125B QuickGene-Mini80 User's Manual 2007.6
1
• A location far from objects which generate strong magnetic fields (motors, transformers, TV, audio speakers, magnets, etc.) (Bringing QuickGene-Mini80 close to any type of magnetic field may cause a malfunction.)
Use conditions
Items Specifications
Temperature (°C) During operation 15 - 30
During downtime 0 - 55
Humidity (RH) During operation 30 - 80
During downtime 10 - 80
Max. wet bulb temperature (°C)
During operation 29 (non condensing)
During downtime 29 (non condensing)
Temperature gradient (°C/hr) 12 or less (non condensing)
Humidity gradient (RH/day) 30 or less (non condensing)
Altitude, operating (m) 1600 or less
QuickGene_Mini80_E.book Page 2 Tuesday, April 17, 2007 8:43 AM

1 Setting Up
897N100125B QuickGene-Mini80 User's Manual 2007.6 3
1
1.2 Checking QuickGene-Mini80 and AccessoriesCheck that the following are included in the package.Contact your local representative if you notice any missing part(s).
Note: Use an appropriate power cable by following the descriptions below.
US/Canada: Use the power cable included in the package.
Other countries: The power cable is not included in the package. Prepare the power cable that meets your country’s standard.
The specification of the power cable for QuickGene-Mini80 is as follows.
100-120V area Power Voltage: 100 to 120 V Requirements for the plug/connector: AC 125 V 3 A Requirements for the cable: SJT 2 x 18 AWG 60°C
200-240V area Power Voltage: 200 to 240 V Requirements for the plug/connector: AC 250 V 3 A Requirements for the cable: CENELEC 2 x 0.75 mm2 70°C
• QuickGene-Mini80 • QuickGene-Mini80 User's Manual
• AC Adapter
• Power Cable(Only US/Canada)
• Cover • Cartridge Holder
• Tube Holder • Tube Adapter (x8)
Caution:
QuickGene_Mini80_E.book Page 3 Tuesday, April 17, 2007 8:43 AM
1 Setting Up
4 897N100125B QuickGene-Mini80 User's Manual 2007.6
1
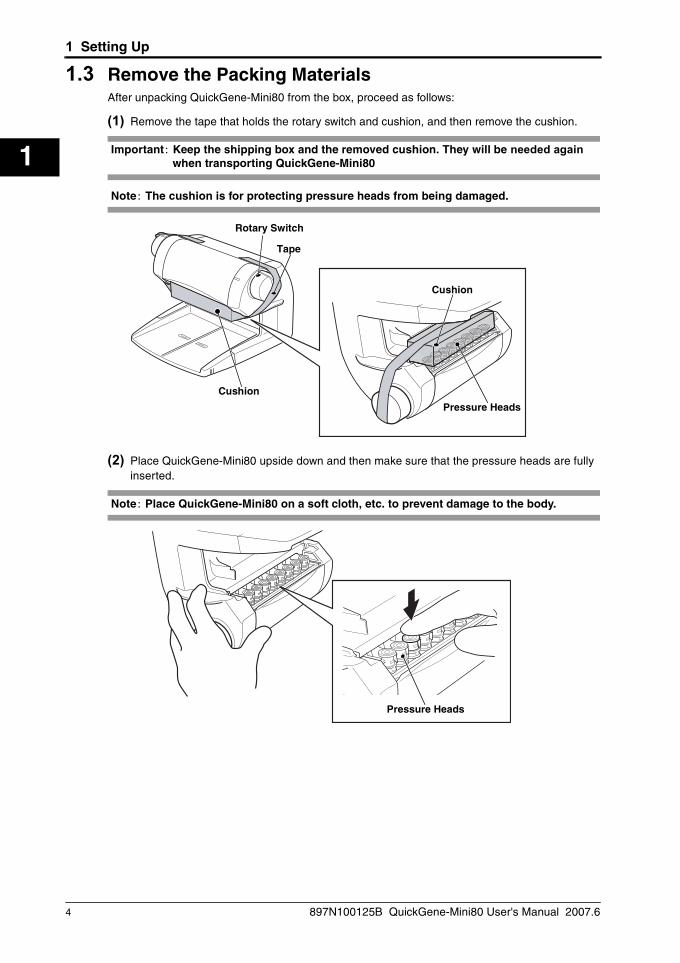
1.3 Remove the Packing MaterialsAfter unpacking QuickGene-Mini80 from the box, proceed as follows:
(1) Remove the tape that holds the rotary switch and cushion, and then remove the cushion.
Important: Keep the shipping box and the removed cushion. They will be needed again when transporting QuickGene-Mini80
Note: The cushion is for protecting pressure heads from being damaged.
(2) Place QuickGene-Mini80 upside down and then make sure that the pressure heads are fully inserted.
Note: Place QuickGene-Mini80 on a soft cloth, etc. to prevent damage to the body.
Rotary Switch
Tape
Cushion
Cushion
Pressure Heads
Pressure Heads
QuickGene_Mini80_E.book Page 4 Tuesday, April 17, 2007 8:43 AM

1 Setting Up
897N100125B QuickGene-Mini80 User's Manual 2007.6 5
1
1.4 Overall ViewThis section explains the name and function of each part in QuickGene-Mini80.
Front and side view
Rear view
Lamp (LED)
Rotary Switch
Stopper
Cartridge Holder
Tube Holder
Pressure Head
Tray
Handle
BIOHAZARD MARK
: This mark represents “DC Input”.
Inlet
AC Adapter
The mark is the mark of the Class II device.
QuickGene_Mini80_E.book Page 5 Tuesday, April 17, 2007 8:43 AM
1 Setting Up
6 897N100125B QuickGene-Mini80 User's Manual 2007.6
1
Cartridge holder
Tube holder
Name Description
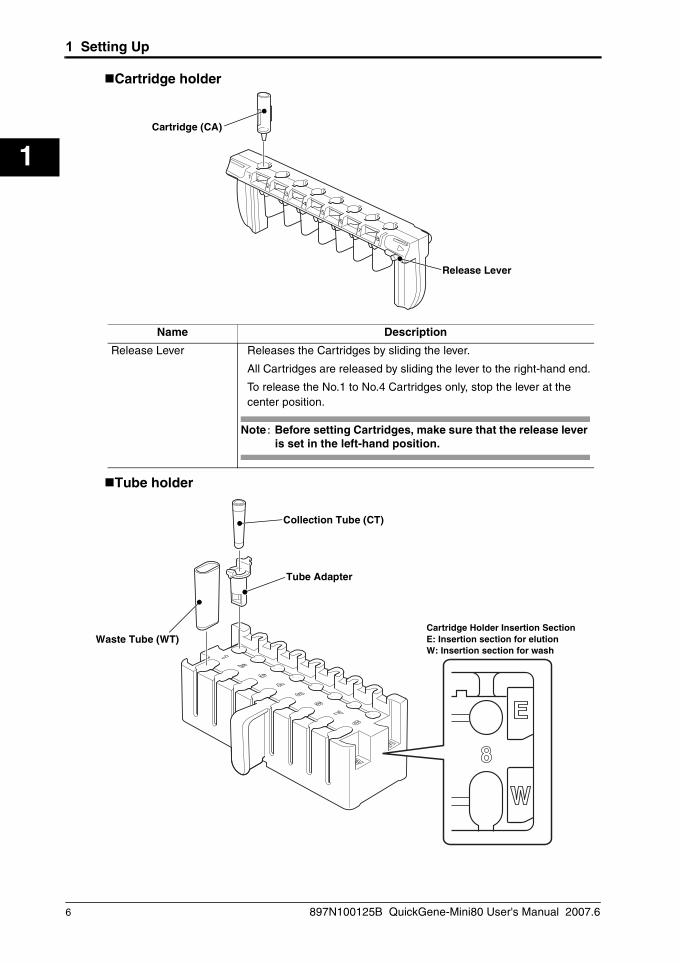
Release Lever Releases the Cartridges by sliding the lever.
All Cartridges are released by sliding the lever to the right-hand end.
To release the No.1 to No.4 Cartridges only, stop the lever at the center position.
Note: Before setting Cartridges, make sure that the release lever is set in the left-hand position.
Cartridge (CA)
Release Lever
Waste Tube (WT)
Collection Tube (CT)
Tube Adapter
Cartridge Holder Insertion SectionE: Insertion section for elutionW: Insertion section for wash
QuickGene_Mini80_E.book Page 6 Tuesday, April 17, 2007 8:43 AM
1 Setting Up
897N100125B QuickGene-Mini80 User's Manual 2007.6 7
1
Label
Cover
Name Description
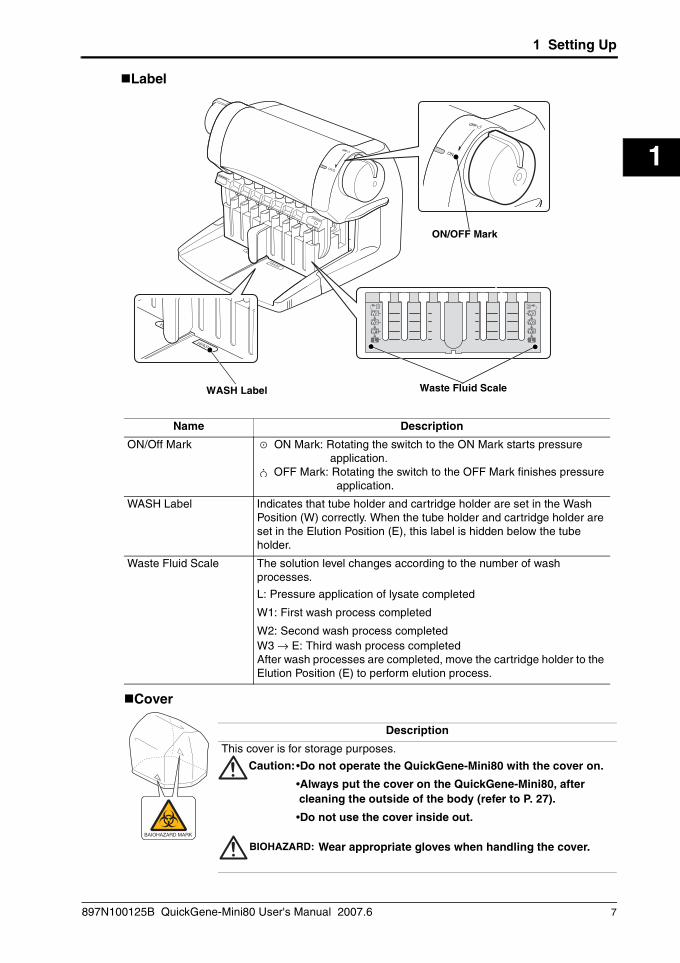
ON/Off Mark ON Mark: Rotating the switch to the ON Mark starts pressure application.
OFF Mark: Rotating the switch to the OFF Mark finishes pressure application.
WASH Label Indicates that tube holder and cartridge holder are set in the Wash Position (W) correctly. When the tube holder and cartridge holder are set in the Elution Position (E), this label is hidden below the tube holder.
Waste Fluid Scale The solution level changes according to the number of wash processes.
L: Pressure application of lysate completed
W1: First wash process completed
W2: Second wash process completedW3 → E: Third wash process completedAfter wash processes are completed, move the cartridge holder to the Elution Position (E) to perform elution process.
Description
This cover is for storage purposes.
•Do not operate the QuickGene-Mini80 with the cover on.
•Always put the cover on the QuickGene-Mini80, after cleaning the outside of the body (refer to P. 27).
•Do not use the cover inside out.
Wear appropriate gloves when handling the cover.
WASH Label Waste Fluid Scale
ON/OFF Mark
BAIOHAZARD MARK
Caution:
BIOHAZARD:
QuickGene_Mini80_E.book Page 7 Tuesday, April 17, 2007 8:43 AM
1 Setting Up
8 897N100125B QuickGene-Mini80 User's Manual 2007.6
1
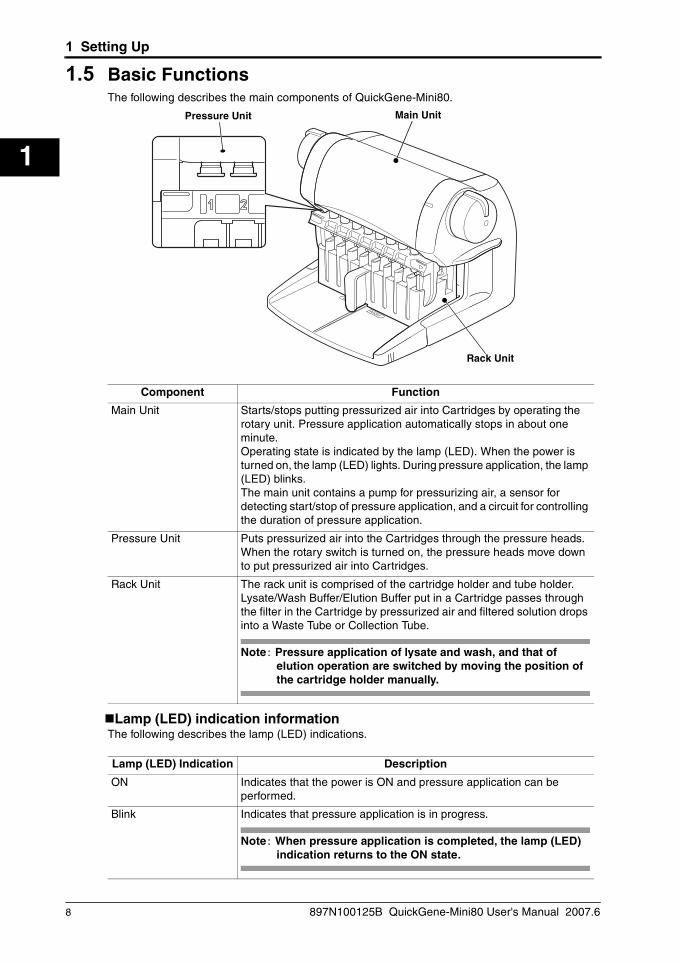
1.5 Basic FunctionsThe following describes the main components of QuickGene-Mini80.
Lamp (LED) indication informationThe following describes the lamp (LED) indications.
Component Function
Main Unit Starts/stops putting pressurized air into Cartridges by operating the rotary unit. Pressure application automatically stops in about one minute.Operating state is indicated by the lamp (LED). When the power is turned on, the lamp (LED) lights. During pressure application, the lamp (LED) blinks.The main unit contains a pump for pressurizing air, a sensor for detecting start/stop of pressure application, and a circuit for controlling the duration of pressure application.
Pressure Unit Puts pressurized air into the Cartridges through the pressure heads. When the rotary switch is turned on, the pressure heads move down to put pressurized air into Cartridges.
Rack Unit The rack unit is comprised of the cartridge holder and tube holder. Lysate/Wash Buffer/Elution Buffer put in a Cartridge passes through the filter in the Cartridge by pressurized air and filtered solution drops into a Waste Tube or Collection Tube.
Note: Pressure application of lysate and wash, and that of elution operation are switched by moving the position of the cartridge holder manually.
Lamp (LED) Indication Description
ON Indicates that the power is ON and pressure application can be performed.
Blink Indicates that pressure application is in progress.
Note: When pressure application is completed, the lamp (LED) indication returns to the ON state.
Main Unit
Rack Unit
Pressure Unit
QuickGene_Mini80_E.book Page 8 Tuesday, April 17, 2007 8:43 AM

1 Setting Up
897N100125B QuickGene-Mini80 User's Manual 2007.6 9
1
1.6 Basic OperationThe following describes the working flow of QuickGene-Mini80:
(1) Set the Waste Tubes and Collection Tubes into the tube holder and then insert the cartridge holder into the Wash Position (W) of the tube holder.
(2) Set the Cartridges into the cartridge holder.
(3) Apply lysate to the Cartridges and then set the cartridge holder and tube holder in QuickGene-Mini80.
(4) Rotate the rotary switch toward the front side to apply air pressure to the Cartridges.
(5) Make sure that lysate is discharged completely and then return the rotary switch to the original position to terminate pressure application.
(6) Pull out the cartridge holder and tube holder.
(7) Apply Wash Buffer to the Cartridges and then set the cartridge holder and tube holder in QuickGene-Mini80.
(8) Rotate the rotary switch toward the front side to apply air pressure to the Cartridges.
(9) Make sure that Wash Buffer is discharged completely and then return the rotary switch to the original position to terminate pressure application.
(10)Repeat Steps 6 to 9 depending on the protocol of the relevant Isolation Kits.
(11) Pull out the cartridge holder and tube holder and then insert the cartridge holder into the Elution Position (E) of the tube holder.
(12) Apply Elution Buffer to the Cartridges and then set the cartridge holder and tube holder in QuickGene-Mini80.
(13)Rotate the rotary switch toward the front side to apply air pressure to the Cartridges.
(14)Make sure that Elution Buffer is discharged completely and then return the rotary switch to the original position to terminate pressure application.The extracted sample is eluted into the Collection Tube and the waste is discharged into the Waste Tube.
QuickGene_Mini80_E.book Page 9 Tuesday, April 17, 2007 8:43 AM

1 Setting Up
10 897N100125B QuickGene-Mini80 User's Manual 2007.6
1
1.7 Precautions on TransportationWhen transporting QuickGene-Mini80, note the following points.
• Be sure to hold the handles.
• Do not hold the rotary switch.
• Do not hold the tray.
• Do not insert your hands into the pressure head section.
• Remove the tube holder before transportation.
Be sure to hold the handles.
QuickGene_Mini80_E.book Page 10 Tuesday, April 17, 2007 8:43 AM
1 Setting Up
897N100125B QuickGene-Mini80 User's Manual 2007.6 11
1
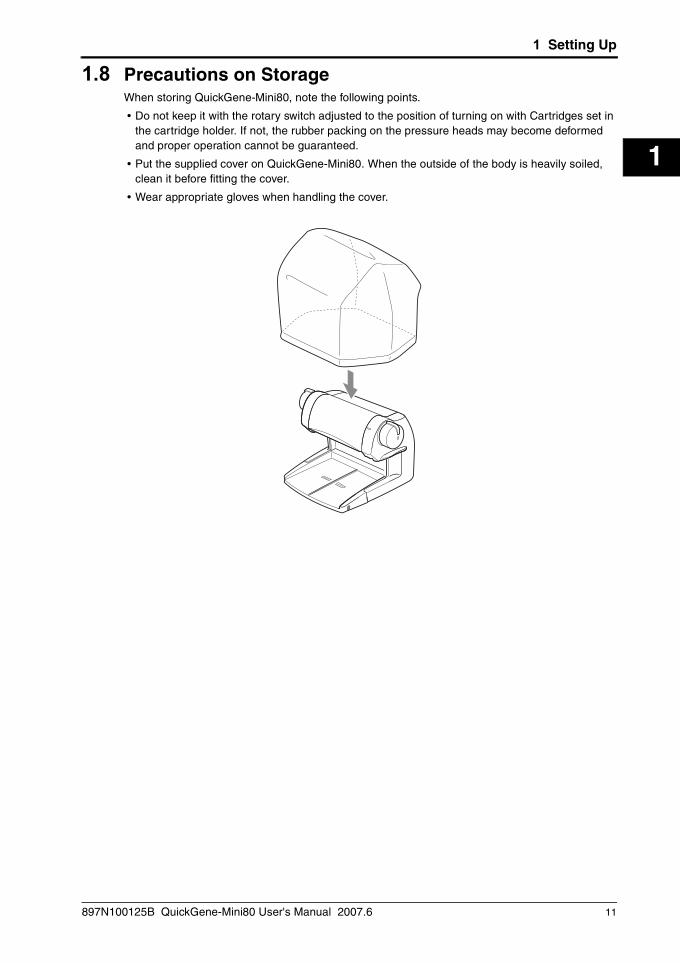
1.8 Precautions on StorageWhen storing QuickGene-Mini80, note the following points.
• Do not keep it with the rotary switch adjusted to the position of turning on with Cartridges set in the cartridge holder. If not, the rubber packing on the pressure heads may become deformed and proper operation cannot be guaranteed.
• Put the supplied cover on QuickGene-Mini80. When the outside of the body is heavily soiled, clean it before fitting the cover.
• Wear appropriate gloves when handling the cover.
QuickGene_Mini80_E.book Page 11 Tuesday, April 17, 2007 8:43 AM

1 Setting Up
12 897N100125B QuickGene-Mini80 User's Manual 2007.6
1
QuickGene_Mini80_E.book Page 12 Tuesday, April 17, 2007 8:43 AM
2 Operation
897N100125B QuickGene-Mini80 User's Manual 2007.6 13
2
2 Operation
This chapter explains how to operate QuickGene-Mini80 and shows the flow of extraction.
BIOHAZARD:
Always wear appropriate gloves, a mask, and safety goggles during any biohazardous operations in extraction process. Even when touching the device after any operation with a biohazard risk, wear appropriate gloves and a mask since the device may be contaminated.
Important: Before starting extraction, put on appropriate gloves, a mask, and safety goggles if required by the operation. In the operation from preparing samples to extraction completion, be careful not to contaminate the samples with sweat, saliva, etc.
2.1 Turning the Power ON and OFFThis section explains how to turn the power of QuickGene-Mini80 on and off.
Note: Since QuickGene-Mini80 is not equipped with a power switch, the power is turned on/off by connecting/disconnecting the power cable.
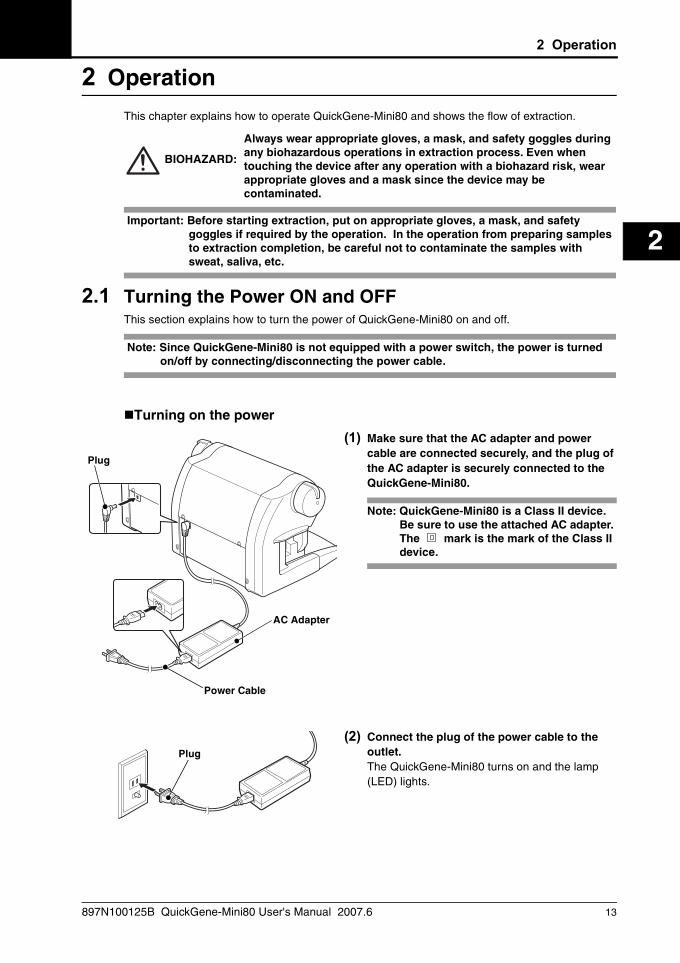
Turning on the power
(1) Make sure that the AC adapter and power cable are connected securely, and the plug of the AC adapter is securely connected to the QuickGene-Mini80.
Note: QuickGene-Mini80 is a Class II device. Be sure to use the attached AC adapter. The mark is the mark of the Class II device.
(2) Connect the plug of the power cable to the outlet.The QuickGene-Mini80 turns on and the lamp (LED) lights.
Plug
Power Cable
AC Adapter
Plug
QuickGene_Mini80_E.book Page 13 Tuesday, April 17, 2007 8:43 AM
2 Operation
14 897N100125B QuickGene-Mini80 User's Manual 2007.6
2
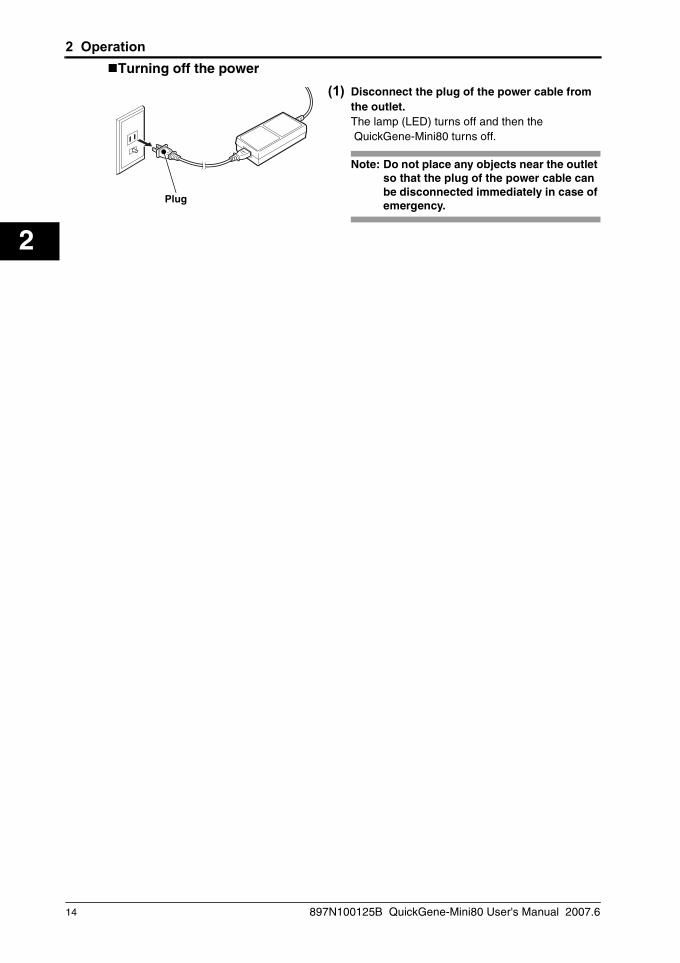
Turning off the power
(1) Disconnect the plug of the power cable from the outlet.The lamp (LED) turns off and then the QuickGene-Mini80 turns off.
Note: Do not place any objects near the outlet so that the plug of the power cable can be disconnected immediately in case of emergency.
Plug
QuickGene_Mini80_E.book Page 14 Tuesday, April 17, 2007 8:43 AM

2 Operation
897N100125B QuickGene-Mini80 User's Manual 2007.6 15
2
2.2 PreparationThe following preparations are required for extraction operation.
Items to be prepared- Gloves- Mask- Safety Goggles- Collection Tubes (CT) (*1,*2)- Waste Tubes (WT) (*1)- Cartridges (CA) (*1)- Buffer (Wash Buffer, Elution Buffer) (*1)- Lysate (Samples)For the preparation of samples, refer to the handbook of each kit.
*1: Provided with the Isolation Kits.Tube adapters are required when using Collection Tubes provided with the Isolation Kits ("When using Collection Tubes included in the Isolation Kits:"(P.17)).
*2: Commercially-available 1.5 ml micro tubes can be used in place of Collection Tubes.
Preparation of lysatePrepare lysate.Make lysate using the specified kit for each target sample. For details, refer to the handbook of the Isolation Kits.
QuickGene_Mini80_E.book Page 15 Tuesday, April 17, 2007 8:43 AM
2 Operation
16 897N100125B QuickGene-Mini80 User's Manual 2007.6
2
2.3 ExtractionThis section explains extraction procedure including before and after extraction operations. Be sure to perform extraction in the following order.
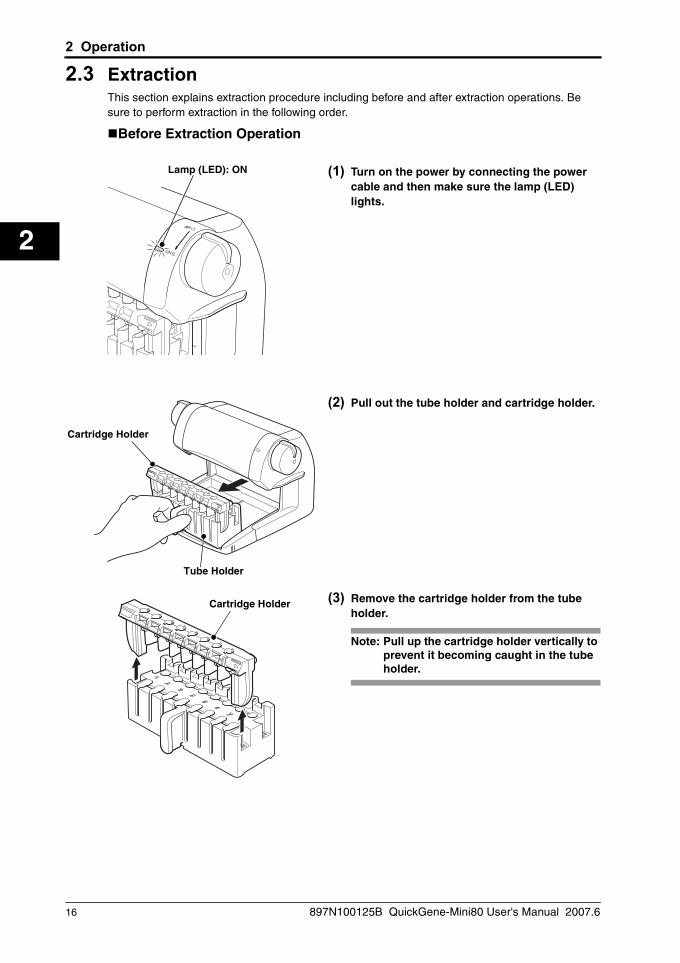
Before Extraction Operation
(1) Turn on the power by connecting the power cable and then make sure the lamp (LED) lights.
(2) Pull out the tube holder and cartridge holder.
(3) Remove the cartridge holder from the tube holder.
Note: Pull up the cartridge holder vertically to prevent it becoming caught in the tube holder.
Lamp (LED): ON
Tube Holder
Cartridge Holder
Cartridge Holder
QuickGene_Mini80_E.book Page 16 Tuesday, April 17, 2007 8:43 AM

2 Operation
897N100125B QuickGene-Mini80 User's Manual 2007.6 17
2
(4) Set Collection Tubes and Waste Tubes into the tube holder.
(5) Insert the cartridge holder into the Wash Position (W) of the tube holder.
Collection Tube
Waste Tube
Tube Adapter
Tube Holder
• When using Collection Tubes included in the Isolation Kits:Set a tube adapter into the tube holder as shown and then insert a Collection Tube into the tube adapter.
• When using commercially-available1.5 ml micro tubes as collection tubes:Set 1.5 ml micro tubes so that the cap is positioned as shown. Tube adapters are not used.
Tube Adapter
Collection Tube
1.5 ml Micro Tube Cap
Tube Holder
Cartridge Holder
QuickGene_Mini80_E.book Page 17 Tuesday, April 17, 2007 8:43 AM

2 Operation
18 897N100125B QuickGene-Mini80 User's Manual 2007.6
2
(6) Set Cartridges into the cartridge holder.
Important:• Make sure that the release lever is
positioned at the left-hand end. If any Cartridges are set without the release lever positioned at the left-hand end, the Cartridges will drop into the Waste Tubes.
• Align the fins on the Cartridge with the grooves in the cartridge holder and then push in the Cartridge.
• Set Cartridges into the cartridge holder in the order of the number on the cartridge holder.
(7) Check the location of the Tubes and Cartridges.
Important: Put the tubes into the tube holder in the order of the number on the tube holder. Insert the Cartridges and Tubes starting from the left, in order. If they are not in order, Buffer and/or lysate may spill. This results in an extraction failure, and Buffer and/or lysate becoming waste.
Extraction<Applying Lysate to Cartridges>(1) Apply lysate to each Cartridge.
Use a pipette to transfer the lysate into the Cartridges. In this operation, take care not to touch the filter in the Cartridge, the Cartridge itself or the cartridge holder.
Note: If any lysate is left on the rim of a Cartridge or on the cartridge holder, wipe it off with a soft paper tissue.
Cartridge
Release Lever
Fin
1 2 3 5 6 7 8
1 2 3 4 5
OK OK OK NG
6 7 8
4CartridgeHolder
Tube Holder
QuickGene_Mini80_E.book Page 18 Tuesday, April 17, 2007 8:43 AM

2 Operation
897N100125B QuickGene-Mini80 User's Manual 2007.6 19
2
(2) Set the tube holder and cartridge holder into the QuickGene-Mini80.
Important: After setting it, check the following:
• The cartridge holder is placed against the stopper inside the QuickGene-Mini80.
• The WASH label can be seen.
(3) Rotate the rotary switch toward the front side to lower the pressure heads.
(4) The lamp (LED) blinks and pressurized air is put into the Cartridges.
Note: • When the solution in each Cartridge is
discharged completely before pressure application automatically stops, return the rotary switch to the original position to terminate pressure application (Refer to Step 6).
• Pressure application automatically stops in about one minute.
Tube Holder
Cartridge Holder
Stopper
WASH Label Cartridge Holder
Pressure Head
Cartridge
Rotary Switch
Rotate up to here.
Lamp (LED): Blink
QuickGene_Mini80_E.book Page 19 Tuesday, April 17, 2007 8:43 AM
2 Operation
20 897N100125B QuickGene-Mini80 User's Manual 2007.6
2
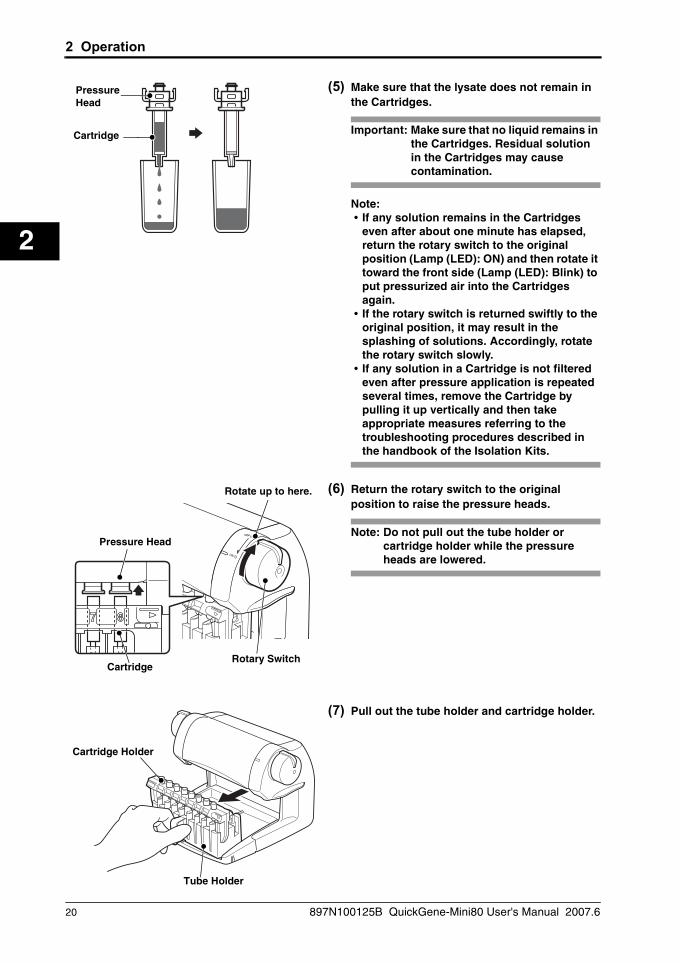
(5) Make sure that the lysate does not remain in the Cartridges.
Important: Make sure that no liquid remains in the Cartridges. Residual solution in the Cartridges may causecontamination.
Note:• If any solution remains in the Cartridges
even after about one minute has elapsed, return the rotary switch to the originalposition (Lamp (LED): ON) and then rotate it toward the front side (Lamp (LED): Blink) to put pressurized air into the Cartridges again.
• If the rotary switch is returned swiftly to the original position, it may result in the splashing of solutions. Accordingly, rotate the rotary switch slowly.
• If any solution in a Cartridge is not filtered even after pressure application is repeated several times, remove the Cartridge by pulling it up vertically and then take appropriate measures referring to the troubleshooting procedures described in the handbook of the Isolation Kits.
(6) Return the rotary switch to the original position to raise the pressure heads.
Note: Do not pull out the tube holder orcartridge holder while the pressure heads are lowered.
(7) Pull out the tube holder and cartridge holder.
PressureHead
Cartridge
Pressure Head
CartridgeRotary Switch
Rotate up to here.
Tube Holder
Cartridge Holder
QuickGene_Mini80_E.book Page 20 Tuesday, April 17, 2007 8:43 AM

2 Operation
897N100125B QuickGene-Mini80 User's Manual 2007.6 21
2
<Wash>(8) Apply Wash Buffer to each Cartridge.
Use a pipette to apply Wash Buffer to the Cartridges. In this operation, take care not to touch the filter in the Cartridge, the Cartridge itself or the cartridge holder.
Note: If any Wash Buffer is left on the rim of a Cartridge or on the cartridge holder, wipe it off with a soft paper tissue.
(9) Set the tube holder and cartridge holder into the QuickGene-Mini80 again.
Important: After setting it, check the following:
• The cartridge holder is placed against the stopper inside the QuickGene-Mini80.
• The WASH label can be seen.
(10) Repeat the wash process the necessary number of times according to the protocols.
Note:• Refer to Steps (3) to (8).• The waste fluid scale indicates the number
of wash processes.L: Pressure application of lysate completedW1: First wash process completedW2: Second wash process completedW3 → E: Third wash process completedWhen the wash processes are completed, move the cartridge holder to the Elution Position (E) to perform the elution process.
Tube Holder
Cartridge Holder
Stopper
WASH Label Cartridge Holder
QuickGene_Mini80_E.book Page 21 Tuesday, April 17, 2007 8:43 AM

2 Operation
22 897N100125B QuickGene-Mini80 User's Manual 2007.6
2
(11) When wash process is completed, return the rotary switch to the original position to raise the pressure heads.
Important: Make sure that no liquid remains in the Cartridges. Residual solution in the Cartridges may cause contamination.
Note: Do not pull out the tube holder and cartridge holder while the pressure heads are lowered.
(12) Pull out the tube holder and cartridge holder.
Precautions for Putting DNase into CartridgesApply DNase directly onto the filter in each Cartridge. Be careful not to touch the filter with the pipette tip.
<Elution>(13) Remove the cartridge holder and then insert
it into the Elution Position (E) of the tube holder.Cartridges are positioned above the Collection Tubes.
Important: Ensure that the tube holder is set in the Elution Position (E) before applying Elution Buffer.
Note: When moving the cartridge holder, do not slide the release lever.
Pressure Head
CartridgeRotary Switch
Rotate up to here.
Tube Holder
Cartridge Holder
Tube Holder
Cartridge Holder
QuickGene_Mini80_E.book Page 22 Tuesday, April 17, 2007 8:43 AM

2 Operation
897N100125B QuickGene-Mini80 User's Manual 2007.6 23
2
(14) Apply Elution Buffer to each Cartridge.Use a pipette to apply Elution Buffer to the Cartridges. In this operation, take care not to touch the filter in the Cartridge, the Cartridge itself or the cartridge holder.
Note: If any Elution Buffer is left on the rim of a Cartridge or on the cartridge holder, wipe it off with a soft paper tissue.
(15) Set the tube holder and cartridge holder into the QuickGene-Mini80 again.
Important: After setting it, check the following.
• The cartridge holder is placed against thestopper inside the QuickGene-Mini80.
• The WASH label is placed under the tube holder cannot be seen.
Note: Make sure that the WASH label is hidden below the tube holder before starting pressure application.
(16) Repeat Steps 3 and 5.
(17) Return the rotary switch to the original position to raise the pressure heads.
Important: Make sure that no liquid remains in the Cartridges.
Note: Do not pull out the tube holder and cartridge holder while the pressure heads are lowered.
Tube Holder
Cartridge Holder
Stopper
WASH Label Cartridge Holder
Pressure Head
Cartridge
Rotary Switch
Rotate up to here.
QuickGene_Mini80_E.book Page 23 Tuesday, April 17, 2007 8:43 AM
2 Operation
24 897N100125B QuickGene-Mini80 User's Manual 2007.6
2
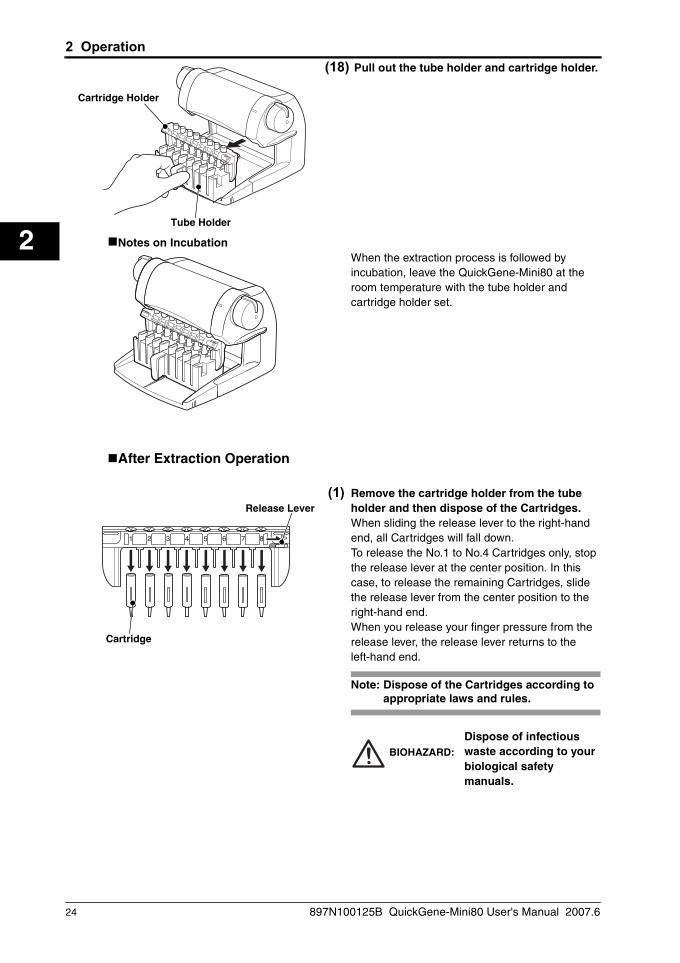
(18) Pull out the tube holder and cartridge holder.
Notes on IncubationWhen the extraction process is followed by incubation, leave the QuickGene-Mini80 at the room temperature with the tube holder and cartridge holder set.
After Extraction Operation
(1) Remove the cartridge holder from the tube holder and then dispose of the Cartridges.When sliding the release lever to the right-hand end, all Cartridges will fall down.To release the No.1 to No.4 Cartridges only, stop the release lever at the center position. In this case, to release the remaining Cartridges, slide the release lever from the center position to the right-hand end.When you release your finger pressure from the release lever, the release lever returns to the left-hand end.
Note: Dispose of the Cartridges according to appropriate laws and rules.
Dispose of infectious waste according to your biological safety manuals.
Tube Holder
Cartridge Holder
Release Lever
Cartridge
BIOHAZARD:
QuickGene_Mini80_E.book Page 24 Tuesday, April 17, 2007 8:43 AM

2 Operation
897N100125B QuickGene-Mini80 User's Manual 2007.6 25
2
(2) Remove the Collection Tubes.
(3) Remove the Waste Tubes.
Note: Dispose of the Waste Tubes and waste solution according to appropriate laws and rules.
Dispose of infectious waste according to your biological safety manuals.
Tube Adapter
Collection Tube
• When using Collection Tubes included in the Isolation Kits:Insert the Collection Tubes into the Tube Rack (optional) and then put Caps (included in the Isolation Kits) on the Collection Tubes.
Note: When the Tube Rack is not used, remove the Collection Tubes after putting Caps on them. The eight Caps included in the Isolation Kits can be detached by hand.
• When using commercially-available 1.5 ml micro tubes:Put caps on 1.5 ml micro tubes and then remove them.
Tube Rack (optional)
Cap
Collection Tube
Cap
1.5 ml Micro Tube
Cap
Waste Tube
Specified Waste Containers (Example)
BIOHAZARD:
QuickGene_Mini80_E.book Page 25 Tuesday, April 17, 2007 8:43 AM

2 Operation
26 897N100125B QuickGene-Mini80 User's Manual 2007.6
2
QuickGene_Mini80_E.book Page 26 Tuesday, April 17, 2007 8:43 AM
3 Maintenance
897N100125B QuickGene-Mini80 User's Manual 2007.6 27
3
3 Maintenance
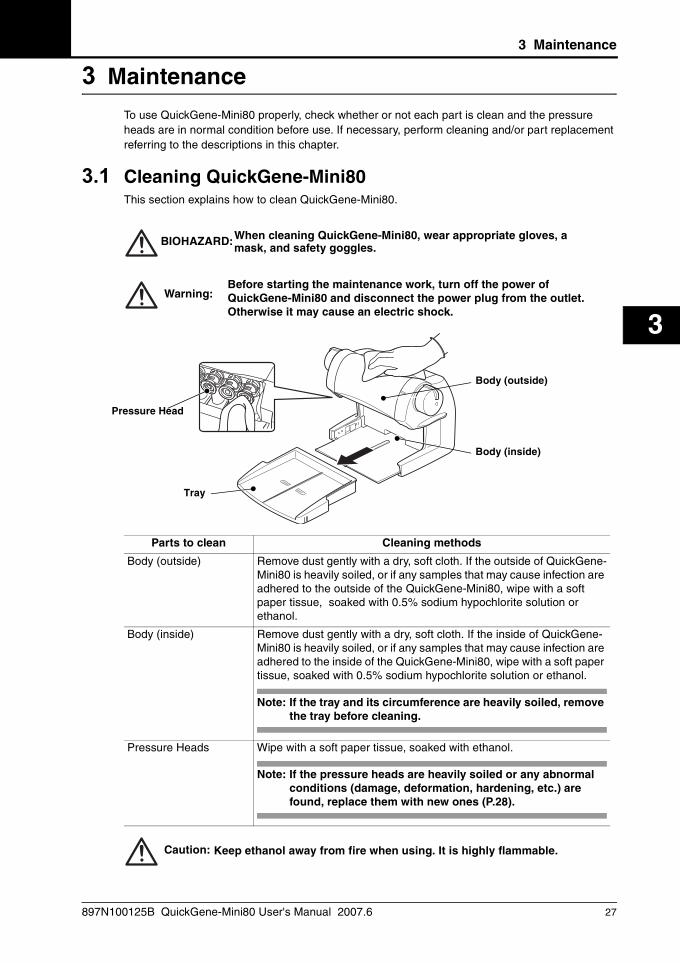
To use QuickGene-Mini80 properly, check whether or not each part is clean and the pressure heads are in normal condition before use. If necessary, perform cleaning and/or part replacement referring to the descriptions in this chapter.
3.1 Cleaning QuickGene-Mini80This section explains how to clean QuickGene-Mini80.
BIOHAZARD:
Warning:Before starting the maintenance work, turn off the power of QuickGene-Mini80 and disconnect the power plug from the outlet. Otherwise it may cause an electric shock.
Caution:
Parts to clean Cleaning methods
Body (outside) Remove dust gently with a dry, soft cloth. If the outside of QuickGene-Mini80 is heavily soiled, or if any samples that may cause infection are adhered to the outside of the QuickGene-Mini80, wipe with a soft paper tissue, soaked with 0.5% sodium hypochlorite solution or ethanol.
Body (inside) Remove dust gently with a dry, soft cloth. If the inside of QuickGene-Mini80 is heavily soiled, or if any samples that may cause infection are adhered to the inside of the QuickGene-Mini80, wipe with a soft paper tissue, soaked with 0.5% sodium hypochlorite solution or ethanol.
Note: If the tray and its circumference are heavily soiled, remove the tray before cleaning.
Pressure Heads Wipe with a soft paper tissue, soaked with ethanol.
Note: If the pressure heads are heavily soiled or any abnormal conditions (damage, deformation, hardening, etc.) are found, replace them with new ones (P.28).
Body (outside)
Pressure Head
Tray
Body (inside)
Keep ethanol away from fire when using. It is highly flammable.
When cleaning QuickGene-Mini80, wear appropriate gloves, a mask, and safety goggles.
QuickGene_Mini80_E.book Page 27 Tuesday, April 17, 2007 8:43 AM
3 Maintenance
28 897N100125B QuickGene-Mini80 User's Manual 2007.6
3
3.2 Cleaning the PartsThe following table describes how to clean the parts.
3.3 How to Clean/Replace the Pressure HeadsHeavily-soiled, damaged, deformed or hardened pressure heads may cause contamination or insufficient pressure application, resulting in extraction failure. Accordingly, if any abnormal conditions are found in the pressure heads, replace them promptly.
How to clean/replace the pressure heads is described below.
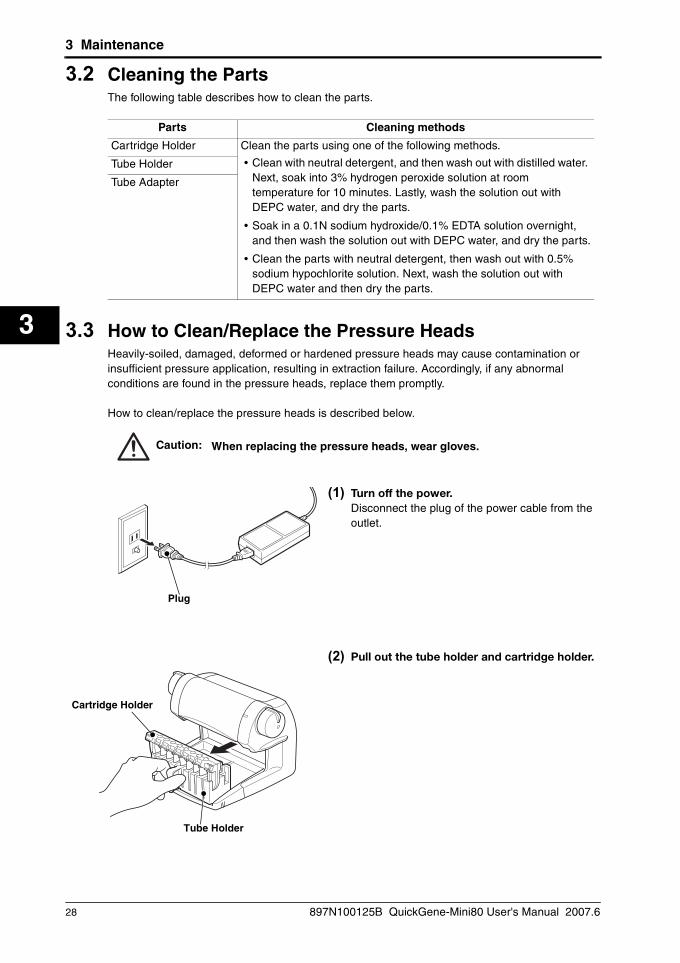
When replacing the pressure heads, wear gloves.
(1) Turn off the power.Disconnect the plug of the power cable from the outlet.
(2) Pull out the tube holder and cartridge holder.
Parts Cleaning methods
Cartridge Holder Clean the parts using one of the following methods.
• Clean with neutral detergent, and then wash out with distilled water. Next, soak into 3% hydrogen peroxide solution at room temperature for 10 minutes. Lastly, wash the solution out with DEPC water, and dry the parts.
• Soak in a 0.1N sodium hydroxide/0.1% EDTA solution overnight, and then wash the solution out with DEPC water, and dry the parts.
• Clean the parts with neutral detergent, then wash out with 0.5% sodium hypochlorite solution. Next, wash the solution out with DEPC water and then dry the parts.
Tube Holder
Tube Adapter
Caution:
Plug
Tube Holder
Cartridge Holder
QuickGene_Mini80_E.book Page 28 Tuesday, April 17, 2007 8:43 AM
3 Maintenance
897N100125B QuickGene-Mini80 User's Manual 2007.6 29
3
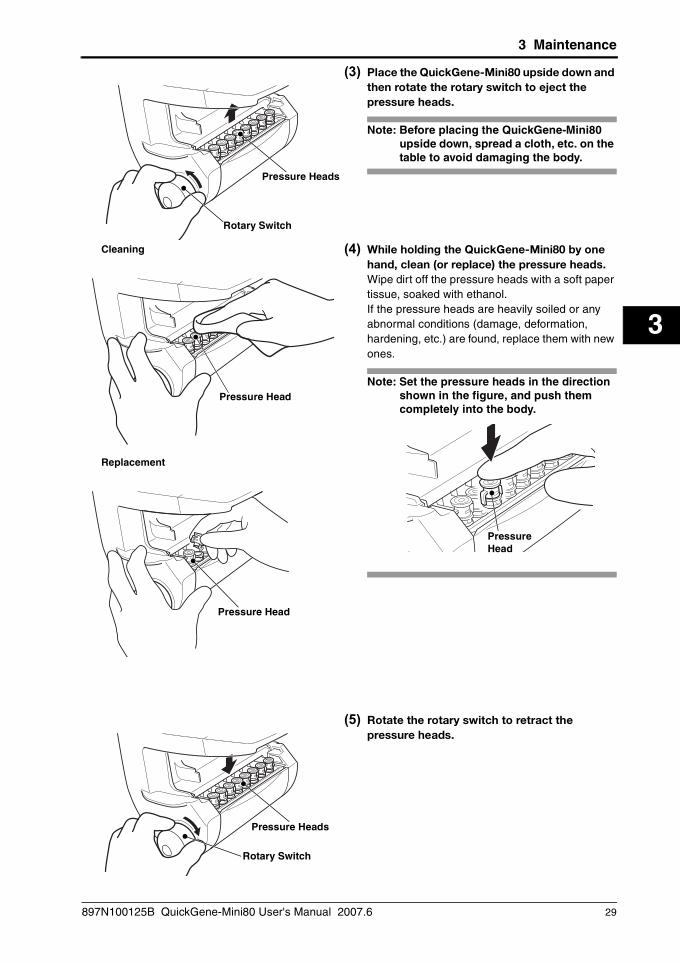
(3) Place the QuickGene-Mini80 upside down and then rotate the rotary switch to eject the pressure heads.
Note: Before placing the QuickGene-Mini80 upside down, spread a cloth, etc. on the table to avoid damaging the body.
(4) While holding the QuickGene-Mini80 by one hand, clean (or replace) the pressure heads.Wipe dirt off the pressure heads with a soft paper tissue, soaked with ethanol.If the pressure heads are heavily soiled or any abnormal conditions (damage, deformation, hardening, etc.) are found, replace them with new ones.
Note: Set the pressure heads in the direction shown in the figure, and push them completely into the body.
(5) Rotate the rotary switch to retract the pressure heads.
Pressure Heads
Rotary Switch
Replacement
Cleaning
Pressure Head
Pressure Head
Pressure Head
Pressure Heads
Rotary Switch
QuickGene_Mini80_E.book Page 29 Tuesday, April 17, 2007 8:43 AM
3 Maintenance
30 897N100125B QuickGene-Mini80 User's Manual 2007.6
3
QuickGene_Mini80_E.book Page 30 Tuesday, April 17, 2007 8:43 AM

4 Troubleshooting
897N100125B QuickGene-Mini80 User's Manual 2007.6 31
4
4 Troubleshooting
This chapter explains the procedures that should be taken when you suspect device failures.
Phenomenon Cause Appropriate action
The lamp (LED) does not light.
• The power plug is not connected to the outlet.
• The AC adapter is not connected to QuickGene-Mini80.
• The power cable is not connected to the AC adapter.
• Connect the power plug to the outlet completely.
• Connect the AC adapter to QuickGene-Mini80 completely.
• Connect the power cable to the AC adapter completely.
The solution put in Cartridges does not steadily drop into the Collection or Waste Tubes.
Cartridges are incorrectly inserted into the cartridge holder.
• Insert the Cartridges completely into the cartridge holder.
• Set the Collection and Waste Tubes corresponding to the position of the Cartridge to be inserted.
Pressure heads have become deformed or hardened.
Replace the pressure heads with new ones (P.28).
Pressure heads are incorrectly installed.
Install the pressure heads correctly (P.28).
Cartridges cannot be released/held properly.
The cartridge holder is soiled.
Clean the cartridge holder (P.28).
Pressure application does not start even after rotating the rotary switch toward the front side.
QuickGene-Mini80 may have a mechanical or electrical problem.
Contact your local representative.
QuickGene-Mini80 emits an abnormal noise.
QuickGene-Mini80 may have a mechanical or electrical problem.
Contact your local representative.
QuickGene-Mini80 emits an abnormal smell.
Turn off the power immediately by disconnecting the power cable from the outlet and then contact your local representative.
QuickGene_Mini80_E.book Page 31 Tuesday, April 17, 2007 8:43 AM

4 Troubleshooting
32 897N100125B QuickGene-Mini80 User's Manual 2007.6
4
QuickGene_Mini80_E.book Page 32 Tuesday, April 17, 2007 8:43 AM
5 Main Specifications
897N100125B QuickGene-Mini80 User's Manual 2007.6 33
5
5 Main Specifications
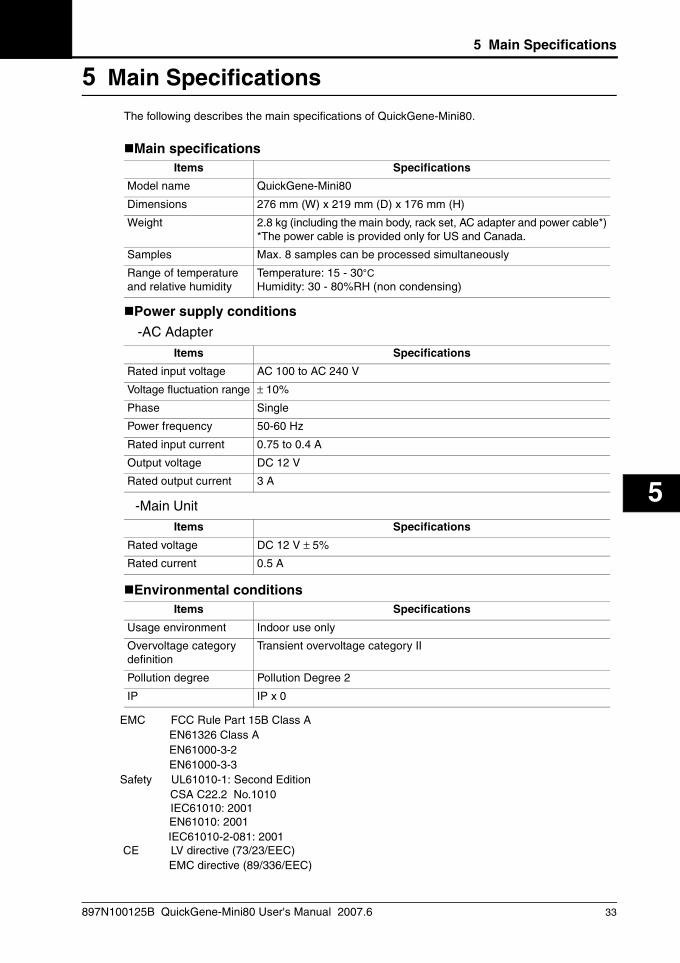
The following describes the main specifications of QuickGene-Mini80.
Main specifications
Power supply conditions
-AC Adapter
-Main Unit
Environmental conditions
EMC FCC Rule Part 15B Class A EN61326 Class A EN61000-3-2 EN61000-3-3Safety UL61010-1: Second Edition CSA C22.2 No.1010 IEC61010: 2001 EN61010: 2001
IEC61010-2-081: 2001 CE LV directive (73/23/EEC) EMC directive (89/336/EEC)
Items Specifications
Model name QuickGene-Mini80
Dimensions 276 mm (W) x 219 mm (D) x 176 mm (H)
Weight 2.8 kg (including the main body, rack set, AC adapter and power cable*)*The power cable is provided only for US and Canada.
Samples Max. 8 samples can be processed simultaneously
Range of temperature and relative humidity
Temperature: 15 - 30°CHumidity: 30 - 80%RH (non condensing)
Items Specifications
Rated input voltage AC 100 to AC 240 V
Voltage fluctuation range ± 10%
Phase Single
Power frequency 50-60 Hz
Rated input current 0.75 to 0.4 A
Output voltage DC 12 V
Rated output current 3 A
Items Specifications
Rated voltage DC 12 V ± 5%
Rated current 0.5 A
Items Specifications
Usage environment Indoor use only
Overvoltage category definition
Transient overvoltage category II
Pollution degree Pollution Degree 2
IP IP x 0
QuickGene_Mini80_E.book Page 33 Tuesday, April 17, 2007 8:43 AM

5 Main Specifications
34 897N100125B QuickGene-Mini80 User's Manual 2007.6
5
FCC WARNINGChanges or modifications not expressly approved by the party responsible for compliance could void the user’s authority to operate the equipment.
This equipment has been tested and found to comply with the limits for a Class A digital device pursuant to Part 15 of the FCC Rules. These limits are designed to provide reasonable protection against harmful interference when the equipment is operated in a commercial environment. This equipment generates, uses and can radiate radio frequency energy and, if not installed and used in accordance with the instruction manual, may cause harmful interference to radio communications. Operation of this equipment in a residential area is likely to cause harmful interference, in which case, the users will be required to correct the interference at their own expense.
WarningThis is a Class A product of Electromagnetic Interference (EMI) standard. In a domestic environment this product may cause radio interference in which case the user may be required to take adequate measures.
This Class A digital apparatus complies with Canadian ICES-003.Cet appareil numérique de la class A est comforme à la nomal NMB-003 du Canada.
QuickGene_Mini80_E.book Page 34 Tuesday, April 17, 2007 8:43 AM
897N100125B QuickGene-Mini80 User's Manual 2007.6 35
A
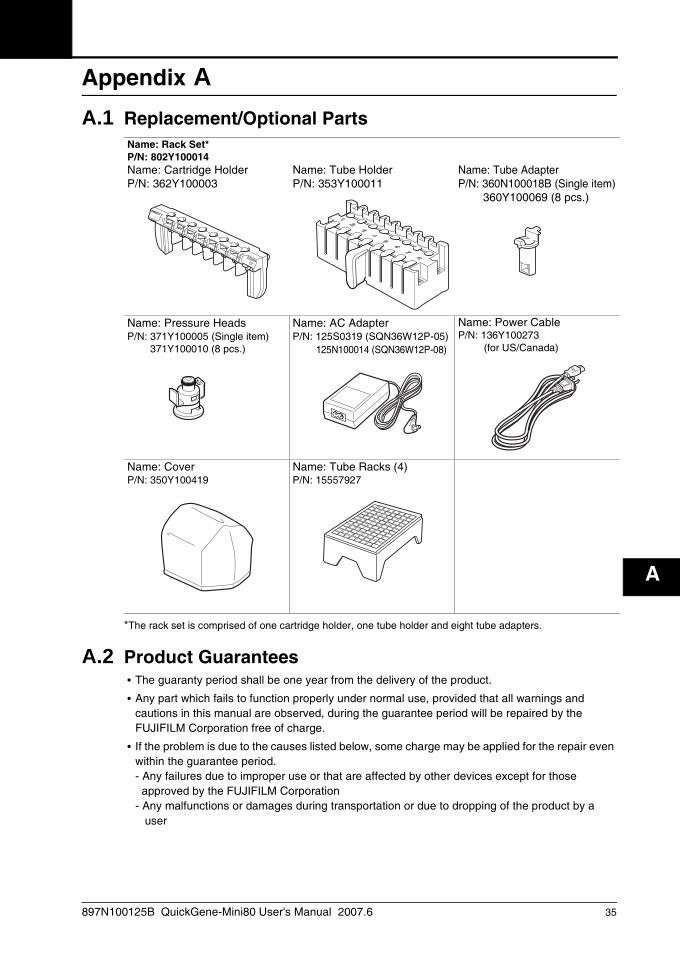
Appendix AA.1 Replacement/Optional Parts
*The rack set is comprised of one cartridge holder, one tube holder and eight tube adapters.
A.2 Product Guarantees• The guaranty period shall be one year from the delivery of the product.
• Any part which fails to function properly under normal use, provided that all warnings and cautions in this manual are observed, during the guarantee period will be repaired by the FUJIFILM Corporation free of charge.
• If the problem is due to the causes listed below, some charge may be applied for the repair even within the guarantee period.- Any failures due to improper use or that are affected by other devices except for those approved by the FUJIFILM Corporation- Any malfunctions or damages during transportation or due to dropping of the product by a user
Name: Rack Set*P/N: 802Y100014Name: Cartridge HolderP/N: 362Y100003
Name: Tube HolderP/N: 353Y100011
Name: Tube AdapterP/N: 360N100018B (Single item)
360Y100069 (8 pcs.)
Name: Pressure HeadsP/N: 371Y100005 (Single item)
371Y100010 (8 pcs.)
Name: AC AdapterP/N: 125S0319 (SQN36W12P-05)
125N100014 (SQN36W12P-08)
Name: Power CableP/N: 136Y100273 (for US/Canada)
Name: CoverP/N: 350Y100419
Name: Tube Racks (4)P/N: 15557927
06_ChapterA.fm Page 35 Tuesday, May 15, 2007 9:23 AM

36 897N100125B QuickGene-Mini80 User's Manual 2007.6
A
A.3 About ServicesBefore you ask for device repairs, refer to “4 Troubleshooting (P.31)” to check the problems. If the problems cannot be solved, contact your local representative, or the relative customer support.
A.4 Notes for Transporting/Shipping QuickGene-Mini80When transporting/shipping QuickGene-Mini80 to a new location, perform the following tasks:
Warning: Before carrying QuickGene-Mini80, disconnect the plug from the outlet. If
the power cable is damaged, this may cause a device failure, fire, injury, or electric shock.
When transporting/shipping QuickGene-Mini80, be sure to perform the following tasks:Remove all attached parts (tube holder and cartridge holder) from QuickGene-Mini80.Place the cushion removed at the time of unpacking onto the pressure heads and then secure the cushion and rotary switch with tape (Refer to “1.3 Remove the Packing Materials (P.4)”).After completing the above tasks, pack QuickGene-Mini80 in its original shipping box or some other equivalent box.
QuickGene_Mini80_E.book Page 36 Tuesday, April 17, 2007 8:43 AM

Nucleic Acid Isolation Device
QuickGene-Mini80 User’s Manual897N100125B
Date of issuance: June 2007FUJIFILM Corporation
Printed in Japan
• The contents of this manual may be updated without notice.
• The FUJIFILM Corporation assumes no liability for damages to third party copyrights or other rights arising from the use of any information in this manual.
• Contents of this manual are not to be reproduced without permission from the FUJIFILM Corporation.
• Manuals with missing or wrongly collated pages will be replaced free of charge.
Cover.fm Page iii Tuesday, April 17, 2007 8:37 AM

FUJIFILM Corporation, Life Science Products DivisionMIDTOWN WEST, 7-3, AKASAKA 9-CHOME,MINATO-KU, TOKYO 107-0052, JAPANTel: +81-3-6271-2158Fax: +81-3-6271-3136E-mail: [email protected]://lifescience.fujifilm.com
Printed on Recycled Paper
Cover.fm Page iv Tuesday, April 17, 2007 8:37 AM