user to learn more, visit lively.com/support guide
TRANSCRIPT

JBS3-USERGUIDE-V1 GDT-2434
To learn more, visit lively.com/Support
User Guide

LIVELY is a trademark of Best Buy and its affiliated companies. ©2021 Best Buy. All rights reserved. Screen images simulated. Appearance of device may vary. Other marks are property of their respective owners and may be trademarks.
My Important Information
Use this space to write information that you may need to refer to in the future. Keep this information in a safe place, and do not share your passwords with anyone.
Lock Screen Secret KeyPattern PIN
Password
Wi-Fi InformationNetwork Name Password
Google Sign-in InformationEmail or phone Password

Thank you for choosing Lively™ Smart
The LivelyTM Smart is a simple smartphone with a list-based menu, large screen, and long-lasting battery, making it easy for you to stay connected to family and friends. With Lively Smart, you'll enjoy exclusive access to the Lively Response Team, giving you peace of mind, wherever you go.
For additional resources, including how-to cards and videos, visit lively.com/Support.


I
Table of ContentsSection 1: Getting Started ��������������������������������������������������������������������� 1
Key Items in Your Lively Smart Box .................................................................................... 2Your Lively Smart ................................................................................................................... 3Charging the Battery ............................................................................................................ 5Understanding Touch Gestures .......................................................................................... 6Phone Setup (First time) ....................................................................................................... 7Phone Overview ................................................................................................................... 24Lock Screen Overview ........................................................................................................ 26Lock Screen Options ........................................................................................................... 29Home Screen Overview ...................................................................................................... 31Status Bar .............................................................................................................................. 33Navigation Buttons .............................................................................................................. 35App List ................................................................................................................................... 36

II
Section 2: Learning the Basics ���������������������������������������������������������� 39Adding a Contact ................................................................................................................. 40Making a Call ....................................................................................................................... 42Sending a Text ...................................................................................................................... 43Voice Typing .......................................................................................................................... 45Taking a Photo ...................................................................................................................... 46Setting Up Your Voicemail Greeting ................................................................................. 47Talk, Text, and Data Usage ................................................................................................ 50Checking Talk, Text, and Data Usage .............................................................................. 52Using Wi-Fi to Reduce Your Data Usage ........................................................................ 53Connecting to Wi-Fi ............................................................................................................ 54Calling Urgent Response .................................................................................................... 56
Section 3: Phone Calls ������������������������������������������������������������������������ 57Phone App Overview .......................................................................................................... 58
III
Dial Pad ................................................................................................................................. 59Call History ............................................................................................................................ 60Contacts ................................................................................................................................. 62Voicemail ............................................................................................................................... 63Answering or Ignoring a Call ............................................................................................ 64Speakerphone ...................................................................................................................... 65Bluetooth ............................................................................................................................... 67Accessing the Dial Pad During Calls ............................................................................... 69Adjusting the Call Volume .................................................................................................. 70Adjusting the Ringer Volume .............................................................................................. 71
Section 4: Text Messages ������������������������������������������������������������������� 73Text Messages App Overview ........................................................................................... 74Sending New Text Messages ............................................................................................. 75Sending a Group Text Message ....................................................................................... 77

IV
Reading and Replying to Text Messages ....................................................................... 78Sending Photo Messages .................................................................................................. 80Deleting Entire Conversations .......................................................................................... 82Deleting Individual Messages .......................................................................................... 83Checking Emergency Alerts .............................................................................................. 84
Section 5: Camera and Photos ���������������������������������������������������������85Camera App Overview ...................................................................................................... 86Taking a Photo ..................................................................................................................... 87Recording a Video ............................................................................................................... 88Viewing Your Photos and Videos ...................................................................................... 90Deleting Your Photos and Videos ...................................................................................... 91Sharing Your Photos and Videos ...................................................................................... 92
Section 6: Email, Internet, and Applications �����������������������������������95Signing in to Your Email Account ...................................................................................... 96

V
Creating an Email Account ................................................................................................ 98Creating and Sending an Email ..................................................................................... 100Reading and Replying to an Email ................................................................................. 102Sending an Email with a Photo or Video ....................................................................... 103Browsing the Internet ...................................................................................................... 105Downloading a New App .................................................................................................. 107Uninstalling an App ............................................................................................................ 110
Section 7: Changing Settings ������������������������������������������������������������ 111Connecting to Wi-Fi ............................................................................................................ 112Airplane Mode ..................................................................................................................... 113Bluetooth .............................................................................................................................. 115Customizing Your Home Screen Applications ............................................................... 117Customizing Your Lock Screen Background .................................................................. 121Customizing Your Ringtones ............................................................................................ 123Screen Brightness ............................................................................................................... 126

VI
Google Assistant ................................................................................................................. 127Real Time Text (RTT) ........................................................................................................... 128
Section 8: Additional Help ����������������������������������������������������������������129How-To Guides .................................................................................................................... 130Get Help From Any App ...................................................................................................... 131Additional Support ............................................................................................................. 132Contact Us ............................................................................................................................ 133
Legal �����������������������������������������������������������������������������������������������������135Customer Agreement ........................................................................................................ 135Arbitration Agreement, Class Action Waiver, Jury Waiver, and Forum Selection Clause ................................................................................................................................... 135Limited Warranty ............................................................................................................... 136Health And Safety Statement ........................................................................................ 136
Index �����������������������������������������������������������������������������������������������������147

VII


1
Get
ting
Star
ted
Section 1: Getting StartedTopics• Key Items in Your Lively Smart Box• Your Lively Smart• Charging the Battery• Phone Setup (First time)• Understanding Touch Gestures• Phone Overview
• Lock Screen Overview• Lock Screen Options• Home Screen Overview• Status Bar• Navigation Buttons• App List
2
Getting Started
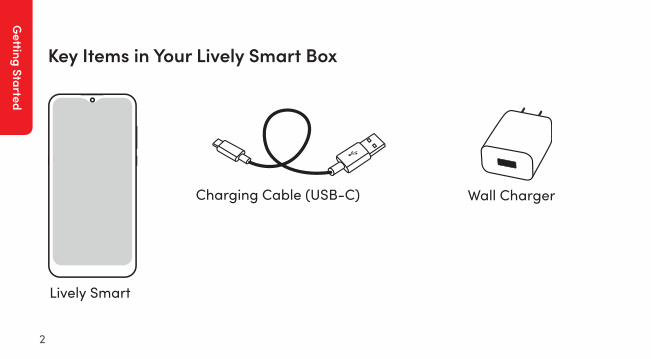
Key Items in Your Lively Smart Box
Lively Smart
Charging Cable (USB-C) Wall Charger

3
Get
ting
Star
ted
Your Lively Smart
Front-facing Camera
Display
Power/Lock Button
Volume Button
Speaker
Earpiece Speaker
Microphone
Microphone

4
Getting Started
Your Lively Smart (continued)
USB Charging Port
SIM/SD Card Storage Google Assistant Button
FlashDual Rear Cameras
Audio Jack

5
Get
ting
Star
ted
Charging the Battery
The phone’s battery may be low when it is removed from its box. Charge the phone before use and whenever the battery is low so that the phone is ready when you need it.
1. Plug larger end of charging cable into the wall charger.
2. Plug wall charger into a wall outlet.
3. Plug smaller end of charging cable into the bottom of your smartphone.

6
Getting Started
Understanding Touch Gestures
These are the most common touch gestures you will use when interacting with your Lively Smart touch screen:
PINCH AND SPREADTouch the screen with two
fingers and bring them together or apart
TAPBriefly touch
the screen with your fingertip
PRESS AND HOLDTouch the screen for an extended period of time
DRAGMove your fingertip
across the screen without losing contact

7
Get
ting
Star
ted
Phone Setup (First time)
Before using your phone for the first time, it needs to be set up. The Setup Wizard built into your phone will help guide you through this process.
Your setup may be different than the instructions in this User Guide because of software updates or if you choose different options. If the steps are different, just follow your smartphone's on-screen instructions for setup.
NOTE

8
Getting Started
Turn On
1. PRESS AND HOLD the Power/Lock button on the right side of your phone to turn it on.
2. TAP the GET STARTED button.
STEP 1 STEP 2

9
Get
ting
Star
ted
User Guide
1. Use this portion of the User Guide to help you through the setup process.
2. TAP the Next button.

10
Getting Started
Connect to Wi-Fi
1. TAP your Wi-Fi network from the list.
If you do not have Wi-Fi access, you can TAP Set up offline to continue.
You can set up your Wi-Fi later. Skip to "Connecting to Wi-Fi" on page 54.
2. Enter your password and TAP Connect.
STEP 1 STEP 2
NOTE

11
Get
ting
Star
ted
Check for Updates
Your phone will check for updates. If any required updates are found, they will automatically download. Please follow the on-screen instructions.
Leave your phone and Wi-Fi connection on during this process. Your phone may automatically restart after updates are complete.
NOTE

12
Getting Started
Copy Apps & Data
If you have a Google Account, TAP Next to transfer your apps, photos, and contacts from your old phone to your Lively Smart. Otherwise, TAP Don't copy.

13
Get
ting
Star
ted
Sign in or Create a Google Account
In order to download apps, music, games, or other content from the Google Play™ Store, you must sign in or create a Google or Gmail Account. Write down your Google account login information under "My Important Information" on the inside front cover for future reference.

14
Getting Started
Sign in or Create a Google Account (continued)
Option 1: To sign in to an existing Google account:
1. Enter your Google email (Gmail) address and TAP Next.
2. Enter your password and TAP Next�
Having a Google account is not required to use your Lively Smart. If you don’t want to create an account, TAP Skip. If you choose to skip setting up a Google account, you will not be able to use some additional Google features. You can always add a Google account later if you want to use these features.
NOTE

15
Get
ting
Star
ted
Sign in or Create a Google Account (continued)
Option 2: To create a new Google account:
1. TAP Create account and then TAP For myself from the drop-down menu.
2. Follow the on-screen prompts to create your account. Choose a Gmail address, password, and privacy settings.
3. TAP More to review the available Google services, and TAP each slider to turn a service on or off. When finished, TAP Accept.
STEP 1

16
Getting Started
Choose the “Easy-to-use Lively Smart” Home Screen
Select Easy-to-use Lively Smart Home screen for the best experience with your new phone.
1. TAP Easy-to-use Lively Smart, then TAP Next.

17
Get
ting
Star
ted
Set a lock screen
To protect your information, set up a lock screen for an extra layer of protection if you happen to lose or misplace your phone.
1. Enter a security PIN to keep your phone safe, then TAP NEXT.
Make sure that the number is at least four digits, easy to remember, and hard to guess.
2. Re-enter your security PIN, then TAP Confirm.
Write down your settings under "My Important Information" on the inside front cover for future reference. If you don’t want a lock on your phone, TAP Skip (you can always set this up later).
NOTE
NOTE
STEP 2

18
Getting Started
Unlock with Face
You can choose to unlock your Lively Smart using your camera's facial recognition technology.
1. To do this now, TAP Next and follow the on-screen instructions. Otherwise TAP Skip.

19
Get
ting
Star
ted
Continue setup
The remaining screens are optional and can be skipped to set up later by going to Phone Settings. If you would like to set up Voice Assistant (which allows you to type texts and emails using your voice), add another email account, or customize additional settings on your phone, TAP Continue.
Or TAP Leave & get reminder to start using your phone and finish setup later.

20
Getting Started
Google Assistant
Turning on Google Assistant lets you verbally speak to your smartphone to complete tasks, look up information, and more.
1. DRAG to read through the information.
2. TAP Turn on to use the Google Assistant.
3. Follow the on-screen prompts to learn more about Google Assistant.
TAP No thanks if you don’t want to use the Google Assistant. You can turn this feature on later.
STEP 2
NOTE

21
Get
ting
Star
ted
Finishing up
1. Follow the on-screen instructions to continue through setup. TAP No thanks to change any of these settings after the initial setup is complete by going to Settings.
2. Please review and accept the Terms and Conditions to complete Setup.
STEP 2STEP 1
the dispote, YOU AND WE AGREE TO
WAIVE, TO THE FULLEST EXTENT
PERMITTED BY APPLICABLE LAW,
ANY RIGHT WE MAY HAVE TO A
TRIAL BY JURY IN ANY LEGAL
PROCEEDING DIRECTLY OR
INDIRECTLY ARISING OUT OF YOUR
USE OF THE SERVICES OR THIS
AGREEMENT NWHETHER BASED ON
CONTRACT, TORT, OR ANY OTHER
THEORY "=
For ore iofor atioo oo AAA, its
Roles aod Procedores, aod how to
fle ao arritratioo clai , yoo ay call
AAA at �00&���&���9, write the AAA
at 1633 Broadway, 10th Floor, New
York, New York 10019, or visit the
AAA wersite at http[PPwww"adr"orE!
Effective February 20, 2020
Terms & Conditions
2 of 2
Accept & Continue
12:45 PM
12:45 PM
Back

22
Getting Started
Adding finishing touches
Your phone will now complete setup. This may take a few moments and your phone may restart, but when finished, you will automatically be taken to your Lively Smart Home screen.

23
Get
ting
Star
ted
Setup Complete
Your Lively Smart may take a few moments to finish setting up.
While it is setting up, there will be a banner at the top of your screen.
When setup is complete, you will see a Welcome bubble.
TAP Start to get a tour of your smartphone (recommended), or TAP Skip.
24
Getting Started
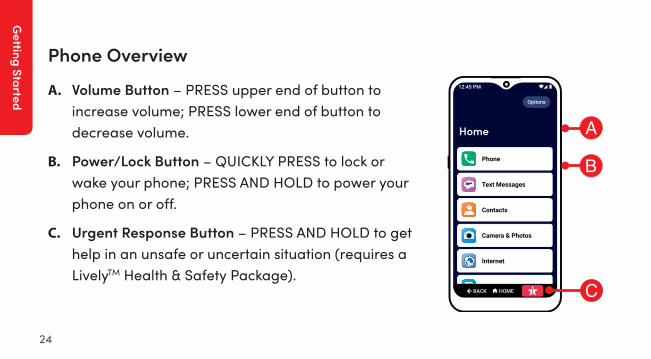
Phone Overview
A. Volume Button – PRESS upper end of button to increase volume; PRESS lower end of button to decrease volume.
B. Power/Lock Button – QUICKLY PRESS to lock or wake your phone; PRESS AND HOLD to power your phone on or off.
C. Urgent Response Button – PRESS AND HOLD to get help in an unsafe or uncertain situation (requires a LivelyTM Health & Safety Package).

25
Get
ting
Star
ted
Phone Overview (continued)
D. Google Assistant Button – PRESS to verbally ask questions, get information, and more.
E. BACK Button – TAP to return to the previous screen.
F. HOME Button – TAP to return to the Home screen.

26
Getting Started
Lock Screen Overview
Your Lively Smart has a lock screen that prevents accidental dialing and provides an extra layer of security if you misplace your phone. Your phone automatically locks if you haven't interacted with it for a while.
To lock or unlock your phone:
DRAG your finger from the bottom of the screen to the top in one, quick “swiping” motion to access your Home screen.

27
Get
ting
Star
ted
Lock Screen Overview (continued)
A. Urgent Response Button – PRESS AND HOLD to get help in an unsafe or uncertain situation (requires a LivelyTM Health & Safety Package).
B. Current Time
C. Current Date
D. Your Phone Number

28
Getting Started
Lock Screen Overview (continued)
E. Notifications – View text messages, missed calls, app info, and other information directly from your lock screen.
F. Swipe to Unlock – DRAG your finger from the bottom of the screen to the top in one, quick “swiping” motion to access your Home screen.

29
Get
ting
Star
ted
Lock Screen Options
There are five lock screen options you can choose from:
A. None – No Lock Screen will appear at all. QUICKLY PRESSING the Power/Lock Button will take you immediately to the Home screen.
B. Swipe – Unlocking your phone will only require you to “swipe” your finger from the bottom of the screen to the top in one, quick motion.
Text Messages now
nowCall History

30
Getting Started
Lock Screen Options (continued)
C. Pattern – After swiping to unlock, you will be required to draw a pattern that only you know.
D. PIN – After swiping to unlock, you will be required to enter a numerical PIN that only you know.
E. PASSWORD - After swiping to unlock, you will be required to enter a password (that may include letters, numbers, and special characters) that only you know.
Don't forget your lock screen's secret key. Use the inside front cover of this User Guide to write down your lock screen information.
NOTE

31
Get
ting
Star
ted
Home Screen Overview
The Home screen lists commonly used apps in one place. From here, you can access all features of your Lively Smart.
A. Status Bar – Shows you current time, Bluetooth, Wi-Fi, cellular, and battery.
B. Title Bar – Name of the application or screen you are viewing.
C. App List – A list of commonly used apps. See "Customizing Your Home Screen Applications" on page 117 to change which apps appear on your Home screen.

32
Getting Started
Home Screen Overview (continued)
D. Options – TAP to view more options relevant to the screen you are currently viewing.
E. How-to Guides – View animated guides on how to use your phone and get helpful tips.
F. View All Apps – TAP to view all the apps on your phone in alphabetical order.
G. Navigation Buttons – Navigate around your phone.

33
Get
ting
Star
ted
Status Bar
The Status Bar at the top of your screen shows you important information about the state of your phone.
A. Current Time – The current time automatically set by the Lively network.
B. Bluetooth Status– Appears when your phone's Bluetooth is turned on.
34
Getting Started
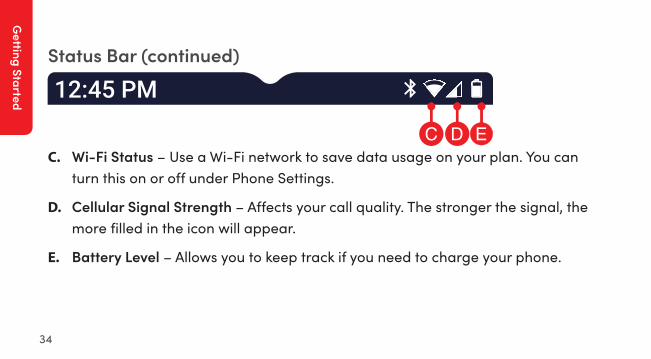
Status Bar (continued)
C. Wi-Fi Status – Use a Wi-Fi network to save data usage on your plan. You can turn this on or off under Phone Settings.
D. Cellular Signal Strength – Affects your call quality. The stronger the signal, the more filled in the icon will appear.
E. Battery Level – Allows you to keep track if you need to charge your phone.

35
Get
ting
Star
ted
Navigation Buttons
At the bottom of your screen, you will find three buttons that are used frequently to navigate around your phone.
A. BACK Button – Takes you one step back from your last action.
B. HOME Button – Takes you back to the Home screen.
C. Urgent Response Button – PRESS AND HOLD to get help in an unsafe or uncertain situation (requires a LivelyTM Health & Safety Package).
HomeBack

36
Getting Started
App List
An “app” is a application designed to do a specific task for you. We’ve added apps on your Home screen to get you started, but you can customize this list by using the Options button on the Home screen.
Phone – Make calls and view call history.
Text Messages – View, send, and receive text messages.
Contacts – View names and phone numbers you have added.

37
Get
ting
Star
ted
App List (continued)
Camera & Photos – Capture and view photos or videos.
Internet – Browse the Internet and find websites that interest you.
Email – Send and receive email messages.
Maps & Directions – Get directions to your destination.

38
Getting Started
App List (continued)
Lively – Access your Lively Health and Safety Services, update your Personal Emergency Profile and more.
Settings – Adjust important settings of your phone.
How-To Guides – View animated guides on how to use your phone and get helpful tips.
All Apps – View full list of all apps on your phone.

39
Lear
ning
the
Basi
cs
Section 2: Learning the BasicsTopics• Adding a Contact• Making a Call• Sending a Text• Voice Typing• Taking a Photo
• Setting Up Your Voicemail Greeting• Talk, Text, and Data Usage• Using Wi-Fi to Reduce Your Data Plan• Connecting to Wi-Fi• Calling Urgent Response

40
Learning the Basics
Adding a Contact
1. On the Home screen, TAP Contacts.
You may need to allow access to various settings the first time you open Contacts.
2. TAP Add New Contact.
3. Enter contact’s first and last name and TAP Next.
STEP 1 STEP 2 STEP 3
Aaron Smith
Amanda Bates
Amy Johnson
Beth Smith
NOTE

41
Lear
ning
the
Basi
cs
Adding a Contact (continued)
4. Enter contact phone number, select a phone type, and TAP Next.
TAP Favorite Contact if you want to keep the person at the top of your Contacts list.
TAP Add More Details to add an additional phone number, email, or notes.
5. Review the information and TAP Save Contact.
STEP 4 STEP 5
NOTE

42
Learning the Basics
Making a Call
1. On the Home screen, TAP Phone.
2. TAP Dial Pad.
3. Enter the 10-digit phone number and TAP Place Call.
STEP 1 STEP 2 STEP 3
2
ABC
5
JKL
8
TUV
0
+
1
4
GHI
7
PQRS
3
DEF
6
MNO
9
WXYZ
A(( &) C)"&%!&
(555) 555-1234
Dial Pad
PA%!B C%AA
HomeBack
12:45 PM

43
Lear
ning
the
Basi
cs
Sending a Text
1. On the Home screen, TAP Text Messages.
You may need to allow access to various settings the first time you open Text Messages.
2. TAP Create a New Message.
3. TAP Enter Phone Number.
You can also send a text message to a saved Contact.
STEP 1 STEP 2 STEP 3
Your inbox is empty.
Create a New Message
Text Messages
Options
HomeBack
12:45 PM
NOTE
NOTE

44
Learning the Basics
Sending a Text (continued)
4. Enter the 10-digit phone number and TAP Start Text Message.
5. Compose your text message using the keyboard.
6. TAP Send.
For information about sending a group text, see "Sending a Group Text Message" on page 77.
STEP 4 STEP 5 STEP 6
Your Message...
Send
(555) 555-1234
Options
12:45 PM
HomeH()e
2
ABC
5
JKL
8
TUV
0
+
1
4
GHI
7
PQRS
3
DEF
6
MNO
9
WXYZ
(555) 555-1234
Enter a Phone Number
Dial Pad
Start Text Message
HomeBack
12:45 PM
NOTE

45
Lear
ning
the
Basi
cs
Voice Typing
1. When using the keyboard, TAP Voice Typing.
2. Speak your message. The words are shown in the message box. TAP Voice Typing again to stop Voice Typing function.
3. If needed, edit your message using the keyboard or by using Voice Typing again.
STEP 1 STEP 2
(555) 555-1234
Options
Did you get the
Send
12:45 PM
HomeH()e
Your Message...
Send
(555) 555-1234
Options
12:45 PM
HomeH()e

46
Learning the Basics
Taking a Photo
1. On the Home screen, TAP Camera & Photos.
2. TAP Camera.
You may need to allow access to various settings the first time you open the Camera.
3. Aim the camera and TAP the Camera button to take a picture.
STEP 1 STEP 2 STEP 3
Camera & Photos
Options
Camera
Photos & Videos
HomeBack
12:45 PM
NOTE

47
Lear
ning
the
Basi
cs
Setting Up Your Voicemail Greeting
1. On the Home screen, TAP Phone.
2. TAP Voicemail.
You may need to allow access to various settings the first time you open Voicemail.
STEP 1 STEP 2
NOTE

48
Learning the Basics
Setting Up Your Voicemail Greeting (continued)
3. TAP Options from the top right corner.
4. TAP Set Greeting Message.
5. TAP the Tap to Begin box and begin speaking your greeting.
STEP 3 STEP 4 STEP 5
Record a greeting for callers to hear
when you do not answer the phone.
Tap to Begin
Record reeting
0:00
Discard Save
Record a Greeting
HomeBack
12:45 PM
Voicemail Inbox
Options
You have no voicemail
messages.
HomeBack
12:45 PM

49
Lear
ning
the
Basi
cs
Setting Up Your Voicemail Greeting (continued)
6. TAP the Tap to Stop box to finish your recording.
7. TAP the Tap to Play box to listen to your recording.
8. TAP Save if you are satisfied or Discard if you would like to record a new greeting.
STEP 6 STEP 7 STEP 8
Tap to Play
0:10
Tap to Play
Preview Greeting
0:10
Discard Save
You have recorded a greeting. Tap
Save to "nish or tap Discard to
record a new greeting.
Record a Greeting
HomeBack
12:45 PM
Tap to Play
0:10
Tap to Play
Preview Greeting
0:10
Discard Save
You have recorded a greeting. Tap
Save to "nish or tap Discard to
record a new greeting.
Record a Greeting
HomeBack
12:45 PM
Record a greeting for callers to hear
when you do not answer the phone.
Discard Save
Record a Greeting
Tap to Stop
Stop 5hen 8inished
0:08
HomeBack
12:45 PM

50
Learning the Basics
Talk, Text, and Data Usage
Your Lively Smart allows you to do much more than just call your friends and family. It’s an easy-to-use smartphone with a broad range of capabilities from sending pictures and videos via Text Message or Email, browsing the Internet to catch up on the latest news, to downloading the latest apps and games.
What is Data?
Cellular data is electronic information sent wirelessly between your phone and the Lively network. Examples of features that typically use data on your Data Plan allowance:
• Sharing photos or videos on social media sites

51
Lear
ning
the
Basi
cs
Talk, Text, and Data Usage (continued)
What is Data? (continued)
• Sending and receiving email messages
• Browsing the Internet
• Watching streaming videos on a website or using video apps
• Listening to music on a website or using music streaming apps
• Turn-by-turn directions using the Maps & Directions app
• Downloading apps from the Google Play™ Store
Features such as sending photos, browsing the Internet, and downloading apps may require data usage. You may be subject to usage caps, depending on your subscription plan.
NOTE

52
Learning the Basics
Checking Talk, Text, and Data Usage
To avoid overage fees, periodically check your talk, text, and data usage:
1. On the Home screen, TAP Settings.
2. TAP Check My Usage.
With no long-term contracts or cancellation fees, you can switch your plan at any time.
Settings
Options
Internet & Devices
Check My Usage
Sound & Display
Personalize Phone
Advanced Settings
HomeBack
12:45 PM
STEP 1 STEP 2
NOTE

53
Lear
ning
the
Basi
cs
Using Wi-Fi to Reduce Your Data Usage
If your home already has Internet access and a Wi-Fi network, sometimes called a “wireless network,” you can connect your phone to your Wi-Fi connection to reduce data usage on your monthly data plan allowance.
When successfully connected to your Wi-Fi network, all data usage will go through your home’s Internet access instead of Lively's cellular network.
Periodically check the Status Bar to confirm if you are connected to Wi-Fi. If not, data use may be deducted from your monthly data allowance. If you are connected to Wi-Fi, you will see this in the Status Bar:
NOTE

54
Learning the Basics
Connecting to Wi-Fi
1. On the Home screen, DRAG to scroll down, and TAP Settings.
2. TAP Internet & Devices.
3. TAP Wi-Fi.
STEP 1 STEP 2 STEP 3
Internet
& Devices
Wi-Fi
Airplane Mode
Bluetooth
HomeBack
12:45 PM
Settings
Options
Internet & Devices
Check My Usage
Sound & Display
Personalize Phone
Advanced Settings
HomeBack
12:45 PM

55
Lear
ning
the
Basi
cs
Connecting to Wi-Fi (continued)
4. TAP the Use Wi-Fi switch to turn on Wi-Fi.
5. TAP your network name from the list.
6. Enter the network password and TAP CONNECT.
TAP Show password to view the text as you type.
Use the inside cover of this User Guide to take note of your Wi-Fi settings for future reference.
If you don't know your network name or password, contact your Internet Service Provider (ISP).
STEP 4 STEP 5
HomeBack
Another-WiFi-Network
Smith-Family-Network
HomeOffe
MTD234X0e2C
Mo=ile_344s2_645
34342_3a
linksys
12:45 PM
HomeBack
HomeBack
Another-WiFi-Network
Smith-Family-Network
HomeOffe
MTD234X0e2C
Mo=ile_344s2_645
34342_3a
linksys
12:45 PM
HomeBack
NOTE

56
Learning the Basics
Calling Urgent Response
The Urgent Response button on your Lively Smart gives you access to our exclusive Urgent Response Service. This service provides easy-to-use and reliable access to IAED-Certified Lively Response Agents who will confirm your location, evaluate your situation, and get you the help you need. Available with all Lively™ Health & Safety Packages.
PRESS AND HOLD the Urgent Response button to call Urgent Response in an uncertain or unsafe situation.
If you accidentally call Urgent Response, please stay on the line and advise the Agent that it is not an emergency. Our Agents are notified of attempted calls, take each one seriously, and are trained to call back to confirm your situation.
NOTE

57
Phon
e C
alls
Section 3: Phone CallsTopics• Phone App Overview• Dial Pad • Call History • Contacts • Voicemail • Answering or Ignoring a Call
• Speakerphone • Bluetooth• Accessing the Dial Pad During Calls• Adjusting the Call Volume• Adjusting the Ringer Volume

58
Phone Calls
Phone App Overview
TAP Phone from the Home screen to get the following options:
A. Dial Pad – Make a call by dialing the number.
B. Call History – See your incoming and outgoing call history.
C. Contacts – Save or view phone numbers with a contact name for quicker dialing.
D. Voicemail – Listen to voice messages from callers you may have missed.

59
Phon
e C
alls
Dial Pad
These are the features of the Dial Pad:
A. Phone Number Field – This shows the phone number you’re about to call as you are dialing. Use the delete button if you make a mistake.
B. Add to Contacts – TAP to add this number to a contact name for quicker dialing in the future.
C. Dial Pad – This is where you dial the phone number.
D. Place Call Button – TAP Place Call when you are ready to call.
2
ABC
5
JKL
8
TUV
0
+
1
4
GHI
7
PQRS
3
DEF
6
MNO
9
WXYZ
A(( &) C)"&%!&
(555) 555-1234
Dial Pad
PA%!B C%AA
HomeBack
12:45 PM

60
Phone Calls
Call History
From Call History, you can view your incoming, outgoing, missed, and dismissed call history. TAP any call record for more options like calling back, sending a text message, adding to contacts, and viewing caller details.

61
Phon
e C
alls
Call History (continued)
These are the types of call history records:
5. Incoming – Incoming calls that were answered.
6. Outgoing – All outgoing calls.
7. Dismissed – Incoming calls that you hung up on before answering.
8. Missed – Incoming calls that ended before you could answer.
Incoming
Missed

62
Phone Calls
Contacts
Contacts is where you can save your most frequently called contacts so that you don’t have to manually dial their number each time.
To add a new contact, see "Adding a Contact" on page 40.

63
Phon
e C
alls
Voicemail
In Voicemail, you can configure your greeting message that’s played to callers when you can’t answer the phone. You can also listen to voice messages left for you.
1. On the Home screen, TAP Phone.
2. TAP Voicemail.
3. To listen to your voice message, TAP the voice message you want to listen to from the history.
To update your greeting, see "Setting Up Your Voicemail Greeting" on page 47.
STEP 2
NOTE

64
Phone Calls
Answering or Ignoring a Call
Your Lively Smart will vibrate and/or ring to notify you when someone is calling. On your screen, you will see any information available about the caller as well as an option to answer or to ignore the call. Ignoring a call will send them to your Voicemail.
To answer or ignore the call:
A. PRESS AND HOLD your finger on the Phone Icon button.
B. DRAG your finger UP to answer or DOWN to ignore.
Unknown
(555) 555-1234
Incoming Call...
Slide Down to Ignore
Slide U) to &n+wer
12:45 PM

65
Phon
e C
alls
Speakerphone
Once in a call, you will have the ability to route the caller’s voice to either the Earpiece Speaker or the Speakerphone. The Earpiece allows you to have a private conversation if you are in a public setting, while the Speakerphone allows you to free your hands or allow other people surrounding you to participate in the conversation.

66
Phone Calls
Speakerphone (continued)
To switch between the Earpiece Speaker and Speakerphone while on an active call:
1. TAP Speaker to listen through the Speakerphone.
2. TAP Speaker again to listen through the Earpiece.
STEP 1 STEP 2
Speaker Add Call
Mute Dial Pad
End Call
Unknown
(555) 555-1234
Call in Progress: 01:01
HomeBack
12:45 PM
Speaker Add Call
Mute Dial Pad
End Call
Unknown
(555) 555-1234
Call in Progress: 01:01
HomeBack
12:45 PM

67
Phon
e C
alls
Bluetooth
You can listen to phone calls wirelessly when you connect Bluetooth-enabled headphones or car stereo system to your phone. If you make or answer a call while Bluetooth is connected, the smartphone automatically uses the connected Bluetooth device for audio.
See "Bluetooth" on page 115 for instructions on pairing Bluetooth devices.NOTE

68
Phone Calls
Bluetooth (continued)
To switch between Bluetooth and the Earpiece Speaker while on an active call:
1. TAP Audio.
2. TAP Bluetooth to listen through your Bluetooth headphones or TAP Earpiece to listen through the Earpiece speaker.
STEP 1 STEP 2
Next
Earpiece
Speakerphone
Bluetooth
Select an Audio Type
12:45 PM
HomeBack

69
Phon
e C
alls
Accessing the Dial Pad During Calls
There may be instances while on a call that you will need to access the Dial Pad to dial an extension or to make a selection on an Interactive Voice Response prompt (e.g., “press ‘1’ to speak to a representative”).
To access the Dial Pad while on an active call:
1. TAP Dial Pad.
2. TAP the Hide Dial Pad button to go back to the active call information screen or to access the Speakerphone setting.
STEP 1 STEP 2
Dial Pad
Hide Dial Pad
2
ABC
5
JKL
8
TUV
0
+
1
4
GHI
7
PQRS
3
DEF
6
MNO
9
WXYZ
End Call
H<;:Back
12:45 PM
Speaker Add Call
Mute Dial Pad
End Call
Unknown
(555) 555-1234
Call in Progress: 01:01
HomeBack
12:45 PM

70
Phone Calls
Adjusting the Call Volume
To adjust the Call Volume while on an active call:
1. PRESS upper end of the Volume Button to increase the Call Volume.
2. PRESS lower end of the Volume Button to decrease the Call Volume. If you lower the volume all the way, the phone switches to vibrate mode.
After you press a volume button, a volume level indicator appears on the right side of the screen. The bell shows your ringer volume and the phone shows your call volume.
NOTE

71
Phon
e C
alls
Adjusting the Ringer Volume
To adjust the Ringer Volume while viewing the Home screen:
1. PRESS upper end of the Volume Button to increase the Ringer Volume.
2. PRESS lower end of the Volume Button to decrease the Ringer Volume.
After you press a volume button, a volume level indicator appears on the right side of the screen. The bell shows your ringer volume and the phone shows your call volume.
NOTE

72
Phone Calls

73
Text
Mes
sage
s
Section 4: Text MessagesTopics• Text Messages App Overview • Sending New Text Messages • Sending a Group Text Message• Reading and Replying to Text Messages
• Sending Photo Messages• Deleting Entire Conversations• Deleting Individual Messages• Checking Emergency Alerts

74
Text Messages
Text Messages App Overview
Text Messages are a quick and simple way to send short messages to anyone who has a cell phone capable of receiving them.
TAP Text Messages from the Home screen to get the following options:
A. Create a New Message – Compose a new Text Message.
B. Conversation History – A list of Text Message conversations you have had and can reply to.

75
Text
Mes
sage
s
Sending New Text Messages
1. On the Home screen, TAP Text Messages.
2. TAP Create a New Message�
3. TAP either Choose Contact or Enter Phone Number.
4. Select the recipient from Contacts or enter the phone number.
STEP 2 STEP 3
Your inbox is empty
Choose Contact
Create New Message
Create "roup %essa&e
Enter Phone Number
12:45 PM
HomeBack
Your inbox is empty.
Create a New Message
Text Messages
Options
HomeBack
12:45 PM

76
Text Messages
Sending New Text Messages (continued)
5. Compose your message using the On-Screen Keyboard or with Voice Typing.
See "Voice Typing" on page 45 for instructions on how to compose a message using your voice.
6. TAP Send.
STEP 5 STEP 6
Your Message...
Send
(555) 555-1234
Options
12:45 PM
HomeH()e
NOTE

77
Text
Mes
sage
s
Sending a Group Text Message
1. On the Home screen, TAP Text Messages.
2. TAP Create a New Message�
3. TAP Create a Group Message.
4. TAP Add People, then TAP either Choose Contact or Enter Phone Number�
5. Compose your message using the On-Screen Keyboard or with Voice Typing.
6. TAP Send.
STEP 3 STEP 4
Your inbox is empty
Choose Contact
Create New Message
Create "roup %essa&e
Enter Phone Number
12:45 PM
HomeBack

78
Text Messages
Reading and Replying to Text Messages
1. On the Home screen, TAP Text Messages.
2. TAP any Text Message in your Conversation History.
3. DRAG your finger up and down to read the Text Message conversation.
STEP 2 STEP 3

79
Text
Mes
sage
s
Reading and Replying to Text Messages (continued)
4. TAP anywhere in the “Your Message…” field.
TAP "Hide" in the navigation bar to close the keyboard.
5. Compose your message using the On-Screen Keyboard or with Voice Typing.
See "Voice Typing" on page 45 for instructions on how to compose a message using your voice.
6. TAP Send.
Your Message...
Send
(555) 555-1234
Options
12:45 PM
HomeH()e
STEP 5 STEP 6
NOTE
NOTE

80
Text Messages
Sending Photo Messages
While composing a new Text Message or replying to an existing Text Message conversation:
1. TAP on the left side of the “Your Message…” field.
2. TAP Send Photo or Video, then TAP the photo you would like to send from your Photo Album. A checkbox will appear on the photo when selected.
3. TAP Take a Photo or Video if you want to take a new photo or video.
STEP 1 STEP 2
Your Message...
Send
(555) 555-1234
Options
12:45 PM
HomeH()e

81
Text
Mes
sage
s
Sending Photo Messages (continued)
4. TAP Add to Conversation.
5. Optional: Compose your message using the On-Screen Keyboard or with Voice Typing.
See "Voice Typing" on page 45 for instructions on how to compose a message using your voice.
6. TAP Send.
STEP 4 STEP 5
NOTE

82
Text Messages
Deleting Entire Conversations
1. TAP any Text Message in your Conversation History.
2. TAP Options at the top right of the screen.
3. TAP Delete Conversation.
4. TAP Delete in the pop-up to confirm.
STEP 2 STEP 3

83
Text
Mes
sage
s
Deleting Individual Messages
1. TAP the contact from your Conversation History.
2. TAP on the Text Message you want to delete.
3. TAP Delete Message�
4. TAP Delete in the pop-up to confirm.
STEP 2 STEP 3

84
Text Messages
Checking Emergency Alerts
1. On the Home screen, TAP Text Messages�
2. TAP Options at the top right of the screen.
3. TAP View Emergency Alerts.
4. TAP an emergency alert to read it.
STEP 2 STEP 3 STEP 4
Wireless Emergency Alerts
Oloer
Severe Alert
Jan 12 10:25pm
Flait fooo arninn ttii area til...
AMBER Alert
Ab_ 20 1:25pm
Silver Toyota 4Runner, CA plate...
Alert Settings
12:45 PM
HomeBack
Maggie Simpson
Today 12:05pm
Did you get the new Jitterbug s...
Options
Close
Create New Messager
Delete All Messages
View Emergency Alerts
View xowvto �uides
12:45 PM
HomeBack

85
Cam
era
& Ph
otos
Section 5: Camera and Photos Topics• Camera App Overview • Taking a Photo • Recording a Video
• Viewing Your Photos and Videos• Deleting Your Photos and Videos• Sharing Your Photos and Videos
86
Cam
era & Photos
Camera App Overview
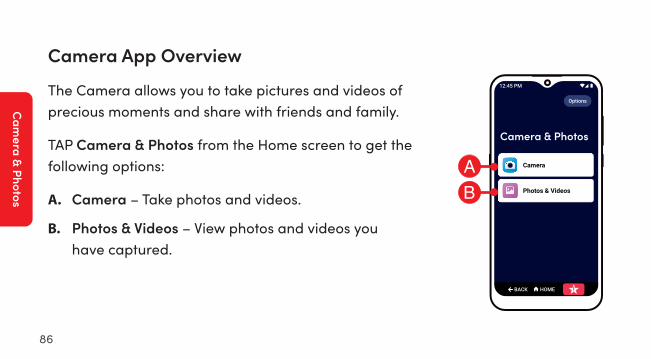
The Camera allows you to take pictures and videos of precious moments and share with friends and family.
TAP Camera & Photos from the Home screen to get the following options:
A. Camera – Take photos and videos.
B. Photos & Videos – View photos and videos you have captured.
Camera & Photos
Options
Camera
Photos & Videos
HomeBack
12:45 PM

87
Cam
era
& Ph
otos
Taking a Photo
1. On the Home screen, TAP Camera & Photos�
2. TAP Camera.
3. Aim the back of your phone towards your subject.
To switch to the front camera, TAP switch camera.
4. TAP where you would like to focus.
5. TAP the Shutter button.
STEP 1 STEP 3
NOTE

88
Cam
era & Photos
Recording a Video
1. On the Home screen, TAP Camera & Photos.
2. TAP Camera.
3. TAP VIDEO near the Shutter button. The Shutter button will turn red.
4. Aim the back of your phone towards your subject.
To switch to the front camera, TAP switch camera.
STEP 1 STEP 3
NOTE
89
Cam
era
& Ph
otos
Recording a Video (continued)
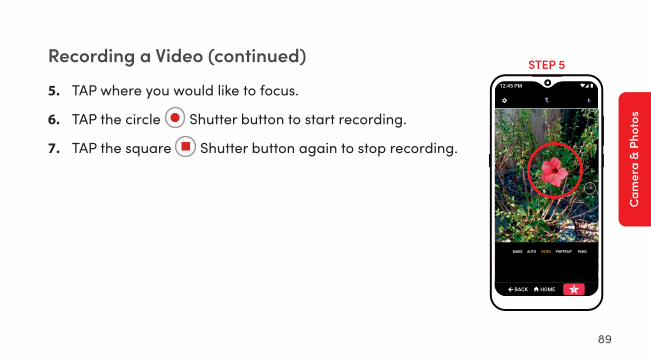
5. TAP where you would like to focus.
6. TAP the circle Shutter button to start recording.
7. TAP the square Shutter button again to stop recording.
STEP 5
MORE AUTO PORTRAIT PANOVIDEO

90
Cam
era & Photos
Viewing Your Photos and Videos
After you have captured a photo or video, you can view it by accessing Photos & Videos.
1. On the Home screen, TAP Camera & Photos.
2. TAP Photos & Videos.
3. TAP any photo or video to view it in full screen.
4. To exit full screen, DRAG down from the top or TAP BACK.
STEP 1 STEP 3

91
Cam
era
& Ph
otos
Deleting Your Photos and Videos
While viewing your Photos & Videos, you can delete any photos that you no longer need.
1. TAP on a photo or video to view it.
2. TAP the Trash Can on the bottom right of the screen.
If you don't see the Trash Can, TAP anywhere on the screen and it will appear.
3. TAP Move to trash in the pop-up to confirm.
If you accidentally delete a photo or video, you can find or recover it in the Trash for up to 60 days.
STEP 2
NOTE
NOTE

92
Cam
era & Photos
Sharing Your Photos and Videos
While composing a new Text Message or replying to an existing Text Message conversation:
1. TAP on the left side of the “Your Message…” field.
2. TAP Send Photo or Video, then TAP the photo you would like to send from your Photo Album. A checkbox will appear on the photo when selected.
3. Tap Take a Photo or Video if you want to take a new photo or video or select an existing one from your gallery.
STEP 1 STEP 3
Your Message...
Send
(555) 555-1234
Options
12:45 PM
HomeH()e

93
Cam
era
& Ph
otos
Sharing Your Photos and Videos (continued)
4. TAP Add to Conversation.
5. Compose your message using the On-Screen Keyboard or with Voice Typing.
6. TAP Send.
STEP 4 STEP 5

94
Cam
era & Photos

95
Emai
l / In
tern
et /
Apps
Section 6: Email, Internet, and ApplicationsTopics• Signing in to Your Email Account • Creating an Email Account • Creating and Sending an Email• Reading and Replying to an Email
• Sending an Email with a Photo or Video• Browsing the Internet• Downloading a New App• Uninstalling an App

96
Email / Internet / Apps
Signing in to Your Email Account
If you already have an email account, use the Email app to read and send emails. To sign in to the account:
1. On the Home screen, TAP Email.
2. TAP GOT IT.
3. TAP Add an email address.
TAP your email provider from the list.
STEP 1 STEP 2

97
Emai
l / In
tern
et /
Apps
Signing in to Your Email Account (continued)
4. Enter your email address and TAP Next.
5. Enter your password and TAP Next or Sign in.
6. Follow the on-screen prompts to finish signing in to your email account.
Your account sign-in may vary depending on your email provider. Follow the on-screen instructions to sign in to your account.
NOTE

98
Email / Internet / Apps
Creating an Email Account
If you don’t have an email, we recommend creating a Google (Gmail) account. A Google account will also allow you to download new apps on your smartphone. To create a Google email account:
1. On the Home screen, TAP Email.
2. TAP Add an email address.
3. TAP Google from the list.
STEP 1 STEP 3

99
Emai
l / In
tern
et /
Apps
Creating an Email Account (continued)
4. TAP Create account, then TAP For myself from the pop-up.
5. Follow the on-screen prompts to create your email account.
Your setup steps may vary. Follow the on-screen instructions to set up your account.
Write down your email and password under "My Important Information" on the inside front cover for future reference.
NOTE
100
Email / Internet / Apps
Creating and Sending an Email
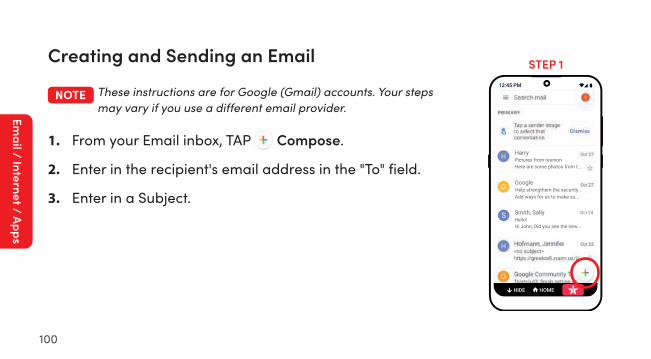
These instructions are for Google (Gmail) accounts. Your steps may vary if you use a different email provider.
1. From your Email inbox, TAP Compose.
2. Enter in the recipient's email address in the "To" field.
3. Enter in a Subject.
NOTE
STEP 1
Oct 24

101
Emai
l / In
tern
et /
Apps
Creating and Sending an Email (continued)
4. Compose your email message using the On-Screen Keyboard or with Voice Typing.
5. TAP send at the top right of the screen to send your email.
STEP 5
102
Email / Internet / Apps
Reading and Replying to an Email
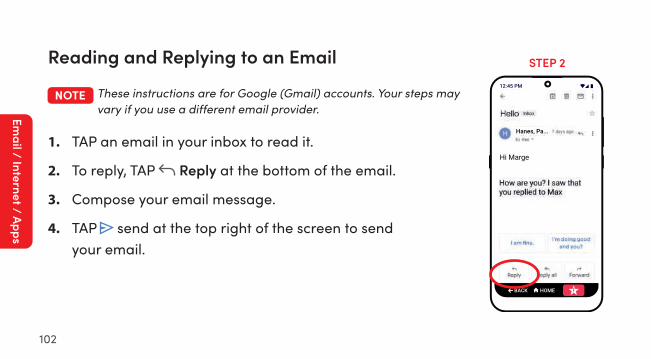
These instructions are for Google (Gmail) accounts. Your steps may vary if you use a different email provider.
1. TAP an email in your inbox to read it.
2. To reply, TAP Reply at the bottom of the email.
3. Compose your email message.
4. TAP send at the top right of the screen to send your email.
NOTE
STEP 2

103
Emai
l / In
tern
et /
Apps
Sending an Email with a Photo or Video
These instructions are for Google (Gmail) accounts. Your steps may vary if you use a different email provider.
1. From your Email inbox, TAP Compose.
2. TAP the attachment button at the top right of the screen.
NOTESTEP 1 STEP 2
Oct 24

104
Email / Internet / Apps
Sending an Email with a Photo or Video (continued)
3. TAP Attach file.
4. Choose the photos or videos you would like to attach to your email message.
5. TAP send at the top right of the screen to send your email message with attachments.

105
Emai
l / In
tern
et /
Apps
Browsing the Internet
1. On the Home screen, TAP Internet. The Chrome web browser will open.
2. While browsing the Internet, you can:
• Navigate to a web page – Enter a web address (URL) in the box near the top of the screen.
• Search for information – Enter your search terms in the box near the top of the screen.
STEP 1 STEP 2

106
Email / Internet / Apps
Browsing the Internet (continued)
• Open a new tab – Tabs let you have multiple web pages open at the same time. TAP the 1 box icon at the top right to view your web pages. Select a different tab or TAP + to open a new tab. Go back – TAP BACK to go back to the previous web page.
• Scroll – DRAG your finger up or down to view the web page.
• Tap – TAP a link on a web page to navigate to the next page.

107
Emai
l / In
tern
et /
Apps
Downloading a New App
You can add additional apps to your smartphone, letting you play games, check weather, use social media, listen to music, and more.
1. On the Home screen, TAP Options.
2. TAP Download a New App�
STEP 1 STEP 2
108
Email / Internet / Apps
Downloading a New App (continued)
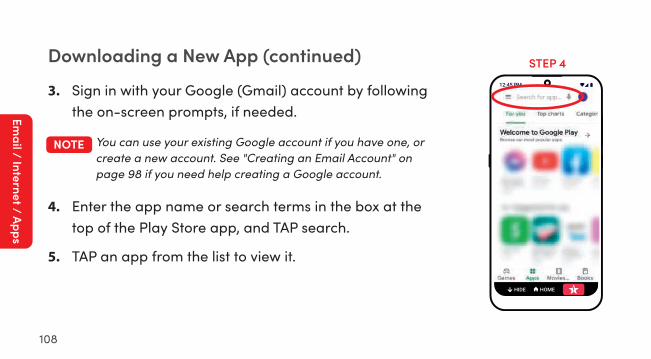
3. Sign in with your Google (Gmail) account by following the on-screen prompts, if needed.
You can use your existing Google account if you have one, or create a new account. See "Creating an Email Account" on page 98 if you need help creating a Google account.
4. Enter the app name or search terms in the box at the top of the Play Store app, and TAP search.
5. TAP an app from the list to view it.
STEP 4
NOTE

109
Emai
l / In
tern
et /
Apps
Downloading a New App (continued)
6. TAP Install to add the app to your smartphone.
7. To open the app, TAP Open after it finishes downloading or find it in the View All Apps list.
You must be connected to Wi-Fi or data to download new apps.NOTE

110
Email / Internet / Apps
Uninstalling an App
1. On the Home screen, DRAG to scroll down, and TAP View All Apps.
2. TAP Options at the top right of the screen.
3. TAP Uninstall App.
4. DRAG to scroll down, and TAP the app you want to remove.
5. TAP OK in the pop-up to confirm.
STEP 2 STEP 4

111
Cha
ngin
g Se
ttin
gs
Section 7: Changing SettingsTopics• Connecting to Wi-Fi• Airplane Mode • Bluetooth • Customizing Your Home Screen Applications• Customizing Your Lock Screen Background
• Customizing Your Ringtones• Screen Brightness • Accessibility• Google Assistant• Real Time Text (RTT)

112
Changing Settings
Connecting to Wi-Fi
See "Connecting to Wi-Fi" on page 54 to learn how to connect to Wi-Fi.

113
Cha
ngin
g Se
ttin
gs
Airplane Mode
When traveling on an airplane, you may be required to put your phone in Airplane Mode. In Airplane Mode, you cannot make or receive calls (including Urgent Response), texts, or browse the internet.
To turn on Airplane Mode:
1. On the Home screen, TAP Settings.
2. TAP Internet & Devices.
STEP 1 STEP 2
Settings
Options
Internet & Devices
Check My Usage
Sound & Display
Personalize Phone
Advanced Settings
HomeBack
12:45 PM

114
Changing Settings
Airplane Mode (continued)
3. TAP Airplane Mode.
When Airplane Mode is turned on, the Cellular Signal Strength icon in the status bar changes into an airplane.
STEP 3
Internet
& Devices
Wi-Fi
Airplane Mode
Bluetooth
HomeBack
12:45 PM
NOTE

115
Cha
ngin
g Se
ttin
gs
Bluetooth
Bluetooth allows you to connect wirelessly to devices such as car stereos, portable speakers and wireless headphones.
To connect to a Bluetooth device:
1. Make sure that your Bluetooth device is in Bluetooth pairing mode. See the device’s instructions for more information.
2. On the Home screen, DRAG to scroll down, and TAP Settings.
3. TAP Internet & Devices.
STEP 3
Settings
Options
Internet & Devices
Check My Usage
Sound & Display
Personalize Phone
Advanced Settings
HomeBack
12:45 PM

116
Changing Settings
Bluetooth (continued)
4. TAP Bluetooth.
5. TAP Pair new device.
6. TAP your Bluetooth device’s name from the list.
7. TAP PAIR in the pop-up to confirm. If prompted, enter the device PIN.
If you’re reconnecting to a Bluetooth device that you’ve paired to recently, your smartphone will automatically reconnect after you turn on Bluetooth.
STEP 4 STEP 5
Internet
& Devices
Wi-Fi
Airplane Mode
Bluetooth
HomeBack
12:45 PM
NOTE

117
Cha
ngin
g Se
ttin
gs
Customizing Your Home Screen Applications
You can customize your smartphone to put the apps you use most on your Home screen for easy access.
You can add, remove, or change the order of apps on your Home screen.

118
Changing Settings
Customizing Your Home Screen Applications (continued)
To add an app to your Home screen:
1. On the Home screen, TAP Options in the top right corner.
2. TAP Add Home Apps.
3. DRAG to scroll down and TAP the apps you want to add to the Home screen.
4. TAP Add to Home Screen.
STEP 1 STEP 2 STEP 4

119
Cha
ngin
g Se
ttin
gs
Customizing Your Home Screen Applications (continued)
To reorder apps on your Home screen:
1. On the Home screen, TAP Options in the top right corner.
2. TAP Reorder Home Apps.
3. PRESS and DRAG the Tile icon where you want the app to appear.
4. TAP Save Order.
STEP 2 STEP 3

120
Changing Settings
Customizing Your Home Screen Applications (continued)
To remove an app from your Home screen:
1. On the Home screen, TAP Options in the top right corner.
2. TAP Remove Home Apps.
3. DRAG to scroll down and TAP the apps you want to remove from the Home screen.
4. TAP Remove From Home Screen.
5. TAP Remove in the pop-up to confirm.
Text Messages
Contacts
Internet
Maps & Directions
Lively
Internet
Remove Home Apps
Remove From Home Screen
HomeBack
12:45 PM
STEP 3 & 4

121
Cha
ngin
g Se
ttin
gs
Customizing Your Lock Screen Background
You can customize your Lock Screen with a photo that is unique to you.
1. On the Home screen, DRAG to scroll down, and TAP Settings.
2. TAP Personalize Phone.
3. TAP Custom Lock Screen.
4. TAP Photos to select a photo you took on your phone, or TAP Wallpapers to select a preset wallpaper.
STEP 3 STEP 4
Personalize
P�one
Home Screen Apps
Custom Lock Screen
HomeBack
12:45 PM

122
Changing Settings
Customizing Your Lock Screen Background (continued)
5. TAP the image you want to use for your lock screen.
6. PINCH AND SPREAD your fingers to adjust the photo to fit your screen.
7. TAP Preview Lock Screen.
8. TAP Save as Lock Screen.
STEP 5 STEP 6
HomeBack
12:45 PM
12:45
My Number (555) 555-1234
Swipe up to unlock
Wednesday, Mar 28
Urgent Response
123
Cha
ngin
g Se
ttin
gs
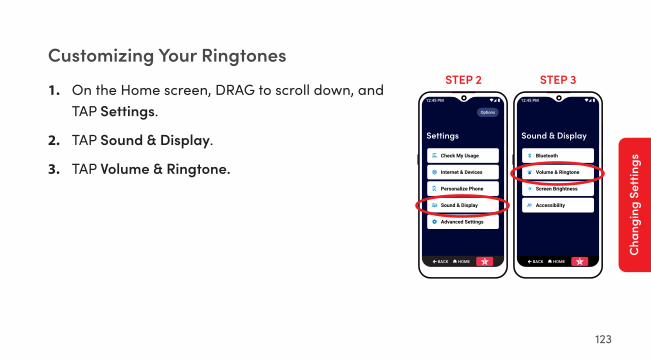
Customizing Your Ringtones
1. On the Home screen, DRAG to scroll down, and TAP Settings.
2. TAP Sound & Display.
3. TAP Volume & Ringtone�
STEP 2 STEP 3
Sound & Display
Bluetooth
Volume & Ringtone
Screen Brightness
Accessibility
HomeBack
12:45 PM
Settings
Options
Internet & Devices
Check My Usage
Sound & Display
Personalize Phone
Advanced Settings
HomeBack
12:45 PM

124
Changing Settings
Customizing Your Ringtones (continued)
4. Select the ringtone you want to change:
• TAP Phone ringtone to change the sound when you get a phone call.
• TAP Default notification sound to change the sound when you get an app notification.
• TAP Default alarm sound to change the sound when an alarm rings.
To change volume levels, DRAG the sliders left to lower the volume or right to raise the volume.
STEP 4
NOTE

125
Cha
ngin
g Se
ttin
gs
Customizing Your Ringtones (continued)
5. TAP a ringtone from the list to listen to it.
6. When you find a ringtone you like, TAP OK.

126
Changing Settings
Screen Brightness
1. On the Home screen, DRAG to scroll down, and TAP Settings.
2. TAP Sound & Display.
3. TAP Screen Brightness.
4. TAP the brightness level you would like to use: High, Medium, or Low.
5. TAP Save Brightness�
STEP 3 STEP 4
Sound & Display
Bluetooth
Volume & Ringtone
Screen Brightness
Accessibility
HomeBack
12:45 PM

127
Cha
ngin
g Se
ttin
gs
Google Assistant
Google Assistant offers voice commands, voice searching, and voice-activated device control. To turn the Google Assistant on or off:
1. On the Home screen, TAP Settings.
2. TAP Sound & Display.
3. TAP Accessibility.
4. TAP Start Google Assistant to turn the slider on or off.
5. Press the Google Assistant button on the left side of your phone to open the Google Assistant.
STEPS 4 & 5

128
Changing Settings
Real Time Text (RTT)
RTT transmits each character as it is typed while you're on a call, making it easy for callers with hearing or speech impairments to have a conversation with text. To turn Real Time Text (RTT) on or off:
1. On the Home screen, TAP Settings.
2. TAP Sound & Display.
3. TAP Accessibility.
4. TAP Real Time Text Visibility.
5. TAP RTT call to turn Real Time Text on or off.
STEP 4

129
Addi
tiona
l Hel
p
Section 8: Additional HelpTopics• How-To Guides • Get Help From Any App• Additional Support• Contact Us

130
Additional Help
How-To Guides
The How-To Guides give you additional instructions about how to use your Lively Smart in an easy-to-use, step-by-step guide.
1. On the Home screen, DRAG to scroll down, and TAP How-To Guides.
2. TAP a category to view common questions.
3. TAP a question to view a step-by-step guide on your phone.
Internet
How do I search the Internet?
How do I s��n �n to �oo��e?
How do I connect to !�"��?
Tap a question to learn
more about this topic.
HomeBack
12:45 PM
How-To Guides
Set Up
Apps
Phone
Text Messages
Contacts
Pop><ar :>6@es
Learn more about how to
use your phone.
Contact Us
HomeBack
12:45 PM
STEP 2 STEP 3
131
Addi
tiona
l Hel
p
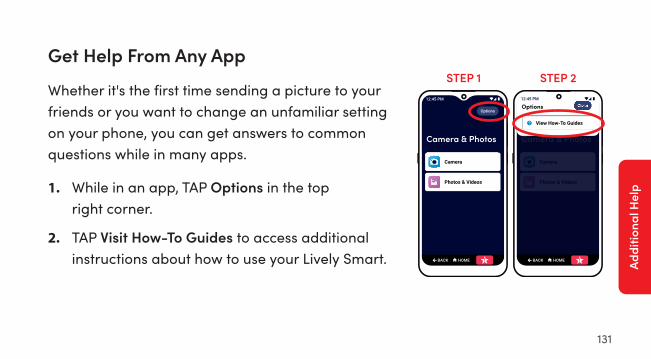
Get Help From Any App
Whether it's the first time sending a picture to your friends or you want to change an unfamiliar setting on your phone, you can get answers to common questions while in many apps.
1. While in an app, TAP Options in the top right corner.
2. TAP Visit How-To Guides to access additional instructions about how to use your Lively Smart.
Camera & Photos
Camera
Photos & Videos
Options
Close
View How-To Guides
12:45 PM
HomeBack
Camera & Photos
Options
Camera
Photos & Videos
HomeBack
12:45 PM
STEP 1 STEP 2

132
Additional Help
Additional Support
At Lively, we provide you with easy-to-follow educational tools for the way you want to learn. Whether it’s your first smartphone or you are ready for advanced features, we're here to help every step of the way.
Go to lively.com/Support to access additional education tools to make you a Lively Smart expert. There you’ll find:
• Frequently Asked Questions
• How-to Videos
• How-to Cards
• And more!

133
Addi
tiona
l Hel
p
Contact Us
If you have any questions or comments, we're here to help:
• Send us an email at: [email protected]
• Call us toll-free at: 1.800.733.6632
• Write to us at: Lively Customer Service P.O. Box 4428 Carlsbad, CA 92018

134
Additional Help

135
Lega
l
LegalCustomer Agreement BY USING THE LIVELY SMART AND LIVELY SERVICES, YOU ARE AGREEING TO BE BOUND BY THE CUSTOMER AGREEMENT. TO REVIEW THE MOST CURRENT VERSION OF THE CUSTOMER AGREEMENT, WHICH GOVERNS YOUR USE OF THE LIVELY SMART AND LIVELY SERVICES, PLEASE VISIT WWW�LIVELY�COM/LEGAL/CUSTOMER-AGREEMENT.
Arbitration Agreement, Class Action Waiver, Jury Waiver, and Forum Selection ClauseBY USING THE LIVELY SMART AND LIVELY SERVICES, YOU ARE AGREEING TO BE BOUND BY OUR ARBITRATION AGREEMENT, CLASS ACTION WAVER, AND FORUM SELECTION CLAUSE IN THE CUSTOMER AGREEMENT. TO REVIEW THE MOST CURRENT VERSION OF THIS CLAUSE, PLEASE VISIT WWW�LIVELY�COM/LEGAL/CUSTOMER-AGREEMENT.

136
Legal
Limited Warranty To View Our Standard Limited Warranty for Lively products, please visit www�lively�com.
Health And Safety Statement We recommend that you read this chapter carefully before using your phone. The manufacturer disclaims any liability for damage, which may result as a consequence of improper use or use contrary to the instructions contained herein.TRAFFIC SAFETY:Given that studies show that using a phone while driving a vehicle constitutes a real risk, even when the hands-free kit is used (car kit, headset...), drivers are requested to refrain from using their phone when the vehicle is not parked. Check the laws and regulations on the use of wireless phones and their accessories in the areas where you drive. Always obey them. The use of these devices may be prohibited or restricted in certain areas.CONDITIONS OF USE:You are advised to switch off the phone from time to time to optimize its performance.Remember to abide by local authority rules of mobile phone use on aircrafts.If your phone is a unibody device, where the back cover and battery are not removable, Disassembling the phone will void your warranty. Disassembling the phone can cause bodily injury if the battery is punctured.Always handle your phone with care and keep it in a clean and dust-free place.Do not allow your phone to be exposed to adverse weather or environmental conditions, such as moisture, humidity, rain, infiltration of liquids, dust, sea air, etc. The manufacturer’s recommended operating temperature range is -20°C

137
Lega
l
(-4°F) to +60°C (140°F).At over 55°C (131°F), the legibility of the phone’s display may be impaired, though this is temporary and not serious.Do not open, dismantle, or attempt to repair your phone yourself.Do not drop, throw, or bend your phone.Use only batteries, battery chargers, and accessories which are recommended by TCL Communication Ltd. and its affiliates and are compatible with your phone model. TCL Communication Ltd. and its affiliates disclaim any liability for damage caused by the use of other chargers or batteries.Your phone should not be disposed of in a municipal waste.Please check local regulations for disposal of electronic products.Remember to make backup copies or keep a written record of all important information stored on your phone.Some people may suffer epileptic seizures or blackouts when exposed to flashing lights, or when playing video games. These seizures or blackouts may occur even if a person never had a previous seizure or blackout. If you have experienced seizures or blackouts, or if you have a family history of such occurrences, please consult your doctor before playing video games on your phone or enabling a flashing-lights feature on your phone.Parents should monitor their children’s use of video games or other features that incorporate flashing lights on the phones. All persons should discontinue use and consult a doctor if any of the following symptoms occur: convulsion, eye or muscle twitching, loss of awareness, orientation, or movements.PRIVACY:Please note that you must respect the laws and regulations in force in your jurisdiction or other jurisdiction(s) where you will use your phone regarding taking photographs and recording sounds with your phone. Pursuant to such laws

138
Legal
and regulations, it may be strictly forbidden to take photographs and/or to record the voices of other people or any of their personal attributes, and reproduce or distribute them, as this may be considered to be an invasion of privacy. It is the user's sole responsibility to ensure that prior authorization has been obtained, if necessary, in order to record private or confidential conversations or take a photograph of another person; the manufacturer, the seller or vendor of your phone (including the carrier) disclaim any liability which may result from improper use of the phone.BATTERY:For non-unibody device, where the battery is removable:- Do not attempt to open the battery due to the risk of toxic fumes and burns;- Do not puncture, disassemble, or cause a short circuit in a battery;- Do not burn or dispose of a used battery in the garbage or store it at temperatures above 60°C (140°F).- Batteries must be disposed of in accordance with locally applicable environmental regulations.- Only use the battery for the purpose for which it was designed. Never use damaged batteries or those not recommended by TCL Communication Ltd. and/or its affiliates.For unibody device, where the battery is not removable:- Do not attempt to eject, replace, or open battery;- Do not puncture the back cover of your phone;- Do not burn or dispose of your phone in the garbage or store it at temperatures above 60°C (140°F).Phone and battery as a unibody device must be disposed of in accordance with locally applicable environmental regulations.

139
Lega
l
This symbol on your phone, the battery, and the accessories means that these products must be taken to collection points at the end of their life:- Municipal waste disposal centers with specific bins for these items of equipment;- Collection bins at points of sale.They will then be recycled, preventing substances being disposed of in the environment, so that their components can be reused.
Electronic Recycling (Within USA Only):For more information on Electronic Recycling, please:Visit the Alcatel Electronic Recycling Program web page at us.alcatelmobile.com/accessibility-compliance/electronic-recycling-program/.Battery Recycling (USA & Canada):Alcatel partners with Call2Recycle to offer a safe and convenient battery recycling program. For more information on our Battery Recycling Program, please visit USA and Canada website at us.alcatelmobile.com/accessibility-compliance/battery-recycling/ CAUTION: RISK OF EXPLOSION IF BATTERY IS REPLACED BY AN INCORRECT TYPE. DISPOSE OF USED BATTERIES ACCORDING TO THE INSTRUCTIONS.
!WARNING: This product can expose you to chemicals including lead, which is known to the State of California to cause cancer and birth defects or other reproductive harm. For more information go to www�P65Warnings�ca�gov.
CHARGERS:

140
Legal
Home A.C./ Travel chargers will operate within the temperature range of: -10°C (14°F) to 50°C (122°F).The chargers designed for your phone meet the standard for safety of information technology equipment and office equipment use. Due to different applicable electrical specifications, a charger you purchased in one jurisdiction may not work in another jurisdiction. They should be used for this purpose only.Characteristics of power supply (depending on the country):Travel charger: Input: 100-240 V, 50/60 Hz, 200 mA Output: 5V, 2ABattery: Lithium 3500 mAhRadio wavesTHIS PHONE MEETS THE GOVERNMENT’S REQUIREMENTS FOR EXPOSURE TO RADIO WAVES.Your phone is a radio transmitter and receiver. It is designed and manufactured not to exceed the emission limits for exposure to radio-frequency (RF) energy. These limits are part of comprehensive guidelines and establish permitted levels of RF energy for the general population. The guidelines are based on standards that were developed by independent scientific organizations through periodic and thorough evaluation of scientific studies. These guidelines include a substantial safety margin designed to ensure the safety of all persons, regardless of age and health.The exposure standard for phones employs a unit of measurement known as the Specific Absorption Rate, or SAR. The SAR limit set by public authorities such as the Federal Communications Commission of the US Government (FCC), is 1.6 W/kg averaged over 1 gram of body tissue. Tests for SAR are conducted using standard operating positions with the phone transmitting at its highest certified power level in all tested frequency bands.This device is complied with SAR for general population /uncontrolled exposure limits in ANSI/IEEE C95.1-1992 and

141
Lega
l
had been tested in accordance with the measurement methods and procedures specified in IEEE1528.The FCC has granted an Equipment Authorization for this model phone with all reported SAR levels evaluated as in compliance with the FCC RF exposure guidelines. SAR information on this model phone is on file with the FCC and can be found under the Display Grant section of www�fcc�gov/oet/ea/fccid after searching for FCCID: 2ACCJH130 for 5007S.Although the SAR is determined at the highest certified power level, the actual SAR level of the phone while operating can be well below the maximum value. This is because the phone is designed to operate at multiple power levels so as to use only the power required to reach the network. In general, the closer you are to a wireless base station antenna, the lower the power output of the phone. Before a phone model is available for sale to the public, compliance with national regulations and standards must be shown.The highest SAR value for 5007S when tested is 1.15W/Kg for use at the ear and 1.28W/Kg for use close to the body.While there may be differences between the SAR levels of various phones and at various positions, they all meet the government requirement for RF exposure.For body-worn operation, the phone meets FCC RF exposure guidelines provided that it is used with a non-metallic accessory with the handset at least 15 mm from the body. Use of other accessories may not ensure compliance with FCC RF exposure guidelines.Additional information on SAR can be found on the Cellular Telecommunications & Internet Association (CTIA) Web site: http://www�ctia�org/The World Health Organization (WHO) considers that present scientific information does not indicate the need for any special precautions for use of phones. If individuals are concerned, they might choose to limit their own or their children’s

142
Legal
RF exposure by limiting the length of calls, or using “hands-free” devices to keep phones away from the head and body. Additional WHO information about electromagnetic fields and public health are available on the following website: http://www�who�int/peh-emf�Note: This equipment has been tested and found to comply with the limits for a Class B digital device pursuant to part 15 of the FCC Rules. These limits are designed to provide reasonable protection against harmful interference in a residential installation. This equipment generates, uses and can radiate radio frequency energy and, if not installed and used in accordance with the instructions, may cause harmful interference to radio communications. However, there is no guarantee that interference to radio or television reception, which can be determined by turning the equipment off and on, the user is encouraged to try to correct the interference by one or more of the following measures:- Reorient or relocate the receiving antenna;- Increase the separation between the equipment and receiver;- Connect the equipment into an outlet on a circuit different from that to which the receiver is connected;- Consult the dealer or an experienced radio/ TV technician for help.Changes or modifications not expressly approved by the party responsible for compliance could void the user’s authority to operate the equipment.For the receiver devices associated with the operation of a licensed radio service (e.g. FM broadcast), they bear the following statement:Operation is subject to the following two conditions:- This device may not cause harmful interference;

143
Lega
l
- This device must accept any interference received, including interference that may cause undesired operation.Your phone is equipped with a built-in antenna. For optimal operation, you should avoid touching it or degrading it.As mobile devices offer a range of functions, they can be used in positions other than against your ear. In such circumstances the device will be compliant with the guidelines when used with a headset or usb data cable.If you are using another accessory ensure that whatever product is used is free of any metal and that it positions the phone at least 15 mm away from the body.Please note by using the device some of your personal data may be shared with the main device. It is under your own responsibility to protect your own personal data, not to share with it with any unauthorized devices or third party devices connected to yours. For products with Wi-Fi features, only connect to trusted Wi-Fi networks. Also when using your product as a hotspot (where available), use network security. These precautions will help prevent unauthorized access to your device. Your product can store personal information in various locations including a SIM card, memory card, and built-in memory. Be sure to remove or clear all personal information before you recycle, return, or give away your product. Choose your apps and updates carefully, and install from trusted sources only. Some apps can impact your product’s performance and/or have access to private information including account details, call data, location details and network resources.Note that any data shared with TCL Communication Ltd. is stored in accordance with applicable data protection legislation. For these purposes TCL Communication Ltd. implements and maintains appropriate technical and organizational measures to protect all personal data, for example against unauthorized or unlawful processing and accidental loss or destruction of or damage to such personal data whereby the measures shall provide a level of security that is appropriate having regard to- The technical possibilities available;

144
Legal
- The costs for implementing the measures;- The risks involved with the processing of the personal data, and;- The sensitivity of the personal data processed.You can access, review and edit your personal information at any time by logging into your user account, visiting your user profile or by contacting us directly. Should you require us to edit or delete your personal data, we may ask you to provide us with evidence of your identity before we can act on your request.US Information Concerning the Federal Communications Commission (“FCC”) Requirements for Hearing Aid Compatibility with Wireless DevicesWhen wireless devices are used near hearing devices (such as hearing aids and cochlear implants), users may detect a buzzing, humming, or whining noise. Some hearing devices are more immune than others to this interference, and wireless devices also vary in the amount of interference that they generate.The wireless telephone industry has developed ratings to assist hearing device users in finding wireless devices that may be compatible with their hearing devices. Not all wireless devices have been rated. Wireless devices that are rated will have the rating displayed on the box together with other relevant approval markings.The ratings are not guarantees. Results will vary depending on the user’s hearing device and hearing loss. If your hearing device is vulnerable to interference, you may not be able to use a rated wireless device successfully. Consulting with your hearing health professional and testing the wireless device with your hearing device is the best way to evaluate it for your personal needs.This smartphone has been tested and rated for use with hearing aids for some of the wireless technologies that the smartphone uses. However, other wireless technologies may be used in this smartphone that have not been tested

145
Lega
l
for use with hearing aids. It is important to try the different features of your smartphone thoroughly and in different locations to determine if you hear any interfering noise when using this smartphone with your hearing aid or cochlear implant. Consult your wireless service provider about its return and exchange policies, and for information about hearing aid compatibility.Hearing aid compatibility rating for this smartphone: M4/T4How the ratings workM-Ratings: Wireless devices rated M3 or M4 meet FCC requirements and are likely to generate less interference to hearing devices than wireless devices that are not labeled. M4 is the better or higher of the two ratings.T-Ratings: Wireless devices rated T3 or T4 meet FCC requirements and are likely to be more usable with a hearing device’s telecoil ("T Switch" or "Telephone Switch") than unrated wireless devices. T4 is the better or higher of the two ratings. (Note that not all hearing devices have telecoils in them.)Hearing devices may also be measured for immunity to this type of interference. Your hearing device manufacturer or hearing health professional may help you find results for your hearing device. The more immune your hearing aid is, the less likely you are to experience interference noise from wireless devices.For more information about the actions that the FCC has taken with regard to hearing aid compatibility with wireless devices and other steps that the FCC has taken to ensure that individuals with disabilities have access to telecommunications services, visit www�fcc�gov/cgb/dro.FCC ID for 5007S: 2ACCJH130This product meets applicable national SAR limits of 1.6 W/kg. The specific maximum SAR values can be found on Radio waves section.

146
Legal
When carrying the product or using it while worn on your body, either use an approved accessory such as a holster or otherwise maintain a distance of 15 mm from the body to ensure compliance with RF exposure requirements. Note that the product may be transmitting even if you are not making a phone call.PROTECT YOUR HEARINGTo prevent possible hearing damage, do not listen at high volume levels for long periods. Exercise caution when holding your phone near your ear while the loudspeaker is in use.

147
Lega
l
IndexAAirplane Mode 115All Apps 33, 39App
Downloading 53, 109Play Store 110Uninstall 112
BBattery 1, 5, 32, 35, 142
Charging 5Bluetooth 34, 69, 117Brightness

Screen 128Button
Back 26, 36Delete 61Google Assistant 26Home 26, 36Navigation 1, 33, 36Power/Lock 3, 25, 30Shutter 89, 90, 91Urgent Response 28, 36, 58Volume 25, 72, 73
CCall History 59, 60, 62, 63Call Volume 59, 72Camera & Photos 38Cellular Signal Strength 35, 116

149
Inde
x
Charging 1, 2, 4, 5Charging Cable 2Contacts 42, 60, 61, 64Contact Us 134Current Date 28Current time 32, 34DData 41, 54, 55Deleting 75, 84, 85, 87, 93
Photos 93Texts 84, 85Videos 93
Directions 38, 53Downloading 53, 97, 109, 110, 111E
Earpiece Speaker 3, 67, 68Email 38, 52, 97, 98, 100, 102, 104, 105FFacebook 52GGmail 15, 100, 102, 104, 105Google
Play Store 53Google Assistant 113, 129Group Text Message 79HHealth & Safety Package 25, 28, 36Home Screen 32How-to Cards 134How-To Guides 132
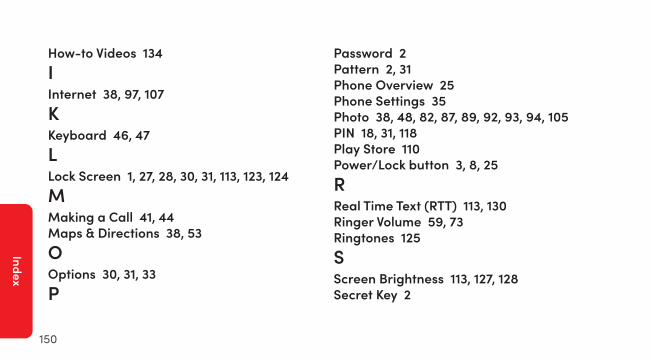
150
Index
How-to Videos 134IInternet 38, 97, 107KKeyboard 46, 47LLock Screen 1, 27, 28, 30, 31, 113, 123, 124MMaking a Call 41, 44Maps & Directions 38, 53OOptions 30, 31, 33P
Password 2Pattern 2, 31Phone Overview 25Phone Settings 35Photo 38, 48, 82, 87, 89, 92, 93, 94, 105PIN 18, 31, 118Play Store 110Power/Lock button 3, 8, 25RReal Time Text (RTT) 113, 130Ringer Volume 59, 73Ringtones 125SScreen Brightness 113, 127, 128Secret Key 2

151
Inde
x
Shutter button 89, 90, 91Speakerphone 59, 67, 68, 71Status bar 116Support 134Swipe 29, 30TText Message 37, 75, 76, 77, 78, 79, 80, 81Title Bar 32Touch Gestures 6UUrgent Response button 25, 28, 36, 58Usage
Data 35, 55USB-C 5
Charging cable 2
VVideos 38, 52, 53, 88, 106Voicemail 49, 60, 65Voice Typing 47Volume
Ringtones 125WWall Charger 2, 5Wi-Fi 32, 35, 55, 56, 114

152
Index

