user manualuser manual sdvd7015sdvd7015static.highspeedbackbone.net/pdf/sylvania_sdvd7015_dvd...user...
TRANSCRIPT

User ManualUser Manual
SDVD7015SDVD7015
7" Portable DVD Player7" Portable DVD Player

The lightning flash with an arrowhead symbol within an equilateraltriangle is intended to alert the user of the presence of uninsulated"dangerous voltage" within the product's enclosure that may be ofsufficient magnitude to constitute a risk of electric shock to persons.
The exclamation point within an equilateral triangle is intended to alertthe user of the presence of important operating and maintenance(servicing) instructions in the literature accompanying the appliance.
RISK OF ELECTRIC SHOCKDO NOT OPEN !
Safety precautions
!
WARNING: Do not stare into beam invisible laser radiation. This productutilises a Class 1 Laser. Use of controls, adjustments or procedures not listedin this manual may result in hazardous radiation exposure.
CAUTION: DURING PLAYBACK, THE DISC SPINS AT HIGH SPEED, SO DO NOTLIFT OR MOVE THE PLAYER, DOING SO MAY DAMAGE THE DISC. CAUTION:This Digital Video Disc Player employs a Laser System. Make sure thedevice is shut down prior to opening player lid.Visible laser radiation when openand interlocks defeated.Use of controls or adjustments or performance ofprocedures other than those specified herein may result in hazardous radiationexposure.
DO NOT STARE INTO BEAM.To ensure proper use of this product, please read this owner’s manual carefully andretain for future reference. Should the unit require maintenance, contact anauthorized service location, or contact us.Only qualified service personnel shouldremove the cover.
CLASS 1LASER PRODUCT
CAUTION
Safety precautions
FCC NOTICE: This equipment has been tested and found to comply with thelimits for a Class B digital device. Pursuant with the FCC Rules, Part 15. Theselimits are designed to provide reasonable protection against harmful interferencein a residential installation.
This equipment generates,uses and can radiate radio frequency energyand,if not installed and used in accordance with the instructions,may causeharmful interference to radio communication,However,this is no guarantee thatinterference will not occur in a particular installation.If this equipment does causeharmful interference to radio or television reception, which can be determined byturning the equipment off and on,the user is encouraged to try to correct theinterference by one of the following measures:
- Reorient or relocate the receiving antenna.- Increase the separation between the equipment and
receiver.- Connect the equipment into an outlet on a circuit dif-
ferent from that to which the receiver is connected.- Consult the dealer or an experienced radio/TV techni-
cian for help.
FCC Caution:To assure continued compliance,(example-use only shieldedinterface cables when connecting to computer or peripheral devices).Anychanges or modifications not expressly approved by the party responsiblefor compliance could void the user’s authority to operate this equipment.
This device complies with part 15 of the FCC rules. Operation is subject to the followingtwo conditions: (1)this device may not cause harmful interference, and (2) this devicemust accept any interference received. including interference that may cause undesiredoperation.
BATTERY WARNING: The DVD player contains a Li-Polymer battery pack.There is a risk of fire and burns if the battery pack is handled improperly. Do notdisassemble, crush, puncture, short external contacts, or dispose of in fire orwater. Do not attempt to open or service the battery pack. Replace only with thebattery pack designated for this product. Discard used batteries according to themanufacturer’s instructions.
21
!
"
!
#
$
%
&
'
(
)
43
Safety Information
CAUTION: Use of controls or adjustments or performanceof procedures other than those specified herein mayresult in hazardous radiation exposure.
Please carefully study this manual and always keep itavailable. There are, however, some installation and operationprecautions which you should be aware of.
1.Read Instructions - All the safety and operating instructionsshould be read before the product is operated.
2.Retain Instructions - The safety and operating instructionsshould be retained for future reference.
3.Heed Warnings - All warnings on the product and in theoperating instructions should be adhered to.
4.Follow Instructions - All operating and use instructions shouldbe followed.
5.Cleaning - Unplug this product from the wall outlet beforecleaning. Do not use liquid cleaners or aerosol cleaners. Cleanonly with dry cloth.
6.Attachments - Do not use attachments not recommended bythe product manufacturer as they may cause hazards.
7.Water and Moisture - Do not use this product near water - forexample, near a bath tub, wash bowl, kitchen sink, or laundrytub; in a wet basement; or near a swimming pool; and the like.
8.Accessories - Do not place this product on an unstable cart,stand, tripod, bracket, or table. The product may fall, causingserious injury to a child or adult, and serious damage to theproduct. Use only with a cart, stand, tripod, bracket, or tablerecommended by the manufacturer, or sold with the product.Any mounting of the product should follow the manufacturer’sinstructions, and should use a mounting accessoryrecommended by the manufacturer.
9.A product and cart combination should be moved with care.Quick stops, excessive force, and uneven surfaces may causethe product and cart combination to overturn.
10.Ventilation - Slots and openings in the cabinet are provided forventilation and to ensure reliable operation of the product and toprotect it from overheating, and these openings must not beblocked or covered. The openings should never be blocked byplacing the product on a bed, sofa, rug, or other similar surface.This product should not be placed in a built-in installation such asa bookcase or rack unless proper ventilation is provided or themanufacturer’s instructions have been adhered to.
11.Power Sources - This product should be operated only fromthe type of power source indicated on the marking label. If you arenot sure of the type of power supply to your home, consult yourproduct dealer or local power company. For products intended tooperate from battery power, or other sources, refer to theoperating instructions.
12.Power-Cord Protection - Power-supply cords should be routedso that they are not likely to be walked on or pinched by itemsplaced upon or against them, paying particular attention to cordsat plugs, convenience receptacles, and the point where they exitfrom the product.
13.Lightning - For added protection for this product during alightning storm, or when it is left unattended and unused for longperiods of time, unplug it from the wall outlet and disconnect theantenna or cable system. This will prevent damage to the productdue to lightning and power-line surges.
14.Overloading - Do not overload wall outlets, extension cords, orintegral convenience receptacles as this can result in a risk of fireor electric shock.
Safety Information
!
"
!
#
$
%
&
'
(
$
)

65
Safety Information
15.Object and Liquid Entry - Never push objects of any kind intothis product through openings as they may touch dangerousvoltage points or short-out parts that could result in a fire or elec-tric shock.Never spill liquid of any kind on the product.
16.Servicing - Do not attempt to service this product yourself asopening or removing covers may expose you to dangerous voltageor other hazards. Refer all servicing to qualified service personnel.
17.Damage Requiring Service - Unplug this product from the walloutlet and refer servicing to qualified service personnel under thefollowing conditions:a. When the power-supply cord or plug is damaged.b. If liquid has been spilled, or objects have fallen into the product.c. If the product has been exposed to rain or water.d. If the product does not operate normally by following theoperating instructions. Adjust only those controls that are coveredby the operating instructions as an improper adjustment of othercontrols may result in damage and will often require extensivework by a qualified technician to restore the product to its normaloperation.e. If the product has been dropped or damaged in any way, and f. When the product exhibits a distinct change in performance - thisindicates a need for service.
18.Replacement Parts - When replacement parts are required, besure the service technician has used replacement parts specifiedby the manufacturer or have the same characteristics as theoriginal part. Unauthorized substitutions may result in fire, electricshock, or other hazards.
Safety Information
19.Safety Check - Upon completion of any service or repairs to thisproduct, ask the service technician to perform safety checks todetermine that the product is in proper operating condition.
20. Heat - The product should be situated away from heat sourcessuch as radiators, heat registers, stoves or other products(including amplifiers) that produce heat.
21. Rechargeable battery - Charge voltage cannot be below 9-12V.
!
"
!
#
$
%
&
'
(
)

87
Introduction
Your new portable DVD player isdesigned for you to enjoy all forms ofdisc media. Its slim shape allows you toeasily carry it with you and enjoymovies and music anywhere. Yourplayer incorporates the latest digitalaudio/video (AV) technologies to giveyou the ultimate in listening andviewing pleasure.
Your new player also supports CD andMP3. Your player also has severalunique features, including an S-videooutput (for greater picture clarity), largeactive LCD screen, multi-angle andmulti-language, Parental Control (toprevent children from viewinginappropriate content), and KodakPicture CD compatibility (so you canshow photos on your TV). This is atruly multimedia machine designed forthe multimedia world to enjoy.
Introduction
UNPACKINGFirst inventory the contents of your Portable DVD playerpackage:
If any item should be damaged or missing, pleasecontact your dealer without delay.
Keep the packaging materials, you may need them totransport your player in the future.
WARNING: Changes or modifications made to this equipment, notexpressly approved by us or parties authorized by us will void allmanufacture warranties.
Portable DVD Player 1
Audio Cable 1 pair
S-Video Cable 1 pair
Video & Coaxial Cable 1 pair
Li-Polymer Battery Pack 1
Remote Control 1
External Power Adapter 1
Cigarette Lighter Adapter 1
Operating Manual 1
Stereo Earphone 1
!
"
!
#
$
%
&
'
(
)
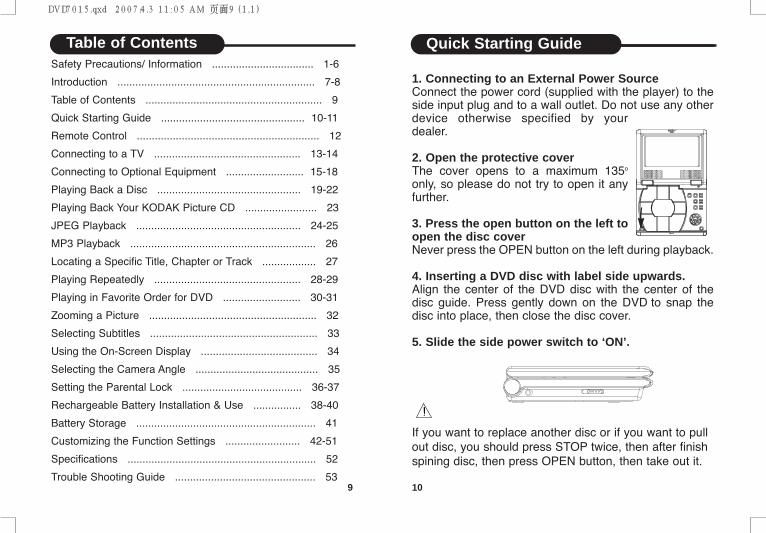
Safety Precautions/ Information .................................. 1-6
Introduction .................................................................. 7-8
Table of Contents ........................................................... 9
Quick Starting Guide ................................................ 10-11
Remote Control ............................................................. 12
Connecting to a TV ................................................. 13-14
Connecting to Optional Equipment .......................... 15-18
Playing Back a Disc ................................................ 19-22
Playing Back Your KODAK Picture CD ........................ 23
JPEG Playback ....................................................... 24-25
MP3 Playback .............................................................. 26
Locating a Specific Title, Chapter or Track .................. 27
Playing Repeatedly ................................................. 28-29
Playing in Favorite Order for DVD .......................... 30-31
Zooming a Picture ........................................................ 32
Selecting Subtitles ........................................................ 33
Using the On-Screen Display ....................................... 34
Selecting the Camera Angle ......................................... 35
Setting the Parental Lock ........................................ 36-37
Rechargeable Battery Installation & Use ................ 38-40
Battery Storage ............................................................ 41
Customizing the Function Settings ......................... 42-51
Specifications ............................................................... 52
Trouble Shooting Guide ............................................... 5310
Quick Starting Guide
9
Table of Contents
1. Connecting to an External Power SourceConnect the power cord (supplied with the player) to theside input plug and to a wall outlet. Do not use any otherdevice otherwise specified by yourdealer.
2. Open the protective coverThe cover opens to a maximum 135o
only, so please do not try to open it anyfurther.
3. Press the open button on the left toopen the disc coverNever press the OPEN button on the left during playback.
4. Inserting a DVD disc with label side upwards.Align the center of the DVD disc with the center of thedisc guide. Press gently down on the DVD to snap thedisc into place, then close the disc cover.
5. Slide the side power switch to ‘ON’.
If you want to replace another disc or if you want to pullout disc, you should press STOP twice, then after finishspining disc, then press OPEN button, then take out it.
!
!
"
!
#
$
%
&
'
(
)
1211
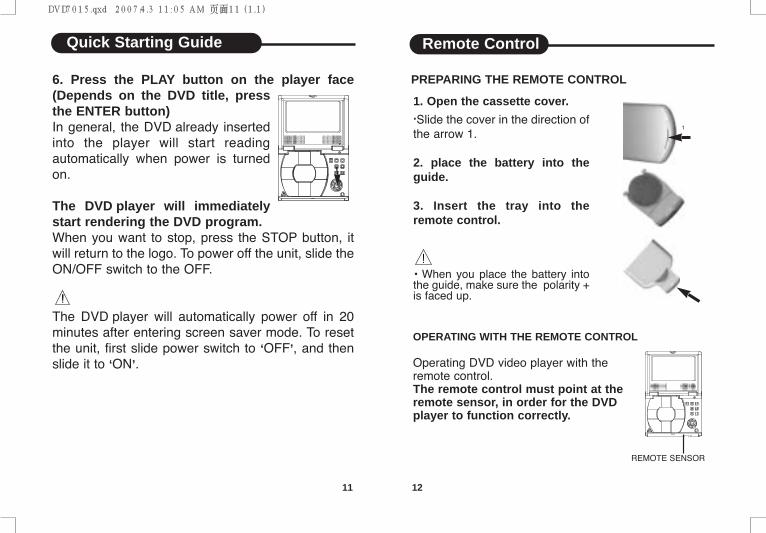
6. Press the PLAY button on the player face(Depends on the DVD title, pressthe ENTER button)In general, the DVD already insertedinto the player will start readingautomatically when power is turnedon.
The DVD player will immediatelystart rendering the DVD program.When you want to stop, press the STOP button, itwill return to the logo. To power off the unit, slide theON/OFF switch to the OFF.
The DVD player will automatically power off in 20minutes after entering screen saver mode. To resetthe unit, first slide power switch to ‘OFF’, and thenslide it to ‘ON’.
Quick Starting Guide
!
Remote Control
PREPARING THE REMOTE CONTROL
OPERATING WITH THE REMOTE CONTROL
Operating DVD video player with theremote control.The remote control must point at theremote sensor, in order for the DVDplayer to function correctly.
REMOTE SENSOR
1. Open the cassette cover..Slide the cover in the direction ofthe arrow 1.
2. place the battery into theguide.
3. Insert the tray into theremote control.
• When you place the battery intothe guide, make sure the polarity +is faced up.
!
1
!
"
!
#
$
%
&
'
(
)

1413
Connecting to a TV
BETTER
• Turn off the power and unplug both units before setting upany connections.
Connect the DVD video player with anoptional S -Video cable, if the TV has an S -Video input. Do not connect the yellow videocable if using the S -Video cable.
!
Connecting to a TV
GOOD
SETTING UP YOUR PLAYER
Step 1:connect the audio cables to AUDIO OUT of theDVD player..Step 2:connect the yellow cable to the VIDEO on theside of your player.(For TVs that support S-Video Output please follow thediagram “BETTER” below.)
TV Audio Output
RedWhite
TV Video Output
Yellow
RedWhite
TV Audio Output TV S-Video input
option
!
"
!
#
$
%
&
'
(
$
)

1615
Connecting to Optional EquipmentConnecting to Optional Equipment
CONNECTING EARPHONES
1. Connect the earphones.Earphones with a 3.5 mm stereo plug can be connected.
2. Adjust the volume by turning the dial.
• Avoid listening to sound at high level which may beharmful to your ears.
!
Rearspeaker
Enjoying Dolby Pro Logic Surround Sound (GOOD)Dolby Pro Logic Surround
Enjoy the dynamic realistic sound of Dolby Pro LogicSurround by connecting an amplifier and speakersystem (right and left front speakers, a center speaker,and one or two rear speakers).
To VIDEOOUT
To AUDIOOUT
ConnectionExample
To audioinput
Amplifierequipped withDolby Pro Logic Surround
Frontspeaker
(left)
Frontspeaker(right)Center
speaker
TV
Yellow
Subwoofer
!
"
!
#
$
%
&
'
(
)
1817
Connecting to Optional EquipmentConnecting to Optional Equipment
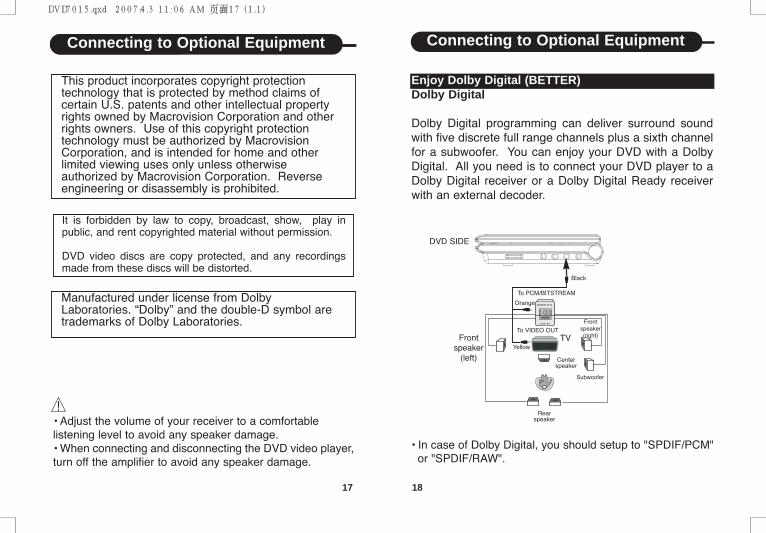
• Adjust the volume of your receiver to a comfortablelistening level to avoid any speaker damage.• When connecting and disconnecting the DVD video player,turn off the amplifier to avoid any speaker damage.
Manufactured under license from DolbyLaboratories. “Dolby” and the double-D symbol aretrademarks of Dolby Laboratories.
This product incorporates copyright protectiontechnology that is protected by method claims ofcertain U.S. patents and other intellectual propertyrights owned by Macrovision Corporation and otherrights owners. Use of this copyright protectiontechnology must be authorized by MacrovisionCorporation, and is intended for home and otherlimited viewing uses only unless otherwiseauthorized by Macrovision Corporation. Reverseengineering or disassembly is prohibited.
It is forbidden by law to copy, broadcast, show, play inpublic, and rent copyrighted material without permission.
DVD video discs are copy protected, and any recordingsmade from these discs will be distorted.
!
Enjoy Dolby Digital (BETTER)Dolby Digital
Dolby Digital programming can deliver surround soundwith five discrete full range channels plus a sixth channelfor a subwoofer. You can enjoy your DVD with a DolbyDigital. All you need is to connect your DVD player to aDolby Digital receiver or a Dolby Digital Ready receiverwith an external decoder.
• In case of Dolby Digital, you should setup to "SPDIF/PCM" or "SPDIF/RAW".
To VIDEO OUT
To PCM/BITSTREAM
DVD SIDE
Frontspeaker
(left)
Frontspeaker(right)TV
Orange
Yellow
Black
Rearspeaker
Centerspeaker
Subwoofer
!
"
!
#
$
%
&
'
(
)

Press the II/STEP once duringplayback, then press PLAY toresume normal playback. PressII/STEP repeatedly during playback,the picture will advance one frameeach time, then press PLAYbutton to resume normalplayback.During the still playback the sound is muted. MP3 CD, Audio CD andPicture CD do not have the stepfeature.
Playing Back a Disc
HOW TO START PLAYBACK FROM THE MENU SCREEN
Title 1
Title 3
Title 2
Title 4
HOW TO PAUSE PLAYBACK (STILL PLAYBACK)
1. Press TITLE/MENU toaccess the menu screen.
2. Press orthe number buttons toselect the title.
3. Press the ENTER orPLAY button.The DVD video player willstart playback from the titleselected.
Note:You also can input theassigned number of the titleto select it directly.
ENTER
Playing Back a Disc
CONTROLS FOR BASIC PLAYBACK
2019
II/STEP
PLAY
1. PLAY
2. PAUSE
3. STOP
4. SUB TITLE
5. DISC MENU
6. PREV
1
10
7. NEXT
8. DIRECTION BUTTONS
9. ENTER
10. SETUP
11. OPEN/PUSH
11
2
3
4
5
6
7
8
9
!
"
!
#
$
%
&
'
(
)
Playing Back a Disc
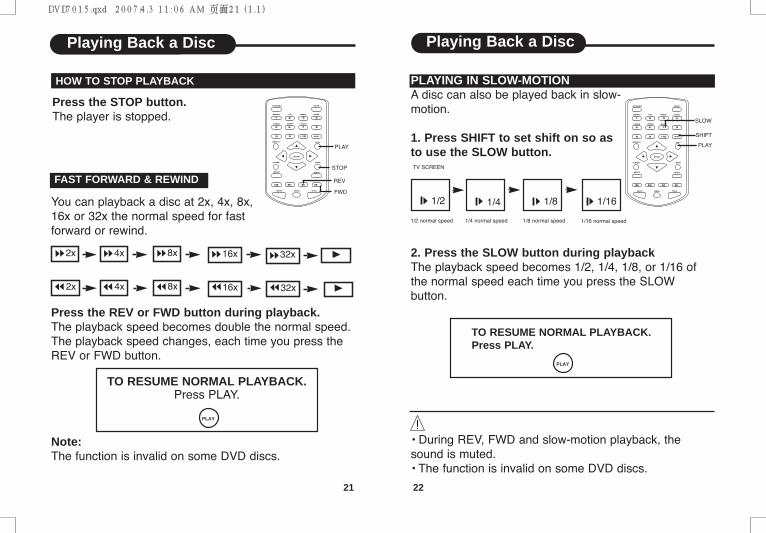
PLAYING IN SLOW-MOTIONA disc can also be played back in slow-motion.
1. Press SHIFT to set shift on so asto use the SLOW button.
2. Press the SLOW button during playbackThe playback speed becomes 1/2, 1/4, 1/8, or 1/16 ofthe normal speed each time you press the SLOWbutton.
TO RESUME NORMAL PLAYBACK.Press PLAY.
PLAY
• During REV, FWD and slow-motion playback, thesound is muted.• The function is invalid on some DVD discs.
!
1/4 normal speed1/2 normal speed
TV SCREEN
1/8 normal speed
1/2 1/8 1/161/4
1/16 normal speed
You can playback a disc at 2x, 4x, 8x,16x or 32x the normal speed for fastforward or rewind.
Press the REV or FWD button during playback.The playback speed becomes double the normal speed.The playback speed changes, each time you press theREV or FWD button.
Note:The function is invalid on some DVD discs.
Playing Back a Disc
HOW TO STOP PLAYBACK
Press the STOP button.The player is stopped.
TO RESUME NORMAL PLAYBACK.Press PLAY.
PLAY
2x 4x 8x 16x
2x 4x 8x 16x
FAST FORWARD & REWIND
32x
32x
2221
STOP
PLAY
REV
FWD
SLOW
PLAY
SHIFT
!
"
!
#
$
%
&
'
(
)

YOU CAN USE YOUR DVD PLAYER TO VIEWPHOTOGRAPHS STORED ON A CD-R. THEPHOTOGRAPHS ON THE DISC NEED TO BE SAVED INTHE JPEG FILE FORMAT. FOR MORE INFORMATIONABOUT JPEGS PLEASE VISIT WWW.JPEG.COM.
JPEG Playback
PLAYING BACK JPEG FILES1. Place the CD on the disc tray.
2. Select a folder or a picture contained on the CD.After the CD is loaded, a menu will appear on thescreen. Press UP or DOWN to select a folder, and pressENTER/PLAY to view folder contents (shown in rightcolumn as below).
00:00 00:00 001\015
GIRL
BBBBBB
CCCCCC
AAAAAA
You can use the GOTO to select JPEG.
Playing Back Your KODAK Picture CD
When a Kodak Picture CD is loaded, an automated slideshow is launched, Each picture in the current directorywill be displayed consecutively in a slide-show fashionand will be scaled to fit most of the screen.
To display an image indefinitely, press the PAUSE key.To view the Next or Previous picture press the or on remote control or next/previous on the unit keys. Toresume the slideshow press the ENTER key.
SPECIAL
To view the titles of the KODAK picture CD at playmode, press the stop key or menu key, display willshow titles of the Disc.
To select the title, press down button then pressenter or play button to resume auto playback until thelast picture appears. Auto playback will stop anddisplay shows the number of titles of the disc.
NORMAL
2423
!
"
!
#
$
%
&
'
(
$
)
26
MP3 Playback
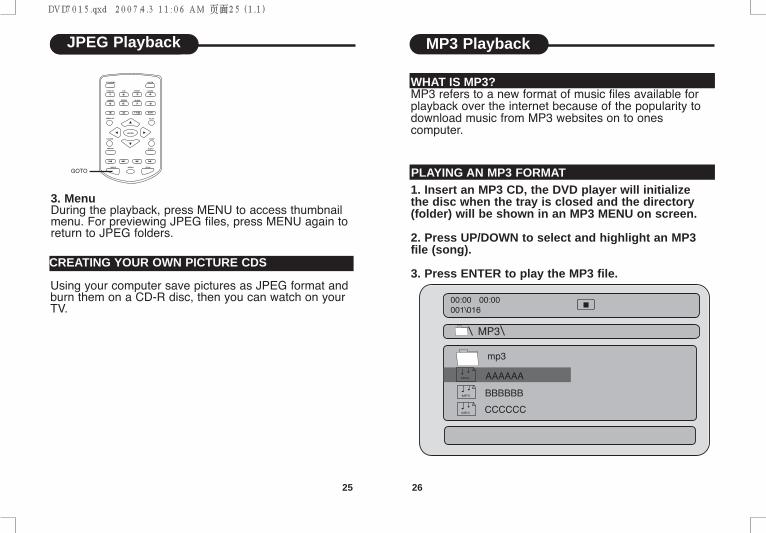
WHAT IS MP3?MP3 refers to a new format of music files available forplayback over the internet because of the popularity todownload music from MP3 websites on to onescomputer.
1. Insert an MP3 CD, the DVD player will initializethe disc when the tray is closed and the directory(folder) will be shown in an MP3 MENU on screen.
2. Press UP/DOWN to select and highlight an MP3file (song).
3. Press ENTER to play the MP3 file.
PLAYING AN MP3 FORMAT
00:00 00:00 001\016
BBBBBB
CCCCCC
AAAAAA
MP3
mp3
MP3
MP3
MP3
25
JPEG Playback
3. MenuDuring the playback, press MENU to access thumbnailmenu. For previewing JPEG files, press MENU again toreturn to JPEG folders.
CREATING YOUR OWN PICTURE CDS
Using your computer save pictures as JPEG format andburn them on a CD-R disc, then you can watch on yourTV.
GOTO
!
"
!
#
$
%
&
'
(
)

28
THIS DVD VIDEO PLAYER ALLOWS YOU TOPLAYBACK A SPECIFIC TITLE, CHAPTER, TRACK,OR SEGMENT REPEATEDLY. (TITLE REPEAT,CHAPTER/TRACK REPEAT, A-B REPEAT)
HOW TO REPEAT A TITLE, CHAPTER, OR DISC
During normal playback, press the REPEAT button(To be set SHIFT on).The repeat mode changes, each time you press theREPEAT button.
Playing Repeatedly
Repeats the same chapter.
Repeats the same title.
Resumes normal playback.
Repeats the whole disc
TITLE
ALL
CHAPTER
27
LOCATING A TITLE USING THE TITLE MENUYou can locate a specific title using the title menu function, if aDVD video disc contains a title menu.1. Press the TITLE buttonOn the LCD or TV screen, the title menuwill appear.2. Press the button to selectthe title you want.You can also directly locate a specifictitle by pressing its assigned numberwith the number buttons.3. Press the PLAY buttonThis will cause the DVD video player to start playback fromchapter 1 of the title selected.You also can use skip buttons to select a title or trackdesired:Press or button repeatedly till the one displays.
Locating a Specific Title, Chapter or Track
Chapter 1 Chapter 2 Chapter 1 Chapter 2 Chapter 3
DVD DISCS ARE NORMALLY DIVIDED INTO TITLESWHICH ARE SUB-DIVIDED INTO CHAPTERS.MOREOVER, CD AND MP3 CD ARE DIVIDED INTOTRACKS.
TITLE 1
DVD Video Disc
TITLE 2
PLAY
PREVIOUSNEXT
REPEAT
SHIFT
!
"
!
#
$
%
&
'
(
)

30
1. Press the PROGRAM button (To be set SHIFT on).PROGRAM MENU displays on the screen.
2. Using the numbered button, select the items youwant in the order you want them programmed in.The number of the item selected will be input into thePROGRAM volume.
Playing in Favorite Order for DVD
HOW TO SET TITLES, CHAPTERS, OR TRACKS IN AFAVORITE ORDER
1 TT: CH: 6 TT: CH:
2 TT: CH: 7 TT: CH:
3 TT: CH: 8 TT: CH:
4 TT: CH: 9 TT: CH:
5 TT: CH: 10 TT: CH:
EXIT NEXT
1 TT: 01 CH: 01 6 TT: CH:
2 TT: CH: 7 TT: CH:
3 TT: CH: 8 TT: CH:
4 TT: CH: 9 TT: CH:
5 TT: CH: 10 TT: CH:
EXIT START NEXT
29
HOW TO REPEAT A SPECIFIC SEGMENT
(The REPEAT function to be set off)1. Press the A-B button at the beginning of thesegment in which you want to repeat playback(point A) (To be set SHIFT on).
2. Press the A-B button again at the end of thesegment (point B)The DVD video player will automatically return to point Aand start to repeat playback of the selected segment (A-B).
3. Press the A-B button to cancel the A-B repeat functionThe DVD video player will resume to normal playback.
Playing Repeatedly
Set point A
Set point B
Resumes normal playback.
AB
A
A-B
SHIFT
!
"
!
#
$
%
&
'
(
)
32
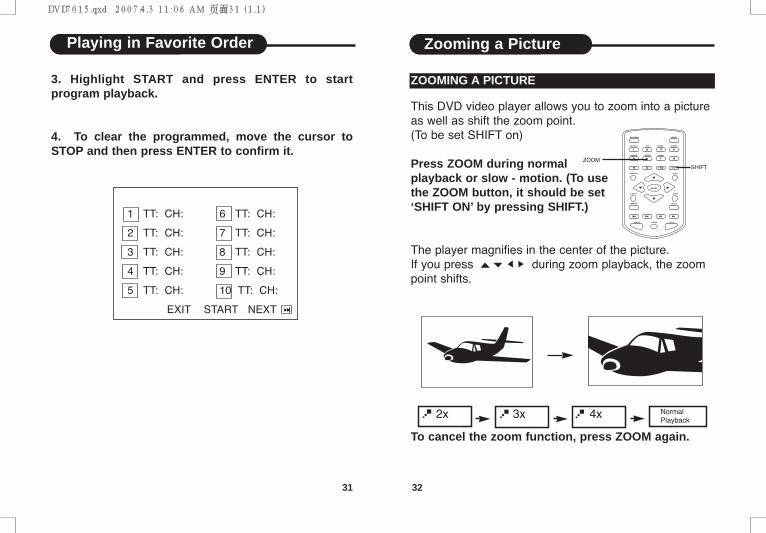
ZOOMING A PICTURE
Zooming a Picture
This DVD video player allows you to zoom into a pictureas well as shift the zoom point.(To be set SHIFT on)
Press ZOOM during normalplayback or slow - motion. (To usethe ZOOM button, it should be set‘SHIFT ON’ by pressing SHIFT.)
The player magnifies in the center of the picture.If you press during zoom playback, the zoompoint shifts.
To cancel the zoom function, press ZOOM again.
2x 3x 4x NormalPlayback
31
3. Highlight START and press ENTER to startprogram playback.
4. To clear the programmed, move the cursor toSTOP and then press ENTER to confirm it.
Playing in Favorite Order
1 TT: CH: 6 TT: CH:
2 TT: CH: 7 TT: CH:
3 TT: CH: 8 TT: CH:
4 TT: CH: 9 TT: CH:
5 TT: CH: 10 TT: CH:
EXIT START NEXT
ZOOMSHIFT
!
"
!
#
$
%
&
'
(
$
)

34
Using the On-Screen Display
THIS UNIT ALLOWS YOU TO VIEW THEOPERATIONAL STATUS AND DISC INFORMATION ONYOUR TV SCREEN.
CHECKING THE OPERATIONAL STATUS
Title ElapsedTT 01/12 CH 006/039 0:02:20
Chapter ElapsedTT 01/12 CH 006/039 0:03:50
Chapter RemainTT 01/12 CH 006/039 0:10:40
Current Title
Total Title
Current Chapter
Total Chapter
Title RemainTT 01/12 CH 006/039 0:18:50
Display Off
With this function you can view on your TV the following:-Current title-Track number-Total playing time
Playing time
Press the DISPLAYduring playback toturn on the ONSCREEN DISPLAYPress it again to turn itoff.
33
Selecting Subtitles
HOW TO DISPLAY SUBTITLES
You have the option to select a preferred subtitlefrom those included on the DVD video disc.
Press the SUB-T buttonduring playback.
1/03
2/03SUBTITLE 2
3/03SUBTITLE 3
SUBTITLE OFF
SUBTITLE 1
Press the SUB-T buttonduring playback until thesubtitles disappears.
SUBTITLE OFF
To TURN OFF the subtitles.
SUB-T
DISPLAY
!
"
!
#
$
%
&
'
(
$
$
)

36
YOU CAN USE THE PARENTAL LOCK FUNCTIONONLY WITH DVD VIDEO DISCS EQUIPPED WITH THEPARENTAL LOCK FEATURE.
SETTING THE PARENTAL LOCKDVD video discs equipped with the parental lock functionare rated according to their content. The contents allowedby a parental lock level and the way a DVD video disc canbe controlled may vary from disc to disc. For example, if thedisc allowed, you could edit out violent scenes unsuitable forchildren and replace them with more suitable scenes, orlock out playback of the disc all together.
Setting the Parental Lock
1. Press STOP twice duringplayback
2. Press SETUPThe SETUP MENU appearson the screen.
3. Select Preference Page,press ENTER.
PreferenceVideoDolbyAudioGeneral
-- Preference Page --TV Type NTSCAudio EngSubtitle OffDisc Menu EngParentalPasswordDefault
Go To Preference Page
35
If the DVD video disc was recorded with multiple angles,you have the option to change the camera angle of thescene you are watching.
Method 1 At 'play' mode, press 'shift' on remote control, press ANGLE button, then press NUMBER key 1,2,3,4 to change the desired angle.
Method 2 At 'play' mode, press 'shif' on remote control, press ANGLE button, then press SHIFT key, press ANGLE key to select the desired angle.
Selecting the Camera Angle
THIS DVD VIDEO PLAYER ALLOWS YOU TO SELECTFROM SEVERAL DIFFERENT ANGLES.
ANGLE 1 ANGLE 2
HOW TO CHANGE THE CAMERA ANGLE
• The angle function will not work on DVD video discsthat does not contains recorded with multiple angles.
2/2
1/2!
ANGLE
STOP
DIRECTION
SETUP
!
"
!
#
$
%
&
'
(
$
)

38
Rechargeable Battery Installation & Use
37
4. Select Parental.
5. Select ratings, press ENTER
6. Enter your password then press ENTER.The pre-set password is 3308
7. Press SETUP to exit setup, press ENTER to start.
Setting the Parental Lock
TO CHANGE YOUR PASSWORD:
1. Follow step 3 to select password change.2. Enter old password.3. Enter new password.4. Re-enter to confirm your new password.5. Press ENTER.6. Press SETUP to exit.
1 Kid Safe2 G3 PG4 PG-135 PG-R6 R7 NC-178 Adult
Password
OK
STOP
DIRECTION
SETUP
INSTALLING & REMOVING THE BATTERY PACK
USE AND MAINTENANCE
1. Make sure the unit is powered off andunplugged.2. Attach the battery pack to theoutlet of the unit as illustration 1,and align them with each other tillyou hear a click sound as illustration 2.
Removing the Battery Pack1. Make sure the unit is powered off andunplugged.2. Pull the battery pack as arrowhead 3while sliding the latch as 4 (at the bottomof the unit).
1
2
34
This unit is supplied with a highly-effective rechargeable battery(Li-Polymer). Such a battery pack has a high storage capacityand low level of degradation. The latter means that the batterycan also be recharged when only partially spent.
Plug the AC adapter into the battery.Please fully charge the battery priorto first use.
Charging indicator
AC Adapter/charge input
!
"
!
#
$
%
&
'
(
$
)

40
Rechargeable Battery Installation & Use
39
Rechargeable Battery Installation & Use
Never recharge the battery which is already fully charged.For the longterm using of customer, when fully charged inthe 2. mode, make sure unplug the AC/DC adapter from theDVD player first, then disconnect the battery from the unit.
Under no circumstance should you short out the battery, store itin a metal container, or leave it in a humid or damp environment.Store the battery in an airtight container if possible. Rechargeeffectiveness will degrade when environmental temperaturesdrop below 10 ºC or exceed 35 ºC.
Do not use car adapter for battery recharging.!
CHARGING THE BATTERY PACKThe battery pack can be charged in two ways:
1. Charge the battery directly.2. Charge the battery while it is connected to the DVD player.
1. To charge the battery pack directly, connect the AC/DCadapter to the DC IN jack on the left side of the battery pack.Connect the power plug into the outlet .
The battery pack charge indicator will turn red and the batterypack will start to charge.
When the battery pack is fully charged, the battery pack chargeindicator will turn green.
2. To charge the battery pack while it is connected to the DVDplayer, make sure the POWER OFF of DVD player. Connect theAC/DC adapter to the DC IN jack on the left side of the DVDplayer or battery. Connect the power plug into the outlet.
The provided battery can be recharged for about 300 times. Ittakes about 7 hours to recharge the battery, then the red indicatorwill change from red to green when it is full. Please continuerecharging it for about 1hours. A fully charged battery can powerthe unit for about 2 hours. And it depends on the operations ofthe player such as brightness of the screen, volume level, etc.
Recharge the battery in time when fully spent in order tomaximize its life.
!
"
!
#
$
%
&
'
(
$
)
42
Customizing the Function Settings
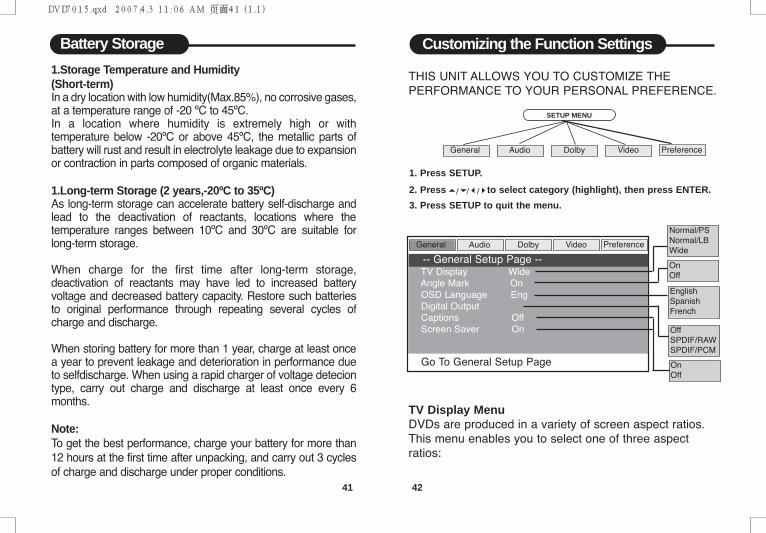
THIS UNIT ALLOWS YOU TO CUSTOMIZE THEPERFORMANCE TO YOUR PERSONAL PREFERENCE.
SETUP MENU
1. Press SETUP.
2. Press to select category (highlight), then press ENTER.
3. Press SETUP to quit the menu./ / /
TV Display MenuDVDs are produced in a variety of screen aspect ratios.This menu enables you to select one of three aspectratios:
PreferenceVideoDolbyAudioGeneral
-- General Setup Page --TV Display WideAngle Mark OnOSD Language EngDigital OutputCaptions OffScreen Saver On
Go To General Setup Page
PreferenceVideoDolbyAudioGeneral
Normal/PSNormal/LBWide
OnOff
EnglishSpanishFrench
OffSPDIF/RAWSPDIF/PCM
OnOff
41
Battery Storage
1.Storage Temperature and Humidity(Short-term) In a dry location with low humidity(Max.85%), no corrosive gases,at a temperature range of -20 ºC to 45ºC.In a location where humidity is extremely high or withtemperature below -20ºC or above 45ºC, the metallic parts ofbattery will rust and result in electrolyte leakage due to expansionor contraction in parts composed of organic materials.
1.Long-term Storage (2 years,-20ºC to 35ºC)As long-term storage can accelerate battery self-discharge andlead to the deactivation of reactants, locations where thetemperature ranges between 10ºC and 30ºC are suitable forlong-term storage.
When charge for the first time after long-term storage,deactivation of reactants may have led to increased batteryvoltage and decreased battery capacity. Restore such batteriesto original performance through repeating several cycles ofcharge and discharge.
When storing battery for more than 1 year, charge at least oncea year to prevent leakage and deterioration in performance dueto selfdischarge. When using a rapid charger of voltage deteciontype, carry out charge and discharge at least once every 6months.
Note:To get the best performance, charge your battery for more than12 hours at the first time after unpacking, and carry out 3 cyclesof charge and discharge under proper conditions.
!
"
!
#
$
%
&
'
(
)

44
Customizing the Function Settings
Angle MarkThe Angle Mark can be set On or Off. It must be set toOn to enable you to view the different camera angles ifthe DVD has this feature. On is the default setting.
On Screen Display Language (OSD Lang)The on screen display language can be set to any offour options shown below.Once a language is selectedthe menus will immediately change to that language.
SPDIF SetupThe Sony Philips Digital Interface options are Off, Rawor PCM.
RawRaw is an uncompressed digital bitstream, which isprocessed sequentially. The Dolby Digital Audiocontained on the disc, is passed directly to the amplifierthrough the digital coaxial output, without the need fordecoding. This is the default setting.
PCMPCM (Pulse Code Modulation) is an uncompressed
43
• Normal/PS• Normal/LB• Wide
Select the most appropriate aspect ratio for the DVDbeing viewed.
1. Normal/PSNormal Pan and Scan is used for most normal televisionbroadcasts. It has an aspect ratio of 4:3. If you selectthis setting when viewing a DVD the picture will fill thescreen but, you will not see the left and right edges ofthe picture.
2. Normal/LBNormal Letter Box will show the DVD in its originalaspect ratio so depending on the size of your televisionscreen, you may see black borders above and below thepicture.
3. WideChoose this setting if you have a widescreen television.This is the default setting.
Customizing the Function Settings
!
"
!
#
$
%
&
'
(
$
)
46
Customizing the Function Settings
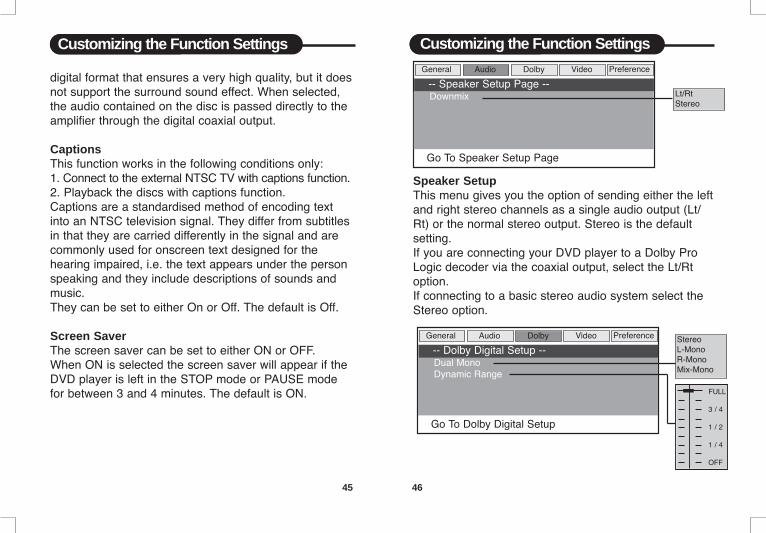
Speaker SetupThis menu gives you the option of sending either the leftand right stereo channels as a single audio output (Lt/Rt) or the normal stereo output. Stereo is the defaultsetting.If you are connecting your DVD player to a Dolby ProLogic decoder via the coaxial output, select the Lt/Rtoption.If connecting to a basic stereo audio system select theStereo option.
PreferenceVideoDolbyAudioGeneral
-- Speaker Setup Page --Downmix
Go To Speaker Setup Page
Lt/RtStereo
PreferenceVideoDolbyAudioGeneral
-- Dolby Digital Setup --Dual MonoDynamic Range
Go To Dolby Digital Setup
StereoL-MonoR-MonoMix-Mono
FULL
3 / 4
1 / 2
1 / 4
OFF
45
digital format that ensures a very high quality, but it doesnot support the surround sound effect. When selected,the audio contained on the disc is passed directly to theamplifier through the digital coaxial output.
CaptionsThis function works in the following conditions only:1. Connect to the external NTSC TV with captions function.2. Playback the discs with captions function.Captions are a standardised method of encoding textinto an NTSC television signal. They differ from subtitlesin that they are carried differently in the signal and arecommonly used for onscreen text designed for thehearing impaired, i.e. the text appears under the personspeaking and they include descriptions of sounds andmusic. They can be set to either On or Off. The default is Off.
Screen SaverThe screen saver can be set to either ON or OFF.When ON is selected the screen saver will appear if theDVD player is left in the STOP mode or PAUSE modefor between 3 and 4 minutes. The default is ON.
Customizing the Function Settings
!
"
!
#
$
%
&
'
(
)

48
Customizing the Function Settings
Video SetupSharpnessThe sharpness of the television picture can be set toHigh, Mid or Low. The default is Low.
BrightnessThe picture brightness can be adjusted as follows. SelectBrightness and press the right arrow button. This will displaya bargraph that indicates the brightness setting.Use the left and right arrows to adjust the brightness level. Itcan be set to + or - 20. The default is 0.
ContrastThe picture contrast can be adjusted as follows. SelectContrast and press the right arrow button. This will display abargraph that indicates the contrast setting.Use the left and right arrows to adjust the contrast level. It can be set to + or - 16. The default is 0.
Press the ENTER button to return to the Video SetupPage.
47
Dolby Digital SetupThe Dolby Digital options allow you to choose the waythe stereo signal is mixed.Dual MonoThe audio out description of these selections is shown inthe table on the next page. The default is Stereo.
MODE LEFT SPEAKER RIGHT SPEAKER
STEREO STEREO-L STEREO-R
L-MONO L-MONO L-MONO
R-MONO R-MONO R-MONO
MIX-MONO L-MONO + R-MONO L-MONO + R-MONO
DynamicThis function allows you to alter the dynamic rangecompression of the sound output. High volume outputs(gunfire, explosions) are softened enabling you to watchyour favourite movie without disturbing others. The default is Full.
Customizing the Function Settings
PreferenceVideoDolbyAudioGeneral
-- Video Setup Page --Sharpness LowBrightness 00Contrast 00
Go To Video Setup Page
HighMidLow
Brightness 0
Contrast 0
!
"
!
#
$
%
&
'
(
)

50
Customizing the Function Settings
to view the subtitles.The default is Off.
If you want to see and change the subtitle whileplayback, you can control by SUB-T button on Remotecontrol unit.
Note:Depends on the disc which does not have linked-upinformation, the subtitle may not work properly.
Disc MenuThe Disc Menu enables you to select the language usedfor the menus presented on the DVD.There are eight languages presented on the menu.The default is English.
ParentalThis facility enables you to set a content level abovewhich DVDs will not play. There are eight levels, thelowest being "Kid Safe" then increasing in level to"Adult". For example if you set a level of "PG-13", anyDVDs rated "Pgr" and above will not play. There is alsoan option to turn the parental control function off.When you navigate to highlight the required level andselect by pressing the ENTER button you will be askedfor a password.Enter the four digit password and press the ENTERbutton to set the parental control level. (The password isinitially set to "3308".) The default is ADULT.
49
Change
Reset
1 Kid Safe2 G3 PG4 PG-135 PG-R6 R7 NC-178 Adult
Preferences PagePress STOP twice while playback
AudioThe audio menu enables you to select thelanguage used for the audio output.There are eight languages as shown in themenu opposite. The default is English.
SubtitleThe subtitle menu enables you to select thelanguageused for the subtitles of the DVD playback.There are eight languages presented on themenu plus an Off option if you do not want
EnglishFrenchSpanishChineseJapaneseKoreanRussianGermanOthers
Customizing the Function Settings
PreferenceVideoDolbyAudioGeneral
-- Preference Page --TV Type NTSCAudio EngSubtitle OffDisc Menu EngParentalPasswordDefault
Go To Preference Page
PALNTSC
EnglishFrenchSpanishChineseJapaneseKoreanRussianGermanOffOthers
!
"
!
#
$
%
&
'
(
)

52
Specifications
DVD VIDEO PLAYER/OUTPUTS
AC Adapter Power supply 110-240V AC 50/60Hz
Power consumption 9W
Weight 2.0 kg
External dimensions 204x 38 x 162mm (W/H/D)
Signal system NTSC/PAL
Laser emiconductor laser, wavelength 650 nm
DVD VIDEO PLAYER
OUTPUTS
Video output 1.0 V (p-p), 75 Ω, negative sync., pin jack x 1
Audio output 0.5 V (p-p), 75 Ω, pin jack x 1(digital audio)
Audio output 2.0 V (rms), 10KΩ, pin jack(L,R) x 1(analog audio)
51
PasswordThis menu enables you to change the four digitpassword that is used to set the parental control.Navigate to highlight the change option and press theENTER button. The password change menu will bedisplayed with the first field selected.Enter the existing (old) password. This is initially set to"3308". The next field will be selected.Enter a new four digit password. The next field will beselected.Confirm the password change by entering the newpassword again then press the ENTER button.
DefaultThis menu enables you to reset the functions of theDVD player to the initial factory settings.Select Reset and press the ENTER button.
Customizing the Function Settings
!
"
!
#
$
%
&
'
(
)

53
Trouble Shooting Guide
Symptom
No power
No picture/sound
Rolling b/w picture
Black & Whitepicture
The player does notstart playback
Correction
• Connect the power plug into the power portsecurely.
• Check wether the A/V cables have beenconnected righttly.
• If playback through a TV, verify theconnection between them: audio cable, videocable or S video cable.
• Adjust the vertical hold on your TV.
• Damaged S conector (bent pin).
• Insert a playable disc. (Check the disc typeand color system).
• Place the disc with the playback side downand correctly inside the guide.
• Clean the disc.
• Cancel the parental lock function or changethe parental lock level. (The Pre-set passwordis 3308.)
• Reset the portable DVD player.
!
"
!
#
$
%
&
'
(
$
)

GKB3.833.8558SS-ENG-R