user manual tithermobasic - bticino€¦ · user manual tithermobasic software for the...
TRANSCRIPT
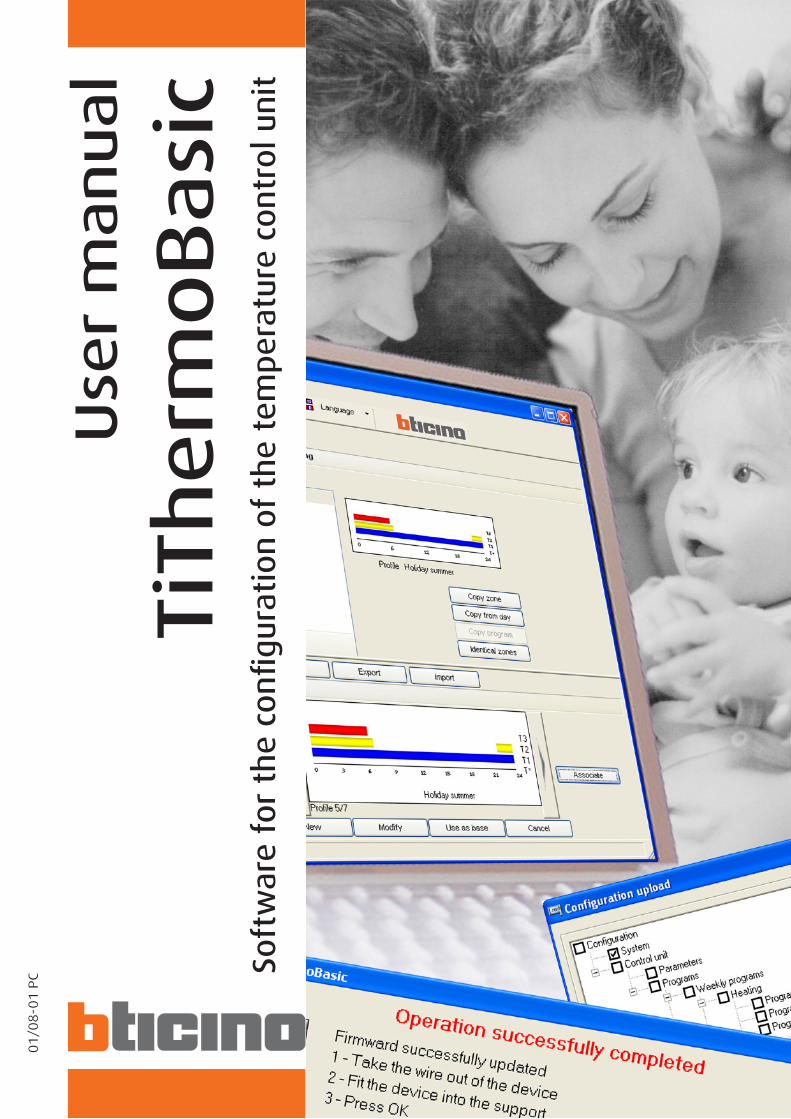
Use
r m
an
ual
TiTh
erm
oB
asi
cSo
ftw
are
for
the
con
fig
urat
ion
of
the
tem
per
atur
e co
ntr
ol u
nit
01/0
8-0
1 P
C


�
CONTENTS
1. General description Page 4
2. Minimum system requirements Page 4
3. Selection of functions Page 5
4. Work area Page 7 4.1 Window “System” Page 7
4.2 “Control Unit” Window Page 10
4.� “Library profiles” Window Page 11
5. Example of a project Page 16 5.1 System configuration Page 17
5.2 Configuration of Weekly programs Page 20
5.� Configuration of Holiday program Page 24
6. Connecting to the Control Unit Page 25
7. Functions enabled while connecting Page 27 7.1 Upload Page 27
7.2 Download Page 28
7.� Compare Page �0
7.4 Diagnosis Page �0
8. Firmware update Page 31

TiThermoBasic 4
TiThermoBasic is a tool which lets you create or modify, through a simple and in-tuitive graphical user interface, the configuration to be transferred to the tempe-rature control unit, thereby defining and customising the parameters linked to the temperature control system as well as the profiles of the different operational pro-grammes.
The software can also update the firmware of the unit with a special function.
2.Minimumsystemrequirements
Hardwarerequirements
• Personal Computer with Pentium processor 400MHz or higher
• CD-ROM drive
• SVGA graphics card with resolution 800x600
• RAM 128 Mb
Softwarerequirements
• Windows 2000 / XP
• Internet Explorer ver. 5.5 or higher
1.General description

5
3.Selectionoffunctions
The main functions that can be executed with TiThermoBasic can be selected by using the icons in the toolbar or by opening drop-down menus, thus selecting the various options. Some functions are available only after making a connection between the PC and the Control Unit.
Creates a new project
Opens an existing project
Saves the current project
Disables connection to Control Unit
Loads the configuration present in the Control Unit (*)
Downloads the configuration created in the Control Unit (*)
Downloads the Firmware update in the Control Unit
Executes the diagnosis procedure of the Control Unit (*)
Toolbar
The followings functions are included in the toolbar:
Drop-down menuConnection to the BTicino website
Selection of language
Selection of PC serial port
Executes connection to the Control Unit
Drop-downmenu
The followings functions are included in the drop-down menus:
“File”menu
• New creates a new project
• Open opens an existing project
• Save saves the current project
• Save as... saves the project after requesting a file name
• Quit exits the program
(*) Functions enabled only if a connection to the temperature control unit has been enabled
Functions enabled only when connected
to the Unit
TiThermoBasic 6
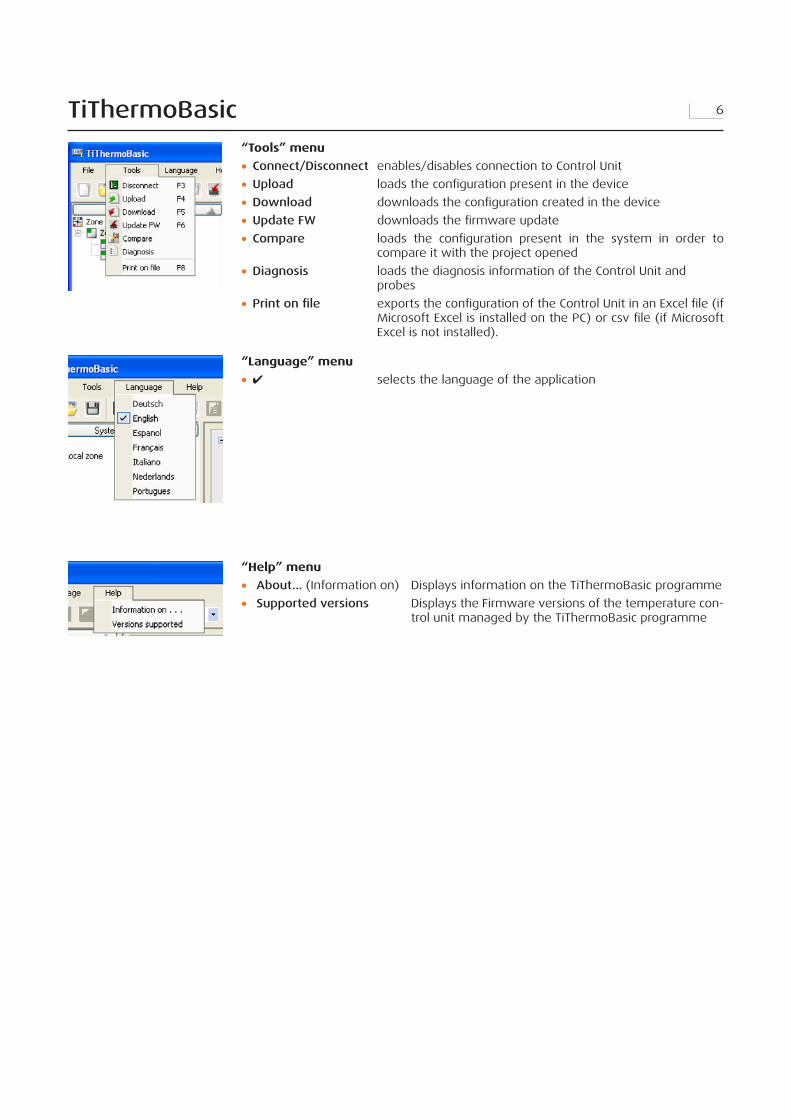
“Language”menu
• ✔ selects the language of the application
“Help”menu
• About... (Information on) Displays information on the TiThermoBasic programme
• Supported versions Displays the Firmware versions of the temperature con-trol unit managed by the TiThermoBasic programme
“Tools”menu
• Connect/Disconnect enables/disables connection to Control Unit
• Upload loads the configuration present in the device
• Download downloads the configuration created in the device
• Update FW downloads the firmware update
• Compare loads the configuration present in the system in order to compare it with the project opened
• Diagnosis loads the diagnosis information of the Control Unit and probes
• Print on file exports the configuration of the Control Unit in an Excel file (if Microsoft Excel is installed on the PC) or csv file (if Microsoft Excel is not installed).
7
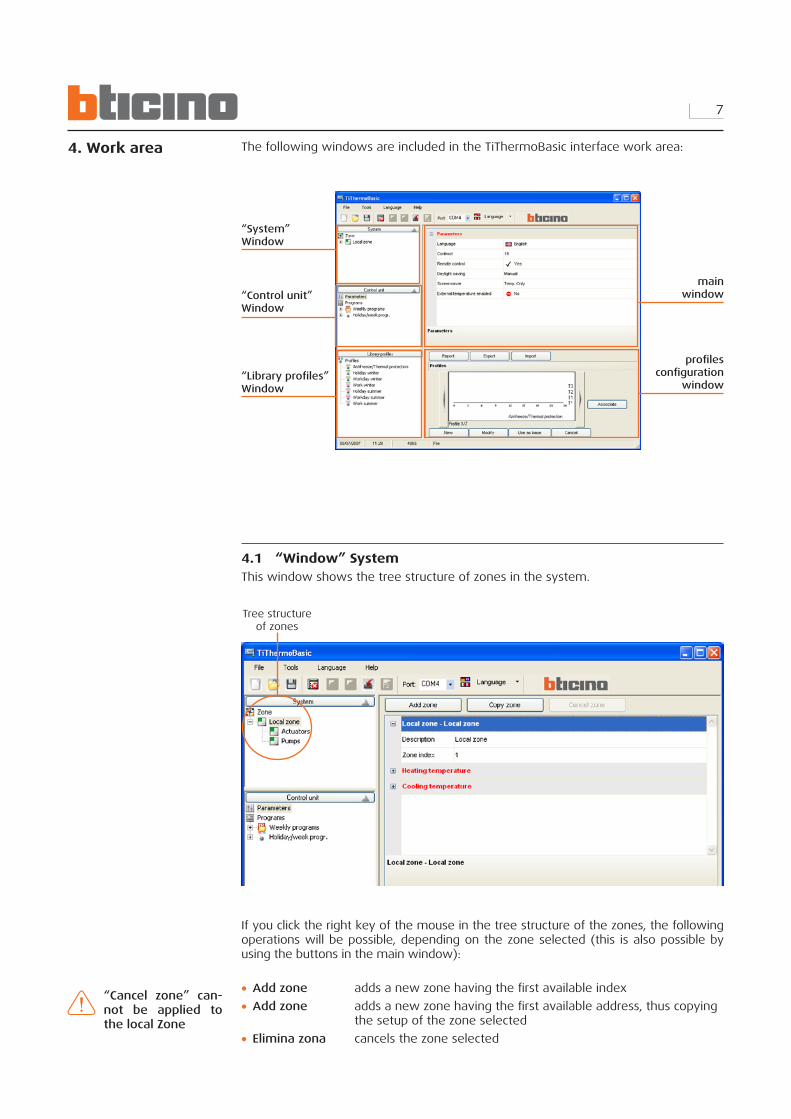
4.Workarea The following windows are included in the TiThermoBasic interface work area:
4.1 “Window”SystemThis window shows the tree structure of zones in the system.
“System” Window
“Control unit” Window
“Library profiles” Window
profiles configuration
window
main window
Tree structure of zones
“Cancel zone” can-not be applied to the local Zone
• Add zone adds a new zone having the first available index
• Add zone adds a new zone having the first available address, thus copying the setup of the zone selected
• Elimina zona cancels the zone selected
If you click the right key of the mouse in the tree structure of the zones, the following operations will be possible, depending on the zone selected (this is also possible by using the buttons in the main window):
TiThermoBasic 8
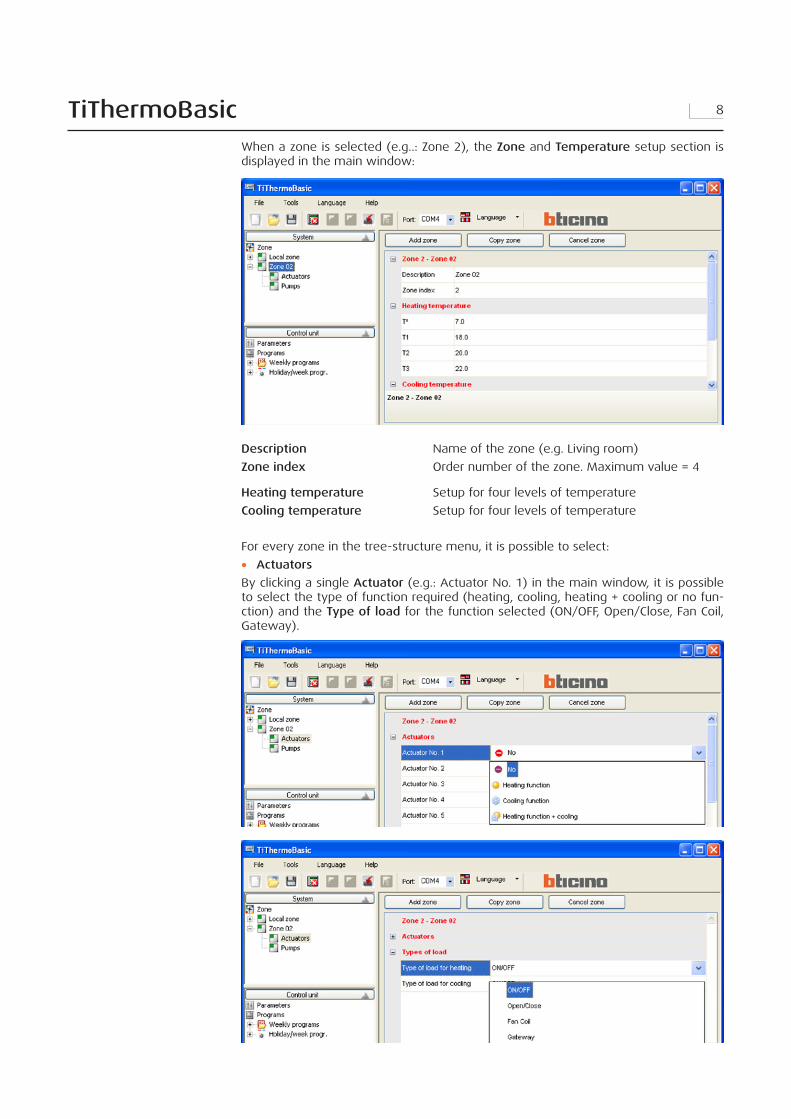
When a zone is selected (e.g..: Zone 2), the Zone and Temperature setup section is displayed in the main window:
For every zone in the tree-structure menu, it is possible to select:
• Actuators
By clicking a single Actuator (e.g.: Actuator No. 1) in the main window, it is possible to select the type of function required (heating, cooling, heating + cooling or no fun-ction) and the Type of load for the function selected (ON/OFF, Open/Close, Fan Coil, Gateway).
Description Name of the zone (e.g. Living room)
Zone index Order number of the zone. Maximum value = 4
Heating temperature Setup for four levels of temperature
Cooling temperature Setup for four levels of temperature

�
• Pumps
By clicking a single Pump (e.g.: Pump No. 1), it is possible to select the type of function required (heating, cooling, heating + cooling or no function) and the Activation Delays.
TiThermoBasic 10
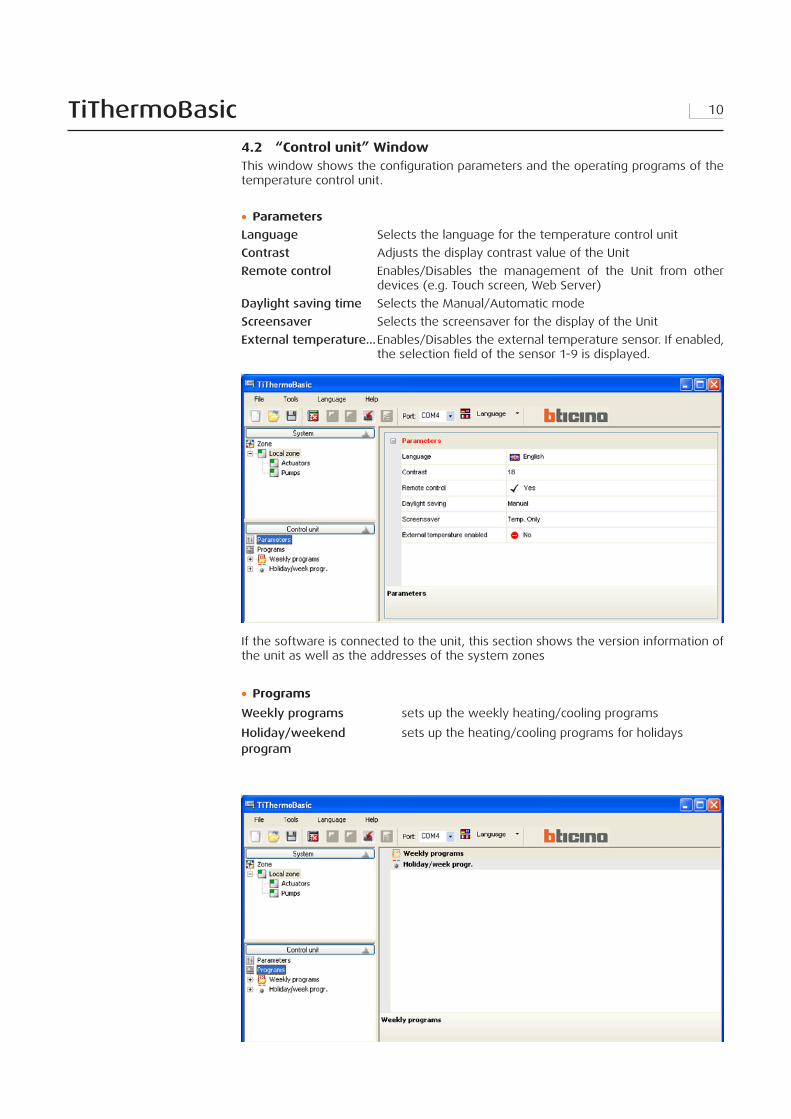
• Programs
Weekly programs sets up the weekly heating/cooling programs
Holiday/weekend sets up the heating/cooling programs for holidaysprogram
4.2 “Controlunit”WindowThis window shows the configuration parameters and the operating programs of the temperature control unit.
• Parameters
Language Selects the language for the temperature control unit
Contrast Adjusts the display contrast value of the Unit
Remote control Enables/Disables the management of the Unit from other devices (e.g. Touch screen, Web Server)
Daylight saving time Selects the Manual/Automatic mode
Screensaver Selects the screensaver for the display of the Unit
External temperature... Enables/Disables the external temperature sensor. If enabled, the selection field of the sensor 1-� is displayed.
If the software is connected to the unit, this section shows the version information of the unit as well as the addresses of the system zones

11
TiThermoBasic auto-matically memorizes all the changes made to the profile Library. In order to reset the initial condition of the profile Library, it is necessary to re-install the software.
4.3 “Libraryprofiles”WindowThis window displays the profiles included in the software library.
When you select the Profiles node, a window on the right will be displayed. This will allow you to select and display all profiles included in the library.
• New
Adds a new profile to the library and starts the editing mode of the newly added profile.
• Modify
Starts the editing mode of the selected profile.
• Use as base
Adds a new profile to the library by using the currently selected profile as a base. Starts the editing mode of the newly added profile.
• Cancel
Removes the selected profile from the library. The profile will also be automatically eliminated from all the collections that are using it.
TiThermoBasic 12
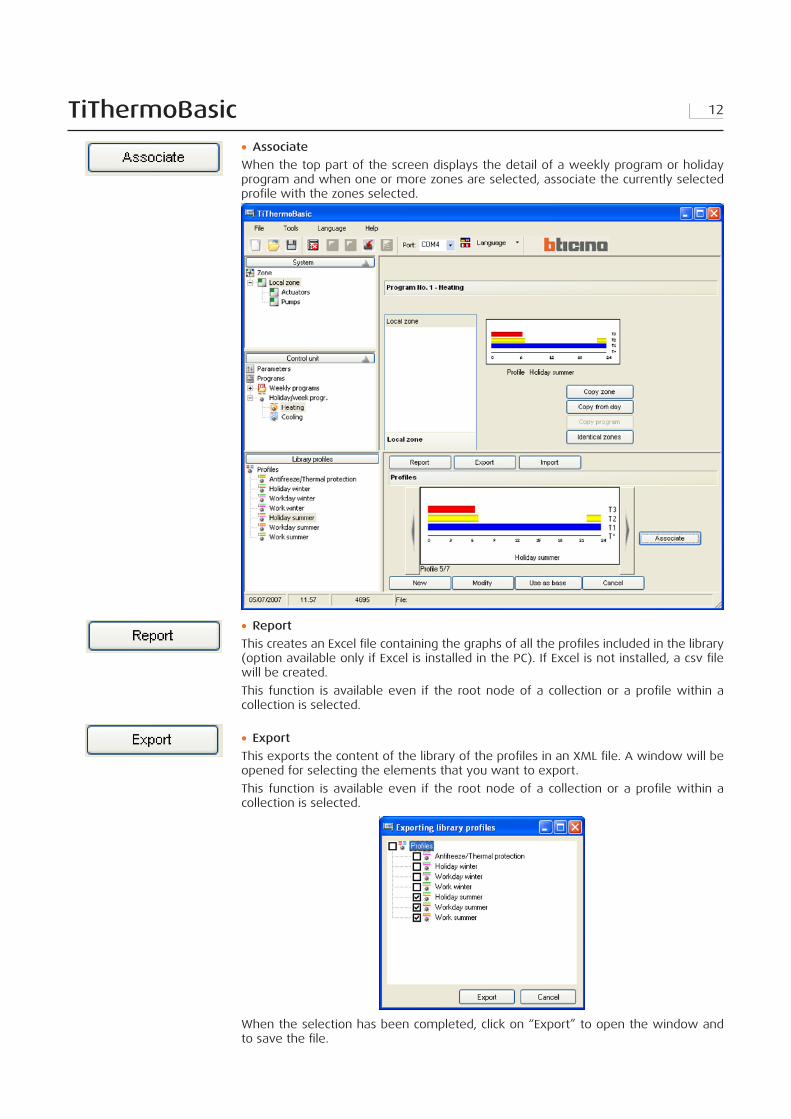
• Report
This creates an Excel file containing the graphs of all the profiles included in the library (option available only if Excel is installed in the PC). If Excel is not installed, a csv file will be created.
This function is available even if the root node of a collection or a profile within a collection is selected.
• Export
This exports the content of the library of the profiles in an XML file. A window will be opened for selecting the elements that you want to export.
This function is available even if the root node of a collection or a profile within a collection is selected.
When the selection has been completed, click on “Export” to open the window and to save the file.
• Associate
When the top part of the screen displays the detail of a weekly program or holiday program and when one or more zones are selected, associate the currently selected profile with the zones selected.

1�
• Import
This allows you to import the profiles and the collections from an external XML file.
A window will be opened in order to select the file to be imported, thus showing a list of the profiles and collections included in the file selected.
This function is available even if the root node of a collection or a profile within a collection is selected.
It is now possible to select the profiles to be imported.When the selection has been completed, click on “Import” to start the import process.The new profiles are added to the TiThermoBasic profiles library following a verification of the existence of an identical profile.If a profile identical to the profile being imported is found in the profiles library, you will be asked if the profile shall be imported anyway. If you answer “Yes”, the profile will be added to the library, otherwise the profile will be ignored.
TiThermoBasic 14
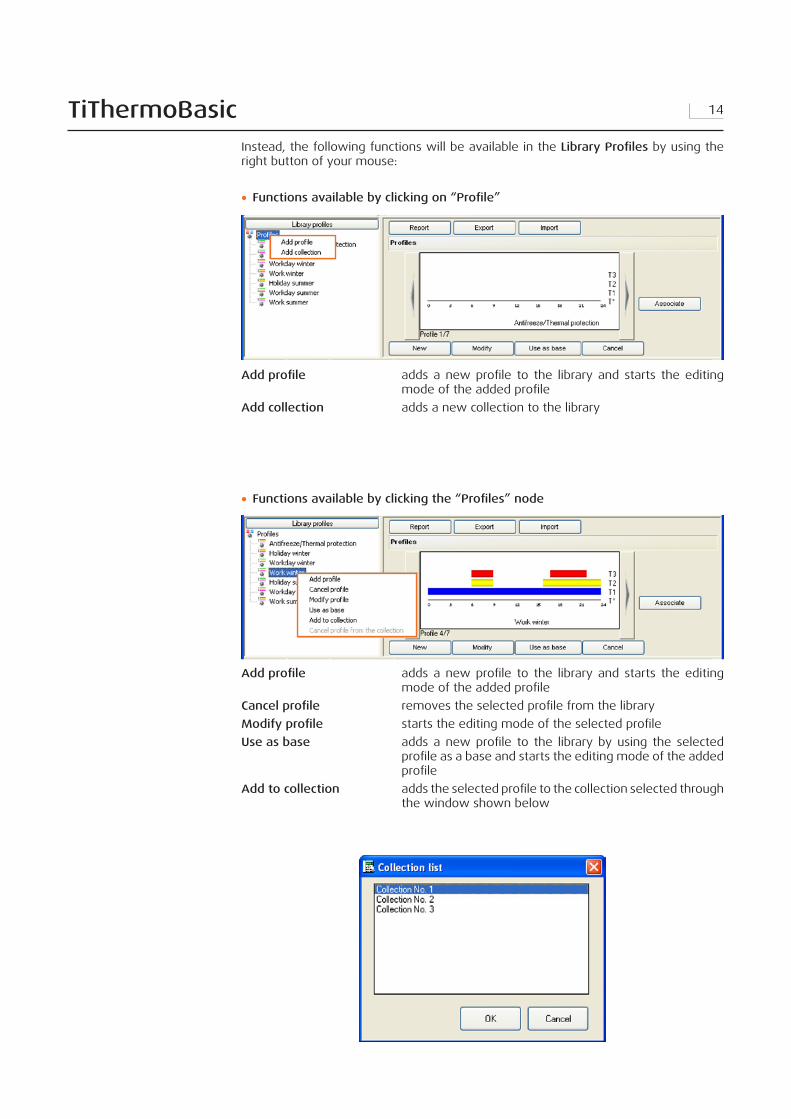
• Functions available by clicking the “Profiles” node
Add profile adds a new profile to the library and starts the editing mode of the added profile
Cancel profile removes the selected profile from the library
Modify profile starts the editing mode of the selected profile
Use as base adds a new profile to the library by using the selected profile as a base and starts the editing mode of the added profile
Add to collection adds the selected profile to the collection selected through the window shown below
Instead, the following functions will be available in the Library Profiles by using the right button of your mouse:
• Functions available by clicking on “Profile”
Add profile adds a new profile to the library and starts the editing mode of the added profile
Add collection adds a new collection to the library

15
• Functions available by clicking a Collection
Rename collection renames the collection selected
Cancel collection eliminates the collection selected
• Functions available by clicking a profile of a Collection
Add profile adds a new profile to the library and starts the editing mode of the added profile
Cancel profile removes the selected profile from the library
Modify profile starts the editing mode of the selected profile
Use as base adds a new profile to the library by using the selected profile as a base and starts the editing mode of the added profile
Cancel profile from collection eliminates the profile selected from the collection
TiThermoBasic 16
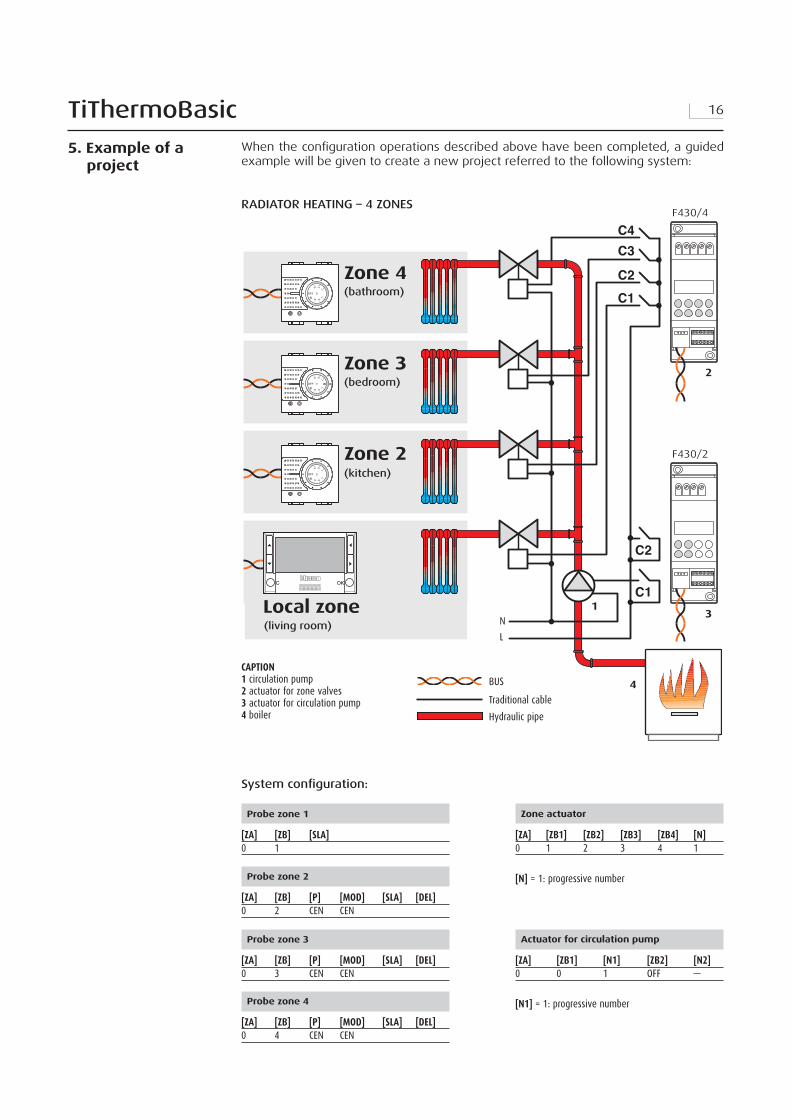
Probezone1
[ZA] [ZB] [SLA]0 1
Probezone2
[ZA] [ZB] [P] [MOD] [SLA] [DEL]0 2 CEN CEN
Probezone3
[ZA] [ZB] [P] [MOD] [SLA] [DEL]0 3 CEN CEN
Probezone4
[ZA] [ZB] [P] [MOD] [SLA] [DEL]0 4 CEN CEN
Zoneactuator
[ZA] [ZB1] [ZB2] [ZB3] [ZB4] [N]0 1 2 3 4 1
[N]=1:progressivenumber
Actuatorforcirculationpump
[ZA] [ZB1] [N1] [ZB2] [N2]0 0 1 OFF —
[N1]=1:progressivenumber
OKC
F4�0/4
F4�0/2
13
2
4
(bathroom)
(bedroom)
(kitchen)
(living room)
System configuration:
5.Exampleofaproject
When the configuration operations described above have been completed, a guided example will be given to create a new project referred to the following system:
RADIATOR HEATING – 4 ZONES
CAPTION1circulationpump2actuatorforzonevalves3actuatorforcirculationpump4boiler
BUS
Traditionalcable
Hydraulicpipe

17
5.1 SystemconfigurationWhen the programme is opened, the Local zone is by default present in the system window..
By selecting the local Zone, in the main window it will be possible to:
- assign a Description to the zone (e.g. Living room)- change the preset values of the Antifreeze temperature or Thermal protection levels
and the temperature levels T1, T2 and T� used in the weekly programmes.
Click Actuators in the tree structure of the Zones.

TiThermoBasic 18
In the main window, click Actuator No. 1 and select the Heating function.
Click on Type of load for heating and select ON/OFF.
Click Pumps in the System window.In the main window, click Pump No. 1 and assign the Heating function.

1�
Click on Heating delay to assign the activation delay of the pump.
After selecting the created zone (Zone 02), it will be possible to customize the description (e.g. Bathroom) and/or change the configuration.
To create a new zone with the same setup, click the “Copy zone” button.A new zone having the first available index will be created.

TiThermoBasic 20
5.2 ConfigurationofWeeklyprograms
It is possible to create up to three weekly programs for each operation mode of the system (Heating and Cooling). For each program it is possible to determine different temperature profiles (0h-24h) for every day and for every zone of the system.
To set up a weekly heating program:
- click Programs in the Control Unit window;- expand the Programs tree structure -> Weekly programs -> Heating;- select one of the three available programs (e.g.: Program 01).
In the main window, the list of the days of the week will be displayed.
- Select the day you want to configure (e.g. Monday);
The list of the configured zones within the project will be displayed.
- Select a zone (e.g. Living room) to display the associated profile.

21
Copy zone: copies the setup of the current zone to one or more zones.
A window will be opened to select the zones to which the setup of the selected zone shall be applied. It is possible to select several zones by using the Shift and Control keys.
The following actions are now possible:
Associate: associates a new profile with the day and with the zones selected.
- Select the required profile from among those included in the library profiles and click on the Associate button.
It is possible to associate the same profile with other zones by simply making a multiple selection (with the Shift and Control keys) within the list of the zones.

TiThermoBasic 22
Copy day: copies the setup of the current day to one or more days.
A window will appear for selecting the day.It is possible to select several days by using the Shift and Control keys.
Copy program: copies the setup of the current program to one or more weekly programs belonging to the same function (heating or cooling).
A window will be opened for selecting the programs.

2�
Display program: shows the synoptic panel of the profiles associated with each zone for each day of the week.
By clicking on the Export button, it will be possible to export the synoptic panel in graph mode into an xls file (if Excel is installed) or in text mode (if Excel is not installed).
The display may occur in graph mode by enabling “Display profiles graph”.
Identical zones: this indicates, in the list of the zones, which zones use the profile of the selected zone.

TiThermoBasic 24
5.3 ConfigurationofHolidayprogramUsing the same configuration logic described for the weekly Program, it is possible to create, for the selected mode (Heating or Cooling), a daily profile for each zone of the system.
CompletetheconfigurationandsavetheProject
In order to transfer the project to the temperature control unit Item 46�5, proceed as described in the following pages.

25
MAINTENANCE
Configure zones Diagnostic Probe setting System test
CONFIGURA ZONE 1:Zona 1 2:Zona 2 3:Zona 3
Rinomina
Rinomina
Attuatori
Pompe
Elimina
Azzera tutto
Apprendimento
Invia
AR
T. 3
559
Item 3559
6.ConnectingtotheControlUnit
In order to use specific functions (e.g.: Upload, Download, etc.), it is necessary to con-nect the PC where the TiThermoBasic software is installed to the Unit.
In order to activate the connection, perform the followingoperations in theordergiven:
• connect the programming cable, Item �55�, to the USB port of the PC
• From the Port drop-down menu, shown in the toolbar, select the serial port address of the PC you want to connect the Control Unit to (e.g..: COM4);
• select Connect from the Tools menu or from the toolbar
The following window will be given with the instructions on how to connect to the Unit.
Run the requested operations:
1)make sure that the Control Unit has acquired the system configuration
2) set the Control Unit to Maintenance mode
3) connect the programming cable to the device
4) press OK to continue
When the connection has been made, the following functions will be made available: Upload and Download configuration, Diagnostics, Firmware update.
If the port selected is not the one which the unit will actually connect to, this could cease to function during the next connection operations, hence it may require a RESET procedure
If the unit is connected before selecting “Con-nect”, this could cease to function, thereby re-quiring a RESET proce-dure

TiThermoBasic 26
If the procedure fails, the following message will be displayed:
If the Unit ceases to function during the connection procedure, it is necessary to perform the following RESET procedure:
1)Disconnect the programming cable from the Unit
2) Remove the batteries from their housing and then put them back in
3) Place the Unit on the base connected to the system
4) Run the system setup cycle
5) Repeat the connection activation procedure by following the order of the operations and, if required, by changing the selected com, if incorrect
In order to activate the connection, perform the followingoperations in theordergiven:
• select Connect from the Tools menu or from the toolbar
Here, too, a window will be given with the instructions on how to disconnect from the Control Unit:
Run the requested operations:
3) Remove the programming cable from the Unit
4) Press OK

27
7.Functionsenabledwhileconnecting
7.1 UploadThe Upload function enables you to transfer all or part of the configuration of the Control Unit to the project opened in TiThermoBasic.
• Select Upload from the Tools menu or from the toolbar
• Click the Upload button to start transferring.
A window will appear in which it is possible to select all or part of the configuration you want to transfer. The loaded setup will overwrite the ones corresponding to the current project.
By selecting a main node, the whole underlying tree structure will be automatically selected.

TiThermoBasic 28
A window will appear in which it is possible to set the date/time and select the parts of the project to be transferred to the Control Unit.
If the configuration of the project being downloaded does not coincide with the configuration of the system on the Control Unit, the following dialog box will be displayed:
7.2 DownloadThe Download function enables you to transfer all or part of the configuration of the project opened in TiThermoBasic.
• Select Download from the Tools menu or from the toolbar
• Click the Download button to start transferring.
it is possible to get details of the setup which is determining the incompatibility by clicking on Details;

2�
When the project has been downloaded, the following will be displayed CAUTION:
MAINTENANCE
Configure zones Diagnostic Probe setting System test
CONFIGURA ZONE 1:Zona 1 2:Zona 2 3:Zona 3
Rinomina
Rinomina
Attuatori
Pompe
Elimina
Azzera tutto
Apprendimento
Invia
CONFIGURE ZONES 1:Living room 2:Zone 2 3:Zone 3
Send
CONFIGURE ZONES 1:Living room 2:Zone 2 3:Zone 3
Send
Living room
Zone 3
or to use one of the three possible actions:
Force the configuration of the project will in any case be transferred the Unit
Align the configuration of the project will be aligned to that of the Control Unit
Cancel downloading will not be performed
Execute the following procedure to run the system properly.(see § x.x.x.x temperature control unit installation Manual Item 46�5)

TiThermoBasic �0
7.4 DiagnosisThe Diagnosis function enables you to verify the status of the single components for each zone.
• Select Diagnosis from the Tools menu or from the toolbar
7.3 CompareThe Compare function enables you to display the differences between the project configuration and the configuration in the system.
• Select Compare from the Tools menu.
The following window will appear:
In the following window, the status (check mark = normal; red circle = error) of the single components will be displayed for each zone of the system:
�1
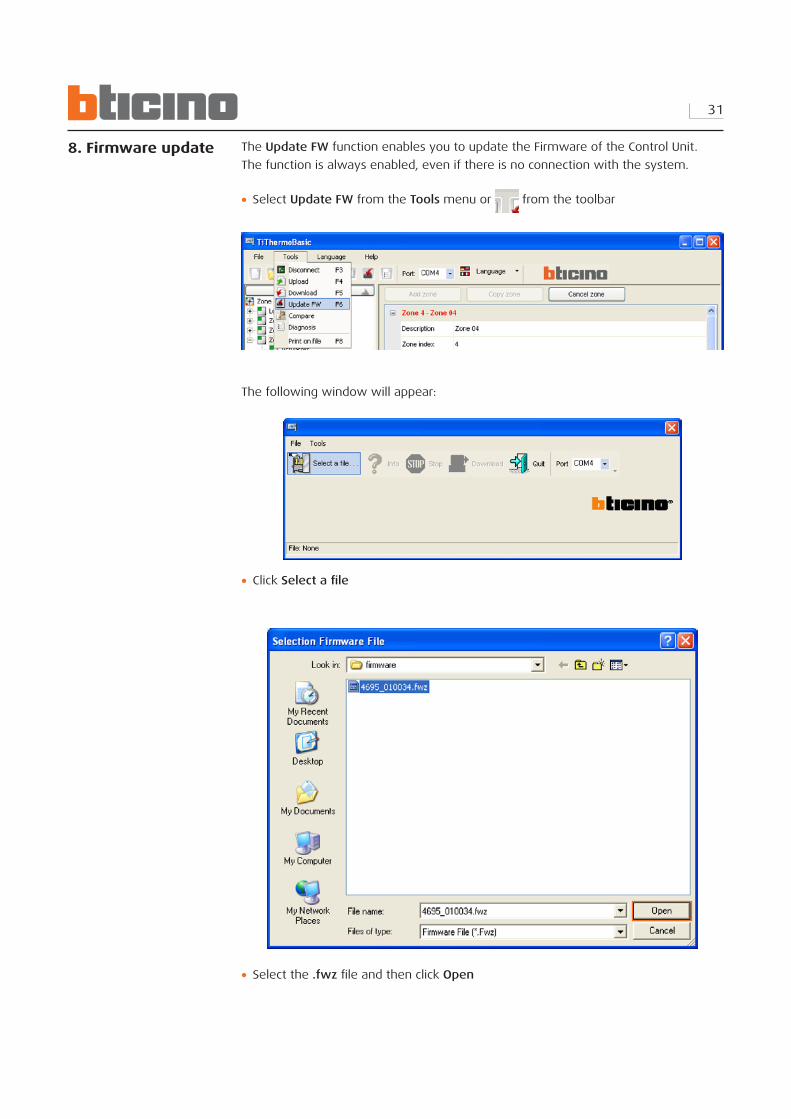
8.Firmwareupdate The Update FW function enables you to update the Firmware of the Control Unit.
The function is always enabled, even if there is no connection with the system.
• Select Update FW from the Tools menu or from the toolbar
The following window will appear:
• Select the .fwz file and then click Open
• Click Select a file

TiThermoBasic �2
Run the requested operations:
1) Set the Unit to Maintenance mode
2) Connect the programming cable to the device
3) press OK to continue
• Click Download to start updating the firmware
If the software does not detect the connection with the Unit, the following window will be given:
• Click Info to get information on the selected file

��
During the data transfer phase, the following window will appear; it is possible to interrupt the operation by selecting Stop.
When the update procedure has been completed, the following message will be di-splayed:
Run the requested operations:
1) Remove the programming cable from the Unit
2) Place the Unit into the support
3) Press OK

BTicino SpAVia Messina, �820154 Milano - Italywww.bticino.it
BTi
cino
SpA
rese
rves
at a
ny
tim
e t
he r
ight
to m
odif
y th
e c
onte
nts
of
this
bo
okl
et
and t
o c
om
munic
ate, i
n a
ny
form
and m
odal
ity,
the c
han
ges
bro
ught
to t
he s
ame.