user manual sartorius cubis series - labmakelaar€¦ · cubis msa user manual 3 notes on using...
TRANSCRIPT
User Manual
Sartorius Cubis Series
Electronic Semimicro, Micro, Precision and Analytical Balances
MSA Models

2 Cubis MSA User Manual
Contents
Contents
Notes on Using this Manual . . . . . . . . . . . . . . . . . . . . . . 3
Safety Instructions . . . . . . . . . . . . . . . . . . . . . . . . . . . . . 4
Intended Use. . . . . . . . . . . . . . . . . . . . . . . . . . . . . . . . 6
General View of the Equipment and Equipment Supplied 6
Getting Started . . . . . . . . . . . . . . . . . . . . . . . . . . . . . . . 9
Installation Instructions . . . . . . . . . . . . . . . . . . . . . . . . 17
Power Cord Receptacle . . . . . . . . . . . . . . . . . . . . . . . . 17
Anti-theft Locking Device . . . . . . . . . . . . . . . . . . . . . . 19
Preparing Below-Balance Weighing . . . . . . . . . . . . . . . 26
Moving the Balance . . . . . . . . . . . . . . . . . . . . . . . . . . 29
Using the Balance . . . . . . . . . . . . . . . . . . . . . . . . . . . . . 30
Turning the Balance On/Off . . . . . . . . . . . . . . . . . . . . 30
Operating Concept: Q-Guide . . . . . . . . . . . . . . . . . . . . 30
Using the Display and Control Unit . . . . . . . . . . . . . . . 31
Quick Guide: First Weighing . . . . . . . . . . . . . . . . . . . . 32
User Interface (Touch Screen) . . . . . . . . . . . . . . . . . . . 33
Using the Touch Screen . . . . . . . . . . . . . . . . . . . . . . . . 34
Activating/Switching Users . . . . . . . . . . . . . . . . . . . . . 36
System Settings (Menu) . . . . . . . . . . . . . . . . . . . . . . . . . . . . . 37
Leveling the Balance (Q-Level) . . . . . . . . . . . . . . . . . . . 38
Configuring Calibration/Adjustment . . . . . . . . . . . . . . 39
Timer-controlled Actions . . . . . . . . . . . . . . . . . . . . . . . 40
Displaying Device Information . . . . . . . . . . . . . . . . . . . 42
Alibi Memory . . . . . . . . . . . . . . . . . . . . . . . . . . . . . . . 43
Device Parameters . . . . . . . . . . . . . . . . . . . . . . . . . . . . 46
Task Management . . . . . . . . . . . . . . . . . . . . . . . . . . . . . 58
Importing Tasks . . . . . . . . . . . . . . . . . . . . . . . . . . . . . 58
Using Applications with the Factory Settings . . . . . . . . 59
Creating New Tasks (Configuration) . . . . . . . . . . . . . . . 59
Configuring a Printout . . . . . . . . . . . . . . . . . . . . . . . . 62
Combining Applications into One Task . . . . . . . . . . . . 68
Executing Tasks . . . . . . . . . . . . . . . . . . . . . . . . . . . . . 69
Weighing . . . . . . . . . . . . . . . . . . . . . . . . . . . . . . . . . . . . 70
Mass Unit Conversion . . . . . . . . . . . . . . . . . . . . . . . . . . . 71
Minimum Sample Quantity SQmin . . . . . . . . . . . . . . . . . 74
Individual Identifiers . . . . . . . . . . . . . . . . . . . . . . . . . . . 76
Density Determination . . . . . . . . . . . . . . . . . . . . . . . . . . 79
Statistics . . . . . . . . . . . . . . . . . . . . . . . . . . . . . . . . . . . . 84
Calculation . . . . . . . . . . . . . . . . . . . . . . . . . . . . . . . . . . . 87
Examples of Calculation Formulas . . . . . . . . . . . . . . . . 90
Diameter Determination . . . . . . . . . . . . . . . . . . . . . . . 90
Diameter Determination for Cylindrical Bodies . . . . . . . 92Air Buoyancy Correction . . . . . . . . . . . . . . . . . . . . . . . 92
Averaging . . . . . . . . . . . . . . . . . . . . . . . . . . . . . . . . . . . . 95
Formulation . . . . . . . . . . . . . . . . . . . . . . . . . . . . . . . . . 100
Weighing in Percent . . . . . . . . . . . . . . . . . . . . . . . . . . . 104
Timer-controlled Functions . . . . . . . . . . . . . . . . . . . . . 107
Totalizing . . . . . . . . . . . . . . . . . . . . . . . . . . . . . . . . . . . 109
DKD Measurement Uncertainty . . . . . . . . . . . . . . . . . . 111
Second Tare Memory (Preset Tare) . . . . . . . . . . . . . . . . 113
Parts Counting . . . . . . . . . . . . . . . . . . . . . . . . . . . . . . . 115
Checkweighing . . . . . . . . . . . . . . . . . . . . . . . . . . . . . . . 119
Importing/Exporting Data . . . . . . . . . . . . . . . . . . . . . . 123
Calibration and Adjustment . . . . . . . . . . . . . . . . . . . . . 126
Calibration/Adjustment Using Internal Check Weight . 126
Calibration/Adjustment Using External Check Weight . 127
User Management . . . . . . . . . . . . . . . . . . . . . . . . . . . . 129
User Management . . . . . . . . . . . . . . . . . . . . . . . . . . . 129
Creating User Profiles . . . . . . . . . . . . . . . . . . . . . . . . 129
Activating Users . . . . . . . . . . . . . . . . . . . . . . . . . . . . 132
Editing User Profiles . . . . . . . . . . . . . . . . . . . . . . . . . 133
Interfaces . . . . . . . . . . . . . . . . . . . . . . . . . . . . . . . . . . . 135
USB Port (PC) . . . . . . . . . . . . . . . . . . . . . . . . . . . . . . 136
PS2 Interfaces for Barcode Scanner or Keyboard . . . . 137
Interfaces (RS-232) 25-pin and 9-pin . . . . . . . . . . . . 138
Configuring Serial Ports . . . . . . . . . . . . . . . . . . . . . . 141
Bluetooth® Interface (COM C, Optional) . . . . . . . . . . . 144
Network Interface (Ethernet) . . . . . . . . . . . . . . . . . . . 146
Data Output . . . . . . . . . . . . . . . . . . . . . . . . . . . . . . . 151
Data Input . . . . . . . . . . . . . . . . . . . . . . . . . . . . . . . . 156
Updating the Software . . . . . . . . . . . . . . . . . . . . . . . . . 160
Error and Status Messages . . . . . . . . . . . . . . . . . . . . . . 162
GPL License . . . . . . . . . . . . . . . . . . . . . . . . . . . . . . . . . 163
Care and Maintenance . . . . . . . . . . . . . . . . . . . . . . . . . 164
Packing the Balance for Shipment . . . . . . . . . . . . . . . 167
Disposal . . . . . . . . . . . . . . . . . . . . . . . . . . . . . . . . . . . . 172
Specifications . . . . . . . . . . . . . . . . . . . . . . . . . . . . . . . . 173
Balance Dimensions . . . . . . . . . . . . . . . . . . . . . . . . . . . 186
Accessories . . . . . . . . . . . . . . . . . . . . . . . . . . . . . . . . . . 194
Declaration of Conformity . . . . . . . . . . . . . . . . . . . . . . 196
EC Type-Approval Certificate . . . . . . . . . . . . . . . . . . . . 200
Plates and Markings . . . . . . . . . . . . . . . . . . . . . . . . . . . 201
Cubis MSA User Manual 3
Notes on Using this Manual
Notes on Using this Manualt Please read this entire manual carefully and completely before using the device.
t Read the safety precautions carefully.
t This manual is part of the product. Keep it in a safe and easily accessible location.t If the manual should be lost or misplaced, please contact Sartorius for
a replacement or download the latest manual from our website:
www.sartorius.com
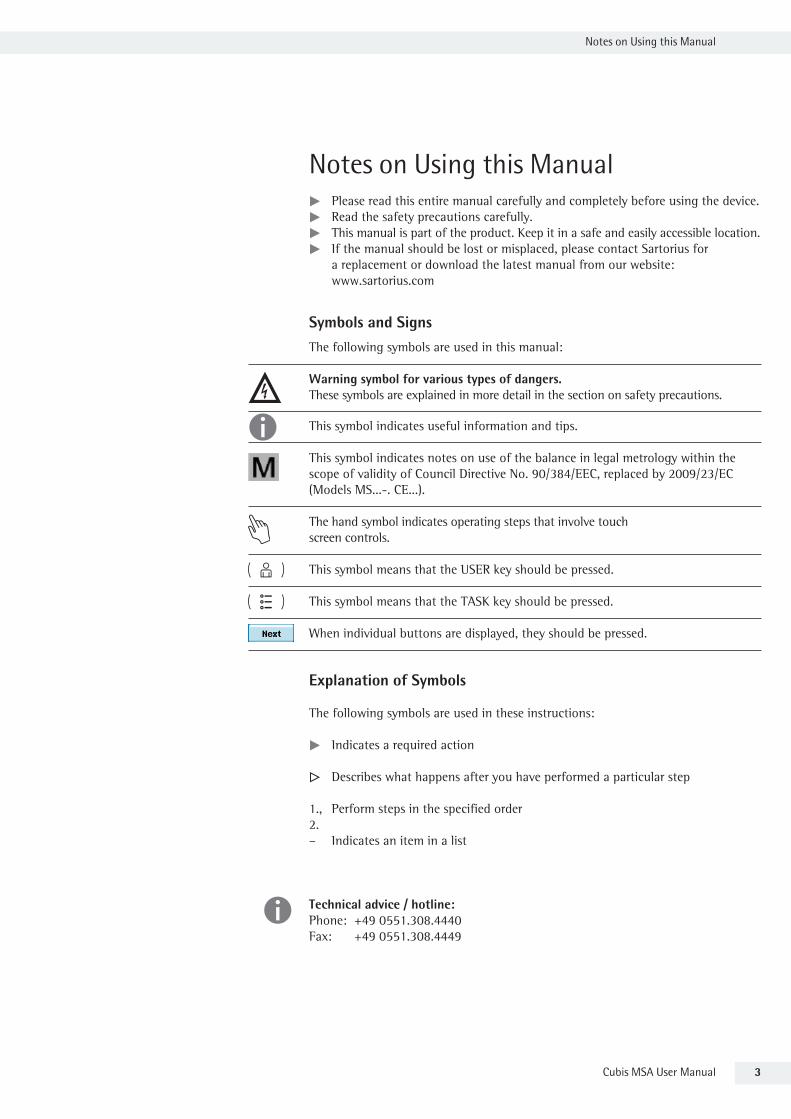
Symbols and Signs
The following symbols are used in this manual:
2 Warning symbol for various types of dangers. These symbols are explained in more detail in the section on safety precautions.
h This symbol indicates useful information and tips.
This symbol indicates notes on use of the balance in legal metrology within the
scope of validity of Council Directive No. 90/384/EEC, replaced by 2009/23/EC
(Models MS...-. CE...).
The hand symbol indicates operating steps that involve touch
screen controls.
H This symbol means that the USER key should be pressed.
D This symbol means that the TASK key should be pressed.
When individual buttons are displayed, they should be pressed.
Explanation of Symbols
The following symbols are used in these instructions:
t Indicates a required action
y Describes what happens after you have performed a particular step
1., Perform steps in the specified order2.
– Indicates an item in a list
h Technical advice / hotline:Phone: +49 0551.308.4440
Fax: +49 0551.308.4449

4 Cubis MSA User Manual
Safety Precautions
Safety PrecautionsThis device complies with European Council Directives as well as international regulations and standards for electrical
equipment, electromagnetic compatibility, and the stipulated safety requirements. Improper use or handling can,
however, result in damage and/or injury.This device should only be operated by trained personnel.
Operators must read these installation instructions, particularly the safety information, and must be familiar with the operation of the equipment. The operator is required to supplement these safety precautions as appropriate. The
operating personnel must be provided with the appropriate training.
The requirements pertaining to applicable installation regulations must be followed when using electrical equipment
in systems and environmental conditions with increased safety requirements. Relevant laws, standards, regulations,
guidelines and environmental protection laws valid in your country must be observed.
Always keep the equipment and balance freely accessible. Any installation work or balance operation that does not
conform to the instructions will result in forfeiture of all claims under the manufacturer’s warranty.
Danger of Explosion!
1 Do not use this equipment in hazardous areas in which explosive materials are present.
Danger of Electrical Shock!
If the device is not used in accordance with the instructions, this can affect the product liability for the device.
2 Make sure that the voltage rating printed on the AC adapter is identical to your local line voltage. The wall outlet must have a protective grounding conductor. The operating instructions included with the AC adapter must be
followed.
2 Do not switch on the equipment if the AC adapter or power cord are damaged.
If the balance itself, the AC adapter or any cables on the balance are damaged, disconnect the equipment from the
power supply and secure it so that it cannot be turned on.
2 Chemicals (e.g., gases or liquids) that can corrode and damage the inside or outside of the balance, AC adapter,
power cable or peripherals must be kept away from the equipment.
2 Do not operate the balance unless the housing and the display are undamaged and the housing is closed so that inadvertent contact with parts inside the equipment is not possible. Make sure that no liquids penetrate the balance
and do not allow conductive parts to touch the balance.
2 Note on Installation:
The operator shall be solely responsible for any modifications to the equipment and for connecting any cables or
equipment not supplied by Sartorius.
Information on operational quality is available upon request from Sartorius.
You should only use peripherals and options supplied by Sartorius.
3 Protection Class of the Balance Housing
– Models with a readability of >10 mg: These models fulfill the requirements of protection class IP54.
The IP protection only applies to the balance housing and not to the AC adapter.
– The IP protection is only guaranteed when the weighing pan is mounted.
– The IP protection is restricted if the data interfaces are used. Retain the cover cap for the data output.
When the data output is not in use, reapply the cover cap to protect it against vapors, moisture, and dust or dirt.

Cubis MSA User Manual 5
Safety Precautions
Note on cable quality:
CE conformity is only guaranteed with well shielded cables.
The shielding braid of the cable must be made of metal with at least 80% coverage and also covered with metal foil
as much as possible.
The shielding on both sides on the full metal or metalized connector casing, as well as on the casing inlet, must be high-frequency compliant and have a flat design.
You can only turn off power to the device by pulling the plug or disconnecting the power cord, or by unscrewing the four-pin plug at the DC supply cable for the balance.
Do not exert mechanical pressure on the display with sharp objects, as this will damage the display. Liquid
penetration can damage the electrical components.
Only use a lightly-moistened cloth for cleaning. See “Care and Maintenance” for cleaning the device. Do not
compromise the IP protection of the balance.
Do not open the balance housing. If the seal is broken, this will result in forfeiture of all claims under the
manufacturer’s warranty.
The device may only be opened by specialized personnel trained by Sartorius.
Disconnect the balance from the wall outlet prior to moving the device.
Avoid condensation damage to the device. When the balance is turned on, condensation build-up is not possible. If the device is moved from a cool environment to a warm environment, you must allow the device to acclimatize for
approx. 2 hours before connecting to the power supply.
Hazards at the Place of Installation and During Operation
Avoid generating static electricity and establish equipotential bonding.
A 10 kOhm ground is used when connecting the balance to the power supply. Disconnecting the ground conductor is
not permitted.
3 Exercise caution to avoid glass breakage.
There is a danger of lacerations or cuts caused by sharp edges on glass or metal (contact springs), particularly when
removing or replacing the glass draft shield panels; during cleaning; if a glass sample container breaks, or when
modifying the balance hardware configuration.
3 Models with a separate electronics module (e. g. MSx6.6/3.6/2.7):.
Do not replace the electronics module. Replacing with, e. g. models of the ME/SE series will damage the device.
3 Make sure all equipment operators have received proper instructions when working with hazardous or toxic materials.
Failure to follow correct handling procedures can result in breakage of parts or spillage of liquids or other substances.
Make sure the necessary protective clothing or equipment is worn, such as protective gloves, clothing, eyewear.
All safety regulations applicable in the laboratory must be observed.
3 Exercise caution to avoid squeezing or crushing fingers when
– Operating the electronic draft shield
– Removing or installing the panels
– Adjusting the display
Do not expose the device to aggressive chemical vapors or to unnecessarily extreme temperatures, moisture, shocks,
or vibration.
The device should be set up in areas away from equipment or devices that have strong magnetic properties. Extreme
electromagnetic fields from electrical lines should also be avoided.
6 Cubis MSA User Manual
Safety Precautions
Intended Use
Cubis models are high-resolution balances. They were specially
developed for exact determination of material mass in liquid,
paste, powder or solid form.
Appropriate containers must be used for each type of sample
material.
Specific models cover specific weighing ranges: see
“Technical Specifications."
Cubis models are designed specially for use in research,
education and day-to-day laboratory tasks in science and
industry.
They are designed to be used exclusively indoors.
Cubis models can be operated as standalone, connected to a PC, or on a network.
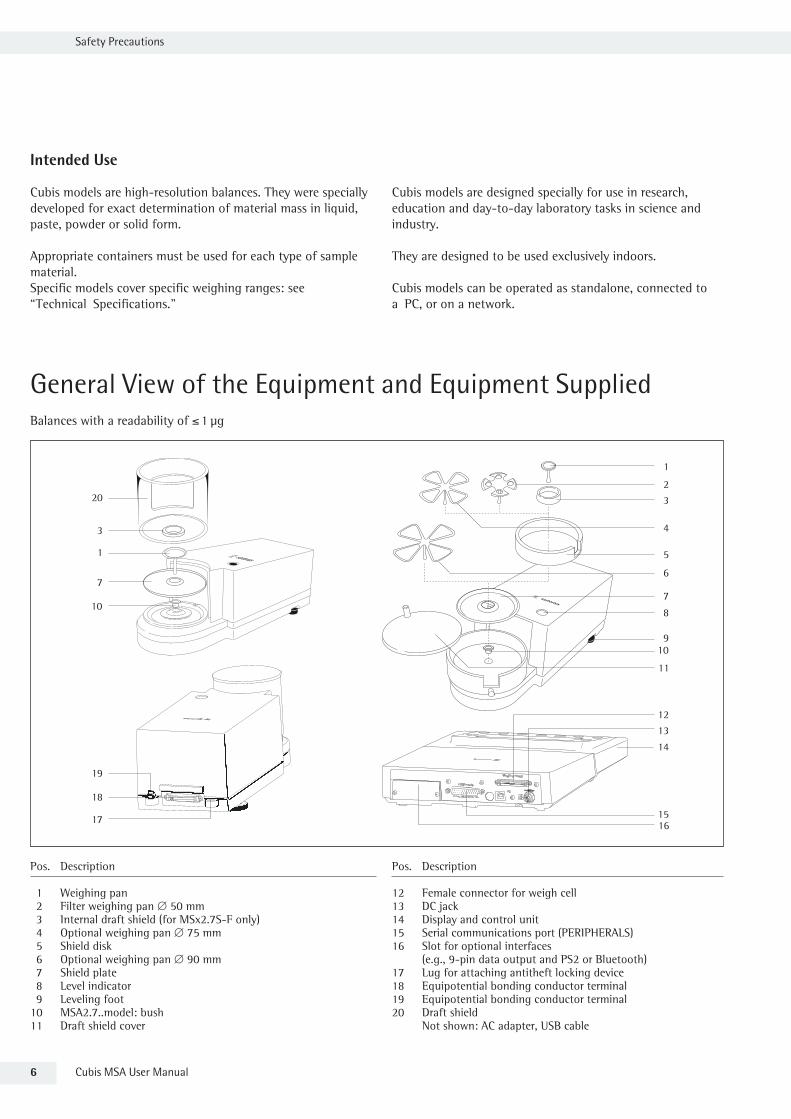
General View of the Equipment and Equipment SuppliedBalances with a readability of 1 µg
Pos. Description
1 Weighing pan 2 Filter weighing pan d 50 mm 3 Internal draft shield (for MSx2.7S-F only) 4 Optional weighing pan d 75 mm 5 Shield disk 6 Optional weighing pan d 90 mm 7 Shield plate 8 Level indicator 9 Leveling foot10 MSA2.7..model: bush11 Draft shield cover
Pos. Description
12 Female connector for weigh cell13 DC jack14 Display and control unit15 Serial communications port (PERIPHERALS)16 Slot for optional interfaces
(e.g., 9-pin data output and PS2 or Bluetooth)17 Lug for attaching antitheft locking device 18 Equipotential bonding conductor terminal19 Equipotential bonding conductor terminal20 Draft shield
Not shown: AC adapter, USB cable
Use 6971987
1
2
3
4
5
6
7
8
9
11
12
13
14
15
1617
18
19
7
1
3
20
10
10

Cubis MSA User Manual 7
General View of the Equipment and Equipment Supplied
General View of the Equipment and Equipment SuppliedAnalytical and precision balances with a weighing range of up to 15 kg
Pos. Description
1 Upper sliding draft shield panel/Handle
2 Back panel
3 Weighing pan
4 Pan support (not for MSx225.../MSx125... models)
5 Shield plate 6 Pan retainer
7 Right sliding panel/Handle
8 SD card slot (for MSU, MSA models)
9 Leveling foot
10 Display 11 Display and control unit
12 Draft shield/Shield disk (only for models with a readability of 1 mg and 10 mg)
13 Below-balance weighing port
(on the bottom of the balance)
14 Leveling foot
15 Level indicator
16 Power socket
17 Slot for attaching an anti-theft device
18 USB socket for a PC connection
19 Below-balance weighing hook
20 Slot for optional interfaces,
e.g., 9-pin data output and PS2 (as shown) or Bluetooth
21 Communication port (PERIPHERALS) for accessories22 Menu access switch
23 Left sliding panel/handle
24 Ethernet Interface
(on the bottom of the display and control unit)
25 Semi-microbalances: Female connector for weigh cell26 Semi-microbalances: Electronics module
(for MSx225.../MSx125... models)
Not shown:
– AC adapter
– USB cable
– Operating instructions
10
11
23
3
4
5
5
6
6
13
13
11
11
14
14
6
12
12
4
3
3
15
16
17
18
19
20
21
22
4
25
26
15
1720
21
22
1
2
3
4
5
6
7
9
8
24

8 Cubis MSA User Manual
General View of the Equipment and Equipment Supplied
General View of the Equipment and Equipment SuppliedBalances with a weighing range of 20 kg or more
1
3
4
5
7
2
6
Pos. Description
1 DC jack2 Leveling foot3 Level indicator4 Serial communications port (PERIPHERALS)
Pos. Description
5 USB socket for a PC connection6 Display and control unit7 Weighing pan Not shown: AC adapter, USB cable
Cubis MSA User Manual 9
Getting Started
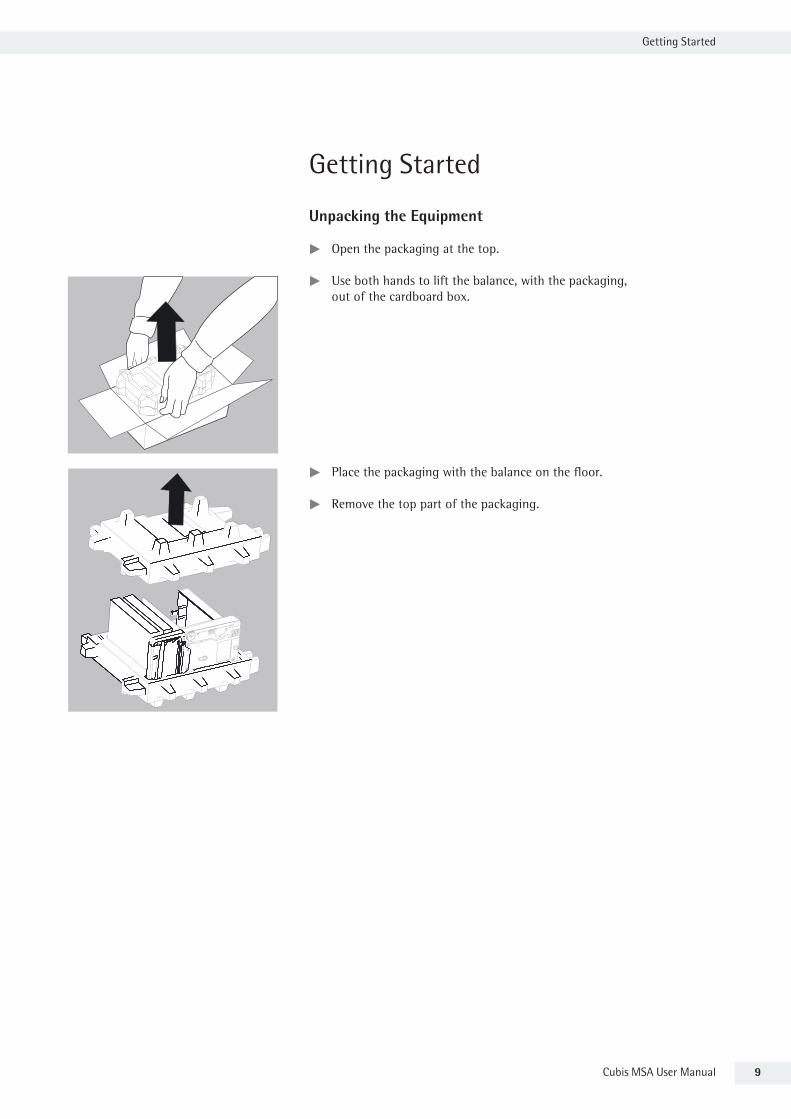
Getting Started Unpacking the Equipment
t Open the packaging at the top.
t Use both hands to lift the balance, with the packaging,
out of the cardboard box.
t Place the packaging with the balance on the floor.
t Remove the top part of the packaging.
10 Cubis MSA User Manual
Getting Started
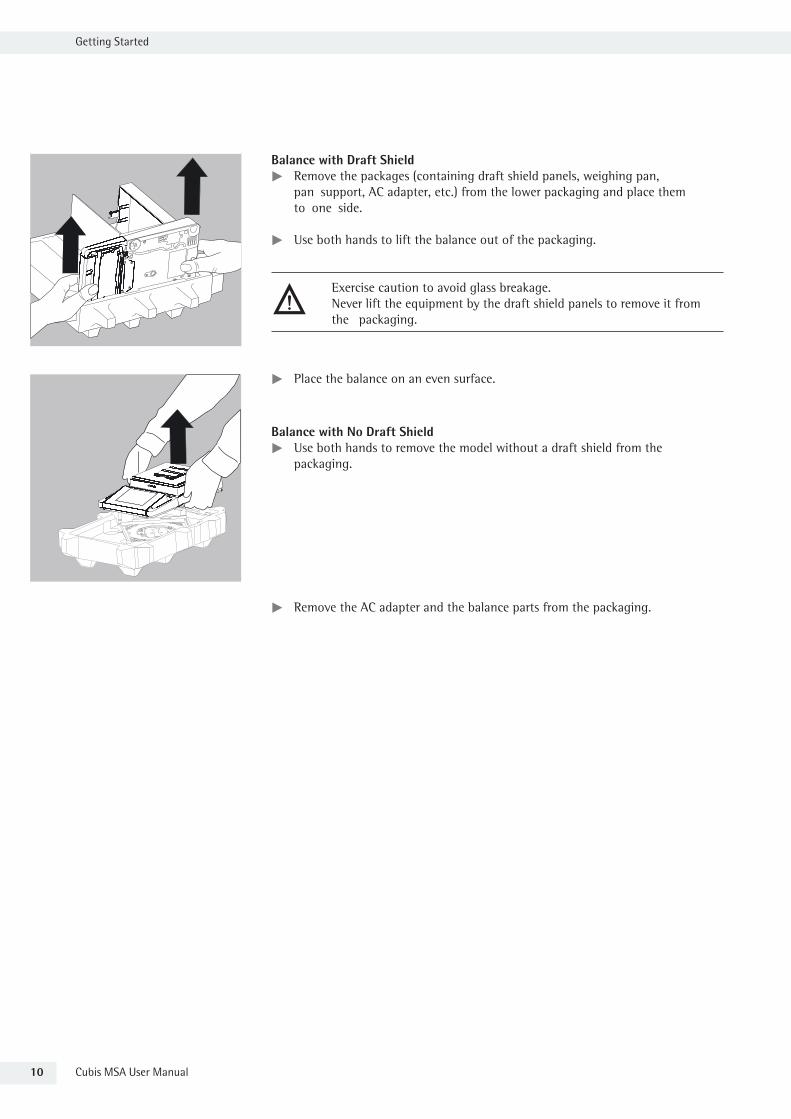
Balance with Draft Shield t Remove the packages (containing draft shield panels, weighing pan,
pan support, AC adapter, etc.) from the lower packaging and place them
to one side.
t Use both hands to lift the balance out of the packaging.
3 Exercise caution to avoid glass breakage.
Never lift the equipment by the draft shield panels to remove it from
the packaging.
t Place the balance on an even surface.
Balance with No Draft Shield t Use both hands to remove the model without a draft shield from the
packaging.
t Remove the AC adapter and the balance parts from the packaging.