user manual presented by achieve it solutionsachieveits.com/assets/whitepapers/achieve one 6.5 sql -...
TRANSCRIPT

ACHIEVE WAREHOUSE MANAGEMENT
USER MANUAL
PRESENTED BY
ACHIEVE IT SOLUTIONS
Copyright 2011 - 2016 by Achieve IT Solutions
These materials are subject to change without notice. These materials are provided by Achieve
IT Solutions for informational purposes only, without representation or warranty of any kind,
and Achieve IT Solutions shall not be liable for errors or omissions with respect to the materials.
The use and copying of this document and the associated computer software is subject to
Achieve IT Solutions customer registration agreement. Any other use is prohibited.
Achieve One is a trademark of Achieve IT Solutions
SAP Business One is a trademark of SAP AG.
All other trademark or service marks are the property of their respective owners.
Achieve Warehouse Management is part of the Achieve One Suite, which has been
certified by SAP as conforming to SAP’s standards for Business One add-on solutions.
Achieve IT Solutions
640 Belle Terre Road
Building B
Port Jefferson, New York 11777
631-543-3200

i | P a g e A c h i e v e W a r e h o u s e M a n a g e m e n t U s e r G u i d e
ACHIEVE WAREHOUSE MANAGEMENT
USER MANUAL
Table of Contents
Introduction .................................................................................................................................... 1
Setup ............................................................................................................................................... 3
WMS Adjustment Types ............................................................................................................. 4
Warehouse Users ....................................................................................................................... 6
General Tab ............................................................................................................................. 7
Menu Options Tab .................................................................................................................. 9
Warehouse User Group Setup ................................................................................................... 9
Warehouse Forms .................................................................................................................... 10
Master 2D-1D Barcodes ........................................................................................................... 11
Warehouse Configuration ........................................................................................................ 12
Document Processor Options Tab ........................................................................................ 12
Handheld Options Tab .......................................................................................................... 14
Subtab: General ................................................................................................................ 14
Subtab: Shipping ............................................................................................................... 17
Subtab: Receiving .............................................................................................................. 23
Subtab: Inventory Transactions ........................................................................................ 25
Subtab: Productions .......................................................................................................... 29
Notification Options Tab ....................................................................................................... 31
Warehouse Initialization .......................................................................................................... 32
Item Master Data ......................................................................................................................... 34
Using Units of Measure ............................................................................................................ 34
Using Packages ......................................................................................................................... 34
Standard Fields ...................................................................................................................... 34
WMS Added Fields ................................................................................................................ 35

ii | P a g e A c h i e v e W a r e h o u s e M a n a g e m e n t U s e r G u i d e
Inventory Data Tab ................................................................................................................... 35
Purchasing Data Tab ................................................................................................................. 41
Sales Data Tab .......................................................................................................................... 43
Special Item Options ................................................................................................................ 44
Using Serial and Batch Numbers ........................................................................................... 44
External Serial Numbers ................................................................................................... 48
Item Master Data .......................................................................................................... 49
SAP Business One Processes ......................................................................................... 54
WMS Handheld Processes ............................................................................................ 65
Using Non-Inventory Items ................................................................................................... 69
Item-Type Non-Inventory Items ....................................................................................... 69
Labor-Type Non-Inventory Items ...................................................................................... 70
Bin Location Settings .................................................................................................................... 71
Standard Fields ......................................................................................................................... 71
WMS Added Fields ................................................................................................................... 72
Warehouse – Setup ...................................................................................................................... 74
Standard Fields ......................................................................................................................... 75
WMS Added Fields ................................................................................................................... 75
Warehouse Management Procedures ......................................................................................... 77
Receiving Menu ........................................................................................................................ 78
Receive PO ............................................................................................................................ 79
Receive No PO ....................................................................................................................... 83
Container Receipt ................................................................................................................. 85
Directed Put Away ................................................................................................................ 89
Shipping Menu ......................................................................................................................... 91
Picking ................................................................................................................................... 92
Packing .................................................................................................................................. 96
RMA Acceptance ................................................................................................................. 100
iii | P a g e A c h i e v e W a r e h o u s e M a n a g e m e n t U s e r G u i d e
Standard SAP ................................................................................................................... 100
RMA Evaluation on Handheld Devices ............................................................................ 102
Inventory Menu ...................................................................................................................... 103
Transfers ............................................................................................................................. 103
Suggested Bin Transfers ...................................................................................................... 105
Goods Issue/Goods Receipt ................................................................................................ 109
Inventory Transfer Requests ............................................................................................... 111
SAP Entry ......................................................................................................................... 111
Handheld ITR Pick ........................................................................................................... 112
Handheld ITR Receipt ...................................................................................................... 116
Handheld ITR Quick Receipt............................................................................................ 118
Bulk Bin Transfer ................................................................................................................. 120
Production Menu ................................................................................................................... 120
Issue Components ............................................................................................................... 120
Handheld Device Entry.................................................................................................... 121
Receipt from Production ..................................................................................................... 123
Handheld Device Entry.................................................................................................... 123
WMS Production ................................................................................................................. 125
Start Production Run ....................................................................................................... 126
Issue Raw Materials ........................................................................................................ 128
Print Production Run Labels ........................................................................................... 131
Receive Finished Goods .................................................................................................. 132
Complete Production Run ............................................................................................... 133
Return Raw Materials ..................................................................................................... 134
Cycle Count Menu .................................................................................................................. 136
Cycle Count ......................................................................................................................... 136
Physical Count ..................................................................................................................... 138
Bin Count ............................................................................................................................. 140

iv | P a g e A c h i e v e W a r e h o u s e M a n a g e m e n t U s e r G u i d e
Location Lookup ..................................................................................................................... 143
Label Printing .......................................................................................................................... 144
Using the Logistics Manager ...................................................................................................... 145
Selection Criteria ..................................................................................................................... 146
Open Documents Tab ............................................................................................................. 149
Pending Replenishment Tab ................................................................................................... 150
Released By Logistics Tab........................................................................................................ 152
Ready for WMS Tab ................................................................................................................ 152
Being Picked by WMS Tab....................................................................................................... 153
Doc Processor Tab ................................................................................................................... 154
Parked Orders Tab .................................................................................................................. 154
Freight Control Tab ................................................................................................................. 154
Completed Tab ........................................................................................................................ 154
Logistics Manager: Pick by Shipping Request ....................................................................... 155
Selection Criteria ................................................................................................................. 155
Open Documents Tab ......................................................................................................... 155
Shipping Request Tab.......................................................................................................... 156
Freight Control Picked/Freight Control Packed Tabs .......................................................... 157
WMS Management and Utility Programs ................................................................................. 157
Document Processor Monitor ................................................................................................ 157
Documents with Errors ....................................................................................................... 158
Pending Documents ............................................................................................................ 159
Handheld Audit ....................................................................................................................... 159
WMS User Inquiry ................................................................................................................... 162
WMS Print Queue ................................................................................................................... 162
Inventory Location Lookup ..................................................................................................... 163
Bulk Bin Transfer ..................................................................................................................... 165
Label Printing .......................................................................................................................... 165

v | P a g e A c h i e v e W a r e h o u s e M a n a g e m e n t U s e r G u i d e
Warehouse Logistics Inquiry ................................................................................................... 167
Suggestions for Warehouse Management Practices ................................................................ 168
Equipment ............................................................................................................................... 168
WMS Database ........................................................................................................................ 168
Data ......................................................................................................................................... 169
Labels ...................................................................................................................................... 169
Warehouse Organization ........................................................................................................ 169
Item Management .................................................................................................................. 170
1 | P a g e A c h i e v e W a r e h o u s e M a n a g e m e n t U s e r G u i d e
Introduction
Many companies struggle with problems in their warehouses. Inventory may be misplaced,
wrong items may be shipped, and the warehouse workers may be working overtime to keep up
with demands.
Achieve Warehouse Management is designed to provide the tools your company will need to
process more orders and move more inventory in less time. Every function, from receiving to
packing, is designed to let you pick the right goods into the right carton and ship them out the
door accurately, quickly and efficiently. The system is designed to let warehouses re-engineer
for maximum productivity and retail compliance by providing a process for efficient warehouse
operations with Radio Frequency (RF) handhelds, bar codes, and a pick/pack/ship software
package that allows you to implement this process.
As with all Achieve One modules, Achieve Warehouse Management has been built specifically
for SAP Business One. It will integrate smoothly with all of the standard features of the
Business One software. It also integrates with other Achieve One modules, including Achieve
Freight Control and Achieve Container Management.

2 | P a g e A c h i e v e W a r e h o u s e M a n a g e m e n t U s e r G u i d e
Major features of Achieve Warehouse Management include:
Simultaneous Radio Frequency (RF) and Batch Scanning supported
Purchase Order receiving and put-away
Warehouse receiving and put-away
Sales Order pick/pack/ship
Inventory cycle counts
Bin to bin transfers
Multiple unit of measure picking
Real-time inventory and management information
Print, receive, transfer, ship, receive from production, and cycle count from
handheld device
UPC and code 39 label printing
Achieve Container Management option for container receiving
Achieve Freight Control option for UPS, USPS and FedEx shipping
Achieve EDI Control option for UCC128
Auto-billing process upon completion of shipment
Modes of Operation:
Extended paper based
o Multi-zone and bin management
Batch/Cradle upload scanning
o Multi-zone and bin management
o Warehouse transactions via batch/cradle scanners
Radio Frequency
o Multi-zone and bin management
o Warehouse transactions via radio frequency scanners

3 | P a g e A c h i e v e W a r e h o u s e M a n a g e m e n t U s e r G u i d e
Setup
There are a number of setups that must be entered before Achieve Warehouse Management
can be used. These are located primarily under the Administration > Achieve One menu. They
are described in detail in the following section.
Please note that there are special installation procedures for Achieve Warehouse
Management. These are described in detail in the Achieve One Installation Guide. They must
be completed before you begin the setups described below. Also, if you are using handheld
devices in the warehouse, it is necessary to configure them so that they will interact properly
with the system.
4 | P a g e A c h i e v e W a r e h o u s e M a n a g e m e n t U s e r G u i d e
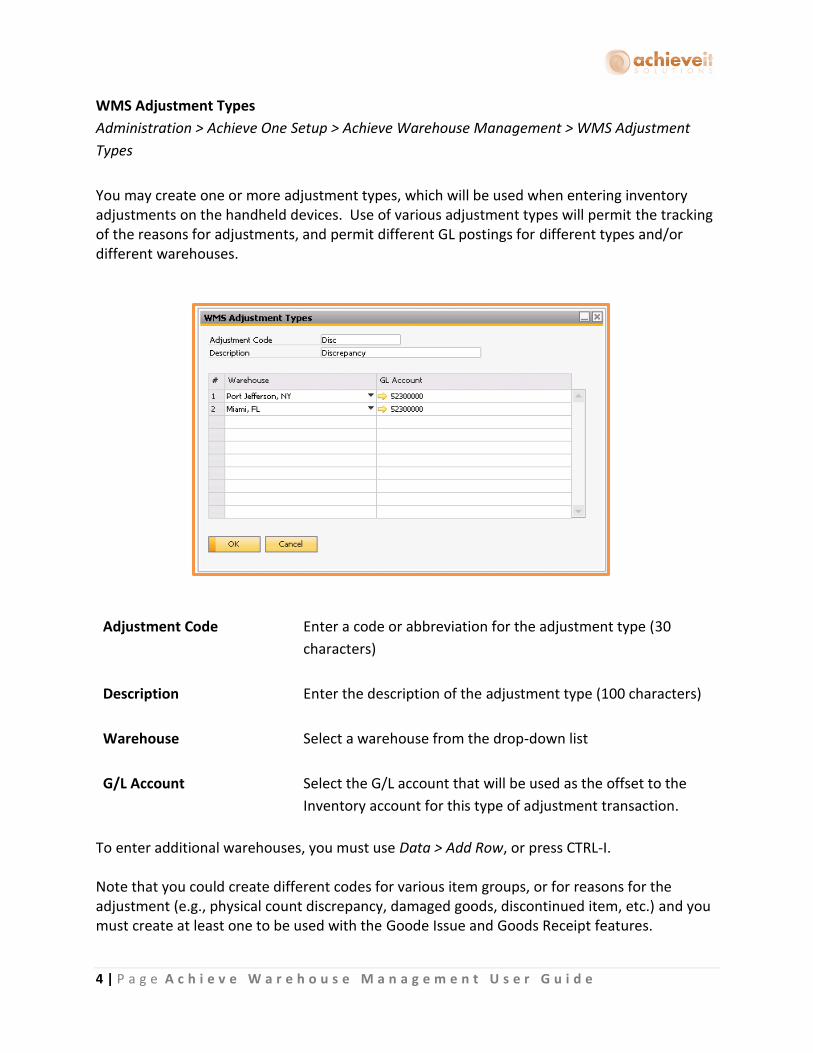
WMS Adjustment Types
Administration > Achieve One Setup > Achieve Warehouse Management > WMS Adjustment
Types
You may create one or more adjustment types, which will be used when entering inventory adjustments on the handheld devices. Use of various adjustment types will permit the tracking of the reasons for adjustments, and permit different GL postings for different types and/or different warehouses.
Adjustment Code
Enter a code or abbreviation for the adjustment type (30
characters)
Description Enter the description of the adjustment type (100 characters)
Warehouse Select a warehouse from the drop-down list
G/L Account Select the G/L account that will be used as the offset to the
Inventory account for this type of adjustment transaction.
To enter additional warehouses, you must use Data > Add Row, or press CTRL-I. Note that you could create different codes for various item groups, or for reasons for the adjustment (e.g., physical count discrepancy, damaged goods, discontinued item, etc.) and you must create at least one to be used with the Goode Issue and Goods Receipt features.

5 | P a g e A c h i e v e W a r e h o u s e M a n a g e m e n t U s e r G u i d e
Warehouse Printers Administration > Achieve One Setup > Achieve Warehouse Management > Warehouse Printers
For each warehouse that will use WMS, it is necessary to list the printers that are available.
These printers may be used to print either labels or reports in conjunction with the WMS
procedures.
For each warehouse, enter the information for each printer in the upper part of the screen. As
the printers are entered, they are displayed in the list below. You may modify information
about an existing printer by clicking on the appropriate line.
Warehouse Code
Select the warehouse from the drop-down list.
Printer Name Enter the name the will refer to the printer in selection lists.
(50 characters)
Printer Type Select either Label Printer or Report Printer. Note that label
printers can be special printers that are designed to print
barcode or other labels. Report printers may be any standard
ink-jet or laser printer.
6 | P a g e A c h i e v e W a r e h o u s e M a n a g e m e n t U s e r G u i d e
Printer Server If desired, enter the name of the network server that is used
to list and control the printers. This is not necessary if the
printer server is the same as the SAP server. If the SAP /WMS
server is not the print server, then the shared printer needs to
be added to the WMS server (where the document processor
is) in order for the document processor to automatically print.
Printer Queue Name Select the Windows printer from the drop-down list. This list
will include all printers found on the printer server that is
indicated above, or those that are available to the Business
One server.
Default Printer Check this box if this printer will be the default printer for the
warehouse. Only one printer in each warehouse may be the
default.
Warehouse Users
Administration > Achieve One Setup > Achieve Warehouse Management > Warehouse Users
The Warehouse User setup is needed only for users who will be performing warehouse
functions by means of a handheld device. These users are not required to have a license for the
Business One program, and they are not included in the number of users covered by the WMS
license within Business One. The number of handheld licenses is specified in the WMS contract
– these are concurrent licenses, not assigned to specific individuals, so you may enter as many
warehouse users as you wish. The number of individuals using handhelds at any given time
must not exceed the number of handheld licenses.

7 | P a g e A c h i e v e W a r e h o u s e M a n a g e m e n t U s e r G u i d e
For each user, enter the information on both the General and Menu Options tabs. You can
modify information about an existing user by using the standard SAP Find functionality to pull
up the record.
General Tab
User ID
Enter an ID code for the user (10 characters)
Tip: Recommended to use numeric values if device does not
have alpha keys
User Name Enter the user’s name (100 characters)
Status Select “Active” or “Inactive”. Only active users may sign on to
the handhelds.
Type Select “Employee” or “User”. WMS Users can be linked to
either SAP Employee Master Data Records or SAP Users.
SAP ID Select the corresponding SAP Employee or SAP User record to
link this WMS User to.

8 | P a g e A c h i e v e W a r e h o u s e M a n a g e m e n t U s e r G u i d e
Warehouse Code Select the code for the default warehouse where this user will
work.
Label Printer Select the user’s default label printer. The drop-down list will
display only label printers from the user’s warehouse.
Report Printer Select the user’s default report printer. The drop-down list
will display only report printers from the user’s warehouse.
Change Password Enter the user’s password for the handheld. This entry may be
used to set the password for the first time, or to change it to a
new password afterwards.
Hide Finished This option will default the Hide Finished option for the
Handheld as enabled for this WMS User.
Password Exemption This option will allow the WMS User to not have to enter in
any override passwords on the Handheld that you may set up
for WMS.

9 | P a g e A c h i e v e W a r e h o u s e M a n a g e m e n t U s e r G u i d e
Menu Options Tab
The checkboxes on this tab indicate the menu options and functions that will be available to
this WMS User on the handheld. Check only those options for which they are authorized.
Warehouse User Group Setup
Administration > Achieve One Setup > Achieve Warehouse Management > Warehouse User
Group Setup
Use the Warehouse User Group Setup screen to create User Groups for assigning teams of
pickers during multi-user picking on the Handheld. This feature can only be used in conjunction
with the Pack Planning feature in WMS.
First define a Group ID code Name (usually a bit more descriptive). Next add the WMS Users to
the list that you want to be a part of this User Group. Once that is completed hit Add to add the
User Group to the system.

10 | P a g e A c h i e v e W a r e h o u s e M a n a g e m e n t U s e r G u i d e
Warehouse Forms
Administration > Achieve One Setup > Achieve Warehouse Management > Warehouse Forms
Use the Warehouse Forms setup to designate report templates for each label or form that will
be printed from each warehouse. These must be Crystal Reports templates (.rpt files). They
may be stored anywhere on your network, but all users must have the appropriate Windows
Permissions to access to them. If you are using other Achieve One modules, such as Achieve
Document Delivery, you may use the same folder for these report templates as you use for
templates for the other modules.
For each warehouse, select the templates and printers to be used in that warehouse for each
label or report. As each warehouse is entered, click on “Update” and the information is
displayed in the list below.
You may modify information about an existing warehouse by highlighting and clicking on the
appropriate line.
The distinction between “Labels” and “Reports” depends primarily on the format of the Crystal
template and the type of printer being used. In general, the item label, carton label, and
production ticket would normally be labels (printed on label stock), while the pick list, packing

11 | P a g e A c h i e v e W a r e h o u s e M a n a g e m e n t U s e r G u i d e
slip, pending replenishment report, and transfer report would most often be reports (printed
on plain paper).
Note that if you do not specify a printer for a particular form, the default label or report printer
for the warehouse will be used by the system.
Master 2D-1D Barcodes
Administration > Achieve One Setup > Achieve Warehouse Management > Master 2D-1D
Barcodes
The Master 2D-1D Barcode screen allows you to set up templates for scanning 1D and 2D
matrix style barcodes on the handhelds. Support for the barcode scanning is dependent upon
the hardware device capabilities.
First define a template Code and Name (usually a bit more descriptive). Then choose the
delimiter for the barcode, either Comma or Semi-Colon. Next choose the tables and fields that
will need to be read from the barcode. You can add or remove lines by using the New Position
and Delete Position boxes on the right. Once you have all the tables and fields set you can add
the record.

12 | P a g e A c h i e v e W a r e h o u s e M a n a g e m e n t U s e r G u i d e
Warehouse Configuration
Administration > Achieve One Setup > Achieve Warehouse Management > WMS Configuration
The WMS Configuration screen allows you to determine many choices in the way the WMS
system will be used for your company. It consists of three major tabs.
Document Processor Options Tab
Processor Server Name
If the WMS Document Processor is located on a different
server from the SAP server, enter the name. If it is on the SAP
server, leave this field blank.
Accounts Payable Select the method you wish the system to use when items are
received in the warehouse:
Create the Goods Receipt PO as a draft; do not create
an A/P Invoice
Create and add the Goods Receipt PO; do not create an
A/P Invoice

13 | P a g e A c h i e v e W a r e h o u s e M a n a g e m e n t U s e r G u i d e
Create and add the Goods Receipt PO; also create an
A/P Invoice as a draft
Create and add the Goods Receipt PO; also create and
add the A/P Invoice
o If receiving by Container, the GRPO process is
handled by the Container Management module,
and this setting will not have any affect for the
receiving of containerized documents.
Accounts Receivable Select the method you wish the system to use when items
have been shipped from the warehouse:
Create the Delivery as a draft; do not create an A/R
Invoice
Create and add the Delivery; do not create an A/R
Invoice
Create and add the Delivery; also create an A/R Invoice
as a draft
Create and add the Delivery; also create and add the
A/R Invoice
Allow the Freight Control system to create the Delivery
and/or A/R Invoice – the WMS system will create a
Shipping Request (requires Achieve Freight Control)
Freight Control If you are using Achieve Freight Control, there are several other
options available:
Pick By Shipping Request If checked then WMS will pick against Shipping Requests that
will be created before picking in WMS instead of picking against
Sales Orders that create Shipping Requests after picking
Logistics Manager Creates
Packages
This can only be used if you are using the Pick By Shipping
Request option. If checked then when Shipping Requests are
created by the Logistics Manager, the system will automatically
pack the items on them based on the default packing settings
(see below).
Repackage after
Allocation
This can only be used if you are using the Logistics Manager
Creates Packages option. If checked, then after Shipping

14 | P a g e A c h i e v e W a r e h o u s e M a n a g e m e n t U s e r G u i d e
Requests are allocated and moved to Ready for WMS, they will
automatically re-pack.
Pack Planning
This can only be used if you are using the Pick By Shipping
Request Option. If checked you will enable several functions in
the Pack Planning process for predefining package contents
prior to picking
Packing Select the packaging method you wish to use:
Package using standard packaging (in this case, each
item must have a package code and quantity per
package in the Item Master)
Package in a single package
No packaging
Pack During Pick This can only be used if you are using the Pick By Shipping
Request Option. If checked you will be able to Pack items into
packages as you are picking them on the Handheld
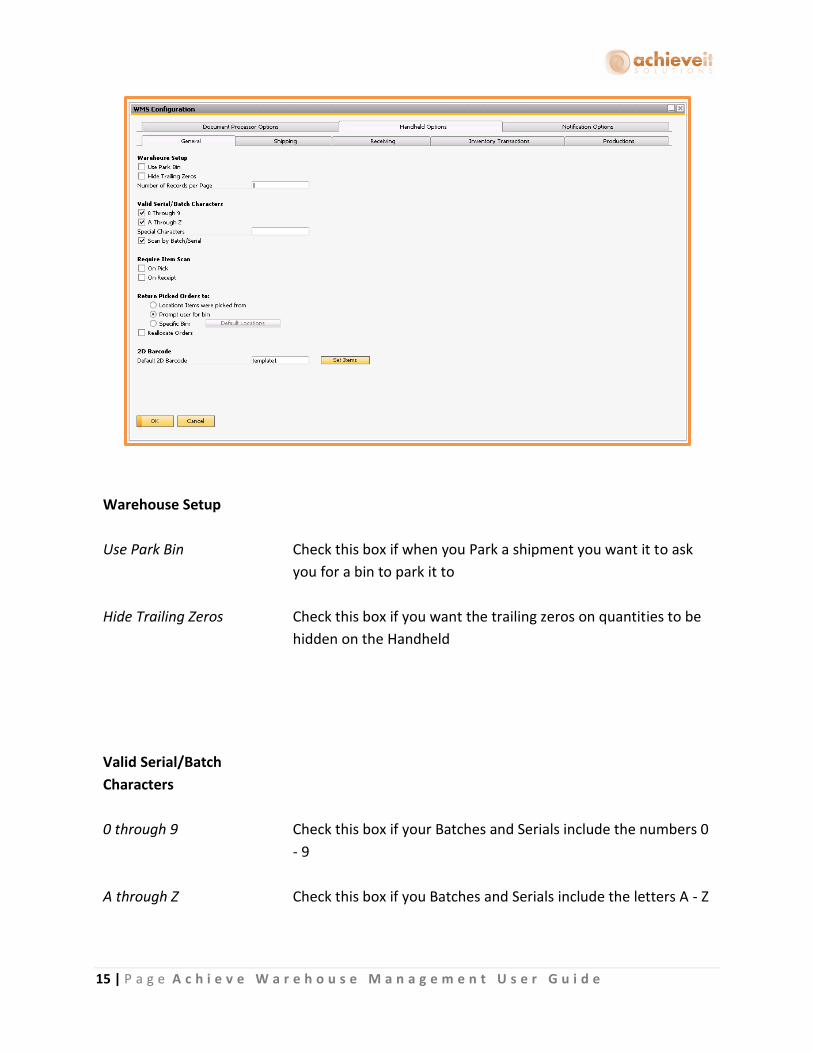
Handheld Options Tab
Subtab: General
15 | P a g e A c h i e v e W a r e h o u s e M a n a g e m e n t U s e r G u i d e
Warehouse Setup
Use Park Bin Check this box if when you Park a shipment you want it to ask
you for a bin to park it to
Hide Trailing Zeros Check this box if you want the trailing zeros on quantities to be
hidden on the Handheld
Valid Serial/Batch
Characters
0 through 9 Check this box if your Batches and Serials include the numbers 0
- 9
A through Z Check this box if you Batches and Serials include the letters A - Z
16 | P a g e A c h i e v e W a r e h o u s e M a n a g e m e n t U s e r G u i d e
Special Characters Enter in any special characters (such as – or / ) that your Batches
or Serials may include
Scan by Batch/Serial Checking this box will allow you to enter a batch or serial
number directly into the Bin field on the Handheld. When used
the handheld will not need you to enter the item or bin, it will
fill it in based on the batch or serial number you entered
Require Item Scan
On Pick
Check this if you want to require Handheld users to scan the
items when picking. The user will not be able to tap the line on
the device. The user must enter the data via the keyboard or a
barcode scan.
On Receipt Check this if you want to require Handheld users to scan the
items when receiving. The user will not be able to tap the line
on the device. The user must enter the data via the keyboard or
a barcode scan
Return Picked Orders to
When a pick is Cancelled or a Shipping Request that was picked
is Voided
Location Items were
picked from
Picked items will be returned to the bins they were picked from
with this option that only works when picking by Sales Order
Prompt user for bin
User will be prompted to choose the bin that they want the
picked items to be returned, all items are returned to the
same bin, this is not an item by item selection
Specific Bin
Designate a specific bin that all picked items will be returned, all
items are returned to the same bin, this is not an item by
item selection
Reallocate Orders
Check this box if you would like Cancelled Picks to first be
reallocated before they are available to be picked again. If this is
unchecked, and the order or shipping request is picked again,
the allocations will advise the user to take from the same

17 | P a g e A c h i e v e W a r e h o u s e M a n a g e m e n t U s e r G u i d e
locations. Checking the box allows the allocation method to
select new locations based on current warehouse status
2D Barcode
Default 2D Barcode
Choose the default 2D Barcode template for WMS
Set Items
Use this option to set the default 2D barcode template for
either All items or only those Without an existing default
Subtab: Shipping
Shipping
Auto Fill Shipped Quantity
Check this box if you want the handheld to automatically fill in
the quantity shipped:
18 | P a g e A c h i e v e W a r e h o u s e M a n a g e m e n t U s e r G u i d e
If the box is
checked, select one
of the methods for
auto-fill:
Default 0: the handheld will display zero; the user must
enter the shipped quantity
Always 1: the handheld will display 1; the user must scan
each individual unit
Default Sales Order Quantity: the handheld will display the
open quantity from the SO; the user may override if
needed
o Default Full Batch Qty; use this checkbox if you
want the full batch quantity to be defaulted in
when selecting batches
Enable Quick Scan When working with serial or batch items this option will skip the
item screen and go directly to the serial/batch selection screen
on the handheld
Allow Over Pick This will allow users to pick more quantity of an item than what
is on the Sales Order/Shipping Request
Print Order Pick Ticket Check this box if you want the system to print the pick list
automatically when the order status moves to “Ready for
WMS”.
Print Order Carton Label
Calculate Expected
Number of Labels
Check this box if you want the system to print the carton label
automatically when the order status moves to “Ready for
WMS”.
This will try and estimate how many labels to print based
on the item’s SAP packaging settings
Print Order Packing List Check this box if you want the system to print the packing slip
automatically after completion of the pick process. Note: this
option is not available if using Achieve Freight Control.
Load All Sales Orders
OR
Indicate your choice for the method of loading sales orders to
the handhelds:

19 | P a g e A c h i e v e W a r e h o u s e M a n a g e m e n t U s e r G u i d e
Load Sales Orders
Released by Logistics
Manager
Load all open sales orders: this will automatically send
each sales order, as soon as it is entered, through the
allocation process to “Ready for WMS” status
Load for Sales Orders released by the Logistics Manager:
orders will not be released for picking until they are
selected from within the Logistics Manager (this allows
selection and prioritization by delivery date, customer,
items, etc.)
Load Orders that can be
Shipped Complete
This option applies if using the Logistics Manager: check the box
if you wish the system to automatically load orders that can be
shipped complete, without replenishment (i.e., there is
adequate quantity of all items on the order, in bins designated
as Pick bins), without first sending those orders to the Logistics
Manager.
Auto Backorder Processing This option applies if using the Logistics Manager: check the box
if you wish the system to automatically load items that have
been previously backordered (i.e., other items from the same
order have already been shipped), but have now come into
stock.
Print Item Label during
Shipping
Select the option for printing item labels during the shipping
process:
None: do not print labels
One per line: print one label for each line of the SO/SR
(e.g., one label per item code, regardless of quantity)
One per unit: print one label for each unit shipped
Multiple User Check This will make sure if two users happen to pull up the same
document to pick in the handheld that the first one that finishes
it will be the one who actually completes it (the other user will
receive a message when they try to finish it). This is only to
protect against simultaneously selecting the document before
the system has had the opportunity to update the documents’
status.
20 | P a g e A c h i e v e W a r e h o u s e M a n a g e m e n t U s e r G u i d e
Group Override Password Choose a password that users can enter in order to pick a
package on the handheld that they are not assigned to. This can
only be used in conjunction with the Pack Planning option.
Override Password Choose a password that users can enter in order to perform the
functions checked below:
Override Bin Pick from a bin other than the one indicated on the
handheld
Short Pick Finalize picking an item after picking less than the
quantity indicated on the handheld
Cancel Pick Cancel the pick of a Sales Order and undo all entries that
were made for it
Logistics Manager
Ignore Non-Inventory
Items
This will keep non-inventory items out of the Logistics Manager
Non-Inventory Item 100%
Fulfillment
This will leave non-inventory items in the Logistics Manager but
assign them 100% Fulfillment
Logistics Manager
Floating Decimals
This feature controls how decimals are displayed in the Logistics
Manager in SAP. If checked, then each number will only use the
number of decimals it needs (including none) instead of always
showing the default number of decimals in SAP
Released Weight Total
UoM
This drop down will let you select the Weight UoM for the
Released Total weight field in the logistics manager
RMA
Activate RMA Acceptance Check if you wish to utilize the RMA Acceptance functionality
(validate RMA’s against an expiration date)

21 | P a g e A c h i e v e W a r e h o u s e M a n a g e m e n t U s e r G u i d e
RMA Acceptance
Tolerance Days
Enter the number of days past the RMA expiration when
returned items will still be accepted
Freight Control
Enable Mandatory
Package Type Attributes
This enables/disables options on the SAP package setups that can
require certain package information be entered on the handheld
while packing
Default Locations
If using Achieve Freight Control, click on the “Default Locations”
button to enter the default shipping bin, which tells the system
to automatically move all items to this bin as they are picked.
Also enter the default exchange/put away bin which will be used
for Batch Exchanges during packing as well as unpacked items on
the handheld.
Allow Batch\Serial
Exchange
This will allow users that are packing on the handheld to
exchange the batches and serials that were picked for different
ones.
Enforce Full Picked Batch
Quantity
This will only allow users to pick the full batch quantity when
picking batches. This is used when an item is always consumed in
full by batch, such as for items stocked in weight where
serialization can’t be used because the inventory quantity
wouldn’t be 1
22 | P a g e A c h i e v e W a r e h o u s e M a n a g e m e n t U s e r G u i d e
Override Password Choose a password that users can enter in order to perform the
functions checked below:
Allow Exchange Exchange batches and serials during packing on the
handheld
Short Pack Finalize packing an item after picking less than the
quantity indicated on the handheld
Cancel Pack Cancel the pack of a Shipping Request and undo all
entries that were made for it
Display WMS Picking
when no FC Packing Exists
After picking, the Shipping Request will display the bins that the
items were picked from prior to packing. It will be displayed in
the tracking number field on the Packages tab of the shipping
request.
Use Staging Locations
This (in conjunction with settings in Achieve Freight Control) will
require users to choose a staging location to move picked orders
to after finishing their picking on the handheld
Batch Flow Through
Allocations
Use Batch Flow Through
Allocations
If checked, when a batch managed line item on a Purchase Order
that has a Sales Order as its base document is received, the
batches will automatically be assigned to the Sales Order using
SAP Business One’s standard batch assignment screen. If the
received quantity is greater than the sales order quantity, the
sales order quantity will be increased automatically so that the
full batch quantities can be assigned in SAP without any errors.
Order Reservations
Use Order Reservations
This will enable Achieve Order Reservations to work with WMS

23 | P a g e A c h i e v e W a r e h o u s e M a n a g e m e n t U s e r G u i d e
Use Suggested Bin
Transfer
This will enable Suggested Bin transfers for Order Reservations.
When an item is reserved against stock quantities the system will
prompt the user to create a Suggested Bin Transfer that will
move the item from its current location to a reserved location.
Subtab: Receiving
Receiving
Auto Fill Receiving
Quantity
Check this box if you want the handheld to automatically fill in
the quantity received
If the box is
checked, select
one of the
methods for auto-
fill:
Default 0: the handheld will display zero; the user must
enter the received quantity
Always 1: the handheld will display 1; the user must scan
each individual unit
Default Purchase Order Quantity: the handheld will display
the open quantity from the PO; the user may override if
needed

24 | P a g e A c h i e v e W a r e h o u s e M a n a g e m e n t U s e r G u i d e
o Default Full Batch Qty; use this checkbox if you also
want the full batch quantity to be defaulted in when
selecting batches
Enable Quick Scan When working with serial or batch items this option will skip the
item screen and go directly to the serial/batch selection screen
on the handheld
Allow Over Receipt
This will allow users to receive more quantity of an item than
what is on the Purchase Order
Print Item Label during
Receiving
Select the option for printing item labels during the receiving
process:
None: do not print labels
One per line: print one label for each line of the PO
(e.g., one label per item code, regardless of quantity)
One per unit: print one label for each unit received
Use ASN Serial Numbers
This can be enabled when using an Achieve One feature for
very high volume called External Serial Numbers. Please see
the guide Using External Serial Number with Achieve One WMS
for more information
Enable Blind
Receive
This can be enabled when using an Achieve One feature
for very high volume called External Serial Numbers.
Please see the guide Using External Serial Number with
Achieve One WMS for more information
Containers
Scan PO
These options are for when you are using Achieve Container
Management
Check this box if you want to require users to enter the PO
numbers during Container receiving.
Filter By Container Check this box if you want Container Receiving on the
handheld to filtered by the container numbers on the shipment

25 | P a g e A c h i e v e W a r e h o u s e M a n a g e m e n t U s e r G u i d e
Scan Bin Check this box if you want to require users to scan the
receiving bin during Container Receiving on the handheld.
Subtab: Inventory Transactions
Goods Receipt
Goods Receipt Price List Select the price list to use as the item price during Goods Receipt
processing on the handheld device. The choices are the same as
those available during manual Goods Receipt entry.
Transfers
Print Transfer Report Check this box if you would like the system to automatically print
the Transfer Report when warehouse transfers are entered on
the handheld device.
Full Batch Qty Use this checkbox if you want the full batch quantity to be
defaulted in when selecting batches
26 | P a g e A c h i e v e W a r e h o u s e M a n a g e m e n t U s e r G u i d e
Use Last To Bin
Use this checkbox to automatically default in the last To Bin used
during the current transfer on the Handheld
Use Last From Bin
Use this checkbox to automatically default in the last From Bin
used during the current transfer on the Handheld
Auto Fill Transfer Qty
Default 0: the handheld will display zero; the user must
enter the transfer quantity
Always 1: the handheld will display 1; the user must scan
each individual unit
Cycle Count Select the method for entering serialized item quantities during
a cycle count:
Always require a scan: The user must scan each unit
individually to record each serial number
Only require a scan if the input QTY <> system: If the
counted quantity is the same as the system quantity,
then a scan is not required; otherwise, the user must
scan each unit.
Bin Count
WMS Adjustment Type
Select the default WMS Adjustment Code for bin count
discrepancies
Auto Fill Bin Qty
Default 0: the handheld will display zero; the user must
enter the transfer quantity
Always 1: the handheld will display 1; the user must scan
each individual unit
Quarantine Bin Control
Require Password for
Movement Out
27 | P a g e A c h i e v e W a r e h o u s e M a n a g e m e n t U s e r G u i d e
Check this box and choose a password if you want to require
that handheld users enter a password to move items out of
designated quarantine bins.
Require Password for
Movement In
Check this box and choose a password if you want to require
that handheld users enter a password to move items into
designated quarantine bins.
Bin Replenishment
Use Bin Replenishment
Check this box if you would like the AWM Document processor
to create Suggested Bin Transfers to move inventory from
Overstock bins to Pick bins. The Pick bins will need to have item
assignments as well as Minimums and Maximums set.
Run Every X Minutes
Enter how often you would like the Bin Replenishment to run in
minutes
Inventory Transfer
Requests
Auto Fill ITR Quantity
Check this box if you want the handheld to automatically fill in
the quantity on ITRs
If the box is
checked, select
one of the
methods for auto-
fill:
Default 0: the handheld will display zero; the user must
enter the received quantity
Always 1: the handheld will display 1; the user must scan
each individual unit
Default Purchase Order Quantity: the handheld will display
the open quantity from the PO; the user may override if
needed
o Default Full Batch Qty; use this checkbox if you
want the full batch quantity to be defaulted in when
selecting batches
Enable Quick Scan When working with serial or batch items this option will skip the
item screen and go directly to the serial/batch selection screen
on the handheld
28 | P a g e A c h i e v e W a r e h o u s e M a n a g e m e n t U s e r G u i d e
Allow Over Pick/Receipt
This will allow users to pick and receive more quantity of an
item than what is on the ITR
Close Short Pick/Receipt
This will close ITR documents after they are finished on the
handheld even if they are short picked or short received.
Print ITR Pick
Check this box if you want the system to print the ITR pick list
automatically when the ITR status moves to “Ready for WMS”.
Print Item Label during
Transfer Request
Select the option for printing item labels during the Transfer
Request process:
None: do not print labels
One per line: print one label for each line of the PO
(e.g., one label per item code, regardless of quantity)
One per unit: print one label for each unit received
Direct Put Away
Auto-Save
When working with serialized items in the Direct Put Away
screen on the handheld, this option removes the need to hit
Save again after the serial numbers are entered
Reserved Sales Quotes
Check this box if you want to include reservations for Sales
Quotes
Reserved Sales Orders
Check this box if you want to include reservations for Sales
Orders
Fixed Item Bin Min/Max
Check this box if you want to include items that are assigned to
Specific Item Restriction type bins and are below their bin
minimum
Random Item Bin with
existing Stock Qtys
29 | P a g e A c h i e v e W a r e h o u s e M a n a g e m e n t U s e r G u i d e
Check this box if you want to include items that are not
assigned to Specific Item Restriction type bins but already have
existing quantities in regular bins
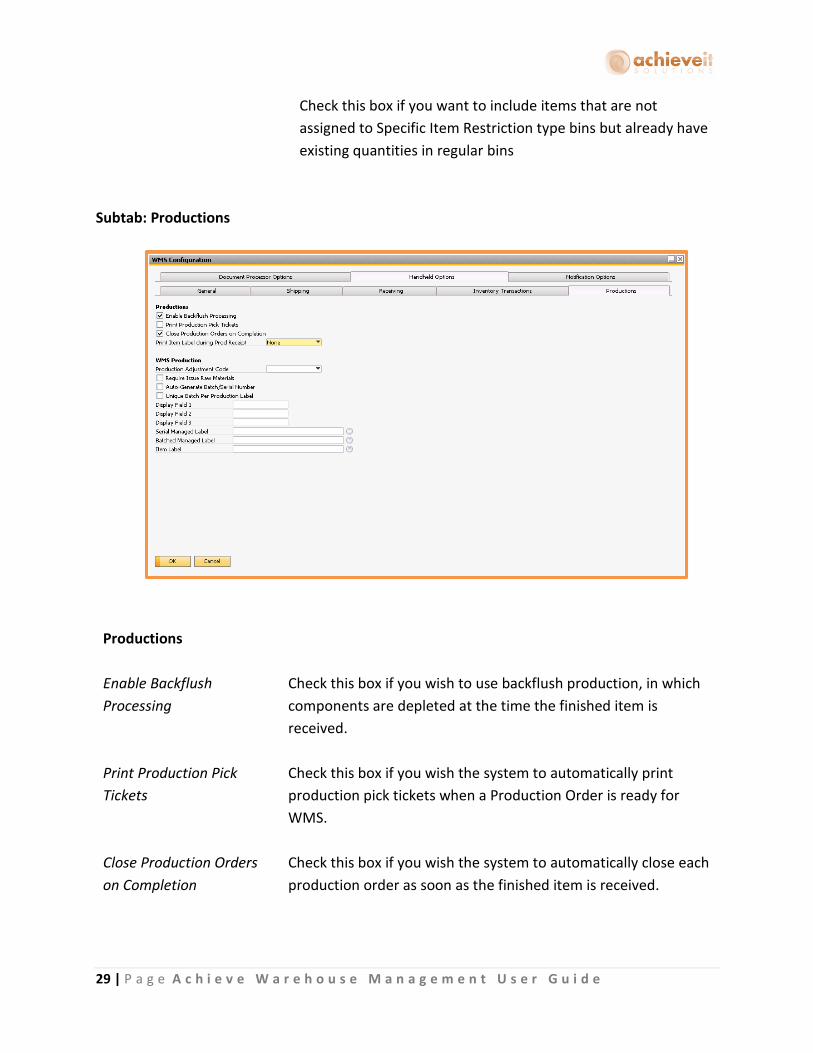
Subtab: Productions
Productions
Enable Backflush
Processing
Check this box if you wish to use backflush production, in which
components are depleted at the time the finished item is
received.
Print Production Pick
Tickets
Check this box if you wish the system to automatically print
production pick tickets when a Production Order is ready for
WMS.
Close Production Orders
on Completion
Check this box if you wish the system to automatically close each
production order as soon as the finished item is received.
30 | P a g e A c h i e v e W a r e h o u s e M a n a g e m e n t U s e r G u i d e
Print Item label during
Production Receipt
Select the option for printing item labels during the production
receiving process:
None: do not print labels
One per line: print one label for each line of the PO
(e.g., one label per item code, regardless of quantity)
One per unit: print one label for each unit received
WMS Production
These are the settings for the WMS Production screen on the
handheld that we will discuss later in this document
Production Adjustment
Code
Select the default WMS Adjustment Code for the inventory
quantity adjustments made by issuing raw materials and
receiving finished goods in the WMS Production Screen
Require Issue Raw
Materials
This option forces users to Issue the Raw Materials before they
can print production run labels
Auto-Generate
Batch/Serial Number
This option will allow users to not have to enter batch or serial
numbers for finished goods manually. Instead the creation of the
labels will generate new batch or serial numbers automatically.
Unique Batch Per
Production Order
This option will require that each individual finished goods
package received from the production run is unique
Display Field 1
Display Field 2
Display Field 3
Enter in your own field name(s) to be displayed on the WMS
Production Print Production Run Label screen on the Handheld
Serial Managed Label
Specify the report path for the serial managed finished goods’
item label
Batched Managed Label
Specify the report path for the batch managed finished goods’
item label
Item Label
Specify the report path for the non-managed finished goods’
item label

31 | P a g e A c h i e v e W a r e h o u s e M a n a g e m e n t U s e r G u i d e
Notification Options Tab
The screen lists a number of situations that could occur during WMS processing. For each one,
indicate whether a specific individual should receive a notification that the incident has
happened.
User Select the name of the user who should be notified when a
problem situation occurs. Select “Not Used” if you do not wish
any notifications for this type of problem.
Int. Check this box if the notification should be by internal
message – an alert within Business One
Email Check this box if the notification should be by means of the
user’s normal email address
32 | P a g e A c h i e v e W a r e h o u s e M a n a g e m e n t U s e r G u i d e
Activate Automatic
Availability Check
Normally the WMS system will manage item availability and
will notify you when there is a backorder situation, as above.
Therefore, the Business One Availability Check that would
occur during Sales Order entry is turned off by default.
However, if you wish to utilize this function, you may check
this box to enable it.
Skip when row is
based on Sales
Quotation
Have the Availability Check skip checking items that are based
from a Sales Quote
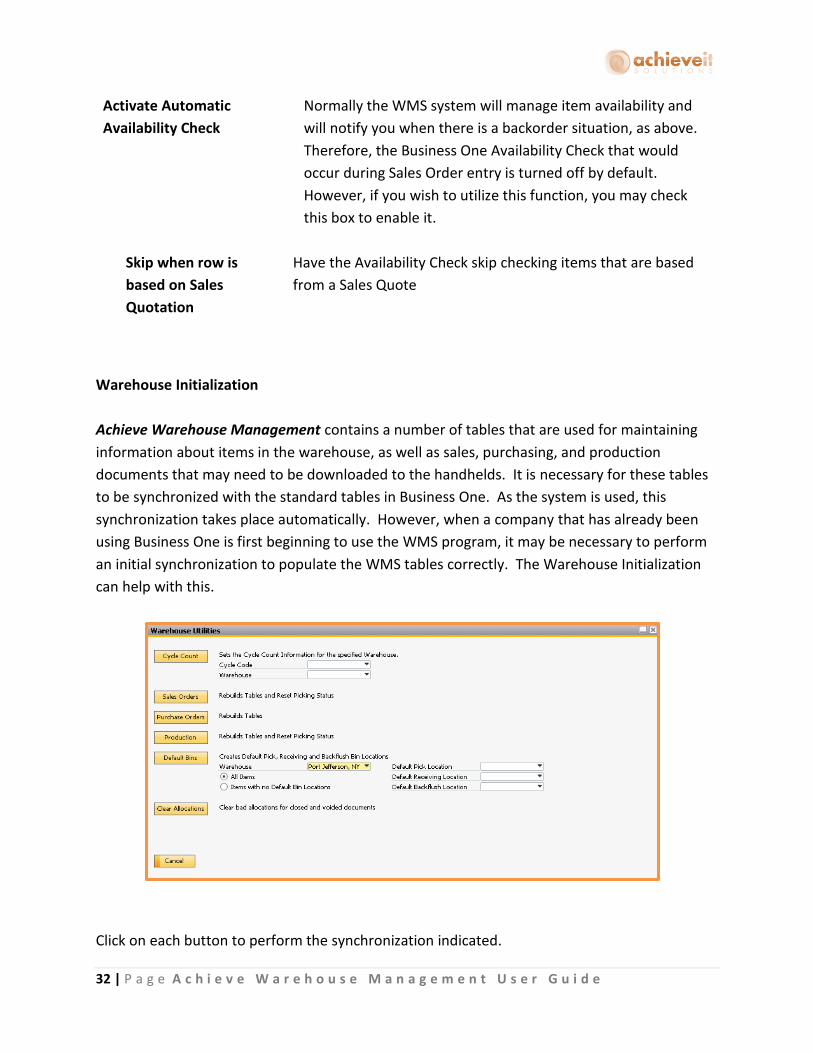
Warehouse Initialization
Achieve Warehouse Management contains a number of tables that are used for maintaining
information about items in the warehouse, as well as sales, purchasing, and production
documents that may need to be downloaded to the handhelds. It is necessary for these tables
to be synchronized with the standard tables in Business One. As the system is used, this
synchronization takes place automatically. However, when a company that has already been
using Business One is first beginning to use the WMS program, it may be necessary to perform
an initial synchronization to populate the WMS tables correctly. The Warehouse Initialization
can help with this.
Click on each button to perform the synchronization indicated.
33 | P a g e A c h i e v e W a r e h o u s e M a n a g e m e n t U s e r G u i d e
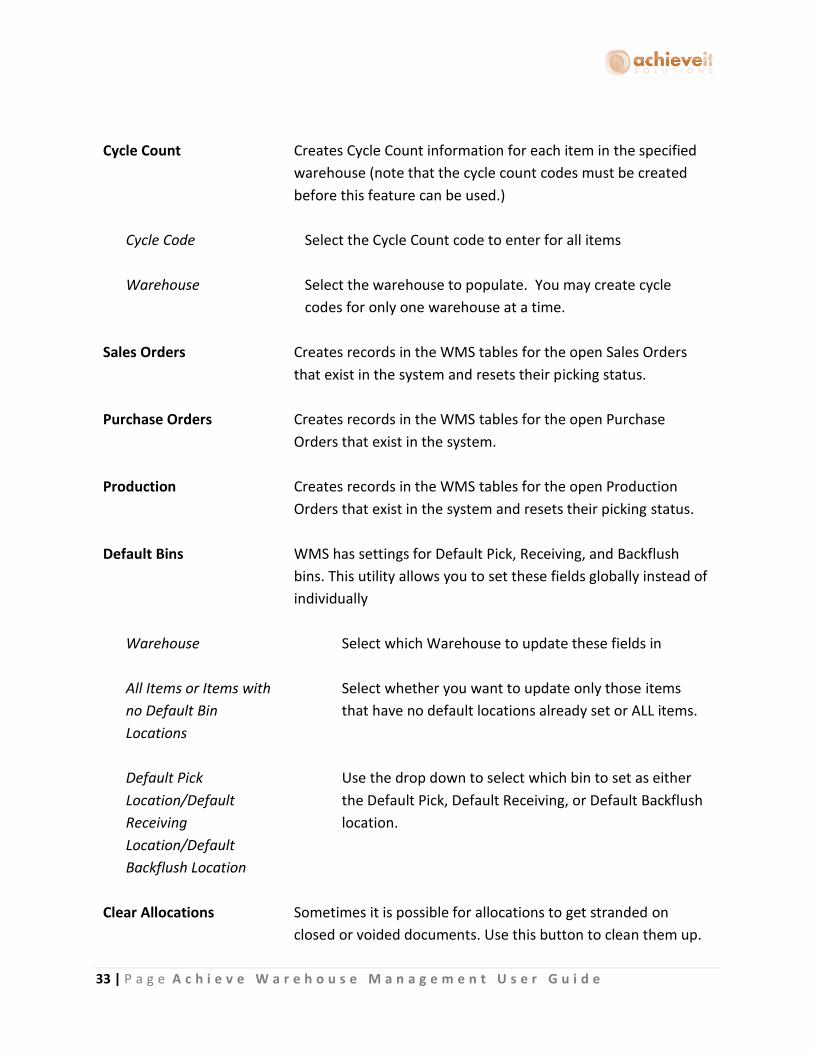
Cycle Count Creates Cycle Count information for each item in the specified
warehouse (note that the cycle count codes must be created
before this feature can be used.)
Cycle Code Select the Cycle Count code to enter for all items
Warehouse Select the warehouse to populate. You may create cycle
codes for only one warehouse at a time.
Sales Orders Creates records in the WMS tables for the open Sales Orders
that exist in the system and resets their picking status.
Purchase Orders Creates records in the WMS tables for the open Purchase
Orders that exist in the system.
Production Creates records in the WMS tables for the open Production
Orders that exist in the system and resets their picking status.
Default Bins WMS has settings for Default Pick, Receiving, and Backflush
bins. This utility allows you to set these fields globally instead of
individually
Warehouse
Select which Warehouse to update these fields in
All Items or Items with
no Default Bin
Locations
Select whether you want to update only those items
that have no default locations already set or ALL items.
Default Pick
Location/Default
Receiving
Location/Default
Backflush Location
Use the drop down to select which bin to set as either
the Default Pick, Default Receiving, or Default Backflush
location.
Clear Allocations
Sometimes it is possible for allocations to get stranded on
closed or voided documents. Use this button to clean them up.

34 | P a g e A c h i e v e W a r e h o u s e M a n a g e m e n t U s e r G u i d e
Item Master Data
Using Units of Measure
WMS uses the standard SAP Business One Units of Measure for each item. You may indicate a
default purchasing unit of measure, sales unit of measure, and inventory unit of measure for
each item. The system tracks item quantities by the inventory unit of measure, so it is
necessary to enter a conversion factor for the other units. In addition, you may use different
units of measure on sales and purchasing documents, as long as you enter a conversion factor
there as well.
For full explanations of each field please see your standard SAP help documentation.
Using Packages
WMS uses the standard SAP Business One Packages for its processes. For full explanations of
each field please see your standard SAP help documentation.
Standard Fields
Length, Width, Height,
Volume
WMS, in conjunction with Achieve Freight Control, will use
these dimension fields when determining standard packaging
Weight WMS, in conjunction with Achieve Freight Control, will add this
weight to the items in the package when rate shopping and
determining shipment costs

35 | P a g e A c h i e v e W a r e h o u s e M a n a g e m e n t U s e r G u i d e
WMS Added Fields
Master Package Number
Scan Mandatory
Check this box if you want to require that a master package
number be entered when packing on the WMS handheld
Master Package Type
Scan Mandatory
Check this box if you want to require that a master package type
be entered when packing on the WMS handheld
Package Volume Scan
Mandatory
Check this box if you want to require that the package volume
be entered when packing on the WMS handheld
Scale Weight Scan
Mandatory
Check this box if you want to require that the weight be entered
when packing on the WMS handheld
Carrier Scan Mandatory
Check this box if you want to require that a carrier ID # be
entered when packing on the WMS handheld
Seal Scan Mandatory
Check this box if you want to require that a seal # be entered
when packing on the WMS handheld
Inspection Seal Scan
Mandatory
Check this box if you want to require that an inspection seal #
be entered when packing on the WMS handheld
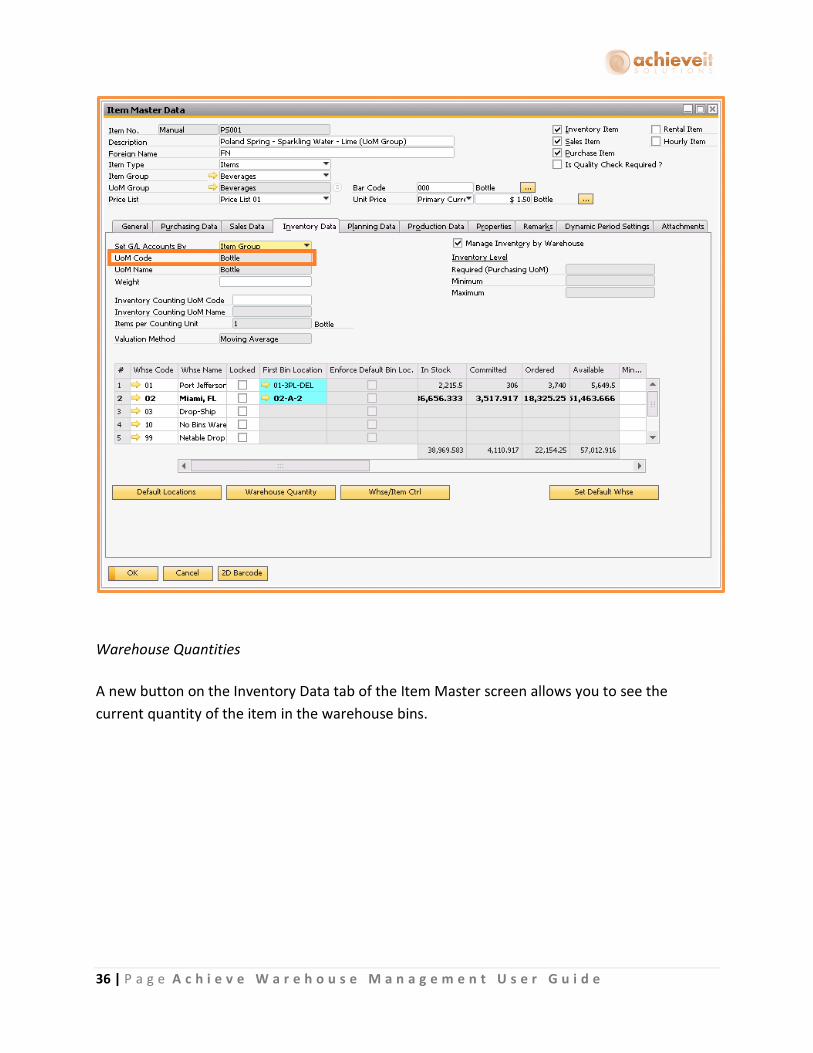
Inventory Data Tab
The Inventory Data tab will contain the default Inventory UoM for the item.
The Inventory UoM is used to indicate the actual quantity in the warehouse. It should be the
base or smallest unit of measure from which all of the others are derived. If possible, the
Inventory UoM should be “Each” or something equivalent which would not require fractional
parts.
Please consult your support representative if you have any questions regarding the best way to
set up the units of measure.
36 | P a g e A c h i e v e W a r e h o u s e M a n a g e m e n t U s e r G u i d e
Warehouse Quantities
A new button on the Inventory Data tab of the Item Master screen allows you to see the
current quantity of the item in the warehouse bins.

37 | P a g e A c h i e v e W a r e h o u s e M a n a g e m e n t U s e r G u i d e
Click on the “Warehouse Quantity” button. The Item Qty window is displayed. You may view
quantities in one warehouse or in all warehouses. The window displays a list of bins in each
warehouse where this item is currently located. It includes the bin number, quantity on hand in
the bin, allocated quantity, the last date that the item was added to the bin, and the bin type.
You can also see the total on hand quantity.

38 | P a g e A c h i e v e W a r e h o u s e M a n a g e m e n t U s e r G u i d e
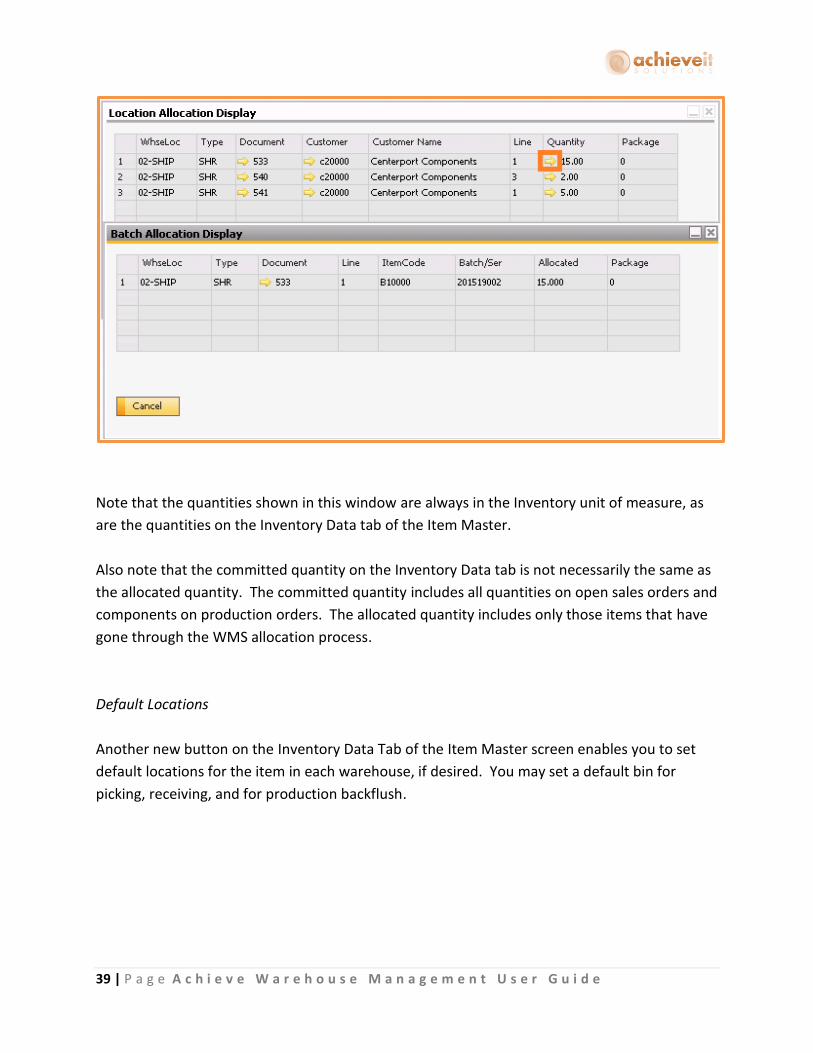
If you drill into the gold arrow next to the number in the Allocated column it will open the
Location Allocation Display window which shows you which documents make up that allocation
number.
Then if you drill into the gold arrow next to the number in the Quantity column it will open up
the Batch Allocation Display window. If the item is set to use Serials or Batches and has batches
or serials allocated (whether from the Sales Order or from Picking) then this window will display
them.
39 | P a g e A c h i e v e W a r e h o u s e M a n a g e m e n t U s e r G u i d e
Note that the quantities shown in this window are always in the Inventory unit of measure, as
are the quantities on the Inventory Data tab of the Item Master.
Also note that the committed quantity on the Inventory Data tab is not necessarily the same as
the allocated quantity. The committed quantity includes all quantities on open sales orders and
components on production orders. The allocated quantity includes only those items that have
gone through the WMS allocation process.
Default Locations
Another new button on the Inventory Data Tab of the Item Master screen enables you to set
default locations for the item in each warehouse, if desired. You may set a default bin for
picking, receiving, and for production backflush.

40 | P a g e A c h i e v e W a r e h o u s e M a n a g e m e n t U s e r G u i d e
Click on the “Default Locations” button. The Default Bin Locations window is displayed. You
may enter your choices in the upper portion of the window, and they will be shown in the lower
portion.
Warehouse Code Select the warehouse for the default location
Default Receiving Bin Select the location into which this item will generally be
received in this warehouse
41 | P a g e A c h i e v e W a r e h o u s e M a n a g e m e n t U s e r G u i d e
Default Picking Bin Select the location from which this item will generally be
picked in this warehouse
Default Backflush Bin Select the location from which this item will be picked as a
component during production in this warehouse. This choice
is valid only if “Enable Backflush Processing” was selected in
WMS Options, and if the item is not a serial or batch-number
item. It is required that the item must be in this bin if it is a
backflush component on a production order.
When all entries have been entered for a warehouse, click on “Update” to save the selections
and display them in the grid.
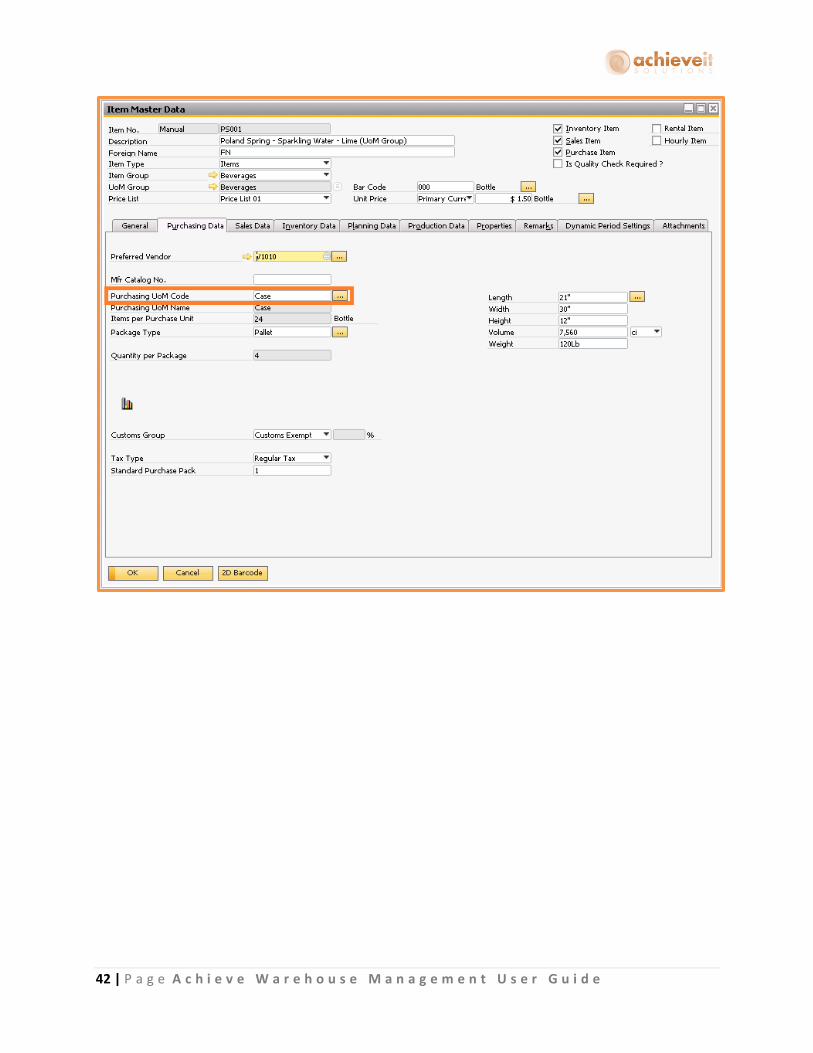
Purchasing Data Tab
The Purchasing Data tab will contain the default Purchasing UoM for the item.
The Purchasing UoM found on this screen will be the default unit of measure on Purchase
Orders and other purchase documents. However, you will be able to enter other valid units of
measure if desired.
Please consult your support representative if you have any questions regarding the best way to
set up the units of measure.
42 | P a g e A c h i e v e W a r e h o u s e M a n a g e m e n t U s e r G u i d e

43 | P a g e A c h i e v e W a r e h o u s e M a n a g e m e n t U s e r G u i d e
Sales Data Tab
The Sales Data tab will contain the default Sales UoM for the item.
The Sales UoM found on this screen will be the default unit of measure on Sales Orders and
other Sales documents. However, you will be able to enter other valid units of measure if
desired.
Please consult your support representative if you have any questions regarding the best way to
set up the units of measure.
44 | P a g e A c h i e v e W a r e h o u s e M a n a g e m e n t U s e r G u i d e
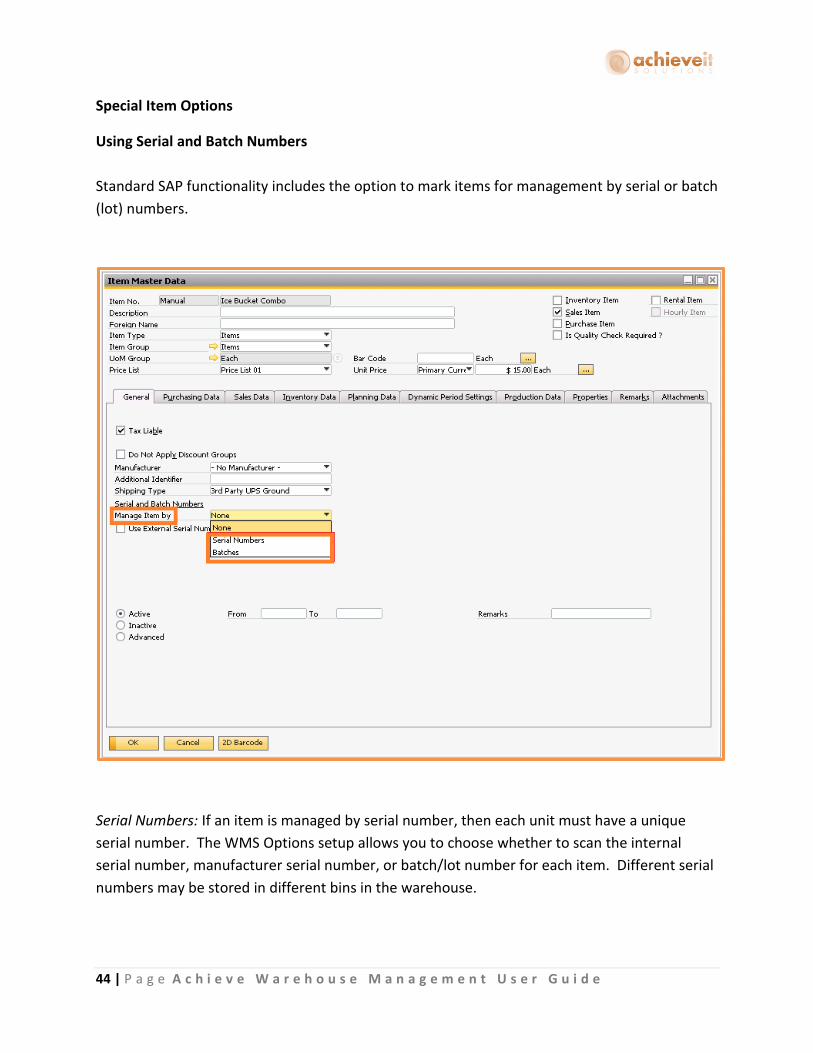
Special Item Options
Using Serial and Batch Numbers
Standard SAP functionality includes the option to mark items for management by serial or batch
(lot) numbers.
Serial Numbers: If an item is managed by serial number, then each unit must have a unique
serial number. The WMS Options setup allows you to choose whether to scan the internal
serial number, manufacturer serial number, or batch/lot number for each item. Different serial
numbers may be stored in different bins in the warehouse.
45 | P a g e A c h i e v e W a r e h o u s e M a n a g e m e n t U s e r G u i d e
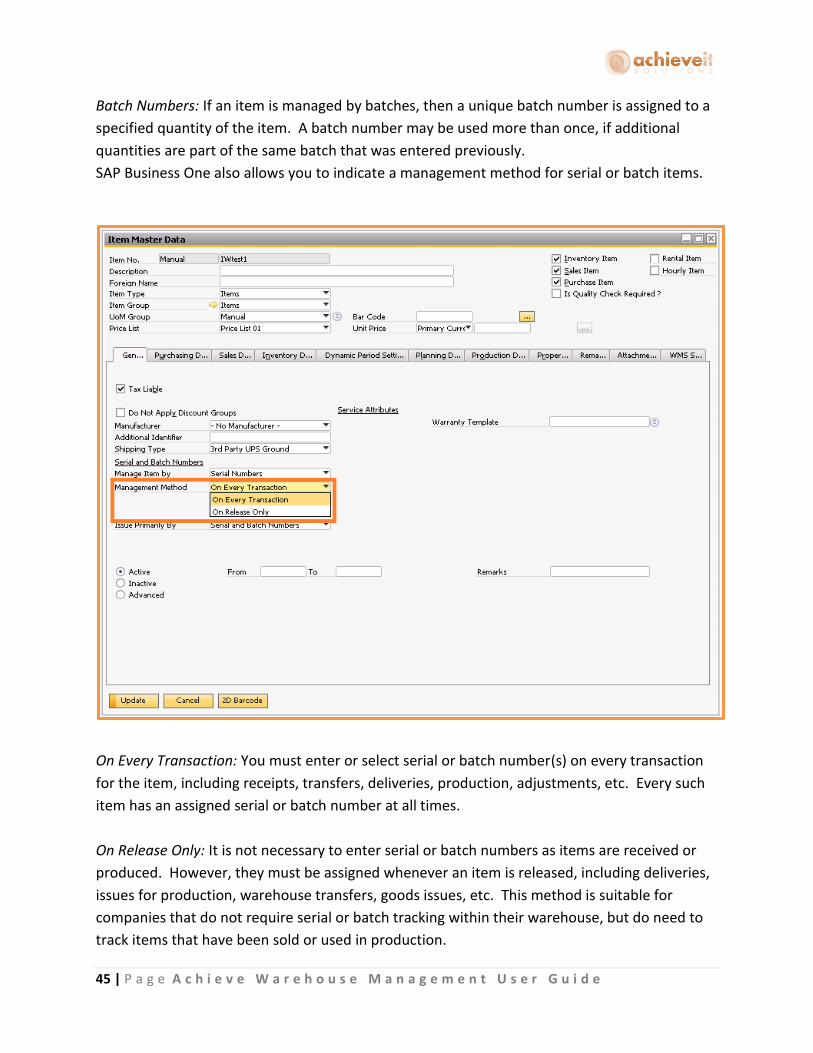
Batch Numbers: If an item is managed by batches, then a unique batch number is assigned to a
specified quantity of the item. A batch number may be used more than once, if additional
quantities are part of the same batch that was entered previously.
SAP Business One also allows you to indicate a management method for serial or batch items.
On Every Transaction: You must enter or select serial or batch number(s) on every transaction
for the item, including receipts, transfers, deliveries, production, adjustments, etc. Every such
item has an assigned serial or batch number at all times.
On Release Only: It is not necessary to enter serial or batch numbers as items are received or
produced. However, they must be assigned whenever an item is released, including deliveries,
issues for production, warehouse transfers, goods issues, etc. This method is suitable for
companies that do not require serial or batch tracking within their warehouse, but do need to
track items that have been sold or used in production.
46 | P a g e A c h i e v e W a r e h o u s e M a n a g e m e n t U s e r G u i d e
Achieve Warehouse Management adheres to all of the procedures required by the Business
One program. You will be required to enter or select serial or batch numbers for all
transactions as indicated by the management method for the item. Please note that in order to
use On Release Only for Serial Management, the option must be selected in the Warehouse
Management Options screen discussed earlier
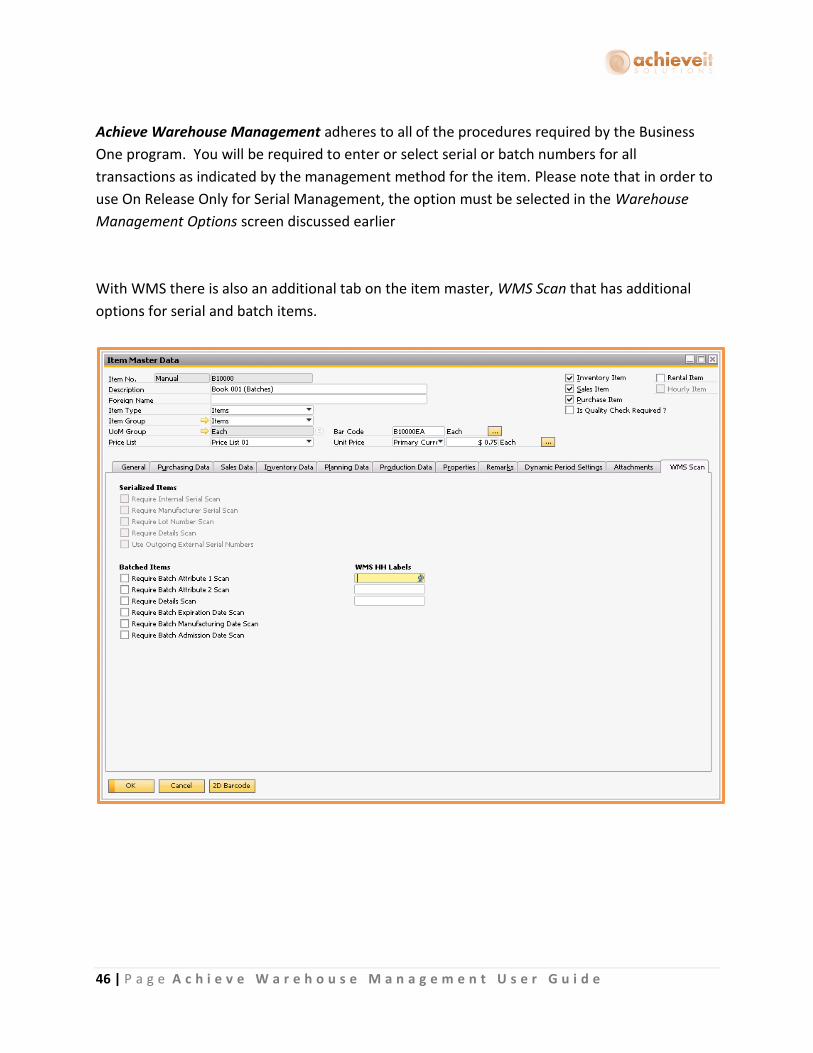
With WMS there is also an additional tab on the item master, WMS Scan that has additional
options for serial and batch items.

47 | P a g e A c h i e v e W a r e h o u s e M a n a g e m e n t U s e r G u i d e
Serialized Items
Require Internal Serial
Scan
Will require that users scan a value into the Internal Serial
Number field on the handheld
Require Manufacturer
Serial Scan
Will require that users scan a value into the Manufacturer
Serial Number field on the handheld
Require Lot Number Scan Will require that users scan a value into the Lot Number field
on the handheld
Require Details Scan Will require that users scan a value into the Details field on the
handheld
Use Outgoing External
Serial Numbers
This can be enabled when using an Achieve One feature for
very high volume called External Serial Numbers. Please see
the guide Using External Serial Number with Achieve One
WMS for more information
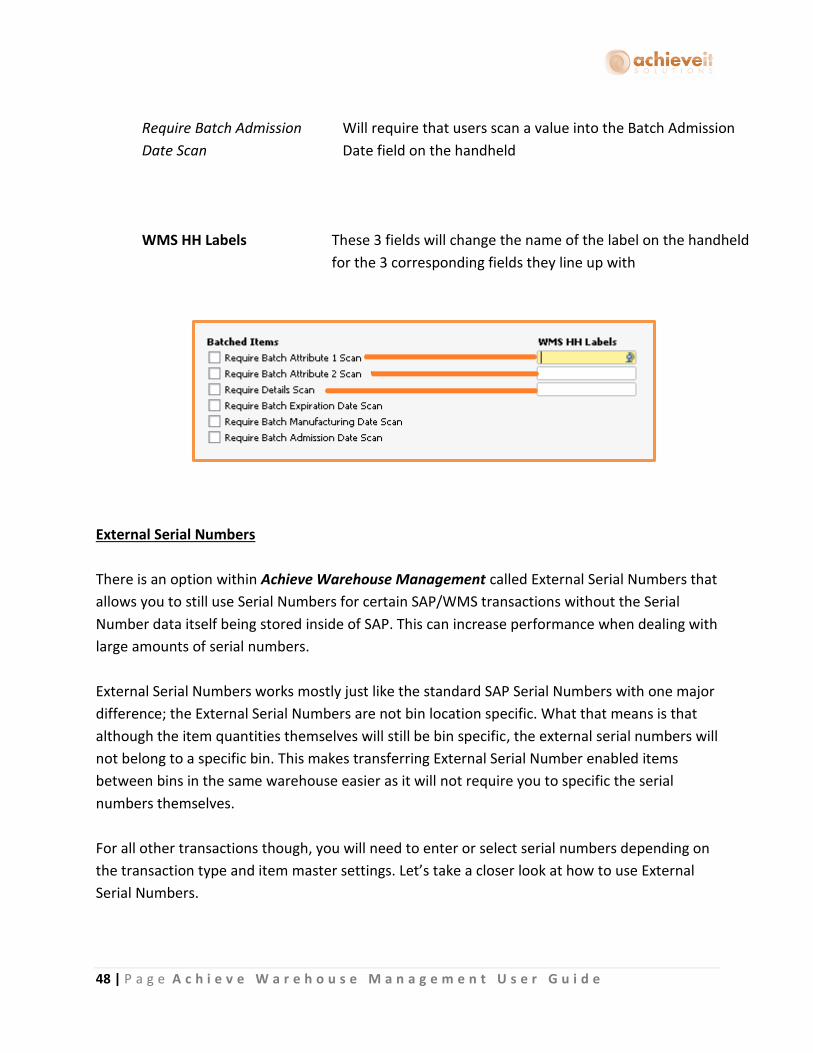
Batched Items
Require Batch Attribute 1
Scan
Will require that users scan a value into the Batch Attribute 1
field on the handheld
Require Batch Attribute 2
Scan
Will require that users scan a value into the Batch Attribute 2
field on the handheld
Require Details Scan Will require that users scan a value into the Details field on the
handheld
Require Batch Expiration
Date Scan
Will require that users scan a value into the Batch Expiration
field on the handheld
Require Batch
Manufacturing Date Scan
Will require that users scan a value into the Batch
Manufacturing Date field on the handheld
48 | P a g e A c h i e v e W a r e h o u s e M a n a g e m e n t U s e r G u i d e
External Serial Numbers
There is an option within Achieve Warehouse Management called External Serial Numbers that
allows you to still use Serial Numbers for certain SAP/WMS transactions without the Serial
Number data itself being stored inside of SAP. This can increase performance when dealing with
large amounts of serial numbers.
External Serial Numbers works mostly just like the standard SAP Serial Numbers with one major
difference; the External Serial Numbers are not bin location specific. What that means is that
although the item quantities themselves will still be bin specific, the external serial numbers will
not belong to a specific bin. This makes transferring External Serial Number enabled items
between bins in the same warehouse easier as it will not require you to specific the serial
numbers themselves.
For all other transactions though, you will need to enter or select serial numbers depending on
the transaction type and item master settings. Let’s take a closer look at how to use External
Serial Numbers.
Require Batch Admission
Date Scan
Will require that users scan a value into the Batch Admission
Date field on the handheld
WMS HH Labels
These 3 fields will change the name of the label on the handheld
for the 3 corresponding fields they line up with
49 | P a g e A c h i e v e W a r e h o u s e M a n a g e m e n t U s e r G u i d e
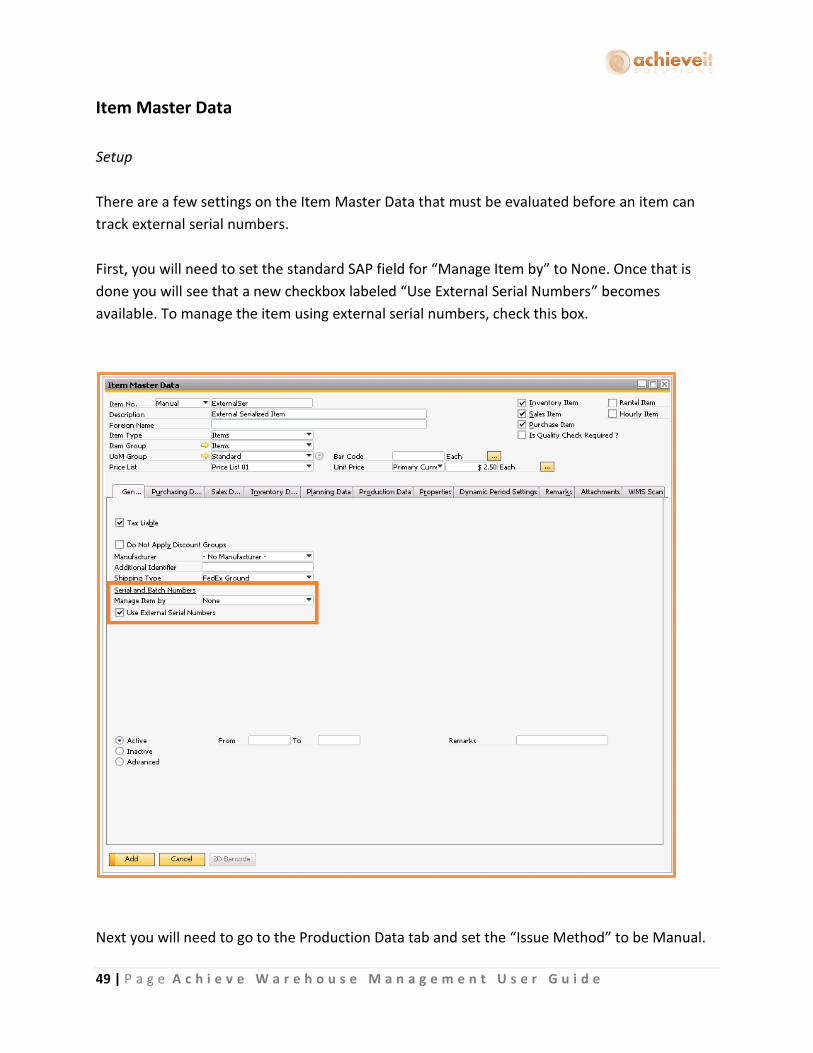
Item Master Data
Setup
There are a few settings on the Item Master Data that must be evaluated before an item can
track external serial numbers.
First, you will need to set the standard SAP field for “Manage Item by” to None. Once that is
done you will see that a new checkbox labeled “Use External Serial Numbers” becomes
available. To manage the item using external serial numbers, check this box.
Next you will need to go to the Production Data tab and set the “Issue Method” to be Manual.

50 | P a g e A c h i e v e W a r e h o u s e M a n a g e m e n t U s e r G u i d e
Note, if you forget this step and try to Add or Update the item, a message will pop up letting
you know that it needs to be set to Manual and asks if you would like to set it now.
51 | P a g e A c h i e v e W a r e h o u s e M a n a g e m e n t U s e r G u i d e
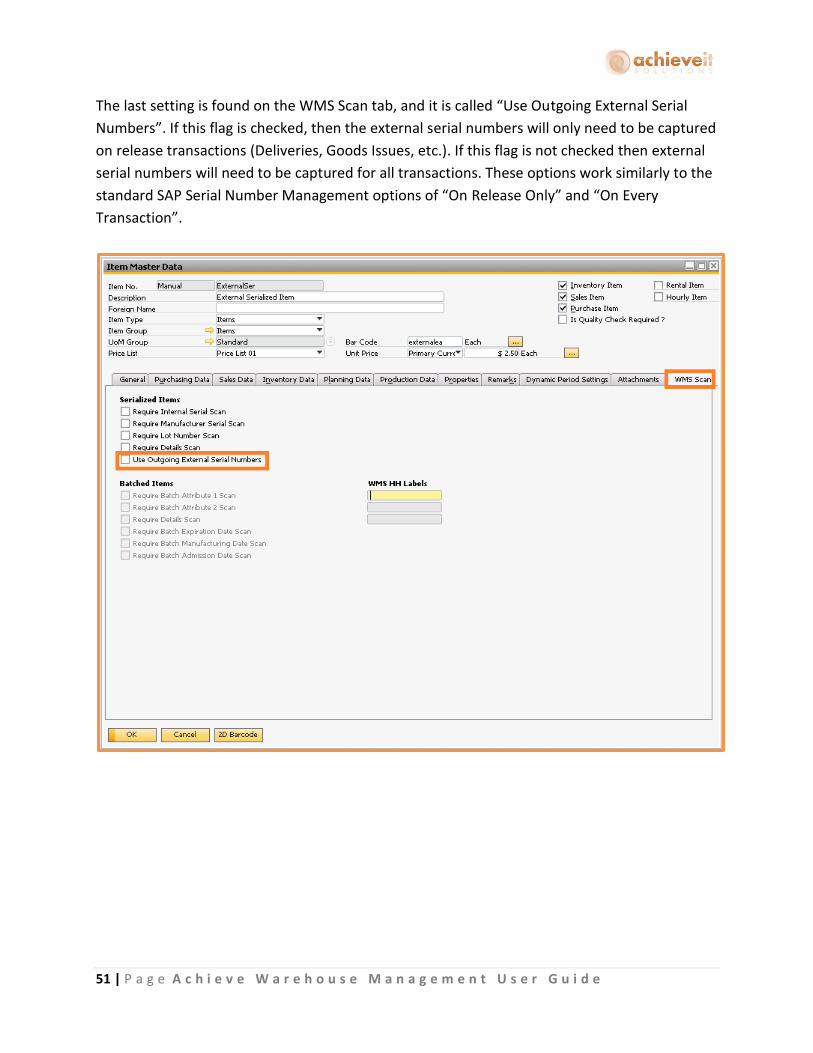
The last setting is found on the WMS Scan tab, and it is called “Use Outgoing External Serial
Numbers”. If this flag is checked, then the external serial numbers will only need to be captured
on release transactions (Deliveries, Goods Issues, etc.). If this flag is not checked then external
serial numbers will need to be captured for all transactions. These options work similarly to the
standard SAP Serial Number Management options of “On Release Only” and “On Every
Transaction”.
52 | P a g e A c h i e v e W a r e h o u s e M a n a g e m e n t U s e r G u i d e
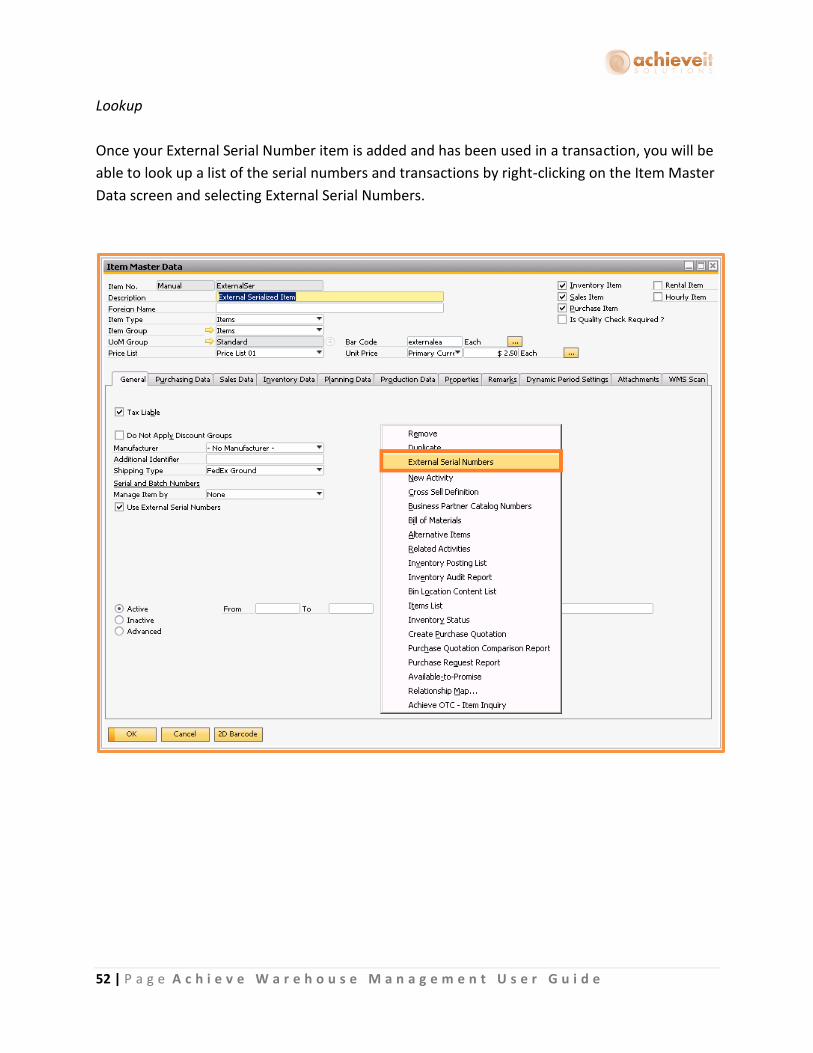
Lookup
Once your External Serial Number item is added and has been used in a transaction, you will be
able to look up a list of the serial numbers and transactions by right-clicking on the Item Master
Data screen and selecting External Serial Numbers.

53 | P a g e A c h i e v e W a r e h o u s e M a n a g e m e n t U s e r G u i d e
That will open up the External Serial Number Transaction Display screen. At the top, you will
see a list of the serial numbers, what warehouse they are in, and if they are available or not. As
you highlight each row, the bottom will display the transactions that the serial number has
been involved in.

54 | P a g e A c h i e v e W a r e h o u s e M a n a g e m e n t U s e r G u i d e
SAP Business One Processes
When using External Serial Numbers inside of SAP transactions, the system will prompt you to
enter or select them.
Incoming Transactions
On incoming transactions like GRPOs or Returns for example, you will need to enter in the
external serial numbers that are coming into the system. To do that there are two options.
Note, if your item is set to use Outgoing External Serial Numbers only, then it will not prompt
you for the external serial numbers.
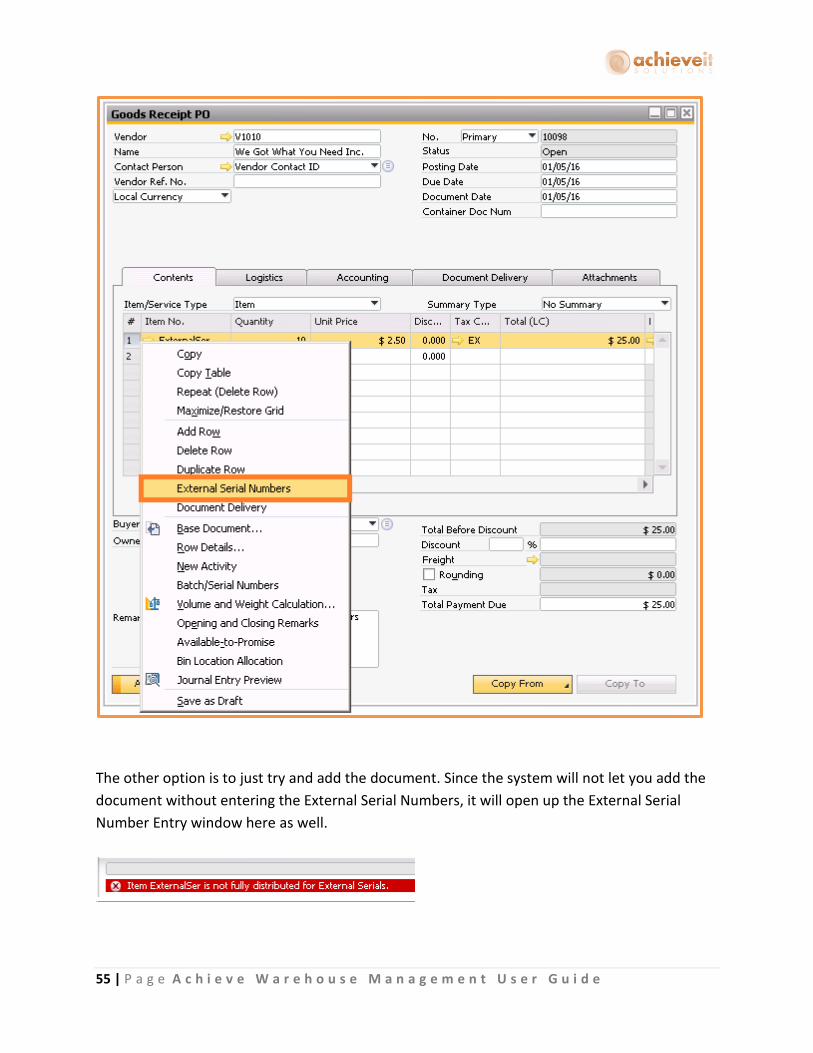
The first option is to highlight the item row on the document, then right-click and select
External Serial Numbers. That will open up the External Serial Number Entry window.
55 | P a g e A c h i e v e W a r e h o u s e M a n a g e m e n t U s e r G u i d e
The other option is to just try and add the document. Since the system will not let you add the
document without entering the External Serial Numbers, it will open up the External Serial
Number Entry window here as well.
56 | P a g e A c h i e v e W a r e h o u s e M a n a g e m e n t U s e r G u i d e
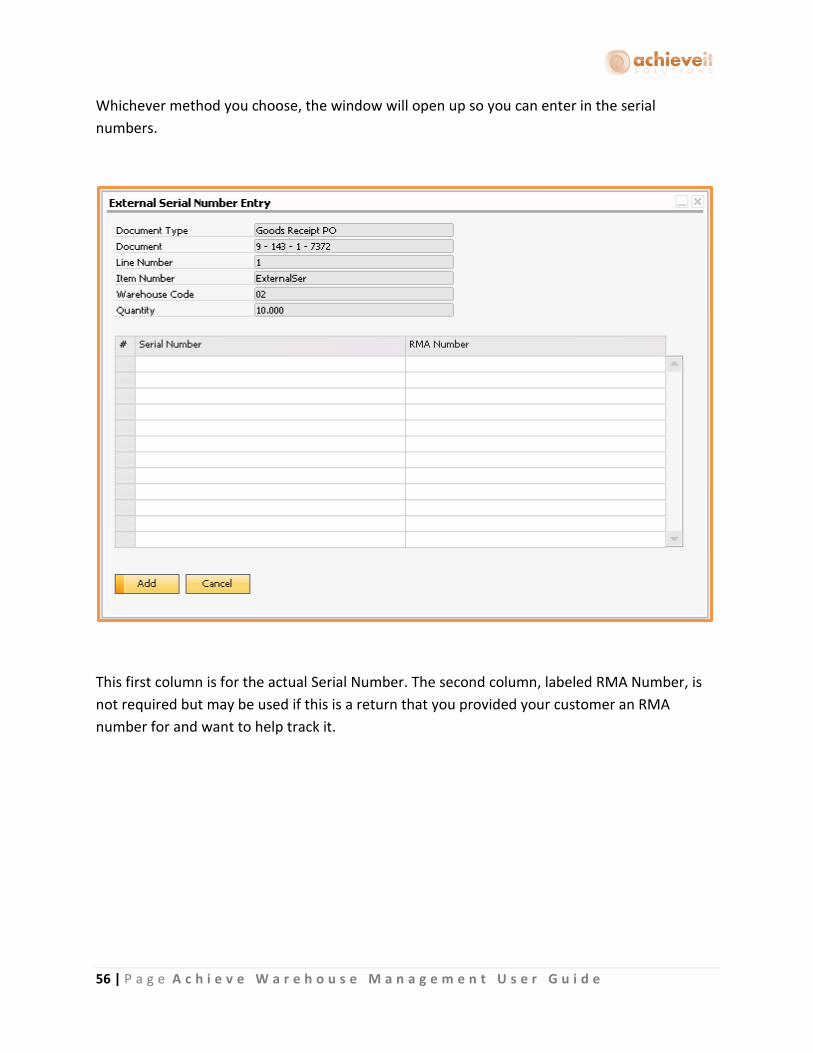
Whichever method you choose, the window will open up so you can enter in the serial
numbers.
This first column is for the actual Serial Number. The second column, labeled RMA Number, is
not required but may be used if this is a return that you provided your customer an RMA
number for and want to help track it.

57 | P a g e A c h i e v e W a r e h o u s e M a n a g e m e n t U s e r G u i d e
After you have filled in all your information, you can click on Add to save the serial numbers.
That will bring you back to the main document screen where you can now finish your
transaction.
Note, since External Serial Numbers are not bin specific like we mentioned above, the bin you
select will only be for the item quantities, not the serial numbers themselves.
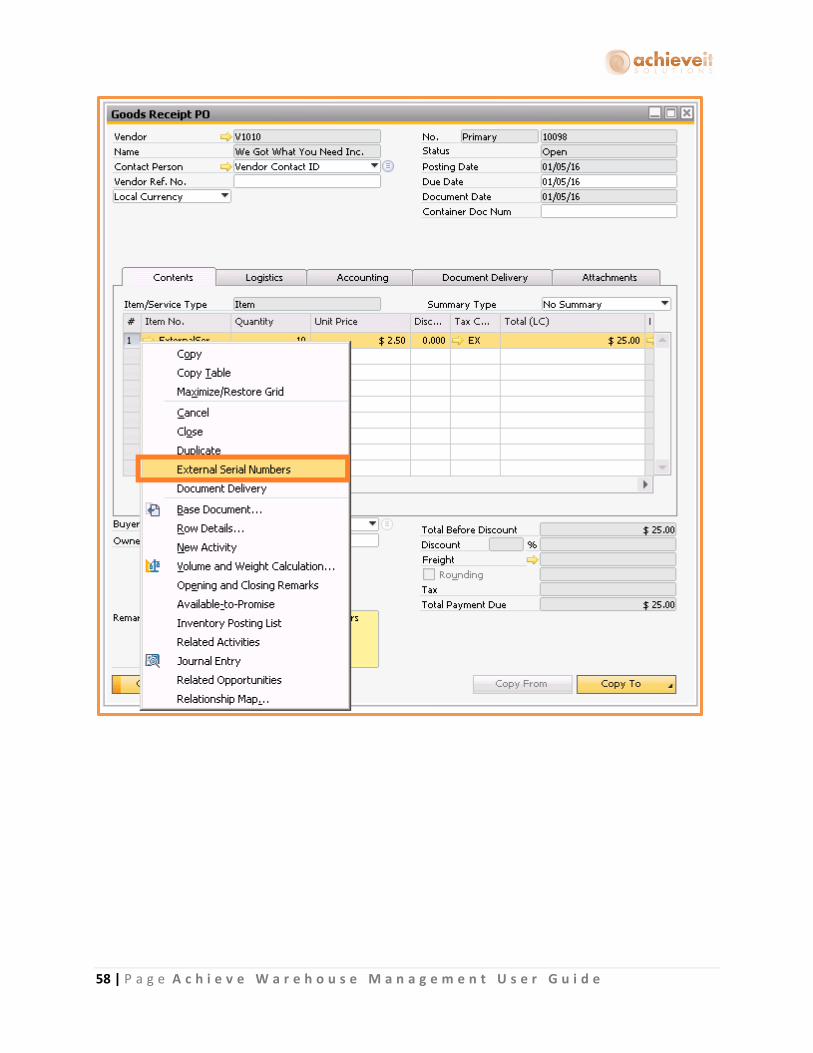
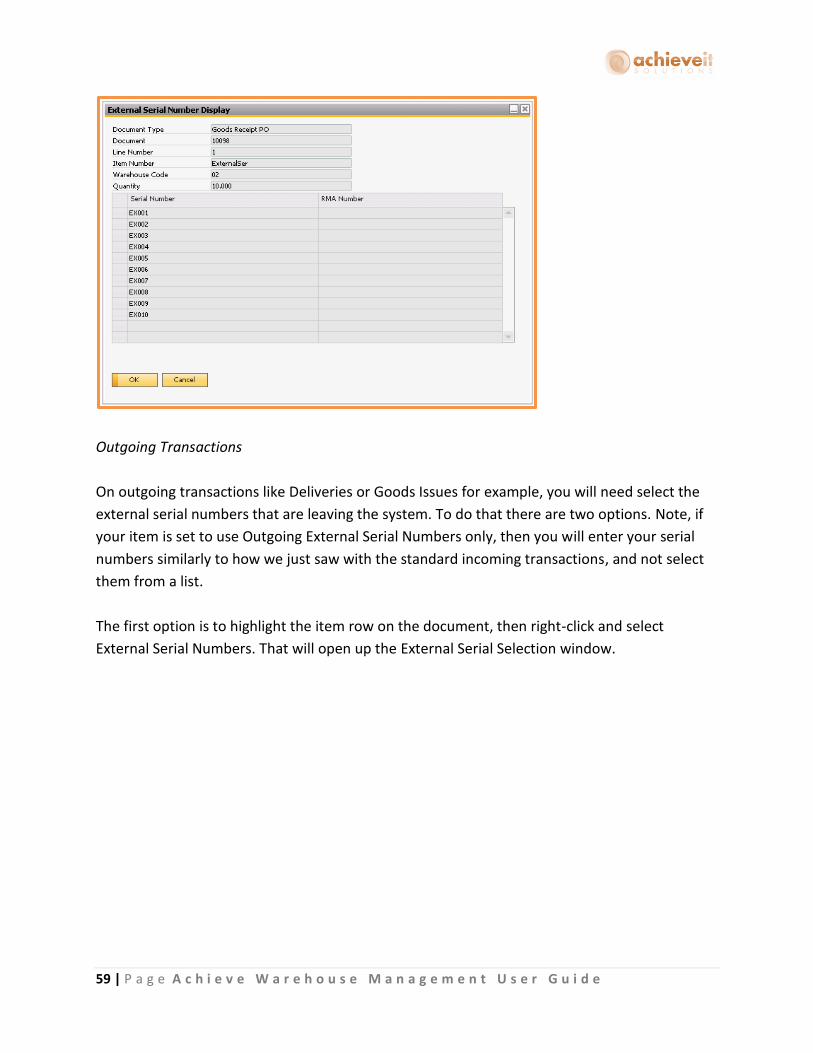
After the document has been added, you can pull it back up and review the serial numbers that
were entered by right-clicking on the row and selecting External Serial Numbers. That will bring
up the External Serial Number Display screen.
58 | P a g e A c h i e v e W a r e h o u s e M a n a g e m e n t U s e r G u i d e
59 | P a g e A c h i e v e W a r e h o u s e M a n a g e m e n t U s e r G u i d e
Outgoing Transactions
On outgoing transactions like Deliveries or Goods Issues for example, you will need select the
external serial numbers that are leaving the system. To do that there are two options. Note, if
your item is set to use Outgoing External Serial Numbers only, then you will enter your serial
numbers similarly to how we just saw with the standard incoming transactions, and not select
them from a list.
The first option is to highlight the item row on the document, then right-click and select
External Serial Numbers. That will open up the External Serial Selection window.
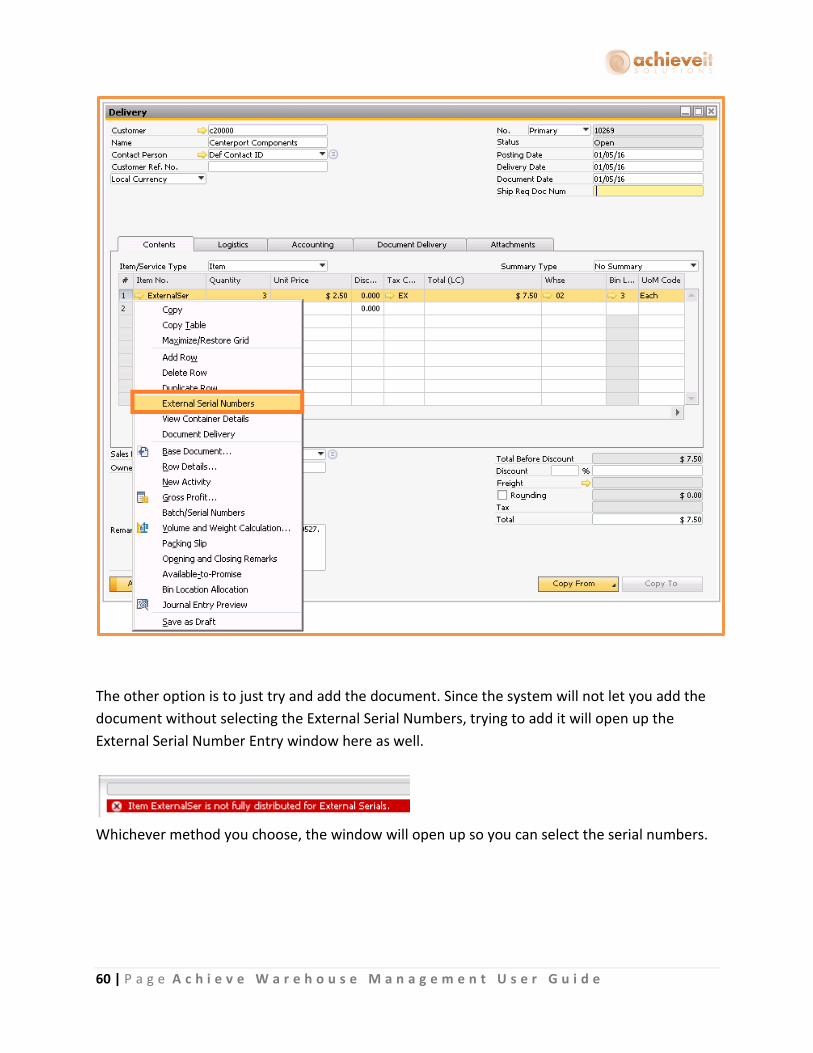
60 | P a g e A c h i e v e W a r e h o u s e M a n a g e m e n t U s e r G u i d e
The other option is to just try and add the document. Since the system will not let you add the
document without selecting the External Serial Numbers, trying to add it will open up the
External Serial Number Entry window here as well.
Whichever method you choose, the window will open up so you can select the serial numbers.
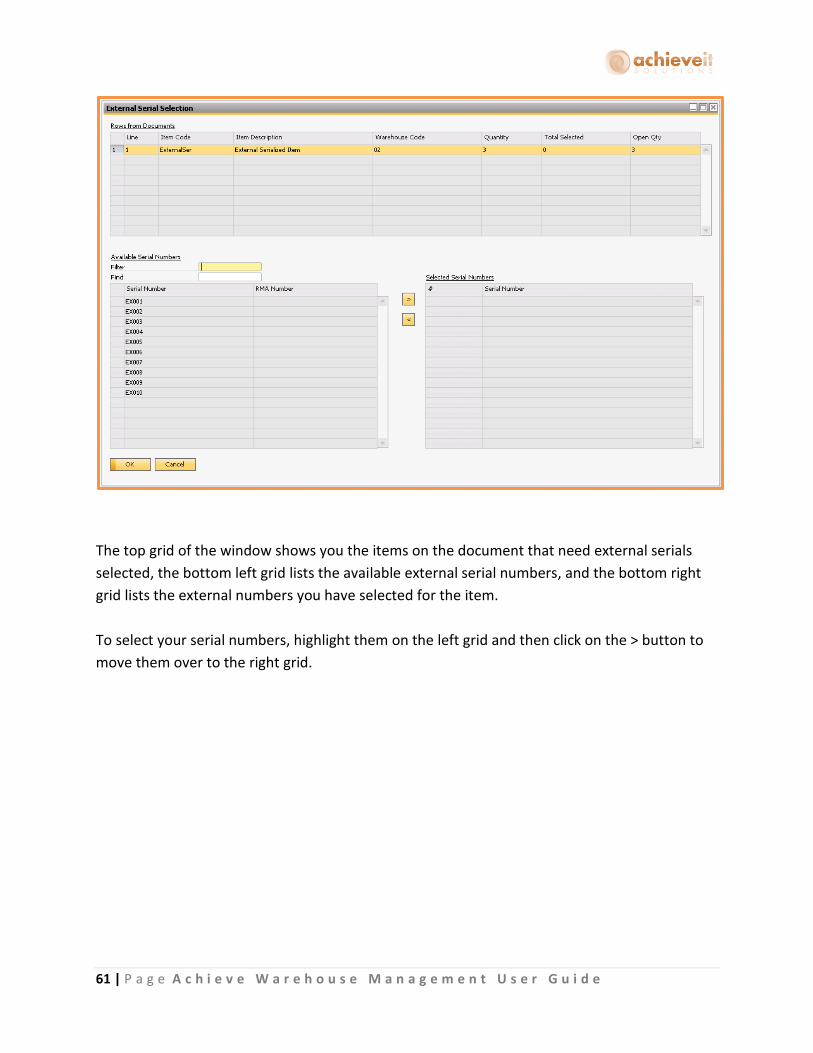
61 | P a g e A c h i e v e W a r e h o u s e M a n a g e m e n t U s e r G u i d e
The top grid of the window shows you the items on the document that need external serials
selected, the bottom left grid lists the available external serial numbers, and the bottom right
grid lists the external numbers you have selected for the item.
To select your serial numbers, highlight them on the left grid and then click on the > button to
move them over to the right grid.
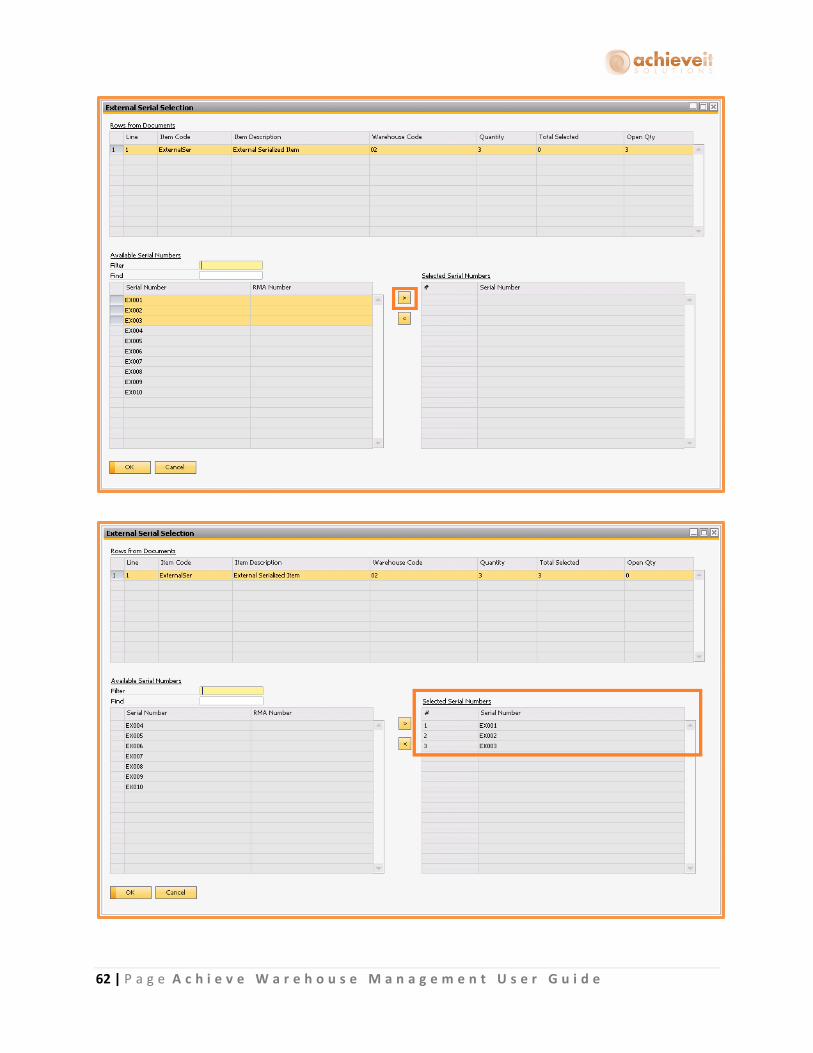
62 | P a g e A c h i e v e W a r e h o u s e M a n a g e m e n t U s e r G u i d e

63 | P a g e A c h i e v e W a r e h o u s e M a n a g e m e n t U s e r G u i d e
If you need to remove a serial number from the selected grid on the right, you can just highlight
it and use the < button to move it back to the available grid on the left.
After you have moved all your serial numbers to the selected grid on the right, you can click on
OK to save the serial numbers. That will bring you back to the main document screen where
you can now finish your transaction.
Note, since External Serial Numbers are not bin specific like we mentioned above, the bin you
select will only be for the item quantities, not the serial numbers themselves.
After the document has been added you can pull it back up and review the serial numbers that
were selected by right-clicking on the row and selecting External Serial Numbers. That will bring
up the External Serial Number Display screen.

64 | P a g e A c h i e v e W a r e h o u s e M a n a g e m e n t U s e r G u i d e

65 | P a g e A c h i e v e W a r e h o u s e M a n a g e m e n t U s e r G u i d e
WMS Handheld Processes
When working with External Serial Numbers, the WMS Handheld Processes are fairly similar to
working with regular SAP Serial Numbers but you will find some of the differences below.
Serial Management Screen
When using a standard SAP Serial Managed item, the Serial Management screen on the
handheld looks like this:
As you can see you have the ability to use the Internal, Manufacturer, Lot #, or Details field
when entering the serial number.
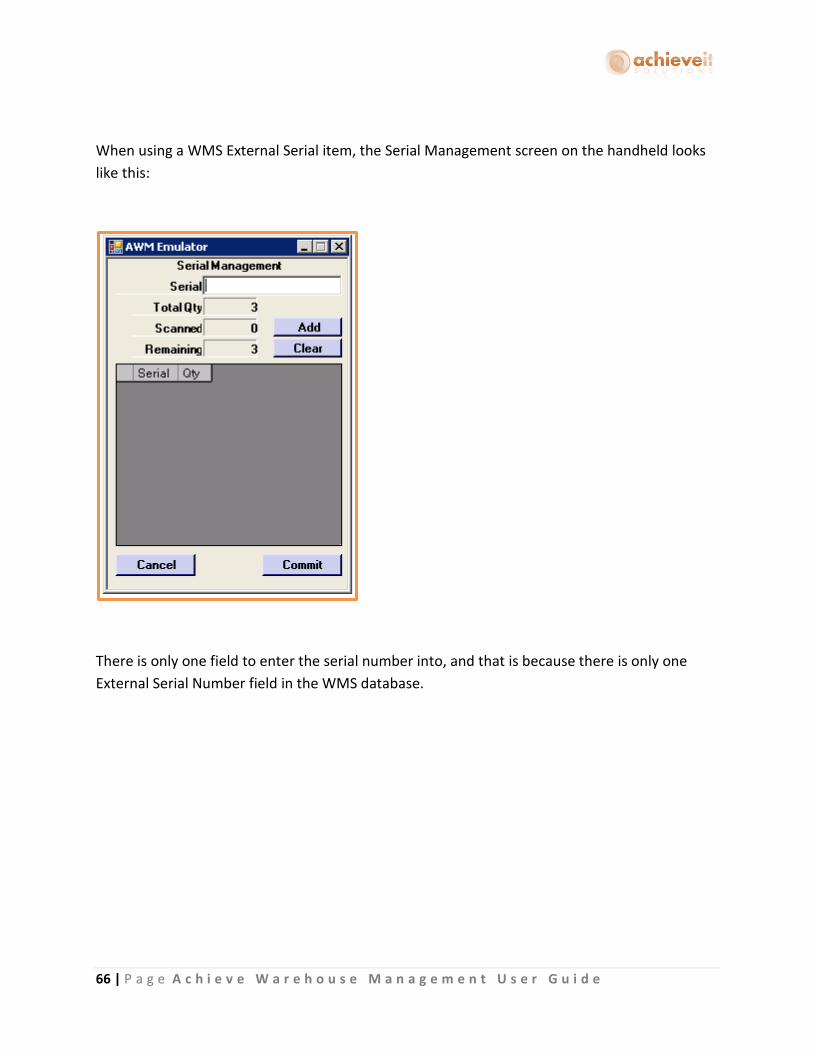
66 | P a g e A c h i e v e W a r e h o u s e M a n a g e m e n t U s e r G u i d e
When using a WMS External Serial item, the Serial Management screen on the handheld looks
like this:
There is only one field to enter the serial number into, and that is because there is only one
External Serial Number field in the WMS database.

67 | P a g e A c h i e v e W a r e h o u s e M a n a g e m e n t U s e r G u i d e
Transfers
When doing a transfer between bins in the same warehouse for a standard SAP Serial Managed
item, you are required to use the … button to select the serial numbers.
When doing a transfer between bins in the same warehouse for an External Serial item, there is
no … button because you are not required to select the serial numbers.
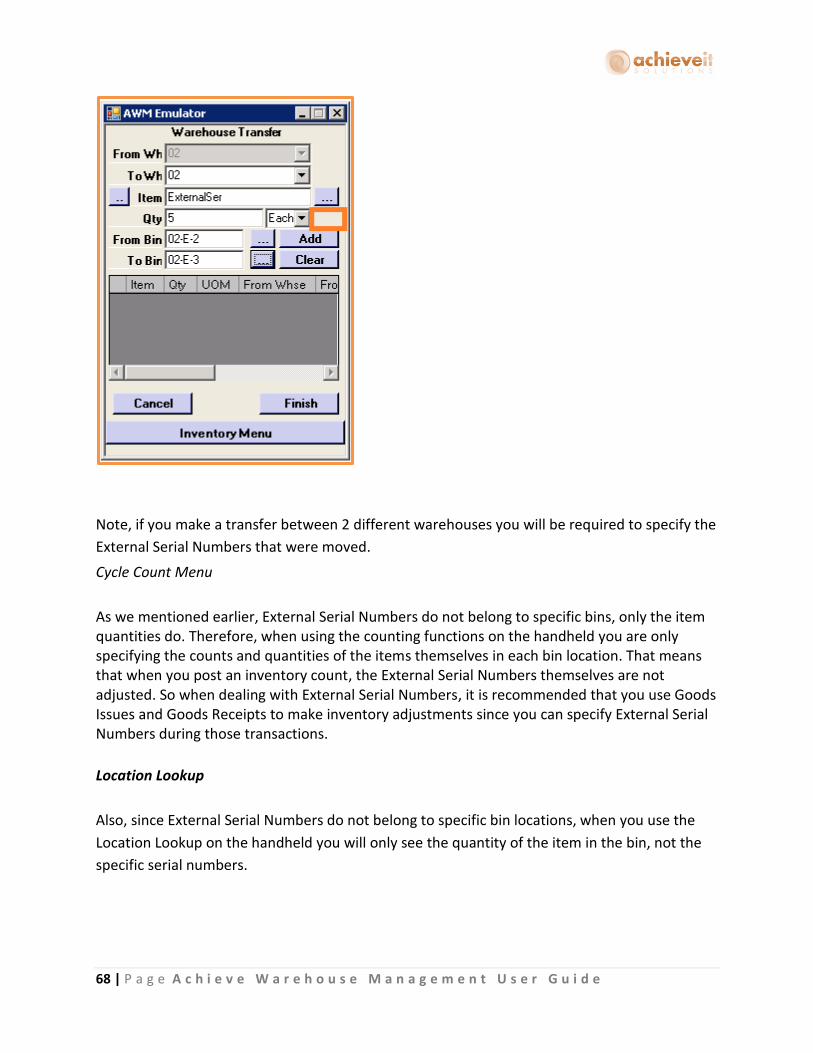
68 | P a g e A c h i e v e W a r e h o u s e M a n a g e m e n t U s e r G u i d e
Note, if you make a transfer between 2 different warehouses you will be required to specify the
External Serial Numbers that were moved.
Cycle Count Menu
As we mentioned earlier, External Serial Numbers do not belong to specific bins, only the item quantities do. Therefore, when using the counting functions on the handheld you are only specifying the counts and quantities of the items themselves in each bin location. That means that when you post an inventory count, the External Serial Numbers themselves are not adjusted. So when dealing with External Serial Numbers, it is recommended that you use Goods Issues and Goods Receipts to make inventory adjustments since you can specify External Serial Numbers during those transactions.
Location Lookup
Also, since External Serial Numbers do not belong to specific bin locations, when you use the
Location Lookup on the handheld you will only see the quantity of the item in the bin, not the
specific serial numbers.

69 | P a g e A c h i e v e W a r e h o u s e M a n a g e m e n t U s e r G u i d e
Using Non-Inventory Items
SAP Business One allows you to designate items that are non-inventory items. The system does
not maintain quantities of these items, although they may be included on sales and purchasing
documents.
Achieve Warehouse Management handles these items differently from regular inventory items
for which quantities must be tracked. There are two kinds of non-inventory items that can be
included on documents.
Item-Type Non-Inventory Items
This category includes such things as catalogs, information sheets, or promotional materials.
They may be included on a sales order so that they will be packed with a shipment of other
goods, or shipped by themselves.

70 | P a g e A c h i e v e W a r e h o u s e M a n a g e m e n t U s e r G u i d e
This type of item is identified by the fact that “Inventory Item” at the top of the screen is not
checked, and the Item Type is “Item”. It is required to enter a default picking location for each
warehouse where the item would be found.
This item may be included in sales documents. Depending on your settings for non-inventory
items that we saw earlier in this document, the item can appear on the handheld along with
other items to be picked. Inventory transactions will be recorded for it as with ordinary items,
however, no bin quantities are tracked.
Labor-Type Non-Inventory Items
This category includes fees for labor or other services, and does not represent physical items.
While they may be included on sales orders for subsequent billing, they are not picked for
shipment and will not appear on handheld devices at any time.
This type of item is identified by the fact that “Inventory Item” at the top of the screen is not
checked, and the Item Type is “Labor”. No default bin locations should be entered.
71 | P a g e A c h i e v e W a r e h o u s e M a n a g e m e n t U s e r G u i d e
Since these items cannot be picked or shipped, they do not appear on the handheld devices,
even if they are on an order with physical items. However, once such an order is picked, the
labor-type items will be copied to the Delivery document along with the other items, and
subsequently copied to the Invoice.
Bin Location Settings
WMS works with the standard SAP Business One Bin Locations and Master Data fields as well as
some new fields that WMS will create.
Standard Fields
WMS uses the standard Bin Location Master Data fields for some of its functionality. For full
explanations of each field please see your standard SAP help documentation.
Exclude from Auto. Alloc.
On Issue
If this box is checked, then this bin will not be used for the
allocation of inventory during WMS processes.
Alternative Sort Code Enter an alternative sort code for the bin location if necessary.
During the WMS allocations, the system can use the code as a
criteria to decide from which bin locations items are allocated.
Bar Code
Enter in a barcode for the bin if necessary. The barcode, when
scanned on the WMS handheld, will bring up this bin
Minimum Qty When using the directed put away or bin replenishment
functions in WMS, this is the minimum quantity for the item
assigned to this bin
Maximum Qty
When using the directed put away or bin replenishment
functions in WMS, this is the maximum quantity for the item
assigned to this bin
Item Restrictions If the bin has item restrictions then WMS will respect them
when processing transactions

72 | P a g e A c h i e v e W a r e h o u s e M a n a g e m e n t U s e r G u i d e
Batch Restrictions If the bin has batch restrictions then WMS will respect them
when processing transactions
Transaction Restriction If the bin has transaction restrictions then WMS will respect
them when processing transactions
WMS Added Fields
Location Type
Select the bin type:
Pick – items may be allocated and picked
Overstock – items may be allocated, but not picked;
items will be used to replenish pick-type bins
Quarantine – items may be stored but they may not be
allocated or picked (e.g., items waiting for quality
control testing, damaged items, etc.)
Staging – items may be moved here as part of the pick
staging process
73 | P a g e A c h i e v e W a r e h o u s e M a n a g e m e n t U s e r G u i d e
Shipping – if using Achieve Freight Control these bins
can be used as a shipping type bin when picking on the
handheld
Reserved Bin/Loc In conjunction with Achieve Order Reservations, this bin will be
designation as a bin for reserved items
Override Loc This option will determine if an item allocated to be picked from
this bin can be overridden and changed to a different bin during
picking:
System – Lets the Bin Override password option in WMS
Configuration dictate if this bin can be overridden. If you
set a Bin Override password, then it will prompt for it
when trying to change bins; if you do not set a Bin
Override password, then this bin can be changed
without any password
Always – This bin can always be overridden regardless of
a Bin Override password being set or not
Never – This bin can never be overridden regardless of a
Bin Override password being set or not
Replenishment UOM When using the Bin Replenishment function this lets WMS know
which Unit of Measure the Min and Max are in
Eligible Carriers If you are using Staging Bins, then you can limit which Orders
can be staged in this bin based on the Carrier from the Shipping
Method
You can also set these WMS specific fields globally using the standard SAP Manage Location Management screen. Just open up the screen and click on the User Defined Field … button. That will open up a secondary window where you can set these fields with the desired information.
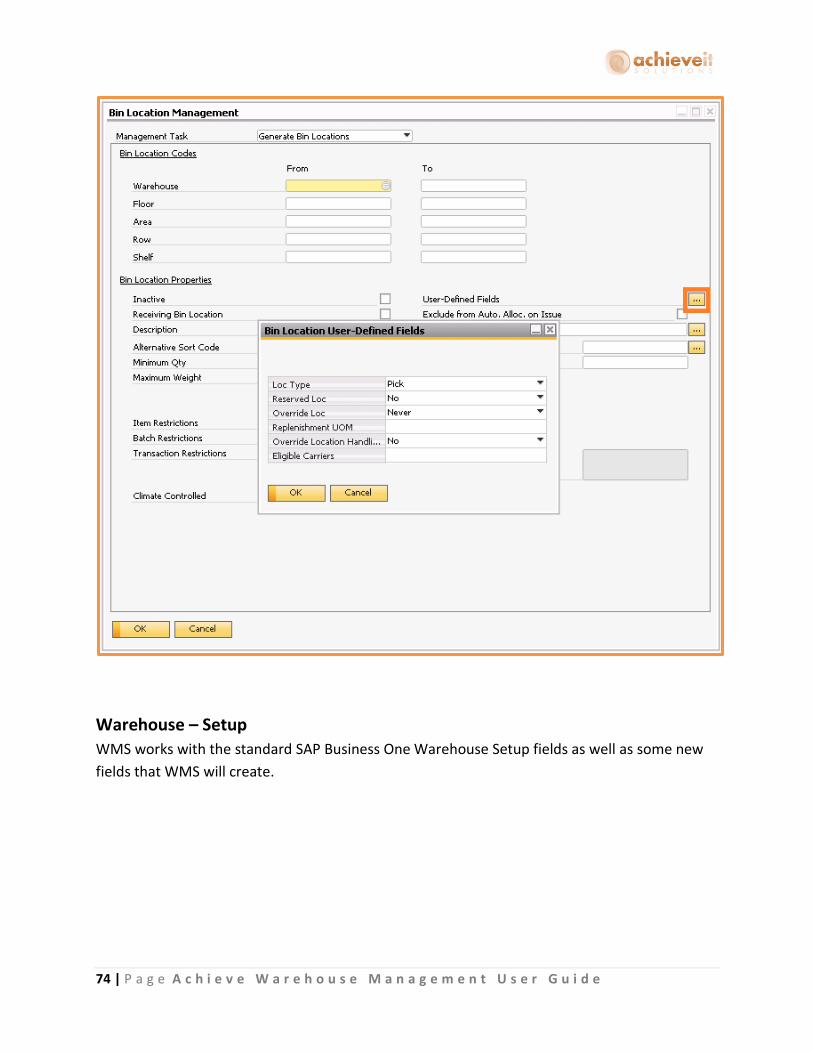
74 | P a g e A c h i e v e W a r e h o u s e M a n a g e m e n t U s e r G u i d e
Warehouse – Setup
WMS works with the standard SAP Business One Warehouse Setup fields as well as some new
fields that WMS will create.
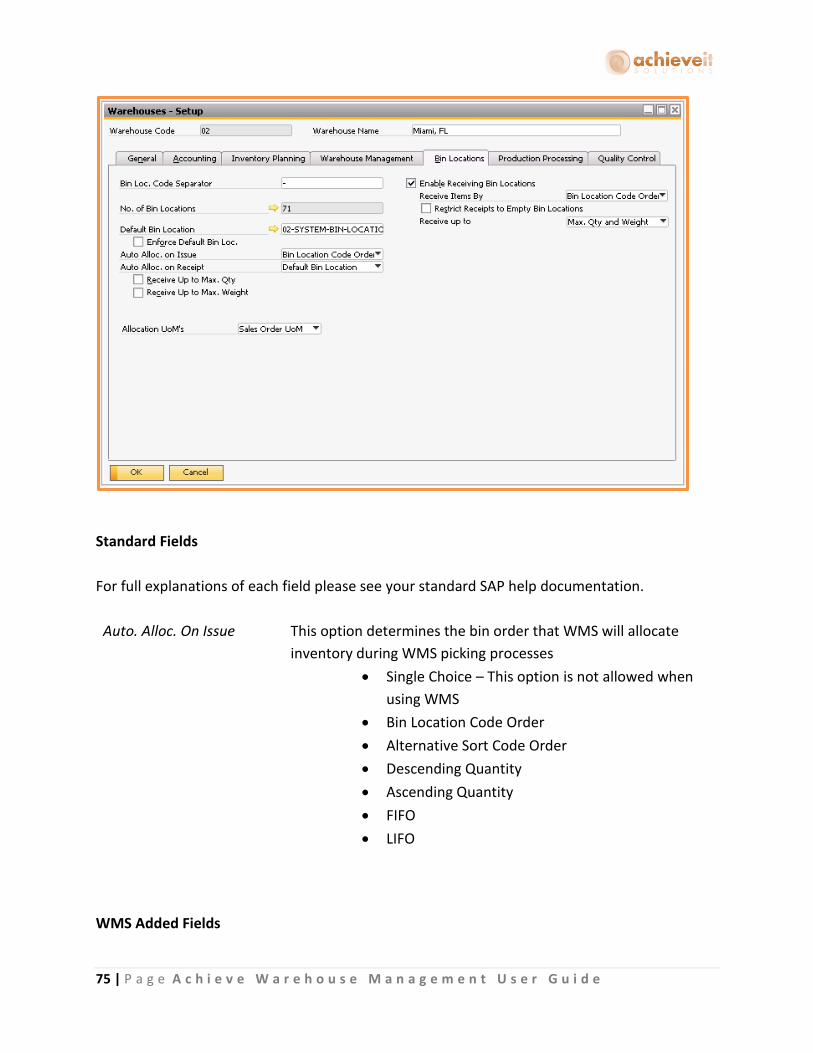
75 | P a g e A c h i e v e W a r e h o u s e M a n a g e m e n t U s e r G u i d e
Standard Fields
For full explanations of each field please see your standard SAP help documentation.
Auto. Alloc. On Issue
This option determines the bin order that WMS will allocate
inventory during WMS picking processes
Single Choice – This option is not allowed when
using WMS
Bin Location Code Order
Alternative Sort Code Order
Descending Quantity
Ascending Quantity
FIFO
LIFO
WMS Added Fields
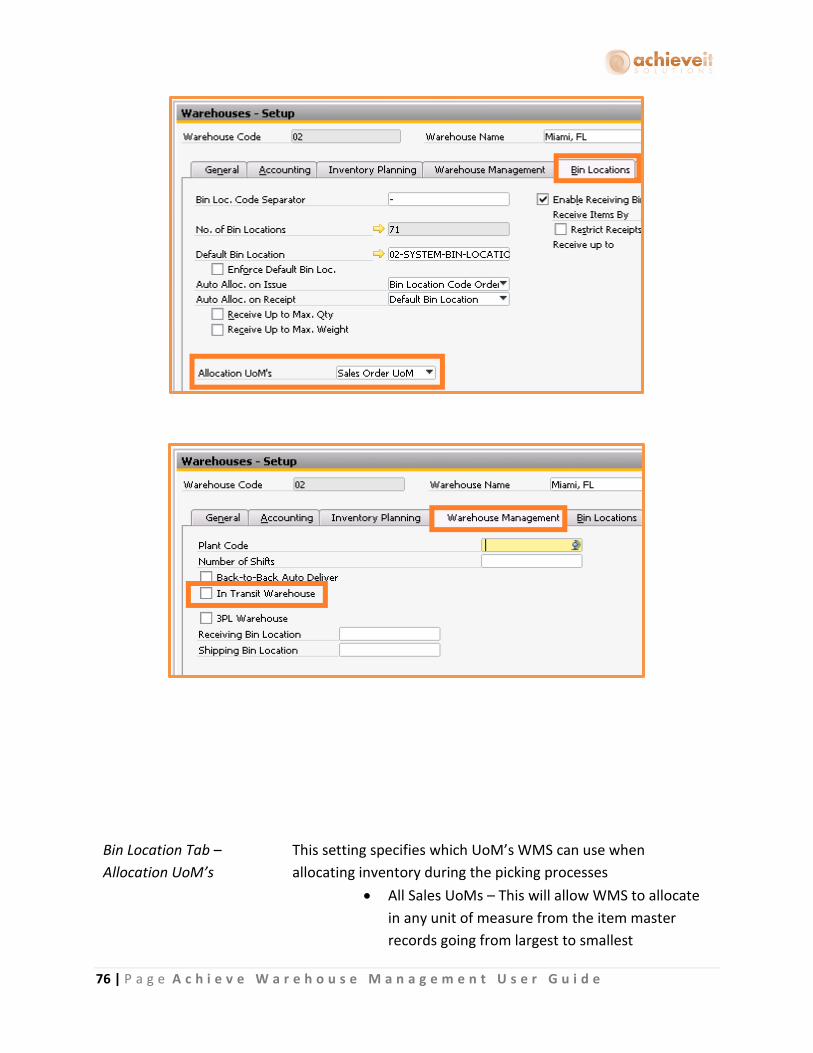
76 | P a g e A c h i e v e W a r e h o u s e M a n a g e m e n t U s e r G u i d e
Bin Location Tab –
Allocation UoM’s
This setting specifies which UoM’s WMS can use when
allocating inventory during the picking processes
All Sales UoMs – This will allow WMS to allocate
in any unit of measure from the item master
records going from largest to smallest
77 | P a g e A c h i e v e W a r e h o u s e M a n a g e m e n t U s e r G u i d e
Inventory UoM Only – This will restrict WMS to
only allocate in the inventory unit of measure
from the item master records
Sales Order UoM – This will restrict WMS to only
allocate in the unit of measure that is set for the
item on the Sales Order being picked
Warehouse Management
Tab – Plant Code
Enter the plant code for this Warehouse (2 character max). This
will indicate that this warehouse can be used in WMS
Production on the Handheld.
Warehouse Management
Tab – Number of Shifts
Enter the number of shifts per plant. This will then allow users
to select their shift number when they are running the WMS
Production on the Handheld.
Warehouse Management
Tab – Back-to-Back Auto
Deliver
If Use Batch Flow Through Allocations is enabled, then after the
Sales Order is updated, a delivery will be created automatically.
Note, because this is a Warehouse-level setting, all such
instances in this warehouse will have deliveries automatically
created, and not go through WMS picking. Therefore you may
decide it is best to create a separate warehouse to handle these
back to back transactions.
Warehouse Management
Tab – In Transit
Warehouse
This checkbox will indicate that this Warehouse is the In-Transit
warehouse for Inventory Transfer Request Picking and Receiving
Warehouse Management Procedures
The following sections provide detailed instructions for the various procedures that can be
performed using the Warehouse Management System.

78 | P a g e A c h i e v e W a r e h o u s e M a n a g e m e n t U s e r G u i d e
Note that the instructions for using handheld devices indicate that the user should enter data at
various points. Entries may be made on the handheld by scanning a barcode label or by typing.
Upon startup, the handheld device will display the warehouse Main Menu:
Receiving Menu
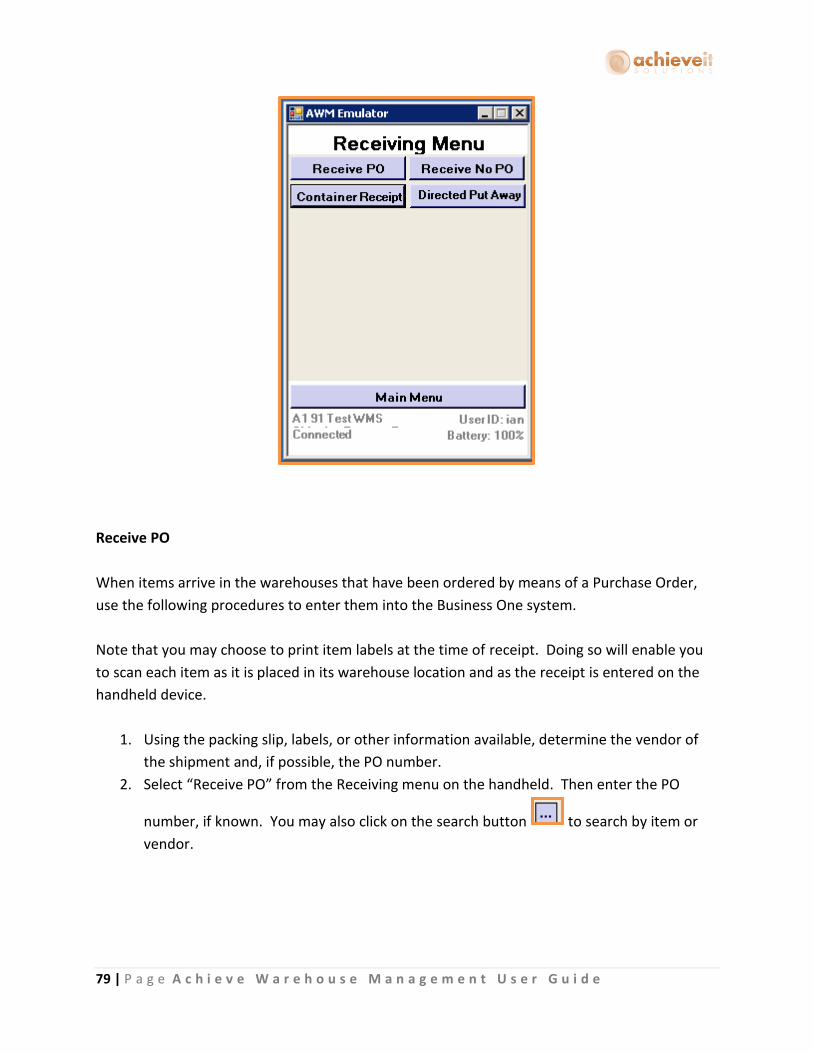
79 | P a g e A c h i e v e W a r e h o u s e M a n a g e m e n t U s e r G u i d e
Receive PO
When items arrive in the warehouses that have been ordered by means of a Purchase Order,
use the following procedures to enter them into the Business One system.
Note that you may choose to print item labels at the time of receipt. Doing so will enable you
to scan each item as it is placed in its warehouse location and as the receipt is entered on the
handheld device.
1. Using the packing slip, labels, or other information available, determine the vendor of
the shipment and, if possible, the PO number.
2. Select “Receive PO” from the Receiving menu on the handheld. Then enter the PO
number, if known. You may also click on the search button to search by item or
vendor.

80 | P a g e A c h i e v e W a r e h o u s e M a n a g e m e n t U s e r G u i d e
3. Once the PO is selected, you may select “Load” to display a list of the items on the PO.
4. Select or scan an item to see the detail and verify the quantity.

81 | P a g e A c h i e v e W a r e h o u s e M a n a g e m e n t U s e r G u i d e
5. Enter, scan, or select the bin where the item is put away. Only one bin may be selected.
Then select “Save”.
6. The screen returns to the list of items. When all items have been completed, select
“Finish” to finalize the receipt.
Depending on the selections made in the WMS Options, the system will create a Goods
Receipt PO as a draft or as a completed document. It may also create an A/P Invoice either
as a draft or completed document.

82 | P a g e A c h i e v e W a r e h o u s e M a n a g e m e n t U s e r G u i d e
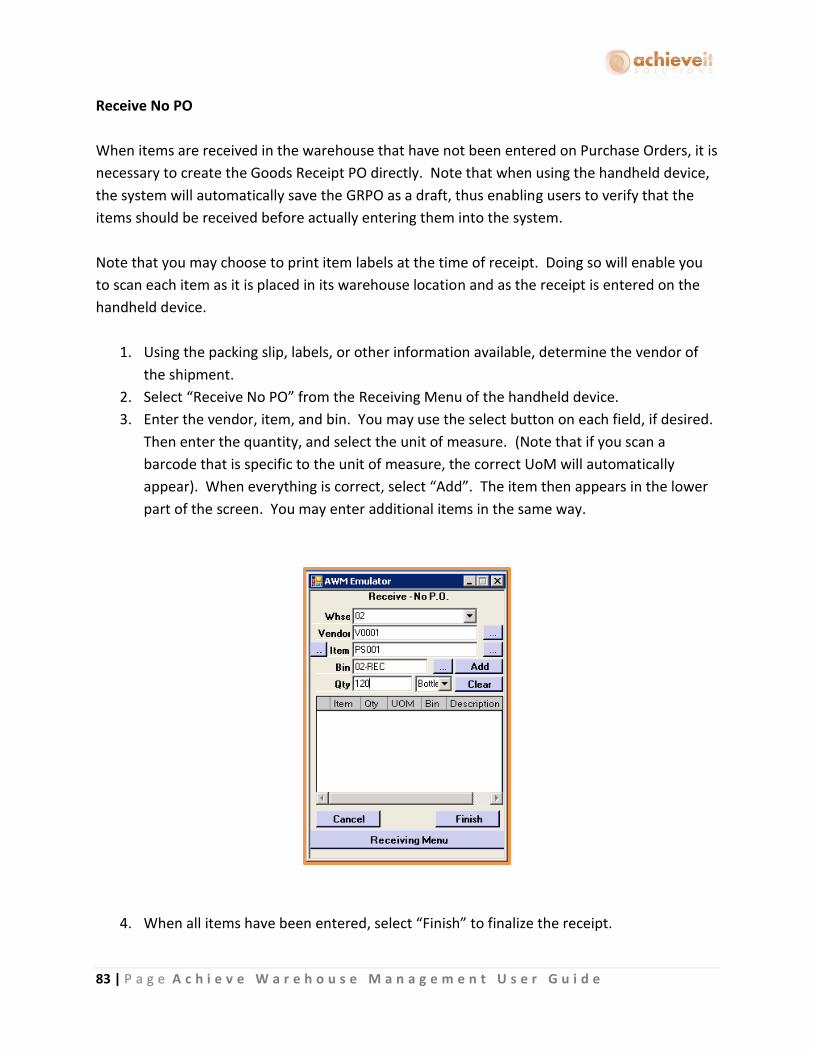
83 | P a g e A c h i e v e W a r e h o u s e M a n a g e m e n t U s e r G u i d e
Receive No PO
When items are received in the warehouse that have not been entered on Purchase Orders, it is
necessary to create the Goods Receipt PO directly. Note that when using the handheld device,
the system will automatically save the GRPO as a draft, thus enabling users to verify that the
items should be received before actually entering them into the system.
Note that you may choose to print item labels at the time of receipt. Doing so will enable you
to scan each item as it is placed in its warehouse location and as the receipt is entered on the
handheld device.
1. Using the packing slip, labels, or other information available, determine the vendor of
the shipment.
2. Select “Receive No PO” from the Receiving Menu of the handheld device.
3. Enter the vendor, item, and bin. You may use the select button on each field, if desired.
Then enter the quantity, and select the unit of measure. (Note that if you scan a
barcode that is specific to the unit of measure, the correct UoM will automatically
appear). When everything is correct, select “Add”. The item then appears in the lower
part of the screen. You may enter additional items in the same way.
4. When all items have been entered, select “Finish” to finalize the receipt.
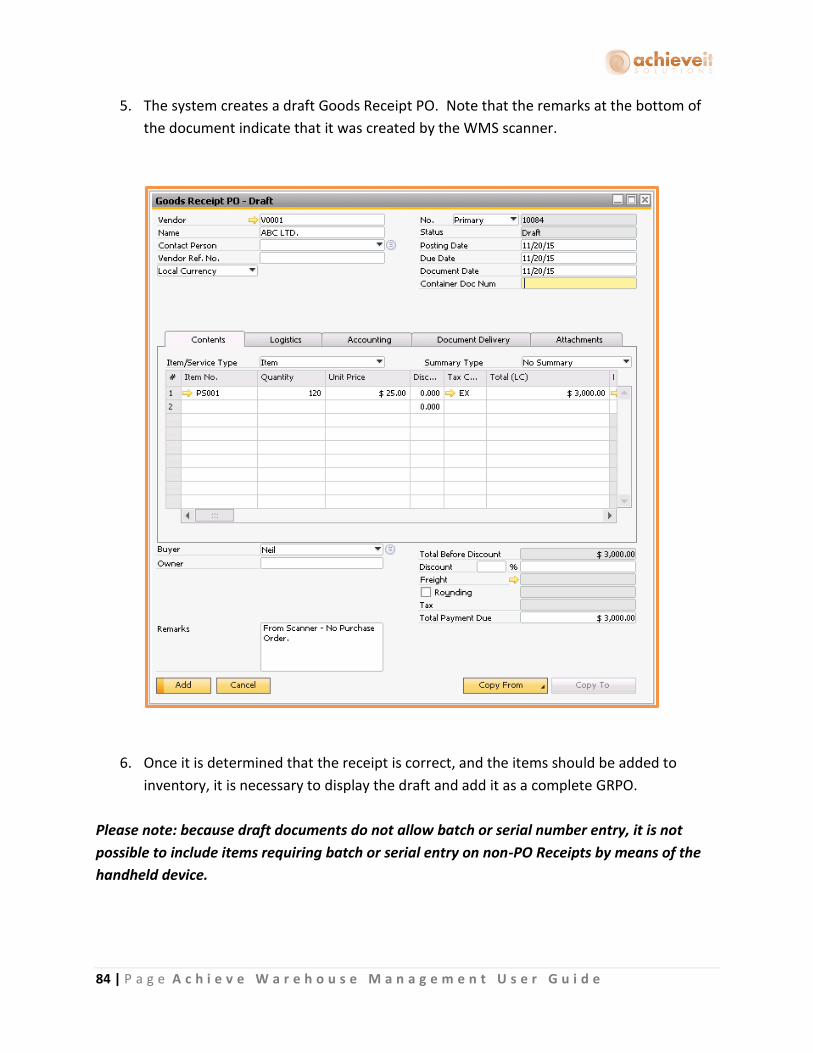
84 | P a g e A c h i e v e W a r e h o u s e M a n a g e m e n t U s e r G u i d e
5. The system creates a draft Goods Receipt PO. Note that the remarks at the bottom of
the document indicate that it was created by the WMS scanner.
6. Once it is determined that the receipt is correct, and the items should be added to
inventory, it is necessary to display the draft and add it as a complete GRPO.
Please note: because draft documents do not allow batch or serial number entry, it is not
possible to include items requiring batch or serial entry on non-PO Receipts by means of the
handheld device.

85 | P a g e A c h i e v e W a r e h o u s e M a n a g e m e n t U s e r G u i d e
Container Receipt
The following procedures apply only if you are using Achieve Container Management for
import shipments.
Container shipments are often very large, possibly consisting of multiple Purchase Orders and
many different items. It often requires considerable time, and more than one warehouse
worker, to log and receive all of the items that arrive in a single container. It would be
inconvenient and counter-productive to require that the shipment be received as individual
PO’s, with the requirement that a single user complete each PO Receipt within a single session.
The Container Receiving element of WMS includes the following special features:
Users may scan the Container number without needing to enter individual PO numbers,
unless the WMS Options have been set to require a PO scan.
Multiple users may receive the same Container at the same time, or at different times.
A user may receive some of the items on a Container, exit out, and receive additional
items at a later time.
A given item may be received in partial quantities; the program will consolidate the
quantities into a total for each item. If the same item appears more than once on the
Container document, the quantities will be assigned to each instance in sequence until
all are fulfilled.
Only Shipments that have a status of “Warehouse Receiving” can be pulled up on the
handheld
The quantity received in the warehouse will be shown on the Container document in a
column titled “Scanned Quantity”. This may be compared to the existing “In-Transit
Quantity”.
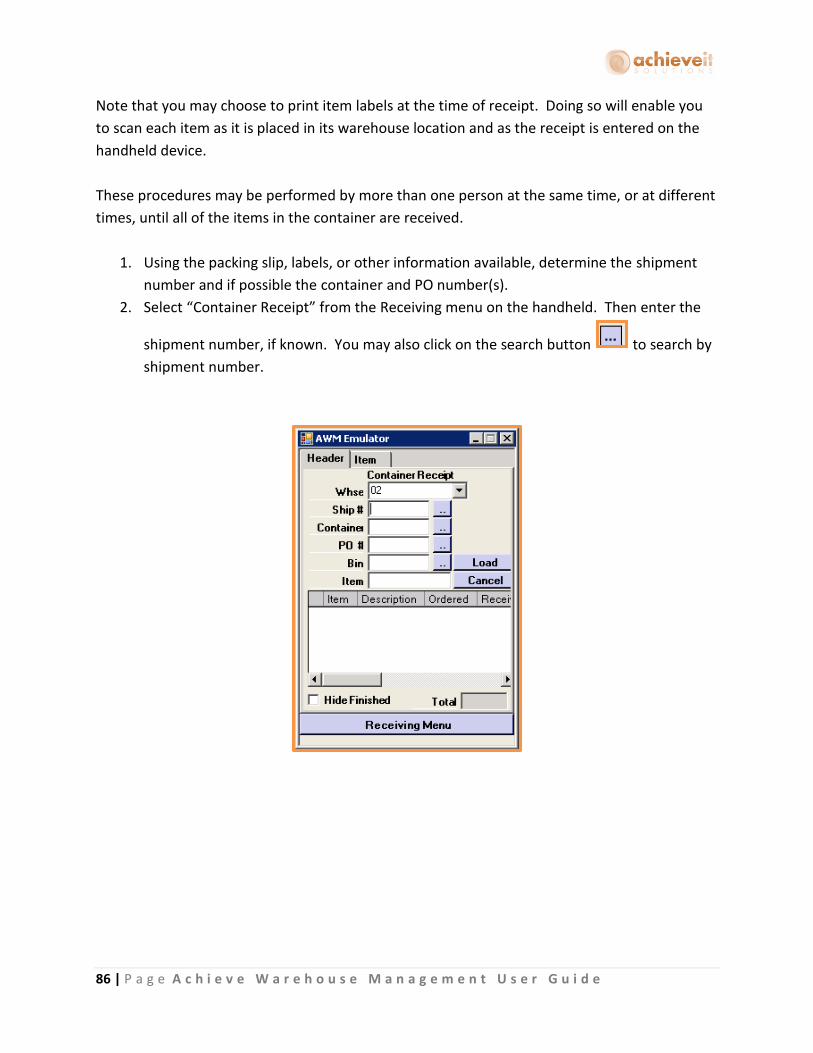
86 | P a g e A c h i e v e W a r e h o u s e M a n a g e m e n t U s e r G u i d e
Note that you may choose to print item labels at the time of receipt. Doing so will enable you
to scan each item as it is placed in its warehouse location and as the receipt is entered on the
handheld device.
These procedures may be performed by more than one person at the same time, or at different
times, until all of the items in the container are received.
1. Using the packing slip, labels, or other information available, determine the shipment
number and if possible the container and PO number(s).
2. Select “Container Receipt” from the Receiving menu on the handheld. Then enter the
shipment number, if known. You may also click on the search button to search by
shipment number.
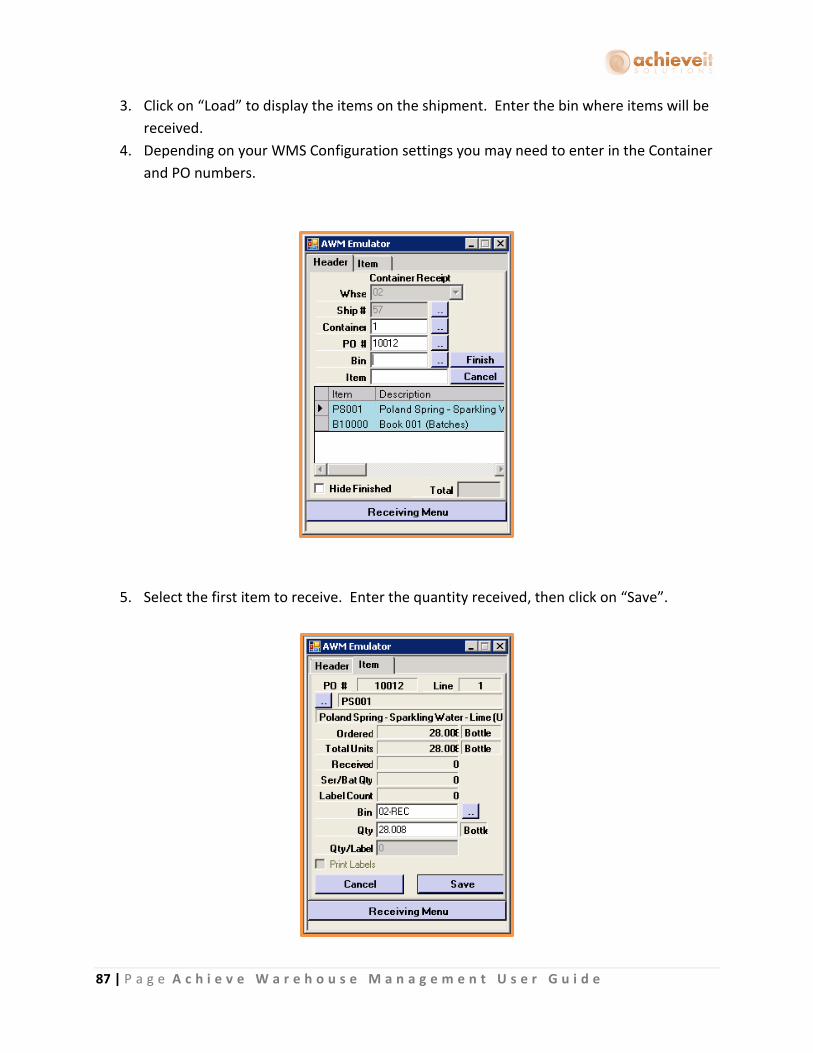
87 | P a g e A c h i e v e W a r e h o u s e M a n a g e m e n t U s e r G u i d e
3. Click on “Load” to display the items on the shipment. Enter the bin where items will be
received.
4. Depending on your WMS Configuration settings you may need to enter in the Container
and PO numbers.
5. Select the first item to receive. Enter the quantity received, then click on “Save”.
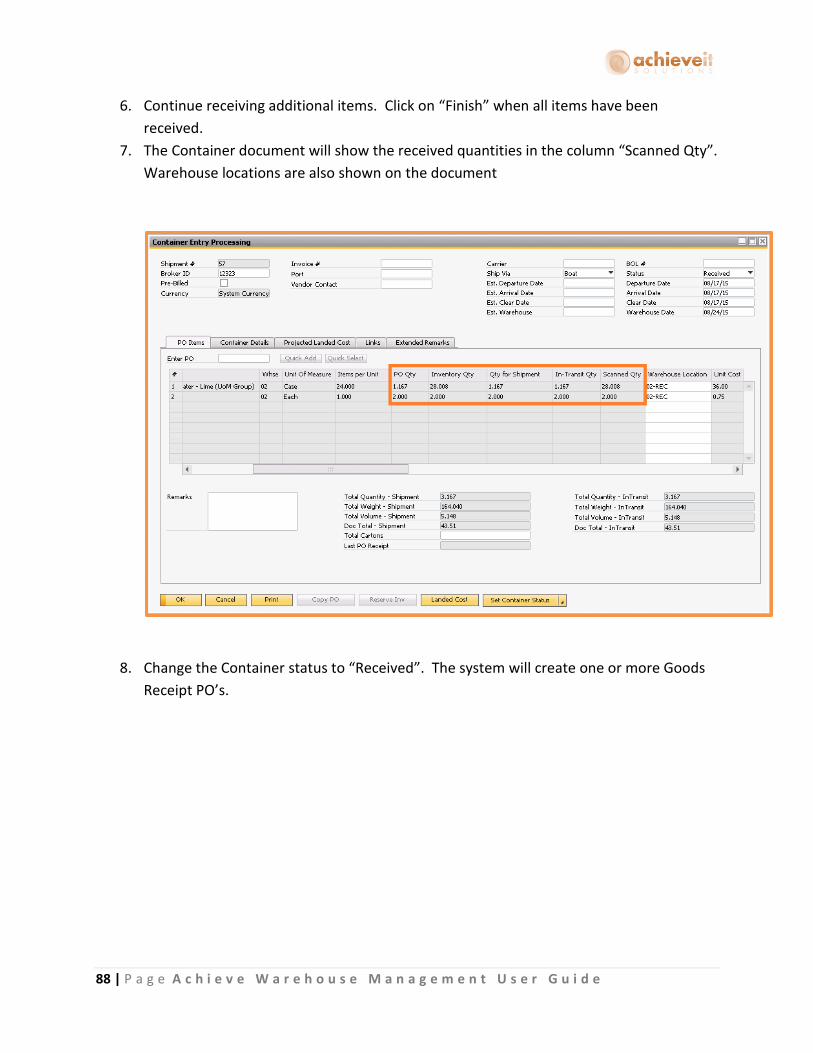
88 | P a g e A c h i e v e W a r e h o u s e M a n a g e m e n t U s e r G u i d e
6. Continue receiving additional items. Click on “Finish” when all items have been
received.
7. The Container document will show the received quantities in the column “Scanned Qty”.
Warehouse locations are also shown on the document
8. Change the Container status to “Received”. The system will create one or more Goods
Receipt PO’s.

89 | P a g e A c h i e v e W a r e h o u s e M a n a g e m e n t U s e r G u i d e
9. As required, you may create the Landed Cost document and change the Container’s
status to “Complete”.
Directed Put Away
The following procedure applies only if you are using the Directed Put Away function.
1. Select “Directed Put Away” from the Receiving menu on the handheld. Then enter the
Receiving Bin that you want to perform the direct put away in if known. You may also
click on the search button to search for the receiving bins.

90 | P a g e A c h i e v e W a r e h o u s e M a n a g e m e n t U s e r G u i d e
2. Once the Receiving Bin is selected, you can then either specify an item and hit Load, or
just hit Load to see all eligible items.
3. When the list pulls up you can start selecting the items. That will bring you to the item
put away screen which displays the bin it is going to move the item to. It also fills in the
quantity it wants to move. You can change it if need be otherwise you can confirm the
quantity and move the items by hitting “Save”.
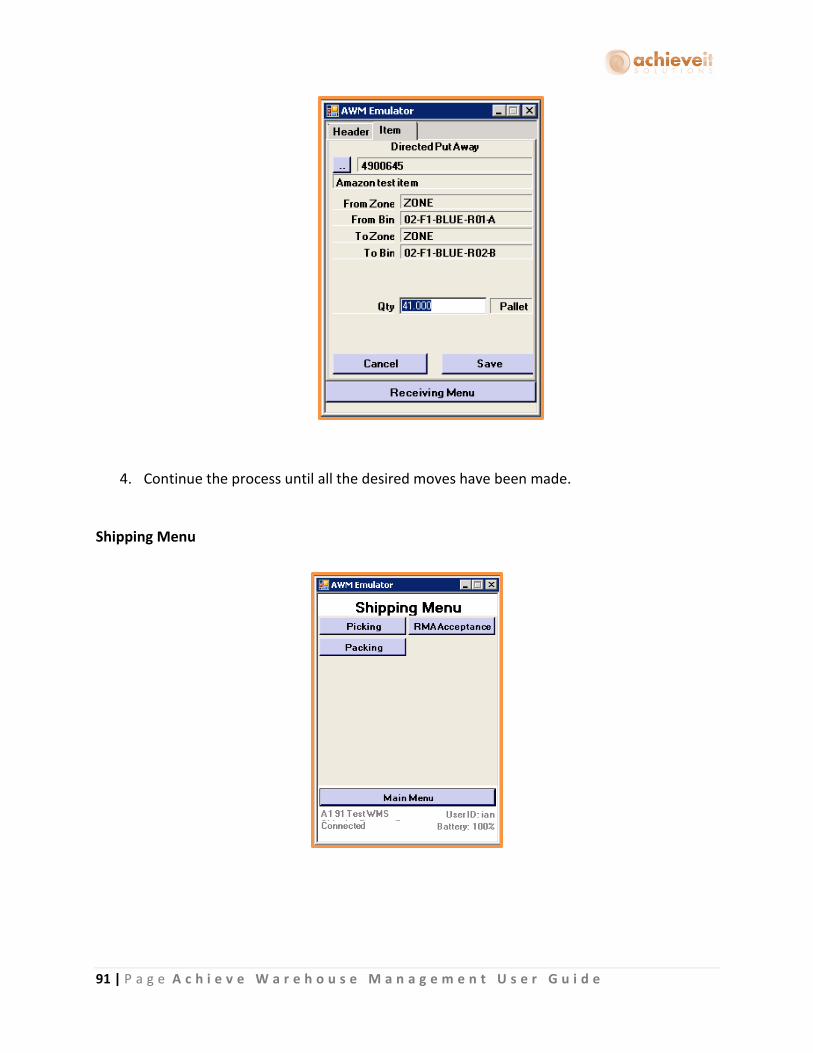
91 | P a g e A c h i e v e W a r e h o u s e M a n a g e m e n t U s e r G u i d e
4. Continue the process until all the desired moves have been made.
Shipping Menu
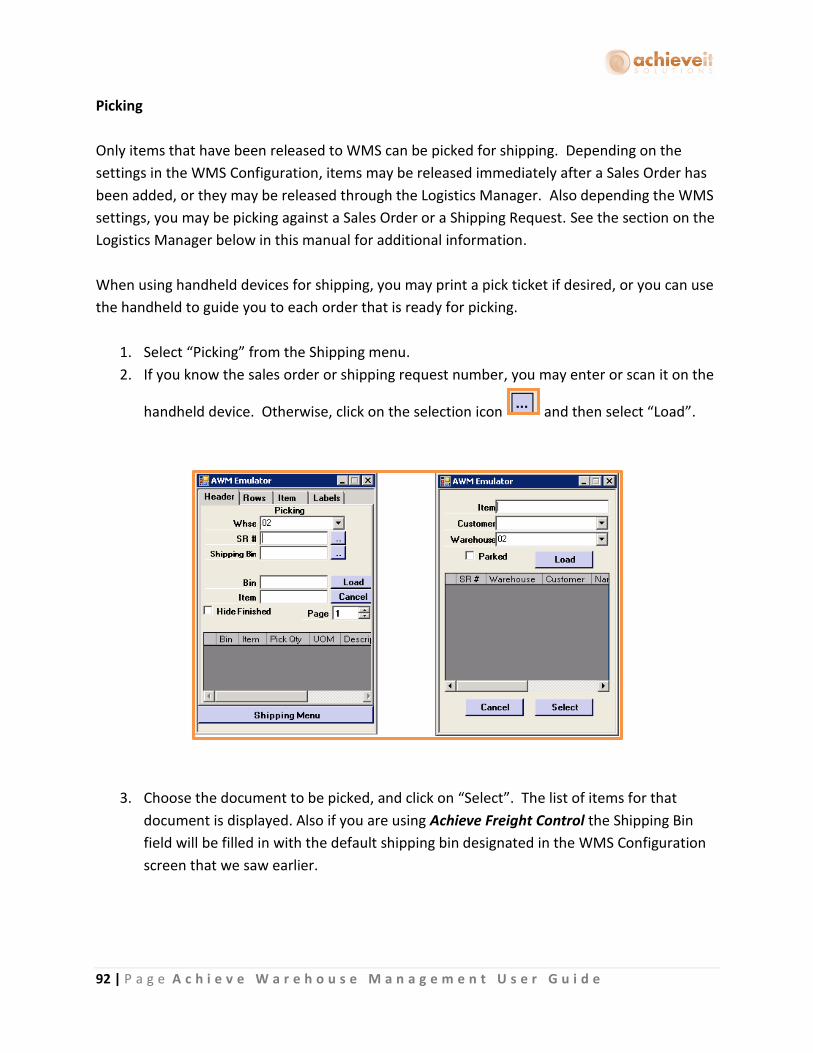
92 | P a g e A c h i e v e W a r e h o u s e M a n a g e m e n t U s e r G u i d e
Picking
Only items that have been released to WMS can be picked for shipping. Depending on the
settings in the WMS Configuration, items may be released immediately after a Sales Order has
been added, or they may be released through the Logistics Manager. Also depending the WMS
settings, you may be picking against a Sales Order or a Shipping Request. See the section on the
Logistics Manager below in this manual for additional information.
When using handheld devices for shipping, you may print a pick ticket if desired, or you can use
the handheld to guide you to each order that is ready for picking.
1. Select “Picking” from the Shipping menu.
2. If you know the sales order or shipping request number, you may enter or scan it on the
handheld device. Otherwise, click on the selection icon and then select “Load”.
3. Choose the document to be picked, and click on “Select”. The list of items for that
document is displayed. Also if you are using Achieve Freight Control the Shipping Bin
field will be filled in with the default shipping bin designated in the WMS Configuration
screen that we saw earlier.
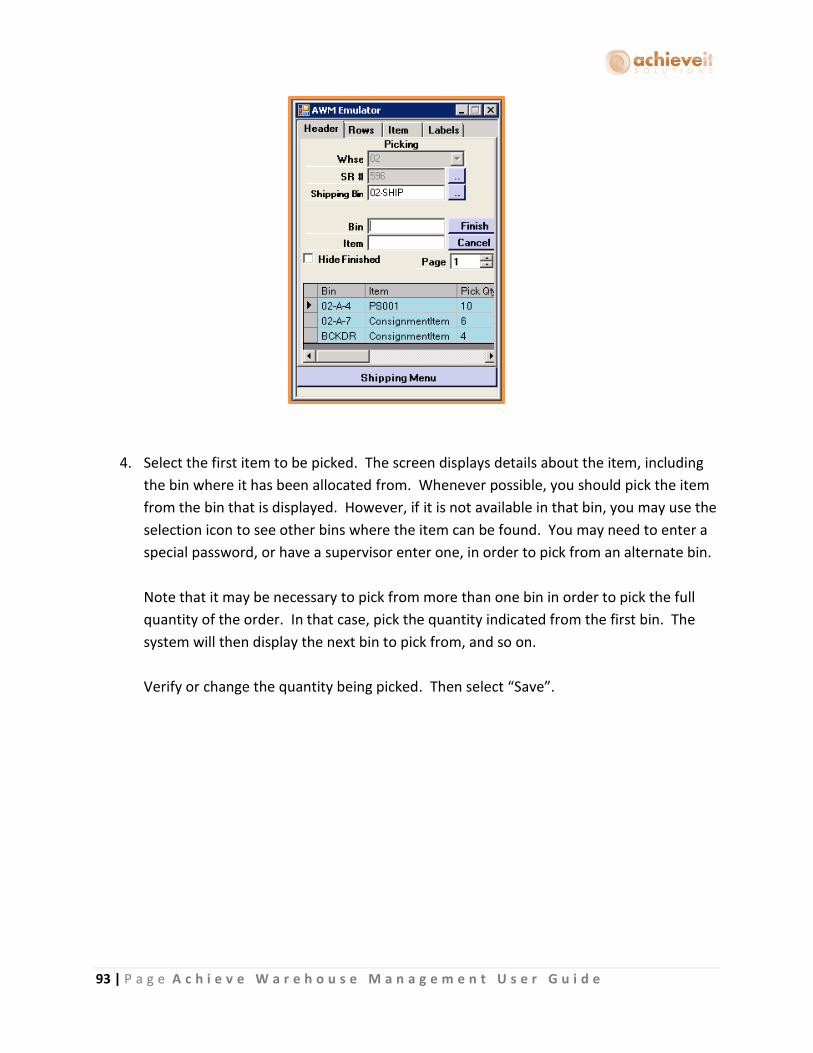
93 | P a g e A c h i e v e W a r e h o u s e M a n a g e m e n t U s e r G u i d e
4. Select the first item to be picked. The screen displays details about the item, including
the bin where it has been allocated from. Whenever possible, you should pick the item
from the bin that is displayed. However, if it is not available in that bin, you may use the
selection icon to see other bins where the item can be found. You may need to enter a
special password, or have a supervisor enter one, in order to pick from an alternate bin.
Note that it may be necessary to pick from more than one bin in order to pick the full
quantity of the order. In that case, pick the quantity indicated from the first bin. The
system will then display the next bin to pick from, and so on.
Verify or change the quantity being picked. Then select “Save”.
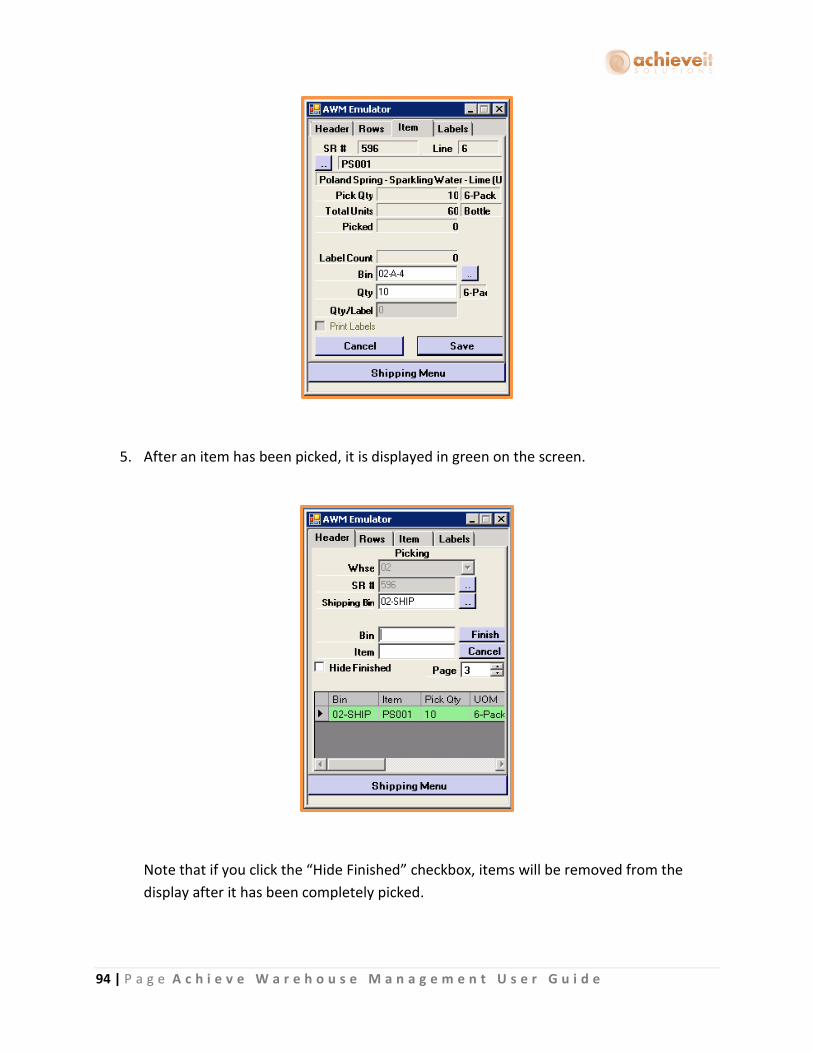
94 | P a g e A c h i e v e W a r e h o u s e M a n a g e m e n t U s e r G u i d e
5. After an item has been picked, it is displayed in green on the screen.
Note that if you click the “Hide Finished” checkbox, items will be removed from the
display after it has been completely picked.

95 | P a g e A c h i e v e W a r e h o u s e M a n a g e m e n t U s e r G u i d e
6. Continue until all items have been picked. If you are using the paging option you may
have to page down or up to move through the items. Then select “Finish”. The screen
will confirm that all items have been picked, or it will indicate that the pick is not
complete. In that case, you may finish if it is not possible to pick any more of the items,
or you may return to the list and pick the remaining items. Note that it is also possible
to “Park” an order if you need to exit before it is completed. You will then be able to
resume picking the order at a later time.
Depending on the selections made in the WMS Options, the system will create a Delivery as a draft, a completed Delivery document, a completed Delivery document and an A/R Invoice as a draft, a completed Delivery document and a completed A/R Invoice document or a Shipping Request if you have Achieve Freight Control and are set to pick by Sales Orders.

96 | P a g e A c h i e v e W a r e h o u s e M a n a g e m e n t U s e r G u i d e
Packing
If you are using Achieve Freight Control and are set to pick by Shipping Request then you have
the option to Pack on the Handheld. Only Shipping Requests that have already been picked can
be packed.
1. Select “Packing” from the Shipping menu.
2. If you know the shipping request number, you may enter or scan it on the handheld
device. Otherwise, click on the selection icon and then select “Load”.
3. Choose the document to be packed, and click on “Select”. Package number 1 will
default in.
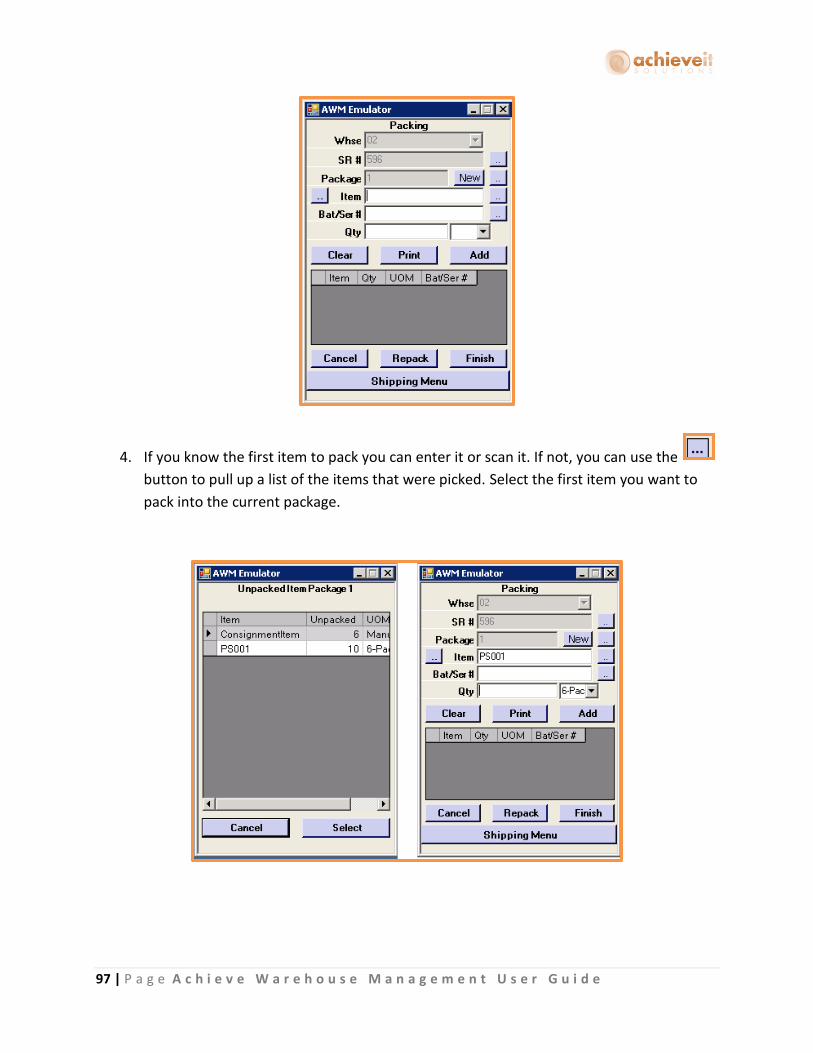
97 | P a g e A c h i e v e W a r e h o u s e M a n a g e m e n t U s e r G u i d e
4. If you know the first item to pack you can enter it or scan it. If not, you can use the
button to pull up a list of the items that were picked. Select the first item you want to
pack into the current package.

98 | P a g e A c h i e v e W a r e h o u s e M a n a g e m e n t U s e r G u i d e
5. If the item is batch or serial managed you will need to choose which batch or serial
number you want to pack. If you know the number you can enter it or scan it. If not, you
can use the button to pull up a list of the batches and serial numbers that were
picked.
6. Next enter in the quantity that you are packing into the current package for that item
and hit Add. That will bring the item into the bottom grid and allow you to continue
packing.
7. As you pack the rest of the items you can either pack them into the current package or
use the New button to create a new package. To change the package you are currently
packing in use the button to pull up the list of packages. While in the packages list
you can also use the Details button to add package details such as package type, Carrier
ID, etc.

99 | P a g e A c h i e v e W a r e h o u s e M a n a g e m e n t U s e r G u i d e
8. Continue until all items have been packed then select “Finish”. The screen will confirm
that all items have been packed, or it will indicate that the pack is not complete. In that
case, you may finish if it is not possible to pack any more of the items, or you may return
to the list and pack the remaining items.
9.
That will complete the packing for your Shipping Request and allow you to continue the shipment process (see the Achieve Freight Control manual for the remaining steps).
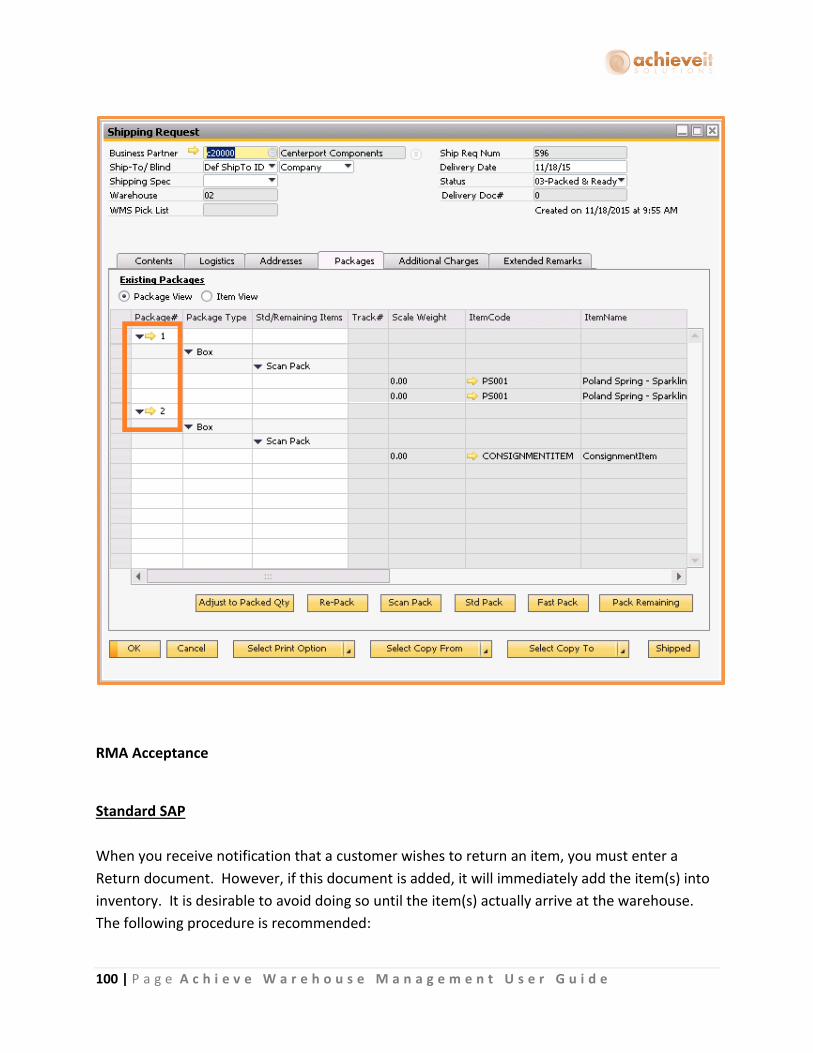
100 | P a g e A c h i e v e W a r e h o u s e M a n a g e m e n t U s e r G u i d e
RMA Acceptance
Standard SAP
When you receive notification that a customer wishes to return an item, you must enter a
Return document. However, if this document is added, it will immediately add the item(s) into
inventory. It is desirable to avoid doing so until the item(s) actually arrive at the warehouse.
The following procedure is recommended:

101 | P a g e A c h i e v e W a r e h o u s e M a n a g e m e n t U s e r G u i d e
1. Create the Return document in the normal way. Note the User-Defined Fields relating
to the RMA:
WMS RMA Number Enter the RMA number assigned to this return
WMS RMA Expiration
Enter the expiration date for the return
2. Save the Return as a Draft.
3. Instruct the customer to mark the returned item with the RMA number, and to return it
by the RMA Expiration date.
4. When the item is returned to the warehouse, warehouse personnel may verify that it is
acceptable by means of the RMA Acceptance program on the handheld device.
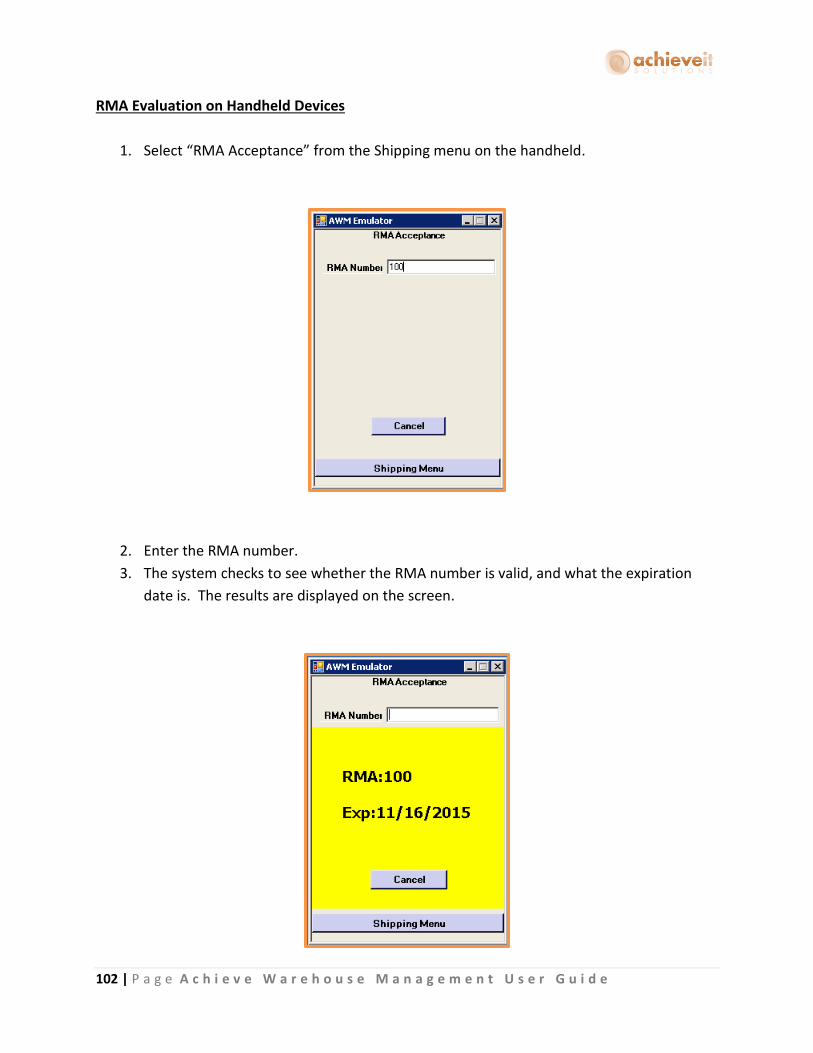
102 | P a g e A c h i e v e W a r e h o u s e M a n a g e m e n t U s e r G u i d e
RMA Evaluation on Handheld Devices
1. Select “RMA Acceptance” from the Shipping menu on the handheld.
2. Enter the RMA number.
3. The system checks to see whether the RMA number is valid, and what the expiration
date is. The results are displayed on the screen.
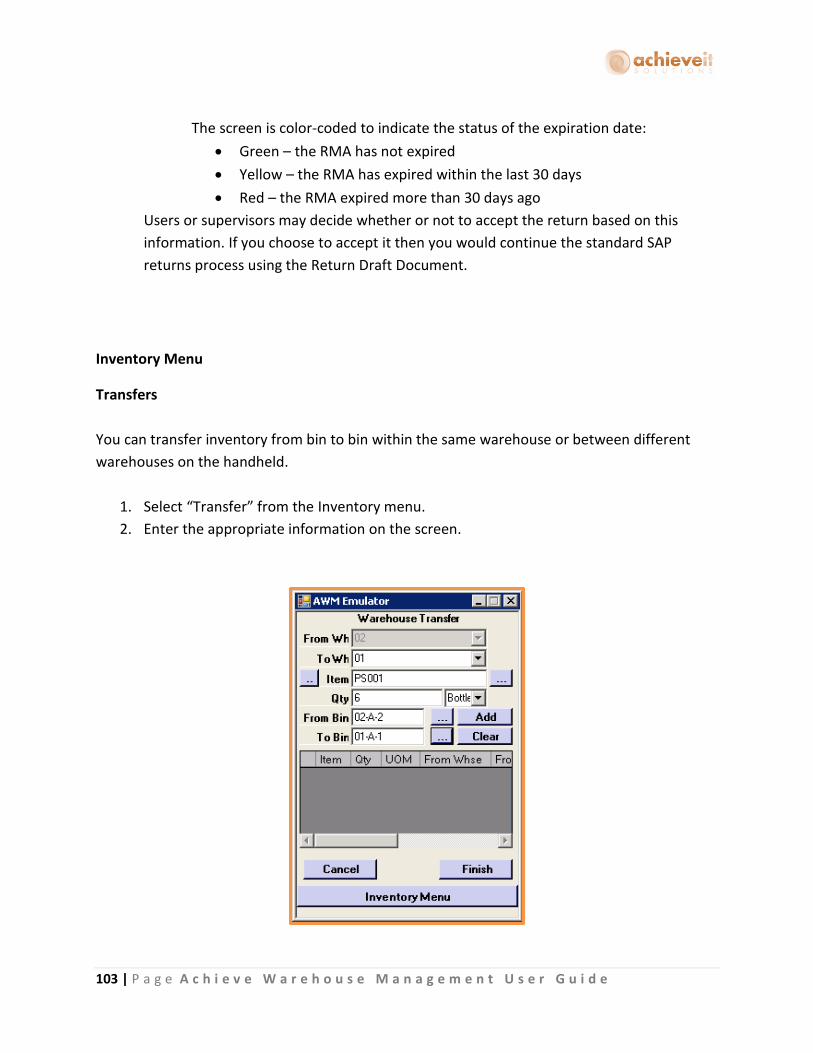
103 | P a g e A c h i e v e W a r e h o u s e M a n a g e m e n t U s e r G u i d e
The screen is color-coded to indicate the status of the expiration date:
Green – the RMA has not expired
Yellow – the RMA has expired within the last 30 days
Red – the RMA expired more than 30 days ago
Users or supervisors may decide whether or not to accept the return based on this
information. If you choose to accept it then you would continue the standard SAP
returns process using the Return Draft Document.
Inventory Menu
Transfers
You can transfer inventory from bin to bin within the same warehouse or between different
warehouses on the handheld.
1. Select “Transfer” from the Inventory menu.
2. Enter the appropriate information on the screen.
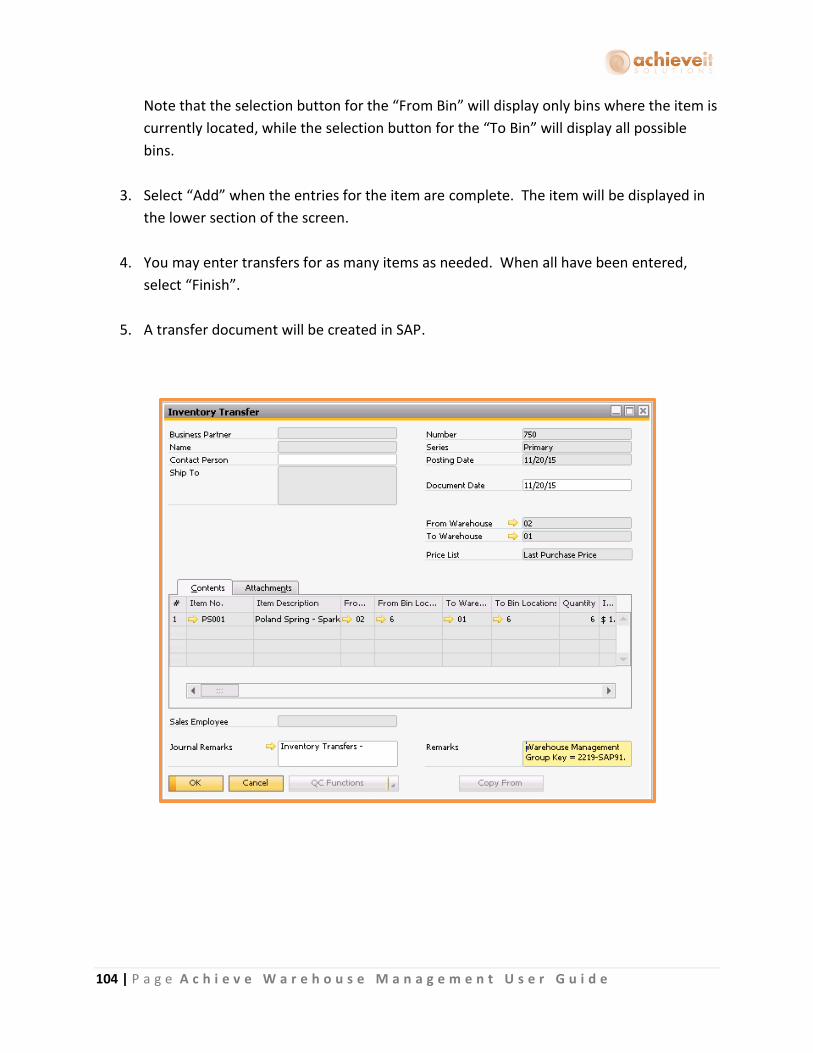
104 | P a g e A c h i e v e W a r e h o u s e M a n a g e m e n t U s e r G u i d e
Note that the selection button for the “From Bin” will display only bins where the item is
currently located, while the selection button for the “To Bin” will display all possible
bins.
3. Select “Add” when the entries for the item are complete. The item will be displayed in
the lower section of the screen.
4. You may enter transfers for as many items as needed. When all have been entered,
select “Finish”.
5. A transfer document will be created in SAP.
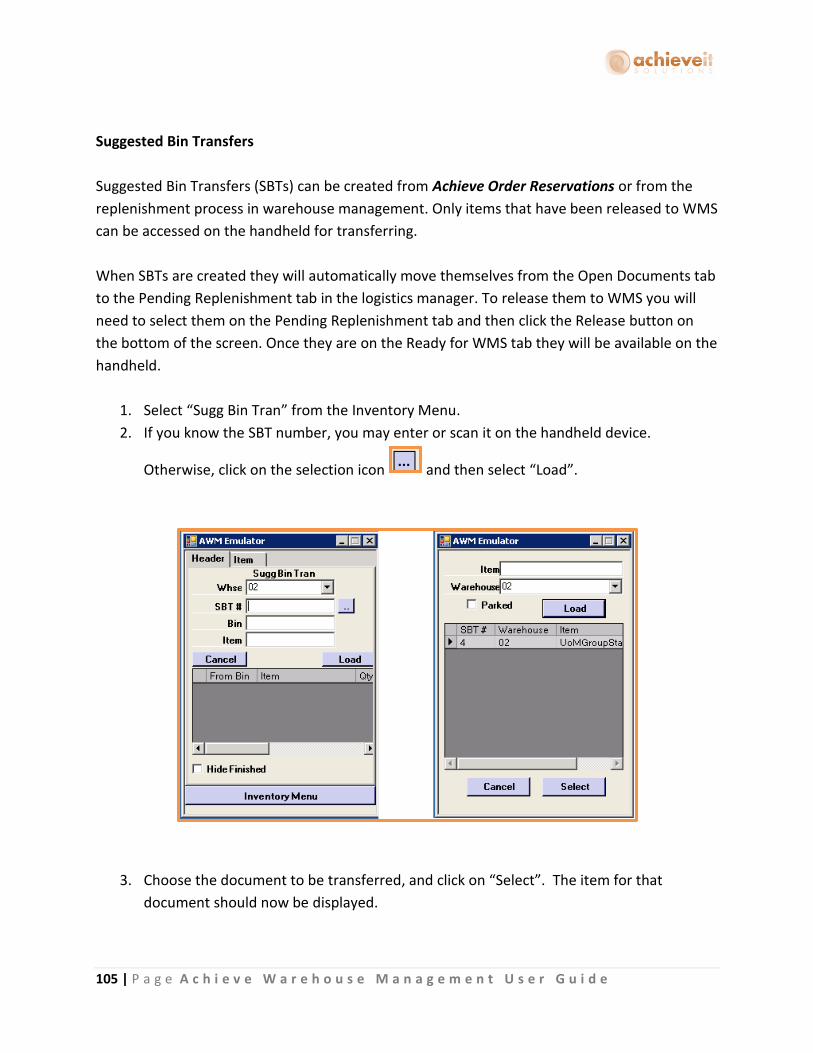
105 | P a g e A c h i e v e W a r e h o u s e M a n a g e m e n t U s e r G u i d e
Suggested Bin Transfers
Suggested Bin Transfers (SBTs) can be created from Achieve Order Reservations or from the
replenishment process in warehouse management. Only items that have been released to WMS
can be accessed on the handheld for transferring.
When SBTs are created they will automatically move themselves from the Open Documents tab
to the Pending Replenishment tab in the logistics manager. To release them to WMS you will
need to select them on the Pending Replenishment tab and then click the Release button on
the bottom of the screen. Once they are on the Ready for WMS tab they will be available on the
handheld.
1. Select “Sugg Bin Tran” from the Inventory Menu.
2. If you know the SBT number, you may enter or scan it on the handheld device.
Otherwise, click on the selection icon and then select “Load”.
3. Choose the document to be transferred, and click on “Select”. The item for that
document should now be displayed.
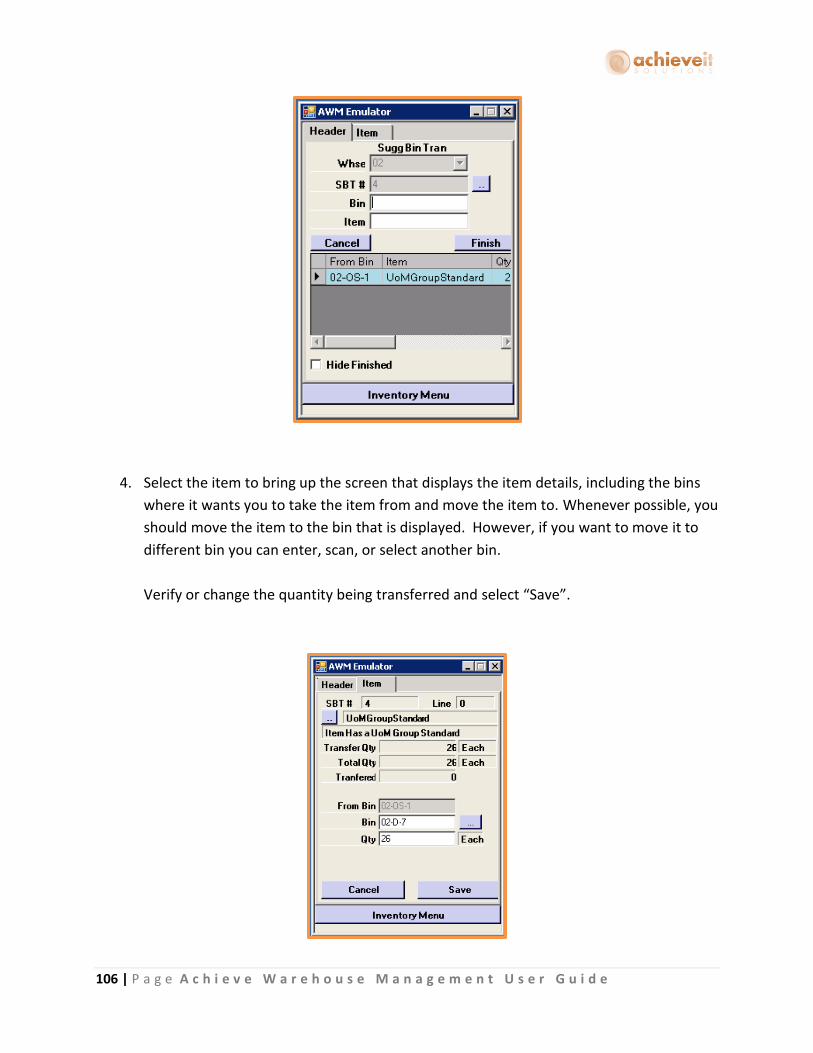
106 | P a g e A c h i e v e W a r e h o u s e M a n a g e m e n t U s e r G u i d e
4. Select the item to bring up the screen that displays the item details, including the bins
where it wants you to take the item from and move the item to. Whenever possible, you
should move the item to the bin that is displayed. However, if you want to move it to
different bin you can enter, scan, or select another bin.
Verify or change the quantity being transferred and select “Save”.
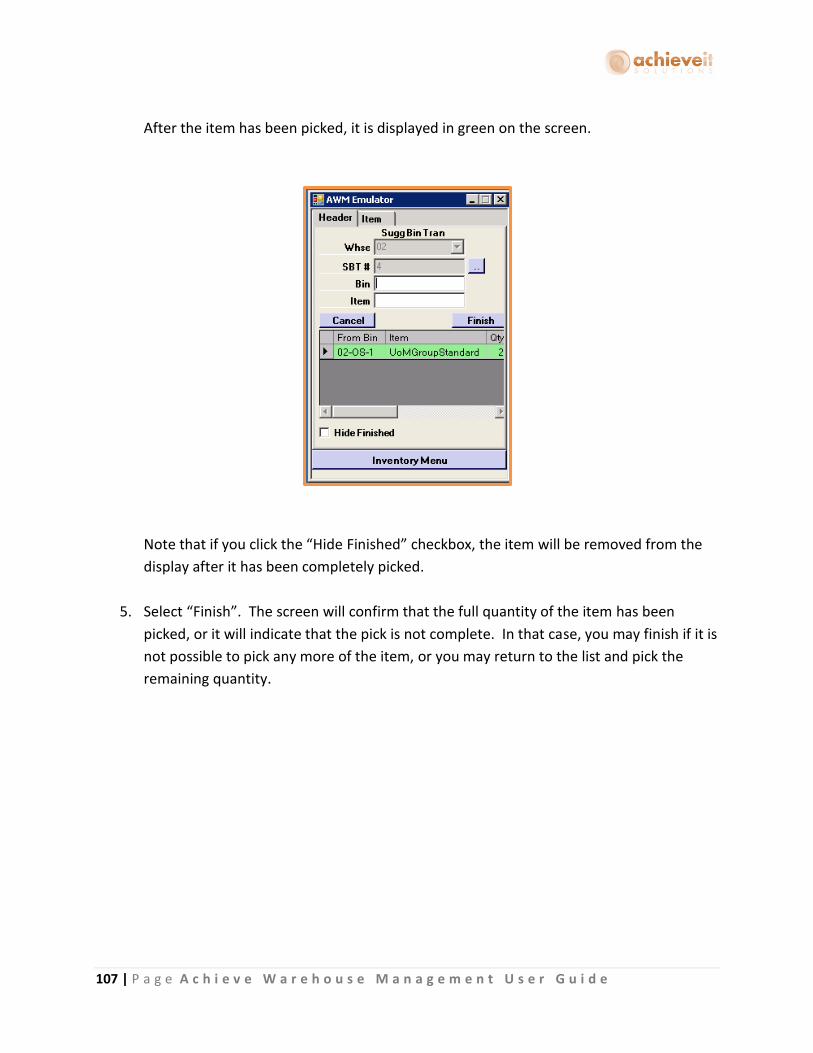
107 | P a g e A c h i e v e W a r e h o u s e M a n a g e m e n t U s e r G u i d e
After the item has been picked, it is displayed in green on the screen.
Note that if you click the “Hide Finished” checkbox, the item will be removed from the
display after it has been completely picked.
5. Select “Finish”. The screen will confirm that the full quantity of the item has been
picked, or it will indicate that the pick is not complete. In that case, you may finish if it is
not possible to pick any more of the item, or you may return to the list and pick the
remaining quantity.
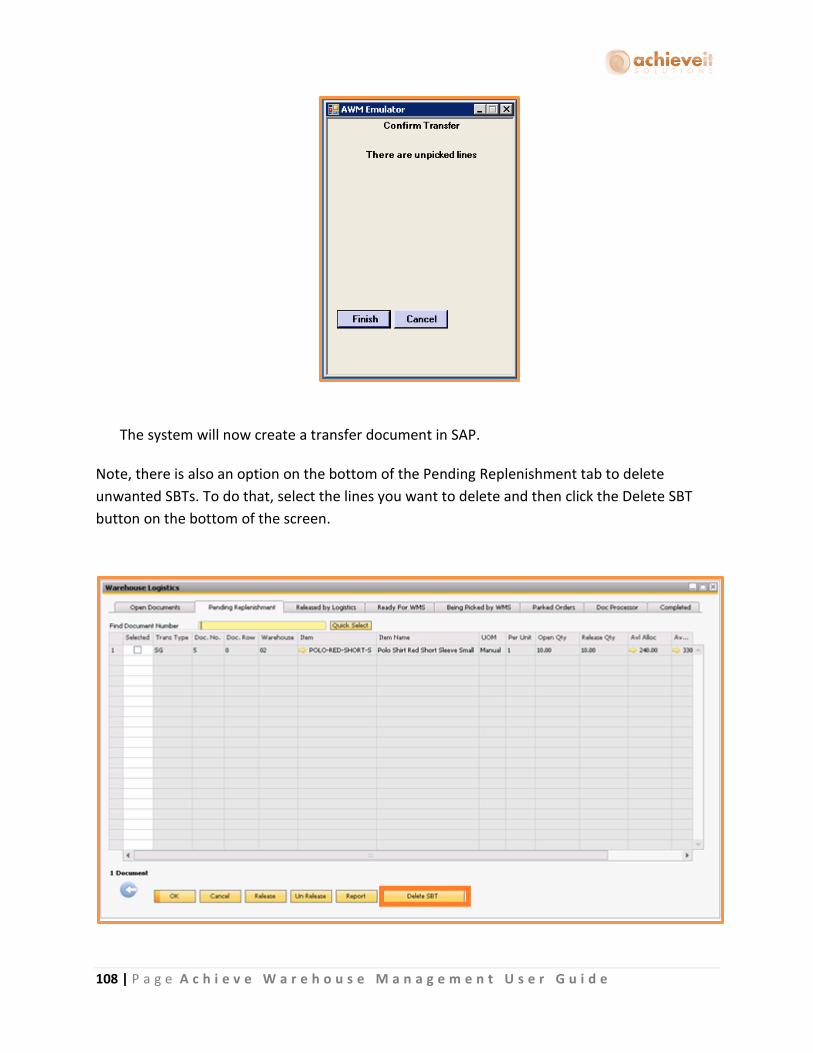
108 | P a g e A c h i e v e W a r e h o u s e M a n a g e m e n t U s e r G u i d e
The system will now create a transfer document in SAP. Note, there is also an option on the bottom of the Pending Replenishment tab to delete
unwanted SBTs. To do that, select the lines you want to delete and then click the Delete SBT
button on the bottom of the screen.

109 | P a g e A c h i e v e W a r e h o u s e M a n a g e m e n t U s e r G u i d e
Goods Issue/Goods Receipt
1. Select “Goods Receipt” or “Goods Issue” from the handheld device main menu.
2. Enter the warehouse code. Then select the Adjustment Code for this adjustment – the
choices are determined by the Adjustment Types entered in the WMS setup, and will
determine the GL posting for this transaction.
3. Enter the bin, item, and quantity of the adjustment. Enter in the quantity that you want
to add or remove from inventory. Click on “Add” to confirm the item.

110 | P a g e A c h i e v e W a r e h o u s e M a n a g e m e n t U s e r G u i d e
4. When all items have been entered, click on “Finish”.
5. The system creates an SAP Goods Receipt or Goods Issue document for the items that
were entered.
Note that the Inventory Offset – Increase/Decrease account will be set according to the
adjustment type.

111 | P a g e A c h i e v e W a r e h o u s e M a n a g e m e n t U s e r G u i d e
Inventory Transfer Requests
You can pick and receive Standard SAP Inventory Transfer Requests (ITRs) using the WMS
Handheld.
SAP Entry
Before you can pick or receive the ITR on the handheld you must create the document in SAP.
When you create an ITR using standard SAP it adds just one document. However when you
create an ITR with WMS, the original ITR is closed as soon as it is added and two new ITR
documents will automatically be created.
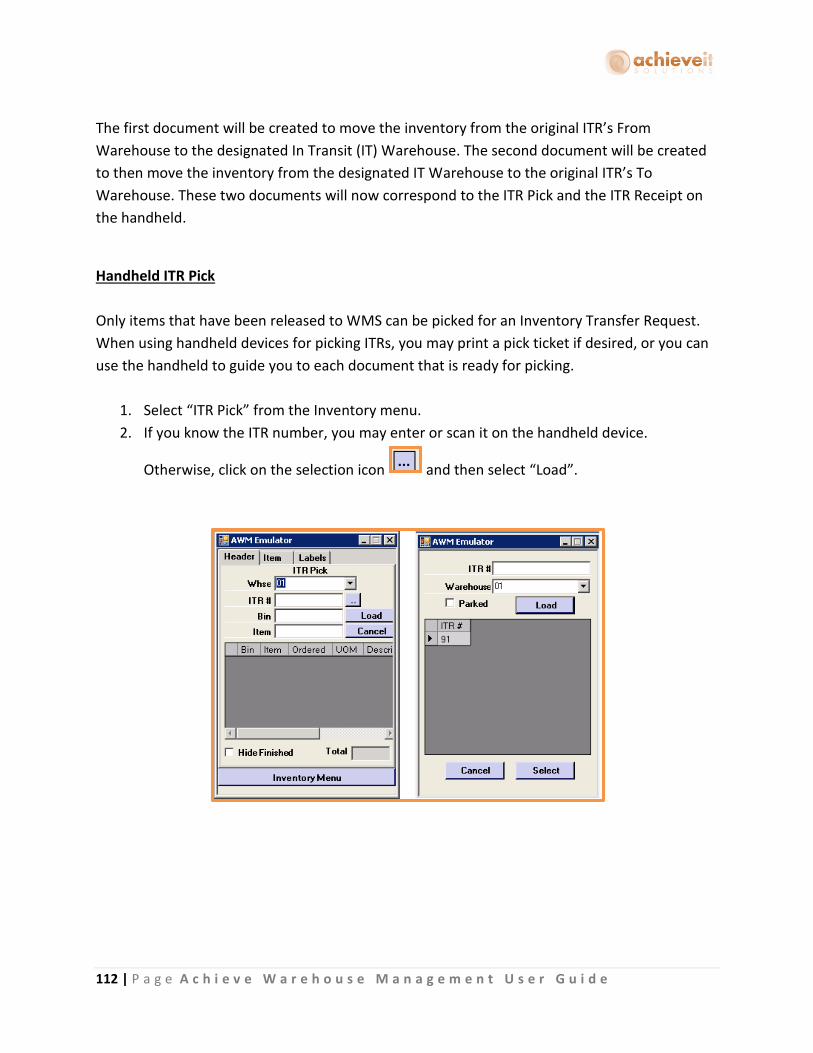
112 | P a g e A c h i e v e W a r e h o u s e M a n a g e m e n t U s e r G u i d e
The first document will be created to move the inventory from the original ITR’s From
Warehouse to the designated In Transit (IT) Warehouse. The second document will be created
to then move the inventory from the designated IT Warehouse to the original ITR’s To
Warehouse. These two documents will now correspond to the ITR Pick and the ITR Receipt on
the handheld.
Handheld ITR Pick
Only items that have been released to WMS can be picked for an Inventory Transfer Request.
When using handheld devices for picking ITRs, you may print a pick ticket if desired, or you can
use the handheld to guide you to each document that is ready for picking.
1. Select “ITR Pick” from the Inventory menu.
2. If you know the ITR number, you may enter or scan it on the handheld device.
Otherwise, click on the selection icon and then select “Load”.

113 | P a g e A c h i e v e W a r e h o u s e M a n a g e m e n t U s e r G u i d e
3. Choose the document to be picked, and click on “Select”. The list of items for that
document is displayed.
4. Select the first item to be picked. The screen displays details about the item, including
the bin where it has been allocated from. Whenever possible, you should pick the item
from the bin that is displayed. However, if it is not available in that bin, you may use the
selection icon to see other bins where the item can be found. You may need to enter a
special password, or have a supervisor enter one, in order to pick from an alternate bin.
Note that it may be necessary to pick from more than one bin in order to pick the full
quantity of the order. In that case, pick the quantity indicated from the first bin. The
system will then display the next bin to pick from, and so on.
You will also notice that there is a To Bin field. This is the bin in the In Transit warehouse
that the items are going to be moved into before they reach their destination. These
bins are most likely not actual physical bins but temporary place holders for the items.
Although if you want to have some better visibility you may want to create bins for each
mode of transportation that is used to ship these goods between warehouses. That way
you know which items are on which vehicles.

114 | P a g e A c h i e v e W a r e h o u s e M a n a g e m e n t U s e r G u i d e
The default receiving location for the item in the IT warehouse will be defaulted in, but
if that is not set up or if you just need to change it to a different bin, you can you can
enter, scan, or select it here.
Then verify or change the quantity being picked and select “Save”.
After an item has been picked, it is displayed in green on the screen.
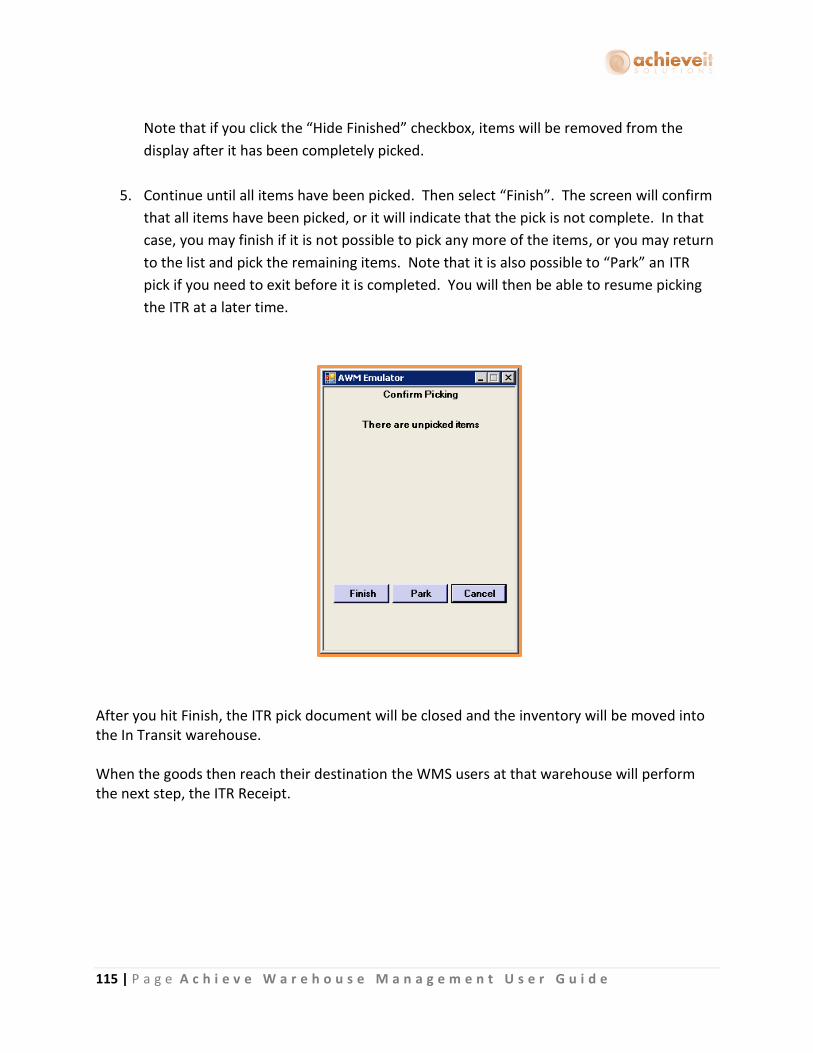
115 | P a g e A c h i e v e W a r e h o u s e M a n a g e m e n t U s e r G u i d e
Note that if you click the “Hide Finished” checkbox, items will be removed from the
display after it has been completely picked.
5. Continue until all items have been picked. Then select “Finish”. The screen will confirm
that all items have been picked, or it will indicate that the pick is not complete. In that
case, you may finish if it is not possible to pick any more of the items, or you may return
to the list and pick the remaining items. Note that it is also possible to “Park” an ITR
pick if you need to exit before it is completed. You will then be able to resume picking
the ITR at a later time.
After you hit Finish, the ITR pick document will be closed and the inventory will be moved into the In Transit warehouse. When the goods then reach their destination the WMS users at that warehouse will perform the next step, the ITR Receipt.
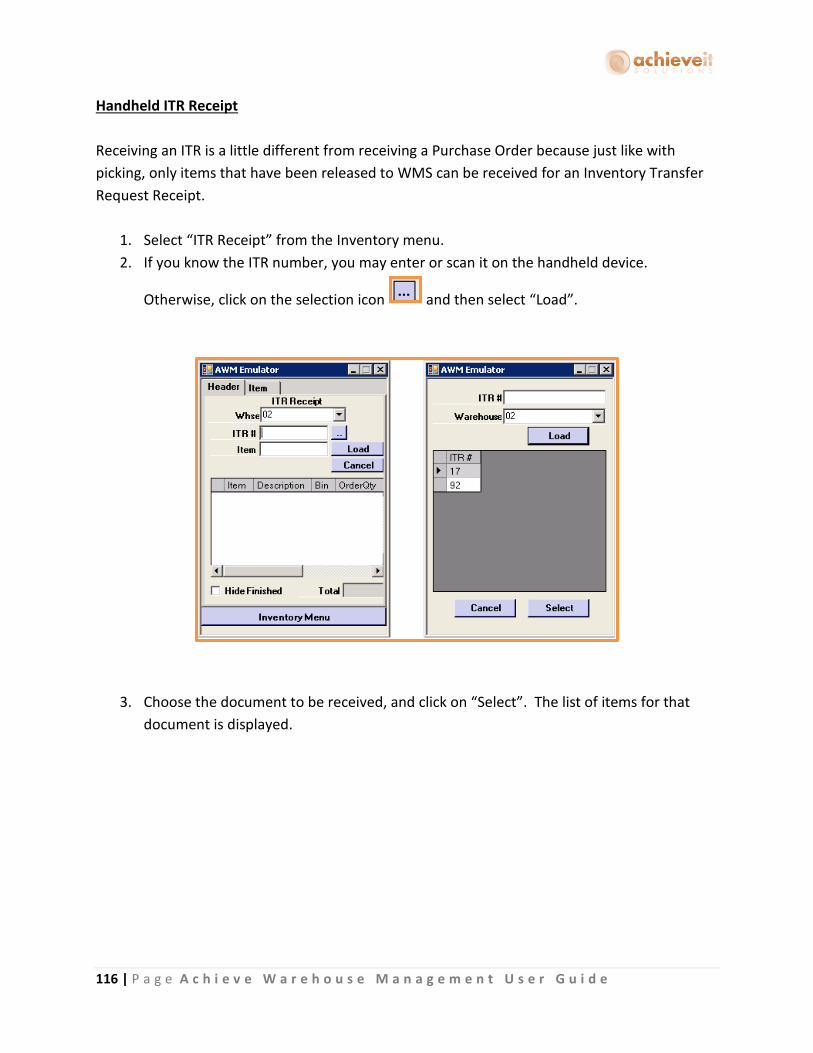
116 | P a g e A c h i e v e W a r e h o u s e M a n a g e m e n t U s e r G u i d e
Handheld ITR Receipt
Receiving an ITR is a little different from receiving a Purchase Order because just like with
picking, only items that have been released to WMS can be received for an Inventory Transfer
Request Receipt.
1. Select “ITR Receipt” from the Inventory menu.
2. If you know the ITR number, you may enter or scan it on the handheld device.
Otherwise, click on the selection icon and then select “Load”.
3. Choose the document to be received, and click on “Select”. The list of items for that
document is displayed.
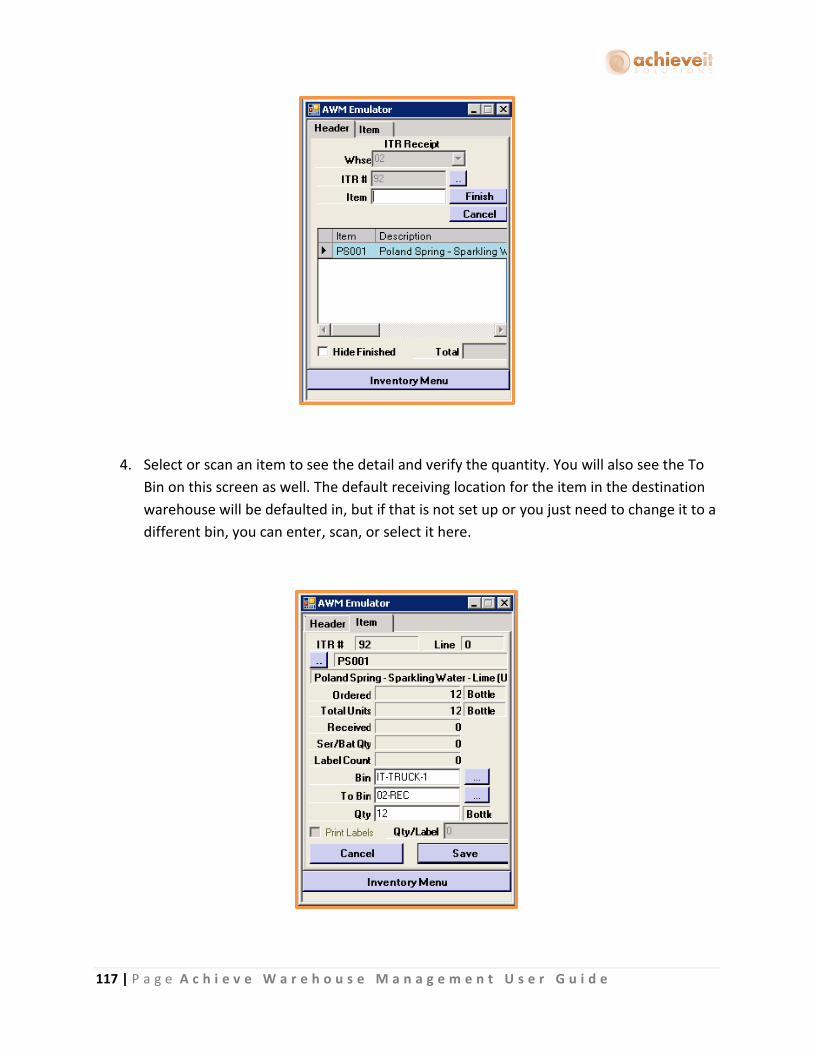
117 | P a g e A c h i e v e W a r e h o u s e M a n a g e m e n t U s e r G u i d e
4. Select or scan an item to see the detail and verify the quantity. You will also see the To
Bin on this screen as well. The default receiving location for the item in the destination
warehouse will be defaulted in, but if that is not set up or you just need to change it to a
different bin, you can enter, scan, or select it here.

118 | P a g e A c h i e v e W a r e h o u s e M a n a g e m e n t U s e r G u i d e
5. The screen returns to the list of items. After an item has been picked, it is displayed in
green on the screen.
Note that if you click the “Hide Finished” checkbox, items will be removed from the
display after it has been completely picked.
6. When all items have been completed, select “Finish” to finalize the receipt.
After you hit Finish, the ITR receipt document will be closed and the inventory will be
moved from the In Transit warehouse to the destination warehouse.
Handheld ITR Quick Receipt
The ITR Quick Receipt screen on the handheld lets you quickly blind receive an entire ITR
without having to scan each item individually.
1. Select “ITR Quick Receipt” from the Inventory menu.
2. If you know the ITR number, you may enter or scan it on the handheld device.
Otherwise, click on the selection icon and then select “Load”.
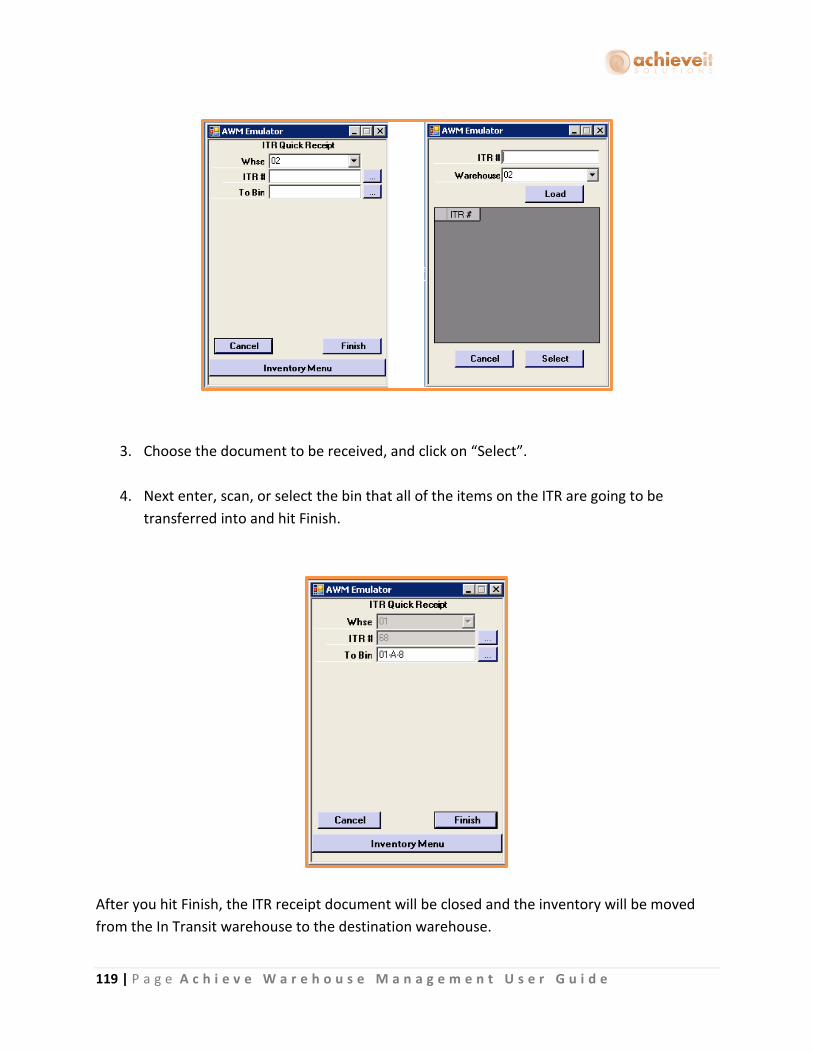
119 | P a g e A c h i e v e W a r e h o u s e M a n a g e m e n t U s e r G u i d e
3. Choose the document to be received, and click on “Select”.
4. Next enter, scan, or select the bin that all of the items on the ITR are going to be
transferred into and hit Finish.
After you hit Finish, the ITR receipt document will be closed and the inventory will be moved
from the In Transit warehouse to the destination warehouse.
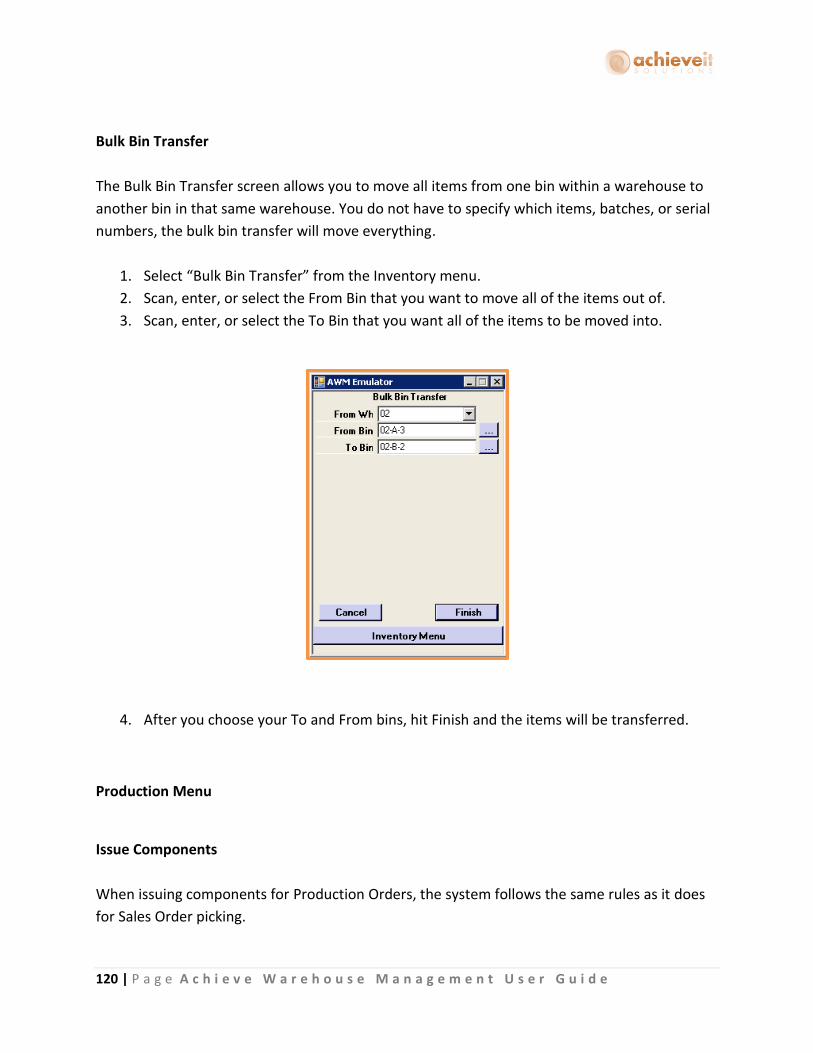
120 | P a g e A c h i e v e W a r e h o u s e M a n a g e m e n t U s e r G u i d e
Bulk Bin Transfer
The Bulk Bin Transfer screen allows you to move all items from one bin within a warehouse to
another bin in that same warehouse. You do not have to specify which items, batches, or serial
numbers, the bulk bin transfer will move everything.
1. Select “Bulk Bin Transfer” from the Inventory menu.
2. Scan, enter, or select the From Bin that you want to move all of the items out of.
3. Scan, enter, or select the To Bin that you want all of the items to be moved into.
4. After you choose your To and From bins, hit Finish and the items will be transferred.
Production Menu
Issue Components
When issuing components for Production Orders, the system follows the same rules as it does
for Sales Order picking.
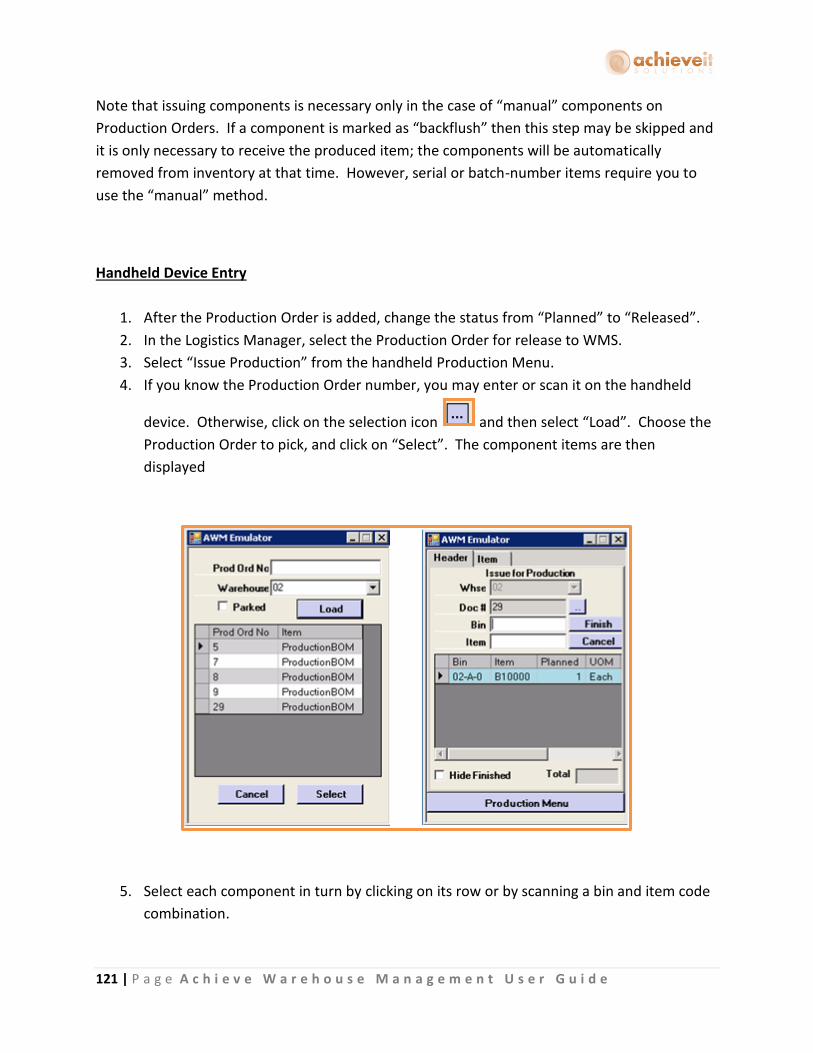
121 | P a g e A c h i e v e W a r e h o u s e M a n a g e m e n t U s e r G u i d e
Note that issuing components is necessary only in the case of “manual” components on
Production Orders. If a component is marked as “backflush” then this step may be skipped and
it is only necessary to receive the produced item; the components will be automatically
removed from inventory at that time. However, serial or batch-number items require you to
use the “manual” method.
Handheld Device Entry
1. After the Production Order is added, change the status from “Planned” to “Released”.
2. In the Logistics Manager, select the Production Order for release to WMS.
3. Select “Issue Production” from the handheld Production Menu.
4. If you know the Production Order number, you may enter or scan it on the handheld
device. Otherwise, click on the selection icon and then select “Load”. Choose the
Production Order to pick, and click on “Select”. The component items are then
displayed
5. Select each component in turn by clicking on its row or by scanning a bin and item code
combination.

122 | P a g e A c h i e v e W a r e h o u s e M a n a g e m e n t U s e r G u i d e
6. Confirm or change the picking bin and quantity. Then click on “Save”. The handheld
returns to the previous screen. Repeat with the remaining components.
7. When all of the components have been picked, click on “Finish”.
8. The system will create an Issue for Production document. The items are removed from
inventory at this point.

123 | P a g e A c h i e v e W a r e h o u s e M a n a g e m e n t U s e r G u i d e
Receipt from Production
Once items have been produced, you must enter a Receipt from Production in order to receive
them into inventory. Note that you may create partial receipts at any time, until the entire
Production Order is finished.
If “Enable Backflush Processing” has been selected in the WMS Options, you may enter
components on a Production Order that are marked “backflush”. In this case, a Receipt from
Production may be entered without first issuing the components. The following conditions are
required in order to use Backflush processing:
The component item must be marked as “backflush” in the Item Master and on the
Production Order
A default Backflush bin must be established for the item
A sufficient quantity of the item must be present in the default Backflush bin before
beginning the Receipt from Production procedure
Note that serial and batch-number items may not be designated as “backflush”.
Handheld Device Entry
1. Select “Production Receipt” from the handheld Production Menu.
2. If you know the Production Order number, you may enter or scan it on the handheld
device. Otherwise, click on the selection icon and then select “Load”. Choose
the order to receive, and click on “Select”.

124 | P a g e A c h i e v e W a r e h o u s e M a n a g e m e n t U s e r G u i d e
3. The finished item is shown in the lower portion of the screen. Click on the item
number.
4. Enter the bin where the item is received, and the quantity. Then click on “Save”.
The handheld returns to the previous screen.
5. Complete the receipt by clicking on “Finish”. 6. The system creates a Receipt from Production document.
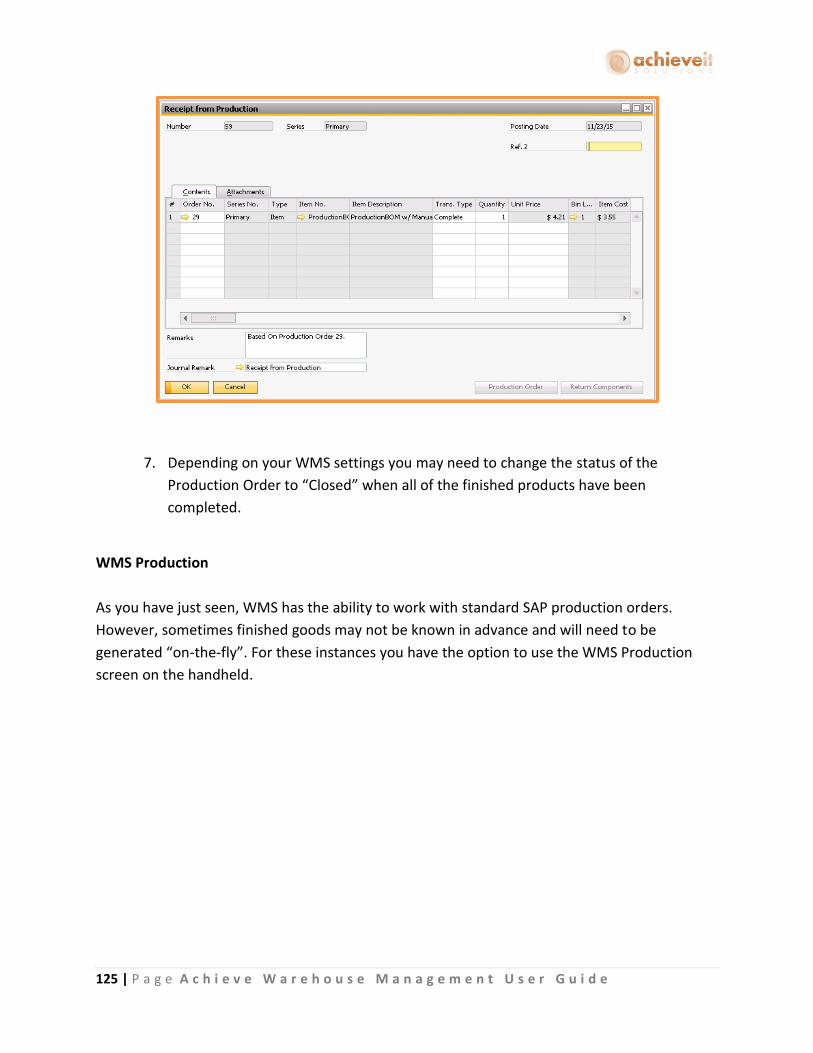
125 | P a g e A c h i e v e W a r e h o u s e M a n a g e m e n t U s e r G u i d e
7. Depending on your WMS settings you may need to change the status of the
Production Order to “Closed” when all of the finished products have been
completed.
WMS Production
As you have just seen, WMS has the ability to work with standard SAP production orders.
However, sometimes finished goods may not be known in advance and will need to be
generated “on-the-fly”. For these instances you have the option to use the WMS Production
screen on the handheld.
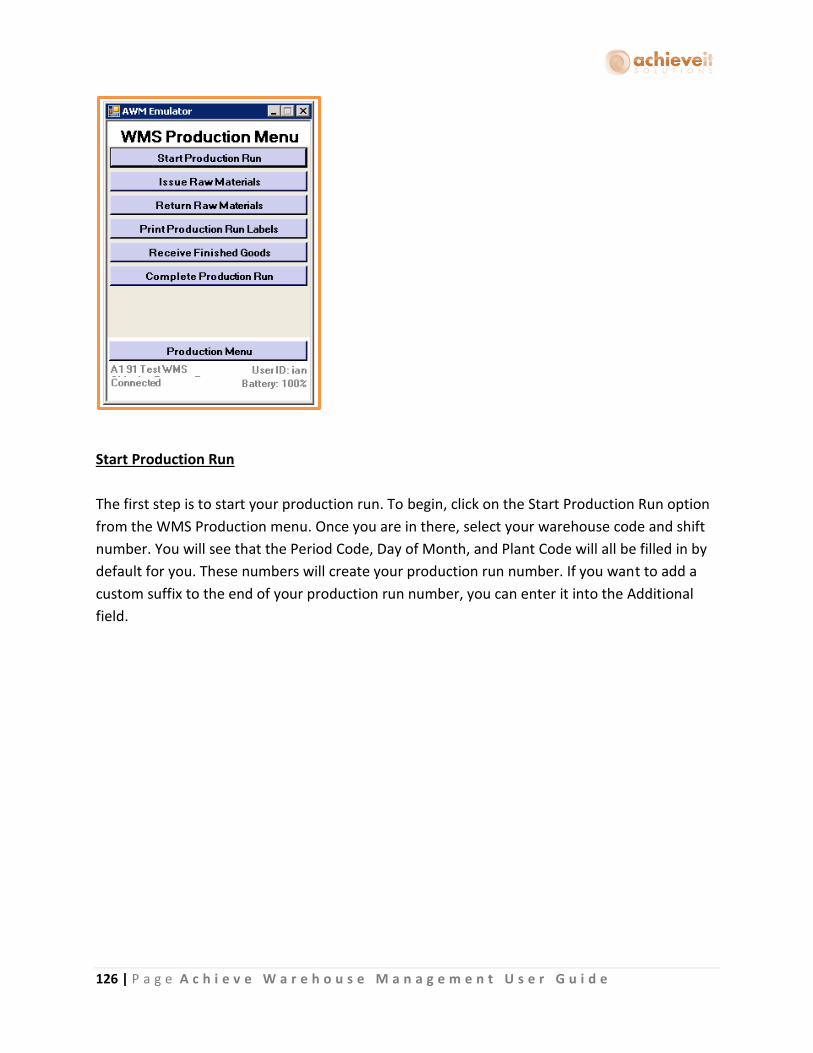
126 | P a g e A c h i e v e W a r e h o u s e M a n a g e m e n t U s e r G u i d e
Start Production Run
The first step is to start your production run. To begin, click on the Start Production Run option
from the WMS Production menu. Once you are in there, select your warehouse code and shift
number. You will see that the Period Code, Day of Month, and Plant Code will all be filled in by
default for you. These numbers will create your production run number. If you want to add a
custom suffix to the end of your production run number, you can enter it into the Additional
field.

127 | P a g e A c h i e v e W a r e h o u s e M a n a g e m e n t U s e r G u i d e
Once all the information looks good, select the Start button to create your production run
number and start the production run.

128 | P a g e A c h i e v e W a r e h o u s e M a n a g e m e n t U s e r G u i d e
If the production run number already exists it will give you an error message.
Issue Raw Materials
The next step is to issue the raw materials for the production run. To start, go to the Issue Raw
Materials screen from the WMS Production menu.
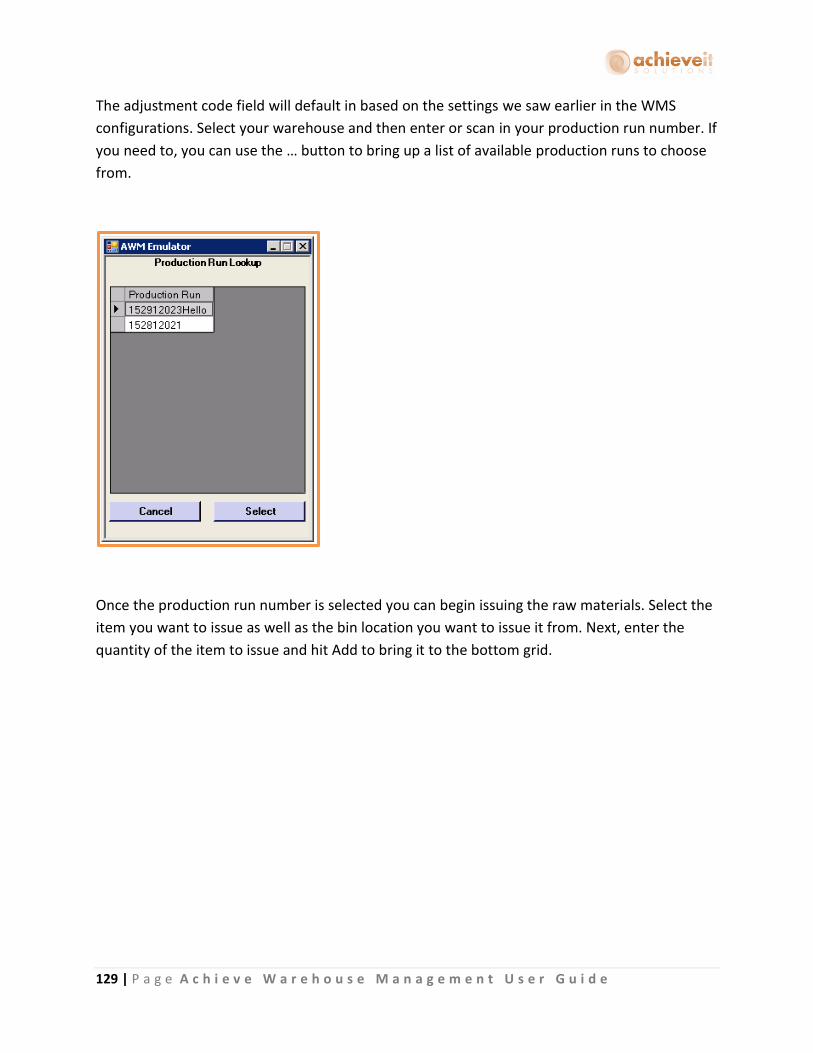
129 | P a g e A c h i e v e W a r e h o u s e M a n a g e m e n t U s e r G u i d e
The adjustment code field will default in based on the settings we saw earlier in the WMS
configurations. Select your warehouse and then enter or scan in your production run number. If
you need to, you can use the … button to bring up a list of available production runs to choose
from.
Once the production run number is selected you can begin issuing the raw materials. Select the
item you want to issue as well as the bin location you want to issue it from. Next, enter the
quantity of the item to issue and hit Add to bring it to the bottom grid.
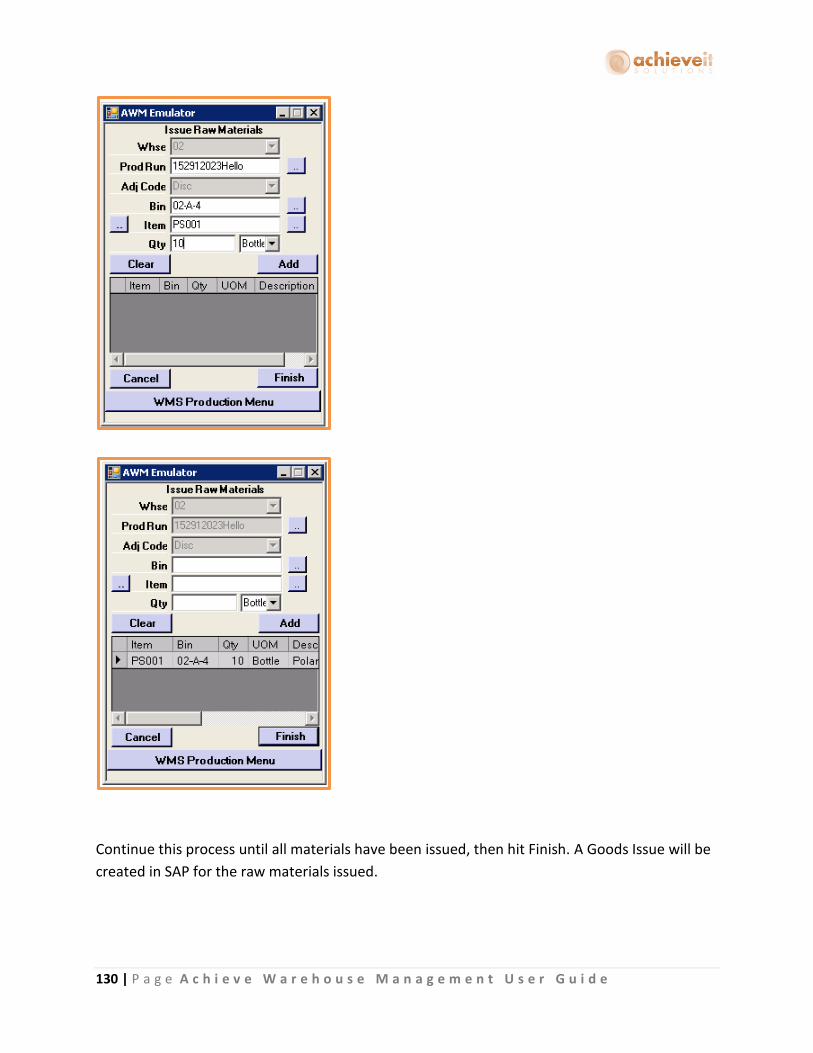
130 | P a g e A c h i e v e W a r e h o u s e M a n a g e m e n t U s e r G u i d e
Continue this process until all materials have been issued, then hit Finish. A Goods Issue will be
created in SAP for the raw materials issued.
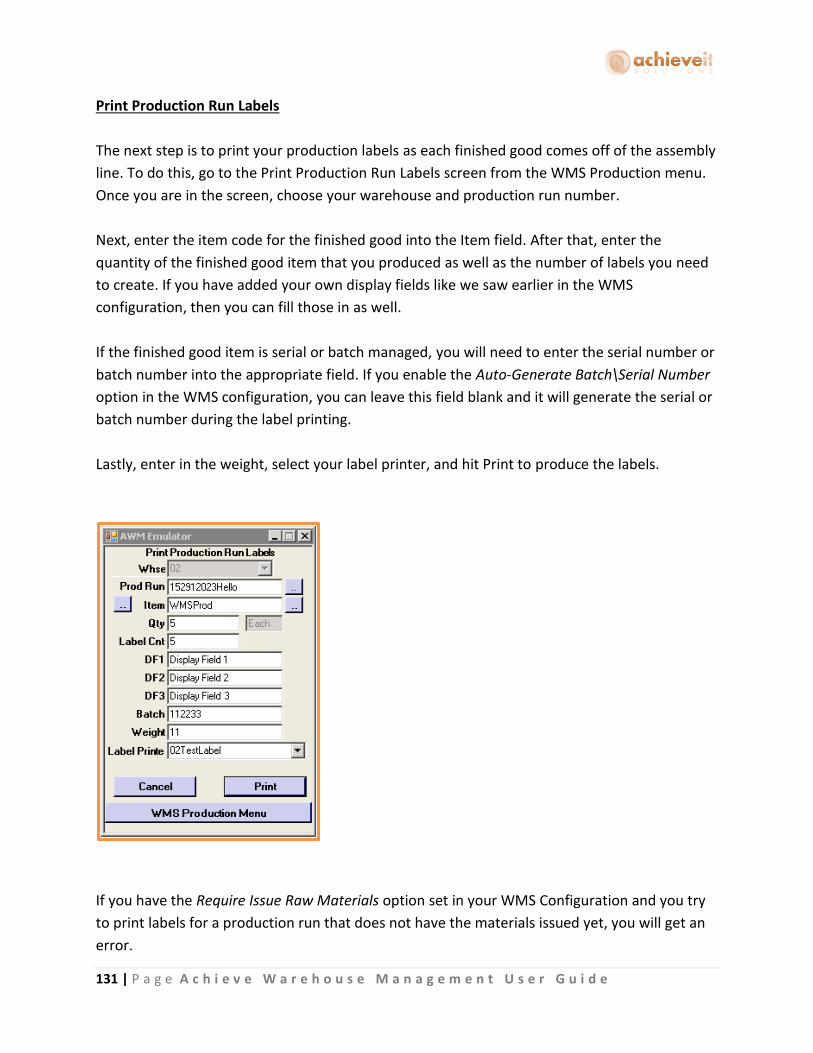
131 | P a g e A c h i e v e W a r e h o u s e M a n a g e m e n t U s e r G u i d e
Print Production Run Labels
The next step is to print your production labels as each finished good comes off of the assembly
line. To do this, go to the Print Production Run Labels screen from the WMS Production menu.
Once you are in the screen, choose your warehouse and production run number.
Next, enter the item code for the finished good into the Item field. After that, enter the
quantity of the finished good item that you produced as well as the number of labels you need
to create. If you have added your own display fields like we saw earlier in the WMS
configuration, then you can fill those in as well.
If the finished good item is serial or batch managed, you will need to enter the serial number or
batch number into the appropriate field. If you enable the Auto-Generate Batch\Serial Number
option in the WMS configuration, you can leave this field blank and it will generate the serial or
batch number during the label printing.
Lastly, enter in the weight, select your label printer, and hit Print to produce the labels.
If you have the Require Issue Raw Materials option set in your WMS Configuration and you try
to print labels for a production run that does not have the materials issued yet, you will get an
error.
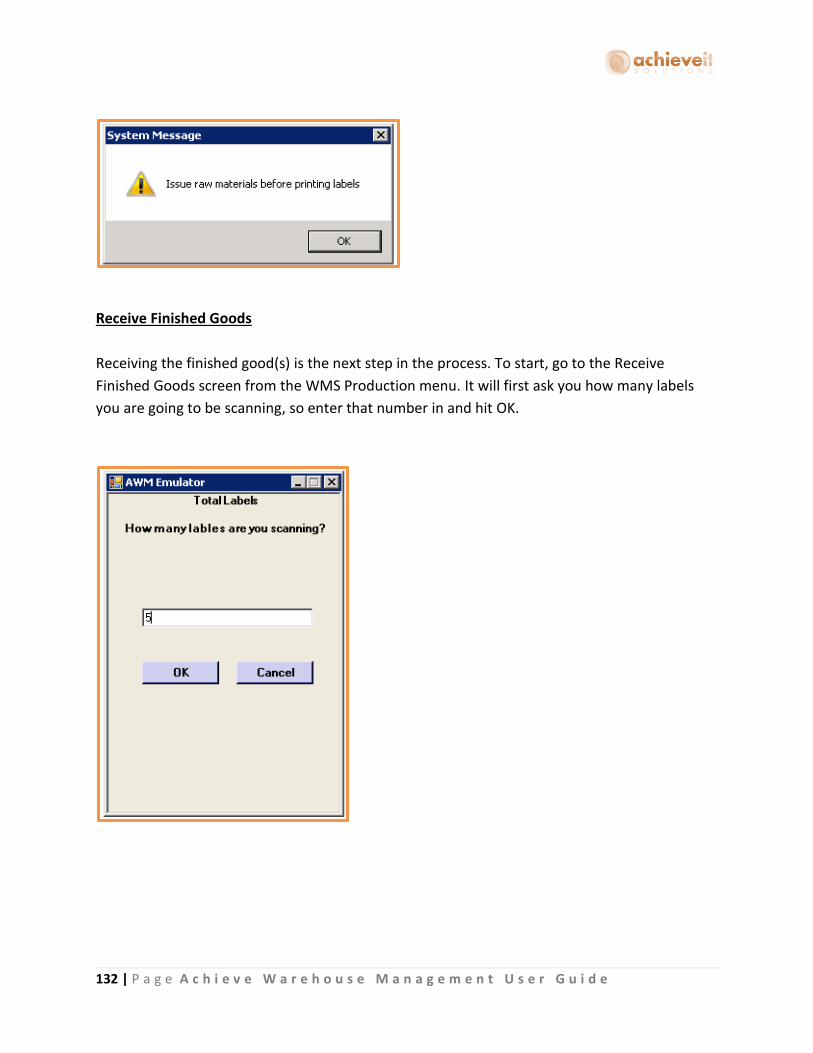
132 | P a g e A c h i e v e W a r e h o u s e M a n a g e m e n t U s e r G u i d e
Receive Finished Goods
Receiving the finished good(s) is the next step in the process. To start, go to the Receive
Finished Goods screen from the WMS Production menu. It will first ask you how many labels
you are going to be scanning, so enter that number in and hit OK.

133 | P a g e A c h i e v e W a r e h o u s e M a n a g e m e n t U s e r G u i d e
On the next screen you will select your warehouse and enter or scan in your first Label ID. The
item code and quantity for the matching label ID’s finished good will be filled in. Next, select
the bin location you are receiving the finished good into and hit Add to bring it down to the
bottom grid. Continue this process until all of the label IDs for the production run have been
scanned and added. When you are done click Finish.
A Goods Receipt will be added to SAP for the finished good.
Complete Production Run
The final step in the WMS Production process is marking your production run completed. To do
that, go to the Complete Production Run screen from the WMS Production menu. Select your
warehouse, then enter or scan in the production run number and hit Complete.

134 | P a g e A c h i e v e W a r e h o u s e M a n a g e m e n t U s e r G u i d e
If the finished goods have not been received yet it will let you know that you have to do so
before you can complete the production run.
Otherwise it will mark the production run completed.
Return Raw Materials
The Return Raw Materials screen can be used when you want to return unused raw materials
back into inventory. Start by going to the Return Raw Materials screen from the WMS
Production menu.
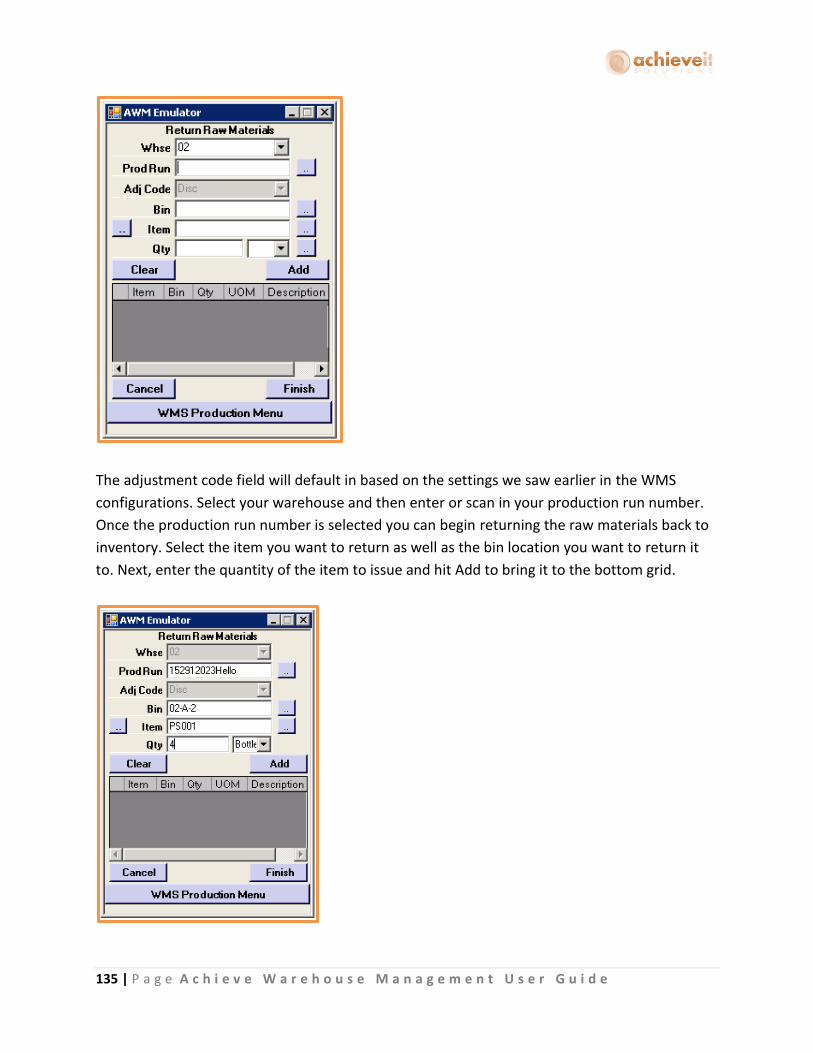
135 | P a g e A c h i e v e W a r e h o u s e M a n a g e m e n t U s e r G u i d e
The adjustment code field will default in based on the settings we saw earlier in the WMS
configurations. Select your warehouse and then enter or scan in your production run number.
Once the production run number is selected you can begin returning the raw materials back to
inventory. Select the item you want to return as well as the bin location you want to return it
to. Next, enter the quantity of the item to issue and hit Add to bring it to the bottom grid.
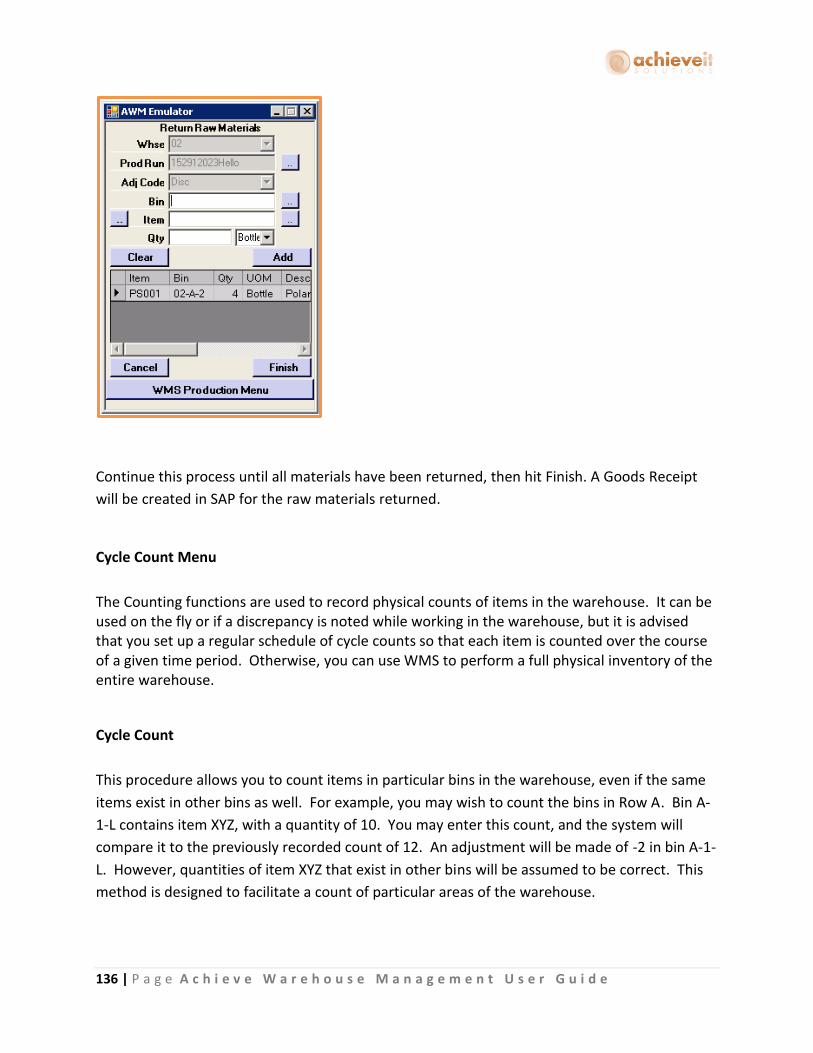
136 | P a g e A c h i e v e W a r e h o u s e M a n a g e m e n t U s e r G u i d e
Continue this process until all materials have been returned, then hit Finish. A Goods Receipt
will be created in SAP for the raw materials returned.
Cycle Count Menu
The Counting functions are used to record physical counts of items in the warehouse. It can be used on the fly or if a discrepancy is noted while working in the warehouse, but it is advised that you set up a regular schedule of cycle counts so that each item is counted over the course of a given time period. Otherwise, you can use WMS to perform a full physical inventory of the entire warehouse.
Cycle Count
This procedure allows you to count items in particular bins in the warehouse, even if the same
items exist in other bins as well. For example, you may wish to count the bins in Row A. Bin A-
1-L contains item XYZ, with a quantity of 10. You may enter this count, and the system will
compare it to the previously recorded count of 12. An adjustment will be made of -2 in bin A-1-
L. However, quantities of item XYZ that exist in other bins will be assumed to be correct. This
method is designed to facilitate a count of particular areas of the warehouse.

137 | P a g e A c h i e v e W a r e h o u s e M a n a g e m e n t U s e r G u i d e
The Cycle Count screen requires the use of the standard SAP Cycle Codes. To create the Cycle
Codes in SAP go to Administration > Setup > Inventory > Inventory Cycles
After you create the codes, you will need to enter a Cycle Code for each item in the Item
Master. The Cycle Codes are entered on the Inventory Data tab, on the row for each
warehouse. Based on the frequency of the cycle, the system will automatically enter the next
date for the count; however, you may change the date if needed.
1. On the handheld select “Cycle Count” from the Cycle Count Menu.
2. Enter the bin, item, and quantity. Be sure to enter the actual quantity in the bin, not the
difference between the system quantity and the actual quantity. Note that only items
that have Cycle Count Codes for this warehouse will be allowed. Selecting the search
button next to the item code field will provide a list of these items, and may be used as
a “count sheet”.
3. Select the “Add” button. The item will be displayed in the lower part of the screen.
4. Enter as many items as needed. Then select “Finish” to confirm the entries.
5. After you hit Finish, WMS will create a standard SAP Inventory Counting document for
the items and bins you counted. Note that you cannot have more than one Inventory
Counting document with an item/bin combination on it at the same time with WMS.
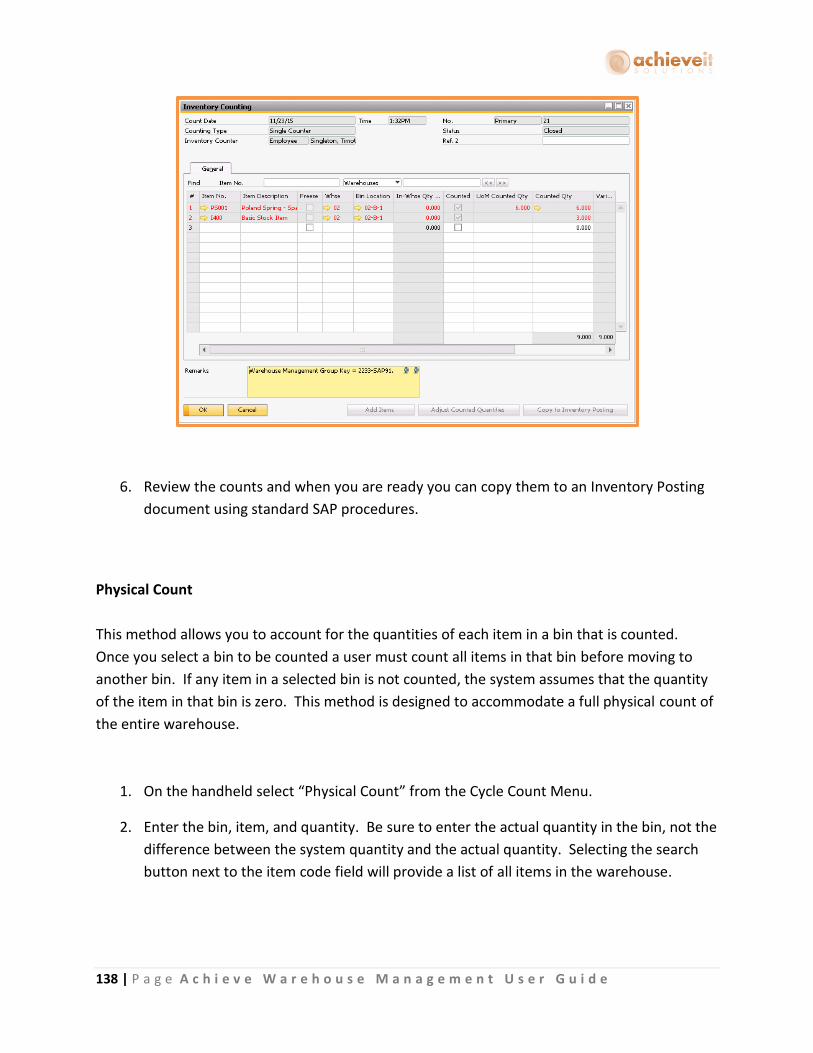
138 | P a g e A c h i e v e W a r e h o u s e M a n a g e m e n t U s e r G u i d e
6. Review the counts and when you are ready you can copy them to an Inventory Posting
document using standard SAP procedures.
Physical Count
This method allows you to account for the quantities of each item in a bin that is counted.
Once you select a bin to be counted a user must count all items in that bin before moving to
another bin. If any item in a selected bin is not counted, the system assumes that the quantity
of the item in that bin is zero. This method is designed to accommodate a full physical count of
the entire warehouse.
1. On the handheld select “Physical Count” from the Cycle Count Menu.
2. Enter the bin, item, and quantity. Be sure to enter the actual quantity in the bin, not the
difference between the system quantity and the actual quantity. Selecting the search
button next to the item code field will provide a list of all items in the warehouse.

139 | P a g e A c h i e v e W a r e h o u s e M a n a g e m e n t U s e r G u i d e
3. Select the “Add” button. The item will be displayed in the lower part of the screen.
4. Enter as many items as needed, but each item can only be counted once per bin. Then
select “Finish” to confirm the entries. Be sure that each item in the bin has been
counted completely. Any item in the bin that is not counted will be assumed to have a
zero quantity.
5. After you hit Finish, WMS will create a standard SAP Inventory Counting document for
the items and bins you counted. Note that you cannot have more than one Inventory
Counting document with an item/bin combination on it at the same time with WMS.

140 | P a g e A c h i e v e W a r e h o u s e M a n a g e m e n t U s e r G u i d e
6. Review the counts and when you are ready you can copy them to an Inventory Posting
document using standard SAP procedures.
Bin Count
This method allows you to create an immediate adjustment for one bin at a time. You would enter a count of all items in a specified bin. The system will then take those counts and automatically create a standard SAP Inventory Posting document for that bin. Quantities in other bins are not affected. This method does not require the use of Cycle Codes or the manual creation of an SAP Inventory Posting document.
1. Select “Bin Count” from the Cycle Count Menu.
2. Enter the bin, item, and quantity. Be sure to enter the actual quantity in the bin, not the difference between the system quantity and the actual quantity.
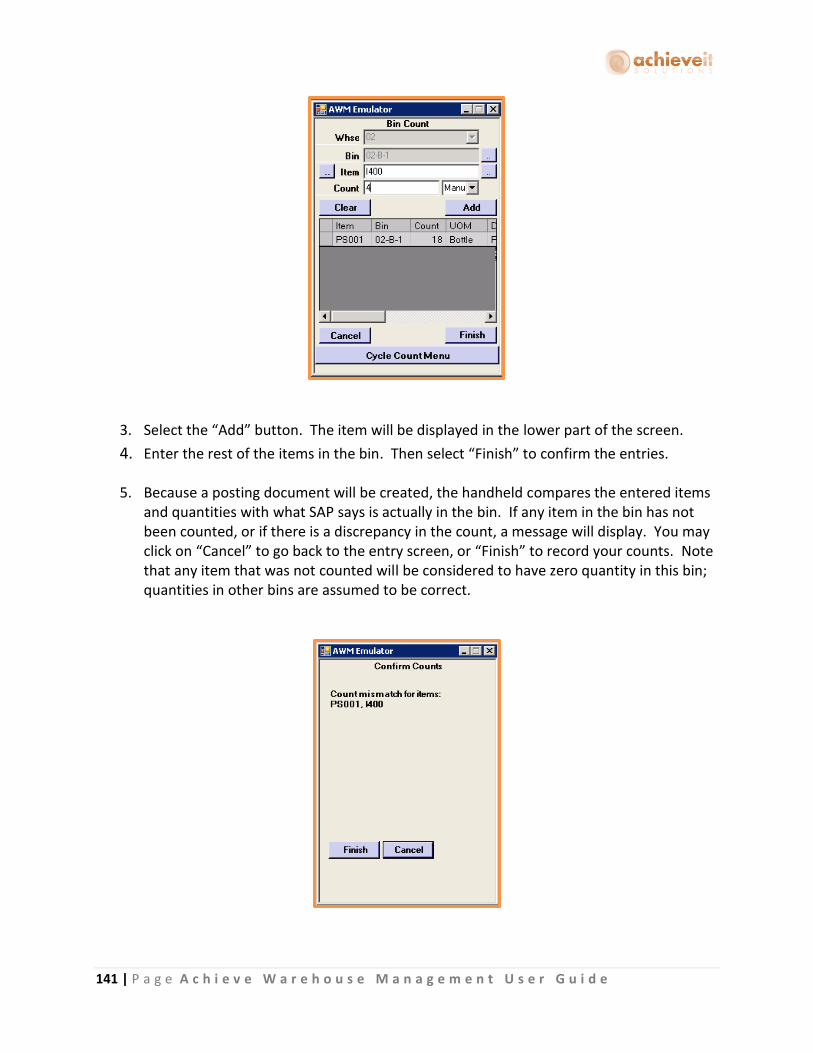
141 | P a g e A c h i e v e W a r e h o u s e M a n a g e m e n t U s e r G u i d e
3. Select the “Add” button. The item will be displayed in the lower part of the screen.
4. Enter the rest of the items in the bin. Then select “Finish” to confirm the entries.
5. Because a posting document will be created, the handheld compares the entered items and quantities with what SAP says is actually in the bin. If any item in the bin has not been counted, or if there is a discrepancy in the count, a message will display. You may click on “Cancel” to go back to the entry screen, or “Finish” to record your counts. Note that any item that was not counted will be considered to have zero quantity in this bin; quantities in other bins are assumed to be correct.

142 | P a g e A c h i e v e W a r e h o u s e M a n a g e m e n t U s e r G u i d e
You also have the ability to completely clear out a bin if you need to. Since WMS assumes an item that is not counted is a 0 during a Bin Count, if you only enter a bin and do not add any items to the grid, it will prompt you with a message asking you to clear the inventory in that bin when you hit Finish.
6. After you hit Finish, WMS will create an Inventory Posting document for that bin.

143 | P a g e A c h i e v e W a r e h o u s e M a n a g e m e n t U s e r G u i d e
Location Lookup
This program allows you to see a detailed listing of current locations of specified items,
including batch or serial numbers in each bin. You can search by a variety of criteria to find
relevant information.
This program can be used directly from the handheld device or from within SAP Business One as
described in the WMS Management section below.
1. Select “Location Lookup” from the handheld Main Menu.
2. Enter the selection criteria: you may enter information in as many of the fields as you
wish; warehouse, bin, item, expiration date, and serial or batch number.
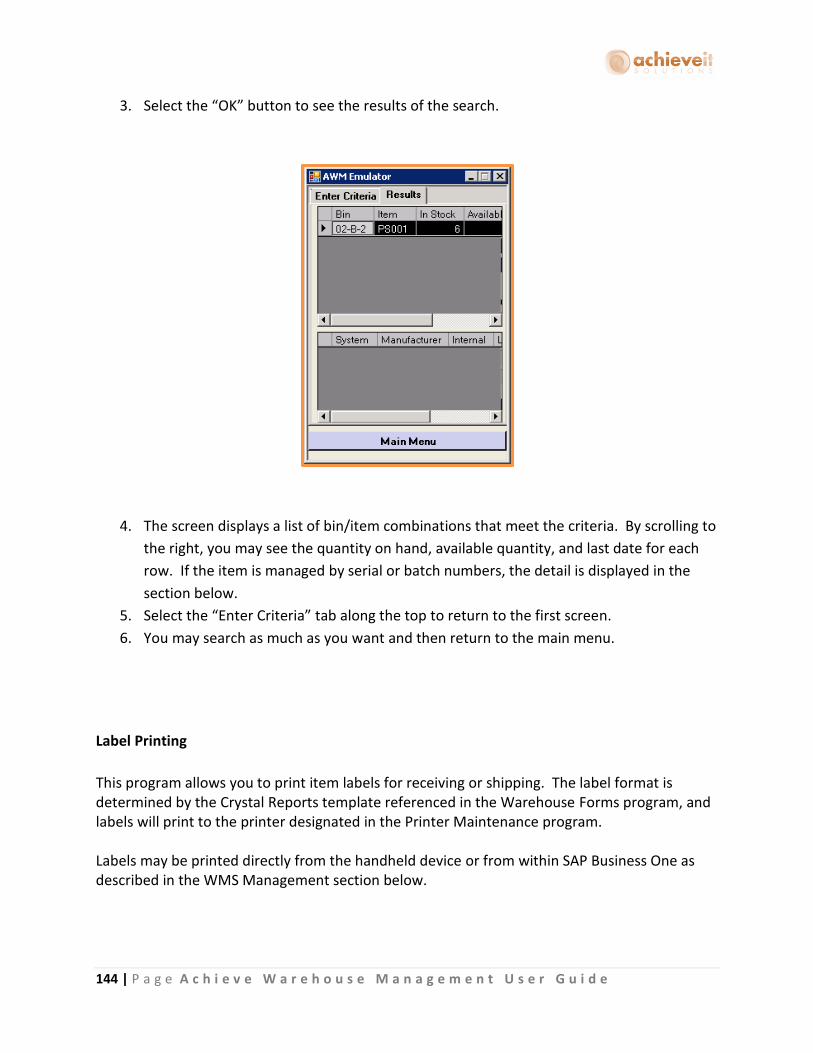
144 | P a g e A c h i e v e W a r e h o u s e M a n a g e m e n t U s e r G u i d e
3. Select the “OK” button to see the results of the search.
4. The screen displays a list of bin/item combinations that meet the criteria. By scrolling to
the right, you may see the quantity on hand, available quantity, and last date for each
row. If the item is managed by serial or batch numbers, the detail is displayed in the
section below.
5. Select the “Enter Criteria” tab along the top to return to the first screen.
6. You may search as much as you want and then return to the main menu.
Label Printing
This program allows you to print item labels for receiving or shipping. The label format is determined by the Crystal Reports template referenced in the Warehouse Forms program, and labels will print to the printer designated in the Printer Maintenance program. Labels may be printed directly from the handheld device or from within SAP Business One as described in the WMS Management section below.

145 | P a g e A c h i e v e W a r e h o u s e M a n a g e m e n t U s e r G u i d e
1. Select “Label Printing” from the handheld device Main Menu.
2. Enter the item code. The description is shown automatically. 3. Enter the quantity and unit of measure that are to appear on the label 4. Enter the number of labels to print 5. Be sure the correct printer is selected at the bottom of the screen. 6. Select the “Print” button to begin printing. 7. If necessary, you may select the “Cancel” button to stop the printing. 8. You may continue to print more labels, or return to the main menu.
Using the Logistics Manager
Achieve One > Achieve Warehouse Management > Warehouse Logistics Manager
The WMS Options program, described earlier in this manual, provides two different methods of
sending sales orders to the warehouse for picking.
1. Load all open sales orders. This method assumes that all orders should be picked and
shipped as soon as possible. As soon as a sales order is added to the system, it is
immediately released to WMS so it will be available for picking. No other action is
needed.

146 | P a g e A c h i e v e W a r e h o u s e M a n a g e m e n t U s e r G u i d e
2. Load Sales Orders released from Logistics Manager. This method provides greater
flexibility. It accommodates scenarios where orders may be placed in advance, for
future shipment, and should not be picked immediately. It also allows for prioritization
by customer or item, selection by route, and other combinations of criteria. Use of the
Logistics Manager requires that one or more individuals must monitor orders and
release them as appropriate to the warehouse for picking.
The Logistics Manager also provides a means of tracking individual items in the picking
and shipping process. The warehouse manager will be able to see how items move
through the procedure, how many are waiting for various actions, and so forth.
Note that the WMS Options also provides two possible exceptions to the use of the
Logistics Manager. Orders may be sent to the warehouse automatically if either of
these choices is selected:
a. Load orders that can be shipped complete. In this case, any order where all
items are available and unallocated will be sent directly to WMS; only those that
will be partially shipped or which require replenishment will require manual
release with the Logistics Manager.
b. Auto Backorder Processing. In this case, once an order has been partially
shipped but some items were not originally available, the remaining items will be
sent directly to WMS as soon as they are received and become available.
The following section describes the use of the Logistics Manager.
Selection Criteria
The Selection Criteria screen of the Logistics Manager provides many options for determining
which orders will be available for picking. It is important to use these options in such a way that
all orders are viewed at some point so that none are missed. However, it may be useful to
restrict selection so that certain orders can be selected at the same time, and then reset the
criteria to find other groups of orders later.

147 | P a g e A c h i e v e W a r e h o u s e M a n a g e m e n t U s e r G u i d e
You may use any combination of criteria to display a list of orders to be picked.
Group By Select the method for grouping items on the list:
None – display each document line item separately
Document – display one line per document
Sales Orders, Reserve
Invoices, Production
Orders, Suggest Transfers
or Inventory Transfer
Requests
Select the type of document to work with. You may select
Sales Orders, AR Reserve Invoices, Production Orders, Suggest
Bin Transfers or ITRs. You may also enter a beginning and/or
ending document number to include in the list, or leave blank
to include all document numbers
Posting Date Enter a beginning and/or ending posting date for documents
to be included, or leave blank to include all posting dates.
Required Date Enter a beginning and/or ending required date for documents
to be included, or leave blank to include all required dates.
148 | P a g e A c h i e v e W a r e h o u s e M a n a g e m e n t U s e r G u i d e
Delivery/Due Date Enter a beginning and/or ending delivery date for documents
to be included, or leave blank to include all delivery dates.
Cancellation Date Enter a beginning and/or ending cancellation date for
documents to be included, or leave blank to include all
cancellation dates.
Customer Enter a beginning and/or ending customer for documents to
be included, or leave blank to include all customers.
Shipping Method Enter a beginning and/or ending shipping method for
documents to be included, or leave blank to include all
shipping methods.
Priority Enter a beginning and/or ending priority level for documents
to be included, or leave blank to include all priority levels.
Note that the priority level is found in the Shipping Type for
each document.
Route If you are using delivery routes, you may select a route from
the drop-down list. Only orders for that route will be
included. Otherwise, leave the field blank if routes are not
used, or if all routes are to be included.
Display UoM Choose if you want to see the item quantities in the
document’s unit of measure or the item’s inventory unit of
measure.
Item Enter a beginning and/or ending item code for documents to
be included, or leave blank to include all items.
Fulfillment % Enter a beginning and/or ending fulfillment percentage for
documents to be included, or leave blank to include all
fulfillment percentages. The fulfillment percentage is the
percent of items on an order that are available and
unallocated in the warehouse.

149 | P a g e A c h i e v e W a r e h o u s e M a n a g e m e n t U s e r G u i d e
Warehouses The screen displays all of the warehouses in the company,
grouped by location. Check those that are to be included in
the list.
Sort By Select the way the list of items should be sorted:
Customer
Delivery Date
Document Number
Warehouse
Priority
Once you have entered your selections, click on “OK” to view the Open Documents screen of
the Logistics Manager.
Open Documents Tab
The Logistics Manager opens to the Open Documents tab. Use this tab to select the items that
will be sent to WMS for picking.

150 | P a g e A c h i e v e W a r e h o u s e M a n a g e m e n t U s e r G u i d e
The screen displays a list of all items that meet the conditions of the selection criteria. You can
see information about the document, customer, item, available quantity, and fulfillment
percent. You may also change the quantity to be released on any row.
Note that you can change the sorting of the items by clicking on a column heading, regardless
of the “Sort By” selection that was entered. For example, if the UPS pickup will be soon, you
may want to click on “Shipping” so that all UPS orders are grouped together.
You may select items that you wish to pick by checking the box at the beginning of the row, and
then click on the “Release” button. Once you have release an item, it will no longer appear in
the Open Documents tab.
There is an option on the bottom of the tab called Allocation Criteria. This button will allow you
do create allocation rules for when you release your documents. For each document type you
can select specific locations of the warehouse that the documents can be allocated from upon
release. These will then become the default settings going forward so if you need to change or
remove them just open up the window and update them.
Pending Replenishment Tab
Once an item or document has been released from the Open Documents tab, it moves to the
Pending Replenishment tab. Here it will begin allocation. The system will determine whether
there is sufficient unallocated quantity in picking bins to accommodate it. If there is, then the

151 | P a g e A c h i e v e W a r e h o u s e M a n a g e m e n t U s e r G u i d e
item or document will move itself to the Ready for WMS tab. If not, then the item or document
will stay in the Pending Replenishment tab until there is sufficient quantities.
There is an exception though. If the document has multiple lines, and some of the lines can be
shipped, as long as the document allows partial delivery (standard SAP field) then all rows from
the document will move to Ready for WMS with the non-allocated rows being designated to
the backorder bin (BCKDR).
Items shown on the Pending Replenishment tab may also need to be moved from overstock
bins to picking bins. Once those have been moved, they will be released automatically, or by
means of the “Release” button on this screen.
Note that users are notified of the need for replenishment by means of the Notification Options
(either by internal message or by email), or by printing the information on this screen using the
“Report” button. The report button gives you the option to see the items that have not been
printed yet or that have already been printed in case you lose the print out.
It is also possible to “Un Release” items from this screen. In this case, the items will return to
the Open Documents screen.
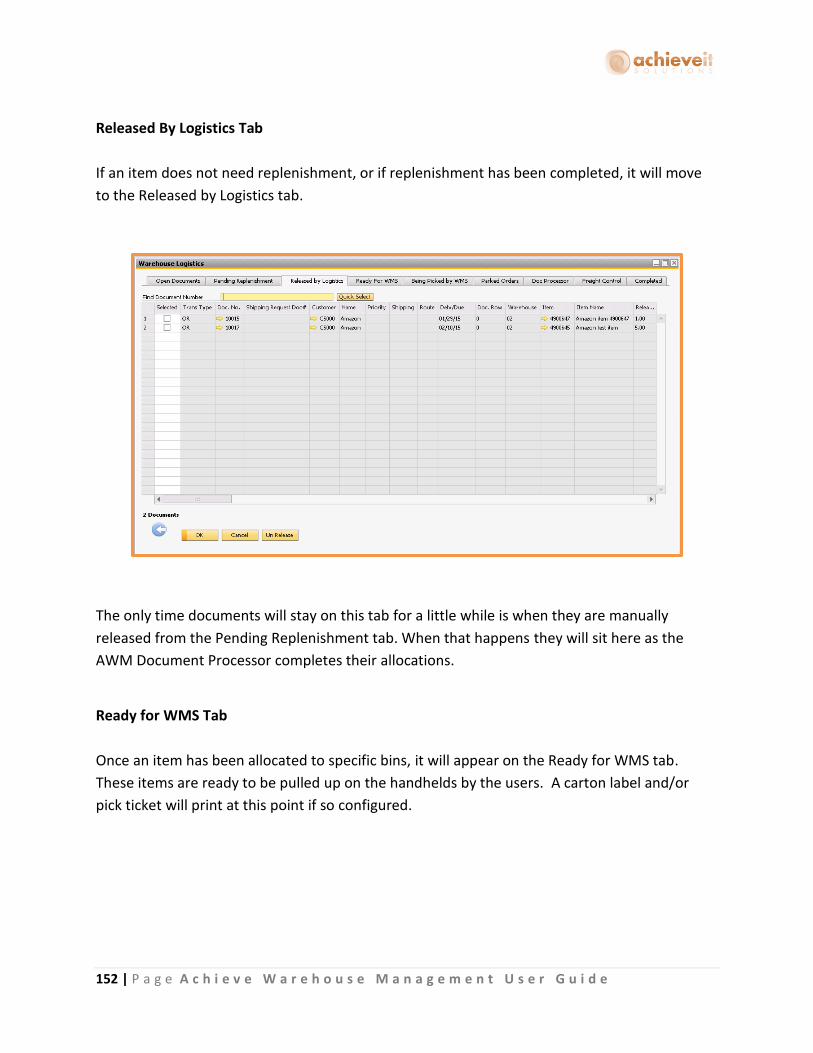
152 | P a g e A c h i e v e W a r e h o u s e M a n a g e m e n t U s e r G u i d e
Released By Logistics Tab
If an item does not need replenishment, or if replenishment has been completed, it will move
to the Released by Logistics tab.
The only time documents will stay on this tab for a little while is when they are manually
released from the Pending Replenishment tab. When that happens they will sit here as the
AWM Document Processor completes their allocations.
Ready for WMS Tab
Once an item has been allocated to specific bins, it will appear on the Ready for WMS tab.
These items are ready to be pulled up on the handhelds by the users. A carton label and/or
pick ticket will print at this point if so configured.

153 | P a g e A c h i e v e W a r e h o u s e M a n a g e m e n t U s e r G u i d e
Being Picked by WMS Tab
This tab shows items that are currently in the process of being picked on the handheld. There is
a button on this tab called Park that allows you to park an order that is currently being picked.
This function is not used in the normal picking process, but can be helpful in scenarios like
handhelds dying in the middle of picking. If that happens and you are unable to pull it back up
on a handheld you can use Park button to park it so that you can then un-park it on the
handheld and continue picking the order.
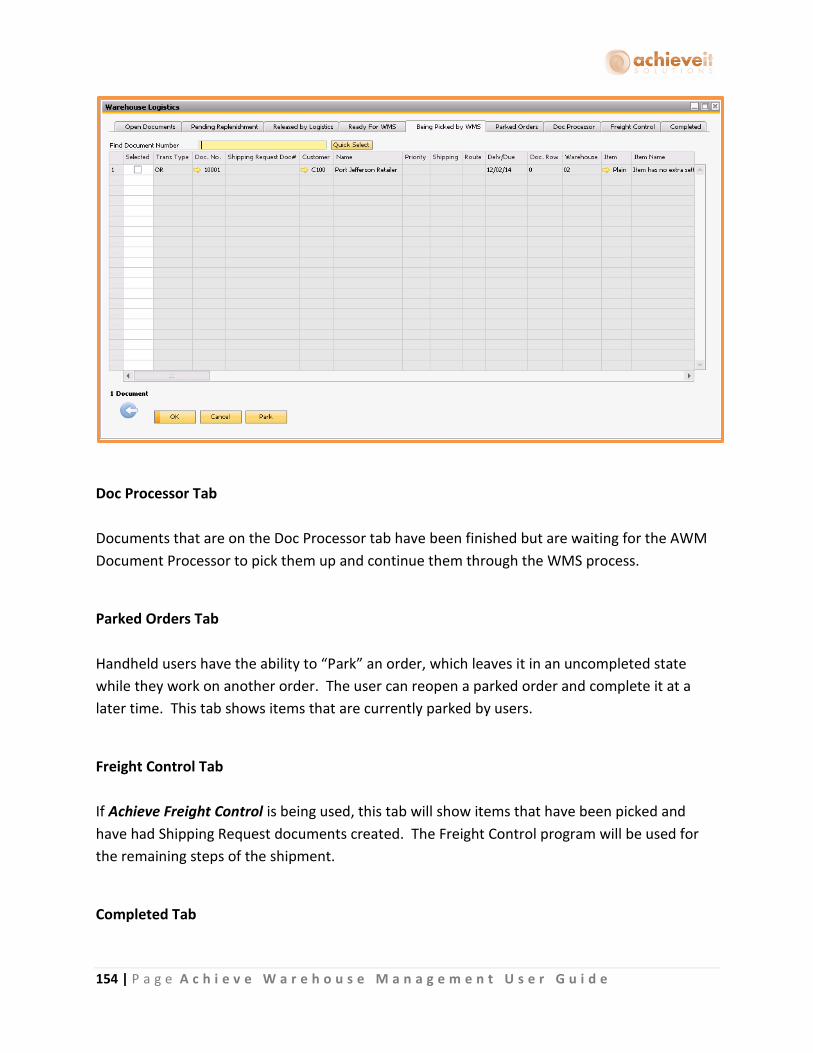
154 | P a g e A c h i e v e W a r e h o u s e M a n a g e m e n t U s e r G u i d e
Doc Processor Tab
Documents that are on the Doc Processor tab have been finished but are waiting for the AWM
Document Processor to pick them up and continue them through the WMS process.
Parked Orders Tab
Handheld users have the ability to “Park” an order, which leaves it in an uncompleted state
while they work on another order. The user can reopen a parked order and complete it at a
later time. This tab shows items that are currently parked by users.
Freight Control Tab
If Achieve Freight Control is being used, this tab will show items that have been picked and
have had Shipping Request documents created. The Freight Control program will be used for
the remaining steps of the shipment.
Completed Tab

155 | P a g e A c h i e v e W a r e h o u s e M a n a g e m e n t U s e r G u i d e
If Achieve Freight Control is not being used, this tab will show items that have been picked and
are pending the creation of a Delivery document.
Note: When an order appears on any of the tabs prior to “Being Picked by WMS”, it is possible
for users to make changes to the Sales Order in SAP. Changes to the order quantity will cause
the order to become unallocated and return to the Open Documents tab. Once the order
appears on the Being Picked tab, it can no longer be edited – users will receive a message
indicating that the order is being picked and cannot be changed.
Logistics Manager: Pick by Shipping Request
When you have WMS set to pick by Shipping Request, the logistics manager process follows a
similar path except for the few changes below. Note that all tabs except the Open Documents
tab (which will still show Sales Orders) will show the documents as Shipping Requests.
Selection Criteria
The document type drop down will now have another option called Shipping Requests. You can
enter a beginning and/or ending shipping request number to include in the list, or leave blank
to include all shipping request numbers.
Open Documents Tab
If you pick by Shipping Request, when a Sales Order is moved from the Open Documents tab a
Shipping Request will be created. There is an option on the bottom of the screen that says
“Shipping Request Type” giving two options on how to create them. “By Customer” means that
if you have multiple Sales Orders selected for the same customer, the system will combine the
ones that share the same Warehouse, Ship-To, Shipping Method, Shipping Spec and Delivery
date into a single Shipping Request. The others will have their own individual Shipping Requests
created. “By Order” means that no matter how many Sales Orders you select that share similar
data, they will all have their own individual Shipping Requests created for them.
There are also two ways to move the Sales Orders from the Open Documents tab. If you use the
Release button, the Shipping Requests will be created and then moved to the Pending

156 | P a g e A c h i e v e W a r e h o u s e M a n a g e m e n t U s e r G u i d e
Replenishment tab for allocation. However if you use the Create button, which only appears if
you pick by shipping request, it will create the Shipping Requests and leave them on the new
Shipping Request tab (see section below). It will not move them forward to the Pending
Replenishment tab automatically.
Shipping Request Tab
This is a new tab that only appears when you are picking by shipping request. The documents
on this tab will be Shipping Requests that were either created outside of WMS, were created by
the Create button on the Open Documents tab, or were unreleased from Pending
Replenishment, Released by Logistics or Ready for WMS. You can use the Release button on
this tab to move shipping requests through WMS.

157 | P a g e A c h i e v e W a r e h o u s e M a n a g e m e n t U s e r G u i d e
Freight Control Picked/Freight Control Packed Tabs
Instead of there being just one Freight Control tab, when you pick by shipping request there will
be two freight control tabs; Freight Control Picked and Freight Control Packed. The Freight
Control Picked tab will show all the open shipping requests that have been picked but are not
yet packed. The Freight Control Packed tab will show all the open shipping requests that have
been picked and packed but not yet delivered.
WMS Management and Utility Programs
The Achieve Warehouse Management System includes a number of programs that can be used
to monitor warehouse inventory and perform various inventory management functions. These
are found on the Achieve Warehouse Management menu. Some of the features are also
available on the handheld devices.
Document Processor Monitor
Achieve One > Achieve Warehouse Management > Document Processor Monitor
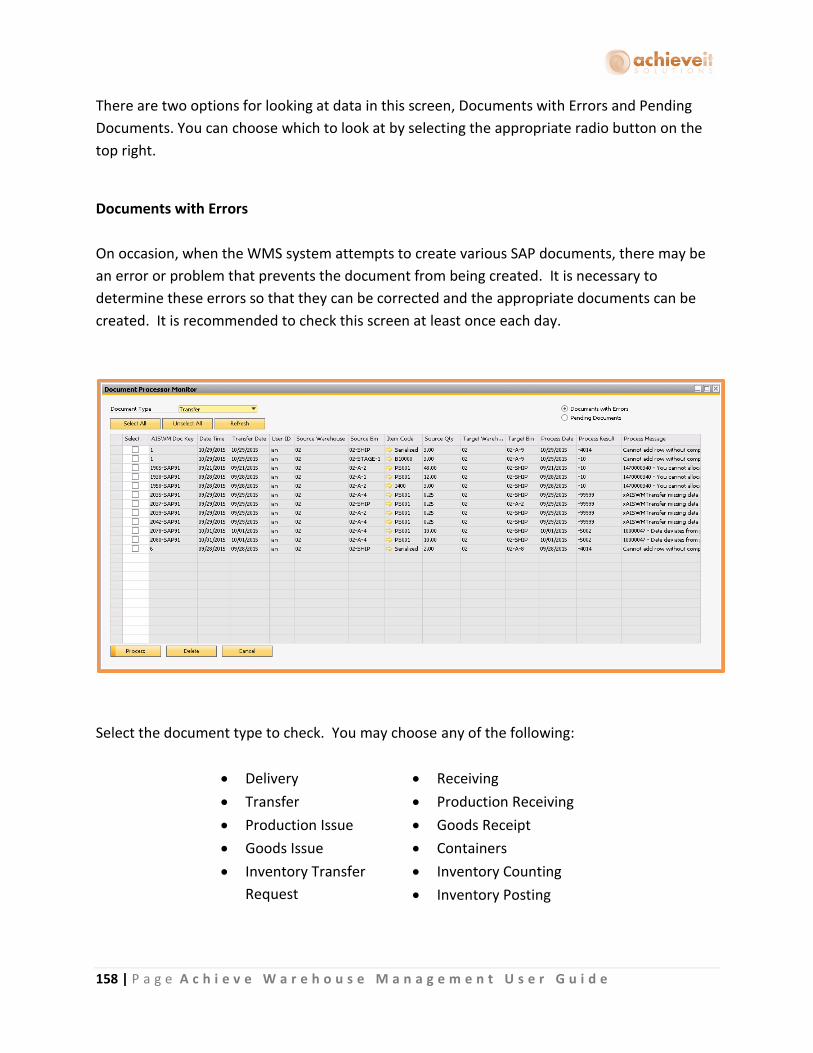
158 | P a g e A c h i e v e W a r e h o u s e M a n a g e m e n t U s e r G u i d e
There are two options for looking at data in this screen, Documents with Errors and Pending
Documents. You can choose which to look at by selecting the appropriate radio button on the
top right.
Documents with Errors
On occasion, when the WMS system attempts to create various SAP documents, there may be
an error or problem that prevents the document from being created. It is necessary to
determine these errors so that they can be corrected and the appropriate documents can be
created. It is recommended to check this screen at least once each day.
Select the document type to check. You may choose any of the following:
Delivery Receiving
Transfer Production Receiving
Production Issue Goods Receipt
Goods Issue Containers
Inventory Transfer
Request
Inventory Counting
Inventory Posting
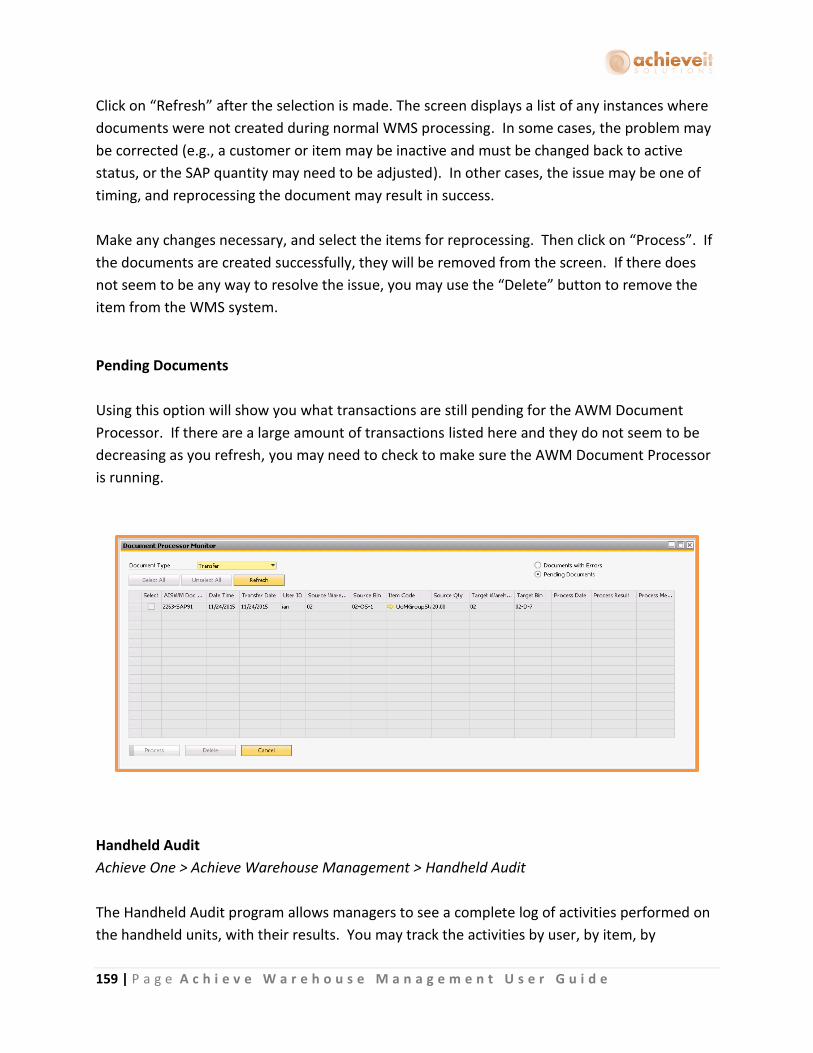
159 | P a g e A c h i e v e W a r e h o u s e M a n a g e m e n t U s e r G u i d e
Click on “Refresh” after the selection is made. The screen displays a list of any instances where
documents were not created during normal WMS processing. In some cases, the problem may
be corrected (e.g., a customer or item may be inactive and must be changed back to active
status, or the SAP quantity may need to be adjusted). In other cases, the issue may be one of
timing, and reprocessing the document may result in success.
Make any changes necessary, and select the items for reprocessing. Then click on “Process”. If
the documents are created successfully, they will be removed from the screen. If there does
not seem to be any way to resolve the issue, you may use the “Delete” button to remove the
item from the WMS system.
Pending Documents
Using this option will show you what transactions are still pending for the AWM Document
Processor. If there are a large amount of transactions listed here and they do not seem to be
decreasing as you refresh, you may need to check to make sure the AWM Document Processor
is running.
Handheld Audit
Achieve One > Achieve Warehouse Management > Handheld Audit
The Handheld Audit program allows managers to see a complete log of activities performed on
the handheld units, with their results. You may track the activities by user, by item, by
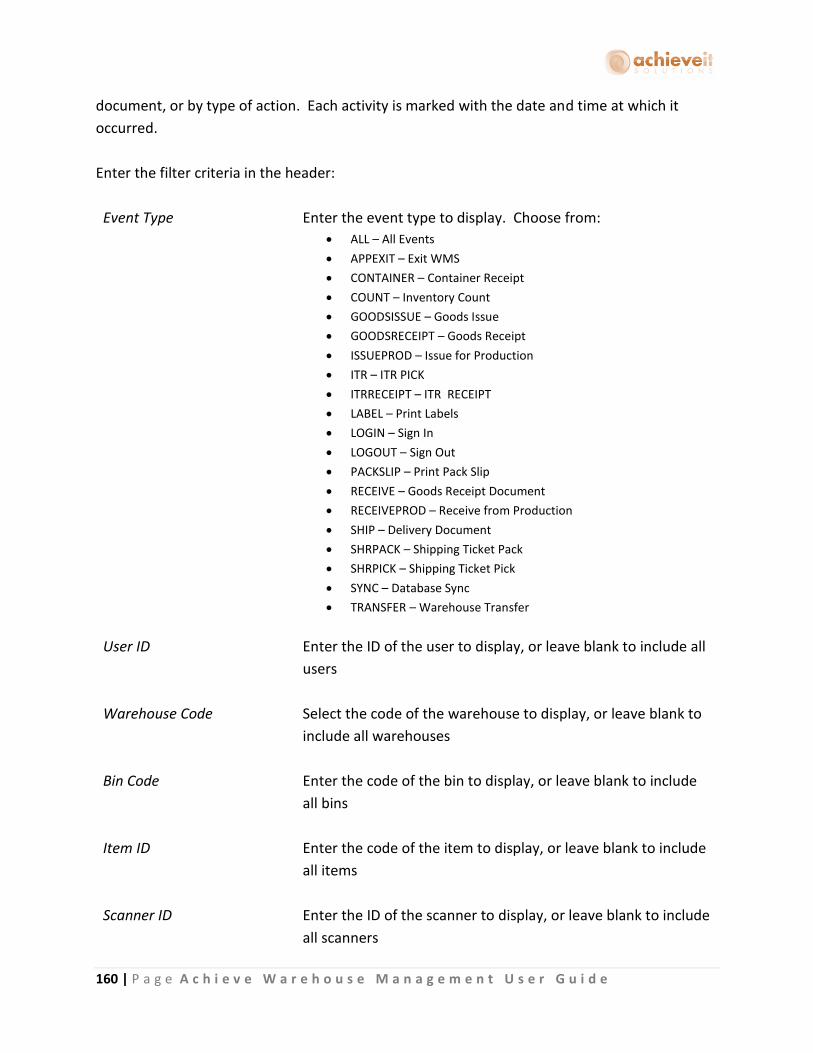
160 | P a g e A c h i e v e W a r e h o u s e M a n a g e m e n t U s e r G u i d e
document, or by type of action. Each activity is marked with the date and time at which it
occurred.
Enter the filter criteria in the header:
Event Type Enter the event type to display. Choose from:
ALL – All Events
APPEXIT – Exit WMS
CONTAINER – Container Receipt
COUNT – Inventory Count
GOODSISSUE – Goods Issue
GOODSRECEIPT – Goods Receipt
ISSUEPROD – Issue for Production
ITR – ITR PICK
ITRRECEIPT – ITR RECEIPT
LABEL – Print Labels
LOGIN – Sign In
LOGOUT – Sign Out
PACKSLIP – Print Pack Slip
RECEIVE – Goods Receipt Document
RECEIVEPROD – Receive from Production
SHIP – Delivery Document
SHRPACK – Shipping Ticket Pack
SHRPICK – Shipping Ticket Pick
SYNC – Database Sync
TRANSFER – Warehouse Transfer
User ID Enter the ID of the user to display, or leave blank to include all
users
Warehouse Code Select the code of the warehouse to display, or leave blank to
include all warehouses
Bin Code Enter the code of the bin to display, or leave blank to include
all bins
Item ID Enter the code of the item to display, or leave blank to include
all items
Scanner ID Enter the ID of the scanner to display, or leave blank to include
all scanners

161 | P a g e A c h i e v e W a r e h o u s e M a n a g e m e n t U s e r G u i d e
Document Enter the number of the document to display, or leave blank
to include all document numbers
Line Action Select the Line Action to display. Choose from:
Cancel
Failure
Finish
Load
Reset
Success
You may also leave the field blank to include all actions
From Date/To Date Enter the first and last dates of the events to display, or leave
blank to include all dates
From Quantity/
To Quantity
Enter the smallest and largest quantities to display, or leave
blank to include all quantities
Once the criteria have been entered, click on “Load Grid” to display the selected events.

162 | P a g e A c h i e v e W a r e h o u s e M a n a g e m e n t U s e r G u i d e
WMS User Inquiry
Achieve One > Achieve Warehouse Management > WMS User Inquiry
This program displays a list of handheld units that are currently in use. It displays the access
date, ID and name of the user, the scanner ID number and IP Address, the action currently
taking place, the document number if applicable, and the version of Achieve One that the
handheld is running.
Click on “Load Grid” to see the current status of the handhelds.
While on this screen you can also use the Delete Line button on the bottom to log users out of
the handhelds. This is helpful if a handheld dies in the middle of using it and the user cannot log
back in.
WMS Print Queue
Achieve One > Achieve Warehouse Management > WMS Print Queue
This program allows you to see print jobs that are pending from the WMS system.

163 | P a g e A c h i e v e W a r e h o u s e M a n a g e m e n t U s e r G u i d e
If you wish to prevent a report from printing or maybe the print job failed, you can check its box
and click on “Delete” at the bottom of the screen to remove it from the queue.
However, instead of deleting a failed print job, you could also try to re-print it. After addressing
the issue, check the boxes of the jobs you want to try printing, then use the “Process” button at
the bottom to clear the error and have WMS try again.
Inventory Location Lookup
Achieve One > Achieve Warehouse Management > Inventory Location Lookup
This program allows you to see a detailed listing of current locations of specified items,
including batch or serial numbers in each bin. You can search by a variety of criteria to find
relevant information.
Note that this program can be accessed from the handheld units as well as from within SAP.

164 | P a g e A c h i e v e W a r e h o u s e M a n a g e m e n t U s e r G u i d e
Enter the filter criteria in the header:
Warehouse Code Select the code of the warehouse to display, or leave blank to
include all warehouses
Bin WH Location Enter a bin number to display, or leave blank to include all bins
Item ID Enter an item code, or leave blank to include all items
Internal Serial Enter an internal serial number, or leave blank to include all
serial numbers
Manufacturer Serial Enter a manufacturer’s serial number, or leave blank to
include all serial numbers
Batch/Lot Enter a batch number, or leave blank to include all batches
Expiry Date Enter an expiration date for batches, or leave blank to include
all expiration dates

165 | P a g e A c h i e v e W a r e h o u s e M a n a g e m e n t U s e r G u i d e
Once the criteria has been entered, click on “Load Grid” to display the selected items. For
batch or serial number items, highlight a line in the upper grid and the lower grid will display
the specific batches or serial numbers located in that bin.
Bulk Bin Transfer
The Bulk Bin Transfer screen allows you to move all items from one bin within a warehouse to
another bin in that same warehouse. You do not have to specify which items, batches, or serial
numbers, the bulk bin transfer will move everything.
Note that this program can be accessed from the handheld units as well as from within SAP.
First select the Warehouse Code, then enter in the From and To Bins. Once you have all the
data filled in, click the Transfer button at the bottom and all the inventory in the From Bin will
be transferred into the To Bin.
Label Printing
Achieve One > Achieve Warehouse Management > Label Printing
This program allows you to print item labels for receiving or shipping. The label format is
determined by the Crystal Reports template referenced in the Warehouse Forms program.
Note that this program may be accessed from the handheld units, as well as from within SAP.

166 | P a g e A c h i e v e W a r e h o u s e M a n a g e m e n t U s e r G u i d e
Enter the following information:
Warehouse Select the warehouse
Item Enter the item code
Description The item description appears automatically
Unit of Measure Select which unit of measure the label should print in
Label Printer Select the printer for the labels, from the list of WMS printers
for the warehouse
Qty on Label Enter the item quantity, which will be printed on each label
Number of Labels Enter the number of labels you wish to print
Serial/Batch If the item is batched or serialized enter the serial or batch
number you want printed on the label
When the information is complete, click on “Print” to print the labels.
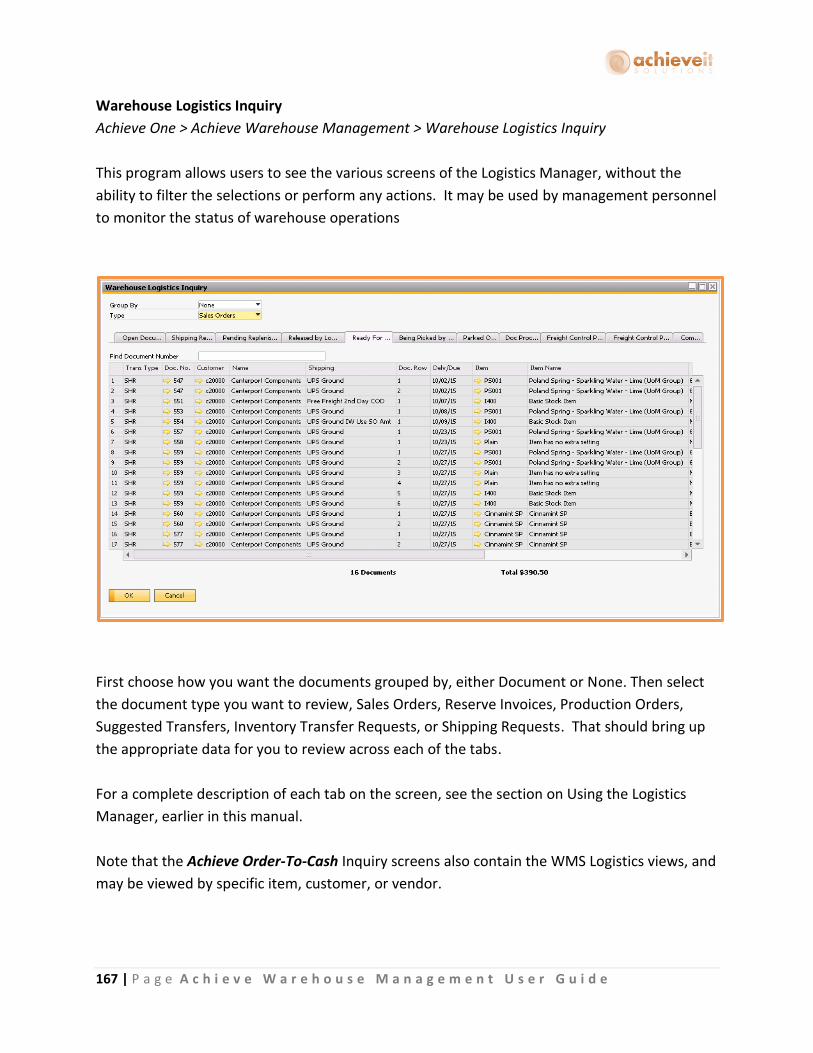
167 | P a g e A c h i e v e W a r e h o u s e M a n a g e m e n t U s e r G u i d e
Warehouse Logistics Inquiry
Achieve One > Achieve Warehouse Management > Warehouse Logistics Inquiry
This program allows users to see the various screens of the Logistics Manager, without the
ability to filter the selections or perform any actions. It may be used by management personnel
to monitor the status of warehouse operations
First choose how you want the documents grouped by, either Document or None. Then select
the document type you want to review, Sales Orders, Reserve Invoices, Production Orders,
Suggested Transfers, Inventory Transfer Requests, or Shipping Requests. That should bring up
the appropriate data for you to review across each of the tabs.
For a complete description of each tab on the screen, see the section on Using the Logistics
Manager, earlier in this manual.
Note that the Achieve Order-To-Cash Inquiry screens also contain the WMS Logistics views, and
may be viewed by specific item, customer, or vendor.

168 | P a g e A c h i e v e W a r e h o u s e M a n a g e m e n t U s e r G u i d e
Suggestions for Warehouse Management Practices
The following suggestions may be useful in implementing the Achieve Warehouse Management
System in your warehouse. Please feel free to discuss them, and any other questions that arise,
with your support representative.
Equipment
Long range vs. short range scanners: At times companies find that their short-range
scanners won’t reach the bin barcodes on the top racks, and vice versa for the long-
range scanners for the rack positions on the floor. A workaround is to have all the bin
barcodes closer to the ground, on the bottom rack position, so that even if you don’t
have long-range scanners you can still scan it. But then this opens up the issue of
accidentally scanning the wrong rack position. To avoid this, you might want consider a
mix of scanners. All of this should be discussed and considered when determining the
RF handhelds to purchase for the WMS Module.
Barcode labels and thermal ribbon: There are various types of barcode label printers,
ribbons and labels. There are a few things to consider on thermal ribbons and
labels. There are usually three types of labels and ribbons, for various sizes of barcode
labels. For the labels it has to do with how “permanent” the adhesive on the back of the
label is, and it usually gets broken down into a temporary, semi-permanent, and
permanent type categorization. You should consider this for both the item and bin
labels, depending on the environmental conditions that the labels will be in. You can
use regular warehouse labels (hot/cold/dust) on equipment for serial numbers, but
usually permanent labels in refrigerated or frozen storage for items or bins, etc. Then
for the thermal ribbon you have the same type of considerations, but this time it’s
relating to the thermal transfer and how much that needs to hold up to environmental
conditions.
WMS Database
SBO and WMS Database Data not syncing: This occasionally happens, especially when
in testing mode and the Document Processor is not setup to automatically run. This can
usually be fixed by manually stopping and starting the Document Processor. Usually it is
installed on the SBO Server. Use the Windows Administrative Tools > Services to stop
and re-start the service “AWM Document Processor”.

169 | P a g e A c h i e v e W a r e h o u s e M a n a g e m e n t U s e r G u i d e
Data
Scanner/Hardware configurations and Barcode Setup in Item UoM Tab in Item
Master: Depending on the Scanner settings, some scanners automatically incorporate
check digits (the standard usually for different package sizes) before and after the main
part of the barcode. It also depends on which barcode format you’re using as well. You
should test the scanners, especially if they’re existing ones, to see how they are
configured. Do they scan the barcode and strip the check digits; do they just read back
the entire barcode check digits before and after and all? WMS Item UoM Tab needs the
entire Barcode, in the Item UoM Tab in the Barcode Field, to distinguish between the
different UoM’s for the same Item. So typically you would setup the entire barcode in
the UoM Tab, and then make sure the scanners read them properly.
Labels
Labels: every bin must be labeled so it can be scanned by the barcode reader. If the bin
contains one specific item, you can have a label with the item code on the bin.
Otherwise, each item must have a label so it can be scanned as it is put away, moved, or
picked. Note that different package sizes will have different barcodes, so it is important
to re-label items if they are repackaged or if packages are broken up.
Serial and batch numbers: if possible, create barcode labels with the serial or batch
number for each item, so they can be scanned as needed.
Warehouse Organization
Bin ID’s: When assigning ID codes to the bins, it is important to incorporate codes
indicating the warehouse, zone, row, and location within the row (for example,
NYEAST22-16-3 for New York warehouse, East zone, row 22, section 16, shelf 3). This
enables warehouse personnel to go directly to the right location when putting items
away or picking them. It is also important not to have more than one bin with the same
ID, even if they are in different warehouses.
Keep fast-moving items in the front section of the warehouse and slower-moving
items in the rear. Aisles should be arranged so that workers can move up and down the
fast-moving sections without having to go to the slower-moving areas unless they need
to.

170 | P a g e A c h i e v e W a r e h o u s e M a n a g e m e n t U s e r G u i d e
Zones: you may wish to divide a large warehouse into zones, with certain items always
in the same zone.
Bin types: keep enough stock in picking bins to last a few days, and regularly replenish
from overstock bins. The overstock bins can be located in the rear, a loft area, or other
part of the warehouse that is not needed for picking.
Quarantine: items that have been returned as damaged, those that are waiting for
quality-control testing, obsolete items, or any others that should not be sold to
customers must be placed in quarantine-type bins. Items in these bins will be
considered part of the total inventory quantity and value, but they will never be
allocated for picking. It is advised that you regularly review items in these bins to be
sure that they will be moved to pick or overstock bins if they are acceptable for sale, or
returned to the vendor or otherwise disposed of if they are not. Keeping items in
quarantine bins for extended periods will cause confusion for sales and customer-
service people when they check on the available quantity of the items.
FIFO picking: if you have designated the picking method as FIFO (first-in, first-out; or
oldest first), the system will specify picking each item from the bin that appears to be
the oldest before moving on to newer bins. The “age” of the bin is determined by the
date on which it was last touched, or when items were last placed in it. It is important
to put newer items into different bins so that the aging system is accurate – if you keep
adding to the same bin, the system will think that all of the items in it are newer, even if
it contains a mix of old and new items.
Item Management
Physical Inventory and Cycle Counting: In order to maintain correct inventory
quantities, it is necessary to do physical counts of the stock and update the computer
system with any discrepancies. Some companies count the entire warehouse once or
twice a year. However, this schedule allows discrepancies to exist and compound for
many months without being corrected. In addition, it is virtually impossible to
determine the cause of the discrepancies if a long time has elapsed since they occurred.
Finally, a full-warehouse physical inventory is disruptive to the entire company, and
usually involves personnel who are not familiar with the warehouse being involved in
the counting.

171 | P a g e A c h i e v e W a r e h o u s e M a n a g e m e n t U s e r G u i d e
Instead, it is recommended to perform cycle counts, which include a selected part of the
inventory, more frequently. Ideally, there should be a cycle count of a limited number
of items every day. This can be scheduled in such a way that only an hour or so is
needed to count the designated items each day, and every item in the warehouse will
be counted at least once a year. Fast-moving items should be counted more frequently,
since they are more likely to have discrepancies. The count should take place at a time
when items are not being moved in or out of the warehouse, and no inventory-related
activity is being done on the computer; most likely this will be before or after business
hours.