user manual and care instructions - rifle scopes · laser receiving objective ... laser range...
TRANSCRIPT

MIDAS 1200YU S E R M A N U A L A N D
C A R E I N S T R U C T I O N S

2
“Mode“ Button“Ranging“/”Power” ButtonEyepiece
Battery CompartmentsLaser Receiving ObjectiveLaser Emission Objective
Rangefinder Elements
3
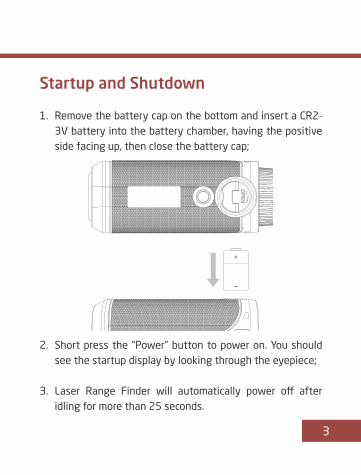
Startup and Shutdown
1. Remove the battery cap on the bottom and insert a CR2-3V battery into the battery chamber, having the positive side facing up, then close the battery cap;
2. Short press the “Power” button to power on. You should see the startup display by looking through the eyepiece;
3. Laser Range Finder will automatically power off after idling for more than 25 seconds.

4
Eyepiece LCD Display
Unit: M--Meter, Y--Yard;Unit: M--Meter, Y--Yard;Secondary Display: Incline Angle, Vertical Distance, True Horizontal Distance;Aiming Reticle;Low Battery Indicator;Sight Distance Display, “----” represents that target can-not be measured.

5
Menu Operational Summary
1. Power ON: Press to power on, LCD will display as fol-lowing:
2. Ranging: Short press “Ranging” button shortly, the range reading is displayed as below:

6
3. Scanning Mode: Holding the “Ranging” button and skimming among different targets the Rangefinder will scan a group of measurable targets at different distances and give you constant readings of different angular and distance information.
4. Change Unit of Measurement: Holding the “Mode” but-ton , and then within 2 seconds short press the “Rang-ing” button to change the unit between meter and yard.
5. Change Secondary Display: After the unit is powered ON at normal ranging mode, short press the “Mode” button to switch among different measurement displays that include incline angle, vertical distance, true horizontal distance.

7

8
6. Memory Mode: Long press the “Mode” button to switch from Normal Mode (N) to Memory Mode (M) (see the illustration below).
Long press the
“Mode” button
Short press the
“Ranging” button to
review the data
Long press “Ranging” button
back to Normal Mode; The system will
automatically go back to Normal Mode
if no operation within 10 seconds
Release
“Mode” button
9
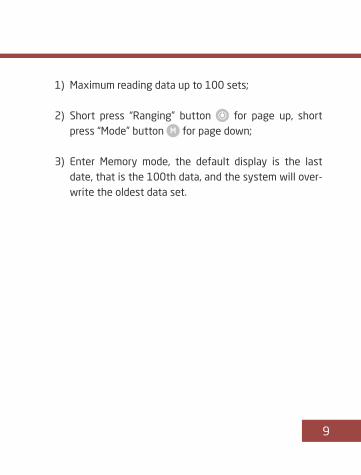
1) Maximum reading data up to 100 sets;
2) Short press “Ranging” button for page up, short press “Mode” button for page down;
3) Enter Memory mode, the default display is the last date, that is the 100th data, and the system will over-write the oldest data set.
10
THE ATHLON GOLD MEDAL LIFETIME WARRANTY*
Your Athlon product is not only warranted to be free of de-fects in materials and workmanship for the lifetime of the product. Athlon will also repair or replace, at no charge to you, your product if you should damage it through normal use. No receipt is needed, no registration is required. This is a com-mitment that Athlon Optics will be the best product you can buy for your money.
*This warranty does not cover damages caused by deliberate damage, misuse, theft or maintenance provided by someone other than the Athlon Authorized Service Department.

11

T O L L F R E E : 1 - 8 5 5 - 9 1 3 - 5 6 7 8
C O N TA C T @ A T H L O N O P T I C S . C O M
14308 W 96TH TERRACE LENEXA, KS 66215