user manual 92-1452 - spx coolingspxcooling.com/pdf/m92-1452.pdf · the bevel protractor at the...
TRANSCRIPT

/ Marley H3 Fan /User Manual 92-1452
FAN SERIAL NO.
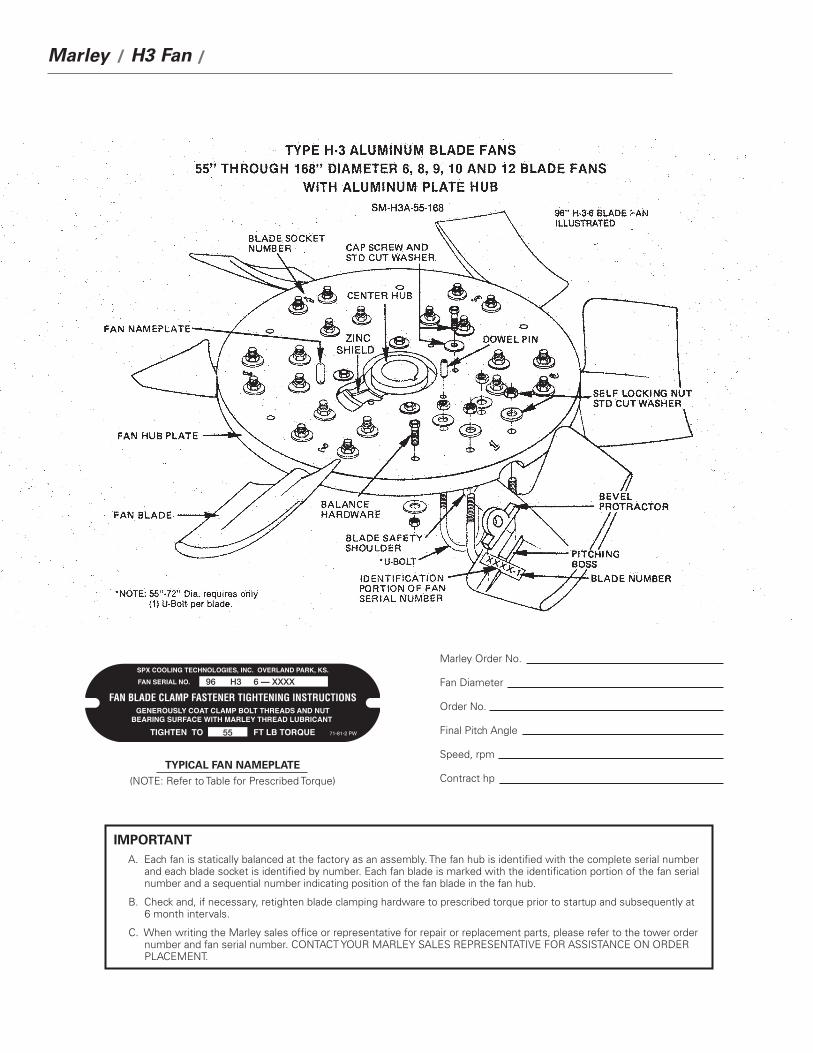
FAN BLADE CLAMP FASTENER TIGHTENING INSTRUCTIONSGENEROUSLY COAT CLAMP BOLT THREADS AND NUT
BEARING SURFACE WITH MARLEY THREAD LUBRICANT
SPX COOLING TECHNOLOGIES, INC. OVERLAND PARK, KS.
71-81-2 PWTIGHTEN TO FT LB TORQUE55
96 H3 6 — XXXX
Order No.FAN SERIAL NO.
FAN BLADE CLAMP FASTENER TIGHTENING INSTRUCTIONSGENEROUSLY COAT CLAMP BOLT THREADS AND NUT
BEARING SURFACE WITH MARLEY THREAD LUBRICANT
SPX COOLING TECHNOLOGIES, INC. OVERLAND PARK, KS.
71-81-2 PWTIGHTEN TO FT LB TORQUE55
96 H3 6 — XXXX
IMPORTANT A. Each fan is statically balanced at the factory as an assembly. The fan hub is identified with the complete serial number
and each blade socket is identified by number. Each fan blade is marked with the identification portion of the fan serial number and a sequential number indicating position of the fan blade in the fan hub.
B. Check and, if necessary, retighten blade clamping hardware to prescribed torque prior to startup and subsequently at 6 month intervals.
C. When writing the Marley sales office or representative for repair or replacement parts, please refer to the tower order number and fan serial number. ConTACT your MArlEy sAlEs rEprEsEnTATivE for AssisTAnCE on ordEr plACEMEnT.
TYPICAL FAN NAMEPLATE
(noTE: refer to Table for prescribed Torque)
Marley order no.
fan diameter
order no.
final pitch Angle
speed, rpm
Contract hp
Marley / H3 Fan /

FAN ASSEMBLY
fan hubs are shipped from the Marley factory with center hub and zinc shield assembled to the hub plate. if components of the hub assembly are to be replaced in the field, refer to paragraphs 1,2 and 3 for reas-sembly instructions.
1. position the protective zinc shield and the fan hub plate on the center hub with the keyway and socket no. 1 lined up. one of the bolt hole patterns will be aligned properly in only one position.
2. drive the dowel pins flush into the four smaller holes to accurately position the hub plate.
3. Apply a thread sealant/adhesive to the cap screws, install and tighten. see Table 1 for correct center hub torque.
4. Make certain that the identification number on each blade cor-responds to the identification number in the fan assembly serial number on the nameplate.
5. u-bolt threads and bearing surface of self-locking nuts are lubri-cated at the factory prior to shipment. Touch up all threads and nut bearing surfaces with a generous coating of the lubricant supplied with the fan.
6. install blade marked no. 1 in hub socket no. 1. install blade no. 2 in hub socket no. 2, and so on around the fan. install blades with pitching boss and fan direction arrow on air discharge side of fan.
7. Be certain that each blade is as far from the center of the fan as the shoulder on the shank end of the blade will permit after the locking nuts are tightened. This is necessary in order to maintain proper balance.
8. support blade tips in a horizontal plane when u-bolts are tight-ened. Hold each blade at the proper pitch angle when tightening.
9. Total vertical tip track variation should not exceed tolerances speci-fied in Table 1. Excessive tip track will cause dynamic imbalance.
SETTING FAN BLADE PITCH
1. The trial pitch angle is the calculated setting for design conditions (water rate, heat load, air density and contract horsepower). set the bevel protractor at the trail pitch angle supplied and pitch all the blades to the same angle. All blades must be pitched to the same angle when each blade is pointing in the same direction in the fan cylinder.
2. progressively tighten the self-locking u-bolt nuts to specified torque. stainless steel fasteners are prone to galling. Be alert to a sudden rise in nut turning resistance before parts are properly clamped. This signifies galling. remove nuts and u-bolt and replace with new ones until satisfactory joint is made. see Table 1 for correct u-bolt torque.
3. recheck the pitch of each blade, as the pitch might change while tightening the nuts.
Table 1 - specified Torque and Tip Track variation
FAN DIA.55”-72”
73”-84”
85”-96”
97”-144”
145”-168”
Center Hub Torque
40-50ft/lbs
40-50ft/lbs
40-50ft/lbs
40ft/lbs
100ft/lbs
U-Bolt Torque40
ft/lbs40
ft/lbs55
ft/lbs40
ft/lbs70
ft/lbs
Vertical TipTrack Variation
3⁄4”(± 3⁄8”)
3⁄4”(± 3⁄8”)
3⁄4”(± 3⁄8”)
1”(± 1⁄2”)
11⁄2”(± 3⁄4”)
CHECKING LOAD AT MOTOR
1. operate the fan until motor and Geareducer have reached opera-tion temperature. Take operating voltage and amperage measure-ments* for use in calculating motor hp by the following equation:
hp = x nameplate hp
2. The calculated horsepower should equal but not exceed the speci-fied contract horsepower. Measurements used in above calcula-tions must be made with hot water flowing through the tower. repitch blades as required to obtain contract horsepower. reading taken with no water or cold circulating water will result in an er-roneous calculate horsepower. degrees change in pitch required to change motor load one hp: see Table 2.
3. if blades are repitched, self-locking u-bolt nut must be retightened to specified torque. see Table 1. Touch up u-bolt threads and nut bearing surface with lubricant consisting of 50% petrolatum and 50% graphite by weight.
FAN REBALANCE
1. if the fan hub plate, center hub, or one or more blades are replaced, the complete fan assembly may require rebalancing. other components can be replaced without significantly affecting balance.
2. if rebalance is required, trail and error attachment of balance weights at various locations on the hub may produce a satisfac-tory dynamic balance with the fan operating on the tower. if this is not satisfactory, the fan assembly can be rebalanced as follows: A. fan assembly should be mounted on a suitable mandrel match-
ing the hub bore, and the mandrel placed on knife wheels or level, parallel bars with the fan blades in a vertical plane. This must be done in a draft free area.
B. Apply balance washers to hub, on same side as blade sockets, until all tendency for fan to rotate is overcome. This is ac-complished by allowing the fan assembly to rotate freely on the knives until it comes to rest with the heaviest portion at the bottom. Manually rotate the fan 90º so that the heaviest portion is at either side of the fan centerline. Add weights to the light side of the hub plate. Holes are provided in the plate between each blade socket for attachment of weights.
C. if one or more blades are replaced, relocating some of the blades in other sockets might simplify balance and result in fewer balance weights being required.
FAN MAINTENANCE
A monthly inspection of the fan should be made to assure continued trouble-free operation. remove carefully and completely any accumula-tion of dirt or scale deposits, if balance is affected.
actual volts x actual ampsnameplate volts x nameplate amps
Table 2 - pitch vs. hp
No. of Blades: 6 8 9 10 12Fan Dia. Pitch Change Per hp
60” 3 2.572” 2.5 284” 1 .8 .696” .8 .7 .6 .5108” 1120” .8132” .6144” .4
168” A one degree change in pitch will vary the power required by approximately 3 hp.
CAUTION: When checking and/or changing blade pitch or when cycling fan in normal operation, do not exceed 30 sec./hr. total motor starting time as motor may become overheated.

Manual 92-1452
7401 WEST 129 STREET | OVERLAND PARK, KANSAS 66213 UNITED STATES | 913 664 7400 | [email protected] | spxcooling.com
In the interest of technological progress, all products are subject to design and/or material change without notice.©2009 SPX Cooling Technologies, Inc. | Printed in USA