user instruction book for indesit washing machine...
TRANSCRIPT

User Instruction Book
for
INDESIT
WASHING MACHINE
WG1234TG
................................................Commercial Codes
1552218039
1GB
Thank you for choosing an Indesit product. This washeris reliable and easy to use.We suggest you read your owner's manual carefully.This will help you become familiar with your washerand its functions in order to obtain years of troublefree performance.
Controlled consumption
The machine automatically adjusts the amount of water usedin the wash to the size of the load, giving optimum use ofwater, energy and detergent.
Double-action wash
Clothes are soaked in water and detergent, water then“rains” steadily through the clothes.
Safety, a good habit to get intoCAUTIONPlease read the instructions in this handbook carefully,as they contain important information about safeinstallation, operating and servicing.This washer is manufactured in compliance withinternational safety regulations designed to safeguardthe consumer.
1. This appliance is designed to be used indoors and underno circumstances should it be installed outside.2. This appliance should only be used in a domesticenvironment by a responsible person to wash householdlaundry according to the instructions.3. Under no circumstances should children be allowed tooperate or tamper with this product.4. Beware, this appliance is heavy, do not attempt to moveit, unless you are able to do so.5. Before the introduction of a new wash load into themachine, please ensure all previous items have beenremoved.6. For electrical safety do not attempt to operate this machinewith wet hands or feet.7. Do not operate this appliance connected to an extensionlead. If a longer supply cable is required this must be replacedwith one of the same specifications in compliance with thecurrent electrical regulations. This operation should be carriedout by a qualified person.8. After putting in the detergent, ensure the soap drawer isfully closed before operating the appliance. Only automaticdetergent should be used, or too many suds will be producedand damage may occur to internal parts.
9. Do not pull the supply cable to disconnect the plug fromthe wall socket.10. Beware that during the wash cycle the door glass canbecome hot. Children should not be left unsupervised whilstthe appliance is in operation. During operation the door islocked at all times. On each stop position the door will releaseafter an approximate 3 minute time delay. Do not attemptto open the door before this time otherwise damage mayoccur to the door release mechanism.
Saves while it washes
The double action wash penetrates so deeply that at just60°C you obtain the same results you would normally obtainat 90°C with a traditional washer.

2GB
Overview
ABC
G FE
D
A. Programme selector
Use this dial to select one of the 15 wash programmesavailable for all your laundry requirements (see programmetable on page 5).Remember that this dial should be turned in a clockwisedirection and only when the machine is off.
B. Temperature selector
Use this dial to set the wash temperature shown in theprogramme table (page 5). You may reduce therecommended wash temperature of the programme youhave selected or run a cold wash (symbol ).Note: When using cycle number 2, do not use tempe-rature settings below 60°C.
C. Detergentdispenser
The detergent dispenser hasthree compartments marked1, 2 and 3:1 prewash detergent2 wash detergent3 fabric softener.
D. ON-OFF button
This button turns your appliance ON/OFF. Press button D toturn on the washer and depress button D to turn off thewasher.
E. Slow spin button
Use this button to reduce the spinning speed from 1200 to600 rpm for the cotton and linen programmes and from850 to 600 rpm for the synthetic fabrics programmes.
F. Rinse Hold button
This function interrupts the cycle so that the laundry is leftsoaking in water before the spin cycle.This function is extremely useful because it stops delicate orsynthetic fabrics from creasing (for example when one hasto wait several hours before removing the laundry load).It should be used only with the programmes for syntheticfabrics and woollens.IMPORTANT: Before opening the door, drain away the waterby setting knob A on "drain". To carry out the spin cycle,simply press F.
G. ON/OFF Indicator light
When this is lit, the machine is on.
1 23

3GB
Wash
Strongaction
Delicateaction
Wash at95°C
Wash at60°C
Wash at40°C
Wash at30°C
Hand washNotwashablein water
BleachinBleachingonly incold water
Do notbleach
IroningHot ironat max200°C
Medium hotironing atmax 150°C
Iron atmax 100°C
Notironable
Drycleaning
Dry cleanwith anysolvent
Dry cleanonly with,perchloridebenzineav., purealcohol,R111 andR113
Dry cleanwith av.benzine,purealcoholand R113
Do not dryclean
Drying
HighTemperat
Low
Machinedryable
Do notmachine dry
Spread todry
Hang todrywithoutspindrying
Dry onclotheshanger
1. Understanding the labels
Using your washer
Preparing your laundry....
Divide your laundry by fabric and colour fastness. Wash whiteand coloured items separately.Remember to empty pockets, removing especially those smallitems like coins, paper, pins and badges that might jam thepump. Fasten or remove loose buttons and fasten zippers.Turn shirts inside out for better results.
Check wash labels
Garments and laundry generally have wash instruction labels(which tell you if they shloud be dry-cleaned, hand washedor machine washed) showing the wash temperature, howto iron etc.Important: fabrics should only be machine washed if theirlabels show the appropriate symbol (see table 1).
Alternate small and large items whenloading your washer
This washing machine has an electronic load balancingcontrol: before carrying out the spin cycle, this device ensuresthat the laundry is arranged as evenly as possible in the drum,according to the type of fabric and the way it was initiallyloaded. This will minimize vibration and noise even duringthe fastest spin cycle. For best results however, werecommend you alternate small and large items when youload your washing machine remember to spread them out;never wash large loads of terry cloth items.
lc
A P F

4GB
Detergents and fabric softener
Open detergent dispenser C by pulling it outwards. Fill withdetergent and conditioner using the quantities indicated bythe manufacturer on the packet according to the load youare washing, the water hardness and how soiled your laundryis. As you become more familiar with your washer, you willregulate the quantities according to your own personalexperience.
Compartment 1Prewash cycle detergent(powder)Compartment 2Wash cycle detergent(powder or liquid)Compartment 3Fabric softner
Never fill compartment 3 above the grid.Use compartment 2 for liquid detergent, filling thecompartment just before you start the washer. Rememberthat liquid detergent is ideal for wash cycles withtemperatures up to 60°C and for the programmes with noprewash cycle. Special containers are available for liquid andpowder detergents. Fill the container and place in the drumwith the laundry, following the instructions shown on thedetergent packet.Do not use hand washing detergents since these producevery heavy suds.When using cold wash cycles, remember to reduce thedetergent dosage.
Starting up your washerRun the first wash without laundry using programme2 at 90°C.
Load your laundry in the washer, add the detergent andfabric softener and remember to:- shut the door properly- plug the washer in at the mains- turn on the water supply- check that button D is not pressed in (position O)
Selecting the programme
The table on pages 5 will help you choose the rightprogramme. Turn dial A to the programme number you havechosen. Set the temperature on dial B and, if necessary, pressfunctions buttons E, F; set ON/OFF button D to position I(ON).
At the end of the wash cycle...
To turn off the washer press the ON-OFF button D and waitapproximately 3 minutes before opening the door. Once youhave removed your clean laundry from the washer, rememberto leave the door open or at least ajar (this will prevent theformation of an unpleasant odour) and shut off the watersupply.
1 23

5GB
Selecting the programmesThe description of the wash programme by type of fabric is shown on the detergent dispenser.
Type of Fabric & How Dirty CycleKnob
Temp.Knob
Pre-washDetergent
WashDetergent
Softener Description of Wash Cycle
HEAVY FABRICS
Extremely dirty whites (sheets, tablecloths,etc.)
1 MAX ◆ ◆ ◆ Warm prewash, wash at 90°C, rinses,intermediate and final spins.
Very dirty whites (sheets, tablecloths, etc.) 2 MAX ◆ ◆ Wash at 90°C, rinses, intermediate and finalspins.
Very dirty heavy whites and colours 2 60°C ◆ ◆ Wash at 60°C, rinses, intermediate and finalspins.
Very dirty heavy whites and colours. 2 40°C ◆ ◆ Wash at 40°C, rinses, intermediate and finalspins.
Fairly dirty heavy whites and colours(coloured underwear, house coats, etc.)
3 60°C ◆ ◆ Wash at 60°C, rinses, intermediate and finalspins.
Whites and delicate colours that are notvery dirty.
3 40°C ◆ ◆ Wash at 40°C, rinses, intermediate and finalspins.
Whites and delicate colours that are notvery dirty (shirts, T-shirts, etc.)
4 40°C ◆ ◆ Wash at 40°C, rinses, intermediate and finalspins.
Rinses 5 ◆ Rinses with automatic softener dispensing,intermediate and final spins.
Softener 6 ◆ Rinses with automatic softener dispensing,intermediate and final spins.
Spin 7 Drain and final spin.
SYNTHETICS
Very dirty heavy synthetic colours(underwear for infants, etc.).
8 60°C ◆ ◆ Wash at 60°C, rinses, wrinkle-guard ordelicate spin.
Very dirty synthetic colours. 8 50°C ◆ ◆ Wash at 50°C, rinses, wrinkle-guard ordelicate spin.
Very dirty, delicate synthetic colours. 8 40°C ◆ ◆ Wash at 40°C, rinses, wrinkle-guard ordelicate spin.
Fairly dirty delicate synthetic colours. 9 50°C ◆ ◆ Wash at 50°C, rinses, wrinkle-guard ordelicate spin.
Not very dirty delicate synthetic colours(all types of underwear).
10 40°C ◆ ◆ Wash at 40°C, rinses, wrinkle-guard ordelicate spin.
Rinses 12 ◆ Rinse with automatic softener dispensing,wrinkle-guard or delicate spin.
Softener 13 ◆ Rinse with automatic softener dispensing,wrinkle-guard or delicate spin.
Spin 14 Drain and delicate spin.
DELICATES
Wool (machine washable) 11 40°C ◆ ◆ Wash at 40°C, rinses, wrinkle-guard ordelicate spin.
Rinses 12 ◆ Rinse with automatic softener dispensing,wrinkle-guard or delicate spin.
Softener 13 ◆ Rinse with automatic softener dispensing,wrinkle-guard or delicate spin.
Spin 14 Drain and delicate spin.
Drain 15 Drain without spin.

6GB
Washing tips
What not to wash in your appliance?
- Torn, frayed or unhemmed items; in order to wash itemsof this kind, wrap them in a linen bag to prevent them fromtearing during the wash.- Dark coloured items with white items. Dark items shouldbe washed separately .
Curtains
Curtains tend to crease badly. Try this washing hint to preventcreases: fold the curtains carefully and place in a pillow caseor loose mesh bag; wash separately ensuring that the weightis no more than a half wash load.
Quilts, tennis shoes and wind-cheaters
Contrary to common belief, goose or duck down quilts andwind-cheaters, can in fact be machine washed, providedthe instructions shown on the label are followed carefully.Remember however to load no more than 2-3 kg of laundryand to repeat the rinse cycle once or twice following with agentle spin. In the case of tennis shoes, wipe off mud andthen machine wash with denims or heavy fabrics (but notwhite fabrics).
Stain removal
The most common stains will disappear during the wash. Ifthey are particularly stubborn, soak the garment in waterand rub a little detergent onto the stain before putting it inthe washing machine.Greasy marks (especially old ones) need treating with a stain-remover. Be careful not to mark the fabric with remover.
Pre-treatment for awkward stains
- Ink: ball point/felt tip; Put a few drops of nail varnish removeror surgical spirit onto a piece of cotton wool and dab thestain. Wash at 90°C (NB. This is only suitable for colourfastcottons)- Tar and oil; Scrape off any thick tar or oil on the surface.Soften the remainder with margarine or butter and wipeaway with a clean cloth. Treat any residual stain withturpentine, then wash according to the fabric- Wax; Scrape off, then put the stained garment betweentwo pieces of blotting paper and press with a hot iron. Dabthe stain immediately with cotton wool dipped in turpentine- Chewing gum; Apply nail varnish remover to the gum,then remove it carefully- Lipstick; Pretreat with a liquid detergent using the dosingball, rub vigorously and rinse before washing- Grass; Soak in a warm washing solution using a biologicalwashing product, then wash according to the fabric.Alternatively, saturate the stain with white methylated spirit.Rinse and wash normally- Paint: Water based latex, acrylic and school paints, emulsionpaints; Treat stains while still wet. Rinse thoroughly underrunning water to flush out the paint, then wash accordingto the fabric.Oil based paint/varnish; Sponge with white spirit or paintbrush cleaner before washing in the normal way.
Do not exceed the recommended weightsshown in the table
For best washing results, do not exceed the recommendedweights shown in the table; the weights shown refer to drylaundry.
Maximum dry laundryloadheavy fabricsmaximum 5 kgdelicate fabricsmaximum 2 kgpure new woolmaximum 1 kgmixed loadsmaximum 2,5 kg
How heavy is yourlaundry?1 sheet 400-500 g1 pillow case 150-200 g1 table cloth 400-500 g1 bathrobe 900-1200 g1 bathroom towel150-250 g

7GB
Energy saving hints
General maintenance
- Try to wash complete laundry loads: this saves unnecessaryconsumption of water and energy.- Select the right programme for your laundry: this willobviously depend on the type of fabric and how soiled yourlaundry is; we recommend the use of programmes withoutprewash which will save you time, water and energy. Theprewash cycle should in fact be used only for heavily soiled,cotton fabrics.- Set the right temperature: use temperatures above 60°Conly for very stubborn dirt but remember that moderndetergents are very efficient even at low temperatures.- Use the correct quantities of detergent: do not use toomuch detergent; remember that not only will this makerinsing more difficult but also pollutes the enviroment.- Use the economy buttons: when washing small laundryloads use the Economy button if available on your washerand reduce the detergent quantity.
After every wash
Leave the door open and wipe the door gasket dry aftereach wash so that damp or odours do not form.
Remove the plug
Before cleaning or servicing always remove the plug fromthe socket. This is for safety reasons.
No solvents or abrasive substance
You do not need solvents or abrasive substances to cleanthe outside of the washing-machine and the rubber parts.Just use a cloth, warm water and soap.
Detergent dispenserdrawer
This can be removed andcleaned. Just pull it towardsyou, as shown in the diagram,and leave it under runningwater for a few minutes.
Unplug the machine when you go away
It’s best to unplug the machine when you go away, turn offthe water supply and leave the machine door open or ajar.The drum and rubber door lining will dry and no unpleasantodours will form inside.
When moving house
When you move, all you need to do is secure the inside ofthe machine with the transit screws (supplied with thepackaging of the machine) so that it will not be damaged.
Cleaning and special servicing
Hose
Check the hose once a year. It should be replaced if anysigns of splitting or damage can be seen. The machine isunder a lot of strain while operating and this may cause acracked hose to split open suddenly.
Inspecting the drain pump
Your washer has a self-cleaning pump and therefore requiresno cleaning or mainteannce.
Removing limescale
Water contains increasing amounts of limescale because ofpollution. If you live in a hard water area in addition tousing water-softener in each wash, it is a good idea to putthe machine through a cycle without laundry or detergent,just using limescale remover.
- Your washer features automatic consumption control, thismeans that you can wash laundry loads from 1 - 5 kg withconsiderable savings. Your washer will use just the rightamount of water and electricity. All you need to do is dosethe detergent.- Fabric softeners: always use a softener; not only do theseperfume and soften your laundry, they also make it easy toiron, saving you time.

8GB
Trouble shootingIf the machine does not seem to be working properly beforecalling the service engineer there are a number of thingsyou can check. Perhaps you have forgotten to push in abutton or you are not using the machine properly.
Machine won't start
Make sure:the appliance is plugged to the mains socket; you haveelectricity in your home, the door is firmly shut, the ON/OFFbutton D is on I, the programming cycle knob, in washerswhich have one, is on O, the programme is properly set andthe mains water tap is open.
Machine won't fill
Make sure:the water tap is open and connected correctly to the hose;the water mains has not been cut off and that water pressureis sufficient; also check the hose for kinks.
Water is pumping in and out all the time
Make sure:there are no kinks in the drain pipe and that it is at least at aheight of 60-100 cm; the pipe mouth is not below waterlevel and that the wall drain has no air outlet. If the problemscontinue even after you have checked these points, shutthe water tap and turn off your washer.
Problems with pumping out water orspinning
Make sure:the programme selected has a draining cycle; the noncreasing "hydropstop" button, on washers which have one,has not been pressed accidentally; the drainage pump is notjammed; the drain pipe is bent; the drainage piping isplugged; any drainage pipe extensions are properlyconnected and do not prevent water flow.
Lots of vibration during the spin
Make sure:the internal oscillating unit was released correctly at the timeof installation (see installation instructions); the washer islevelled correctly or too tightly fitted between furniture unitsand the wall.
Your washer is leaking.
Make sure:the ring nut of the supply pipe is firmly tightened; thedetergent dispenser is not plugged and the drainage pipe isfirmly fixed.
Excessive formation of suds.
Make sure:the type of detergent you have used - is it suitable for anautomati washer - have you used too much detergent?
If despite all this your washer is still not running properly, callyour local Authorized Service Centre providing thefollowing information:
- fault- model code (Mod. ....)
and serial number (S/N ....)shown on the data plate at the back of your washer.
Never use the services of an unauthorised servicing technicianand insist on the use of original spare parts.
9GB
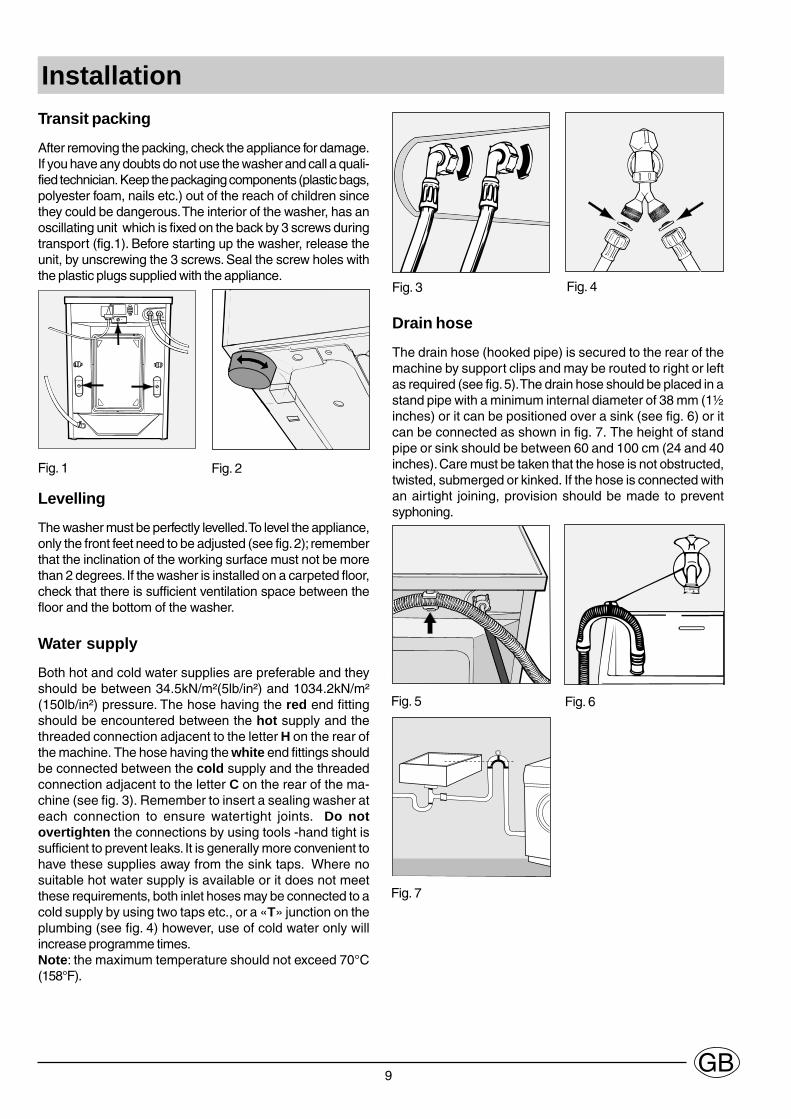
Drain hose
The drain hose (hooked pipe) is secured to the rear of themachine by support clips and may be routed to right or leftas required (see fig. 5). The drain hose should be placed in astand pipe with a minimum internal diameter of 38 mm (1½inches) or it can be positioned over a sink (see fig. 6) or itcan be connected as shown in fig. 7. The height of standpipe or sink should be between 60 and 100 cm (24 and 40inches). Care must be taken that the hose is not obstructed,twisted, submerged or kinked. If the hose is connected withan airtight joining, provision should be made to preventsyphoning.
InstallationTransit packing
After removing the packing, check the appliance for damage.If you have any doubts do not use the washer and call a quali-fied technician. Keep the packaging components (plastic bags,polyester foam, nails etc.) out of the reach of children sincethey could be dangerous. The interior of the washer, has anoscillating unit which is fixed on the back by 3 screws duringtransport (fig.1). Before starting up the washer, release theunit, by unscrewing the 3 screws. Seal the screw holes withthe plastic plugs supplied with the appliance.
Levelling
The washer must be perfectly levelled. To level the appliance,only the front feet need to be adjusted (see fig. 2); rememberthat the inclination of the working surface must not be morethan 2 degrees. If the washer is installed on a carpeted floor,check that there is sufficient ventilation space between thefloor and the bottom of the washer.
Water supply
Both hot and cold water supplies are preferable and theyshould be between 34.5kN/m²(5lb/in²) and 1034.2kN/m²(150lb/in²) pressure. The hose having the red end fittingshould be encountered between the hot supply and thethreaded connection adjacent to the letter H on the rear ofthe machine. The hose having the white end fittings shouldbe connected between the cold supply and the threadedconnection adjacent to the letter C on the rear of the ma-chine (see fig. 3). Remember to insert a sealing washer ateach connection to ensure watertight joints. Do notovertighten the connections by using tools -hand tight issufficient to prevent leaks. It is generally more convenient tohave these supplies away from the sink taps. Where nosuitable hot water supply is available or it does not meetthese requirements, both inlet hoses may be connected to acold supply by using two taps etc., or a «T» junction on theplumbing (see fig. 4) however, use of cold water only willincrease programme times.Note: the maximum temperature should not exceed 70°C(158°F).
Fig. 1 Fig. 2
Fig. 3 Fig. 4
Fig. 5 Fig. 6
Fig. 7

10GB
Electrical connection (figure 8)
Your appliance is now supplied with a 13 amp fused plug itcan be plugged into a 13 amp socket for immediate use.Before using the appliance please read the instructions below.
WARNING - THIS APPLIANCE MUST BE EARTHED.THE FOLLOWING OPERATIONS SHOULD BE CARRIED OUTBY A QUALIFIED ELECTRICIAN.
Replacing the fuse:When replacing a faulty fuse, a 13 amp ASTA approved fuseto BS 1362 should always be used, and the fuse cover re-fitted. If the fuse cover is lost, the plug must not be useduntil a replacement is obtained.
Replacement fuse covers:If a replacement fuse cover is fitted, it must be of the correctcolour as indicated by the coloured marking or the colourthat is embossed in words on the base of the plug.Replacements can be obtained directly from your nearestService Depot.
Removing the plug:If your appliance has a non-rewireable moulded plug andyou should wish to re-route the mains cable throughpartitions, units etc., please ensure that either:the plug is replaced by a fused 13 ampere re-wearable plugbearing the BSI mark of approval.or:the mains cable is wired directly into a 13 amp cable outlet,controlled by a switch, (in compliance with BS 5733) whichis accessible without moving the appliance.
Disposing of the plug:Ensure that before disposing of the plug itself, you makethe pins unusable so that it cannot be accidentally insertedinto a socket.
Instructions for connecting cable to an alternative plug:Important: the wires in the mains lead are coloured inaccordance with the following code:Green & Yellow EarthBlue NeutralBrown LiveAs the colours of the wires in the lead may not correspondwith the coloured markings identifyng the terminals in yourplug, proceed as follows:Connect Green & Yellow wire to terminal marked E or orcoloured Green or Green & Yellow.Connect Brown wire to terminal marked L or coloured Red.Connect Blue wire to terminal marked N or coloured Black.If a 13 amp plug (BS 1363) is used it must be fitted with a13 amp fuse, either in the plug or adaptor or at thedistribution board.If you are in any doubt the electrical supply to your machine,consult a qualified electrician before use.
How to connect an alternative plug:The wires in this mains lead are coloured in accordance withthe following code:BLUE NEUTRAL (N)BROWN LIVE (L)GREEN & YELLOW EARTH (E)
Disposing of the appliance:When disposing of the appliance please remove the plug bycutting the mains cable as close as possible to the plug bodyand dispose of it as described above.
GREEN &YELLOW
BROWN
BLUE
13 ampere fuse
CROSS-BARCORD GRIP
Fig. 8

11GB
m odel W G 1234 T
dim ensions width cm 59,5height cm 85depth cm 55
capacity 1 - 5 Kg
electricalconnections
voltage 240 Volt 50Hzm axim um absorbed power 2300 W
w aterconnections
m axim um pressure 100 N/cm 2m inim um pressure 5 N/cm 2drum capaciuty 42 litres
spinningspeed
up to 1200 rpm
Controlprogram s incom pliance
w ith IECregulation
456
Cotton program :
Turn knob A to the "program 2"setting;Turn knob B to the "60°C"setting.
This appliance conform s with the following E.E.C.directives:- 73/23/EEC of 19/02/73 (Low Voltage) andsubsequent m odifications- 89/336/EEC of 03/05/89 (Electrom agneticCom patibility) and subsequent m odifications
Technical characteristics