user guide version 4 - australia post · australia post e-lms electronic lodgement of mailing...
TRANSCRIPT

e-LMS Electronic Lodgement of Mailing Statements
User Guide Version 4.4

Copyright Statement© Copyright the Australian Postal Corporation 2016. All rights reserved. No part of this document may be reproduced, adapted or transmitted in any form or by any means without the express written permission of Australia Post.
Privacy StatementAustralia Post collects your personal information in order to facilitate the lodgement of your company’s bulk mail articles and provide access to your business mail statement delivery details. Without this information Australia Post would be unable to provide this service.
Where the personal information of a third party has been provided when creating an account, you hereby warrant that relevant individuals have been notified of such disclosure and that they can access their personal information while we store it.
Your personal information is handled in accordance with the Australia Post Group Privacy Policy which outlines how to access and / or correct your personal information or make a privacy related complaint. You may contact the Privacy Contact Officer, Australia Post, GPO Box 1777, Melbourne, Vic, 3001 for privacy related queries. For more information please visit auspost.com.au/privacy.
2Australia Post e-LMS Electronic Lodgement of Mailing Statements User Guide

Contents1 Welcome to e-LMS 4
1.1 Welcome to e-LMS help 4
1.2 Overview 41.2.1 Overview of e-LMS 4
1.2.2 Workflow 5
1.2.3 How safe is my information? 6
1.3 Using e-LMS 71.3.1 Your e-LMS account 7
1.3.2 Navigating around e-LMS 8
1.3.3 Performing tasks 9
2 Getting started 11
2.1 Logging in 11
2.2 Logging in with non-conformance issues 12
2.3 Your Home Page 12
2.4 Session time-out 13
2.5 Blocked account 13
2.6 Change password 14
2.7 Logging out 14
3 Business procedures 15
3.1 Business procedures for Originating Customers 15
3.2 Business procedures for Mail Generators 16
4 Managing your account 17
4.1 Managing your account 17
4.2 Create a new user 18
4.3 Maintain user accounts 19
4.4 Maintain charge accounts 214.4.1 Accounts 22
4.5 Maintain customer names 23
5 Generating Mailing Statements 24
5.1 Generating Mailing Statements 24
5.2 Creating Mailing Statements 255.2.1 Creating Mailing Statements 25
5.2.2 Create a new Mailing Statement 26
5.2.3 Submit a Mailing Statement 29
5.2.4 Save and edit drafts 29
5.2.5 Upload a Mailing Statement 30
5.2.6 Cancel a draft 30
5.3 Progressive Mailing Statements 315.3.1 Progressive Mailing Statements 315.3.2 Rules for Progressive Lodgements 32
5.3.3 Create a Progressive Mailing Statement 32
5.3.4 Add a statement to a Progressive Mailing Statement 33
5.3.5 Close a Progressive Mailing Statement 33
5.3.6 Cancel Progressive Mailing Statements 33
5.4 Approval of Mailing Statements 345.4.1 Approval of Mailing Statements 34
5.4.2 What happens when I submit a Mailing Statement? 35
5.4.3 Why has my Mailing Statement been rejected? 36
5.4.4 Who can approve a Mailing Statement? 36
5.5 Dealing with rejected statements 375.5.1 Dealing with rejection 37
5.5.2 Check the status of Mailing Statements 38
5.5.3 Modify a rejected Mailing Statement 38
5.5.4 Cancel a rejected Mailing Statement 39
6 Searching for Mailing Statements 40
6.1 Searching for Mailing Statements 40
6.2 Find Mailing Statements 416.2.1 Using multiple search criteria 41
6.3 View Mailing Statements 42
6.4 View a Progressive Mailing Statement 42
6.5 Downloading and printing 436.5.1 XML and CSV formats 43
6.6 View Mailing Statement audit trail 44
7 About Pricing and Invoices 45
7.1 About pricing and invoices 45
7.2 How is the price determined? 46
7.3 Invoices 467.3.1 Reconciling your account 46
7.4 Viewing Pricing Statements 46
8 Using Chargeback Functionality 48
8.1 Adding Chargeback Only Product 48
8.2 Maintain Chargeback Only Product 49
8.4 Maintain Chargeback Cost Centre 51
8.5 Add Chargeback Only Item 52
8.6 Maintain Chargeback Only Item 53
9 Reporting 54
9.1 Reports 54
9.2 Lodgements Report 55
9.3 Reconciliation Report 56
9.4 View list of users 58
9.5 Chargeback Items Report 59
10 Frequently asked questions 61
11 e-LMS Contacts 63
3

1 Welcome to e-LMS
1.1 Welcome to e-LMS help Thank you for choosing e-LMS, Australia Post’s online
Mailing Statement solution. e-LMS is the system you use to create and submit a Mailing Statement, track its progress,
retrieve pricing details and enquire about your existing statements. To use e-LMS, you must have a valid Australia Post e-LMS account and be able to access the internet.
Inthisguide,youwillfindinstructionsonhowtousethisapplication.
1.2 Overview
1.2.1 Overview of e-LMS e-LMS (electronic Lodgement of Mailing Statements) is an electronic gateway to
Australia Post, allowing Mail Houses and customers to lodge Mailing Statement information via a web-based application.
By using either direct entry or file transfer from the Mail House production control systems, e-LMS improves the efficiency of mail lodgement and account reconciliation. e-LMS is also used by Australia Post staff to expedite checking, costing, approving and invoicing of bulk mail services.
4Australia Post e-LMS Electronic Lodgement of Mailing Statements User Guide

1.2.2 Workflow e-LMS is the electronic hub for the tasks involved in lodgement of bulk mail. The physical and
business processes involved in a typical e-LMS workflow are shown in the diagrams below:
e-LMS
MailingHouse
2
7
5
1
OriginatingCustomer
8 10
Australia Post Accounting Department
Delivery
Despatch
Lodgement Facility
3
4
9
6
e-LMS
DeliveryAustralia Post Accounting Department
Lodgement Facility
OriginatingCustomer
Despatch
2
3
1
45
7 9
8 10
6
Workflow 1
Workflow2
1 Mailing Statements submitted
2 Mail is despatched to an Australia Post lodgement facility
3 Mailing Statement is validated and processed
4 Physical mail is checked and approved
5 Mail is dispatched for delivery
6 Pricing Statement is issued
7 Mail Generator checks status of mailing statements
8 Tax Invoice is issued
9 Customer checks Tax Invoice
10 Payment made by Originating Customer
5Australia Post e-LMS Electronic Lodgement of Mailing Statements User Guide

EXPLANATION OF WORKFLOWS
Mailing Statements submitted
Workflow 1If an Originating Customer has engaged a Mail Generator (Mailing House) to lodge on their behalf, the Mail Generator will submit a Mailing Statement on the Originating Customer’s behalf.
Enter the details of the mailing job in e-LMS, by selecting:
• Account number
• Job details which can identify and track the job
• Where the mail will be physically lodged
e-LMS allows the user to prepare draft Mailing Statements prior to lodgement. These are saved and can be edited and submitted when required.
Workflow 2Mail Generators/Customer can submit their own Mailing Statements.
Mail is despatched to an Australia Post lodgement facility
Mailing statement is validated and processed
e-LMS has automated back-office functions that speed up the process of validating each Mailing Statement. This validation includes checking the details entered in the Mailing Statement and verification of the customer’s account status.
Physical mail is checked and approved
When the mail arrives at the acceptance point, the physical mail is checked against the corresponding Mailing Statement. If the mail matches the details on the Mailing Statement, the job is approved for delivery, otherwise the Mailing Statement is marked as non-conforming, and may be rejected. The Mail Generator will be alerted about non-conforming mail whenever they log into e-LMS, and can view the status of all rejected jobs.
Mail is dispatched for delivery
Pricing statement is issued
Once the Mailing Statement has been validated, a Pricing Statement is issued by the Australia Post accounting system, upon which the customer will be invoiced.
Mail generator checks status of Mailing Statements
At any stage during the lodgement process, the Mail Generator can view the status of all jobs, which may be in draft, pending approval, rejected awaiting re-submission or approved for delivery.
Tax invoice is issued
Customer checks tax Invoice
Workflow 1e-LMS permits only the Originating Customer to verify the details of a Tax Invoice against the corresponding Mailing Statements and Pricing Statements.
Workflow 2Mail Generator/Customer can verify the details of a Tax Invoice against the corresponding Mailing Statements and Pricing Statements.
Payment made by customer10
9
8
7
6
5
4
3
2
1
1.2.3 How safe is my information? Australia Post takes security seriously. We have implemented security systems at all
Australia Post facilities, including physical and data security measures designed to protect our resources and your information.
Please refer to the Australia Post Privacy Statement on page 2 of this document.
6Australia Post e-LMS Electronic Lodgement of Mailing Statements User Guide

1.3 Using e-LMS
1.3.1 Your e-LMS account To use e-LMS, you must have a valid account. Your account details are set up and maintained
by the Australia Post e-LMS Support Consultants. Your account type will reflect the role your organisation plays in the workflow:
Mail Generator As a Mail Generator, you will be able to create and manage Mailing Statements for your
own jobs and jobs you perform on the behalf of your customers.
Originating Customer As an Originating Customer, you will be able to view Mailing Statements that have been submitted on
your behalf by a Mail House (Mail Generator). You will also be able to view Pricing Statements so that you can validate charges billed to your Australia Post charge accounts.
Account details
To open or change your e-LMS accountContact Australia Post e-LMS Support on 1800 287 457 or email: [email protected]
To add and remove your own charge accountsContact Australia Post e-LMS Support on 1800 287 457 or email: [email protected]
To add and remove your customer’s charge accountsYou must have Administrator privileges to maintain your customer’s accounts on your account.
Users Each account can have multiple users with independent logins. The list of users is maintained
by your in-house e-LMS Administrator.
To add and remove users You must have Administrator privileges to maintain users on your account.
Avoid the browser toolbarWhen navigating between pages, avoid using your browser’s toolbar. Use of the Back button in particular may give unexpected results.
7Australia Post e-LMS Electronic Lodgement of Mailing Statements User Guide

1.3.2 Navigating around e-LMS
Navigation menu To perform a particular task, you must first
navigate your way to the page that provides the functions you need. The main tasks are displayed on the navigation menu, which appear as tabs across the top of the page.
This menu will change as you move around e-LMS. The tasks available from the navigation menu will depend on your current location and what you are doing on that page. For example, a related task may be shown as unavailable (grey) until you have completed your current task.
To select a new task• If available (blue tab), click the tab on the navigation menu corresponding to the task
you want to perform.
• If not available (grey tab), you must complete the current task before you will be able to select that task.
Multi-step tasks Tasks that cannot be fully displayed on a
single page may be split into two or more steps. In multi-step tasks, an additional navigation menu will be displayed.
To proceed to the next step
Click the Continue button displayed at the bottom of the page.
You will not be permitted to proceed to the next step until you have successfully completed all mandatory fields on the current page. In this case, when you click the Continue button, the current page will be re-displayed highlighting the fields you need to complete or modify.
To return to a previous stepClick the navigation bar corresponding to the step you want to return to.
To complete the task When you have reached the final step of the task and completed all the mandatory fields on that page, click the command button at the bottom of the page, for example:
The Submit button is displayed at step 3 of creating a new Mailing Statement.
The Continue button will be displayed on all intermediate steps, except the final page.
Home Search ReportsNew Mailing Statement
Red = Current task Blue = Available task Grey = Task is not currently available
Step 1 : Your Details
Step 2 : Line Items
Step3:Confirm
8Australia Post e-LMS Electronic Lodgement of Mailing Statements User Guide

1.3.3 Performing tasks You perform tasks by selecting options, entering values and selecting commands from menus,
fields and buttons on the current page. Task menus
You may be given options relating to the current page on a submenu displayed on the left of the page, below the navigation menu. For example, on the Home Page, you can select from the following options:
Fields
Your task selections are made in fields, which may appear in several forms on the page:
Text box
To enter text in a text box1. Click inside the box.
2. Type text and numbers into the box observing the notes displayed below the box.
When you have finished typing, check the text in the box before moving to another field. You can select another field with the cursor, or use the TAB key to move to the next field, or select a command button to perform the task.
Drop list
To select an option from a drop list1. Click the list button on the right of the box. The list of available options will be displayed.
2. Select an option from the list with the cursor.
The selected option will be displayed in the box. You can now select another field with the cursor, or use the TAB key to move to the next field, or select a command button to perform the task.
Checkbox
To select and clear a checkbox option1. Click inside the checkbox with the cursor to select and clear the checkbox.
The option is selected when a tick mark is displayed in the checkbox.
Welcome
Change Password
Your Recent Drafts
Your Recent Statements
Telephone number:Please use format (12) 34567890
*
Account number: None
Mail contains advertising material:
9Australia Post e-LMS Electronic Lodgement of Mailing Statements User Guide

MandatoryandoptionalfieldsAny field displayed in bold with a red asterisk ( * ) is mandatory and must be completed or selected before the current task or step can be completed. Other fields are optional and need only be selected if required.
Validation Some fields may be validated to ensure
the correct data has been entered, and all mandatory fields have been completed. If an error is detected, the page will be re-displayed with the fields that require your attention highlighted. For example:
Command buttons
To perform a task, you must click a command button. The button will be labelled with the command it will perform; for example, clicking Print will print the current page. You must complete all mandatory fields before selecting a command.
Other options available on the page
User guideClick user guide to access the online user guide for information on this application.
LogoutClick logout to end your e-LMS session.
Lodgement point:Mandatory
*Please select...
10Australia Post e-LMS Electronic Lodgement of Mailing Statements User Guide

2 Getting started
2.1 Logging in To use e-LMS, you must have a valid Australia Post e-LMS account.
1. In your internet browser, go to: http://online.auspost.com.au/elms
2. Login by entering your username and password and click login.
Forgotten your username and/or password? Select: Forgotten your password? Click Here on the login page as shown.
Follow the instructions in the email to re-set your password. If you still experience difficulties, contact your in-house e-LMS Administrator for assistance or call Australia Post e-LMS Support on 1800 287 457.
**
Username:
Password:
Please Log in
Welcome to Electronic Lodgement of Mailing Statements
Log in
Bold fields (also marked with a *) are mandatory
Forgotten your password? Click here
Still having problems logging in?1. Check that you have typed in the correct Username and Password.
2. If you are still having problems, your account may have expired, or may be suspended. A notification will appear on the login screen advising this. Please contact your credit officer.
11Australia Post e-LMS Electronic Lodgement of Mailing Statements User Guide

2.2 Logging in with non-conformance issues You will be alerted if any new statements have non-conformance issues. You must view and
acknowledge the non-conformance issues before you will be permitted to proceed to your Home Page. A Mailing Statement with a non-conformance alert is approved for processing; however future orders may be rejected if these non-conformance issues are not rectified.
To view and acknowledge the non-conformance issues
1. Click the View button adjacent to that Mailing Statement. Details of the statement and the non-conformance issues will be displayed.
2. Click Acknowledge .
3. Repeat until you have acknowledged all Mailing Statements with non-conformance issues.
2.3 Your Home Page The following information will be displayed on your Home Page:
Your recent drafts Recent statements that have been saved as drafts and have yet to be submitted.
Your open Progressive Statements Recent statements that have been saved as drafts and have yet to be submitted.
Your recent approved & Invoiced Statements Recent statements that have been finalised with a status of Approved & Invoiced.
From your Home Page, you can
• Edit and Cancel recent drafts.
• View recently finalised Mailing Statements.
• Use the navigation menu to locate the information and functions you need.
• Use the options menu to perform tasks, and to change your password.
• Click user guide to display online help.
• Logout.
12Australia Post e-LMS Electronic Lodgement of Mailing Statements User Guide

2.4 Session time-out
As a security measure, you will be automatically logged out of e-LMS if your page is inactive for a period of time.The time-out period is defined in your user profile and can only be changed by the system Administrator.
What happened to the Mailing Statement I was working on?Your Mailing Statement will be saved as a draft, which you can continue editing the next time you login. No data will be lost.
What happens when I log in after a time-out?The system will return you to your Home Page. If you were editing a Mailing Statement, the data will be saved in a draft.
Can I change the time-out period?The time-out period is intended to protect both you and Australia Post from unauthorised use of your account. The length of the time-out period is specifically designed to cater for the needs of a typical user.
2.5 Blocked account
If you attempt to login with an invalid password, your user account will be blocked on the third attempt.To re-activate a blocked account, you must contact your in-house e-LMS Administrator.
13Australia Post e-LMS Electronic Lodgement of Mailing Statements User Guide

2.6 Change password
The rules for creating a password are:• Must contain at least 8 characters and not longer than 32 characters.
• Passwords are case sensitive.
• You cannot re-use an old password.
To change your password
1. From the navigation menu, click Home . Your Home Page will be displayed.
2. From the task menu, click Change My Password. The Change Password page will be displayed.
3. In the Current Password field, type your current password.
4. In the New Password field, type your new password.
5. In the ConfirmNewPassword field, type your new password again.
6. Click Change Password .
2.7 Logging out To logout from this session, click logout, which can be found at the top-right corner of every page.
14Australia Post e-LMS Electronic Lodgement of Mailing Statements User Guide

3 Business procedures
3.1 Business procedures for Originating Customers The business procedures and tasks related to bulk mail lodgements are listed below:
Business Procedure Related e-LMS Tasks
Query the status of statement
Search for statements
View a Mailing Statement
Download and print a statement
View audit trail
Statement is part of a progressive lodgement
View details of a progressive lodgement
Validate invoice
View a Pricing Statement
Reconcile your account against lodgements
Create reports
Query your account
15Australia Post e-LMS Electronic Lodgement of Mailing Statements User Guide

3.2 Business procedures for Mail Generators The business procedures and tasks related to generating a Mailing Statement are listed below:
Business Procedure Related e-LMS Tasks
Make a single lodgement
Create a new Mailing Statement
Submit a statement
Save and edit drafts
Upload an XML statement
Cancel a draft
Make a Progressive Lodgement
Rules for Progressive Lodgements:
• Create a Progressive Mailing Statement
• Add a statement to a progressive lodgement
• Cancel a progressive lodgement
Mail is lodged at Lodgement Point What happens when a statement is submitted?
Mail has non-conformance issues Acknowledge non-conformance alerts
Mail job is approved Check the status of a statement
Mail job is rejected
Reasons why mail may be rejected:
• Check the status of a statement
• Modify a rejected statement
• Cancel a rejected statement
• View audit trail
Query the status of a statement
Search for statements
View a Mailing Statement
View a Progressive Mailing Statement
Download and print a statement
View Audit Trail
Progressive Lodgement is completed
Close a Progressive Lodgement
Customer validates invoice View a Pricing Statement
16Australia Post e-LMS Electronic Lodgement of Mailing Statements User Guide

4 Managing your account
4.1 Managing your account
What do you want to do?
Create a new user 4.2 Maintain charge accounts 4.4
Maintain user accounts 4.3 Maintain customer names 4.5
17Australia Post e-LMS Electronic Lodgement of Mailing Statements User Guide

4.2 Create a new user You must login as Administrator to perform all user administration tasks. When the system adds a
new user account, the information you supply will be checked to ensure all mandatory fields have been completed, and that the data is valid.
To create a new user1. Click the Home tab.
2. From the task menu, click Add User. The Create User page will be displayed.
3. Complete the user details in the displayed fields, as described in the table below.
4. Click Save .
The following information is displayed when creating a new user:
Field Description
Customer Your account details are displayed
User Details Typethenewuser’sdetailsinthefieldsbelow
Username* Type the user’s username
First Name* Type the user's first name
Last Name* Type the user's last name
Address Type the user's address
Phone Type the user's phone number
Fax Type the user's fax number
E-mail* Type the user's email address
Authorisation DetailsSelect the role and other account details for this user inthefieldsbelow
Role* Select from the available user roles
Default Lodgement State*ThisfieldwillonlybedisplayedifyouareaMailGenerator
The state where this user lodges mail
Start Date* Select the date the user account will be available
End Date Optional expiry date for this account
Active This checkbox is used to block and unblock a user account
Password*Type a temporary password. The user will be asked to change the password when they login
Confirm Password* Type the password again
* Mandatory.
18Australia Post e-LMS Electronic Lodgement of Mailing Statements User Guide

4.3 Maintain user accounts You must login as Administrator to perform all user administration tasks.
To view and edit user detailsViewing and editing a user’s details is a multi-step task.
1. Click the Home tab.
2. From the task menu, click Modify User. The Modify User page will be displayed.
3. Type the user’s details in one or more of the search fields: Username - the user’s e-LMS username First Name Last Name
4. Click Search .
5. Summary details for each user that match your search criteria will be displayed to help you identify the user. Click the Username of the user you want to modify. The details of the selected user will be displayed.
6. Make the changes required. For information about the fields displayed on this page, see the table below.
7. Click Save .
To block a user accountViewing and editing a user’s details is a multi-step task.
1. Click the Home tab.
2. From the task menu, click Modify User. The Modify User page will be displayed.
3. Type the user’s details in one or more of the search fields: Username - the user’s e-LMS username First Name Last Name
4. Click Search .
5. Summary details for each user that match your search criteria will be displayed to help you identify the user. Click the Username of the user you want to modify. The details of the selected user will be displayed.
6. To block the user’s account, select the Inactive checkbox (a tick mark is displayed).
7. Click Save .
19Australia Post e-LMS Electronic Lodgement of Mailing Statements User Guide

To unblock a user accountViewing and editing a user’s details is a multi-step task.
1. Click the Home tab.
2. From the task menu, click Modify User. The Modify User page will be displayed.
3. Type the user’s details in one or more of the search fields: Username - the user’s e-LMS username First Name Last Name
4. Click Search .
5. Summary details for each user that match your search criteria will be displayed to help you identify the user. Click the Username of the user you want to modify. The details of the selected user will be displayed.
6. Clear the Inactive checkbox (the checkbox is empty).
7. In the New Password field, type a new, temporary password.
8. In the ConfirmPassword field, type the password again.
9. Click Save .
To reset the user’s passwordViewing and editing a user’s details is a multi-step task.
1. Click the Home tab.
2. From the task menu, click Modify User. The Modify User page will be displayed.
3. Type the user’s details in one or more of the search fields: Username - the user’s e-LMS username First Name Last Name
4. Click Search .
5. Summary details for each user that match your search criteria will be displayed to help you identify the user. Click the Username of the user you want to modify. The details of the selected user will be displayed.
6. In the New Password field, type a new, temporary password.
7. In the ConfirmPassword field, type the password again.
8. Click Save .
20Australia Post e-LMS Electronic Lodgement of Mailing Statements User Guide

The following information is displayed on the page:
Field Description
Customer Your account details are displayed
User Details Typethenewuser’sdetailsinthefieldsbelow
Username* Type the user’s username
First Name* Type the user's first name
Last Name* Type the user's last name
Address Type the user's address
Phone Type the user's phone number
Fax Type the user's fax number
E-mail* Type the user's email address
Authorisation DetailsSelect the role and other account details for this user inthefieldsbelow
Role*The user’s role determines the user’s authorisation level. For more information on roles and permissions, refer to the relevant topics in the online user guide
Default Lodgement State*ThisfieldwillonlybedisplayedifyouareaMailGenerator
The state where this user lodges mail
Start Date* The date the user account will be available
End Date Optional expiry date for this account
InactiveThis checkbox is used to block and unblock a user account. If you are unblocking an account, you must also reset the password
New PasswordTo reset the user’s password, type a temporary password. The user will be asked to change the password when they login
Confirm Password* Type the password again * Mandatory.
4.4 Maintain charge accounts You must be logged in as the e-LMS Administrator to maintain charge accounts.
Two lists of account numbers are maintained on a Mail Generator account:
Your own Australia Post charge account numbers When creating Mailing Statements, these are referred to as Your Accounts.
Only authorised Australia Post personnel are permitted to maintain these accounts.
Your customer’s Australia Post charge account numbers When creating Mailing Statements, these are referred to as Your Customer’s Accounts.
Your in-house e-LMS Administrator is permitted to maintain these accounts.
When you add an account, the system will check the account details before it is added to the list of available accounts in the Active Accounts list box. Accounts listed in the Pending Accounts list box are awaiting confirmation from the system. If the system fails to validate the account, it will be listed in the Error Accounts list box.
Accounts added to the Pending Accounts list may not be available until the next business day. After adding a customer charge account number, you should also add the customer’s name.
21Australia Post e-LMS Electronic Lodgement of Mailing Statements User Guide

4.4.1 Accounts The Australia Post charge accounts of your customers are displayed.
To add and remove your customer’s charge account numbers1. Click the Home tab.
2. From the task menu, click Maintain Account. The Maintain Account Numbers page will be displayed.
The charge account numbers available on your account are displayed in the Active Accounts list box.
To add a new charge account number
Type the number in the Account Number field, and click Add .
When you add an account, the system will check the account details before it is added to the list of accounts. This may take overnight to complete.
To remove a charge account number
Select the account you want to remove in the Active Accounts list box, and click Remove .
• To select a group of accounts, hold down the SHIFT key.
• To select multiple accounts, hold down the CTRL key.
• To clear your selection, click a different account number.
When you have finished maintaining account numbers, select another task from the menu, or logout.
To add and remove your own charge account numbersContact Australia Post e-LMS Support on 1800 287 457 or email: [email protected]
22Australia Post e-LMS Electronic Lodgement of Mailing Statements User Guide

4.5 Maintain customer names You must be logged in as the e-LMS Administrator to maintain customer names. When you create
a new Mailing Statement, you can select the Originating Customer name from a drop-down list. The names displayed in this list are maintained by the Customer Names administration function.
To add a customer name1. From the task menu, select Customer Names.
2. In the Add Customer Name field, type the customer name and click Add .
The name will be displayed in the Customer Names box.
To remove a customer name1. From the task menu, select Customer Names.
2. In the Customer Names box, select the customer name and click Remove .
The page will refresh with the name removed.
23Australia Post e-LMS Electronic Lodgement of Mailing Statements User Guide

5 Generating Mailing Statements
5.1 Generating Mailing Statements The details of your order must be specified in a Mailing Statement. This provides the
information needed to price the mail services provided and to identify and track the mail job.
What do you want to know about?
Creating Mailing Statements 5.2 Approval of Mailing Statements 5.4
Progressive Mailing Statements 5.3 Dealing with Rejected Statements 5.5
24Australia Post e-LMS Electronic Lodgement of Mailing Statements User Guide

5.2 Creating Mailing Statements
5.2.1 Creating Mailing Statements
What do you want to do?
Create a new Mailing Statement 5.2.2 Upload a Mailing Statement 5.2.5
Submit a Mailing Statement 5.2.3
Save and edit draft statements 5.2.4
Cancel a draft 5.2.6
25Australia Post e-LMS Electronic Lodgement of Mailing Statements User Guide

5.2.2 Create a new Mailing Statement From the navigation menu, click New Mailing Statement. Creating a new statement is a multi-step
task. You must at least complete all the mandatory fields (*) before proceeding to the next step. The following information is displayed at each step in the statement:
Step 1: Your details
Generating customer Your details are displayed. This information is supplied by the system and cannot be changed here.
Generating user The details of the person creating the mailing statement are displayed. This information is supplied
by the system and cannot be changed here.
Job reference The following information is needed for billing and to help you identify the Mailing Statement when
you search, view and print statements.
The fields displayed on the page will reflect the tasks you are authorised to perform. For example, the Progressive Mailing Statement field will only be displayed if you are authorised to make Progressive Lodgements.
Mailing Statement1. Select the charge account number this order will be billed to.
2. Click the drop list button to display the available accounts.
3. Select from either the list of Your Accounts, or from the list of Your Customer’s Accounts.
4. For details on Progressive Mailing Statements refer to section 5.3.
You can only select from the accounts displayed in this list. You have the option to create a single lodgement, or to add the new statement to a Progressive Mailing Statement.
If you are creating a single lodgementIn the Progressive Mailing Statement field, select No (Single Lodgement).
To add the statement to an existing Progressive Mailing StatementIn the Progressive Mailing Statement field, select from the list of existing Progressive Mailing Statements.
To add the statement to a new Progressive Mailing StatementIn the Progressive Mailing Statement field, select Create New Progressive MS.
26Australia Post e-LMS Electronic Lodgement of Mailing Statements User Guide

Account number1. Select the charge account number this order will be billed to.
2. Click the drop list button to display the available accounts.
3. Select from either the list of Your Accounts, or from the list of Your Customer’s Accounts.
You can only select from the accounts displayed in this list.
Originating Customer name If this job is being submitted on behalf of one of your customers (you chose an account from
Your Customer’s Accounts), the Originating Customer’s name will be displayed.
If this is your own job (you chose an account from Your Accounts), your business name will be displayed plus any Customer names that have been added to your Customer’s profile.
Unique ID Type a unique job identifier on which you can search for this order in the database.
Job number Type your job reference number.
Job name Type the name of the job.
Invoice reference details Type additional reference information. Lodgement Details.
Lodgement point1. Select the charge account number this order will be billed to.
2. Click the drop list button to display the available accounts.
3. Select from either the list of Your Accounts, or from the list of Your Customer’s Accounts. You can only select from the accounts displayed in this list.
4. Click the drop list button and select from the list of available Lodgement Points. You can only select from the locations displayed in this list.
27Australia Post e-LMS Electronic Lodgement of Mailing Statements User Guide

Step 2: Line items The items currently added to this statement are displayed in the Line Items section at the bottom
of the page. You can add items with multiple product types on the same Mailing Statement.
To add a new line item1. In the Add New Article section, from the Product Grouping list box, select the product type.
Article types applicable to the select product type will be displayed. If a cubing relevant product is requested, a link to the Cubic Weight Calculator displays.
2. Click Cubic Weight Calculator. The Cubing Calculator window displays.
3. Complete the fields.
4. Click Calculate . The cubic weight is calculated and displayed. This can then be used to populate the weight field in the previous screen.
5. Click Close to continue.
6. From the Article Type list box, select the type of article. The lodgement conditions and contracts applicable to the selected article type will be displayed.
7. If displayed, read the Lodgement Conditions.
8. From the Select Contract drop down box, select either Full Rate or a Contract from the list. Only contracts applicable to the product type at the selected lodgement point will be displayed.
If the line item is lodged on Full Rate pricing, the text Full Rate will not appear on the Pricing and Mailing Statement. However, if lodged using a Contract, then the Contract Number is included on the Pricing and Mailing Statement. If there is a Contract to lodge for a product/account/lodgement point combination, the Select Contract drop down box is replaced by the Select Contract or Full Rate drop down box. If there are no contracts to lodge the article, the drop down box does not display.
9. Answer the questions displayed specific to the selected contract or product.
10. In the Number of Articles table, type the number of articles corresponding to the categories shown. You can make multiple entries in this table.
11. For Internal Chargeback, select the Chargeback Cost Centre from the list to link the article.
12. Check the details you have typed and click Add this Article . The page will refresh with the new item displayed in the Line Items section.
13. Repeat steps 1 to 7 until you have added all items required on this statement.
To change a line item quantity
1. In the Line Items section, click Modify Quantity .
2. Change the number of articles in the Quantity field.
3. Click Save .
The page will refresh with the new item quantity displayed in the Line Items section.
To delete a line item
In the Line Items section, click Delete next to the item you want to delete. The page will be refreshed with the item removed.
28Australia Post e-LMS Electronic Lodgement of Mailing Statements User Guide

Step3:Confirm The details you have entered will be displayed. Please check that the details you have entered
on this statement are correct, taking note of the Lodgement Conditions for each type of product, and carefully read the CustomerCertification before submitting this statement.
Lodgement Conditions and Disclaimer Text are only displayed during Mailing Statement creation. When the Mailing Statement is accessed via a search, this text does not appear on the Mailing Statement.
5.2.3 Submit a Mailing Statement
On the third and final step of creating a new Mailing Statement, you will be asked to confirm the details of your order. When you click Submit , the status of the statement changes from Draft to In Progress and the statement is submitted for a series of checks. These checks will identify if there are any inconsistencies in the statement or the physical mail.
At the time of creation and submission of a Mailing Statement that contains a line item with a unit price equal to or below a system parameter lower limit, or equal to or greater than a system parameter upper limit, the Mailing Statement has a status of Pricing Check Required. These statements are investigated by the Australia Post e-LMS Support consultants who can:
Review and validate the potentially invalid price in SAP, then submit the mailing statement to SAP for re-pricing. The mailing statement is then moved to the status of Awaiting Approval.
Lodgement point staff should contact the Australia Post e-LMS Support consultants to initiate this process.
5.2.4 Save and edit a draft Statement While you are creating a Mailing Statement, you can click Save Draft at any time and return
to the statement later.
To edit a draft1. Click the Home tab.
2. Locate the draft from the list of Your Recent Drafts.
3. Click the Edit button next to the draft you want to edit.
If the statement you want is not listed1. Click the Search tab.
2. Search for Mailing Statements with a status of Draft.
3. From the Search Results page, in the MS# column, click the statement you want to edit. The draft will be displayed.
4. Click Edit Draft .
29Australia Post e-LMS Electronic Lodgement of Mailing Statements User Guide

5.2.5 Upload a Mailing Statement Mailing Statements can be created outside of e-LMS in the XML format. The XML file must be
well-formed and must comply with Australia Post specifications. You can obtain a copy of the e- LMS v2.0 XML Interface Programmer’s Guide from your Australia Post representative.
To upload an XML Mailing Statement1. From the navigation menu, click the Upload Mailing Statement tab.
2. Click the Browse button. Depending on the version of Windows you are running, either the Choose File or Open File dialog will be displayed. This dialog allows you to select a file on your local computer or network.
3. Navigate to the folder on your local computer or network where the XML file (.xml) is located, and select the file.
4. Click Open. The dialog will close, and the name of the file you are uploading, including the full pathname, will be displayed in the filename box on the page.
5. Click Upload this Statement .
The contents of the XML Mailing Statement will be verified and, if the statement passes these checks, will be automatically submitted.
It is your responsibility to ensure any uploaded XML statements have been successfully submitted.
Once the statement has been uploaded and submitted, the statement is processed and viewed like any other statement. Refer to the online user guide for information on how to view this statement in e-LMS and track its progress.
5.2.6 Cancel a draft You can cancel Mailing Statements that have the status of either Draft or Rejected.
To cancel a recent draft statement1. Click the Home tab.
2. Locate the draft from the list of Your Recent Drafts.
3. Click the Cancel button next to the draft you want to cancel.
To cancel any draft or rejected statement1. Click the Search tab.
2. Search for Mailing Statements with a status of Draft and/or Rejected.
3. From the Search Results page, in the MS# column, click the statement you want to edit. The statement will be displayed.
4. From the View Mailing Statement page, click Cancel this Statement . Summary details of the statement will be displayed.
5. Type any additional information in the Comments field.
6. Click Cancel this Statement .
30Australia Post e-LMS Electronic Lodgement of Mailing Statements User Guide

5.3 Progressive Mailing Statements
5.3.1 Progressive Mailing Statements You can use a Progressive Mailing Statement to group Mailing Statements created successively for
the same job on the same charge account. The Progressive Mailing Statement collects the details from all the statements in the batch and provides you with a progressive report on the entire mail job. The Mailing Statements contained in the batch are otherwise processed and billed like any other statement.
The tasks described below will only be displayed in e-LMS if you are authorised to make Progressive Lodgements.
What do you want to know about?
What do you want to do?
Create a Progressive Mailing Statement 5.3.3 Close a Progressive Mailing Statement 5.3.5
Add a Statement to a Progressive Mailing Statement
5.3.4 Cancel a Progressive Mailing Statement 5.3.6
Rules for Progressive Lodgements 5.3.2
31Australia Post e-LMS Electronic Lodgement of Mailing Statements User Guide

5.3.2 Rules for Progressive Lodgements
These business rules must be applied by e-LMS users and are not necessarily enforced by the system.
The following rules and guidelines must be observed when making Progressive Lodgements:• Progressive lodgements can only be made by authorised customers.
• You must create a new Progressive Mailing Statement for each product code. Mailing Statements in the same progressive batch must use the same product code.
• The Progressive Mailing Statement must be closed manually by the customer after 30 days. The number of days the Progressive Mailing Statement has been open will be displayed when you view the statement.
• The customer must advise the Australia Post Lodgement Point recorded on the statement when each Progressive Mailing Statement is closed.
5.3.3 Create a Progressive Mailing Statement
When you create a new Mailing Statement, you are given the option to:• Create a single lodgement (the statement will not be added to a
Progressive Mailing Statement), or
• Add the statement to an existing Progressive Mailing Statement, or
• Create a new Progressive Mailing Statement.
When creating a new Mailing Statement, in the Progressive Mailing Statement field, select Create New Progressive MS.
When you create a new Progressive Mailing Statement, you must specify the name of the Originating Customer, the charge account number, the Lodgement Point and other information that is common to all Mailing Statements in the Progressive Mailing Statement.
When you subsequently add further statements to a Progressive Mailing Statement, these details cannot be edited. The only reference field that can be edited in a Progressive Mailing Statement lodgement is the Unique ID.
32Australia Post e-LMS Electronic Lodgement of Mailing Statements User Guide

5.3.4 Add a statement to a Progressive Mailing Statement
When you create a new Mailing Statement, you are given the option to:• Create a single lodgement (the statement will not be added to a Progressive Mailing Statement), or
• Add the statement to an existing Progressive Mailing Statement, or
• When creating a new Mailing Statement, in the Progressive Mailing Statement field, select from the list of existing Progressive Mailing Statements, or
• Create a new Progressive Mailing Statement.
Alternatively, from your Home Page, in the Your Open Progressive Mailing Statements section, select the Add MS button adjacent to the Progressive Mailing Statement you want to add the new statement to. The New Mailing Statement page will be displayed with the selected Progressive Statement No. displayed in the Progressive Mailing Statement field. You can also add statements when you view a Progressive Mailing Statement.
When you add statements to a Progressive Mailing Statement, the account information, job details, lodgement point and product code cannot be edited, as these details are common to all statements in the batch.
5.3.5 Close a Progressive Mailing Statement Progressive Mailing Statements must be closed every 30 days. The timing will depend on your own
billing cycle and in-house reporting needs. Progressive Mailing Statements must be closed manually by the Mail Generator.
You must advise the Australia Post Lodgement Point recorded on the statement when each Progressive Mailing Statement is closed.
When you view a Progressive Mailing Statement, you can close the Progressive Mailing Statement by clicking the Finalise button. This command button will only be available if all statements contained in the batch have reached the status of Approved & Invoiced, Reversed or Cancelled.
Once closed, you can locate a Progressive Mailing Statement (and summary Pricing Statement) from the Search page, or by viewing the audit trail of any of the original Mailing Statements in that batch. The Mailing Statements contained in a Progressive Statement are billed progressively and individually, as they are finalised, like any other Mailing Statement. The summary Pricing Statement is provided for reporting purposes only.
5.3.6 Cancel Progressive Mailing Statements When you view a Progressive Mailing Statement, you can cancel the Progressive Mailing Statement
by clicking the Cancel button. This command button will only be available if all statements contained in the batch have the status of Cancelled.
To cancel a Mailing Statement
1. Click the View button adjacent to the statement you want to cancel.
2. From the View Mailing Statement page, click Cancel this Statement . Summary details of the statement will be displayed.
3. Type any additional information in the Comments field.
4. Click Cancel this Statement .
33Australia Post e-LMS Electronic Lodgement of Mailing Statements User Guide

5.4 Approval of Mailing Statements
5.4.1 Approval of Mailing Statements Mailing Statements are subjected to various system and manual checks before they are approved
for delivery and can be finalised.
What do you want to know about?
What happens when I submit a Mailing Statement?
5.4.2 Who can approve a Mailing Statement?
5.4.4
Why has my Mailing Statement been rejected?
5.4.3
34Australia Post e-LMS Electronic Lodgement of Mailing Statements User Guide

5.4.2 What happens when I submit a Mailing Statement? When you submit a Mailing Statement, the status of the statement changes from Draft to
In Progress and a number of automated system checks are performed. If the statement passes these checks, a Pricing Statement is generated by the Australia Post accounting system, and the status changes to Awaiting Approval. The Pricing Statement reflects the details of the statement, and is the basis on which the service will be invoiced.
If there are problems with any of the system checks, the statement will either remain In Progress until the problems are resolved, or, the statement will be Rejected. The reasons for rejection will be recorded and can be viewed from the audit trail.
When you dispatch the physical mail to the nominated Lodgement Point, additional manual checks will be performed to ensure that the physical mail matches up with the details in the Mailing Statement, and hence the correct price is charged for the service. If the mail passes the manual checks, the status of the statement will then change to Approved & Invoiced. If there are problems with any of these checks, the order may be rejected, and will show a status of Rejected. The reasons for rejection will be recorded and can be viewed from the audit trail.
The statement may also be approved with non-conformance issues. In this case, the Mail Generator or agent will be alerted to these issues, but the order will still be processed.
The other possible status values include:On hold The order is being held, usually at the request of the customer, for operational or logistical reasons.
Approved awaiting EPOS pricing The order requires payment to be made before it can be finalised.
Reversed An approved statement has been reversed either because the mail was never lodged, or because the wrong customer account was used on the original order.
Cancelled The order has been cancelled by, or at the request of, the customer.
35Australia Post e-LMS Electronic Lodgement of Mailing Statements User Guide
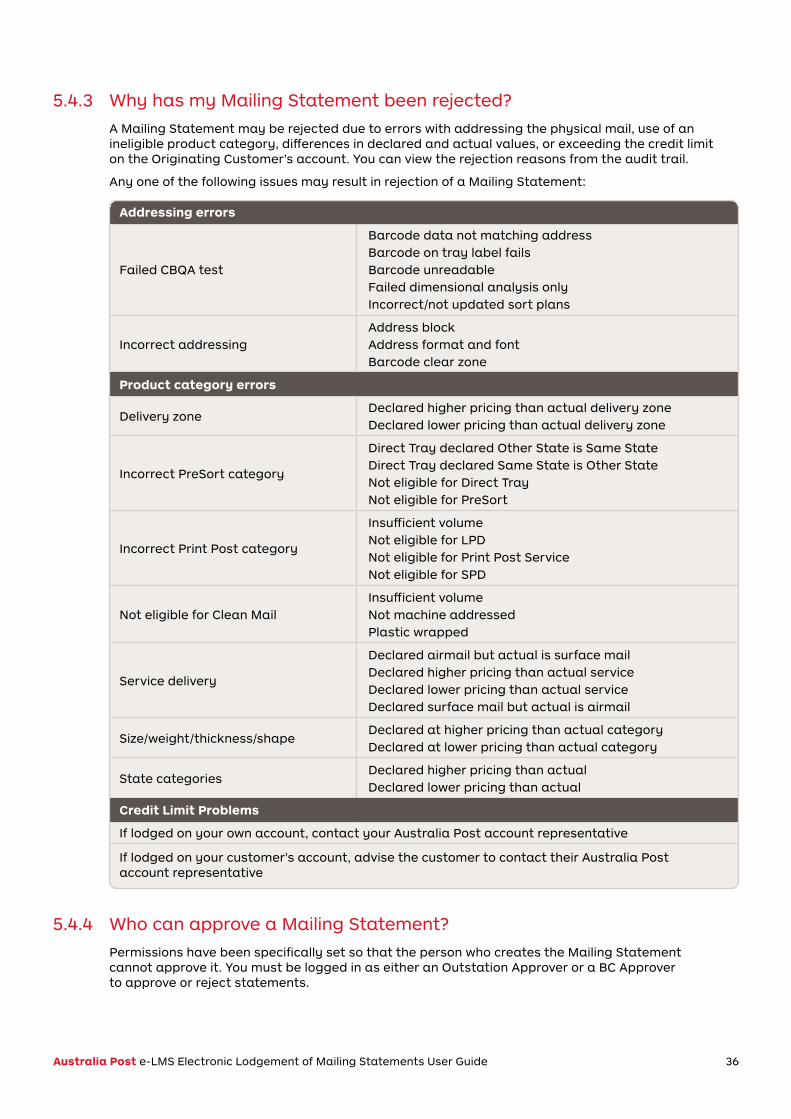
5.4.3 Why has my Mailing Statement been rejected? A Mailing Statement may be rejected due to errors with addressing the physical mail, use of an
ineligible product category, differences in declared and actual values, or exceeding the credit limit on the Originating Customer’s account. You can view the rejection reasons from the audit trail.
Any one of the following issues may result in rejection of a Mailing Statement:
Addressing errors
Failed CBQA test
Barcode data not matching address Barcode on tray label fails Barcode unreadable Failed dimensional analysis only Incorrect/not updated sort plans
Incorrect addressingAddress block Address format and font Barcode clear zone
Product category errors
Delivery zoneDeclared higher pricing than actual delivery zone Declared lower pricing than actual delivery zone
Incorrect PreSort category
Direct Tray declared Other State is Same State Direct Tray declared Same State is Other State Not eligible for Direct Tray Not eligible for PreSort
Incorrect Print Post category
Insufficient volume Not eligible for LPD Not eligible for Print Post Service Not eligible for SPD
Not eligible for Clean MailInsufficient volume Not machine addressed Plastic wrapped
Service delivery
Declared airmail but actual is surface mail Declared higher pricing than actual service Declared lower pricing than actual service Declared surface mail but actual is airmail
Size/weight/thickness/shapeDeclared at higher pricing than actual category Declared at lower pricing than actual category
State categoriesDeclared higher pricing than actual Declared lower pricing than actual
Credit Limit Problems
If lodged on your own account, contact your Australia Post account representative
If lodged on your customer’s account, advise the customer to contact their Australia Post account representative
5.4.4 Who can approve a Mailing Statement? Permissions have been specifically set so that the person who creates the Mailing Statement
cannot approve it. You must be logged in as either an Outstation Approver or a BC Approver to approve or reject statements.
36Australia Post e-LMS Electronic Lodgement of Mailing Statements User Guide

5.5 Dealing with rejected statements
5.5.1 Dealing with rejection Mail Statements may be rejected due to errors in the Mailing Statement, or in the physical mail.
You must take an appropriate action before a rejected Mailing Statement will be processed.
Reasons for rejection If the reason for rejection is a product category error
You can either correct the Mailing Statement or cancel it. You must locate the Mailing Statement from the Search page, from where you can view, edit, resubmit or cancel it. You do not have to make corrections now, but a rejected Mailing Statement will not be processed until it has been corrected and re-submitted.
If the reason for rejection is an addressing error You must contact the Business Centre where the mail was lodged.
If the reason for rejection is related to the credit limit on the customer’s charge account You must contact your Australia Post account representative.
To search for rejected Mailing Statements1. Click the Search tab.
2. Search for Mailing Statements with a status of Rejected.
3. From the Search Results page, in the MS# column, click the Mailing Statement you want to view.
To view rejection reasons
1. From the View Mailing Statement page, click View Audit Trail .
2. Locate the audit trail record that records the rejection.
3. The rejection reasons will be listed in the Details column.
To modify and resubmit a rejected Mailing Statement
1. From the View Mailing Statement page, click Modify Rejected .
2. Make the corrections required.
3. In the final edit page (Step 3. Confirm), click the Submit button.
To cancel a rejected Mailing Statement
1. From the View Mailing Statement page, click Cancel this Statement . Summary details of the statement will be displayed.
2. Type any additional information in the Comments field.
3. Click Cancel this Statement .
37Australia Post e-LMS Electronic Lodgement of Mailing Statements User Guide

5.5.2 Check the status of Mailing Statements The status of a Mailing Statement will tell you the stage the order has reached in the lifecycle of the
statement. To identify the status of statements, you must search the database for the statements you want to check.
To check the status of Mailing Statements1. Click the Search tab.
2. Select search criteria that will identify the statements you want to find. For example, type the Unique ID for an order, or search for multiple statements by date range with the From Date and To Date fields. You can use more than one search criteria.
3. Click Search .
4. The status of statements found by your search will be displayed in the Status column. To identify why a statement has been rejected, view the audit trail.
5.5.3 Modify a rejected Mailing Statement If a Mailing Statement has been rejected, you must locate the statement, modify it and resubmit it.
When you resubmit the amended statement, the status will change from Rejected to In Progress. The resubmitted statement will then be re-checked before it can be approved.
Any rejected statements that are over a month old will be automatically cancelled by the system.
To locate, modify and resubmit a rejected statement1. Click the Search tab.
2. Search for Mailing Statements with a status of Rejected.
3. From the Search Results page, in the MS# column, click the Mailing Statement you want to edit. The Mailing Statement will be displayed.
4. Click Modify Rejected .
5. Make the corrections required.
6. For the final edit page (Step 3. Confirm), click the Submit button.
38Australia Post e-LMS Electronic Lodgement of Mailing Statements User Guide

5.5.4 Cancel a rejected Mailing Statement To cancel a rejected Mailing Statement, you must first locate the statement you want to cancel.
When you cancel a rejected statement, the status will change from Rejected to Cancelled. Cancelled statements are not deleted from the database, and can be searched for and viewed like any other statement.
Any rejected statements that are over a month old will be automatically cancelled by the system.
To locate and cancel a rejected statement1. Click the Search tab.
2. Search for Mailing Statements with a status of Rejected.
3. From the Search Results page, in the MS# column, click the Mailing Statement you want to cancel. The Mailing Statement will be displayed.
4. Click Cancel this Statement .
5. Type any additional information in the Comments field.
6. Click Cancel this Statement .
39Australia Post e-LMS Electronic Lodgement of Mailing Statements User Guide

6 Searching for Mailing Statements
6.1 Searching for Mailing Statements Mailing Statements are stored in the e-LMS database, which you can access from the Search page.
What do you want to do?
Find Mailing Statements 6.2 Downloading and Printing 6.5
View Mailing Statements 6.3
View a Progressive Mailing Statement 6.4
View Mailing Statement audit trail 6.6
40Australia Post e-LMS Electronic Lodgement of Mailing Statements User Guide

6.2 Find Mailing Statements You can search for and view any statement, including drafts, statements that are being processed,
and statements that have been finalised. You must select search criteria to locate the statements you want; for example, you can search for all rejected statements, or use the Unique ID to find a particular statement.
6.2.1 Using multiple search criteria When you use more than one search criteria, the statements found by the search will match
all criteria. For example, if you specify:
From Date: 01/06/2015
To Date: 30/06/2015
Status: Approved & Invoiced
Leave all other criteria blank, the search will locate only those statements that are finalised and were submitted in the month of June 2015.
Search criteria The following criteria are available from the Search page:
Field Description
Generating Customer NameThe business name of the Mail Generator that created and submitted the statements
From DateLocates statements that were submitted on or after this date
To DateLocates statements that were submitted on or before this date
Lodgement State The State where the statement was lodged
Lodgement Point The Mail Centre where the statement was lodged
Mailing Statement Number System generated Mailing Statement Number
Progressive Mailing Statement NumberSystem generated Progressive Mailing Statement Number
Unique IDUnique identification code for Mailing Statements supplied by the Mail Generator
Job Number The Mail Generator’s own job number
Job Name The Mail Generator’s own job name
Invoice Ref The Mail Generator's own invoice reference
Originating Customer NameThe name of the Originating Customer, as entered by the Mail Generator
Account Number The charge account number
Status The current status of the Mailing Statement
To search for a statement1. Click the Search tab.
2. Select one or more search criteria that will identify the statements you want to find. For example, type the Unique ID for an order, or search for multiple statements by date range with the From Date and To Date fields. You can use more than one search criteria.
3. Click Search . The statements that match your search criteria will be displayed.
41Australia Post e-LMS Electronic Lodgement of Mailing Statements User Guide
6.3 View Mailing Statements To view a statement, you must find the statement and then select the statement (or statements)
you want to view from the search results page.
From the Search Results page, you can:• In the MS# column, click the Mailing Statement you want to view
• Use the checkboxes on the left of the page to select one or more statements, and click View MS
From the View Mailing Statement page, you can then:• Download and print statements
• Edit and cancel drafts
• Modify and cancel rejected statements
• View Pricing Statements
• View the audit trail
6.4 View a Progressive Mailing Statement On your Home Page, the most recent Progressive Mailing Statements that are currently open are
listed in the Your Open Progressive Mailing Statements section. To view a Progressive Mailing Statement, click the View button adjacent to the statement you want to view.
When you view a Progressive Mailing Statement, the information that is common to all statements in the progressive lodgement will be displayed at the top of the page. The statements that have been added to the progressive lodgement are listed in the Mailing Statements section. The list of statements includes the Mailing Statement No., the date the statement was lodged, and the status of each statement.
From the Progressive Mailing Statement page, you can:• View details of each statement contained in the progressive lodgement
• Add new statements to the progressive lodgement
• Close the progressive lodgement
• Cancel the Progressive Mailing Statement
If the progressive statement you want to view is not listed, you can:
View the full list of open Progressive Mailing StatementsFrom your Home Page:
1. From the task menu, click Progressive Statements.
2. Click the View button adjacent to the statement you want to view.
Find all statements that belong to a progressive lodgementFrom your Home Page:
1. Click the Search tab.
2. In the Progressive Mailing Statement Number field, type the Progressive Mailing Statement number.
3. Click Search .
The Mailing Statements that belong to the specified progressive lodgement will be displayed on the Search Results page. From here you can view one or more statements.
42Australia Post e-LMS Electronic Lodgement of Mailing Statements User Guide

6.5 Downloading and printing
If the Mailing Statement has been previously printed, the Printed icon will appear in the first column on the Search Results page.
When you search for Mailing Statements, the statements that match your search criteria will be displayed on the Search Results page. Use the checkboxes on the left of the page to select the statements that you want to print or download.
To print the selected statements
1. Click View MS .
2. At the top-right corner of the page, click printable. The print-friendly version of the page will be displayed.
3. Click Print . The Print dialog will be displayed.
4. Select your printer and printing options, and click Print.
To download the selected statements
1. From the View Mailing Statement page, click Download MS .
2. Select either XML or CSV format for the downloaded file. The File Download dialog will be displayed.
3. Click Save. The Save As dialog will be displayed.
4. Locate the folder where you want to save the file, and click Save. The progress of the file download will be displayed. The time to download the file will depend on the size of the file and the speed of your modem.
5. When the download is complete, you can either:
• Click Open to view the file.
• Click Open Folder to display the files in the folder.
• Click Close.
• Close the Download File dialog.
You should always check the Status column before you view, download and print a statementIn particular, draft statements are subject to change, or may be cancelled without being submitted. Draft statements may be listed on the Search Results page unless you specifically exclude them from your search. To exclude draft statements from your search, from the Search Details page, in the Status section, clear the Draft checkbox.
6.5.1 XML and CSV formats Downloadable versions of the Mailing Statement are available in both XML and CSV formats.
The XML file conforms to the published XML schema for e-LMS Mailing Statements. You can view CSV files in a spreadsheet program, or import directly into a database.
43Australia Post e-LMS Electronic Lodgement of Mailing Statements User Guide

6.6 View Mailing Statement audit trail
You can view a complete transactional history over the entire lifecycle of a Mailing Statement. To view the audit trail of a statement, you must find the statement and then select the statement you want to view from the Search Results page.
To view the audit trail of a statement1. From the Search Results page, in the MS# column, click the Mailing Statement you want
to view. The Mailing Statement will be displayed.
2. From the View Mailing Statement page, click View Audit Trail .
To print the audit trail reportFrom the View Audit Trail page:
1. At the top-right corner of the page, click printable. The print-friendly version of the page will be displayed.
2. Click Print . The Print dialog will be displayed.
3. Select your printer and printing options, and click Print.
Audit Trail Report
The following information will be displayed in the Audit Trail Report:
The Audit Trail Report is in date order.
Column Description
DateThe date the task was performed. The time recorded is in the time zone of the Lodgement Point at which the MS is lodged
User ID The Username login that performed the task
Status The status after the task was performed
Detail Details of the task performed including rejection reasons
44Australia Post e-LMS Electronic Lodgement of Mailing Statements User Guide

7 About Pricing and Invoices
7.1 About pricing and invoices The details you enter on the Mailing Statement are used to automatically price the order and
generate the invoice. The pricing details for a Mailing Statement are contained in a Pricing Statement.
What do you want to know about?
How is the price determined? 7.2 Viewing Pricing Statements 7.4
Invoices 7.3
45Australia Post e-LMS Electronic Lodgement of Mailing Statements User Guide
7.2 How is the price determined? When a Mailing Statement is submitted, the details entered on the Mailing Statement, including the
quantities of mail items, are sent to the Australia Post accounting system for pricing. This ensures that pricing of each statement is done with the latest information, and incorporates rates from any applicable contract you may have selected on the Mailing Statement.
A Pricing Statement is generated by the Australia Post accounting system and sent back to e-LMS, which can be viewed by the Originating Customer. Only the Originating Customer, who is being billed for the services, is permitted to view pricing.
Depending on product category you may be prompted to select Full Rate or Contract Pricing (refer to 5.2.2 step 2 on page 28).
7.3 Invoices The details of the invoice are based on the Pricing Statement, which is auto-generated by the system
and attached to the Mailing Statement. Once the Mailing Statement has been approved, the Australia Post accounting system will automatically create a billing entry in your account, which will appear on your next invoice statement.
7.3.1 Reconciling your account You can reconcile your consolidated Tax Invoice against the individual Pricing Statements
for each lodgement by referring to the following common fields/columns:
e-LMS Pricing Statement Consolidated Tax Invoice
Mailing Statement No. Refer to the Invoice Number column
Customer Account Number Refer to Customer Account Number
Lodgement Point Line items are sorted by Lodgement Point
Sales Order Number Refer to the Transaction ID column
Invoice Reference Details Refer to the Customer Reference column
If you have questions about your account Contact your Australia Post account manager, who will investigate your query,
and will be able to take any corrective action that may be required.
7.4 Viewing Pricing Statements
Only the Originating Customer, who is being billed for the services, is permitted to view pricing.
A Pricing Statement is attached to every Mailing Statement once it has passed the system checks. To view a Pricing Statement, you must find the statement and then select the statement (or statements) you want to view from the search results page.
46Australia Post e-LMS Electronic Lodgement of Mailing Statements User Guide

From the Search Results page, you can:• In the MS# column, click the Mailing Statement you want to view.
The Mailing Statement will be displayed.
• Use the checkboxes on the left of the page to select one or more statements, and click View MS .
You can only view pricing on statements with the status of Approved & Invoiced.
From the View Mailing Statement page, you can then choose:
To view the Pricing StatementYou can only view pricing on statements that have been approved.
Click View Pricing Statement .
To download the Pricing StatementYou can only view pricing on statements that have been approved.
1. Click View Pricing Statement .
2. Click Download PS .
For more information, refer to the Downloading and Printing section in online help.
To print the Pricing StatementYou can only view pricing on statements that have been approved.
1. Click View Pricing Statement .
2. Click Print .
For more information, refer to the Downloading and Printing section in online help.
Progressive lodgements If the Mailing Statement is part of a progressive lodgement, you can also view, download and
print the summary Pricing Statement. A summary Pricing Statement will be generated when each statement in the batch reaches the status of Approved & Invoiced. The summary Pricing Statement will contain the accumulated values of all items in the Mailing Statements contained in the progressive lodgement. A Pricing Statement is also generated for each Mailing Statement in the batch. The summary Pricing Statement will only be available if at least one statement contained in the lodgement has reached the status of Approved & Invoiced.
To view the summary progressive Pricing Statement1. View any statement in the progressive lodgement that has the status of Approved & Invoiced.
2. Click the View Progressive Pricing Statement button.
47Australia Post e-LMS Electronic Lodgement of Mailing Statements User Guide

8 Using Chargeback Functionality
8.1 Adding Chargeback Only Product The creation of an Internal Chargeback Product is for Ext Generator Customers to create
Chargeback Products for NON-e-LMS related products. These fields allow customers to create unique product codes.
Create code Product Code
This is a unique code that the customer assigns to products.
Description A brief description of the product that chargeback applies to.
Unit Cost The unit price of each product shown above.
Comments Additional information that may be required for creation of this product.
Save Click Save .
*
*
Product Code
Description
Chargeback Product Details
Create an Internal Chargeback Product
Save Cancel
Unit Cost (0.00)
Comments
Bold fields (also marked with a *) are mandatory
48Australia Post e-LMS Electronic Lodgement of Mailing Statements User Guide
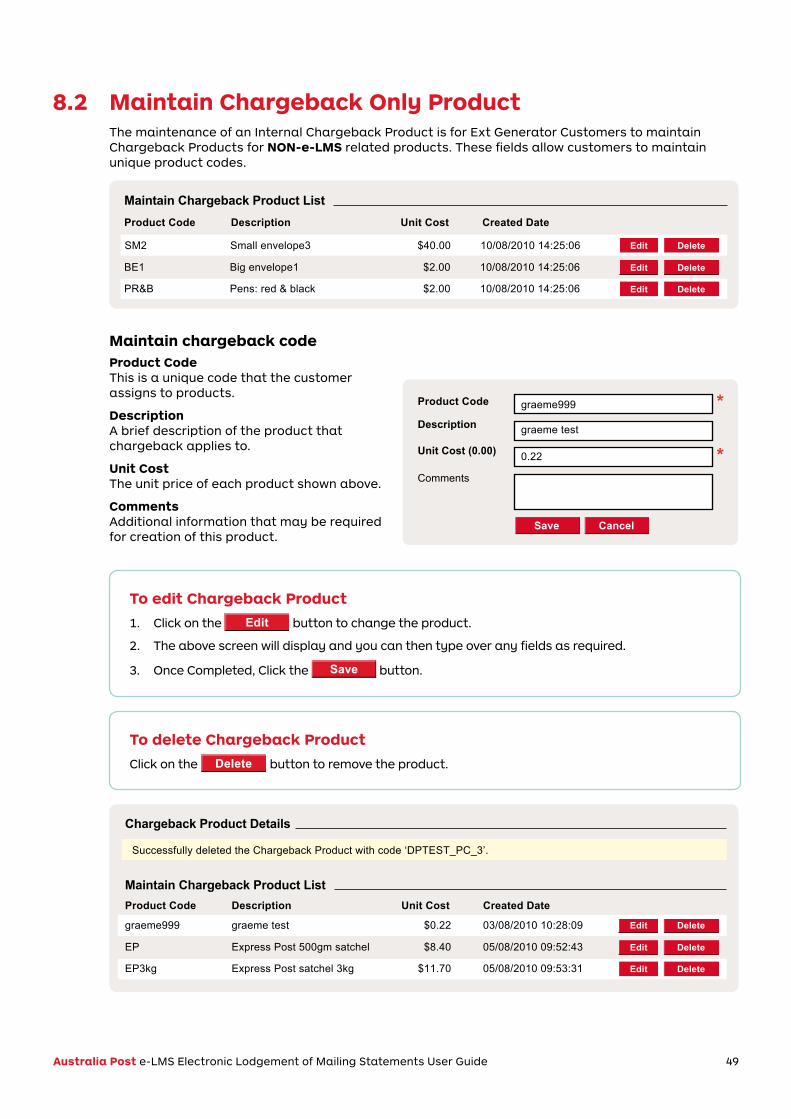
8.2 Maintain Chargeback Only Product The maintenance of an Internal Chargeback Product is for Ext Generator Customers to maintain
Chargeback Products for NON-e-LMS related products. These fields allow customers to maintain unique product codes.
SM2 Small envelope3 $40.00 10/08/2010 14:25:06
Product Code Description Unit Cost Created Date
Maintain Chargeback Product List
Edit Delete
BE1 Big envelope1 $2.00 10/08/2010 14:25:06 Edit Delete
PR&B Pens: red & black $2.00 10/08/2010 14:25:06 Edit Delete
Maintain chargeback code Product Code
This is a unique code that the customer assigns to products.
Description A brief description of the product that chargeback applies to.
Unit Cost The unit price of each product shown above.
Comments Additional information that may be required for creation of this product.
To edit Chargeback Product
1. Click on the Edit button to change the product.
2. The above screen will display and you can then type over any fields as required.
3. Once Completed, Click the Save button.
To delete Chargeback Product
Click on the Delete button to remove the product.
graeme999 graeme test $0.22 03/08/2010 10:28:09
Product Code Description Unit Cost Created Date
Successfully deleted the Chargeback Product with code ‘DPTEST_PC_3’.
Edit Delete
EP Express Post 500gm satchel $8.40 05/08/2010 09:52:43 Edit Delete
EP3kg Express Post satchel 3kg $11.70 05/08/2010 09:53:31 Edit Delete
Chargeback Product Details
Maintain Chargeback Product List
*
*
Product Code graeme999
graeme test
0.22
Description
Save Cancel
Unit Cost (0.00)
Comments
49Australia Post e-LMS Electronic Lodgement of Mailing Statements User Guide

Express Post C5 Single $4.00 30/09/2010 22:35:16
Product Code Description Unit Cost Created Date
Errors were encountered. Please check the fields marked below and try again.1. The Product with code ‘Express Post C5’ has one or more associated items, and so cannot be deleted.
Edit Delete
Chargeback Product Details
Maintain Chargeback Product List
1. The Product with code ‘Express Post C5’ has one or more associated items, and so cannot be deleted.
8.3 Add Chargeback Cost Centre The creation of an Internal Chargeback Cost Centre is for Ext Generator Customers
to create Chargeback Cost Centres for e-LMS and NON-e-LMS related products. These fields allow customers to create unique Cost Centres.
Create code Cost Code
This is a unique code that the customer creates to assign to account codes.
Account Code This is a list of account numbers (own accounts) that you wish to apply the Cost Centres to. You may apply to one account number or all account numbers.
Comments Additional information that may be required for creation of this product.
Unit Cost The unit price of each product shown above.
Save Click Save .
**
Code
Account Code
Chargeback Cost Centre Details
Create a Chargeback Cost Centre
Save Cancel
Location
Comments
Bold fields (also marked with a *) are mandatory
Description
Please select...
Please note that if any codes have transactions associated with them less than 6 months old from time of creation, they cannot be deleted. The following message will display:
50Australia Post e-LMS Electronic Lodgement of Mailing Statements User Guide

8.4 Maintain Chargeback Cost Centre The maintenance of an Internal Chargeback Cost Centre is for Ext Generator Customers to maintain
Chargeback Cost Centres for e-LMS and NON-e-LMS related products. These fields allow customers to edit or delete Cost Centres.
Chargeback Cost Centres Cost Code
This is a unique code that the customer creates to assign to account codes.
Account Code This is a list of account numbers (own accounts) that you wish to apply the Cost Centres to. You may apply to one account number or all account numbers.
Description A brief description of the Cost Code that it applies to.
Location A brief description of the location of the Cost Code that it applies to (not mandatory).
Date Created Show date of when the Cost Centre Code was originally created.
Chargeback Cost Centres can be edited and deleted.
0000000021/6-3093 1674 Marketing 19/08/2010
Cost Centre Code Account Code Description Location Date CreatedYour Chargeback Cost CentresChargeback Cost Centres
Edit Delete
0000000021/6-3094 1674 Graphics 04/08/2010 Edit Delete
To edit a Cost Centre
Click the Edit button on the row you wish to change.
To delete a Cost Centre
Click the Delete button on the row you wish to remove.
Chargeback Cost Centres1. “The Cost Centre with code ‘0000000021/6-3093’ has one or more items, and so cannot be deleted.
0000000021/6-3093 1674 Marketing 19/08/2010
Cost Centre Code Account Code Description Location Date CreatedYour Chargeback Cost Centres
Edit Delete
0000000021/6-3094 1674 Graphics 04/08/2010 Edit Delete
Please note that if any codes have transactions associated with them less than 6 months old from time of creation, they cannot be deleted. The following message will display:
51Australia Post e-LMS Electronic Lodgement of Mailing Statements User Guide

8.5 Add Chargeback Only Item The adding Chargeback Only Item is for Ext Generator Customers to allocate NON e-LMS related
products to your Internal Cost Centre Codes.
Add Chargeback Only Item Product Code
Click on the drop down to select product code from the list.
Account Code Click on the drop down to select an Account Code (note: amount allocated in this area does not affect your Australia Post Account).
Cost Centre Click on the drop down to select a Cost Centre Code where the product needs to be charged to.
Unit Cost (0.00) This unit cost is linked to the selected Product Code and will automatically display.
Quantity Enter the quantity of the product required to be charged.
Comments Additional information that may be required for creation of this item.
Save Click Save .
*Product
Account Code
Chargeback Item Details
Create a Chargeback Item
Cost Centre
Quantity
Comments
Bold fields (also marked with a *) are mandatory
Unit Cost (0.00)
Save Cancel
Please select an account code...
*Please select a product...
***
Please select a cost centre...
52Australia Post e-LMS Electronic Lodgement of Mailing Statements User Guide

8.6 Maintain Chargeback Only Item The adding Chargeback Only Item is for Ext Generator Customers to allocate NON e-LMS related
products to your Internal Cost Centre Codes.
Add Chargeback Only Item Product Code
Click on the drop down to select Product Code from the list.
Account Code Click on the drop down to select an Account Code (note: amount allocated in this area does not affect your Australia Post Account).
Cost Centre Click on the drop down to select a Cost Centre code where the product needs to be charged to.
Unit Cost (0.00) This unit cost is linked to the selected product code and will automatically display.
Quantity Enter the quantity of the product required to be charged.
Comments Additional information that may be required for creation of this item.
Save: Click Save .
Chargeback Cost Centres can be edited and deleted.
To edit a Cost Centre
Click the Edit button on the row you wish to change.
To delete a Cost Centre
Click the Delete button on the row you wish to remove.
Chargeback Cost Centres1. “The Cost Centre with code ‘0000000021/6-3093’ has one or more items, and so cannot be deleted.
0000000021/6-3093 1674 Marketing 19/08/2010
Cost Centre Code Account Code Description Location Date CreatedYour Chargeback Cost Centres
Edit Delete
0000000021/6-3094 1674 Graphics 04/08/2010 Edit Delete
Please note that if any codes have transactions associated with them less than 6 months old from time of creation, they cannot be deleted. The following message will display:
53Australia Post e-LMS Electronic Lodgement of Mailing Statements User Guide

9 Reporting
9.1 Reports You can select from the following standard reports:
Lodgements Report 9.2 View list of users 9.4
Reconciliation Report 9.3 Chargeback Items Report 9.5
54Australia Post e-LMS Electronic Lodgement of Mailing Statements User Guide

9.2 Lodgements Report
You must login as Administrator to view this report.
The Lodgements Report gives summary information on your lodgements. The scope of the report can be restricted by date range, by lodgement point and by other report filters. For example, you can report on all lodgements made during the month of June.
Creating a report is a multi-step task. In this first step, you will define the filters that control the contents of the report and how you want the report outputted. If you choose to display the report, once you have verified that the report contains the information you want, you can then print or download the report.
Two download formats are available• CSV format files can be viewed and reformatted in a spreadsheet program,
or import directly into a database.
• HTML is a widely used document format which can be viewed and edited in most word-processing programs.
When appropriate, you should always use filters to restrict the size of your report; the e-LMS database is nationwide and contains a large volume of information. Unfiltered reports will take longer to generate, are slower to download, and are more difficult to manage and format in spreadsheets.
To create and view a report
Reports displayed on the screen are limited to a maximum of 10,000 Mailing Statements.
1. From the navigation menu, click Reports . The Reports page will be displayed.
2. From the task menu, click Customer Lodgements. The Lodgement Report page will be displayed.
3. Use the fields displayed in the Filter Details section to filter and sort your report.
4. Click Create Report . Summary details of lodgements that match your filter settings will be displayed.
To return to the Lodgement Report page and change your filter settings, click Back to Search .
To return to the Reports page and select a different report, click Back to Reports .
55Australia Post e-LMS Electronic Lodgement of Mailing Statements User Guide

To download a report in CSV or HTML format
Reports displayed on the screen are limited to a maximum of 10,000 Mailing Statements.
1. Select to create Report for CSV or HTML download or alternatively create and view the report on-screen (see previous page) if the report is for less than 10,000 Mailing Statements.
2. Click the Save Results to CSV or Save Results to HTML button. The File Download dialog will be displayed.
3. Click Save. The Save As dialog will be displayed.
4. Locate the folder where you want to save the file, and click Save.
The progress of the file download will be displayed. The time to download the file will depend on the size of the file and the speed of your modem.
When the download is complete, you can either:
• Click Open to view the file,
• Click Open Folder to display the files in the folder, or
• Click Close.
9.3 Reconciliation Report
You must login as Administrator to view this report.
The Reconciliation Report gives details of the items lodged on your accounts. The scope of the report can be restricted by date range, by account number and by other report filters. For example, you can report on all lodgements made since the start of the month, on a particular account number.
Creating a report is a multi-step task. In this first step, you will define the filters that control the contents of the report and how you want the report outputted. If you choose to display the report, once you have verified that the report contains the information you want, you can then print or download the report.
Two download formats are available• CSV format files can be viewed and reformatted in a spreadsheet program,
or import directly into a database.
• HTML is a widely used document format which can be viewed and edited in most word-processing programs.
When appropriate, you should always use filters to restrict the size of your report; the e-LMS database is nationwide and contains a large volume of information. Unfiltered reports will take longer to generate, are slower to download, and are more difficult to manage and format in spreadsheets.
56Australia Post e-LMS Electronic Lodgement of Mailing Statements User Guide

To create and view a report
Reports displayed on the screen are limited to a maximum of 10,000 records.
1. From the navigation menu, click Reports . The Reports page will be displayed.
2. From the task menu, click Reconciliation. The Reconciliation Report page will be displayed.
3. Use the fields displayed in the Filter Details section to filter and sort your report.
4. Click Create Report . Summary details of reconciliations that match your filter settings will be displayed.
To return to the Reconciliations Report page and change your filter settings, click Back to Search .
To return to the Reports page and select a different report, click Back to Reports .
To download a report in CSV or HTML format
Reports are limited to a maximum of 10,000 records.
1. Select to create Report for CSV or HTML download or alternatively create and view the report on-screen (see above) if the report is for less than 10,000 records.
2. Click the Save Results to CSV or Save Results to HTML button. The File Download dialog will be displayed.
3. Click Save. The Save As dialog will be displayed.
4. Locate the folder where you want to save the file, and click Save. The progress of the file download will be displayed. The time to download the file will depend on the size of the file and the speed of your modem.
When the download is complete, you can either:
• Click Open to view the file,
• Click Open Folder to display the files in the folder, or
• Click Close.
57Australia Post e-LMS Electronic Lodgement of Mailing Statements User Guide

9.4 View list of users
You must login as Administrator to view this report.
You can view a list of users in your account, filtered and sorted on selected database field names. You can then either print the report directly from e-LMS, or download the report in CSV or HTML format.
Two download formats are available• CSV format files can be viewed and reformatted in a spreadsheet program,
or import directly into a database.
• HTML is a widely used document format which can be viewed and edited in most word-processing programs.
To view and print a list of users1. From the navigation menu, click Reports .
The Reports page will be displayed.
2. From the task menu, click User. The List of Users page will be displayed.
3. Use the fields displayed in the Filter Details section to filter and sort your report.
4. Click Create Report . Summary details of users that match your filter settings will be displayed.
5. To print the list, at the top-right corner of the page, click printable. The print-friendly version of the page will be displayed.
6. Click Print . The Print dialog will be displayed.
7. Select your printer and printing options, and click Print.
To return to the List of Users page and change your filter settings, click Back to Search .
To return to the Reports page and select a different report, click Back to Reports .
58Australia Post e-LMS Electronic Lodgement of Mailing Statements User Guide

To download a list of users1. From the navigation menu, click Reports .
The Reports page will be displayed.
2. From the task menu, click External Users. The List of External Users page will be displayed.
3. Use the fields displayed in the Filter Details section to filter and sort your report.
4. Click Create Report . Summary details of users that match your filter settings will be displayed.
5. Click the Save Results to CSV or Save Results to HTML button. The File Download dialog will be displayed.
6. Click Save. The Save As dialog will be displayed.
7. Locate the folder where you want to save the file, and click Save. The progress of the file download will be displayed. The time to download the file will depend on the size of the file and the speed of your modem.
When the download is complete, you can either:
• Click Open to view the file,
• Click Open Folder to display the files in the folder, or
• Click Close.
9.5 Chargeback Items Report
You must login as Administrator to view this report.
The Chargeback Items Report gives summary information on your Chargeback. The scope of the report can be restricted by Cost Centre Code, MS Line Item Product, Chargeback Only Product, Account Number and Date Range. For example, you can report on all Cost Centre Codes made during the month of June.
Creating a report is a multi-step task. In this first step, you will define the filters that control the contents of the report and how you want the report outputted. If you choose to display the report, once you have verified that the report contains the information you want, you can then print or download the report.
Two download formats are available• CSV format files can be viewed and reformatted in a spreadsheet program,
or import directly into a database.
• HTML is a widely used document format which can be viewed and edited in most word-processing programs.
59Australia Post e-LMS Electronic Lodgement of Mailing Statements User Guide

When appropriate, you should always use filters to restrict the size of your report; the e-LMS database is nationwide and contains a large volume of information. Unfiltered reports will take longer to generate, are slower to download, and are more difficult to manage and format in spreadsheets.
To create and view a report
Reports displayed on the screen are limited to a maximum of 10,000 records.
1. From the navigation menu, click Reports . The Reports page will be displayed.
2. From the task menu, click Chargeback Items. The Chargeback Item Report page will be displayed.
3. Use the fields displayed in the Filter Details to filter and sort your report.
4. Click Create Report . Summary details of Chargeback Items that match your filter settings will be displayed.
To return to the Chargeback Item Report page and change your filter settings, click Back to Search .
To return to the Reports page and select a different report, click Back to Reports .
To download a report in CSV or HTML format
Reports displayed on the screen are limited to a maximum of 10,000 records.
1. Select to create Report for CSV or HTML download or alternatively create and view the report on-screen (see above) if the report is for less than 10,000 records.
2. Click the Save Results to CSV or Save Results to HTML button. The File Download dialog will be displayed.
3. Click Save. The Save As dialog will be displayed.
4. Locate the folder where you want to save the file, and click Save.
The progress of the file download will be displayed. The time to download the file will depend on the size of the file and the speed of your modem.
When the download is complete, you can either:
• Click Open to view the file,
• Click Open Folder to display the files in the folder, or
• Click Close.
60Australia Post e-LMS Electronic Lodgement of Mailing Statements User Guide

10 Frequently asked questions
Question Answer Relevant to
Who do I call when I need help?
Contact Australia Post e-LMS Support on 1800 287 457.
All customers
Can a customer create user accounts and reset passwords?
Yes. In fact your in-house e-LMS Administrator is the only user that is authorised to add and maintain users and reset a user's password.
All customers
When adding a customer charge account, why does the number stay in the Pending Accounts?
If the account number has not been previously recorded in e-LMS, the system performs an overnight update of the database. You should add your customer account numbers at least one day before you want to create statements that use that account.
Administrators
When logging in, the system will not accept my password.
To type in a valid password, follow this checklist
1. Passwords are case sensitive, and can be a mix of upper and lower case, numeric and special characters. Ensure you are entering the password correctly.
2. Passwords cannot be less than 8 or more than 32 characters long.
3. When you change your password, you cannot re-use an old password.
All users
61Australia Post e-LMS Electronic Lodgement of Mailing Statements User Guide

Question Answer Relevant to
When working in e-LMS, some of the list boxes and text fields either do not display at all, or do not behave properly.
Unsupported versions of Windows or IE can affect the functions of the e-LMS system.
Theminimumsystemconfigurationsare: Operating system Microsoft Windows 7 or later.
Internet browser Microsoft Internet Explorer 5.5 (SP1) or later, or Mozilla Firefox 1.5 or later.
All users
How do I add customers to the list of Originating Customers displayed when I create a new Mailing Statement?
Ask your e-LMS Administrator to add the customer name using the Customer Names function.
Mail Generators
What do I do when a statement has the status of System Checks Failed?
Contact the Australia Post Business Centre where you lodged the mail.
Mail Generators
Can I print or download more than one statement at the same time?
Yes, you can print and download multiple statements. When you search for Mailing Statements, the statements that match your search criteria will be displayed on the Search Results page. Use the checkboxes on the left of the page to select the statements that you want to print or download.
To print the selected statements:
1. Click View MS.
2. Click printable (top right of the page).
3. From the Print dialog, select your printer and other print options, then click Print.
To download the selected statements:
1. Click Download MS.
2. Select CSV or HTML format.
3. From the Download File dialog, click Save.
4. From the Save As dialog, navigate to the folder where the file will be saved, and click Save.
5. Close the Download File dialog.
All users
62Australia Post e-LMS Electronic Lodgement of Mailing Statements User Guide

For assistance with using e-LMS Please contact Australia Post e-LMS Support on 1800 287 457 or email: [email protected]
For assistance with your account Please contact your Australia Post Account Manager or Credit Officer.
For information about joining the Bulk Mail Partner Program Please visit: auspost.com.au/BMP
or contact your Australia Post Account Manager or call 13 13 18.
Useful links auspost.com.au
auspost.com.au/ELMS
11 e-LMS contacts
63Australia Post e-LMS Electronic Lodgement of Mailing Statements User Guide

July 2016