user guide - quest/strada/questxs - velomobiel.nl · user guide - quest/strada/questxs 01. 2,65 m...
TRANSCRIPT
Index
1. Introduction 1.1 Speci�cations2. Operation Tips 2.1 Driving features 2.2 Tra�c 2.3 Use3. Use 3.1 Entry and exit 3.2 Clipless pedals 3.3 Luggage4. Personalized set up of the bike 4.1 The seat 4.2 Setup: leg extension and pedals 4.3 Adjusting the bottom bracket5.Operation 5.1 Tiller 5.2 Brakes and Parking 5.3 Gears 5.4 Lights 5.5 Bell 5.6 Cycle Computer 5.7 Foam Cover6. Driving the Quest / Strada / QuestXS 6.1 Place in tra�c7. Safety 7.1 Visibility 7.2 Visibility in the dark 7.3 Helmet8. Maintenance 8.1 Tires 8.2 Punctures 8.3 Tire wear / wheel alignment 8.4 Spokes 8.5 Removing front wheel 8.6 Removing rear wheel 8.7 Light system 8.8 Strut lubrication 8.9 Brakes 8.10 Chain / derailleur 8.11 Steering adjustments9. Electric scheme 201310. Dealers - Contacts
velomobiel.nl
User Guide - Quest/Strada/QuestXS
01

2,65 m0,76 m carrosserie/0.80 m at tires0,95 m (unladen)34,5 kg / 29,5 carbon option8 m (afhankelijk van breedte voorbanden)
35 - 40º )
• B&M Lumotec IQ Cyo (adjustable from inside)• Spanninga LED rear and brake light• B&M NiMH 4,5 Ah 6 volt battery/B&M battery charger, interior light• Opitional turn signals flashers (8x luxeon 1W LED), electric horn, 2nd battery and /or 2nd front lightDriveline ISIS triple 53/42/30Shimano PDM 525 (spd)KMC X9Sram 9v 11/12/13/14/16/18/21/24/28Other compatible cassettes possibleFront Shimano Tiagra, Rear Sram X-9Sram Grip shift X-9SA Alloy Drum 70 or 90 mmFront: Vredestein Perfect Moirree 47-406Rear: Vredestein Perfect Moirree 54-559Front: Sapim 163 mm strong butted 13/14 rvs (90 mm 158 mm) RVSRear: Sapim 264 mm race butted 14/15/14 RVSKHE Alloy Black 36H
2,6 m0,765 m0,855 (unladen)31 kg / 27,5 carbon option12 m (afhankelijk van breedte voorbanden)35 - 40º
The Quest/Strada or XS comes ready-to-ride, including light system, bike copmuter, bell, air pump, spare tyre and tyre repair set.
This manual provides guidance regarding the maintenance and operation of your bike. Taking the time toread it will help you to understand how your bike works and when it needs maintenance. This will berewarded by many kilometers of enjoyable and carefree cycling.
Length 2,85 mWidth 0,765 mHeight 0,9 m (unladen)Weight (approx) 34 kg / 29,5 kg carbon optionTurning Circle 11 m (afhankelijk van breedte voorbanden)Seat Angle 35 - 40º
Electric Components • B&M Lumotec IQ Cyo (adjustable from inside) • Spanninga LED rear and brake light • B&M NiMH 4,5 Ah 6 volt battery/B&M battery charger, interior light • Opitional turn signals flashers (8x luxeon 1W LED), electric horn, 2nd battery and /or 2nd front lightCrankset Driveline ISIS triple 53/42/30Pedals Shimano PDM 525 (spd)Chain KMC X9Cassette Sram 9v 11/12/13/14/16/18/21/24/28 Other compatible cassettes possibleDerailleurs Front Shimano Tiagra, Rear Sram X-9Shifters Sram Grip shift X-9Brakes SA Alloy Drum 70 or 90 mmTires Front: Schwalbe Kojak 35-406 Rear: Schwalbe Kojak 50-559Spokes Front: Sapim 163 mm strong butted 13/14 rvs (90 mm 158 mm) RVS Rear: Sapim 264 mm race butted 14/15/14 RVSRims KHE Alloy Black 36H
1.1velomobiel.nl
1. Introduction
2 202
1.1 Speci�cations

2.1/2.2/2.3velomobiel.nl2 203
• Controls for steering and brakes are different from a typical bicycle. • A tricycle has a very different behavior in turns than a bicycle. Taking turns too quickly can raise the inside wheel and could ultimately cause the trike to overturn. Start gently as you learn the handling characteristics of the Quest/Strada/XS.• You can easily reach higher speeds. Higher speeds require longer stopping distances.• The Quest/Strada has limited ground clearance. Look out for large speed bumps and changes in pavement level that are not parallel to your line of travel.• The brakes on the Quest/Strada are Sturmey Archer drum brakes. On longer mountain descents the drums may overheat if engaged for long periods. Stop if you smell the brakes overheating or if performance decreases and allow some time for the brakes to cool. Remove the front wheel covers if you intend to ride in areas with longer descents, as the brakes cool better without them.• Before each ride check the tires for wear and deformation. A tire blowout can cause a loss of control.• A Quest/Strada/XS has a derailleur drive system. You can only shift if you are pedaling forward. If force is applied to the pedals when the derailleur has the chain out of position (if for example you shifted with bike at a standstill) you can cause damage to the shifting mechanism. Stop if you hear the chain making sounds when reversing.• Note: the stability of the Quest/Strada/XS is strongly influenced by hard crosswinds. Depending on circumstances such as cornering speed, road gradient, presence of vegetation and buildings and the weight of the rider, a gusting wind from the side can be dangerous.
2
2.1 Driving features
2. Operation Tips
The Quest /Strada/XS has a number of special features. Give yourself plenty of time to get accustomed to them:
• Be courteous in traffic: a velomobile is a relatively new and striking phenomenon on the street. Your behavior in traffic will be critically assessed.• Others will often underestimate your speed. Many will assume the Quest/Strada/XS is a larger vehicle and think it is further away that it really is.• In some circumstances, a low bike is less visible. Parked cars, fences or hedges can hide you from other vehicles. Keep this in mind, even if you have the right of way.
2.2 Tra�c
• The Quest/Strada/XS is built as light as possible. The body is strong enough to absorb the forces that occur during driving, but can be damaged by improper use.• Park your bike in a sheltered place during strong winds, especially in the vicinity of buildings where strong gusts can occur. In extreme cases, the bike can be overturned.• You can use a cable or bracket type lock to secure the Quest/Strada/XS by passing it through the wheel. Remove the wheel cover or make a hole in it. At night, your bike is best protected against risks in the garage at home.• To estimate the value of your bike for insurance purposes, be sure to take into account its contents (computers, GPS etc.), this usually adds little extra cost to your premium.
2.3 Use

Easy entry and exit from the Quest / Strada / XS requires some skilland practice.• Hook the tiller behind the rim, so it is not in the way.• You can put your feet on the crossbar between the wheel arches or on the seat. Do NOT stand on the floor beside the seat.• You can use your hands on the sides of the cockpit to support yourself. You can sit at the back edge of the cockpit opening.• Now put your feet forward while you lower yourself onto the seat.
3.1/3.2/3.3velomobiel.nl
2
3.1 Entry and Exit
3. Use
204
1
3
3.2 Clipless Pedals (SPD)
The bike is equipped with SPD “clipless” pedals. This system requires special cycling shoes with bolt on cleats. The correct position of these cleats is important, read the instructions supplied by the manufacturer. Tall people that have issues with limited foot space, can move the cleats to the outside and the front of the shoe to gain more clearance.
The SPD (or similar) system is strongly recommended for this bike. The ride is more relaxing if you're not constantly using your leg strength to keep your feet in position on the pedals. When clipped in you can more efficiently transfer your power. In addition, your feet cannot slip off the pedals, striking the vehicle’s body and resulting in damage and / or injury.
3.3 Luggage
The Quest / Strada / XS has space for luggage beside the seat. The storage space in the back of the bike is easilyaccessible by folding the seat forward. Avoid placing heavy items on the chain and sprocket guards or behind the wheel. Pack compact, heavier, items right behind the front wheels next to you, so the bike remains stable in sharp curves. Placing luggage high, or further back, decreases the stability of the bike in turns.
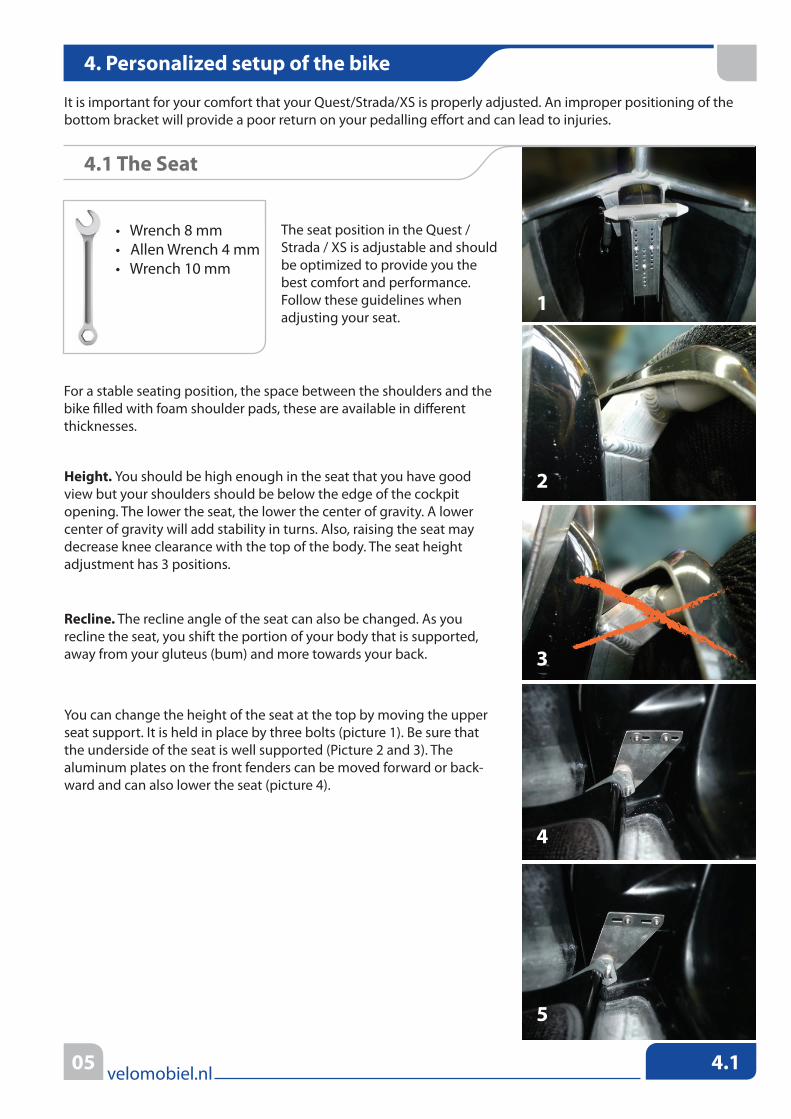
Height. You should be high enough in the seat that you have goodview but your shoulders should be below the edge of the cockpitopening. The lower the seat, the lower the center of gravity. A lowercenter of gravity will add stability in turns. Also, raising the seat maydecrease knee clearance with the top of the body. The seat heightadjustment has 3 positions.
Recline. The recline angle of the seat can also be changed. As yourecline the seat, you shift the portion of your body that is supported,away from your gluteus (bum) and more towards your back.
You can change the height of the seat at the top by moving the upper seat support. It is held in place by three bolts (picture 1). Be sure that the underside of the seat is well supported (Picture 2 and 3). The aluminum plates on the front fenders can be moved forward or back-ward and can also lower the seat (picture 4).
The seat position in the Quest / Strada / XS is adjustable and should be optimized to provide you the best comfort and performance. Follow these guidelines when adjusting your seat.
For a stable seating position, the space between the shoulders and thebike �lled with foam shoulder pads, these are available in di�erentthicknesses.
4.1velomobiel.nl
4. Personalized setup of the bike
1
2
3
4
• Wrench 8 mm• Allen Wrench 4 mm• Wrench 10 mm
4.1 The Seat
It is important for your comfort that your Quest/Strada/XS is properly adjusted. An improper positioning of the bottom bracket will provide a poor return on your pedalling e�ort and can lead to injuries.
5
05
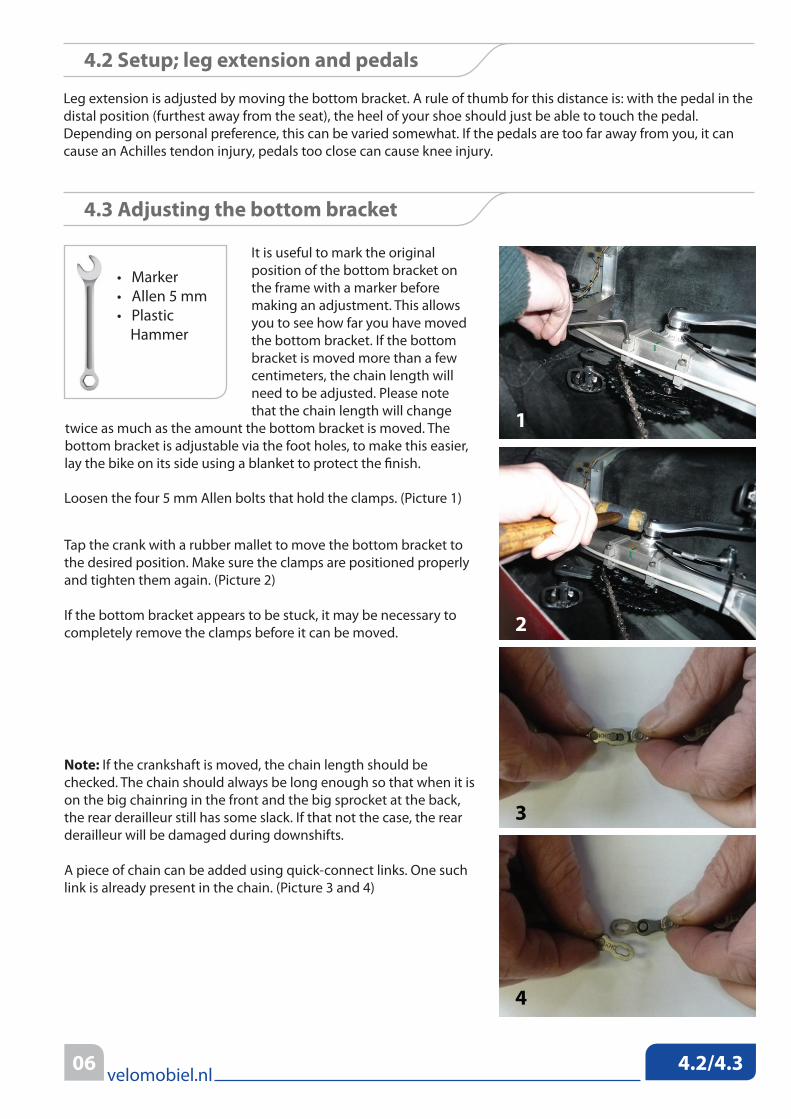
Loosen the four 5 mm Allen bolts that hold the clamps. (Picture 1)
Leg extension is adjusted by moving the bottom bracket. A rule of thumb for this distance is: with the pedal in the distal position (furthest away from the seat), the heel of your shoe should just be able to touch the pedal. Depending on personal preference, this can be varied somewhat. If the pedals are too far away from you, it can cause an Achilles tendon injury, pedals too close can cause knee injury.
It is useful to mark the originalposition of the bottom bracket onthe frame with a marker beforemaking an adjustment. This allowsyou to see how far you have movedthe bottom bracket. If the bottombracket is moved more than a fewcentimeters, the chain length willneed to be adjusted. Please note that the chain length will change
twice as much as the amount the bottom bracket is moved. Thebottom bracket is adjustable via the foot holes, to make this easier,lay the bike on its side using a blanket to protect the �nish.
4.2/4.3velomobiel.nl
1
• Marker• Allen 5 mm• Plastic Hammer
4.2 Setup; leg extension and pedals
4.3 Adjusting the bottom bracket
2
3
4
Tap the crank with a rubber mallet to move the bottom bracket tothe desired position. Make sure the clamps are positioned properlyand tighten them again. (Picture 2)
If the bottom bracket appears to be stuck, it may be necessary tocompletely remove the clamps before it can be moved.
06
Note: If the crankshaft is moved, the chain length should be checked. The chain should always be long enough so that when it is on the big chainring in the front and the big sprocket at the back, the rear derailleur still has some slack. If that not the case, the rear derailleur will be damaged during downshifts.
A piece of chain can be added using quick-connect links. One such link is already present in the chain. (Picture 3 and 4)

Brake AdjustersKnob to Adjust Derailleur
Front Shifter Brake Lever
Rear Shifter
Parking Brake ToggleTurn Signals
Horn button
5.1velomobiel.nl2 207
The controls you use most often when riding are all within easy reach on the tiller; brakes, gears, horn andturn signals. The switches to control the lights and computer are on the dashboard.
5.1 Tiller
5. Operation
The Quest/Strada/XS is steered with a rotating tiller. It can be moved up and down or left and right without a�ecting the steering. Twisting the tiller will turn your bike. You can hold the tiller in a position that you �nd comfortable.
Parking Brake EngagedParking Brake Releaseda b
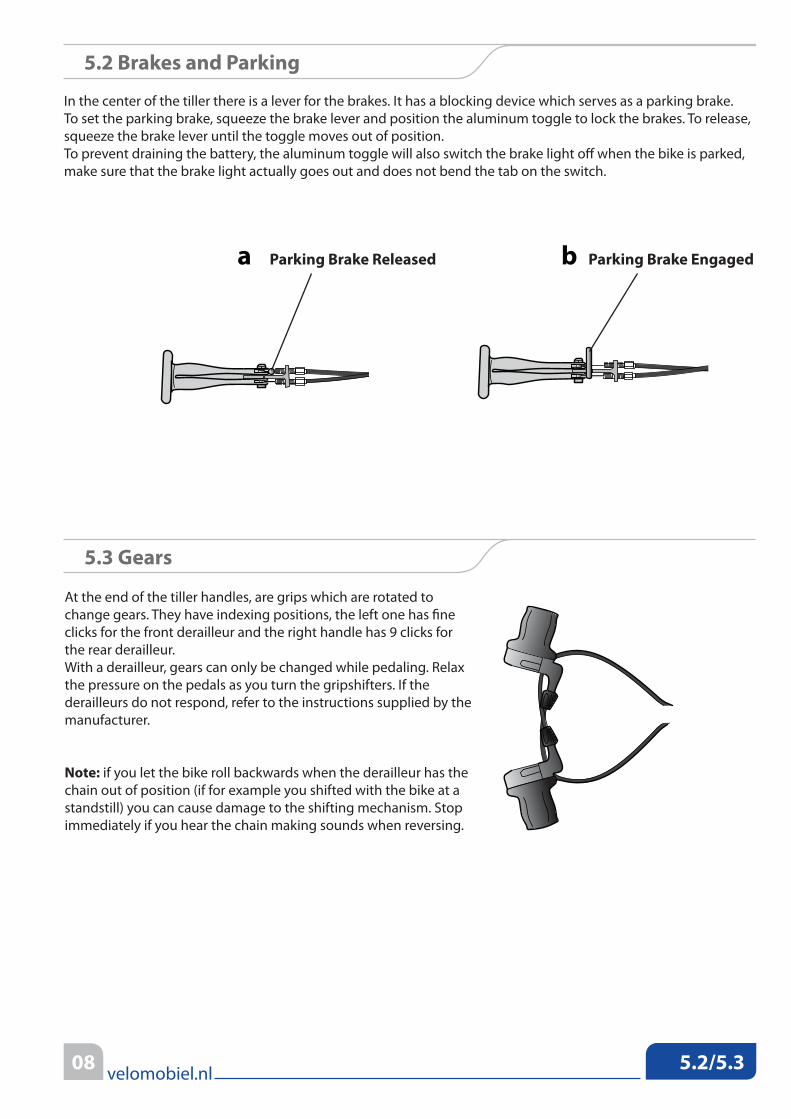
In the center of the tiller there is a lever for the brakes. It has a blocking device which serves as a parking brake. To set the parking brake, squeeze the brake lever and position the aluminum toggle to lock the brakes. To release, squeeze the brake lever until the toggle moves out of position.To prevent draining the battery, the aluminum toggle will also switch the brake light o� when the bike is parked, make sure that the brake light actually goes out and does not bend the tab on the switch.
At the end of the tiller handles, are grips which are rotated to change gears. They have indexing positions, the left one has �ne clicks for the front derailleur and the right handle has 9 clicks for the rear derailleur.With a derailleur, gears can only be changed while pedaling. Relax the pressure on the pedals as you turn the gripshifters. If the derailleurs do not respond, refer to the instructions supplied by the manufacturer.
Note: if you let the bike roll backwards when the derailleur has the chain out of position (if for example you shifted with the bike at a standstill) you can cause damage to the shifting mechanism. Stop immediately if you hear the chain making sounds when reversing.
5.2/5.3velomobiel.nl2 208
5.2 Brakes and Parking
5.3 Gears
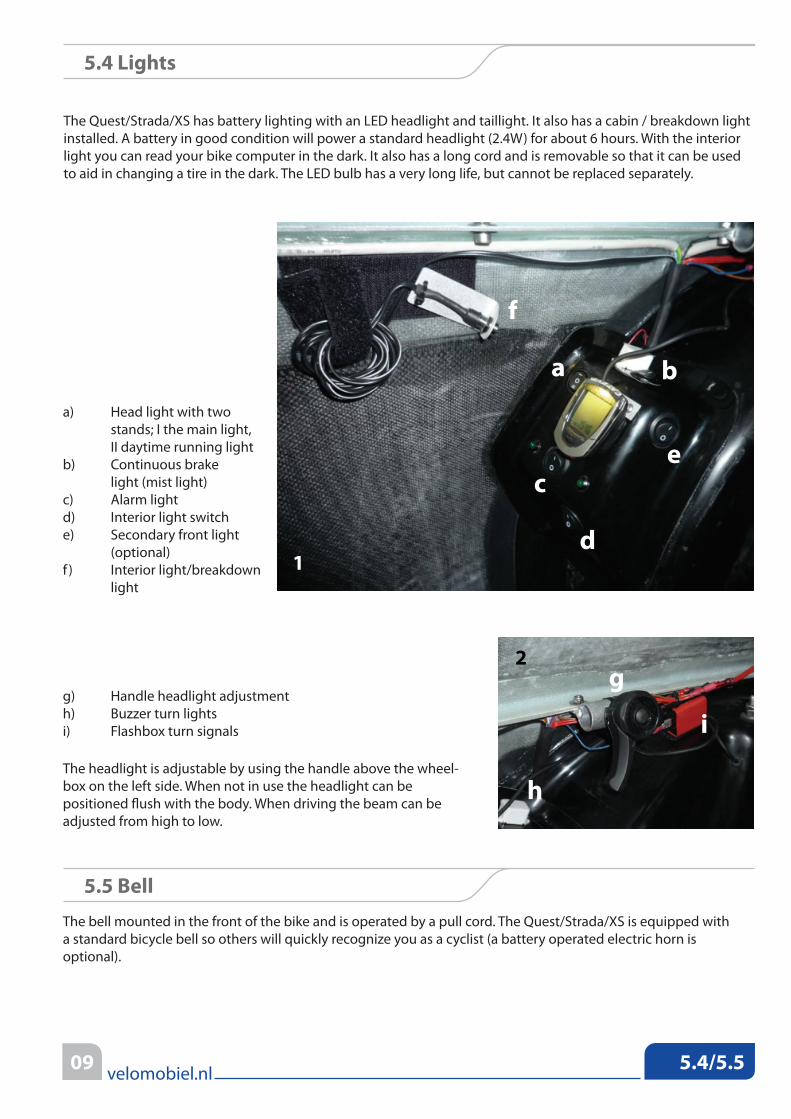
The Quest/Strada/XS has battery lighting with an LED headlight and taillight. It also has a cabin / breakdown light installed. A battery in good condition will power a standard headlight (2.4W) for about 6 hours. With the interior light you can read your bike computer in the dark. It also has a long cord and is removable so that it can be used to aid in changing a tire in the dark. The LED bulb has a very long life, but cannot be replaced separately.
a) Head light with two stands; I the main light, II daytime running lightb) Continuous brake light (mist light)c) Alarm lightd) Interior light switche) Secondary front light (optional)f ) Interior light/breakdown light
The bell mounted in the front of the bike and is operated by a pull cord. The Quest/Strada/XS is equipped witha standard bicycle bell so others will quickly recognize you as a cyclist (a battery operated electric horn is optional).
The headlight is adjustable by using the handle above the wheel-box on the left side. When not in use the headlight can be positioned �ush with the body. When driving the beam can be adjusted from high to low.
g) Handle headlight adjustmenth) Buzzer turn lightsi) Flashbox turn signals
5.4/5.5velomobiel.nl
5.4 Lights
1
a b
c
d
e
f
2
5.5 Bell
209
g
h
i

Refer to the cycle computer’s factory (OEM) manual for setup instructions. The magnet for the bike computer is in the left front wheel, the sensor is on the left strut.
Below is a table with the circumferences of a few tires (in cm):Schwalbe Kojak 35 149Schwalbe Marathon Plus 47 155Schwalbe Marathon Racer 150 Schwalbe Stelvio 146Schwalbe Durano 146Vredenstein Perfect Moiree 35 150Vredenstein Perfect Moiree 47 154.5F-Lite 157.5
The Quest/Strada/XS has a lid made of thermo-formed foam.
When the weather is nice it can be driven without the cover. The lid can be stored inside the bike in several places. It can be placed behind the seat (Picture 1 &2), or positioned in the front of the fairing, above your knees. (Picture 3) Two Velcro strips are located above the knee area to hold the lid in its storage position. It can also be folded and then placed next to the rear wheel well. Do not leave the lid folded or rolled up for a long time as it could be permanently deformed.
5.6/5.7velomobiel.nl
5.6 Cycle Computer
5.7 Foam Cover
210
1
2
3
The lid has 5 Velcro straps (XS has 6) attached to the bike. In strong winds it is recommended to secure all �ve. When used in the city, secure only the 2 side straps so that you may release the lid and stick your hand out to signal.
If you park your bike you can fasten the cover over the cockpitentrance.
6.1velomobiel.nl2 211
Because the Quest/Strada/XS behaves quite di�erently from the standard bicycle that most cyclists are accus-tomed to, we recommend you take the time to relax and explore the riding characteristics of the bike.
The Quest/Strada/XS has a fast aerodynamic shape. Depending on the wind, you will be around 25% faster than you would be on a road bike. If you stop pedaling, the Quest/Strada/XS will coast a long distance. Accelerating takes more energy. An “e�cient” driver adjusts his or her driving accordingly, seeking the ideal line in a turn. Naturally you need to be careful when taking turns so that you can still see the road ahead of you.
6.1 Place in tra�c
6. Driving the Quest/Strada/QuestXS
In most locations a Quest/Strada/XS is considered a bicycle and is subject to the same road rules as a bicycle. Being a tricycle, the Quest/Strada/XS requires some special considerations. It is only 76 cm (30”) wide at the wheels and will therefore usually �t within most bike paths and cycle lanes.
It is your responsibility to consult the laws for your locality and to be sure you comply with all local, state and federal regulations.
The energy necessary for acceleration is directly proportional to weight. The Quest/Strada/XS is about twice as heavy as a sport bike with a rack and lights. However, this does not mean that you need twice as muchenergy to reach a certain speed. You must consider the total weight of bike and rider together. In a Quest/Strada/XS, a rider weighing 80 kg would only weigh 16% more than the same rider on a sport bike. As thespeed increases the Quest/Strada/XS bene�ts from its aerodynamic shape and has the advantage of lower airresistance. At speeds above 30 km/h (18.75 mph) you can accelerate faster than a road bike.
6.1 Special precautions
Winter Time: Although a trike is potentially safer on icy roads than a two wheeled bicycle, there are still dangers. If you slide sideways from an icy patch to a dry part of the road, it is possible to �ip over.
Winds: Strong winds will a�ect your Quest/Strada/XS. Side winds can actually have a sail like e�ect and propelyou along making cycling easier. But strong winds can be dangerous, particularly as you turn into the wind,so exercise caution.
7.1/7.2/7.3velomobiel.nl2 212
Quest / Strada / XS drivers riding in tra�c often get the criticism that they are hard to see. We believe that some-one who doesn’t see a brightly colored object nearly 3 meters long is just not looking. Such comments from drivers often arise from the fact that the Quest/Strada/XS is an unknown phenomenon and will attract attention.
However, in some situations you can actually be less visible. If you appear from behind (parked) cars, bushes orfences, people may not see you. Another danger is that people may misjudge your speed. It is a good ideato keep this in mind as you encounter certain situations. Avoiding an accident is better than claiming that youhad the right of way afterwards. Pay attention to whether others see you and make eye contact with your fellowroad users.
7.2 Visibility in the dark
7. Safety
Test the lights and the condition of the battery regularly. Adjust your speed to match visibility, particularly at night.
7.1 Visibility
7.3 Helmet
Always wear a helmet while cycling. Choose an approved model. A helmet with a �at back will be morecompatible with the headrest. In certain driving conditions you may �nd a visor to be a desirable feature.The Quest / Strada / XS comes standard with a rear view mirror installed. Some �nd a helmet mounted mirroruseful.
It is save to wear a helmet, your head is not protected by the body of the bike. Be aware that your rearwheel is the Achilles heel of your vehicle, a three wheeler may react �ercely when the rearwheel gets of track. A tire losing air rapidly or skidding on an icy spot can make you loose control. If the rearwheel gets caught in a rail or runs besides the pavement and suddenly jumps on the road again it may cause the bike to go sideways and than tip over. If one or two wheels get of the pavement slow down and very slowly steer it back on the road.

Work on key components such as suspension, steering, brakes and drive should be carried out with goodengineering practices. Improper repairs a�ect your safety. We recommend that you have your bikeinspected by a bike mechanic familiar with recumbent trikes every 10,000 km. If one is not available thenVelomobiel.nl or one of our dealer would be happy to assist a local bike shop with a bike check-up.Regular maintenance tasks include:• Adjusting the brakes• Maintaining proper tire inflation• Checking for broken or loose spokes• Lubricating the chain
Tires are a compromise between low rolling resistance, weight,durability and puncture resistance. Because your physical power islimited, a compromise has to be made, sacri�cing durability forlower weight and reduced rolling resistance.
All wheels on the Quest/Strada/XS are attached to the suspensionon only one side. This allows the tires to be changed withoutdismounting the wheels (picture 1).
You can support the bike on the tip of your toes to lift the wheel o�the ground (pictures 2 and 3). You can also very gently lay the bikeon its side on grass or on a blanket for a short period of time.
Be sure to find the cause of the flat tire (small rock in the tire, rimtape lying askew, thorn) or else it will cause another flat.
It is recommended (especially in the dark and / or rain) that youreplace both the tire and the inner tube. Once home you can comfortably check and repair the punctured tube and inspect the tire.
8.1/8.2velomobiel.nl
2
13
Keep the tires properly inflated. The tire manufacturer provides pressure information on the sidewall of the tire. Proper inflation will give lower tire rolling resistance and better handling. The correct pressure of the tires is the best achieved using a manual pump with pressure gauge. Also occasionally remove any bits of glass or stones that may have become embedded in the tires as these can cause flat tires.The front wheels on the Quest/XS are cambered for improved handling and will wear the tires slightly off center. Rotating the tires every 1,500 kilometers will increase their service life.
8.2 Punctures
8. Maintenance
8.1 Tires
1
3

3
2
1
Tire life is highly dependent on your driving style and the type of surface that you ride on. Quick or aggressive turns will increase tire wear, but so will driving daily on a winding path.
To determine alignment:• Set the wheels in the straight position.• Measure the distance between the wheels at the front and back, due to camber it is important you mea-sure at the same height.
You can make an alignment tool or purchase one by Velomobiel.nl (Picture 1). A long metal ruler can also be a simple tool for checking alignment.
The alignment of the wheels is very important for the life of the tires and the performance of the bike. Thefront wheels should run exactly parallel. Measuring the toe-in accurately should be done on a flat surface.
If the di�erence in the distance is more than 2 mm then you need toadjust the alignment or toe*.
Follow this procedure:• Loosen the locknut on the steering rod while you keep it from moving with a second wrench (Picture 2).• Loosen the retaining nut on the balljoint to remove it from the steering mechanism. The balljoint has a flat area right underneath the ball for a wrench. Use a thin wrench to keep the ball from turning while you loosen the retaining nut (Picture 3).• Pull the balljoint loose from the steering mechanism.• Turn the balljoint in or out in the required direction to make the rod shorter or longer.• Reassemble without tightening the nuts and measure again.• If the alignment is correct, tighten the locknut and the retaining nut.
Note: The balljoints are not meant to be disassembled.
* Front end alignment is generally referred to as Toe If the wheels are closer in the front than the back it iscalled Toe-in if they are closer together in the back it is called Toe-out. Target a front end alignment of 0 - 2mmof Toe-in. Toe out is not recommended.
8.3velomobiel.nl2 214
8.3 Tire Wear / front wheel alignment
• Wrench 10 mm• Wrench 10 mm• Wrench 8 mm• Wheel alignment tool

If you replace a spoke make sure it is as tight as the other spokes. Allspokes should be tight and have even tension. Loose spokes can move while driving and will soon break due to metal fatigue.
Wheel truing requires some experience. Using a wheel building stand with Quest/Strada/XS wheels will require an adapter because they are designed for wheels supported on both sides. These adapters are available from your local dealer.
The spokes that most frequently break, are the nine with the head on the outside of the inner hub �ange. On the Quest/XS, these spokes can be replaced without removing the wheel (on the Strada, the wheel is very easy to remove from the bike).
Follow these steps:• Unscrew the nipple and remove the broken spoke. (Picture 1)• Bend the new spoke slightly crooked. (Picture 2)• Insert the spoke through the hole in the flange by placing it in the tunnel for the steering mechanism. (Picture 3)• Twist the spoke between its neighbors, in the same manner as the others in the wheel.• Screw the nipple back on, first using a screwdriver and then with the spoke wrench. • If you tighten the new spoke to the same tension as the others, it is usually not necessary to true the wheel.
To replace other spokes in front or rear wheels, it is necessary to remove the wheel from the bike.
During fast turns the wheels are subjected to large lateral forces. Occasionally spokes may break. Check your wheels for broken or loose spokes. Quest/Strada/XS wheels have 36 spokes.
• spoke length front wheels Scho-thorst : 179 mm (for 70 mm drum) or 176 mm (for 90 mm drum)
• spoke length front wheels KHE (black): 163 mm (for 70 mm drum) or 158 mm (for 90 mm drum)• spoke length rear: 264 mm
Spaken
1
2
3
4
5
• Screwdriver • Spoke Wrench
8.4 Spokes
8.4velomobiel.nl2 215

Pull the computer with its holder from the tab on the wheel well and push the cable through the hole, into the inside of the wheel well. (Picture 2)Note: This step will not be necessary if your bike isequipped with a wireless computer.
Use the 8 mm wrench (a thin wrench will �t more easily) to keep theballjoint from turning and the 10 mm wrench to loosen the retain-ing nut. Remove the nut and separate the balljoint from the suspen-sion member.Note: The ball joints can not be disassembled. (Picture 3)
Remove the strut from the wheel well; it is now only attached to thebrake cable and the computer (unless wireless). Remove the rubberhubcap and loosen the wheel bolt with a 5 mm Allen, then pullout the axle. (Picture 4)
Removal of the Quest/XS front wheel, requires disassembly of the suspension as they come out together. This is not necessary in the Strada, so you can skip to Step 4.
Loosen the two M8 (using two 13 mm wrenches) nuts that are tightened against each other on the strut assembly (thin nut on top) and remove the rubber ring and washer. (Picture 1)
To remove the computer sensor from the strut, cut the cable ties.(Picture 5) Again, this step is not necessary for a wireless computer.
Unhook the brake cable and the strut can be taken o� the bike. (Picture 6)
* available in Velomobiel.nl
1
2
3
4
5 6
• Wrench 13mm• Wrench 13mm• Wrench 8mm*• Gear Wrench 10mm*• Allen 5mm
8.5velomobiel.nl216
8.5 Removing a front wheel

Two M8 nuts are locked against each other at the end of the axleon the derailleur side.
Set the derailleur in the 9th gear. This places it in a position to clear the body as the wheel moves down. Then disconnect the wing nut at the top of the shock and let the rear wheel drop.
Loosen them using two 13 mm wrenches and remove themtogether with the thick washer.
Remove the derailleur cover with 3 mm Allen wrench.
The rear wheel is supported by three 6002ZZ bearings in the swingarm. A 15 mm diameter axle runs through the bearings and has the cassette and the wheel mounted on it. An M8 bolt holds the wheel to the hub and double M8 nuts retain the other side. The puller needed for disassembly comes with a new bike or it can be purchased from Velomobiel.nl or our dealers.The hole in the cartridge body is enlarged by Velomobiel.nl; a standard body will not �t.
8.6velomobiel.nl217
8.6 Removing the rear wheel
1
2
3
4
• Wrench 13 mm• Wrench 13 mm• Allen 3 mm• Allen 4 mm• Axel Puller

8.6velomobiel.nl218
Thread the axle puller onto the end of the axle.
Pull the axel out of the wheel hub and bearings by turning the nuton the puller. With the axle halfway out, you can remove the wheelin a downwards direction. If you pull the axle out further, thecassette can also be removed.
To Reassemble: Put some grease on the shaft and place a nut onthe end. Re�t by gently tapping with a rubber mallet and rotating it.Make sure that everything is aligned �rst. Tighten the two nutsagainst each other and do not forget the thick washer. Tighten theM8 bolt on the wheel side, but not so tight that the threaded rodwith the two nuts on the other side is damaged over time.
Make sure that the splines on the hub fully engage into the cassettebody.
6
7
8
9
Then remove the M8 bolt with thick washer on the wheel side. Ifnecessary, keep the shaft from turning with a 4mm Allen on thederailleur side. 5

The headlight is adjustable by using the handle inside your velomo-bile.
The Quest/Strada/XS has 6V 4,1 Ah NiMh battery. The battery will give you a theoretical 24,6 Watt hour, the B&M Lumotec IQ Cyo headlight consumes 2,4W thus the battery will last 10 hours with the headlight alone.
But you also have :Taillight - 0.2 WRunning lights - 0.24 WBrake light - 1WInterior lighting - 0.12 W
As an accessory you may have:Indicator lights - 1W each LEDHorn - 9WThe battery:• In cold weather conditions or with a older battery you will not get the theoretical performance.• The NiMh battery can be charged at any time and doesn’t have to be depleted before charging like a NiCd battery.• Never store the battery for an extended period of time in a discharged condition; this will shorten its life span.• When the charger is charging the red light is on, if the light turns green it is fully charged, this may take up to six hours.• The charger may be connected to the battery for a longer period of time it will shut off automatically when the battery is fully charged.• Charging time for a discharged battery is approximately 5 hours.• It is not good for a battery to fully discharge it, charge it as soon as the lights begin to dim.• If there is a short circuit in the wiring, the fuse will blow. Do not bypass the fuse without first fixing the short, as even a small battery can cause a fire.• Even if a battery is not used it will discharge over time.
The struts should be lubricated once a year. There is a vent hole at the very top of the strut. Ten to twenty drops of light oil should be sufficient. The oil will sit inside strut and after several hours of driving, it will lubricate the sliders.
Squeaking and creaking noises should disappear. Overuse of oil may reduce the frictional damping of the shock over time.
8.8 Strut Lubrication
8.7velomobiel.nl2 219
8.7 Light system

1
2
3
4
If the brakes are not working smoothly or continue to stick after you release them, it's time to lubricate the bearings surfaces and pivots on the brake mechanism. Use a thin oil or Te�on spray with high penetrating power.
It is possible to lubricate the brake pivots without removing the wheel. Unscrew the wheel bolt from the axle and remove it together with the thick washer (picture 1).
Push the wheel slightly and then lubricate the lever shaft from the inside and outside. Push the lever back and forth several times and lubricate again, repeat this until the lever moves smoothly again. Put a drop of oil between the pressure points of the brake shoes (picture 2 and 3).
Do not forget to lubricate the other pivot point (picture 4) and clean any spilled oil. Install the wheel and tighten the wheel bolt with thick washer securely.
Note: lubricate sparingly, there should be no oil on the brakeshoes!
Secure the locknuts with threaded locking compound or hairspray.
You can adjust the brakes by turning the adjusters in the brake levers. To check the brake after tightening the cable you can lift the bike on its side and turn the wheel by hand. A quickway to make sure that both brakes adjusted equally, is to set the parking brake and lift the rear of the bike. Swinging the rear left or right should take the same e�ort.
• Wrench 10 mm• Allen 5 mm
8.9velomobiel.nl2 220
8.9 Brakes
Brake CableAdjusters

4
Over time, play may develop in the plastic block for the universal-joint at the bottom of the steering mechanism. This can be remedied by adjusting the two bolts that go through it. Adjust one �rst then the other keeping in mind that each acts in a di�erent axis.
Note: The steering must be free to move, otherwise the lower terminals of the block may cause unwanted steering reactions.
The bolts are screwed in to the threaded aluminium forks the nut is for securing its position.
The chain should be lubricated occasionally. It can be done with Shimano oil we add to new velomobiles.
You can easily lubricate the chain on the bike by placing a wooden block underneath it to allow the rear wheel to turn. Remove the chain cover under the seat to access the chain. Apply lubricant to the chain as you move it to expose more chain.
Over time, the shifter cable may stretch a little and the shifting of the rear derailleur can become inaccurate. To compensate for this, turn the adjuster screws where the cable comes out of the gripshif-ters. You can do this while you ride the bike so that you can check the impact immediately.
Of course be very alert of tra�c. Alternately you can place a wooden block under the tunnel to lift the bike. Then you can adjust the derailleur while you “dry” cycle with the rear wheel o� the ground.
8.10 Chain / Derailleur
Derailleur adjustment
8.10/8.11velomobiel.nl2 221
8.11 Steering Joint

Demonteren voorwiel
velomobiel.nl
9. Electric scheme 2013
22 9.
HeadlightB&M Lumotec IQ Cyo
Interior light/breakdown light
Daytimerunning light
Horn Button
Horn
Rk 6V 11/2
49
49a
Battery NiMh 6V 4,1Ah
Fuse 10Ah
Flashbox turn signals
Buzzer turn lights
Brake Lights Switch
Brake LightTurn Signals Switch
Headlight
Headlight
Turn Signals
Turn Signals

For questions, remarks, cycle parts and maintenance contact us or our dealers:
Velomobiel.nlDe Vliet 6NL-8253 PB DrontenTel: 0031 (0)321 332717Fax: 0031 (0)321 333638E-mail: [email protected]
ACEWeurden 607101 NL WinterswijkTel: 0031 (0)543 530905Email: [email protected]
ElanMeijhorst 70176537 EN NijmegenTel: 0031 (0)24 3430854Email: [email protected]�etsen.com
Sinner BikesStavangerweg 159723 JC GroningenTel: 0031 (0)50 5493415Email: [email protected]
For more information visit our website: www.velomobiel.nlThis manual was translated with the help of bluevelo.com
EMvelomobielEtienne StienenTel: +32 (0) 474 986 348Email: [email protected]
Velomobiles Composite Design Elmar Maier Hammersteinpark Gebäude 104 29392 Wesendorf, DEmail: [email protected]://velomobiles.de
Velomobilcenter.dkSandbakken 9 Toppevad3660 Stenløse, DKEmail: [email protected] http://velomobilcenter.dk
CyclesJV Velomobiles Center Le MansJoël Vincent11-15 rue du champ de Mars72100 Le Mans, FTel: 0033 (0)6 14 48 37 35Email: [email protected]
velomobiel.nl
10. Dealers - Contacts
23
The Netherlands
Belgium Germany
Denmark France
Bluevelo291 Pretty River Parkway North, Unit 1Collingwood, OntarioL9Y 4J3Tel: 416-871-2349Email: [email protected]://www.bluevelo.com
Canada