user guide - july 2015 - peerless network · 2020-04-07 · user guide - july 2015 . ... to log...
TRANSCRIPT

User Guide - July 2015

Peerless Network | Confidential 1
Table of Contents Getting Started ............................................................................................................................................................................. 2
Dashboard .................................................................................................................................................................................... 3
Request Types ............................................................................................................................................................................... 4
New Number Request .............................................................................................................................................................. 4
Select Numbers ..................................................................................................................................................................... 4
Apply Features ...................................................................................................................................................................... 5
E911 Address Validation ....................................................................................................................................................... 6
Order Receipt Confirmation ................................................................................................................................................. 6
Order Detail and History ....................................................................................................................................................... 7
Port In Request ......................................................................................................................................................................... 8
Order Feature Selection ....................................................................................................................................................... 9
Order Decomposition ........................................................................................................................................................... 9
Supplement......................................................................................................................................................................... 10
Order Status ........................................................................................................................................................................ 10
Change Order .......................................................................................................................................................................... 11
Disconnect Order .................................................................................................................................................................... 13
Reports ....................................................................................................................................................................................... 14
TN Inventory ........................................................................................................................................................................... 14
Porting Activity ....................................................................................................................................................................... 15
Admin Functions ......................................................................................................................................................................... 17
Entity Management ................................................................................................................................................................ 17
User Management .................................................................................................................................................................. 18
Edit Existing User ................................................................................................................................................................ 18
Create New User ................................................................................................................................................................. 19

Peerless Network | Confidential 2
Getting Started
To log into ANImate, go to https://animate.peerlessnetwork.com and enter your Email ID and Password.
By accessing and using ANImate, you accept the terms of the End User License Agreement.
To modify user settings, click your User Name to access your profile. To sign out of ANImate,
click the Sign Out icon in the search bar in the upper portion of the application.
The Profile Management section allows you to modify your time zone, update your password and set email notifications via
the Global Notifications section below.
Global Notifications are email notifications sent to users
based on specific order milestones or statuses. Entity
Administrators are responsible for establishing which
notifications users will receive and users have the
option to set the notification status to Active or Inactive
in their profile. See the Admin section to identify how
to set up Global Notifications for a specific user’s orders
or Global Notifications for all orders.
This application is optimized for Chrome.
Firefox and IE 10 or 11 browsers are also supported.

Peerless Network | Confidential 3
Dashboard The dashboard provides users with the ability to create and view orders, receive alerts, generate reports, view the EULA
and user guides. Additionally, Administrators will have Entity and User Management functions enabled.
Orders can be initiated by selecting the “Order” drop down menu in the “Dashboard” menu bar or by selecting the order
type in the “Create New Order” bar.
All in-process orders are accessible via the “Orders” or “Order By Status” tab. Closed orders are accessible via the “Closed
Orders” tab. All order lists are sortable and may be filtered by using the “Filter By” section. A CSV can be downloaded by
clicking the icon.
The “Global Search” option at the top right corner of the application, enables users to search for any phone number, order
number or PON associated to their account.
Alerts are informational announcements generated by ANImate. Urgent alerts are those generated because of a
provisioning failure within the application. Provisioning failures can be resubmitted or ignored by accessing the order link.
To remove the “Alert Notification”, simply click on the “Clear” button to the right of the notification. Provisioning failures
should be resolved prior to clearing the “Alert Notification”.

Peerless Network | Confidential 4
Request Types
New Number Request From the “Dashboard”, select “Order”, “New Number” or click on the “New Number” button.
Select Numbers
If you are unable to find the desired geographic attributes or quantity of TNs while searching the available TN inventory,
you may create an Exception Request by clicking the “Create Exception” button.
At a minimum, you must select either LATA, Location or Rate Center to perform
a New Number search. All geographic attributes and NPA/NXX values are
dynamic and will filter the available inventory based on your selections.
Enter the Quantity of requested TNs and Consecutive #s, if a range is being
requested. The Consecutive #s value must be a multiplier of the Quantity
requested. For example, if you enter a quantity of 20 and Consecutive #s as 5,
you are telling the application that you are requesting 4 ranges of 5 numbers
each.
The Vanity Digits value represents the last four digits of a TN and will either
search for a match or search for a match as the leading TN in a range.
If ANImate is unable to find a range of TNs in Peerless’ Standard Category of TN
inventory, it may ask you if you would like to enhance your search. An
Enhanced Search may create the desired range by including one or more vanity
numbers. By accepting a range created with the use of vanity numbers, you are
accepting the associated rate elements for vanity numbers according to your
agreement with Peerless Network.
Click the “Search” button after selecting your geographic TN attributes and the
desired quantity.
PON is an optional field for New Number Requests
An exception request should include a detailed description of what type of
numbers you are looking for that are not currently available in Peerless
Network’s inventory. A Peerless Network representative will review the request
and respond to the request via email. Please include State, LATA, Rate Center
and desired quantity in your request.
Peerless Network | Confidential 5
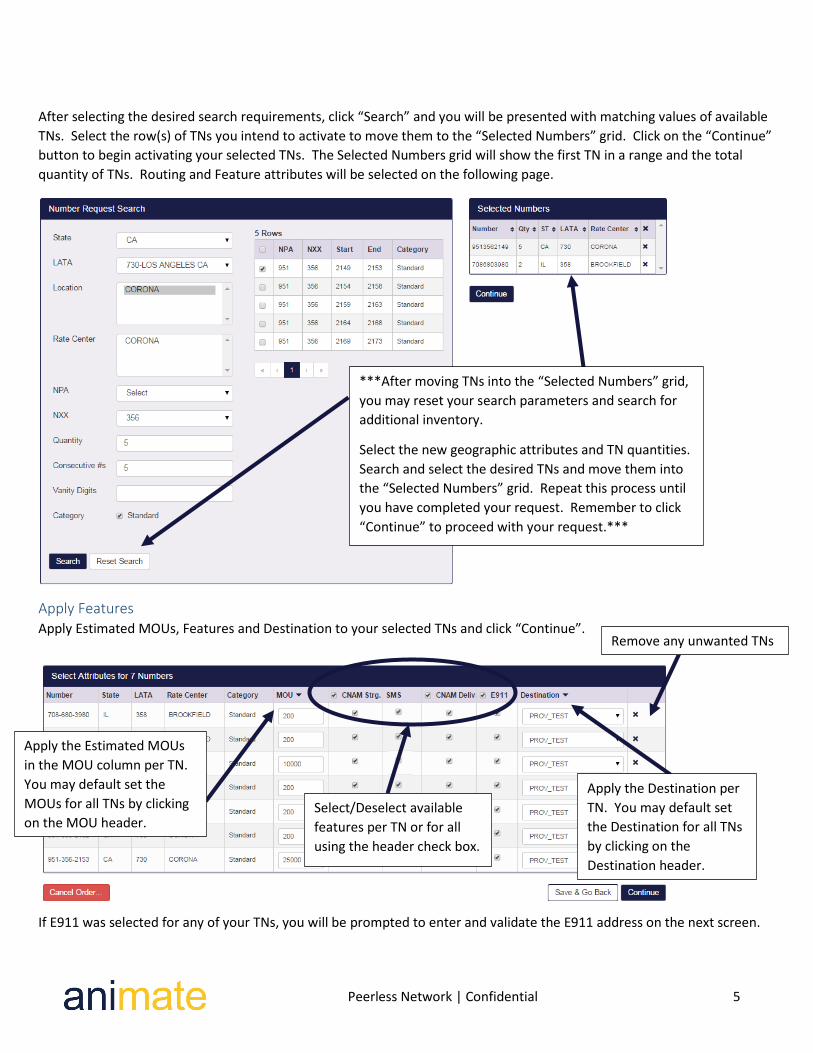
After selecting the desired search requirements, click “Search” and you will be presented with matching values of available
TNs. Select the row(s) of TNs you intend to activate to move them to the “Selected Numbers” grid. Click on the “Continue”
button to begin activating your selected TNs. The Selected Numbers grid will show the first TN in a range and the total
quantity of TNs. Routing and Feature attributes will be selected on the following page.
Apply Features Apply Estimated MOUs, Features and Destination to your selected TNs and click “Continue”.
If E911 was selected for any of your TNs, you will be prompted to enter and validate the E911 address on the next screen.
Apply the Estimated MOUs
in the MOU column per TN.
You may default set the
MOUs for all TNs by clicking
on the MOU header.
Apply the Destination per
TN. You may default set
the Destination for all TNs
by clicking on the
Destination header.
Select/Deselect available
features per TN or for all
using the header check box.
Remove any unwanted TNs
***After moving TNs into the “Selected Numbers” grid,
you may reset your search parameters and search for
additional inventory.
Select the new geographic attributes and TN quantities.
Search and select the desired TNs and move them into
the “Selected Numbers” grid. Repeat this process until
you have completed your request. Remember to click
“Continue” to proceed with your request.***
Peerless Network | Confidential 6
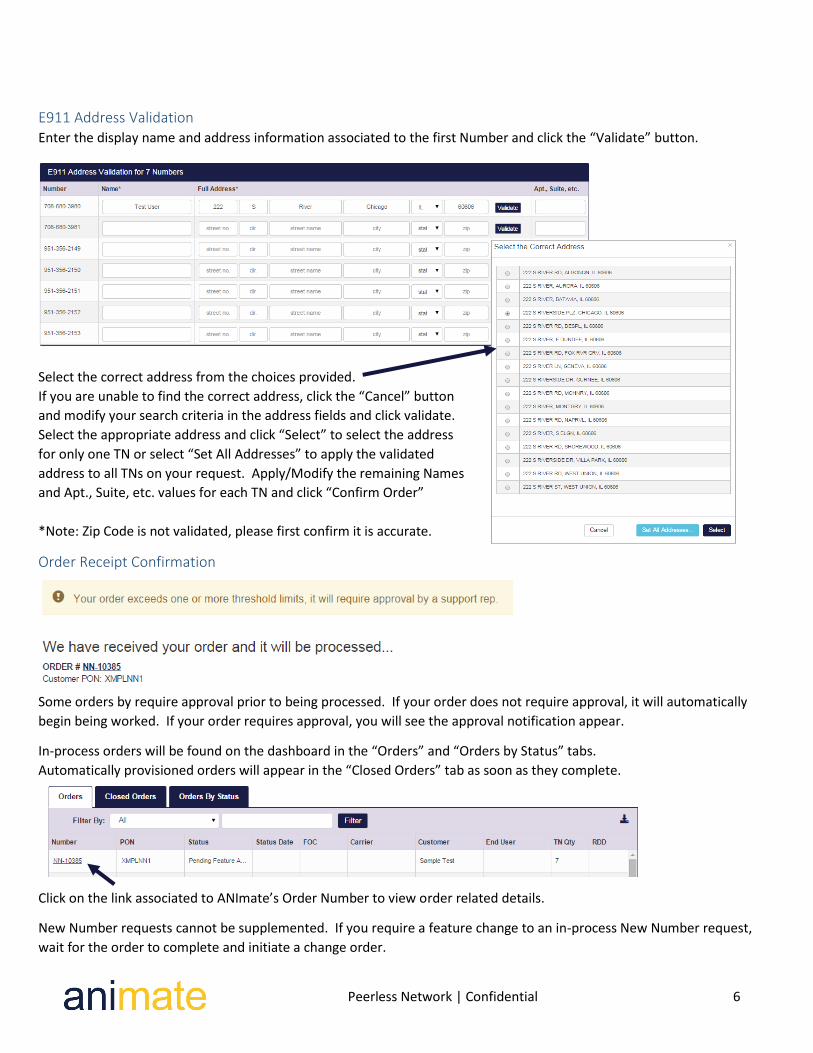
E911 Address Validation Enter the display name and address information associated to the first Number and click the “Validate” button.
Select the correct address from the choices provided.
If you are unable to find the correct address, click the “Cancel” button
and modify your search criteria in the address fields and click validate.
Select the appropriate address and click “Select” to select the address
for only one TN or select “Set All Addresses” to apply the validated
address to all TNs on your request. Apply/Modify the remaining Names
and Apt., Suite, etc. values for each TN and click “Confirm Order”
*Note: Zip Code is not validated, please first confirm it is accurate.
Order Receipt Confirmation
Some orders by require approval prior to being processed. If your order does not require approval, it will automatically
begin being worked. If your order requires approval, you will see the approval notification appear.
In-process orders will be found on the dashboard in the “Orders” and “Orders by Status” tabs.
Automatically provisioned orders will appear in the “Closed Orders” tab as soon as they complete.
Click on the link associated to ANImate’s Order Number to view order related details.
New Number requests cannot be supplemented. If you require a feature change to an in-process New Number request,
wait for the order to complete and initiate a change order.

Peerless Network | Confidential 7
Order Detail and History The below order example depicts a standard closed New Number Request.
A detailed description
of order related
activities/history.
List of TNs, geographic
attributes, features and
routing.
Order Summary,
including dates, users
and PON.

Peerless Network | Confidential 8
Port In Request From the “Dashboard”, select “Order”, “Port In” or click on the “Port In” button.
Required fields are indicated with an “*”.
After filling in all required fields, click the “Continue” button. ANImate will not allow you to continue without populating all
required fields. After clicking “Continue”, ANImate will analyze the State, LATA and Rate Center information on your order
and ask you to provide the estimated MOU per TN, features and destination.
If initiating a Partial
Port request and you
are porting the ATN
(BTN), you must
indicate a replacement
ATN from one of the
TNs your end user is
leaving with their
current carrier.
Customer PON must
be a unique value
Order initiator’s
information
End User information
as it appears on their
Invoice/CSR or CSR if
associated to a
reseller with the
current provider.
Key in or copy and paste TNs to
be ported in one column
without dashes or spaces.
Alternatively, upload a CSV of
the list of TNs in a single
column without a header row.
Any TNs you require
to be disconnected
with the current
carrier should be
listed here.
Add LOAs or Invoice
copies here.

Peerless Network | Confidential 9
Order Feature Selection All TNs are required to have an estimated MOU populated. In addition to the MOUs, select your desired features and the
destination the TNs should route to once ported. If you requested E911, you will be prompted to perform an E911 address
validation (see example in New Number workflow). Click “Continue” to proceed with your order.
Order Decomposition ANImate will decompose your initial order into one or multiple orders based on current carrier. Peerless must submit LSRs,
at a minimum, by carrier. It is possible that Peerless will further decompose your order by individual account numbers, if
your requested TNs are associated to different accounts with the current provider(s).
The status of pending orders can be found in the dashboard under the “Orders” or “Orders by Status” tabs.
To view the order details, click on the order number hyperlink in the dashboard. Once on the order details page, you may
add additional attachments, add notes, view related orders from the decomposition process or initiate a supplement.
If you wish to remove
one or multiple TNs
from your request,
click the “x” next to
each TN.
Confirm each
individual order or
click the “x” to
remove an order.
If your initial request was
decomposed into multiple orders
and you require Peerless to
attempt to align the FOC date,
please select “FOC Date Sync”.
To submit your
order(s), click on
the “Confirm
Orders” button.
Please take note of
ANImate’s order
number(s).

Peerless Network | Confidential 10
Supplement
To initiate a supplement request, find and click your order from the dashboard, or use the global search option at the top of
the application to take you to the order details page. In the upper right corner of the order will be a drop down menu with
three supplement options. Select the appropriate option and click the “Supplement” button.
Selecting “All Other” will take you to the initial Port In Order page. After making
your necessary modifications, you will be prompted to confirm your feature settings
and your order will again go through the decomposition process.
In the event that Peerless identifies any issues with your request, your request will either be placed in “Clarification” or
“Rejected” status. An order that is clarified back to you, must be supplemented to have the order proceed. An order that is
rejected, must be resubmitted with a new request.
Order Status
Pending CSR
Peerless will either submit a request for a CSR with the current provider, or continue processing the order without
needing to request a CSR.
Pending LSR
Peerless has confirmed order details and will issue the LSR to the current provider.
Pending FOC
Peerless has issued the LSR and is awaiting a FOC, Clarification or Rejection from the current provider.
Clarification Requested/Rejected
Depending on the response from the current provider, Peerless may need to request additional information. You
will be required to supplement your order for Peerless to proceed. Detailed information on the clarification or
rejections will be found in the notes section of your order. If an order is Rejected, it must be resubmitted as a new
request.
FOC Received
A FOC Date and Time has been confirmed.
Pending NPAC Activation
TNs have been loaded in Peerless Network’s switch and are ready to be activated in the NPAC.
TNs Activated
TNs have been activated in the NPAC and some requested features are still being implemented.
Closed
All porting and provisioning of your request has been completed.
Select “Cancel” to cancel your
request.
Select “Change Due Date” to modify
your requested due date.
Select “All Other” to modify any
aspect of your request, including
adding or removing TNs.
Peerless Network | Confidential 11
Change Order
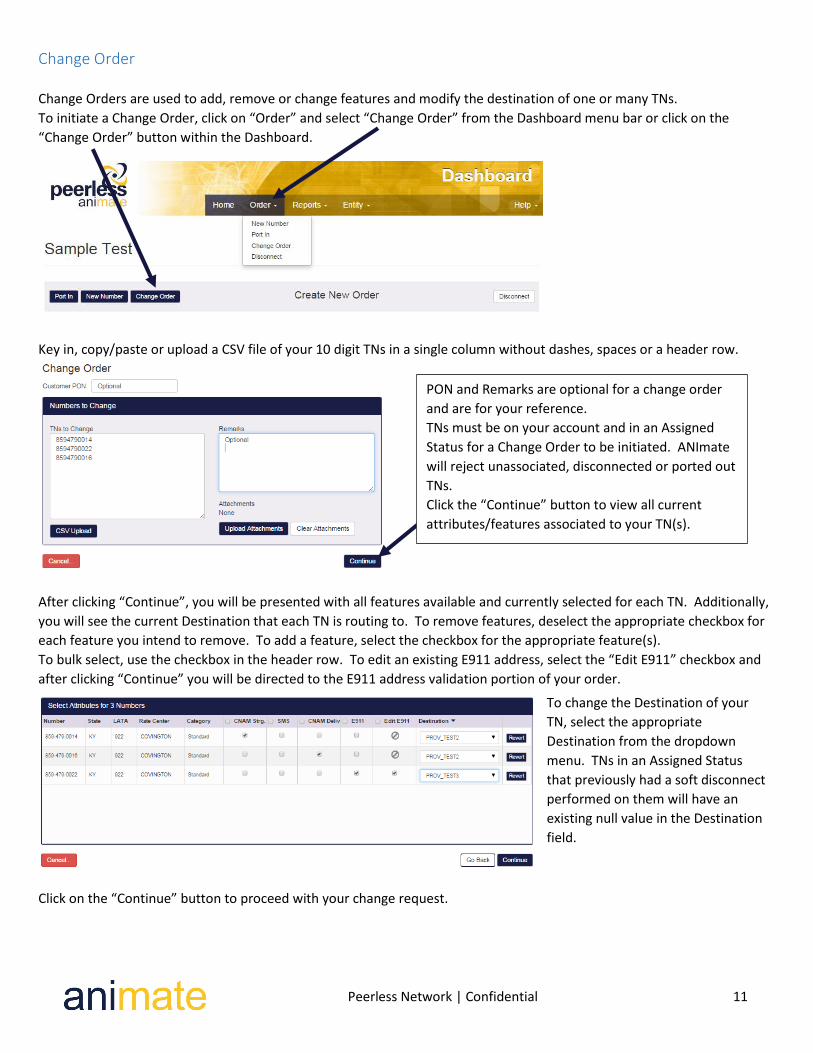
Change Orders are used to add, remove or change features and modify the destination of one or many TNs.
To initiate a Change Order, click on “Order” and select “Change Order” from the Dashboard menu bar or click on the
“Change Order” button within the Dashboard.
Key in, copy/paste or upload a CSV file of your 10 digit TNs in a single column without dashes, spaces or a header row.
After clicking “Continue”, you will be presented with all features available and currently selected for each TN. Additionally,
you will see the current Destination that each TN is routing to. To remove features, deselect the appropriate checkbox for
each feature you intend to remove. To add a feature, select the checkbox for the appropriate feature(s).
To bulk select, use the checkbox in the header row. To edit an existing E911 address, select the “Edit E911” checkbox and
after clicking “Continue” you will be directed to the E911 address validation portion of your order.
Click on the “Continue” button to proceed with your change request.
PON and Remarks are optional for a change order
and are for your reference.
TNs must be on your account and in an Assigned
Status for a Change Order to be initiated. ANImate
will reject unassociated, disconnected or ported out
TNs.
Click the “Continue” button to view all current
attributes/features associated to your TN(s).
To change the Destination of your
TN, select the appropriate
Destination from the dropdown
menu. TNs in an Assigned Status
that previously had a soft disconnect
performed on them will have an
existing null value in the Destination
field.

Peerless Network | Confidential 12
If you requested to add an E911 record to a TN(s) or update an existing E911 record, you will need to add/update an
address and validate it before being able to complete your change order. For existing E911 addresses, you will need to click
on the “Edit” button and for new E911 records, you will just need to key in the new address and click on “Validate”.
Click on the “Confirm Order” button to complete your change order.
Your change order has been received and can be viewed by clicking on the Order# hyperlink or from the dashboard.
Destination and CNAM Delivery changes should take place in near real-time. SMS updates are processed nightly and CNAM
Delivery updates will be provided via the orders status.
After clicking validate, select
the correct address and click
the “Select” button.
*Note: Zip Code is not
validated, please first confirm
it is accurate.
Peerless Network | Confidential 13
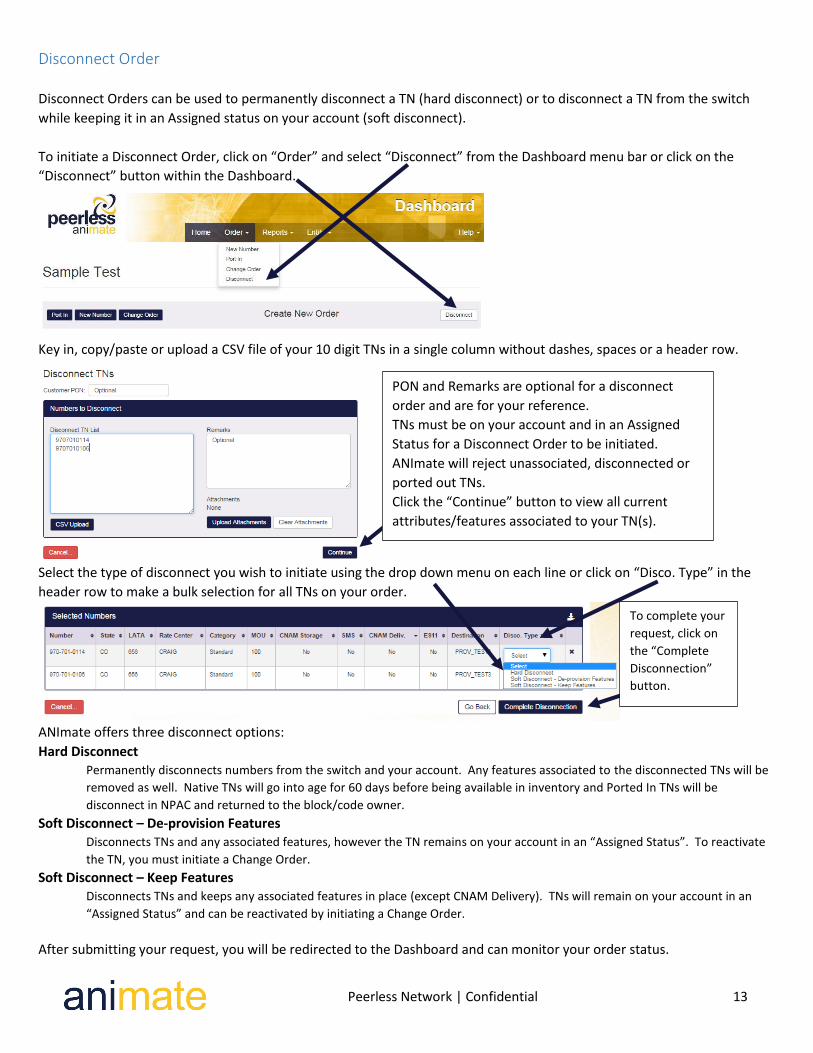
Disconnect Order
Disconnect Orders can be used to permanently disconnect a TN (hard disconnect) or to disconnect a TN from the switch
while keeping it in an Assigned status on your account (soft disconnect).
To initiate a Disconnect Order, click on “Order” and select “Disconnect” from the Dashboard menu bar or click on the
“Disconnect” button within the Dashboard.
Key in, copy/paste or upload a CSV file of your 10 digit TNs in a single column without dashes, spaces or a header row.
Select the type of disconnect you wish to initiate using the drop down menu on each line or click on “Disco. Type” in the
header row to make a bulk selection for all TNs on your order.
ANImate offers three disconnect options:
Hard Disconnect Permanently disconnects numbers from the switch and your account. Any features associated to the disconnected TNs will be
removed as well. Native TNs will go into age for 60 days before being available in inventory and Ported In TNs will be
disconnect in NPAC and returned to the block/code owner.
Soft Disconnect – De-provision Features Disconnects TNs and any associated features, however the TN remains on your account in an “Assigned Status”. To reactivate
the TN, you must initiate a Change Order.
Soft Disconnect – Keep Features Disconnects TNs and keeps any associated features in place (except CNAM Delivery). TNs will remain on your account in an
“Assigned Status” and can be reactivated by initiating a Change Order.
After submitting your request, you will be redirected to the Dashboard and can monitor your order status.
PON and Remarks are optional for a disconnect
order and are for your reference.
TNs must be on your account and in an Assigned
Status for a Disconnect Order to be initiated.
ANImate will reject unassociated, disconnected or
ported out TNs.
Click the “Continue” button to view all current
attributes/features associated to your TN(s).
To complete your
request, click on
the “Complete
Disconnection”
button.
Peerless Network | Confidential 14
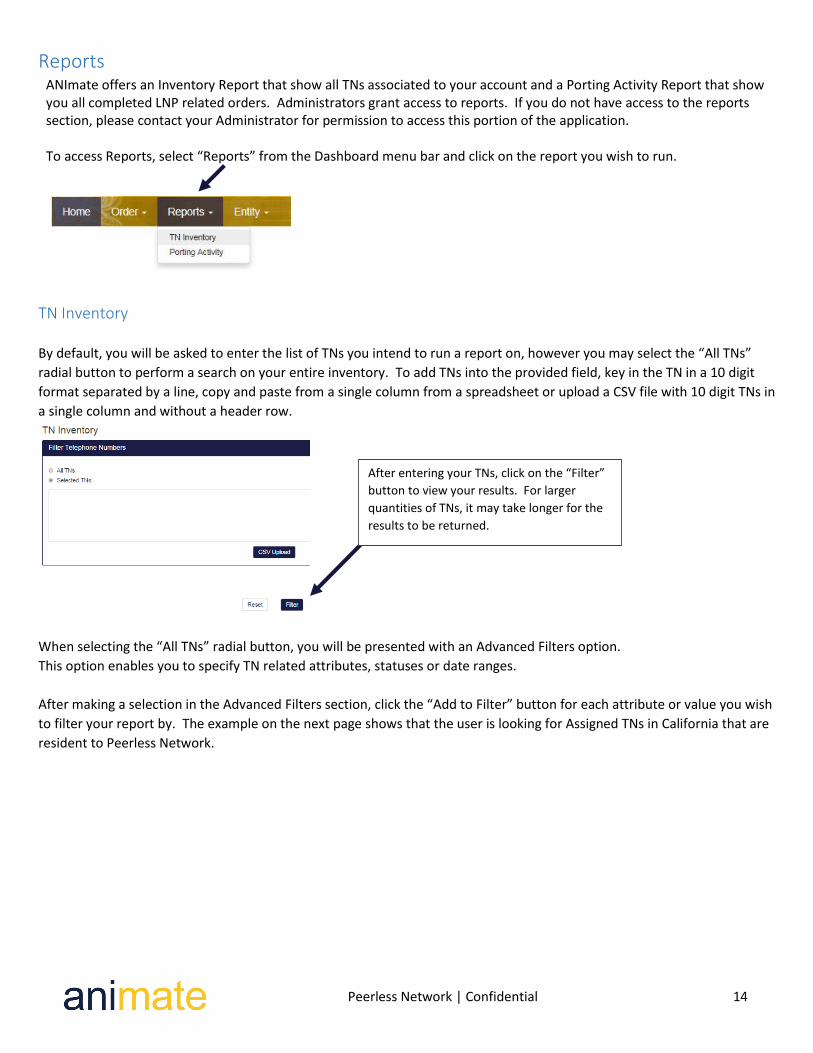
Reports ANImate offers an Inventory Report that show all TNs associated to your account and a Porting Activity Report that show you all completed LNP related orders. Administrators grant access to reports. If you do not have access to the reports section, please contact your Administrator for permission to access this portion of the application. To access Reports, select “Reports” from the Dashboard menu bar and click on the report you wish to run.
TN Inventory
By default, you will be asked to enter the list of TNs you intend to run a report on, however you may select the “All TNs”
radial button to perform a search on your entire inventory. To add TNs into the provided field, key in the TN in a 10 digit
format separated by a line, copy and paste from a single column from a spreadsheet or upload a CSV file with 10 digit TNs in
a single column and without a header row.
When selecting the “All TNs” radial button, you will be presented with an Advanced Filters option.
This option enables you to specify TN related attributes, statuses or date ranges.
After making a selection in the Advanced Filters section, click the “Add to Filter” button for each attribute or value you wish
to filter your report by. The example on the next page shows that the user is looking for Assigned TNs in California that are
resident to Peerless Network.
After entering your TNs, click on the “Filter”
button to view your results. For larger
quantities of TNs, it may take longer for the
results to be returned.
Peerless Network | Confidential 15
*If selecting a specific State, you have an option to choose a specific LATA and Rate Center.
Below is an example showing the results of your filtered report. To export your results to a spreadsheet, click the icon.
Porting Activity
By default, you will be asked to enter the list of TNs you intend to run a report on, however you may select the “All TNs”
radial button to perform a search on your entire inventory. To add TNs into the provided field, key in the TN in a 10 digit
format separated by a line, copy and paste from a single column from a spreadsheet or upload a CSV file with 10 digit TNs in
a single column and without a header row.
When selecting the “All TNs” radial button, you will be presented with an “Advanced Filters” option.
This option enables you to specify TN and Order related attributes, statuses or date ranges.
After entering your TNs, click on the “Filter”
button to view your results. For larger
quantities of TNs, it may take longer for the
results to be returned.
After adding your filter
parameters into the filter
box, click on the “Filter”
button to run your report.
Alternatively, you may
clear your filter options
by clicking the “x” next to
each item or clicking the
“Reset” button below.
Peerless Network | Confidential 16
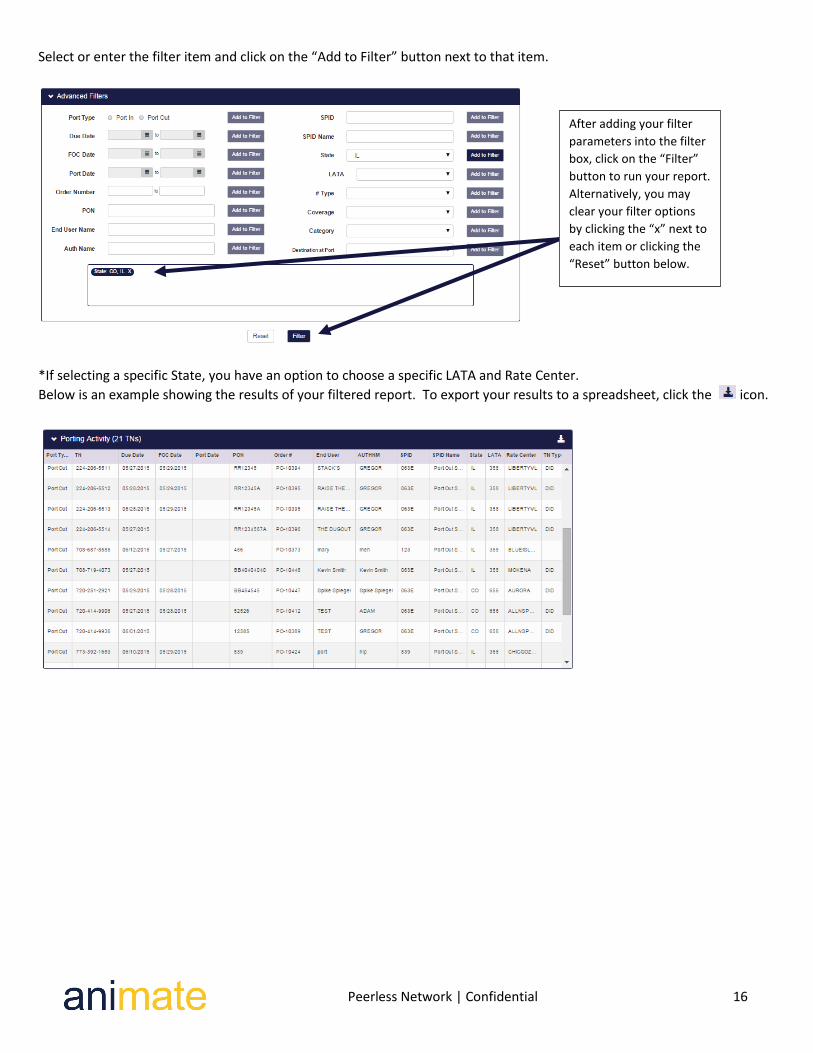
Select or enter the filter item and click on the “Add to Filter” button next to that item.
*If selecting a specific State, you have an option to choose a specific LATA and Rate Center.
Below is an example showing the results of your filtered report. To export your results to a spreadsheet, click the icon.
After adding your filter
parameters into the filter
box, click on the “Filter”
button to run your report.
Alternatively, you may
clear your filter options
by clicking the “x” next to
each item or clicking the
“Reset” button below.
Peerless Network | Confidential 17
Admin Functions Administrators will have exclusive access to their account settings (under Entity Management) and individual users’
permissions/portal access (under User Management). Each Entity is required to have at least one Administrator,
however Administrator privileges may be granted to multiple users.
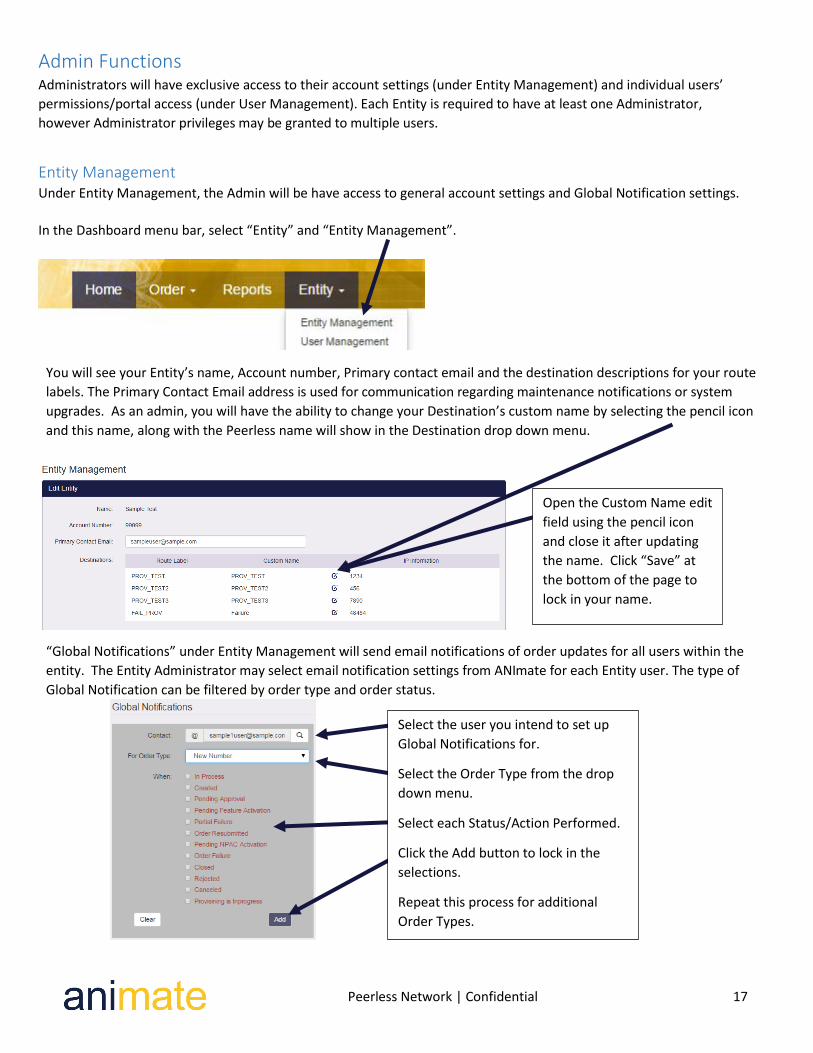
Entity Management Under Entity Management, the Admin will be have access to general account settings and Global Notification settings.
In the Dashboard menu bar, select “Entity” and “Entity Management”.
You will see your Entity’s name, Account number, Primary contact email and the destination descriptions for your route
labels. The Primary Contact Email address is used for communication regarding maintenance notifications or system
upgrades. As an admin, you will have the ability to change your Destination’s custom name by selecting the pencil icon
and this name, along with the Peerless name will show in the Destination drop down menu.
“Global Notifications” under Entity Management will send email notifications of order updates for all users within the
entity. The Entity Administrator may select email notification settings from ANImate for each Entity user. The type of
Global Notification can be filtered by order type and order status.
Select the user you intend to set up
Global Notifications for.
Select the Order Type from the drop
down menu.
Select each Status/Action Performed.
Click the Add button to lock in the
selections.
Repeat this process for additional
Order Types.
Open the Custom Name edit
field using the pencil icon
and close it after updating
the name. Click “Save” at
the bottom of the page to
lock in your name.

Peerless Network | Confidential 18
The Admin will also have the ability to enable Loss Notifications, control feature settings, view authorized Categories and
see all Admin and User IDs/Email Address for their account.
User Management Under User Management, the admin will have the ability to grant various permissions to users on an individual basis.
In the Dashboard menu bar, select “Entity” and “User Management”.
Edit Existing User
To edit an existing user, begin typing in the user’s name, or select the user from the list provided.
Email addresses entered here will
receive a loss notification whenever a
DID previously assigned to your account
has been confirmed as ported out.
Feature Settings will only show features available to you.
“Always” option will default select this feature on all TNs.
“Optional” will provide the option to select this feature on a per
TNs basis.
A list of Administrators and
Users is displayed at the
bottom of Entity Management
and may be edited from here or
via the User Management
process defined below.

Peerless Network | Confidential 19
From the Edit User screen, an administrator can modify the user’s name, user ID, phone number, time zone preference and
modify the user’s permission level between General User and Administrator.
Click on the “Generate New Password” button to create a new password for the user. The user may modify the password
after they log in by selecting the profile management feature discussed on page 2.
Administrators may also enable users to control available feature selections on a per order basis by checking/un-checking
features under the “Features User May Set” heading. Some Entities may have access to multiple TN categories and can
likewise control the user’s permission level to source numbers from specific TN categories.
Global Notifications may also be updated on the Edit User screen (See Entity Management section). Global Notifications set
in the “User Management” section however will only send email notifications for that specific user’s orders.
Any modifications made to a user will only be preserved once the “Save Changes” button has been clicked.
Create New User
To create a new user, click on the “Create New User” button after selecting “Entity”, “User Management” from the
Dashboard menu bar.
After selecting the
user, click on the
“Select User” button
on the bottom left
of the window.
Users may be deleted or temporarily suspended.
Administrators are responsible for deleting users
that should no longer have rights to the application.
Administrators may also modify the Order
Authorization of each user.
Create – Allows users to write and view their own
orders.
View Work of Others – Allows users to view work of
other users.
Edit Work of Others – Allows users to edit
(supplement, cancel) work of others.

Peerless Network | Confidential 20
All fields are required to create a new user. After adding the new user’s information, click on the “Generate Initial
Password” button. Copy and paste this password and provide it to the user once the set up process has been completed.
Select the permission levels for this user. (See the Edit Existing User section above for details.)
After selecting the permission levels, you must click the “Save Changes” button to save/create the user.
After the user has been created, you may authorize the user to receive a series of email notifications (Global Notifications)
based on order status/activity. (See the Entity Management section above for details.)
After generating the user’s
password, click the “Add
User” button to proceed to
the next user set up steps.