user guide and installation manual · 2019-07-12 · pallet, which includes the solar panels,...
TRANSCRIPT

User Guide and Installation
Manual
Standalone Power system Model: BM3340/80 Troppo
BlackMax User Manual: Version 2.0 - June 2019
BlackMax 2
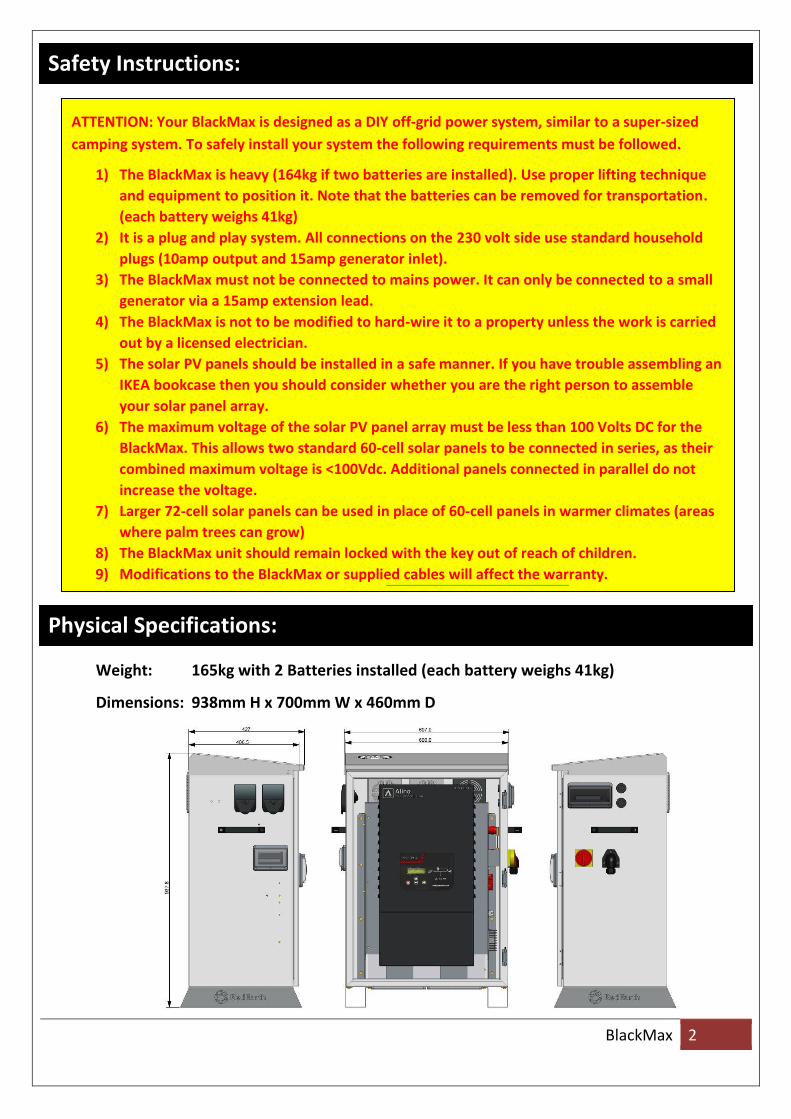
Weight: 165kg with 2 Batteries installed (each battery weighs 41kg)
Dimensions: 938mm H x 700mm W x 460mm D
Safety Instructions:
ATTENTION: Your BlackMax is designed as a DIY off-grid power system, similar to a super-sized
camping system. To safely install your system the following requirements must be followed.
1) The BlackMax is heavy (164kg if two batteries are installed). Use proper lifting technique
and equipment to position it. Note that the batteries can be removed for transportation.
(each battery weighs 41kg)
2) It is a plug and play system. All connections on the 230 volt side use standard household
plugs (10amp output and 15amp generator inlet).
3) The BlackMax must not be connected to mains power. It can only be connected to a small
generator via a 15amp extension lead.
4) The BlackMax is not to be modified to hard-wire it to a property unless the work is carried
out by a licensed electrician.
5) The solar PV panels should be installed in a safe manner. If you have trouble assembling an
IKEA bookcase then you should consider whether you are the right person to assemble
your solar panel array.
6) The maximum voltage of the solar PV panel array must be less than 100 Volts DC for the
BlackMax. This allows two standard 60-cell solar panels to be connected in series, as their
combined maximum voltage is <100Vdc. Additional panels connected in parallel do not
increase the voltage.
7) Larger 72-cell solar panels can be used in place of 60-cell panels in warmer climates (areas
where palm trees can grow)
8) The BlackMax unit should remain locked with the key out of reach of children.
9) Modifications to the BlackMax or supplied cables will affect the warranty.
10) Earthing the BlackMax: For the RCBO to function it is recommended.Only qualified
electricians can install and earth stake and MEN link. Physical Specifications:

BlackMax 3
Overview:
Your BlackMax is an ideal solution if you want to power a small outlying area that is not connected
to the grid.
It can be installed by any competent person, without the need for an electrician or solar installer.
Use it where you want a continuous supply of electricity without needing a generator running all
the time. It can power typical tools found in a shed and also keep the fridge cold. Solar panels
generate the electricity and the battery keeps everything running at night.
The solar panels need to be installed in a sunny area, with all of them facing in the same direction.
Even if only part of one of the panels is shaded, all the panels will generate far less electricity than
normal.
The BlackMax unit can be located either inside or outside. If it is outside then it needs to be in a
shaded area.
How it works:
During the day electricity is generated by the solar panels. This electricity supplies the loads that
are plugged into the BlackMax’s power outlet. Excess electricity is used to charge the battery.
During the night, when the solar panels stop generating electricity, the load is supplied from the
battery. A generator (available as an option) can be plugged in to support the BlackMax during
periods of above average load.
Overview:

BlackMax 4
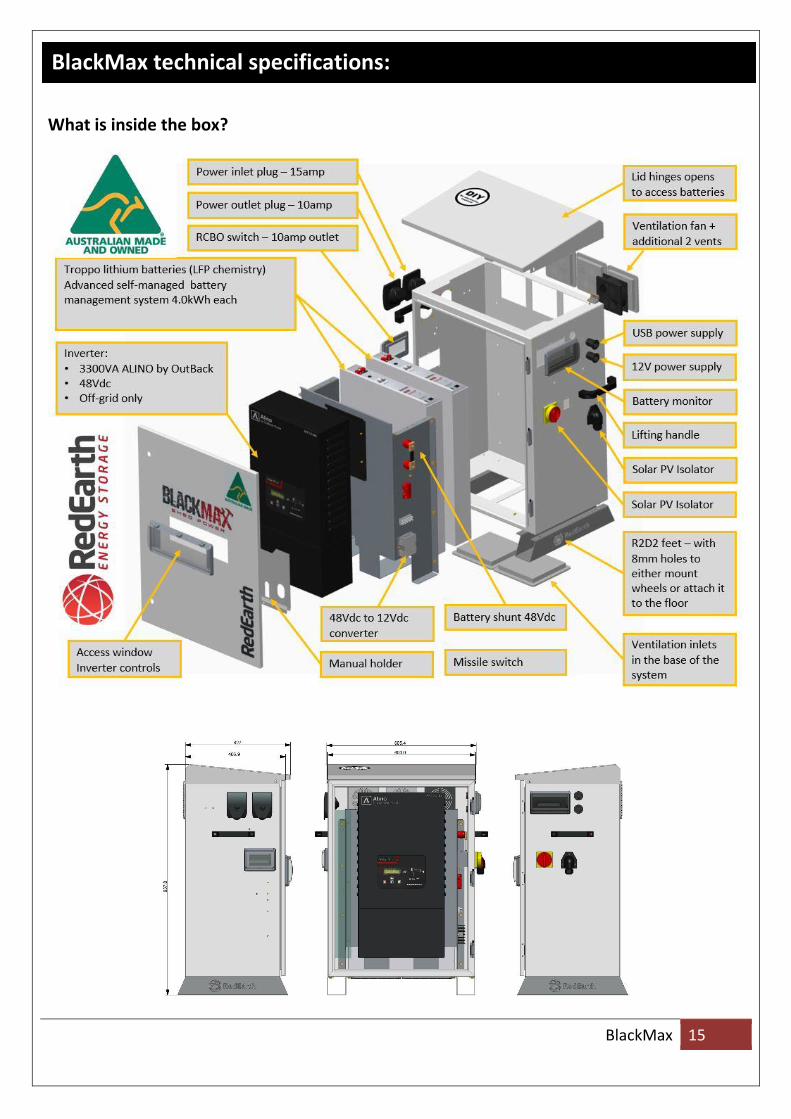
The BlackMax unit incorporates an inverter (3.3kVA
Alino by Outback Power), one or two 4.0kWh
“Troppo” Lithium LFP (LiFePo) batteries and several
displays and plug connectors in a single
transportable weatherproof enclosure.
All electrical connections are made via plugs,
making the system to be a DIY install by anyone.
BlackMax features:

BlackMax 5
AC side of the BlackMax:
DC side of BlackMax:

BlackMax 6
Follow these 7 steps to ensure a quick and successful install of your BlackMax system. The steps
are explained in more detail in the following sections:
1. Start by making sure the BlackMax is the right sized system for you. It is designed for shed-
type loads, including a small fridge. It is not sized to run an air-conditioner. It is not designed
to be connected to the electricity grid. Your supplier can answer your questions; otherwise
you can contact RedEarth directly on (07) 3279 6707.
2. Order the BlackMax system from your supplier. You will need to decide if you want the 6 or
8 solar panel option. There is an additional electrical box that is supplied for the 8-panel
system. Once it arrives confirm that you have received everything you need for the install.
3. Decide where the solar panels will be installed and then position the BlackMax unit in its
location, ideally within 8 meters of the solar array, and in the shade.
4. Install the solar panels and connect them to the BlackMax.
5. Turn on the BlackMax and confirm that it is operating correctly.
6. Test the backup generator operation, if available.
7. Monitor the performance of your BlackMax. You will learn how much power and energy
your various pieces of equipment use by observing the displays on the system. If you draw
too much energy from the battery, it will shut down and a manual restart will be required.
The BlackMax is for use in off-grid applications and cannot be plugged into the electricity grid. It is
designed for powering shed-type loads including a small fridge.
The most common issue that can occur after installed is that the BlackMax is connected to a load
that uses more electricity than the system is designed to provide. This means a generator is will be
required to make the missing electricity.
RedEarth does have larger power systems to run a home with air-conditioning, or a
home that is connected to the electricity grid. Contact RedEarth on (07) 3279 6707.
The BlackMax is supplied in two main configurations,
1) BlackMax only: If you will be supplying the solar panels yourself then the system will arrive
bolted to a small wooden pallet, along with a cable set to connect the solar panels.
2) BlackMax with Solar panels: This is the complete package, and you will receive a larger
pallet, which includes the solar panels, cables, rails and parts to mount the Solar panels on a
tin roof. A 6-solar panel kit is standard; an 8-panel option is available at additional cost.
A number of options are available for the BlackMax apart from the 8-panel solar kit including a
Honda EU22i generator or an additional battery if only one was orderd initially.
STEP 1: Make sure the BlackMax is the right system for you
Seven steps to an easy install:

BlackMax 7
Your main task during the installation of the BlackMax system will be mounting and wiring up the
solar panels. The BackMax system itself arrives ready-to-run.
Note: The complete system can be tested before installation of the solar panels. The panels can be
placed on the ground and plugged into the BlackMax unit. (see image below) This will ensure you
understand how to connect the panels, without initially being concerned with mounting the solar
panels.
To install the BlackMax system you will need the following items:
1. BlackMax Power system. (includes built-in inverter and either 1 or 2 batteries, as orderd)
2. Manuals (located inside the unit)
a. This user manual
b. Alino inverter manual
c. Battery manual, MSDS and Battery warranty statement
d. PV installation instructions
e. Factory certification (including serial numbers)
f. Shortcut to failure article (for some light reading)
3. Solar panels (2, 4 or 6). 8 panels can be used if you ordered the optional 8 panel kit.
4. Cable set for connecting the solar panels to the BlackMax. These are supplied with your
system. For 6-panel system (3 x twin cables with MC4 plugs); for the 8-panel system (4 x
twin cables with MC4 plugs plus a combiner box)
5. Solar panel mounting system. There are a range of methods for securing the panels,
including mounting them at ground level. If you ordered solar panels then your BlackMax
will come with a solar panel mounting system suitable for tin roofs.
STEP 2: Confirm you have everything you need for the install

BlackMax 8
6. Hand tools to install the solar panels and cables. Note that the BlackMax is supplied charged
and can be used to power hand tools during installation without needing to have the solar
panels connected or a generator running.
7. 15amp extension lead, for connecting a generator. (supplied)
8. Generator (optional). A Honda EU22i can be supplied as an option.
9. Hand trolley to move the system around (one can be supplied as an option)
The BlackMax can be transported on a pickup or trailer. If it has two batteries installed it weighs
165kg. The batteries (43kg each) can be removed if necessary through a cut-out under the lid.
Note that the “full house” system with solar panels is delivered on a pallet that is 1.65m long, 1.1m
wide and 1.1m high and weighs up to 300kg. The weight depends on the options selected.
The BlackMax should be placed within 8 meters of
the solar panels. An optional 6 meter extension
cable is available if the panels are further away.
Note that the longer the cables are the greater the
voltage drop, which reduces the energy from the
solar panels.
The IP rating of the system is IP43 and is suitable
for outside installation. If outside it must be in a
shaded area. (See table for an explanation of IP
ratings)
A hand trolley can
be used to move
the BlackMax
around. It is
available as an
option from
RedEarth when
the “full house”
system is ordered.
STEP 3: Install the BlackMax
NOTE: Please call RedEarth if you have questions during
installation. Tech support 0487 002 451

BlackMax 9
Cooling air flow passes up through the base of the system and then out the back and top. Do not
block the air vents otherwise the system will overheat and shutdown. Once the system cools down
again it can be restarted. The flow of air is assisted by an electric fan connected to one of the rear
vents. It is controlled by a temperature switch. This is adjustable and set to 25degC in the factory.
The controls of the inverter can be accessed through the front cover, without needing to open the
main door.
The door should remain locked with the key out of reach of children.
To avoid the potential of the unit tipping over it should be secured to the ground using the holes in
the feet.
Installing the solar panels involves both mechanically securing the panels as well as electrically
connecting the panels to the BlackMax.
Electrical connection overview:
Understanding the electrical layout will help you decide where to install the solar panels.
The solar panels need to be connected two in
series to form a “string” (see right). This
provides the right amount of voltage for the
BlackMax.
Each “string” of 2 panels is then connected in
parallel to increase the size of the solar array.
6-Panel wiring using the supplied triple plugs
STEP 4: Install the Solar panels and connect them to the BlackMax
WARNING: The Solar DC Isolator on the BlackMax must be in the off position before
any solar panels are connected

BlackMax 10
8-panel wiring using the supplied combiner box
Mechanical installation of the solar panels:
Refer to the separate brochure included with your BlackMax, “Guidelines for installing DIY small
solar system – EnergyStuff”.
Electrical connection of the solar panels:
Follow the connection sequence below to complete the electrical connection.
1. Place the BlackMax in its final position.
2. Make sure the Solar DC Isolator is switched off.
3. Check the distance from the BlackMax to the triple plug combiners (for
a 6 panel system) or the combiner box (for the 8 panel system) is less
than the length of the 8 meter twin extension cable provided.
4. Connect the triple plug or combiner box to the BlackMax using the 8 meter twin extension
cable supplied.
5. If installing the 8-panel system, then fix the Combiner Box to the wall
using the external mountings supplied on the rear of the box – DO NOT
PENETRATE BACK OF COMBINER BOX as this will reduce the IP rating
and may let water in.
6. Connect the provided single strand extension cables between the triple
plug/combiner box and each “string” of
solar panels (one set of twin wires per
string)
7. These extension cables are of different
lengths. Connect the closest “string” of
panels with the shortest cable.
8. After completion of all connections tuck
the excess cable away under the panels.
9. Turn on the DC Solar Isolator on the
BlackMax. Combiner box for 8-panel system,
with extension cable pre-wired

BlackMax 11
Turn on the BlackMax to confirm that it is operating correctly and to become familiar with the
controls and displays.
The included manual for the Alino inverter provides additional information on the inverter.
STEP 5: Turn on the BlackMax and confirm everything is operating
correctly

BlackMax 12
There are two displays on outside of the BlackMax, one for the DC (battery) side and one for the
AC (power point) side. These are in addition to the display on the inverter itself.

BlackMax 13
Test the optional use of a backup
generator if available.
When the generator is connected the
battery will be charged as a priority.
Other loads will also be powered by the
generator at the same time. If the other
loads are too high the generator may
become overloaded. Reduce your other
loads while the battery is being charged.
The generator is only needed if the
battery becomes depleted and it is dark
(ie the solar panels are not charging the
battery). If the BlackMax shuts down
during the night, then it will
automatically begin recharging itself in
the morning when the sun comes up.
Running the generator for an hour is
usually enough if you are having a big
night. The solar will recharge the
batteries in the morning.
The typical small generator has 15A outlets (Honda
eu20i shown at left) A 15A extension lead is provided to
connect it to the BlackMax. A matching 15A inlet is
provided on the BlackMax. A 15A inlet is also fitted to
remind users that the BlackMax can not be connected
to the electricity grid.
STEP 6: Test the operation of the optional generator

BlackMax 14
Monitor the performance of your
BlackMax during ongoing use. You will
learn how much power your equipment
uses by observing the displays on the
system.
If you have any questions, contact
RedEarth Tech Support on 0487 002 451.
The BlackMax can provide 2,600 Watts
continuous output before it begins
beeping (complaining). If it overloads and
shuts down, reduce the load and wait for
it to automatically restart within a minute.
The surge capacity of the inverter is
6000VA for 0.5 seconds.
Typical loads for equipment you might find in your workshop are shown below. (maybe not the
CPAP machine)
STEP 7: Monitor your BlackMax during ongoing use
BlackMax 15
What is inside the box?
BlackMax technical specifications:

BlackMax 16
The BlackMax uses the APCU 3348 inverter, listed in the right column of the tables below.

BlackMax 17
RedEarth also provides several options for the BlackMax system;
• The complete system including PV panels and mounting parts
• 8 panel expansion option
• 6-meter extension cable for PV panels
• Honda EU22i generator
• Hand trolley to move the BlackMax into position
• Earth stake (and MEN link) – can only be installed by a licensed
electrician
• Multi-meter with AC/DC current
measurement
Contact RedEarth Energy Storage:
www.redearthenergystorage.com.au
Options available from RedEarth:
The cubby house - prototype