usc marshall school of business powerpoint 2007...
TRANSCRIPT

© Marshall School of Business - USC 8/15/12 Wayne Wilmeth Page 1 of 43
USC Marshall School of Business Academic Information Services
PowerPoint 2007 - Introduction
This is the first of six PowerPoint handouts. It is intended to introduce you to the PowerPoint environment and begin building presentations.
Topics Covered in this Handout: Navigating the PowerPoint Environment
Creating a New Presentation
Selecting a Design Template
Creating New Slides
Applying Layouts
Creating a Title Slide
Creating Bulleted Lists
Creating Tables
Setting Transition Effects
Running Your Slideshow
Slide Show Options
Custom Slide Shows
Printing
Other Marshall PowerPoint 2007 Handouts These are the other Marshall PowerPoint handouts listed in the suggested order they should be read.
Drawing Tools – Covers using the drawing tools and working with images, shapes, and lines.
SmartArt – Allows you to easily combine text with graphics to make your message more visual.
Charts – Includes Pie, Line, Area, Bar, Column, Stock, XY, Scatter, Pyramid, and Radar charts.
Themes/Templates – How to customize the background and create your own theme.
Animation – Includes such animation effects as making columns rise up one-by-one, synchronizing bullets with images, making arrows fly in, etc.

© Marshall School of Business - USC 8/15/12 Wayne Wilmeth Page 2 of 43
TABLE OF CONTENTS
Topics Covered in this Handout: ......................................................................................................................................... 1
Other Marshall PowerPoint 2007 Handouts ....................................................................................................................... 1
TABLE OF CONTENTS ............................................................................................................................................................... 2
WHAT IS POWERPOINT AND WHAT CAN YOU MAKE WITH IT? ............................................................................................. 5
NAVIGATING THE POWERPOINT ENVIRONMENT – NORMAL VIEW ....................................................................................... 6
POWERPOINT VIEWS .............................................................................................................................................................. 7
Normal View / Outline View ............................................................................................................................................... 7
Slide Sorter View ................................................................................................................................................................. 8
Notes Pages ......................................................................................................................................................................... 8
Slide Show ........................................................................................................................................................................... 8
Slide Master / Notes Master / Handout Master ................................................................................................................. 8
PAGE SETUP ............................................................................................................................................................................ 9
SELECTING A THEME ............................................................................................................................................................. 10
SET THEME OPTIONS - COLOR, FONT, AND BACKGROUND .................................................................................................. 11
Change the Typeface ......................................................................................................................................................... 11
Select a Color Scheme ....................................................................................................................................................... 11
Select a Background Style ................................................................................................................................................. 11
NEW SLIDES AND LAYOUTS ................................................................................................................................................... 12
SELECIING A SLIDE LAYOUT ................................................................................................................................................... 13
Creating a New Slide ......................................................................................................................................................... 13
Change the Layout of an Existing Slide ............................................................................................................................. 13
CREATING A TITLE SLIDE ....................................................................................................................................................... 14
FORMATTING TEXT ............................................................................................................................................................... 15
THE “TITLE AND CONTENT” LAYOUT..................................................................................................................................... 16
CREATING A BULLETED LIST .................................................................................................................................................. 17
CHANGING THE BULLET TYPE ............................................................................................................................................... 18
Part A: Specify the Scope (Which Bullets do you Wish to Change?) ............................................................................ 18
Part B: Changing the Bullet ........................................................................................................................................... 19
Adjust Distance Between Bullets and Text ....................................................................................................................... 20
Animating Bullets .................................................................................................................................................................. 21
Note about Animating from the Slide Master .................................................................................................................. 21
Animate Indented Bullets Individually .............................................................................................................................. 21
ALTERNATIVES TO BULLETED LISTS ....................................................................................................................................... 22
TABLES ................................................................................................................................................................................... 23
Inserting a Table ................................................................................................................................................................ 23
TABLES – MAKING STRUCTURAL CHANGES .......................................................................................................................... 24

© Marshall School of Business - USC 8/15/12 Wayne Wilmeth Page 3 of 43
The Layout Ribbon ............................................................................................................................................................ 24
Right Clicking Cells ............................................................................................................................................................ 24
The Design Ribbon ............................................................................................................................................................ 24
Resizing Tables/Columns/Rows ........................................................................................................................................ 25
TABLES – DATA ENTRY .......................................................................................................................................................... 25
TABLES – TEXT FORMATTING ................................................................................................................................................ 26
“Layout” Tab ..................................................................................................................................................................... 26
“Home” Tab....................................................................................................................................................................... 26
“Design” Tab ..................................................................................................................................................................... 26
TABLES - OVERALL FORMATTING .......................................................................................................................................... 27
TABLES - FORMAT CELLS INDIVIDUALLY ............................................................................................................................... 28
Apply Table Borders .......................................................................................................................................................... 28
Apply Cell Backgrounds ..................................................................................................................................................... 29
Apply Effects to Cells ......................................................................................................................................................... 30
ALTERNATIVES TO TABLES .................................................................................................................................................... 31
Use Images as Cell Backgrounds ....................................................................................................................................... 31
Display Numeric Data in a Chart Rather than a Table ...................................................................................................... 32
Think Outside of the Table Box ......................................................................................................................................... 33
RUNNING SLIDE SHOWS ....................................................................................................................................................... 34
Starting a Slide Show ........................................................................................................................................................ 34
Navigation During a Slide Show ........................................................................................................................................ 34
Mouse Navigational Options............................................................................................................................................. 35
Drawing on the Screen During a Slide Show ..................................................................................................................... 35
SLIDE SORTER VIEW / TRANSITION EFFECTS ......................................................................................................................... 36
Transition Effects (Slide Entrance & Sound) ..................................................................................................................... 36
Remove a Transition Effect ............................................................................................................................................... 36
Change Slide Order ........................................................................................................................................................... 37
Delete a Slide .................................................................................................................................................................... 37
Hiding Slides ...................................................................................................................................................................... 37
Don’t advance on mouse click .......................................................................................................................................... 37
IMPORT SLIDES FROM ANOTHER POWERPOINT PRESENTATION ........................................................................................ 38
REHEARSE TIMINGS............................................................................................................................................................... 39
Rehearse Timings .............................................................................................................................................................. 39
Turning Off Automatic Slide Advancement ...................................................................................................................... 40
Record Narration............................................................................................................................................................... 40
SLIDE SHOW SETUP ............................................................................................................................................................... 41
CUSTOM SLIDE SHOWS ......................................................................................................................................................... 42
Creating a Custom Show ................................................................................................................................................... 42

© Marshall School of Business - USC 8/15/12 Wayne Wilmeth Page 4 of 43
Running a Custom Slide Show ........................................................................................................................................... 42
PRINTING ............................................................................................................................................................................... 43

© Marshall School of Business - USC 8/15/12 Wayne Wilmeth Page 5 of 43
WHAT IS POWERPOINT AND WHAT CAN YOU MAKE WITH IT?
PowerPoint is a presentation application that allows you to create and display your ideas graphically on slides which can be projected to an audience using an LCD type projector or printed out on paper or transparency. Slides can contain text, bulleted lists, images, drawn objects, charts, sound, and movies. You can also add animation effects to add clarity and impact to your slides. Some examples of the types of slides which can be created are shown below. Note that you are not locked into to making just slides which use the layouts below. Note also that Charts, Tables, and SmartArt are not covered in this handout but are covered in other Marshall handouts.
Title Slide This is typically your first slide and announces the topic of your presentation.
Section Header This type of slide is typically used to announce a change in topic during your presentation.
Bulleted Lists Used to display main points. See the Animations handout to synchronize bullets with images.
Charts Allows you to display numeric data graphically in the form of Pie, Line, Area, bar, etc., charts.
Tables Typically used to list related non numeric data in groups.
SmartArt Used to easily combine text and images in a very wide variety of ways.

© Marshall School of Business - USC 8/15/12 Wayne Wilmeth Page 6 of 43
NAVIGATING THE POWERPOINT ENVIRONMENT – NORMAL VIEW
Tabs – Click a tab to see the buttons it contains. Double click an object to jump to a pertinent tab.
Quick Access Toolbar – Allows you to place often used buttons on it. Right click any button to add it to the toolbar. Right click a button on the toolbar to remove it.
Side Tab – Allows you to select, move, or delete a slide. Outline Tab – Allows you to type text and move bullet points up & down. If you close this pane, click the “Normal” view button to get it back. Normal View – this is the Normal view window. It is the default environment when you start a new presentation and is where you will do most of your work.
MS Button – Click to access printing, saving, opening files, closing files, and PowerPoint options.
More Options – Click the expand arrows to view dialogue boxes with more options.
Fit Slide to Window
Zoom In/Out
Select View – Most commonly used views: Normal, Slide Sorter, & Slideshow.
Notes Area – allows you to type notes for each slide that you can print out with the slide.
Resize Pane – Click and drag the lines to resize the areas.

© Marshall School of Business - USC 8/15/12 Wayne Wilmeth Page 7 of 43
POWERPOINT VIEWS
PowerPoint has several different Views you will be using depending upon what you wish to do. You can access all views available under the “View” tab. You can access Normal, Slide Sorter, and Slide Show by using the shortcuts in the lower right.
Slide Sorter
Normal
Slide Show
Normal View / Outline View This is default view and the one you will use the most. See the illustration below for information on what you can do with “Normal” view. Slide Content Area
Use this area to create and edit slide content. For example, text, drawings, images, SmartArt, bullet lists, charts, etc.
Notes Pages This area allows you to type text beneath each slide. The text will not display in a slide show but you can print it out as shown below to help you practice or give your presentation.
Outline Tab Use this tab to drag text to a different slide. Only text typed in the pre-positioned text placeholders will appear here.
This pane contains the “Slides” and “Outline” tabs. See the blow ups on the left for info.
Slides Tab Use this tab to move/delete slides or select multiple slides at once for copying and formatting.
Drag the line to control how much each pane gets of the total screen.

© Marshall School of Business - USC 8/15/12 Wayne Wilmeth Page 8 of 43
Slide Sorter View Slide Sorter view displays your slides as miniatures. You will typically use this view to create slide transition effects, hide slides, move slides, and set slide timing. Note that you cannot work on individual slide content in this view. See page 36 of this handout for more information on using the “Slide Sorter”.
Notes Pages As mentioned earlier, Notes Pages allows you to type text beneath each slide. The text will not display in a slide show but you can print it out as shown below to help you practice or give your presentation. You can type in your notes in the bottom pane while in Normal view or you can type them in while in Notes Pages view as shown to the right.
Slide Show You will use this view when you wish to show your slide show to an audience. PowerPoint will display each slide full screen. You will use this view to text your animation, sound, and transition effects. See page 34 of this handout for more information on using “Slide Show” view.
Slide Master / Notes Master / Handout Master You can use these views to edit the template that controls how all of your slides are laid out and are formatted. Note that these are not covered here but are covered in the “PowerPoint – Themes” handout.

© Marshall School of Business - USC 8/15/12 Wayne Wilmeth Page 9 of 43
PAGE SETUP
By default, PowerPoint is setup to display slides and printouts as follows:
Slide Presentations – A screen ratio of 4:3 set to “landscape” which works will with most computer screens.
Printouts - 8.5” x 11” paper set to “landscape” for printing out slides and “portrait” for printing out handouts, notes, and outlines.
These settings work well for most presentations; however, if you think your presentation will not work with these settings, for best results, you should change them prior to creating your slides. 1. Click the “Design” tab. 2. Click “Page Setup”.
Notes, Handouts & Outline Use this to specify the orientation of printed notes, handouts, and outlines. This will not affect your slide show.
Slides Use this to specify the orientation of printed slides and slides during a slide show. The default is landscape.
Slides Sized for: Use this to specify the dimensions of the slides and slide show. The default is On-Screen Show (4:3) which typically fills most screens edge to edge. Note you can also set it to other dimensions such as legal paper, banners, etc.
4:3 Ratio 16:9 Ratio
© Marshall School of Business - USC 8/15/12 Wayne Wilmeth Page 10 of 43
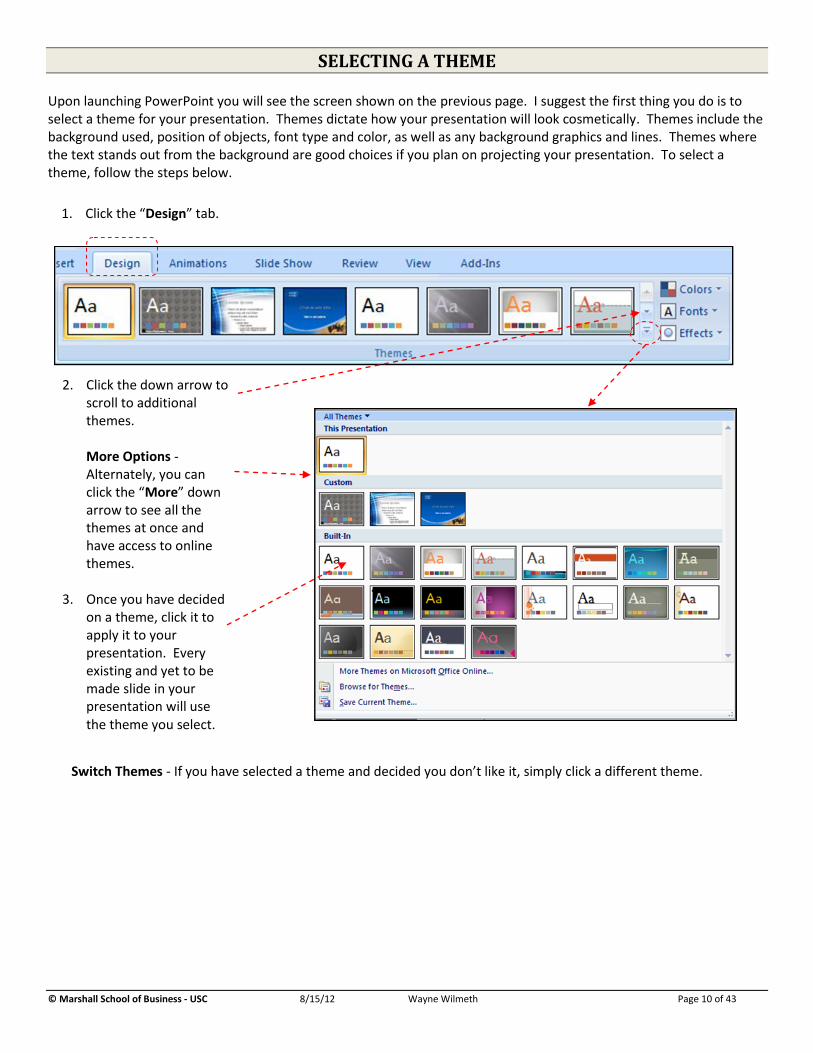
SELECTING A THEME
Upon launching PowerPoint you will see the screen shown on the previous page. I suggest the first thing you do is to select a theme for your presentation. Themes dictate how your presentation will look cosmetically. Themes include the background used, position of objects, font type and color, as well as any background graphics and lines. Themes where the text stands out from the background are good choices if you plan on projecting your presentation. To select a theme, follow the steps below.
2. Click the down arrow to scroll to additional themes.
More Options -
Alternately, you can click the “More” down arrow to see all the themes at once and have access to online themes.
3. Once you have decided
on a theme, click it to apply it to your presentation. Every existing and yet to be made slide in your presentation will use the theme you select.
Switch Themes - If you have selected a theme and decided you don’t like it, simply click a different theme.
1. Click the “Design” tab.

© Marshall School of Business - USC 8/15/12 Wayne Wilmeth Page 11 of 43
SET THEME OPTIONS - COLOR, FONT, AND BACKGROUND
When you select your theme, you are selecting the overall layout the theme uses as well as its default color scheme and default font. Within the theme you have selected, PowerPoint gives you easy to use tools that allow you to make limited changes to the color scheme and background as well as the typeface. If you would like to make more extensive changes, see the handout on “PowerPoint – Themes”.
Change the Typeface These steps will allow you to change the typeface for all slides in your presentation by selecting premade combinations of title and body text. Note that the top font affects only Title text and the bottom font affects all other text in the presentation. Also, if you have changed the font of specific text using the tools on the “Home” tab, the steps below will no longer affect that text. 1. Click the “Design” tab. 2. Click the “Fonts” drop down arrow. 3. Click the typeface set you wish to use.
Select a Color Scheme These steps allow you to make changes to your color scheme by selecting from a limited list of premade color schemes. Note that if you have changed the font color of specific text using the tools on the “Home” tab, the steps below will no longer affect that text. 1. Click the “Design” tab. 2. Click the “Colors” drop down. 3. Click a color scheme.
Select a Background Style Within a color scheme, there are a limited number of background colors you can select from. The background you select will be applied to all of your slides. 1. Click the “Design” tab. 2. Click the “Background Styles” drop down. 3. Click a background. Note that there are more colors and other background options under “Format Background…”
Note that selecting a different Color Scheme will affect what backgrounds are available and selecting a different Background Style will affect what background colors appear in the Colors window.

© Marshall School of Business - USC 8/15/12 Wayne Wilmeth Page 12 of 43
NEW SLIDES AND LAYOUTS
Whenever you start a new slide, you should specify a “Layout”. Layouts help you place a specific type of content on your side. For example, if you wish to make a “Title” slide, you would select the “Title Slide” layout, if you want to make a slide which contains a bulleted list or chart, you will select “Title and Content” layout. There is also a blank layout that leaves content placement up to you. Note that the type of layout you select does not “lock you in” - you can insert any type of object you wish into any layout. You can even make your own layouts (See the “PowerPoint – Themes” handout.) However, selecting the right layout does have the following advantages:
They save you time by giving you preformatted text place holders to type text into.
The text typed into a text place holder provided by the layout shows up in “Outline” view. Outline view allows you to drag text between slides. (See the image below.)
Changes to the text formatting in the Slide Master or Layout Master affects all slides which use that layout. This is useful for making text formatting changes to multiple sides at once.
NOTE: You cannot group the premade text placeholders.
Text typed in the text layout boxes which appear when you select a layout shows up on the Outline tab. You can drag text from one side to another on the Outline tab. Note that text typed in text boxes that you have inserted yourself under the “Insert” tab will not show up on the Outline tab.

© Marshall School of Business - USC 8/15/12 Wayne Wilmeth Page 13 of 43
SELECIING A SLIDE LAYOUT
You can specify the slide layout when you create a new slide. You can also change the layout of an existing slide.
Creating a New Slide To create a new slide, follow the steps below. 1. Click the “Home” tab. 2. Click the “New Slide” drop down arrow (lower half). 3. Click the layout you wish to use.
Change the Layout of an Existing Slide To change the layout of an existing slide, follow these steps: 1. Click the “Home” tab. 2. Click the “Layout” drop down arrow. 3. Click the layout you wish to use.

© Marshall School of Business - USC 8/15/12 Wayne Wilmeth Page 14 of 43
CREATING A TITLE SLIDE
This section covers how to create a “Title Slide”. A Title Side is typically the first slide in your presentation and is used to display the topic of your presentation.
1. Click the “Home” tab. 2. Click the “New Slide” drop down arrow (lower half). 3. Click the “Title Slide” layout.
4. Click in the Title Text placeholder and type the title of your presentation.
5. Click in the Subtitle Text placeholder and type a subtitle for your presentation.
Note that you do not have to type
in a text place holder. If you leave them as is, they will still show up in Normal view but not in the Sideshow.

© Marshall School of Business - USC 8/15/12 Wayne Wilmeth Page 15 of 43
FORMATTING TEXT
There are three approaches to formatting text: Change Typeface Only for all Slides in the Presentation
The “Fonts” drop down under the “Design” tab will allow you to change the typeface of all slides in your presentation. Note that you cannot use this to change other font options such as size, bold, or italics. Also, this will not affect text boxes you have formatted on an individual level.
Apply Text Formatting to a Single Text Placeholder
You can use any of the Font tools under the “Home” tab to affect any text box you select. Note however that once you do this, any formatting you do from the master will not affect that text box’s formatting. Further, changing themes will have odd formatting results to those text boxes.
Apply Text Formatting to All Slides in the Presentation In this method, you make your formatting changes from the Slide Master using the Font tools under the “Home” tab. The advantage of making changes from the Slide Master is that you can affect multiple slides simultaneously. Note that if you have formatted a text box while in Normal view, changes in the Slide Master will not affect that text box. 1. Click the “View” tab and then “Slide Master”. 2. Click the “Home” tab to see the font formatting tools.
3. Click the top slide (Slide Master) if you wish to affect all slides using any layout.
OR Click one of the layout
masters if you just want to affect slides using that layout.
4. Click the frame around
text you would like to affect:
Title Text Body Text 5. Use the Font tools on the “Home” tab to set your formatting options. 6. To return to Normal view, click the “View” tab and then “Normal”. See the “PowerPoint – Themes” handout for more information on working with the Slide/Layout Masters.

© Marshall School of Business - USC 8/15/12 Wayne Wilmeth Page 16 of 43
THE “TITLE AND CONTENT” LAYOUT
This is a very versatile layout. It gives you a title placeholder and several different content options depending upon the icon you click. For example, if you click the “Chart” icon, the chart wizard will start and your content will be a chart. See the image below for descriptions of the different types of content you can insert.
Title Placeholder Type the title of the slide here. If you don’t want a title, leave it untouched.
Bulleted List Simply click next to the bullet and type. Press Enter to get a new bulleted line. Press Tab to indent.
Table Click this button to begin creating a table on the slide.
Chart Starts the Chart Wizard allowing you to create bar, pie, line, area, scatter, stock, bubble, and other charts.
SmartArt Inserts preset combinations of text and graphics including pyramid diagrams, Venn diagrams, picture lists, organizational charts, etc.
Movie Allows you to insert a move you have saved as a file.
ClipArt ClipArt is premade artwork provided by Microsoft. Click this to open the ClipArt search box.
Picture Allows you to insert an image you have saved as a file.

© Marshall School of Business - USC 8/15/12 Wayne Wilmeth Page 17 of 43
CREATING A BULLETED LIST
Bulleted lists are a very common method of listing main ideas, summaries, steps, etc. They are also somewhat boring and overused. Therefore, after learning how to make them here, read the “PowerPoint – Animations” handout to see how you can synchronize images with bulleted lists and the “PowerPoint – SmartArt” handout for more interesting approaches to presenting data that would normally go on a bulleted list.
1. Click the “Home” tab. 2. Click the “New Slide” drop down arrow (lower half). 3. Click the “Title and Content” layout. 4. Click in the title box (i.e. “Click to add title”). 5. Type the title text for your slide.
6. Click on the bullet where it says “Click to add text”. 7. Type your first bulleted item. The content icons below will automatically disappear as soon
as you start typing at a bullet.
Insert Another Bullet – Press ENTER to add another bulleted item.
Indent a Bullet - Press the TAB key on your keyboard
or click the “Increase List Level” button located on the “Home” tab.
UnIndent a Bullet - Press SHIFT TAB on your keyboard or click the “Decrease List Level” button located on the “Home” tab.
Remove a Bullet - Press BACKSPACE or DELETE on
your keyboard.

© Marshall School of Business - USC 8/15/12 Wayne Wilmeth Page 18 of 43
CHANGING THE BULLET TYPE
PowerPoint allows you to use pretty much any symbol or even an image as a bullet. For example, your bullets are round dots and you would like to use numbered bullets. Further, you can change a bullet’s size and color as well. There are two steps to changing the type of bullet you are using:
A. Specify the Scope. Do you wish to change just a single bullet? All bullets on a single slide? All bullets on all Slides?
B. Change the Bullet.
Part A: Specify the Scope (Which Bullets do you Wish to Change?)
Changing a Single Bullet on a Single List To change just a single bullet on a list and not affect any other bullets on the slide or any other slide, do the following: a. Click on the line which contains the bullet you wish to affect. (In the image, you can see the cursor is at the end of the line.) b. Change the bullet (see “Part B”).
Changing All Bullets on a Single Slide To change all bullets on the current slide but no other slides, follow the steps below. Note this will affect both main and indented bullets. a. Click the frame around your bulleted list to select the frame. b. Change the bullet (see “Part B”).
Changing All Bullets on All Slides To change all bullets on all slides, follow the steps below. Note that this will allow you to change bullets by indention level. Note also that this will not affect bullets you have changed on an individual level in Normal view. a. Go into the Slide Master (“View” – “Slide Master”). b. Click the Master Slide (top of the list on the left). b. Click so your cursor in on the line of the bullet you wish to change. For example, if you wish to change all main level bullets, click on the line “Click to edit Master text styles”. If you wish to change bullets which have been indented once, click “Second level” and so on. c. Change the bullet (see “Part B”). (Click “View “ then “Close Master View” once you are done.)
Because your cursor is on the top bullet, only unindented bullets will be affected.

© Marshall School of Business - USC 8/15/12 Wayne Wilmeth Page 19 of 43
Click the “Bulleted” and “Numbered” tab to switch between bullet and number choices.
If you wish to use one of the bullets in the window, click the bullet.
Part B: Changing the Bullet Now that you have specified which bullets to change in “Part A” on the previous page, we will actually change the bullet. 1. Specify the Scope of the change (see “Part A”). 2. Click the “Home” tab. 3. Click either the “Bullets” or the “Numbering” drop down arrow. (Doesn’t matter which you select). 4. Click “Bullets and Numbering” at the bottom of the list. 5. See the illustration below for selecting your bullet.
Use Picture as Bullet Click the “Picture” button and then “Import” to select a picture saved as a file as a bullet. a. Click the picture in the
gallery to use it as a bullet.
Other Bullets (Customize) If you would like to select some of the symbols available in the Wingdings typeface, click the “Customize” button. a. To use a symbol as a bullet, click it.
Bullet Size Use the size up/down arrows to specify the size of the bullet as a percentage of the text. Bullet Color Click the “Color” drop down to specify the bullet’s color.

© Marshall School of Business - USC 8/15/12 Wayne Wilmeth Page 20 of 43
Adjust Distance Between Bullets and Text If you would like to change the distance between your bullet and your text, follow the steps below. 1. Display the Ruler (“View” – “Ruler”). 2. Click in the line you wish to affect. 3. See the illustration below to adjust the distance. (Typically you will drag the bottom triangle to adjust the distance.)
Top Triangle Drag this to adjust the bullet’s position.
Bottom Triangle Drag this to adjust the Text’s position.
Square Dragging this moves both the top and bottom triangles together.
Location of cursor Note that if you are in Normal view, this will affect just the one bullet. If you are in the Slide Master, this would affect all non-indented bullets on all slides.
If you are in the master and wish to affect all bullets which have been indented one level, you would click anywhere on the “Second Level” line prior to adjusting the triangles.

© Marshall School of Business - USC 8/15/12 Wayne Wilmeth Page 21 of 43
Animating Bullets
If you would like to make your bullets appear one by one during your slideshow, follow the steps below. To have more control over how the bullets animate, see the “PowerPoint – Animation” handout. Note that you must run your slideshow (F5) to see the bullets animate. 1. Be in Normal view (“View” – “Normal”). 2. Click anywhere within the bulleted list you wish to animate. 3. Click the “Animations” tab.
4. Click the “Animate” drop down arrow. 5. Select any of the “By 1st Level Paragraphs” effects. By 1st Level Paragraphs will make main level bullets appear one by one. Sub-bullets will appear with the main bullet they are below. See the “PowerPoint – Animation” for information on how to further control your bullets using Custom Animation. 6. To see the animation, run your slideshow (i.e. Press F5, and then click your mouse to see each bullet animate. To remove the animation affect, follow steps 1-4 and then select “No Animation”.
Note about Animating from the Slide Master It may have occurred to you that can animate all of your bullet slides at once by setting the animation in the Slide Master. This will work; however, this will animate any slide that uses the “Title and Content” layout including charts, tables, clipart, etc., which may not be desirable. If you wish to animate all your bullet slides at once, the best approach is to create a new Layout in the slide master just for bulleted slides and apply the animation just to that layout. Back in Normal view, you will then apply the new layout to all of your bullet slides. The “PowerPoint – Animations” handout covers this process step-by-step.
Animate Indented Bullets Individually If you have indented bullets and wish them to animate individually, follow the steps below. 1. Click within the bulleted list you wish to affect. 2. Click the “Animations” tab and then click “Custom Animation”. 3. Click the animation drop down arrow on the far right. 4. Select “Effect Options…”. 5. Click the “Text Animation” tab. 6. Set Group Text to “By 2nd Level Paragraphs” and click “OK”.

© Marshall School of Business - USC 8/15/12 Wayne Wilmeth Page 22 of 43
ALTERNATIVES TO BULLETED LISTS
Audiences typically find slides with just words on them such as bulleted lists boring. Dressing up your bulleted lists with images which animate with your bullets can help a lot. This is covered in the “PowerPoint – Animation” handout. Another approach is to display your ideas using “SmartArt” rather than bulleted lists. SmartArt allows you to easily express ideas graphically by typing text into premade text/art templates. Most of the items you would place on a bulleted list will also lend themselves to SmartArt graphics. All of the items below were created using SmartArt. For more information on using SmartArt, see the “PowerPoint – SmartArt” handout.

© Marshall School of Business - USC 8/15/12 Wayne Wilmeth Page 23 of 43
TABLES
Tables allow you to place information in a tabular format using columns and rows. Depending upon your audience, tables do have their place but like Bullet Charts, text only tables can be somewhat boring. Therefore, like bullet charts, we will cover how to create tables but then we will go over some alternative approaches. We wish to create the table to the right. Note that you may find it saves you time if you sketch out your table on a piece of paper prior to creating the table in PowerPoint.
Inserting a Table
1. Click the “Home” tab. 2. Click the “New Slide” drop down arrow (lower half). 3. Click the “Title and Content” layout.
4. Click in the title box (i.e. “Click to add title”). 5. Type the title text for your slide. 6. Click the “Insert Table” icon.
7. Use the up/down arrows to specify the number of columns and rows you would like. (Note that you can insert/delete columns/rows later if necessary.)
8. Click “OK”.
The table will appear using the color scheme determined by the theme your presentation is using. See the pages which follow for information on formatting, data entry, and structural changes.

© Marshall School of Business - USC 8/15/12 Wayne Wilmeth Page 24 of 43
TABLES – MAKING STRUCTURAL CHANGES
You can change the table’s structure by using the tools on the “Layout” tab and in some cases by right clicking selected cells. See the illustration below for information on how to change the table’s structure.
The Layout Ribbon
Right Clicking Cells You can also access most of the same options on the “Layout” tab by right clicking selected cells in the table.
The Design Ribbon First off, when you click a table you will see two “Design” tabs. We want the one under “Table Tools”. The tools on the Design ribbon are mostly for formatting; however, there are two buttons you can use to affect the table’s structure:
Draw Table – You can use this to split cells by drawing across the cells. Eraser– You can use this to merge cells by erasing the line which
separates cells.
Distribute Columns Evenly Makes the selected columns the same width.
Delete Column or Row Deletes the selected column(s) or row(s).
Insert Row (Above) Inserts a blank row above the current row.
Insert Row (Below) Inserts a blank row below the current row.
Insert Column (Left) Inserts a blank column to the left of the current column.
Insert Column (Right) Inserts a blank column to the right of the current column.
Merge Cells Joins multiple cells into one cell. Requires that you select multiple cells first.
Distribute Rows Evenly Makes the selected rows the same height.
Row Height Controls the vertical height of the selected row(s).
Column Width Controls the horizontal width of the selected columns(s).
Split Cells Splits the selected cell(s) into multiple rows or columns.

© Marshall School of Business - USC 8/15/12 Wayne Wilmeth Page 25 of 43
Resizing Tables/Columns/Rows To resize cells, you can use the “Resize” options located on the “Layout”tab (see previous page), or you can click and drag the lines between cells as shown below.
TABLES – DATA ENTRY
To type data into a cell, simply click in the cell and start typing. Here are a few characteristics/tricks you can use.
Tab to Move to Next Column
Press the TAB key on your keyboard to move the cursor one cell to the right.
Press SHIFT + TAB to move the cursor one cell to the left. Automatically Start a New Row
Pressing TAB in the last column of the last row will automatically insert a new row at the bottom of the table.
Auto Expand Row Height
As you type text into a cell, the depth of the row will automatically expand to accommodate the amount of text you type. The width of the column will not expand automatically.
Tab Stops within a Table
PowerPoint allows you to use the ruler to set tab stops with a table cell. However, when you hit your TAB key to go to the tab stop within the cell, PowerPoint takes you to the next cell instead of the tab stop. To move to a tab stop within a cell, press CONTROL + TAB. Alternative: Instead of using tab stops within a cell, try splitting the cell and not show the borders.
Tab
Tab
New Row
Resize Entire Table To resize the table overall, click and drag the dots located on the outer frame of the table.
Resize Columns/Rows Click and drag the line within the table to resize a specific column or row.

© Marshall School of Business - USC 8/15/12 Wayne Wilmeth Page 26 of 43
TABLES – TEXT FORMATTING
The tools needed to format table text are located in several different areas. See the illustrations below for details.
“Layout” Tab The “Layout” tab allows you control text alignment (vertical and horizontal) as well as text direction and each cell’s internal margin. 1. Highlight the cells you wish to affect or click the frame around the table to affect all text in the table. 2. Click the “Layout” tab and use the options below.
“Home” Tab The “Home” tab contains the most commonly used text formatting options such as typeface, size, color, bold, italic, etc.
“Design” Tab The text options under the design tab include color, outline, and such WordArt styles as glow, reflection, and shadow.
Text Fill Color Text Outline Color Effects (Glow, Shadow, Reflection Preset Style Combinations
Text Alignment (Horizontal) Use the Left, Center, and Right buttons on the “Layout” tab to specify the horizontal alignment of text within a cell. Text Alignment (Vertical) Use the Top, Middle, and Bottom, buttons on the “Layout” tab to specify the vertical alignment of text within a cell.
Text Direction Use this option to specify if text should be left to right, stacked, or rotated.
Cell Margins Use this option to specify the internal margin within a cell (i.e. how close the text can get to the edge of the cell).

© Marshall School of Business - USC 8/15/12 Wayne Wilmeth Page 27 of 43
TABLES - OVERALL FORMATTING
If you click your table, you will get a second “Design” tab in the Table Tools section. Most of the table formatting options are under this tab. This section covers how to change the format of your entire table at once using preset formatting options.
These options affect the entire table regardless of which cell you are in or are highlighting.
These options can be applied to specific cells.
To apply a style to the entire table: a. Click any of the “Table Styles” options above to apply the style to your entire table. b. Use the “Table Style Options” choices to control how banding occurs and which
columns/rows are bold. You can use different combinations of Table Style Options to have control over entire rows and columns. See the examples below for more information.
In this example, we checked “Header Row” and “First Column” to bold the text in them and also checked “Banded Rows” to color in every other row.
In this example, we checked “Total Row” and “Last Column” to bold the text in them and also checked “Banded Columns” to color in every other column.

© Marshall School of Business - USC 8/15/12 Wayne Wilmeth Page 28 of 43
TABLES - FORMAT CELLS INDIVIDUALLY
f you have very specify ideas about how you would like your table formatted, PowerPoint allows you to format cells on an individual level well. Note that you can also apply formatting to multiple cells by selecting them first.
We will start by removing all lines and formatting from the table’s structure. 1. Click the table. 2. Click the “Design” tab. 3. Click the “No Style, No Grid” table style.
Hide/Display the Table Grid Your table should resemble the one on the left. The light gray grid will not show up in your sideshow. If you would like to hide them in Normal view as well, click the “View Gridlines” button located on the “Layout” tab. (Note you must click within your table first.)
Apply Table Borders The steps in this section cover how to apply borders to any cell(s) you specify. 1. Click your table then click the “Design” tab for tables. 2. Set the border style (i.e. solid line, dashes, etc.)
3. Set the border thickness. 4. Set the border color. 5. Now that you have specified the type of borders, apply
them using either method shown below.
“Draw Table” Method a. Follow steps 1-4 above. b. Click the “Draw Table” button. c. Click and drag along the grey gridlines to paint them with
the border. Follow the lines carefully or you may accidently split a cell. (Press Escape to turn off drawing.)
Remove a Border To remove a border, don’t use the “Eraser”, (that will merge the cells). Set the border style to “No Border” and then use “Draw Pencil” to trace over the border to be removed.

© Marshall School of Business - USC 8/15/12 Wayne Wilmeth Page 29 of 43
Apply Cell Backgrounds The “Shading” button allows you to give cells a variety of backgrounds including solid colors, gradients, pictures, and textures. To apply background to a cell, follow the steps below. 1. Highlight the cells you wish to affect or
click the frame around the table to select all cells.
2. Click the Table Tools “Design” tab. 3. Click the “Shading” drop down arrow. 4. Select a color if you wish to apply a solid
color. Note there are also other options.
“Borders” Method To apply the border using this method, first follow steps 1-4 above, then follow the steps below. a. Highlight the cells you wish to apply a
border to. (For example, to place a line below your titles, highlight the top row.)
b. Click the “Design” tab (for tables). c. Click the “Borders” drop down and select
where to place the border. (In this example, you would select Bottom
Border to place the line below the highlighted area.)
Remove Borders You can remove borders using this method as well. a. Highlight the cells to be affected. b. Click the “Borders” drop down and select
“No Borders”.

© Marshall School of Business - USC 8/15/12 Wayne Wilmeth Page 30 of 43
Apply Effects to Cells “ Effects” allow you to apply a bevel, shadow, or reflection effect to selected cells. 1. Select the cells you wish to affect or click the frame around the
table to affect all cells. 2. Click the Table Tools “Design” tab. 3. Click the “Effects” drop down arrow. 4. Select the desired effect.

© Marshall School of Business - USC 8/15/12 Wayne Wilmeth Page 31 of 43
ALTERNATIVES TO TABLES
As we mentioned earlier, text only tables can be somewhat boring. In this section we will cover how to include images in your table and how some tables might be better represented using a chart or other type of graphic.
Use Images as Cell Backgrounds Try using images as cell backgrounds.
Our original table is above. We then split the cells which had names in them as shown below. For the text cells, we made the background black and the text white.
The images files came from the Images tab on Google. To place them as cell backgrounds in PowerPoint:
a. Click the cell to be affected. b. Click the Table Tools “Design” tab. c. Click the “Shading” drop down arrow (Paint bucket). d. Click “Picture” and select your picture file. e. Repeat steps a-d for the other cells.

© Marshall School of Business - USC 8/15/12 Wayne Wilmeth Page 32 of 43
Display Numeric Data in a Chart Rather than a Table If your table contains numeric data, you might be able to get your message across more effectively if you use a chart rather than a table. The chart below uses the same data as in the table to the right. See the “PowerPoint – Charts” handout for information on how to make charts.
Note that you may wish to make several charts to represent table data depending upon what your message is.

© Marshall School of Business - USC 8/15/12 Wayne Wilmeth Page 33 of 43
Think Outside of the Table Box Be creative, the information in our table is shown below as pictures on top of a map of the United States. Regardless of you how you represent your data, remember that most people would rather look at images and graphics then have to read a text only table. See the “PowerPoint – Drawing Tools” handout for information on how to work with pictures and text boxes.

© Marshall School of Business - USC 8/15/12 Wayne Wilmeth Page 34 of 43
RUNNING SLIDE SHOWS
When you run your slide show, PowerPoint will display each slide full screen and allow you to proceed on to the next slide at your discretion. Note that if you intend to project your slide show to an audience, you will need an LCD projector connected to the computer.
Starting a Slide Show There are five different methods of starting your slideshow, the only difference is on which slide the show begins.
Press F5 on your Keyboard: Starts the slide show from the 1st slide.
The “Slideshow” button: Starts the slide show from the current slide.
“View” then “Slide Show”: Starts the slide show from the 1st slide.
“Slide Show” in Custom Animation: Starts the slide show from the current slide.
“Show” in Custom Slide Show: Starts the slide show from the 1st slide.
Navigation During a Slide Show While running your slide show, you can use your mouse or keyboard to affect the slideshow. In general, using the keyboard characters is less distracting to the audience then pulling up menus with your mouse. Note that there are typically multiple ways to perform the same task. For example, to go to the next slide you can press enter or your spacebar or click your left mouse button.
Task Keyboard Command Mouse Command List of Commands During a Slide Show
F1 Right mouse click then “Help”.
Next Slide Enter Spacebar
Left mouse click (unless disabled).
Previous Slide Page Up Backspace Left Arrow Up Arrow
Right mouse click then “Previous”.
Stop the Side Show Escape Right mouse click then “End Show”.
Black Screen B (Press B again to return) Right mouse click then “Screen” – “Black Screen”.
White Screen W (Press W again to return) Right mouse click then “Screen” – “White Screen”.
Draw on the Screen Control + P (Press Escape once to stop drawing. Press Escape again to get your mouse pointer back.)
Right mouse click then “Pointer Options” then select what you wish to draw with.
Erase everything that was drawn on the slide
E Right mouse click then “Pointer Options” then “Erase All Ink on Slide”.
Erase specific items which were drawn on the slide.
Control + E Right mouse click then “Pointer Options” then “Eraser”.
Jump to First Slide Home Right mouse click then “Go To Slide” and select the slide.
Jump to Last Slide End Right mouse click then “Go To Slide” and select the slide.
Jump to Specific Slide Type slide number then Enter Right mouse click then “Go To Slide”
© Marshall School of Business - USC 8/15/12 Wayne Wilmeth Page 35 of 43
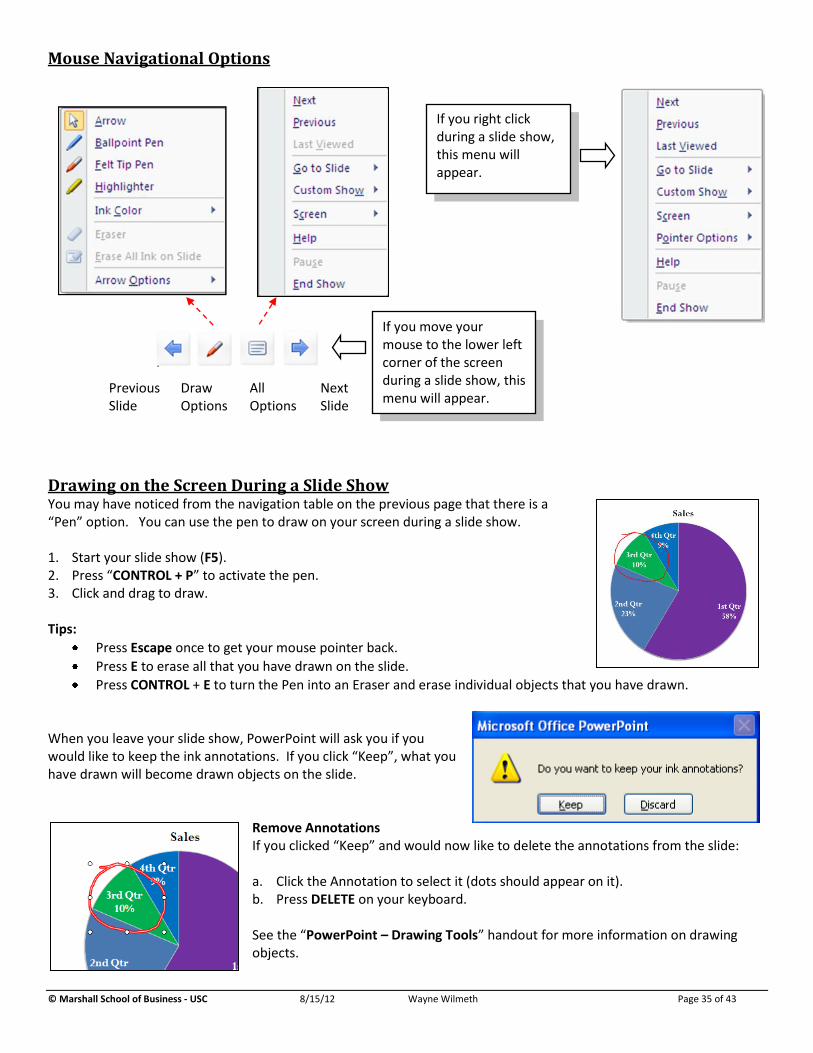
Mouse Navigational Options
Drawing on the Screen During a Slide Show You may have noticed from the navigation table on the previous page that there is a “Pen” option. You can use the pen to draw on your screen during a slide show. 1. Start your slide show (F5). 2. Press “CONTROL + P” to activate the pen. 3. Click and drag to draw. Tips:
Press Escape once to get your mouse pointer back.
Press E to erase all that you have drawn on the slide.
Press CONTROL + E to turn the Pen into an Eraser and erase individual objects that you have drawn. When you leave your slide show, PowerPoint will ask you if you would like to keep the ink annotations. If you click “Keep”, what you have drawn will become drawn objects on the slide.
Remove Annotations If you clicked “Keep” and would now like to delete the annotations from the slide: a. Click the Annotation to select it (dots should appear on it). b. Press DELETE on your keyboard. See the “PowerPoint – Drawing Tools” handout for more information on drawing objects.
Next Slide
Previous Slide
Draw Options
All Options
If you move your mouse to the lower left corner of the screen during a slide show, this menu will appear.
If you right click during a slide show, this menu will appear.

© Marshall School of Business - USC 8/15/12 Wayne Wilmeth Page 36 of 43
SLIDE SORTER VIEW / TRANSITION EFFECTS
Slide Sorter View is typically used when you wish to manipulate slides as a whole. For example, move or delete slides, import slides, and set transition effects.
Transition Effects (Slide Entrance & Sound) By default, when you go to the next side in a slide show, the next slide replaces the first rather unceremoniously. You can use transition effects to change how the next slide appears. For example, you can have it slowly fade in, wipe from the side, open like blinds, etc. You can also specify sound effects to accompany the transition. 1. Change views to “Slide Sorter”. (Lower right corner of the screen ) 2. Click the “Animations” tab.
3. Click the slide you wish to apply a transition effect to. (Hold “Control” to select non-adjacent multiple slides.)
4. Click the transition effect you would like to apply.
5. If desired, select a “Transition Sound”.
Click the Scroll or More button to view more effects.
6. Set the “Transition Speed”.
7. If you would like to apply the settings to all slides, click “Apply To All”.
8. To see the transition effect, run your slide show (F5).
Remove a Transition Effect To remove a transition effect from a slide: 1. Click to select the slide(s) in Slide Sorter view. 2. Click the “No Transition” button. 3. If desired, click “Apply To All”.

© Marshall School of Business - USC 8/15/12 Wayne Wilmeth Page 37 of 43
Change Slide Order Your slides will display in your slideshow by in the numbered order they appear in Slide Sorter, to change the order, click and drag a side to its new location. All slides will automatically number.
Delete a Slide To delete any slide, select it in Slide Sorter then press the “DELETE” key on your keyboard.
Hiding Slides There are times where you do not wish a particular audience to see a slide but you don’t want to delete it. To hide a slide, follow the steps below. 1. In Slide Sorter, right click the slide to be hidden. 2. From the pop-up menu, click “Hide Slide”. Note that the slides number will now appear in a box with a diagonal line through it. To unhide a slide, repeat steps 1-2 above on the hidden slide.
Don’t advance on mouse click By default, when you click your left mouse button during a slide show PowerPoint will advance to the next slide. Most of the time this is desirable; however, if your presentation is using hyperlinks, triggers (see “PowerPoint – Animations), or even animated bullets, this can cause problems. For example, you intend to click the hyperlink or trigger and accidently miss so PowerPoint takes you to the next slide. To turn off Advance on Mouse Click, follow the steps below. 1. In Slide Sorter view, click the “Animations” tab. 2. Select the slide(s) you wish to disable advance on mouse click. 3. Uncheck “Advance Slide on Mouse Click”. Note you can still press PAGE DOWN to advance the slide.
© Marshall School of Business - USC 8/15/12 Wayne Wilmeth Page 38 of 43
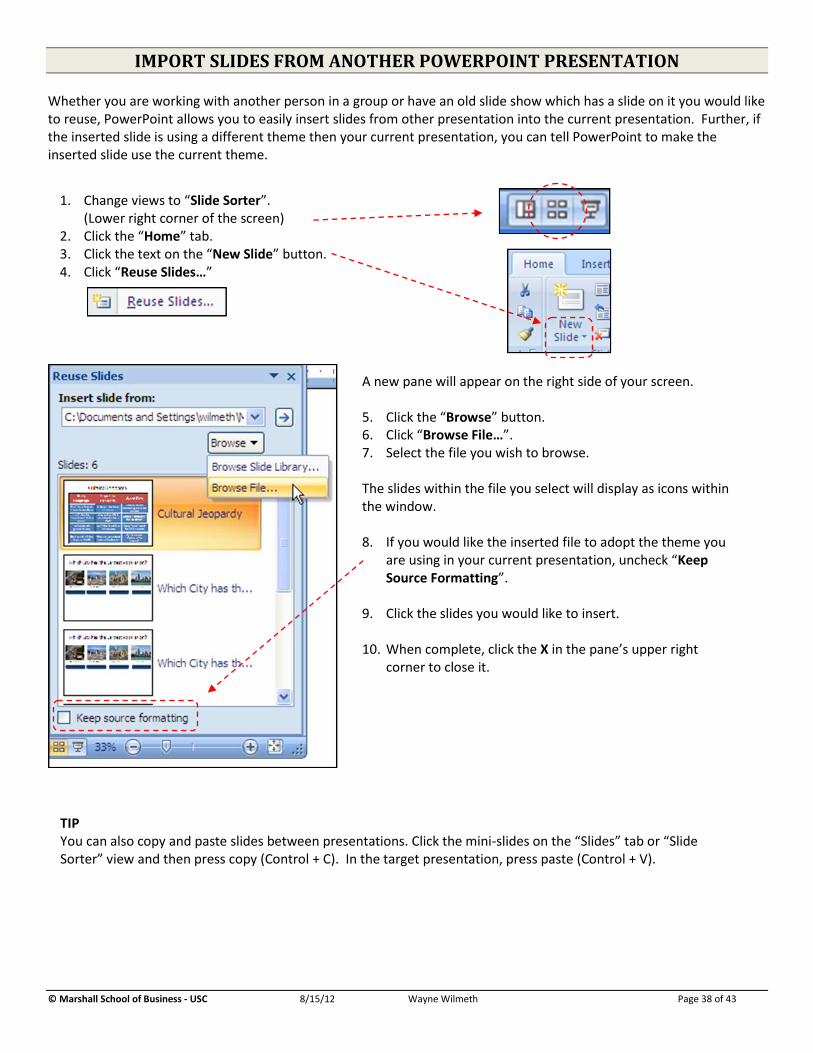
IMPORT SLIDES FROM ANOTHER POWERPOINT PRESENTATION
Whether you are working with another person in a group or have an old slide show which has a slide on it you would like to reuse, PowerPoint allows you to easily insert slides from other presentation into the current presentation. Further, if the inserted slide is using a different theme then your current presentation, you can tell PowerPoint to make the inserted slide use the current theme.
1. Change views to “Slide Sorter”. (Lower right corner of the screen) 2. Click the “Home” tab. 3. Click the text on the “New Slide” button. 4. Click “Reuse Slides…”
A new pane will appear on the right side of your screen. 5. Click the “Browse” button. 6. Click “Browse File…”. 7. Select the file you wish to browse. The slides within the file you select will display as icons within the window. 8. If you would like the inserted file to adopt the theme you
are using in your current presentation, uncheck “Keep Source Formatting”.
9. Click the slides you would like to insert. 10. When complete, click the X in the pane’s upper right
corner to close it.
TIP You can also copy and paste slides between presentations. Click the mini-slides on the “Slides” tab or “Slide Sorter” view and then press copy (Control + C). In the target presentation, press paste (Control + V).

© Marshall School of Business - USC 8/15/12 Wayne Wilmeth Page 39 of 43
REHEARSE TIMINGS
When you are given a specific amount of time to present, Rehearse Timings can be useful because it tells you exactly how long your slide show took in total and for each slide. Note about Automatic Slide Shows You can also use the timings to advance the slides automatically based on the timings; however, this is not recommended for a live presentation. Trying to keep the verbal part of your presentation in synch with an automatic slide show is typically a disaster. You may talk faster or slower live than you did during rehearsal, you could get interrupted with questions, and an automatic presentation tends to discourage the use of audience interaction during the presentation.
Rehearse Timings 1. Be in Slide Sorter view. 2. Click the “Slide Show” tab. 3. Click “Rehearse Timings” to start the slide show. 4. Practice your speech and advance your slides as you normally would. The slide show will start and the Rehearsal toolbar below will display. You can advance the slides as you normally would or you can use the Rehearsal bar to advance, pause, and reset the timing for the current slide.
4. When get to the last slide, you will a pop-up box telling you what the total time was. It will also ask you if you would
like to keep the new slide timings. If you click “Yes”, the slide show will become an automatic slide show and each slide’s duration will be recorded beneath it. If you click “No”, the timings will not be listed and the slide show will not become automatic.
5. Click “Yes”. We wish to see how long each slide took. We will turn off the automatic advance later. The amount of time each slide was displayed for is listed below the slide in minutes and seconds (mm:ss).
Total Time for Slide Show
Total Time for Current Slide
Reset time for current slide
Pause slide show
Go to Next Slide
© Marshall School of Business - USC 8/15/12 Wayne Wilmeth Page 40 of 43
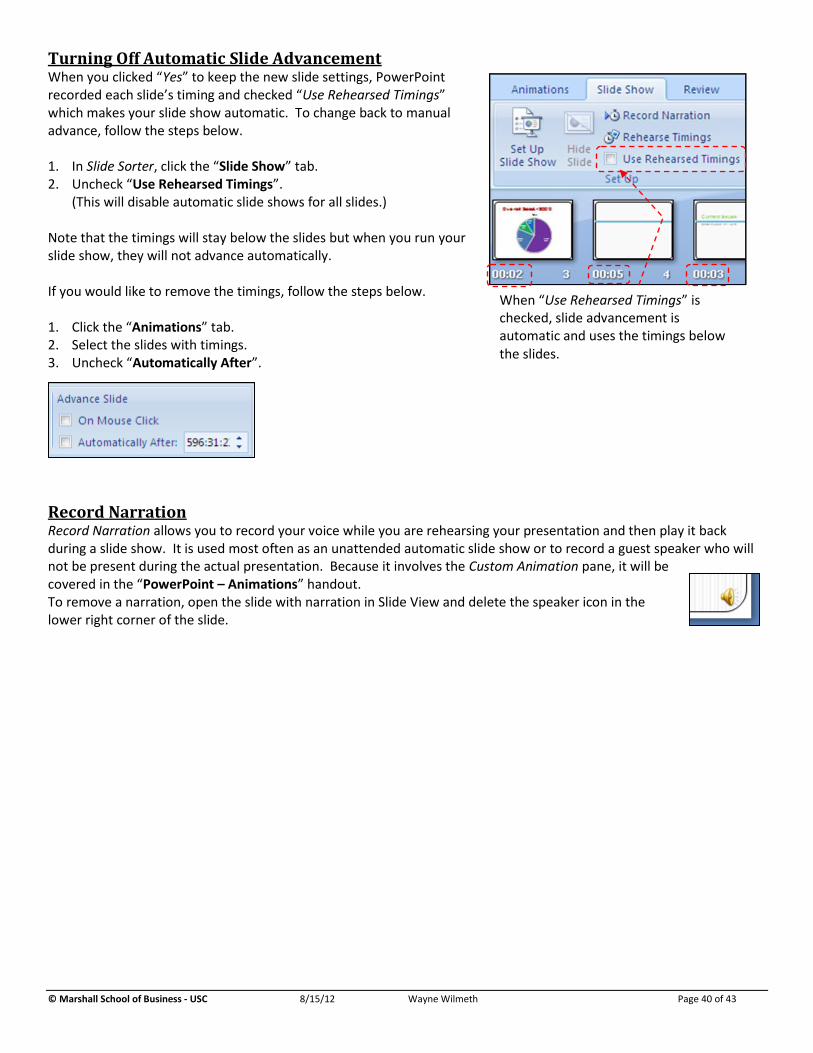
When “Use Rehearsed Timings” is checked, slide advancement is automatic and uses the timings below the slides.
Turning Off Automatic Slide Advancement When you clicked “Yes” to keep the new slide settings, PowerPoint recorded each slide’s timing and checked “Use Rehearsed Timings” which makes your slide show automatic. To change back to manual advance, follow the steps below. 1. In Slide Sorter, click the “Slide Show” tab. 2. Uncheck “Use Rehearsed Timings”. (This will disable automatic slide shows for all slides.) Note that the timings will stay below the slides but when you run your slide show, they will not advance automatically. If you would like to remove the timings, follow the steps below. 1. Click the “Animations” tab. 2. Select the slides with timings. 3. Uncheck “Automatically After”.
Record Narration Record Narration allows you to record your voice while you are rehearsing your presentation and then play it back during a slide show. It is used most often as an unattended automatic slide show or to record a guest speaker who will not be present during the actual presentation. Because it involves the Custom Animation pane, it will be covered in the “PowerPoint – Animations” handout. To remove a narration, open the slide with narration in Slide View and delete the speaker icon in the lower right corner of the slide.

© Marshall School of Business - USC 8/15/12 Wayne Wilmeth Page 41 of 43
SLIDE SHOW SETUP
For a typical presentation, the default setup has the most commonly used settings; however, should your presentation be atypical, you can change how your slide show functions below. 1. From Normal or Slide Sorter view, click the “Slide Show” tab. 2. Click “Set Up Slide Show”.
Presented by a Speaker – this is the default and displays each slide full screen during a slide show.
Browsed by an Individual – Use this if you intend to place the presentation on the web.
Browsed at a Kiosk –Typically used for a self running presentation at a trade show.
Loop continuously until Esc – When checked, returns you to the first slide after the last slide. Typically used in a self running slide show.
Show without Narration – Check to suppress any narration you have recorded.
Show without Animation – when checked, animations will not animate.
Pen Color –Specify the color of ink annotations.
Show Slides - One method of specifying which slides will display. Note you can also hide slides and create custom shows which are covered later.
Advance Slides - Manually ignores any timings. Using timings, if present will use timings if you have them but also allow manual advance.
Show Presenter View If you have two monitors, this allows you to show your slide show on one and notes pages on the other.
Use hardware graphics acceleration – Clicking this will speed up the drawing of objects during a slide show.
Slide show resolution – If your slide show is behaving very slowly, you might try selecting a lower resolution; however, your slides may take on a grainy look.
Note there are More Options Under the MS Button a. Click the “Microsoft” button in the upper left corner.
b. Click “More PowerPoint Options”. c. Click the “Advanced” tab on the left. d. Scroll to the “Slide Show” section.

© Marshall School of Business - USC 8/15/12 Wayne Wilmeth Page 42 of 43
CUSTOM SLIDE SHOWS
If you have a basic presentation that you use repeatedly for different audiences or clients, but find yourself needing to change which slides you hide for each client, then “Custom Slides Shows” is for you. Custom Slide Shows allow you save a list of which slides display and which slides hidden during a slide show. You can then play whichever list you desire.
Creating a Custom Show 1. Click the “Slide Show” tab. 2. Click the “Custom Slide Show” button. 3. Click “Custom Shows…”. 4. Click the “New” button to create a new show.
5. Type a name for the show.
This is a list of all slides in the file.
This is a list of all slides you have place in your custom show.
6. To place a slide in the custom show, click the slide in the left column and then click the “Add” button.
You can reorder a custom show by clicking a slide and then the Up or Down button.
7. Click “OK” once you have placed the desired slides. 8. Click “Close”. 9. To make more shows, repeat steps 1-8 above.
Running a Custom Slide Show To run a custom slide show, follow the steps below. 1. Click the “Slide Show” tab. 2. Click the “Custom Slide Show” button. Your custom shows should be listed. Click a show to run it. Note that you can edit an existing show by clicking the “Custom Shows…” button.

© Marshall School of Business - USC 8/15/12 Wayne Wilmeth Page 43 of 43
PRINTING
Frame slides – Places a frame around each slide when checked.
Include comment pages – Prints out comments associated with a side when checked.
Print hidden slides – When checked, hidden slides will print.
Scale to fit paper – Resizes the side to fit on the printout when checked.
Print Range All – Prints all Sides. Current Slide – Prints the current slide. Selection – Available if you have Control clicked multiple slides in Slide Sorter. Slides – Allows you to specify specific slides to print.
Print What Slides - Prints one slide per page. Handouts – Prints multiple slides per page (Use the Slides per page drop down to specify the number) Notes Pages – Prints one slide per page and any notes associated with it. Outline View – Prints what you can see on the Outline tab. Color/grayscale Color – Prints in color. Grayscale – Prints in black, white, & shades of gray. Pure Black and White – Prints in black & white only. Backgrounds usually go to white.
Handouts Prints multiple slides on a page. Typically photocopied and passed out to the audience.
Notes Pages Prints one slide per page and any notes for the slide below. Useful for practicing or giving your speech from.
Slides Prints one slide per page. Useful for creating transparencies.
PowerPoint offers a variety of printing options. 1. Click the Microsoft
button. 2. Select “Print”. 3. Select “Print” again. 4. See below for printing
options.