usb to vga adapter - gfk etilizecontent.etilize.com/user-manual/1013380423.pdf · while the...
TRANSCRIPT
USB to VGA Adapter
USB 2.0 to VGA Multi Monitor External Video Adapter
USB2VGAE2Instruction Manual
*Please ensure that the driver installation is complete prior to the physical installation of the USB 2.0 to VGA adapter

FCC Compliance Statement
This equipment has been tested and found to comply with the limits for a Class B digital device, pursuant to part 15 of the FCC Rules. These limits are designed to provide reasonable protection against harmful interference in a residential installation. This equipment generates, uses and can radiate radio frequency energy and, if not installed and used in accordance with the instructions, may cause harmful interference to radio communications. However, there is no guarantee that interference will not occur in a particular installation. If this equipment does cause harmful interference to radio or television reception, which can be determined by turning the equipment off and on, the user is encouraged to try to correct the interference by one or more of the following measures:
Reorient or relocate the receiving antenna.•
Increase the separation between the equipment and receiver.•
Connect the equipment into an outlet on a circuit different from that to which the receiver • is connected.
Consult the dealer or an experienced radio/TV technician for help.•
Use of Trademarks, Registered Trademarks, and other Protected Names and Symbols
This manual may make reference to trademarks, registered trademarks, and other protected names and/or symbols of third-party companies not related in any way to StarTech.com. Where they occur these references are for illustrative purposes only and do not represent an endorsement of a product or service by StarTech.com, or an endorsement of the product(s) to which this manual applies by the third-party company in question. Regardless of any direct acknowledgement elsewhere in the body of this document, StarTech.com hereby acknowledges that all trademarks, registered trademarks, service marks, and other protected names and/or symbols contained in this manual and related documents are the property of their respective holders.

i
Table of ContentsIntroduction ..................................................................... 1
Packaging Contents.....................................................................1
System Requirements .................................................................1
Installation ....................................................................... 2Driver Installation .........................................................................2
Multiple USB Video Adapter Installation ......................................3
Verifying Installation .....................................................................4
Configuring the USB Video Adapter .............................. 5Display ID ....................................................................................5
Display Resolution .......................................................................5
Display Rotation ..........................................................................6
Display Modes .............................................................................6
Identify Monitors ..........................................................................7
Multi-Display Control Panel .........................................................8
Display Settings ...........................................................................8
Specifications .................................................................. 9
Supported Video Resolutions ........................................ 9
Technical Support ........................................................... 10
Warranty Information ...................................................... 10
1
IntroductionPackaging Contents
1 x USB2VGAE2 video adapter•
1 x Driver CD•
1 x Instruction Manual•
System RequirementsAvailable USB 2.0 port•
Single Video Adapter: • CPU: Intel/AMD single core 1.5GHz or higher RAM: 512MB or more
2-3 Video Adapters: • CPU: Intel/AMD single core 2.4GHz or higher RAM: 1GB or more
4-6 Video Adapters: • CPU: Intel/AMD dual core 2.0GHZ or higher RAM: 2GB or more
Microsoft Windows• ® 2000/XP/Vista/7 (32/64-bit) NOTE: Aero desktop theme not supported.
2
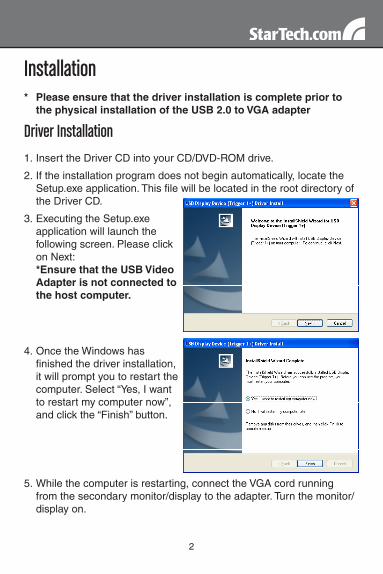
InstallationPlease ensure that the driver installation is complete prior to * the physical installation of the USB 2.0 to VGA adapter
Driver InstallationInsert the Driver CD into your CD/DVD-ROM drive.1.
If the installation program does not begin automatically, locate the 2. Setup.exe application. This file will be located in the root directory of the Driver CD.
Executing the Setup.exe 3. application will launch the following screen. Please click on Next: *Ensure that the USB Video Adapter is not connected to the host computer.
Once the Windows has 4. finished the driver installation, it will prompt you to restart the computer. Select “Yes, I want to restart my computer now”, and click the “Finish” button.
While the computer is restarting, connect the VGA cord running 5. from the secondary monitor/display to the adapter. Turn the monitor/display on.
3
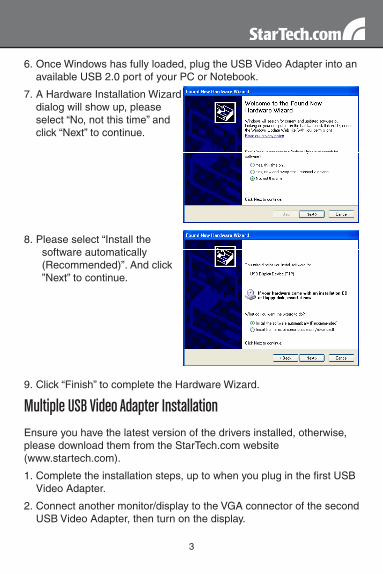
Once Windows has fully loaded, plug the USB Video Adapter into an 6. available USB 2.0 port of your PC or Notebook.
A Hardware Installation Wizard 7. dialog will show up, please select “No, not this time” and click “Next” to continue.
Please select “Install the 8. software automatically (Recommended)”. And click ”Next” to continue.
Click “Finish” to complete the Hardware Wizard.9.
Multiple USB Video Adapter InstallationEnsure you have the latest version of the drivers installed, otherwise, please download them from the StarTech.com website (www.startech.com).
Complete the installation steps, up to when you plug in the first USB 1. Video Adapter.
Connect another monitor/display to the VGA connector of the second 2. USB Video Adapter, then turn on the display.
4
Connect the USB type A connector on the second USB Video 3. Adapter to an available USB 2.0 port on the host computer. The driver installation will begin automatically.
Repeat these steps for each additional USB Video Adapter you wish to install. Once all USB Video Adapters are installed, reboot the computer. After rebooting, you may be prompted to reboot one final time; please do so.
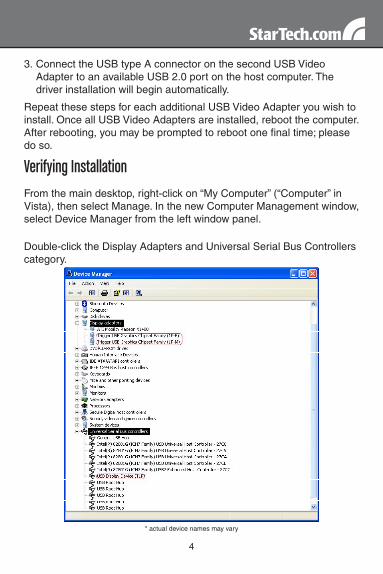
Verifying InstallationFrom the main desktop, right-click on “My Computer” (“Computer” in Vista), then select Manage. In the new Computer Management window, select Device Manager from the left window panel.
Double-click the Display Adapters and Universal Serial Bus Controllers category.
* actual device names may vary

5
Configuring the USB Video AdapterLook for the USB Video Adapter icon ( ) on your Windows Start bar. Right-click this icon to access the variety of functions associated to the adapter.
NOTE: The Aero desktop theme is not supported by this adapter, so should be disabled prior to use of the USB Video Adapter.
Display IDThe USB Video Adapter supports the VESA defined DDC/EDID standard. The utility will show the display device ID whenever it is attached to the USB Video Adapter.
If there is no display device attached to the USB Video Adapter, an “Unknown Monitor” ID will be shown. In some cases, if the attached display device does not support EDID, the ID will also be defined as “Unknown Monitor”.
Display ResolutionSelect the desired video display resolution for the connected monitor.
The default setting resolution is: 1024 x 768 * 32bit.

6
Display Rotation4 options available: “0°, 90°, 180°, 270° when used with the Extended or Primary display modes. It is a useful function for some rotatable display devices.
Display Modes“EXTENDED” DISPLAY MODE (DEFAULT)
A default display mode; this feature allows the attached USB Video Adapter enabled display to work as an “Extended” display to the on-board display. The extended working space improves work efficiency.
You may change the relative position of this extended display through the Display Settings.
“MIRROR” DISPLAY MODE
This feature allows the same content from the on-board display to be duplicated (mirroring) to the USB Video Adapter enabled display.
The screen resolution setting on the USB Video Adapter enabled device will match the on-board displays’s resolution. For example, if the on-board displays’s resolution is 1024x768x32bit, and the USB Video Adapter will use the same resolution.
7
“PRIMARY” DISPLAY MODE
A unique feature to allow the USB Video Adapter to act as the main working display. The USB Video Adapter will work as the main graphics adapter on the system. The on-board display will work as the extended display.
Please be advised that some display utilities and drivers that shipped with certain AGP and built-in display adapters may prevent this option from working on some systems. You may be able to disable the other utility program (usually found in the same toolbar located on the bottom right hand corner) to make this function work properly.
“OFF” DISPLAY MODE
This option disables the video output from the USB Video Adapter.
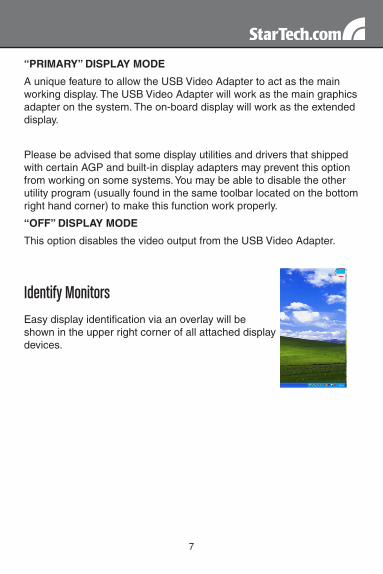
Identify MonitorsEasy display identification via an overlay will be shown in the upper right corner of all attached display devices.
8
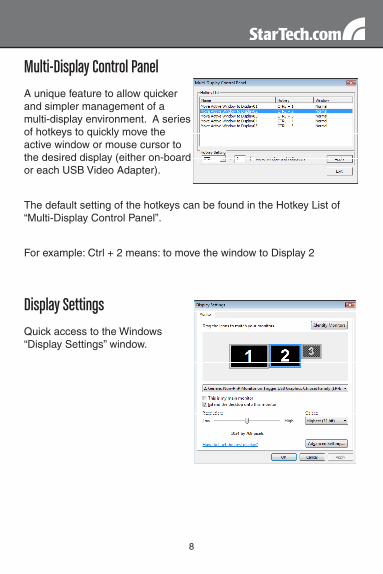
Multi-Display Control PanelA unique feature to allow quicker and simpler management of a multi-display environment. A series of hotkeys to quickly move the active window or mouse cursor to the desired display (either on-board or each USB Video Adapter).
The default setting of the hotkeys can be found in the Hotkey List of “Multi-Display Control Panel”.
For example: Ctrl + 2 means: to move the window to Display 2
Display SettingsQuick access to the Windows “Display Settings” window.

9
Specifications
Bus Interface USB 2.0
ConnectorsUSB type A male
DE-15 VGA female
Onboard Memory 16MB
Maximum Video Resolution1600x1200 (standard)
1680x1050 (widescreen)
Total Number of Adapters 5
Compatible Operating Systems
Windows 2000/XP/Vista/7 (32/64-bit)
Supported Video ResolutionsResolution Color Depth Refresh Rate
800x600 16/32-bit 60/75Hz
1024x768 16/32-bit 60/75Hz
1152x864 16/32-bit 60Hz
1280x768 16/32-bit 60Hz
1280x800 16/32-bit 60Hz
1280x960 16/32-bit 60Hz
1280x1024 16/32-bit 60Hz
1400x1050 16/32-bit 60Hz
1440x900 16/32-bit 60Hz
1680x1050 16/32-bit 60Hz
1600x1200 16/32-bit 60Hz

10
Technical SupportStarTech.com’s lifetime technical support is an integral part of our commitment to provide industry-leading solutions. If you ever need help with your product, visit www.startech.com/support and access our comprehensive selection of online tools, documentation, and downloads.
Warranty InformationThis product is backed by a one year warranty.
In addition, StarTech.com warrants its products against defects in materials and workmanship for the periods noted, following the initial date of purchase. During this period, the products may be returned for repair, or replacement with equivalent products at our discretion. The warranty covers parts and labor costs only. StarTech.com does not warrant its products from defects or damages arising from misuse, abuse, alteration, or normal wear and tear.
Limitation of Liability
In no event shall the liability of StarTech.com Ltd. and StarTech.com USA LLP (or their officers, directors, employees or agents) for any damages (whether direct or indirect, special, punitive, incidental, consequential, or otherwise), loss of profits, loss of business, or any pecuniary loss, arising out of or related to the use of the product exceed the actual price paid for the product. Some states do not allow the exclusion or limitation of incidental or consequential damages. If such laws apply, the limitations or exclusions contained in this statement may not apply to you.

StarTech.com has been making “hard-to-find easy” since 1985, providing high quality solutions to a diverse IT and A/V customer base that spans many channels, including government, education and industrial facilities to name just a few. We offer an unmatched selection of computer parts, cables, A/V products, KVM and Server Management solutions, serving a worldwide market through our locations in the United States, Canada, the United Kingdom and Taiwan.
Visit www.startech.com today for complete information about all our products and to access exclusive interactive tools such as the Cable Finder, Parts Finder and the KVM Reference Guide.